- 投稿日:2019-08-19T21:46:26+09:00
I Made My DIY Bar Chart Accessible using UIAccessibility in Swift
[Wrote in Swift 5 with Xcode 10]
The App
I’m not a professional programmer. I do coding for a hobby. But when I code, I always tried to make it accessible as possible.
Currently I’m creating an app which adds a bit of a fun to board game playing. I have been used it myself in closed settings for a while and, IMHO, it worked exceptionally well so far. So I thought it might be a good idea to share this tiny, humble app with a fellow board gamers around the world through the App Store!!
But before I do that, I need to make it accessible as far as I could go.
What's the App for?
Basically, It is a dice counter. A player rolls dice and records that dice number with the app. The App stores and shows those results using collection view and bar graphs. That's it.
It's a simple app and it has a straight forward UI. So without taking much effort, thanks to the Apple’s great UIAccessibility features, it already is a decent accessible app from the get-go. I’m not saying it is perfect or even great but decent enough just a tiny tweak would suffice to cut it.
Except for a bar chart.
DIY Stacked Bar Chart
About a Chart with Animation
(I wrote about this chart itself extensibly here and here. Unfortunately those are Japanese articles but the code itself is an universal language so I hope you will get the idea.)
Because I wrote it by myself I know every bits how it works. It helped me a lot when I planned how I should adapt UIAccessibility and it took me a little to no effort when I implemented it. Here’s my thought process of it.
What happened if I didn’t do anything.
For the beginning, let's see what would it look like without any works.
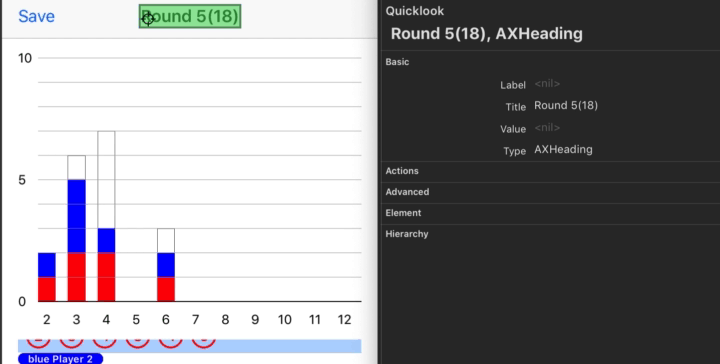
This gif shows how a focus of VoiceOver moved between views. I'm not sure why but the system has never bothered to call into Bar itself. Y axis labels without actual values are useless to say the least.
So how should I improve it? Let's find out!
Recommended Watch
If you are totally new to the topic, I recommend you to watch this 2015 WWDC session. Yes it is old (4 fracking years ago!!) but if you want to know very basics of the framework, this is the session you want to watch.
isAccessibilityElement
We need to tell the system that whether the object is supposed to be accessible or not. For example, if it exists just because for visual clarity reason it doesn't make sense it is accessible. "This line is a separator of two views" won't help user for anything. It's just a noise. So we should be set
isAccessibilityElementof those parts asfalse.On the other hand,
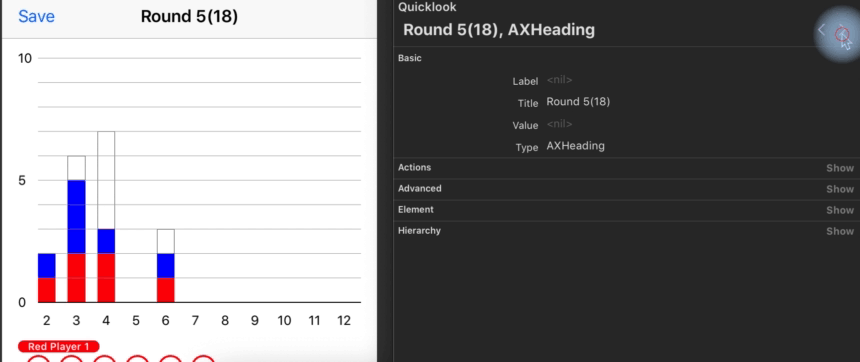
Barneeds to be accessible because it holds a meaningful information. So make them so accordingly.Bar.swiftoverride var isAccessibilityElement: Bool { get { return true } set { } }ChartController.swiftyScaleLabel.isAccessibilityElement = falseaccessibilityLabel
A
labelis a name of the view. What would be an appropriate name for the bar? I'm not sure about this (because my English sucks, as you've already realized), but I would go like this
"Bar graph for (number of X axis)"override var accessibilityLabel: String? { get { return "Bar graph for \(tag)" } set { } }Let me know if you have better idea. Better wording, etc.
accessibilityValue
Next stop is
value. This is the fun part.So what is a value of the stacked bar graph?
I'm not an expert of a stacked bar chart so I might totally miss the point but I guess what user should get here is a value of the each "stack" of graph and total sum of them.
e.g.) "Red 1, Blue 2, Total 3"
Based on this idea, I came up with some rules.
- Just return colors which have values. (ignore ones with no value)
- If it has zero value then it should not be accessible.
- Considering localization, it should have a flexibility in wording.
Let's implement these.
Create Source for Accessible Data.
It would be handy if we had a dedicated data type for the bar graph.
struct AccessibleData<T: LosslessStringConvertible> {
    /// value. Int, in this case
    var value: T
    /// label would be color; red, blue etc..
    let label: String
    /// set closure which takes value and label
    let descriptor: (String, T) -> String

    func description() -> String {
        return descriptor(label, value)
    }
}

protocol AccessibleChartDataSource {
    var accessibleValues: [AccessibleData<Int>] { get }
}
And use these like this.
let accessibleData = AccessibleData(
                         value: tempAccessibleValues[idx],
                         label: UIColor(cgColor: playerCGColor).toString,
                         /// "Red 1", "Blue 2"
                         descriptor: { $0 + " \($1)" }
                         )
I extended
UIColorto return color name as a string.Next, comfort
BarwithAccessibleChartDataSource.Bar.swiftclass Bar: UIView, AccessibleChartDataSource { var accessibleValues = [AccessibleData<Int>]() ...After that, we need to update
isAccessibilityElementas it reflects its own state.Bar.swiftoverride var isAccessibilityElement: Bool { get { let totalValue = accessibleValues.reduce(0, { $0 + $1.value }) return totalValue > 0 ? true : false } set { } }And finally,
accessibilityValue.Bar.swiftoverride var accessibilityValue: String? { get { /// It should goes along something those lines; /// jpn: "赤2 青1 で合計3" /// eng: "Red 2, blue 1, total 3 " let totalValue = accessibleValues.reduce(0, { $0 + $1.value }) var description = accessibleValues.reduce("", { result, data in if data.value > 0 { if result.isEmpty { return data.description() } else { return result + ", " + data.description() } } return result }) description += ", total \(totalValue)" return description } set { } }Don't forget to update
valuewhen graph's value has changed.What about other properties?
We are not touching these properties this time because I don't think we need to, but they deserve to be considered if it helps users to interact with your app.
var accessibilityTraits: UIAccessibilityTraits
var accessibilityHint: String?
var accessibilityFrame: CGFrame
I pondered if charts are
UIAccessibilityTraits.image) or not for a while but after I tried it on the device I don't think it is a good idea.Conclusion
After these changes, Accessibility Inspector shows us now it returns much more appropriate information!
Thank you for reading!
Diagram of the Chart
FYI, a diagram of the chart is like this.
ChartController┌──────────────────┐ │ Storyboard │ └──────────────────┘ @IBOutlet ChartController────────────────────────────────────────────────┼───────────────────────────────────────┐ │ ▼ │ │ ┌───────────────────────┐ ┌──────────────────┐ │ │ │ UILabel │ ┌────│ ChartView │ │ │ │ (yAxisLabel) │◀──┘ └──────────────────┘ │ │ └───────────────────────┘ │ │ │ ▼ │ │ ┌───────────────────────┐ │ │ │ UIStackView │ │ │ │ (barStackView) │ │ │ └───────────────────────┘ │ │ arrangedSubviews │ │ ┌───────────────────────────┼───────────────────────────┐ │ │ ▼ ▼ ▼ │ │ ┌──────────────────┐ ┌──────────────────┐ ┌──────────────────┐ │ │ │ Bar │ │ Bar │ │ Bar │ │ │ └──────────────────┘ └──────────────────┘ └──────────────────┘ │ │ │ │ │ ┌──────────────────┴────────────────┐ │ │ ▼ ▼ subview │ │ ┌───────────────────────┐ ┌───────────────────────┐ │ │ │ CALayer │ │ UILabel │ │ │ └───────────────────────┘ │ (xAxisLabel) │ │ │ sublayers └───────────────────────┘ │ │ ┌──────────────────────────────┼─────────────────────────────┐ │ │ ▼ ▼ ▼ │ │┌───────────────────────┐ ┌───────────────────────┐ ┌───────────────────────┐ │ ││ ColorStackLayer │ │ ColorStackLayer │ │ ColorStackLayer │ │ ││ (CALayer) │ │ (CALayer) │ │ (CALayer) │ │ │└───────────────────────┘ └───────────────────────┘ └───────────────────────┘ │ └──────────────────────────────────────────────────────────────────────────────────────────────────────┘
- 投稿日:2019-08-19T13:59:23+09:00
Swift の Optional と Kotlin の Nullable
業務の中で iOS と Android のPRの両方をレビューしていて、Swift と Kotlin とで Type safe な書き方の呼び方が違うよねって話題に上がったので忘備録的な感じで書いています。
呼び方の違い
Swift
Optional
var name: String?
または
var name: Optional<String>
Apple Developer Documentation - Optional
Kotlin
Nullable
(Java の Optional とは別物)var name: String?Type safe な書き方の違い
iOS Developper なので Swift ベースで書いています。
Swift での呼び方、書き方はこうだけど、 Kotlin ではこう書くよ的な。Optional Binding (Swift)
var name: String?
if let aName = name {
  print(aName.uppercased())
} else {
  print("`name` is nil.")
}
THE SWIFT PROGRAMMING LANGUAGE / The Basics - Optional Binding
Kotlin の場合
呼び方: Checking for null in conditions
(Kotlin に詳しい人はなんて呼んでいるんでしょうね・・・)var name: String? if (name != null) { print(name.toUpperCase()) } else { print("`name` is null.") }KOTLIN PROGRAMMING LANGUAGE / Null Safety - Checking for null in conditions
Optional Chaining (Swift)
var name: String?
let count = name?.count
print(count)
THE SWIFT PROGRAMMING LANGUAGE / Optional Chaining
Kotlin の場合
呼び方: Safe Calls
var name: String?
val length = name?.length
print(length)
KOTLIN PROGRAMMING LANGUAGE / Null Safety - Safe Calls
Forced Unwrapping (Swift)
var name: String?
let count = name!.count
print(count)
THE SWIFT PROGRAMMING LANGUAGE / The Basics - If Statements and Forced Unwrapping
Kotlin の場合
呼び方: !! Operator (Non-null Operator)
※人によっては呼び方が変わってくるかもですvar name: String? val length = name!!.length print(length)KOTLIN PROGRAMMING LANGUAGE / Null Safety - The !! Operator
Nil-Coalescing Operator (Swift)
var name: String?
let aName = name ?? "Swift"
print(aName)
THE SWIFT PROGRAMMING LANGUAGE / Basic Operators - Nil-Coalescing Operator
Kotlin の場合
呼び方: Elvis Operator
var name: String?
val aName = name ?: "Kotlin"
print(aName)
- 投稿日:2019-08-19T10:38:50+09:00
Swiftlintで警告を消す方法
Swiftlintを導入すると、いろいろとWarningを出してもらえるので便利な反面、
エラーが出すぎるとエディタの可視性が悪くなるので、警告を消す方法です。swiftlint: disable 警告名をswiftファイルのコメントに記載します。// swiftlint: disable type-body-length
- 投稿日:2019-08-19T08:33:18+09:00
【Swift】SwiftUIのListでスクロール末尾で次のデータを読み込み表示する方法
SwiftUIでListを使って一覧を表示するサンプルはよく見かけますが
画面表示時に全てのデータを取得して設定するものが多く
APIなどでページを分けて読み込む方法がなかなか見つけられませんでした。そこで色々調べていて
一つ方法を見つけましたので書いてみました。もし間違いやうまくいかないケースなどございましたら
ご指摘いただけますとうれしいです今回必要となるものは
RandomAccessCollectionの拡張onAppearメソッドhttps://developer.apple.com/documentation/swift/randomaccesscollection
https://developer.apple.com/documentation/swiftui/text/3276931-onappearです。
※ Bata版のためSnapshotは載せられないのでコードだけ示させていただきます??♂️
※ 細かい処理などは省略しています??♂️実装
内容としてはQiitaのAPIから記事の一覧を取得します。
RandomAccessCollectionの拡張
こちらを参考にしています。
extension RandomAccessCollection where Self.Element: Identifiable {
    public func isLastItem<Item: Identifiable>(_ item: Item) -> Bool {
        guard !isEmpty else {
            return false
        }

        guard let itemIndex = lastIndex(where: { AnyHashable($0.id) == AnyHashable(item.id) }) else {
            return false
        }

        let distance = self.distance(from: itemIndex, to: endIndex)
        return distance == 1
    }
}
やっていることは
引数に渡されたitemの次のitemが
配列の一番最後のitemの場合に
trueを返すようにします。データの取得
次にデータを取得します。
import Foundation

// QiitaのAPIから取得するデータモデル

struct QiitaItem: Decodable, Equatable, Identifiable {
    let id: String
    let likesCount: Int
    let reactionsCount: Int
    let commentsCount: Int
    let title: String
    let createdAt: String
    let updatedAt: String
    let url: URL
    let tags: [Tag]
    let user: User?

    var profileImageURL: URL? {
        guard let url = user?.profileImageUrl else {
            return nil
        }
        return URL(string: url)
    }

    struct Tag: Decodable, Equatable {
        let name: String
    }

    struct User: Decodable, Equatable {
        let githubLoginName: String?
        let profileImageUrl: String?
    }
}
import Combine import Foundation final class ListViewModel: ObservableObject { @Published var items: [QiitaItem] = [] @Published var isLoading = false private var cancellables: Set<AnyCancellable> = [] private let perPage = 20 private var currentPage = 1 func loadNext(item: QiitaItem) { if items.isLastItem(item) { self.currentPage += 1 getQiitaList(page: currentPage, perPage: perPage) { [weak self] result in self?.handleResult(result) } } } func onAppear() { getQiitaList(page: currentPage, perPage: perPage) { [weak self] result in self?.handleResult(result) } } private func getQiitaList(page: Int, perPage: Int, completion: @escaping (Result<[QiitaItem], Error>) -> Void) { let parameters: [String: Any] = [ "page": currentPage, "per_page": perPage, ] guard let url = URL(string: "https://qiita.com/api/v2/items"), let request = makeGetRequest(url: url, parameters: parameters) else { return completion(.failure(APIError.requestError)) } fetch(request: request) { result in completion(Result { let decoder = JSONDecoder() decoder.keyDecodingStrategy = .convertFromSnakeCase return try decoder.decode([QiitaItem].self, from: result.get()) }) } } private func fetch(request: URLRequest, completion: @escaping (Result<Data, Error>) -> Void) { URLSession.shared.dataTask(with: request) { data, response, error in if let error = error { return completion(.failure(APIError.responseError(error))) } guard let httpResponse = response as? HTTPURLResponse else { return completion(.failure(APIError.invalidResponse(response))) } guard (200 ..< 300) ~= httpResponse.statusCode else { return completion(.failure(APIError.invalidStatusCode(httpResponse.statusCode))) } guard let data = data else { return completion(.failure(APIError.noResponseData)) } return completion(.success(data)) }.resume() } private func makeGetRequest(url: URL, parameters: [String: Any]) -> URLRequest? { guard var components = URLComponents(url: url, resolvingAgainstBaseURL: false) else { return nil } components.queryItems = parameters.map { (arg) -> URLQueryItem in let (key, value) = arg return URLQueryItem(name: key, value: String(describing: value)) } var request = URLRequest(url: components.url!) request.httpMethod = "GET" return request } private func handleResult(_ result: Result<[QiitaItem], Error>) { DispatchQueue.main.async { [weak self] in guard let self = self else { return } self.isLoading = false switch result { case .success(let items): self.currentPage += 1 self.items.append(contentsOf: items) case .failure(let error): self.currentPage = 1 print(error) } } } } enum APIError: Error { case requestError case responseError(Error) case invalidResponse(URLResponse?) case invalidStatusCode(Int) case noResponseData case resultError }画面への表示
import SwiftUI

struct ContentView: View {

    @ObservedObject var viewModel: ListViewModel

    var body: some View {
        NavigationView {
            List(viewModel.items) { item in
                Text(item.title)
                    .onAppear {
                        self.viewModel.loadNext(item: item)
                }
            }.onAppear {
                self.viewModel.onAppear()
            }.navigationBarTitle("検索結果")
        }
    }
}
ここでのポイントは
Text(item.title)
    .onAppear {
        self.viewModel.loadNext(item: item)
}
でListの中のデータが画面に表示された時に
ListViewModelのloadNextを呼び出して
現在取得しているデータ配列の最後の一つ手前のデータだった場合に
次のデータを取得しています。まとめ
スクロール末尾の検知(みたいなこと)
それに合わせた次のページの読み込み
ができるということは確認できました。まだやってみたという段階なので
まだ見えていない問題などが出てくるかもしれませんので
今後も見つけたら更新します。参考にしたRandomAccessCollectionの拡張には
offset使って読み込むタイミングを調整する方法もありますので
ぜひそちらも参考にしてみてください?
- 投稿日:2019-08-19T07:58:02+09:00
紙を42回折ると月に届くのか Swift + Xcode Playground で調べる
紙を42回折ると月に到達するという話がある
オチとしては、「42回も紙を折ることはできない」という話だった気がする。
地球から月への距離は
地球中心から月の中心までの平均距離は38万4,403km(約1.3光秒)であり、地球の赤道半径の約60.27倍である。
iOS には Units and Measurement という仕組みがある
単位変換が簡単にできそう。
Units and Measurement | Apple Developer Documentation
Label numeric quantities with physical dimensions to allow locale-aware formatting and conversion between related units.
紙を何回折ると月に届くのか調べるプログラムを Swift で書く
紙の厚さを 0.08mm と仮定。
import UIKit

// 地球と月との距離 38万4403キロメートル
let dist = Measurement(value: 384403, unit: UnitLength.kilometers)

// 紙の厚さは0.08ミリメートル
let paperThickness = Measurement(value: 0.08, unit: UnitLength.millimeters)

// 厚さを基準であるメートルに変換
var thickness = paperThickness.converted(to: UnitLength.meters)

// とりあえず100回ぐらい折ってみようか
for i in 0..<100 {

    if thickness.value >= 1000.0 {
        // キロメートルに変換して出力
        print("\(i)回目: \(thickness.converted(to: UnitLength.kilometers))")
    } else if thickness.value >= 1.0 {
        // メートルのまま出力
        print("\(i)回目: \(thickness)")
    } else if thickness.value >= 0.01 {
        // センチメートルに変換して出力
        print("\(i)回目: \(thickness.converted(to: UnitLength.centimeters))")
    } else {
        // ミリメートルに変換して出力
        print("\(i)回目: \(thickness.converted(to: UnitLength.millimeters))")
    }

    // 地球と月との距離を超えたら終了
    if thickness >= dist {
        print("\(paperThickness)の厚さの紙を\(i)回折ると月に到達することがわかった。")
        break
    }

    // 厚さを2倍にする
    thickness = thickness * 2
}
実行結果
0.08 mmの厚さの紙を43回折ると月に到達することがわかった。
0回目: 0.08 mm
1回目: 0.16 mm
2回目: 0.32 mm
3回目: 0.64 mm
4回目: 1.28 mm
5回目: 2.56 mm
6回目: 5.12 mm
7回目: 1.024 cm
8回目: 2.048 cm
9回目: 4.096 cm
10回目: 8.192 cm
11回目: 16.384 cm
12回目: 32.768 cm
13回目: 65.536 cm
14回目: 1.31072 m
15回目: 2.62144 m
16回目: 5.24288 m
17回目: 10.48576 m
18回目: 20.97152 m
19回目: 41.94304 m
20回目: 83.88608 m
21回目: 167.77216 m
22回目: 335.54432 m
23回目: 671.08864 m
24回目: 1.34217728 km
25回目: 2.68435456 km
26回目: 5.36870912 km
27回目: 10.73741824 km
28回目: 21.47483648 km
29回目: 42.94967296 km
30回目: 85.89934592 km
31回目: 171.79869184 km
32回目: 343.59738368 km
33回目: 687.19476736 km
34回目: 1374.38953472 km
35回目: 2748.77906944 km
36回目: 5497.55813888 km
37回目: 10995.11627776 km
38回目: 21990.23255552 km
39回目: 43980.46511104 km
40回目: 87960.93022208 km
41回目: 175921.86044416 km
42回目: 351843.72088832 km
43回目: 703687.44177664 km
0.08 mmの厚さの紙を43回折ると月に到達することがわかった。
今回の動作確認環境
- Xcode 10.3
参考資料

- 投稿日:2019-08-19T02:42:28+09:00
AWS SDK for iOS Samples を試す
GitHub の awslabs/aws-sdk-ios-samples リポジトリには AWS SDK for iOS を利用した以下のサンプルプロジェクトが用意されています
- CognitoAuth-Sample
- CognitoYourUserPools-Sample
- IoT-Sample
- Lex-Sample
- Polly-Sample
- S3TransferUtility-Sample
以下、それぞれを実行し、関連するコードを眺めます
CognitoAuth-Sample(Swift)
UI を実装せずとも SDK が提供するウェブビューベースでのサインアップ・サインインコンポーネントを利用して、手早く iOS アプリにユーザー認証の機能を追加できるサンプルが提供されています
セットアップ方法
- リポジトリをクローンして、依存ライブラリをインストール
- Announcing Your User Pools in Amazon Cognito に従いCognito Identity Pool を作成
- アプリクライアントの設定を行う(詳細は README.md を参照)
- .xcworkspace を開く
- Info.plist を更新
- アプリを実行する
使ってみる
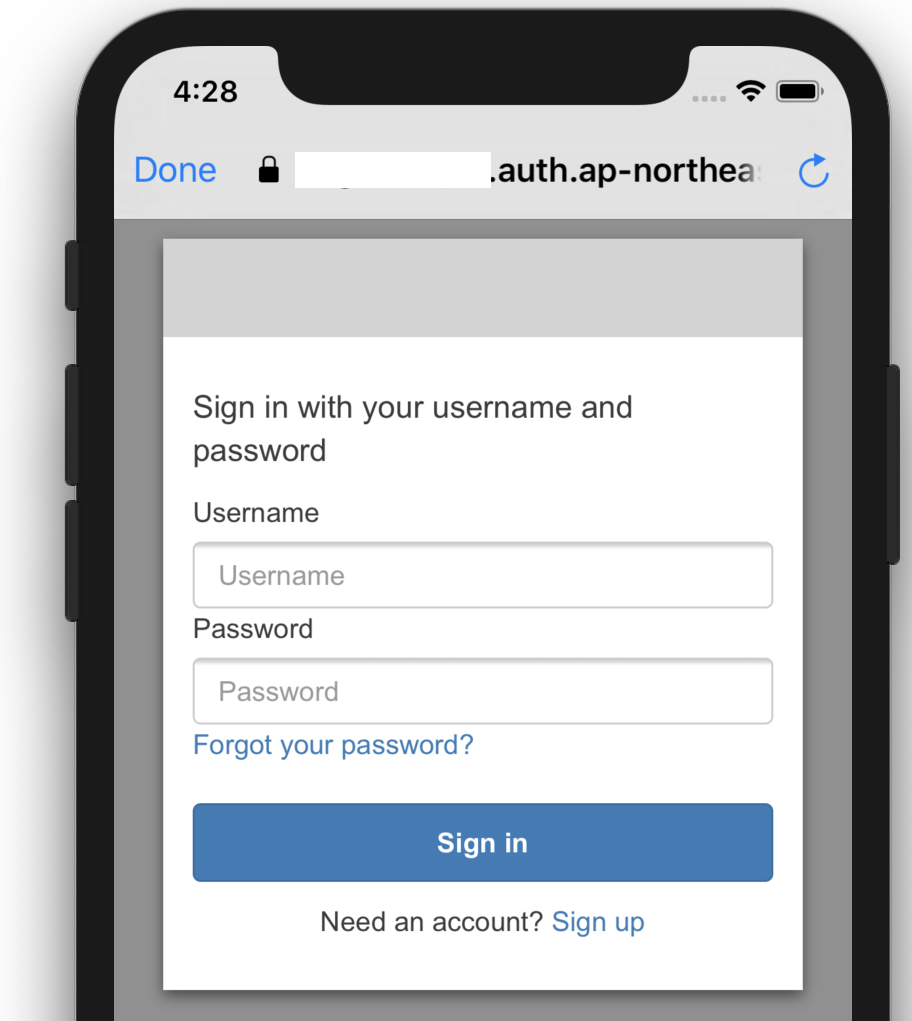
以下のように、起動するとまずログイン画面が表示されます
ユーザーが存在しないので、まずはサインアップを進めます。サインアップボタンを押し、ユーザー名、Eメールアドレス、パスワードを入力すると、確認コードの記載されたメールが届きますので、アプリ上でそれを入力し、サインアップを完了させます
サインアップが完了したアカウントを利用してログインするとメタデータが表示されます
実装を見てみる
ViewController的にはAWSCognitoAuthDelegateの実装が必要なようです。とはいっても通常は単に self を返却すれば大丈夫です。import UIKit import AWSCognitoAuth class ViewController: UITableViewController, AWSCognitoAuthDelegate { ... func getViewController() -> UIViewController { return self; } ...あとはサインイン、サインアウトなどのイベント発生時に対応する API を呼ぶだけ
    @IBAction func signInTapped(_ sender: Any) {
        self.auth.getSession  { (session:AWSCognitoAuthUserSession?, error:Error?) in
            if(error != nil) {
                self.session = nil
                self.alertWithTitle("Error", message: (error! as NSError).userInfo["error"] as? String)
            }else {
                self.session = session
            }
            self.refresh()
        }

...

    @IBAction func signOutTapped(_ sender: Any) {
        self.auth.signOut { (error:Error?) in
            if(error != nil){
                self.alertWithTitle("Error", message: (error! as NSError).userInfo["error"] as? String)
            }else {
                self.session = nil
                self.alertWithTitle("Info", message: "Session completed successfully")
            }
            self.refresh()
        }
    }
また、ざっくりと良き塩梅にログイン状態は保持されます。
CognitoYourUserPools-Sample(Swift)
独自で UI を作成した場合の Cognito のサンプルコードです。
セットアップ方法
- リポジトリをクローンして、依存ライブラリをインストール
- Announcing Your User Pools in Amazon Cognito に従いCognito Identity Pool を作成
- アプリクライアントの設定を行う(詳細は README.md を参照)
- .xcworkspace を開く
- Constants.swift を更新
- アプリを実行する
使ってみる
まずはサインアップの画面、そして検証コードの入力画面です。このようにしてユーザーを作成し、サインインの準備をします。

つづいて、作成したユーザーにてサインインを行うと、ユーザーのメタデータが表示されるサンプルとなっています。

実装を見てみる
- aws-sdk-ios-samples/CognitoYourUserPools-Sample/Swift/CognitoYourUserPoolsSample をみるとずらりと各
ViewControllerが並んでいます- 基本的に画面をせかせか実装 + Cognito の対応する Delegate をあらかじめ実装しておき、対応する API を呼び出すみたいな流れです
サインインの部分だけをピックアップしてみてみます
aws-sdk-ios-samples/SignInViewController.swift
あらかじめ Delegate を実装しつつも...
extension SignInViewController: AWSCognitoIdentityPasswordAuthentication {
    public func getDetails(_ authenticationInput: AWSCognitoIdentityPasswordAuthenticationInput, passwordAuthenticationCompletionSource: AWSTaskCompletionSource<AWSCognitoIdentityPasswordAuthenticationDetails>) {
        self.passwordAuthenticationCompletion = passwordAuthenticationCompletionSource
        DispatchQueue.main.async {
            if (self.usernameText == nil) {
                self.usernameText = authenticationInput.lastKnownUsername
            }
        }
    }

    public func didCompleteStepWithError(_ error: Error?) {
        DispatchQueue.main.async {
            if let error = error as NSError? {
                let alertController = UIAlertController(title: error.userInfo["__type"] as? String,
                                                        message: error.userInfo["message"] as? String,
                                                        preferredStyle: .alert)
                let retryAction = UIAlertAction(title: "Retry", style: .default, handler: nil)
                alertController.addAction(retryAction)

                self.present(alertController, animated: true, completion:  nil)
            } else {
                self.username.text = nil
                self.dismiss(animated: true, completion: nil)
            }
        }
    }
}
ボタンによるサインインイベントのフックは以下のような具合
    @IBAction func signInPressed(_ sender: AnyObject) {
        if (self.username.text != nil && self.password.text != nil) {
            let authDetails = AWSCognitoIdentityPasswordAuthenticationDetails(username: self.username.text!, password: self.password.text! )
            self.passwordAuthenticationCompletion?.set(result: authDetails)
        } else {
            let alertController = UIAlertController(title: "Missing information",
                                                    message: "Please enter a valid user name and password",
                                                    preferredStyle: .alert)
            let retryAction = UIAlertAction(title: "Retry", style: .default, handler: nil)
            alertController.addAction(retryAction)
        }
    }
IoT-Sample(Swift)
セットアップ方法
- リポジトリをクローンして、依存ライブラリをインストール
- Cognito Identity Pool を作成
- Unauth_Role に AmazonLexRunBotsOnly をアタッチ
- .xcworkspace を開く
- awsconfiguration.json を更新
- Constants.swift を更新
- アプリを実行する
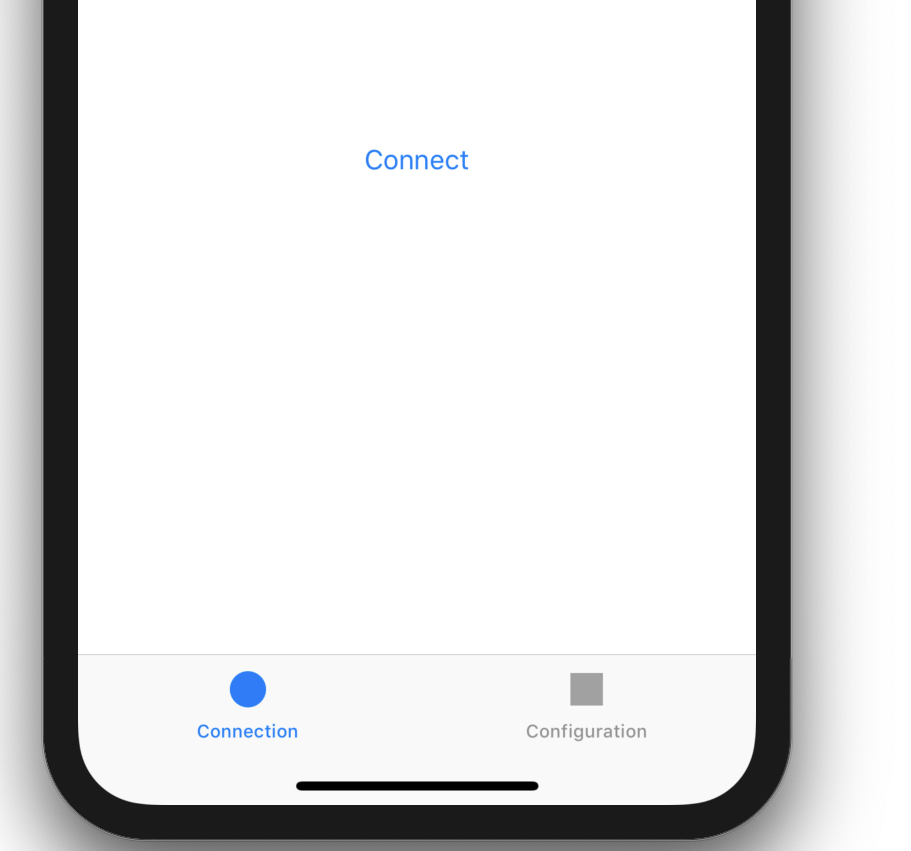
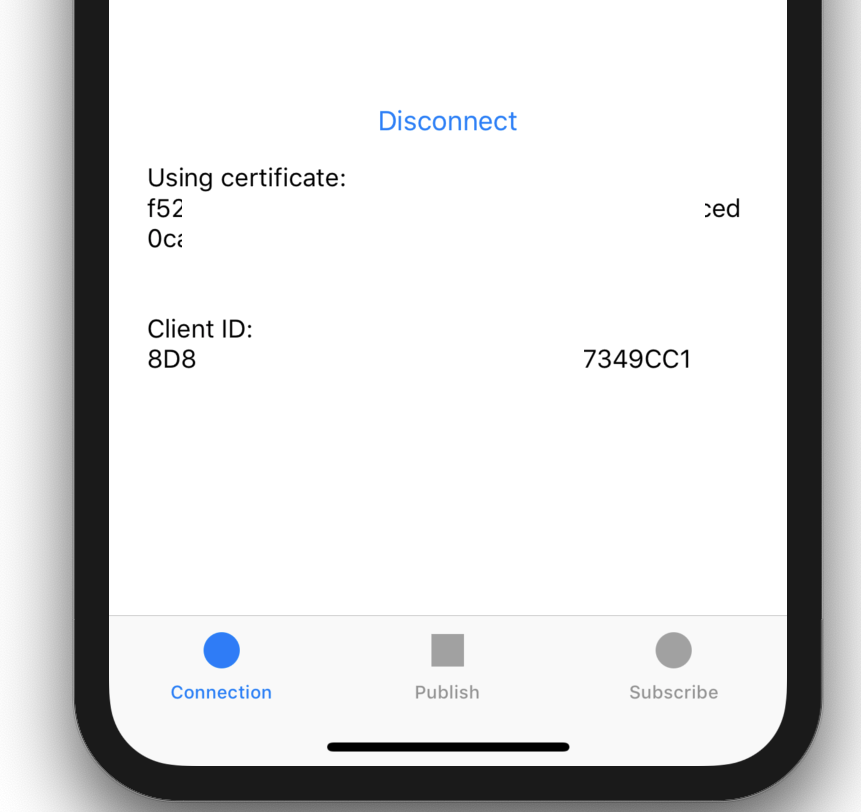
使ってみる
Connect ボタンを押すと必要な諸々の設定が始まり、接続が完了すると Disconnect ボタンが出現します(詳細はソースコード参照)

単体のシミュレータだとよくわからん状態になるので、動画をご覧ください。
https://static.53ningen.com/wp-content/uploads/2019/04/23013339/iot.m4v
Publish と Subscribe をタブで切り替えられます。Subscriber は Publisher からのメッセージを受信してスライドバーが連動する簡単なデモアプリケーションになっています。
実装を見てみる
ConnectionViewController.swift
基本的には
mqttEventCallbackとしてコールバック関数を定義して、iotDataManager.connect に渡すいうものになっています。複雑そうにみえますが、接続処理のフックと、各接続状態に応じた UI の制御を地味に書いていくような流れにみえます。PublishViewController.swift
Publish 側の ViewController は単に sliderValueChanged イベントをフックして iotDataManager.publishString を対象のトピックに対して行っているだけです。
class PublishViewController: UIViewController {

    @IBOutlet weak var publishSlider: UISlider!

    @IBAction func sliderValueChanged(_ sender: UISlider) {
        print("Publish slider value: " + "\(sender.value)")

        let iotDataManager = AWSIoTDataManager(forKey: ASWIoTDataManager)
        let tabBarViewController = tabBarController as! IoTSampleTabBarController

        iotDataManager.publishString("\(sender.value)", onTopic:tabBarViewController.topic, qoS:.messageDeliveryAttemptedAtMostOnce)
    }
}
SubscribeViewController.swift
Subscriber 側も Publisher 側とほぼ同様の考え方で実装可能です
class SubscribeViewController: UIViewController {

    @IBOutlet weak var subscribeSlider: UISlider!

    override func viewDidLoad() {
        super.viewDidLoad()

        // Do any additional setup after loading the view, typically from a nib.
        subscribeSlider.isEnabled = false
    }

    override func viewWillAppear(_ animated: Bool) {
        let iotDataManager = AWSIoTDataManager(forKey: ASWIoTDataManager)
        let tabBarViewController = tabBarController as! IoTSampleTabBarController

        iotDataManager.subscribe(toTopic: tabBarViewController.topic, qoS: .messageDeliveryAttemptedAtMostOnce, messageCallback: {
            (payload) ->Void in
            let stringValue = NSString(data: payload, encoding: String.Encoding.utf8.rawValue)!

            print("received: \(stringValue)")
            DispatchQueue.main.async {
                self.subscribeSlider.value = stringValue.floatValue
            }
        } )
    }

    override func viewWillDisappear(_ animated: Bool) {
        let iotDataManager = AWSIoTDataManager(forKey: ASWIoTDataManager)
        let tabBarViewController = tabBarController as! IoTSampleTabBarController
        iotDataManager.unsubscribeTopic(tabBarViewController.topic)
    }
}
Lex-Sample(Swift)
音声やテキストを使用して、対話型のインターフェイスを構築できるサービス Amazon Lex を iOS アプリに組み込むサンプルリポジトリ。以下のような手順で簡単に試せます。
セットアップ方法
- リポジトリをクローンして、依存ライブラリをインストール
- Cognito Identity Pool を作成
- Unauth_Role に AmazonLexRunBotsOnly をアタッチ
- .xcworkspace を開く
- awsconfiguration.json を更新
- Constants.swift を更新
- アプリを実行する
使ってみる
こんな感じでチャット風にやりとりできる画面と音声入力でやりとりできる画面が用意されている
実装を見てみる
AWSLexInteractionDelegateを実装すればよい形になっているので、何をすれば良いか自体は明確になっている// MARK: Interaction Kit extension ChatViewController: AWSLexInteractionDelegate { @objc public func interactionKitOnRecordingEnd(_ interactionKit: AWSLexInteractionKit, audioStream: Data, contentType: String) { DispatchQueue.main.async(execute: { let audioItem = JSQAudioMediaItem(data: audioStream) self.speechMessage = JSQMessage(senderId: ClientSenderId, displayName: "", media: audioItem) self.messages?[self.speechIndex] = self.speechMessage! self.finishSendingMessage(animated: true) }) } public func interactionKit(_ interactionKit: AWSLexInteractionKit, onError error: Error) { //do nothing for now. } public func interactionKit(_ interactionKit: AWSLexInteractionKit, switchModeInput: AWSLexSwitchModeInput, completionSource: AWSTaskCompletionSource<AWSLexSwitchModeResponse>?) { self.sessionAttributes = switchModeInput.sessionAttributes DispatchQueue.main.async(execute: { let message: JSQMessage if (switchModeInput.dialogState == AWSLexDialogState.readyForFulfillment) { if let slots = switchModeInput.slots { message = JSQMessage(senderId: ServerSenderId, senderDisplayName: "", date: Date(), text: "Slots:\n\(slots)") self.messages?.append(message) self.finishSendingMessage(animated: true) } } else { message = JSQMessage(senderId: ServerSenderId, senderDisplayName: "", date: Date(), text: switchModeInput.outputText!) self.messages?.append(message) self.finishSendingMessage(animated: true) } }) let switchModeResponse = AWSLexSwitchModeResponse() switchModeResponse.interactionMode = AWSLexInteractionMode.text switchModeResponse.sessionAttributes = switchModeInput.sessionAttributes completionSource?.set(result: switchModeResponse) } func interactionKitContinue(withText interactionKit: AWSLexInteractionKit, completionSource: AWSTaskCompletionSource<NSString>) { textModeSwitchingCompletion = completionSource } }Polly-Sample(Swift)
ディプラーニングを使用したリアルな音声の読み上げサービスを iOS アプリに組み込むサンプルリポジトリ。以下のような手順で簡単に試せます。
セットアップ方法
- リポジトリをクローンして、依存ライブラリをインストール
- Cognito Identity Pool を作成
- Unauth_Role に AmazonPollyFullAccess をアタッチ
- .xcworkspace を開く
- awsconfiguration.json を更新
- アプリを実行する
Cognito Identity Pool はマネジメントコンソールを触るのが面倒であれば amplify CLI を使って手軽に作成できます。
$ amplify init
$ amplify add auth
# 特定の選択肢に対しては下記のように選択し、Unauth ロールが生成されるようにする
# Do you want to use the default authentication and security configuration? Default configuration with Social Provider (Federation)
...
# Do you want to use the default authentication and security configuration? Manual configuration
...

$ amplify push
使ってみる
スクショのようにボイスと読み上げたいテキストを入力して、ボタンをおすと読み上げてくれる簡単なサンプルになっています
実装を見てみる
ざっくりと以下のような流れ
AWSPollySynthesizeSpeechURLBuilderRequestにて読み上げを行いたいテキストや取得するオーディオファイルのフォーマット、ボイスを選択する- getPreSignedURL にてオーディオファイルの署名付き URL を取得できるので
AVPlayerに投げて音声の再生を行う@IBAction func buttonClicked(_ sender: AnyObject) { let input = AWSPollySynthesizeSpeechURLBuilderRequest() if textField.text != "" { input.text = textField.text! } else { input.text = textField.placeholder! } input.outputFormat = AWSPollyOutputFormat.mp3 input.voiceId = selectedVoice let builder = AWSPollySynthesizeSpeechURLBuilder.default().getPreSignedURL(input) builder.continueOnSuccessWith { (awsTask: AWSTask<NSURL>) -> Any? in let url = awsTask.result! self.audioPlayer.replaceCurrentItem(with: AVPlayerItem(url: url as URL)) self.audioPlayer.play() return nil } }S3TransferUtility-Sample(Swift)
セットアップ方法
- リポジトリをクローンして、依存ライブラリをインストール
- amplify init
- amplify push
- amplify add storage
- amplify push
- .xcworkspace を開く
- アプリを実行する
使ってみる
画像のアップロード、およびダウンロードができます

実装を見てみる
DownloadViewController.swift
AWSS3TransferUtility.default().downloadDataによりダウンロードを行いつつ、プログレスの取り扱いも記述されたサンプルコードになっている@IBAction func start(_ sender: UIButton) { DispatchQueue.main.async(execute: { self.statusLabel.text = "" self.progressView.progress = 0 }) self.imageView.image = nil; let expression = AWSS3TransferUtilityDownloadExpression() expression.progressBlock = {(task, progress) in DispatchQueue.main.async(execute: { if (self.progressView.progress < Float(progress.fractionCompleted)) { self.progressView.progress = Float(progress.fractionCompleted) } }) } self.completionHandler = { (task, location, data, error) -> Void in DispatchQueue.main.async(execute: { if let error = error { NSLog("Failed with error: \(error)") self.statusLabel.text = "Failed" } else if(self.progressView.progress != 1.0) { self.statusLabel.text = "Failed" } else{ self.statusLabel.text = "Success" self.imageView.image = UIImage(data: data!) } }) } transferUtility.downloadData( forKey: S3DownloadKeyName, expression: expression, completionHandler: completionHandler).continueWith { (task) -> AnyObject? in if let error = task.error { NSLog("Error: %@",error.localizedDescription); DispatchQueue.main.async(execute: { self.statusLabel.text = "Failed" }) } if let _ = task.result { DispatchQueue.main.async(execute: { self.statusLabel.text = "Downloading..." }) NSLog("Download Starting!") // Do something with uploadTask. } return nil; } }UploadViewController.swift
AWSS3TransferUtility.default().uploadDataをたたいて、Download とおなじような形で Upload も扱える@objc func uploadImage(with data: Data) { let expression = AWSS3TransferUtilityUploadExpression() expression.progressBlock = progressBlock DispatchQueue.main.async(execute: { self.statusLabel.text = "" self.progressView.progress = 0 }) transferUtility.uploadData( data, key: S3UploadKeyName, contentType: "image/png", expression: expression, completionHandler: completionHandler).continueWith { (task) -> AnyObject? in if let error = task.error { print("Error: \(error.localizedDescription)") DispatchQueue.main.async { self.statusLabel.text = "Failed" } } if let _ = task.result { DispatchQueue.main.async { self.statusLabel.text = "Uploading..." print("Upload Starting!") } // Do something with uploadTask. } return nil; } }ライセンス表記
本記事中に登場するソースコードのライセンスは Apache License 2.0 です。
https://github.com/awslabs/aws-sdk-ios-samples/blob/master/LICENSE


- 投稿日:2019-08-19T01:21:13+09:00
イメージで理解するSwiftの高階関数(filter, map, reduce, compactMap, flatMap)
はじめに
本記事ではSwiftの初心者〜中級者向けにSwift Standard Libraryフレームワークで提供されている主な高階関数について説明します。以下のようにイメージを合わせて書くことで、イメージが掴みやすいようにしました。
高階関数とは、関数を引数や戻り値にとる関数のことです。Swift Standard Libraryでは主に配列などで利用でき、for文で配列の各要素を処理するよりも宣言的なプロラミングが可能です。
例題)1〜10の数字から2の倍数だけ取得して、それぞれ3倍したものの合計
// for文を用いた例(命令型プログラミング)
let array = [1, 2, 3, 4, 5, 6, 7, 8, 9, 10]
var result = 0
for element in array {
    guard element % 2 == 0 else { continue }
    result = result + (element * 3)
}

// 高階関数を用いた例(宣言型プログラミング)
let array = [1, 2, 3, 4, 5, 6, 7, 8, 9, 10]
let result = array
    .filter { $0 % 2 == 0 }
    .map { $0 * 3 }
    .reduce(0) { $0 + $1 }
具体的な処理を関数(クロージャー)として指定できるため、高階関数自体が汎用的で利用しやすいものとなっています。
本記事で説明する高階関数
大きくはSequenceプロトコルに準拠した型で利用できるものとOptionalプロトコルに準拠した型で利用できるものを説明します。
Sequence: filter, map, reduce, compactMap, flatMap
Sequenceの高階関数
filter
イメージ
「リストの要素からなにかの条件に合うものだけを返す」
利用例
// ?と?のリストから、?を取り除いたリストを取得する
let array = ["?", "?", "?", "?", "?", "?"]

// このとき、$0はリスト内のそれぞれの要素を意味する
let result = array.filter { $0 != "?" }

print(result) // ["?", "?", "?"]
map
イメージ
「リストの全ての要素に何か変換をして返す」
利用例
// ?のリストの要素を?に変換したリストを取得する
let array = ["?", "?", "?"]

// ここで利用したreplacingOccurrences関数は文字列を置き換える関数
let result = array.map { $0.replacingOccurrences(of: "?", with: "?") }

print(result) // ["?", "?", "?"]
reduce
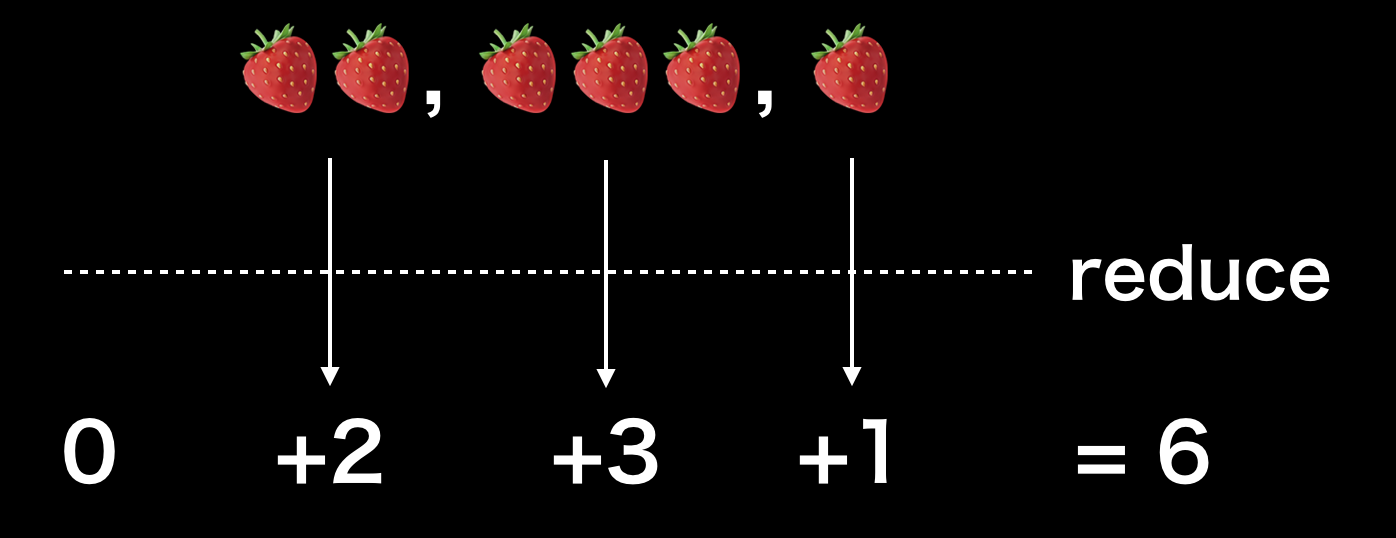
イメージ
「全ての要素に何か変換をして1つの結果を得る」
利用例
// 複数の?を含むリストから合計のいちごの数を数える
let array = ["??", "???", "?"]

// このとき、$0は累積の結果、$1はリスト内のそれぞれの要素を意味する
// 第1引数の0は累積していく値の初期値
let result = array.reduce(0) { $0 + $1.count }

print(result) // 6
compactMap
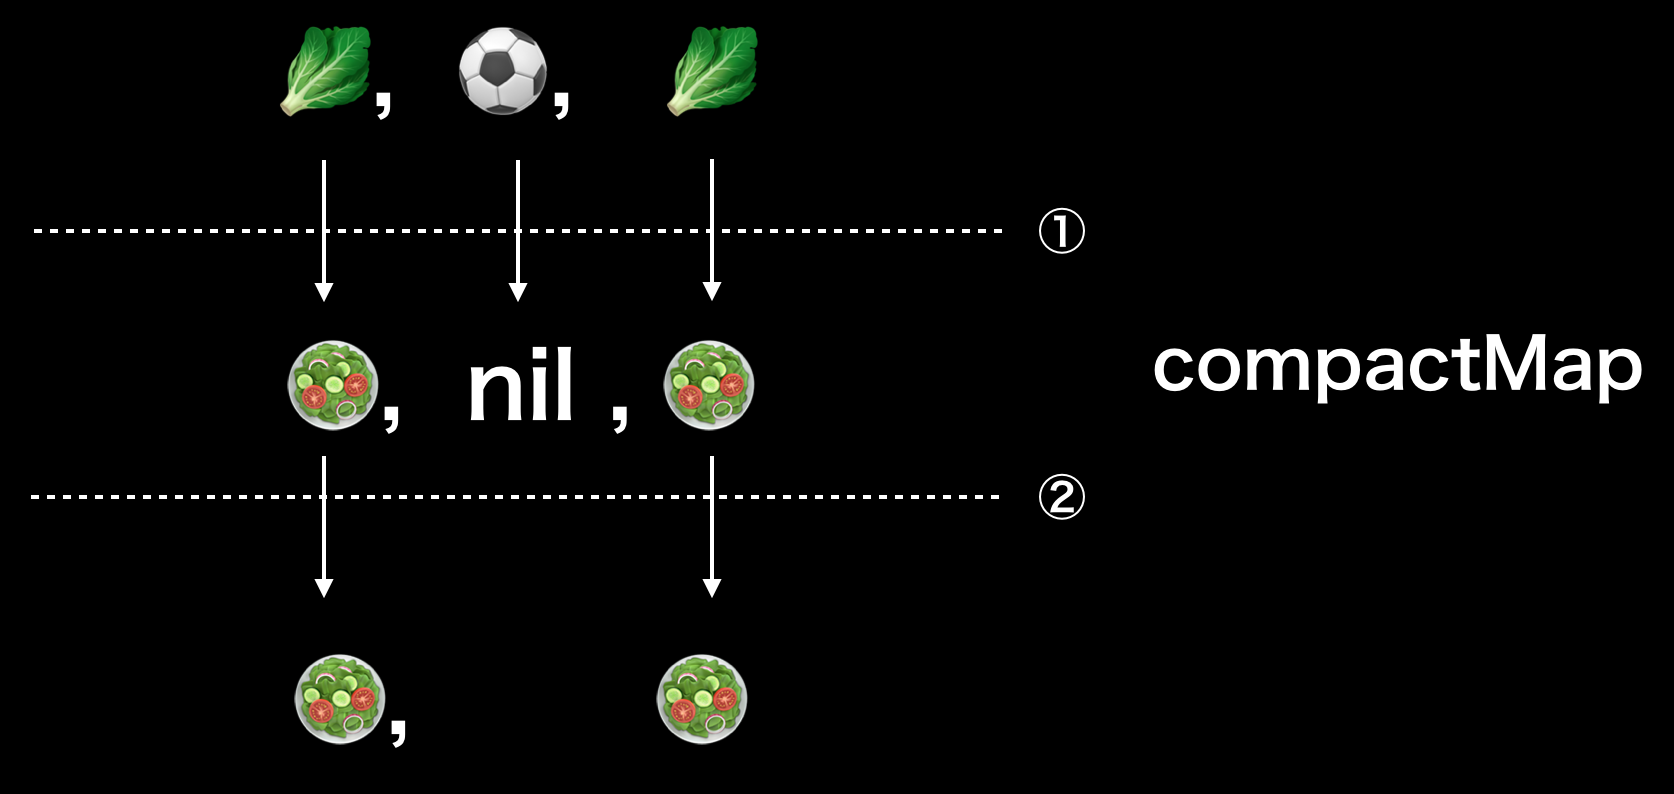
イメージ
「全ての要素に何か変換をして、nilになったものを取り除いて返す」
利用例
// ?の場合は?に変換し、それ以外の場合はnilを返す
// nilとなる要素はcompactMapで取り除く
let array = ["?", "⚽", "?"]

let result = array.compactMap { $0 == "?" ? "?" : nil }
print(result) // ["?", "?"]
※補足
上記と同様の処理をmapを利用して行った場合は、nilを含むOptional<String>型の配列となります。let array = ["?", "?", "?"] let result = array.map { $0 == "?" ? "?" : nil } print(result) // ["?", "?"] // [Optional("?"), nil, Optional("?")]"flatMap
イメージ
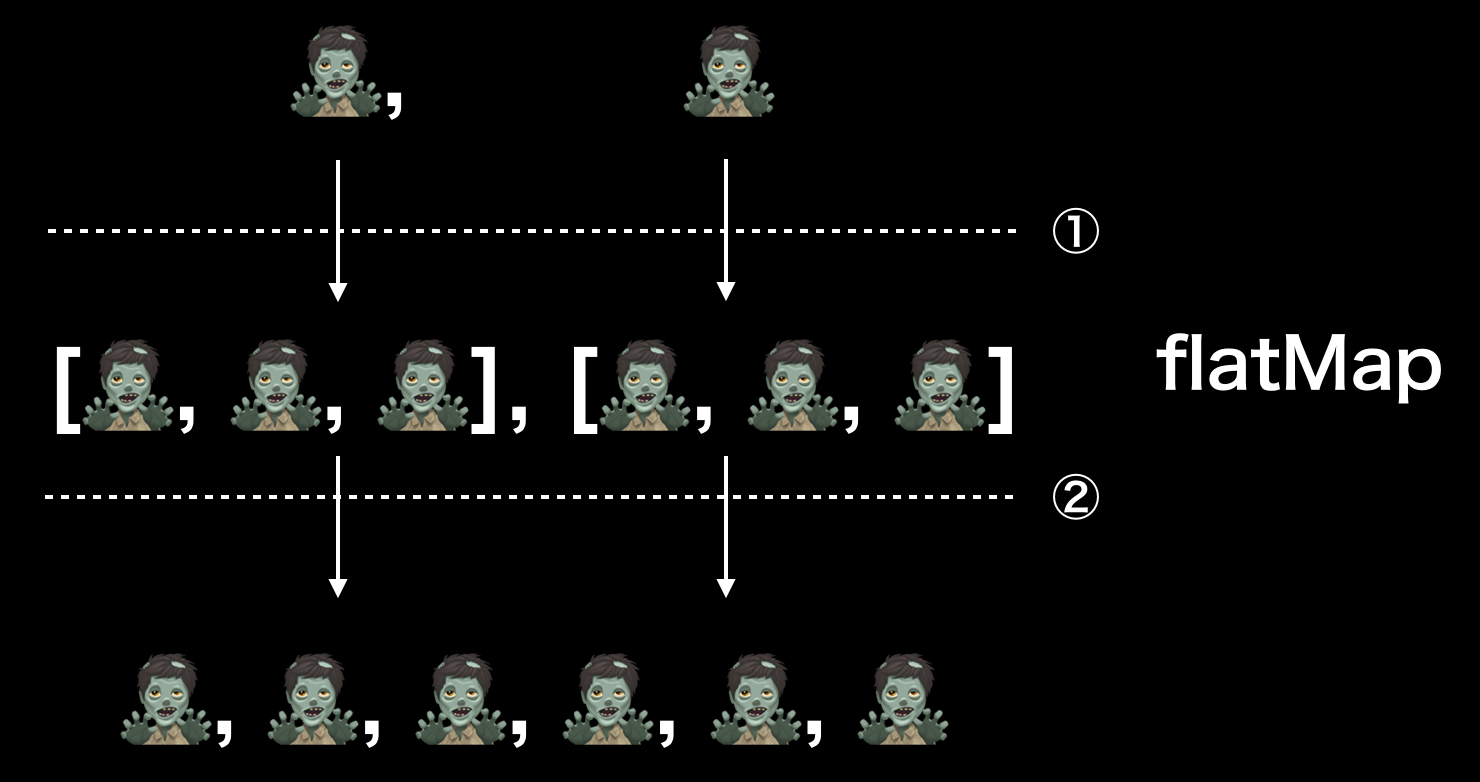
「全ての要素に何か変換をして、その結果の要素が配列であればそれをフラットにして返す」
利用例
// 要素の?を[?, ?, ?]に変換し、その多重配列をフラットにしたものを返す
let array = ["?", "?"]
let result = array.flatMap { Array(repeating: $0, count: 3) }
print(result) // ["?", "?", "?", "?", "?", "?"]
※補足
上記と同様の処理をmapを利用して行った場合は、[[String]]型の配列となります。let array = ["?", "?"] let result = array.map { Array(repeating: $0, count: 3) } print(result) // [["?", "?", "?"], ["?", "?", "?"]]Optionalの高階関数
map
イメージ
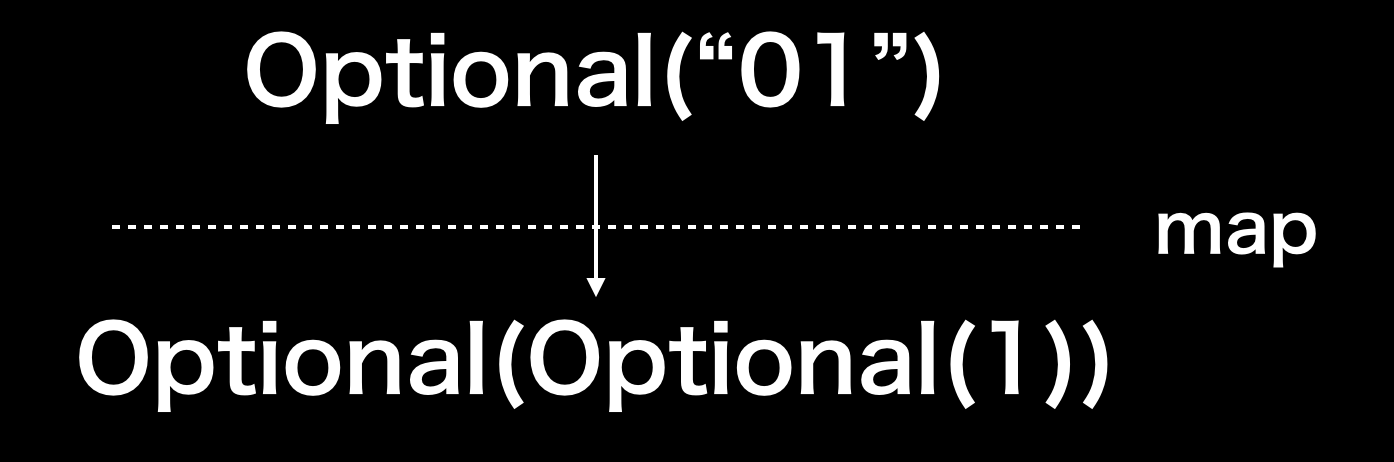
「Optional型でラップされた型(中身)に対して何か変換を行う」
利用例
// Optional<String>型の変数をInt型に変換する
// init?(_ description: String)は失敗可能イニシャライザであるため、
// その結果はさらにOptional型となる
let number: String? = "01"
print(number.map { Int($0) })
flatMap
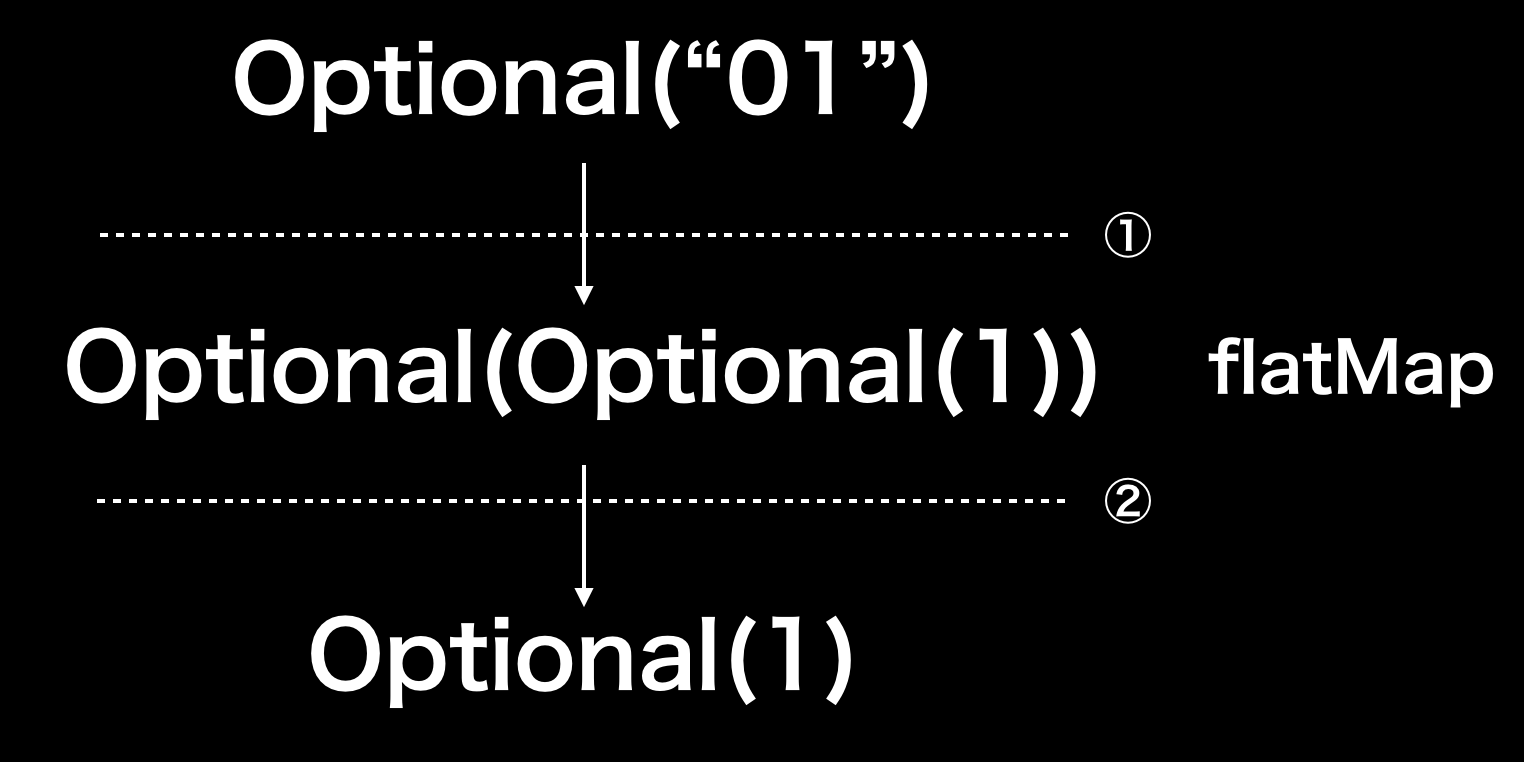
イメージ
「Optional型でラップされた型(中身)に対して何か変換を行い、その結果がOptional型であればアンラップする(多重のOptionalをフラットにする)」
利用例
// Optional<String>型の変数をInt型に変換する
// init?(_ description: String)は失敗可能イニシャライザであるため、
// その結果はさらにOptional型となるがflatMapによりアンラップされる
let number: String? = "01"
print(number.flatMap { Int($0) })
※失敗可能イニシャライザがわからない場合はこちらの記事で解説をしていますのでご覧ください。
その他の高階関数
Sequenceの高階関数の一覧です。Optionalは先述のmapとflatMapのみです。クリックすると公式ドキュメントに飛びます。
contains(where:)first(where:)min(by:)max(by:)sorted(by:)elementsEqual(_:by:)lexicographicallyPrecedes(_:by:)drop(while:)forEach(_:)prefix(while:)split(maxSplits:omittingEmptySubsequences:whereSeparator:)starts(with:by:)withContiguousStorageIfAvailable(_:)補足: 高階関数の構文について
上記の高階関数の説明では、Swiftの後置クロージャー(trailing closure)と簡易引数名(shorthand argument name)を利用しています。
後置クロージャー(trailing closure)は関数の最後の引数がクロージャーの場合に以下のように最後の引数ラベルを省略し、クロージャーを関数の後に置いて記述できるという文法です。例えばUIViewのanimate関数では、以下のように2つの書き方ができます。
// UIViewのanimate関数
class func animate(withDuration duration: TimeInterval, animations: @escaping () -> Void)
// 後置クロージャーを利用しない場合 UIView.animate(withDuration: 2.0, animations: { label.alpha = 0 }) // 後置クロージャーを利用する場合 UIView.animate(withDuration: 2.0) { label.alpha = 0 }また、クロージャーが引数を取る場合に、その引数名を省略できるという簡易引数名(shorthand argument name)の構文もあります。引数名を省略する場合は順に
$0,$1,$2...という名前で参照できます。// 簡易引数名を利用しない場合 let numbers = [1, 2, 3, 4, 5] let result = numbers.filter { number in number % 2 == 0 } // 簡易引数名を利用する場合 let numbers = [1, 2, 3, 4, 5] let result = numbers.filter { $0 % 2 == 0 }参考


- 投稿日:2019-08-19T01:05:31+09:00
Swifterを自分のアプリ組み込む方法
@k-boyさんの記事を参考にSwifterを自分のアプリに組み込んでみたのですが、色々とつまづいたので備忘のため手順を残しておきます。
1. 自分のアプリにCocoaPodでSwiterをインストールする
- 自分のアプリディレクトリに移動し、
$ pod initを実行する- Podfileが作成されるので
pod 'Swifter', :git => 'https://github.com/mattdonnelly/Swifter.git'を追記する$ pod installを実行する# Uncomment the next line to define a global platform for your project # platform :ios, '9.0' target 'MyTweetTool' do # Comment the next line if you don't want to use dynamic frameworks use_frameworks! # Pods for MyTweetTool pod 'Swifter', :git => 'https://github.com/mattdonnelly/Swifter.git' end2. Twitter Developersで自分のアプリを登録する
Twitter Developersに自分のアプリを登録します。
細かい手順は割愛しますが@tdknさんの記事が参考になります。登録が完了し、最終的に下記のように自分のConsumer API keysが確認できればOKです。
3. Custom URL Schemeを設定する
SwifterはOAuthにてAPIの認証を行うため、一時的にブラウザを開きます。
開いた先から自分のアプリに戻って来られるようにCustome URL Schemeを設定します。
- Info.plistに自分のCFBundleURLTypes定義を追加する
    <key>CFBundleURLTypes</key>
    <array>
        <dict>
            <key>CFBundleURLName</key>
            <string>$(PRODUCT_BUNDLE_IDENTIFIER)</string>
            <key>CFBundleURLSchemes</key>
            <array>
                <string>swifter-{Consumer API key}</string>
            </array>
        </dict>
    </array>
※CFBundleURLSchemesにswifter-{Consumer API key}とありますが、{Consumer API key}には先程のTwitter DevelopersのAPI keyを入力します
- AppDelegate.swiftでapplication:openURL:options:をオーバーライドする
func application(_ app: UIApplication, open url: URL, options: [UIApplication.OpenURLOptionsKey : Any] = [:]) -> Bool {
        return Swifter.handleOpenURL(url, callbackURL: URL(string: "swifter-{Consumer API key}://")!)
}
※Swifterのコードを呼び出すので
import SwifteriOSが必要です4. Swifterを使ってtweetを投稿する
自分が作成したのはテキスト入力と投稿ボタンだけのシンプルなUIのアプリで画面構成は下記のようになります。
説明よりも実際のコードを紹介します。
ViewController.swiftimport UIKit import SwifteriOS import SafariServices class ViewController: UIViewController, SFSafariViewControllerDelegate { @IBOutlet weak var tweetMsgArea: UITextView! private let appStatus = AppStatus() override func viewDidLoad() { super.viewDidLoad() // Do any additional setup after loading the view. } @IBAction func tweetPushed(_ sender: Any) { tweet() } func tweet() { let TWITTER_CONSUMER_KEY = "{Consumer API key}" let TWITTER_CONSUMER_SECRET = "{Consumer API secret key}" // load from UserDefaults let tokenKey = self.appStatus.twitterTokenKey let tokenSecret = self.appStatus.twitterTokenSecret if tokenKey == nil || tokenSecret == nil { let swifter = Swifter(consumerKey: TWITTER_CONSUMER_KEY, consumerSecret: TWITTER_CONSUMER_SECRET) swifter.authorize( withCallback: URL(string: "swifter-{Consumer API key}://")!, presentingFrom: self, success: { accessToken, response in print(response) guard let accessToken = accessToken else { return } self.appStatus.twitterTokenKey = accessToken.key self.appStatus.twitterTokenSecret = accessToken.secret self.tweet() }, failure: { error in print(error) }) } else { let swifter = Swifter(consumerKey: TWITTER_CONSUMER_KEY, consumerSecret: TWITTER_CONSUMER_SECRET, oauthToken: tokenKey!, oauthTokenSecret: tokenSecret!) swifter.postTweet(status: tweetMsgArea.text, success: { response in print(response) }, failure: { error in print(error) }) } } } class AppStatus { var userdefault = UserDefaults.init(suiteName: "app_status")! var twitterTokenKey : String? { get { if let token : String = userdefault["token_key"] { return token } else { return nil } } set { userdefault["token_key"] = newValue } } var twitterTokenSecret : String? { get { if let secret : String = userdefault["token_secret"] { return secret } else { return nil } } set { userdefault["token_secret"] = newValue } } } extension UserDefaults { subscript<T: Any>(key: String) -> T? { get { if let value = object(forKey: key) { return value as? T } else { return nil } } set(_newValue) { if let newValue = _newValue { set(newValue, forKey: key) } else { removeObject(forKey: key) } synchronize() } } }ポイントとしてはUserDefaultsからアクセストークンを取得し、取得できなかった場合は
Swifter.authorize()を呼び出してアクセストークンを取得します。
既に取得できていた場合はそのままSwifter.postTweet()で入力された内容をTweetします。5. トラブルシュート
dyld: Library not loaded: ... Reason: image not foundと出る場合
Embedded BinariesにSwifteriOSが設定されていないことが原因。
下記のように設定を行う。


- 投稿日:2019-08-19T00:20:36+09:00
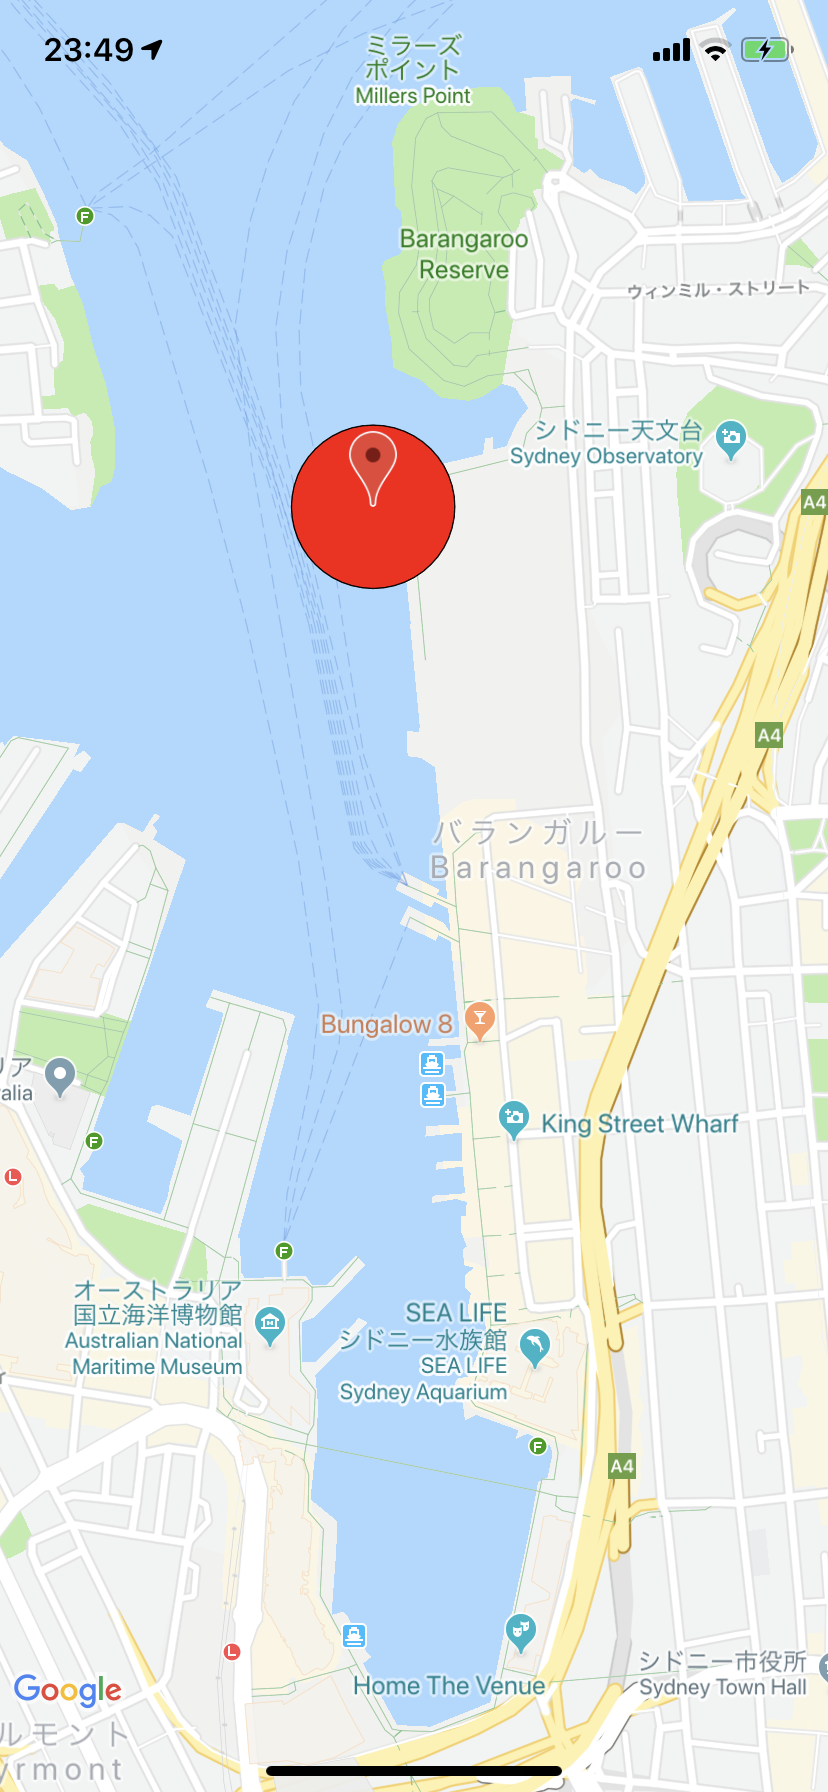
GoogleMapSDK + Geofence 実装
前回GoogleMapSDKを使ってMap表示 してみました
今回はここにコードを追加してGeofenceを実装してみます
*ほとんどこちらと同じになります認証リクエストを変更
info.plistの方をまず修正します
前回のままだとinfo.plist位置情報利用の設定がPrivacy - Location When In Use Usage Descriptionのみだったため、「使用中のみ許可」に設定していいか聞かれるだけで「常に許可」が選択肢として表示されませんでした
今回はバッググラウンドでも利用できるようにしたいので、Privacy - Location Always and When In Use Usage Descriptionも追加します
あとはコードでlocationManager.requestWhenInUseAuthorizationだったところをlocationManager.requestAlwaysAuthorization()に変更すれば完了ちなみに、「使用中のみ許可」のみを認証リクエストに表示することはできても、「常に表示」のみを認証リクエストに表示することはできないようです
この記事にかかれていますが、iOS10までは「常に許可」「使用中のみ許可」のどちらかがサポートしてあればよかったですが
iOS11から「使用中のみ許可」のみサポートが必須になったからですモニタリングしたい緯度経度と領域を設定
import GoogleMaps

class ViewController: UIViewController, CLLocationManagerDelegate {

    // モニタリングしたい場所の緯度経度を設定
    let moniteringCoordinate = CLLocationCoordinate2DMake(-33.86,151.20)

     (以下省略)
}

extension ViewController {
    func startGeofenceMonitering() {
        // モニタリングしたい領域を作成
        let moniteringRegion = CLCircularRegion(center: moniteringCoordinate, radius: 100, identifier: "シドニー")
        // モニタリング開始
        locationManager.startMonitoring(for: moniteringRegion)

    }
}

extension ViewController {
     // 認証ステータスが変わったときに呼ばれる
    func locationManager(_ manager: CLLocationManager, didChangeAuthorization status: CLAuthorizationStatus) {
        switch status {
        case .notDetermined:
            print("ユーザー認証未選択")
            break
        case .denied:
            print("ユーザーが位置情報取得を拒否しています。")
            //位置情報取得を促す処理を追記
            break
        case .restricted:
            print("位置情報サービスを利用できません")
            break
        case .authorizedWhenInUse:
            print("アプリケーション起動時のみ、位置情報の取得を許可されています。")
            break
        case .authorizedAlways:
            print("このアプリケーションは常時、位置情報の取得を許可されています。")
            break
        default:
            break
        }
    }

    // ジオフェンスモニタリング
    // モニタリング開始成功時に呼ばれる
    func locationManager(_ manager: CLLocationManager, didStartMonitoringFor region: CLRegion) {
        print("モニタリング開始")
    }

    // モニタリングに失敗したときに呼ばれる
    func locationManager(_ manager: CLLocationManager, monitoringDidFailFor region: CLRegion?, withError error: Error) {
        print("モニタリングに失敗しました")
    }

    // ジオフェンス領域に入ったときに呼ばれる
    func locationManager(_ manager: CLLocationManager, didEnterRegion region: CLRegion) {
        print("設定したジオフェンスに入りました")
    }

    // ジオフェンス領域から出たときに呼ばれる
    func locationManager(_ manager: CLLocationManager, didExitRegion region: CLRegion) {
        print("設定したジオフェンスから出ました")
    }

    // ジオフェンスの情報が取得できないときに呼ばれる
    func locationManager(_ manager: CLLocationManager, didFailWithError error: Error) {
        print("モニタリングエラーです")
    }
}
動作確認はしていませんがおそらくこれで正常に動くはずです
領域を可視化
おそらくこれで正常に動くはずですが、設定した領域がどこなのかユーザーからは見ることができないので可視化します
前回ピンを立てたように以下のコードを追加するlet circle = GMSCircle.init(position: moniteringCoordinate, radius: 100) circle.position = moniteringCoordinate circle.radius = 100 circle.fillColor = .red circle.map = mapViewこれで領域が可視化されます
コード全体
import GoogleMaps

class ViewController: UIViewController, CLLocationManagerDelegate {

    let locationManager = CLLocationManager()
    // モニタリングしたい場所の緯度経度を設定
    let moniteringCoordinate = CLLocationCoordinate2DMake(-33.86,151.20)
    override func viewDidLoad() {
        super.viewDidLoad()
        setUpMapView()
        setupLocationManager()
    }

    func setUpMapView() {
        // マップに指定の緯度経度の場所を指定の倍率で表示するように指示
        let camera = GMSCameraPosition.camera(withLatitude: -33.86, longitude: 151.20, zoom: 10.0)

        // 指定のフレームとcameraPositionでmapviewをビルドして返す
        let mapView = GMSMapView.map(withFrame: CGRect.zero, camera: camera)
        mapView.isMyLocationEnabled = true

        // markerはピンの場所
        let marker = GMSMarker()
        marker.position = CLLocationCoordinate2D(latitude: -33.86, longitude: 151.20)
        marker.title = "Sydney"
        marker.snippet = "Australia"
        marker.map = mapView

        let circle = GMSCircle.init(position: moniteringCoordinate, radius: 100)
        circle.position = moniteringCoordinate
        circle.radius = 100
        circle.fillColor = .red
        circle.map = mapView

        view = mapView
    }


    func setupLocationManager() {
        // ユーザーに対して位置情報を取得する許可をリクエストする
        // 常に使用する許可を得るrequestAlwaysAuthorizationとアプリ使用中のみ許可を得るrequestWhenInUseAuthorizationがある
        // ここでrequestWhenInUseAuthorization()でリクエストするならinfo.plistの方もPrivacy - Location When In Use Usage Descriptionにする必要がある
        // ここでrequestAlwaysAuthorization()でリクエストするならinfo.plistの方も Privacy - Location Always and When In Use Usage Descriptionにする必要がある
        // info.plistが違う項目を設定しているとリクエストができないため現在地が取得できない
        locationManager.requestAlwaysAuthorization()

        // 「アプリ使用中の位置情報取得」の許可が得られた場合のみ、CLLocationManagerクラスのstartUpdatingLocation()を呼んで、位置情報の取得を開始する

        if .authorizedAlways == CLLocationManager.authorizationStatus() {
            // 許可が得られた場合にViewControllerクラスがCLLoacationManagerのデリゲート先になるようにする
            locationManager.delegate = self
            // 何メートル移動ごとに情報を取得するか。ここで設定した距離分移動したときに現在地を示すマーカーも移動する
            locationManager.distanceFilter = 1
            // 位置情報取得開始
            locationManager.startUpdatingLocation()
            // モニタリング開始
            startGeofenceMonitering()
        }
    }
}

extension ViewController {
    func startGeofenceMonitering() {
        // モニタリングしたい領域を作成
        let moniteringRegion = CLCircularRegion(center: moniteringCoordinate, radius: 100, identifier: "シドニー")
        // モニタリング開始
        locationManager.startMonitoring(for: moniteringRegion)

    }
}

extension ViewController {
    // 位置情報を取得・更新するたびに呼ばれる
    func locationManager(_ manager: CLLocationManager, didUpdateLocations locations: [CLLocation]) {
        let location = locations.first
        let latitude =  location?.coordinate.latitude
        let longitude = location?.coordinate.longitude

        print("latitude: \(latitude!)\n longitude: \(longitude!)")
    }

    func locationManager(_ manager: CLLocationManager, didChangeAuthorization status: CLAuthorizationStatus) {
        switch status {
        case .notDetermined:
            print("ユーザー認証未選択")
            break
        case .denied:
            print("ユーザーが位置情報取得を拒否しています。")
            //位置情報取得を促す処理を追記
            break
        case .restricted:
            print("位置情報サービスを利用できません")
            break
        case .authorizedWhenInUse:
            print("アプリケーション起動時のみ、位置情報の取得を許可されています。")
            break
        case .authorizedAlways:
            print("このアプリケーションは常時、位置情報の取得を許可されています。")
            break
        default:
            break
        }
    }

    // ジオフェンスモニタリング
    // モニタリング開始成功時に呼ばれる
    func locationManager(_ manager: CLLocationManager, didStartMonitoringFor region: CLRegion) {
        print("モニタリング開始")
    }

    // モニタリングに失敗したときに呼ばれる
    func locationManager(_ manager: CLLocationManager, monitoringDidFailFor region: CLRegion?, withError error: Error) {
        print("モニタリングに失敗しました")
    }

    // ジオフェンス領域に入ったときに呼ばれる
    func locationManager(_ manager: CLLocationManager, didEnterRegion region: CLRegion) {
        print("設定したジオフェンスに入りました")
    }

    // ジオフェンス領域から出たときに呼ばれる
    func locationManager(_ manager: CLLocationManager, didExitRegion region: CLRegion) {
        print("設定したジオフェンスから出ました")
    }

    // ジオフェンスの情報が取得できないときに呼ばれる
    func locationManager(_ manager: CLLocationManager, didFailWithError error: Error) {
        print("モニタリングエラーです")
    }
}
参照
https://qiita.com/powerispower/items/39203e1e908149fead19
https://qiita.com/koogawa/items/83883a0282207be7751c追記
2点追記
iOS13から位置情報の認証リクエスト周りが大きく変更するみたいで
新しい認証リクエストが出るらしい
https://jp.techcrunch.com/2019/06/05/2019-06-03-apple-ios-13-location-privacy/
「1回だけ」ってどういうユースケースだろう
しかもかなり大きいのがこれによってrequestAlwaysAuthorization を叩いてもiOS13から「常に許可」という選択肢は表示されないらしく、表示するにはユーザーに一度「使用時に許可」を選択してもらわないと「常に許可」は表示できない
詳しく は以下の記事を参照
https://qiita.com/YujiHamada3/items/3d750c336ecfb51677d0
https://japanese.engadget.com/2019/08/19/ios-13-ceo/info.plistに
Privacy - Location Always and When In Use Usage DescriptionとPrivacy - Location When In Use Usage Descriptionの2つを設定した場合
valueが異なるようにしないとサポート必須の「使用時のみ許可」が表示されるだけで「常に許可」は選択肢に表示されないというか、Privacy - Location Always Usage Descriptionって必要あるのか...