- 投稿日:2019-08-19T22:12:08+09:00
Serverless Frameworkでboto3をモックしてテストする
Serverless FrameworkやSAMなどのサーバーレスアプリを開発するためのフレームワークでは、Lambda関数をテストする手法として、LocalStackやDynamoDB localを用いてローカルでテストを実行することができます。しかし今回は、それよりも単体テストに近い様なテストをPythonのライブラリであるmotoを用いてboto3をモックし、lambdaのテストを簡単に行う方法を書いていこうと思います。
環境
- Python 3.6
- Serverless Framework 1.39.0
- boto3 1.9.208
- moto 1.3.13
使用例
lambda関数
ここではDynamoDBからアイテムを取得して、レスポンスする簡単なlambdaを作成しました。
import json
import boto3
from decimal_encoder import DecimalEncoder

def get_article(event, context):
    dynamodb = boto3.resource('dynamodb')
    table = dynamodb.Table('article')

    article_id = event['pathParameters']['article_id']
    res = table.get_item(
        Key={
            "article_id": article_id
        }
    )
    article = res.get('Item')

    response = {
        "statusCode": 200,
        "body": json.dumps(article, cls=DecimalEncoder)
    }

    return response
テストコード
@mock_dynamodb2を書くことによってその関数内のboto3のDynamoDB関係のライブラリをモックしてくれる様になります。GETメソッドをテストするときなどはあらかじめテーブルにデータが入っていてほしい場合があるかと思います。そういう時も、テストコード内で通常と同様にput_itemをすることでデータを入れることができます。import unittest import boto3 from moto import mock_dynamodb2 from handler import get_article from test.utility import init_dynamodb class TestEvent(unittest.TestCase): @mock_dynamodb2 def test_get_article(self): # articleテーブルを作成 init_dynamodb() # テストのためのarticleを一つ追加 dynamodb = boto3.resource('dynamodb') table = dynamodb.Table('article') item = { 'article_id': 1, 'title': 'test_title', 'body': 'test_article_body', } table.put_item(Item=item) # lambdaに渡すパラメーターを設定 event = { 'pathParameters': { 'article_id': 1 } } # 関数を実行 response = get_article(event, []) print(response) # {'statusCode': 200, 'body': '{"article_id": 1, "title": "test_title", "body": "test_article_body"}'} # テスト self.assertEqual(200, response['statusCode'])ちなみに、init_dynamodb()の内容は以下の様になっていて、articleというテーブルを事前に作成しています。この様な形で必要なテーブルを全て事前に作成することで、簡潔で綺麗なテストコードにすることができます。
import boto3
from moto import mock_dynamodb2

@mock_dynamodb2
def init_dynamodb():
    dynamodb = boto3.resource('dynamodb')
    dynamodb.create_table(**{
        'TableName': 'article',
        'AttributeDefinitions': [
            {
                'AttributeName': 'article_id',
                'AttributeType': 'N'
            }
        ],
        'KeySchema': [
            {
                'AttributeName': 'article_id',
                'KeyType': 'HASH'
            }
        ],
        'ProvisionedThroughput': {
            'ReadCapacityUnits': 1,
            'WriteCapacityUnits': 1
        }
    })
まとめ
今回はDynamoDBの機能だけしか使いませんでしたがmotoでは、同様にして様々なAWSのサービスをモック化することができます。対応しているサービスはmotoのgithubに詳しく書いてあるので興味のある人は読んでみてください。サーバーレスアプリのテスト手法の一つとして非常に便利そうなので、ぜひ活用してみてください。
- 投稿日:2019-08-19T21:12:16+09:00
ぼくのかんがえたさいきょうのWordpress@AWS環境(Route53でドメイン取得編)
はじめに
当記事はぼくのかんがえたさいきょうのWordpress@AWS環境(概要編)
にて記載している作成手順(概要)の2の詳細になります。
Route53にて独自ドメインを取得するまでを記載します。手順
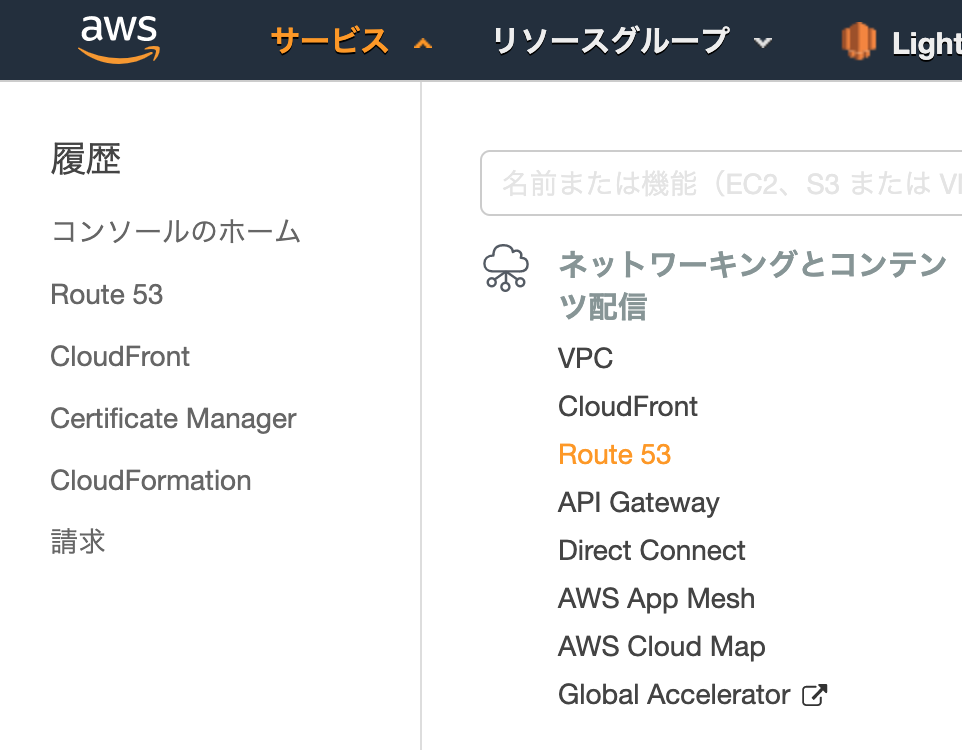
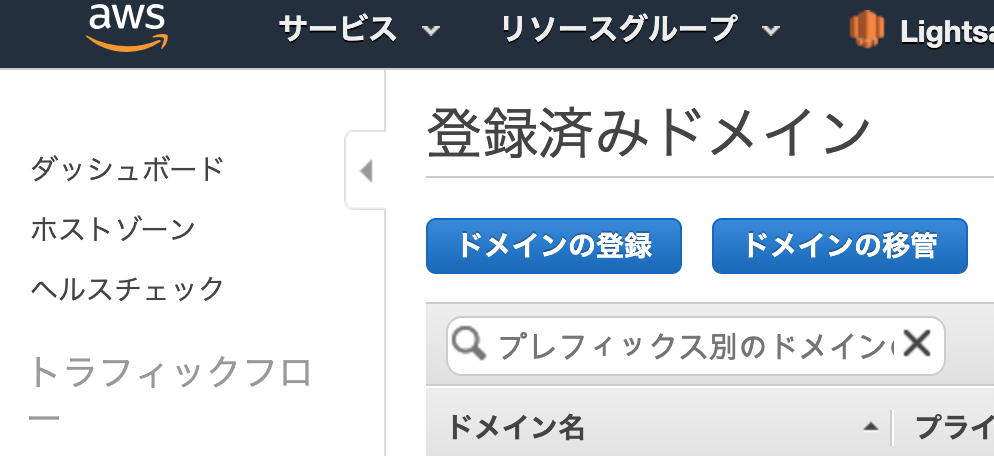
AWSにログインし、サービスから「Route53」をクリックします。
「ドメインの登録」をクリック
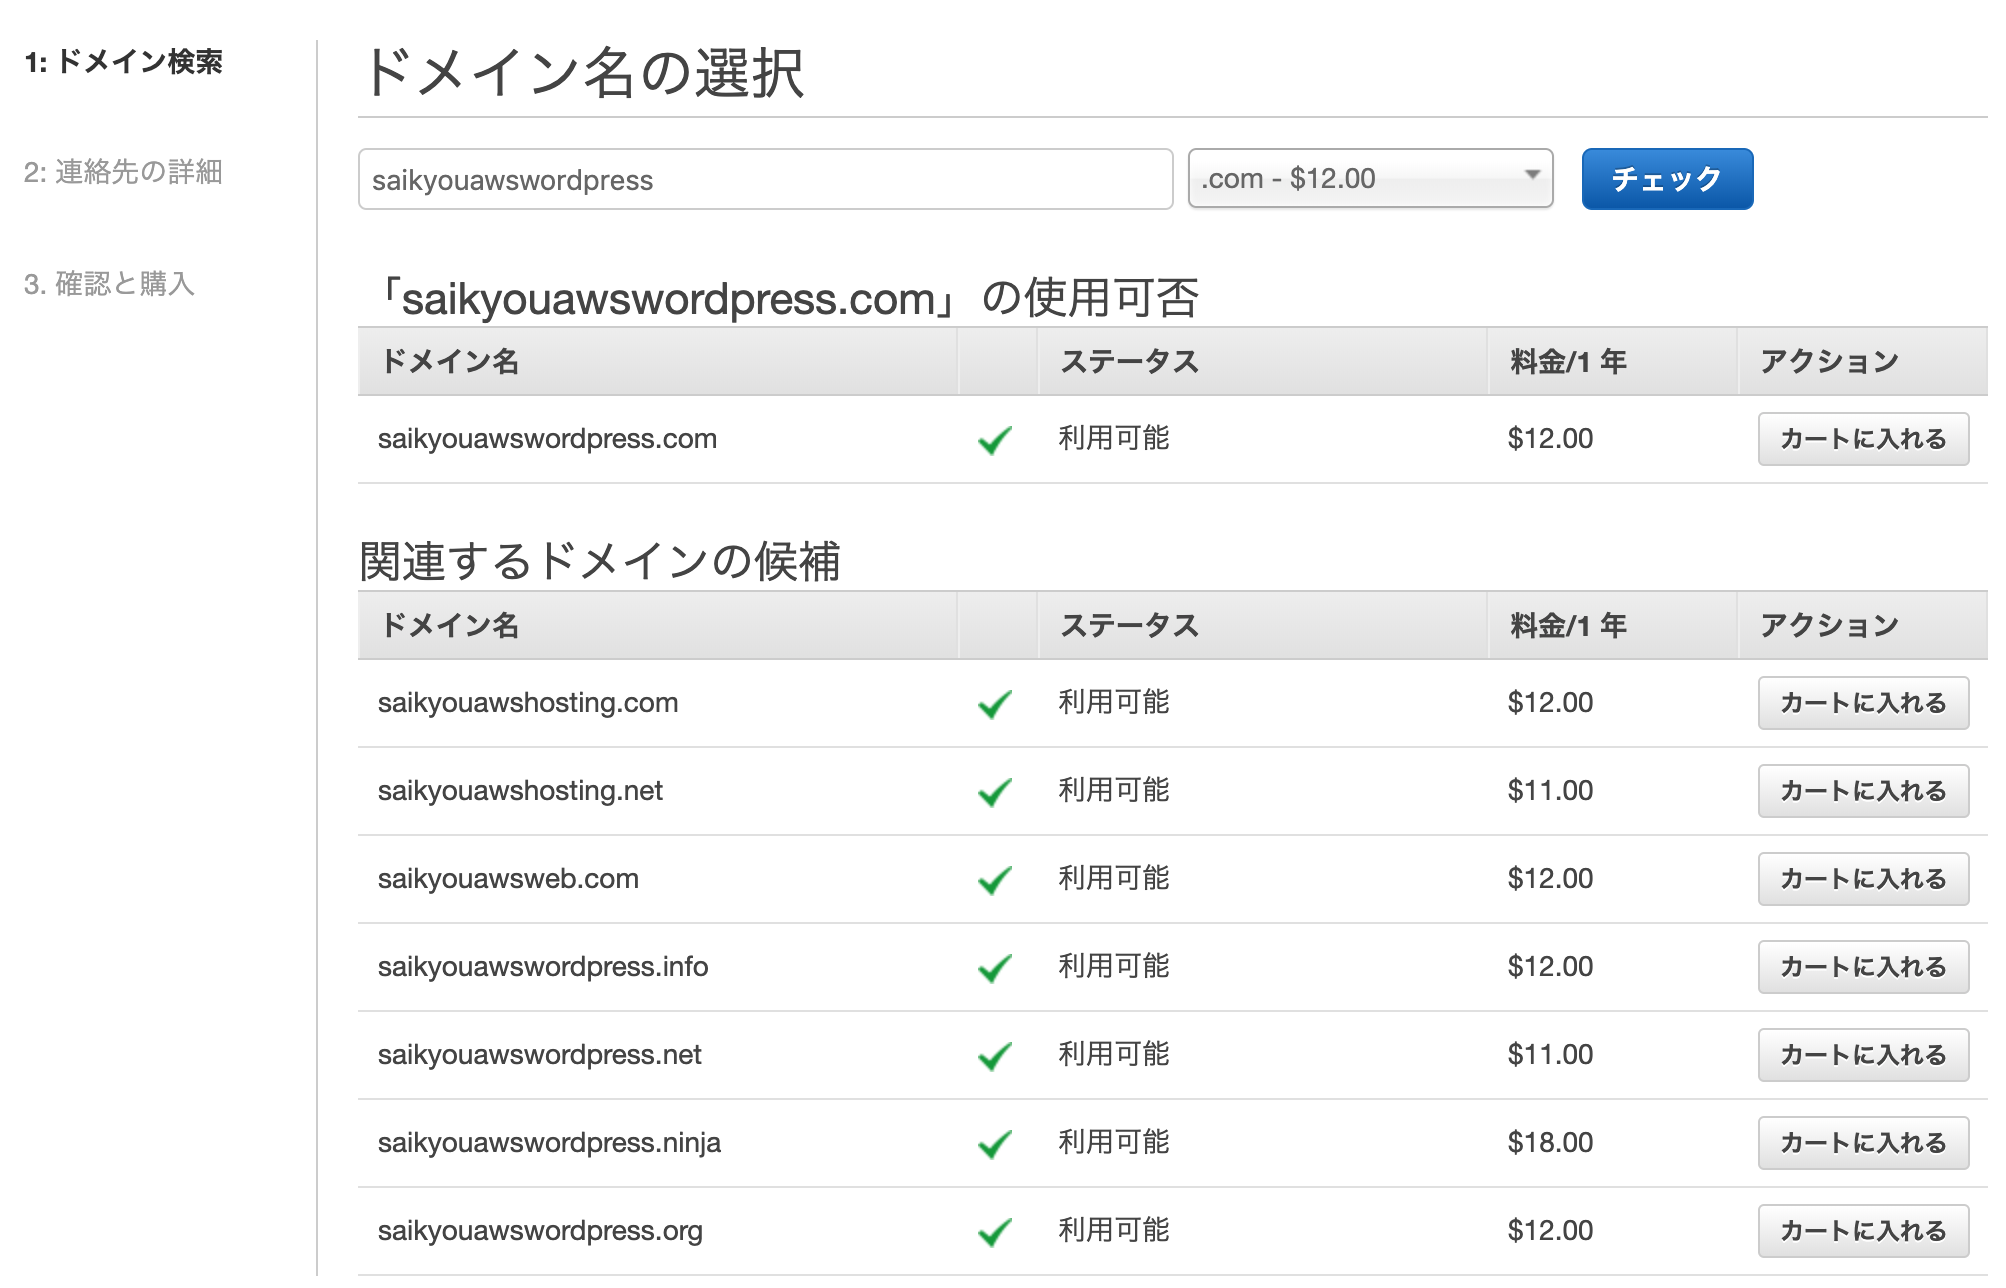
ドメイン名の選択で自分の取得したいドメイン名を入力
「チェック」をクリックすると利用可能なドメインの一覧が表示されるので
「カートに入れる」をクリックして
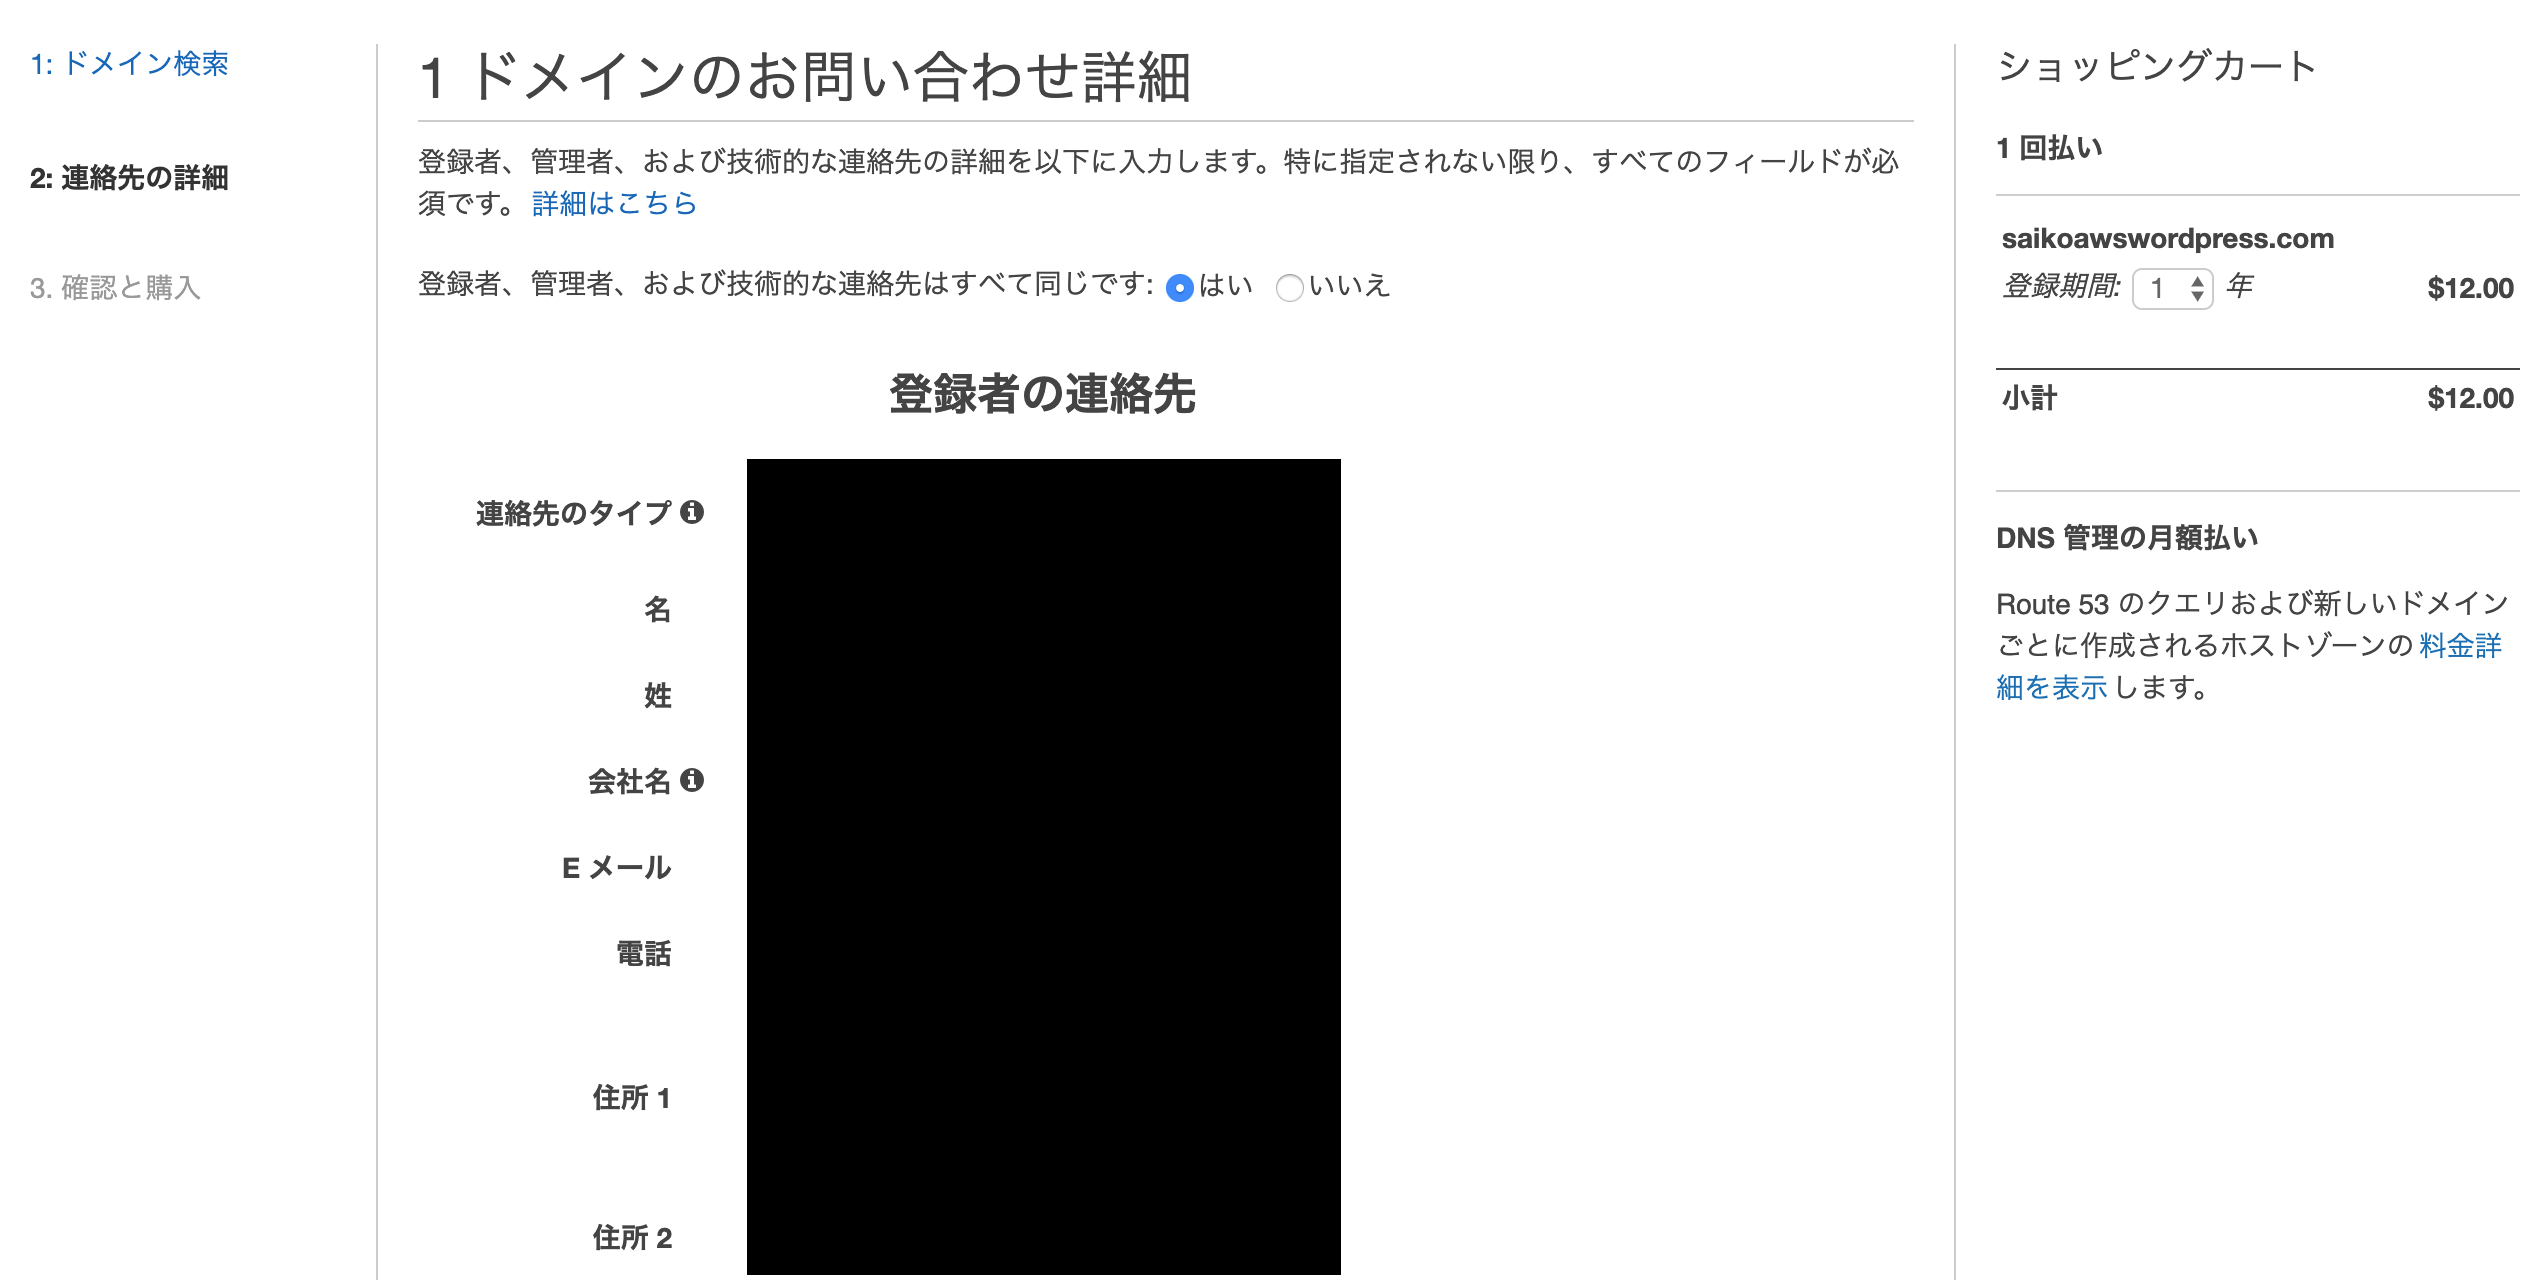
下にスクロールして「続行」をクリック
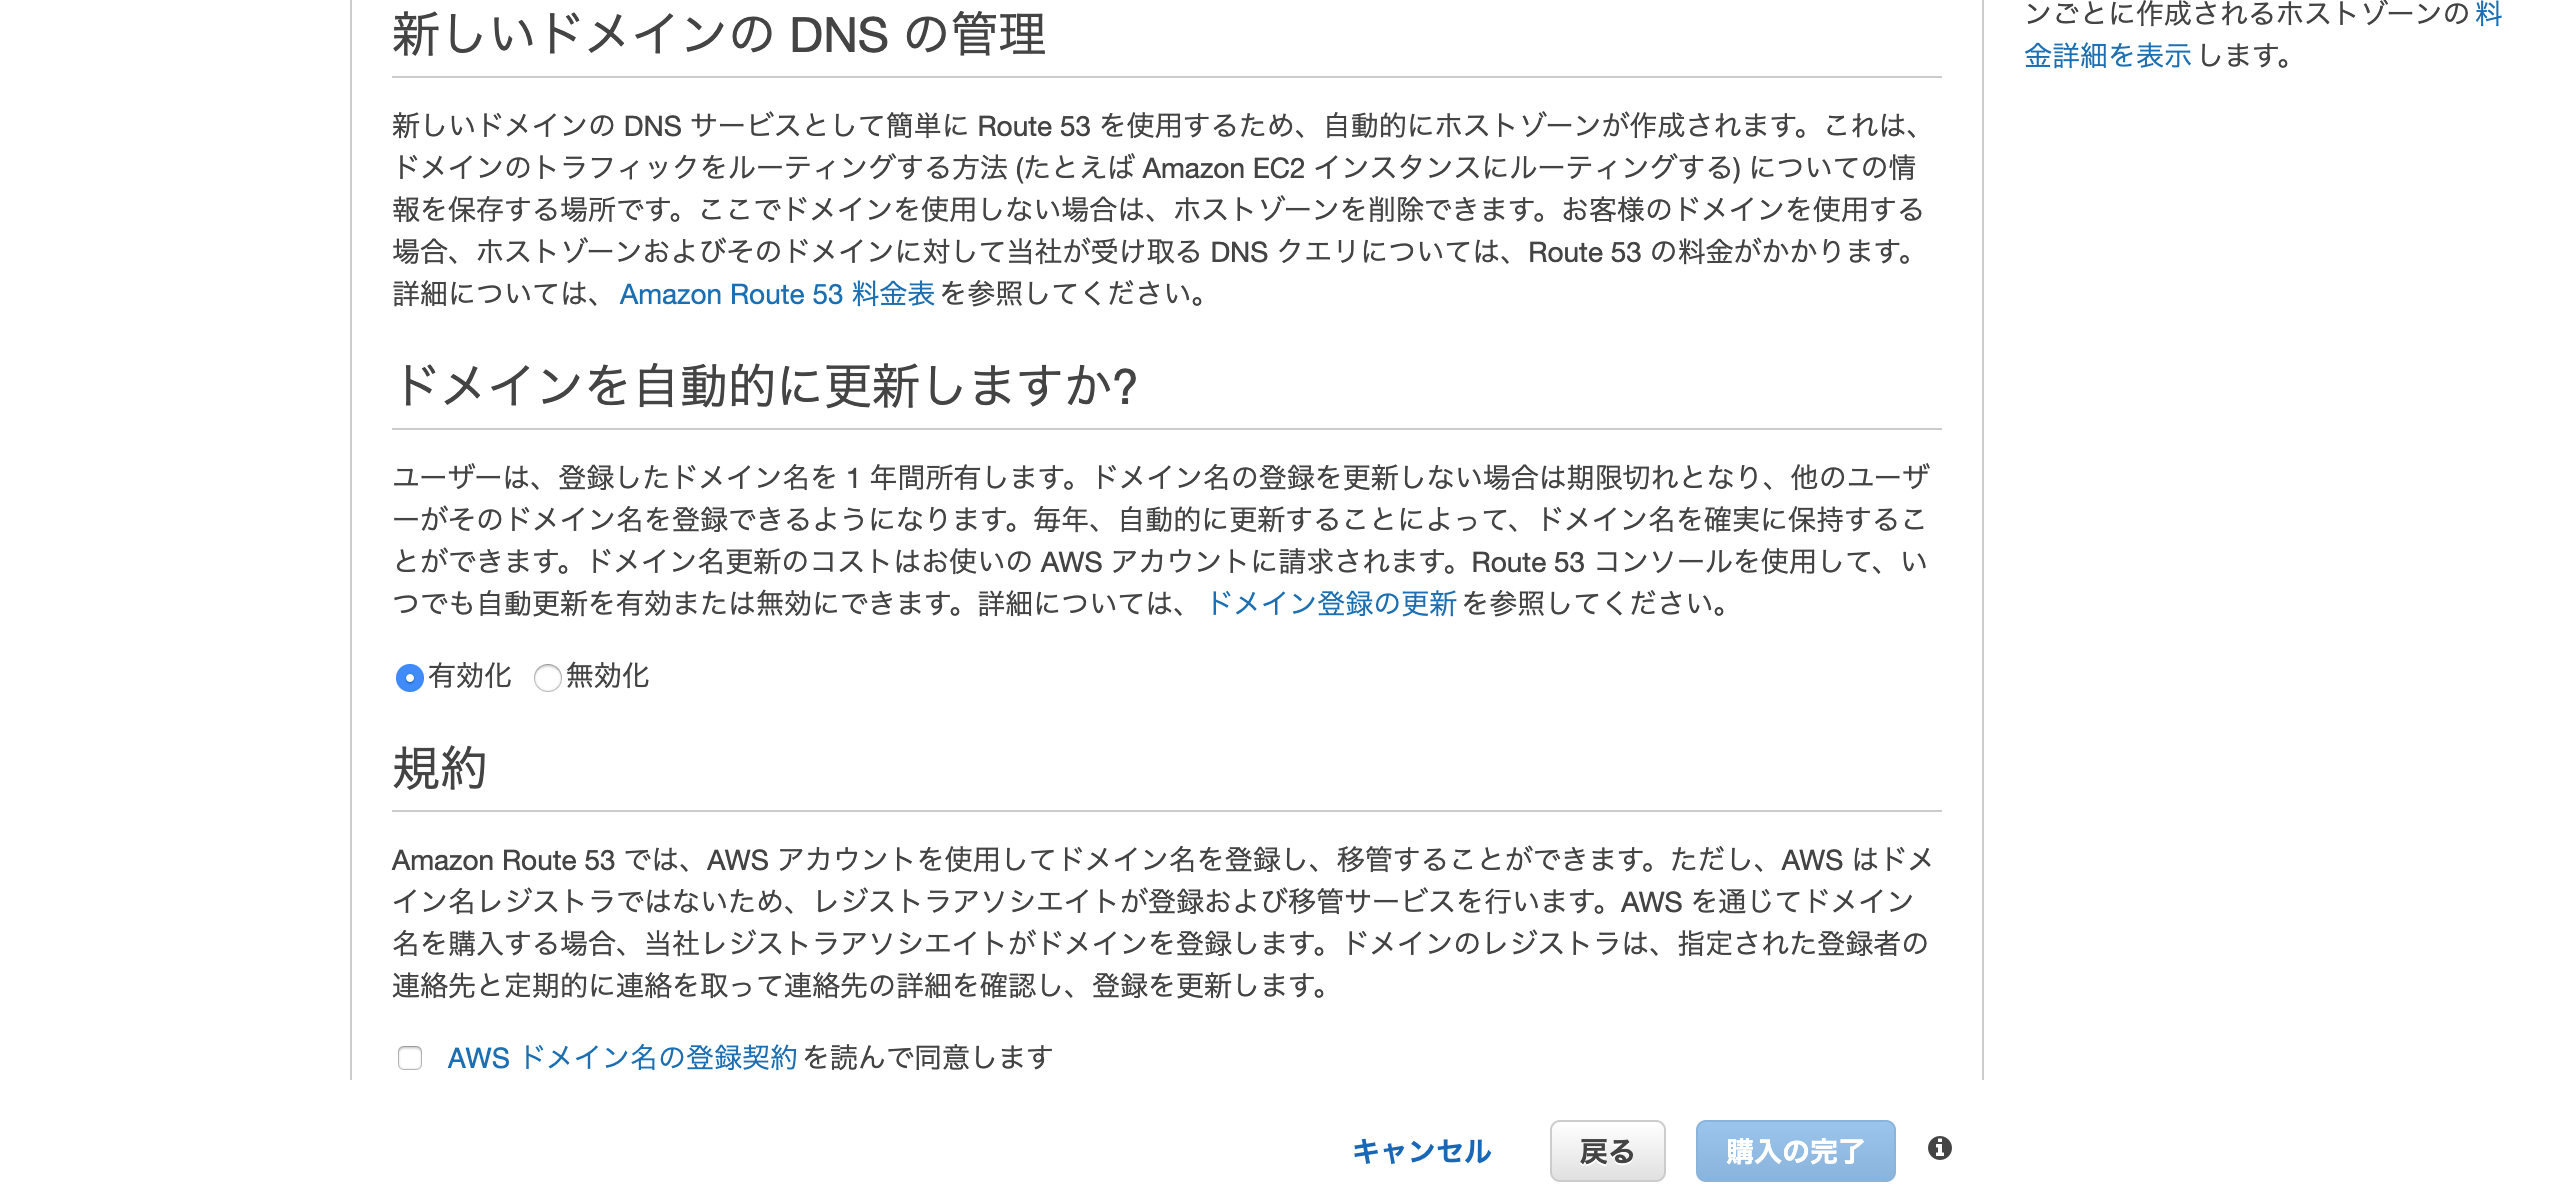
必要事項を入力して「続行」をクリック
入力した情報、取得するドメインに間違えがなければ
「AWSドメイン名の登録契約を読んで同意します」にチェックを入れて
「購入の完了」をクリック
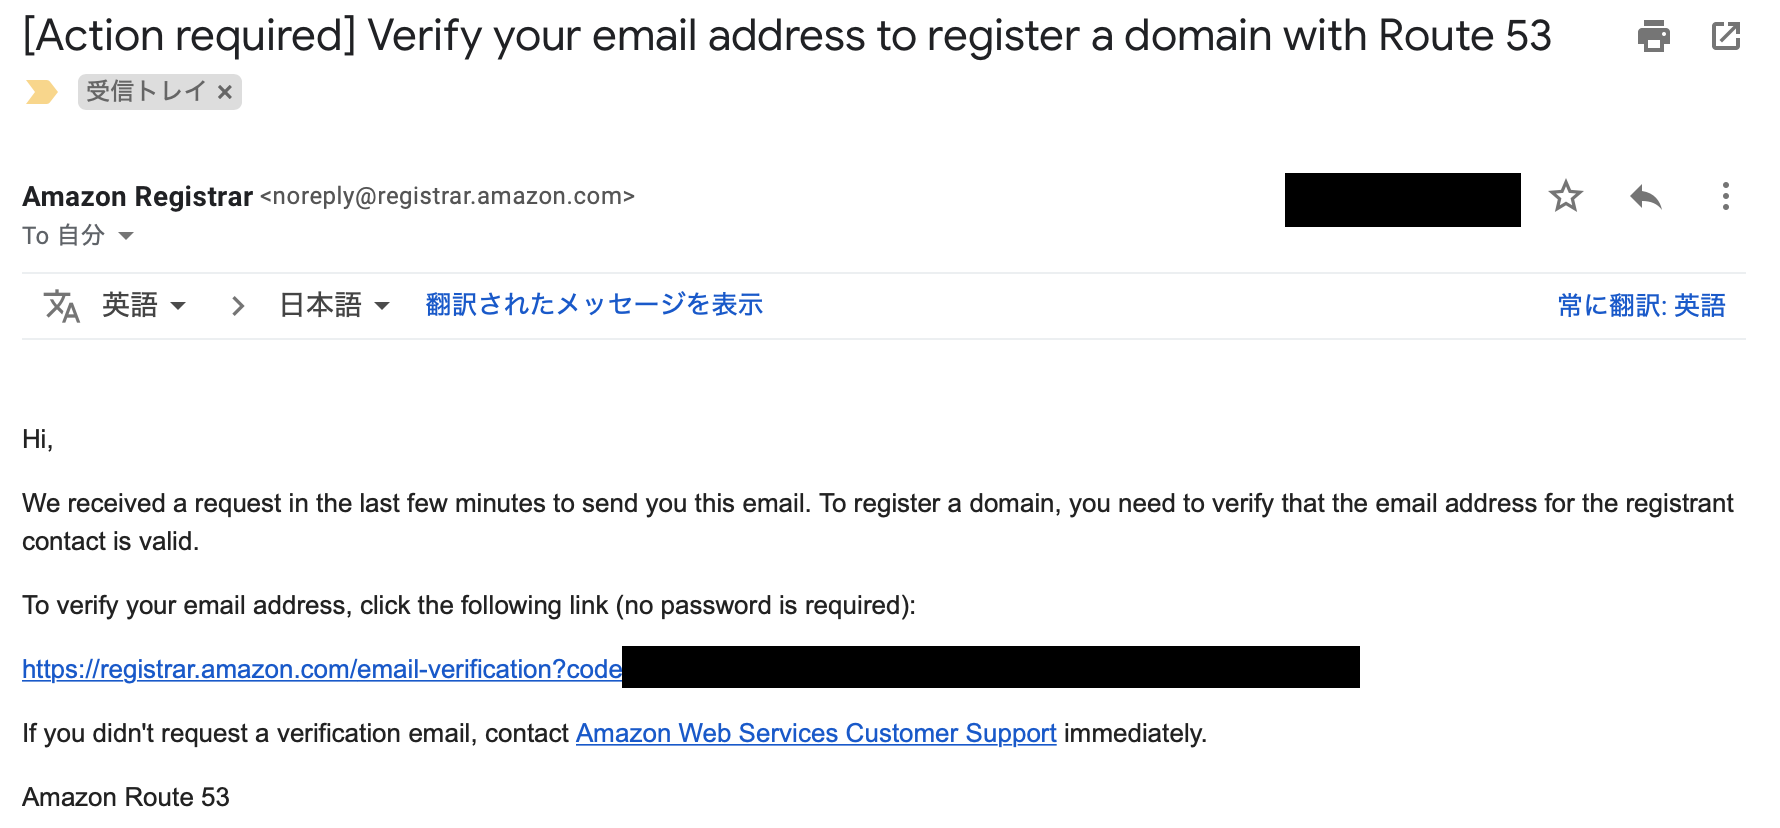
登録したメールアドレスに確認用のメールが
届くので記載されているURLをクリックして認証する
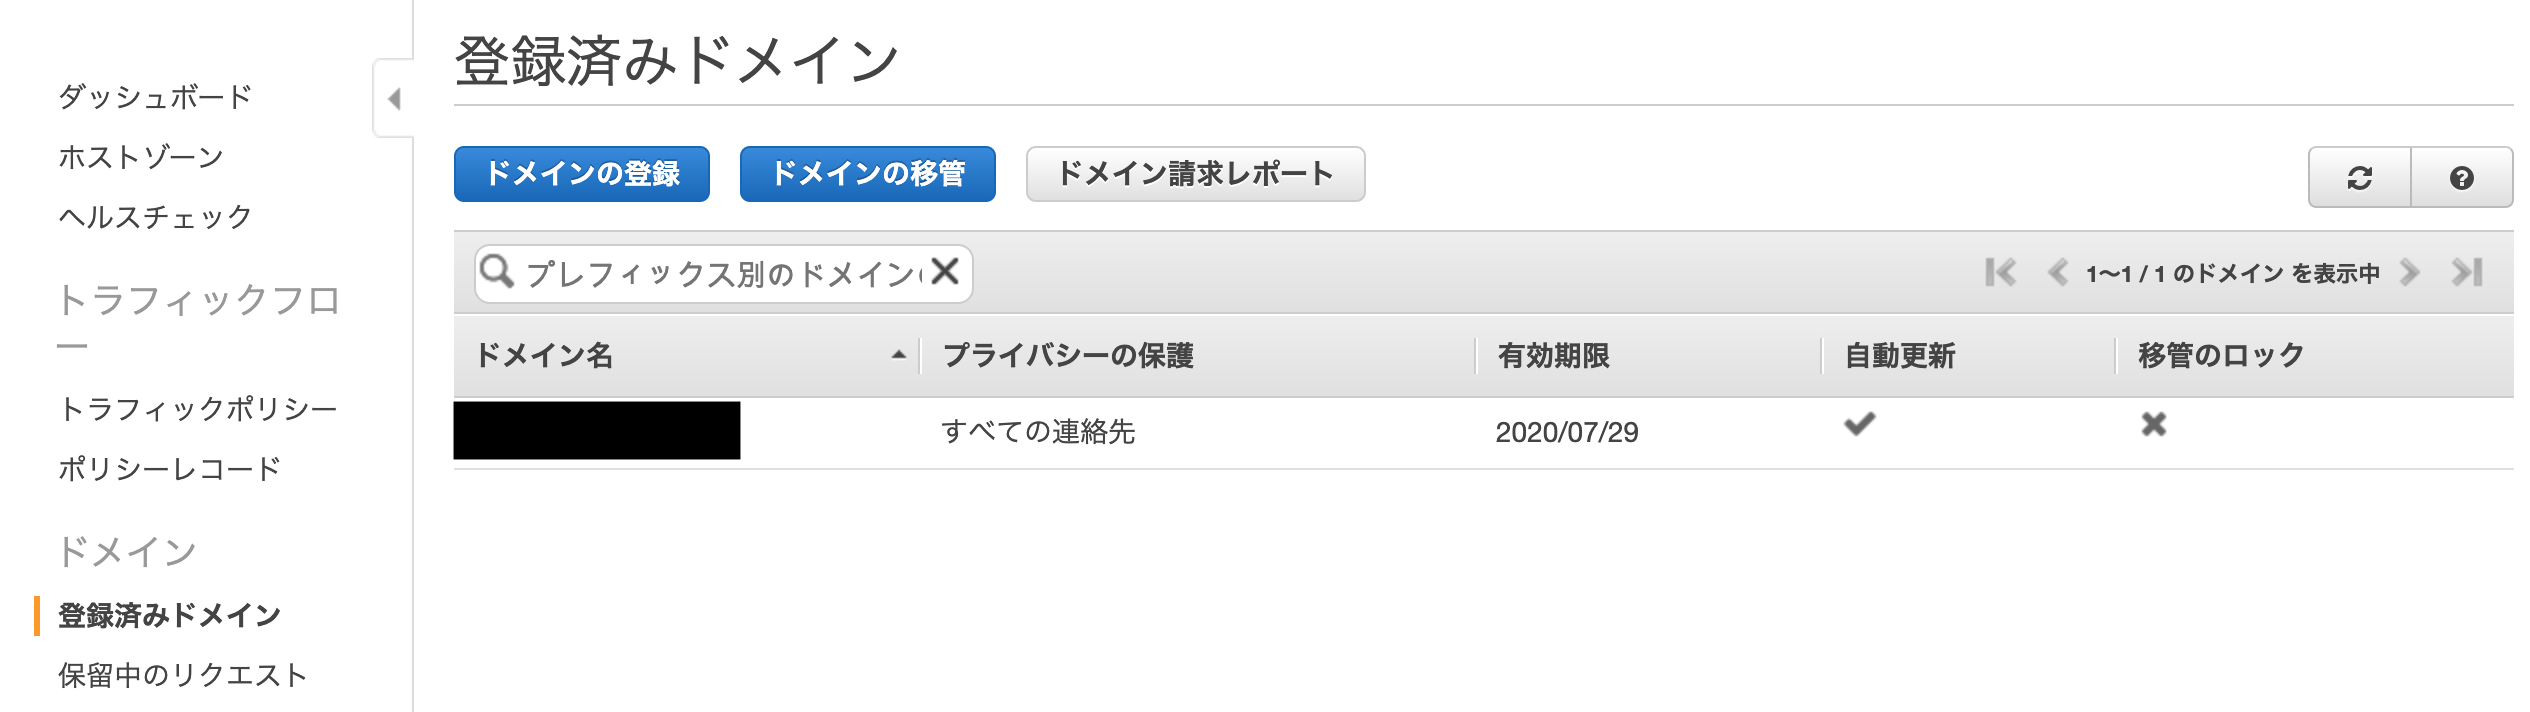
「保留中のリクエスト」に登録したドメインが表示されており、
登録処理が完了すると
「登録済みのドメイン」にレコードが移行される
以上でドメインの取得は完了です。


- 投稿日:2019-08-19T19:33:33+09:00
AnsibleでEKS環境を構築する
はじめに
パブリッククラウドでKubernetes環境を構築するとなるとTerraformが一番人気だと思いますが、今回はAnsibleでEKS環境を構築してみました。
TerraformでのEKS環境構築については以前書いた記事をご覧ください。
今回用いたコードはGitHubにあげてあります。
環境
OS: macOS Mojave 10.14.1
Ansible: 2.8.4 (Homebrew)
Python: 3.7.4
awscli: 1.16.220 (pip)
boto: 2.49.0 (pip)
boto3: 1.9.210 (pip)
botocore: 1.12.210 (pip)
kubectl: v1.10.11フォルダ構造
├── ansible.cfg
├── inventory
│   └── inventory.ini
├── playbooks
│   ├── build_eks.yaml
│   └── destroy_eks.yaml (説明対象外)
└── roles
    └── eks
        ├── vars
        │   └── main.yaml
        ├── tasks
        │   ├── iam
        │   │   ├── create_iam_role.yaml
        │   │   └── delete_iam_role.yaml (説明対象外)
        │   ├── vpc
        │   │   ├── create_vpc.yaml
        │   │   └── delete_vpc.yaml (説明対象外)
        │   ├── eks
        │   │   ├── create_eks_cluster.yaml
        │   │   └── delete_eks_cluster.yaml (説明対象外)
        │   └── ec2
        │       ├── create_eks_worker.yaml
        │       ├── join_eks_cluster.yaml
        │       └── delete_eks_worker.yaml (説明対象外)
        ├── files
        │   ├── amazon-eks-nodegroup.yaml
        │   ├── ec2-trust-policy.json
        │   └── eks-trust-policy.json
        └── templates
            └── aws-auth-cm.yaml
今回は環境削除に関するファイル内容の説明は割愛します。
実装
ansible.cfg
Ansibleの設定ファイルです。インベントリファイルとroleのフォルダパスを定義しています。
ansible.cfg[defaults] inventory = ./inventory/inventory.ini roles_path = ./rolesinventory
インベントリファイルです。今回はローカルマシンから直接実行します。
inventory/inventory.ini[local] localhost ansible_connection=local [local:vars] ansible_python_interpreter=/usr/local/bin/python3playbooks
実行するタスクを記述します。構築には以下5つのタスクが含まれます。
- IAM Roleの作成
- VPC関連リソースの作成
- EKSクラスタの作成
- EKSワーカーノードの作成
- クラスタとワーカーノードの紐付け
playbooks/build_eks.yaml- name: BUILD EKS hosts: local gather_facts: false tasks: - name: CREATE IAM ROLE include_role: name: eks tasks_from: iam/create_iam_role.yaml - name: CREATE VPC include_role: name: eks tasks_from: vpc/create_vpc.yaml - name: CREATE EKS CLUSTER include_role: name: eks tasks_from: eks/create_eks_cluster.yaml - name: CREATE EKS WORKER NODES include_role: name: eks tasks_from: ec2/create_eks_worker.yaml - name: JOIN EKS WORKER NODES TO EKS CLUSTER include_role: name: eks tasks_from: ec2/join_eks_cluster.yaml
[].tasks[].include_role.nameの値にはroles配下のフォルダ名を入れます。今回はeksです。roles
vars
変数定義を下記ファイルで行います。
roles/eks/vars/main.yamlcommon: project: ansible region: ap-northeast-1 profile: default vpc: name: "{{ common.project}}-vpc" cidr_block: "10.0.0.0/16" subnets: - cidr: 10.0.10.0/24 az: "{{ common.region }}a" - cidr: 10.0.11.0/24 az: "{{ common.region }}c" - cidr: 10.0.12.0/24 az: "{{ common.region }}d" security_groups: - name: "{{ common.project }}-cluster-sg" description: "Security group for EKS cluster" rules: - group_name: "{{ common.project }}-worker-sg" group_desc: "Security group for EKS worker nodes" rule_desc: "Allow pods to communicate with the cluster API server" proto: tcp ports: 443 rules_egress: - group_name: "{{ common.project }}-worker-sg" group_desc: "Security group for EKS worker nodes" rule_desc: "Allow the cluster control plane to communicate with the worker Kubelet and pods" proto: tcp from_port: 1025 to_port: 65535 - group_name: "{{ common.project }}-worker-sg" group_desc: "Security group for EKS worker nodes" rule_desc: "Allow the cluster control plane to communicate with pods running extension API servers on port 443" proto: tcp ports: 443 - name: "{{ common.project }}-worker-sg" description: "Security group for EKS worker nodes" rules: - group_name: "{{ common.project }}-worker-sg" group_desc: "Security group for EKS worker nodes" rule_desc: "Allow worker nodes to communicate with each other" proto: all from_port: 1 to_port: 65535 - group_name: "{{ common.project }}-cluster-sg" group_desc: "Security group for EKS cluster" rule_desc: "Allow worker Kubelets and pods to receive communication from the cluster control plane" proto: tcp from_port: 1025 to_port: 65535 - group_name: "{{ common.project }}-cluster-sg" group_desc: "Security group for EKS cluster" rule_desc: "Allow pods running extension API servers on port 443 to receive communication from cluster control plane" proto: tcp ports: 443 eks_cluster: name: "{{ common.project }}-cluster" role_name: eks-cluster-iam-role version: "1.13" security_groups: "{{ common.project }}-cluster-sg" eks_worker: stack_name: "{{ common.project }}-stack" role_name: eks-worker-iam-role nodegroup_name: "{{ common.project }}-ng" autoscaling_min_size: 1 autoscaling_max_size: 4 autoscaling_desired_size: 2 instance_type: t3.medium image_id: ami-0fde798d17145fae1 volume_size: 20 key_name: ec2-key bootstrap_args: ""
common.profileは~/.aws/credentialsのprofile名です。下記コマンドで設定を行うと~/.aws/credentialsと~/.aws/configに内容が書き込まれます。$ aws configure~/.aws/credentials[default] aws_access_key_id = XXXXXXXX aws_secret_access_key = YYYYYYYYYY~/.aws/config[default] region = ap-northeast-1 output = jsontasks
順に見ていきます。まずはIAM Roleの設定です。
policyの設定ファイルはroles/eks/files/配下に格納してあります。roles/eks/tasks/iam/create_iam_role.yaml- name: IAM | create EKS service role iam_role: name: "{{ eks_cluster.role_name }}" profile: "{{ common.profile }}" region: "{{ common.region }}" managed_policies: - AmazonEKSClusterPolicy - AmazonEKSServicePolicy assume_role_policy_document: "{{ lookup('file', 'eks-trust-policy.json') }}" description: "Allows EKS to manage clusters on your behalf." register: eks_cluster_iam_role_results - name: IAM | create IAM worker node role iam_role: name: "{{ eks_worker.role_name }}" profile: "{{ common.profile }}" region: "{{ common.region }}" managed_policies: - AmazonEKSWorkerNodePolicy - AmazonEKS_CNI_Policy - AmazonEC2ContainerRegistryReadOnly assume_role_policy_document: "{{ lookup('file', 'ec2-trust-policy.json') }}" register: eks_worker_iam_role_results
次はVPC関連リソースの設定です。5つのリソースの作成を行います。
- VPC
- Subnet
- Internet Gateway
- Root Table
- Security Group
roles/eks/tasks/vpc/create_vpc.yaml- name: VPC | create VPC ec2_vpc_net: name: "{{ vpc.name }}" profile: "{{ common.profile }}" region: "{{ common.region }}" cidr_block: "{{ vpc.cidr_block }}" register: vpc_results - name: VPC | create subnets loop: "{{ subnets }}" ec2_vpc_subnet: profile: "{{ common.profile }}" region: "{{ common.region }}" vpc_id: "{{ vpc_results.vpc.id }}" cidr: "{{ item.cidr }}" az: "{{ item.az }}" register: subnet_results - name: VPC | create igw ec2_vpc_igw: profile: "{{ common.profile }}" region: "{{ common.region }}" vpc_id: "{{ vpc_results.vpc.id }}" register: igw_results - name: VPC | create public route table ec2_vpc_route_table: profile: "{{ common.profile }}" region: "{{ common.region }}" vpc_id: "{{ vpc_results.vpc.id }}" subnets: "{{ subnet_results.results | json_query('[].subnet.id') }}" routes: - dest: 0.0.0.0/0 gateway_id: "{{ igw_results.gateway_id }}" register: rt_results - name: VPC | create security groups loop: "{{ security_groups }}" ec2_group: profile: "{{ common.profile }}" region: "{{ common.region }}" name: "{{ item.name }}" description: "{{ item.description }}" rules: "{{ item.rules }}" rules_egress: "{{ item.rules_egress|default(omit) }}" vpc_id: '{{ vpc_results.vpc.id }}' purge_rules: false purge_rules_egress: false register: sg_results
次はEKSクラスタの設定です。
wait: trueとすることでクラスタ構築完了まで次の作業に進まないようにします。
これを定義しておかないとEKSワーカーノード作成時にクラスタ情報を参照することができません。roles/eks/tasks/eks/create_eks_cluster.yaml- name: EKS | create EKS cluster aws_eks_cluster: name: "{{ eks_cluster.name }}" profile: "{{ common.profile }}" region: "{{ common.region }}" version: "{{ eks_cluster.version }}" role_arn: "{{ eks_cluster_iam_role_results.arn }}" subnets: "{{ subnet_results.results | json_query('[].subnet.id') }}" security_groups: "{{ eks_cluster.security_groups }}" wait: true register: eks_cluster_results
次はEKSワーカーノードの設定です。
テンプレートファイルのamazon-eks-nodegroup.yamlは公式のものをそのまま使用しています。(後述)roles/eks/tasks/ec2/create_eks_worker.yaml- name: EC2 | create EKS worker nodes cloudformation: stack_name: "{{ eks_worker.stack_name }}" profile: "{{ common.profile }}" region: "{{ common.region }}" template: ../roles/eks/files/amazon-eks-nodegroup.yaml template_parameters: ClusterName: "{{ eks_cluster_results.name }}" ClusterControlPlaneSecurityGroup: "{{ ','.join(eks_cluster_results.resources_vpc_config.security_group_ids) }}" NodeGroupName: "{{ eks_worker.nodegroup_name }}" NodeAutoScalingGroupMinSize: "{{ eks_worker.autoscaling_min_size }}" NodeAutoScalingGroupDesiredCapacity: "{{ eks_worker.autoscaling_desired_size }}" NodeAutoScalingGroupMaxSize: "{{ eks_worker.autoscaling_max_size }}" NodeInstanceType: "{{ eks_worker.instance_type }}" NodeImageId: "{{ eks_worker.image_id }}" NodeVolumeSize: "{{ eks_worker.volume_size }}" KeyName: "{{ eks_worker.key_name }}" BootstrapArguments: "{{ eks_worker.bootstrap_args }}" VpcId: "{{ eks_cluster_results.resources_vpc_config.vpc_id }}" Subnets: "{{ ','.join(eks_cluster_results.resources_vpc_config.subnet_ids) }}" register: eks_worker_results
最後にEKSのクラスタとワーカーノードの紐付けを行います。
roles/eks/templates配下にあるaws-auth-cm.yamlにワーカーノードの情報を代入したものを同じファイル名でroles/eks/files配下にコピーしています。roles/eks/tasks/ec2/join_eks_cluster.yaml- name: config | update kubeconfig shell: aws eks --region {{ common.region }} update-kubeconfig --name {{ eks_cluster_results.name }} - name: EC2 | copy a new version of aws-auth-cm.yaml from template template: src: ../roles/eks/templates/aws-auth-cm.yaml dest: ../roles/eks/files/aws-auth-cm.yaml - name: EC2 | join EKS worker nodes to EKS cluster shell: kubectl apply -f ../roles/eks/files/aws-auth-cm.yamlfiles
amazon-eks-nodegroup.yamlはEKSワーカーノードを作成するためのテンプレートファイルです。内容は公式のものと同じです。
https://amazon-eks.s3-us-west-2.amazonaws.com/cloudformation/2019-02-11/amazon-eks-nodegroup.yamlroles/eks/files/amazon-eks-nodegroup.yaml--- AWSTemplateFormatVersion: 2010-09-09 Description: Amazon EKS - Node Group Parameters: KeyName: Description: The EC2 Key Pair to allow SSH access to the instances Type: AWS::EC2::KeyPair::KeyName NodeImageId: Description: AMI id for the node instances. Type: AWS::EC2::Image::Id NodeInstanceType: Description: EC2 instance type for the node instances Type: String Default: t3.medium ConstraintDescription: Must be a valid EC2 instance type AllowedValues: - t2.small - t2.medium - t2.large - t2.xlarge - t2.2xlarge - t3.nano - t3.micro - t3.small - t3.medium - t3.large - t3.xlarge - t3.2xlarge - m3.medium - m3.large - m3.xlarge - m3.2xlarge - m4.large - m4.xlarge - m4.2xlarge - m4.4xlarge - m4.10xlarge - m5.large - m5.xlarge - m5.2xlarge - m5.4xlarge - m5.12xlarge - m5.24xlarge - c4.large - c4.xlarge - c4.2xlarge - c4.4xlarge - c4.8xlarge - c5.large - c5.xlarge - c5.2xlarge - c5.4xlarge - c5.9xlarge - c5.18xlarge - i3.large - i3.xlarge - i3.2xlarge - i3.4xlarge - i3.8xlarge - i3.16xlarge - r3.xlarge - r3.2xlarge - r3.4xlarge - r3.8xlarge - r4.large - r4.xlarge - r4.2xlarge - r4.4xlarge - r4.8xlarge - r4.16xlarge - x1.16xlarge - x1.32xlarge - p2.xlarge - p2.8xlarge - p2.16xlarge - p3.2xlarge - p3.8xlarge - p3.16xlarge - p3dn.24xlarge - r5.large - r5.xlarge - r5.2xlarge - r5.4xlarge - r5.12xlarge - r5.24xlarge - r5d.large - r5d.xlarge - r5d.2xlarge - r5d.4xlarge - r5d.12xlarge - r5d.24xlarge - z1d.large - z1d.xlarge - z1d.2xlarge - z1d.3xlarge - z1d.6xlarge - z1d.12xlarge NodeAutoScalingGroupMinSize: Description: Minimum size of Node Group ASG. Type: Number Default: 1 NodeAutoScalingGroupMaxSize: Description: Maximum size of Node Group ASG. Set to at least 1 greater than NodeAutoScalingGroupDesiredCapacity. Type: Number Default: 4 NodeAutoScalingGroupDesiredCapacity: Description: Desired capacity of Node Group ASG. Type: Number Default: 3 NodeVolumeSize: Description: Node volume size Type: Number Default: 20 ClusterName: Description: The cluster name provided when the cluster was created. If it is incorrect, nodes will not be able to join the cluster. Type: String BootstrapArguments: Description: Arguments to pass to the bootstrap script. See files/bootstrap.sh in https://github.com/awslabs/amazon-eks-ami Type: String Default: "" NodeGroupName: Description: Unique identifier for the Node Group. Type: String ClusterControlPlaneSecurityGroup: Description: The security group of the cluster control plane. Type: AWS::EC2::SecurityGroup::Id VpcId: Description: The VPC of the worker instances Type: AWS::EC2::VPC::Id Subnets: Description: The subnets where workers can be created. Type: List<AWS::EC2::Subnet::Id> Metadata: AWS::CloudFormation::Interface: ParameterGroups: - Label: default: EKS Cluster Parameters: - ClusterName - ClusterControlPlaneSecurityGroup - Label: default: Worker Node Configuration Parameters: - NodeGroupName - NodeAutoScalingGroupMinSize - NodeAutoScalingGroupDesiredCapacity - NodeAutoScalingGroupMaxSize - NodeInstanceType - NodeImageId - NodeVolumeSize - KeyName - BootstrapArguments - Label: default: Worker Network Configuration Parameters: - VpcId - Subnets Resources: NodeInstanceProfile: Type: AWS::IAM::InstanceProfile Properties: Path: "/" Roles: - !Ref NodeInstanceRole NodeInstanceRole: Type: AWS::IAM::Role Properties: AssumeRolePolicyDocument: Version: 2012-10-17 Statement: - Effect: Allow Principal: Service: ec2.amazonaws.com Action: sts:AssumeRole Path: "/" ManagedPolicyArns: - arn:aws:iam::aws:policy/AmazonEKSWorkerNodePolicy - arn:aws:iam::aws:policy/AmazonEKS_CNI_Policy - arn:aws:iam::aws:policy/AmazonEC2ContainerRegistryReadOnly NodeSecurityGroup: Type: AWS::EC2::SecurityGroup Properties: GroupDescription: Security group for all nodes in the cluster VpcId: !Ref VpcId Tags: - Key: !Sub kubernetes.io/cluster/${ClusterName} Value: owned NodeSecurityGroupIngress: Type: AWS::EC2::SecurityGroupIngress DependsOn: NodeSecurityGroup Properties: Description: Allow node to communicate with each other GroupId: !Ref NodeSecurityGroup SourceSecurityGroupId: !Ref NodeSecurityGroup IpProtocol: -1 FromPort: 0 ToPort: 65535 NodeSecurityGroupFromControlPlaneIngress: Type: AWS::EC2::SecurityGroupIngress DependsOn: NodeSecurityGroup Properties: Description: Allow worker Kubelets and pods to receive communication from the cluster control plane GroupId: !Ref NodeSecurityGroup SourceSecurityGroupId: !Ref ClusterControlPlaneSecurityGroup IpProtocol: tcp FromPort: 1025 ToPort: 65535 ControlPlaneEgressToNodeSecurityGroup: Type: AWS::EC2::SecurityGroupEgress DependsOn: NodeSecurityGroup Properties: Description: Allow the cluster control plane to communicate with worker Kubelet and pods GroupId: !Ref ClusterControlPlaneSecurityGroup DestinationSecurityGroupId: !Ref NodeSecurityGroup IpProtocol: tcp FromPort: 1025 ToPort: 65535 NodeSecurityGroupFromControlPlaneOn443Ingress: Type: AWS::EC2::SecurityGroupIngress DependsOn: NodeSecurityGroup Properties: Description: Allow pods running extension API servers on port 443 to receive communication from cluster control plane GroupId: !Ref NodeSecurityGroup SourceSecurityGroupId: !Ref ClusterControlPlaneSecurityGroup IpProtocol: tcp FromPort: 443 ToPort: 443 ControlPlaneEgressToNodeSecurityGroupOn443: Type: AWS::EC2::SecurityGroupEgress DependsOn: NodeSecurityGroup Properties: Description: Allow the cluster control plane to communicate with pods running extension API servers on port 443 GroupId: !Ref ClusterControlPlaneSecurityGroup DestinationSecurityGroupId: !Ref NodeSecurityGroup IpProtocol: tcp FromPort: 443 ToPort: 443 ClusterControlPlaneSecurityGroupIngress: Type: AWS::EC2::SecurityGroupIngress DependsOn: NodeSecurityGroup Properties: Description: Allow pods to communicate with the cluster API Server GroupId: !Ref ClusterControlPlaneSecurityGroup SourceSecurityGroupId: !Ref NodeSecurityGroup IpProtocol: tcp ToPort: 443 FromPort: 443 NodeGroup: Type: AWS::AutoScaling::AutoScalingGroup Properties: DesiredCapacity: !Ref NodeAutoScalingGroupDesiredCapacity LaunchConfigurationName: !Ref NodeLaunchConfig MinSize: !Ref NodeAutoScalingGroupMinSize MaxSize: !Ref NodeAutoScalingGroupMaxSize VPCZoneIdentifier: !Ref Subnets Tags: - Key: Name Value: !Sub ${ClusterName}-${NodeGroupName}-Node PropagateAtLaunch: true - Key: !Sub kubernetes.io/cluster/${ClusterName} Value: owned PropagateAtLaunch: true UpdatePolicy: AutoScalingRollingUpdate: MaxBatchSize: 1 MinInstancesInService: !Ref NodeAutoScalingGroupDesiredCapacity PauseTime: PT5M NodeLaunchConfig: Type: AWS::AutoScaling::LaunchConfiguration Properties: AssociatePublicIpAddress: true IamInstanceProfile: !Ref NodeInstanceProfile ImageId: !Ref NodeImageId InstanceType: !Ref NodeInstanceType KeyName: !Ref KeyName SecurityGroups: - !Ref NodeSecurityGroup BlockDeviceMappings: - DeviceName: /dev/xvda Ebs: VolumeSize: !Ref NodeVolumeSize VolumeType: gp2 DeleteOnTermination: true UserData: Fn::Base64: !Sub | #!/bin/bash set -o xtrace /etc/eks/bootstrap.sh ${ClusterName} ${BootstrapArguments} /opt/aws/bin/cfn-signal --exit-code $? \ --stack ${AWS::StackName} \ --resource NodeGroup \ --region ${AWS::Region} Outputs: NodeInstanceRole: Description: The node instance role Value: !GetAtt NodeInstanceRole.Arn NodeSecurityGroup: Description: The security group for the node group Value: !Ref NodeSecurityGroup
IAM Role作成時に用いるpolicyのjsonファイルをEKSクラスタとEKSワーカーノードの2つ分用意します。roles/eks/files/eks-trust-policy.json{ "Version": "2012-10-17", "Statement": [ { "Effect": "Allow", "Principal": { "Service": "eks.amazonaws.com" }, "Action": "sts:AssumeRole" } ] }roles/eks/files/ec2-trust-policy.json{ "Version": "2012-10-17", "Statement": [ { "Effect": "Allow", "Principal": { "Service": "ec2.amazonaws.com" }, "Action": "sts:AssumeRole" } ] }templates
EKSのクラスタとワーカーノードの紐付けに用いるConfigMapリソースのマニフェストファイルを用意します。
rolearnの値にワーカーノードのインスタンスロールが代入されます。roles/eks/template/aws-auth-cm.yamlapiVersion: v1 kind: ConfigMap metadata: name: aws-auth namespace: kube-system data: mapRoles: | - rolearn: {{ eks_worker_results.stack_outputs.NodeInstanceRole }} username: system:node:{{ '{{EC2PrivateDNSName}}' }} groups: - system:bootstrappers - system:nodes実行
EKS環境の構築は下記コマンドで行います。
$ ansible-playbook playbooks/build_eks.yaml

PLAY [BUILD EKS] ***************************************************************************************************************************************************************************************

TASK [CREATE IAM ROLE] *********************************************************************************************************************************************************************************

TASK [eks : IAM | create EKS service role] *************************************************************************************************************************************************************
changed: [localhost]

TASK [eks : IAM | create IAM worker node role] *********************************************************************************************************************************************************
changed: [localhost]

TASK [CREATE VPC] **************************************************************************************************************************************************************************************

TASK [eks : VPC | create VPC] **************************************************************************************************************************************************************************
changed: [localhost]

TASK [eks : VPC | create subnets] **********************************************************************************************************************************************************************
changed: [localhost] => (item={'cidr': '10.0.10.0/24', 'az': 'ap-northeast-1a'})
changed: [localhost] => (item={'cidr': '10.0.11.0/24', 'az': 'ap-northeast-1c'})
changed: [localhost] => (item={'cidr': '10.0.12.0/24', 'az': 'ap-northeast-1d'})

TASK [eks : VPC | create igw] **************************************************************************************************************************************************************************
changed: [localhost]

TASK [eks : VPC | create public route table] ***********************************************************************************************************************************************************
changed: [localhost]

TASK [eks : VPC | create security groups] **************************************************************************************************************************************************************
changed: [localhost] => (item={'name': 'ansible-cluster-sg', 'description': 'Security group for EKS cluster', 'rules': [{'group_name': 'ansible-worker-sg', 'group_desc': 'Security group for EKS worker nodes', 'rule_desc': 'Allow pods to communicate with the cluster API server', 'proto': 'tcp', 'ports': 443}], 'rules_egress': [{'group_name': 'ansible-worker-sg', 'group_desc': 'Security group for EKS worker nodes', 'rule_desc': 'Allow the cluster control plane to communicate with the worker Kubelet and pods', 'proto': 'tcp', 'from_port': 1025, 'to_port': 65535}, {'group_name': 'ansible-worker-sg', 'group_desc': 'Security group for EKS worker nodes', 'rule_desc': 'Allow the cluster control plane to communicate with pods running extension API servers on port 443', 'proto': 'tcp', 'ports': 443}]})
changed: [localhost] => (item={'name': 'ansible-worker-sg', 'description': 'Security group for EKS worker nodes', 'rules': [{'group_name': 'ansible-worker-sg', 'group_desc': 'Security group for EKS worker nodes', 'rule_desc': 'Allow worker nodes to communicate with each other', 'proto': 'all', 'from_port': 1, 'to_port': 65535}, {'group_name': 'ansible-cluster-sg', 'group_desc': 'Security group for EKS cluster', 'rule_desc': 'Allow worker Kubelets and pods to receive communication from the cluster control plane', 'proto': 'tcp', 'from_port': 1025, 'to_port': 65535}, {'group_name': 'ansible-cluster-sg', 'group_desc': 'Security group for EKS cluster', 'rule_desc': 'Allow pods running extension API servers on port 443 to receive communication from cluster control plane', 'proto': 'tcp', 'ports': 443}]})

TASK [CREATE EKS CLUSTER] ******************************************************************************************************************************************************************************

TASK [eks : EKS | create EKS cluster] ******************************************************************************************************************************************************************
changed: [localhost]

TASK [CREATE EKS WORKER NODES] *************************************************************************************************************************************************************************

TASK [eks : EC2 | create EKS worker nodes] *************************************************************************************************************************************************************
changed: [localhost]

TASK [JOIN EKS WORKER NODES TO EKS CLUSTER] ************************************************************************************************************************************************************

TASK [eks : config | update kubeconfig] ****************************************************************************************************************************************************************
changed: [localhost]

TASK [eks : EC2 | copy a new version of aws-auth-cm.yaml from template] ********************************************************************************************************************************
changed: [localhost]

TASK [eks : EC2 | join EKS worker nodes to EKS cluster] ************************************************************************************************************************************************
changed: [localhost]

PLAY RECAP *********************************************************************************************************************************************************************************************
localhost                  : ok=12   changed=12   unreachable=0    failed=0    skipped=0    rescued=0    ignored=0
完了後に
kubectlでワーカーノードが紐付けられているか確認してみましょう。$ kubectl get node NAME STATUS ROLES AGE VERSION ip-10-0-11-206.ap-northeast-1.compute.internal Ready <none> 2m v1.13.7-eks-c57ff8 ip-10-0-12-67.ap-northeast-1.compute.internal Ready <none> 2m v1.13.7-eks-c57ff8
今回ファイル内容の説明は省きましたが、EKS環境の削除は下記コマンドで行います。$ ansible-playbook playbooks/destroy_eks.yaml PLAY [DESTROY EKS] ************************************************************************************************************************************************************************************* TASK [DELETE EKS WORKER NODES] ************************************************************************************************************************************************************************* TASK [eks : EC2 | delete EKS worker nodes] ************************************************************************************************************************************************************* changed: [localhost] TASK [DELETE EKS CLUSTER] ****************************************************************************************************************************************************************************** TASK [eks : EKS | delete EKS cluster] ****************************************************************************************************************************************************************** changed: [localhost] TASK [eks : EKS | wait 10 min for EKS cluster to be deleted] ******************************************************************************************************************************************* Pausing for 600 seconds (ctrl+C then 'C' = continue early, ctrl+C then 'A' = abort) ok: [localhost] TASK [DELETE VPC] ************************************************************************************************************************************************************************************** TASK [eks : VPC | get VPC] ***************************************************************************************************************************************************************************** ok: [localhost] TASK [eks : VPC | get route table] ********************************************************************************************************************************************************************* ok: [localhost] TASK [eks : VPC | delete public route table] *********************************************************************************************************************************************************** skipping: [localhost] => (item={'id': 'rtb-07db0226caafb28d0', 'routes': [{'destination_cidr_block': '10.0.0.0/16', 'gateway_id': 'local', 'instance_id': None, 'interface_id': None, 'vpc_peering_connection_id': None, 'state': 'active', 'origin': 'CreateRouteTable'}], 'associations': [{'id': 'rtbassoc-03f60e6cd732c0987', 'route_table_id': 'rtb-07db0226caafb28d0', 'subnet_id': None, 'main': True}], 'tags': {}, 'vpc_id': 'vpc-0af7dd4f1891d0981'}) changed: [localhost] => (item={'id': 'rtb-0f8b7524bbf5e6dda', 'routes': [{'destination_cidr_block': '10.0.0.0/16', 'gateway_id': 'local', 'instance_id': None, 'interface_id': None, 'vpc_peering_connection_id': None, 'state': 'active', 'origin': 'CreateRouteTable'}, {'destination_cidr_block': '0.0.0.0/0', 'gateway_id': 'igw-04d8395d96f34316f', 'instance_id': None, 'interface_id': None, 'vpc_peering_connection_id': None, 'state': 'active', 'origin': 'CreateRoute'}], 'associations': [{'id': 'rtbassoc-09e75ccec74991762', 'route_table_id': 'rtb-0f8b7524bbf5e6dda', 'subnet_id': 'subnet-0ac96de4386bb63b7', 'main': False}, {'id': 'rtbassoc-0c274c4a1b95496ef', 'route_table_id': 'rtb-0f8b7524bbf5e6dda', 'subnet_id': 'subnet-0a399ac33c6f17d70', 'main': False}, {'id': 'rtbassoc-09ddc4e870c76a580', 'route_table_id': 'rtb-0f8b7524bbf5e6dda', 'subnet_id': 'subnet-0285ffb6ff7c19cdc', 'main': False}], 'tags': {}, 'vpc_id': 'vpc-0af7dd4f1891d0981'}) TASK [eks : VPC | delete igw] ************************************************************************************************************************************************************************** changed: [localhost] TASK [eks : VPC | get security groups] ***************************************************************************************************************************************************************** ok: [localhost] TASK [eks : VPC | set security group rule lists empty] ************************************************************************************************************************************************* changed: [localhost] => (item={'description': 'Security group for EKS cluster', 'group_name': 'ansible-cluster-sg', 'ip_permissions': [{'from_port': 443, 'ip_protocol': 'tcp', 'ip_ranges': [], 'ipv6_ranges': [], 'prefix_list_ids': [], 'to_port': 443, 'user_id_group_pairs': [{'description': 'Allow pods to communicate with the cluster API server', 'group_id': 'sg-09fd422bb4e7764c0', 'user_id': '601207319152'}]}], 'owner_id': '601207319152', 'group_id': 'sg-02dbf6f7fa528548b', 'ip_permissions_egress': [{'from_port': 1025, 'ip_protocol': 'tcp', 'ip_ranges': [], 'ipv6_ranges': [], 'prefix_list_ids': [], 'to_port': 65535, 'user_id_group_pairs': [{'description': 'Allow the cluster control plane to communicate with the worker Kubelet and pods', 'group_id': 'sg-09fd422bb4e7764c0', 'user_id': '601207319152'}]}, {'from_port': 443, 'ip_protocol': 'tcp', 'ip_ranges': [], 'ipv6_ranges': [], 'prefix_list_ids': [], 'to_port': 443, 'user_id_group_pairs': [{'description': 'Allow the cluster control plane to communicate with pods running extension API servers on port 443', 'group_id': 'sg-09fd422bb4e7764c0', 'user_id': '601207319152'}]}], 'vpc_id': 'vpc-0af7dd4f1891d0981', 'tags': {}}) changed: [localhost] => (item={'description': 'Security group for EKS worker nodes', 'group_name': 'ansible-worker-sg', 'ip_permissions': [{'ip_protocol': '-1', 'ip_ranges': [], 'ipv6_ranges': [], 'prefix_list_ids': [], 'user_id_group_pairs': [{'description': 'Allow worker nodes to communicate with each other', 'group_id': 'sg-09fd422bb4e7764c0', 'user_id': '601207319152'}]}, {'from_port': 1025, 'ip_protocol': 'tcp', 'ip_ranges': [], 'ipv6_ranges': [], 'prefix_list_ids': [], 'to_port': 65535, 'user_id_group_pairs': [{'description': 'Allow worker Kubelets and pods to receive communication from the cluster control plane', 'group_id': 'sg-02dbf6f7fa528548b', 'user_id': '601207319152'}]}, {'from_port': 443, 'ip_protocol': 'tcp', 'ip_ranges': [], 'ipv6_ranges': [], 'prefix_list_ids': [], 'to_port': 443, 'user_id_group_pairs': [{'description': 'Allow pods running extension API servers on port 443 to receive communication from cluster control plane', 'group_id': 'sg-02dbf6f7fa528548b', 'user_id': '601207319152'}]}], 'owner_id': '601207319152', 'group_id': 'sg-09fd422bb4e7764c0', 'ip_permissions_egress': [{'ip_protocol': '-1', 'ip_ranges': [{'cidr_ip': '0.0.0.0/0'}], 'ipv6_ranges': [], 'prefix_list_ids': [], 'user_id_group_pairs': []}], 'vpc_id': 'vpc-0af7dd4f1891d0981', 'tags': {}}) changed: [localhost] => (item={'description': 'default VPC security group', 'group_name': 'default', 'ip_permissions': [{'ip_protocol': '-1', 'ip_ranges': [], 'ipv6_ranges': [], 'prefix_list_ids': [], 'user_id_group_pairs': [{'group_id': 'sg-0edd4b79db4e338cf', 'user_id': '601207319152'}]}], 'owner_id': '601207319152', 'group_id': 'sg-0edd4b79db4e338cf', 'ip_permissions_egress': [{'ip_protocol': '-1', 'ip_ranges': [{'cidr_ip': '0.0.0.0/0'}], 'ipv6_ranges': [], 'prefix_list_ids': [], 'user_id_group_pairs': []}], 'vpc_id': 'vpc-0af7dd4f1891d0981', 'tags': {}}) TASK [eks : VPC | delete security groups] ************************************************************************************************************************************************************** changed: [localhost] => (item={'description': 'Security group for EKS cluster', 'group_name': 'ansible-cluster-sg', 'ip_permissions': [{'from_port': 443, 'ip_protocol': 'tcp', 'ip_ranges': [], 'ipv6_ranges': [], 'prefix_list_ids': [], 'to_port': 443, 'user_id_group_pairs': [{'description': 'Allow pods to communicate with the cluster API server', 'group_id': 'sg-09fd422bb4e7764c0', 'user_id': '601207319152'}]}], 'owner_id': '601207319152', 'group_id': 'sg-02dbf6f7fa528548b', 'ip_permissions_egress': [{'from_port': 1025, 'ip_protocol': 'tcp', 'ip_ranges': [], 'ipv6_ranges': [], 'prefix_list_ids': [], 'to_port': 65535, 'user_id_group_pairs': [{'description': 'Allow the cluster control plane to communicate with the worker Kubelet and pods', 'group_id': 'sg-09fd422bb4e7764c0', 'user_id': '601207319152'}]}, {'from_port': 443, 'ip_protocol': 'tcp', 'ip_ranges': [], 'ipv6_ranges': [], 'prefix_list_ids': [], 'to_port': 443, 'user_id_group_pairs': [{'description': 'Allow the cluster control plane to communicate with pods running extension API servers on port 443', 'group_id': 'sg-09fd422bb4e7764c0', 'user_id': '601207319152'}]}], 'vpc_id': 'vpc-0af7dd4f1891d0981', 'tags': {}}) changed: [localhost] => (item={'description': 'Security group for EKS worker nodes', 'group_name': 'ansible-worker-sg', 'ip_permissions': [{'ip_protocol': '-1', 'ip_ranges': [], 'ipv6_ranges': [], 'prefix_list_ids': [], 'user_id_group_pairs': [{'description': 'Allow worker nodes to communicate with each other', 'group_id': 'sg-09fd422bb4e7764c0', 'user_id': '601207319152'}]}, {'from_port': 1025, 'ip_protocol': 'tcp', 'ip_ranges': [], 'ipv6_ranges': [], 'prefix_list_ids': [], 'to_port': 65535, 'user_id_group_pairs': [{'description': 'Allow worker Kubelets and pods to receive communication from the cluster control plane', 'group_id': 'sg-02dbf6f7fa528548b', 'user_id': '601207319152'}]}, {'from_port': 443, 'ip_protocol': 'tcp', 'ip_ranges': [], 'ipv6_ranges': [], 'prefix_list_ids': [], 'to_port': 443, 'user_id_group_pairs': [{'description': 'Allow pods running extension API servers on port 443 to receive communication from cluster control plane', 'group_id': 'sg-02dbf6f7fa528548b', 'user_id': '601207319152'}]}], 'owner_id': '601207319152', 'group_id': 'sg-09fd422bb4e7764c0', 'ip_permissions_egress': [{'ip_protocol': '-1', 'ip_ranges': [{'cidr_ip': '0.0.0.0/0'}], 'ipv6_ranges': [], 'prefix_list_ids': [], 'user_id_group_pairs': []}], 'vpc_id': 'vpc-0af7dd4f1891d0981', 'tags': {}}) skipping: [localhost] => (item={'description': 'default VPC security group', 'group_name': 'default', 'ip_permissions': [{'ip_protocol': '-1', 'ip_ranges': [], 'ipv6_ranges': [], 'prefix_list_ids': [], 'user_id_group_pairs': [{'group_id': 'sg-0edd4b79db4e338cf', 'user_id': '601207319152'}]}], 'owner_id': '601207319152', 'group_id': 'sg-0edd4b79db4e338cf', 'ip_permissions_egress': [{'ip_protocol': '-1', 'ip_ranges': [{'cidr_ip': '0.0.0.0/0'}], 'ipv6_ranges': [], 'prefix_list_ids': [], 'user_id_group_pairs': []}], 'vpc_id': 'vpc-0af7dd4f1891d0981', 'tags': {}}) TASK [eks : VPC | delete subnets] ********************************************************************************************************************************************************************** changed: [localhost] => (item={'cidr': '10.0.10.0/24', 'az': 'ap-northeast-1a'}) changed: [localhost] => (item={'cidr': '10.0.11.0/24', 'az': 'ap-northeast-1c'}) changed: [localhost] => (item={'cidr': '10.0.12.0/24', 'az': 'ap-northeast-1d'}) TASK [eks : VPC | delete VPC] ************************************************************************************************************************************************************************** changed: [localhost] TASK [DELETE IAM ROLE] ********************************************************************************************************************************************************************************* TASK [eks : IAM | delete EKS service role] ************************************************************************************************************************************************************* changed: [localhost] TASK [eks : IAM | delete IAM worker node role] ********************************************************************************************************************************************************* changed: [localhost] PLAY RECAP ********************************************************************************************************************************************************************************************* localhost : ok=14 changed=10 unreachable=0 failed=0 skipped=0 rescued=0 ignored=0まとめ
AnsibleでのEKS環境構築方法を説明しました。
Ansibleは慣れ親しんでいるyamlを使うだけあってTerraformのtfファイルより遥かに書きやすかったです。
どの役割のファイルをどのフォルダに格納すべきかも分かりやすいです。
また、shellを使って自在に色々いじれるのでEKSのクラスタとワーカーノードの紐付けが楽でした。Terraformに比べて劣っていることと言えば環境削除用にファイルを作成しないといけない点があります。
それを考慮してもEKS環境に限っては Ansible > Terraform だと思いました。参考
https://docs.ansible.com/ansible/latest/modules/list_of_cloud_modules.html
https://github.com/lgg42/ansible-role-eks
https://github.com/justindav1s/ansible-aws-eks
https://github.com/rishabh-bohra/ansible-aws-eks
- 投稿日:2019-08-19T17:36:35+09:00
CloudFormationとCodePipelineによるLambdaの自動デプロイ
はじめに
近年CI/CDの重要性が各所で叫ばれています。AWS Lambdaを用いたサービスを開発する際にも、例えばGitHubにプッシュしたコードが自動でLambdaへデプロイされればCI/CDの実現に繋がります。本記事ではAWSのCloudFormationとCodePipelineを用いて、GitHubからLambda(+DynamoDB)までの自動デプロイ環境の構築方法を紹介します。
関連するコンポーネントの説明
GitHub
GitHub自体の説明は他に任せます。今回はGitHub上でコードを管理し、そのリポジトリへのプッシュをトリガーに自動デプロイされる環境を構築します。devブランチはdev環境へ、masterブランチはprod環境へデプロイされるようにします。
CodePipeline
環境の構築やテスト、デプロイを自動で実行するマネージドサービスです。今回はコードを取得するSourceフェーズ、ビルドを行うBuildフェーズ、デプロイを行うDeployフェーズを利用します。デプロイにはソースコードだけではなくLambdaやDynamoDBなどのインフラに関する情報も必要ですので、ここには後述するCloudFormationを利用します。
またCodePipelineではデプロイするためのファイルやバイナリをアップロードするS3や、各種AWSリソースを操作するためのIAMも定義する必要があります。これらはすべてCloudFormationのテンプレートに記載します。
CloudFormation
AWSのリソースをテンプレートと呼ばれるテキストで定義し、構築や更新ができるサービスです。AWSリソースをCLIやWebコンソールから手動で構築・更新を繰り返していると、気づいたら「今どんな設定がされているかわからない」「同じ環境を再現できない」「リソース同士の依存関係がわからない」などの問題が生じます。関連するリソース群をまとめてテンプレートとして保存しておくことでCloudFormation経由で簡単に全リソースをデプロイすることができます。さらにテンプレートはJSONまたはYAML形式であるため、ソースコードと同じようにGitなどで差分管理することも可能です。
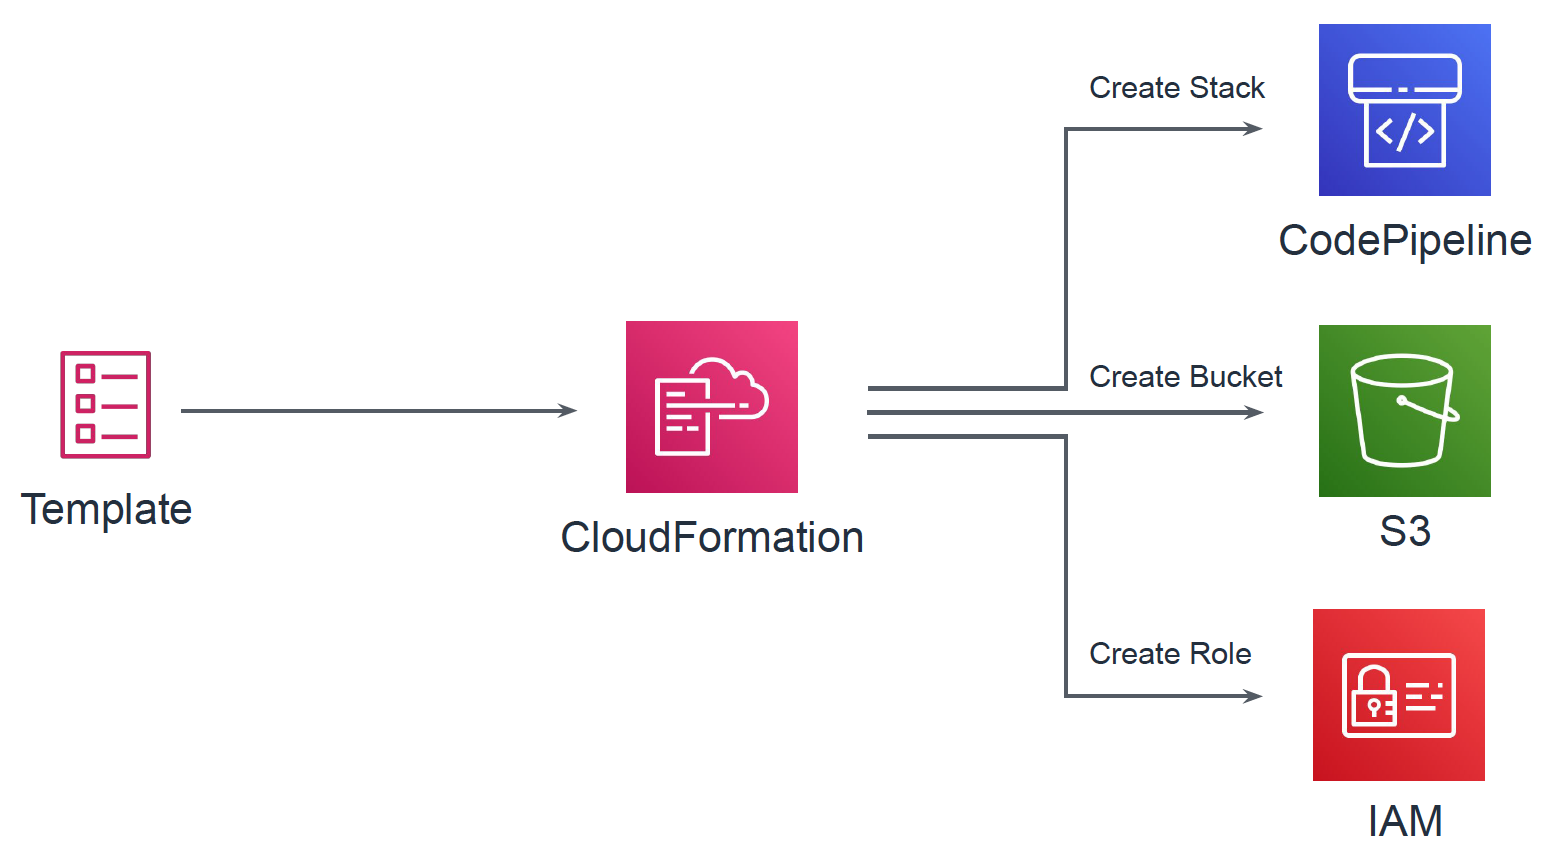
また紛らわしいのですが、上記のCodePipelineもAWSリソースであり、CloudFormationテンプレートで定義可能です。以下ではCodePipelineのテンプレートとLambda+DynamoDBの2つのテンプレートを準備します。またLambda+DynamoDBのテンプレートはソースコードと同じリポジトリで管理することとします。
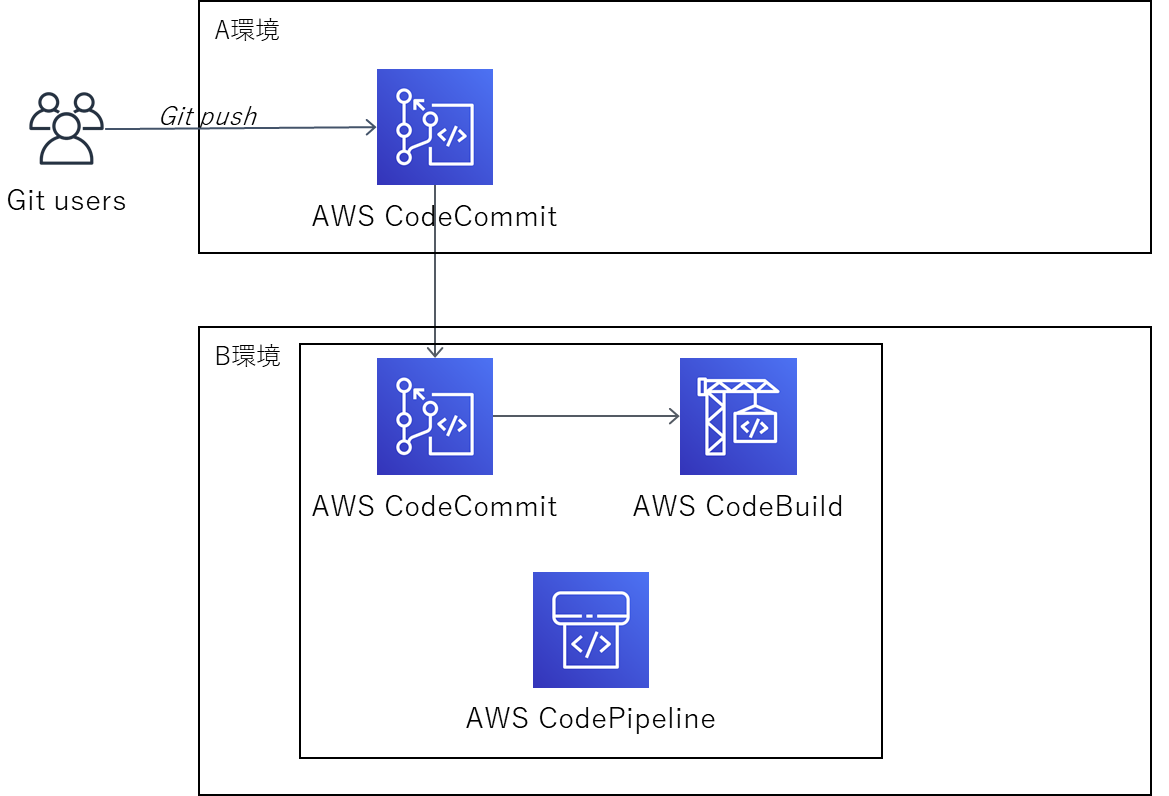
構成の概要
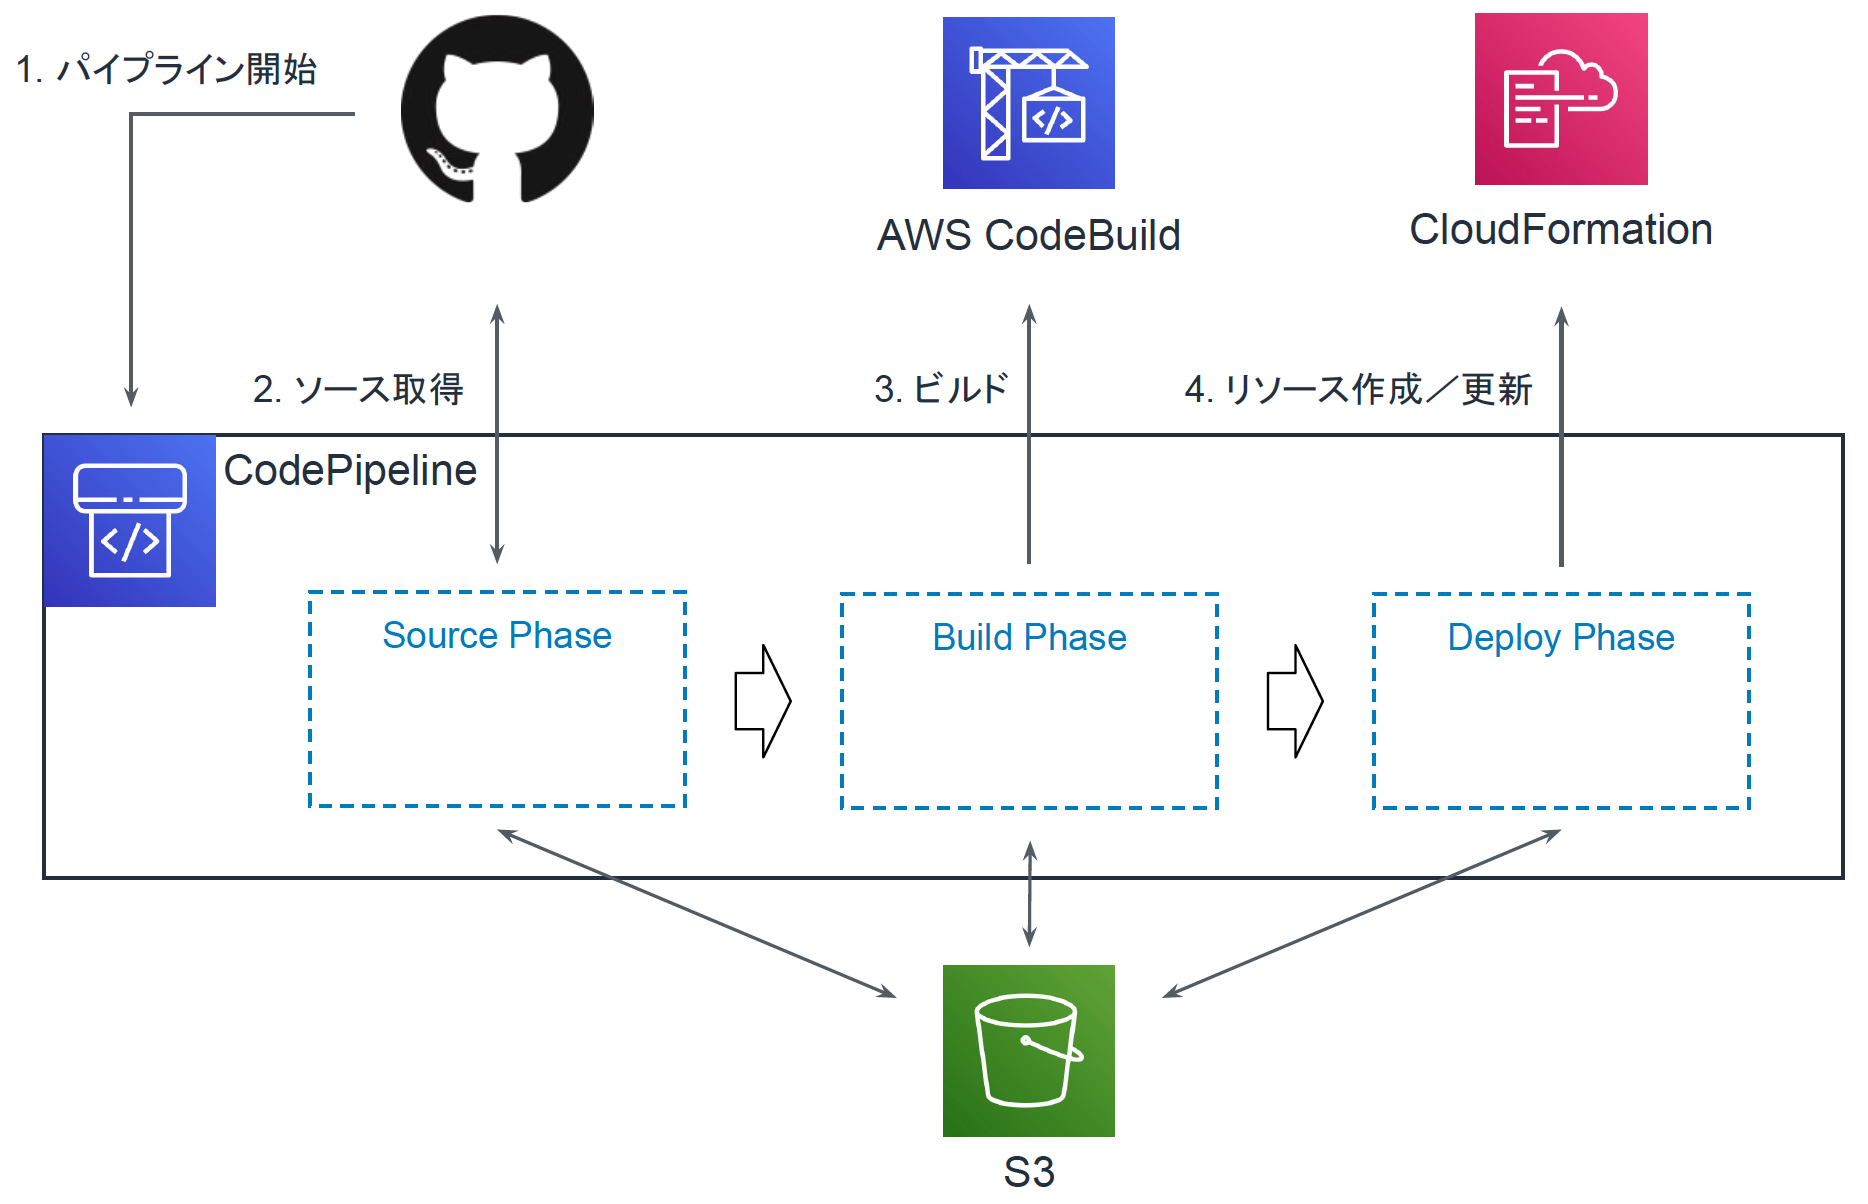
パイプラインは以下の流れで動作します。
- GitHubをトリガーに処理を開始
- GitHubからコードを取得
- CodeBuildによりビルド
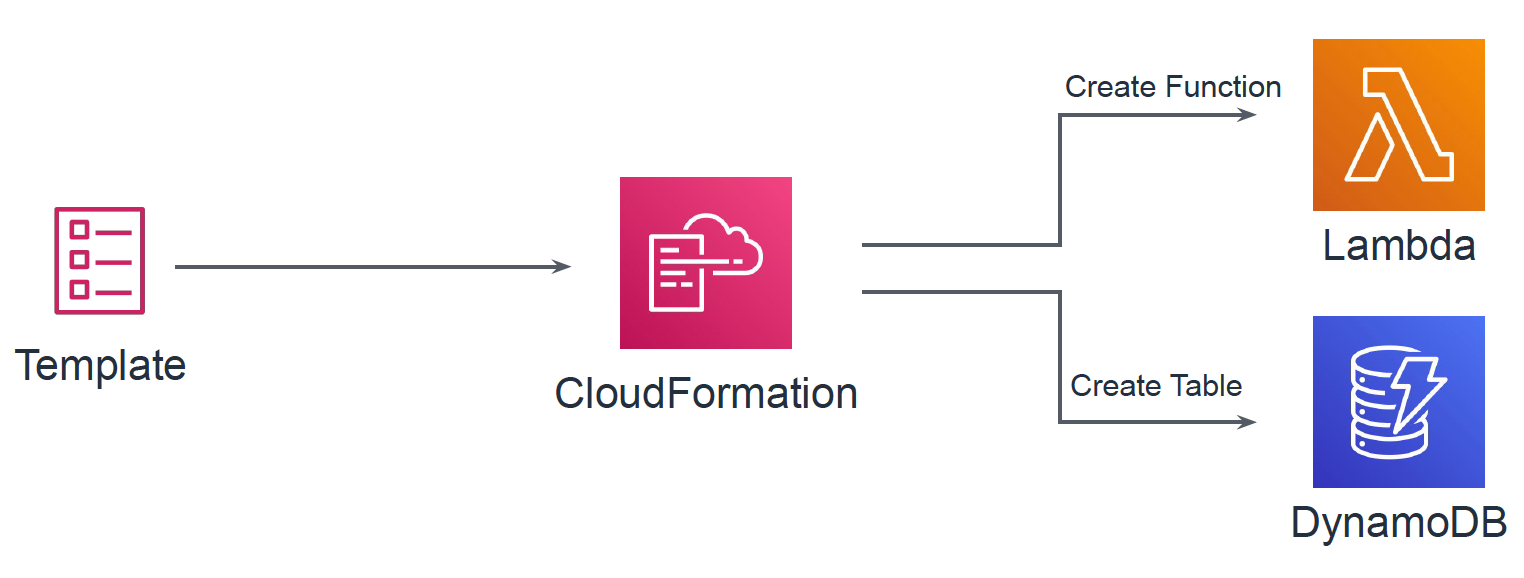
- CloudFormationによりLambda関数やDynamoDBテーブルを作成
各フェーズ間のファイル(アーティファクト)のやりとりにはS3を用います。パイプラインの作成に伴いGitHubリポジトリとの紐付けが行われ、以降はGItHubへpushするだけでLambdaなどがデプロイされる環境が出来上がります。以下の図がパイプライン全体のイメージです。
このパイプラインはWebコンソールからも作成できるのですが、パイプライン作成においても人的ミスや属人化などを防ぐために、CloudFormation経由で作成することとします。CloudFormationテンプレートにはパイプラインの定義だけでなく、アーティファクトの保存先となるS3バケットや、Lambdaなどをデプロイするために必要なIAMロールなども定義します。以下ではtemplate_pipeline.ymlとして記述しています。
パイプラインのDeployフェーズではLambda関数やDynamoDBテーブルをCloudFormationにより作成/更新します。LambdaやDynamoDBをCloudFormationテンプレートで定義しておき、ソースコードと一緒にGitHubにて管理します。以下ではtemplate_deploy.ymlとして記述しています。
構築
ここでは実際に自動デプロイをするための環境構築の準備をします。AWSの設定はすべてCloudFormationで行いますので、そのためのテンプレートファイルの準備をしていきます。
GitHubリポジトリ
GitHubリポジトリにはLambdaへデプロイするコードの他に、Lambda関数やDynamoDBテーブルを定義するテンプレートファイル、パイプラインで参照するパラメータファイルなどを保存しておきます。以下がフォルダ構成です。各ファイルについての説明はファイル準備にて記載します。
/
├── README.md
├── lambda_handler.py        # Lambda関数で動くコード
└── pipeline_settings
    ├── buildspec.yml        # Buildフェーズで動く内容
    ├── param_dev.json       # dev環境用パラメータ
    ├── param_prod.json      # prod環境用パラメータ
    └── template_deploy.yml  # LambdaやDynamoDBを定義するテンプレート
ファイル準備
template_pipeline.yml
template_pipeline.ymlではdev環境用のパイプライン(PipelineDev)とprod環境用のパイプライン(PipelineProd)を定義しています。それ以外にもS3バケットや、各種リソースに割り当てるIAMロールなどを定義しています。
リソース名 概要 ArtifactStoreBucket アーティファクト保存用S3バケット BuildProject Buildフェーズで行うビルド PipelineDeployRole Deployフェーズでtemplate_deploy.ymlをデプロイするための権限を定義したIAMロール PipelineRole パイプライン自体に与えるIAMロール CodeBuildRole BuildフェーズのCodeBuildに与えるIAMロール PipelineDev dev環境用のパイプライン PipelineProd prod環境用のパイプライン Buildフェーズにおいては、実行する内容をbuildspec.ymlというファイルを参照するようにしています。これはGitHubリポジトリに含めており、SourceフェーズでダウンロードしたSourceOutputに含まれています。
CloudFormationテンプレートの具体的な書き方については公式ドキュメントに詳細にまとまっています。
template_pipeline.ymlAWSTemplateFormatVersion: 2010-09-09 Description: CloudFormation Template of Pipeline Parameters: Owner: Type: String Repo: Type: String OAuthToken: Type: String NoEcho: true ModuleName: Type: String DevModuleStackName: Type: String ProdModuleStackName: Type: String TemplateFilePath: Type: String Default: template_deploy.yml PackagedTemplateFilePath: Type: String Default: packaged.yml DevDeployParamFile: Type: String Default: param_dev.json ProdDeployParamFile: Type: String Default: param_prod.json DevBranch: Type: String Default: dev ProdBranch: Type: String Default: master BuildSpec: Type: String Default: pipeline_settings/buildspec.yml Resources: ArtifactStoreBucket: Type: AWS::S3::Bucket BuildProject: Type: AWS::CodeBuild::Project Properties: Name: !Ref ModuleName ServiceRole: !GetAtt CodeBuildRole.Arn Artifacts: Type: CODEPIPELINE Environment: Type: LINUX_CONTAINER ComputeType: BUILD_GENERAL1_SMALL Image: aws/codebuild/ubuntu-base:14.04 EnvironmentVariables: - Name: PACKAGED_TEMPLATE_FILE_PATH Value: !Ref PackagedTemplateFilePath - Name: S3_BUCKET Value: !Ref ArtifactStoreBucket Source: Type: CODEPIPELINE BuildSpec: !Ref BuildSpec PipelineDeployRole: Type: AWS::IAM::Role Properties: AssumeRolePolicyDocument: Version: 2012-10-17 Statement: - Effect: Allow Action: sts:AssumeRole Principal: Service: cloudformation.amazonaws.com Path: / Policies: - PolicyName: !Sub ${ModuleName}DeployPolicy PolicyDocument: Version: 2012-10-17 Statement: - Effect: Allow Action: - dynamodb:* Resource: !Sub arn:aws:dynamodb:${AWS::Region}:${AWS::AccountId}:table/* - Effect: Allow Action: - lambda:* Resource: !Sub arn:aws:lambda:${AWS::Region}:${AWS::AccountId}:function:* - Effect: Allow Action: - iam:CreateRole - iam:DeleteRole - iam:GetRole - iam:PassRole - iam:DeleteRolePolicy - iam:PutRolePolicy - iam:GetRolePolicy Resource: !Sub arn:aws:iam::${AWS::AccountId}:role/* - Effect: Allow Action: s3:GetObject Resource: - !Sub arn:aws:s3:::${ArtifactStoreBucket} - !Sub arn:aws:s3:::${ArtifactStoreBucket}/* PipelineRole: Type: AWS::IAM::Role Properties: AssumeRolePolicyDocument: Version: 2012-10-17 Statement: - Action: sts:AssumeRole Effect: Allow Principal: Service: codepipeline.amazonaws.com Path: / Policies: - PolicyName: CodePipelineAccess PolicyDocument: Version: 2012-10-17 Statement: - Sid: S3GetObject Effect: Allow Action: s3:* Resource: - !Sub arn:aws:s3:::${ArtifactStoreBucket} - !Sub arn:aws:s3:::${ArtifactStoreBucket}/* - Sid: S3PutObject Effect: Allow Action: s3:* Resource: - !Sub arn:aws:s3:::${ArtifactStoreBucket} - !Sub arn:aws:s3:::${ArtifactStoreBucket}/* - Sid: CodeBuildStartBuild Effect: Allow Action: - codebuild:StartBuild - codebuild:BatchGetBuilds Resource: !Sub arn:aws:codebuild:${AWS::Region}:${AWS::AccountId}:project/${ModuleName} - Sid: CFnActions Effect: Allow Action: - cloudformation:DescribeStacks - cloudformation:DescribeChangeSet - cloudformation:CreateChangeSet - cloudformation:ExecuteChangeSet - cloudformation:DeleteChangeSet Resource: - !Sub arn:aws:cloudformation:${AWS::Region}:${AWS::AccountId}:stack/${DevModuleStackName}/* - !Sub arn:aws:cloudformation:${AWS::Region}:${AWS::AccountId}:stack/${ProdModuleStackName}/* - Sid: PassRole Effect: Allow Action: - iam:PassRole Resource: !GetAtt PipelineDeployRole.Arn CodeBuildRole: Type: AWS::IAM::Role Properties: AssumeRolePolicyDocument: Version: 2012-10-17 Statement: - Action: sts:AssumeRole Effect: Allow Principal: Service: codebuild.amazonaws.com Path: / Policies: - PolicyName: CodeBuildAccess PolicyDocument: Version: 2012-10-17 Statement: - Sid: CloudWatchLogsAccess Effect: Allow Action: - logs:CreateLogGroup - logs:CreateLogStream - logs:PutLogEvents Resource: - !Sub arn:aws:logs:${AWS::Region}:${AWS::AccountId}:log-group:/aws/codebuild/* - Sid: S3Access Effect: Allow Action: - s3:PutObject - s3:GetObject - s3:GetObjectVersion Resource: - !Sub arn:aws:s3:::${ArtifactStoreBucket} - !Sub arn:aws:s3:::${ArtifactStoreBucket}/* - Sid: CloudFormationAccess Effect: Allow Action: cloudformation:ValidateTemplate Resource: "*" PipelineDev: Type: AWS::CodePipeline::Pipeline Properties: Name: !Sub dev-pipeline-${ModuleName} RoleArn: !GetAtt PipelineRole.Arn ArtifactStore: Type: S3 Location: !Ref ArtifactStoreBucket Stages: - Name: Source Actions: - Name: DownloadSource ActionTypeId: Category: Source Owner: ThirdParty Version: 1 Provider: GitHub Configuration: Owner: !Ref Owner Repo: !Ref Repo Branch: !Ref DevBranch OAuthToken: !Ref OAuthToken OutputArtifacts: - Name: SourceOutput - Name: Build Actions: - InputArtifacts: - Name: SourceOutput Name: Package ActionTypeId: Category: Build Provider: CodeBuild Owner: AWS Version: 1 OutputArtifacts: - Name: BuildOutput Configuration: ProjectName: !Ref BuildProject - Name: Deploy Actions: - Name: CreateChangeSet ActionTypeId: Category: Deploy Owner: AWS Provider: CloudFormation Version: '1' InputArtifacts: - Name: BuildOutput Configuration: ActionMode: CHANGE_SET_REPLACE RoleArn: !GetAtt PipelineDeployRole.Arn StackName: !Ref DevModuleStackName ChangeSetName: !Sub ${DevModuleStackName}-changeset Capabilities: CAPABILITY_NAMED_IAM TemplatePath: !Sub BuildOutput::${PackagedTemplateFilePath} TemplateConfiguration: !Sub BuildOutput::${DevDeployParamFile} RunOrder: '1' - Name: ExecuteChangeSet ActionTypeId: Category: Deploy Owner: AWS Provider: CloudFormation Version: '1' InputArtifacts: - Name: BuildOutput Configuration: ActionMode: CHANGE_SET_EXECUTE ChangeSetName: !Sub ${DevModuleStackName}-changeset StackName: !Ref DevModuleStackName RunOrder: '2' PipelineProd: Type: AWS::CodePipeline::Pipeline Properties: Name: !Sub prod-pipeline-${ModuleName} RoleArn: !GetAtt PipelineRole.Arn ArtifactStore: Type: S3 Location: !Ref ArtifactStoreBucket Stages: - Name: Source Actions: - Name: DownloadSource ActionTypeId: Category: Source Owner: ThirdParty Version: 1 Provider: GitHub Configuration: Owner: !Ref Owner Repo: !Ref Repo Branch: !Ref ProdBranch OAuthToken: !Ref OAuthToken OutputArtifacts: - Name: SourceOutput - Name: Build Actions: - InputArtifacts: - Name: SourceOutput Name: Package ActionTypeId: Category: Build Provider: CodeBuild Owner: AWS Version: 1 OutputArtifacts: - Name: BuildOutput Configuration: ProjectName: !Ref BuildProject - Name: Deploy Actions: - Name: CreateChangeSet ActionTypeId: Category: Deploy Owner: AWS Provider: CloudFormation Version: '1' InputArtifacts: - Name: BuildOutput Configuration: ActionMode: CHANGE_SET_REPLACE RoleArn: !GetAtt PipelineDeployRole.Arn StackName: !Ref ProdModuleStackName ChangeSetName: !Sub ${ProdModuleStackName}-changeset Capabilities: CAPABILITY_NAMED_IAM TemplatePath: !Sub BuildOutput::${PackagedTemplateFilePath} TemplateConfiguration: !Sub BuildOutput::${ProdDeployParamFile} RunOrder: '1' - Name: ExecuteChangeSet ActionTypeId: Category: Deploy Owner: AWS Provider: CloudFormation Version: '1' InputArtifacts: - Name: BuildOutput Configuration: ActionMode: CHANGE_SET_EXECUTE ChangeSetName: !Sub ${ProdModuleStackName}-changeset StackName: !Ref ProdModuleStackName RunOrder: '2'buildspec.yml
パイプラインのBuildフェーズで行う内容を定義します。今回はCloudFormationでpackageコマンドを実施します。ここで参照している環境変数「PACKAGED_TEMPLATE_FILE_PATH」と「S3_BUCKET」はtemplate_pipeline.ymlの中のBuildProjectの
EnvironmentVariablesとして定義しているものです。buildspec.ymlversion: 0.2 phases: build: commands: - | aws cloudformation package \ --template-file pipeline_settings/template_deploy.yml \ --s3-bucket $S3_BUCKET \ --output-template-file $PACKAGED_TEMPLATE_FILE_PATH artifacts: files: - $PACKAGED_TEMPLATE_FILE_PATH - pipeline_settings/* discard-paths: yesparam_dev.json, param_prod.json
DeployフェーズにてLambda関数などをデプロイする際にtemplate_deploy.ymlを用いますが、それに対して入力するパラメータを定義したものです。デプロイ用のテンプレートを環境ごとに用意してメンテするのは効率的ではないためこうしています。
param_dev.json{ "Parameters": { "LambdaFunctionName": "TestFunctionDev", "LambdaFunctionHandler": "lambda_handler.lambda_handler" } }param_prod.json{ "Parameters": { "LambdaFunctionName": "TestFunctionProd", "LambdaFunctionHandler": "lambda_handler.lambda_handler" } }template_deploy.yml
Lambda関数やDynamoDBテーブルを定義します。またそれらに与えるIAMロールなども定義します。Parametersで定義しているパラメータが、template_pipeline.ymlのDeployフェーズの
TemplateConfigurationで指定したファイルから読み込まれます(ここでは上記のparam_dev.jsonまたはparam_prod.jsonに相当します)。template_deploy.ymlAWSTemplateFormatVersion: '2010-09-09' Description: Service Infra Build Pipeline Parameters: LambdaFunctionName: Type: String LambdaFunctionHandler: Type: String Resources: LambdaTestFunction: Type: AWS::Lambda::Function Properties: Description: test function Environment: Variables: TABLE_ARN: !GetAtt DynamoDBTestTable.Arn FunctionName: !Ref LambdaFunctionName Handler: !Ref LambdaFunctionHandler MemorySize: 256 Role: !GetAtt LambdaRole.Arn Runtime: python3.6 Timeout: 10 DynamoDBTestTable: Type: AWS::DynamoDB::Table Properties: AttributeDefinitions: - AttributeName: name AttributeType: S - AttributeName: key AttributeType: S - AttributeName: date AttributeType: S BillingMode: PAY_PER_REQUEST GlobalSecondaryIndexes: - IndexName: KeyDate KeySchema: - AttributeName: key KeyType: HASH - AttributeName: date KeyType: RANGE Projection: ProjectionType: ALL KeySchema: - AttributeName: name KeyType: HASH TimeToLiveSpecification: AttributeName: expireAt Enabled: true LambdaRole: Type: AWS::IAM::Role Properties: AssumeRolePolicyDocument: Version: "2012-10-17" Statement: - Effect: "Allow" Principal: Service: - "lambda.amazonaws.com" Action: "sts:AssumeRole" Policies: - PolicyName: !Sub ${LambdaFunctionName}-DynamoDB PolicyDocument: Version: "2012-10-17" Statement: - Effect: "Allow" Action: - "dynamodb:GetItem" - "dynamodb:Query" - "dynamodb:PutItem" - "dynamodb:UpdateItem" Resource: !GetAtt DynamoDBTestTable.Arn - PolicyName: !Sub ${LambdaFunctionName}-CloudWatch PolicyDocument: Version: "2012-10-17" Statement: - Effect: "Allow" Action: "logs:*" Resource: "arn:aws:logs:*:*:*"CodePipelineのデプロイ
ファイルは準備できたので、ここからパイプラインをデプロイします。最初にデプロイするときはcreate-stackコマンドを、更新の際はupdate-stackコマンドを利用します。
パイプラインからGitHubへアクセスが必要なため、リポジトリのオーナーやリポジトリ名を指定します。またプライベートリポジトリの場合は認証が必要ですので、GitHubのPersonal access tokenを取得しておきます(取得方法については公式のヘルプページを参照)。
aws cloudformation create-stack \
    --stack-name auto-deploy-pipeline \
    --template-body file://template_pipeline.yml \
    --capabilities CAPABILITY_IAM CAPABILITY_NAMED_IAM \
    --parameters \
    ParameterKey=OAuthToken,ParameterValue=GitHubPersonalAccessToken \
    ParameterKey=Owner,ParameterValue=GitHubRepoOwnerName \
    ParameterKey=Repo,ParameterValue=GitHubRepoName \
    ParameterKey=ModuleName,ParameterValue=deploy-test-module \
    ParameterKey=DevModuleStackName,ParameterValue=dev-test-module \
    ParameterKey=ProdModuleStackName,ParameterValue=prod-test-module
更新については
create-stackをupdate-stackにするだけです。CodePipelineの実行
GitHubのdevブランチにプッシュすることでdevパイプラインが動き、masterブランチにプッシュすることでprodパイプラインが動きます。
まとめ
GitHubからLambdaデプロイまでの自動化を行いました。今回はシンプルな構成にしましたが、CodePipeline, CodeBuildは高機能で、例えばテストの自動化を組み込んだり、予め決めたメールアドレスにデプロイの承認を求めるといったことも実装可能です。このあたりは上記のテンプレートを公式ドキュメントに沿ってカスタマイズしていくことでどんどん実現することが可能です。そのあたりもぜひお試しください。
- 投稿日:2019-08-19T17:10:57+09:00
PHPで書かれたスクリプトをAWS Lambda上で定期実行する
AWS上で動いているシステムがあって、さらに定期実行したいPHPで書かれたスクリプトをどこかで実行することになった。
適当なマシン上で定期実行することもできるが、今回AWSを使っているのでAWS Lambdaで動かすことにしてみた。以下ではスクリプトのサンプルとして、「AWS Lambdaの実行リージョンと同じリージョンにある、そのアカウントが持つEC2インスタンスのIDのリストを取得する」ものを実行することにする。
事前調査
AWS Lambdaをまだ使ったことがなかったので、最初に目的通りできそうか調査を行った。
- Lambda上で実行したものは最大15分で強制終了させられる。
- つまり最大15分で終了するインスタンスであると解釈することができる。実際のところAmazon Linuxが動いているようだ。
- 今のところそんなに時間が掛かるスクリプトはない想定だが、それ以上掛かる場合はAWS Batch辺りを使うのだろう。
- マシンサイジングできるのはメモリ量だけ。メモリ量は128MBから3008MBまで64MB刻みで割り当てることが可能。
- 現在Lambdaの標準ランタイムとして用意されているのはNode.js, Python, Ruby, Java, Go, .NETであり、PHPは用意されていない。しかし、カスタムランタイムを作ってやって渡してやればPHPも実行可能になる。また他の言語でもAmazon Linux上で動くものなら実行できるようにできると考えられる。
- PHPのカスタムランタイムは自分で作っても良いが、すでに提供してくれているところもあるので、問題なければこれを使えば良い。結局自分で作ることはなかったので作り方は調べていないがこのリンク先にあるshファイルを見れば良いと思う。
- トリガーにCloudwatch Eventsを使用すると時刻をトリガーにできるので定期実行可能。
- Lambdaには無期限の無料利用枠があり、割と頑張らないと無料枠から脱出できない。
というわけで行けそうなので進める。
デフォルト構成の調査
AWSマネジメントコンソールを使って、Lambda関数を"一から作成"の「カスタムランタイム」の「デフォルトのブートストラップを使用する」で1つ作ってみた。
「関数コード」を見ると、bootstrap, hello.sh, README.mdの計3ファイルが生成されたのが見える。README.mdを読んでわかることは、
- まず読むべきドキュメントは https://docs.aws.amazon.com/ja_jp/lambda/latest/dg/runtimes-custom.html
- 使いたい(自分で作った、あるいは誰かが提供している)カスタムランタイムはレイヤーに設定する。
- このLambda関数が実行される際に、実際に実行されるのは「関数コード」でルートにあるbootstrapである。
なお、これはREADME.mdではなく後で実行してみてわかったことだが、ルートにbootstrapがなければレイヤーに含まれるbootstrapファイルが実行されるようだ。
続けてbootstrapを確認。
bootstrap#!/bin/sh set -euo pipefail # Handler format: <script_name>.<function_name> # # The script file <script_name>.sh must be located at the root of your # function's deployment package, alongside this bootstrap executable. source $(dirname "$0")/"$(echo $_HANDLER | cut -d. -f1).sh" while true do # Request the next event from the Lambda runtime HEADERS="$(mktemp)" EVENT_DATA=$(curl -v -sS -LD "$HEADERS" -X GET "http://${AWS_LAMBDA_RUNTIME_API}/2018-06-01/runtime/invocation/next") INVOCATION_ID=$(grep -Fi Lambda-Runtime-Aws-Request-Id "$HEADERS" | tr -d '[:space:]' | cut -d: -f2) # Execute the handler function from the script RESPONSE=$($(echo "$_HANDLER" | cut -d. -f2) "$EVENT_DATA") # Send the response to Lambda runtime curl -v -sS -X POST "http://${AWS_LAMBDA_RUNTIME_API}/2018-06-01/runtime/invocation/$INVOCATION_ID/response" -d "$RESPONSE" doneつまり、
- http://\${AWS_LAMBDA_RUNTIME_API}/2018-06-01/runtime/invocation/next をGETする。
- そのレスポンスヘッダの中にLambda-Runtime-Aws-Request-Idがあるので、その値を取得しINVOCATION_IDとする。
- 任意のスクリプトを実行する。
- http://\${AWS_LAMBDA_RUNTIME_API}/2018-06-01/runtime/invocation/$INVOCATION_ID/response にスクリプトの実行結果をPOSTする。
- ここまでをwhileで延々とループさせる。
というのがbootstrapがやっていることであると読める。
AWSマネジメントコンソール上だと「関数コード」で設定できるハンドラというものがある。ここで設定した値は環境変数_HANDLERに入る。
ハンドラ名は"hello.handler"が初期設定である。そのため、bootstrapの
source $(dirname "$0")/"$(echo $_HANDLER | cut -d. -f1).sh"行および、
RESPONSE=$($(echo "$_HANDLER" | cut -d. -f2) "$EVENT_DATA")行はhello.shのhandler関数を呼んでいることになる。
hello.shの中身は以下なので、スクリプトの実行結果はJSONを期待されているようだ。hello.shfunction handler () { EVENT_DATA=$1 RESPONSE="{\"statusCode\": 200, \"body\": \"Hello from Lambda!\"}" echo $RESPONSE }結局こちらでやるべきことは以下となる。
- レイヤーに https://github.com/stackery/php-lambda-layer に書かれているものを設定する。PHP 7.3なら「arn:aws:lambda:(リージョン):887080169480:layer:php73:3」。
- bootstrapを修正してPHPのスクリプトを呼ぶようにする。
- PHPのスクリプトはbootstrapから呼べる場所に置く。
Lambda側へ渡したいファイルの作成
というわけでbootstrapをPHPのスクリプトを呼ぶように修正してみる。
bootstrap#!/bin/sh set -euo pipefail while true do # Request the next event from the Lambda runtime HEADERS="$(mktemp)" EVENT_DATA=$(curl -sS -LD "$HEADERS" -X GET "http://${AWS_LAMBDA_RUNTIME_API}/2018-06-01/runtime/invocation/next") INVOCATION_ID=$(grep -Fi Lambda-Runtime-Aws-Request-Id "$HEADERS" | tr -d '[:space:]' | cut -d: -f2) # Execute the handler /opt/bin/php -c "${LAMBDA_TASK_ROOT}/php.ini" "${LAMBDA_TASK_ROOT}/${_HANDLER}.php" if [ $? -eq 0 ]; then RESPONSE="{\"statusCode\": 200, \"body\": \"Success\"}" else RESPONSE="{\"statusCode\": 500, \"body\": \"Error\"}" fi # Send the response to Lambda runtime curl -sS -X POST "http://${AWS_LAMBDA_RUNTIME_API}/2018-06-01/runtime/invocation/$INVOCATION_ID/response" -d "$RESPONSE" > /dev/null done上記の通り
/opt/bin/php -c "${LAMBDA_TASK_ROOT}/php.ini" "${LAMBDA_TASK_ROOT}/${_HANDLER}.php"としたので、スクリプトファイルはbootstrapと同じディレクトリに"(ハンドラ名).php"という名前で置くことになる。
もっとも、ファイル名は変化するわけではないのでハンドラ名なんて使わなくても良いのだが、設定必須項目が使われないのもちょっと、ということで。ここでphp.iniも使うようにしている。
これは今回のサンプルスクリプトがsimplexml.soとjson.soを使うので、それらをロードする必要があるためである。
simplexml.soとjson.soは https://github.com/stackery/php-lambda-layer に書かれている通りカスタムランタイム側で用意してくれているので、これらをロードすれば良い。
内容は以下となる。extension_dirでsoファイルが置かれているディレクトリを指定しないとロードできなかった。
これもbootstrapと同じディレクトリに配置する。php.iniextension_dir=/opt/lib/php/7.3/modules extension=simplexml extension=json説明をbootstrap側に戻す。
スクリプトの実行結果はスクリプトの実行時のリターンコードが0かどうかで中身を変えているだけに今回はしてある。他にも元のbootstrapと比べて特に欲しくない情報は出力しないようにしている。
これは標準出力や標準エラー出力へのすべての書き出しがCloudwatch Logsに出力されるからである。
逆に言えば、スクリプト側ではログ出力したい情報は標準出力か標準エラー出力に書き出すようにしておくと良い。また、 http://\${AWS_LAMBDA_RUNTIME_API}/2018-06-01/runtime/invocation/next をGETした際のレスポンスボディ(EVENT_DATA変数に格納されるもの。JSONである)はまったく使わずに握り潰している。
今回のサンプルスクリプトファイルの内容は以下である。
先に書いた通り、単に「AWS Lambdaの実行リージョンと同じリージョンにある、そのアカウントが持つEC2インスタンスのIDのリストを取得する」だけのものとさせてもらっている。script.php<?php require 'aws/aws-autoloader.php'; use Aws\Ec2\Ec2Client; $ec2Client = new Ec2Client([ 'version' => 'latest', 'region' => $_ENV['AWS_REGION'], ]); $reservations = $ec2Client->describeInstances()['Reservations']; foreach ($reservations as $reservation) { echo $reservation['Instances'][0]['InstanceId'] . "\n"; } ?>このスクリプトのファイル名をscript.phpという名前にしたので、ハンドラ名はscriptとなる。
AWS SDK for PHPを呼んでいるがインストールは https://docs.aws.amazon.com/ja_jp/sdk-for-php/v3/developer-guide/getting-started_installation.html の一番下、「ZIPファイルを使用したインストール」で行っている。
展開位置はbootstrapと同じディレクトリであり、つまりbootstrap, php.ini, script.phpの3ファイルが置かれているディレクトリにawsディレクトリが作られている。
なお、私はPHPをほとんど触ったことないのでComposerの使い方とか知らないが、一般にはComposerを使うものだと思われる。Lambda側へファイルを渡すための準備
修正したbootstrapやphp.ini, script.php、それに展開したAWS SDK for PHPはLambda側に置く必要がある。
AWSマネジメントコンソールを使うなら「関数コード」にてzipにして渡したりできる。
今回はCloudformationを使う。その場合、zipをS3に置いておく必要がある。zipにする時の注意だが、bootstrapはLinuxファイルシステムにおける実行権限がついていなければならない。
特にWindows上で作業する場合は注意すること。WSLを使って作業するなどで問題ないと思われるが。また、ルートディレクトリがzip書庫内に含まれていてはならない。
私は以下のコマンドで圧縮している。
ここでlambda-phpはbootstrapやphp.ini, script.php, 展開したAWS SDK for PHPが置かれているディレクトリとする。$ cd lambda-php; zip -r ../src.zip .; cd -この作成したzip(ここではsrc.zipという名前にしている)をS3にアップロードするが、こちら側の注意点としては https://docs.aws.amazon.com/ja_jp/AWSCloudFormation/latest/UserGuide/aws-properties-lambda-function-code.html のS3Bucketの項に書かれている通り、Cloudformationを実行する(=Lambda関数が作成される)リージョンと同じリージョンのバケットを使用しなければならないことである。
また、バケットは別のAWSアカウントのものでも良いが、その場合はCloudformationを実行するアカウントからsrc.zipがアクセス権限上ダウンロード可能になっていないとならない。簡単にはパブリックアクセス可能にしておくなど。
Cloudformationテンプレートの作成
Lambda関数の一式をCloudformationで作成するにあたり、 https://github.com/stackery/php-lambda-layer にはAWS SAMを使った例が出ている。
これをやりたいことに合わせて適当に修正したtemplate.ymlというファイルにしたものが以下である。
(先に言っておくと私はこの方法を使用していないので、やり方だけ書く)template.ymlAWSTemplateFormatVersion: 2010-09-09 Transform: AWS::Serverless-2016-10-31 Resources: IamRole: Type: "AWS::IAM::Role" Properties: AssumeRolePolicyDocument: Version: "2012-10-17" Statement: - Effect: "Allow" Principal: Service: - "lambda.amazonaws.com" Action: - "sts:AssumeRole" Path: "/" Policies: - PolicyName: "CreateLogPolicy" PolicyDocument: Version: "2012-10-17" Statement: - Effect: "Allow" Action: - "logs:CreateLogGroup" Resource: !Sub "arn:aws:logs:${AWS::Region}:${AWS::AccountId}:*" - Effect: "Allow" Action: - "logs:CreateLogStream" - "logs:PutLogEvents" Resource: !Sub "arn:aws:logs:${AWS::Region}:${AWS::AccountId}:log-group:/aws/lambda/${AWS::StackName}-function:*" - PolicyName: "ScriptPolicy" PolicyDocument: Version: "2012-10-17" Statement: - Effect: "Allow" Action: - "ec2:DescribeInstances" Resource: "*" ServerlessFunction: Type: "AWS::Serverless::Function" Properties: FunctionName: !Sub "${AWS::StackName}-function" CodeUri: src Runtime: provided Handler: script Role: !GetAtt IamRole.Arn MemorySize: 128 Timeout: 10 Layers: - !Sub "arn:aws:lambda:${AWS::Region}:887080169480:layer:php73:3" Events: event: Type: Schedule Properties: Schedule: "cron(*/5 * * * ? *)"Eventsは5分ごとに定期実行するための設定にしてある。なお、実際には20から30秒程度遅れて実行されるようだ。実行環境の起動に掛かる時間だろうか。
スケジュールはcronの時刻設定書式が使用できるが、 https://docs.aws.amazon.com/ja_jp/AmazonCloudWatch/latest/events/ScheduledEvents.html の通り一般的なcronのものの書式とは違いがあり、年を指定でき、日か曜日の使わない方は"?"にするなどの必要がある。
IAM roleはCloudwatch Logsにログを出力するのを許可するもの(CreateLogPolicy)と、スクリプトで必要なEC2インスタンスの一覧を取得するのを許可するもの(ScriptPolicy)を設定してある。
カスタムランタイムを使用する場合、通常Runtimeを"provided"にしてLayersに使用するカスタムランタイムを設定する。
また、与えるメモリ量は最小の128MB、強制終了までの時間は10秒に設定している。AWS CLIがインストールされた環境で、
aws cloudformation package --s3-bucket (deployを実行するのと同じリージョンにある適当な存在するバケット名) --template-file template.yml --output-template-file output.ymlを実行するとCodeUriで指定したディレクトリの中にあるファイルを再帰的にzip圧縮してS3の--s3-bucketで指定したバケットにアップロードしてくれ(ファイル名はzipファイルのmd5のように見える)、Cloudformationに食わせられるテンプレートファイルを--output-template-fileに指定した名前で生成してくれる。
ただ、このzip作成時にbootstrapに自動的に実行権限を付けてくれたら嬉しかったのだがそうはいかなかった。生成されたoutput.ymlの内容は以下である。
output.ymlAWSTemplateFormatVersion: 2010-09-09 Transform: AWS::Serverless-2016-10-31 Resources: IamRole: Type: AWS::IAM::Role Properties: AssumeRolePolicyDocument: Version: '2012-10-17' Statement: - Effect: Allow Principal: Service: - lambda.amazonaws.com Action: - sts:AssumeRole Path: / Policies: - PolicyName: CreateLogPolicy PolicyDocument: Version: '2012-10-17' Statement: - Effect: Allow Action: - logs:CreateLogGroup Resource: Fn::Sub: arn:aws:logs:${AWS::Region}:${AWS::AccountId}:* - Effect: Allow Action: - logs:CreateLogStream - logs:PutLogEvents Resource: Fn::Sub: arn:aws:logs:${AWS::Region}:${AWS::AccountId}:log-group:/aws/lambda/${AWS::StackName}-function:* - PolicyName: ScriptPolicy PolicyDocument: Version: '2012-10-17' Statement: - Effect: Allow Action: - ec2:DescribeInstances Resource: '*' ServerlessFunction: Type: AWS::Serverless::Function Properties: FunctionName: Fn::Sub: ${AWS::StackName}-function CodeUri: s3://xxxxxxxxxxxx/6d54284568d5c9f126c866bc6483835d Runtime: provided Handler: script Role: Fn::GetAtt: - IamRole - Arn MemorySize: 128 Timeout: 10 Layers: - Fn::Sub: arn:aws:lambda:${AWS::Region}:887080169480:layer:php73:3 Events: event: Type: Schedule Properties: Schedule: cron(*/5 * * * ? *)この生成されたoutput.ymlを使用して
aws cloudformation deploy --template-file output.yml --capabilities CAPABILITY_IAM --stack-name (適当なスタック名)を実行すると、Cloudformationを使用したデプロイが実行される。
https://github.com/stackery/php-lambda-layer ではこれらのコマンドはAWS SAM CLIを使用して実行されているが、インストールしてみてsam --helpするとsam packageはaws cloudformation packageの、sam deployはaws cloudformation deployのエイリアスであることが分かるので、たぶんSAM CLIをインストールする必要は実際にはないと思われる。生成されたoutput.ymlはSAMテンプレート形式で記述されており、Cloudformationで実行時にTransformによりCloudformationテンプレート形式に変換される。
実行しないと実際に何になるのかがわからないのがちょっと嫌だったので、実行後にAWSマネージメントコンソールのCloudformationのところで見られる変換後のテンプレートを参考に、最初からCloudformationテンプレート形式で書くことにした、というのが先に書いた通り上記のSAMテンプレートを使用する方式を使わなかった理由である。
aws cloudformation packageを使っていないので、上記「Lambda側へファイルを渡すための準備」の通りに圧縮して作ったsrc.zipをS3(以下の例では「xxxxxxxxxxxx-(リージョン名)」というバケット)にアップロードしてある。というわけで作成したCloudformationテンプレートが以下である。
AWSTemplateFormatVersion: "2010-09-09"
Resources:
  IamRole:
    Type: "AWS::IAM::Role"
    Properties:
      AssumeRolePolicyDocument:
        Version: "2012-10-17"
        Statement:
          -
            Effect: "Allow"
            Principal:
              Service:
                - "lambda.amazonaws.com"
            Action:
              - "sts:AssumeRole"
      Path: "/"
      Policies:
        -
          PolicyName: "CreateLogPolicy"
          PolicyDocument:
            Version: "2012-10-17"
            Statement:
              -
                Effect: "Allow"
                Action:
                  - "logs:CreateLogGroup"
                Resource: !Sub "arn:aws:logs:${AWS::Region}:${AWS::AccountId}:*"
              -
                Effect: "Allow"
                Action:
                  - "logs:CreateLogStream"
                  - "logs:PutLogEvents"
                Resource: !Sub "arn:aws:logs:${AWS::Region}:${AWS::AccountId}:log-group:/aws/lambda/${AWS::StackName}-function:*"
        -
          PolicyName: "ScriptPolicy"
          PolicyDocument:
            Version: "2012-10-17"
            Statement:
              -
                Effect: "Allow"
                Action:
                  - "ec2:DescribeInstances"
                Resource: "*"
  LambdaFunction:
    Type: "AWS::Lambda::Function"
    Properties:
      FunctionName: !Sub "${AWS::StackName}-function"
      Code:
        S3Bucket: !Sub "xxxxxxxxxxxx-${AWS::Region}"
        S3Key: src.zip
      Handler: script
      MemorySize: 128
      Timeout: 10
      Role: !GetAtt IamRole.Arn
      Runtime: provided
      Layers:
        - !Sub "arn:aws:lambda:${AWS::Region}:887080169480:layer:php73:3"
  EventsRule:
    Type: "AWS::Events::Rule"
    Properties:
      ScheduleExpression: "cron(*/5 * * * ? *)"
      Targets:
        -
          Id: !Sub "${AWS::StackName}-rule-target"
          Arn: !GetAtt LambdaFunction.Arn
  LambdaPermission:
    Type: "AWS::Lambda::Permission"
    Properties:
      Action: "lambda:invokeFunction"
      Principal: "events.amazonaws.com"
      FunctionName: !Ref LambdaFunction
      SourceArn: !GetAtt EventsRule.Arn
SAMテンプレートのAWS::Serverless::Functionタイプが、CloudformationテンプレートだとAWS::Lambda::Function, AWS::Events::Rule, AWS::Lambda::Permissionの3つになる感じか。
これを
aws cloudformation deploy --template-file (テンプレートファイル名) --capabilities CAPABILITY_IAM --stack-name (適当なスタック名)を実行すると、こちらでもCloudformationを使用したデプロイが実行される。
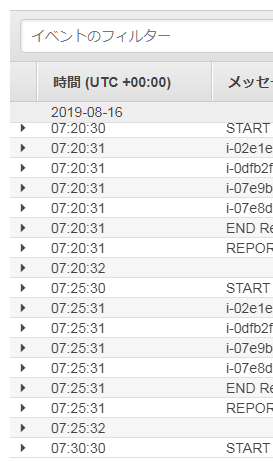
AWSマネジメントコンソールを使うなら"スタックの作成"でテンプレートファイルをアップロードし、「スタックの名前」を入力して「AWS CloudFormationによってIAMリソースが作成される場合があることを承認します。」のチェックを入れて「スタックの作成」を行えば同じことになる。ここまでやってCloudwatch Logsを見ると5分置きに実行されているのがわかる。
- 投稿日:2019-08-19T16:51:36+09:00
【初心者】Amazon Kinesis Video Streams を使ってみる(ラズパイカメラからの送信)
目的
- 動画配信について勉強する必要があり、とりあえず基本を実機で試してみることにした。
Kinesis Video Streams とは(自分の理解)
- カメラからの動画を受信してストリームとして保存し、配信や解析を行う他のサービスに渡すことができるサービス。
やったこと
- ラズパイ(Raspberry Pi 3 model B) にUSBカメラ(Buffalo BSWHD06M) を接続する。
- ラズパイにKinesis Video Streams のProducerSDKをインストール、設定する。
- ラズパイからの動画をAWS東京リージョンに送信し、マネージメントコンソールの動画プレビュー画面で確認する。
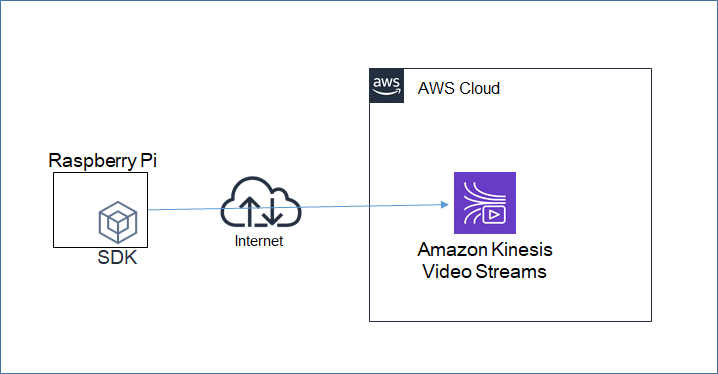
構成図
作業手順
公式ドキュメント:Kinesis ビデオストリーム の使用開始に従い作業を行う。
AccessKeyの発行
- IAMユーザを作成し、「AmazonKinesisVideoStreamsFullAccess」権限を付与し、AccessKeyを発行する。後でラズパイ側での動画送信コマンドの実行時に使用する。
ストリームの作成
- マネージメントコンソールのKinesis Video Streamsの画面で、ストリーム「mksamba-video-stream」を作成する。ストリームとは、動画をカメラ等(producer)から受信し、蓄積し、別サービス等(consumer)に渡すためのパイプのような領域。
ラズパイの準備
- OS(Raspbian Stretch) をインストールする。環境としては以下の通り。
pi@raspberrypi:~ $ lsb_release -a
No LSB modules are available.
Distributor ID: Raspbian
Description:    Raspbian GNU/Linux 9.8 (stretch)
Release:        9.8
Codename:       stretch
- USBカメラが/dev/video0として認識されていることを確認する。
クライアントのインストール
- 公式ドキュメント:ステップ 3: Kinesis ビデオストリームにデータを送信するに従い、ラズパイ用のクライアント(C++プロデューサーライブラリ)を入れる。
- ドキュメント通りに、「Raspbianの場合は…」というところを見ながらコマンドを入力したが、エラーが出まくるので、エラーから推測してパッケージを追加する。
$ git clone https://github.com/awslabs/amazon-kinesis-video-streams-producer-sdk-cpp
$ sudo apt-get install gstreamer1.0-plugins-bad gstreamer1.0-plugins-good gstreamer1.0-plugins-ugly gstreamer1.0-tools
$ sudo apt-get install gstreamer1.0-omx
(kinesis-video-native-build ディレクトリに移動し、) $ ./min-install-script
- 以下は公式ドキュメントにはないが追加インストールしたもの。まず ./min-install-script 実行時に cmakeがないと言われるので、cmakeを追加。
$ sudo apt-get install cmake
- 次に「Could NOT find Log4cplus (missing: LOG4CPLUS_LIBRARIES LOG4CPLUS_INCLUDE_DIR)」等のエラーが出るので、以下を追加。
- 以下のパッケージが必要なことについて、公式ドキュメントには載っていなかったが、githubのREADMEには記載があった。
$ sudo apt-get install libssl-dev libcurl4-openssl-dev liblog4cplus-1.1-9 liblog4cplus-dev
- 公式ドキュメントに記載の以下のコマンドでカメラ動画のKinesis Video Streamsへの送出を試みたが、いくつかエラーが発生。順次修正する。
$ gst-launch-1.0 v4l2src device=/dev/video0 ! videoconvert ! video/x-raw,format=I420,width=640,height=480 ! omxh264enc control-rate=2 target-bitrate=512000 periodicity-idr=45 inline-header=FALSE ! h264parse ! video/x-h264,stream-format=avc,alignment=au,profile=baseline ! kvssink stream-name="MyKinesisVideoStream" access-key="YourAccessKey" secret-key="YourSecretKey" aws-region="YourAWSRegion"
- まず、「WARNING: erroneous pipeline: プロパティ "periodicity-idr" がエレメント "omxh264enc-omxh264enc0" にありません」というWARNING(実際にはエラーであり動画送信不可)が発生。ここは「periodicity-idr」を「periodicty-idr」に修正する。(英単語としては「periodicity」だが、パラメータとしては「periodicty」で実装されている様子。)
- 次に、「WARNING: erroneous pipeline: エレメント "kvssink" がありません」というWARNINGが発生。公式ドキュメントには記載がないため、AWSサポートにも確認し、以下の設定を追加。kvssinkの実体であるlibgstkvssink.soをgstreamerから参照できるようパスを調整する必要がある。
export GST_PLUGIN_PATH=/home/pi/amazon-kinesis-video-streams-producer-sdk-cpp/kinesis-video-native-build/downloads/local/lib:$GST_PLUGIN_PATH
export LD_LIBRARY_PATH=/home/pi/amazon-kinesis-video-streams-producer-sdk-cpp/kinesis-video-native-build/downloads/local/lib
cp -p /home/pi/amazon-kinesis-video-streams-producer-sdk-cpp/kinesis-video-native-build/libgstkvssink.so /home/pi/amazon-kinesis-video-streams-producer-sdk-cpp/kinesis-video-native-build/downloads/local/lib/gstreamer-1.0/
動画送信の確認
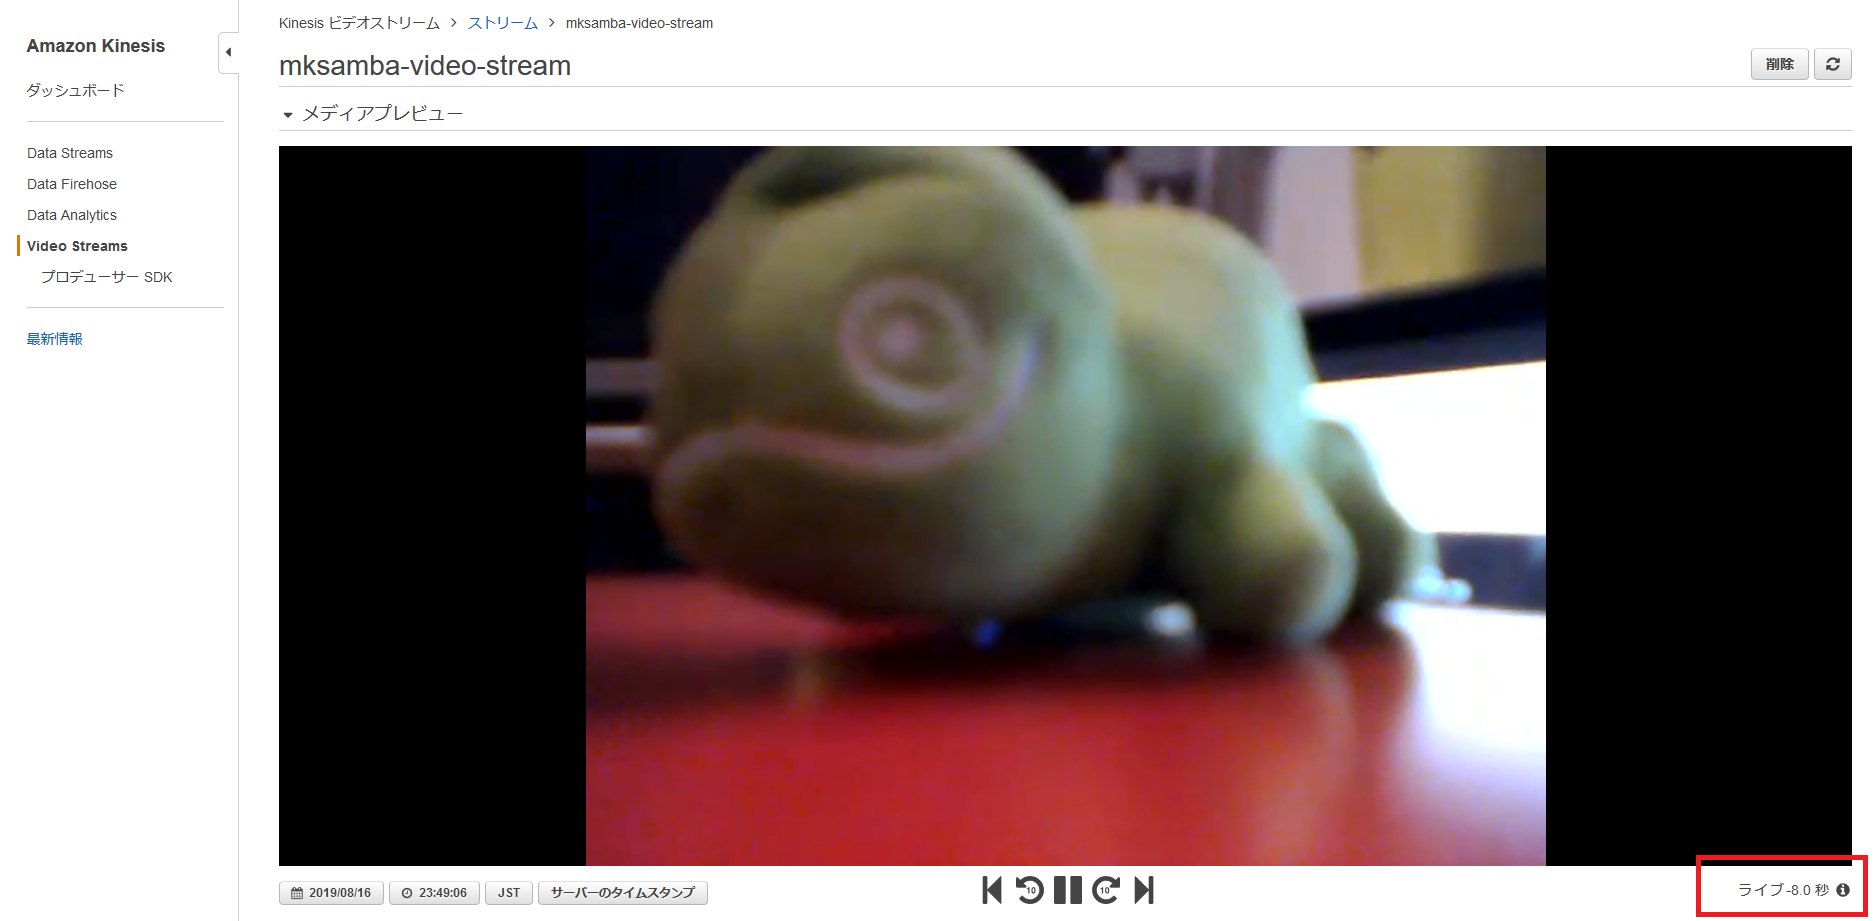
- 無事カメラの入力がKinesis Video Streamsに送信され、マネージメントコンソールで表示可能になった。
- 右下に「ライブ -8.0秒」と表示されており、筆者の環境だと、動画がアップロードされ、表示されるまでに約8秒かかっている。どこの区間に時間がかかっているかは不明(ラズパイのエンコード処理、インターネット経由のアップロード、AWS側での処理等)。
- ラズパイ側の仕組みのざっくり理解としては以下の通り。
- gstreamerというのは、ストリーミングメディアアプリケーションを作成するためのフレームワーク。
- kvssink というのは、AWSがgstreamer用に開発したプラグイン(シンクエレメント)。エレメントというのは、gstreamerの中で入出力を行うパイプのようなもので、シンクエレメントは、外部出力を行うエレメント。
所感
- クライアントのインストールに結構時間がかかってしまった。linuxの知識等があればドキュメントに記載がなくてももう少し脳内補完できるのかも、、
- 次のステップとしてはRekognition Video等との連携を実施してみたい。
参考記事
- 投稿日:2019-08-19T16:00:15+09:00
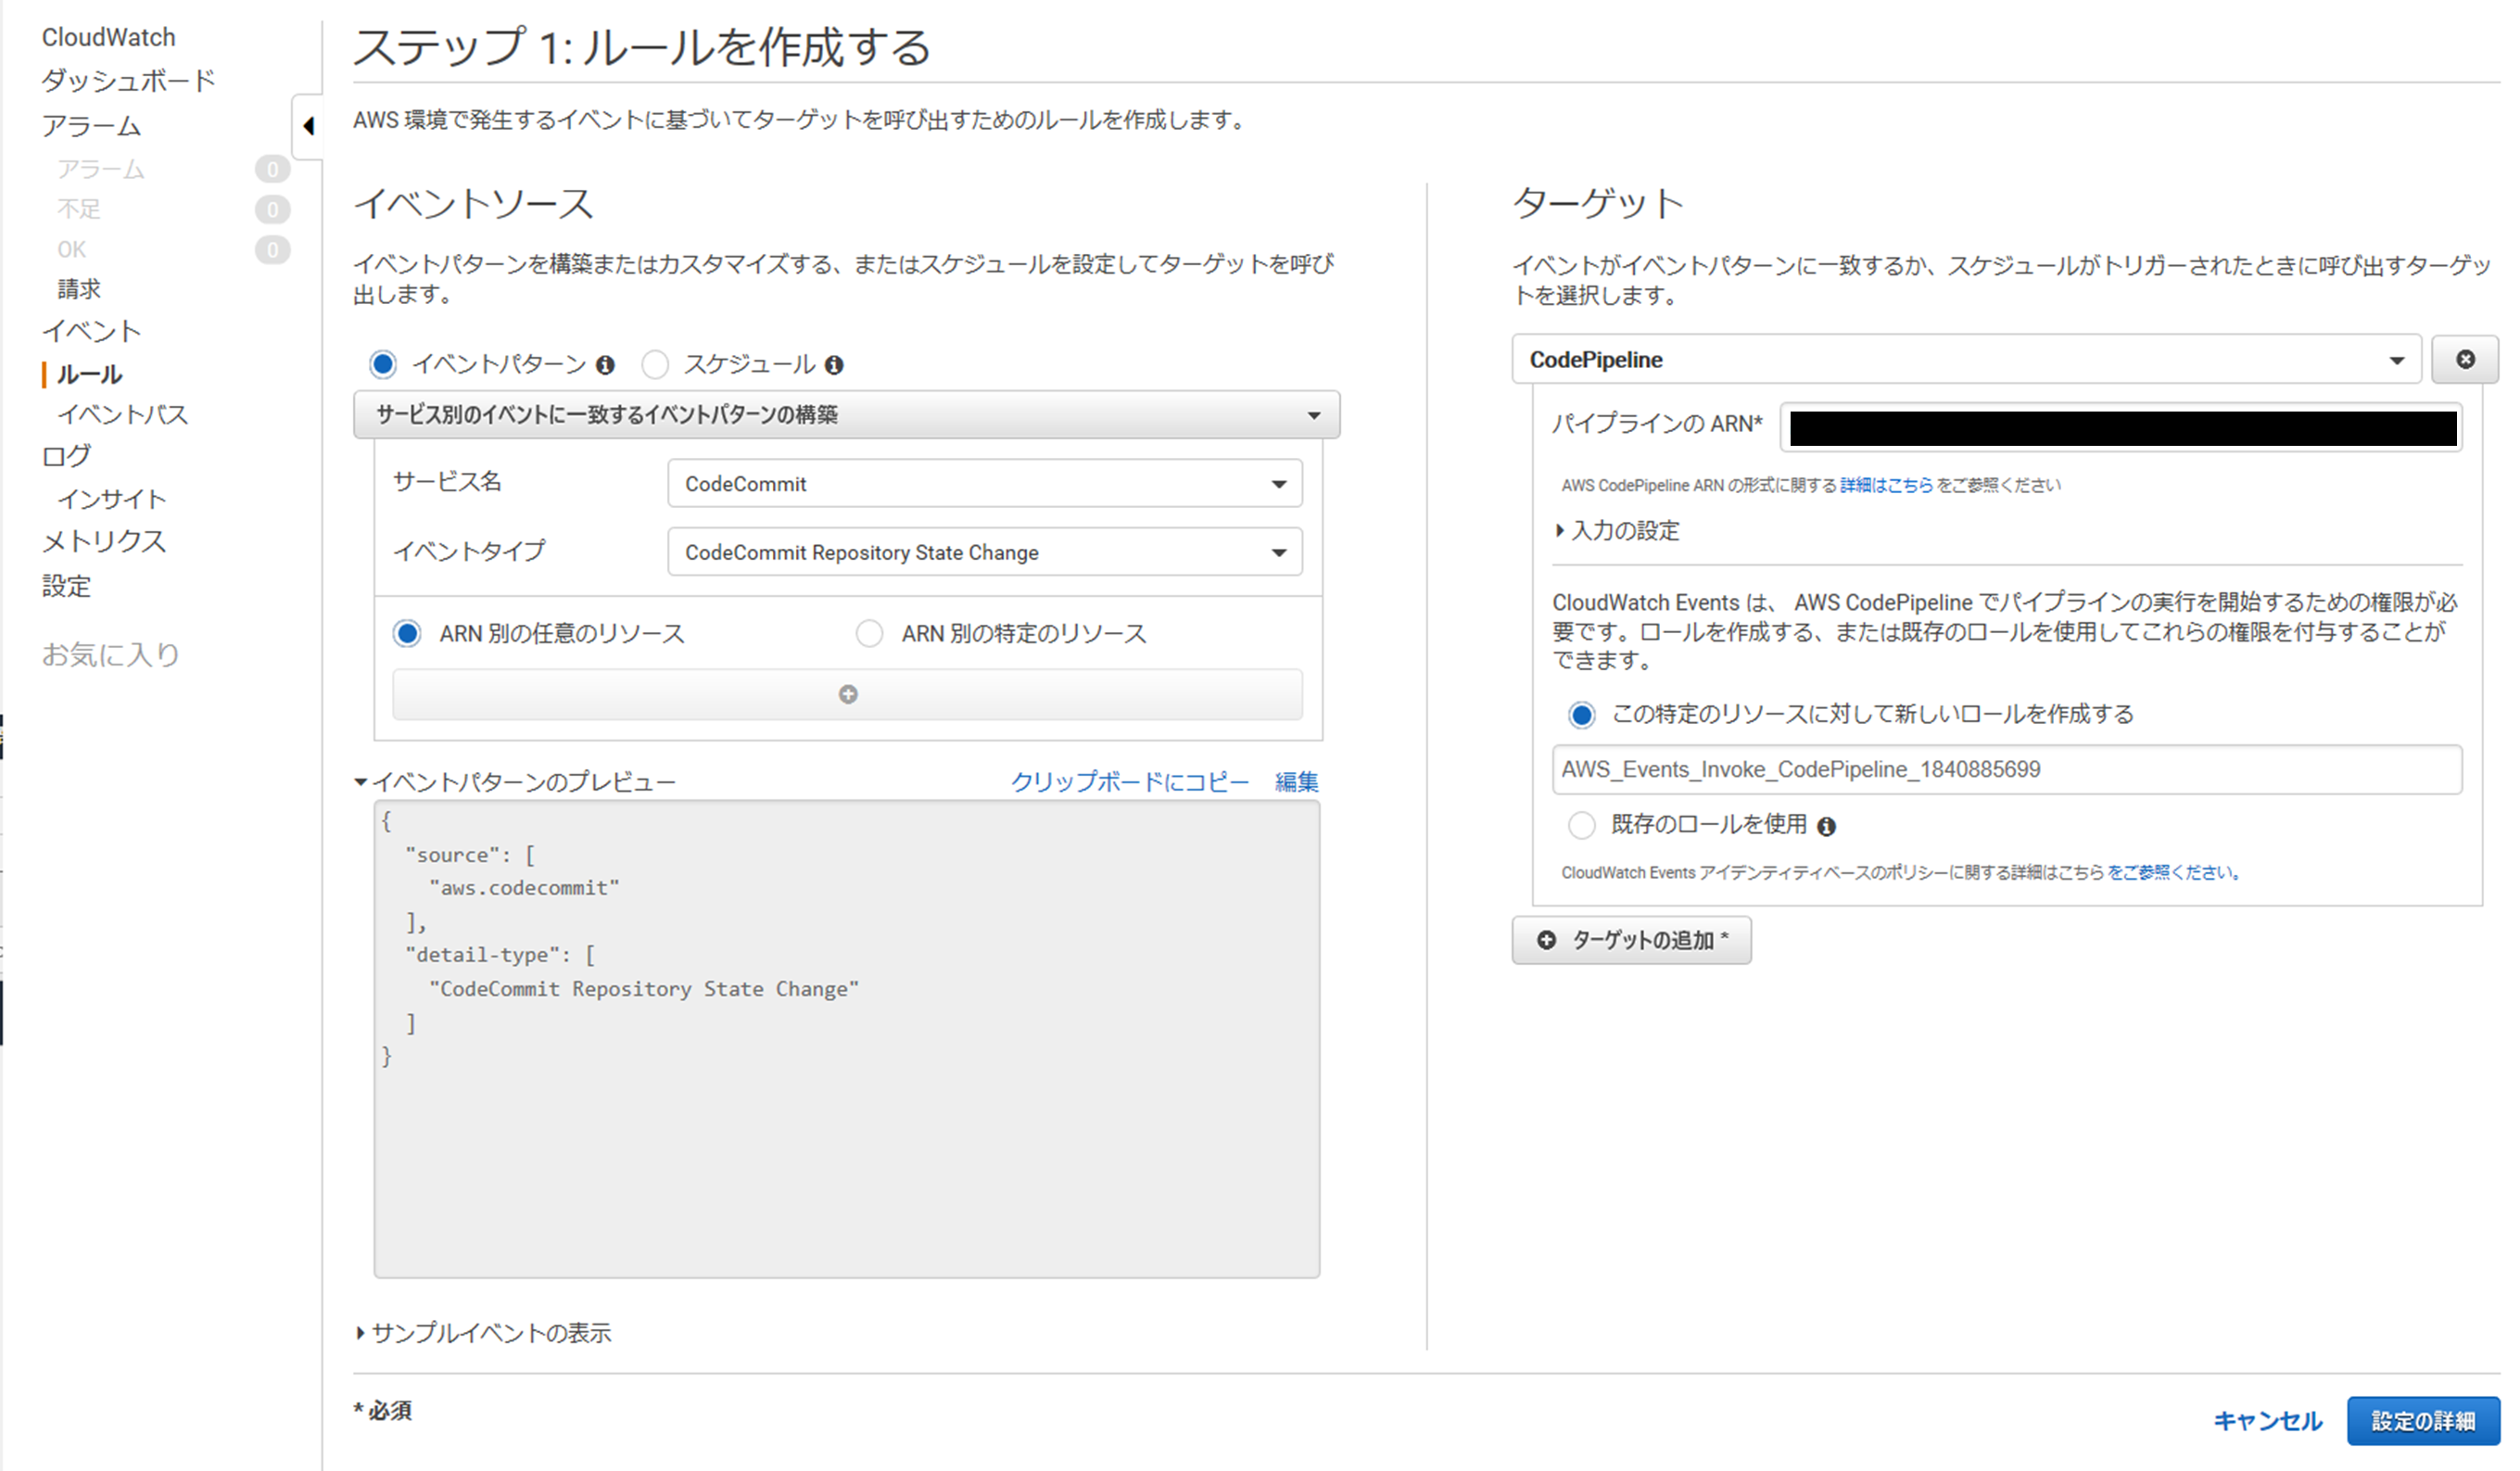
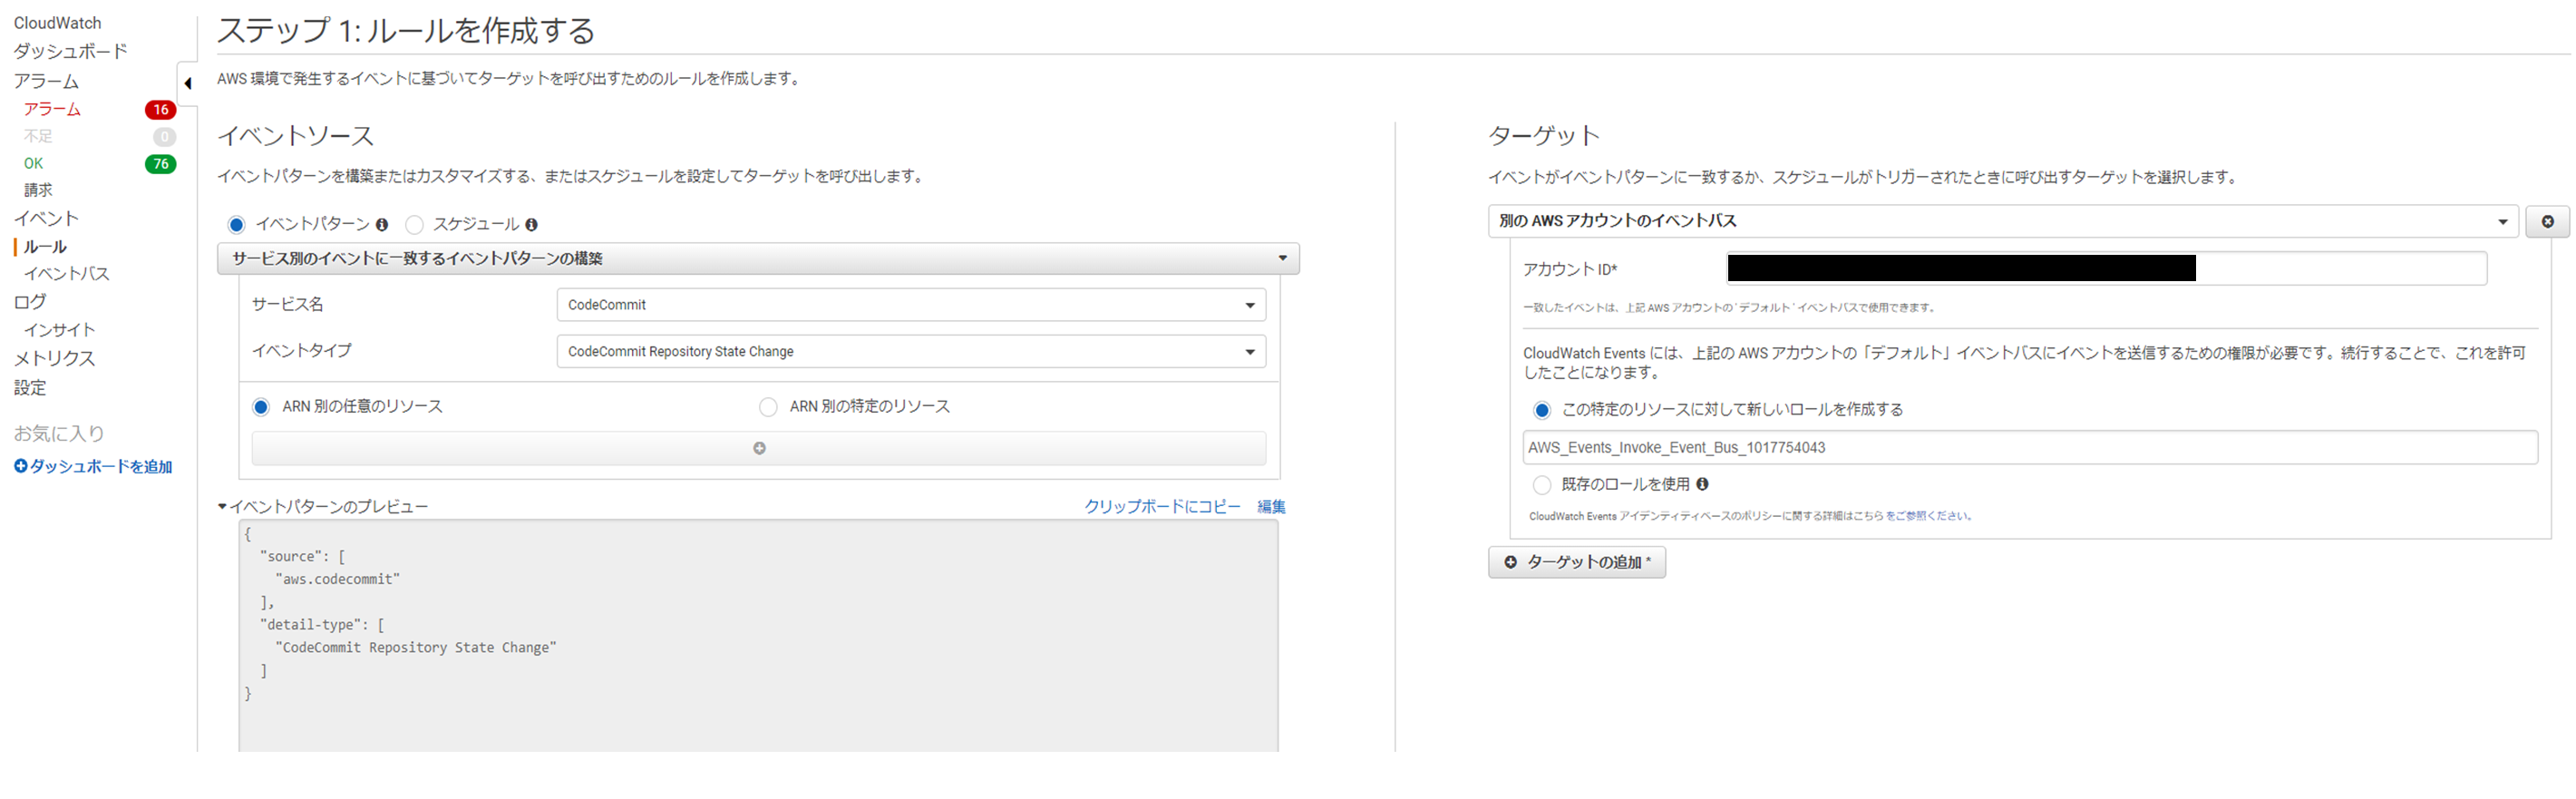
AWSアカウントをまたいで、CodePipelineを作成するときに必要な設定
目的
わからずにサポートに問い合わせをしたので、備忘録としてメモ。
経緯
こういうアカウントをまたいだCodePipelineを作成しようとしたときに、いくらGit PushしてもCodePipeLineが起動しなかった。
ググってでてきたサンプル通りに作ったのにだめでした・・・
解決
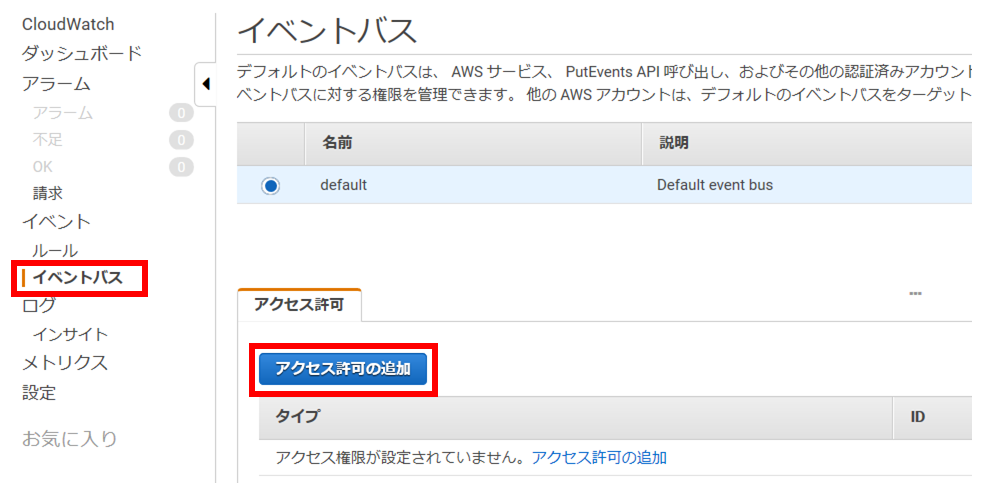
CloudWatch Events のイベントバスの機能を使用することで解決。
イベントバスを設定することでA環境とB環境がつながる。
※CodePipeLineは、ポーリングでCodePipelineの変更を検知するのではなく、CloudWatch Eventsを使用して検知することを推奨しているので、CloudWatch Eventsを使用して行う方法。CodePipeLineを作成する環境(B環境)
イベントパスを追加
・CloudWatch コンソール画面左のメニューより [イベントバス] を選択。
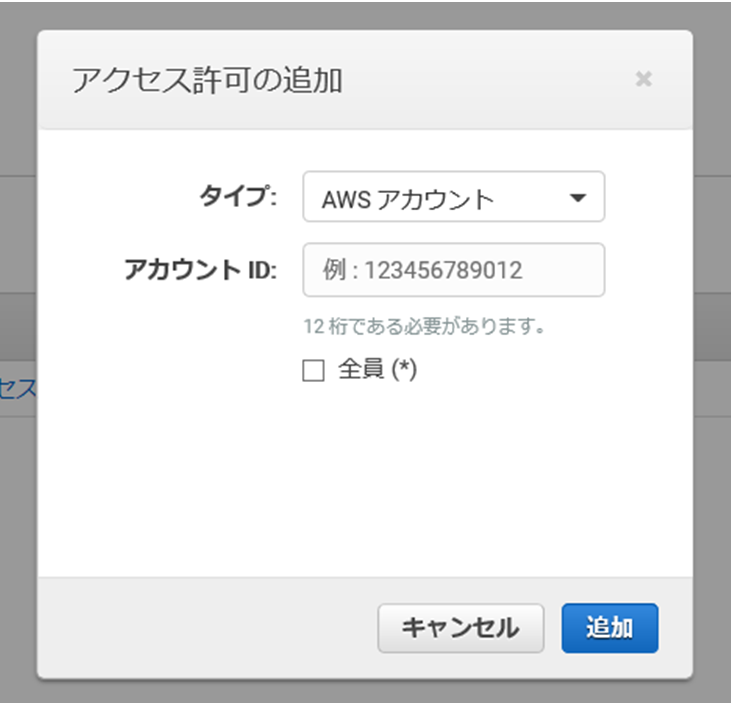
・[アクセス許可を追加]ボタンを押下
・タイプにAWSアカウントを選択し、CodecommitがあるアカウントのIDを入力して、[追加]ボタンを押下。
CloudWatch Eventsを追加
・下記のように入力して追加。
Codecommitがある環境(A環境)
CloudWatch Eventsを追加
・下記のように入力して追加。アカウントIDは、CodePipeLineがある環境のアカウントIDを指定する。
最後に
CodePipeLineの設定はセミナーとかで聞くと簡単そうですが、実際にやってみるとわからないことだらけで大変ですね・・・
CodeBuildの設定でも苦労してるのに・・・参考資料(サポートが提供してくれたリンク)
[1] 定期的なチェックを使用してパイプラインを開始する - CodePipeline https://docs.aws.amazon.com/ja_jp/codepipeline/latest/userguide/run-automatically-polling.html
===(抜粋)===========================================
リポジトリの変更が検出されると、パイプラインが自動的に開始されます。変更検出方法のひとつに、定期的なチェックがあります。PollForSourceChanges フラグを使用すると、定期的なチェックを有効あるいは無効にできます。CLI を使用して、パイプラインを作成または編集する場合、このパラメータはデフォルトで true に設定されます。この設定は推奨されません。代わりに、推奨される変更検出方法を使用するようにパイプラインを編集し、このパラメータを false に設定します。
====================================================[2] パイプラインを編集してプッシュイベントを使用する - CodePipeline https://docs.aws.amazon.com/ja_jp/codepipeline/latest/userguide/update-change-detection.html
===(抜粋)===========================================
AWS CodePipeline は、完全なエンドツーエンドの継続的デリバリーをサポートしています。このサービスでは、コードの変更があると、パイプラインが開始されます。コードが変更されたときにパイプラインを開始する方法は 2 つあります。・イベント (Amazon CloudWatch Events またはウェブフック)
・ポーリング (定期的に確認)当初は、ポーリングのみがサポートされていました。イベントは、コードが変更されたときにパイプラインを開始するためのデフォルトの推奨方法です。
====================================================[3] AWS アカウント間のイベントの送受信 - Amazon CloudWatch Events https://docs.aws.amazon.com/ja_jp/AmazonCloudWatch/latest/events/CloudWatchEvents-CrossAccountEventDelivery.html
[4] CodeCommit ソースの CloudWatch イベント ルールを作成する (コンソール) - CodePipeline https://docs.aws.amazon.com/ja_jp/codepipeline/latest/userguide/pipelines-trigger-source-repo-changes-console.html
- 投稿日:2019-08-19T15:06:53+09:00
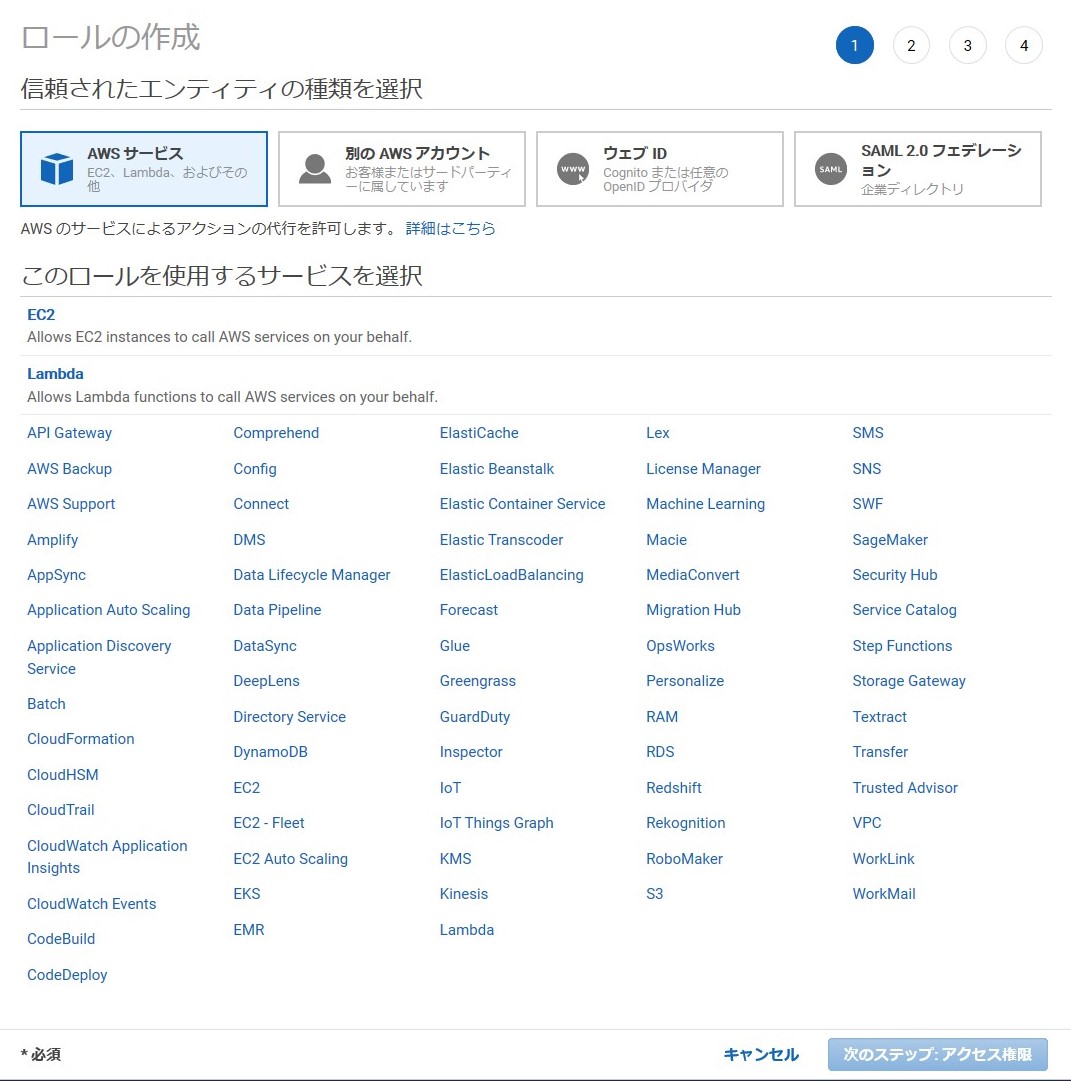
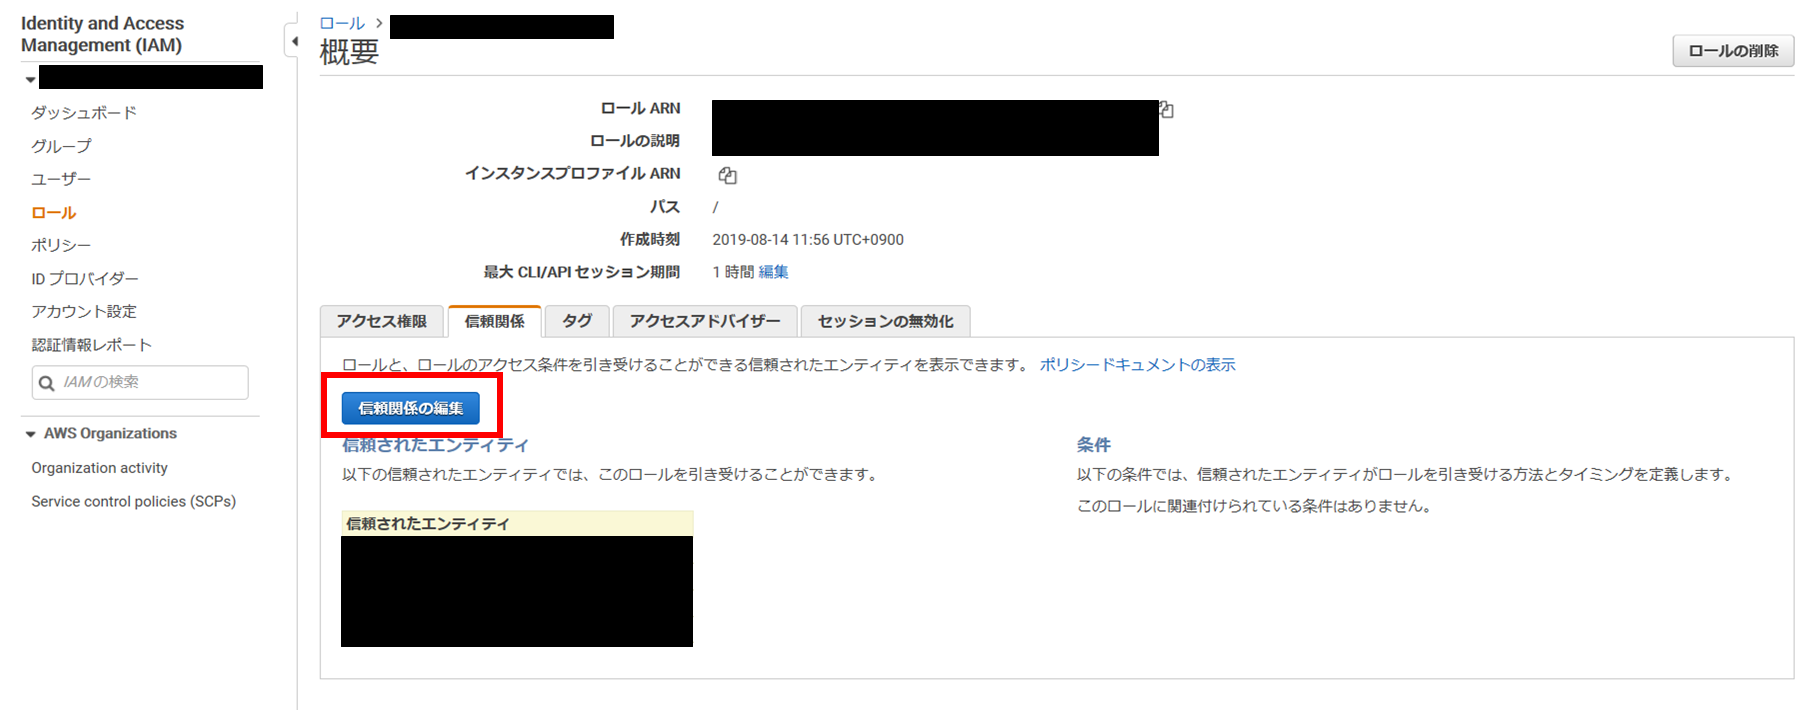
マネジメントコンソールでCodePipelineのロールを作成するときの注意
目的
CodePipelineのロールを作成するときに、わからないことがありサポートに問い合わせため備忘録。
経緯
AWSサービスの中にCodePipelineがない!
CodeBuild/CodeDeployはあるけど・・・
試しにCodeBuildでロールを作成し、CodePipelineにロールを設定してもうまくいかず。。解決
一旦、テキトーなAWSサービスを選んでロールを作成。
作成した後に、個別に修正する。・[信頼関係の編集]ボタンを押下
・ポリシードキュメントのServiceを下記に変更し、[信頼ポリシーの更新]ボタン押下。
        "Service": [
          "codepipeline.amazonaws.com"
        ]
感想
画面になければ自分でコードで編集せいっていうね。。。
- 投稿日:2019-08-19T10:40:36+09:00
[memo]shellでAWS S3にログデータを定期に同期させる実行
承前
今までPHPのバックエンドしかやってこなかった人間が初めてShell Scriptに挑戦した記録的なやつ。
AWSコマンド(AWS cli)は事前インストールしておいてください何するの?
EC2に吐き出したログをS3バケットに同期しなきゃという使命感をもって対応する
何した?
EC2のlogを吐き出している場所に対して、S3にSyncをする処理を作る
同期の際は同日に反映されたファイルは上書きするていで良かったらしい(お現場事情)s3_sync_log_api_details.sh#!/bin/sh ## s3_sync_log_api_details.sh $@ ## # initial parameter export PATH=/sbin:/bin:/usr/sbin:/usr/bin export EC2_REGION=`curl -s http://[domain_name]/latest/meta-data/local-hostname | cut -d '.' -f2` INSTANCE_ID=`curl -s http://[domain_name]/latest/meta-data/instance-id` AWS_CONFIG_FILE="/root/.aws/config" # sync detail directories LOG_DIR="/var/log/[project_name]" # sync s3 buckets BUKET_NAME="s3://[s3_repository_domain]/api/log/" # sync logging file into s3 aws s3 sync ${LOG_DIR} ${BUKET_NAME}その次は?
定期的に同期をする必要があるので設定をする必要がありますね
今回は10分毎に同期させようという話crontab.conf/10 * * * * cd /srv/www/[my_directory]/config/sync; sh ./s3_sync_log_api_details.sh感想
このときLaravelを使っていたんですがなんでAtrisanを使わなかったんでしょうねっていう感じ。
でも実はしっかりとバッチで動かすってことをしてこなかったので経験としては非常によかったです。
- 投稿日:2019-08-19T09:00:15+09:00
AWS Cloud Development Kit(AWS CDK)でEC2インスタンスを立ち上げてみる
AWS Cloud Development Kit(AWS CDK)の利用ノウハウを増やすべく、EC2インスタンスを立ち上げてみました。
公式ドキュメントやGitHubのソースを眺めたらだいたいは実装できるのですが、ハマりポイントがちらほらとありました。AWS Cloud Development Kit(AWS CDK)ってなんぞ?という方は下記をご参考ください。
AWS クラウド開発キット (CDK) – TypeScript と Python 用がご利用可能に | Amazon Web Services ブログ
https://aws.amazon.com/jp/blogs/news/aws-cloud-development-kit-cdk-typescript-and-python-are-now-generally-available/前提
- AWSアカウントがある
- AWS CLIが利用できる
- Node.jsがインストール済み
AWS CDKのインストール
AWS CDKのコマンドが利用できるようにするため、
aws-cdkをインストールします。
リリース後も頻繁にアップデートされていますので、インストール済みの方も最新バージョンか確認しておくと良いかもです。> node -v v10.11.0 > npm -v 6.10.1 > npm i -g aws-cdk # fishの場合 > exec fish -l > cdk --version 1.2.0 (build 6b763b7)AWS CDKプロジェクト作成
cdkコマンドでプロジェクトを作成します。言語はTypeScriptを利用します。> mkdir use-cdk-ec2 > cd use-cdk-ec2 > cdk init app --language=typescript Applying project template app for typescript Initializing a new git repository... Executing npm install... npm notice created a lockfile as package-lock.json. You should commit this file. npm WARN use-cdk-ec2@0.1.0 No repository field. npm WARN use-cdk-ec2@0.1.0 No license field. # Useful commands * `npm run build` compile typescript to js * `npm run watch` watch for changes and compile * `cdk deploy` deploy this stack to your default AWS account/region * `cdk diff` compare deployed stack with current state * `cdk synth` emits the synthesized CloudFormation template
cdk initコマンドを実行すると以下のようにファイルが自動生成されました。
コマンド実行したディレクトリの名前が反映されました。> tree . -L 2 . ├── README.md ├── bin │ └── use-cdk-ec2.ts ├── cdk.json ├── lib │ └── use-cdk-ec2-stack.ts ├── node_modules (略) ├── package-lock.json ├── package.json └── tsconfig.json 3 directories, 5 files
@aws-cdk/aws-ec2のインストール
@aws-cdk/aws-ec2をインストールして利用できるようにします。aws-cdk/packages/@aws-cdk/aws-ec2 at master · aws/aws-cdk
https://github.com/aws/aws-cdk/tree/master/packages/%40aws-cdk/aws-ec2> npm install -s @aws-cdk/aws-ec2 + @aws-cdk/aws-ec2@1.1.0 added 4 packages from 1 contributor and audited 538 packages in 8.417s found 0 vulnerabilities実装する
@aws-cdk/aws-ec2を利用してEC2インスタンスが立ち上がるように実装します。
EC2インスタンスを立ち上げるには、VPC、サブネット、セキュリティグループが必要になります。bin/use-cdk-ec2.ts#!/usr/bin/env node import 'source-map-support/register'; import cdk = require('@aws-cdk/core'); import { UseCdkEc2Stack } from '../lib/use-cdk-ec2-stack'; const app = new cdk.App(); new UseCdkEc2Stack(app, 'UseCdkEc2Stack', { env: { account: process.env.CDK_DEFAULT_ACCOUNT, region: process.env.CDK_DEFAULT_REGION } });lib/use-cdk-ec2-stack.tsimport cdk = require('@aws-cdk/core'); import ec2 = require('@aws-cdk/aws-ec2/lib'); export class UseCdkEc2Stack extends cdk.Stack { constructor(scope: cdk.Construct, id: string, props?: cdk.StackProps) { super(scope, id, props); let vpc = ec2.Vpc.fromLookup(this, 'VPC', { vpcId: this.node.tryGetContext('vpc_id') }); const cidrIp = this.node.tryGetContext('cidr_ip'); const securityGroup = new ec2.SecurityGroup(this, 'SecurityGroup', { vpc }); securityGroup.addEgressRule(ec2.Peer.anyIpv4(), ec2.Port.allTraffic()); securityGroup.addIngressRule(ec2.Peer.ipv4(cidrIp), ec2.Port.tcp(22)); let ec2Instance = new ec2.CfnInstance(this, 'myInstance', { imageId: new ec2.AmazonLinuxImage().getImage(this).imageId, instanceType: new ec2.InstanceType('t3.small').toString(), networkInterfaces: [{ associatePublicIpAddress: true, deviceIndex: '0', groupSet: [securityGroup.securityGroupId], subnetId: vpc.publicSubnets[0].subnetId }], keyName: this.node.tryGetContext('key_pair') }); new cdk.CfnOutput(this, 'Id', { value: ec2Instance.ref }); new cdk.CfnOutput(this, 'PublicIp', { value: ec2Instance.attrPublicIp }); } }実装のポイントをいくつか上げてみます。
既存VPCをインポートする
VPCはAWS CDKで作成することもできますが、既存のVPCをインポートすることもできます。下記は実装例となります。
aws-cdk/integ.import-default-vpc.lit.ts at master · aws/aws-cdk
https://github.com/aws/aws-cdk/blob/master/packages/%40aws-cdk/aws-ec2/test/integ.import-default-vpc.lit.ts
ec2.Vpc.fromLookup()を利用してインポートしますが、その場合スタックのインスタンス作成時にアカウントとリージョン情報を渡す必要があります。そうするとAWS CDKが指定されたアカウント、リージョンからVPCの情報を取得してくれます。bin/use-cdk-ec2.ts#!/usr/bin/env node import 'source-map-support/register'; import cdk = require('@aws-cdk/core'); import { UseCdkEc2Stack } from '../lib/use-cdk-ec2-stack'; const app = new cdk.App(); new UseCdkEc2Stack(app, 'UseCdkEc2Stack', { env: { account: process.env.CDK_DEFAULT_ACCOUNT, region: process.env.CDK_DEFAULT_REGION } });
envを指定しないと以下のようなエラーが発生します。> cdk synth Cannot retrieve value from context provider vpc-provider since account/region are not specified at the stack level. Either configure 'env' with explicit account and region when you define your stack, or use the environment variables 'CDK_DEFAULT_ACCOUNT' and 'CDK_DEFAULT_REGION' to inherit environment information from the CLI (not recommended for production stacks) Subprocess exited with error 1
envについて詳しくはこちらが参考になります。Environments - AWS Cloud Development Kit (AWS CDK)
https://docs.aws.amazon.com/cdk/latest/guide/environments.html
ec2.Vpc.fromLookupの第3パラメータでVPCの絞り込み条件が指定できます。詳細は下記が詳しいです。interface VpcLookupOptions · AWS CDK
https://docs.aws.amazon.com/cdk/api/latest/docs/@aws-cdk_aws-ec2.VpcLookupOptions.html今回は、
vpcIdを指定します。lib/use-cdk-ec2-stack.ts(略) let vpc = ec2.Vpc.fromLookup(this, 'VPC', { vpcId: this.node.tryGetContext('vpc_id') }); (略)
scopeでなくthisを指定する
cdk.Stackを継承したクラス内で各リソースを定義するのに、第一パラメータにscope: cdk.Constructを指定する必要がありますが、個々で指定するべきは、クラスのconstructorにあるscopeではなく、thisを渡す必要があります。
VS Codeを利用しているとメソッドの説明でscopeとあるので、つい指定してしまいがちですが、エラーになります。
詳細は下記を参考ください。
TODO:リンク貼る
> cdk synth -v
(略)
No stack could be identified for the construct at path
Subprocess exited with error 1
Error: Subprocess exited with error 1
    at ChildProcess.proc.on.code (/Users/xxx/.anyenv/envs/ndenv/versions/v10.11.0/lib/node_modules/aws-cdk/lib/api/cxapp/exec.ts:110:23)
    at ChildProcess.emit (events.js:182:13)
    at ChildProcess.EventEmitter.emit (domain.js:442:20)
    at Process.ChildProcess._handle.onexit (internal/child_process.js:240:12)
外部から値を指定するには
Contextを利用する実装に含めたくない値がある場合、
cdkコマンドの--context(または -c)オプションで指定することができます。
実装ではthis.node.tryGetContext('KEY')で値が取得できます。値が複数ある場合、
--context(または -c)オプションを複数指定します。> cdk synth \ -c KEY=VALUE \ -c KEY2=VALUE2EC2インスタンスのパラメータ指定
EC2インスタンスは
ec2.CfnInstanceクラスを利用して定義します。パラメータについては下記が詳しかったです。
この辺を把握するにはCFnの利用経験がないとちょっと厳しいかもしれません。Interface CfnInstanceProps
https://docs.aws.amazon.com/cdk/api/latest/typescript/api/aws-ec2/cfninstanceprops.html#aws_ec2_CfnInstancePropsデプロイしてみる
実装ができたらデプロイしてみます。環境変数に設定するAWSアカウント番号(12桁の数値)とリージョン、
--contextオプションで指定する既存VPCのIDやキーペア、SSHアクセスを許可するIPアドレスについては各自のを指定してください。
cdkコマンドを実行する前にnpm run buildを忘れないようにしましょう。(大敗> npm run build > use-cdk-ec2@0.1.0 build /Users/kai/dev/aws/cdk/use-cdk-ec2 > tsc > export CDK_DEFAULT_ACCOUNT=999999999999 > export CDK_DEFAULT_REGION=us-east-1 > cdk deploy \ -c vpc_id=vpc-xxxxxxxx \ -c key_pair=cdk-test-ec2-key \ -c cidr_ip=xxx.xxx.xxx.xxx/32 This deployment will make potentially sensitive changes according to your current security approval level (--require-approval broadening). Please confirm you intend to make the following modifications: Security Group Changes ┌───┬──────────────────────────┬─────┬────────────┬────────────────────┐ │ │ Group │ Dir │ Protocol │ Peer │ ├───┼──────────────────────────┼─────┼────────────┼────────────────────┤ │ + │ ${SecurityGroup.GroupId} │ In │ TCP 22 │ xxx.xxx.xxx.xxx/32 │ │ + │ ${SecurityGroup.GroupId} │ Out │ Everything │ Everyone (IPv4) │ └───┴──────────────────────────┴─────┴────────────┴────────────────────┘ (NOTE: There may be security-related changes not in this list. See http://bit.ly/cdk-2EhF7Np) Do you wish to deploy these changes (y/n)? y UseCdkEc2Stack: deploying... UseCdkEc2Stack: creating CloudFormation changeset... 0/4 | 15:22:17 | CREATE_IN_PROGRESS | AWS::EC2::SecurityGroup | SecurityGroup (SecurityGroupDD263621) 0/4 | 15:22:17 | CREATE_IN_PROGRESS | AWS::CDK::Metadata | CDKMetadata 0/4 | 15:22:20 | CREATE_IN_PROGRESS | AWS::CDK::Metadata | CDKMetadata Resource creation Initiated 1/4 | 15:22:20 | CREATE_COMPLETE | AWS::CDK::Metadata | CDKMetadata 1/4 | 15:22:22 | CREATE_IN_PROGRESS | AWS::EC2::SecurityGroup | SecurityGroup (SecurityGroupDD263621) Resource creation Initiated 2/4 | 15:22:23 | CREATE_COMPLETE | AWS::EC2::SecurityGroup | SecurityGroup (SecurityGroupDD263621) 2/4 | 15:22:26 | CREATE_IN_PROGRESS | AWS::EC2::Instance | myInstance 2/4 | 15:22:27 | CREATE_IN_PROGRESS | AWS::EC2::Instance | myInstance Resource creation Initiated 3/4 | 15:22:43 | CREATE_COMPLETE | AWS::EC2::Instance | myInstance 4/4 | 15:22:45 | CREATE_COMPLETE | AWS::CloudFormation::Stack | UseCdkEc2Stack ✅ UseCdkEc2Stack Outputs: UseCdkEc2Stack.PublicIp = xxx.xxx.xxx.xxx UseCdkEc2Stack.Id = i-xxxxxxxxxxxxxxxxx Stack ARN: arn:aws:cloudformation:us-east-1:999999999999:stack/UseCdkEc2Stack/59b2a500-b292-11e9-8257-12505ef78976デプロイできたらSSHアクセスしてみます。
> ssh -i cdk-test-ec2-key \
  ec2-user@xxx.xxx.xxx.xxx

The authenticity of host 'xxx.xxx.xxx.xxx (xxx.xxx.xxx.xxx)' can't be established.
ECDSA key fingerprint is SHA256:xxx.
Are you sure you want to continue connecting (yes/no)? yes
Warning: Permanently added 'xxx.xxx.xxx.xxx' (ECDSA) to the list of known hosts.

       __|  __|_  )
       _|  (     /   Amazon Linux AMI
      ___|\___|___|

https://aws.amazon.com/amazon-linux-ami/2018.03-release-notes/
10 package(s) needed for security, out of 13 available
Run "sudo yum update" to apply all updates.
[ec2-user@ip-xxx-xxx-xxx-xxx ~]$
やったぜ。
後片付け
検証が済んだらスタックを削除しておきます。
> cdk destroy \
  -c vpc_id=vpc-xxxxxxxx
Are you sure you want to delete: UseCdkEc2Stack (y/n)? y
UseCdkEc2Stack: destroying...
   0 | 15:27:57 | DELETE_IN_PROGRESS   | AWS::CloudFormation::Stack | UseCdkEc2Stack User Initiated
   0 | 15:27:59 | DELETE_IN_PROGRESS   | AWS::CDK::Metadata      | CDKMetadata
   0 | 15:27:59 | DELETE_IN_PROGRESS   | AWS::EC2::Instance      | myInstance
   1 | 15:28:01 | DELETE_COMPLETE      | AWS::CDK::Metadata      | CDKMetadata

 ✅  UseCdkEc2Stack: destroyed
cdk destroyコマンドの-cオプションでvpc_idをつけないと下記のエラーが発生しました。
おそらく、cdk destroyコマンド実行時にもec2.Vpc.fromLookupが走ってしまうためみたいです。チョットフベン> cdk destroy The filter 'null' is invalidまとめ
@aws-cdk/aws-ec2パッケージのREADMEにEC2インスタンスについて記載がなく、それがむしろ気になって実装してみましたが、情報を調べつつの実装となり手間取りました。ただ、日頃からプログラミングする人であれば、慣れたらYAMLやJSONで定義するよりもスムーズに実装できる感がありました。参考
AWS クラウド開発キット (CDK) – TypeScript と Python 用がご利用可能に | Amazon Web Services ブログ
https://aws.amazon.com/jp/blogs/news/aws-cloud-development-kit-cdk-typescript-and-python-are-now-generally-available/aws-cdk/packages/@aws-cdk/aws-ec2 at master · aws/aws-cdk
https://github.com/aws/aws-cdk/tree/master/packages/%40aws-cdk/aws-ec2aws-cdk/integ.import-default-vpc.lit.ts at master · aws/aws-cdk
https://github.com/aws/aws-cdk/blob/master/packages/%40aws-cdk/aws-ec2/test/integ.import-default-vpc.lit.tsEnvironments - AWS Cloud Development Kit (AWS CDK)
https://docs.aws.amazon.com/cdk/latest/guide/environments.htmlVpc.from_lookup in v0.36 (python): Cannot retrieve value from context provider vpc-provider since account/region are not specified at the stack level · Issue #3082 · aws/aws-cdk
https://github.com/aws/aws-cdk/issues/3082interface VpcLookupOptions · AWS CDK
https://docs.aws.amazon.com/cdk/api/latest/docs/@aws-cdk_aws-ec2.VpcLookupOptions.htmlTODO:リンク貼る
Interface CfnInstanceProps
https://docs.aws.amazon.com/cdk/api/latest/typescript/api/aws-ec2/cfninstanceprops.html#aws_ec2_CfnInstanceProps
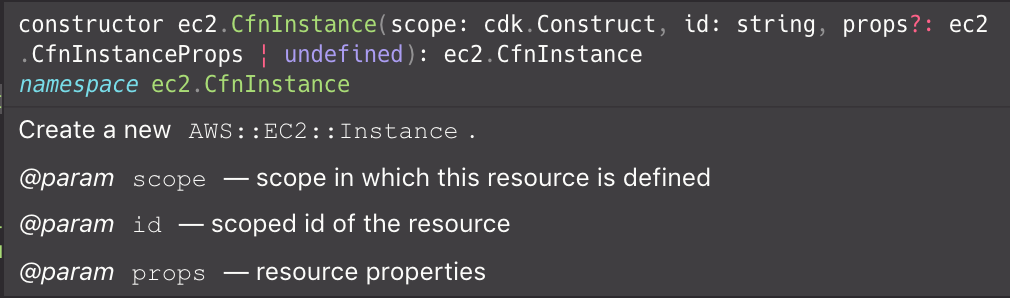
- 投稿日:2019-08-19T06:20:07+09:00
Amazon Managed BlockchainでHyperledger Fabric基盤を構築する
以前試した、AWS Blockchain TemplatesでHyperledger Fabric基盤を構築するから新しいブロックチェーンサービスが出たので試してみた。
(参考)
Get Started Creating a Hyperledger Fabric Blockchain Network Using Amazon Managed Blockchain
Amazon Managed BlockchainでHyperledger Fabricのブロックチェーンネットワークを構築してみた概要
Amazon Managed Blockchainとは
- Amazon Managed Blockchainはブロックチェーン基盤を構築するサービスである
- ブロックチェーン基盤の1つであるHyperledger Fabricをサポートしている
- Hyperledger Fabricはブロックチェーンを利用したDLT(分散型台帳技術)の1つである
- Amazon Managed Blockchainはデータを台帳として分散して保持するネットワークをフルマネージドで構築できるサービス
(参考)Amazon QLDBとは
- 台帳データベースのサービスである
- 台帳データベースではデータの変更履歴がトレース可能な状態で保持される
- ブロックチェーンは利用していない
- QLDBはDLTを利用していないサービスである
環境構築
今回作成するネットワークは以下のピンク枠内
ネットワーク作成
「Network edition」は立てるノード数による
今回はお試しなので、「Starter」を選択
ネットワーク名、説明は任意の値
「Voting policy」は今回使わないのでデフォルト値
組織名と説明は任意の値
ネットワークの管理者のユーザー名とパスワードは任意の値
VPCエンドポイントの作成
ネットワーク作成後、「Create VPC endpoint」からエンドポイントを作成
指定するVPCは任意
指定するVPC内のインスタンスから管理者としてアクセスし、設定等を行う
管理者クライアント(EC2)の作成
さきほど指定したVPC内にインスタンスを立ち上げる
接続設定をシンプルにするために今回はSGはVPCエンドポイントと同じものを指定
VPCエンドポイント作成したサブネットを設定
SSMセッションマネージャーでログインするので、鍵は生成せずにインスタンス作成
パッケージインストール
管理者クライアントからコマンドを実行していく
ログイン
セッションマネージャーを利用
ログイン後に以下のコマンド実行
(参考)AWS Systems Manager のセッションマネージャで EC2 (Linux) にアクセスした際に気をつけたいこととその緩和策sudo -iu ec2-user pwd script ./session001.log w
dockerをインストール
bc-clientsudo yum update -y sudo yum install -y telnet sudo yum -y install emacs sudo yum install -y docker sudo service docker start sudo usermod -a -G docker ec2-userdocker composeをインストール
bc-clientsudo curl -L \ https://github.com/docker/compose/releases/download/1.20.0/docker-compose-`uname \ -s`-`uname -m` -o /usr/local/bin/docker-compose sudo chmod a+x /usr/local/bin/docker-compose sudo yum install libtool -ygoをインストール
bc-clientwget https://dl.google.com/go/go1.10.3.linux-amd64.tar.gz tar -xzf go1.10.3.linux-amd64.tar.gz sudo mv go /usr/local sudo yum install libtool-ltdl-devel -y sudo yum install git -y.bash__profileを更新
bc-clientvim ./.bash_profile.bash__profileがデフォルトであれば以下で上書き
.bash_profile# .bash_profile # Get the aliases and functions if [ -f ~/.bashrc ]; then . ~/.bashrc fi # User specific environment and startup programs PATH=$PATH:$HOME/.local/bin:$HOME/bin:/usr/local/bin:/home/ec2-user/go/bin # GOROOT is the location where Go package is installed on your system export GOROOT=/usr/local/go # GOPATH is the location of your work directory export GOPATH=$HOME/go # Update PATH so that you can access the go binary system wide export PATH=$GOROOT/bin:$PATH export PATH=$PATH:/home/ec2-user/go/src/github.com/hyperledger/fabric-ca/bin上書き後に再読み込み
bc-clientsource ~/.bash_profileバージョン確認
以下であることを確認
- Docker–17.06.2-ce or later
- Docker-compose–1.14.0 or later
- Go–1.10.x
bc-clientdocker version docker-compose version go version(参考)AWS CLIの更新
AWS CLIのバージョンが低い場合は、更新する
Amazon Linux2の場合、pipのインストールが必要bc-client(更新前)[ec2-user@ip-172-31-5-178 ~]$ aws --version aws-cli/1.16.102 Python/2.7.16 Linux/4.14.123-86.109.amzn1.x86_64 botocore/1.12.92bc-clientsudo pip install -U awsclibc-client(更新後)[ec2-user@ip-172-31-5-178 ~]$ aws --version aws-cli/1.16.198 Python/2.7.16 Linux/4.14.123-86.109.amzn1.x86_64 botocore/1.12.188更新後、AWSコマンドが利用できない場合は以下コマンドでセットアップ
(参考)AWS CLI の設定
※「Default output format」で「json」ではなく「JSON」を指定すると動かないbc-clientaws configureCAに接続
「network-id」と「member-id」はマネジメントコンソールで確認
レスポンスに含まれる「CaEndpoint」をメモbc-clientaws managedblockchain get-member \ --network-id n-RBYM74VOSBG57LWTGAP5A4FJQE \ --member-id m-DNGBD4KRKVBTDKIFIU2MCBUMQ4エンドポイントの有効化
メモした「CaEndpoint」を利用
bc-clientcurl https://ca.m-dngbd4krkvbtdkifiu2mcbumq4.n-rbym74vosbg57lwtgap5a4fjqe.managedblockchain.us-east-1.amazonaws.com:30002/cainfo -k(参考)つながらない場合
- VPCエンドポイントとEC2のセキュリティグループが同一であることを確認
- SGのインバウンド設定にて、自身のSGからのアクセスを許可しているか確認
CA設定
bc-clientgo get -u github.com/hyperledger/fabric-ca/cmd/... cd /home/ec2-user/go/src/github.com/hyperledger/fabric-ca git fetch git checkout release-1.2 make fabric-ca-clientサンプルリポジトリをクローン
bc-clientcd /home/ec2-user git clone https://github.com/hyperledger/fabric-samples.gitdocker composeを起動
bc-clienttouch ./docker-compose-cli.yaml vim ./docker-compose-cli.yamldocker-compose-cli.yamlversion: '2' services: cli: container_name: cli image: hyperledger/fabric-tools:1.2.0 tty: true environment: - GOPATH=/opt/gopath - CORE_VM_ENDPOINT=unix:///host/var/run/docker.sock - CORE_LOGGING_LEVEL=info # Set logging level to debug for more verbose logging - CORE_PEER_ID=cli - CORE_CHAINCODE_KEEPALIVE=10 working_dir: /opt/gopath/src/github.com/hyperledger/fabric/peer command: /bin/bash volumes: - /var/run/:/host/var/run/ - /home/ec2-user/fabric-samples/chaincode:/opt/gopath/src/github.com/ - /home/ec2-user:/opt/homebc-clientdocker-compose -f docker-compose-cli.yaml up -d管理者を登録
証明書取得
bc-clientaws s3 cp s3://us-east-1.managedblockchain/etc/managedblockchain-tls-chain.pem /home/ec2-user/managedblockchain-tls-chain.pem管理者ユーザーの登録
ネットワークの管理者のユーザー名とパスワード、メモした「CaEndpoint」を指定
bc-clientfabric-ca-client enroll \ -u https://Administrator:password@ca.m-DNGBD4KRKVBTDKIFIU2MCBUMQ4.n-RBYM74VOSBG57LWTGAP5A4FJQE.managedblockchain.us-east-1.amazonaws.com:30002 \ --tls.certfiles /home/ec2-user/managedblockchain-tls-chain.pem -M /home/ec2-user/admin-mspMSP(Membership Service Providers)に必要な証明書をコピー
bc-clientsudo cp -r admin-msp/signcerts admin-msp/admincertsノード作成
マネジメントコンソールにて作成可能
組織を指定し、「Create peer node」からノード作成
インスタンスタイプ、AZは任意
チャネル作成
設定ファイル作成、実行
「Name」と「ID」はmember-idを指定(マネジメントコンソールで確認)
bc-clientcd ~ touch ./configtx.yaml vim ./configtx.yamlconfigtx.yamlOrganizations: - &Org1 # DefaultOrg defines the organization which is used in the sampleconfig # of the fabric.git development environment Name: m-DNGBD4KRKVBTDKIFIU2MCBUMQ4 # ID to load the MSP definition as ID: m-DNGBD4KRKVBTDKIFIU2MCBUMQ4 MSPDir: /opt/home/admin-msp # AnchorPeers defines the location of peers which can be used # for cross org gossip communication. Note, this value is only # encoded in the genesis block in the Application section context AnchorPeers: - Host: Port: Application: &ApplicationDefaults # Organizations is the list of orgs which are defined as participants on # the application side of the network Organizations: Profiles: OneOrgChannel: Consortium: AWSSystemConsortium Application: <<: *ApplicationDefaults Organizations: - *Org1bc-clientdocker exec cli configtxgen \ -outputCreateChannelTx /opt/home/mychannel.pb \ -profile OneOrgChannel -channelID mychannel \ --configPath /opt/home/環境変数の設定
マネジメントコンソールから設定値を確認し、変数に追加
bc-clientcat >> ~/.bash_profile << "EOF" export MSP_PATH=/opt/home/admin-msp export MSP=m-DNGBD4KRKVBTDKIFIU2MCBUMQ4 export ORDERER=orderer.n-rbym74vosbg57lwtgap5a4fjqe.managedblockchain.us-east-1.amazonaws.com:30001 export PEER=nd-xezvqn2klzcr5pl6j7zhqeyaje.m-dngbd4krkvbtdkifiu2mcbumq4.n-rbym74vosbg57lwtgap5a4fjqe.managedblockchain.us-east-1.amazonaws.com:30003 EOF上書き後に再読み込み
bc-clientsource ~/.bash_profileチャネル作成
bc-clientdocker exec -e "CORE_PEER_TLS_ENABLED=true" \ -e "CORE_PEER_TLS_ROOTCERT_FILE=/opt/home/managedblockchain-tls-chain.pem" \ -e "CORE_PEER_ADDRESS=$PEER" \ -e "CORE_PEER_LOCALMSPID=$MSP" \ -e "CORE_PEER_MSPCONFIGPATH=$MSP_PATH" \ cli peer channel create -c mychannel \ -f /opt/home/mychannel.pb -o $ORDERER \ --cafile /opt/home/managedblockchain-tls-chain.pem --tlsチャネル参加
bc-clientdocker exec -e "CORE_PEER_TLS_ENABLED=true" \ -e "CORE_PEER_TLS_ROOTCERT_FILE=/opt/home/managedblockchain-tls-chain.pem" \ -e "CORE_PEER_ADDRESS=$PEER" \ -e "CORE_PEER_LOCALMSPID=$MSP" \ -e "CORE_PEER_MSPCONFIGPATH=$MSP_PATH" \ cli peer channel join -b mychannel.block \ -o $ORDERER --cafile /opt/home/managedblockchain-tls-chain.pem --tlschaincode(cc)の実行
ccのインストール
a、bそれぞれ数値を持ち、値の移動を行うccをインストール
https://github.com/mcenatie/fabric/blob/master/examples/chaincode/go/chaincode_example02/chaincode_example02.gobc-clientdocker exec -e "CORE_PEER_TLS_ENABLED=true" \ -e "CORE_PEER_TLS_ROOTCERT_FILE=/opt/home/managedblockchain-tls-chain.pem" \ -e "CORE_PEER_LOCALMSPID=$MSP" \ -e "CORE_PEER_MSPCONFIGPATH=$MSP_PATH" \ -e "CORE_PEER_ADDRESS=$PEER" \ cli peer chaincode install \ -n mycc -v v0 -p github.com/chaincode_example02/goccのインスタンス化
初期値として、aに100、bに200を設定
bc-clientdocker exec -e "CORE_PEER_TLS_ENABLED=true" \ -e "CORE_PEER_TLS_ROOTCERT_FILE=/opt/home/managedblockchain-tls-chain.pem" \ -e "CORE_PEER_LOCALMSPID=$MSP" \ -e "CORE_PEER_MSPCONFIGPATH=$MSP_PATH" \ -e "CORE_PEER_ADDRESS=$PEER" \ cli peer chaincode instantiate \ -o $ORDERER -C mychannel -n mycc -v v0 \ -c '{"Args":["init","a","100","b","200"]}' \ --cafile /opt/home/managedblockchain-tls-chain.pem --tls(参考)コンソールログ
bc-client[ec2-user@ip-172-31-7-168 ~]$ docker exec -e "CORE_PEER_TLS_ENABLED=true" \ > -e "CORE_PEER_TLS_ROOTCERT_FILE=/opt/home/managedblockchain-tls-chain.pem" \ > -e "CORE_PEER_LOCALMSPID=$MSP" \ > -e "CORE_PEER_MSPCONFIGPATH=$MSP_PATH" \ > -e "CORE_PEER_ADDRESS=$PEER" \ > cli peer chaincode install \ > -n mycc -v v0 -p github.com/chaincode_example02/go 2019-07-14 15:50:06.540 UTC [chaincodeCmd] checkChaincodeCmdParams -> INFO 001 Using default escc 2019-07-14 15:50:06.541 UTC [chaincodeCmd] checkChaincodeCmdParams -> INFO 002 Using default vscc 2019-07-14 15:50:07.225 UTC [chaincodeCmd] install -> INFO 003 Installed remotely response:<status:200 payload:"OK" > [ec2-user@ip-172-31-7-168 ~]$ docker exec -e "CORE_PEER_TLS_ENABLED=true" \ > -e "CORE_PEER_TLS_ROOTCERT_FILE=/opt/home/managedblockchain-tls-chain.pem" \ > -e "CORE_PEER_LOCALMSPID=$MSP" \ > -e "CORE_PEER_MSPCONFIGPATH=$MSP_PATH" \ > -e "CORE_PEER_ADDRESS=$PEER" \ > cli peer chaincode instantiate \ > -o $ORDERER -C mychannel -n mycc -v v0 \ > -c '{"Args":["init","a","100","b","200"]}' \ > --cafile /opt/home/managedblockchain-tls-chain.pem --tls 2019-07-14 15:51:12.286 UTC [chaincodeCmd] checkChaincodeCmdParams -> INFO 001 Using default escc 2019-07-14 15:51:12.287 UTC [chaincodeCmd] checkChaincodeCmdParams -> INFO 002 Using default vsccccがインスタンス化、デプロイされたことを確認
bc-clientdocker exec -e "CORE_PEER_TLS_ENABLED=true" \ -e "CORE_PEER_TLS_ROOTCERT_FILE=/opt/home/managedblockchain-tls-chain.pem" \ -e "CORE_PEER_LOCALMSPID=$MSP" \ -e "CORE_PEER_MSPCONFIGPATH=$MSP_PATH" \ -e "CORE_PEER_ADDRESS=$PEER" \ cli peer chaincode list --instantiated \ -o $ORDERER -C mychannel \ --cafile /opt/home/managedblockchain-tls-chain.pem --tls(参考)実行結果
bc-client[ec2-user@ip-172-31-7-168 ~]$ docker exec -e "CORE_PEER_TLS_ENABLED=true" \ > -e "CORE_PEER_TLS_ROOTCERT_FILE=/opt/home/managedblockchain-tls-chain.pem" \ > -e "CORE_PEER_LOCALMSPID=$MSP" \ > -e "CORE_PEER_MSPCONFIGPATH=$MSP_PATH" \ > -e "CORE_PEER_ADDRESS=$PEER" \ > cli peer chaincode list --instantiated \ > -o $ORDERER -C mychannel \ > --cafile /opt/home/managedblockchain-tls-chain.pem --tls Get instantiated chaincodes on channel mychannel: Name: mycc, Version: v0, Path: github.com/chaincode_example02/go, Escc: escc, Vscc: vscccc実行(Query)
aの値を確認するコマンド
bc-clientdocker exec -e "CORE_PEER_TLS_ENABLED=true" \ -e "CORE_PEER_TLS_ROOTCERT_FILE=/opt/home/managedblockchain-tls-chain.pem" \ -e "CORE_PEER_ADDRESS=$PEER" \ -e "CORE_PEER_LOCALMSPID=$MSP" \ -e "CORE_PEER_MSPCONFIGPATH=$MSP_PATH" \ cli peer chaincode query -C mychannel \ -n mycc -c '{"Args":["query","a"]}'cc実行(Invoke)
aからbに10移動
bc-clientdocker exec -e "CORE_PEER_TLS_ENABLED=true" \ -e "CORE_PEER_TLS_ROOTCERT_FILE=/opt/home/managedblockchain-tls-chain.pem" \ -e "CORE_PEER_ADDRESS=$PEER" -e "CORE_PEER_LOCALMSPID=$MSP" \ -e "CORE_PEER_MSPCONFIGPATH=$MSP_PATH" \ cli peer chaincode invoke -C mychannel \ -n mycc -c '{"Args":["invoke","a","b","10"]}' \ -o $ORDERER --cafile /opt/home/managedblockchain-tls-chain.pem --tls実行結果
bc-client(実行前)[ec2-user@ip-172-31-7-168 ~]$ docker exec -e "CORE_PEER_TLS_ENABLED=true" \ > -e "CORE_PEER_TLS_ROOTCERT_FILE=/opt/home/managedblockchain-tls-chain.pem" \ > -e "CORE_PEER_ADDRESS=$PEER" \ > -e "CORE_PEER_LOCALMSPID=$MSP" \ > -e "CORE_PEER_MSPCONFIGPATH=$MSP_PATH" \ > cli peer chaincode query -C mychannel \ > -n mycc -c '{"Args":["query","a"]}' 100bc-client(実行後)[ec2-user@ip-172-31-7-168 ~]$ docker exec -e "CORE_PEER_TLS_ENABLED=true" \ > -e "CORE_PEER_TLS_ROOTCERT_FILE=/opt/home/managedblockchain-tls-chain.pem" \ > -e "CORE_PEER_ADDRESS=$PEER" \ > -e "CORE_PEER_LOCALMSPID=$MSP" \ > -e "CORE_PEER_MSPCONFIGPATH=$MSP_PATH" \ > cli peer chaincode query -C mychannel \ > -n mycc -c '{"Args":["query","a"]}' 90 [ec2-user@ip-172-31-7-168 ~]$ docker exec -e "CORE_PEER_TLS_ENABLED=true" \> -e "CORE_PEER_TLS_ROOTCERT_FILE=/opt/home/managedblockchain-tls-chain.pem" \> -e "CORE_PEER_ADDRESS=$PEER" \ > -e "CORE_PEER_LOCALMSPID=$MSP" \ > -e "CORE_PEER_MSPCONFIGPATH=$MSP_PATH" \ > cli peer chaincode query -C mychannel \ > -n mycc -c '{"Args":["query","b"]}' 210AWS Blockchain Templatesと比較して
- Hyperledger Fabricのサポートバージョンが1.0から1.2になった
- 今回は試してないが、メンバーの追加で他AWSアカウントを参加させられる
- 組織ごとにもつAWSアカウントを利用できるのでより実用的になった
- 共有備品や会議室の予約等、部署をまたいで管理
- セキュアな情報を社外の組織と共有
- ネットワークを構築するためのVPCをわざわざ作成する必要がなくなった
- ノードの作成がコンソールで可能
- より簡単にノードを立てられるようになった
- 専用のインスタンスタイプができた
- AZは6つから選択可能
- docker等のインストールはコマンドを実行してやらないといけない
- CAやチャネル、CCの設定に手間がかかる点は変わらず
- これらもマネジメントコンソールからやりたい

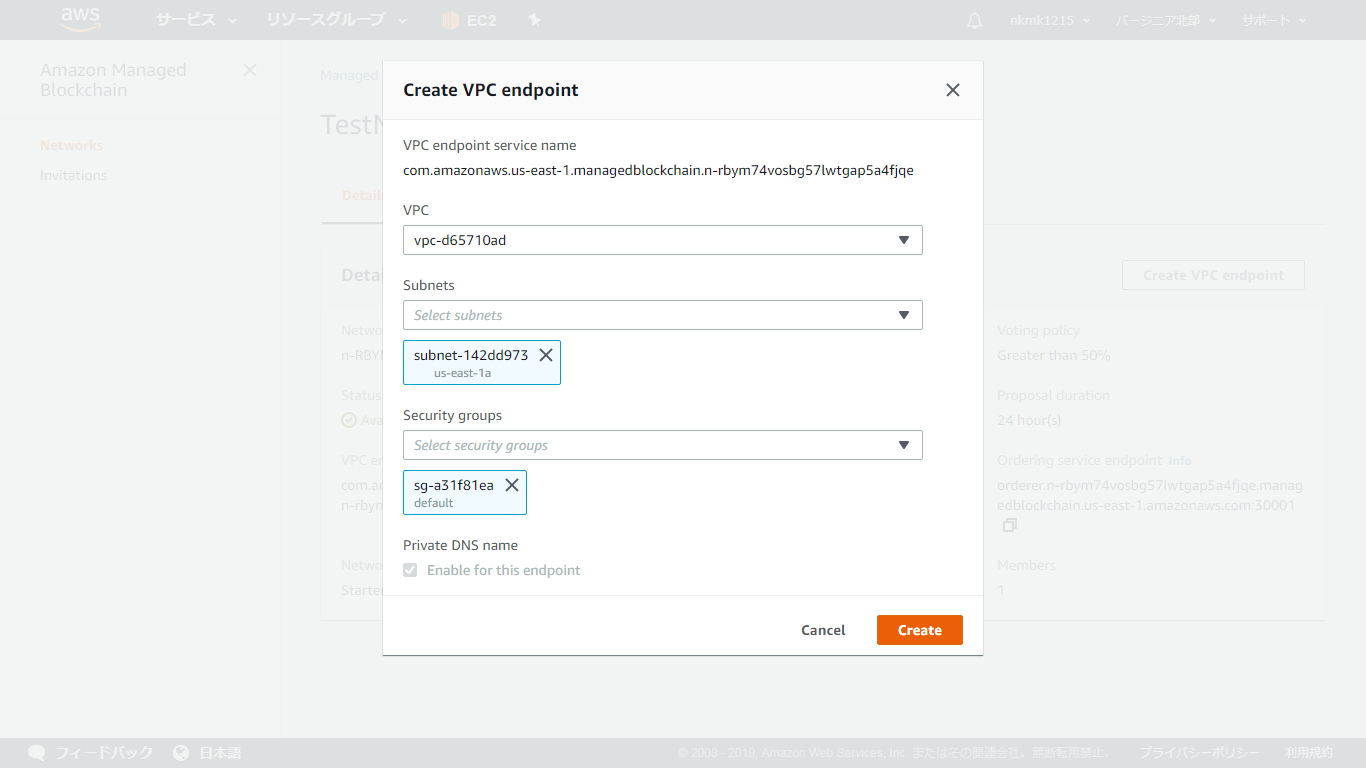
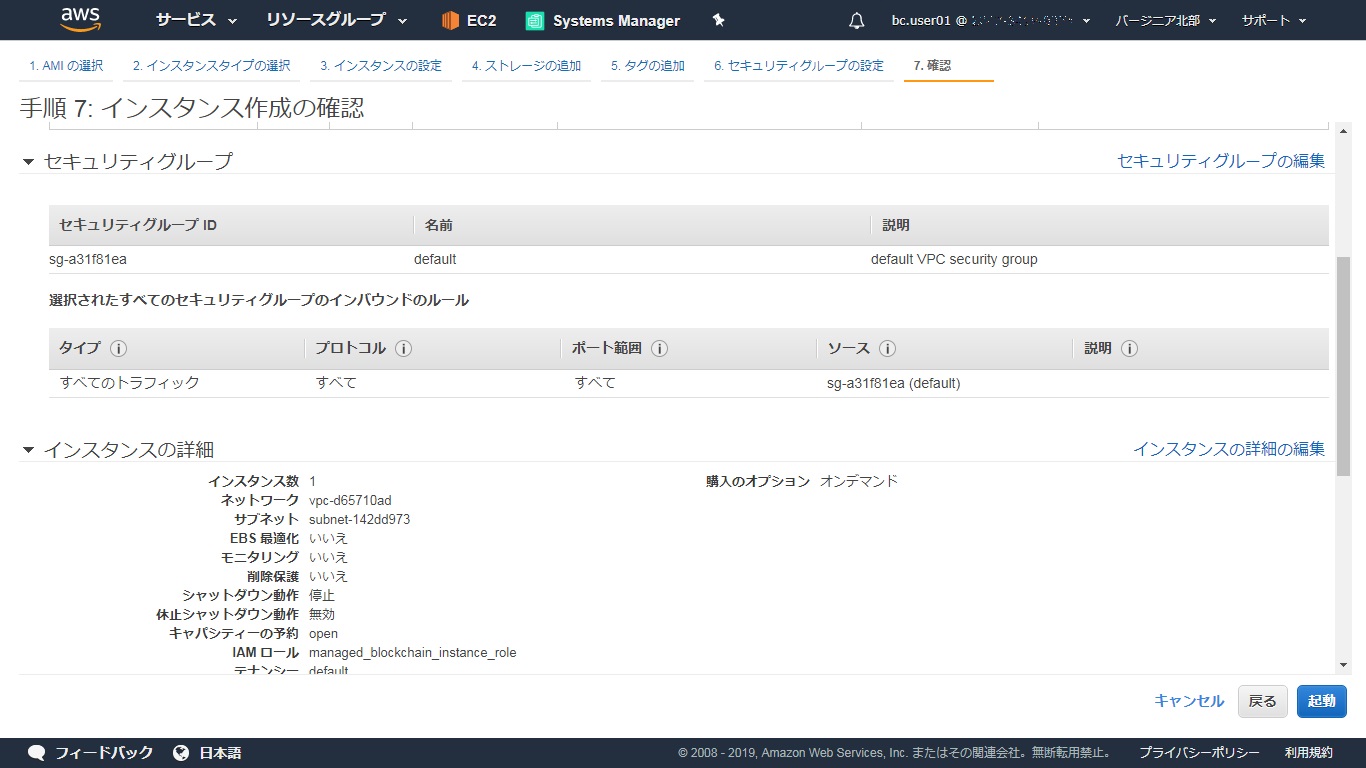
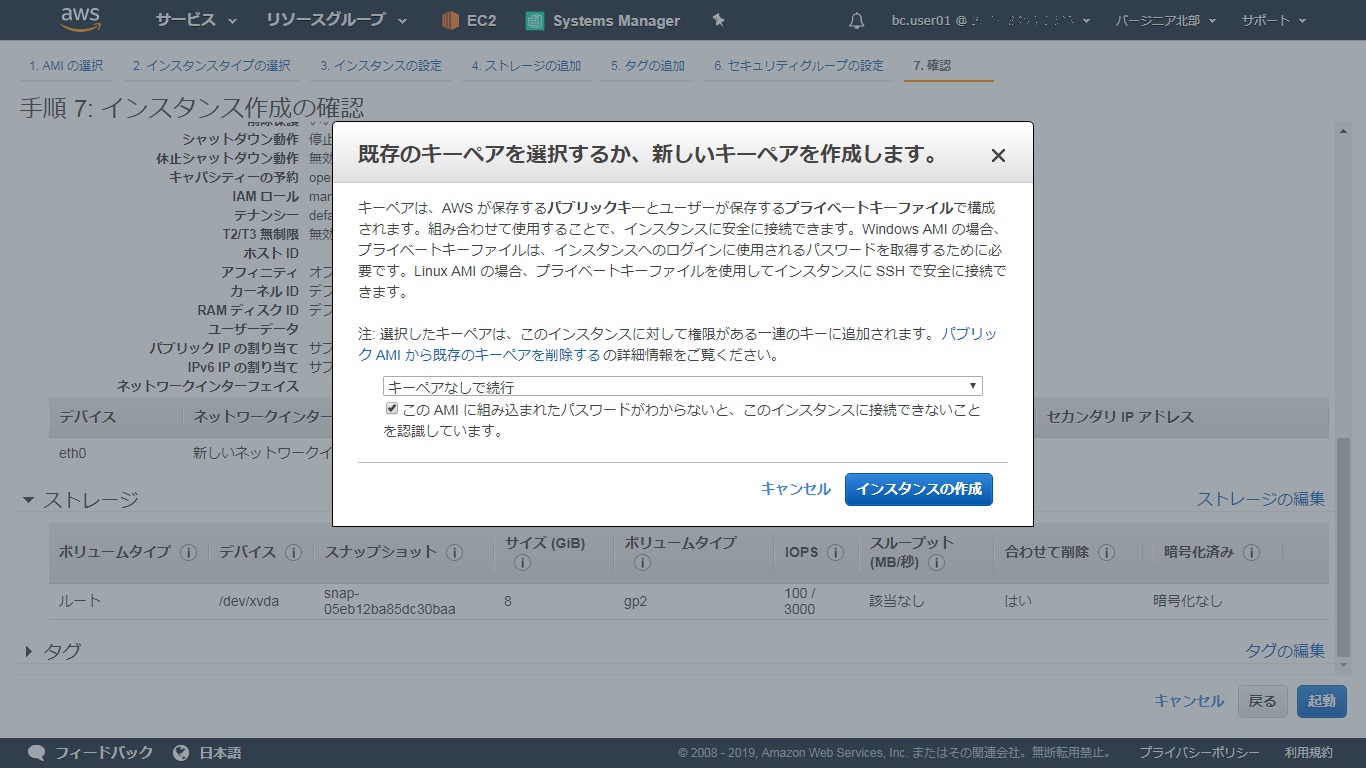
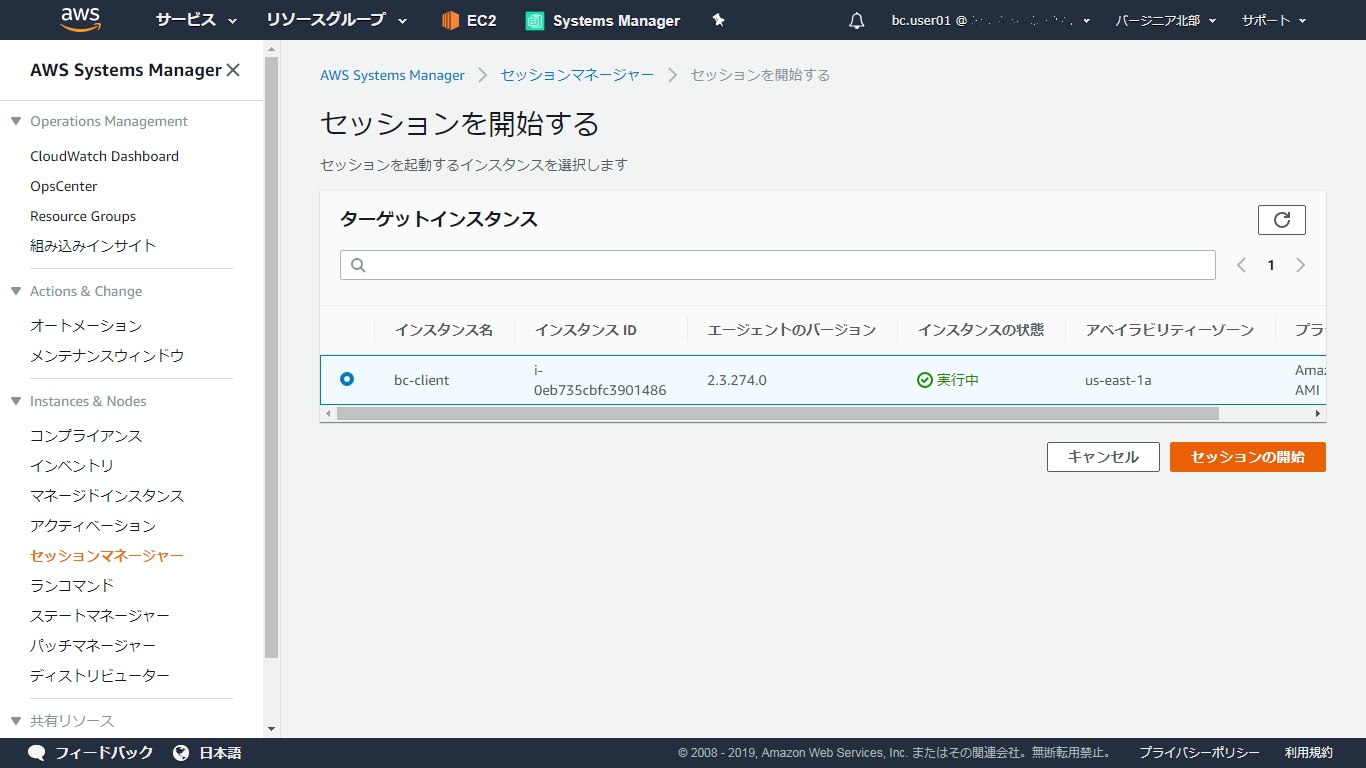
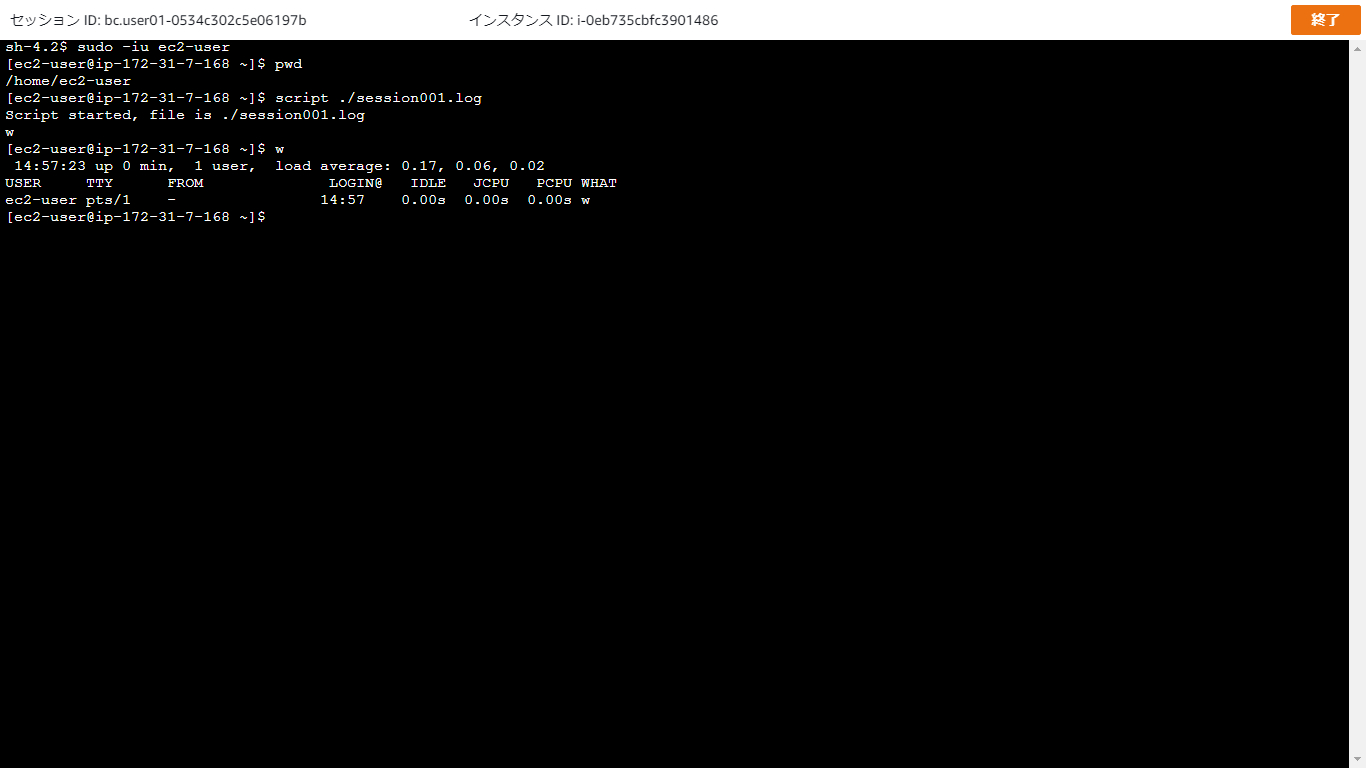
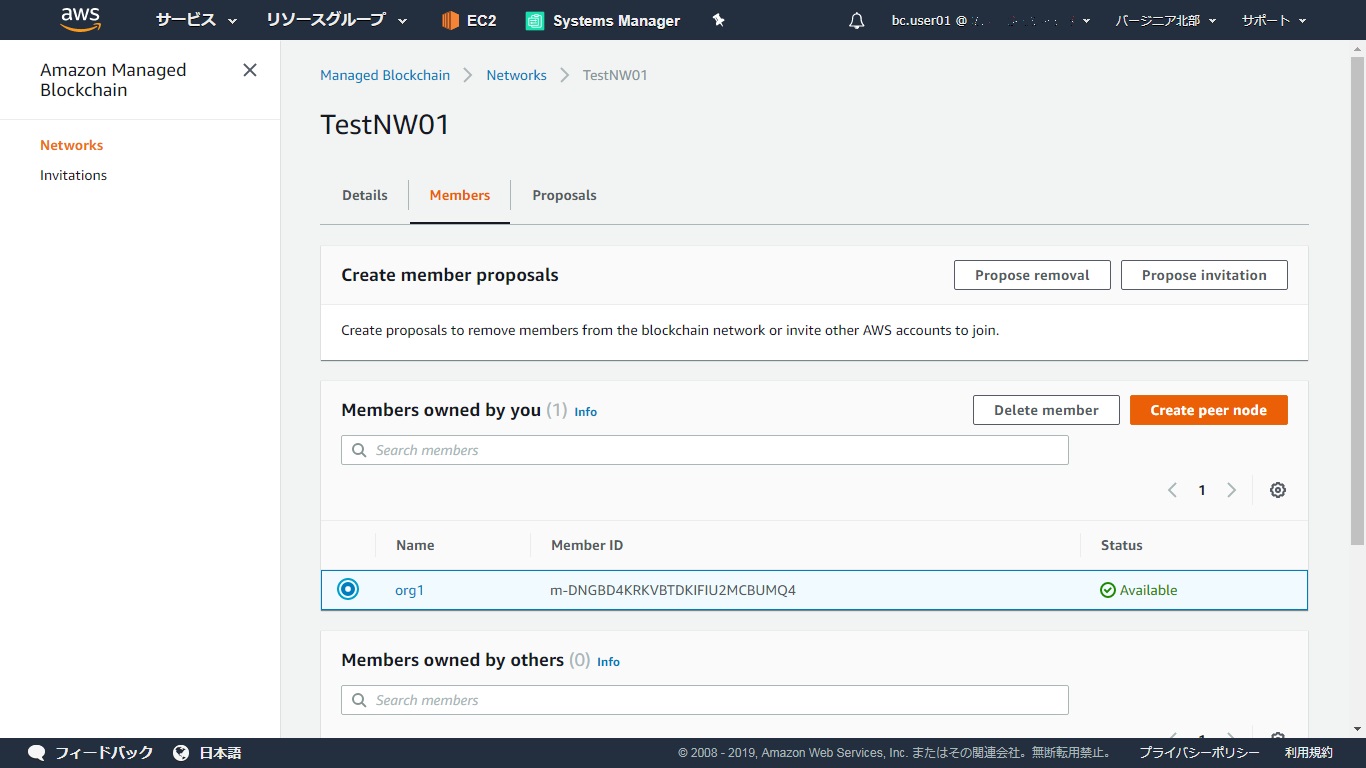
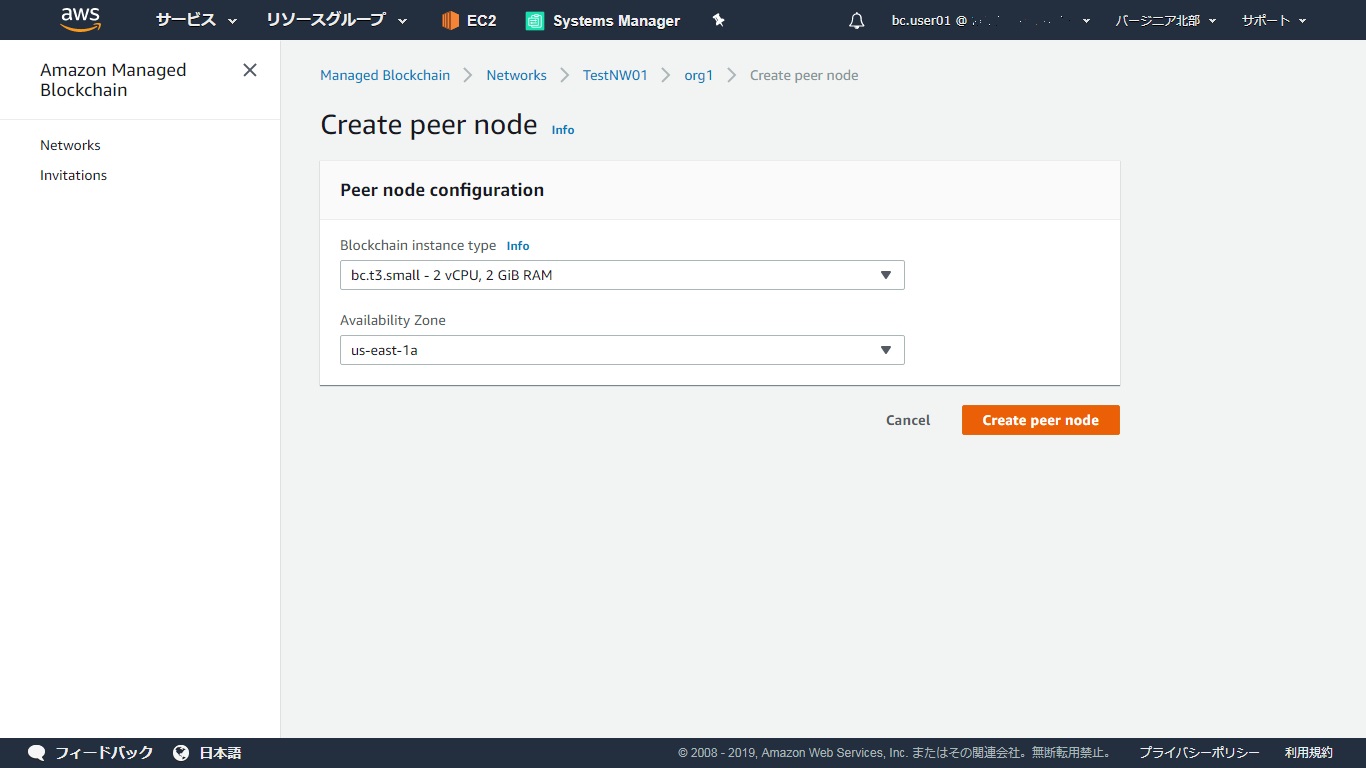
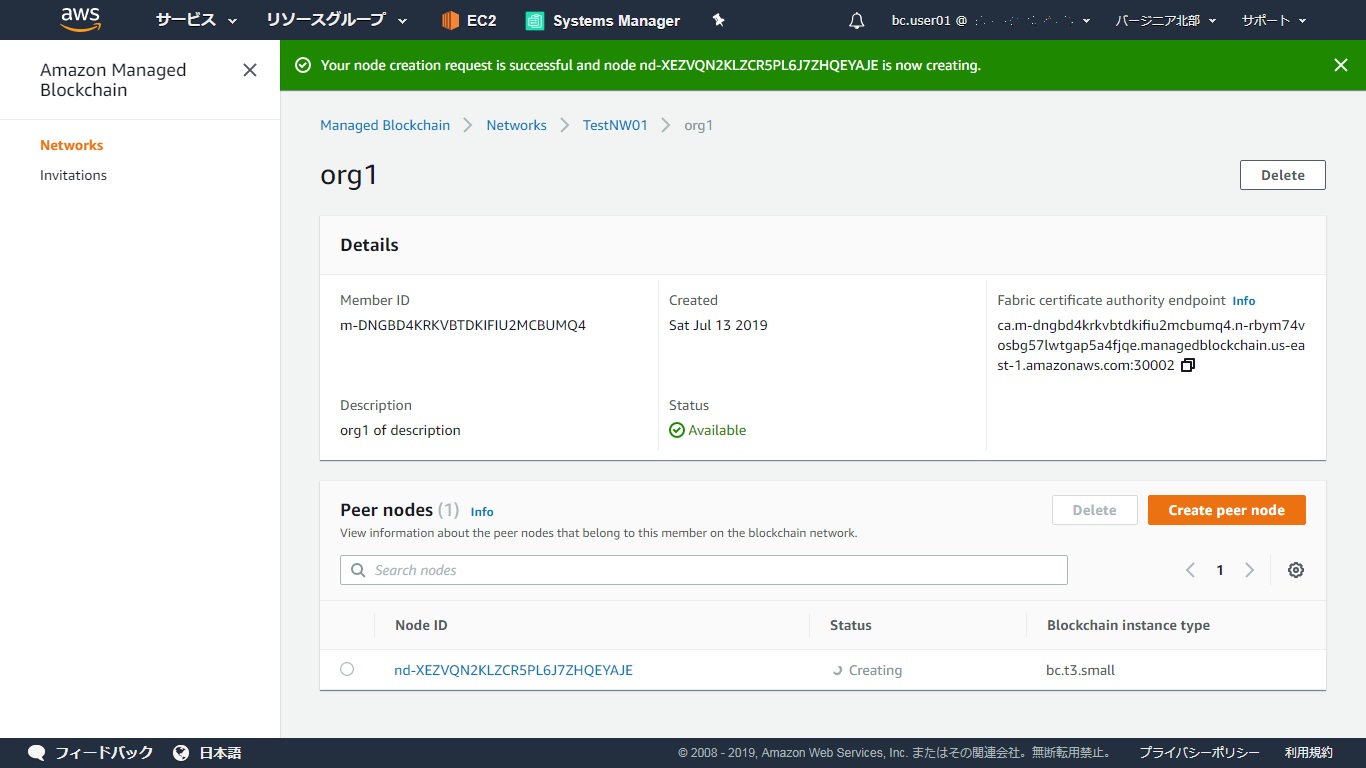
- 投稿日:2019-08-19T06:19:17+09:00
AWS Glueのオンラインセミナー受けてみた
「AWS Black Belt Online Seminar AWS Glue」の自分向けメモ
AWS Glueって何?......レベルの人向けGlue登場の背景
ビッグデータがキーワード
- データ分析のプロセスは以下
- 収集
- 保存
- 分析
- 活用
- ビッグデータが注目される前、ほとんどCSVやRDS上のデータとして保存
- 今日ではIOTによる大量データや様々なデータ形式が使われている
- 大量データの生で保存、かつ必要なときに必要分取得、活用できる保存場所が求められた
データレイクの登場
- 様々なデータソースから生成される生データをそのまま保存する
- 生データは分析するために前処理(ELT処理)が必要
Glue
- フルマネージドでサーバーレスなELTサービス
- データカタログによって、他サービスとの連携が容易
- 暗号化対応
機能
全体像
- クローラーによってデータソースからメタデータ(テーブル構造やスキーマ)をクロール
- クローラーが更新したメタデータをデータカタログにて管理
- トリガーにてサーバーレスエンジンが起動
- サーバーレスエンジンはジョブを実行し、データカタログとデータソースから結果を出力
データカタログ
- データソースのメタデータを管理するリポジトリ機能
- データソースは以下を指定可能
- DynamoDB
- S3
- Redshift
- RDS
- オンプレDB
Apache Hiveメタストアとは
- 実データとは別に表の定義だけ保存する仕組み
- 実データはHDFS(Hadoop Distributed File System)やS3などに保存する
クローラー
- データカタログにメタデータを作成する機能
- スキーマ情報を自動で判断
- パーティションも自動で認識
メタデータ
- テーブル情報
- テーブルプロパティ
- テーブルスキーマ
スキーマ管理
- バージョン管理可能
- バージョン比較(差分表示)も可能
接続管理
- S3、DyanmmoDB:IAMロールで制御
- Redshift、RDS、オンプレDB、EC2:JDBCでアクセス制御
- 事前に接続設定の追加が必要
- セキュリティグループの設定が必要
サーバーレスエンジン
ジョブ作成
- ETLの処理単位(ジョブ)はApache SparkとPython Shellがある
Worker Type
- DPU(ジョブ実行時に割り当てる処理能力)
- G.1xとG.2xを選択可能
SparkでETL実行した際に起きうる課題
- 型が混在すると処理が止まってしまう
- 事前にデータの中身を調査する必要がある
DynamicFrameとは
- 複数の型の可能性を残して、後で決定できるようにする(Choice型)
- 複数の型を発見した場合に両方の型をもつことが可能
ブックマーク機能
- ジョブの実行状態を保持、追跡が可能
- 定常的にELT処理を行う場合に有効
- 処理済みデータを再度処理しない
- 処理結果を重複出力しない
サーバレスETL処理の使い分け
- Lmabda
- 小規模処理
- 15分以内
- 豊富なトリガー
- Glue Python Shell
- 中規模処理
- 実行時間制限なし
- Pandasなどのライブラリ
- Glue Spark
- 大規模処理
- 実行時間制限なし
- 並列分散処理
オーケストレーション
独自ライブラリの利用
- Spack、Python Shellともに利用可能
トリガー
- ジョブを開始するための定義を設定できる機能
- スケジュール、ジョブイベント、手動実行可能
ワークフロー機能
- クローラー、トリガー、ジョブのDAG(有向非巡回グラフ)を生成する機能
開発環境
開発エンドポイント
- ジョブを実行するために開発したコードを動かす実行環境
Notebookサーバー
- プログラムそのものの記述と実行結果を表示する環境
SageMaker Notebook
- Glueのコンソール上でSageMaker Notebookサーバーを起動する
- SageMaker Notebookから直接SparkSQLの実行が可能
開発エンドポイントとNotebookの関係
- ユーザー → Notebook → 開発エンドポイント → Glue
ネットワーク/セキュリティ/監視
GlueからVPCへのアクセス
- プライベートサブネットのENI経由でアクセスしていく
セキュリティグループ
- Glueが利用しているENIをセキュリティグループに自己参照として設定
IAM
- IAMを用いて、Glueの権限管理
リソースレベルによるポリシーとアクセス許可
- データカタログリソースへの制御
暗号化
- KMSキーを指定して、データベース、テーブルを含むデータベースカタログ全体を暗号化
モニタリング
- クローラー、ジョブステータス、ジョブの実行状況の確認可能
Continuous Logging
- Spark ETLジョブの新緑状況をリアルタイムで確認可能
ユースケース
データカタログを用いたメタデータ管理
- EMR、Athena、Redshift利用時のメタデータ管理
- S3条にあるデータのメタデータをデータカタログに登録
ジョブによるSQLの定期実行
- Redshiftに定期クエリを実行
- タイムアウト設定し中断することが可能
- SQLを長時間実行し続けることが可能
ワークフロー機能を用いたELTパイプライン
- 複数ジョブを組み合わせて利用
サーバーレスアナリティクス
- 開発エンドポイント、SageMaker Notebookを用いて分析
データレイクを用いたログ分析基盤
- fluentd、Kinesis Data Streamsでリアルタイムにログデータを可視化(スピードレイヤー)
- fluentd、Kinesis Firehose、S3で収集したログデータをELT処理、可視化(バッチレイヤー)
GlueとSageMagerを用いた機械学習基盤
- Glueにて学習データを作成し、学習の実行とモデルのデプロイをSageMkerで実行
- ワークフロー機能もしくはStep Functionsで構築
料金
- ELTジョブ
- Apatche Spark
- Python Shell
- 開発エンドポイント
- データカタログ
- ストレージ
- リクエスト
- クローラー
まとめ
- サーバーレスのELTサービス
- メタデータを管理
- 他サービスとセキュアに連携
- 投稿日:2019-08-19T06:18:56+09:00
Amazon EKSのオンラインセミナー受けてみた
「AWS Black Belt Online Seminar Amazon Elastic Container Service for Kubernetes (Amazon EKS)」の自分向けメモ
EKSって何?......レベルの人向け何故コンテナなのか
- パッケージング
- 配布
- イミュータブルインフラストラクチャ
上記が人気の理由
1台のサーバーでDockerコンテナを利用するのは簡単だが、サーバーが増えると管理が大変になっていくKubernets(K8s)概要
- 複数ホスト間でのアプリの管理
- デプロイ、メンテ、スケーリング機能
- CNCF(Cloud Native Computing Foundation)による管理、推進
できること
- ホスト管理、スケジューリング
- コンテナの死活管理
- オートリカバリ
- 再起動
- サービスディスカバリ、ロードバランシング
- 負荷分散
- アプリ設定の管理
- バッチ実行
- エコシステムとの連携
アーキテクチャ
Workerとplaneで構成される
- k8s master(Control plane)
- k8s APIを実行するためのCLIであるkubectl(キューブコントロール)で操作する
- Worker Node
- EC2インスタンス群
- 実行環境
Control plane
- etcd:3つに分散されたKVS
- Kubectlからload balancer経由でetcdにアクセスする
- 構成、管理するのは大変 ⇒ EKSの誕生
- Worker Nodeを配置するVPCの用意だけでよい
Workloadsリソース
リソースのうち、コンテナ実行に関するリソースは以下
Pods
- 最小デプロイ単位
- 1Podに1つのコンテナが基本
- 1Podに複数コンテナを含むことも可能
- VolumeやNetworkを共有し、コンテナ間はlocalhostで通信
ReplicaSet
- Podのレプリカを作成し、Podの数を維持するリソース
- ロングランニングなPod向け
- 障害時に別NodeにPodを作成する
Deployment
- 複数のReplicaSetを作成、管理
- Podのローリングアップデートやロールバックを実現するためのリソース
- ローリングアップデート:バージョンアップ時に新バージョンの起動、旧バージョンの停止をする
DeamonSet
- 選択したノードの組に対して、各ノードにPodを1つ動かすためのリソース
- fluentdなどログ収集用のノードで利用する
Job
- 1つ以上のPodを作成し、指定された数のPodが正常に完了するようにコントロールするリソース
- Podが失敗した場合は新しいPodを作成する
- CronJob:Jobを時間通りに実行する
Service/Ingressリソース
- 外部公開する際のリソース
- Serviceリソース
- 外部からのアクセスをロードバランシングできる
- Ingress
- ALBを公開できる
EKS概要
- 運用難易度の高いControl planeのマネージドサービスで提供
- K8sをそのまま動かせる
- 2018年に東京リージョンで利用可能になった
使い方
- クラスター作成
- Worker Node配置
- アタッチ
事前準備
- kubectl等のインストール
- ロール、VPC作成
クラスター作成
- CLIで作成可能
- クラスター名
- ロール指定
- サブネット指定
- セキュリティグループ(ENIに適用する)
- kubeconfigの作成
↑Control plane作成完了
Worker Node配置
- テンプレートから作成完了
- インスタンスタイプやEKS最適化AMIを指定可能
Worker Nodeをクラスターに参加させる
- ファイルをダウンロードし、インスタンスロールを記載し、適用で参加
- CNI(Container Networking Interface)を利用し、シンプルでセキュアなネットワークの構築が可能
アドオン起動
- オートスケーリング
- Worker NodeとPodを考慮する
- k8s自体は考慮不要
- Fluentdを用いたログ収集
- EKS Deployment Pipeline
- コミットをトリガーにローリングアップデートまで自動化が可能
- 投稿日:2019-08-19T06:18:32+09:00
Amazon WorkSpacesのオンラインセミナー受けてみた
「AWS Black Belt Online Seminar Amazon WorkSpaces」の自分向けメモ
Amazon WorkSpaces語感はなんとなく分かるけど......レベルの人向けデスクトップ仮想化(VDI)の背景
- セキュリティ向上が目的で注目されるようになった
- データをローカルに持ち出せない
- 安価
- 最近はリモートワークとしてさらに注目されている(働き方改革)
オンプレのVDIの課題
- 高額な初期投資
- 利用までに時間がかかる
- 定期的な大規模システム更改
- 利用者増減対応が困難
- サイジングが重要だが困難
- 業務内容を踏まえたサイジングが困難
概要
- オンプレの課題の解決を図った
- クラウド上のデスクトップ環境(いつでも・どこでも)
- 初期投資不要
- サイジング、増減が容易
- デプロイ、管理がシンプル
- グローバル展開しやすい
- AWSサービスとの連携が容易
- WorkSpacesの監視をCloudWatchで行う
- 価格要素
- スペック・タイプ
- 利用時間(MonthlyかHourly)
- 月80h以下ならHourlyがお得
- ユースケース
- モバイルワーク
- 短期PRJ
- トレーニング
- 派遣社員
- コンプライアンスの準拠
- 機能
- シミュレーション、3Dエンジニアリングも耐えうるスペック
- Amazon Linux 2がベース
- ブラウザ、Libre Office、AWS SDKが標準搭載
- セルフサービス管理機能
- 管理者の負担軽減
- Windowsを利用することも可能(Bring Your Online Licence(BYOL))
- ライセンスをAWSに持ち込み、利用することが可能
- 200台の利用から
- BYOLが自動化され、2ヶ月かかっていた移行プロセスを大幅改善
利用方法
セットアップ
- ディレクトリ作成
- ディレクトリにユーザー追加
- ユーザーにバンドル割り当て
- WorkSpacesの設定
- 自動停止
- 暗号化
- 起動
WorkSpacesクライアント
- ネットワーク接続性の確認
- ユーザー名とパスワードでデスクトップ画面が立ち上がる
- ブラウザでのアクセスも可能
アーキテクチャ
ログインフロー
- インターネット経由で接続リクエストが認証ゲートに送られる
- AWS内で、ディレクトリサービスにリクエストが飛ぶ
- ディレクトリサービスはドメインコントロール経由でオンプレにDirect Connectでリクエストを投げる
- 認証情報を入力し、ストリーミングゲートウェイにリクエストを投げる
- 認証が通ると、Direct Connect経由でDIVがユーザーに見える
- ストリーミングとそれ以外の通信でネットワークが分かれている
VPC
- AWS管理VPCとユーザー用VPCがある
ストリーミングプロトコル
- PCoIPプロトコルを使用
- 通信の暗号化
冗長構成
- 認証Gateway、Streaming Gatewayは冗長化済みで考慮不要
- Directory Service
- 異なるAZに展開されている
- WorkSpaces
- いずれかのサブネットにデプロイされ、全体的には均等分散される
- Dドライブは12時間ごとにバックアップをとっている
- Cドライブは起動時の状態に戻る
ディレクトリサービス
- AWS Directory Serviceを利用したデスクトップ認証
- AD Connectorを利用した既存ドメイン連携
トラフィックフローとネットワーク接続
デスクトップストリーミング
- 認証はインターネット経由
- WorkSpacesからオンプレは専用線
- 認証も専用線にすることが可能
WorkSpacesからインターネット接続
- WorkSpacesにEIPを付与(セキュリティ設定は必要)
- NAT Gatewayを利用
- オンプレ経由で利用(壁、proxyは既存のオンプレを使う)
セキュリティとアクセス制御
- ユーザー認証
- ADドメイン認証
- MFA
- RADIUSとの連携
- IP制限
- IPアクセスコントロールグループ
- セキュリティグループ
- ディレクトリ用
- WorkSpaces用
- デバイス制御
- クライアント証明書
- デバイスタイプによってアクセス可否設定
- WorkSpacesのグループポリシー
- デスクトップやOS上での挙動を制御
- ローカルプリンターのサポート
- クリップボードのリダイレクト
- セッションレジュームのタイムアウト
- ストリーミングの暗号強度
- 一般的なWindowsのグループポリシーも利用可能
デザインパターン
ユースケース、要件の収集
- WorkSpacesの数、予想される増加の程度からサブネットのサイズを決定
- ユーザーのタイプからペルソナを定義
- 業務種類
- 気密性
- 認証
- セルフサーボス
- 端末種類
- アクセス制限
- 接続するActive Directoryドメインの数
- 単一ドメイン、複数ドメイン
- 既存ドメインの設定ポリシー
AWSアカウントの構造
- 用途に応じてAWSアカウントを分割、課金はPayerアカウントに集約
- WorkSpaces用の独立したアカウント
- ログや認証は共有サービスに集約
- 全アカウントで一貫したタグ付け
VPC、サブネットの設計
- WorkSpaces専用VPC作成と複数サブネット
- 将来の拡張性を考慮したサブネット作成によるIP枯渇を避ける
まとめ
- フルマネージドなDIVサービス
- セキュアなデスクトップ環境
- 初期投資不要、すぐ始められる
- AWS連携可能
- 適切なアーキテクチャ設計が重要
- 投稿日:2019-08-19T02:42:28+09:00
AWS SDK for iOS Samples を試す
GitHub の awslabs/aws-sdk-ios-samples リポジトリには AWS SDK for iOS を利用した以下のサンプルプロジェクトが用意されています
- CognitoAuth-Sample
- CognitoYourUserPools-Sample
- IoT-Sample
- Lex-Sample
- Polly-Sample
- S3TransferUtility-Sample
以下、それぞれを実行し、関連するコードを眺めます
CognitoAuth-Sample(Swift)
UI を実装せずとも SDK が提供するウェブビューベースでのサインアップ・サインインコンポーネントを利用して、手早く iOS アプリにユーザー認証の機能を追加できるサンプルが提供されています
セットアップ方法
- リポジトリをクローンして、依存ライブラリをインストール
- Announcing Your User Pools in Amazon Cognito に従いCognito Identity Pool を作成
- アプリクライアントの設定を行う(詳細は README.md を参照)
- .xcworkspace を開く
- Info.plist を更新
- アプリを実行する
使ってみる
以下のように、起動するとまずログイン画面が表示されます
ユーザーが存在しないので、まずはサインアップを進めます。サインアップボタンを押し、ユーザー名、Eメールアドレス、パスワードを入力すると、確認コードの記載されたメールが届きますので、アプリ上でそれを入力し、サインアップを完了させます
サインアップが完了したアカウントを利用してログインするとメタデータが表示されます
実装を見てみる
ViewController的にはAWSCognitoAuthDelegateの実装が必要なようです。とはいっても通常は単に self を返却すれば大丈夫です。import UIKit import AWSCognitoAuth class ViewController: UITableViewController, AWSCognitoAuthDelegate { ... func getViewController() -> UIViewController { return self; } ...あとはサインイン、サインアウトなどのイベント発生時に対応する API を呼ぶだけ
    @IBAction func signInTapped(_ sender: Any) {
        self.auth.getSession  { (session:AWSCognitoAuthUserSession?, error:Error?) in
            if(error != nil) {
                self.session = nil
                self.alertWithTitle("Error", message: (error! as NSError).userInfo["error"] as? String)
            }else {
                self.session = session
            }
            self.refresh()
        }

...

    @IBAction func signOutTapped(_ sender: Any) {
        self.auth.signOut { (error:Error?) in
            if(error != nil){
                self.alertWithTitle("Error", message: (error! as NSError).userInfo["error"] as? String)
            }else {
                self.session = nil
                self.alertWithTitle("Info", message: "Session completed successfully")
            }
            self.refresh()
        }
    }
また、ざっくりと良き塩梅にログイン状態は保持されます。
CognitoYourUserPools-Sample(Swift)
独自で UI を作成した場合の Cognito のサンプルコードです。
セットアップ方法
- リポジトリをクローンして、依存ライブラリをインストール
- Announcing Your User Pools in Amazon Cognito に従いCognito Identity Pool を作成
- アプリクライアントの設定を行う(詳細は README.md を参照)
- .xcworkspace を開く
- Constants.swift を更新
- アプリを実行する
使ってみる
まずはサインアップの画面、そして検証コードの入力画面です。このようにしてユーザーを作成し、サインインの準備をします。

つづいて、作成したユーザーにてサインインを行うと、ユーザーのメタデータが表示されるサンプルとなっています。

実装を見てみる
- aws-sdk-ios-samples/CognitoYourUserPools-Sample/Swift/CognitoYourUserPoolsSample をみるとずらりと各
ViewControllerが並んでいます- 基本的に画面をせかせか実装 + Cognito の対応する Delegate をあらかじめ実装しておき、対応する API を呼び出すみたいな流れです
サインインの部分だけをピックアップしてみてみます
aws-sdk-ios-samples/SignInViewController.swift
あらかじめ Delegate を実装しつつも...
extension SignInViewController: AWSCognitoIdentityPasswordAuthentication {
    public func getDetails(_ authenticationInput: AWSCognitoIdentityPasswordAuthenticationInput, passwordAuthenticationCompletionSource: AWSTaskCompletionSource<AWSCognitoIdentityPasswordAuthenticationDetails>) {
        self.passwordAuthenticationCompletion = passwordAuthenticationCompletionSource
        DispatchQueue.main.async {
            if (self.usernameText == nil) {
                self.usernameText = authenticationInput.lastKnownUsername
            }
        }
    }

    public func didCompleteStepWithError(_ error: Error?) {
        DispatchQueue.main.async {
            if let error = error as NSError? {
                let alertController = UIAlertController(title: error.userInfo["__type"] as? String,
                                                        message: error.userInfo["message"] as? String,
                                                        preferredStyle: .alert)
                let retryAction = UIAlertAction(title: "Retry", style: .default, handler: nil)
                alertController.addAction(retryAction)

                self.present(alertController, animated: true, completion:  nil)
            } else {
                self.username.text = nil
                self.dismiss(animated: true, completion: nil)
            }
        }
    }
}
ボタンによるサインインイベントのフックは以下のような具合
    @IBAction func signInPressed(_ sender: AnyObject) {
        if (self.username.text != nil && self.password.text != nil) {
            let authDetails = AWSCognitoIdentityPasswordAuthenticationDetails(username: self.username.text!, password: self.password.text! )
            self.passwordAuthenticationCompletion?.set(result: authDetails)
        } else {
            let alertController = UIAlertController(title: "Missing information",
                                                    message: "Please enter a valid user name and password",
                                                    preferredStyle: .alert)
            let retryAction = UIAlertAction(title: "Retry", style: .default, handler: nil)
            alertController.addAction(retryAction)
        }
    }
IoT-Sample(Swift)
セットアップ方法
- リポジトリをクローンして、依存ライブラリをインストール
- Cognito Identity Pool を作成
- Unauth_Role に AmazonLexRunBotsOnly をアタッチ
- .xcworkspace を開く
- awsconfiguration.json を更新
- Constants.swift を更新
- アプリを実行する
使ってみる
Connect ボタンを押すと必要な諸々の設定が始まり、接続が完了すると Disconnect ボタンが出現します(詳細はソースコード参照)

単体のシミュレータだとよくわからん状態になるので、動画をご覧ください。
https://static.53ningen.com/wp-content/uploads/2019/04/23013339/iot.m4v
Publish と Subscribe をタブで切り替えられます。Subscriber は Publisher からのメッセージを受信してスライドバーが連動する簡単なデモアプリケーションになっています。
実装を見てみる
ConnectionViewController.swift
基本的には
mqttEventCallbackとしてコールバック関数を定義して、iotDataManager.connect に渡すいうものになっています。複雑そうにみえますが、接続処理のフックと、各接続状態に応じた UI の制御を地味に書いていくような流れにみえます。PublishViewController.swift
Publish 側の ViewController は単に sliderValueChanged イベントをフックして iotDataManager.publishString を対象のトピックに対して行っているだけです。
class PublishViewController: UIViewController {

    @IBOutlet weak var publishSlider: UISlider!

    @IBAction func sliderValueChanged(_ sender: UISlider) {
        print("Publish slider value: " + "\(sender.value)")

        let iotDataManager = AWSIoTDataManager(forKey: ASWIoTDataManager)
        let tabBarViewController = tabBarController as! IoTSampleTabBarController

        iotDataManager.publishString("\(sender.value)", onTopic:tabBarViewController.topic, qoS:.messageDeliveryAttemptedAtMostOnce)
    }
}
SubscribeViewController.swift
Subscriber 側も Publisher 側とほぼ同様の考え方で実装可能です
class SubscribeViewController: UIViewController {

    @IBOutlet weak var subscribeSlider: UISlider!

    override func viewDidLoad() {
        super.viewDidLoad()

        // Do any additional setup after loading the view, typically from a nib.
        subscribeSlider.isEnabled = false
    }

    override func viewWillAppear(_ animated: Bool) {
        let iotDataManager = AWSIoTDataManager(forKey: ASWIoTDataManager)
        let tabBarViewController = tabBarController as! IoTSampleTabBarController

        iotDataManager.subscribe(toTopic: tabBarViewController.topic, qoS: .messageDeliveryAttemptedAtMostOnce, messageCallback: {
            (payload) ->Void in
            let stringValue = NSString(data: payload, encoding: String.Encoding.utf8.rawValue)!

            print("received: \(stringValue)")
            DispatchQueue.main.async {
                self.subscribeSlider.value = stringValue.floatValue
            }
        } )
    }

    override func viewWillDisappear(_ animated: Bool) {
        let iotDataManager = AWSIoTDataManager(forKey: ASWIoTDataManager)
        let tabBarViewController = tabBarController as! IoTSampleTabBarController
        iotDataManager.unsubscribeTopic(tabBarViewController.topic)
    }
}
Lex-Sample(Swift)
音声やテキストを使用して、対話型のインターフェイスを構築できるサービス Amazon Lex を iOS アプリに組み込むサンプルリポジトリ。以下のような手順で簡単に試せます。
セットアップ方法
- リポジトリをクローンして、依存ライブラリをインストール
- Cognito Identity Pool を作成
- Unauth_Role に AmazonLexRunBotsOnly をアタッチ
- .xcworkspace を開く
- awsconfiguration.json を更新
- Constants.swift を更新
- アプリを実行する
使ってみる
こんな感じでチャット風にやりとりできる画面と音声入力でやりとりできる画面が用意されている
実装を見てみる
AWSLexInteractionDelegateを実装すればよい形になっているので、何をすれば良いか自体は明確になっている// MARK: Interaction Kit extension ChatViewController: AWSLexInteractionDelegate { @objc public func interactionKitOnRecordingEnd(_ interactionKit: AWSLexInteractionKit, audioStream: Data, contentType: String) { DispatchQueue.main.async(execute: { let audioItem = JSQAudioMediaItem(data: audioStream) self.speechMessage = JSQMessage(senderId: ClientSenderId, displayName: "", media: audioItem) self.messages?[self.speechIndex] = self.speechMessage! self.finishSendingMessage(animated: true) }) } public func interactionKit(_ interactionKit: AWSLexInteractionKit, onError error: Error) { //do nothing for now. } public func interactionKit(_ interactionKit: AWSLexInteractionKit, switchModeInput: AWSLexSwitchModeInput, completionSource: AWSTaskCompletionSource<AWSLexSwitchModeResponse>?) { self.sessionAttributes = switchModeInput.sessionAttributes DispatchQueue.main.async(execute: { let message: JSQMessage if (switchModeInput.dialogState == AWSLexDialogState.readyForFulfillment) { if let slots = switchModeInput.slots { message = JSQMessage(senderId: ServerSenderId, senderDisplayName: "", date: Date(), text: "Slots:\n\(slots)") self.messages?.append(message) self.finishSendingMessage(animated: true) } } else { message = JSQMessage(senderId: ServerSenderId, senderDisplayName: "", date: Date(), text: switchModeInput.outputText!) self.messages?.append(message) self.finishSendingMessage(animated: true) } }) let switchModeResponse = AWSLexSwitchModeResponse() switchModeResponse.interactionMode = AWSLexInteractionMode.text switchModeResponse.sessionAttributes = switchModeInput.sessionAttributes completionSource?.set(result: switchModeResponse) } func interactionKitContinue(withText interactionKit: AWSLexInteractionKit, completionSource: AWSTaskCompletionSource<NSString>) { textModeSwitchingCompletion = completionSource } }Polly-Sample(Swift)
ディプラーニングを使用したリアルな音声の読み上げサービスを iOS アプリに組み込むサンプルリポジトリ。以下のような手順で簡単に試せます。
セットアップ方法
- リポジトリをクローンして、依存ライブラリをインストール
- Cognito Identity Pool を作成
- Unauth_Role に AmazonPollyFullAccess をアタッチ
- .xcworkspace を開く
- awsconfiguration.json を更新
- アプリを実行する
Cognito Identity Pool はマネジメントコンソールを触るのが面倒であれば amplify CLI を使って手軽に作成できます。
$ amplify init
$ amplify add auth
# 特定の選択肢に対しては下記のように選択し、Unauth ロールが生成されるようにする
# Do you want to use the default authentication and security configuration? Default configuration with Social Provider (Federation)
...
# Do you want to use the default authentication and security configuration? Manual configuration
...

$ amplify push
使ってみる
スクショのようにボイスと読み上げたいテキストを入力して、ボタンをおすと読み上げてくれる簡単なサンプルになっています
実装を見てみる
ざっくりと以下のような流れ
AWSPollySynthesizeSpeechURLBuilderRequestにて読み上げを行いたいテキストや取得するオーディオファイルのフォーマット、ボイスを選択する- getPreSignedURL にてオーディオファイルの署名付き URL を取得できるので
AVPlayerに投げて音声の再生を行う@IBAction func buttonClicked(_ sender: AnyObject) { let input = AWSPollySynthesizeSpeechURLBuilderRequest() if textField.text != "" { input.text = textField.text! } else { input.text = textField.placeholder! } input.outputFormat = AWSPollyOutputFormat.mp3 input.voiceId = selectedVoice let builder = AWSPollySynthesizeSpeechURLBuilder.default().getPreSignedURL(input) builder.continueOnSuccessWith { (awsTask: AWSTask<NSURL>) -> Any? in let url = awsTask.result! self.audioPlayer.replaceCurrentItem(with: AVPlayerItem(url: url as URL)) self.audioPlayer.play() return nil } }S3TransferUtility-Sample(Swift)
セットアップ方法
- リポジトリをクローンして、依存ライブラリをインストール
- amplify init
- amplify push
- amplify add storage
- amplify push
- .xcworkspace を開く
- アプリを実行する
使ってみる
画像のアップロード、およびダウンロードができます

実装を見てみる
DownloadViewController.swift
AWSS3TransferUtility.default().downloadDataによりダウンロードを行いつつ、プログレスの取り扱いも記述されたサンプルコードになっている@IBAction func start(_ sender: UIButton) { DispatchQueue.main.async(execute: { self.statusLabel.text = "" self.progressView.progress = 0 }) self.imageView.image = nil; let expression = AWSS3TransferUtilityDownloadExpression() expression.progressBlock = {(task, progress) in DispatchQueue.main.async(execute: { if (self.progressView.progress < Float(progress.fractionCompleted)) { self.progressView.progress = Float(progress.fractionCompleted) } }) } self.completionHandler = { (task, location, data, error) -> Void in DispatchQueue.main.async(execute: { if let error = error { NSLog("Failed with error: \(error)") self.statusLabel.text = "Failed" } else if(self.progressView.progress != 1.0) { self.statusLabel.text = "Failed" } else{ self.statusLabel.text = "Success" self.imageView.image = UIImage(data: data!) } }) } transferUtility.downloadData( forKey: S3DownloadKeyName, expression: expression, completionHandler: completionHandler).continueWith { (task) -> AnyObject? in if let error = task.error { NSLog("Error: %@",error.localizedDescription); DispatchQueue.main.async(execute: { self.statusLabel.text = "Failed" }) } if let _ = task.result { DispatchQueue.main.async(execute: { self.statusLabel.text = "Downloading..." }) NSLog("Download Starting!") // Do something with uploadTask. } return nil; } }UploadViewController.swift
AWSS3TransferUtility.default().uploadDataをたたいて、Download とおなじような形で Upload も扱える@objc func uploadImage(with data: Data) { let expression = AWSS3TransferUtilityUploadExpression() expression.progressBlock = progressBlock DispatchQueue.main.async(execute: { self.statusLabel.text = "" self.progressView.progress = 0 }) transferUtility.uploadData( data, key: S3UploadKeyName, contentType: "image/png", expression: expression, completionHandler: completionHandler).continueWith { (task) -> AnyObject? in if let error = task.error { print("Error: \(error.localizedDescription)") DispatchQueue.main.async { self.statusLabel.text = "Failed" } } if let _ = task.result { DispatchQueue.main.async { self.statusLabel.text = "Uploading..." print("Upload Starting!") } // Do something with uploadTask. } return nil; } }ライセンス表記
本記事中に登場するソースコードのライセンスは Apache License 2.0 です。
https://github.com/awslabs/aws-sdk-ios-samples/blob/master/LICENSE


- 投稿日:2019-08-19T02:22:52+09:00
ec2 で sudo visudo ができない
起こったこと
ある日ec2インスタンス内で
sudo visudoコマンドを実行すると、、、sudo: >>> /etc/sudoers: syntax error near line 93 <<< sudo: parse error in /etc/sudoers near line 93 sudo: no valid sudoers sources found, quitting sudo: unable to initialize policy pluginと言われ、sudoコマンドが実行できなくなってしまいました。
原因
/etc/sudoersを修正した時にsyntax errorを起こしてしまい開けなくなってしまった解決方法
〜方針〜
新しくec2インスタンスを作成
↓
新しく作成したec2インスタンスに対象ec2インスタンスのEBSをマウント
↓
sudoersを修正
↓
EBSを元のec2インスタンスに戻す1, 対象のec2インスタンスを停止する
2, 停止したインスタンスのEBS(ELASTIC BLOCK STORE)をデタッチ
3, 新しく別のec2インスタンスを生成し、そのインスタンスに先ほどデタッチしたEBSをアタッチ
4, 新しく生成したインスタンスに入りアタッチしたEBSをマウント
ec2インスタンスにログイン
ssh -i { pemファイルディレクトリ } ec2-user@YY.YYY.YY.YYY今回マウント先は
/mnt/volとしたいと思います# /mnt/volディレクトリを作成 sudo mkdir /mnt/vol # EBSをマウント sudo mount /dev/xvdf1 /mnt/vol5,
sudo vim /mnt/vol/etc/sudoersで sudoers を修正6, マウントしたEBSをアンマウント
# EBSをアンマウント
sudo umount /mnt/vol
7, 先ほどデタッチしたEBSを元のec2インスタンスにアタッチ
デバイスを
/div/xvdaとしてください
8, 最初に停止したec2インスタンスを起動
以上で作業完了です
参考文献
https://serverfault.com/questions/392977/broke-my-etc-sudoers-file-on-amazon-ec2
https://casualdevelopers.com/tech-tips/how-to-fix-ssh-problem-to-ec2/


- 投稿日:2019-08-19T02:22:52+09:00
ec2 で /etc/sudoers が開けない
起こったこと
ある日ec2インスタンス内で
sudo visudoコマンドを実行すると、、、sudo: >>> /etc/sudoers: syntax error near line 93 <<< sudo: parse error in /etc/sudoers near line 93 sudo: no valid sudoers sources found, quitting sudo: unable to initialize policy pluginと言われ、sudoコマンドが実行できなくなってしまいました。
原因
/etc/sudoersを修正した時にsyntax errorを起こしてしまい開けなくなってしまった解決方法
〜方針〜
新しくec2インスタンスを作成
↓
新しく作成したec2インスタンスに対象ec2インスタンスのEBSをマウント
↓
sudoersを修正
↓
EBSを元のec2インスタンスに戻す1, 対象のec2インスタンスを停止する
2, 停止したインスタンスのEBS(ELASTIC BLOCK STORE)をデタッチ
3, 新しく別のec2インスタンスを生成し、そのインスタンスに先ほどデタッチしたEBSをアタッチ
4, 新しく生成したインスタンスに入りアタッチしたEBSをマウント
ec2インスタンスにログイン
ssh -i { pemファイルディレクトリ } ec2-user@YY.YYY.YY.YYY今回マウント先は
/mnt/volとしたいと思います# /mnt/volディレクトリを作成 sudo mkdir /mnt/vol # EBSをマウント sudo mount /dev/xvdf1 /mnt/vol5,
sudo vim /mnt/vol/etc/sudoersで sudoers を修正6, マウントしたEBSをアンマウント
# EBSをアンマウント
sudo umount /mnt/vol
7, 先ほどデタッチしたEBSを元のec2インスタンスにアタッチ
デバイスを
/div/xvdaとしてください
8, 最初に停止したec2インスタンスを起動
以上で作業完了です
参考文献
https://serverfault.com/questions/392977/broke-my-etc-sudoers-file-on-amazon-ec2
https://casualdevelopers.com/tech-tips/how-to-fix-ssh-problem-to-ec2/
- 投稿日:2019-08-19T00:12:12+09:00
ECS + Fargateで動いていたクローラーをSpot Fleetで格安運用を目指す!
きっかけ
1年前くらいにクローラーをEC2からECS + Fargate構成に移行し、運用してきたのですが、少々Fargateがお高いなぁと思い始めてきまして、お盆で時間があるということもあり、Spot Fleetを使って最安なバッチ実行環境の構築に挑戦してみようと思ったのがことの発端です。
以前作ったクローラーは下記記事のやつです。
https://qiita.com/uramotot/items/5f3fe91f9b78ff6ea450前提
クローラーはPythonで記述されており、以下のライブラリを使っていました。
Architecture
Before
以前はこのような構成で、ECS Schedulerを使ってCrawler用のECS Taskを日時で呼び出し、ECS上にFargateを使って実行されるようになっていました。
Scraping処理の方は、RabbitMQを使って非同期で処理が行えるようになっており、こちらはECS Serviceで常時立っています。
(ECS TaskとECS Serviceについては、以前の記事でも説明しておりますので、割愛します。)スクレイピング結果は処理が終わり次第、RabbitMQのWorkerがRDSに格納していました。
After
大きな変更が3つあります。
まず、1つ目に、Scraping処理を非同期にしていた部分を取りやめて、Scraping処理をscrapyのitem pipelineで実行することにしました。
理由としては、一年近く運用してみて、Retryすることが一度もなかったことと、要件的にクローリングの失敗した際にリトライが必須ではなく、次の日の実行を待って良いくらい緩いものだったためです。また、冪等な書き方をしておけば、仮にクローリングに失敗したとしても、あまり問題にならなそうだなと思ったためです。
ということで、Scraping部分がなくなり、シンプルな構成になったことで、必要なリソースをかなり減らす事ができました。
2つ目は、スクレイピングの処理結果を格納する部分もRDSからDynamoDBに移行しました。
こちらの移行理由としては、スクレイピング結果は対象ドメインによってデータ構造が結構変えたいことも多く、ドキュメント型の性質を持っているDynamoDBを選択しました。
また、DynamoDBはReadとWriteの秒間リクエスト数で課金されるため、クローリングの間隔を最適に設定しておけば、かなり安く使うことができます。
(あと、ストレージは最初の25GBは無料で使えるという太っ腹サービスでもあります。)3つ目は、ECS Taskの起動タイプをFargateからEC2に変更し、ECS Cluster InstanceにEC2 Spot Fleetを用いているところです。
こちらの理由としては、FargateはTaskの実行時にしか課金されないため、バッチ実行時には比較的安く済ませることができるのですが、オンデマンドのEC2インスタンスよりも少しだけ値段が高いです。
また、Spot Instanceのようなものはないので、ある程度vCPUやMemoryを確保するとまぁまぁ高くなってしまいます。Spot Fleetは必要なvCPUやMemoryを設定するだけで、Spot Instanceを取得してくれる便利サービスです。
Spot Instanceは、AWS Cloud内の使用されていない EC2キャパシティーを活用でき、最大90%の割引を受けられるポテンシャルを持っています。
Spot Instanceを使うことで、vCPUやMemoryをある程度確保したとしても安く済ませることができます。また、Application Auto Scalingを使うことで、Spot Instanceの数を増減させるScheduleを設定することが可能になります。
これを用いることで、バッチの実行時間にのみSpot Instanceが起動するようになっています。どれだけ安くなったのか
ということで、3つの大きな変更を加えたわけですが、具体的にどれほど安くなったのでしょうか?
今回はvCPU: 2, Memory: 4GB、その他サービスは最小構成で、月額を計算します。
クローラーの一回の実行時間は3時間とします。Before
Fargateの料金については現時点では、以下の表のとおりです。
料金 1vCPU 0.05056 [USD/h] 1GB Memory 0.00553 [USD/h] https://aws.amazon.com/jp/fargate/pricing/
以下がBefore構成の料金表です。
Service Capacity hour Price per month Fargate (Crawler) vCPU: 1, Memory: 2GB 90 [h] 5.5458 [USD] Fargate (Scraping) vCPU: 1, Memory: 2GB 750 [h] 46.215 [USD] RDS db.t2.micro 750 [h] 21 [USD] 合計すると、
72.7608[USD/month]なので、日本円で月々8000円くらいになりました。
やはり、Fargateは一時的に建てる場合はとても安いですが、ECS Serviceのように常時起動している場合には高くつきますね。After
Spot Fleetの割引料は5割にしています。
Spot InstanceはAM 1:00~7:00の6時間のみ立っているとして計算します。t3a.mediumの料金は、
0.049[USD/h]です。
t3a.mediumはvCPU: 2, Memory: 4GBのキャパシティを持っています。
https://aws.amazon.com/ec2/pricing/on-demand/DynamoDBの料金は以下です。
料金 Write Capacity Unit 0.000742 [USD/month] Read Capacity Unit 0.0001484 [USD/month] 以下がAfter構成の料金表です。
Service Capacity hour Price per month EC2 (Spot) t3a.medium 180 [h] 4.41 [USD] DynamoDB Write: 5, Read: 5 750 [h] 0.004452 [USD] 驚愕の結果となりました!(わざとらしい)
DynamoDBの料金はProvisionedとオンデマンドの2つの請求オプションがあります。
今回はProvisionedの方式を取りました。理由としては、うまく使えばそちらのほうが安いからです。EC2 Spot Instanceは6時間のみしか立たない + 5割り引きで、
4.41 [USD/month]まで落とすことができました!Before の
Fargate (Crawler)と比較しても、リソースが2倍にも関わらず月々半額以下の値段で利用することができる計算になります。まとめ
クローラーを
ECS + Spot Fleetの構成に移行してみたら、月々8000円だったものが500円くらいで動かせる様になりました。Spot Instanceが取得できなかった場合の処理や、厳密なECS Task実行時間にのみSpot Instanceを要求するなどはやっておりませんが、ランニングコストと構築コストを天秤にかけたらちょうど良い感じに収まったと思います。
こういう節約のための施策って、めんどくさかったり、学習コストがかかったり、プログラムを冪等にする必要があるなど、構成が複雑になったりと、色々ハードルがあり、取り掛かるのが億劫だったりします。
しかし、この記事のクローラーは個人利用のため、かなり小さい構成になっていますが、ビジネス利用を考えた場合、この割引率はかなり大きいと思います。
おまけ
ECS + Spot Fleetでバッチを動かすCloudFormationをおまけとしてつけておきます。--- AWSTemplateFormatVersion: 2010-09-09 Mappings: RegionMap: ap-northeast-1: ImageId: ami-04a735b489d2a0320 # ECS for AmazonLinux2 Parameters: InstanceType: Type: String DesiredCapacity: Type: String PublicSubnet: Type: AWS::EC2::Subnet::Id SecurityGroups: Type: List<AWS::EC2::SecurityGroup::Id> Cluster: Type: String TaskDefinition: Type: String StartCron: Type: String StopCron: Type: String StartTaskCron: Type: String Resources: ClusterInstance: Type: AWS::EC2::SpotFleet Properties: SpotFleetRequestConfigData: IamFleetRole: !GetAtt SpotFleetRole.Arn LaunchSpecifications: - BlockDeviceMappings: - DeviceName: /dev/xvda Ebs: DeleteOnTermination: true VolumeSize: 30 VolumeType: gp2 EbsOptimized: true IamInstanceProfile: Arn: !GetAtt InstanceProfile.Arn ImageId: !FindInMap [RegionMap, !Ref 'AWS::Region', ImageId] InstanceType: !Ref InstanceType NetworkInterfaces: - AssociatePublicIpAddress: true DeleteOnTermination: true DeviceIndex: 0 SubnetId: !Ref PublicSubnet Groups: !Ref SecurityGroups Monitoring: Enabled: true UserData: Fn::Base64: !Sub | #!/bin/bash echo ECS_CLUSTER=${Cluster} >> /etc/ecs/ecs.config echo ECS_BACKEND_HOST >> /etc/ecs/ecs.config yum install -y https://amazon-ssm-${AWS::Region}.s3.amazonaws.com/latest/linux_amd64/amazon-ssm-agent.rpm TargetCapacity: 0 TerminateInstancesWithExpiration: true FleetSchedule: Type: AWS::ApplicationAutoScaling::ScalableTarget Properties: MaxCapacity: 0 MinCapacity: 0 ResourceId: !Sub 'spot-fleet-request/${ClusterInstance}' RoleARN: !GetAtt SpotFleetAutoScaleRole.Arn ScalableDimension: ec2:spot-fleet-request:TargetCapacity ScheduledActions: - Schedule: !Ref StartCron ScheduledActionName: StartSchedule ScalableTargetAction: MaxCapacity: !Ref DesiredCapacity MinCapacity: !Ref DesiredCapacity - Schedule: !Ref StopCron ScheduledActionName: StopSchedule ScalableTargetAction: MaxCapacity: 0 MinCapacity: 0 ServiceNamespace: ec2 # === Events === Event: Type: AWS::Events::Rule Properties: Name: Crawler Description: Execute crawling. ScheduleExpression: !Ref StartTaskCron State: ENABLED Targets: - Id: crawler Arn: !Ref Cluster EcsParameters: TaskDefinitionArn: !Ref TaskDefinition TaskCount: 1 RoleArn: !GetAtt EventExecutionRole.Arn # === Role === SpotFleetAutoScaleRole: Type: AWS::IAM::Role Properties: AssumeRolePolicyDocument: Version: 2012-10-17 Statement: - Effect: Allow Principal: Service: - application-autoscaling.amazonaws.com Action: - sts:AssumeRole Path: / ManagedPolicyArns: - arn:aws:iam::aws:policy/service-role/AmazonEC2SpotFleetAutoscaleRole SpotFleetRole: Type: AWS::IAM::Role Properties: AssumeRolePolicyDocument: Version: 2012-10-17 Statement: - Effect: Allow Principal: Service: - spotfleet.amazonaws.com Action: - sts:AssumeRole Path: / ManagedPolicyArns: - arn:aws:iam::aws:policy/service-role/AmazonEC2SpotFleetTaggingRole InstanceProfile: Type: AWS::IAM::InstanceProfile Properties: Path: '/' Roles: - !Ref InstanceProfileRole InstanceProfileRole: Type: AWS::IAM::Role Properties: AssumeRolePolicyDocument: Version: '2012-10-17' Statement: - Effect: Allow Principal: Service: - ec2.amazonaws.com Action: - sts:AssumeRole Path: '/' ManagedPolicyArns: - arn:aws:iam::aws:policy/service-role/AmazonEC2ContainerServiceforEC2Role - arn:aws:iam::aws:policy/service-role/AmazonEC2RoleforSSM EventExecutionRole: Type: AWS::IAM::Role Properties: Path: / AssumeRolePolicyDocument: Version: 2012-10-17 Statement: - Effect: Allow Principal: Service: events.amazonaws.com Action: - sts:AssumeRole ManagedPolicyArns: - arn:aws:iam::aws:policy/service-role/AmazonEC2ContainerServiceEventsRole

