- 投稿日:2019-07-28T20:20:55+09:00
AMP(Accelerated Mobile Pages)入門
概要
こんにちは、都内でフロントエンドエンジニアをしているかめぽんです。最近、Next.jsのバージョンアップにて対応したことで一層話題になっているAMPですが、僕自身AMPのことをそこまで注目していなくてたまたま調べてみたら割とおもしろうそうだったので、インプットした内容をまとめてみました。サンプルコードなども載せていますので、AMPの基礎的な情報の参考にしていただければと思います。
本題
AMPとは、メリット
AMPとはAccelerated Mobile Pagesの略で、GoogleとTwitterが発足したモバイルページを高速に表示させるためのプロジェクト、またはAMP HTMLというフレームワークのことを指します。
AMP自体は以下の構成要素で成り立っています。
- AMP HTML
- Custom Styling(CSS)
- AMP js
- AMP Cache(CDN)
静的なHTML, CSS, jsは普通のwebと同じですがAMP HTMLはAMP独自の仕様が定められており、その仕様どおりに沿ってモバイルサイトを作成することで表示速度を高速にすることができます。
加えて、AMPで作られたサイトはクローラに取り込まれた後AMP Cacheと呼ばれるCDNに保存されます。つまり、従来のWebと異なるのは、実際にURL先にリソースを取りに行くのではなくCDN先にリソースを読みに行くため通常アクセスよりも速く表示できることが特徴です。AMPの基本的なスタンスとしては「読み込みに時間がかかるようなことはさせない」ので高速化を進めていく代わりに、現段階でjsを非同期でしか読み込むことができないという制約があり、インタラクティブで動的なサイトまたはそのようなアプリはまだ不向きなようです。
実践
ここからは実際のソースコードでやっていきたいと思います。
How to use AMP
HTML宣言
最初にHTML宣言ですが以下のように記載します。雷マークがampを意味します。
<html amp lang="ja">でも意味は同じです。<!doctype html> <html ⚡="" lang="ja">ampはutf-8のみ対応そしてviewportの設定が必須なので記載します。
<link rel="canonical" href="index.html"> <meta name="viewport" content="width=device-width,minimum-scale=1,initial-scale=1">application/ld+jsonの設定
ampの設定の中でも大事なのが、LD+jsonです。こちらは、本サイトのamp構造を正しく伝えるための情報になります。Goolgeがschema.orgとLD+jsonで記述することを推奨しています。
<script type="application/ld+json"> { "@context": "", "@type": "Article", "headline": "Welcom to AMP SAMPLE", "image": [ "sample.jpeg" ], "datePublished": "2019-07-28T08:00:00+08:00" } </script>スタイルの読み込み
ampはインラインスタイルしか読めないので、cssファイルを用意するのではなくamp-boilerplateとして登録しておきます。
<style amp-boilerplate>a,abbr,acronym,address,applet,article,aside,audio,b,big,blockquote,body,canvas,caption,center,cite,code,dd,del,details,dfn,div,dl,dt,em,embed,fieldset,figcaption,figure,footer,form,h1,h2,h3,h4,h5,h6,header,hgroup,html,i,iframe,img,ins,kbd,label,legend,li,mark,menu,nav,object,ol,output,p,pre,q,ruby,s,samp,section,small,span,strike,strong,sub,summary,sup,table,tbody,td,tfoot,th,thead,time,tr,tt,u,ul,var,video{margin:0;padding:0;border:0;font-size:100%;font:inherit;vertical-align:baseline}article,aside,details,figcaption,figure,footer,header,hgroup,menu,nav,section{display:block}body{line-height:1}ol,ul{list-style:none}blockquote,q{quotes:none}blockquote:after,blockquote:before,q:after,q:before{content:'';content:none}table{border-collapse:collapse;border-spacing:0}</style>javascriptの読み込み
ampでは、jsは非同期で読み込むことを推奨しているので、async属性をつけましょう。
<script async src="https://cdn.ampproject.org/v0.js"></script> <script async src="./script.js"></script>あとはいつも通りテンプレートを書けば最低限の対応は大丈夫です。LD+jsonに関してはもっと書くべきですがここでは割愛します。以下、ここまでのサンプルを貼っておきます。
<!doctype html> <html ⚡="" lang="ja"> <head> <meta charset="utf-8"> <title>AMP SAMPLE</title> <link rel="canonical" href="index.html"> <meta name="viewport" content="width=device-width,minimum-scale=1,initial-scale=1"> <script type="application/ld+json"> { "@context": "http://schema.org", "@type": "Article", "headline": "Welcom tao AMP SAMPLE", "image": [ "" ], "datePublished": "2015-02-05T08:00:00+08:00" } </script> <style amp-boilerplate="">body{-webkit-animation:-amp-start 8s steps(1,end) 0s 1 normal both;-moz-animation:-amp-start 8s steps(1,end) 0s 1 normal both;-ms-animation:-amp-start 8s steps(1,end) 0s 1 normal both;animation:-amp-start 8s steps(1,end) 0s 1 normal both}@-webkit-keyframes -amp-start{from{visibility:hidden}to{visibility:visible}}@-moz-keyframes -amp-start{from{visibility:hidden}to{visibility:visible}}@-ms-keyframes -amp-start{from{visibility:hidden}to{visibility:visible}}@-o-keyframes -amp-start{from{visibility:hidden}to{visibility:visible}}@keyframes -amp-start{from{visibility:hidden}to{visibility:visible}}</style><noscript><style amp-boilerplate="">body{-webkit-animation:none;-moz-animation:none;-ms-animation:none;animation:none}</style></noscript> <style amp-custom="">a,abbr,acronym,address,applet,article,aside,audio,b,big,blockquote,body,canvas,caption,center,cite,code,dd,del,details,dfn,div,dl,dt,em,embed,fieldset,figcaption,figure,footer,form,h1,h2,h3,h4,h5,h6,header,hgroup,html,i,iframe,img,ins,kbd,label,legend,li,mark,menu,nav,object,ol,output,p,pre,q,ruby,s,samp,section,small,span,strike,strong,sub,summary,sup,table,tbody,td,tfoot,th,thead,time,tr,tt,u,ul,var,video{margin:0;padding:0;border:0;font-size:100%;font:inherit;vertical-align:baseline}article,aside,details,figcaption,figure,footer,header,hgroup,menu,nav,section{display:block}body{line-height:1}ol,ul{list-style:none}blockquote,q{quotes:none}blockquote:after,blockquote:before,q:after,q:before{content:'';content:none}table{border-collapse:collapse;border-spacing:0}</style> <style>html{font-family:ヒラギノ明朝 ProN W6,HiraMinProN-W6,HG明朝E,MS P明朝,MS PMincho,MS 明朝,serif}.wrap{position:relative;width:auto;text-align:center;margin-top:80px}.title{position:relative;font-size:36px;color:#402c2c;font-family:Cambria,Georgia,serif;font-style:normal;-webkit-font-feature-settings:normal;font-feature-settings:normal;font-variant:normal;font-weight:500;line-height:39.6px;letter-spacing:2px}.title::after{position:relative;content:"";display:block;bottom:0;width:50px;height:3px;top:18px;background:#402c2c;margin-left:auto;margin-right:auto}.sub-title{position:relative;font-size:32px;color:#402c2c;font-family:HG明朝E,MS P明朝,MS PMincho,MS 明朝,serif;font-style:normal;-webkit-font-feature-settings:normal;font-feature-settings:normal;font-variant:normal;font-weight:500;line-height:36.6px;letter-spacing:2.5px;margin-top:80px}.flex-wrap{width:970px;height:auto;margin-left:auto;margin-right:auto;display:flex;flex-wrap:wrap;justify-content:space-between;margin-top:60px}.box{width:300px;height:300px;margin-top:40px;-o-object-fit:cover;object-fit:cover;border:none;background:0 0;overflow:hidden;background-position:50%;background-size:cover;background-repeat:no-repeat;transition:all .2s ease;background-image:url(img/sample.jpg)}.box:hover{filter:drop-shadow(3px 3px 4px #909090f0);transform:translate(-1px,-1px)}@media screen and (max-width:768px){.flex-wrap{width:100%}.box{width:33vw;height:33vw;margin:5px}}</style> <script async src="https://cdn.ampproject.org/v0.js"></script> </head> <body> <div id="app"> <div class="wrap"> <h1 class="title">Portfolio</h1> <p class="sub-title">Creative</p> </div> <div class="flex-wrap"> <div class="box"></div> <div class="box"></div> <div class="box"></div> <div class="box"></div> <div class="box"></div> <div class="box"></div> <div class="box"></div> <div class="box"></div> <div class="box"></div> <div class="box"></div> <div class="box"></div> <div class="box"></div> </div> </div> </body> </html>また、今回作ったページとGithubのリンクも貼っておきます。ぜひ、参考にしていただけたらと思います。
最後にページが出来上がったらGoogleが提供しているツールでAMPページとして有効かどうかチェックしてくれますので、コードでも良いですしURLを貼り付けて調べることができます。
まとめ
- AMPとはモバイルのページを高速に表示させる技術
- AMPに対応はAMP用のhtmlが必要
- AMPはAMP独特の制約がある
静的なデータでAMP対応のサイトができました。AMP対応により、サイトがかなり高速に表示されるのはかなりのアドバンテージになると思います。特に、メディアやCMS、ニュースサイトやECサイトなどサイトの速さが命のページにとってはかなり強みになると思います。逆に、javascriptの取り扱いに制約を感じることがあるのでWebアプリケーションとしてAMPの導入はもう少し様子見かなという印象です。Webアプリに関してだとPWAという選択肢もあるので、サービスの特徴によって活用していきたい所存ではあります。また、フロントエンド領域に置いてキャッシュの取り扱いやCDNの知識が必須になってきているので、その部分のキャッチアップもしていきたいと思いました。
参考
https://search.google.com/test/amp?hl=ja
https://amp.dev/ja/
- 投稿日:2019-07-28T19:27:47+09:00
HTML で 画面端 に 変な 余白 が 出来てしまった時の 対処法
目的
- HTMLファイル作成でプレビューを見たら画面端に謎の余白ができてしまって困った時の対処法をまとめる
この記事のターゲット
- HTMLやBootstrapの勉強中にプレビューの画面端に謎の余白がheaderからfooterまで入ってしまい困っている方。
- 余白の原因やスペルミスを探しても見つからず泣きたくなっている方
- どんなに頑張っても余白が消えずにHTMLやBootstrapやCSSが嫌になりそうな方
押さえるポイント
- コードをじっくり眺めてもミスの発見は至難の業 Google Chromeの検証画面やソースコードの差分を視覚的に表示してくれるアプリを使おう!
- 書いたコードを疑う→設定を疑うの順に悪さしてるところを探す。
- 要素の飛び出しが原因のかも。
設定が不十分かスペルミスで要素のwidthの設定がおかしくなってしまっている事が多い。- Google Chromeの検証を用いて余白の原因になっている要素(飛び出してしまっている要素)を探す。
具体的な原因の探し方
- Google Chromeで該当のHTMLファイルを表示する。
- ブラウザ上に表示されたHTMLファイルの任意の場所で右クリック → 検証をクリックする。 画像
- 検証画面にて下記画像のアイコンをクリックしてマウスポインタで余白部分に飛び出している要素を探索する。
- 余白部分に飛び出している要素を発見できたらその親要素は余白部分に飛び出していないか確認する。
- 親要素が余白に飛び出していなかったら、その親要素の要素(タグ)名、クラス名にスペルミスがないか確認する。
- CSSで要素(タグ)名、クラス名を指定するときにスペルミスをしていないか確認する。 ※教材があり、それを元にコーディングしたのに余白が出てしまうときはスペルミスによって設定が反映されないことによる表示の崩れがよくある。
筆者が実際に体験した余白の問題
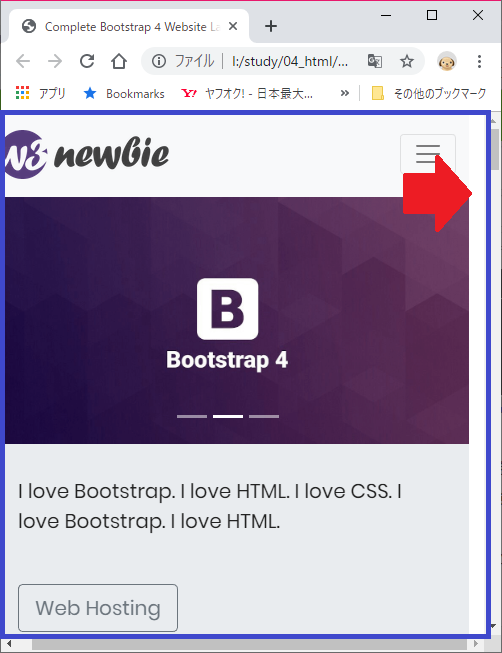
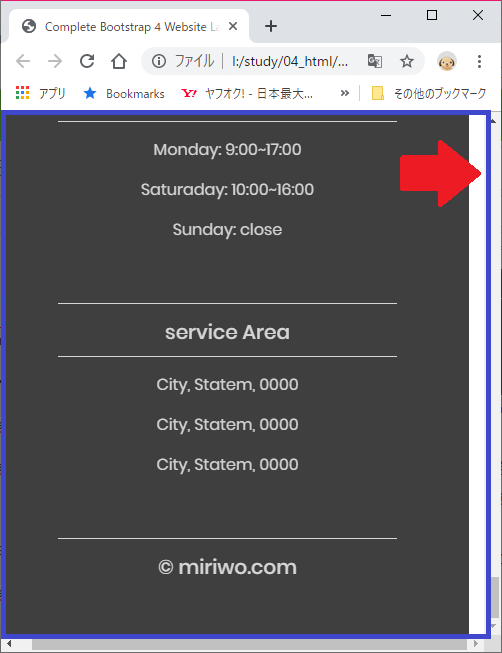
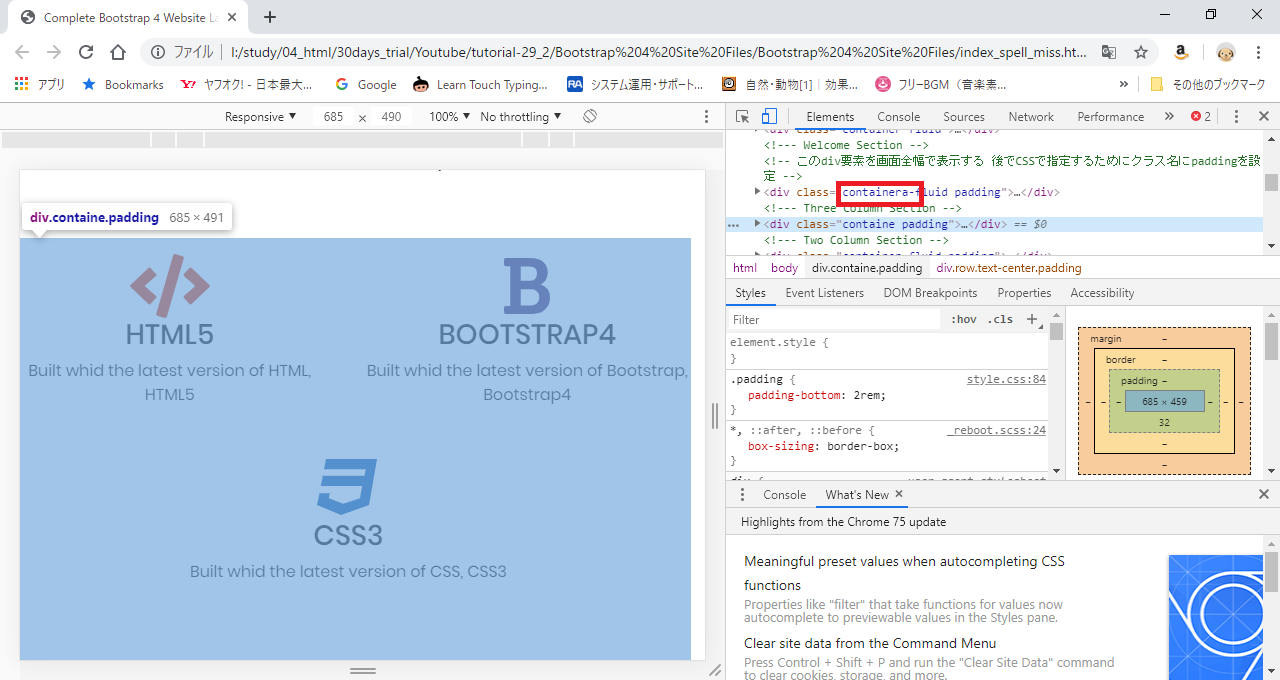
Drew Ryanさんの動画のResponsive Bootstrap Website Start To Finish with Bootstrap 4, HTML5 & CSS3を見ながら動画の見よう見まねでコードを書いていた時にheaderからfooterまで画面右端に余白ができてしまった。
※画像の赤矢印部分に余白ができていることがわかる。
※青枠はブラウザの表示幅()
検証モードで原因を探る
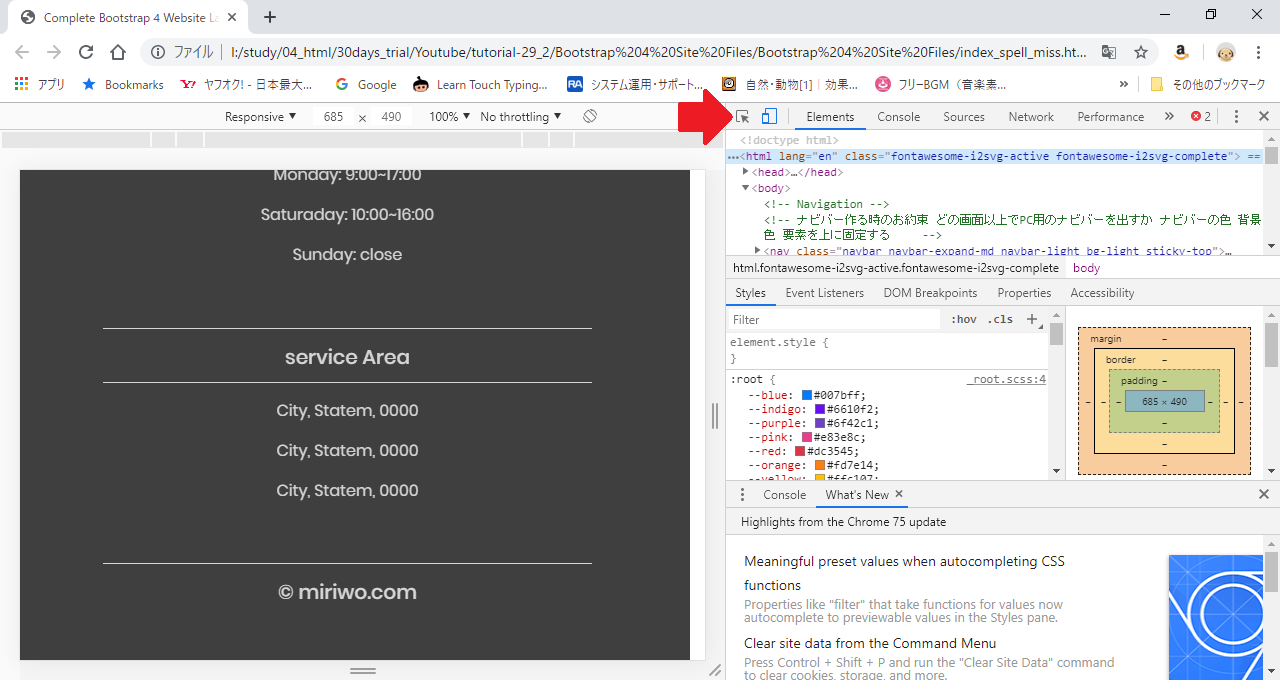
Google Chromeの検証モードを起動(Ctrl + Shift + i)し原因を探した。
赤矢印部分をクリックしてカーソルモード?にして余白部分に飛び出ている要素を探した。
原因箇所の特定完了
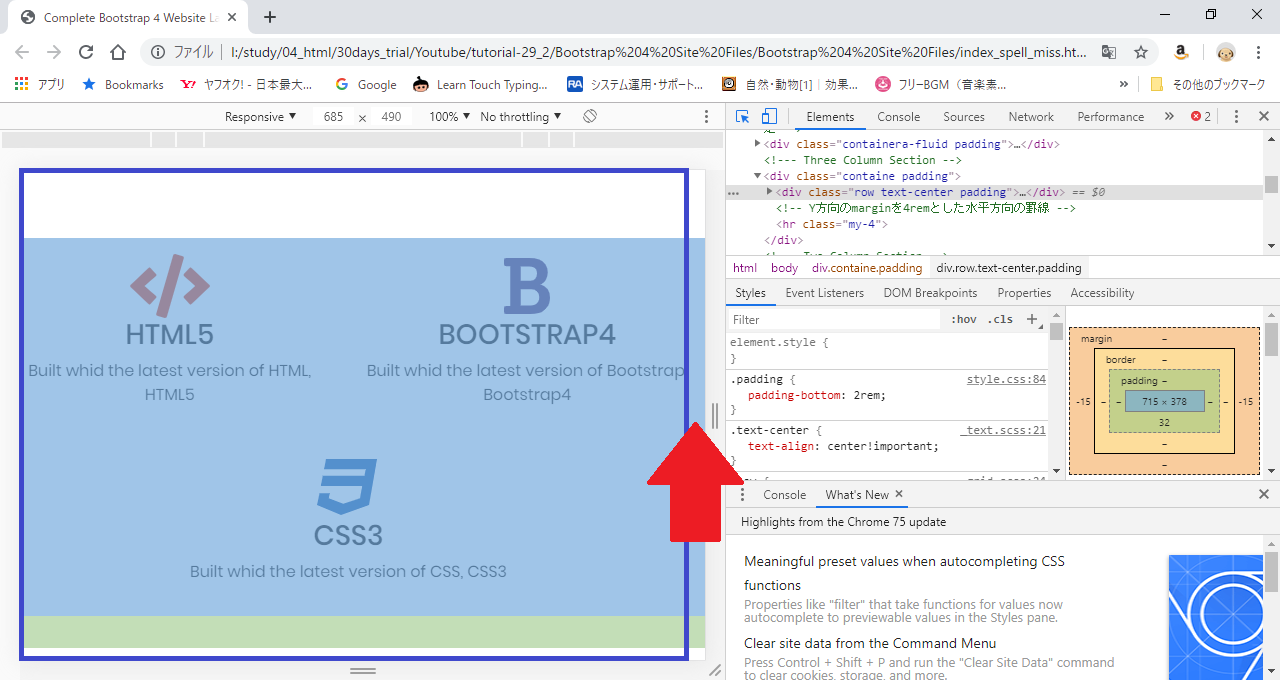
ブラウザ表示幅より飛び出しているcol要素を発見した。
※赤矢印部分がcolクラスのdiv要素が飛び出しているところ
※青枠は正常な表示幅
親要素は飛び出しているかのチェック
飛び出しているcolクラスのdivの親要素であるrowクラスのdivが飛び出しているかを確認した。
rowクラスのdivも飛び出していることを確認した。
※赤矢印部分のrowクラスのdiv要素が飛び出しているところ
※青枠は正常な表示幅
さらに次の親要素は飛び出しているかのチェック
飛び出しているrowクラスのdivの親要素であるcontainerクラスのdivが飛び出しているかを確認した。
containerクラスのdiv要素は飛び出していないことが分かった。
※青枠は正常な表示幅
飛び出していない親要素をチェック
containerクラスのdiv要素のクラス名や要素名、記載方法に誤りがないか確認した。
containerのスペルがおかしい。(画像右上の赤枠部分)
これだとグリッドシステムの表示がおかしくなる。
containerのスペルを直したところ、余白はなくなり正常に表示された。
まとめ
- HTMLでコーディングしたときにできる謎の余白の問題個所の解決方法について記載した。
- HTMLの謎の余白については多くのWebサイトで解決方法が記載されているが、設定を見直す方法がよく記載されている。
- 自分で完全に位置から作成したWebサイトなら設定がおかしい可能性があるが、初心者でコピーコーディングを行ってサンプルとデザインが一致しないのは十中八九スペルミスかだと思われる。(少なくとも自分は今まで詰まったところはすべてスペルミスだった)
- やっとの思いで完成させたWebサイトのデザインの最終仕上げで躓くのはほんとにメンタル的にも来るので、一日空けて再確認をするとミスに気が付きやすい。
付録
- Drew Ryanさんの動画のResponsive Bootstrap Website Start To Finish with Bootstrap 4, HTML5 & CSS3を見ながらBootstrapの勉強をしている自分のような初心者の方で、どうしてもうまく表示されず先に進めないという方がいらっしゃいましたら、筆者のTwitterにDMをいただければ、自分がコーディンしたファイルが格納されてるDropboxのリンクをお渡しします。
※該当コードは商用利用可となっていますが、二次配布については言及されていません。したがって、筆者の書いたファイルをそのまま使用することはご遠慮下さい。あくまで問題が解決せず完全に挫折した際の保険としてご利用ください。


- 投稿日:2019-07-28T09:19:53+09:00
【web開発 CSS】Inputのtextデザイン
はじめに
最近のwebサービスの開発では正しく機能しているかを重視してきたが、そろそろCSSの基本的なデザインは理解しとくべきだし、必ず役に立つ(と信じている)ため、今回はInputのtype="text"についてGoogleなどの大手サイトを参考にしながら作成してみた。また、基本的なアニメーションの勉強も兼ねた。今回はCSSデザインの勉強ということで、下に紹介する検索textボックスなどの検索ボタンや削除ボタンなどは機能は持たせていない。
1. 少し見栄えの良いtextボックス
ここでは3つの簡単なデザインを紹介。
1.1 枠線のみ変更
#text1{
    width: 100%; /*親要素いっぱい広げる*/
    padding: 10px 15px; /*ボックスを大きくする*/
    font-size: 16px;
    border-radius: 3px; /*ボックス角の丸み*/
    border: 2px solid #ddd; /*枠線*/
    box-sizing: border-box; /*横幅の解釈をpadding, borderまでとする*/
}
上のCSSではデフォルトの枠線をpaddingによって広げ色を変えただけのシンプルなもの。これだけでもデフォルトのtextボックスより見栄えは良い。上のgif画像で見られるようにfocus時にはデフォルトの青い枠線が表示される。これをもうちょっと変えてみたのが下の二つ。
box-sizing: border-box;
これを設定することで要素がpaddingとborderも含めてwidthと考えるようになる(デフォルトではwidthは要素本体のみ)ため親要素をはみ出ない。
1.2 focus時の枠線の色変更(border)
#text1:focus {
    border: 2px solid #ff9900;
    z-index: 10;
    outline: 0;
こちらはborderのデフォルトの色を変えただけ。
1.3 focus時の枠線の色変更(shadow)
#text1:focus {
    box-shadow: 0 0 5px 0 rgba(255,153,0,1);
    border: 2px solid #FFF !important;
    outline: 0;
}
こちらはshadowだけで色を表現。borderは背景と同じ白に設定しているため非表示になっている。
2. 検索テキストボックス
こちらはGoogleの設定画面に設置されているものを参考に作成。
<div class="group"> <label for="text2">text2</label> <div class="search_bar"> <i class="fas fa-search search_icon"></i> <input id="text2" type="text" placeholder="キーワードを入力"> <i class="fas fa-times search_icon"></i> </div> </div>.search_bar{ display: flex; /*アイコン、テキストボックスを調整する*/ align-items: center; /*アイコン、テキストボックスを縦方向の中心に*/ justify-content: center; /*アイコン、テキストボックスを横方向の中心に*/ height: 50px; width: 100%; background-color: #ddd; } .search_icon{ /*アイコンに一定のスペースを設ける*/ height: 15px; width: 15px; padding: 5px 5px; } #text2{ font-size: 16px; width: 100%; /*flexの中で100%広げる*/ background-color: #ddd; border: none; /*枠線非表示*/ outline: none; /*フォーカス時の枠線非表示*/ box-sizing: border-box; /*横幅の解釈をpadding, borderまでとする*/ }flex
ここでのポイントは、虫眼鏡と×のアイコンとtextボックスを横並びにする際にinline-blockではなくflexを使っていること。flexを使うことで#text2のwidth: 100%;としても.search_bar要素をはみ出すことなく自動で調整してくれる。また縦のラインを合わせる際にinline-blockよりもflexのほうが簡単。
3. ちょっとしたアニメーションを付けたtextボックス
こちらはYoutubeのコメント投稿欄を参考に作成。擬似要素を使用した二つのデザインを紹介
3.1 中央からのアニメーション
<div class="group"> <label for="text3" id="l_text3">text3</label> <input id="text3" type="text" placeholder="コメントを入力する"> <div class="text_underline"></div> </div>#text3{ font-size: 16px; width: 100%; border: none; outline: none; padding-bottom: 8px; box-sizing: border-box; /*横幅の解釈をpadding, borderまでとする*/ } .text_underline{ position: relative; /*.text_underline::beforeの親要素*/ border-top: 1px solid #c2c2c2; /*text3の下線*/ } /*共通のstyle*/ .text_underline::before, .text_underline::after{ position: absolute; bottom: 0px; /*中央配置*/ width: 0px; /*アニメーションで0pxから50%に*/ height: 1px; /*高さ*/ content: ''; background-color: #3be5ae; /*アニメーションの色*/ transition: all 0.5s; -webkit-transition: all 0.5s; } /*中央から右へのアニメーション*/ .text_underline::before{ left: 50%; /*中央配置*/ } /*中央から左へのアニメーション*/ .text_underline::after{ right: 50%; /*中央配置*/ } #text3:focus + .text_underline::before, #text3:focus + .text_underline::after{ width: 50%; }擬似要素
今回::beforeや::afterというような擬似要素を使用することで無駄に要素を追加しないでアニメーションを適応してみた。上の例では::beforeと::afterをtextボックスの下線の中央に配置することで左右に伸びるアニメーションを実現した。
セレクタ
今回使用したセレクタは隣接セレクタ(+)。これは該当要素に隣接する兄弟関係の要素でありかつ該当要素直下しか適応されない。これが理由で#text3の直前に存在するlabelにはアニメーションをCSSで加えることはできない(もしあばご教授願います)。よって今回は一番簡単だと考えられるjQueryでの実装にした。
$('#text3').focus(function(){
    $('#l_text3').animate({'color': '#3be5ae'}, 500);
}).blur(function(){
    $('#l_text3').animate({'color': 'black'}, 500);
});
こちらのanimateメソッドでは色指定にHTMLカラーコード(#から始まる色を表す英数字文字列)、色の名前およびRGB値のどれでも記述可能。またjQueryにはデフォルトではanimateメソッドで色を変える機能は付いていないぽいので以下のスクリプトが必要。
<script src="https://cdnjs.cloudflare.com/ajax/libs/jquery-color/2.1.2/jquery.color.js"></script>アニメーション
transition: 対象 ミリ秒;でアニメーションを与えることができる。非常にシンプル。
左右からのアニメーション
/*左から右へのアニメーション*/
.text_underline::before{
    position: absolute;
    left: 0px; /*左配置 ここright: 0px;にすると右から左のアニメーション*/
    bottom: 0px; /*左配置*/
    width: 0px; /*アニメーションで0pxから100%に*/
    height: 1px; /*高さ*/
    content: '';
    background-color: #3be5ae; /*アニメーションの色*/
    transition: all 0.5s;
    -webkit-transition: all 0.5s;
}

#text3:focus + .text_underline::before{
    width: 100%;
}
3.1のものとほとんど同じなので説明は簡単に。こちらでは左から右にアニメーションするだけなので伸びる方向が1つ。よって擬似要素も::beforeの1つで実現。ただ::beforeを左端に配置して右に伸ばしてるだけ。
4. かっこいいアニメーションtextボックス
こちらもGoogleのログイン画面に設置されているものを参考に作成。
<div class="group"> <label for="text4">text4</label> <div class="password_box"> <div class="password_inner"> <input id="text4" type="password"> <div class="password_string">パスワードを入力</div> </div> <i class="fas fa-eye-slash"></i> </div> </div>.password_box{ display: flex; /*アイコン、テキストボックスを調整する*/ align-items: center; /*アイコン、テキストボックスを縦方向の中心に*/ justify-content: center; /*アイコン、テキストボックスを横方向の中心に*/ width: 100%; height: 50px; border-radius: 5px; border: 1px solid lightgray; } .password_inner{ width: 100%; height: 100%; background-color: transparent; /*.password_boxの枠線お角一部被るため透明に*/ position: relative; } #text4{ position: absolute; z-index: 1; /*.password_stringよりも上に配置*/ height: 100%; width: 100%; top: 0; left: 0; bottom: 0; right: 0; border: none; /*枠線非表示*/ outline: none; /*フォーカス時の枠線非表示*/ padding: 0 10px; font-size: 16px; background-color: transparent; /*後ろの.password_stringを見せるため*/ box-sizing: border-box; /*横幅の解釈をpadding, borderまでとする*/ } .password_string{ position: absolute; height: 100%; width: 140px; /*文字列分の長さ*/ top: 0; left: 0; bottom: 0; right: 0; padding-left: 10px; /*position: absolute;でのmarginは親要素はみ出す*/ font-size: 16px; line-height: 50px; /*文字列を縦方向にmiddleに見せるため*/ background-color: transparent; color: #80868b; box-sizing: border-box; /*横幅の解釈をpadding, borderまでとする*/ transition: all 0.2s; -webkit-transition: all 0.2s; } .fa-eye-slash{ /*アイコンに一定のスペースを設ける*/ height: 20px; width: 20px; padding: 5px 5px; } /*アニメーション*/ #text4:focus + .password_string{ color: #3be5ae; font-size: 10px; line-height: 10px; width: 85px; height: 10px; padding: 0 2px; background-color: white; transform:translate3d(5px, -6px, 0); }$('#text4').focus(function(){ $('.password_box').animate({borderTopColor: '#3be5ae', borderLeftColor: '#3be5ae', borderRightColor: '#3be5ae', borderBottomColor: '#3be5ae'}, 200); }).blur(function(){ $('.password_box').animate({borderTopColor: '#d3d3d3', borderLeftColor: '#d3d3d3', borderRightColor: '#d3d3d3', borderBottomColor: '#d3d3d3'}, 200); });こちらでも.password_boxの枠線をCSSで変更する方がめんどくさそうだったのでjQueryで記述。またこの時、borderの色を変えるにはborderTopColor, borderLeftColor, borderRightColor, borderBottomColorの全てを指定する必要があり、色の名前(blackなど)は使えない。使えるのはHTMLカラーコードとRGB値のみ。
position: absolute;でのpadding
少し躓いた。position: absolute;ではmarginを使うと親要素をはみ出してしまうため、paddingを使う。position: absolute;の設定下ではpadding分要素が小さくなり、親要素の中に収まる仕組みになっている。
translate3d
アニメーションで要素を動かす際translate()を使うと描画にCPUを使用し、translate3d()を使うとGPUを使用するようになる。当然GPUを使った方がスムーズだしこれを使うべき。
最後に
今回こうしていくつかデザインを作った目的は、これからのwebサービス作りの際の辞書代わりに使うため、CSSデザインの勉強だった。色々触ってるとアニメーションにもいくつもやり方があったりとかなり勉強になった。擬似要素を使うとかなり複雑なデザインも実現できるため習得できると強みになると思った。また、インターネット上の様々なwebサイトをchromeのdeveloperツールを使ってどのような構造になっているのかを見るのはとても勉強になる。


- 投稿日:2019-07-28T09:07:48+09:00
GolangとDBを接続して株価データをチャート表示する
酒井潤さんのUdemy講座を受講していて、
自分でもGolangとDBを接続して、株価データをチャート表示したくなったので、方法をまとめてみました。講座ではsqlite3を使用されていましたが、僕はSQLServerを使用しています。基本的にGolangでは一般的なDB(msSqlとか)の接続方法は大体同じだと思います。
※ソース内のコードはエラーハンドリングとかimportとかは省略していますので、悪しからず。
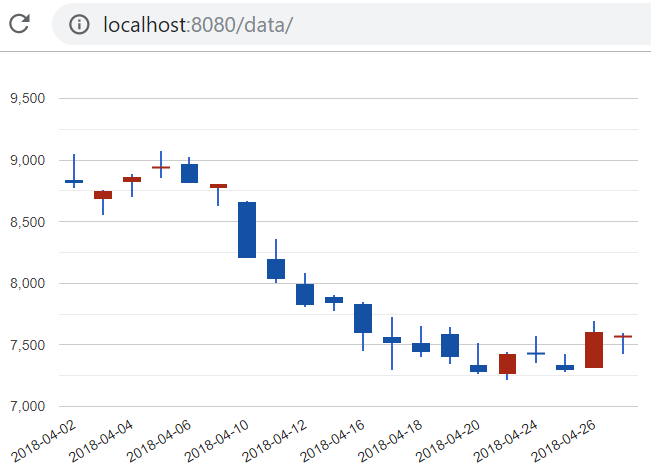
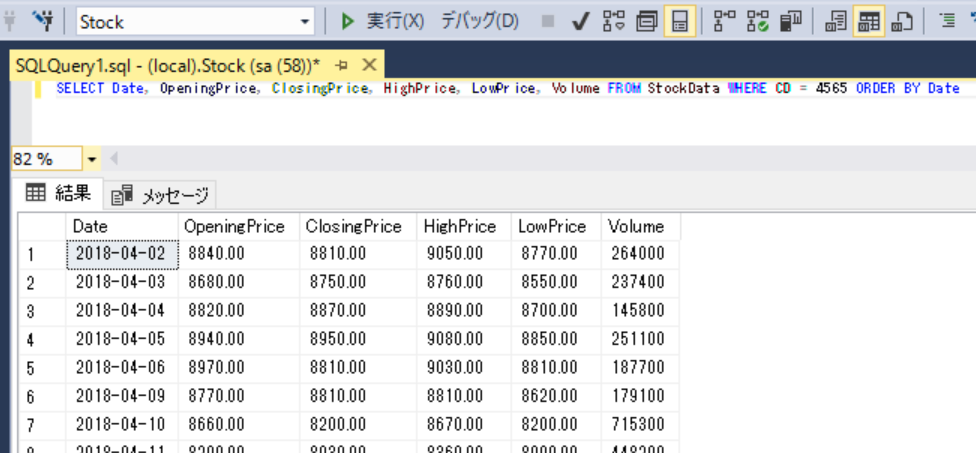
実装例(4565:そーせいのチャート)
テーブル構造
main.go
main.gofunc main() { controllers.StartWebServer() }webserver.go(contorllers>webserver.go)
webserver.govar templates = template.Must(template.ParseFiles("app/views/data.html")) func dataHandler(w http.ResponseWriter, r *http.Request) { //4565:そーせいのデータを表示 df, _ := models.GetData("4565") err := templates.ExecuteTemplate(w, "data.html", df) if err != nil { http.Error(w, err.Error(), http.StatusInternalServerError) } } func StartWebServer() error { http.HandleFunc("/data/", dataHandler) return http.ListenAndServe(":8080", nil) }template.Must(template.ParseFiles("app/views/data.html"))
template.Mustはtemplate.ParseFiles(~)で返されたtemplateのポインタ値をエラーをラッピングして、
templateだけを返してくれます。df, _ := models.GetData("4565")
GetDataに株価コードを渡すようにしました。
stockdata.go(models>stockdata.go)
stockdata.gotype StockData struct { StockCode string `json:"stockcode"` Prices []Price `json:"price"` } type Price struct { Time time.Time `json:"time"` Open float64 `json:"open"` Close float64 `json:"close"` High float64 `json:"high"` Low float64 `json:"low"` Volume int32 `json:"volume"` } func GetData(stockcode string) (df *StockData, err error) { db, err := sql.Open("sqlserver", "server=.;user id=sa;password=password;database=Stock") defer db.Close() cmd := fmt.Sprintf(`SELECT ~`) rows, err := db.Query(cmd) df = &StockData{} for rows.Next() { var price Price rows.Scan(&price.Time, &price.Open, &price.Close, &price.High, &price.Low, &price.Volume) df.Prices = append(df.Prices, price) } }db, err := sql.Open("sqlserver", "server=.;user id=sa;password=password;database=Stock")
sql.Openの第一引数に"sqlserver"、第二引数に接続文字列をセットします。
data.html
data.html<!DOCTYPE html> <html> <head> <title>Page Title</title> <script type="text/javascript" src="https://www.gstatic.com/charts/loader.js"></script> <script type="text/javascript"> google.charts.load('current', {'packages':['corechart']}); google.charts.setOnLoadCallback(drawChart); function drawChart() { var data = google.visualization.arrayToDataTable([ {{ range .Prices }} ['{{.Time}}'.substring(0, 10),{{ .Low }},{{ .Open }},{{ .Close }},{{ .High }}], {{end}} ], true); //お好みで設定 var options = {...} var chart = new google.visualization.CandlestickChart(document.getElementById('chart_div')); chart.draw(data, options); } </script> </head> <body> {{ .StockCode }} <div id="chart_div" style="width: 900px; height: 500px;"></div> </body> </html>[options]に設定する内容はこちら
{{ range .Prices }}
Prices([]Price)をループさせます。
['{{.Time}}'.substring(0, 10),{{ .Low }},{{ .Open }},{{ .Close }},{{ .High }}],
ループ中の現在のPrice構造体から日付、安値、始値、終値、高値を順にセットします。
※{{.Time}}から日付(yyyy/MM/dd)だけを抽出する良い方法が浮かばなかったので、substringで対応しました。(良い方法をご存知の方は教えていただけると幸いです){{end}}
ループを終わります。
これで株価データのチャート表示ができるようになりました。今後はフロントエンド、バックエンド部分の機能拡張を進めていきます。
- 投稿日:2019-07-28T02:13:28+09:00
カメラモジュールOV7725の使い方(ESP32-WROVER-B)
概要
以前OV2640を使って画像を取得したので、今回はOV7725を使って画像を取得してみました。OV7725はjpegではなく、bmp形式で画像が出力されるので、少し制御方法が異なります。
今回はブラウザ上でOV7725のレジスタを変更できるようにしました!結論から申し上げると、30万画素ではあまりきれいな写真は撮れませんでした。初期の携帯に搭載されていたカメラと同性能らしいです…
きれいな写真を撮りたい場合はラズベリーパイを使って、OV5640で撮影したりした方がいいかと思います。
OV2640ではESP32-WROOM-32を使用しましたが、OV7725の場合はbmpで、メモリ使用量が増えるため、PSRAM搭載のESP32-WROVER-Bを使用しました。
公式
https://github.com/espressif/esp32-cameraたぶん公式に採用される前
https://github.com/igrr/esp32-cam-demoピン配置
https://www.instructables.com/id/The-Incredible-ESP32-Wrover-From-Espressif/OV7725 データシート
https://cdn.sparkfun.com/datasheets/Sensors/LightImaging/OV7725.pdf設定
esp-idfのフォルダ内でsubmoduleをクローンします。
git submodule add https://github.com/espressif/esp32-camera.git components/esp32-camera
mv esp-idf/components/esp32-camera/driver/private_include/sccb.h esp-idf/components/esp32-camera/driver/include/sccb.h
mv esp-idf/components/esp32-camera/driver/private_include/sensor.h esp-idf/components/esp32-camera/driver/include/sensor.h
注意点
- driver公式のページ通りにbuildすると、camera_init()が重複していてエラーになったので、中身をapp_main関数に移動しました。
- ピン配置は公式のものではなく、https://github.com/igrr/esp32-cam-demo を参考にしました。
- XCLK:20MHz→6MHzへ変更
コード
esp-idfのexampleにあるsimple serverを改良し、ブラウザで「http://<ローカルアドレス>/」へアクセスすると撮影画像が表示されます。ajaxで画像データ(base64で変換したデータ)を取得し、ブラウザに表示しています。
全コードは下記に載せています。
https://github.com/koki-iwaizumi/esp32-ov7725サイズはVGA、出力形式はYUV422にしています。wifi周りの設定は変更してください。
app_main.c#include <string.h> #include <esp_wifi.h> #include <esp_event_loop.h> #include <esp_log.h> #include <esp_system.h> #include <nvs_flash.h> #include <sys/param.h> #include <esp_http_server.h> #include <esp_camera.h> #include "mbedtls/base64.h" #include "cJSON.h" #include "sensor.h" #include "sccb.h" /********* io ***********/ #define CAM_PIN_PWDN 2 #define CAM_PIN_RESET 15 #define CAM_PIN_XCLK 27 #define CAM_PIN_SIOD 25 #define CAM_PIN_SIOC 23 #define CAM_PIN_VSYNC 22 #define CAM_PIN_HREF 26 #define CAM_PIN_PCLK 21 #define CAM_PIN_D9 19 #define CAM_PIN_D8 36 #define CAM_PIN_D7 18 #define CAM_PIN_D6 39 #define CAM_PIN_D5 5 #define CAM_PIN_D4 34 #define CAM_PIN_D3 32 #define CAM_PIN_D2 35 /********* wifi ***********/ #define EXAMPLE_WIFI_SSID "*" #define EXAMPLE_WIFI_PASS "*" static const char *TAG = "APP"; sensor_t* sensor = NULL; static camera_config_t camera_config = { .pin_pwdn = CAM_PIN_PWDN, .pin_reset = CAM_PIN_RESET, .pin_xclk = CAM_PIN_XCLK, .pin_sscb_sda = CAM_PIN_SIOD, .pin_sscb_scl = CAM_PIN_SIOC, .pin_d7 = CAM_PIN_D9, .pin_d6 = CAM_PIN_D8, .pin_d5 = CAM_PIN_D7, .pin_d4 = CAM_PIN_D6, .pin_d3 = CAM_PIN_D5, .pin_d2 = CAM_PIN_D4, .pin_d1 = CAM_PIN_D3, .pin_d0 = CAM_PIN_D2, .pin_vsync = CAM_PIN_VSYNC, .pin_href = CAM_PIN_HREF, .pin_pclk = CAM_PIN_PCLK, .xclk_freq_hz = 6000000, .ledc_timer = LEDC_TIMER_0, .ledc_channel = LEDC_CHANNEL_0, .pixel_format = PIXFORMAT_YUV422, .frame_size = FRAMESIZE_VGA, .jpeg_quality = 12, .fb_count = 1 }; esp_err_t index_get_handler(httpd_req_t *req) { extern const unsigned char index_start[] asm("_binary_index_html_start"); extern const unsigned char index_end[] asm("_binary_index_html_end"); const size_t index_size = (index_end - index_start); httpd_resp_send_chunk(req, (const char *)index_start, index_size); httpd_resp_sendstr_chunk(req, NULL); return ESP_OK; } esp_err_t image_post_handler(httpd_req_t *req) { int content_buf_size = 10 * 1000; char *content_buf = calloc(content_buf_size, sizeof(char)); if(content_buf == NULL){ ESP_LOGE(TAG, "Failed to allocate frame buffer - content_buf"); httpd_resp_send_500(req); return ESP_FAIL; } if(httpd_req_recv(req, content_buf, req->content_len) <= 0){ ESP_LOGE(TAG, "httpd_req_recv failed"); httpd_resp_send_500(req); return ESP_FAIL; } ESP_LOGE(TAG, "httpd_req_recv content=%s", content_buf); cJSON *content_json = cJSON_Parse(content_buf); for(int i = 0; i <= 172; i++){ char key[4]; itoa(i,key,10); int value = strtol(cJSON_GetObjectItem(content_json, key)->valuestring, NULL, 16); SCCB_Write(sensor->slv_addr, i, value); } cJSON_Delete(content_json); free(content_buf); camera_fb_t *fb = NULL; esp_err_t res = ESP_OK; int64_t fr_start = esp_timer_get_time(); fb = esp_camera_fb_get(); if( ! fb){ ESP_LOGE(TAG, "Camera capture failed"); httpd_resp_send_500(req); return ESP_FAIL; } uint8_t *buf = NULL; size_t buf_len = 0; bool converted = frame2bmp(fb, &buf, &buf_len); esp_camera_fb_return(fb); if( ! converted){ ESP_LOGE(TAG, "BMP conversion failed"); httpd_resp_send_500(req); return ESP_FAIL; } ESP_LOGI(TAG, "esp_get_free_heap_size (%d bytes)", esp_get_free_heap_size()); ESP_LOGI(TAG, "esp_get_minimum_free_heap_size (%d bytes)", esp_get_minimum_free_heap_size()); ESP_LOGI(TAG, "heap_caps_get_free_size(MALLOC_CAP_8BIT) (%d bytes)", heap_caps_get_free_size(MALLOC_CAP_8BIT)); ESP_LOGI(TAG, "heap_caps_get_minimum_free_size(MALLOC_CAP_8BIT) (%d bytes)", heap_caps_get_minimum_free_size(MALLOC_CAP_8BIT)); ESP_LOGI(TAG, "heap_caps_get_largest_free_block(MALLOC_CAP_8BIT) (%d bytes)", heap_caps_get_largest_free_block(MALLOC_CAP_8BIT)); int image_buf_size = 1300 * 1000; uint8_t *image_buf = calloc(image_buf_size, sizeof(char)); if(image_buf == NULL){ free(buf); ESP_LOGE(TAG, "Failed to allocate frame buffer - image_buf"); httpd_resp_send_500(req); return ESP_FAIL; } size_t olen = 0; int base64_err = mbedtls_base64_encode(image_buf, image_buf_size, &olen, buf, buf_len); free(buf); if (base64_err != 0) { ESP_LOGE(TAG, "error base64 encoding, error %d, buff size: %d", base64_err, olen); httpd_resp_send_500(req); return ESP_FAIL; } ESP_LOGI(TAG, "esp_get_free_heap_size (%d bytes)", esp_get_free_heap_size()); ESP_LOGI(TAG, "esp_get_minimum_free_heap_size (%d bytes)", esp_get_minimum_free_heap_size()); ESP_LOGI(TAG, "heap_caps_get_free_size(MALLOC_CAP_8BIT) (%d bytes)", heap_caps_get_free_size(MALLOC_CAP_8BIT)); ESP_LOGI(TAG, "heap_caps_get_minimum_free_size(MALLOC_CAP_8BIT) (%d bytes)", heap_caps_get_minimum_free_size(MALLOC_CAP_8BIT)); ESP_LOGI(TAG, "heap_caps_get_largest_free_block(MALLOC_CAP_8BIT) (%d bytes)", heap_caps_get_largest_free_block(MALLOC_CAP_8BIT)); uint8_t *image_json = calloc(image_buf_size, sizeof(char)); if(image_json == NULL){ free(image_buf); ESP_LOGE(TAG, "Failed to allocate frame buffer - image_json"); httpd_resp_send_500(req); return ESP_FAIL; } sprintf((char *)image_json, "{\"image\":\"%s\"}", (const char *)image_buf); free(image_buf); ESP_LOGI(TAG, "image_json length=%d", strlen((const char*)image_json)); res = httpd_resp_set_type(req, "application/json") || httpd_resp_set_hdr(req, "Access-Control-Allow-Origin", "*") || httpd_resp_send(req, (const char *)image_json, strlen((const char*)image_json)); free(image_json); int64_t fr_end = esp_timer_get_time(); ESP_LOGI(TAG, "BMP: %uKB %ums", (uint32_t)(buf_len/1024), (uint32_t)((fr_end - fr_start)/1000)); return res; } esp_err_t config_get_handler(httpd_req_t *req) { int data_json_size = 10 * 1000; char *data_json = calloc(data_json_size, sizeof(char)); if(data_json == NULL){ ESP_LOGE(TAG, "Failed to allocate frame buffer - data_json"); httpd_resp_send_500(req); return ESP_FAIL; } strcat(data_json, "{"); for(int i = 0; i <= 172; i++){ char data_json_buf[255] = {'\0'}; sprintf(data_json_buf, "\"%d\":\"%d\"", i, SCCB_Read(sensor->slv_addr, i)); strcat(data_json, data_json_buf); if(i != 172) strcat(data_json, ","); } strcat(data_json, "}"); ESP_LOGI(TAG, "data_json=%s", data_json); ESP_LOGI(TAG, "data_json length=%d", strlen((const char*)data_json)); esp_err_t res = httpd_resp_set_type(req, "application/json") || httpd_resp_set_hdr(req, "Access-Control-Allow-Origin", "*") || httpd_resp_send(req, (const char *)data_json, strlen((const char*)data_json)); free(data_json); return res; } httpd_uri_t index_uri = { .uri = "/", .method = HTTP_GET, .handler = index_get_handler, }; httpd_uri_t image_uri = { .uri = "/image", .method = HTTP_POST, .handler = image_post_handler, }; httpd_uri_t config_uri = { .uri = "/config", .method = HTTP_GET, .handler = config_get_handler, }; httpd_handle_t start_webserver(void) { httpd_handle_t server = NULL; httpd_config_t config = HTTPD_DEFAULT_CONFIG(); ESP_LOGI(TAG, "Starting server on port: '%d'", config.server_port); if(httpd_start(&server, &config) == ESP_OK){ ESP_LOGI(TAG, "Registering URI handlers"); httpd_register_uri_handler(server, &index_uri); httpd_register_uri_handler(server, &image_uri); httpd_register_uri_handler(server, &config_uri); return server; } ESP_LOGI(TAG, "Error starting server!"); return NULL; } void stop_webserver(httpd_handle_t server) { httpd_stop(server); } static esp_err_t event_handler(void *ctx, system_event_t *event) { httpd_handle_t *server = (httpd_handle_t *) ctx; switch(event->event_id){ case SYSTEM_EVENT_STA_START: ESP_LOGI(TAG, "SYSTEM_EVENT_STA_START"); ESP_ERROR_CHECK(esp_wifi_connect()); break; case SYSTEM_EVENT_STA_GOT_IP: ESP_LOGI(TAG, "SYSTEM_EVENT_STA_GOT_IP"); ESP_LOGI(TAG, "Got IP: '%s'", ip4addr_ntoa(&event->event_info.got_ip.ip_info.ip)); if(*server == NULL){ *server = start_webserver(); } break; case SYSTEM_EVENT_STA_DISCONNECTED: ESP_LOGI(TAG, "SYSTEM_EVENT_STA_DISCONNECTED"); ESP_ERROR_CHECK(esp_wifi_connect()); if(*server){ stop_webserver(*server); *server = NULL; } break; default: break; } return ESP_OK; } static void initialise_wifi(void *arg) { tcpip_adapter_init(); ESP_ERROR_CHECK(esp_event_loop_init(event_handler, arg)); wifi_init_config_t cfg = WIFI_INIT_CONFIG_DEFAULT(); ESP_ERROR_CHECK(esp_wifi_init(&cfg)); ESP_ERROR_CHECK(esp_wifi_set_storage(WIFI_STORAGE_RAM)); wifi_config_t wifi_config = { .sta = { .ssid = EXAMPLE_WIFI_SSID, .password = EXAMPLE_WIFI_PASS, }, }; ESP_LOGI(TAG, "Setting WiFi configuration SSID %s...", wifi_config.sta.ssid); ESP_ERROR_CHECK(esp_wifi_set_mode(WIFI_MODE_STA)); ESP_ERROR_CHECK(esp_wifi_set_config(ESP_IF_WIFI_STA, &wifi_config)); ESP_ERROR_CHECK(esp_wifi_start()); } void app_main() { static httpd_handle_t server = NULL; ESP_ERROR_CHECK(nvs_flash_init()); esp_err_t err = esp_camera_init(&camera_config); if(err != ESP_OK){ ESP_LOGE(TAG, "Camera Init Failed"); return; } sensor = esp_camera_sensor_get(); initialise_wifi(&server); }HTML周り
index.html<!doctype html> <html lang="ja"> <head> <meta charset="utf-8"> <meta name="viewport" content="width=device-width, initial-scale=1, shrink-to-fit=no"> <link rel="stylesheet" href="https://use.fontawesome.com/releases/v5.6.4/css/all.css"> <link rel="stylesheet" href="https://stackpath.bootstrapcdn.com/bootstrap/4.3.1/css/bootstrap.min.css" integrity="sha384-ggOyR0iXCbMQv3Xipma34MD+dH/1fQ784/j6cY/iJTQUOhcWr7x9JvoRxT2MZw1T" crossorigin="anonymous"> <title>OV7725</title> <style> .alert{ display:none; } #overlay{ position: fixed; top: 0; z-index: 100; width: 100%; height:100%; display: none; background: rgba(0,0,0,0.6); } .cv-spinner{ height: 100%; display: flex; justify-content: center; align-items: center; } .spinner{ width: 40px; height: 40px; border: 4px #ddd solid; border-top: 4px #2e93e6 solid; border-radius: 50%; animation: sp-anime 0.8s infinite linear; } @keyframes sp-anime{ 0% { transform: rotate(0deg); } 100% { transform: rotate(359deg); } } .is-hide{ display:none; } .ov_a{ height:600px; overflow-y:auto; } </style> </head> <body> <div id="overlay"> <div class="cv-spinner"> <span class="spinner"></span> </div> </div> <div class="text-center mt-3 mb-3"> <h1>OV7725</h1> </div> <div class="container-fluid"> <div class="row"> <div class="col-lg-6 text-center mb-4"> <div class="row"> <div class="col-md-12"> <div class="alert alert-success" role="alert">success</div> <div class="alert alert-danger" role="alert">failed</div> </div> <div class="col-md-12"> <img id="img" class="mw-100"> </div> <div class="col-md-12 mt-4"> <button id="image_button" type="button" class="btn btn-success w-100">Take a Picture</button> </div> </div> </div> <div class="col-lg-6"> <div class="ov_a"> <form id="form"> <table id="table_regs" class="table table-striped"> <tr> <th>Address(Hex)</th> <th>Value(Hex)</th> </tr> </table> </form> </div> </div> </div> </div> <script src="https://code.jquery.com/jquery-3.3.1.slim.min.js" integrity="sha384-q8i/X+965DzO0rT7abK41JStQIAqVgRVzpbzo5smXKp4YfRvH+8abtTE1Pi6jizo" crossorigin="anonymous"></script> <script src="https://cdnjs.cloudflare.com/ajax/libs/popper.js/1.14.7/umd/popper.min.js" integrity="sha384-UO2eT0CpHqdSJQ6hJty5KVphtPhzWj9WO1clHTMGa3JDZwrnQq4sF86dIHNDz0W1" crossorigin="anonymous"></script> <script src="https://stackpath.bootstrapcdn.com/bootstrap/4.3.1/js/bootstrap.min.js" integrity="sha384-JjSmVgyd0p3pXB1rRibZUAYoIIy6OrQ6VrjIEaFf/nJGzIxFDsf4x0xIM+B07jRM" crossorigin="anonymous"></script> <script src="https://ajax.googleapis.com/ajax/libs/jquery/3.1.1/jquery.min.js"></script> <script type="text/javascript"> $(function(){ var parseJson = function(data) { var returnJson = {}; for(idx = 0; idx < data.length; idx++){ returnJson[data[idx].name] = data[idx].value } return returnJson; }; $(document).ready(function(){ read_config(); get_image(); }); $("#image_button").on("click", get_image); function get_image(){ $.ajax({ url: "./image", type: "POST", data: JSON.stringify(parseJson($("#form").serializeArray())), dataType: "json", beforeSend: function() { $(".alert").css("display", "none"); $("#overlay").fadeIn(300); } }) .done((data) => { $(".alert").css("display", "none"); $(".alert-success").css("display", "block"); $("#img").attr("src", "data:image/jpeg;base64," + data["image"]); }) .fail((data) => { $(".alert").css("display", "none"); $(".alert-danger").css("display", "block"); console.log(data); }) .always((data) => { setTimeout(function(){ $("#overlay").fadeOut(300); },500); }); } function read_config(){ $.ajax({ url: "./config", type: "GET", dataType: "json", async: false, }) .done((data) => { $.each(data, function(i, item){ $("#table_regs").append('<tr><td>0x' + Number(i).toString(16) + '</td><td><div class="input-group"><div class="input-group-prepend"><span class="input-group-text" id="text1a">0x</span></div><input name="' + i + '" value="' + Number(item).toString(16) + '" type="text" class="form-control"></div></td></tr>'); }); }) } }); </script> </body> </html>


- 投稿日:2019-07-28T01:36:10+09:00
ホームページ作成に役立つHTML, CSSの知識
1 はじめに
- ホームページを作りたいと思いました。
- しかし初心者であるため、中々上手く作ることが出来ませんでした。
- 実際にホームページを作っている友人を頼ることにしました。
- 今回はその友人から教えてもらったものの中で、個人的に役に立つと思うものをいくつかまとめてみました。
2 役に立ったもの
2-1<table>タグ
表を作成するために使用するタグ。
下のような表を作ることが出来ます。colspanやrowspanを用いることで結合もできます。
これは表です。結合もできるよ。 項目1 項目2 項目3 リンゴ バナナ オレンジ コード<table> <tr> <td colspan="3">これは表です。結合もできるよ。 </tr> <tr> <th>項目1</th><th>項目2</th><th>項目3</th> </tr> <tr> <td>リンゴ</td><td>バナナ</td><td>オレンジ</td> </tr> </table>2-2メディアクエリー
スマホ対応をするときなどに使用します。
画面の大きさによってcssの処理を変更することができます。
記述する際は画面サイズが「大きい→小さい」もしくは「小さい→大きい」の順に記載してください。コード/* 画面サイズが1000pxまでのときに対応 */ @media screen and (max-width: 1000px) { /* ここにcssを記述 */ } /* 画面サイズが600pxまでのときに対応 */ @media screen and (max-width: 600px) { /* ここにcssを記述 */ }2-3padding
余白を作る際に使用します。
似たようなものにmarginというものもあります。
違いは余白を作る位置なのですが、この二つの違いはまだ感覚でしか理解できてないため説明は省きます。
今回はpaddingの値指定についてです。paddingは値の1~4つの値を設定して使います。
4つ値を指定する場合の、値に対応する位置を全く覚えきれず、使う度に調べてましたが友人から覚え方を教えていただきました。
4つ指定の場合は上、右、下、左の順番ですがこれは時計回りで覚えればよいそうです。
これでいちいち調べなくて済みます。コード/* 1つの値を設定した場合は、上下左右全てにその値が反映される */ padding:5px; /* 2つの値を設定した場合は、上下に0px左右に5pxが反映される */ padding:0 5px; /* 3つの値を設定した場合は、上に0px左右に3px下に5pxが反映される */ padding:0 3px 5px; /* 4つの値を設定した場合は、上に0px右に1px下に3px左に5px全てにその値が反映される */ padding:0 1px 3px 5px;2-4タグのmargin
htmlでよく利用するh1タグなどがありますが、こちらはあらかじめmarginが自動で設定されています。
そのため予測していたレイアウトとは、少し違った表示になることがあります。
h1 {margin: 0;}などで上手く調整しましょう。3 最後に
この辺りを知っているだけでかなり作りやすくなりました。
自分で勉強するのもいいですが、やはり詳しい人に教えてもらうほうが効率いいですよね。