- 投稿日:2019-06-22T22:51:58+09:00
【Java】for文・拡張for文
for文
同じ処理を指定した回数だけ繰り返す
    for (int i = 0 ; i < 10; i++ ) {
        System.out.print(i);
    }
実行結果 ➡ 0123456789
for(初期化; 条件式; 変化式)
条件式がtrueの間はブロック内の処理を繰り返す拡張for文
配列やListの要素がある限り繰り返す
for文と違い条件式と変化式が無いInteger[] array = {0,1,2,3,4,5,6,7,8,9}; for (Integer str: array) { System.out.print(str); }実行結果 ➡ 0123456789
for(変数の宣言: 取り出す配列・List名)
要素がある限りブロック内の処理を繰り返すIntStream
IntStreamを使うとお手軽というアドバイスを頂きました。
ご指摘ありがとうございます!IntStream.rangeは、指定された開始値から終了値-1までの連続値(IntStream)を返します。
IntStream.range(開始値,終了値)for文で行った処理はIntStreamを使うと以下のようになります。
import java.util.stream.IntStream;

public static void main(String[] args) {
  IntStream.range(0, 10).forEach(System.out::print);
}
初期化や増分の条件式を書く必要がないのでいいですね。
- 投稿日:2019-06-22T22:45:02+09:00
[Android][Java] ListViewにCheckBoxを追加する。
2か月ほど詰まっていたので備忘録
実行環境
IDE:Android Studio 3.4
言語:JavaXperia XZ3(実機デバッグに利用)
OSはAndroid 9 (API Level 28)何がしたいか
ListView内のCheckBoxがスクロールによってそのチェック状態を変更されることがないようにする。
解決方法
ListViewで表示する要素を使いまわす処理をするgetViewメソッド内で、ListViewのCheckBoxのリスナーの貼り直しと、onCheckedChangedメソッド内でgetViewのpositionを利用して
ここには表記していませんが
ArrayAdapter< ListViewに表示するクラス型 >をextends(継承)、
ViewHolderパターンを使っています。以下が成功例となります。
ListAdapter.java// ListItemはListViewで表示する要素の自作クラス。 private ListItem item; // 省略 ~~~~~~~~~~~~ public View getView (final int position, View convertView, ViewGroup parent) { ViewHolder holder; if (convertView == null) { // convertViewに何もなければ新しく生成する。 convertView = mInflater.inflate(mResId, parent, false); // リスト内の各アイテムの要素を取得。 holder = new ViewHolder(); holder.isActive = convertView.findViewById(R.id.alarm_active); convertView.setTag(holder); } else { holder = (ViewHolder)convertView.getTag(); } // リストビューに表示するアイテムのインスタンスを取得する。 item = getItem(position); // リスナーを剥がす。 holder.isActive.setOnCheckedChangeListener(null); // 要素にpositionから取得したitem(自作クラスのインスタンス)を要素へ代入。 holder.isActive.setChecked(item.isActive()); // リスナーを貼る。 holder.isActive.setOnCheckedChangeListener( new CompoundButton.OnCheckedChangeListener() { @Override public void onCheckedChanged (CompoundButton cb, boolean isChecked) { ListItem listItem = getItem(position); // 対warning用nullチェック if (listItem != null){ listItem.setActive(isChecked); } } }); return convertView; }ここで重要なのは匿名クラス内のonCheckedChangedメソッド内の
ListItem listItem = getItem(position);
という処理です。この処理はチェック状態をリストの要素(自作クラス)に反映するためのものですが、
すでにitem = getItem(position);のようにされているからといってこの部分を削除し、
item.setActive(isChecked);のようにしてしまうと正常に動作しません。
- 投稿日:2019-06-22T22:18:32+09:00
Microservices With Docker and Cloud Performance
Microservices are an architectural design for building distributed applications using containers. Microservices get their name because each function works as an independent service. This architecture allows for each service to scale or update without disrupting other services in the application. A microservices framework creates a massively scalable and distributed system, which avoids the bottlenecks of a central database and improves business capabilities, such as continuous delivery/deployment applications and modernizing the technology stack
Microservices in Docker
Containerization is one of the biggest trends in the world right now. Docker, being the most popular containerization platform, is an excellent tool to build microservices. You have different options to structure microservices in Docker.You can deploy each microservice in its own Docker container, read more on how Docker works You can also break down a microservice into various processes and run each in a separate container.
You can also use Docker Compose to run multi-container applications. It can save you a lot of time, as you do not have to create and start each container separately.
With Docker Compose, you can configure your app’s microservices using a YAML file. If you are interested here’s a useful article by Linode on how to deploy microservices with Docker and Docker Compose.
If you have a large-scale application with several containers you can also make use of a container orchestration platform. The two most popular tools are Docker Swarm and Kubernetes. Both allow you to deploy containers to a cluster of computers instead of just one machine.
Docker Swarm is embedded in the Docker Engine; it’s Docker’s native orchestration tool. Kubernetes was created by Google and, it’s the most popular orchestration platform at the moment. While Swarm fits well into the Docker ecosystem and it’s easy to set up, Kubernetes is more customizable and has higher fault tolerance.
Below, you can see an illustration from the Docker blog about how to use Docker Swarm and Compose together to manage container clusters:
You won’t need a container orchestration tool in the case of a smaller app. However, you might want to automate container management when you deal with several microservices.
Microservices in the Cloud
Microservices are frequently run as cloud applications, as they are lightweight and easy to scale and deploy. Popular cloud platforms come with several microservice-friendly features, such as:On-demand resources
Pay as you go pricing
Infrastructure as code
Continuous Deployment and Delivery
Managed services (e.g. dealing with scaling, software configuration and optimization, automatic software updates, etc.)
Large choice of programming languages, operating system, database technologies
Built-in tools such as Docker and Kubernetes
Microservices in the cloud are usually deployed in containers, as that's how you can make the most out of the infrastructure. Besides, containers are isolated, run anywhere, and create a predictable environment. However, it is also possible to deploy microservices in the cloud without using containers.
Although the latter solution is less common, it is the better choice. For instance, WeatherBug runs microservices directly on Amazon EC2, without using containers. They decided to skip Docker and containerization altogether to avoid extra overhead and complexity. You can read the detailed analysis of their approach on The New Stack.
Related blog:
- 投稿日:2019-06-22T21:16:33+09:00
VisualStudioCode + Java + SpringBoot
VisualStudioCode + Java + SpringBoot
はじめに
Java開発にどんなエディタを使っているでしょうか?
- Eclipse
- InteliJ
- NetBeans
などが有名です。
私自身、仕事上Javaを書くことが非常に多いのですが、IDEはEclipseですね。
Pleiades All in Oneが多いですね。
やはり、よく使うものがあらかじめインストールされているから、構築にかかるコストが低いのが一番だからではないでしょうか
ただ、Eclipseは重いんですよね…特に起動が…VisualStudioCode
Microsoftが提供しているVisualStudioのテキストエディタです。
Windowsはもちろん、macOS・Linuxにも対応しています。
高速起動・軽いので最近はよく使っています。
テキストエディタなんですが、多彩なプラグインやデバッグ機能を標準搭載しておりでほぼプラグインと設定次第でほぼIDEのように使えます。VisualStudioCode + Java + SpringBoot
そんなVisualStudioCodeは、様々な言語の開発ができます。
最近知ったんですが、Javaの開発もできると…
ということでJavaの環境構築とSpringBootも使えるということなのでSpringBootの環境構築を備忘録で残しておきます。VisualStudioCodeのダウンロードとインストール(win)
Windowsの環境構築です。
- ここでダウンロードします。
- ダウンロードしたVSCodeUserSetup-x64-X.XX.X.exeを起動する。
- 「Visual Studio Code セットアップウィザードの開始」で「次へ(N) >」を押下する。
- 「使用許諾契約書の同意」で「同意する(A)」にチェックを入れて「次へ(N) >」を押下する。
- 「インストール先の指定」でインストール場所を指定する。デフォルトでもいいですがC直下にしてみました。
- 「次へ(N) >」を押下する。
- 「プログラムグループの指定」でそのまま「次へ(N) >」を押下する。
- 「追加タスクの選択」で以下を選択する。
* 「エクスプローラーのファイル コンテキスト メニューに[Code で開く]アクションを追加する」
* 「エクスプローラーのディレクトリ コンテキスト メニューに[Code で開く]アクションを追加する」
* 「サポートされているファイルの種類のエディターとして、Codeを登録する」
* 「PATHへの追加(再起動後に使用可能)」
を選択します。
- 「次へ(N) >」を押下する。
- 「インストール準備完了」で「インストール(I)」を押下する。
- 「インストール状況」ののち、「Visual Studio Code セット アップウィザードの完了」で「完了(F)」を押下する。
拡張機能の追加
VisualStudioCodeの拡張機能(プラグイン)を追加します。
- 日本語化:Japanese Language Pack for Visual Studio Code
- Java開発:Java Extension Pack
JDKのインストール
JDKをインストールし、環境変数を追加してください。(略)
Java:Homeの設定
- 「Ctrl」 + 「,」で「設定」ウィンドウを開く。
- 「設定の検索」で「Java:Home」と入力すると以下が表示される。
Java: Home
Specifies the folder path to the JDK (8 or more recent) used to launch the Java Language Server.
On Windows, backslashes must be escaped, i.e.
"java.home":"C:\\Program Files\\Java\\jdk1.8.0_161"
「setting.jsonで編集」を押下する。
setting.json{ "java.home": "C:\\XXXX\\Java\\jdk1.8.0_131" }JDKが配置されているところまでのパス(JAVA_HOME)をsetting.jsonに記載します。
これで、Javaの開発に関する最低限のところは完了しました。
Javaプロジェクトの作成
Javaプロジェクトを作成してみます。
- 「Ctrl」 + 「Shift」 + 「P」で「コマンドパレット」を表示し、以下を入力。
Java: Create Java Project
「フォルダーを指定」でworkspaceとするディレクトリを設定します。
「Input a java project name」でJavaプロジェクトの名前を指定します。
新しいウィンドウが表示されプロジェクトが表示されます。
プロジェクトの中にはbinとsrcディレクトリがあり、中にApp.classとApp.javaがあります。便利な機能
App.javaのmainメソッドの上にRun | Debugがあります。
Runで実行、Debugでデバッグ実行です。ブレークポイントは左に表示されている数字のさらに左にフォーカスすると赤い丸が表示されるので表示されている状態でクリックするとブレークポイントを設置できます。
実行引数はデバッグ→歯車アイコン→launch.json
実行構成に"args":を追加することで実行引数を渡すことができます。{ "configurations": [ { "type": "java", "name": "CodeLens (Launch) - App", "request": "launch", "mainClass": "app.App", "projectName": "test_project", "args": "" ← これ } ] }
コードフォーマット:「Alt」 + 「Shift」 + 「F」
コンソールの使用
launch.jsonに
"console": "integratedTerminal",を設定する
SpringBoot
SpringBootを使えるようにするため、拡張機能を追加します。
- SpringBootの拡張機能:「Spring Boot Extension Pack」
- Lombokの拡張機能:「Lombok Annotations Support for VS Code」
SpringBootプロジェクト
SpringBootプロジェクトを作成します。
- 「Ctrl」 + 「Shift」 + 「P」で「コマンドパレット」を開き、以下を入力。
Spring Initializr: Generate a Maven Project
- Specify project langueage.で「Java」を入力(選択)
- Input Group Id for your project.で「Group ID」を入力
- Input Arifact Id for your project.で「Arifact ID」を入力
- Specify Spring Boot versionで「2.1.6」を入力(選択)
- Search for dependenciesで以下を選択
* Spring Web Starter
* Spring Boot DevTools
* Lombok
* Thymeleaf
* MySQL Driver
* MyBatis Framework
- Selected 6 dependenciesを押下
DBの設定
- MySQLのインストール(略)
- DBの作成
CREATE DATABASE test_db CHARACTER SET utf8;
- テーブルの作成
CREATE TABLE IF NOT EXISTS
member                                              -- テーブル名
(
    MAIL_ADDRESS varchar(255) NOT NULL PRIMARY KEY  -- メールアドレス:PK
    ,NAME varchar(255) NOT NULL                     -- 名前
    ,CREATED_DATE datetime                          -- 登録日時
    ,CREATED_USER varchar(255)                      -- 登録者
    ,UPDATED_DATE datetime                          -- 更新日時
    ,UPDATED_USER varchar(255)                      -- 更新者
);
- application.propertiesにDBの接続設定を追加
application.propertiesspring.datasource.url=jdbc:mysql://localhost:3306/test_db spring.datasource.username=root spring.datasource.password=
- アプリケーションを立ち上げ、
http://localhost:8080/とアプリにアクセスできます。MyBatis Generator
ORマッパーとしてMyBatisを使用しています。
MyBatisにはMyBatis GeneratorというDBからjavaファイルを自動生成してくれるツールがあり
Eclipseではプラグインをインストールすると使えたのですが
VisualStudioCodeでは、どうすればいいのかを考えてみました。
- mybatis-generatorのダウンロード
ここでmybatis-generator-core-X.X.X.zipをダウンロードし、解凍する。
- 解凍した資材の中のlib/mybatis-generator-core-X.X.X.jarをsrc/main/resourcesに配置する
- generatorConfig.xmlの配置する
src/main/resources/generatorConfig.xmlを配置する
generatorConfig.xml<?xml version="1.0" encoding="UTF-8" ?> <!DOCTYPE generatorConfiguration PUBLIC "-//mybatis.org//DTD MyBatis Generator Configuration 1.0//EN" "http://mybatis.org/dtd/mybatis-generator-config_1_0.dtd" > <generatorConfiguration> <!-- JDBCドライバまでのパス --> <classPathEntry location="/Users/XXX/XXX/mysql/mysql-connector-java/8.0.16/mysql-connector-java-8.0.16.jar"/> <context id="local"> <!-- 接続先DB情報 --> <jdbcConnection driverClass="com.mysql.jdbc.Driver" connectionURL="jdbc:mysql://localhost:3306/test_db?useSSL=false&nullCatalogMeansCurrent=true" userId="root" password="" /> <!-- Model(Entity)作成先 --> <javaModelGenerator targetPackage="xxx.xxx.app.db.entity" targetProject="/Users/XXX/Documents/workspace/xxx/src/main/java" /> <!-- Mapper.xml作成先 --> <sqlMapGenerator targetPackage="xxx.xxx.db.mapper" targetProject="/Users/XXX/Documents/workspace/xxx/src/main/resources" /> <!-- Mapper.java作成先 --> <javaClientGenerator targetPackage="xxx.xxx.db.mapper" targetProject="/Users/XXX/Documents/workspace/xxx/src/main/java" type="XMLMAPPER" /> <!-- 生成対象テーブル --> <table schema="test_db" tableName="member" ></table> </context> </generatorConfiguration>
- mybatis-generatorの起動 powershell(VSCode内)起動 xxx\src\main\resourcesに移動して以下のコマンドをキック
powershell> java -jar .\mybatis-generator-core-X.X.X.jar -configfile .\generatorConfig.xml -overwrite
- 投稿日:2019-06-22T19:58:34+09:00
kotlinの集合操作の計算速度
kotlinで集合を操作するためにコレクション操作関数としてintersect, subtract, unionが準備されている
サーバサイドでkotlinを用いた処理を書いているときに数十万件のリスト同士の重複を取得する処理を書く場所が出たので計算量とかって大丈夫なんだっけ?となった
tl; dr
よほど
・大規模データ
・性能的な制約が厳しい
場合でない限り大丈夫そうintersect
使用例
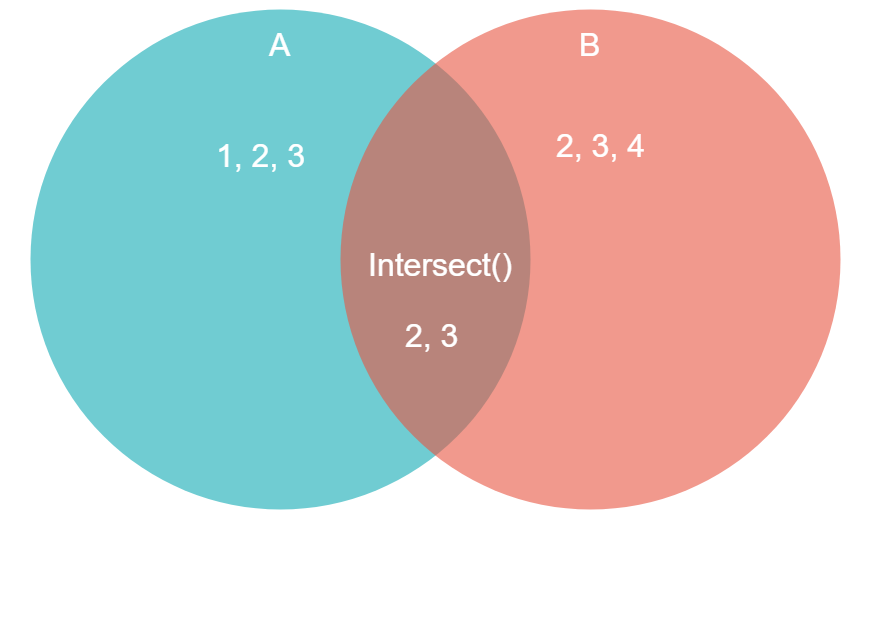
    val a = listOf(1, 2, 3)
    val b = listOf(2, 3, 4)

    println(a.intersect(b)) // -> [2, 3]
集合同士の重複を取得できる定義
public infix fun <T> Iterable<T>.intersect(other: Iterable<T>): Set<T> {
    val set = this.toMutableSet()
    set.retainAll(other)
    return set
}
内部的にはsetに変換してからretainAllしている
retainAllの実行速度はjvmによって異なる?(https://stackoverflow.com/questions/2845176/what-is-the-worst-case-big-oh-using-list-retainall)簡単に試してみた
手元の環境で試すのが早いと思ったので↓のようなコードを書いた
    val sizeList = listOf(
        Pair(100, 100),
        Pair(1000, 1000),
        Pair(10000, 10000),
        Pair(100000, 100000),
        Pair(1000000, 1000000),
        Pair(10000000, 10000000),
        Pair(1000000, 10000),
        Pair(10000,1000000)
    )

    sizeList.forEach { listSize ->
        val lista = List(listSize.first, { it }).shuffled()
        val listb = List(listSize.second, { it }).shuffled()

        val start = Instant.now().toEpochMilli()
        lista.intersect(listb)
        val end = Instant.now().toEpochMilli()

        println(end - start)
    }
実行結果
lista listb end-start(ms) 100 100 5 1000 1000 2 10000 10000 10 100000 100000 67 1000000 1000000 801 10000000 10000000 14757 1000000 10000 253 10000 1000000 135
(100000, 100000) -> (10000000, 10000000)
辺りがサンプル数として適していそうだが、見ても爆発はしていない(ここだけを見るならばO(n)に近い?)
-> 常識的な範囲内で利用するなら大丈夫な模様
- 投稿日:2019-06-22T17:39:57+09:00
Java(Kotlin/JVM)のラムダ式は必ず別インスタンスとなるわけではない
Javaの匿名インナークラスの代わりをラムダ式で書くとき、別インスタンスになると思い込んでいて、インスタンス単位での管理で問題となったメモです。
Android Architecture Components の LiveData を使って、1つの LiveData が管理しているデータソースを別の LiveData としても提供するということを実現するために、空の Observer を LiveData.observer に渡す以下のような実装でハマりました。
サンプルコード
kotlin// observeされている間だけ1秒おきにインクリメントしていくカウンターLiveData class Counter : LiveData<Int>() { private var timer: Timer? = null // アウタークラスのカウンターに依存しつつ、偶数だけを配信するLiveData var oddCounter: MutableLiveData<Int> = object : MutableLiveData<Int>() { override fun observe(owner: LifecycleOwner, observer: Observer<Int>) { super.observe(owner, observer) // アウタークラスにカウンターの実体があるため、 // そちらも observe することで active にし、カウンターを開始する this@Counter.observe(owner, Observer<Int> { }) } } override fun onActive() { val task = object : TimerTask() { override fun run() { var nextCount = (value ?: 0) + 1 postValue(nextCount) if (nextCount % 2 != 0) { oddCounter.postValue(nextCount) } } } timer = Timer() timer?.scheduleAtFixedRate(task, 0, 1000) } override fun onInactive() { timer?.cancel() } } class MainKotlinActivity : AppCompatActivity() { private val counter = Counter() override fun onCreate(savedInstanceState: Bundle?) { super.onCreate(savedInstanceState) setContentView(R.layout.activity_main) // 複数のownerがobserveする実装のサンプルで、アクティビティとプロセスがobserveするコード counter.oddCounter.observe(this, Observer<Int> { value -> value?.let { println("activity got $it") } }) counter.oddCounter.observe(ProcessLifecycleOwner.get(), Observer<Int> { value -> value?.let { println("process got $it") } }) } }これを実行すると、
this@Counter.observe(owner, Observer<Int> {})というコードが、異なるownerインスタンスに対して2回呼び出されますが、2回目でjava.lang.IllegalArgumentException: Cannot add the same observer with different lifecyclesという例外が発生します。原因は、次の通り。
Observer<Int> { }は、何度実行しても(同じクラス内では)同じインスタンスを返すLiveData.observeの仕様 で、1つのobserverを異なるownerでは使えないおそらく、
Observer<Int> { }だとクロージャが呼び出し元のスコープに依存しておらず固定であるため、1つのインスタンスを流用しているんだろう。
実際、Observer<Int> { }をObserver<Int> { print(owner.toString()) }とする、つまり呼び出しのたびに変わるownerに依存する実装になっていれば、別インスタンスを返しました。そもそもバイトコードとしては匿名インナークラスとラムダ式だと全く異なるんだろうと思い、 http://www.ne.jp/asahi/hishidama/home/tech/java/lambda.html#h_invokedynamic このへんを読んでフムフム。
今回、空実装のObserverインスタンスを作りたくて
Observer<Int> { }と書いてしまっていたわけですが、IDE の出す warning に従ったらそうなってしまったという背景があります。実際、以下のようにいくつかの方法で書けるわけですが。。もっともオーソドックスなやり方: Java の匿名インナークラス。
javaObserver<Integer> nullObserver = new Observer<Integer>() { @Override public void onChanged(@Nullable Integer integer) { } }; observe(owner, nullObserver);でもこれは、Android Studio に「can be replaced with lambda」と提案され、それに従うと以下のようにラムダ式を使うコードに変換されます。
javaObserver<Integer> nullObserver = value -> {}; observe(owner, nullObserver);Kotlinでも同様。
kotlinval nullObserver = object : Observer<Int> { override fun onChanged(t: Int?) { } } observe(owner, nullObserver);kotlinval nullObserver = Observer<Int> { } observe(owner, nullObserver);それぞれの違いを意識して使い分けないといかんなと、再認識しました。
単にもとの匿名インナークラスやオブジェクト式のままにしておい場合、別の人がIDEの提案に従って再度同じ変更をしてしまう可能性もあるため、以下のように専用のクラスをインスタンス化するようにしました。
kotlinprivate class NullObserver<T> : Observer<T> { override fun onChanged(t: T?) { } } observe(owner, NullObserver<Int>())いまqiita記事をまとめながら、ソースコードコメントでなにか補足しておいても良かったのかなとも思いました。
おわり。
ちなみに、ここに書いたサンプルコードだと Transformations を使えばこんなややこしい空observeみたいなことをしなくてすむ気もしますが、実際のコードはもう少し込み入った事情があったりはします。
- 投稿日:2019-06-22T17:01:26+09:00
SWIGでJavaとC++のコードを連携させる
本記事について
SWIGを使ってJavaからC++のコードを呼び出す方法について、サンプルコードを載せながら紹介する。この記事ではhello worldからclassの定義と簡単なSTLの使い方くらいまで書く。
※ SWIG歴1週間くらいで記事を書いているため、「こうすればとりあえず動く」ようなコードです。必ずしもベストな方法ではないかもしれません。また、誤り等あればご指摘いただけると幸いです。
サンプルコード: https://github.com/TkrUdagawa/swig_java_sample
SWIGとは
Simplified Wrapper and Interface Generator の略でC/C++で書かれたコードを他の言語から呼び出せるラッパーを生成するツール。Java以外にもPython, Ruby, PHPなどのスクリプト言語もサポートされている。
公式ページ:
http://www.swig.org/手元の実行環境
- Ubuntu 18.04
- gcc 7.3.0
- swig 4.0.0 (ソースからビルド)
- java openjdk version "11.0.3"
SWIGのインストール
執筆時の最新版は4.0.0で2019年4月末にリリースされている。リリースノートを見ると4.0.0でC++11のSTL containerが加わったりしているようなので、少し面倒でも4.0.0をインストールするのが良さそう。
ダウンロード
公式サイトのダウンロードページ からダウンロードする。
インストール
ダウンロードしてきたファイルを展開して、configure, makeでインストールする
$ tar xvfz swig-4.0.0.tar.gz
$ cd swig-4.0.0
$ ./configure
$ make
$ make install
サンプル
1. Hello world
まずは最も単純な例。C++で定義した関数をJavaから呼び出すサンプルを作る。
自分で用意するファイルは以下の3つ├── Main.java ├── hello.cpp └── hello.iC++側の用意
まずはJavaから呼び出されるC++のコードを用意する。
hello.cpp#include <iostream> void hello() { std::cout << "Hello World!" << std::endl; }次にこれをラップするためのSWIGのインターフェースファイルを作成する
hello.i%module hello %{ void hello(); <-① %} void hello(); <- ②%module では作成するモジュールの名前を指定する。
%{ %}の間にC/C++のheaderや宣言を記述し、最後に他言語から呼び出すときのインターフェースとして提供するものを書く。
同じvoid hello() を2回書いているが、①を書かないとコンパイル時にundeclared errorで失敗、②を消すとJavaの実行時に関数が見つからずにこける。ここまで用意できたら
swigコマンドでラッパーコードを生成する。$ swig -java -c++ -cppext cpp hello.i引数の意味は
-javaで生成するソースコードのターゲット言語を指定、-c++でC++の機能を処理できるようにする、-cppext cppで生成されるC++のコードの拡張子を.cppにしている。何も指定しないと拡張子はcxxになる。
このコマンドを実行すると以下の3つのファイルが生成される。
- hello_wrap.cpp
- hello.java
- helloJNI.java
次にC++のコードをコンパイルして共有ライブラリを作成する。
$ g++ -shared -o libhello.so -I/usr/lib/jvm/java-11-openjdk-amd64/include -I/usr/lib/jvm/java-11-openjdk-amd64/include/linux -fPIC hello.cpp hello_wrap.cppincludeパスには
jni.h,jni_md.hなどがあるパスを指定する必要がある。
指定しない場合、コンパイルエラーで特定のヘッダファイルが見つからないと怒られるので、その都度locateコマンドなどでファイルを探してinclude pathに追加していけば大丈夫。Java側の用意
C++のライブラリを読み込むJava側の実装を行う。
Main.javapublic class Main { static { System.loadLibrary("hello"); // <- C++ライブラリのロード } public static void main(String[] args) { hello.hello(); } }これをSWIGで生成されたファイルとともにコンパイルして実行する。これくらいの例なら何も考えずに
javac *.javaなどとやってしまっても良い$ javac hello.java helloJNI.java Main.java $ java Main Hello World! <- C++の関数の実行結果C++側のhello関数を呼び出して、文字列をプリントすることができた。
2. Classを使う
縦と横の長さをセットして面積を計算できる長方形クラスを作る。手順は基本的に1. と一緒。
今回用意するファイル├── Main.java ├── square.cpp ├── square.hpp └── square.i今回はヘッダとソースを分けてみる。
C++側の用意
C++側の長方形のクラスとして
SquareCクラスを実装する。なお、インターフェースファイルで定義するモジュール名とクラス名が重複してはならない。square.hppclass SquareC { public: SquareC(double x, double y); double area(); private: double height_; double width_; };square.cpp#include "square.hpp" SquareC::SquareC(double x, double y) : height_(x), width_(y) { } // 面積を返す double SquareC::area() { return height_ * width_; }次にインターフェースファイルを用意する。
square.i%module square %{ #include "square.hpp" <- ① %} %include "square.hpp" <- ②1.でも書いたように、①のsquare.hppは宣言、②のsquare.hppはインターフェースの定義のために読み込んでいる。
swigコマンドを実行すると今回は4つのファイルが生成される。C++で定義しているclassに対応する
SquareC.javaというのがHello Worldの例ではなかったファイルである。$ swig -java -c++ -cppext cpp square.i
- square_wrap.cpp
- squareJNI.java
- square.java
- SquareC.java
あとは同様にコンパイルする
$ g++ -shared -o libsquare.so -I/usr/lib/jvm/java-11-openjdk-amd64/include -I/usr/lib/jvm/java-11-openjdk-amd64/include/linux -fPIC square.cpp square_wrap.cppJava側の用意
square ライブラリをロードする。C++側で定義していたclassは通常のJavaのクラスと同様に使用することができる。
Main.javapublic class Main { static { System.loadLibrary("square"); } public static void main(String[] args) { SquareC s = new SquareC(3.0, 4.0); System.out.println(s.area()); } }コンパイルして実行
$javac Main.java squareJNI.java SquareC.java square.java
$java Main
12.0
SquareCクラスのインスタンスを作成し、そのメソッドを呼び出して結果をJavaでプリントすることができた。
3. stringを使う
std::stringを使うサンプル。簡単なsetterとgetterでstringの入出力を使う例を作る。
用意するファイルは以下の4つ├── Main.java ├── person.cpp ├── person.hpp └── person.iC++側の用意
名前と年齢のメンバを持つPersonC classを作成する。
person.hpp#include <string> class PersonC { public: PersonC(const std::string&, int); const std::string& get_name() const; void set_name(std::string&); int get_age() const; void set_age(int); private: std::string name_; int age_; };person.cpp#include <string> #include "person.hpp" PersonC::PersonC(const std::string& name, int age) : name_(name), age_(age) {} const std::string& PersonC::get_name() const { return name_; } void PersonC::set_name(std::string& name) { name_ = name; } int PersonC::get_age() const { return age_; } void PersonC::set_age(int age) { age_ = age; }インターフェースファイルには新たに
%include <std_string.i>を追加する。これはSWIGがあらかじめ用意しているstd::stringを扱うためのインターフェースファイルである。person.i%module person %include <std_string.i> %{ #include "person.hpp" %} %include "person.hpp"これまで同様swigコマンドを実行する。
$ swig -java -c++ -cppext cpp person.i以下の5つのファイルが生成される。
- personJNI.java
- person.java
- SWIGTYPE_p_std__string.java
- PersonC.java
- person_wrap.cpp
std::stringをラップする
SWIGTYPE_p_std__string.javaというファイルが新たに生成されている。続いてC++のライブラリを作成する。
g++ -shared -o libperson.so -I/usr/lib/jvm/java-11-openjdk-amd64/include -I/usr/lib/jvm/java-11-openjdk-amd64/include/linux -fPIC person.cpp person_wrap.cppJava側の用意
特に意識することなくString classを使って以下のように書くことができる。
public class Main {
  static {
    System.loadLibrary("person");
  }
  public static void main(String[] args) {
      String p_name = "Taro";
      PersonC p = new PersonC(p_name, 30);
      String n = p.get_name();
      System.out.println(n);
  }
}
$ javac *.java $ java Main Taro4. Vectorを使う
std::vectorを使って内積を計算させるサンプル。インターフェースファイル内でtemplateを使ってあげるとvectorを簡単にJavaでも使うことができる。
├── Main.java
├── inner.cpp
├── inner.hpp
└── inner.i
C++側の用意
C++側は特に何も意識することなくdoubleのvectorの内積を計算するプログラムを書いていく。
inner.hpp#include<vector> double inner_product(const std::vector<double>&, const std::vector<double>&);inner.cpp#include "inner.hpp" double inner_product(const std::vector<double>& a, const std::vector<double>& b) { double ret_val = 0; for (size_t i = 0; i < a.size(); ++i) { ret_val += a[i] * b[i]; } return ret_val; }次にインターフェースファイルを書く。
%include <std_vector.i>

%{
  #include "inner.hpp"
%}

%include "inner.hpp"
%template(DVec) std::vector<double>;
<std_vector.i>をインクルードしてvectorのインターフェースを使うとともに、新たに%templateという行が登場する。これはその名の通りC++のtemplateをラップするためのインターフェースを定義するもので、こうすることでターゲット言語でもC++のtemplateを使ったオブジェクトを扱うことができるようになる。この例ではstd::vector<double>にDVecという型でアクセスできるようになる。swig コマンドを実行すると以下のようなファイルが生成される。
- DVec.java
- inner.java
- innerJNI.java
- inner_wrap.cpp
DVecに対応するJavaソースが生成されている。そして、これまで同様共有ライブラリを作成する。
$ g++ -shared -o libinner.so -I/usr/lib/jvm/java-11-openjdk-amd64/include -I/usr/lib/jvm/java-11-openjdk-amd64/include/linux -fPIC inner.cpp inner_wrap.cppJava側の用意
DVecとして定義した
<std::vector>を使って実装していく。生成されたDVec.javaを覗くとJavaでどのような実装になっているのか見ることができる。public class DVec extends java.util.AbstractList<Double> implements java.util.RandomAccess { private transient long swigCPtr; protected transient boolean swigCMemOwn; (以下略)AbstractListを継承する形で実装されていることがわかる。従って、Javaから使用する際には
std::vectorではなくAbstractListのメソッド(addなど)を呼んであげる必要がある。Main.javapublic class Main { static { System.loadLibrary("inner"); } public static void main(String[] args) { DVec a = new DVec(); a.add(1.0); a.add(2.0); a.add(3.0); DVec b = new DVec(); b.add(3.0); b.add(4.0); b.add(5.0); System.out.println(inner.inner_product(a, b)); } }これをコンパイルして実行する。
$ javac *.java
$ java Main
26.0
5. vectorのvectorを使う
templateが入れ子になっている例を扱う。中間の型をターゲット言語側で使う予定がないなら一番外側のテンプレートのみをインターフェースファイルに書いておけばOK。
ランダムな3×3の行列を作って表示する例を作成する。
C++側の用意
3×3の行列を作成するcreate関数と表示するprint_matrix関数を実装していく。
matrix.hpp#include <vector> std::vector<std::vector<double>> create(); void print_matrix(const std::vector<std::vector<double>>&);matrix.cpp#include <random> #include <iostream> #include "matrix.hpp" std::vector<std::vector<double>> create() { std::random_device rnd {}; std::vector<std::vector<double>> m {}; for (size_t i = 0; i < 3; ++i) { std::vector<double> v {}; for (size_t j = 0; j < 3; ++j) { v.push_back(rnd()); } m.push_back(v); } return m; } void print_matrix(const std::vector<std::vector<double>>& m) { std::cout << "[" << std::endl; for (const auto& r : m) { std::cout << " "; for (const auto& e : r) { std::cout << e << " " ; } std::cout << std::endl; } std::cout << "]" << std::endl; }次にインタフェースファイルを作成する。
matrix.i%module matrix %include <std_vector.i> %{ #include "matrix.hpp" %} %include "matrix.hpp" %template (DMatrix) std::vector<std::vector<double>>;DMatrixのみをインターフェースファイルに記述し、std::vectorについては何も書かないようにしてみる。
この状態でswigコマンドを実行すると以下のファイルが作成される。
- matrixJNI.java
- matrix.java
- DMatrix.java
- matrix_wrap.cpp
- SWIGTYPE_p_std_vectorT_doublet.java
vector double に対応するようなファイルも作成されているように見える。
これまで同様共有ライブラリを作成してC++側の準備を終える。
$ g++ -shared -o libmatrix.so -I/usr/lib/jvm/java-11-openjdk-amd64/include -I/usr/lib/jvm/java-11-openjdk-amd64/include/linux -fPIC matrix.cpp matrix_wrap.cppJava側の用意
Java側のコードを実装する。DMatrixクラスの変数を作成し、関数を読んだり要素にアクセスしてみる。
public class Main {
  static {
    System.loadLibrary("matrix");
  }
  public static void main(String[] args) {
      DMatrix m = matrix.create();
      matrix.print_matrix(m);
      System.out.println(m.get(0)); <- mの要素0をプリントしてみる
      System.out.println(m);        <- m自体をプリントしてみる
  }
}
これを実行すると以下のような結果が得られる。
$ javac *.java
$ java Main
[
  1.99974e+09 2.96596e+08 1.57757e+09
  1.71478e+09 6.51067e+08 2.89146e+09
  1.63441e+09 9.24007e+08 2.31229e+09
]
SWIGTYPE_p_std__vectorT_double_t@27c170f0
[SWIGTYPE_p_std__vectorT_double_t@2626b418, SWIGTYPE_p_std__vectorT_double_t@5a07e868, SWIGTYPE_p_std__vectorT_double_t@76ed5528]
C++側はきちんとDMatrix型の変数を作成し、print_matrixも期待通り動作している。一方でJava側はインスタンスの情報がプリントされるだけでベクトルの中身はプリントされていない。
SWIGTYPE_p_std__vectorT_double_tというのがDVecに対応しそうなクラスではあるが、それのソースコードを見ると4. のサンプルで見たものとは明らかに実装が違うことがわかる。
SWIGTYPE_p_std__vectorT_double_t.javapublic class SWIGTYPE_p_std__vectorT_double_t { private transient long swigCPtr; protected SWIGTYPE_p_std__vectorT_double_t(long cPtr, @SuppressWarnings("unused") boolean futureUse) { swigCPtr = cPtr; } protected SWIGTYPE_p_std__vectorT_double_t() { swigCPtr = 0; } protected static long getCPtr(SWIGTYPE_p_std__vectorT_double_t obj) { return (obj == null) ? 0 : obj.swigCPtr; } }このクラスはswigCPtrというメンバ変数とそれのgetterしか提供していないことがわかる。
なお、インターフェースファイルでDMatrixの要素であるDVecもtemplateで宣言してあげるとJavaからもベクトルの中身をプリントすることができるようになる。
matrix.i%module matrix %include <std_vector.i> %{ #include "matrix.hpp" %} %include "matrix.hpp" %template (DMatrix) std::vector<std::vector<double>>; %template (DVec) std::vector<double>;$ java Main java Main [ 3.37025e+09 3.25125e+09 1.91348e+08 2.32276e+09 2.57749e+09 3.0991e+09 1.9426e+09 2.75113e+09 4.03224e+09 ] [3.370253657E9, 3.251246011E9, 1.91347842E8] [[3.370253657E9, 3.251246011E9, 1.91347842E8], [2.322762433E9, 2.577487148E9, 3.099102289E9], [1.942601516E9, 2.751128283E9, 4.032242749E9]]SWIGでサポートされているSTLについては同様の方法で扱うことができるはず。
長くなったので一旦ここまで。
- 投稿日:2019-06-22T16:23:13+09:00
【内部用】android/javaでのアニメーション
はじめに
基本的にアプリは動くのでアニメーションは大事です。
特にゲームエディタ企画(ScriptEditor班以外)において今から記述するcanvasのアニメーションは習得必須です仕組み
今回はviewのonDrawを繰り返し実行することでアニメーションを実現しています
もっといい方法があるのかもしれません注意
パッケージ名をcom.test.gameeditorとしていますが適切なものに直して下さい
activity_main.xml
LinearLayout がrootにあってその中に独自viewがある一般的な編成です
activity_main.xml<?xml version="1.0" encoding="utf-8"?> <LinearLayout xmlns:android="http://schemas.android.com/apk/res/android" xmlns:app="http://schemas.android.com/apk/res-auto" xmlns:tools="http://schemas.android.com/tools" android:layout_width="match_parent" android:layout_height="match_parent" android:orientation="vertical" tools:context=".MainActivity"> <com.test.gameeditor.MyCanvas android:id="@+id/canvas" android:layout_width="match_parent" android:layout_height="wrap_content" /> </LinearLayout>MainActivity.java
レイアウトをactivity_main.xmlに設定する処理とMyCanvasのonDraw()を60msに一回呼ぶ処理が書かれています
MainActivity.javapackage com.test.gameeditor; import android.support.v7.app.AppCompatActivity; import android.os.Bundle; import android.os.Handler; public class MainActivity extends AppCompatActivity { @Override protected void onCreate(Bundle savedInstanceState) { super.onCreate(savedInstanceState); setContentView(R.layout.activity_main); final MyCanvas canvas = (MyCanvas) findViewById(R.id.canvas); final Handler handler = new Handler(); Runnable runnable = new Runnable() { @Override public void run() { canvas.invalidate(); handler.postDelayed(this, 60); } }; handler.post(runnable); } }MyCanvas.java
アニメーションの内容をonDraw()の中に記述します。
MyCanvas.javapackage com.test.gameeditor; import android.content.Context; import android.graphics.Canvas; import android.graphics.Color; import android.graphics.Paint; import android.view.View; import android.util.AttributeSet; public class MyCanvas extends View { private Paint mPaint = new Paint(); Context context; int x=100; public MyCanvas(Context context) { super(context); } public MyCanvas(Context context, AttributeSet attrs) { super(context, attrs); this.context = context; } @Override protected void onDraw(android.graphics.Canvas canvas) { super.onDraw(canvas); x+=5; canvas.drawRect(0,0,x,getHeight(),mPaint); } }あとがき
これをマスターすればアニメーションが描けるよ
こいつの作り方を今からQiitaに描いて共有します(ゲームエディタに必須なので) pic.twitter.com/XkDkgIPjK2
— hotman (@hotmanww) 2019年6月22日
- 投稿日:2019-06-22T14:23:50+09:00
[Java] Comparableを実装していないクラスに対してコンパイルエラーが発生しない理由
Comparableを実装していないクラスを、TreeSetなどで扱う際、コンパイルエラーではなく、実行時エラー(ClassCastException)がスローされる仕様になっている。
これは、ジェネリクス使用時に、親クラスはComparableインターフェースを実装せずに、子クラスがComparableを実装するシーンを想定していると考えられる。例
Musician親クラスはComaparableを実装していないが、子クラスが実装している。
class Musician {

    public enum Category {
        ROCK, JAZZ, CLASSIC
    }

    public String getName() {
        return name;
    }

    public Category getCategory() {
        return category;
    }

    private String name;
    private Category category;

    Musician(String name, Category category) {
        this.name = name;
        this.category = category;
    }
}

class ChildMusician extends Musician implements Comparable {

    ChildMusician() {
        super("", null);
    }

    @Override
    public int compareTo(Object o) {
        return 0;
    }
}
実行
Set<Musician> musicianSet = new TreeSet<>();
musicianSet.add(new ChildMusician());
子クラスの存在がなければ、一行目でコンパイルエラーを出した方が効率的だと考えられるが、子クラスが存在することもあるため、実行時にキャストのチェックをするようになっている。
- 投稿日:2019-06-22T14:06:41+09:00
CloseableとAutoCloseableの違い
- CloseableはAutoCloseableを継承している
- Closeableの実装クラスをインスタンス化する際は、IOExceptionをキャッチしなければならないが、AutoCloseableの場合はException(IOExceptionの親クラス)をキャッチしなければならない。
AutoCloseableインターフェース
package java.lang;

/**
 * An object that may hold resources (such as file or socket handles)
 * until it is closed. The {@link #close()} method of an {@code AutoCloseable}
 * object is called automatically when exiting a {@code
 * try}-with-resources block for which the object has been declared in
 * the resource specification header. This construction ensures prompt
 * release, avoiding resource exhaustion exceptions and errors that
 * may otherwise occur.
 *
 * @apiNote
 * <p>It is possible, and in fact common, for a base class to
 * implement AutoCloseable even though not all of its subclasses or
 * instances will hold releasable resources.  For code that must operate
 * in complete generality, or when it is known that the {@code AutoCloseable}
 * instance requires resource release, it is recommended to use {@code
 * try}-with-resources constructions. However, when using facilities such as
 * {@link java.util.stream.Stream} that support both I/O-based and
 * non-I/O-based forms, {@code try}-with-resources blocks are in
 * general unnecessary when using non-I/O-based forms.
 *
 * @author Josh Bloch
 * @since 1.7
 */
public interface AutoCloseable {
    /**
     * Closes this resource, relinquishing any underlying resources.
     * This method is invoked automatically on objects managed by the
     * {@code try}-with-resources statement.
     *
     * <p>While this interface method is declared to throw {@code
     * Exception}, implementers are <em>strongly</em> encouraged to
     * declare concrete implementations of the {@code close} method to
     * throw more specific exceptions, or to throw no exception at all
     * if the close operation cannot fail.
     *
     * <p> Cases where the close operation may fail require careful
     * attention by implementers. It is strongly advised to relinquish
     * the underlying resources and to internally <em>mark</em> the
     * resource as closed, prior to throwing the exception. The {@code
     * close} method is unlikely to be invoked more than once and so
     * this ensures that the resources are released in a timely manner.
     * Furthermore it reduces problems that could arise when the resource
     * wraps, or is wrapped, by another resource.
     *
     * <p><em>Implementers of this interface are also strongly advised
     * to not have the {@code close} method throw {@link
     * InterruptedException}.</em>
     *
     * This exception interacts with a thread's interrupted status,
     * and runtime misbehavior is likely to occur if an {@code
     * InterruptedException} is {@linkplain Throwable#addSuppressed
     * suppressed}.
     *
     * More generally, if it would cause problems for an
     * exception to be suppressed, the {@code AutoCloseable.close}
     * method should not throw it.
     *
     * <p>Note that unlike the {@link java.io.Closeable#close close}
     * method of {@link java.io.Closeable}, this {@code close} method
     * is <em>not</em> required to be idempotent.  In other words,
     * calling this {@code close} method more than once may have some
     * visible side effect, unlike {@code Closeable.close} which is
     * required to have no effect if called more than once.
     *
     * However, implementers of this interface are strongly encouraged
     * to make their {@code close} methods idempotent.
     *
     * @throws Exception if this resource cannot be closed
     */
    void close() throws Exception;
}
Closeableインターフェース
package java.io;

import java.io.IOException;

/**
 * A {@code Closeable} is a source or destination of data that can be closed.
 * The close method is invoked to release resources that the object is
 * holding (such as open files).
 *
 * @since 1.5
 */
public interface Closeable extends AutoCloseable {

    /**
     * Closes this stream and releases any system resources associated
     * with it. If the stream is already closed then invoking this
     * method has no effect.
     *
     * <p> As noted in {@link AutoCloseable#close()}, cases where the
     * close may fail require careful attention. It is strongly advised
     * to relinquish the underlying resources and to internally
     * <em>mark</em> the {@code Closeable} as closed, prior to throwing
     * the {@code IOException}.
     *
     * @throws IOException if an I/O error occurs
     */
    public void close() throws IOException;
}
使用例
import java.io.Closeable;
import java.io.IOException;

class AutoCloseableSample implements AutoCloseable {
    @Override
    public void close() throws Exception {
        System.out.println("AutoClosable");
    }
}

class CloseableSample implements Closeable {
    @Override
    public void close() throws IOException {
        System.out.println("Closable");
    }
}

public class ExceptionSample {
    public static void main(String[] args) {
        try (CloseableSample closeableSample = new CloseableSample();  // IOException
              AutoCloseable autoCloseable = new AutoCloseableSample()   // Exception
        ) {
        } catch (IOException e) {}
          catch (Exception e) {}
    }
}
出力
try-with-resourceでopenした順と逆順にcloseされる。
AutoClosable
Closable
- 投稿日:2019-06-22T14:06:41+09:00
[Java] CloseableとAutoCloseableの違い
- CloseableはAutoCloseableを継承している
- Closeableの実装クラスをインスタンス化する際は、IOExceptionをキャッチしなければならないが、AutoCloseableの場合はException(IOExceptionの親クラス)をキャッチしなければならない。
AutoCloseableインターフェース
package java.lang;

/**
 * An object that may hold resources (such as file or socket handles)
 * until it is closed. The {@link #close()} method of an {@code AutoCloseable}
 * object is called automatically when exiting a {@code
 * try}-with-resources block for which the object has been declared in
 * the resource specification header. This construction ensures prompt
 * release, avoiding resource exhaustion exceptions and errors that
 * may otherwise occur.
 *
 * @apiNote
 * <p>It is possible, and in fact common, for a base class to
 * implement AutoCloseable even though not all of its subclasses or
 * instances will hold releasable resources.  For code that must operate
 * in complete generality, or when it is known that the {@code AutoCloseable}
 * instance requires resource release, it is recommended to use {@code
 * try}-with-resources constructions. However, when using facilities such as
 * {@link java.util.stream.Stream} that support both I/O-based and
 * non-I/O-based forms, {@code try}-with-resources blocks are in
 * general unnecessary when using non-I/O-based forms.
 *
 * @author Josh Bloch
 * @since 1.7
 */
public interface AutoCloseable {
    /**
     * Closes this resource, relinquishing any underlying resources.
     * This method is invoked automatically on objects managed by the
     * {@code try}-with-resources statement.
     *
     * <p>While this interface method is declared to throw {@code
     * Exception}, implementers are <em>strongly</em> encouraged to
     * declare concrete implementations of the {@code close} method to
     * throw more specific exceptions, or to throw no exception at all
     * if the close operation cannot fail.
     *
     * <p> Cases where the close operation may fail require careful
     * attention by implementers. It is strongly advised to relinquish
     * the underlying resources and to internally <em>mark</em> the
     * resource as closed, prior to throwing the exception. The {@code
     * close} method is unlikely to be invoked more than once and so
     * this ensures that the resources are released in a timely manner.
     * Furthermore it reduces problems that could arise when the resource
     * wraps, or is wrapped, by another resource.
     *
     * <p><em>Implementers of this interface are also strongly advised
     * to not have the {@code close} method throw {@link
     * InterruptedException}.</em>
     *
     * This exception interacts with a thread's interrupted status,
     * and runtime misbehavior is likely to occur if an {@code
     * InterruptedException} is {@linkplain Throwable#addSuppressed
     * suppressed}.
     *
     * More generally, if it would cause problems for an
     * exception to be suppressed, the {@code AutoCloseable.close}
     * method should not throw it.
     *
     * <p>Note that unlike the {@link java.io.Closeable#close close}
     * method of {@link java.io.Closeable}, this {@code close} method
     * is <em>not</em> required to be idempotent.  In other words,
     * calling this {@code close} method more than once may have some
     * visible side effect, unlike {@code Closeable.close} which is
     * required to have no effect if called more than once.
     *
     * However, implementers of this interface are strongly encouraged
     * to make their {@code close} methods idempotent.
     *
     * @throws Exception if this resource cannot be closed
     */
    void close() throws Exception;
}
Closeableインターフェース
package java.io;

import java.io.IOException;

/**
 * A {@code Closeable} is a source or destination of data that can be closed.
 * The close method is invoked to release resources that the object is
 * holding (such as open files).
 *
 * @since 1.5
 */
public interface Closeable extends AutoCloseable {

    /**
     * Closes this stream and releases any system resources associated
     * with it. If the stream is already closed then invoking this
     * method has no effect.
     *
     * <p> As noted in {@link AutoCloseable#close()}, cases where the
     * close may fail require careful attention. It is strongly advised
     * to relinquish the underlying resources and to internally
     * <em>mark</em> the {@code Closeable} as closed, prior to throwing
     * the {@code IOException}.
     *
     * @throws IOException if an I/O error occurs
     */
    public void close() throws IOException;
}
使用例
import java.io.Closeable;
import java.io.IOException;

class AutoCloseableSample implements AutoCloseable {
    @Override
    public void close() throws Exception {
        System.out.println("AutoClosable");
    }
}

class CloseableSample implements Closeable {
    @Override
    public void close() throws IOException {
        System.out.println("Closable");
    }
}

public class ExceptionSample {
    public static void main(String[] args) {
        try (CloseableSample closeableSample = new CloseableSample();  // IOException
              AutoCloseable autoCloseable = new AutoCloseableSample()   // Exception
        ) {
        } catch (IOException e) {}
          catch (Exception e) {}
    }
}
出力
try-with-resourceでopenした順と逆順にcloseされる。
AutoClosable
Closable