20190524のMacに関する記事は9件です。

Mac で Google 日本語入力を使ってるといつの間にかカタカナ入力になる件

問題

Mac で Google 日本語入力を使っているが、コーディング中、いつの間にかカタカナ入力に切り替わる問題が度々発生してストレスだった。

原因

どのタイミングで切り替わるかわからずに困っていたが、あるとき原因がわかった。

スクリーンショット 2019-05-24 23.06.27.png

おまえか!

そう、使っているエディタで行削除するときのショートカット control + shift + k とかぶっていたのだ。
これによって行削除するたびにカタカナに切り替わっていたのだった。

解決

原因はわかったが、Google 日本語翻訳のショートカットを変更する方法はわからなかった。

私は「カタカナ」は使わないので、「カタカナ」入力ソースごと葬り去ることにした。
システム環境設定のキーボード設定から削除できる(画像参照)。

スクリーンショット 2019-05-24 23.12.03.png

これで解決。お疲れ様でした。

  • このエントリーをはてなブックマークに追加
  • Qiitaで続きを読む

E21: Cannot make changes, 'Modifiable' is offが出た。

コマンドモードで:set modifiable を入力したら編集できるようになった。

環境:Mac

  • このエントリーをはてなブックマークに追加
  • Qiitaで続きを読む

Python 事始め 2019 for mac

令和になって人生で初めての負荷試験担当になりました(予定)。
今から死ぬことになるんだろうな、と戦々恐々としながら AWS の負荷試験入門の本(アフェリンクじゃないよ) 読んでます。

どうせなら保守 & 保守が辛い jMeter よりも、保守しやすく柔軟性の高いと言われてる Locust を使うことを目標に python 始めました。

python (もとい自分の知らない言語)を始めるにあたり必要になるのは開発環境。
開発環境といえば docker ですよね。
大体下になりました。

  • vscode -> ダウンロードする. python 拡張入れるで大体使える。
  • docker -> 環境汚さない。バージョン切り替え用意。構築まで早い。好き。

docker は公式にあるものを使います。それが一番早い。
https://hub.docker.com/_/python

$ docker pull python:3
$ docker run --rm python:3 python --version
Python 3.7.3

これで準備おわりです。便利な世の中。

次、作業環境を構築していきます。
Dockerfile の用意、これも公式をパクれば良いです。
若干書き換えてますが、今は気にしないのが大人です。

FROM python:3

WORKDIR /usr/src/app

COPY requirements.txt ./
RUN pip install --no-cache-dir -r requirements.txt

COPY . .

CMD [ "pytest", "test.py" ]

Dockerfile で requirements.txt なるものをコピーしてるので用意してあげます。
簡単に調べてみると、これはパッケージ管理用のファイルみたいでした。

requirements.txt
pytest

ここまでを build してコンテナ作成します。

$ docker build -t test .

よくあるこんにちは世界をやります。

hello/api.py
def hello():
  return 'hello world !!'

if __name__ == '__main__':
  print(hello())

こんにちはできました!

$ docker run --rm test python hello/api.py
hello world !!

次、開発にとって大事なテスト導入します。
デフォルトのやつもあるみたいですが、さっきスルーしてもらった pytest がわりかしスマートで良さそうでした。

テストするにあたってまず自作関数をモジュールとして読み込めるようにします。
__init__.py ってのを作って定義すればよしなに。

hello/__init__.py
from .api import (
  hello
)

次にテストファイル

test.py
import pytest
from hello import hello

def test_hello():
  assert 'hello orld' == hello()

そしてテスト実行!

$ docker run --rm test
============================= test session starts ==============================
platform linux -- Python 3.7.3, pytest-4.5.0, py-1.8.0, pluggy-0.11.0
rootdir: /usr/src/app
collected 1 item

test.py F                                                                [100%]

=================================== FAILURES ===================================
__________________________________ test_hello __________________________________

    def test_hello():
>     assert 'hello orld' == hello()
E     AssertionError: assert 'hello orld' == 'hello world !!'
E       - hello orld
E       + hello world !!
E       ?       +    +++

test.py:5: AssertionError
=========================== 1 failed in 0.07 seconds ===========================

Dockerfile はコマンドが省略されたとき CMD をデフォルトとして実行します。
今回は pytest test.py ですね。
そしてはい、こけます。
修正しましょう。

import pytest
from hello import hello

def test_hello():
-  assert 'hello orld' == hello()
+  assert 'hello world' == hello()

あと毎回 build -> run って叩くのめんどいので Makefile 作りましょう。
python のランナーは探せば良いのあるかもしれないけど、今回のやつ程度なら Makefile でサクで良いです。(先頭タブじゃないとダメなのが面倒)

# vim:set noexpandtab :
build:
  @docker build -t csvql .

test: build
  @docker run --rm csvql
$ make test
...
============================= test session starts ==============================
platform linux -- Python 3.7.3, pytest-4.5.0, py-1.8.0, pluggy-0.11.0
rootdir: /usr/src/app
collected 1 item

test.py .                                                                [100%]

=========================== 1 passed in 0.04 seconds ===========================

無事通りました :raised_hands:
ここまで出来ればあとは開発へ :thumbsup:

まとめ

  • バージョン切り替えができる環境
  • 環境に左右されない。汚さない。
  • ユニットテストができるように
  • モジュール化を覚えた
  • vscode 使った?
  • このエントリーをはてなブックマークに追加
  • Qiitaで続きを読む

最新版TensorFlow (2.0 Alpha) 画像認識編

はじめに

Tensorflow 2.0 Alpha上で画像認識サンプルを動作させた過程を記載します。
基本的にはこちらの公式チュートリアルの流れに沿って導入しています。


本記事は概要版となります。
詳細は最新版TensorFlow (2.0 Alpha) 画像認識編(詳細版)で紹介しています。


構成

MacBook Pro (13-inch, 2016, Two Thunderbolt 3 ports)

TensorFlowおよび各ライブラリの読み込み

Tensorflow 2.0 Alphaが導入されている前提で進めます。
未導入の方はこちらを参照してください:最新版TensorFlow (2.0 Alpha) 動作環境構築

Tensorflowおよび各ライブラリの読み込み

from __future__ import absolute_import, division, print_function, unicode_literals

# TensorFlow and tf.keras
import tensorflow as tf
from tensorflow import keras

# Helper libraries
import numpy as np
import matplotlib.pyplot as plt

print(tf.__version__)
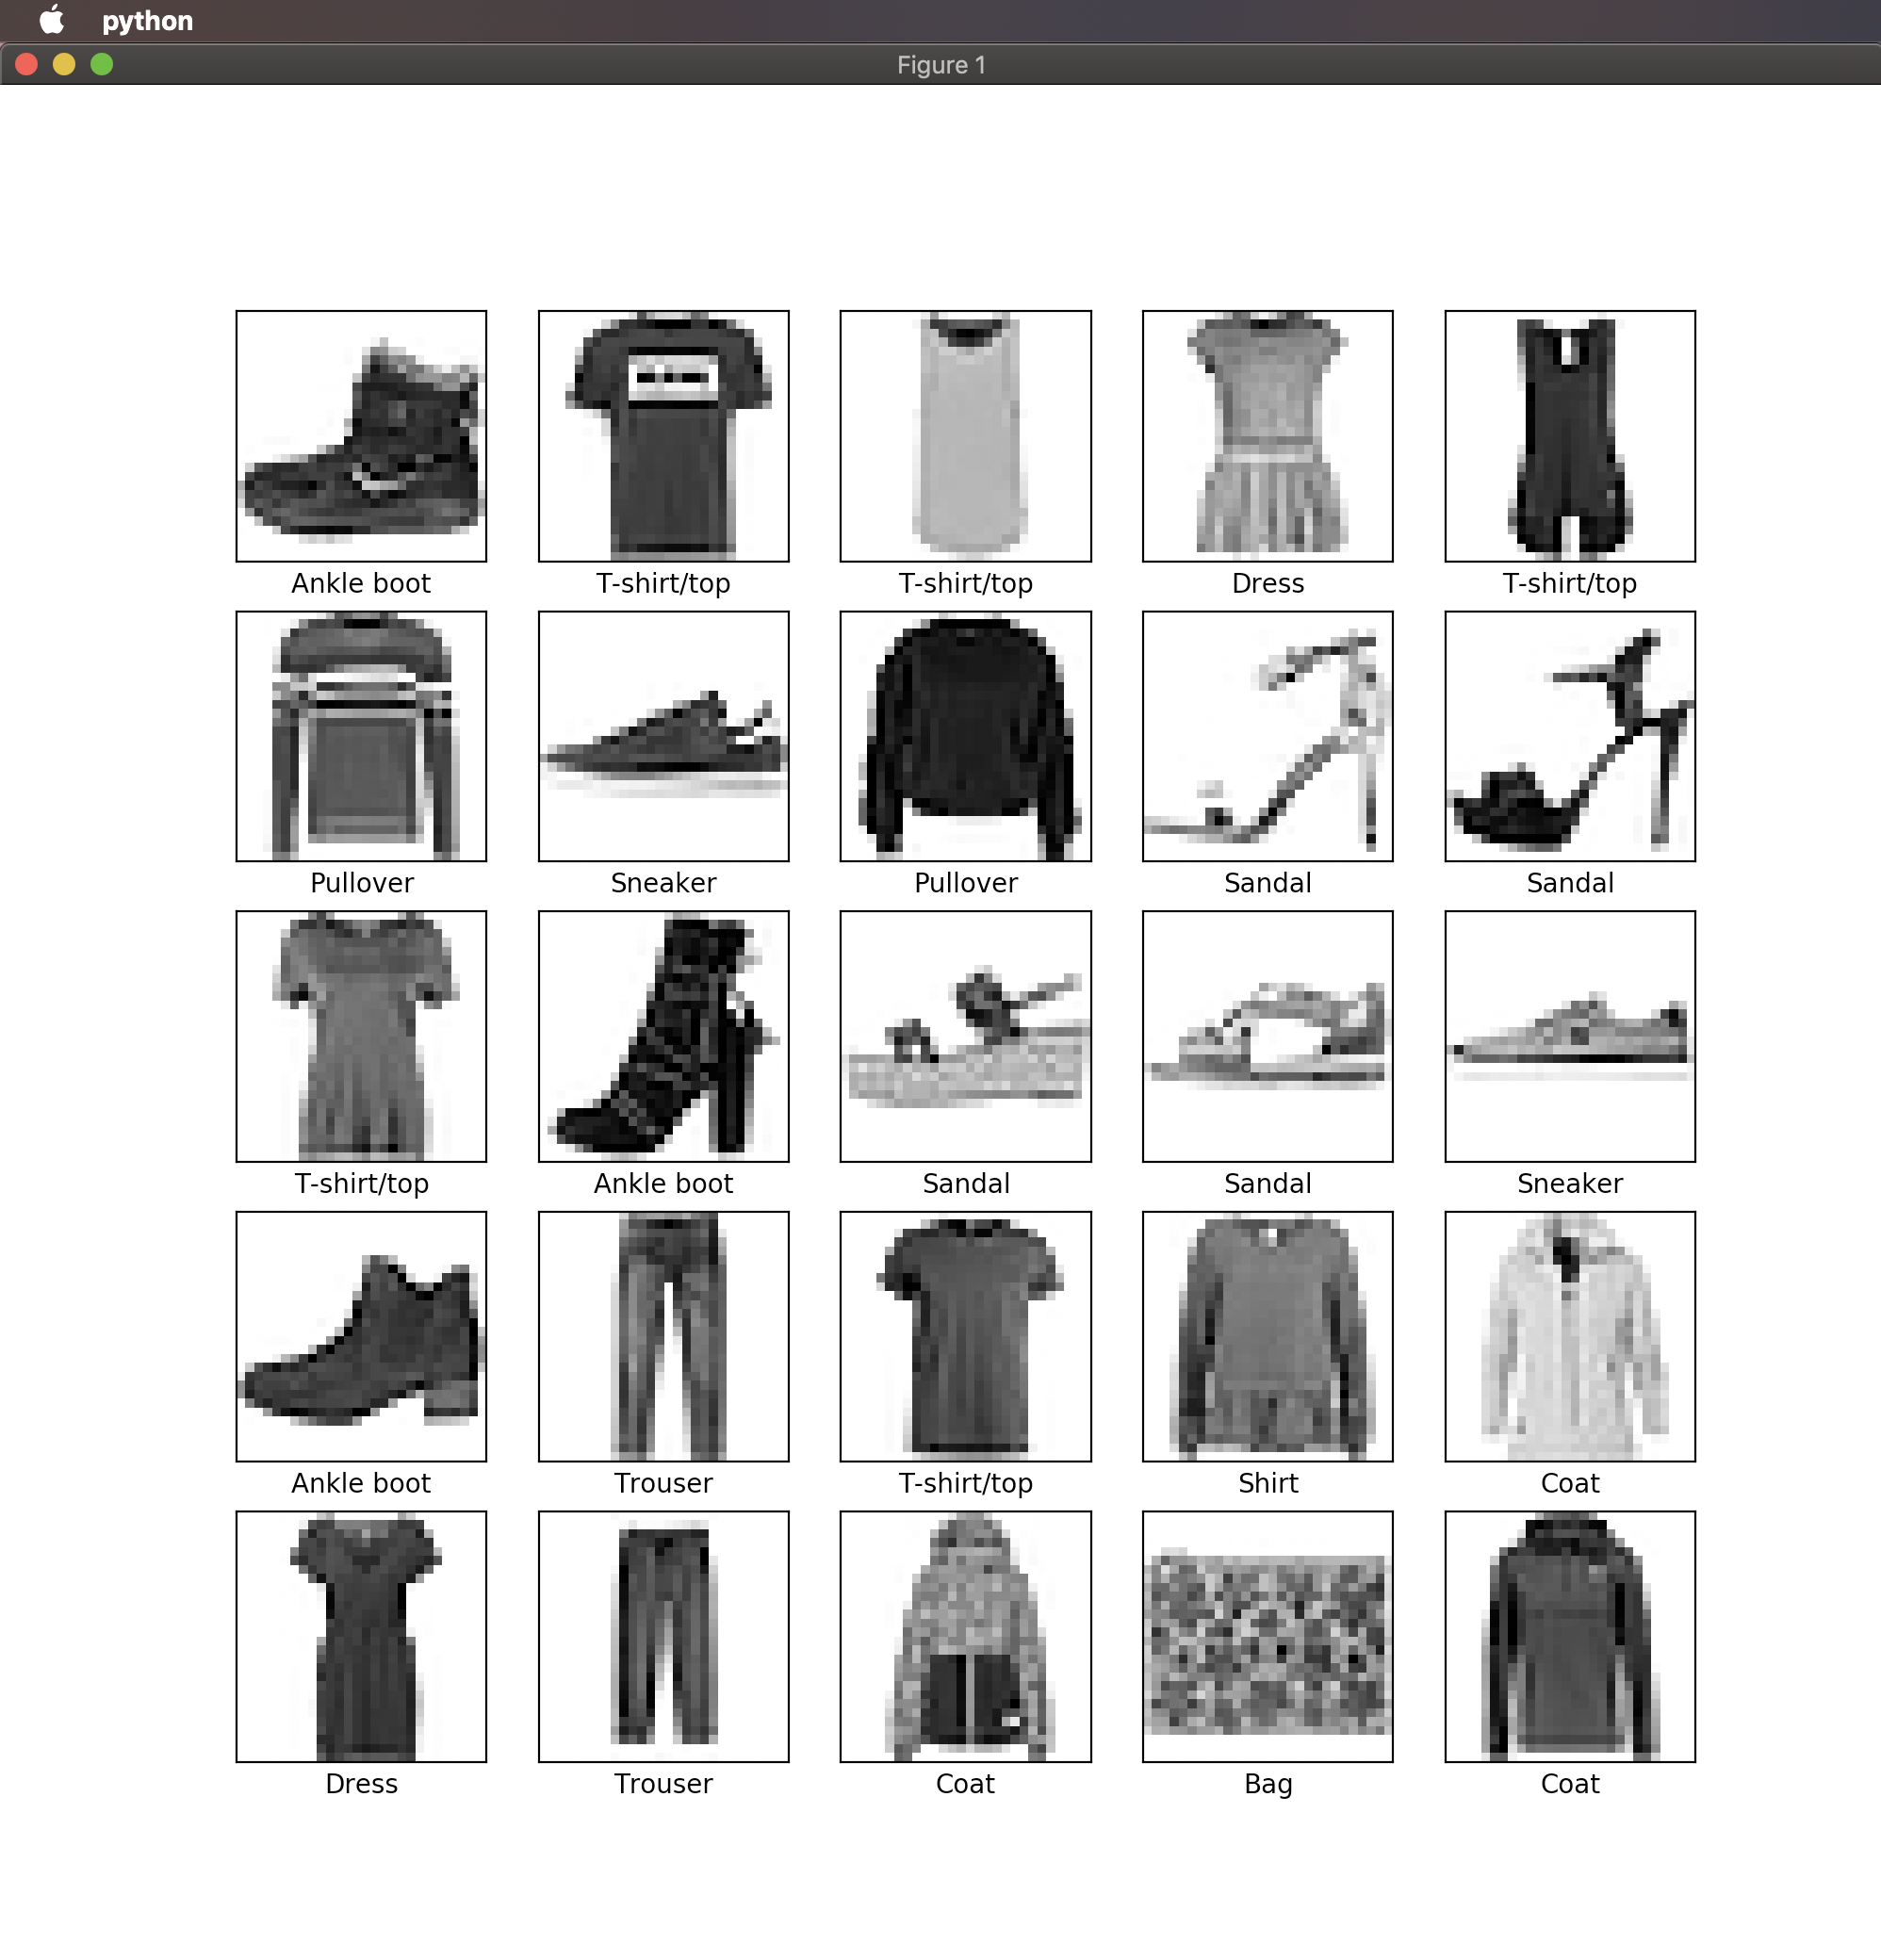
2.0.0-alpha0と出たらOKです。

Fashion MNISTデータセットの読み込み

Fashion MNISTとは10カテゴリ計7万枚の洋服の白黒画像(28x28ピクセル)が含まれているデータセットです。

fashion-mnist-sprite.png

fashion_mnist = keras.datasets.fashion_mnist

(train_images, train_labels), (test_images, test_labels) = fashion_mnist.load_data()

このコマンドを入力するとダウンロードが始まります。

ラベルごとのクラス名は以下の通りです。

ラベル クラス
0 T-shirt/top
1 Trouser
2 Pullover
3 Dress
4 Coat
5 Sandal
6 Shirt
7 Sneaker
8 Bag
9 Ankle boot

ただし、データセットにクラス名は含まれていないため、
以下のように設定してあげましょう。

class_names = ['T-shirt/top', 'Trouser', 'Pullover', 'Dress', 'Coat','Sandal', 'Shirt', 'Sneaker', 'Bag', 'Ankle boot']

データの確認

train_images.shape
(60000, 28, 28)
len(train_labels)
60000
train_labels
array([9, 0, 0, ..., 3, 0, 5], dtype=uint8)
test_images.shape
(10000, 28, 28)
len(test_labels)
10000

データの準備

まずは画像の視覚化をしてみます。

plt.figure()
plt.imshow(train_images[0])
plt.colorbar()
plt.grid(False)
plt.show()

ウィンドウが立ち上がり、以下の画像が表示されたら成功です。
スクリーンショット 2019-05-24 15.47.14.png

0~1の範囲にスケーリング

train_images = train_images / 255.0
test_images = test_images / 255.0

学習用セットの最初の25枚の画像を表示してみます。

plt.figure(figsize=(10,10))
for i in range(25):
    plt.subplot(5,5,i+1)
    plt.xticks([])
    plt.yticks([])
    plt.grid(False)
    plt.imshow(train_images[i], cmap=plt.cm.binary)
    plt.xlabel(class_names[train_labels[i]])
plt.show()

スクリーンショット 2019-05-24 16.07.25.png

モデルの構築

いよいよ学習用モデルの構築に入ります。

model = keras.Sequential([
    keras.layers.Flatten(input_shape=(28, 28)),
    keras.layers.Dense(128, activation='relu'),
    keras.layers.Dense(10, activation='softmax')
])

モデルのコンパイル

ここでは以下のように設定しました。

model.compile(optimizer='adam',
              loss='sparse_categorical_crossentropy',
              metrics=['accuracy'])

モデルの学習

いよいよ学習を開始します。

以下のmodel.fitで訓練を開始します。

model.fit(train_images, train_labels, epochs=5)
Epoch 1/5
60000/60000 [==============================] - 4s 59us/sample - loss: 1.1019 - accuracy: 0.6589
Epoch 2/5
60000/60000 [==============================] - 3s 51us/sample - loss: 0.6481 - accuracy: 0.7669
Epoch 3/5
60000/60000 [==============================] - 3s 47us/sample - loss: 0.5701 - accuracy: 0.7957
Epoch 4/5
60000/60000 [==============================] - 3s 45us/sample - loss: 0.5260 - accuracy: 0.8134
Epoch 5/5
60000/60000 [==============================] - 3s 45us/sample - loss: 0.4973 - accuracy: 0.8231
<tensorflow.python.keras.callbacks.History object at 0x11d804b70>

精度としては82%程度となりました。

精度の評価

test_loss, test_acc = model.evaluate(test_images, test_labels)

print('\nTest accuracy:', test_acc)

実行結果:

Test accuracy: 0.8173

学習モデルを使った予測

学習したモデルを使ってtest_imagesの予測をしてみます。

predictions = model.predict(test_images)

最初の画像の予測結果を見てみます。

predictions[0]
array([2.2446468e-06, 7.3107621e-08, 1.1268611e-05, 1.6483513e-05,
       1.9317991e-05, 1.4457782e-01, 2.7507849e-05, 3.9779294e-01,
       6.4411242e-03, 4.5111132e-01], dtype=float32)

これは0~9のラベルに対してのそれぞれの信頼度になります。
一番信頼度が高いラベルは以下でわかります。

np.argmax(predictions[0])
9

続いて各信頼度をグラフ化してみましょう。

def plot_image(i, predictions_array, true_label, img):
  predictions_array, true_label, img = predictions_array[i], true_label[i], img[i]
  plt.grid(False)
  plt.xticks([])
  plt.yticks([])

  plt.imshow(img, cmap=plt.cm.binary)

  predicted_label = np.argmax(predictions_array)
  if predicted_label == true_label:
    color = 'blue'
  else:
    color = 'red'

  plt.xlabel("{} {:2.0f}% ({})".format(class_names[predicted_label],
                                100*np.max(predictions_array),
                                class_names[true_label]),
                                color=color)

def plot_value_array(i, predictions_array, true_label):
  predictions_array, true_label = predictions_array[i], true_label[i]
  plt.grid(False)
  plt.xticks([])
  plt.yticks([])
  thisplot = plt.bar(range(10), predictions_array, color="#777777")
  plt.ylim([0, 1])
  predicted_label = np.argmax(predictions_array)

  thisplot[predicted_label].set_color('red')
  thisplot[true_label].set_color('blue')

最初の画像の情報を表示してみます。

i = 0
plt.figure(figsize=(6,3))
plt.subplot(1,2,1)
plot_image(i, predictions, test_labels, test_images)
plt.subplot(1,2,2)
plot_value_array(i, predictions,  test_labels)
plt.show()

スクリーンショット 2019-05-24 17.00.17.png

まとめ

画像認識入門編としてFashion MNISTデータセットを使ったサンプル動作を一通り実現できました。
今後は、オリジナルの学習モデルの構築を目標に勉強したいと思います。


本記事は概要版となります。
詳細は最新版TensorFlow (2.0 Alpha) 画像認識編(詳細版)で紹介しています。


  • このエントリーをはてなブックマークに追加
  • Qiitaで続きを読む

リモートのjupyter notebookをローカルで使用したい

環境

  • macOS Mojave 10.14.4
  • 適当なリモートサーバ

コマンド

リモートPC
$jupyter notebook --no-browser --port=8890
ローカルPC
$ssh -N -f -L 8890:localhost:8890 User@ip-address

あとはローカルPCのブラウザでこちらにアクセス

補足

port番号は任意のもので構いません


deep learningの計算って時間かかりますよね。

  • このエントリーをはてなブックマークに追加
  • Qiitaで続きを読む

macOS Sierraのターミナルでファイル名を変更したい

// この記事は、 note に投稿した記事の再掲です。

Mac で $ rename を実行したら以下のエラーが出た(HTML 拡張子を PHP に変更したい)

# HTML 拡張子を PHP に変更したい
$ rename -s html php *.html

# でもエラーが出る
sh: rename: command not found

$ rename をインストール

Mac には $ rename が入ってないらしいので Homebrew からインストール

$ brew install rename

再チャレンジ

# $ rename -s 置換する文字列 置換後の文字列 対象のファイル
$ rename -s html php *.html

できた!

  • このエントリーをはてなブックマークに追加
  • Qiitaで続きを読む

最新版TensorFlow (2.0 Alpha) 動作環境構築 : Mac編

はじめに

MacにTensorflow 2.0 Alphaの動作環境を構築した過程を記載します。

基本的にはこちらの公式チュートリアルの流れに沿って導入しています。


本記事は概要版となります。
詳細は最新版TensorFlow (2.0 Alpha) 動作環境構築 : Mac編(詳細版)で紹介しています。


構成

MacBook Pro (13-inch, 2016, Two Thunderbolt 3 ports)

TensorFlowインストール事前準備

アプリケーション→ユーティリティ→ターミナル.appを開き、以下を1行ずつ実行してください。

Python諸々のバージョン確認

python3 --version
pip3 --version
virtualenv --version

なお、現時点(2019/5/24)での私の環境では以下の通りになりました。
Python 3.7.3
pip 19.0.3
virtualenv 16.6.0

仮想環境の作成(推奨)

Mac本体のシステムから独立した環境を構築したほうが、色々といじるのに便利なため、virtualenvというツールを使った仮想環境の導入をします。

virtualenv --system-site-packages -p python3 ./venv
source ./venv/bin/activate
pip install --upgrade pip
pip list  # 仮想環境内でインストールされているパッケージを表示

仮想環境を終了する場合は以下を実行してください。
なおTensorFlow使用時は有効になっている必要があります。

deactivate  

TensorFlow 2.0 Alpha導入

以下コマンドを実行するとインストールが開始されます。

pip install --upgrade tensorflow==2.0.0-alpha0

動作確認

以下を入力し対話モードに入ります。

python

Tensorflowをtfとして読み込みます。

import tensorflow as tf

手書き数字のデータセットであるMNISTを読み込みます。

mnist = tf.keras.datasets.mnist

(x_train, y_train), (x_test, y_test) = mnist.load_data()
x_train, x_test = x_train / 255.0, x_test / 255.0

tf.keras.Sequentialモデルをビルドします。

model = tf.keras.models.Sequential([
  tf.keras.layers.Flatten(input_shape=(28, 28)),
  tf.keras.layers.Dense(128, activation='relu'),
  tf.keras.layers.Dropout(0.2),
  tf.keras.layers.Dense(10, activation='softmax')
])

model.compile(optimizer='adam',
              loss='sparse_categorical_crossentropy',
              metrics=['accuracy'])

学習と評価を行います。

model.fit(x_train, y_train, epochs=5)

model.evaluate(x_test, y_test)

このような感じで学習と評価がなされていれば導入完了です。

>>> model.fit(x_train, y_train, epochs=5)
Epoch 1/5
60000/60000 [==============================] - 4s 59us/sample - loss: 0.3015 - accuracy: 0.9122
Epoch 2/5
60000/60000 [==============================] - 3s 54us/sample - loss: 0.1462 - accuracy: 0.9564
Epoch 3/5
60000/60000 [==============================] - 3s 54us/sample - loss: 0.1100 - accuracy: 0.9662
Epoch 4/5
60000/60000 [==============================] - 3s 57us/sample - loss: 0.0910 - accuracy: 0.9722
Epoch 5/5
60000/60000 [==============================] - 3s 53us/sample - loss: 0.0765 - accuracy: 0.9760
<tensorflow.python.keras.callbacks.History object at 0x1123d6748>
>>> 
>>> model.evaluate(x_test, y_test)
10000/10000 [==============================] - 0s 32us/sample - loss: 0.0730 - accuracy: 0.9781
[0.07304580859981943, 0.9781]

まとめ

TensorFlow 2.0 Alphaの導入、サンプル動作まで一通り実現できました。
今後は、オリジナルの学習モデルの構築を目標に勉強したいと思います。


本記事は概要版となります。
詳細は最新版TensorFlow (2.0 Alpha) 動作環境構築 : Mac編(詳細版)で紹介しています。


  • このエントリーをはてなブックマークに追加
  • Qiitaで続きを読む

【Homebrew】brew cleanupがこける【Warning: Skipping XXX】

事の発端

先日、Homebrewでとあるパッケージを新規インストールした際、「30日以上brew cleanupしてないやんけ!」と怒られました。
「確かに2ヶ月くらいサボってるなぁ」と思い、brew cleanup コマンドを実行したんですよ。
そしたらなぜかできないんですよね。

$ brew cleanup

Warning: Skipping XXX: most recent version X.X.X not installed
<中略(20件くらい)>
Warning: Skipping XXX: most recent version X.X.X not installed

内容としては「XXXの最新バージョンがインスコされてません!!」って感じらしいです。

下調べ

色々情報を漁っていると、

  1. Homebrewのパッケージインストール先であるCeller 配下にある下位バージョンのパッケージを丸っと削除
  2. 対象のパッケージのリンクを解除してインストールし直す

という手法がありました。

しかし僕は以下の手順で解決しました。
(状況によっては解決しない場合もあります)

とりあえず解決策

「最新バージョン入れればいいのよね。」って事で以下を実行。

## パッケージ更新
$ brew update
$ brew upgrade
## 更新完了後
$ brew cleanup
Pruned 0 symbolic links and 21 directories from /usr/local

パッケージ更新後、brew cleanupは問題なく実行できましたが、想定してたログと違うんですよね。
削減された容量が表示されるはずなのに。。。

詳しく

どうやら30日以上brew cleanupしていないと、brew upgrade時に勝手にbrew cleanupされるようです。
なのでおそらくbrew upgradeの実行前後で容量に差があるはずなのですが、確認できず。。。w

他の方が遭遇された事象についても、意図的に古いバージョンを利用したい方以外は、おそらくこの手順で解決できると思ってます。
※できなかった場合はコメ欄にて情報提供お願いしますm(_ _)m

まとめ

みんな定期的にbrew upgrade(update)brew cleanupしましょう。

参考リンク

  • このエントリーをはてなブックマークに追加
  • Qiitaで続きを読む

C++で始める競プロ / VSCodeの環境構築(Mac)

はじめに

蟻本を始めるにあたってMacでC++の実行環境をVSCodeで構築したのでまとめます
主に以下のサイトを参考にさせていただきました

VSCODEで始める競技プログラミング(環境構築編)

上記のサイトでは触れていなかった箇所でハマってしまったので、そのハマってしまった箇所を書き加える形で書いていきます

C++用のコンパイラをインストールする

Macの場合「デフォルトで入っている g++ コマンドは clang++ のエイリアスで、 brew install gcc で入ってくるのが本物の g++ コマンドである」というひどい罠があります(コメント参照)

今回僕は Clang ではなく GCC を使おうと思うので(AtCoderさんで言語選ぶ時のトップにきているのが GCC の方なので)、以下のコマンドであらためて GCC をインストールしました

$ xcode-select --install
$ brew install gcc

VSCodeをインストールする

次にVSCodeをインストールしましょう
公式サイトDownload for Mac からインストールしてください
VSCode公式サイト.png

VSCodeに拡張機能をインストールする

次にVSCodeに拡張機能をインストールしましょう
VSCodeを起動して、左タブの赤枠の部分から拡張機能をインストールすることができます
VSCodeWelcome.png
参考にさせて頂いたサイトにある通り、以下の3つの拡張機能をインストールしましょう

  1. C/C++
  2. C/C++ClangCommandAdapter
  3. CodeRunner

次に設定ファイルを編集します
上のバーから Code > 設定(Preferences)> 基本設定(Settings)を選択します
ユーザー設定(User)とワークスペース設定(Workspace)にそれぞれsettings.jsonが存在するので、ユーザー設定(User)の方のsettings.jsonを編集します
UserSettings.png
settings.jsonに以下を追記しましょう

settings.json
{
    "clang.executable": "clang++",
    "code-runner.runInTerminal": true,
    "clang.cxxflags": [ "-std=c++14"],
    "code-runner.executorMap": {
        "javascript": "node",
        "java": "cd $dir && javac $fileName && java $fileNameWithoutExt",
        "c": "cd $dir && gcc $fileName -o $fileNameWithoutExt && $dir$fileNameWithoutExt",
        "cpp": "cd $dir && g++ -O2 -std=c++14 $fileName && ./a.out",
        "objective-c": "cd $dir && gcc -framework Cocoa $fileName -o $fileNameWithoutExt && $dir$fileNameWithoutExt",
        "php": "php",
        "python": "python -u",
        "perl": "perl",
        "perl6": "perl6",
        "ruby": "ruby",
        "go": "go run",
        "lua": "lua",
        "groovy": "groovy",
        "powershell": "powershell -ExecutionPolicy ByPass -File",
        "bat": "cmd /c",
        "shellscript": "bash",
        "fsharp": "fsi",
        "csharp": "scriptcs",
        "vbscript": "cscript //Nologo",
        "typescript": "ts-node",
        "coffeescript": "coffee",
        "scala": "scala",
        "swift": "swift",
        "julia": "julia",
        "crystal": "crystal",
        "ocaml": "ocaml",
        "r": "Rscript",
        "applescript": "osascript",
        "clojure": "lein exec",
        "haxe": "haxe --cwd $dirWithoutTrailingSlash --run $fileNameWithoutExt",
        "rust": "cd $dir && rustc $fileName && $dir$fileNameWithoutExt",
        "racket": "racket",
        "ahk": "autohotkey",
        "autoit": "autoit3",
        "dart": "dart",
        "pascal": "cd $dir && fpc $fileName && $dir$fileNameWithoutExt",
        "d": "cd $dir && dmd $fileName && $dir$fileNameWithoutExt",
        "haskell": "runhaskell",
        "nim": "nim compile --verbosity:0 --hints:off --run",
        "lisp": "sbcl --script",
        "kit": "kitc --run"
      }
}

この追記により、ソースコードを開いたまま
⌃(control) + ⌥(option) + N
を押すとターミナルが開いて、コンパイル&実行までしてくれます

と、ここまでが参考にさせて頂いたサイトの主な設定でした
が、僕の場合以下のようなエラーが出ました

error
#include errors detected. Please update your includePath.

例えば以下のコードにおいて

hello.cpp
#include <iostream>

int main(){
    std::cout << "Hello, World" << std::endl;
    return 0;
}

#include <iostream> に赤線が引かれていた場合、上記のようなエラーが起きてしまいます

そこでさらに設定をします

c_cpp_properties.json を設定する

この部分は
Visual Studio Code での C++ の初期設定 (Windows x gcc(MinGW) 編)
を参考にさせていただきました

以下のようにして c_cpp_properties.json を設定します

  1. Ctrl+Shift+P でコマンドパレットを開く
  2. C/Cpp: Edit configurations... を選択
  3. c_cpp_properties.json が作成される
  4. c_cpp_properties.json を設定する

c_cpp_properties.json で具体的に設定する箇所は

1. "includePath"
2. "compilerPath"

になります
以下のコマンドをターミナルで実行して、brew install gcc で gcc がどこにインストールされたのか確認しましょう

$ gcc -v

確認したら、 c_cpp_properties.json を設定しましょう
僕の場合は以下のような設定にしました

c_cpp_properties.json
{
    "configurations": [
        {
            "name": "Mac",
            "includePath": [
                "/usr/local/Cellar/gcc/8.3.0/include",
                "${workspaceFolder}/**"
            ],
            "defines": [],
            "macFrameworkPath": [
                "/System/Library/Frameworks",
                "/Library/Frameworks"
            ],
            "compilerPath": "/usr/local/Cellar/gcc/8.3.0/bin/g++-8",
            "cStandard": "c11",
            "cppStandard": "c++17",
            "intelliSenseMode": "clang-x64"
        }
    ],
    "version": 4
}

ちなみに以下のコマンドでデフォルトで入っている g++ の場所がわかりますが、デフォルトで入っている g++ をそのまま使うのはあまり良い習慣ではないので(コメント参照)、brew install gcc でインストールした g++ を使うようにしました

$ which g++

おわりに

以上でとりあえずは C++で始める競プロ / VSCodeの環境構築(Mac)が完成となります
また何かあれば追記するかもしれません(2019/5/24)
コメントを受け修正しました(2019/5/25)

  • このエントリーをはてなブックマークに追加
  • Qiitaで続きを読む