- 投稿日:2019-05-03T15:45:43+09:00
JSエンジニア必見!アプリ開発の際のReact Nativeことはじめ
開発環境や前提の知識など
事前環境
• Android, iOS のクロスプラットフォーム・アプリ開発フレームワークです。
画面デザインとロジックのコードを共通で利用することができます。
JavaScript でコーディングし、React で画面をデザインできます。・Node.jsやライブラリ管理にnpmなどが活用されます。
・Homebrew
・*watchmanをインストール(よく、忘れがちです)brew install watchmanメリット
Android、iOSでコードが共通化できるので、両方開発する場合は開発効率が良い
JavaScript で開発するため、、Web開発者の学習コストが低い
Facebook, Instagram, CookPad, メルカリ など大手で実績がある。デメリット
アップデート、保守管理が大変
業務で、少し触れていますが、React Native はソースの管理が難しく、
バージョンをあげたりすると、コマンドが通らなくなったりして、意外と神経を使いますおすすめツール
Visual Studio Code
PowerShell (Windowsのみ)
Android Studio (Android アプリのビルドに必須)
Android アプリの IDE
Xcode (iOS アプリのビルドに必須)
iOS や macOS アプリ の IDE
Node.js (必須)
React Native アプリのビルドやデバッグに必要。
yarn (必須)
Node.js のパッケージ・マネージャ。npm の改良版で、置き換えが可能。
必須、と書いたが、npm でも代替は可能。ただしメリットはない。参考URL
React Native開発のすすめ
・https://qiita.com/janus_wel/items/787732d2bf03ed53a3baReactNativeを使ってみる
https://qiita.com/kurohune538/items/fb9f5ff0b005a39fcc27
- 投稿日:2019-05-03T13:12:08+09:00
「Android Studio」と全角で入力しても「案dロ位d」「s辻男」と誤変換しないようにする方法
About
分からないことがあって調べるときに、検索ボックスに「Android Studio」と入力したはずが全角モードになっていて変な文字列になって入力し直し...ということがよくあったので、対策方法を考えました。
解決方法
ユーザー辞書ツールに単語として登録することで、スペースキーを押したときに正しく変換されるようにします。
やり方(Windows 10の場合)
※ここではWindowsでのやり方を紹介していますが、Macでも辞書に登録するという同じ流れでできると思います。
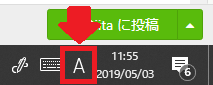
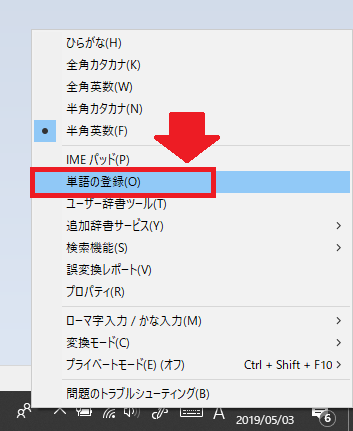
1.タスクバーのIMEアイコンを右クリックする。
↓
2.「単語の登録」をクリックする
↓
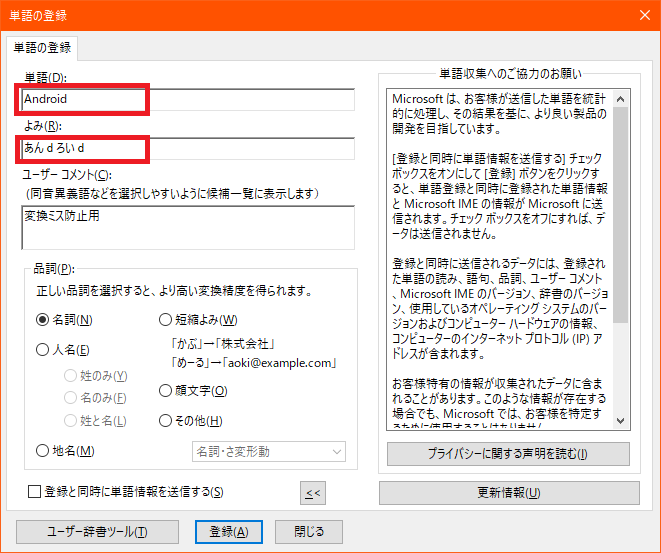
3.下のスクリーンショットのように入力する。入力したら、「登録」ボタンをクリックする。
単語:「Android」
よみ:「あんdろいd」(全角にして「Android」とキーボードを押す)
※分かりやすくするためにユーザーコメントに「変換ミス防止用」と入力してもOK
↓
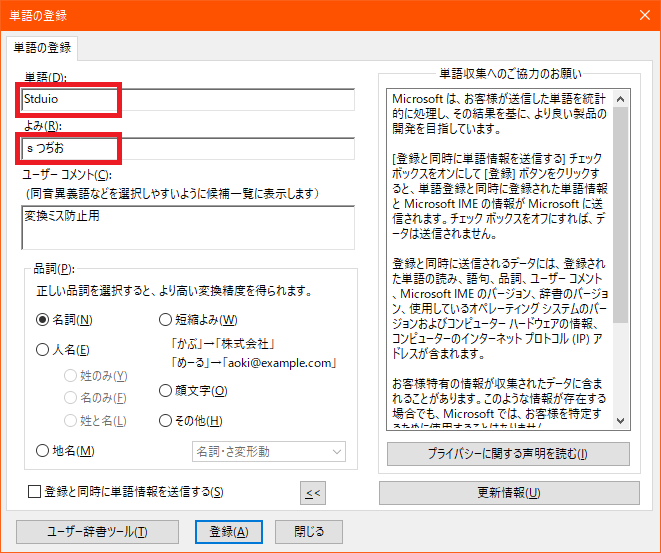
4.次にStudioを登録する。入力したら、「登録」ボタンをクリックする。
単語:「Studio」
よみ:「sつぢお」(全角にして「Studio」とキーボードを押す)
※分かりやすくするためにユーザーコメントに「変換ミス防止用」と入力してもOK
↓
5.ウィンドウを閉じて完了!完成した様子(GIF)
「Android Studio」と入力したつもりでスペースキーを押しても、、、ご覧の通り!!

- 投稿日:2019-05-03T11:28:27+09:00
toolsを利用してRecyclerViewの表示を確認する
目的
RecyclerViewの表示を一々起動して確認するのは大変なので、toolsを利用してlayout editerで確認する時のメモ。
今回表示するitem
<?xml version="1.0" encoding="utf-8"?>
<androidx.constraintlayout.widget.ConstraintLayout xmlns:android="http://schemas.android.com/apk/res/android"
    xmlns:app="http://schemas.android.com/apk/res-auto"
    xmlns:tools="http://schemas.android.com/tools"
    android:layout_width="match_parent"
    android:layout_height="wrap_content"
    android:orientation="vertical">

    <TextView
        android:id="@+id/textView2"
        android:layout_width="match_parent"
        android:layout_height="wrap_content"
        android:layout_marginStart="8dp"
        android:layout_marginTop="8dp"
        android:textSize="20sp"
        app:layout_constraintStart_toStartOf="parent"
        app:layout_constraintTop_toTopOf="parent"
        tools:text="TODOその1" />

    <TextView
        android:id="@+id/textView"
        android:layout_width="match_parent"
        android:layout_height="wrap_content"
        android:layout_marginTop="16dp"
        android:layout_marginEnd="8dp"
        android:gravity="end"
        app:layout_constraintEnd_toEndOf="parent"
        app:layout_constraintStart_toStartOf="parent"
        app:layout_constraintTop_toBottomOf="@+id/textView2"
        tools:text="2019/5/3" />
</androidx.constraintlayout.widget.ConstraintLayout>
layout editerの表示
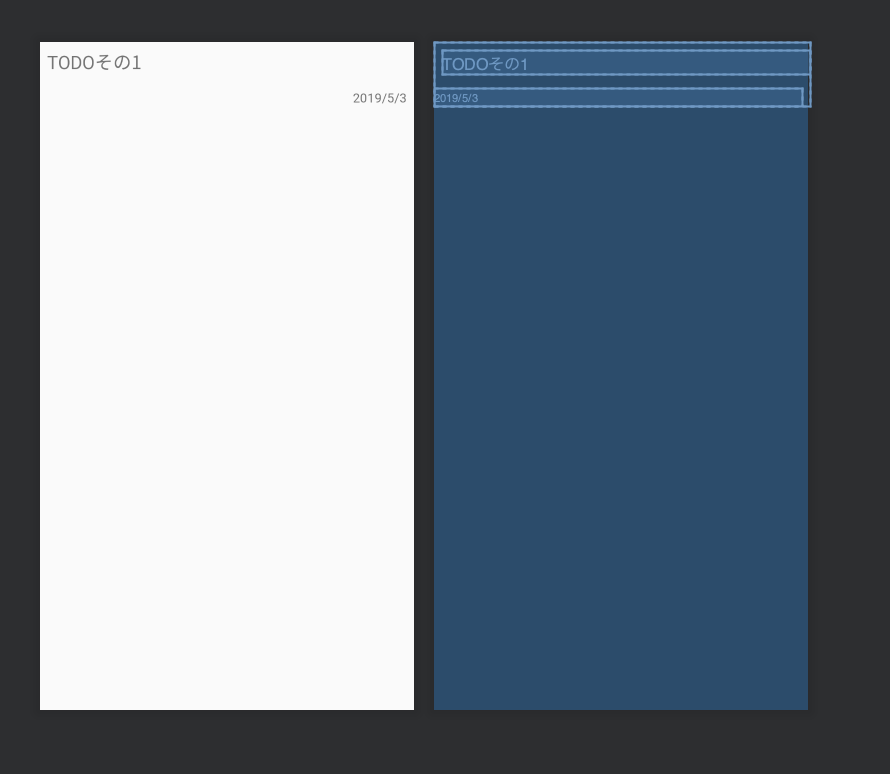
tools:listitem
tools:listitemでitemのレイアウトファイルを設定するとDesignタブでRecyclerViewの表示を確認できる。
    <androidx.recyclerview.widget.RecyclerView
        android:id="@+id/list"
        android:layout_width="match_parent"
        android:layout_height="match_parent"
        tools:listitem="@layout/item_todo"
        tools:orientation="vertical" />
layout editerの表示(RecyclerView)
表示はこんな感じ。
tools:itemCount, tools:layoutManager, tools:spanCount
tools:layoutManagerで表示するlayoutManagerを指定できる。
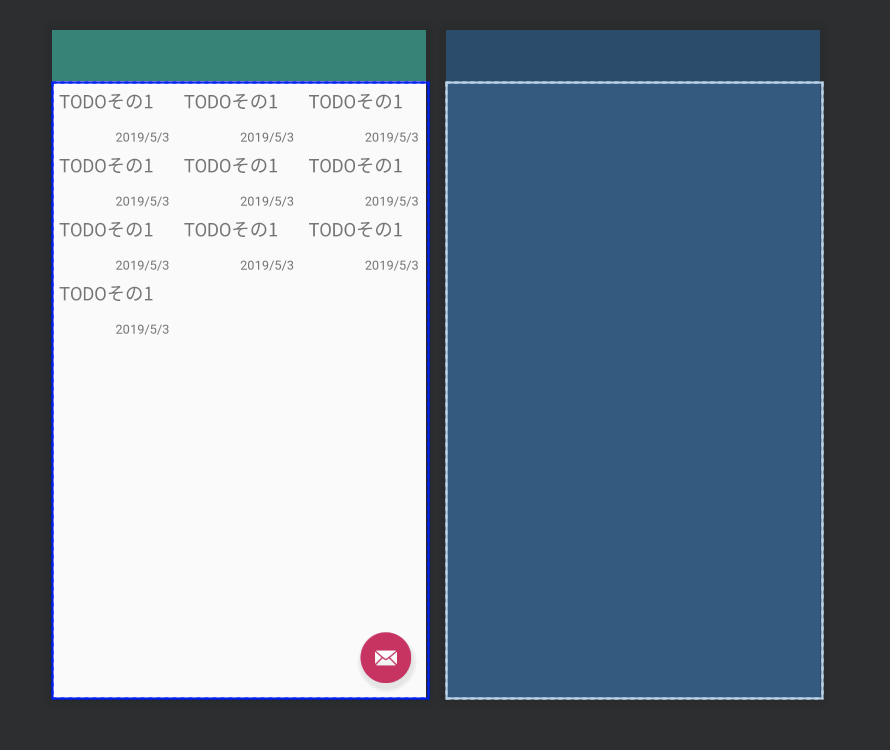
tools:itemCountで表示個数、tools:spanCountでGridLayoutにおける表示間隔を設定できる。<LinearLayout xmlns:android="http://schemas.android.com/apk/res/android" xmlns:app="http://schemas.android.com/apk/res-auto" xmlns:tools="http://schemas.android.com/tools" android:layout_width="match_parent" android:layout_height="match_parent" android:orientation="vertical" tools:context=".MainActivity"> <androidx.recyclerview.widget.RecyclerView android:id="@+id/list" android:layout_width="match_parent" android:layout_height="match_parent" tools:layoutManager="androidx.recyclerview.widget.GridLayoutManager" tools:spanCount="3" tools:itemCount="10" tools:listitem="@layout/item_todo" tools:orientation="vertical" /> </LinearLayout>layout editerの表示(RecyclerView)
itemCount = 10 , spanCount = 3 , layoutManager = GridLayoutManager
のとき、表示はこんな感じ。
備考
- 割とlayout editerで表示系は確認できる。
- ビルドしないとtools設定しても表示されない時がある。謎。
- ココにtools-attributesについて記載があるが、layoutManager等は記載されていない。。どこを見れば機能一覧があるのだろうか。。

- 投稿日:2019-05-03T11:28:27+09:00
toolsとsampledataを利用してRecyclerViewの表示を確認する
目的
RecyclerViewの表示を一々起動して確認するのは大変なので、toolsを利用してlayout editerで確認する時のメモ。
今回表示するitem
item_todo.xml<?xml version="1.0" encoding="utf-8"?> <androidx.constraintlayout.widget.ConstraintLayout xmlns:android="http://schemas.android.com/apk/res/android" xmlns:app="http://schemas.android.com/apk/res-auto" xmlns:tools="http://schemas.android.com/tools" android:layout_width="match_parent" android:layout_height="wrap_content" android:orientation="vertical"> <TextView android:id="@+id/textView2" android:layout_width="match_parent" android:layout_height="wrap_content" android:layout_marginStart="8dp" android:layout_marginTop="8dp" android:textSize="20sp" app:layout_constraintStart_toStartOf="parent" app:layout_constraintTop_toTopOf="parent" tools:text="TODOその1" /> <TextView android:id="@+id/textView" android:layout_width="match_parent" android:layout_height="wrap_content" android:layout_marginTop="16dp" android:layout_marginEnd="8dp" android:gravity="end" app:layout_constraintEnd_toEndOf="parent" app:layout_constraintStart_toStartOf="parent" app:layout_constraintTop_toBottomOf="@+id/textView2" tools:text="2019/5/3" /> </androidx.constraintlayout.widget.ConstraintLayout>layout editerの表示
tools:listitem
tools:listitemでitemのレイアウトファイルを設定するとDesignタブでRecyclerViewの表示を確認できる。
    <androidx.recyclerview.widget.RecyclerView
        android:id="@+id/list"
        android:layout_width="match_parent"
        android:layout_height="match_parent"
        tools:listitem="@layout/item_todo"
        tools:orientation="vertical" />
layout editerの表示(RecyclerView)
表示はこんな感じ。
tools:itemCount, tools:layoutManager, tools:spanCount
tools:layoutManagerで表示するlayoutManagerを指定できる。
tools:itemCountで表示個数、tools:spanCountでGridLayoutにおける表示間隔を設定できる。<LinearLayout xmlns:android="http://schemas.android.com/apk/res/android" xmlns:app="http://schemas.android.com/apk/res-auto" xmlns:tools="http://schemas.android.com/tools" android:layout_width="match_parent" android:layout_height="match_parent" android:orientation="vertical" tools:context=".MainActivity"> <androidx.recyclerview.widget.RecyclerView android:id="@+id/list" android:layout_width="match_parent" android:layout_height="match_parent" tools:layoutManager="androidx.recyclerview.widget.GridLayoutManager" tools:spanCount="3" tools:itemCount="10" tools:listitem="@layout/item_todo" tools:orientation="vertical" /> </LinearLayout>layout editerの表示(RecyclerView)
itemCount = 10 , spanCount = 3 , layoutManager = GridLayoutManager
のとき、表示はこんな感じ。
tools:text(
sampledata)AndroidStudioではsampledataフォルダにsampleデータを作成して表示することができる。
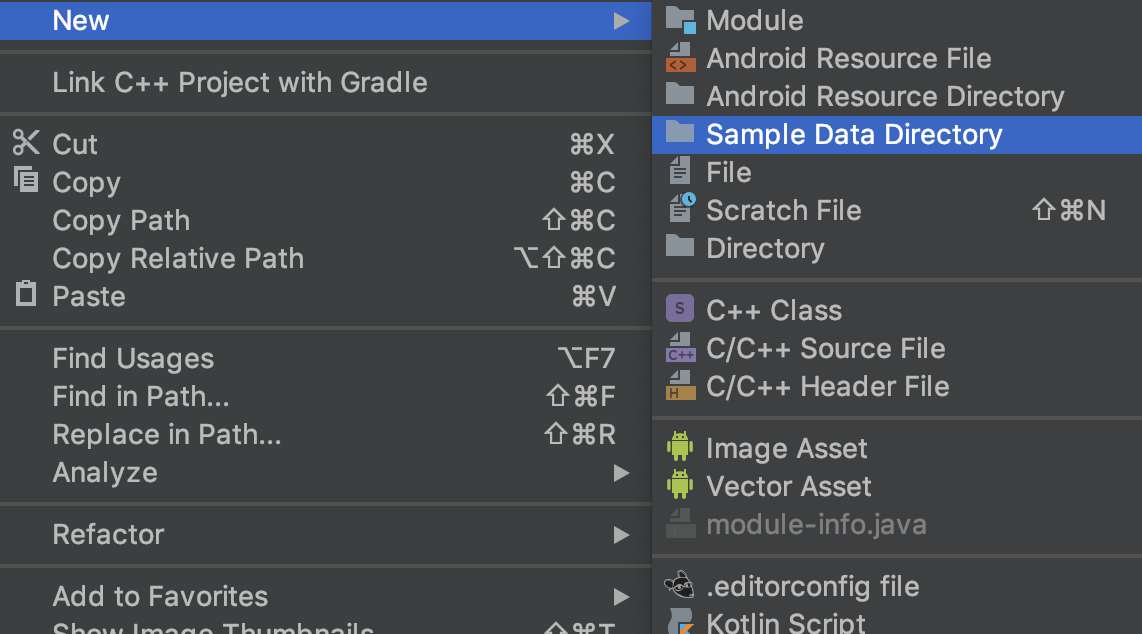
sampledataフォルダを作成
まずは右クリック->New->Sample Data Directory でフォルダを作成する。
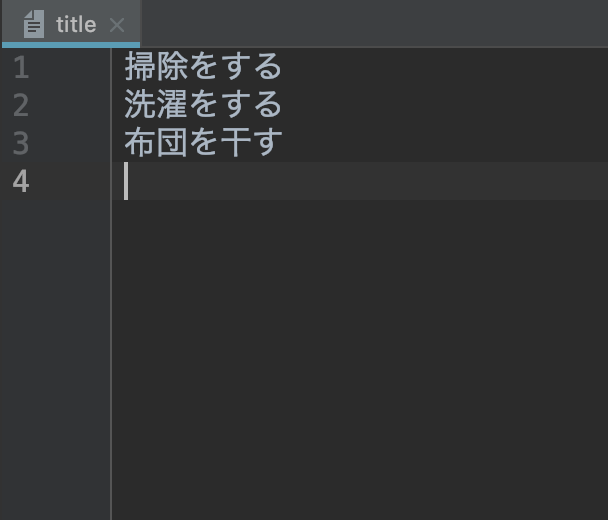
sampledataフォルダにプレーンテキストファイルを置く
以下のようなプレーンテキストファイルをsampledataフォルダに保存する
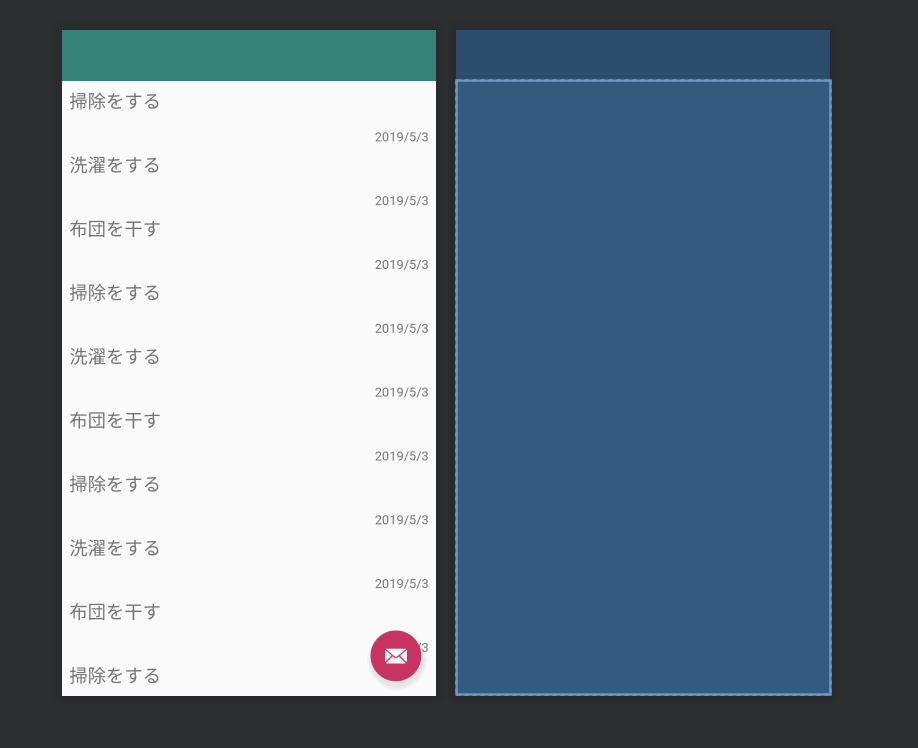
tools:textにsampledataのファイルを指定する
以下のようにtools:text="@sample/title"を追記する
item_todo.xml<TextView android:id="@+id/textView2" android:layout_width="match_parent" android:layout_height="wrap_content" android:layout_marginStart="8dp" android:layout_marginTop="8dp" android:textSize="20sp" app:layout_constraintStart_toStartOf="parent" app:layout_constraintTop_toTopOf="parent" tools:text="@sample/title" />これでlayout editerを確認すると記載したテキストファイルの内容が表示される。
備考
- 割とlayout editerで表示系は確認できる。
- ビルドしないとtools設定しても表示されない時がある。謎。
- ココにtools-attributesについて記載があるが、layoutManager等は記載されていない。。どこを見れば機能一覧があるのだろうか。。
- sampledataにjsonファイルを設定することもできるらしい。試してみたけど動作しなかったのでそのうち確認する。