- 投稿日:2020-11-17T22:35:38+09:00
UIPanGestureRecognizer(パン)とUISwipeGestureRecognizer(スワイプ)をいっしょに使う
同じviewにパンとスワイプを同時に与えると、パンしか効かなくなる。
素早くスワイプした時だけスワイプを発火してそれ以外の時はパンするコードがこちら。
基本PanGestureで、Pan速度が一定を超えた時だけSwipeになります。
スタックオーバーフローの記事の引用です。元記事には実際のジェスチャアニメーションの様子があります。let swipeVelocity: CGFloat = 500 @objc func didPan(_ sender: Any) { guard let panGesture = sender as? UIPanGestureRecognizer else { return } let gestureEnded = Bool(panGesture.state == UIGestureRecognizer.State.ended) let velocity = panGesture.velocity(in: self.view) if gestureEnded && abs(velocity.y) > swipeVelocity { handlePanAsSwipe(withVelocity: velocity.y) } else { handlePan(panGesture) } } func handlePan(_ recognizer: UIPanGestureRecognizer) { switch recognizer.state { // Panの操作を書く case .began: case .changed: default: break } } func handlePanAsSwipe(withVelocity velocity: CGFloat) { if velocity > 0 { print("down") // 下Swipeの操作を書く } else { print("up") // 上Swipeの操作を書く } }let panOrSwipe = UIPanGestureRecognizer(target: self, action: #selector(didPan(_:))) view.addGestureRecognizer(panOrSwipe)?
お仕事のご相談こちらまで
rockyshikoku@gmail.comCore MLを使ったアプリを作っています。
機械学習関連の情報を発信しています。
- 投稿日:2020-11-17T21:33:16+09:00
Self-Sizing(Auto Layoutによる高さの自動調整)機能について
はじめに
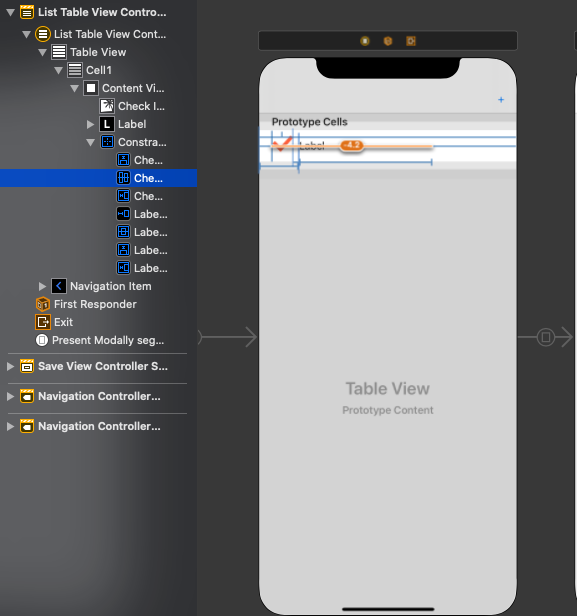
この機能を知るきっかけとなったのは、セルのimageViewを誤って大きくしてしまったことでした。
オレンジが変更箇所になってます。この結果、チェックマークが表示された時にCellが縦に大きくなると言う現象が起きました。
この件を相談すると、Self-Sizingという機能が元々備わっていて、セルの表示に影響が出たと分かりました。
Self-Sizingとは
タイトルにもある通り、セルなどの高さを自動で調整してくれる機能です。
Xcode 9(iOS 11 SDK)でデフォルトになったみたいです。それ以前はコードで表示しなければいけなかったみたいです。
私はデフォルトになってからswiftの勉強を始めたので気にしたこともなかったです。最後に
今回の件は、
そりゃ、セルのimageViewの大きさ変えたら、表示するために高さ変わるやろ〜って感じですが、
チェックマークの表示を切り替えるたびにサイズが切り替わるのでめっちゃ焦りました(笑)
チェックマークのサイズを誤って変更したばっかりに、Self-Sizingの機能が働いてくれて、表示できる様に高さを変更してくれていたんですね〜参考サイト
https://dev.classmethod.jp/articles/xcode-9-uitableview-self-sizing-by-default/
- 投稿日:2020-11-17T21:00:14+09:00
【SwiftUI】Mapkitから取得した情報をFirebaseに保存する
はじめに
SwiftUIでMapkitとFirebaseを使用し、位置情報をデータベースに保存することを目的とする。
前回記事までにSwiftUIで取得した現在地から逆ジオコーディングし、都道府県名と市区町村名を取得するところまでを記載した。
今回は取得した情報をFirebaseに保存するところを記載する。
Mapkitを使った逆コーデイングについては前回記事を参考にしてください。参考記事
【SwiftUI】Mapkitを使った位置情報の取得と逆ジオコーデイング開発環境
OSX 10.15.7 (Catalina)
Xcode 12.2.0
CocoaPods 1.10.0本日の記事内容まとめ
- Mapkitを使用して取得した位置情報をfirebaseに保存する。
- ボタンを押したときにデータベースを更新できるようにする
- 異なるView間でのデータのやり取りをできるようにする
今回記事で実装・更新したところ
今回記事で更新、追加修正した箇所は主に
mapView、Contentview内になります。
それぞれ実装した内容については以下に記載します。MapView内
異なるView間のデータのやり取りを行う場合は、取得元は@binding、取得先は@stateで変数を定義しなくてはいけません。そこが理解し切れていなかったため、何度もエラーが出て、実装にとても時間がかかりました。
以下の記事がとても参考になりました。
【SwiftUI】@Stateとか@Bindingて何新たに実装した箇所
・ContentViewへのデータを送信のために@Bindingの定義
・latitudeとlongitudeを定義ContentView.swift// 以下の行を追加 // MKMapViewの設定 struct mapView : UIViewRepresentable { typealias UIViewType = MKMapView // 以下の行を追加 @Binding var manager : CLLocationManager @Binding var alert : Bool // ここまで @Binding var latitude : Double @Binding var longitude : Double ...略... class Coordinator: NSObject, CLLocationManagerDelegate { var parent : mapView init(parent1 : mapView) { parent = parent1 } func locationManager(_ manager: CLLocationManager, didChangeAuthorization status: CLAuthorizationStatus) { if status == .denied{ parent.alert.toggle() print("denied") } } func locationManager(_ manager: CLLocationManager, didUpdateLocations locations: [CLLocation]) { let location = locations.last // ここから追加 // ContentView内で呼び出すために、緯度と軽度をそれぞれ取得 self.parent.latitude = (location?.coordinate.latitude)! self.parent.longitude = (location?.coordinate.longitude)! // ここまで let point = MKPointAnnotation() let georeader = CLGeocoder()ContentView内
・MapViewからのデータの受け取り
→@Stateで定義。
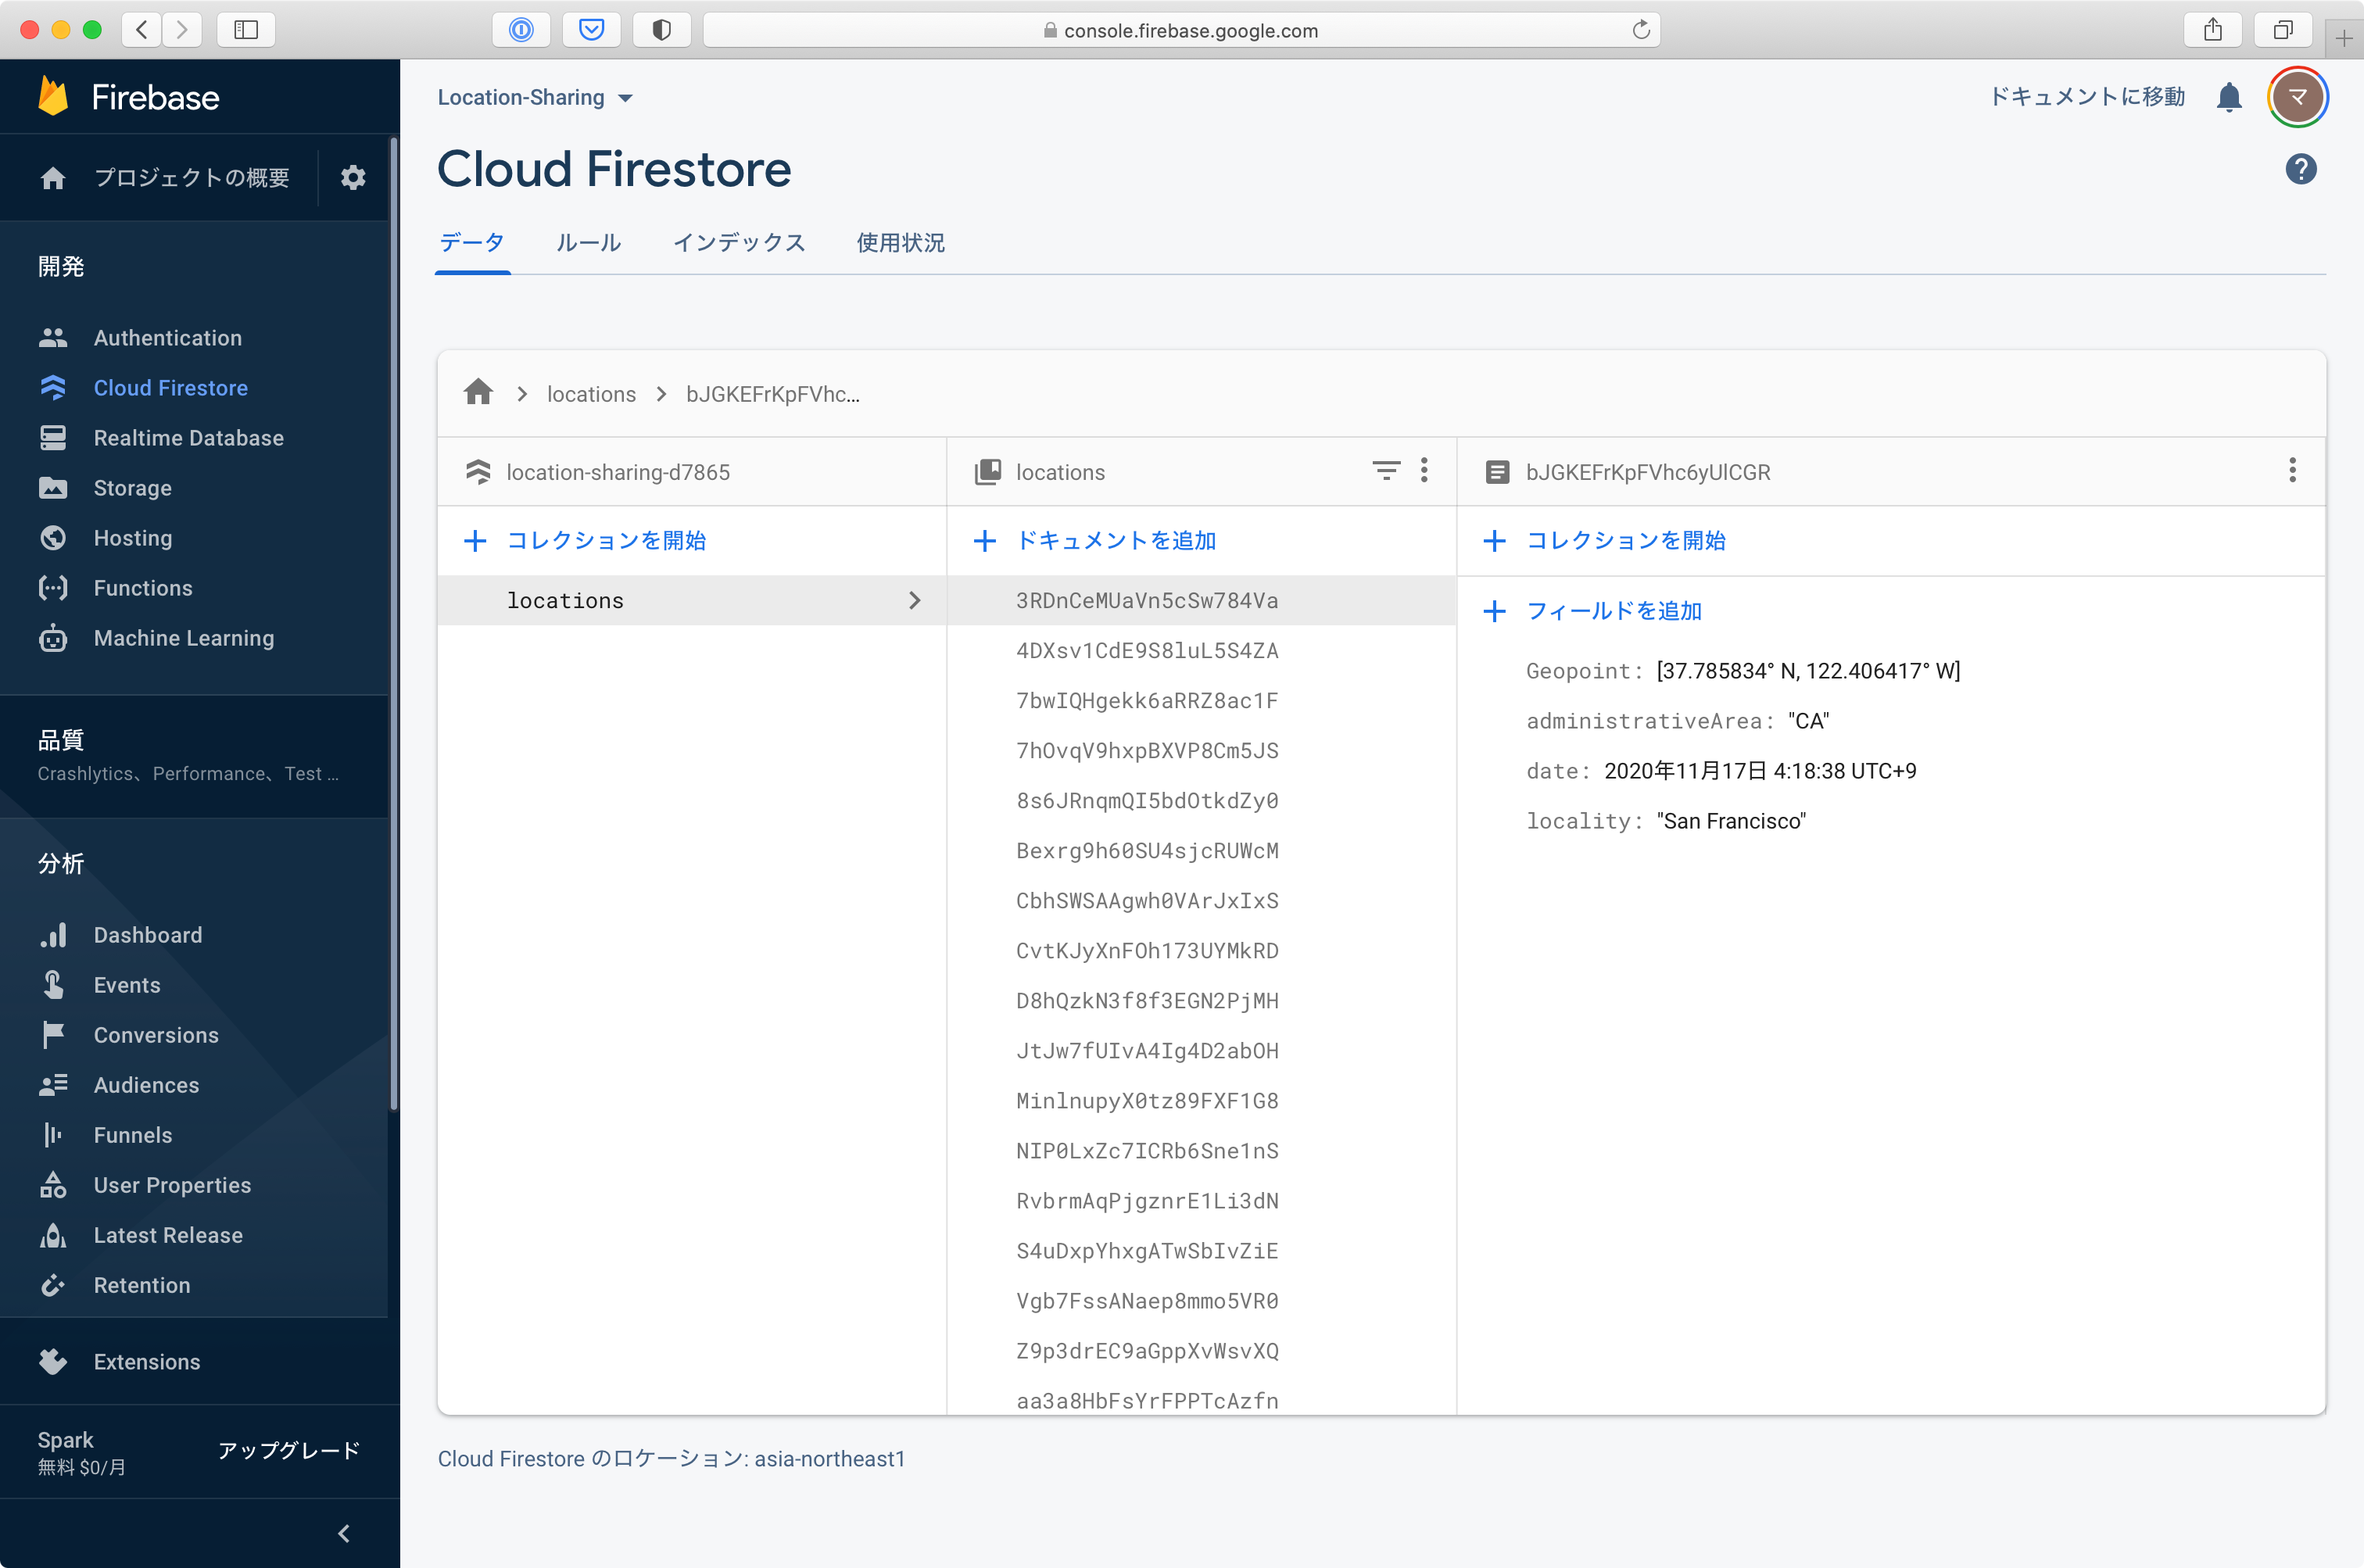
・Firebaseの更新にはaddDocumentを使用する。
・ボタンを設定し、クリック時にデータベースを更新ContentView.swiftstruct ContentView: View { @State var title = "" @State var subtitle = "" // ここから追加 @State var latitude : Double @State var longitude : Double // ここまで @State var manager = CLLocationManager() @State var alert = false var body: some View { // ContentViewに地図を表示 ZStack(alignment: .bottom, content: { // latitudeとlongitudeを追加 mapView(manager: $manager, alert: $alert, latitude: $latitude, longitude: $longitude, title: $title, subtitle: $subtitle).alert(isPresented: $alert) { Alert(title: Text("Please Enable Location Access In Setting Panel!!!")) } // 地名を取得した場合に表示 if self.title != "" { HStack(spacing: 12) { Image(systemName: "info.circle.fill").font(.largeTitle).foregroundColor(.black) VStack(alignment: .leading, spacing: 5){ Text(self.title).font(.body).foregroundColor(.black) Text(self.subtitle).font(.caption).foregroundColor(.gray) } Spacer() // ここから追加 Button(action: { // firebaseの定義 let db = Firestore.firestore() db.collection("locations").addDocument(data: [ "administrativeArea" : self.title, "locality" : self.subtitle, "Geopoint" : GeoPoint(latitude: self.latitude, longitude: self.longitude), "date": Timestamp(date: Date()),]) { (err) in if err != nil{ print((err?.localizedDescription)!) return } print("success") } }) { Image(systemName: "tray.and.arrow.up").font(.largeTitle).foregroundColor(.black) } // ここまで Spacer() } .padding() // "Color"はAssets.xcassetsで設定 .background(Color("Color")) .cornerRadius(15) .offset(y: -30) .padding() } }) } }ContentView_PreviewsとSceneDelegateのContentView部分に追記
それぞれにlatitudeとlongitudeを記載しました。
因数としてTokyoの緯度・経度を記載していますが、位置情報が取得できた場合は更新され、現在地を表示します。ContentView.swiftstruct ContentView_Previews: PreviewProvider { static var previews: some View { // "latitude"と"longitude"を追記 // 場所はTokyoで設定。現在地を取得した場合に更新される。 ContentView(latitude: 35.6804, longitude: 139.7690) } }SceneDelegate.swiftclass SceneDelegate: UIResponder, UIWindowSceneDelegate { var window: UIWindow? func scene(_ scene: UIScene, willConnectTo session: UISceneSession, options connectionOptions: UIScene.ConnectionOptions) { // Use this method to optionally configure and attach the UIWindow `window` to the provided UIWindowScene `scene`. // If using a storyboard, the `window` property will automatically be initialized and attached to the scene. // This delegate does not imply the connecting scene or session are new (see `application:configurationForConnectingSceneSession` instead). // Create the SwiftUI view that provides the window contents. // "latitude"と"longitude"を追記 // 場所はTokyoで設定。現在地を取得した場合に更新される。 let contentView = ContentView(latitude: 35.6804, longitude: 139.7690) // Use a UIHostingController as window root view controller. if let windowScene = scene as? UIWindowScene {アプリのフロー
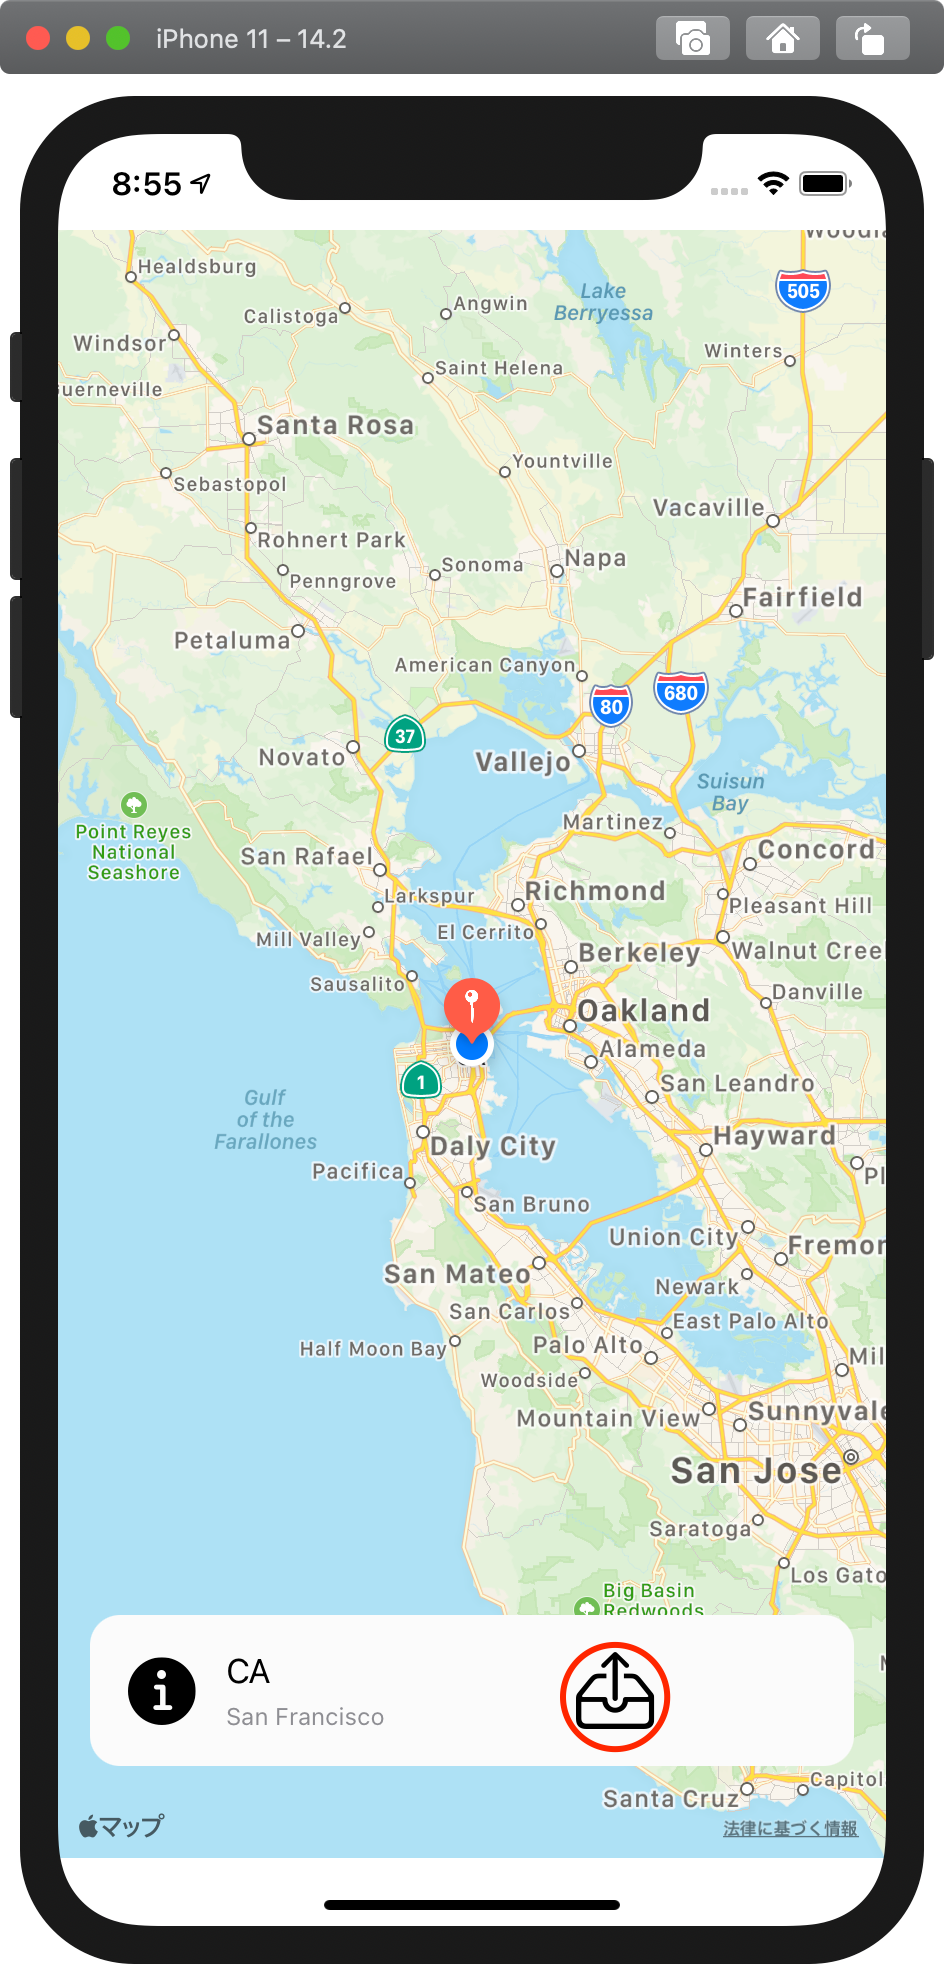
- アプリ立ち上げ
- Mapkitを用いて位置情報の取得→逆ジオコーディングを行い、都道府県名・市町村名を取得
- ContentViewに地図とインフォセクションの表示
- インフォセクション内のボタンを押し、Firebaseのデータベースを更新
Simulatorを起動し、インフォセクション内のボタンを押すと、Firebaseのデータベースが更新されます。
実機で確認したところ、実機を使用した場合も現在地を取得し、逆ジオコーディングし、データベースを更新できました。
今後実装予定の部分
・Firebaseからのデータの受け取り
・受け取ったデータを表示するViewの実装
→listViewで表示。RowViewも作成する
・TabViewを実装
→地図表示と保存したデータを出力するViewを作成以上です。
- 投稿日:2020-11-17T15:58:44+09:00
Flutter実装時にお世話になったページ 2020/11/17
なにか
毎回、同じ問題に、同じ検索して、同じページで解決してるので。。。
TabBarViewのスワイプによる切り替えを無効にしたかった
Stack Overflow "disable swiping tabs in TabBar flutter"
Firebase の Cloud Messaging による通知がiOSで受け取れなかった
公式ドキュメントをちゃんと読めってことですね。
iOS Integration のステップ2で、以下を読み落としてたのとDon't follow the steps named "Add Firebase SDK" and "Add initialization code" in the Firebase assistant.
Dart/Flutter Integration のここを実装せずにテストしてました。(Androidは無くても届く)
import 'package:firebase_messaging/firebase_messaging.dart'; final FirebaseMessaging _firebaseMessaging = FirebaseMessaging();iOS風のモーダル表示
まだ、Flutterとしては実装されていない模様
Github flutter "Support for sheet presentation style"
上記のissue内に記載されている、ライブラリを使用
- 投稿日:2020-11-17T10:25:00+09:00
Xcode12 + SwiftPM + Firebase iOS SDKの注意点
はじめに
Firebase iOS SDK も Swift Package Manager (SwiftPM) 向けの対応が進み、2020/8/25にリリースされたv6.31.0 からβ版として提供され始めました。
Swift Package Manager for Firebase Beta に利用方法が掲載されており、とても簡単に SwiftPM で Firebase iOS SKD を組み込むことができます。
Archive を処理する時の問題
ただ、アプリを Archive して Organizer で Distribute App や Validate App を実行すると次のようなエラーが発生してしまいます。
- Found an unexpected Mach-O header code
- IPA processing failed

原因と回避策
これは既知の問題で、先ほどの Swift Package Manager for Firebase Beta にしっかり回避策が掲載されていました。
If you're using FirebaseAnalytics, Xcode 12.0, and have an issue with device installation or archive uploading, see the workaround at https://github.com/firebase/firebase-ios-sdk/issues/6472#issuecomment-694449182.
このリンク先の Issue を確認すると、アプリバイナリに静的にリンクされるいくつかの Static Frameworks がアーカイブに含まれてしまっているということが原因のようです。下記引用のとおり、ビルドの Post-Action にてそれらの Static Frameworks を削除することで回避できました
Add the following to the Scheme's Build Post-Action:
rm -rf "${TARGET_BUILD_DIR}/${TARGET_NAME}.app/Frameworks/FirebaseAnalytics.framework"
rm -rf "${TARGET_BUILD_DIR}/${TARGET_NAME}.app/Frameworks/GoogleAppMeasurement.framework"
rm -rf "${TARGET_BUILD_DIR}/${TARGET_NAME}.app/Frameworks/FIRAnalyticsConnector.framework"
Make sure to select Provide build settings from the app.

- 投稿日:2020-11-17T09:36:01+09:00
Swift4で同期通信をする
今回は、Swift4で同期HTTP通信を実現します。
使いどきはあまりイメージできておりませんが、書き換えチャレンジです。参考にしたSwift2のコード
まず、Swift4で同期HTTP通信をするためにこちらのサイトを参考にしました。
サイトに掲載されていたSwift2のコードも、勉強のため載せておきます。public class HttpClientImpl { private let session: NSURLSession public init(config: NSURLSessionConfiguration? = nil) { self.session = config.map { NSURLSession(configuration: $0) } ?? NSURLSession.sharedSession() } public func execute(request: NSURLRequest) -> (NSData?, NSURLResponse?, NSError?) { var d: NSData? = nil var r: NSURLResponse? = nil var e: NSError? = nil let semaphore = dispatch_semaphore_create(0) session .dataTaskWithRequest(request) { (data, response, error) -> Void in d = data r = response e = error dispatch_semaphore_signal(semaphore) } .resume() dispatch_semaphore_wait(semaphore, DISPATCH_TIME_FOREVER) return (d, r, e) } }Swift2からSwift4へ変換する
この状態で、Compiler Errorが6つ出ていました。
基本的には、Fixボタンをクリックしていったら良いんですが、、
dispatch_semaphore_waitだけ、Fixボタンでは消えてくれませんでした。?この問題については、AppleのDeveloperページを参考にします。
ときどき、こういったFixボタンで変換できないのが面倒ですね。。https://developer.apple.com/documentation/dispatch/dispatchsemaphore
結果、次のようになりました。
完成したコード
全て変換し終えたコードがこちらです。
public class HttpClientImpl {
    private let session: URLSession
    public init(config: URLSessionConfiguration? = nil) {
        self.session = config.map { URLSession(configuration: $0) } ?? URLSession.shared
    }
    public func execute(request: URLRequest) -> (NSData?, URLResponse?, NSError?) {
        var d: NSData? = nil
        var r: URLResponse? = nil
        var e: NSError? = nil
        let semaphore = DispatchSemaphore(value: 0)
        session
            .dataTask(with: request) { (data, response, error) -> Void in
                d = data as NSData?
                r = response
                e = error as NSError?
                semaphore.signal()
            }
            .resume()
        _ = semaphore.wait(timeout: DispatchTime.distantFuture)
        return (d, r, e)
    }
}
また、使うときはこんな感じです。
// 通信先のURLを生成.
let myUrl:URL = URL(string: "https://www.example.com/xxx")!
let req = NSMutableURLRequest(url: myUrl)

let postText = "key1=value1&key2=value2"
let postData = postText.data(using: String.Encoding.utf8)

req.httpMethod = "POST"
req.httpBody = postData

let myHttpSession = HttpClientImpl()
let (data, _, _) = myHttpSession.execute(request: req as URLRequest)
if data != nil {
    // 受け取ったデータに対する処理
}
- 投稿日:2020-11-17T01:42:07+09:00
子供用の学習アプリケーションを作る(2) アニメーション編
はじめに
以前作成したアプリの続きをしていきます。
参考: 子供用の学習アプリケーションを作る(1)今回は、コンテンツの選択画面にアニメーションを導入し、選択後の詳細画面を作成したので、その実装について記事にしていこうと思います。
動作
まずは、動作を見ていただければと思います。
実装
構成
構成は以下のようになっています。
❯ pwd
/Users/yoshitaka.koitabashi/Desktop/iLearn/src/components

~/Desktop/iLearn/src/components
❯ tree .
.
├── alsContent.tsx
├── contentsSelect.tsx
├── falcon9Content.tsx
├── header.tsx
└── spaceContent.tsx

0 directories, 5 files
今回の実装の説明に使用するのは、こちらです。
・contentsSelect.tsx
コンテンツを選択する画面Home画面からの遷移時に、各コンテンツがふんわり浮かび上がるアニメーションを作成しました。
参考 react-native: Animated
こちらの実装なのですが、単純で、Animatedというライブラリと副作用fookであるuseEffectを利用したパターンになります。contentsSelect.tsximport 'react-native-gesture-handler'; import React, { useRef, useEffect } from 'react'; import { SafeAreaView, ScrollView, StyleSheet, Animated, TouchableOpacity, } from 'react-native'; import { Card, Title } from 'react-native-paper'; import { createStackNavigator } from '@react-navigation/stack'; import AppHeader from './header'; import spaceContent from './spaceContent'; import alsContents from './alsContent'; import falcon9Contents from './falcon9Content'; const contents = ({ navigation }) => { const fadeSpace = useRef(new Animated.Value(0)).current; const fadeAls = useRef(new Animated.Value(0)).current; const fadeFalcon9 = useRef(new Animated.Value(0)).current; const spaceContentFadeIn = () => { Animated.timing(fadeSpace, { toValue: 1, duration: 500, useNativeDriver: true, }).start(); }; const alsContentsFadeIn = () => { Animated.timing(fadeAls, { toValue: 1, duration: 2000, useNativeDriver: true, }).start(); }; const falcon9ContentsFadeIn = () => { Animated.timing(fadeFalcon9, { toValue: 1, duration: 3000, useNativeDriver: true, }).start(); }; useEffect(() => { spaceContentFadeIn(); alsContentsFadeIn(); falcon9ContentsFadeIn(); }); return ( <SafeAreaView style={styles.container}> <ScrollView contentContainerStyle={styles.contentContainer} > <TouchableOpacity onPress={() => { navigation.navigate('Home'); }} > <AppHeader /> </TouchableOpacity> <Animated.View style={[{ opacity: fadeSpace }]}> <Card onPress={() => navigation.navigate('宇宙って?')} style={styles.cardPadding} > <Card.Content> <Title style={styles.cardTitle}>宇宙って?</Title> <Card.Cover source={require('../../public/img/alien.png')} style={styles.cardImg} /> </Card.Content> </Card> </Animated.View> <Animated.View style={[{ opacity: fadeAls }]}> <Card onPress={() => navigation.navigate('ALSって知ってる?')} style={styles.cardPadding} > <Card.Content> <Title style={styles.cardTitle}>ALSって知ってる?</Title> <Card.Cover source={require('../../public/img/health.png')} style={styles.cardImg} /> </Card.Content> </Card> </Animated.View> <Animated.View style={[{ opacity: fadeFalcon9 }]}> <Card onPress={() => navigation.navigate('Falcon9がすごい')} style={styles.cardPadding} > <Card.Content> <Title style={styles.cardTitle}>Falcon 9がすごい</Title> <Card.Cover source={require('../../public/img/startup_isometric.png')} style={styles.cardImg} /> </Card.Content> </Card> </Animated.View> </ScrollView> </SafeAreaView> ); }; const Stack = createStackNavigator(); const contentsSelect = () => ( <Stack.Navigator> <Stack.Screen name="知識の森" component={contents} /> <Stack.Screen name="宇宙って?" component={spaceContent} /> <Stack.Screen name="ALSって知ってる?" component={alsContents} /> <Stack.Screen name="Falcon9がすごい" component={falcon9Contents} /> </Stack.Navigator> ); const styles = StyleSheet.create({ container: { flex: 1, }, cardImg: { height: 300, }, cardPadding: { top: 60, marginBottom: 20, borderRadius: 5, marginLeft: 20, marginRight: 20, }, cardTitle: { fontWeight: 'bold', }, contentContainer: { paddingBottom: 50, }, }); export default contentsSelect;・spaceContent.tsx
宇宙についてのコンテンツの詳細画面詳細画面で少し面白い箇所が、下記です。
何をしているかというと、Home画面に戻す動作をしているのですが、dispatch(StackActions.popToTop())をしないと、navigationのHistoryが消されず想定外の動作をしてしまいます。navigation.navigate('Home'); navigation.dispatch(StackActions.popToTop());spaceContent.tsximport * as React from 'react'; import { ScrollView, StyleSheet, View, Image, TouchableOpacity, } from 'react-native'; import { Card, Paragraph, Chip, Avatar, Title, } from 'react-native-paper'; import { StackActions } from '@react-navigation/native'; import { Text } from 'react-native-elements'; import AppHeader from './header'; const spaceContent = ({ navigation }) => ( <View style={styles.container}> <ScrollView contentContainerStyle={styles.contentContainer} > <TouchableOpacity onPress={() => { navigation.navigate('Home'); navigation.dispatch(StackActions.popToTop()); }} > <AppHeader /> </TouchableOpacity> <Card style={styles.cardPadding} > <Card.Content> <Title style={styles.cardTitle}>宇宙ってなんだろう??</Title> <Card.Cover source={require('../../public/img/alien.png')} /> </Card.Content> </Card> <Card style={styles.cardPadding} > <Card.Content> <Paragraph style={styles.nextCardMessage} > Topics </Paragraph> <View style={styles.row}> <Chip style={styles.chip}> <Text style={styles.chipText}>宇宙開発</Text> </Chip> <Chip style={styles.chip}> <Text style={styles.chipText}>Jaxa</Text> </Chip> <Chip style={styles.chip}> <Text style={styles.chipText}>ISS</Text> </Chip> </View> </Card.Content> </Card> <Card style={styles.cardPadding} > <Card.Content> <Paragraph style={styles.nextCardMessage} > 作者 </Paragraph> <View style={styles.row}> <Avatar.Image size={70} source={require('../../public/img/space-travel.png')} /> <Text style={styles.avatarMessage}> Koitabashi Yoshitaka </Text> </View> </Card.Content> </Card> <Card style={styles.cardPadding} > <Card.Content> <Paragraph style={styles.nextCardMessage} > 物語 </Paragraph> <Text h3 style={styles.storyTitle}> はじめに </Text> <Text style={styles.storyBody}> 宇宙の誕生は、約138億年前のビッグバンから始まります。 </Text> <Image source={require('../../public/img/moon2.png')} style={{ width: 300, height: 200 }} /> <Text h4 style={styles.storyTitle}> ビックバンって、何〜? </Text> <Text style={styles.storyBody}> 人間のまばたきよりも短い時間の中で起こった超・高エネルギーの爆発ビックバンです。 ビッグバンにより、小さな物質同士が結合し合い、星の素となるチリやガスが生まれました。 {'\n'} さらに、それらの物質がくっつき合い、恒星や惑星といった星々が生まれたのです。 {'\n'} </Text> <Image source={require('../../public/img/moon1.png')} style={{ width: 300, height: 200 }} /> <Text style={styles.storyBody}> 誕生以来、宇宙は膨張を続けており、その膨張は加速し続けているといわれています。 {'\n'} そのため、宇宙の大きさは現在の科学でも解明できていません。 </Text> </Card.Content> </Card> </ScrollView> </View> ); const styles = StyleSheet.create({ container: { flex: 1, }, backButton: { paddingTop: 10, paddingBottom: 10, }, cardPadding: { textAlign: 'center', top: 60, marginBottom: 20, borderRadius: 5, marginLeft: 20, marginRight: 20, }, cardTitle: { marginBottom: 15, fontSize: 20, fontWeight: 'bold', }, cardMessage: { marginTop: 15, fontSize: 20, fontWeight: 'bold', }, nextCardMessage: { marginBottom: 20, fontSize: 20, fontWeight: 'bold', }, row: { flexDirection: 'row', flexWrap: 'wrap', paddingHorizontal: 12, }, chip: { backgroundColor: '#2096F3', margin: 2, }, chipText: { color: '#ffffff', }, avatarMessage: { marginLeft: 30, marginTop: 20, fontWeight: 'bold', textAlign: 'left', }, storyTitle: { marginTop: 20, marginBottom: 20, fontWeight: 'bold', }, storyBody: { marginTop: 20, fontWeight: 'bold', }, contentContainer: { paddingBottom: 60, }, }); export default spaceContent;おわり
・ 説明が雑になってきているので、だんだん追記していきます。w
・ 現在は、各コンテンツの内容をハードコーディングしているのですが、いずれ専用のAPIを作成するつもりなので、そこはとりあえず置いておきます。
・ あとは、Qittaのようにmarkdownで誰でも編集できるようにしていきたいと思ってます。参考文献