- 投稿日:2020-09-13T23:23:52+09:00
Content Hugging Priority と Content Compression Resistance Priority を理解する
今回は AutoLayout 関連で、なんとなく使っていて詳しく理解していなかった
Content Hugging PriorityとContent Compression Resistance Priorityを調べていきたいと思います。Content hugging priority とは?
この Priority(優先度) は View が本来のサイズよりも大きくなることに抵抗する度合いを設定します。つまり、この値が大きくなればなるほど、View がそのコンテンツよりも大きくならないようになります。
View Content hugging priority UIView 250 UITextView 250 UIButton 250 UILabel 251 UIImageView 251 UISwitch 750 Content Compression Resistance Priority とは?
この Priority は View が本来のサイズよりも小さくなることに抵抗する度合いを設定します。つまり、この値が大きくなればなるほど、View がそのコンテンツよりも小さく縮小されないようになります。
View Content Compression Resistance Priority UIView 750 UITextView 750 UIButton 750 UILabel 750 UIImageView 750 UISwitch 750 知っておくといいこと
Q1
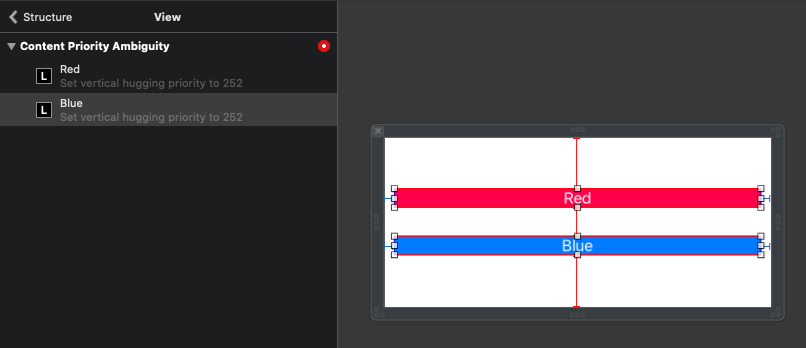
みなさんが仕事で AutoLayout を使っている場合、少なくとも一回ぐらいは Xib で下記のように Label の高さを指定せずに Label 同士を繋げて View のコンテンツとして制約を貼った時に起こる Error に遭遇したことがあるかと思います。
Label 単体で制約を貼った場合は Error が出ないのに、高さを指定していない Label を連結するとどうして Error が出るのでしょう?少し考えてみてください?
答え
答えは、
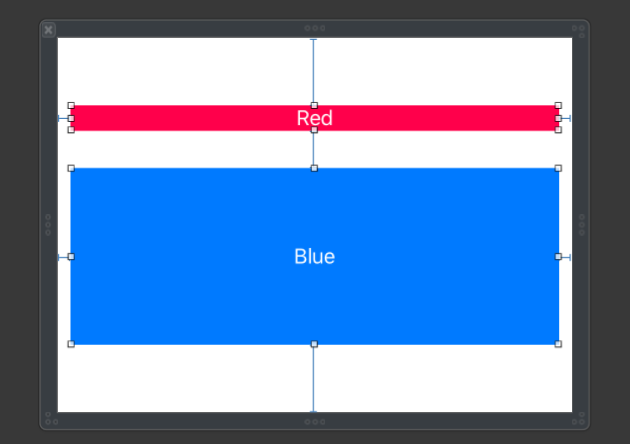
Content hugging priorityの vertial の値がどちらも251だからです?つまり、どちらも同じ値なので、制約を満たすためにどちらかの Label を広げて表示させたいのですが、値が競合しているためシステムが判断できないよ、とのことです。それでは、試しに
blueLabelのContent hugging priorityの vertical 値を1ポイント下げて広げやすくしてみます。Q2
下記のようにラベルの幅の制約(幅40pt)を
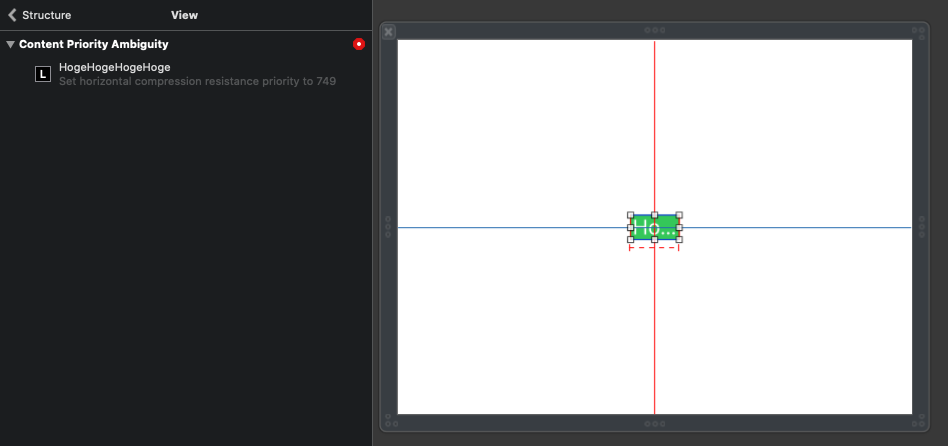
priority750でセットして省略されてしまうような長い文字列を挿入した時、またも Error に遭遇してしまいましたこれはなぜでしょうか?答え
答えは、
Content Compression Resistance Priorityの horizontal の値が横幅(NSLayoutConstraint)の priority と競合しているためです。これによって、システムは横幅で指定されている40ptとコンテンツサイズの大きさに合わせるContent Compression Resistance Priorityの値のどちらを優先していいか分からず Error が出てしまっているのですね?それでは、試しに
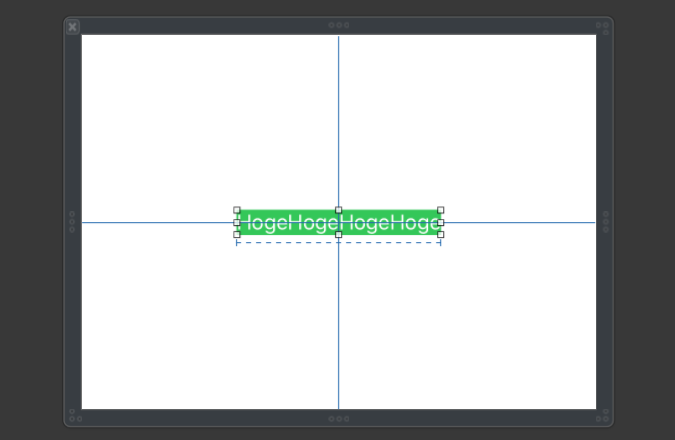
Content Compression Resistance Priorityの値を1ポイント上げて751にしてみましょう。すると、下記のようにコンテンツ幅が優先されて表示されるようになりました?また、
Content Hugging PriorityおよびContent Compression Resistance Priorityは、Viewにサイズを決定するための十分な制約がない場合にNSContentSizeLayoutConstraintという制約をつくるのにも使用されるそうで、プログラム中でNSContentSizeLayoutConstraintとNSLayoutConstraintの Priority の値が同じ場合はNSLayoutConstraintが優先されるようです。参考
- 投稿日:2020-09-13T20:25:29+09:00
【Swift】CoreNFCのコールバック地獄から逃れる
地獄から逃れる為のライブラリ作りました。
I've created a library that wraps CoreNFC for use in RxSwift.https://t.co/LRBq9doL9f#iOS #Swift #RxSwift #CocoaPods #Carthage pic.twitter.com/H9UnPUj0Mn
— かりば (@karibash) July 24, 2020コールバック辛すぎ問題
FeliCaを読み取っていろいろやりたい場合のコールバック処理がつらい
func tagReaderSession(_ session: NFCTagReaderSession, didDetect tags: [NFCTag]) {
    let tag = tags.first!
    session.connect(
        to: tag
    ) { (error) in
        if let _ = error {
            session.invalidate(errorMessage: "NFCタグの読み取りに失敗しました。")
            return
        }

        guard case .feliCa(let feliCaTag) = tag else {
            session.restartPolling()
            return
        }

        feliCaTag.requestService(
            nodeCodeList: self.SERVICE_CODE_LIST
        ) { nodeKeyVersionList, error in
            if let _ = error {
                session.invalidate(errorMessage: "NFCタグの読み取りに失敗しました。")
                return
            }

            feliCaTag.readWithoutEncryption(
                serviceCodeList: self.SERVICE_CODE_LIST,
                blockList: self.BLOCK_LIST
            ) { status1, status2, dataList, error in
                session.invalidate()
                // do something.
            }
        }
    }
}
RxCoreNFCでコールバック地獄を解決
RxCoreNFCを使うと下記のようのフラットに記述できるようになります。
let sessions = NFCTagReaderSession.rx.open(pollingOption: [.iso18092])
let tags = sessions.begin().tags().felicaTags()
let connectedTags = Observable.combineLatest(tags, sessions)
    .flatMap { tag, session in session.connect(tag) }
    .share()

let invalidates = connectedTags
    .requestService(nodeCodeList: SERVICE_CODE_LIST)
    .withLatestFrom(connectedTags)
    .readWithoutEncryption(serviceCodeList: SERVICE_CODE_LIST, blockList: BLOCK_LIST })
    .do(onNext: { result in
        // Do something
    })
    .withLatestFrom(sessions)
    .invalidate()
    .first()

button.rx.tap
    .flatMapFirst { invalidates }
    .subscribe()
    .disposed(by: disposeBag)
- 投稿日:2020-09-13T14:45:19+09:00
expoでApple Push Servicesの証明書を更新する
Appleから下記文面のメールが来た場合の対応。
Your Apple Push Services Certificate will no longer be valid in 30 days.
To generate a new certificate, sign in and visit Certificates, Identifiers & Profiles.
expoのCLIで実行可能
expo credentials:manager -p iosを実行して、Add new Push Notifications Keyを選択する。
Apple Developer accountのAppleIDとパスワードを聞かれるので入力する。
これだけ。公式ドキュメントはこちら
https://docs.expo.io/push-notifications/push-notifications-setup/
- 投稿日:2020-09-13T13:57:19+09:00
FlutterにFirebase(Firestore)を導入したら、iOSのビルドが遅くなった
困ったこと
FlutterにFirebase(Firestore)を導入したら、iOSビルドがとても遅くなった。
元々1分くらいだったのが、10分くらいになってしまった。解決法
ios/Podfileに、下記を1行追加した。
pod 'FirebaseFirestore', :git => 'https://github.com/invertase/firestore-ios-sdk-frameworks.git', :tag => '6.26.0'サンプル(抜粋)
ios/Podfiletarget 'Runner' do use_frameworks! use_modular_headers! pod 'FirebaseFirestore', :git => 'https://github.com/invertase/firestore-ios-sdk-frameworks.git', :tag => '6.26.0' flutter_install_all_ios_pods File.dirname(File.realpath(__FILE__)) endなぜ遅くなったのか?
公式ドキュメントによると、FirestoreのiOS SDKは500k行のC++で書かれているらしく、それを毎回コンパイルするため、時間がかかっているそう。
なので、事前にコンパイルした結果を、githubから取得するようにすることで、時間短縮しているということらしい。Improve iOS Build Times#
Currently the Firestore iOS SDK depends on some 500k lines of mostly C++ code which can take upwards of 5 minutes to build in XCode. To reduce build times significantly, you can use a pre-compiled version by adding 1 line to your ios/Podfile inside your Flutter project;pod 'FirebaseFirestore', :git => 'https://github.com/invertase/firestore-ios-sdk-frameworks.git', :tag => '6.26.0'
Add this line inside your target 'Runner' do block in your Podfile, e.g.:
https://firebase.flutter.dev/docs/overview#initializing-flutterfire
あとがき
公式ドキュメントはしっかり読もうね、というお話でした。
この事象に困り、Flutter Firebase ビルド 遅い iOSなどのキーワードで結構ググりましたが、日本語と英語どちらもあまりヒットせず、みなさんちゃんと公式ドキュメント読んでいるんだなあと感じました。反省。
- 投稿日:2020-09-13T10:51:12+09:00
iOSで共有Frameworkを利用した際に、podで追加したFirebaseが競合しクラッシュしてしまう問題の解決
概要
Fabricを利用したクラッシュレポートの送信が、2020年11月15日で使えなくなるようで、
新しいFirebaseへの置き換えを進めてました。https://firebase.google.com/docs/crashlytics/get-started?hl=ja

プロジェクトは
共有frameworkをアプリ側で利用する形で、両方ともfirebaseを利用しています。
今までは、それぞれのプロジェクトで pod の追加をしていて、特に問題なく動いていました。use_frameworks! target 'library' do pod 'Firebase/Core', `古いバージョン` pod 'Firebase/Firestore', `古いバージョン` pod 'Firebase/Storage', `古いバージョン` pod 'Firebase/Crashlytics', `古いバージョン` target 'app' do pod 'Firebase/Core', `古いバージョン` pod 'Firebase/Firestore', `古いバージョン` pod 'Firebase/Storage', `古いバージョン` pod 'Firebase/Crashlytics', `古いバージョン` end endただし、今回以下のように、バージョンを新しいものに変えたら、ビルドができなくなってしまいました。
今回は、この解決例に関する記事です。use_frameworks! target 'library' do pod 'Firebase/Core' pod 'Firebase/Firestore' pod 'Firebase/Storage' pod 'Firebase/Crashlytics' target 'app' do pod 'Firebase/Core' pod 'Firebase/Firestore' pod 'Firebase/Storage' pod 'Firebase/Crashlytics' end end環境
Mac : Catalina(10.15.6)
Xcode : 11.6
pod : 1.8.4プロジェクト概要
プロジェクト内に、 共有Framework があり、
アプリからそれを参照している。共有フレームワーク及び、アプリで fireabse を利用している。
エラー内容
まずコンパイルの段階で以下のような警告が出ます。
objc[1813]: Class GULZeroingWeakContainer is implemented in both ~略~ One of the two will be used. Which one is undefined.そして、ビルド時、
FirebaseApp.configure()でクラッシュ。func application(_ application: UIApplication, didFinishLaunchingWithOptions launchOptions: [UIApplication.LaunchOptionsKey: Any]?) -> Bool { // Override point for customization after application launch. FirebaseApp.configure() // ここでクラッシュ return true }クラッシュ時のエラー内容はこんな感じ。
myApps[1813:91118] *** Terminating app due to uncaught exception 'com.firebase.installations', reason: 'The default FirebaseApp instance must be configured before the defaultFirebaseApp instance can be initialized. One way to ensure that is to call `[FIRApp configure];` (`FirebaseApp.configure()` in Swift) in the App Delegate's `application:didFinishLaunchingWithOptions:` (`application(_:didFinishLaunchingWithOptions:)` in Swift).'
*** First throw call stack:

libc++abi.dylib: terminating with uncaught exception of type NSException
解決方法
結果、試行錯誤の末これでうまく行ったという感じなので、
うまく説明はできないのですが、
use_frameworks!
をライブラリ側につけない必要がありました。
そして、ライブラリは全部ライブラリ側に設定し、
アプリ側はinherit! :search_pathsで参照します。target 'library' do pod 'Firebase/Core' pod 'Firebase/Firestore' pod 'Firebase/Storage' pod 'Firebase/Crashlytics' target 'app' do use_frameworks! inherit! :search_paths end end参考サイト
CocoaPodsでFirebaseをmain target以外に入れることができない問題(解決済)
https://qiita.com/takasek/items/39c28042c4ecef4685ee
解決にはこちらの記事が非常に参考になりました。
構成が違うためか、記事内容ではそのまま行かなく、use_frameworks!の付け方で
うまく行ったという感じです。このあたり、プロジェクトの構成次第でやり方が変わってきそうですね。
Firebase Crashlytics SDK にアップグレードする
https://firebase.google.com/docs/crashlytics/upgrade-sdk
今回の問題にハマるきっかけとなった、 Crashlytics の更新記事です。
ちなみに日本語記事だと、androidにもiOSでの設定方法が書かれていたり、
ちょと記事がおかしいみたいなので、英語で確認することをおすすめします。
- 投稿日:2020-09-13T10:51:12+09:00
iOSにFirebaseをpodで追加したが、クラッシュしてしまう問題の解決
概要
Fabricを利用したクラッシュレポートの送信が、2020年11月15日で使えなくなるようで、
新しいFirebaseへの置き換えを進めてました。https://firebase.google.com/docs/crashlytics/get-started?hl=ja

プロジェクトは
共有frameworkをアプリ側で利用する形で、両方ともfirebaseを利用しています。
今までは、それぞれのプロジェクトで pod の追加をしていて、特に問題なく動いていました。use_frameworks! target 'library' do pod 'Firebase/Core', `古いバージョン` pod 'Firebase/Firestore', `古いバージョン` pod 'Firebase/Storage', `古いバージョン` pod 'Firebase/Crashlytics', `古いバージョン` target 'app' do pod 'Firebase/Core', `古いバージョン` pod 'Firebase/Firestore', `古いバージョン` pod 'Firebase/Storage', `古いバージョン` pod 'Firebase/Crashlytics', `古いバージョン` end endただし、今回以下のように、バージョンを新しいものに変えたら、ビルドができなくなってしまいました。
今回は、この解決例に関する記事です。use_frameworks! target 'library' do pod 'Firebase/Core' pod 'Firebase/Firestore' pod 'Firebase/Storage' pod 'Firebase/Crashlytics' target 'app' do pod 'Firebase/Core' pod 'Firebase/Firestore' pod 'Firebase/Storage' pod 'Firebase/Crashlytics' end end環境
Mac : Catalina(10.15.6)
Xcode : 11.6
pod : 1.8.4プロジェクト概要
プロジェクト内に、 共有Framework があり、
アプリからそれを参照している。共有フレームワーク及び、アプリで fireabse を利用している。
エラー内容
まずコンパイルの段階で以下のような警告が出ます。
objc[1813]: Class GULZeroingWeakContainer is implemented in both ~略~ One of the two will be used. Which one is undefined.そして、ビルド時、
FirebaseApp.configure()でクラッシュ。func application(_ application: UIApplication, didFinishLaunchingWithOptions launchOptions: [UIApplication.LaunchOptionsKey: Any]?) -> Bool { // Override point for customization after application launch. FirebaseApp.configure() // ここでクラッシュ return true }クラッシュ時のエラー内容はこんな感じ。
myApps[1813:91118] *** Terminating app due to uncaught exception 'com.firebase.installations', reason: 'The default FirebaseApp instance must be configured before the defaultFirebaseApp instance can be initialized. One way to ensure that is to call `[FIRApp configure];` (`FirebaseApp.configure()` in Swift) in the App Delegate's `application:didFinishLaunchingWithOptions:` (`application(_:didFinishLaunchingWithOptions:)` in Swift).'
*** First throw call stack:

libc++abi.dylib: terminating with uncaught exception of type NSException
解決方法
結果、試行錯誤の末これでうまく行ったという感じなので、
うまく説明はできないのですが、
use_frameworks!
をライブラリ側につけない必要がありました。
そして、ライブラリは全部ライブラリ側に設定し、
アプリ側はinherit! :search_pathsで参照します。target 'library' do pod 'Firebase/Core' pod 'Firebase/Firestore' pod 'Firebase/Storage' pod 'Firebase/Crashlytics' target 'app' do use_frameworks! inherit! :search_paths end end参考サイト
CocoaPodsでFirebaseをmain target以外に入れることができない問題(解決済)
https://qiita.com/takasek/items/39c28042c4ecef4685ee
解決にはこちらの記事が非常に参考になりました。
構成が違うためか、記事内容ではそのまま行かなく、use_frameworks!の付け方で
うまく行ったという感じです。このあたり、プロジェクトの構成次第でやり方が変わってきそうですね。
Firebase Crashlytics SDK にアップグレードする
https://firebase.google.com/docs/crashlytics/upgrade-sdk
今回の問題にハマるきっかけとなった、 Crashlytics の更新記事です。
ちなみに日本語記事だと、androidにもiOSでの設定方法が書かれていたり、
ちょと記事がおかしいみたいなので、英語で確認することをおすすめします。github
以下に、サンプルプロジェクトをアップしています。
ただし、ビルドには以下二点、対応が必要です。
- pod update の実行が必要
- GoogleService-Info.plist の追加が必要
- 投稿日:2020-09-13T08:39:25+09:00
[Xcode] 実務的Tips: チーム内でXcodeの設定項目を合わせて不要な修正差分が出ないようにする
今日からでもすぐに取り入れられて、
- コードをよりクリーンにできる、とか
- 工数を削減できる、とか
そんなTipsを紹介していく記事シリーズです。
「知らなかった」「気づかなかった」「忘れていた」そんな誰かの役に立てば幸いです。前提環境
- Xcode 11.3.1
- Swift 5.1.3
課題
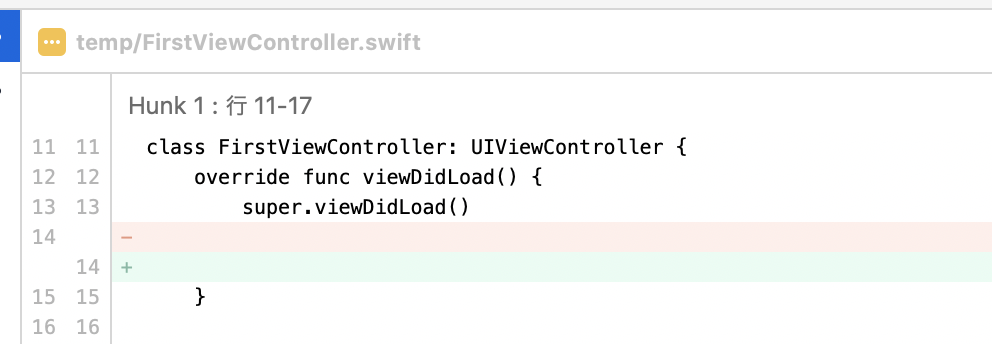
マージリクエスト(プルリクエスト)のレビュー時に、このような空白行の差分が出るとうっとおしくないですか?
解決策
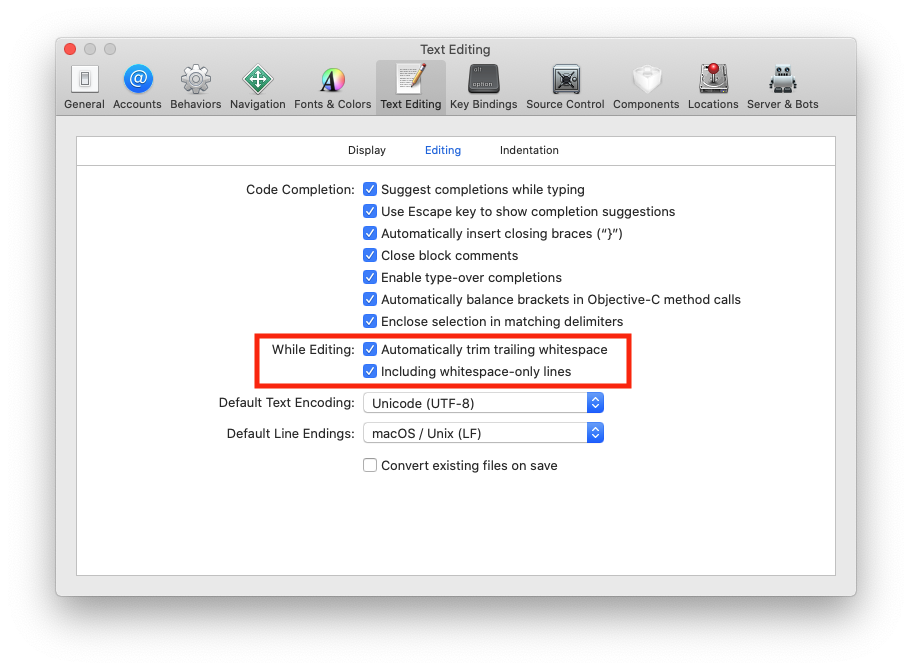
Linterライブラリを入れるのも手ですが、そうも行かない場合は、この設定をONにすればだいぶ軽減されます。
Xcode > Preferences > Text Editingタブ > Editingタブ
- Automatically trim trailing whitespace : 行末のスペースを削除(デフォルトはON)
- Including whitespace-only lines : 空白のみの行について空白を削除(デフォルトはOFF)
チーム内で、両方ともONに統一すると良いかと。
- 投稿日:2020-09-13T08:39:05+09:00
[Xcode] 実務的Tips: Storyboard IDの2つの用途
今日からでもすぐに取り入れられて、
- コードをよりクリーンにできる、とか
- 工数を削減できる、とか
そんなTipsを紹介していく記事シリーズです。
「知らなかった」「気づかなかった」「忘れていた」そんな誰かの役に立てば幸いです。前提環境
- Xcode 11.3.1
- Swift 5.1.3
割とメジャーなStoryboard IDの用途
こちらの記事にあるように、
画面遷移をコードで行う場合に、StoryboardからUIViewControllerのインスタンスを取得するために使う、という用途です。
【Swift】画面遷移の方法まとめ - Segueを使わない画面遷移(たぶん)マイナーなStoryboard IDの用途
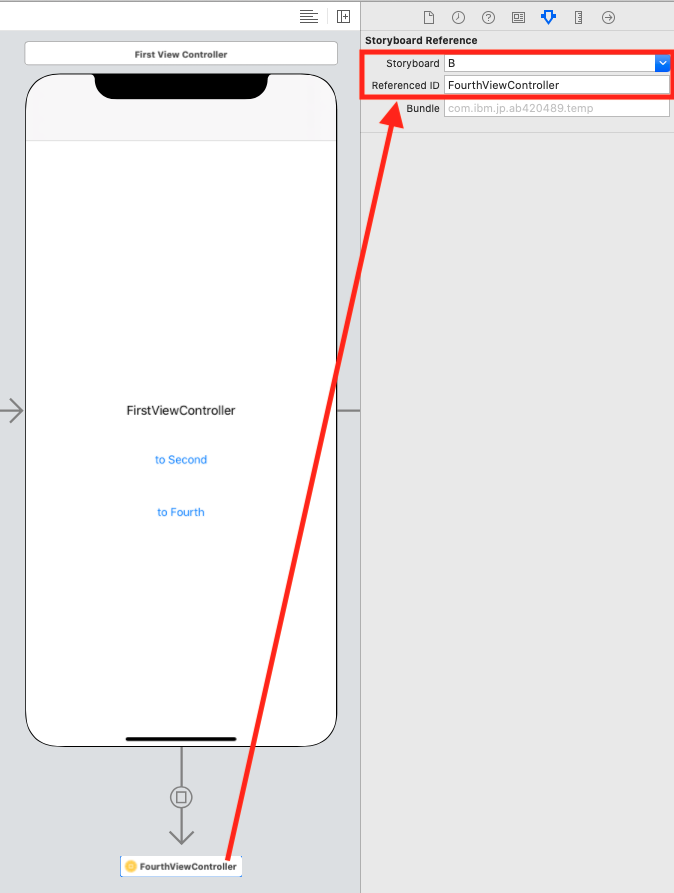
Storyboard Referenceによって、Storyboard-AからStoryboard-Bに遷移する場合に、Storyboard-Bの先頭じゃなく後方のUIViewControllerに遷移したい時に使う、という用途です。
例
Storyboard-B(遷移先)
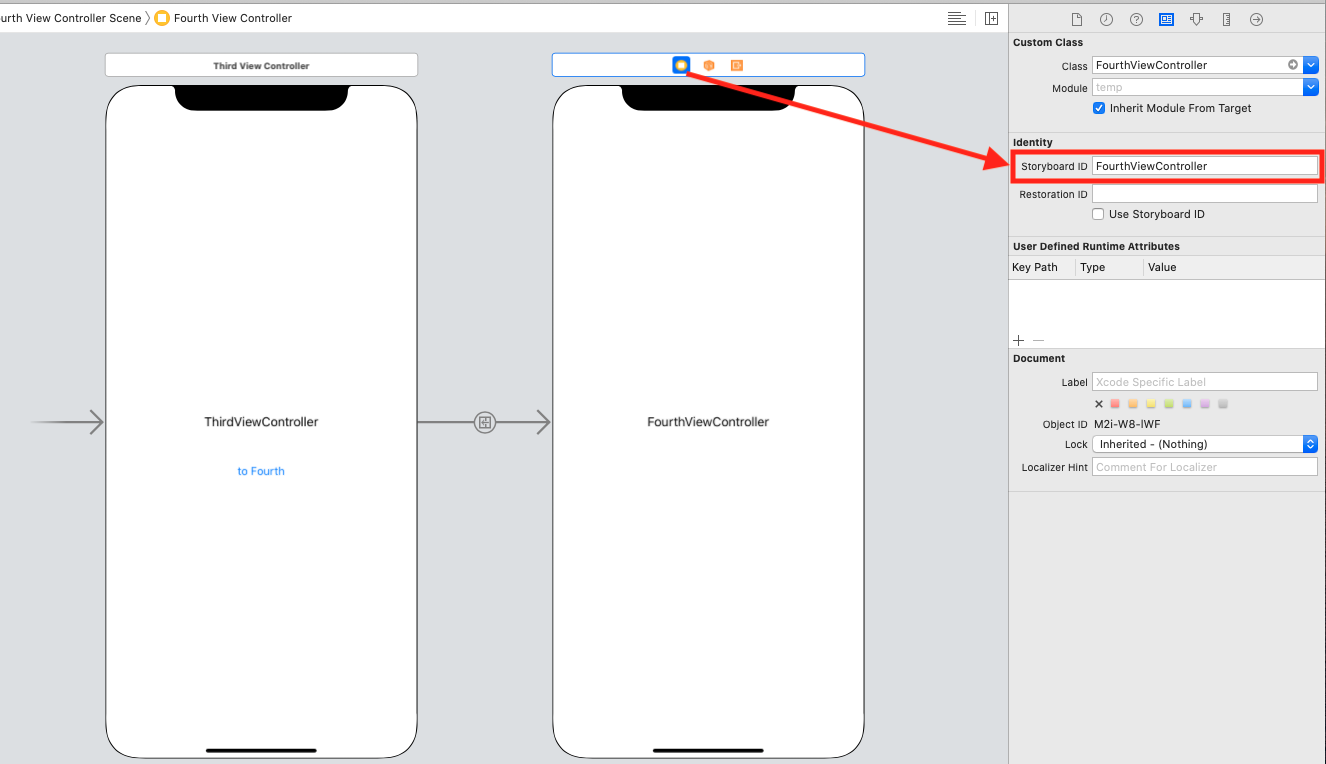
後方のViewController(この例ではFourthViewController)に任意のStoryboard IDを設定しておきます。
Storyboard-A(遷移元)
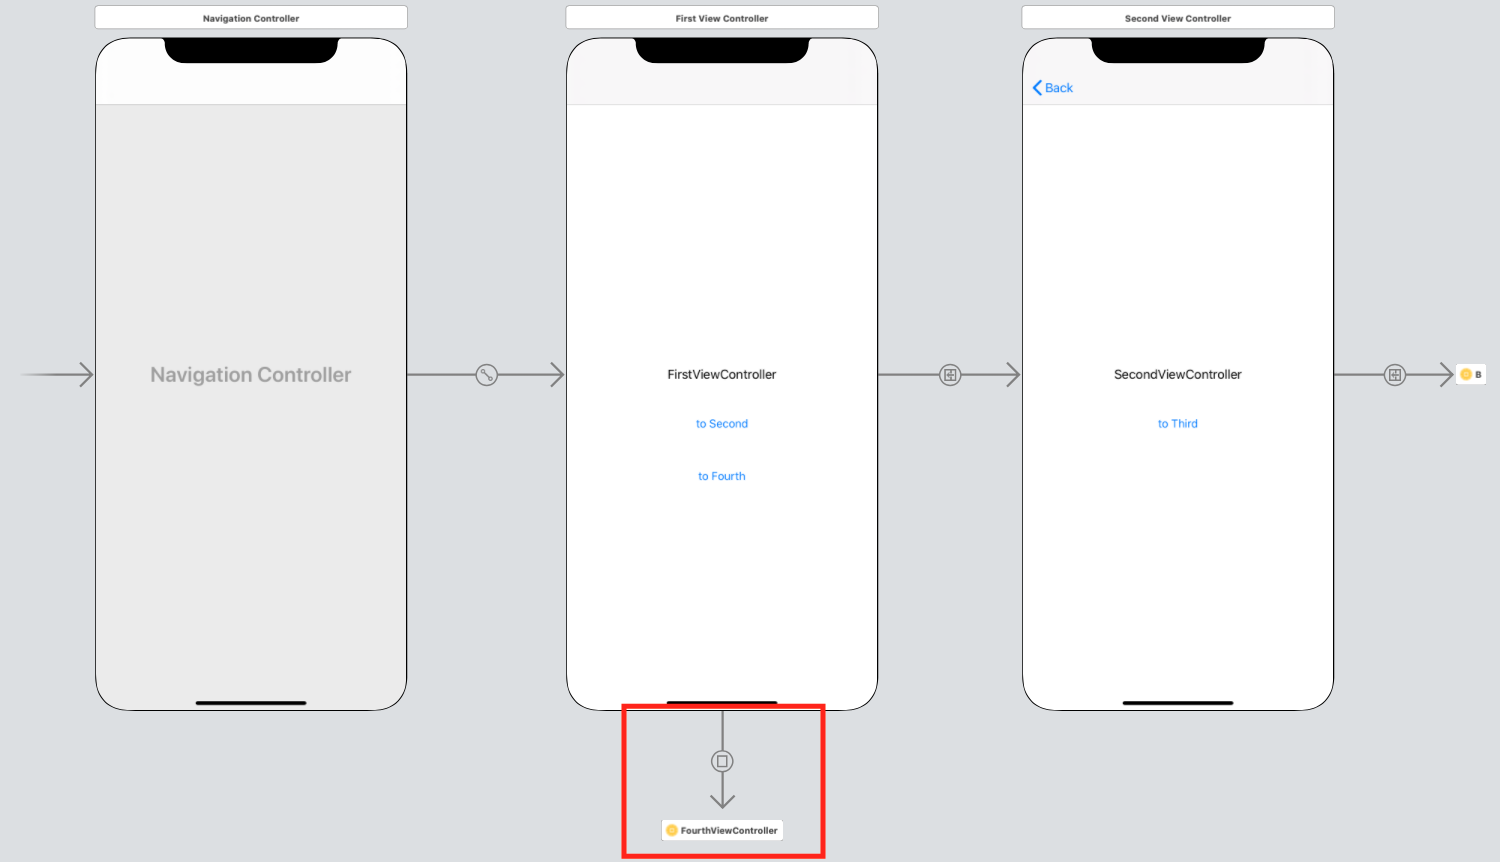
↑FirstViewControllerからStoryboard-BのFourthViewControllerに遷移する導線があります(赤枠部分)。↓このStoryboard Referenceで、「Referenced ID」に上で設定したStoryboard IDを指定します。
そうするとFirstViewControllerからStoryboard-BのFourthViewControllerに遷移できます。
このように、Storyboard IDををうまく使うことで、1つのStoryboardで複数の導線をカバーすることができます。
- 投稿日:2020-09-13T08:39:05+09:00
[Xcode] 実務的Tips: Storyboard IDの用途はコード上でUIViewControllerのインスタンスを作る「だけじゃない」
今日からでもすぐに取り入れられて、
- コードをよりクリーンにできる、とか
- 工数を削減できる、とか
そんなTipsを紹介していく記事シリーズです。
「知らなかった」「気づかなかった」「忘れていた」そんな誰かの役に立てば幸いです。前提環境
- Xcode 11.3.1
- Swift 5.1.3
割とメジャーなStoryboard IDの用途
こちらの記事にあるように、
画面遷移をコードで行う場合に、StoryboardからUIViewControllerのインスタンスを取得するために使う、という用途です。
【Swift】画面遷移の方法まとめ - Segueを使わない画面遷移(たぶん)マイナーなStoryboard IDの用途
Storyboard Referenceによって、Storyboard-AからStoryboard-Bに遷移する場合に、Storyboard-Bの先頭じゃなく後方のUIViewControllerに遷移したい時に使う、という用途です。
例
Storyboard-B(遷移先)
後方のViewController(この例ではFourthViewController)に任意のStoryboard IDを設定しておきます。
Storyboard-A(遷移元)
↑FirstViewControllerからStoryboard-BのFourthViewControllerに遷移する導線があります(赤枠部分)。↓このStoryboard Referenceで、「Referenced ID」に上で設定したStoryboard IDを指定します。
このように、Storyboard IDををうまく使うことで、1つのStoryboardで複数の導線をカバーすることができます。
- 投稿日:2020-09-13T01:10:01+09:00
【Swift】String.SubSequenceとは何か?
はじめに
文字列の日付を桁揃え(yyyy/mm/dd)しようとして、こんな感じで書いてみたところ・・・
let str2 = "2020/7/1"
let array = str2.split(separator: "/")

if (array.count >= 3){
    let str3 = array[0]+"/"+String(format: "%02d", Int(array[1]))+"/"+String(format: "%02d", Int(array[2]))
}
Int(array[1])) のところで、以下のようなエラーが出ました。
Initializer 'init(_:)' requires that 'String.SubSequence' (aka 'Substring') conform to 'BinaryInteger'String.SubSequenceとは?
String.SubSequenceって何?ってことで公式ページを見ると「typealias SubSequence = Substring」となっているので、Substringのページを見てみる。
Overview
When you create a slice of a string, a Substring instance is the result. Operating on substrings is fast and efficient because a substring shares its storage with the original string. The Substring type presents the same interface as String, so you can avoid or defer any copying of the string’s contents.概観
文字列のスライスを作成すると、Substringインスタンスが結果になります。サブストリングは元のストリングとストレージを共有するため、サブストリングの操作は高速で効率的です。 SubstringタイプはStringと同じインターフェースを提供するため、文字列の内容のコピーを回避または延期できます。つまりString.split()の戻り値が、StringではなくSubstringになっているらしい。typeを確認してみると、確かにSubstringの配列になっていた。
let array = str2.split(separator: "/")
print(type(of: array))
Array<Substring>
SubStringをStringに変換すれば問題なさそうなので、以下のようにコードを書き換えました。
let str2 = "2020/7/1"
let array = str2.split(separator: "/")

print(type(of: array))

if (array.count >= 3){
    let str3 = array[0]+"/"+String(format: "%02d", Int(String(array[1]))!)+"/"+String(format: "%02d", Int(String(array[2]))!)
}
これで正しく変換できました。
"2020/07/01"
まとめ
この辺はたぶんはSwift4でStringがコレクション化されたことによるのかなと思われます。
以下、参考リンクです。実行環境
- Xcode 11.2.1(Playgroundで実行)
