- 投稿日:2020-09-13T23:39:13+09:00
これだけはおさえておきたいCypressコマンド集
はじめに
【初心者向けワークショップ】Cloud9+Docker Compose+CypressでE2Eテストを書いてみよう!の記事でCypressを使ったE2Eのテストを書くワークショップの記事を書きました。
この記事では、こういう検証をしたい場合Cypressではどう書くのかを記していきます。
コマンド集は公式ドキュメントにもあります。
本記事ではその中からよく使いそうなこれだけはおさえておきたいものをピックアップして、要素の操作と検証など実践に使いやすい形のサンプルを用意してみました。
また、CypressのテストコードだけでなくHTMLも合わせて載せておりますので参考にしていただけたらと思います。ページ遷移
以下、前提として baseUrlが
cypress.jsonに定義されているものとします。e2e/cypress.json{ "baseUrl": "http://localhost:8080", "reporter": "junit", "reporterOptions": { "mochaFile": "cypress/results/output.xml" } }cypress/integration/spec.jsit('open page', () => { // ページ遷移(パスを指定) cy.visit('/') // Qiitaのページを開く(URLを指定) cy.visit('https://qiita.com') }要素の取得、要素の値を取得
要素の取得
cy.get('[セレクタ]')で要素を取得できます。<div id='header'></div>it('Get element', () => { cy.visit('/') // 要素の取得 cy.get('#header') })親・子要素の取得
<ul class='parent'> <li class='active child'>list1</li> <li class='child'>list2</li> <li class='child'>list3</li> </ul>it('Get child and parent element', () => { cy.visit('/') // 子要素の取得 cy.get('ul').children('.active').should('have.text', 'list1') cy.get('ul').children().should('have.length', 3) cy.task('log', '== 子要素の取得 ==') cy.get('ul').children().each(($li, index, $list) => { cy.task('log', $li.text()) }) // 親要素の取得 cy.get('.child').parent().should('have.class', 'parent')※ ログの出力方法は、後述の ログの出力 をご覧ください。
コンソールログ(抜粋)apache | 172.20.0.3 - - [13/Sep/2020:05:05:16 +0000] "GET / HTTP/1.1" 200 254 cypress | == 子要素の取得 == cypress | list1 cypress | list2 cypress | list3 cypress | cypress | (Results) cypress |ページタイトルの取得
cy.title()でページタイトルを取得できます。
要素の取得でも説明した通り、cy.get('title')でも取得できます。<title>sample page title</title>it('Verify title', () => { cy.visit('/') // ページタイトルを取得して検証する cy.title().should('eq', 'sample page title') cy.get('title').should('have.text', 'sample page title') })要素の操作
クリック、チェック操作
チェックボックスにチェックを入れたり、ラジオボタンを選択したりボタンをクリックすることができます。
<form> <div> <input type='checkbox' name='check' value='check_1' checked='checked'> <input type='checkbox' name='check' value='check_2'> </div> <div> <input type='radio' name='feedback' value='good' checked='checked'>良い <input type='radio' name='feedback' value='bad'>悪い </div> </form> <button type=button onclick='alert("clicked button")'>Click here</button>it('Click or check an element', () => { cy.visit('/') // 要素をチェックする cy.get('[value="check_1"]').check() // チェックボックス cy.get('[type="radio"]').first().check() // ラジオボタンの1番目 // 要素をクリックする cy.get('[type="button"]').click() })入力操作
テキストボックスに文字の入力することができます。
また、入力されたテキスト内の文字を削除することもできます。<textarea>hoge</textarea>it('Delete text and type text', () => { cy.visit('/') // テキストエリアの文字列を検証(消去前) cy.get('textarea').should('have.value', 'hoge') // テキストエリアの文字を消去 cy.get('textarea').clear() // テキストエリアの文字列を検証(消去後) cy.get('textarea').should('have.value', '') // テキストエリアに文字を入力 cy.get('textarea').type('Hello, World') // テキストエリアの文字列を検証(入力後) cy.get('textarea').should('have.value', 'Hello, World') })検証
要素の値の検証
cy.get('[セレクタ]').should('have.id')などhave.xxxで指定します。
また、cy.get('[セレクタ]').should('have.attr', '[属性名]', '[値]')でも各属性の値は取得できます。<div class='title'> <div id='main_title'>Content title</div> <div class='sub_title'>Sub title</div> </div> <input type='number' name='numberbox' value='1'>it('Verify element values and attributes', () => { cy.visit('/') // 要素のテキストを検証する cy.get('#main_title').should('have.text', 'Content title') // 要素のid属性の値を検証する cy.get('.title div:first-child').should('have.id', 'main_title') // 要素のclass属性の値を検証する cy.get('.title div:last-child').should('have.class', 'sub_title') // 要素のvalue属性の値を検証する cy.get('[name="numberbox"]').should('have.value', '1') // 要素のtype属性の値を検証する cy.get('[name="numberbox"]').should('have.attr', 'type', 'number') // 要素のname属性の値を検証する cy.get('[type="number"]').should('have.attr', 'name', 'numberbox') })テキストの部分一致、完全一致の検証
<title>sample page title</title> <div class='title'> <div id='main_title'>Content title</div> <div class='sub_title'>Sub title</div> </div>it('Verify title', () => { cy.visit('/') // ページタイトルを取得して検証する // 完全一致 cy.title().should('eq', 'sample page title') cy.get('title').should('have.text', 'sample page title') // 部分一致 cy.title().should('include', 'sample') cy.get('title').contains('sample') // ページ内のどこかに文字列が存在することを検証する cy.contains('Sub') })要素が表示されている・いないことの検証
<div class='title'> <div id='main_title'>Content title</div> <input type='hidden' name='userid' value='12345'> </div>it('Verify element display', () => { cy.visit('/') // 要素が表示されていることを検証する cy.get('#main_title').should('be.visible') // 要素が表示されていないことを検証する cy.get('.title > input').should('not.be.visible') })ロケーションの取得
it('Get location', () => {
  cy.visit('https://qiita.com')

  // ロケーションの取得
  cy.location().should((loc) => {
    expect(loc.href).to.eq('https://qiita.com/')
    expect(loc.hostname).to.eq('qiita.com')
    expect(loc.pathname).to.eq('/')
    expect(loc.port).to.eq('')
    expect(loc.protocol).to.eq('https:')
  })
})
現在のページのURLの取得は
cy.url()でも可能です。it('Get current url', () => { cy.visit('https://qiita.com') // URLの取得その1 cy.location().should((loc) => { expect(loc.href).to.eq('https://qiita.com/') }) // URLの取得その2 cy.url().should('eq', 'https://qiita.com/') })ログの出力
cypress/plugins/index.jsを以下のように編集します。cypress/plugins/index.jsmodule.exports = (on, config) => { on('task', { log (message) { console.log(message) return null } }) }cypress/integration/spec.jsit('Log', () => { cy.visit('/') // ログの出力 cy.task('log', "*** ログ開始 ***") cy.task('log', "hoge") cy.task('log', "fuga") cy.task('log', "*** ログ終了 ***") })Cypressのコンソールログ(抜粋)cypress | Running: spec.js (1 of 1) apache | 172.20.0.3 - - [13/Sep/2020:02:41:17 +0000] "GET / HTTP/1.1" 200 152 cypress | *** ログ開始 *** cypress | hoge cypress | fuga cypress | *** ログ終了 *** cypress | cypress | (Results) cypress |
- 投稿日:2020-09-13T20:50:20+09:00
CSSで作る必須マーク
「*」のマーク
でこんな感じになる
<!-- classで「required」を付けた文字の後ろに必須マークが出る --> <h:outputText styleClass="required" value="好きな生き物" />.required::after { content: " *"; color: red; vertical-align: middle; }「必須」文字のマーク

 .required::after { content: "必須"; background-color: #f0ad4e; color: #fff; font-size: 12px; font-weight: bold; min-width: 10px; padding: 3px 7px; margin: 0px 5px; line-height: 1; vertical-align: middle; white-space: nowrap; text-align: center; border-radius: 10px; display: inline-block; }


- 投稿日:2020-09-13T18:42:29+09:00
初心者でも、これを読めばOK!簡単にSNSボタンを作れる方法!【Bootstrap/HTML/CSS】
SNSボタンを表示させたい
プログラミングを学び始めて、もうすぐ2ヶ月。
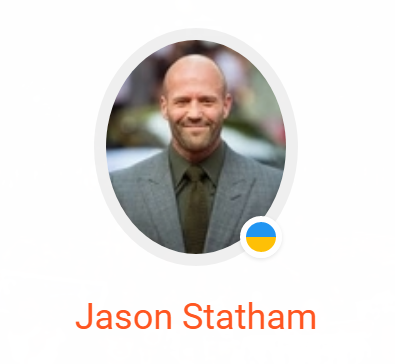
Webアプリを作ることが増えてきました。そこで、よく思うことが「SNSボタンを綺麗に表示させたい・・・」
▲こーゆーやつを、ページ下部にキレイに表示させるのが初心者には大きな一歩なのだ!!!
ということで、自分への備忘録も兼ねて、作り方をまとめておきます。
作り方
「Bootstrap」というCSSフレームワークを使う
あくまで簡単に作るのが目的なので、「Bootstrap」を使います!
初心者の方に説明すると、htmlに一文ちょこっと追加するだけで、CSSが楽になる魔法のツールです!では、以下のページにSNSボタンを追加してみましょう!
html
まず、htmlの
部分に以下を挿入します。<link href="https://maxcdn.bootstrapcdn.com/font-awesome/4.5.0/css/font-awesome.min.css" rel="stylesheet" />こんな感じになります。
<!DOCTYPE html> <html> <head> <meta charset="UTF-8" /> <meta name="viewport" content="width=device-width, initial-scale=1.0" /> <title>プロフィール</title> <link href="style.css" rel="stylesheet" /> <link href="https://fonts.googleapis.com/css?family=Roboto" rel="stylesheet" /> <link href="https://maxcdn.bootstrapcdn.com/font-awesome/4.5.0/css/font-awesome.min.css" rel="stylesheet" /> </head>なんと、これだけで「Bootstrap」が使えるようになりました!簡単!
次に、ボタンを入れたいところのhtmlに、以下のコードを挿入します。
    <ul class="profile-social-links">
        <li>
          <a target="_blank" href="#">
            <i class="fa fa-facebook"></i>
          </a>
        </li>
        <li>
          <a target="_blank" href="#">
            <i class="fa fa-twitter"></i>
          </a>
        </li>
        <li>
          <a target="_blank" href="#">
            <i class="fa fa-instagram"></i>
          </a>
        </li>
        <li>
            <a target="_blank" href="#">

              <i class="fa fa-linkedin"></i>
            </a>
          </li>
      </ul>
htmlは以上!
css
続いて、CSS!
下記をコピペでドーン/*ボタン全体が入ってるブロック*/ .profile-social-links { width: 218px; display: inline-block; float: right; margin: 0px; padding: 15px 20px; background: #FFFFFF; margin-top: 50px; text-align: center; opacity: 0; -webkit-box-sizing: border-box; box-sizing: border-box; -webkit-animation: moveIn 1s 3.1s ease forwards; animation: moveIn 1s 3.1s ease forwards; } /*ボタンを横一列で表示する*/ .profile-social-links li { list-style: none; margin: -5px 0px 0px 0px; padding: 0px; float: left; width: 25%; /*今回4つなので25%です*/ text-align: center; } /*ボタンの設定*/ .profile-social-links li a { display: inline-block; color: green; /*ボタンの色はここで変えてね!*/ width: 24px; height: 24px; padding: 6px; position: relative; overflow: hidden!important; -webkit-border-radius: 50%; border-radius: 50%; } .profile-social-links li a i { position: relative; z-index: 1; }以上です!簡単ですね!
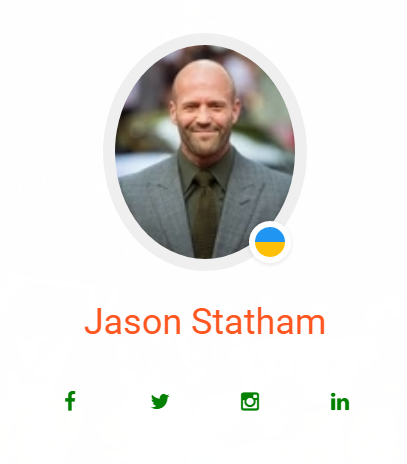
できたもの
良い感じにできた~~~~~嬉しい~~~~
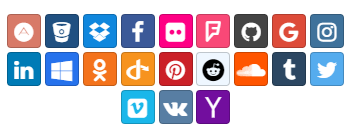
ちなみに、ボタンのラインナップはこちら!Youtubeとかもあればいいんですけどね~
<i class="fa fa-XXXX"></i>ここの、XXXX部分をgoogleやyahooに変えるだけで、ボタンは変わります♪
私のような初心者さんのお役に立てれば嬉しいです!

- 投稿日:2020-09-13T18:07:34+09:00
【初心者でもわかる】hover時に、画像の上に半透明の背景と文字を乗せる方法
どうも7noteです。画像の上に文字を表示させたい時の方法パート②
※パート①、常に上に文字を乗せる方法はこちら
こんな感じに写真の上に文字が乗ったデザインを作ります。
作り方
作り方は、画像と文字をくくる親要素を作り、position指定で好きな位置に文字をもってきます。
index.html<div class="onimg"> <img src="sample.jpg" alt="画像名"> <p>画像の名前が入るよ</p> </div>style.css.onimg { width: 300px; /* 画像の横幅(自由に指定) */ height: 225px; position: relative; /* 帯の表示位置の基準とする */ } .onimg img { width: 100%; margin: 0; } .onimg p { color: #fff; width: 100%; height: 100%; margin: 0; position: absolute; left: 0; bottom: 0; background: rgba(0,0,0,0.5); opacity: 0; display: flex; align-items: center; justify-content: center; } .onimg:hover p { opacity: 1; }解説
細かい方法については前回の記事で書いたので割愛。
変更点としては、文字の表示位置を上下中央にもってくるため
display: flex;を使って上下中央寄せにしています。
そしてopacity: 0;を指定しておき、hoverした時にだけopacityを1にすることでマウスをのせたときにだけ表示することができます。また、ふわっと表示させたい場合はpに対して
transition:all 0.2s ease;を指定することでできます。おそまつ!
~ Qiitaで毎日投稿中!! ~
【初心者向け】HTML・CSSのちょいテク詰め合わせ

- 投稿日:2020-09-13T13:35:59+09:00
【厳選8個】フロントエンド開発でちょっとした時に役立つCSS Tips集
Webアプリのフロントエンド開発をしているときによくあるケースのCSSのTips集です。
私はWebエンジニアをしていてCSSもたまに書くのですがたまにしかないため、「こういう時どうやってCSSを書けばいいんだっけ?」となることが多く、都度、調べています。
自分の備忘録的な目的でまとめていますが、もし同じような問題に遭遇してやり方がわからないという方のお役に立てれば幸いです。
環境
以下の環境で確認をしています。(2020年9月時点で最新版の環境です。)
- macOS Catalina :10.15.6
- Chrome:85.0.4183.102
1. 一行に収まらない長さのテキストの場合は「...」で切る
やりたいこと
解決策
テキストのスタイルに
overflow-x: hidden;、text-overflow: ellipsis;、white-space: nowrap;を指定するHTML
<div class="cut-long-text">
  一行に収まらない長さのテキストの場合は、途中でテキストを切って「...」で表示する
</div>
CSS
.cut-long-text{
  overflow-x: hidden;      /* はみ出る部分は非表示 */
  text-overflow: ellipsis; /* はみ出る部分を...で表示 */
  white-space: nowrap;     /* 行の折り返しをしない */
}
参考:APIリファレンス
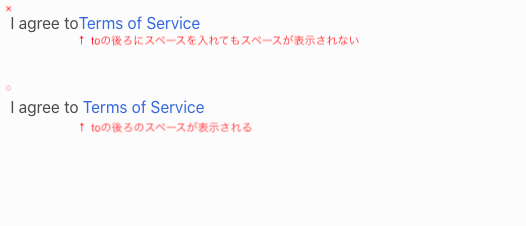
2. タグ内の最後のスペースを表示する
やりたいこと
<div>I agree to </div><a>Terms of Service</a>のように、テキストの後ろにaタグのリンクテキストをつなげる場合。
この場合、toの後ろにスペースを入れたい。
(よくあるケースとしては下にある図のように、利用規約部分だけをリンクにしたい。)
解決策
white-space: pre;を指定するHTML
<div>
  <div class="text-show-space">I agree to </div><a>Terms of Service</a>
</div>
CSS
.text-show-space {
  white-space: pre;
}
参考:APIリファレンス
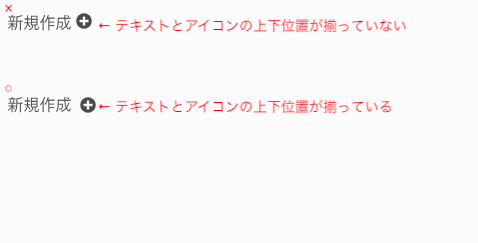
3. 文字とアイコンの位置を揃える
やりたいこと
テキストとSVGアイコンを同じ行に表示するときに、テキストとアイコンの上下方向の位置を揃えたい
解決策
アイコンの
line-heightをテキストと同じ高さに指定し、vertical-align: middle;を指定するHTML
<div class="text-with-icon">新規作成</div>
<div class="icon-wrapper-alignment">
  <div class="icon">
    <svg width="16px" height="16px" aria-hidden="true" >
            ...
    </svg>
  </div>
</div>
CSS
.text-with-icon {
  line-height: 30px;
}

.icon-wrapper-alignment {
  line-height: 30px;      /* テキストと同じline-heightにする */
}

.icon {
  vertical-align: middle; /* 上下中央に配置する */
}
参考:APIリファレンス
4. SVGアイコンの色をCSSから指定する
やりたいこと
SVGアイコンの色をCSSで指定したい
(テキストの色が状態によって変わるのでそれに合わせてアイコンの色も変えたい場合など)
解決策
svgアイコンのfillやstrokeの値に
fill="currentColor"を指定するHTML
<div class="text-info-color">新規作成</div>
<div class="icon-wrapper">
  <div class="icon text-info-color">
    <svg width="16px" height="16px" aria-hidden="true" focusable="false" data-prefix="fas"
         data-icon="plus-circle" class="svg-inline--fa fa-plus-circle fa-w-16" role="img"
         xmlns="http://www.w3.org/2000/svg" viewBox="0 0 512 512">
      <path fill="currentColor"
            d="...">
      </path>
    </svg>
  </div>
</div>
CSS
.text-info-color {
  color: turquoise;
}
参考:APIリファレンス
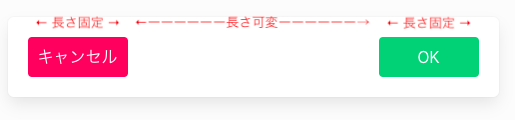
5. 両端にボタンを配置する
やりたいこと
Flexboxを使ってボタンを両端に配置したい
解決策
ボタンを囲む親要素に
justify-content: space-betweenを指定するHTML
<div class="flex-container">
  <button>キャンセル</button>
  <button>OK</button>
</div>
CSS
.flex-container {
  display: flex;
  justify-content: space-between;
  width: 100%;
}
参考:APIリファレンス
6. ポップアップメニューを表示する
やりたいこと
ボタンを押したらそのすぐ横にポップアップメニューを表示したい。そのような場合のpositionの指定方法。
解決策
getBoundingClientRectでボタンの位置を取得して、ポップアップメニューの位置をabsoluteにする
HTML
<button class="button" id="button-menu">メニュー</button>
<div class="box menu" id="menu">
  <div class="menu-item">新規作成</div>
  <hr>
  <div class="menu-item">削除</div>
  <hr>
  <div class="menu-item">設定</div>
</div>
CSS
.menu {
  visibility: hidden;
  position: absolute;
}

.menu-item {
  line-height: 40px;
}
JavaScript
const buttonMenu = document.getElementById('button-menu')
const menu = document.getElementById('menu')

buttonMenu.addEventListener('click', () => {
  // ボタンの座標を取得する
  const buttonPosition = buttonMenu.getBoundingClientRect()

  // メニューの座標を設定する
  const style = menu.style;
  style.visibility = 'visible'
  style.top = `${buttonPosition.top + window.scrollY}px`
  style.left = `${buttonPosition.right + 20}px`
})
参考:APIリファレンス
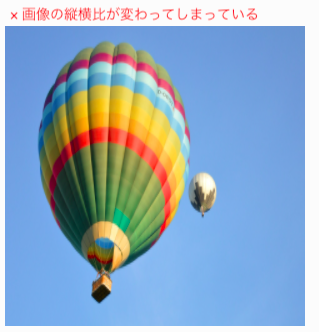
7. 画像の縦横比を変えずに表示する
やりたいこと
画像を縦横比を変えずに表示させたい。
解決策
object-fitを利用する
HTML
<!-- 縦横比が変わってしまう -->
<img class="img-fill" src="images/hot-air-balloon-5390487_1920.jpg">

<!-- 縦横比を維持 -->
<img class="img-contain" src="images/hot-air-balloon-5390487_1920.jpg">

<!-- 縦横比を維持(はみ出る部分はトリミング) -->
<img class="img-cover" src="images/hot-air-balloon-5390487_1920.jpg">
CSS
.img-fill{
  object-fit: fill;    /* 縦横比が変わる */
  width: 300px;
  height: 300px;
}

.img-contain{
  object-fit: contain; /* 縦横比を維持 */
  width: 300px;
  height: 300px;
}

.img-cover{
  object-fit: cover;   /* 縦横比を維持(はみ出る部分はトリミング) */
  width: 300px;
  height: 300px;
}
参考:APIリファレンス
8. 画面全体を半透過でオーバーレイする
やりたいこと
ローディングやモーダルダイアログなどを出したいときに、背景となる画面全体を半透過でオーバーレイする
解決策
疑似要素(::before)を使用する
HTML
<div class="overlay"></div>CSS
.overlay {
  position: fixed;
  top: 0;
  left: 0;
  background-color: rgba(0, 0, 0, 0.6);
}

.overlay::before {
  content: "";
  display: inline-block;
  height: 100vh;
  width: 100vw;
}
参考:APIリファレンス


- 投稿日:2020-09-13T07:48:33+09:00
VS CodeとMarkdownで書いた技術同人誌に導入したCSS組版
技術同人誌を書きました
クリエイティブコーディングに関する技術同人誌を書きました。
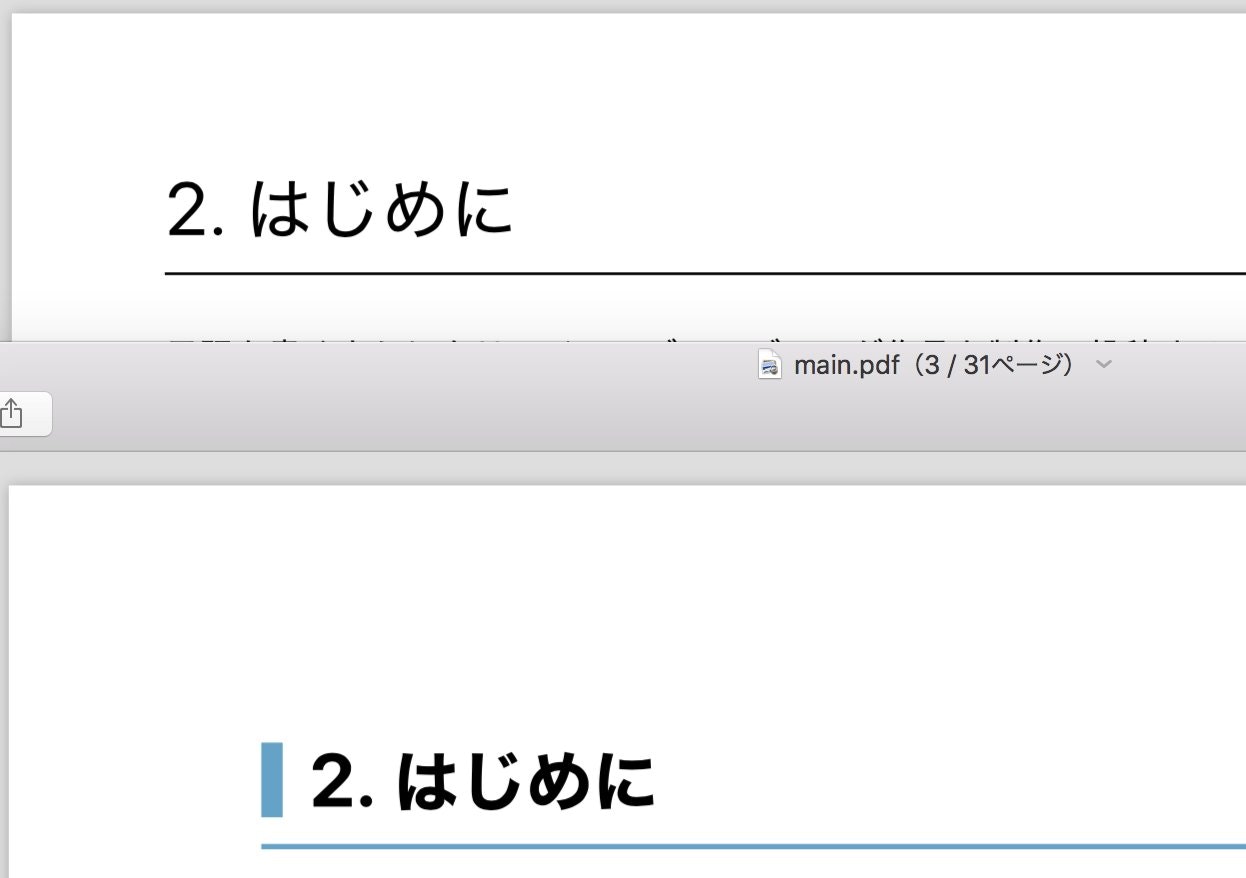
「できるだけ〜」の方は第2版ということで、初版よりも読みやすくしたい!ということでCSS組版を導入しました。
上が初版、下が第2版です。見出しのデザイン、余白の大きさなどに違いがあります。
結論をいうと自分で色々カスタマイズできてめちゃくちゃ楽しかったのですが、
かえって凝りすぎて時間がかかってしまった印象です。
先人たちが公開している便利なツールの使用も検討すべきだったなと思います。VS CodeでMarkdown原稿を書く準備
以下の記事に執筆にあたり便利な拡張機能をまとめてあります。
VSCodeとMarkdownで技術同人誌書いたので拡張機能とかまとめ - Qiita
CSS組版の導入方法
こちらの記事を参考にしました。
【Visual Studio Code】Markdown PDF のスタイル(CSS)を変える方法 - Nekonote大まかな流れとしては
VS Codeでワークスペースを作成→CSSファイルを作成→ワークスペースの記述ファイルにCSSファイルのパスと余白の設定を書く
…という感じです。ワークスペースの設定について、私は以下のように書きました。
{
    "folders": [
        {
            "path": "."
        }
    ],
    "settings": {
        "markdown-pdf.styles": [
            "./style.css"
        ],
        "markdown-pdf.margin.top": "2.5cm",
        "markdown-pdf.margin.bottom": "3.5cm",
        "markdown-pdf.margin.right": "2cm",
        "markdown-pdf.margin.left": "2cm",
    }
}
CSSファイルの記述
色々組み合わせていたら最終的にこのようになりました。
body {
  font-family: "游明朝体";
  font-size: 11pt;
}

h1 {
  font-family: "游ゴシック体";
  padding-bottom: 0.3em;
  line-height: 1.2;
  border-bottom: 2px solid #A4CA68;
  position: relative;
  padding-left: 18px;
  font-weight: bold;
}

h1:before {
  background: #A4CA68;
  content: "";
  height: 28px;
  width: 8px;
  left: 0;
  position: absolute;
  top: 3px;
}

h2 {
  font-family: "游ゴシック体";
  padding-bottom: 0.3em;
  line-height: 1.2;
  position: relative;
  padding-left: 18px;
  font-weight: bold;
}

h2:before {
  background: #A4CA68;
  content: "";
  height: 20px;
  width: 5px;
  left: 0px;
  position: absolute;
  top: 3px;
}

h3 {
  font-family: "游ゴシック体";
  text-decoration: none;
  font-weight: bold;
}

ol {
  counter-reset: li;
  list-style: none;
}

ol li {
  padding-left: 1em;
  text-indent: -1em;
  margin-bottom: 0.5em;
}

ol>li::before {
  content: counter(li) ".";
  counter-increment: li;
  font-weight: bold;
}

p {
  text-indent: 1em;
}

.no-jisage p {
  text-indent: 0em;
}

code {
  margin: 0 2px;
  padding: 1px 5px;
  white-space: nowrap;
  background-color: #f8f8f8;
  border-radius: 3px;
  color: #4271ae !important;
  border: 1px solid #cccccc;
}

pre code {
  margin: 0;
  padding: 0;
  white-space: pre;
  border: none;
  background: transparent;
  color: #000 !important;
}

blockquote p {
  text-indent: 0em;
}
こだわりポイントは以下のとおりです :
- 見出しはゴシック体、本文は明朝体と別のフォントを指定しました。
- 見出し(特に一番大きい見出し)に装飾をつけてアクセントとしました。
- 順序付きリストで付与される数字を太字にしました。
また、リストが2行に渡った際に2行目以降を記号の下に来るように調整しています。- 各段落の冒頭は字下げしました。引用文では字下げしない設定にしています。
意図的に字下げしてほしくない時はno-jisageクラスを指定すればok(名前は適当)# 奥付 <div class="no-jisage"> <p><strong>本のタイトル</strong><br> 本のサブタイトル</p> <p>XXXX年X月XX日 初版発行</p> <p>著者 : @reona396</p> </div>