- 投稿日:2020-08-05T22:26:07+09:00
複数のボタンを、1つの変数でまとめる。
※オブジェクト
(Label とか Buttonとか Text Field とかもオブジェクト。)
(Swiftは、オブジェクト指向言語。)
「分かりそう」で「分からない」でも「分かった」気になれるIT用語辞典複数のオブジェクトを、1つの変数でまとめる。
こんな感じで、複数のボタンを並べたいとき、
var Button1,var Button2,var Button3,var Button4,でも良いのですが、
(@IBOutlet weak var Button1: UIButton!✖️ 4)@IBOutlet weak var Button1: UIButton! @IBOutlet weak var Button2: UIButton! @IBOutlet weak var Button3: UIButton! @IBOutlet weak var Button4: UIButton! override func viewDidLoad() { super.viewDidLoad() Button1.layer.cornerRadius = 8 Button2.layer.cornerRadius = 8 Button3.layer.cornerRadius = 8 Button4.layer.cornerRadius = 8 }コードを1つに、まとめる
オブジェクトを1つの変数でまとめたい ときは、以下の通り。
for構文を使うとできるらしいです?
[ ] とかも、使います。
@IBOutlet var Buttons: [UIButton]!@IBOutlet var Buttons: [UIButton]! override func viewDidLoad() { super.viewDidLoad() for button in Buttons { <------------------------- button.layer.cornerRadius = 10 } }注意点?
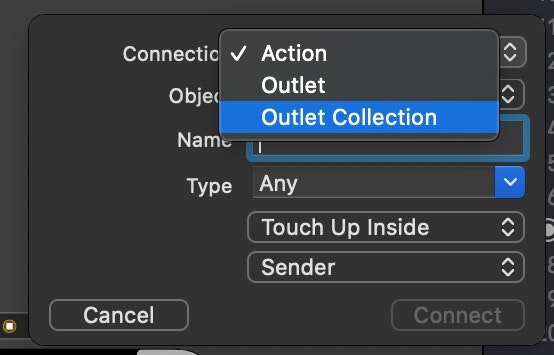
通常の Outlet ではなく、Outlet Collection を選択します。
まず一つ目の部品を選択し、
コード画面にドラッグしたとき、ポップアップウインドウはこんな感じ。
この状態では一つの部品しか関連付いていないので、
コード左側の ◉ をOutlet Collection として使いたい部品にドラッグし、関連付けます。この時は、Optionキーを押さなくてもOKです。
終わりに
今宵の満月は綺麗でござる。
1000年前、藤原道長も同じ月を見ていたを思うと、しみじみシジミ。

- 投稿日:2020-08-05T22:25:44+09:00
ボタンの角を丸くする?

- 投稿日:2020-08-05T20:57:04+09:00
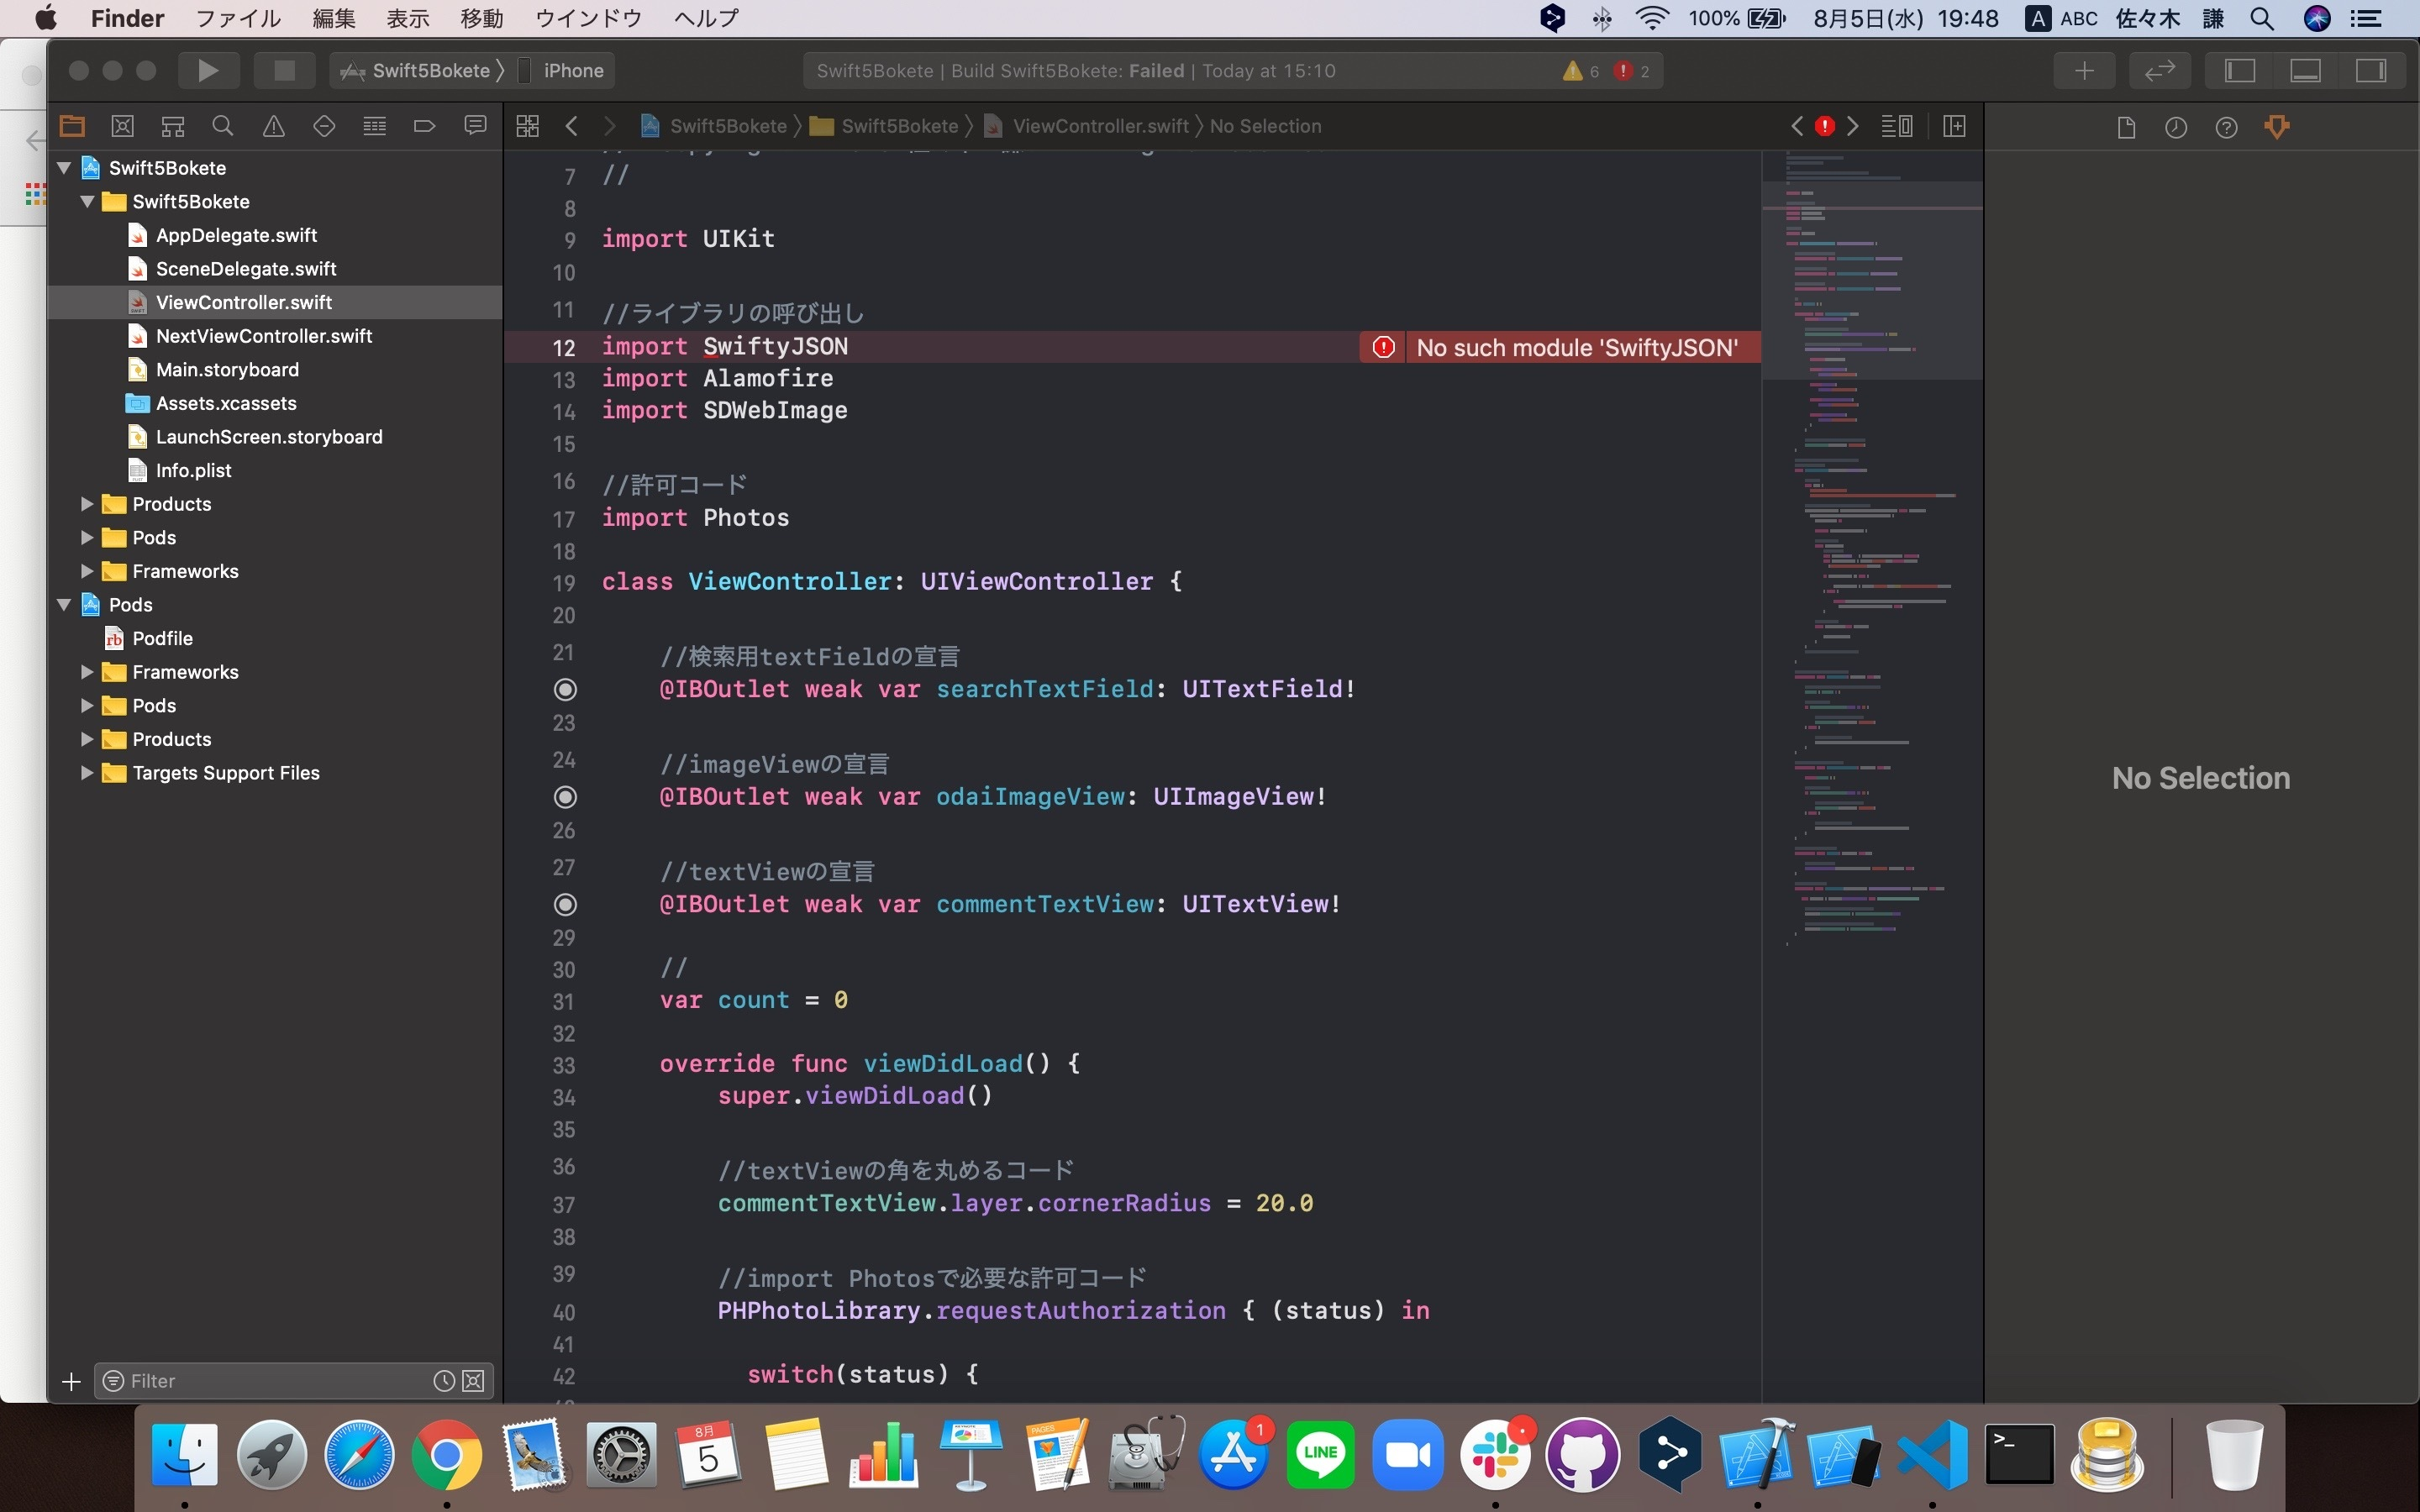
[swift5]エラーNo such module 'ライブラリ名'
エラー状況
画像のようにXcodeでビルドを行うと
No such module 'ライブラリ名'というエラーが発生する。
対応したこと
①Xcodeの再起動
②Macの再起動
③podfileの確認とpod installを再度実行①〜③全て不発...
検索を行い色々と模索していると解決しそうな記事に遭遇!
https://qiita.com/doge_kun55/items/26ac2fa2031ddbeee879解決方法
Xcodeのツールバーにある
Product/Scheme/ManageSchemes/を選択。
すると以下のようにページが開く。
今回の場合はデフォルトで
Swift5Boketeにチェックがついており、その他にはチェックはついていませんでした。
なので全ての項目のshowとsharedにチェックをつけてCloseをクリック。そのあと、再ビルドを実行すると無事ビルドされました。
最後に
ちなみに、今回エラーの解決はしていますが、何が原因で、どういう理由で解決に至ったかということが理解できておりません。もし、この記事を見た方の中に原因をわかる方がおられましたらご教授の程宜しくお願い致します。

- 投稿日:2020-08-05T19:44:03+09:00
Buildしたけど真っ黒、アルアル原因まとめ
Buildしたけど真っ黒、アルアル原因まとめ
2点。
1, NSUnknownKeyException
お笑い養成所(NSC)ではなく、NS Unknown〜(※)です。
ViewControllerとMain StoryBoardを繋げるとき、 やっぱ繋げるのやめようってなって コードを削除しても、繋がりは切れません。不要な接続が繋がったままだから、エラーが起きるみたい。
NSUnknownKeyExceptionが出た時の回避方法
ユーティリティーエリアの、Show the Connection Inspectorからも同じ操作できます。
(メニューバーの、一番右のボタン)
※NS Unknown〜について。
Objective-Cでは、Apple開発にてNS Errorクラスを使って、エラーを表すらしい。
その名残かな?(ちょっと分からない。)
ErrorとNSErrorに関するいくつかの実験てかNSCって、New Star Creationの略なのか?
2, BreakPoint
右クリック、Delete BreakPointsで消せます。
余談。 Xcodeショートカットキーについて。
今日知った、便利なショートカットキー5個。
-Ctrl A 前
-Ctrl E 後ろ-Fn + back DELETE
(WindowsでいうDELETEキー。BackSpaceの逆方向)-Option押しながら、ドラッグ&ドロップ
矩形選択みたいなこと出来る。Option離したら、解除されちゃう。-Command + shift + L オブジェクトライブラリ表示
(Option長押し、表示を維持)
(一回ドラッグ&ドロップすれば、あとは長押し続けなくても表示を維持)
終わりに
久々に見たけど、
BackNumber「高嶺の花子さん」MV 神。


- 投稿日:2020-08-05T18:47:30+09:00
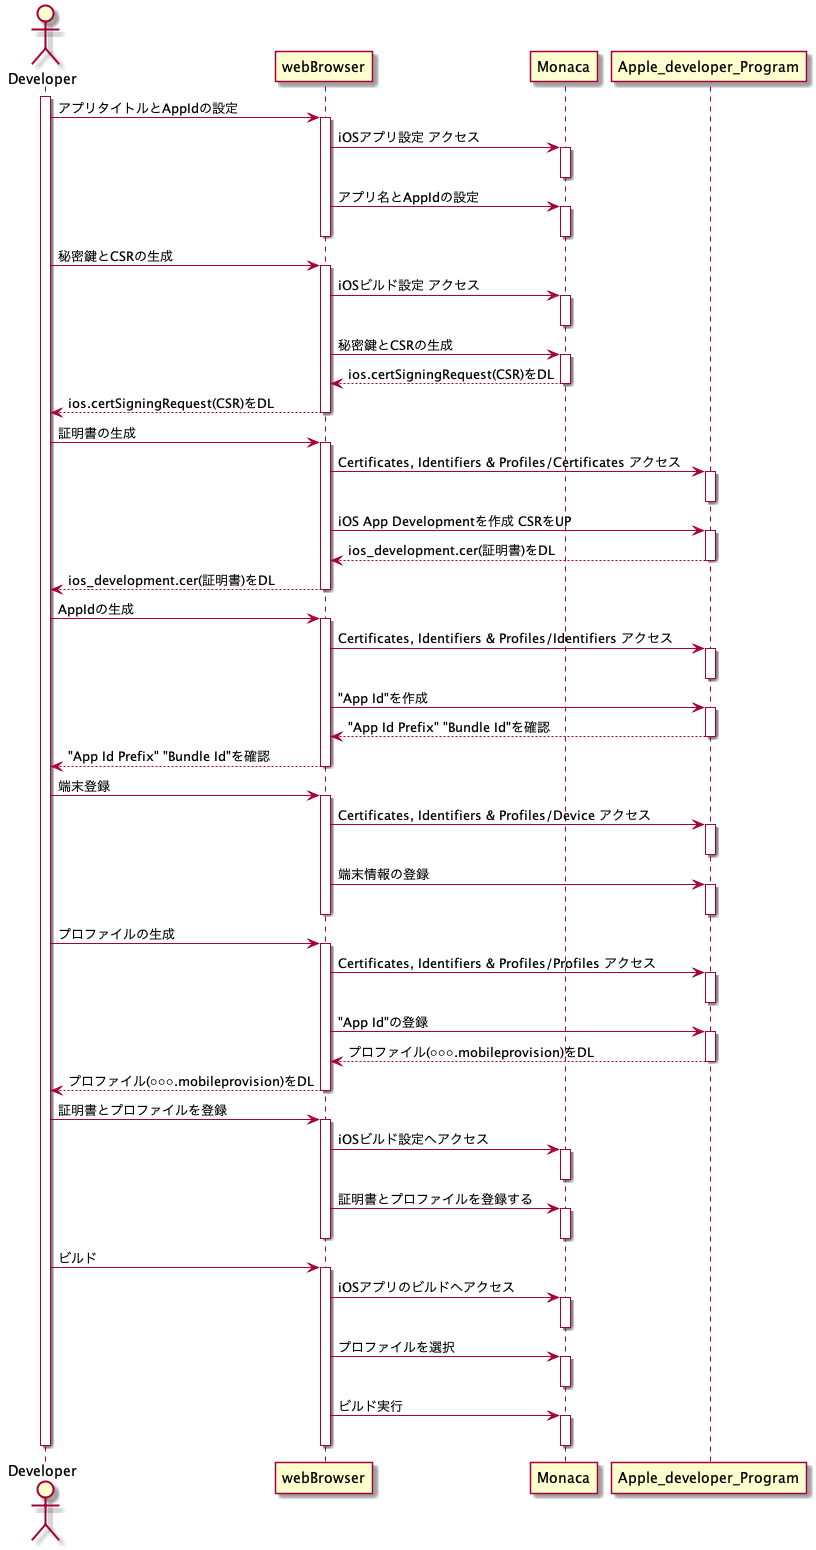
manacaでiOSアプリをカスタムビルドする流れをシーケンス図に起こした
monacaを使って、iOSアプリをカスタムビルド(自分の端末でのみ動くアプリのビルド)を行ったのですが、
monaca側でやれることと、Apple developer Programでやれる事の区切りや、CSR・証明書・プロファイル・BundleIdなどのよくわからない登場ファイルたちがどこで作られどう使われるのかが、全くわからなくなるので、とりあえずシーケンス図にして流れを書き起こしました。
完全自分のためです。シーケンス図は、manacaでの開発が終わり、Appleに開発者の登録も行っている状態から始まります。
なぜなら、私がその状態でこれを作ろうと思ったからです。
以上です。
自分的には役に立ったので、(一度やり直した)きっと誰かの役に立つと信じてます。
信じるって大事。一応このUMLはplantUMLを使ったのでソース載せておきます。
@startuml iOS
actor Developer

activate Developer
    Developer -> webBrowser: アプリタイトルとAppIdの設定
        activate webBrowser
        webBrowser -> Monaca: iOSアプリ設定 アクセス
        activate Monaca
        deactivate Monaca
        webBrowser -> Monaca: アプリ名とAppIdの設定
        activate Monaca
        deactivate Monaca
    deactivate webBrowser

    Developer -> webBrowser: 秘密鍵とCSRの生成
        activate webBrowser
        webBrowser -> Monaca: iOSビルド設定 アクセス
        activate Monaca
        deactivate Monaca
        webBrowser -> Monaca: 秘密鍵とCSRの生成
        activate Monaca
        webBrowser <-- Monaca: ios.certSigningRequest(CSR)をDL
        deactivate Monaca
        Developer <-- webBrowser: ios.certSigningRequest(CSR)をDL
    deactivate webBrowser


    Developer -> webBrowser: 証明書の生成
        activate webBrowser
        webBrowser -> Apple_developer_Program: Certificates, Identifiers & Profiles/Certificates アクセス
        activate Apple_developer_Program
        deactivate Apple_developer_Program
        webBrowser -> Apple_developer_Program: iOS App Developmentを作成 CSRをUP
        activate Apple_developer_Program
        webBrowser <-- Apple_developer_Program: ios_development.cer(証明書)をDL
        deactivate Apple_developer_Program
        Developer <-- webBrowser: ios_development.cer(証明書)をDL
    deactivate webBrowser

    Developer -> webBrowser: AppIdの生成
        activate webBrowser
        webBrowser -> Apple_developer_Program: Certificates, Identifiers & Profiles/Identifiers アクセス
        activate Apple_developer_Program
        deactivate Apple_developer_Program

        webBrowser -> Apple_developer_Program: "App Id"を作成
        activate Apple_developer_Program
        webBrowser <-- Apple_developer_Program: "App Id Prefix" "Bundle Id"を確認
        deactivate Apple_developer_Program
        Developer <-- webBrowser: "App Id Prefix" "Bundle Id"を確認
    deactivate webBrowser

    Developer -> webBrowser: 端末登録
        activate webBrowser
        webBrowser -> Apple_developer_Program: Certificates, Identifiers & Profiles/Device アクセス
        activate Apple_developer_Program
        deactivate Apple_developer_Program

        webBrowser -> Apple_developer_Program: 端末情報の登録
        activate Apple_developer_Program
        deactivate Apple_developer_Program
    deactivate webBrowser

    Developer -> webBrowser: プロファイルの生成
        activate webBrowser
        webBrowser -> Apple_developer_Program: Certificates, Identifiers & Profiles/Profiles アクセス
        activate Apple_developer_Program
        deactivate Apple_developer_Program

        webBrowser -> Apple_developer_Program: "App Id"の登録
        activate Apple_developer_Program
        webBrowser <-- Apple_developer_Program: プロファイル(○○○.mobileprovision)をDL
        deactivate Apple_developer_Program
        Developer <-- webBrowser: プロファイル(○○○.mobileprovision)をDL
    deactivate webBrowser

    Developer -> webBrowser: 証明書とプロファイルを登録
    activate webBrowser
        webBrowser -> Monaca: iOSビルド設定へアクセス
        activate Monaca
        deactivate Monaca
        webBrowser -> Monaca: 証明書とプロファイルを登録する
        activate Monaca
        deactivate Monaca
    deactivate webBrowser

    Developer -> webBrowser: ビルド
    activate webBrowser
        webBrowser -> Monaca: iOSアプリのビルドへアクセス
        activate Monaca
        deactivate Monaca
        webBrowser -> Monaca: プロファイルを選択
        activate Monaca
        deactivate Monaca
        webBrowser -> Monaca: ビルド実行
        activate Monaca
        deactivate Monaca
    deactivate webBrowser

deactivate Developer
@enduml
- 投稿日:2020-08-05T13:52:38+09:00
サードパーティ製アプリをiOS標準Webブラウザとして登録するための条件
iOS14では、デフォルトで起動するWebブラウザを「Safari」以外のアプリにユーザー自身が設定できる様になります。
今回「サードパーティ製アプリが標準ブラウザになる為の要件」が公開されたので簡単にまとめてみました。概要
標準ブラウザになる為の各要件をクリアする
↓
Appleへメール(default-browser-requests@apple.com)で申請という流れになる様です。
承認後は、Entitlementsに「com.apple.developer.web-browser」キーを追加する形に?
標準ブラウザになったら出来ること
Be an option for the user to choose as their default browser.
- 「標準で開くブラウザ」としてユーザが選択出来る様になる
Load pages from all domains with full script access.
- フルスクリプトアクセスですべてのドメインからページをロード可能に。
Use Service Workers in WKWebView instances.
- WKWebViewでService Workersが使用出来る
必須要件
Your app must specify the HTTP and HTTPS schemes in its Info.plist file.
- HTTP/HTTPSのURLスキームをinfo.plistに設定している
Your app can’t use UIWebView.
- UIWebView(既にDeprecated)を使用していない
On launch, the app must provide a text field for entering a URL, search tools for finding relevant links on the internet, or curated lists of bookmarks.
- 「URL入力欄」、「検索窓」または「整理済みブックマーク」を起動時に提示している
The app must navigate directly to the specified destination and render the expected web content. Apps that redirect to unexpected locations or render content not specified in the destination’s source code don’t meet the requirements of a default web browser.
- HTTP/HTTPSのURLを開く場合、ユーザが指定したページに直接移動して、予期されたWebコンテンツをレンダリングしている
→ ユーザが予期しないページへのリダイレクトや、指定されていないコンテンツをレンダリングするアプリはNG。
ただし、以下は例外Apps designed to operate in a parental controls or locked down mode may restrict navigation to comply with those goals.
- 「ペアレンタルやロックダウンモード機能」があるアプリは、ナビゲーションを制限してこれらの目標に準拠する場合がある。
Your app may present a “Safe Browsing” or other warning for content suspected of phishing or other problems.
- フィッシングや詐欺などの問題が疑われるコンテンツに対しては、セーフブラウジング機能が働いたり、警告を表示する場合がある。
Your app may offer a native authentication UI for a site that also offers a native web sign-in flow.
- ネイティブWebサインインフローも提供するサイトにネイティブ認証UIを提供する場合がある。
こちらの記事: https://iphone-mania.jp/news-304786/ では
- ペアレンタルコントロール機能もしくはロックダウンモードを持つこと
- セーフブラウジング、もしくはフィッシングなどの問題への警告を表示すること
も要件としていましたが、これについてはこちらのツイート
iOSデフォルトブラウザの要件がやっと公式発表された!
— 加藤雄一@Smooz / 在庫速報.com (@sassymanyuichi) August 5, 2020
ただ、このページのhttps://t.co/yFb0EaLveh
下記の2つの要件はMust項目では無いのでは
・ペアレンタルコントロール機能もしくはロックダウンモードを持つこと
・セーフブラウジング、もしくはフィッシングなどの問題への警告を表示すること
で指摘されている通り
「ペアレンタルやロックダウンモード機能」と「セーフブラウジング、フィッシングへの警告表示」は必須項目ではないと思います。標準ブラウザ資格を持ったアプリに対する制限
標準ブラウザとなった場合にはユーザのWeb閲覧を独占するため、個人データへの不要なアクセスは回避すべきとの方針。
Info.plistで以下のキーを持っているとリジェクト
NSPhotoLibraryUsageDescription
→ 写真を取得する際はPHPickerViewControllerを使用する。「NSPhotoLibraryAddUsageDescription」の使用はOK。NSLocationAlwaysUsageDescription、NSLocationAlwaysAndWhenInUseUsageDescription
→ 代わりに「NSLocationWhenInUseUsageDescription」を使用するNSHomeKitUsageDescription
→ HomeKitへのアクセス禁止NSBluetoothAlwaysUsageDescription
→ 代わりに「NSBluetoothWhileInUseUsageDescription」を使用NSHealthShareUsageDescription、NSHealthUpdateUsageDescription
→ ヘルスデータへのアクセス禁止参考
- 投稿日:2020-08-05T12:19:38+09:00
MarketingCloudSDK iOSでリッチPush通知を送信する
環境
・xcode Version 11.3.1 (11C504)
・swift Version 5.1.3
・MarketingCloudSDK iOS (v7.2.1)
・Mac OS 10.14.6(Mojave)準備
MarketingCloudSDK iOSでシンプルなpush通知を送信する
の続きとなります。リッチPushとは
push通知を開くと遷移したいurlに飛べたり、push通知に画像、動画などを表示することができる。
リッチPush通知の実装
1.opendirect機能(ディープリンクとも呼ばれる)
AppDelegate.swiftMarketingCloudSDK.sharedInstance().sfmc_setURLHandlingDelegate(self)上記コードをSDKの初期設定記述の後に、AppDelegate.swift内に記述する。
その後、
MarketingCloudSDKURLHandlingDelegateプロトコルメソッドを追加AppDelegate.swiftextension AppDelegate: MarketingCloudSDKURLHandlingDelegate { func sfmc_handle(_ url: URL, type: String) { print(url) if UIApplication.shared.canOpenURL(url) == true { // ios 10.0以上 if #available(iOS 10.0, *) { UIApplication.shared.open(url, options: [:], completionHandler: { success in if success { print("url \(url) opened successfully") } else { print("url \(url) could not be opened") } }) } else { if UIApplication.shared.openURL(url) == true { print("url \(url) opened successfully") } else { print("url \(url) could not be opened") } } } } }※指定できるのは「:」を含むURL形式の値のみ
2.push通知に画像、動画などを表示する
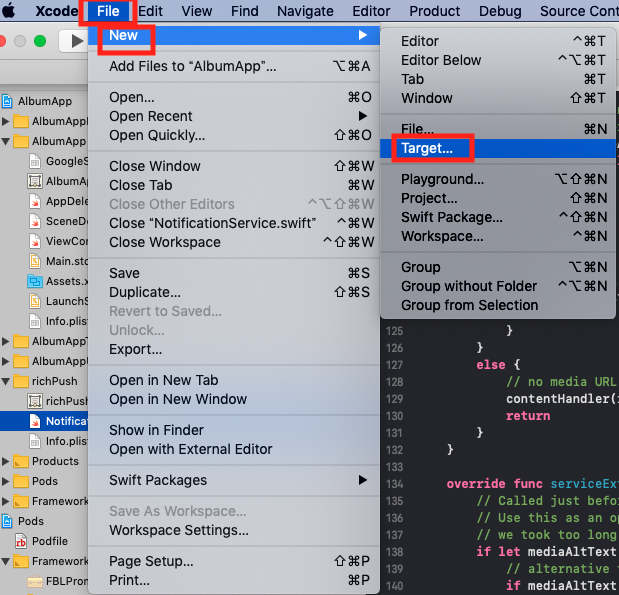
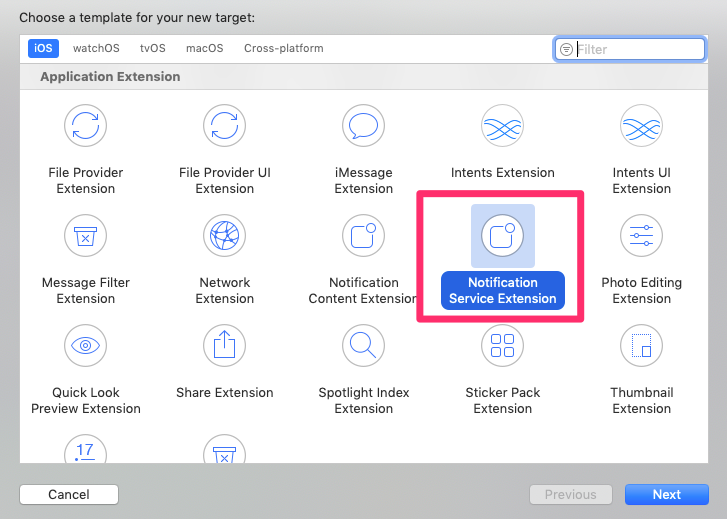
xcode上でNotification Service Extensionを作成する
File → New → target...を選択する
Notification Service Extensionを選択してNextをクリックする
productnameを入力してfinishボタンをクリックする
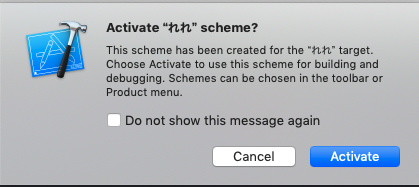
上記のようなポップアップがでてきたらActivateをクリックするNotification Service Extensionの実装
Notification Service Extensionのフォルダができるので、その中のNotificationService.swiftに実装をしていく実装イメージは下記となります
AppDelegate.swift/* * Copyright (c) 2017, salesforce.com, inc. * All rights reserved. * Licensed under the BSD 3-Clause license. * For full license text, see LICENSE.txt file in the repo root or https://opensource.org/licenses/BSD-3-Clause */ import CoreGraphics import UserNotifications class NotificationService: UNNotificationServiceExtension { var contentHandler: ((_ contentToDeliver: UNNotificationContent) -> Void)? = nil var modifiedNotificationContent: UNMutableNotificationContent? func createMediaAttachment(_ localMediaUrl: URL) -> UNNotificationAttachment { // options: specify what cropping rectangle of the media to use for a thumbnail // whether the thumbnail is hidden or not let clippingRect = CGRect.zero let mediaAttachment = try? UNNotificationAttachment(identifier: "attachmentIdentifier", url: localMediaUrl, options: [UNNotificationAttachmentOptionsThumbnailClippingRectKey: clippingRect.dictionaryRepresentation, UNNotificationAttachmentOptionsThumbnailHiddenKey: false]) return mediaAttachment! } override func didReceive(_ request: UNNotificationRequest, withContentHandler contentHandler: @escaping (UNNotificationContent) -> Void) { // save the completion handler we will call back later self.contentHandler = contentHandler // make a copy of the notification so we can change it modifiedNotificationContent = (request.content.mutableCopy() as? UNMutableNotificationContent) // does the payload contains a remote URL to download or a local URL? if let mediaUrlString = request.content.userInfo["_mediaUrl"] as? String { // see if the media URL is for a local file (i.e., file://movie.mp4) guard let mediaUrl = URL(string: mediaUrlString) else { // attempt to create a URL to a file in local storage var useAlternateText: Bool = true if mediaUrlString.isEmpty == false { let mediaUrlFilename:NSString = mediaUrlString as NSString let fileName = (mediaUrlFilename.lastPathComponent as NSString).deletingPathExtension let fileExtension = (mediaUrlFilename.lastPathComponent as NSString).pathExtension // is it in the bundle? if let localMediaUrlPath = Bundle.main.path(forResource: fileName, ofType: fileExtension) { // is the URL a local file URL? let localMediaUrl = URL.init(fileURLWithPath: localMediaUrlPath) if localMediaUrl.isFileURL == true { // create an attachment with the local media let mediaAttachment: UNNotificationAttachment? = createMediaAttachment(localMediaUrl) // if no problems creating the attachment, we can use it if mediaAttachment != nil { // set the media to display in the notification modifiedNotificationContent?.attachments = [mediaAttachment!] // everything is ok useAlternateText = false } } } } // if any problems creating the attachment, use the alternate text if provided if (useAlternateText == true) { if let mediaAltText = request.content.userInfo["_mediaAlt"] as? String { if mediaAltText.isEmpty == false { modifiedNotificationContent?.body = mediaAltText } } } // tell the OS we are done and here is the new content contentHandler(modifiedNotificationContent!) return } // if we have a URL, try to download media (i.e., https://media.giphy.com/media/3oz8xJBbCpzG9byZmU/giphy.gif) if mediaUrl.isFileURL == false { // create a session to handle downloading of the URL let session = URLSession(configuration: URLSessionConfiguration.default) // start a download task to handle the download of the media weak var weakSelf: NotificationService? = self session.downloadTask(with: mediaUrl, completionHandler: {(_ location: URL?, _ response: URLResponse?, _ error: Error?) -> Void in var useAlternateText: Bool = true // if the download succeeded, save it locally and then make an attachment if error == nil { let downloadResponse = response as! HTTPURLResponse if (downloadResponse.statusCode >= 200 && downloadResponse.statusCode <= 299) { // download was successful, attempt save the media file let localMediaUrl = URL.init(fileURLWithPath: location!.path + mediaUrl.lastPathComponent) // remove any existing file with the same name try? FileManager.default.removeItem(at: localMediaUrl) // move the downloaded file from the temporary location to a new file if ((try? FileManager.default.moveItem(at: location!, to: localMediaUrl)) != nil) { // create an attachment with the new file let mediaAttachment: UNNotificationAttachment? = weakSelf?.createMediaAttachment(localMediaUrl) // if no problems creating the attachment, we can use it if mediaAttachment != nil { // set the media to display in the notification weakSelf?.modifiedNotificationContent?.attachments = [mediaAttachment!] // everything is ok useAlternateText = false } } } } // なにか問題が起こり、代替テキストを設定している場合は代替テキストを表示 if (useAlternateText == true) { if let mediaAltText = request.content.userInfo["_mediaAlt"] as? String { if mediaAltText.isEmpty == false { weakSelf?.modifiedNotificationContent?.body = mediaAltText } } } // tell the OS we are done and here is the new content weakSelf?.contentHandler!((weakSelf?.modifiedNotificationContent)!) }).resume() } } else { // no media URL found in the payload, just pass on the orginal payload contentHandler(request.content) return } } override func serviceExtensionTimeWillExpire() { // Called just before the extension will be terminated by the system. // Use this as an opportunity to deliver your "best attempt" at modified content, otherwise the original push payload will be used. // we took too long to download the media URL, use the alternate text if provided if let mediaAltText = modifiedNotificationContent?.userInfo["_mediaAlt"] as? String { // alternative text to display if there are any issues loading the media URL if mediaAltText.isEmpty == false { modifiedNotificationContent?.body = mediaAltText } } // 取得に失敗したときの処理 contentHandler!(modifiedNotificationContent!) } }※動画はmp4に対応
SMCからリッチPush通知を送信する
無事とどけばOK
参考リンク(公式)
https://salesforce-marketingcloud.github.io/MarketingCloudSDK-iOS/sdk-implementation/implementation-urlhandling.html
https://salesforce-marketingcloud.github.io/MarketingCloudSDK-iOS/push-notifications/rich-notifications.html
- 投稿日:2020-08-05T08:40:36+09:00
【Swift】ゼロからのCombineフレームワーク - ユニットテストを書いてみる
Combineを使ったユニットテストの方法
2つの方法を試してみました。
- ライブラリなしでやる
- Entwineというテスト補助用のライブラリを使う
テスト対象コード
incrementCounter: PassthroughSubjectのsendメソッドが呼ばれたら、自身のcounter: Intに数値を加えて、counterStr: CurrentValueSubjectを更新する単純なモデルです。テストコードでは、
incrementCounterのsendメソッドの呼び出しにたいして、counterStrが正しく更新されていることをテストします。CounterViewModel.swiftimport Combine import Foundation protocol CounterViewModelProtocol { var incrementCounter: PassthroughSubject<Int, Never> { get } var counterStr: CurrentValueSubject<String, Never>! { get } } class CounterViewModel: CounterViewModelProtocol { var incrementCounter: PassthroughSubject<Int, Never> = .init() var counterStr: CurrentValueSubject<String, Never>! private var counter: Int = 0 private var cancellables = Set<AnyCancellable>() init() { counterStr = CurrentValueSubject("\(counter)") incrementCounter .sink(receiveValue: { [weak self] increment in if let self = self { self.counter += increment self.counterStr.send("\(self.counter)") } }).store(in: &cancellables) } }ライブラリなしでテストする
How to Test Your Combine Publishersを参考にしました。
テスト補助用のexpectValueというメソッドにPublisherと期待される値の配列を渡して、waitします。CounterViewModelTests.swiftfunc testCounterStr() { let viewModel = CounterViewModel() let expectValues = ["0", "2", "5"] let result = expectValue(of: viewModel.counterStr, equals: expectValues) viewModel.incrementCounter.send(2) viewModel.incrementCounter.send(3) wait(for: [result.expectation], timeout: 1) }テスト補助用のメソッド
extension XCTestCase {
    typealias CompetionResult = (expectation: XCTestExpectation, cancellable: AnyCancellable)
    func expectValue<T: Publisher>(
        of publisher: T,
        timeout: TimeInterval = 2,
        file: StaticString = #file,
        line: UInt = #line,
        equals: [T.Output]
    ) -> CompetionResult where T.Output: Equatable {
        let exp = expectation(description: "Correct values of " + String(describing: publisher))
        var mutableEquals = equals
        let cancellable = publisher
            .sink(receiveCompletion: { _ in },
                  receiveValue: { value in
                    if value == mutableEquals.first {
                        mutableEquals.remove(at: 0)
                        if mutableEquals.isEmpty {
                            exp.fulfill()
                        }
                    }
            })
        return (exp, cancellable)
    }
}
Entwineを使ってテストする
テスト用に用意された
TestSchedulerを使って、テスト対象のSubjectのsendメソッド呼び出しのタイミングを設定したあと、resumeメソッドを呼び出します。
TestableSubscriberをテスト対象のPublisherにreceiveすることで、TestableSubscriberのrecordedOutputにイベントが記録されます。func testCounterStrWithEntWine() { let scheduler = TestScheduler(initialClock: 0) let incrementCounter = viewModel.incrementCounter scheduler.schedule(after: 100) { incrementCounter.send(2) } scheduler.schedule(after: 200) { incrementCounter.send(3) } let subscriber = scheduler.createTestableSubscriber(String.self, Never.self) viewModel.counterStr.receive(subscriber: subscriber) scheduler.resume() let expected: TestSequence<String, Never> = [ (000, .subscription), (000, .input("0")), (100, .input("2")), (200, .input("5")), ] XCTAssertEqual(subscriber.recordedOutput, expected) }参考
- 投稿日:2020-08-05T03:28:42+09:00
PickerViewの実装までの流れ
はじめに
pickerviewの実装について記事を書いていこうと思います。
駆け出しエンジニアということもあるのでご指摘などございましたらご教授よろしくお願いします。
(swift5.4.2)
まずPickerの実装をするまでの工程を紹介します。
1.UIPickerViewDelegate UIPickerViewDateSourceの定義と設定
2.UIPickerViewの列と行とデータ要素の数の設定
3.UIPickerViewの標示する配列の設定ゴール地点!
1.UIPickerViewDelegate UIPickerViewDateSourceの定義と設定について
まず
Delegateとは?
移譲や任せるなどという意味らしく、他にはデザインパターンなどという記述がありとても解釈が難しいところ。
なので私の抽象的な解釈を述べますと
「他のクラスに処理をお任せし、移譲する処理の流れのことをデザインパターンと言いたいのでは?」
とりあえずPickerの実装にDelegateが必要要素と覚えておきましょう!Datesourceとは?
「テーブル(ここでいうpicker)の具体的な表示内容を決める」
以上です。wwfilename.rblet datalist = ["item1","item2","item3","item4"]これでpickerのドラムロールに入れたい値をかく!
filename.rbimport UIKit class ViewController: UIViewController , UIPickerViewDelegate, UIPickerViewDataSourceこれでclassにプロトコルであるUIPickerViewDelegate, UIPickerViewDataSource
の定義は完成しましたfilename.rbpickerView.delegate = self delegateの設定 pickerView.dataSource = self datesourceの設定ここでは、delegateやdatesourceはどれを指しているのか?
self=自分自身
つまり、selfの自身とは、ViewControllerのことを指している。以上
2.UIPickerViewの列と行とデータ要素の数の設定
filename.rb//列数の設定 func numberOfComponents(in pickerView: UIPickerView) -> Int { return 1 } //行とデータ要素数の設定 func pickerView(_ pickerView: UIPickerView, numberOfRowsInComponent component: Int) -> Int { return dataList.count }このメソッドはpicker実装には必須要素になる。
列数の設定
メソッドの処理部分(return n)のnの部分を希望列数にする
行とデータ要素の数の設定
複数行にしたい場合、filename.rbcase 0: return datelist1.count case 1: return datelist2.count default: return 0caseN N=行数
countは要素数を表すので要素数の変更したい場合は、datalistの処理を変更してあげるとcountが合わせてくれる!3.UIPickerViewの標示する配列の設定
filename.rbfunc pickerView(_ pickerView: UIPickerView, titleForRow row: Int, forComponent component: Int) -> String? { return dataList[row] }このメソッドが無いとpickerのデータが反映されずに?の値が帰ってきます。
なので必須で書いてくださいRowとは?
おそらく、ViewControllerの行番号を指しますので
datalistの行番号を表示して!
という解釈でよろしいかと思います終わりに
これでpickerの実装はされたと思います!
ゴール地点
では、pickerのデータがlabelに反映されていますが、そちらの方法は
また今度記事で書いていこうかと思います!

- 投稿日:2020-08-05T01:32:42+09:00
UISliderの停止位置をInt値に固定する
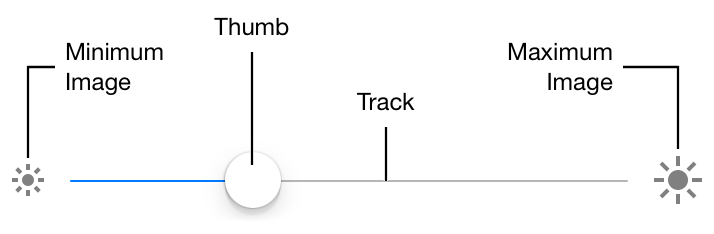
UISliderとは
UIKitで提供されている下記のようなUIパーツです。主につまみ部分(Thumb)をTrack上でドラッグすることで値を変えることができます。公式リファレンスの絵では、画面輝度の設定を想定したものになっています。
使い勝手が微妙に悪い…
標準で提供されているのですが、いくつか使い勝手が悪い点があります。
- 値がFloat型になっており、Int型を扱いずらい
- 目盛りの設置が難しい
今回、この辺りを試行錯誤してみました。
完成版
サンプルプロジェクト
https://github.com/shcahill/IntSliderポイント
ポイントは以下です。
- 最小値(
minimumValue)は0固定- 最大値(
maximumValue)はInt値- Sliderを中途半端な位置で止めた場合は四捨五入してInt値に丸めてThumbの位置を自動調整する
- 1ごとに目盛りを配置
- 目盛りはAutoLayoutを使用しているため、縦横切り替えにも追従可能(TinyConstraints使用)
あえて作り込まなかった点
また、今回のサンプルでは作り込まなかった点は以下のとおりです。
- 目盛りのデザインはカスタマイズできない
- コード上でInt以外の値を設定できてしまう
作り込まなかったのは私がサボっているだけですので、ご容赦ください…
実装方法
Thumbの停止位置をInt値に固定する
やり方としては、ドラッグの終了を検知したタイミングで、Thumb(つまみ)の位置を強制的にInt値の位置へ移動させます。
ドラッグの終了イベントの検知
ドラッグイベントは
touchesEndedをoverrideすることで検知できます。IntSlideroverride func touchesEnded(_ touches: Set<UITouch>, with event: UIEvent?) { super.touchesEnded(touches, with: event) // ドラッグ終了後にThumb位置を調整する fixSliderPosition() }Thumbの位置を調整する
Sliderの値はFloat型ですので、Int型へ丸め込みます。(Thumbの位置はSliderのvalueに追従します)
Int型への丸め込みはround関数を使って四捨五入でやっていますが、利用シーンによっては切り捨て・切り上げに変更しても良いかと思います。ただ、Thumをドラッグしたときの操作感的には四捨五入が良いのではというのが私見です。IntSlider/// Slideの値変更通知(四捨五入して整数で通知されます) var onValueChanged: ((Int) -> Void)? private func fixSliderPosition() { // 現在の値を四捨五入でIntに丸める let index = round(self.value) self.value = index // コールバック通知 onValueChanged?(Int(index)) }
onValueChangedはコールバック通知ですので、読み飛ばしていただいても問題ありません。
ポイントとしては、値の変更通知はInt型として通知を行っているところです。目盛りの表示
Thumbの停止位置(Int値の部分)に目盛りとなるViewを配置します。
Sliderが何段階設定が可能なのか、どこで止まるのか、ということを示すには重要なパーツになります。目盛りの生成
まず、目盛りの生成箇所です。
maximumValueの値が変更される度に目盛りを作り直す必要があるため、目盛りのViewはフィールドでlabelListとして保持します。
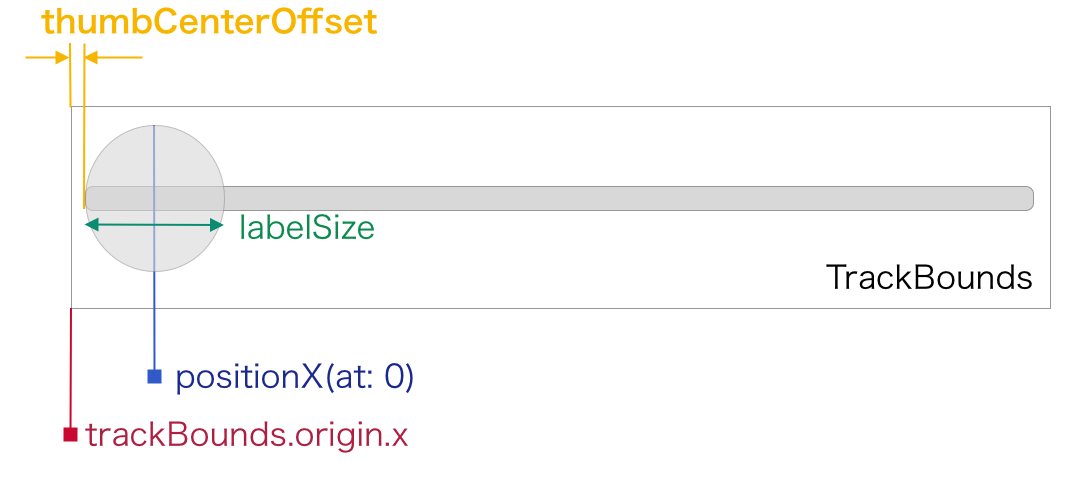
また、目盛りはStackViewに詰め込み、等間隔で並べています。IntSlider// Max値変更の度に目盛りを作り直す必要があるため、フィールドで保持 private var labelList = [UIView]() /// 目盛りを貼りなおします func updateScaleLabel() { // 生成済みのラベルをすべて剥がす labelList.forEach({ $0.removeFromSuperview() }) labelList.removeAll() // StackViewで目盛りを等間隔で配置する let labelArea = UIStackView() labelArea.axis = .horizontal labelArea.distribution = .equalSpacing labelArea.alignment = .fill insertSubview(labelArea, at: 0) let max = Int(maximumValue) + 1 // 目盛りの数だけStackViewに詰め込む for _ in 0..<max { let label = createLabel() labelArea.addArrangedSubview(label) // 目盛りを作り直せるように、配列に保持する labelList.append(label) } /** 目盛りエリアの位置調整(後述) */ // trackの少し下方に配置(offsetの16は適当) labelArea.centerYToSuperview(offset: 16) // track左右のマージン let offset = thumbCenterOffset labelArea.leadingToSuperview(offset: offset) labelArea.trailingToSuperview(offset: offset) }ここで少し面倒なのが、目盛り表示エリア(
labelArea)の左右のマージンthumbCenterOffsetの計算方法です。目盛り表示エリアの配置設定
目盛りのX方向の始点は、trackのboundsのstartXではありません。
目盛りのX方向中心位置は、ThumbのcenterXと一致している必要があります。よって以下のようにthumbCenterOffsetを計算します。IntSlider/// trackの左右両端に対する、thumb中心X座標のマージン var thumbCenterOffset: CGFloat { // trackの始点 let startOffset = trackBounds.origin.x // valueが0のときのThumb位置を計算 let firstThumbPosition = positionX(at: 0) // track/Thumb/目盛りのサイズからoffsetを計算 return firstThumbPosition - startOffset - labelSize / 2 } /// [index]のときのthumbのX中心座標を取得します func positionX(at index: Int) -> CGFloat { let rect = thumbRect(forBounds: bounds, trackRect: trackBounds, value: Float(index)) return rect.midX } var trackBounds: CGRect { return trackRect(forBounds: bounds) }絵にすると以下の感じです。
これでThumbの位置と目盛りの位置がすべて一致するようになります。
参考:UISliderのThumbの表示領域(SizeやFrame)を計算するExtension
目盛りViewの生成
ここでは簡単にするために単純なドットにしていて、カスタマイズもできないようになっています。
private let labelSize: CGFloat = 4.0

func createLabel() -> UIView {
    let label = UIView()
    label.backgroundColor = .black
    label.layer.cornerRadius = CGFloat(labelSize / 2)
    label.width(labelSize)
    label.height(labelSize)
    return label
}
SliderのmaximumValueの値変更
SliderのmaximumValueの値が変更された場合は、目盛りの数と配置が変わるため、上記の
updateScaleLabel()を呼ぶ必要があります。IntSliderfunc updateMaxValue(_ max: Int) { maximumValue = Float(max) value = min(value, maximumValue) updateScaleLabel() }ここでは関数化しましたが、
maximumValueのdidSetで実行するのもいいかもしれません。(その場合、Float型をInt型に補正する必要がありますが。)Thumb部分以外でもドラッグ可能にする
詳細はこちらの記事が参考になります。
UISliderのUXをトコトン追究して改善してみる
必要なコードだけを抜き出すと以下のようになります。IntSlideroverride func beginTracking(_ touch: UITouch, with event: UIEvent?) -> Bool { // つまみ部分以外でもスライド可能 return true }完成
以上をまとめると、コード全体は以下のようになります。
IntSliderimport UIKit import TinyConstraints final class IntSlider: UISlider { private let labelSize: CGFloat = 4.0 /// Slideの値変更通知(四捨五入して整数で通知されます) var onValueChanged: ((Int) -> Void)? private var labelList = [UIView]() required init?(coder aDecoder: NSCoder) { super.init(coder:aDecoder) setup(max: 1) } private func setup(max: Int) { minimumValue = 0 maximumValue = Float(max) // リアルタイムの値変更通知 addTarget(self, action: #selector(onChange), for: .valueChanged) } override func beginTracking(_ touch: UITouch, with event: UIEvent?) -> Bool { // つまみ部分以外でもスライド可能 return true } override func touchesEnded(_ touches: Set<UITouch>, with event: UIEvent?) { super.touchesEnded(touches, with: event) // スライド終了後に位置を調整する fixSliderPosition() } @objc func onChange(_ sender: UISlider) { // スライダーの値が変更された時の処理 onValueChanged?(Int(round(sender.value))) } func updateMaxValue(_ max: Int) { maximumValue = Float(max) value = min(value, maximumValue) updateScaleLabel() } } private extension IntSlider { func fixSliderPosition() { let index = round(self.value) self.value = index onValueChanged?(Int(index)) } /// 目盛りを貼りなおします func updateScaleLabel() { labelList.forEach({ $0.removeFromSuperview() }) labelList.removeAll() let labelArea = UIStackView() labelArea.axis = .horizontal labelArea.distribution = .equalSpacing labelArea.alignment = .fill insertSubview(labelArea, at: 0) // trackの少し下方 labelArea.centerYToSuperview(offset: 16) // 左右のマージン let offset = thumbCenterOffset labelArea.leadingToSuperview(offset: offset) labelArea.trailingToSuperview(offset: offset) let max = Int(maximumValue) + 1 for _ in 0..<max { let label = createLabel() labelArea.addArrangedSubview(label) labelList.append(label) } } /// 目盛りViewの生成 func createLabel() -> UIView { let label = UIView() label.backgroundColor = .black label.layer.cornerRadius = CGFloat(labelSize / 2) label.width(labelSize) label.height(labelSize) return label } /// trackの左右両端に対する、thumb中心X座標のマージン var thumbCenterOffset: CGFloat { let startOffset = trackBounds.origin.x let firstThumbPosition = positionX(at: 0) return firstThumbPosition - startOffset - labelSize / 2 } /// [index]のときのthumbのX中心座標を取得します func positionX(at index: Int) -> CGFloat { let rect = thumbRect(forBounds: bounds, trackRect: trackBounds, value: Float(index)) return rect.midX } var trackBounds: CGRect { return trackRect(forBounds: bounds) } }

- 投稿日:2020-08-05T01:27:15+09:00
[Xcode] Xcodeのディレクトリ構成と実際のプロジェクト構成の乖離を修正する
概要
あんまりないケースですが実務上、Xcodeで指定のディレクトリ上でファイルを新規追加したつもりがFinderで確認すると、全然違う箇所に作成されていた・・・というケースがあり困りました

(新規作成時に表示されるウィンドウ内のFinder上でどこに配置されるかをちゃんと見れば、問題は回避できますが初期表示で出ているディレクトリが全然違う場所を指している現象がよくわかっていません・・・)
前提
- Xcode11.5
- Xcodeのディレクトリ構成が正
- Finder上の実際のディレクトリ構成が誤
とします
Xcodeのディレクトリ構成自体が間違いの場合は以下の記事を書いた人のが参考になります↓
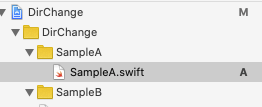
【Xcode】開発途中に手動でディレクトリ構成を変更するXcodeのディレクトリ構成は↓
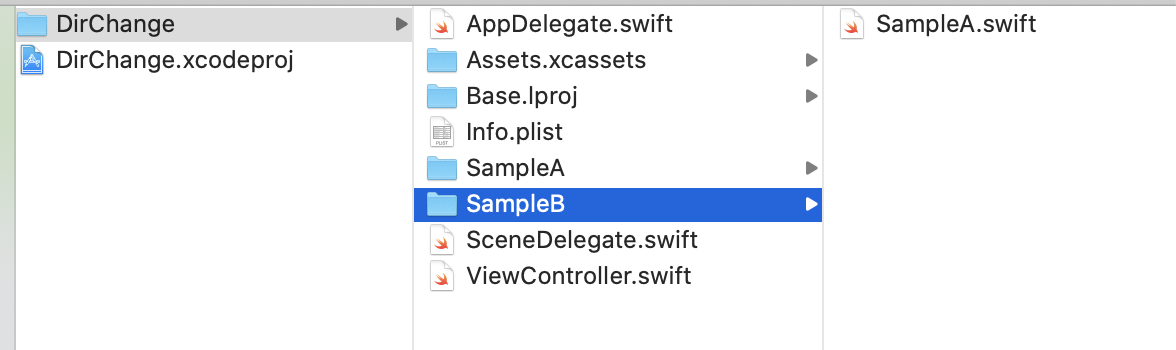
実際のディレクトリ構成は↓
という例とします本来、Xcodeのディレクトリ構成のようにSampleAに
SampleA.swiftファイルが配置されてるのが想定であるのに、実際のディレクトリ構成はSampleBにSampleA.swiftファイルが配置されているのは想定していないだったとします修正方法
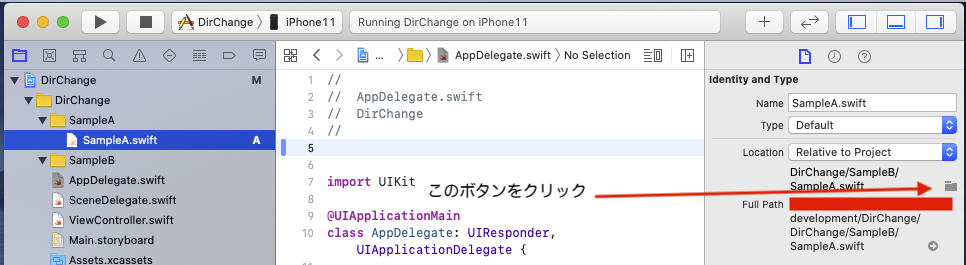
- 実際に配置したい箇所にファイルを移動する(コマンド打ってもFinderでドラッグアンドドロップしてもやり方お任せ)
- Xcodeのボタンで再配置 赤くなったファイルを消して、Finderからドラッグアンドドロップでもいいのですが 下スクショ内にあるボタンタップでも大丈夫です 修正したいファイルをタップ > Identity and Typeタップ > Location?のボタンタップ
↓
それで1で移動したファイルを選択してあげれば修正できます
参考になれば幸いです

備考
Locationの項目にあるボタン名の名称知っている方教えてください


- 投稿日:2020-08-05T01:17:10+09:00
[翻訳] iOS 14 標準Webブラウザ対応
Preparing Your App to be the Default Browser or Email Client から標準Webブラウザ対応の部分を訳しました。
(2020/08/05 時点のものです)訳や解釈に問題があったら教えて下さい。
アプリを標準Webブラウザにする設定
iOS 14以降、アプリを標準Webブラウザとして機能させるには
com.apple.developer.web-browsermanaged entitlementが必要になる。これはAppleにメール( default-browser-requests@apple.com )を送り、許可を得ることで使えるようになる。必ず満たさなければならない要件
HTTPとHTTPSのschemeをInfo.plistファイルに記述する。UIWebViewの使用はできない。- アプリ起動時にURLを入力するためのテキストフィールド、インターネット上の関連リンクを見つけるための検索ツール、もしくはキュレートされたブックマークリストを提供する。
HTTPやHTTPSリンクを開くとき
- アプリは指定されたWebページを必ず直接開き、期待されたWebコンテンツを表示する。予期せぬ場所へリダイレクトしたり、本来のソースコードに指定されていないコンテンツを表示するアプリは、標準Webブラウザの要件を満たしていない。
- パレンタルコントロールやロックダウンモードのあるアプリは、その目的を遵守するために開くWebページを制限してもよい。
- フィッシングや、その他の問題が疑われるコンテンツに対して、セーフブラウジングや他の警告を表示してもよい。
- Webサイトに固有のログイン方法があったとしても、アプリ固有の認証UIを表示してもよい。
補足
ロックダウンモードは、ある目的を実行するために1つもしくは複数のWebサイトのみアクセスを許可するもの。テストやクイズなどで使われる。
セーフブラウジングは、リンクを開く前に、Google Safe BrowsingやTencent Safe Browsingなどのサービスで危険性がないかを調べて、問題があった場合に警告を表示するもの。標準ブラウザの機能
com.apple.developer.web-browsermanaged entitlement を使うアプリは以下のことが可能になる。
- 標準Webブラウザとしてユーザーが選べる。
- すべてのドメインからページを読み込め、フルスクリプトアクセスができる。
- WKWebViewでService Workersが使える。
ブラウザの制限の遵守
com.apple.developer.web-browsermanaged entitlementを持つアプリは、特定のドメインに対して、そのアプリのUniversal Linksであると主張して反応してはいけない。システムはそのような主張を無視する。Universal Linksとして他のアプリを開くことは通常通り可能である。ブラウザアプリはユーザーのWebブラウジングとして特権的な位置にあるため、個人データへの不必要なアクセスを避ける必要がある。
com.apple.developer.web-browsermanaged entitlementを持つアプリで、Info.plistファイルに以下のキーを使っている場合は審査でリジェクトされる。
NSPhotoLibraryUsageDescription— 画像の保存はNSPhotoLibraryAddUsageDescriptionのみを指定する。 WKWebViewはユーザーにフォトライブラリ全体のアクセスを求める必要なく、画像やファイルのアップロードが可能である。アプリが個別の画像にアクセスするには、UIImagePickerControllerの代わりに、NSPhotoLibraryUsageDescriptionが不要なPHPickerViewControllerを使うべきである。
NSLocationAlwaysUsageDescription,NSLocationAlwaysAndWhenInUseUsageDescription— これらの代わりにNSLocationWhenInUseUsageDescriptionを使う。ブラウザアプリの位置情報アクセスを"常に許可"にすることは制限されている。(NSLocationAlwaysUsageDescriptionはiOS 10で非推奨となった。)
NSHomeKitUsageDescription— ブラウザアプリはユーザーのHomeKitデータベースにアクセスすることはできない。
NSBluetoothAlwaysUsageDescription— ブラウザアプリはバックグラウンドで、Bluetoothデバイスへのポーリングをすることはできない。Bluetooth機能にはNSBluetoothWhileInUseUsageDescriptionを使うべきである。
NSHealthShareUsageDescription,NSHealthUpdateUsageDescription— ブラウザアプリはユーザーのHealthKitデータベースにアクセスすることはできない。
PR: iOS 14向けに個人開発のWebブラウザアプリ(6年目)を標準Webブラウザにできるよう、がんばっています!