- 投稿日:2020-08-05T18:07:47+09:00
aws-amplify? 突然 TypeError: Cannot read property 'configure' of undefined が出て何も表示されなくなった
前提条件
React + Next.js + TypeScript 環境で
next start時事象
以下のコンソールエラーが出て表示は真っ白になる。ちなみに開発環境(
nextコマンド実行時)では問題なし。TypeError: Cannot read property 'configure' of undefined
configureというメソッドはうちのプロダクトだとAmplify.configureしか心当たりがなかったため、そのあたりを調査。対応
yarn add @aws-amplify/core # or npm install @aws-amplify/corepages/_app.tsx- import Amplify from 'aws-amplify'; + import Amplify from '@aws-amplify/core';これで治った。
公式ドキュメントでもどちらでも良いと記載してある。
https://github.com/aws-amplify/amplify-js#configurationあとがき
特に
aws系のパッケージのアップデートをしたわけでもなく突然発生。
それも開発環境では発生せずステージング環境だけで発生したためやや焦った。
ビルド時に変数名とかメソッド名が圧縮されてエラーになってるのかなと推測したが原因まではつかめず。
aws-amplifyだけの原因でなく、他のパッケージや環境との兼ね合いがあるかも。ググってもあまり情報が出なかったため記しておく。
もし同様のエラーでお悩みの方はお試しあれ。
- 投稿日:2020-08-05T17:28:50+09:00
Google Functions: Node.jsで重要度付きのロギング
前回、Google Functions: console.infoやconsole.errorなどとログビューアの「重大度」の関係性という記事を投稿しました。そこでは
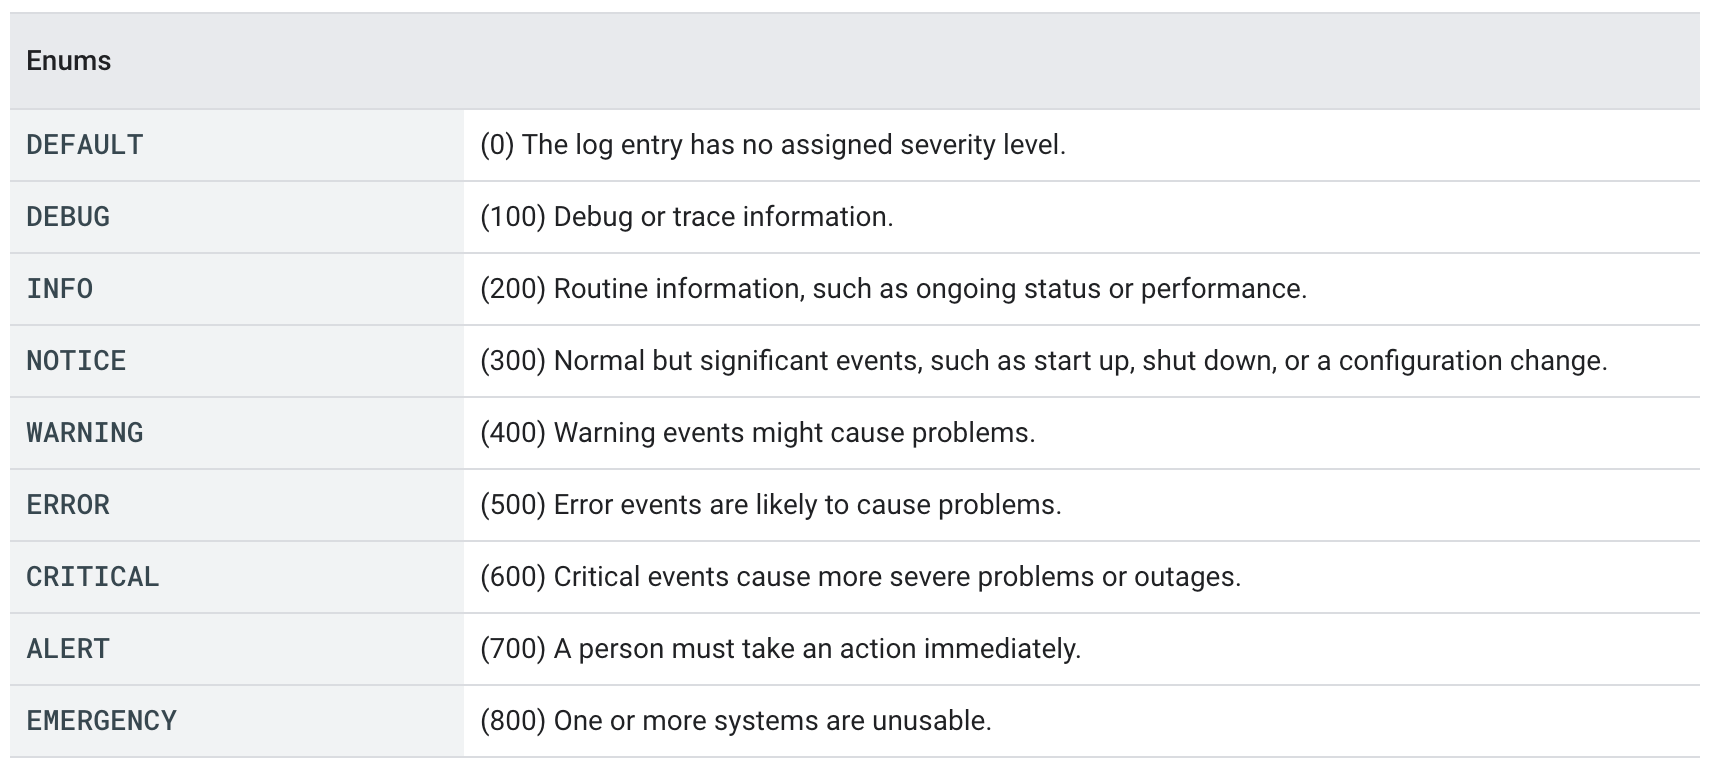
console.errorやconsole.infoなどのConsole APIでは、GCP上のログの重要度(severity)は、DEFAULTかERRORの二択になるということを説明しました。GCP上の重要度はこの2つしか無いわけではなく、以下の9つのレベルがあります。
この投稿では、Google Cloudのロギングクライアントライブラリを使って、Cloud Functionsでも重要度を指定したロギングをする方法を説明します。
この投稿で学ぶこと
- Google Cloud Function & Node.jsで@google-cloud/loggingを使って重要度をつけたログを記録する方法
- そして、その面倒くささ。
console.logと@google-cloud/loggingで記録されるログ内容の違い。ロギングクライアントライブラリをインストールする
まず必要となるロギングクライアントライブラリをインストールします。
yarn add @google-cloud/loggingライブラリをCloud Functionsに組み込む
次にこのロギングライブラリをCloud Functionsの実装に組み込みます。
下のコードが組み込んだものです。
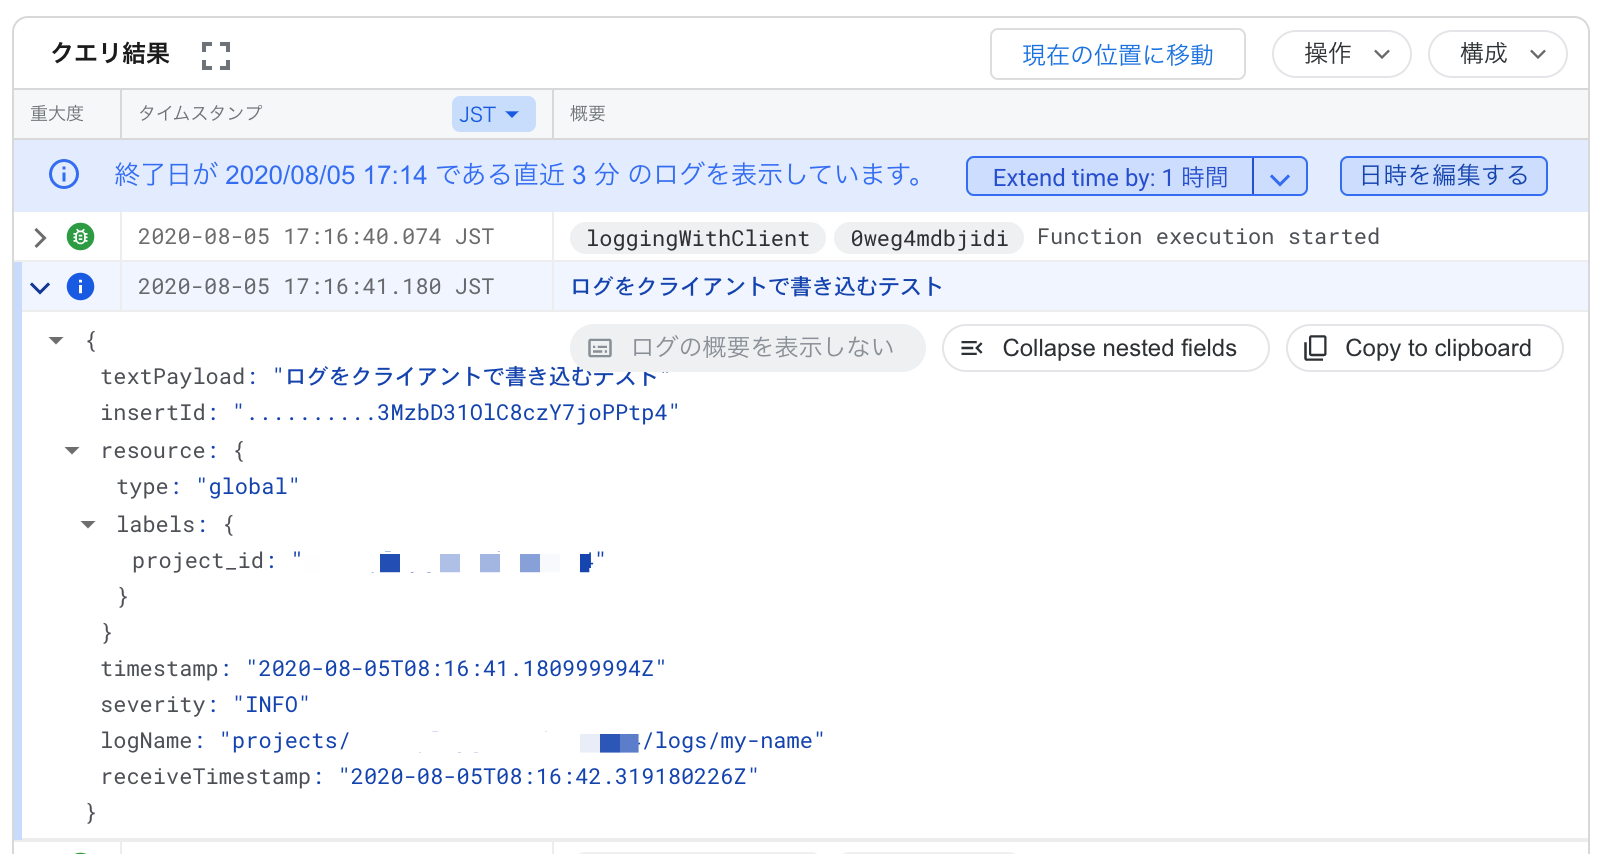
console.logを使ってロギングするのと打って変わって、いろいろな下準備が必要なのと、ログを記録するごとにログエントリーオブジェクトを作る必要があるのが分かります。ちょっとめんどくさそうですね。index.jsconst { Logging } = require('@google-cloud/logging') exports.loggingWithClient = async (req, res) => { // クライアントを作る const logging = new Logging() // ログ出力先を決めてロガーを作る const log = logging.log('my-name') // ログエントリーを作る const entry = log.entry( { resource: { type: 'global' }, severity: 'INFO', // 重要度「INFO」を指定 }, 'ログをクライアントで書き込むテスト', ) // ログを書き込む await log.write(entry) res.send('OK') }ひとまずこれをデプロイして、
gcloud functions deploy loggingWithClient --runtime=nodejs12 --trigger-http呼び出してみます:
curl https://asia-northeast1-${PROJECT}.cloudfunctions.net/loggingWithClientどのようにログが記録されたか、ログビューアを開いてみます。
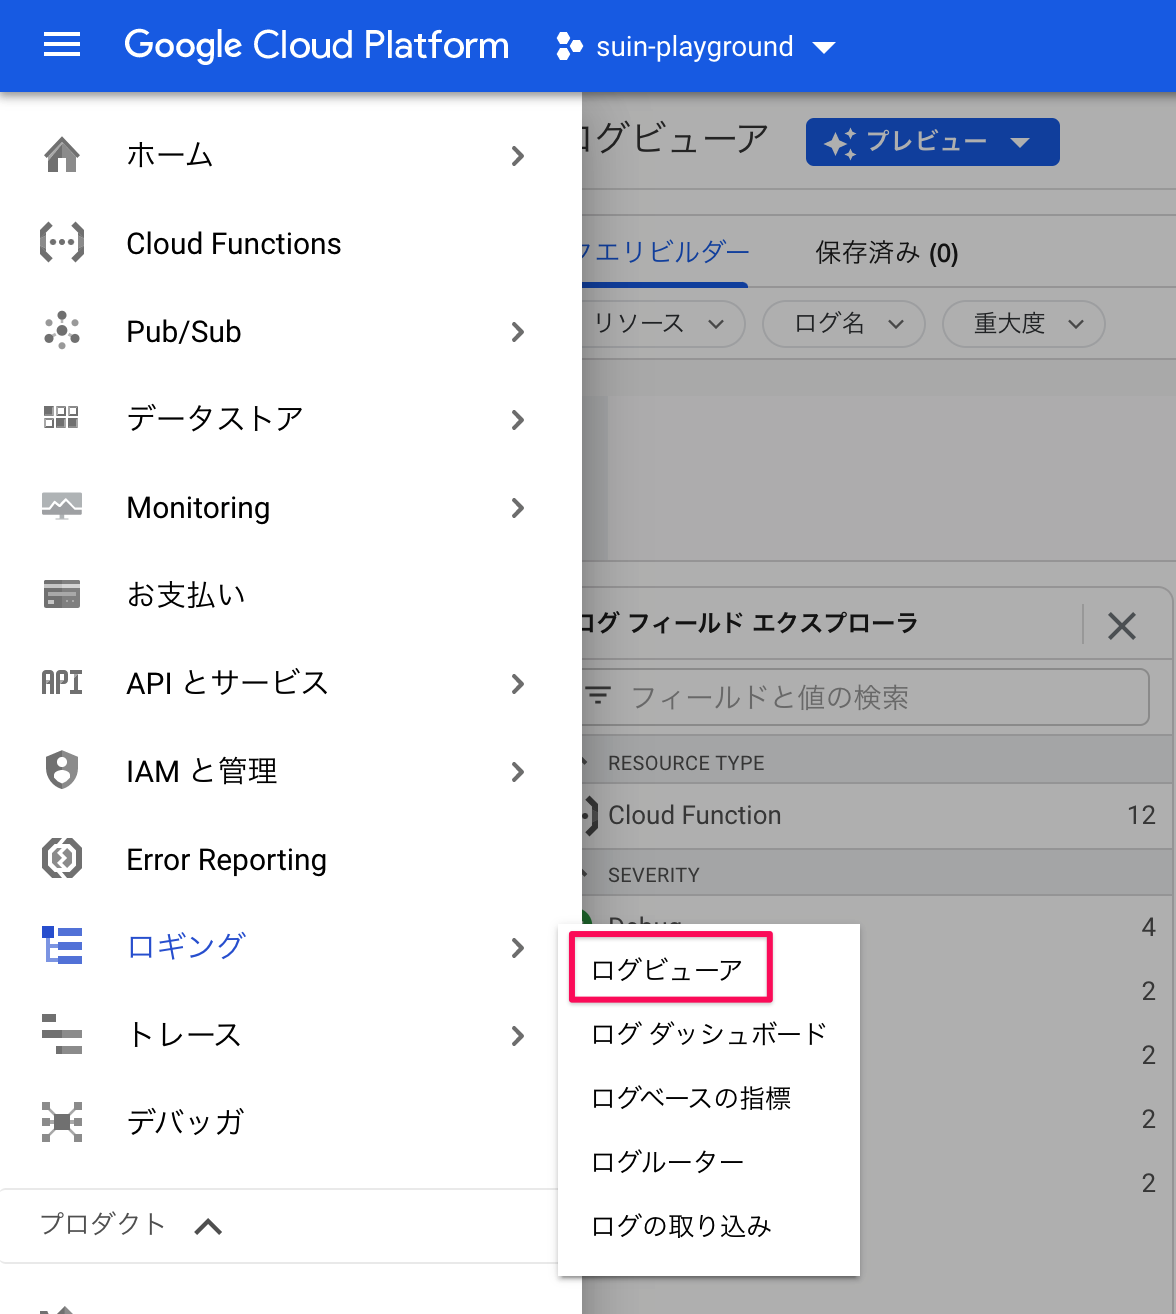
console.logで記録したログは、自動的にどの関数のものか関連付けされるため、管理コンソールの「Cloud Functions」から当該関数の「ログを表示」から行く導線が使えましたが、上のコードで記録したログは関数に紐づけてロギングしていないので、「ロギング」の「ログビューア」から探しに行きます:
この導線からだと、プロジェクトの全ログが出るので、たくさんログがある場合は「直近の3分」などで絞り込むと見つけやすいです。
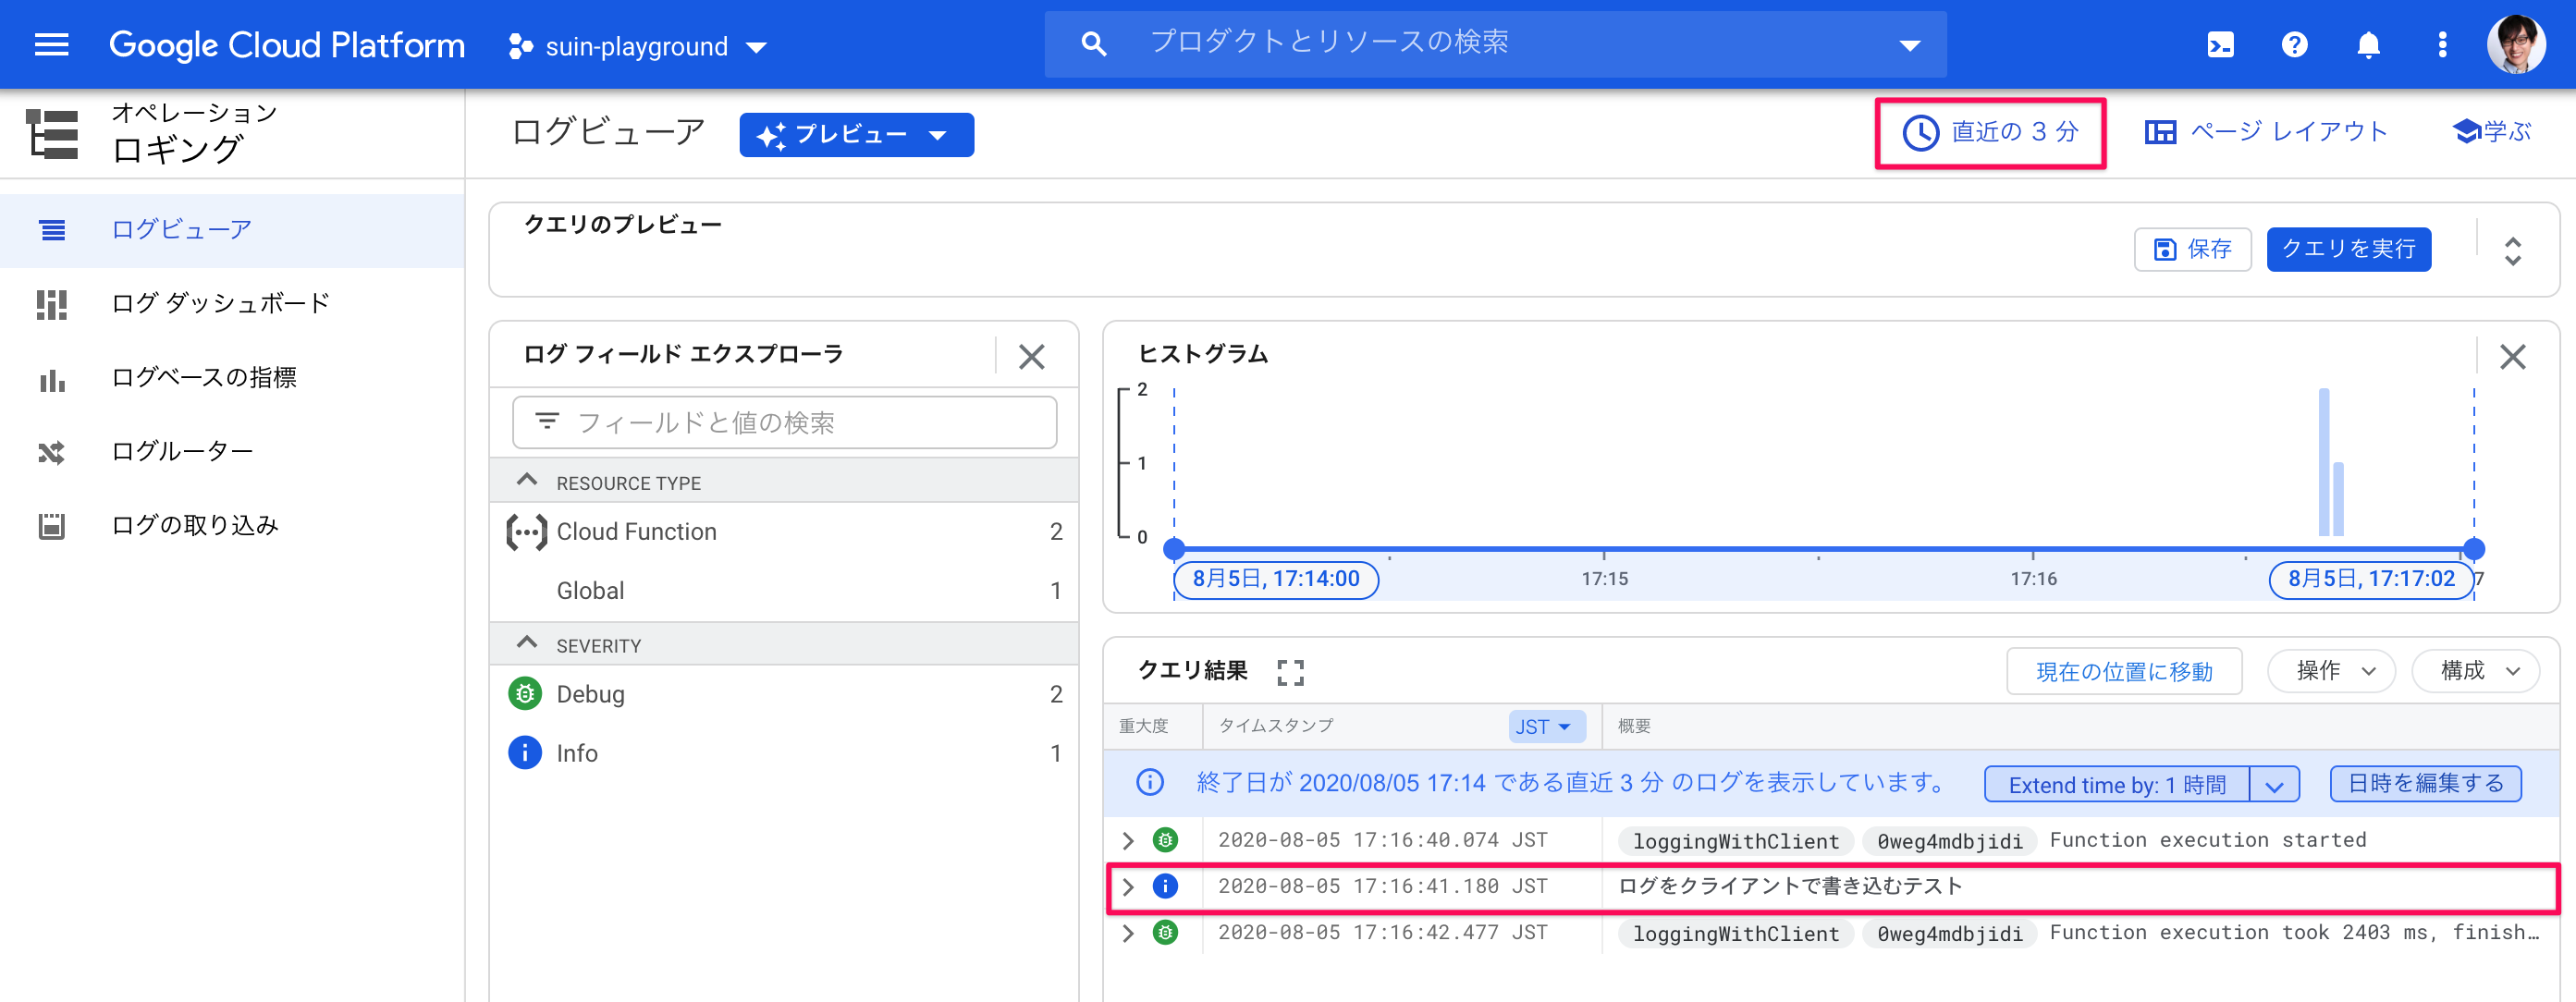
このように、
console.infoなどではできなかった重要度「INFO」でロギングされているのが確認できます:
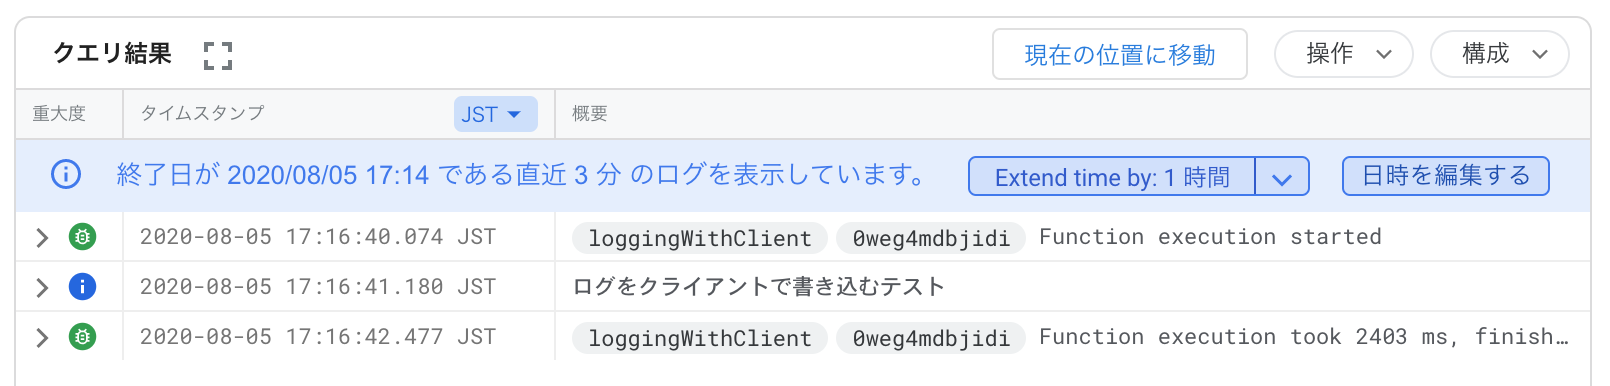
今回試したサンプルコードでは、ログエントリーのメタデータを色々省いたため、かなり質素な内容になっています:
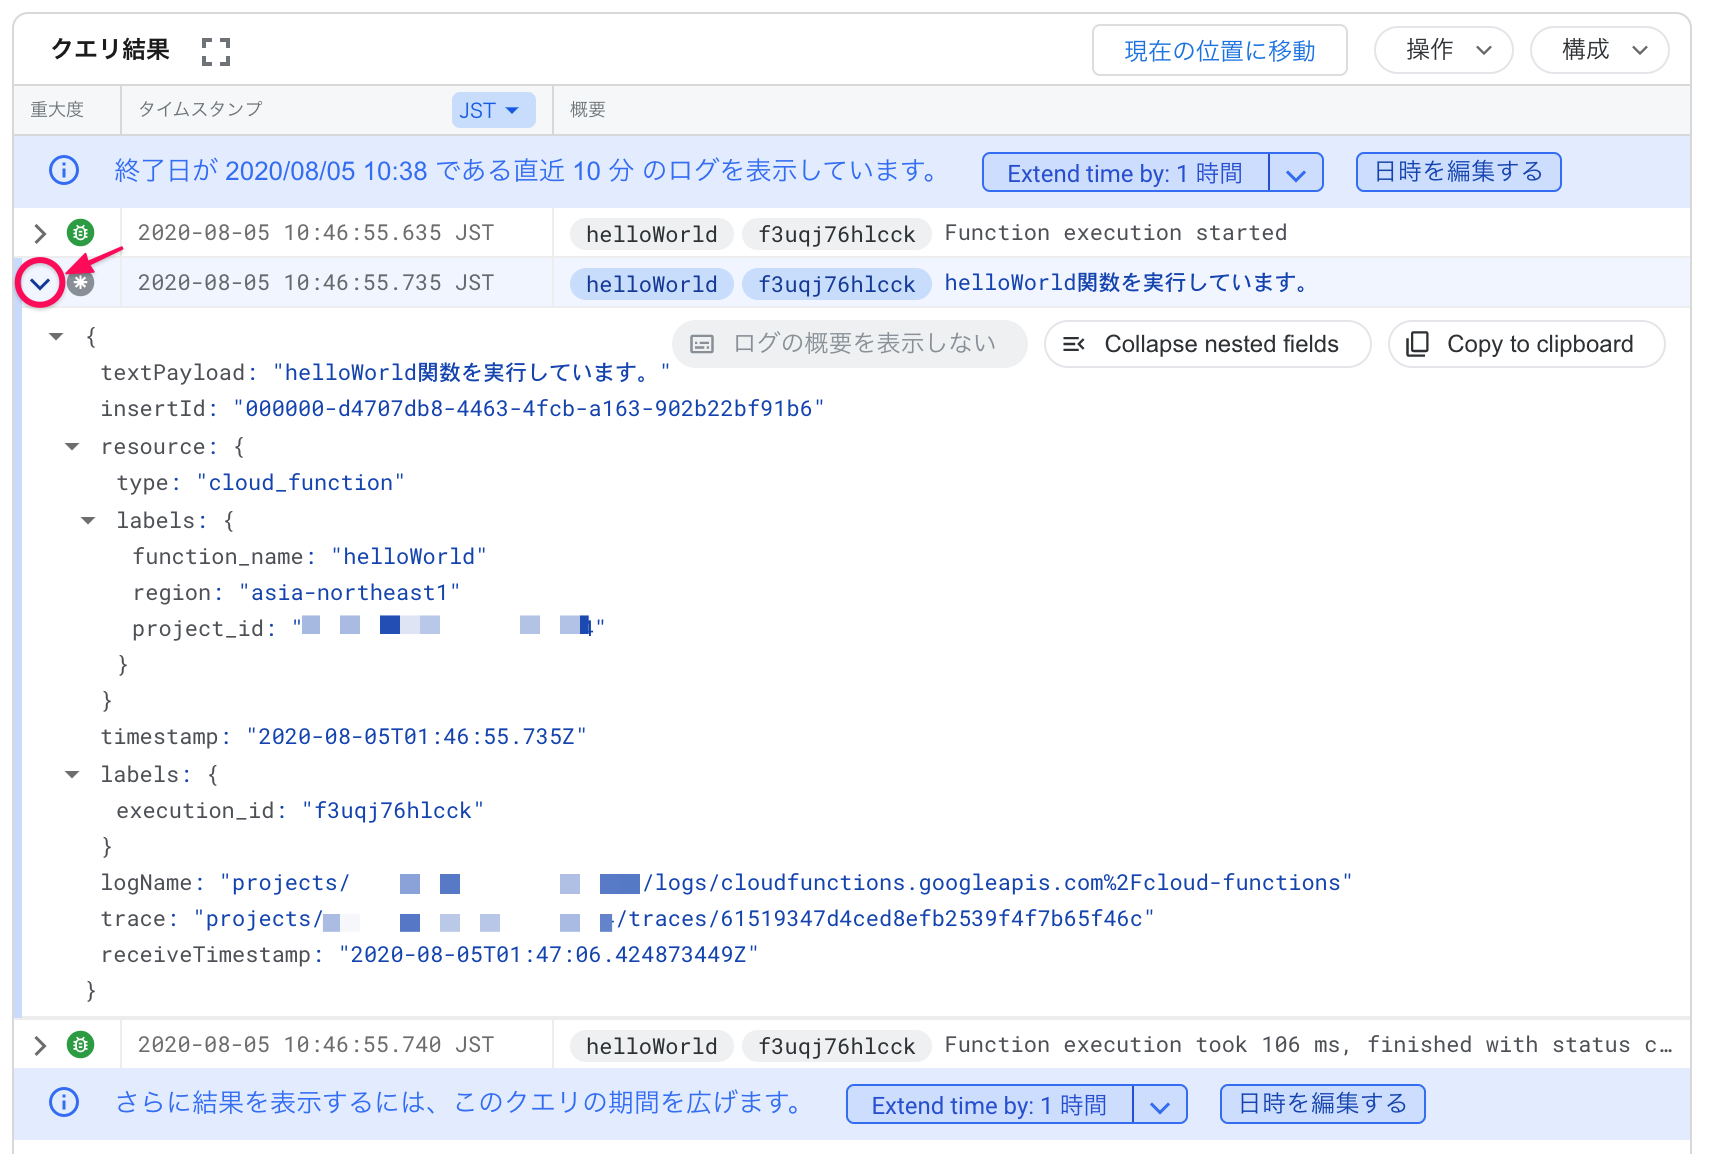
下は普通に
console.logしただけのログエントリーですが、それと比べると情報の少なさが分かります:
まとめ
この投稿を通じて、次のことが分かったと思います。
- Google Cloud Function & Node.jsで@google-cloud/loggingを使って重要度をつけたログを記録する方法
- そして、その面倒くささ。
console.logと@google-cloud/loggingで記録されるログ内容の違い。@google-cloud/loggingはかなり低レベルなロギングができる一方、使い勝手が良くなく、どの関数で実行されたかなどは自動的に記録されないので、次回はもっと利便性の高い方法について投稿したいと思います。
- 投稿日:2020-08-05T16:10:41+09:00
Bot Framework v4 (node.js) をイチから学ぶ (2) Dialog で処理をブロック化して呼び出し実行
チャットボットがユーザーとやり取りを行う動作、タスクは Dialog でブロック化し、(再)利用することができます。実行している Dialog のステート(状態) は MemoryStorage という領域に保存します。
- Dialog: タスクを実行するファンクション(関数)
- ComponentDialog: Dialog の実行順序設定、読み込み、実行&コントロールするクラスモジュール
- MemoryStorage: Dialog のステートや、会話に必要な情報を保存する領域
- ConversationState: 会話の状態 (どのダイアログにいるのか) など、メッセージの受信&返信を会話として進める上で必要な情報
- UserState: ConversationState 以外のユーザー情報など
必要なコード
DialogBot
+- mainDialog.js   // チャットボットのタスクを切り出した ComponentDialog (親)
+- subDialog.js    // チャットボットのタスクを切り出した ComponentDialog (子)
+- dialogBot.js    // Chatbot としての挙動
+- index.js        // API としての基本動作
+- package.json    // 必要なライブラリーや依存関係など
+- .env       // 環境変数を設定
手順
MemoryStorage で Dialog のステートを管理するよう設定する
ひとまず MemoryStorage を定義して、ConversationState を生成します。
MainDialog という ComponentDialog (ファイル名は mainDialog.js) を作成し、こちらでタスクを実行します。
Bot インスタンスが起動するときに ComversationState および MainDialog を取得するようにします。index.jsconst restify = require('restify'); const path = require('path'); // BotFrameworkAdapter に追加して、MemoryStorage と ConversationState をインポート // const { BotFrameworkAdapter } = require('botbuilder'); const { BotFrameworkAdapter, MemoryStorage, ConversationState } = require('botbuilder'); // Dialog を操作する js ファイル(dialogBot.js)を新たに作成、追加 // const { EchoBot } = require('./bot'); const { DialogBot } = require('./dialogBot'); : (中略) : // 空の MemoryStorage を作成して、その配下に ConversationState を生成する const memoryStorage = new MemoryStorage(); const conversationState = new ConversationState(memoryStorage); : (中略) : // Dialog と ConversationState を DialogBot で利用する // const bot = new EchoBot(); const dialog = new MainDialog(); const bot = new DialogBot(conversationState, dialog); server.post('/api/messages', (req, res) => { adapter.processActivity(req, res, async (context) => { // Route to main dialog. await bot.run(context); }); });メッセージ応対を ComponentDialog で行うように設定する
dialogBot.js では、メッセージを受け取って返信する処理を ComponentDialog から行うように設定し、ConversationState を使って Dialog のコントロールを行います。
ConversationState に DialogState を保存し、DialogState に従って Dialog を実行するプロセスになります。dialogBot.jsconst { ActivityHandler } = require('botbuilder'); class DialogBot extends ActivityHandler { constructor(conversationState, dialog) { super(); // Dialog の読み込み this.dialog = dialog; // ConversationState から DialogState を取得 this.conversationState = conversationState; this.dialogState = this.conversationState.createProperty('DialogState'); // メッセージを受信したとき this.onMessage(async (turnContext, next) => { // DialogState で指定された Dialog を実行、その次の Dialog をポイント await this.dialog.run(turnContext, this.dialogState); await next(); }); } // ステートを保存するため、ActivityHandler.run を Override async run(turnContext) { await super.run(turnContext); await this.conversationState.saveChanges(turnContext, false); } } module.exports.DialogBot = DialogBot;WaterfallDialog でタスクとその構成を記述する
ひとまず mainDialog.js 内に実行したいタスク(Step)を記述していきます。
WaterfallDialog を使って、Step を実行したい順に記述します。step.next() で次の Step に送り、最後の Step で step.endDialog() を呼び出して、この WaterfallDialog を終了します。
また、MainDialog が呼び出された時に この WaterfallDialog を実行する手順も記述します。mainDialog.jsconst { ComponentDialog, DialogSet, WaterfallDialog, DialogTurnStatus } = require('botbuilder-dialogs'); const MAIN_DIALOG = 'mainDialog'; class MainDialog extends ComponentDialog { constructor() { // 現在の Dialog の ID を設定 super(MAIN_DIALOG); // この Dialog 内で実行するタスク(Step)を列記 this.addDialog(new WaterfallDialog('start', [ async (step) => { await step.context.sendActivity('こんにちは!') // 次の Step に送る return step.next(); }, async (step) => { await step.context.sendActivity('メインメニューです!') // 最終 Step で この WaterfallDialog を終了する return step.endDialog(); } ])); this.initialDialogId = 'start'; } async run(turnContext, dialogState) { const dialogSet = new DialogSet(dialogState); dialogSet.add(this); // WaterfallDialog を順に実行 // 開始されていない場合は、initialDialogId に指定されている WaterfallDialog を実施 const dialogContext = await dialogSet.createContext(turnContext); const results = await dialogContext.continueDialog(); if (results.status === DialogTurnStatus.empty) { await dialogContext.beginDialog(this.id); } } } module.exports.MainDialog = MainDialog;Dialog Prompt でユーザーとのやり取りを簡略に記述
予め用意されている Dialog Prompt を利用すると、WaterfallDialog 内でユーザーへのメッセージ送信とユーザーのメッセージ取得を簡略に記述できます。
テキストを取得する TextPrompt, Yes|No を選ばせる ConfirmPrompt など、詳細はドキュメント↓を確認してください。
Microsoft Docs > Azure Bot Service > ダイアログライブラリ - プロンプト作成した Dialog Prompt は step.prompt(オブジェクト名) で呼び出します。step.prompt() には step.next() の処理が含まれています。
mainDialog.js// TextPrompt, NumberPrompt, ConfirmPrompt を追加 const { ComponentDialog, DialogSet, WaterfallDialog, DialogTurnStatus, TextPrompt, NumberPrompt, ConfirmPrompt } = require('botbuilder-dialogs'); // 作成する Dialog Prompt のオブジェクト名称を設定 const MAIN_DIALOG = 'mainDialog'; const NAME_PROMPT = 'namePrompt'; const YESNO_PROMPT ='yesnoPrompt'; const AGE_PROMPT = 'agePrompt'; class MainDialog extends ComponentDialog { constructor() { // 現在の Dialog の ID を設定 super(MAIN_DIALOG); // 利用したい Dialog Prompt を新規作成して追加 this.addDialog(new TextPrompt(NAME_PROMPT)); this.addDialog(new ConfirmPrompt(YESNO_PROMPT)); this.addDialog(new NumberPrompt(AGE_PROMPT)); // この Dialog 内で実行するタスク(Step)を列記 this.addDialog(new WaterfallDialog('start', [ async (step) => { await step.context.sendActivity('こんにちは!') // 次の Step に送る return step.next(); }, // Dialog Prompt で記述 async (step) => { return await step.prompt(NAME_PROMPT, 'あなたの名前は?'); }, async (step) => { // ユーザーからのメッセージ(入力値) step.result を取得、step.values の一時領域に保存 step.values.name = step.result; return await step.prompt(YESNO_PROMPT, 'あなたの年齢を聞いてもよいですか?', ['はい', 'いいえ']); }, async (step) => { if (step.result) { return await step.prompt(AGE_PROMPT, 'では、あなたの年齢を入力してね'); } else { // いいえ(false) の場合は、-1 を値として設定 return await step.next(-1); } }, async (step) => { if (step.result >= 20) { await step.context.sendActivity(step.values.name + 'さん、あなたはお酒が飲めますね!'); } await step.context.sendActivity('メインメニューです!') // 最終 Step で この WaterfallDialog を終了する return step.endDialog(); } ])); this.initialDialogId = 'start'; } : (後略)WaterfallDialog の実行 Step を ComponentDialog のメソッドとして独立させる
WaterfallDialog に記述している Step をこの ComponentDialog (MainDialog) 自体のメソッドとして独立させます。
mainDialog.js(前略) : class MainDialog extends ComponentDialog { constructor() { // 現在の Dialog の ID を設定 super(MAIN_DIALOG); // 利用したい Dialog Prompt を新規作成して追加 this.addDialog(new TextPrompt(NAME_PROMPT)); this.addDialog(new ConfirmPrompt(YESNO_PROMPT)); this.addDialog(new NumberPrompt(AGE_PROMPT)); // この Dialog 内で実行するタスク(Step)を列記 this.addDialog(new WaterfallDialog('start', [ this.initialStep.bind(this), this.nameAskStep.bind(this), this.ageComfirmStep.bind(this), this.ageAskStep.bind(this), this.finalStep.bind(this) ])); this.initialDialogId = 'start'; } // 実行するタスク(Step) async initialStep(step) { await step.context.sendActivity('こんにちは!') // 次の Step に送る return step.next(); } async nameAskStep(step) { return await step.prompt(NAME_PROMPT, 'あなたの名前は?'); } async ageComfirmStep(step) { step.values.name = step.result; return await step.prompt(YESNO_PROMPT, 'あなたの年齢を聞いてもよいですか?'); } async ageAskStep(step) { if (step.result) { return await step.prompt(AGE_PROMPT, 'では、あなたの年齢を入力してね'); } else { // いいえ(false) の場合は、-1 を値として設定 return await step.next(-1); } } async finalStep(step) { if (step.result >= 20) { await step.context.sendActivity(step.values.name + 'さん、あなたはお酒が飲めますね!'); } await step.context.sendActivity('メインメニューです!') // 最終 Step で この WaterfallDialog を終了する return step.endDialog(); } : (後略)WaterfallDialog の実行 Step を個別の ComponentDialog として独立させる
WaterfallDialog の実行 Step を別の ComponentDialog として独立させて利用します。
独立させる subDialog.js は mainDialog.js とほぼほぼ同じ、Dialog 名を SUB_DIALOG(subDialog) に設定する箇所だけ変更しています。(もちろん、各 Step を ComponentDialog のメソッドとして独立させていなくても良いです。)subDialog.jsconst { ComponentDialog, DialogSet, WaterfallDialog, DialogTurnStatus ,TextPrompt, NumberPrompt, ConfirmPrompt } = require('botbuilder-dialogs'); const SUB_DIALOG = 'subDialog'; const NAME_PROMPT = 'namePrompt'; const YESNO_PROMPT ='yesnoPrompt'; const AGE_PROMPT = 'agePrompt'; class SubDialog extends ComponentDialog { constructor() { super(SUB_DIALOG); this.addDialog(new TextPrompt(NAME_PROMPT)); this.addDialog(new ConfirmPrompt(YESNO_PROMPT)); this.addDialog(new NumberPrompt(AGE_PROMPT)); this.addDialog(new WaterfallDialog('start', [ this.initialStep.bind(this), this.nameAskStep.bind(this), this.ageComfirmStep.bind(this), this.ageAskStep.bind(this), this.finalStep.bind(this) ])); this.initialDialogId = 'start'; } // 実行するタスク(Step) async initialStep(step) { await step.context.sendActivity('こんにちは!') // 次の Step に送る return step.next(); } async nameAskStep(step) { return await step.prompt(NAME_PROMPT, 'あなたの名前は?'); } async ageComfirmStep(step) { step.values.name = step.result; return await step.prompt(YESNO_PROMPT, 'あなたの年齢を聞いてもよいですか?'); } async ageAskStep(step) { if (step.result) { return await step.prompt(AGE_PROMPT, 'では、あなたの年齢を入力してね'); } else { // いいえ(false) の場合は、-1 を値として設定 return await step.next(-1); } } async finalStep(step) { if (step.result >= 20) { await step.context.sendActivity(step.values.name + 'さん、あなたはお酒が飲めますね!'); } await step.context.sendActivity('メインメニューです!') // 最終 Step で この WaterfallDialog を終了する return step.endDialog(); } async run(turnContext, accessor) { const dialogSet = new DialogSet(accessor); dialogSet.add(this); const dialogContext = await dialogSet.createContext(turnContext); const results = await dialogContext.continueDialog(); if (results.status === DialogTurnStatus.empty) { await dialogContext.beginDialog(this.id); } } } module.exports.SubDialog = SubDialog;mainDialog.js 側は、WaterfallDialog で利用する Dialog に SubDialog() を追加し、step.beginDialog() を使って呼び出します。もちろんメソッドに切り出して、呼び出してもOKです。
mainDialog.jsconst { ComponentDialog, DialogSet, WaterfallDialog, DialogTurnStatus } = require('botbuilder-dialogs'); const { SubDialog } = require('./subDialog'); const MAIN_DIALOG = 'mainDialog'; const SUB_DIALOG = 'subDialog'; class MainDialog extends ComponentDialog { constructor() { // 現在の Dialog の ID を設定 super(MAIN_DIALOG); // WaterfallDialog で実行する Dialog を定義 this.addDialog(new SubDialog()); // この Dialog 内で実行するタスク(Step)を列記 this.addDialog(new WaterfallDialog('start', [ async (step) => { return await step.beginDialog(SUB_DIALOG) } ])); this.initialDialogId = 'start'; } async run(turnContext, dialogState) { const dialogSet = new DialogSet(dialogState); dialogSet.add(this); // WaterfallDialog を順に実行 // 開始されていない場合は、initialDialogId に指定されている WaterfallDialog から実施 const dialogContext = await dialogSet.createContext(turnContext); const results = await dialogContext.continueDialog(); if (results.status === DialogTurnStatus.empty) { await dialogContext.beginDialog(this.id); } } } module.exports.MainDialog = MainDialog;
- 投稿日:2020-08-05T16:09:49+09:00
Bot Framework v4 (node.js) をイチから学ぶ (1) オウム返しができるまで
今更ながら、Bot Framework v4 (node.js) を やりたいこと を実装できることを目標に、イチから学んでみることにしました。
執筆時点のバージョン:
- Bot Framework (javascript): v4.9.3
- node.js: v12.16.3
- npm: v6.14.4
※ Bot Framework SDK (C#) はある程度触っている & node.js はそれほど詳しくないため、分かりにくいところや間違っているところあればご指摘ください。(プルリク的に模範解答を添えて修正依頼をくださると助かります)
Bot Framework v4 (node.js) をイチから学ぶ シリーズ
- (1) オウム返しができるまで(←イマココ)
- (2) Dialog で処理をブロック化して呼び出し実行
必要なコード
EchoBot
+- bot.js          // Chatbot としての挙動
+- index.js        // API としての基本動作
+- package.json    // 必要なライブラリーや依存関係など
+- .env       // 環境変数を設定
Bot Framework の Bot Builder Samples にある EchoBot から上記ファイルをダウンロードするなどして入手、編集するベースとすれば OK です。
手順
チャットボットの稼働に必要なライブラリーやファイルを確認する
node.js の実行ファイルとして index.js が設定されていますので、こちらで必要なライブラリーやファイルを確認しておきます。(※編集作業ナシ)
ライブラリーはBot Framework を使う上で必要となる botbuilder の他、restify, dotenv, path が必要です。
Azure Bot Service の公開に必要な ID などは .env で設定します。
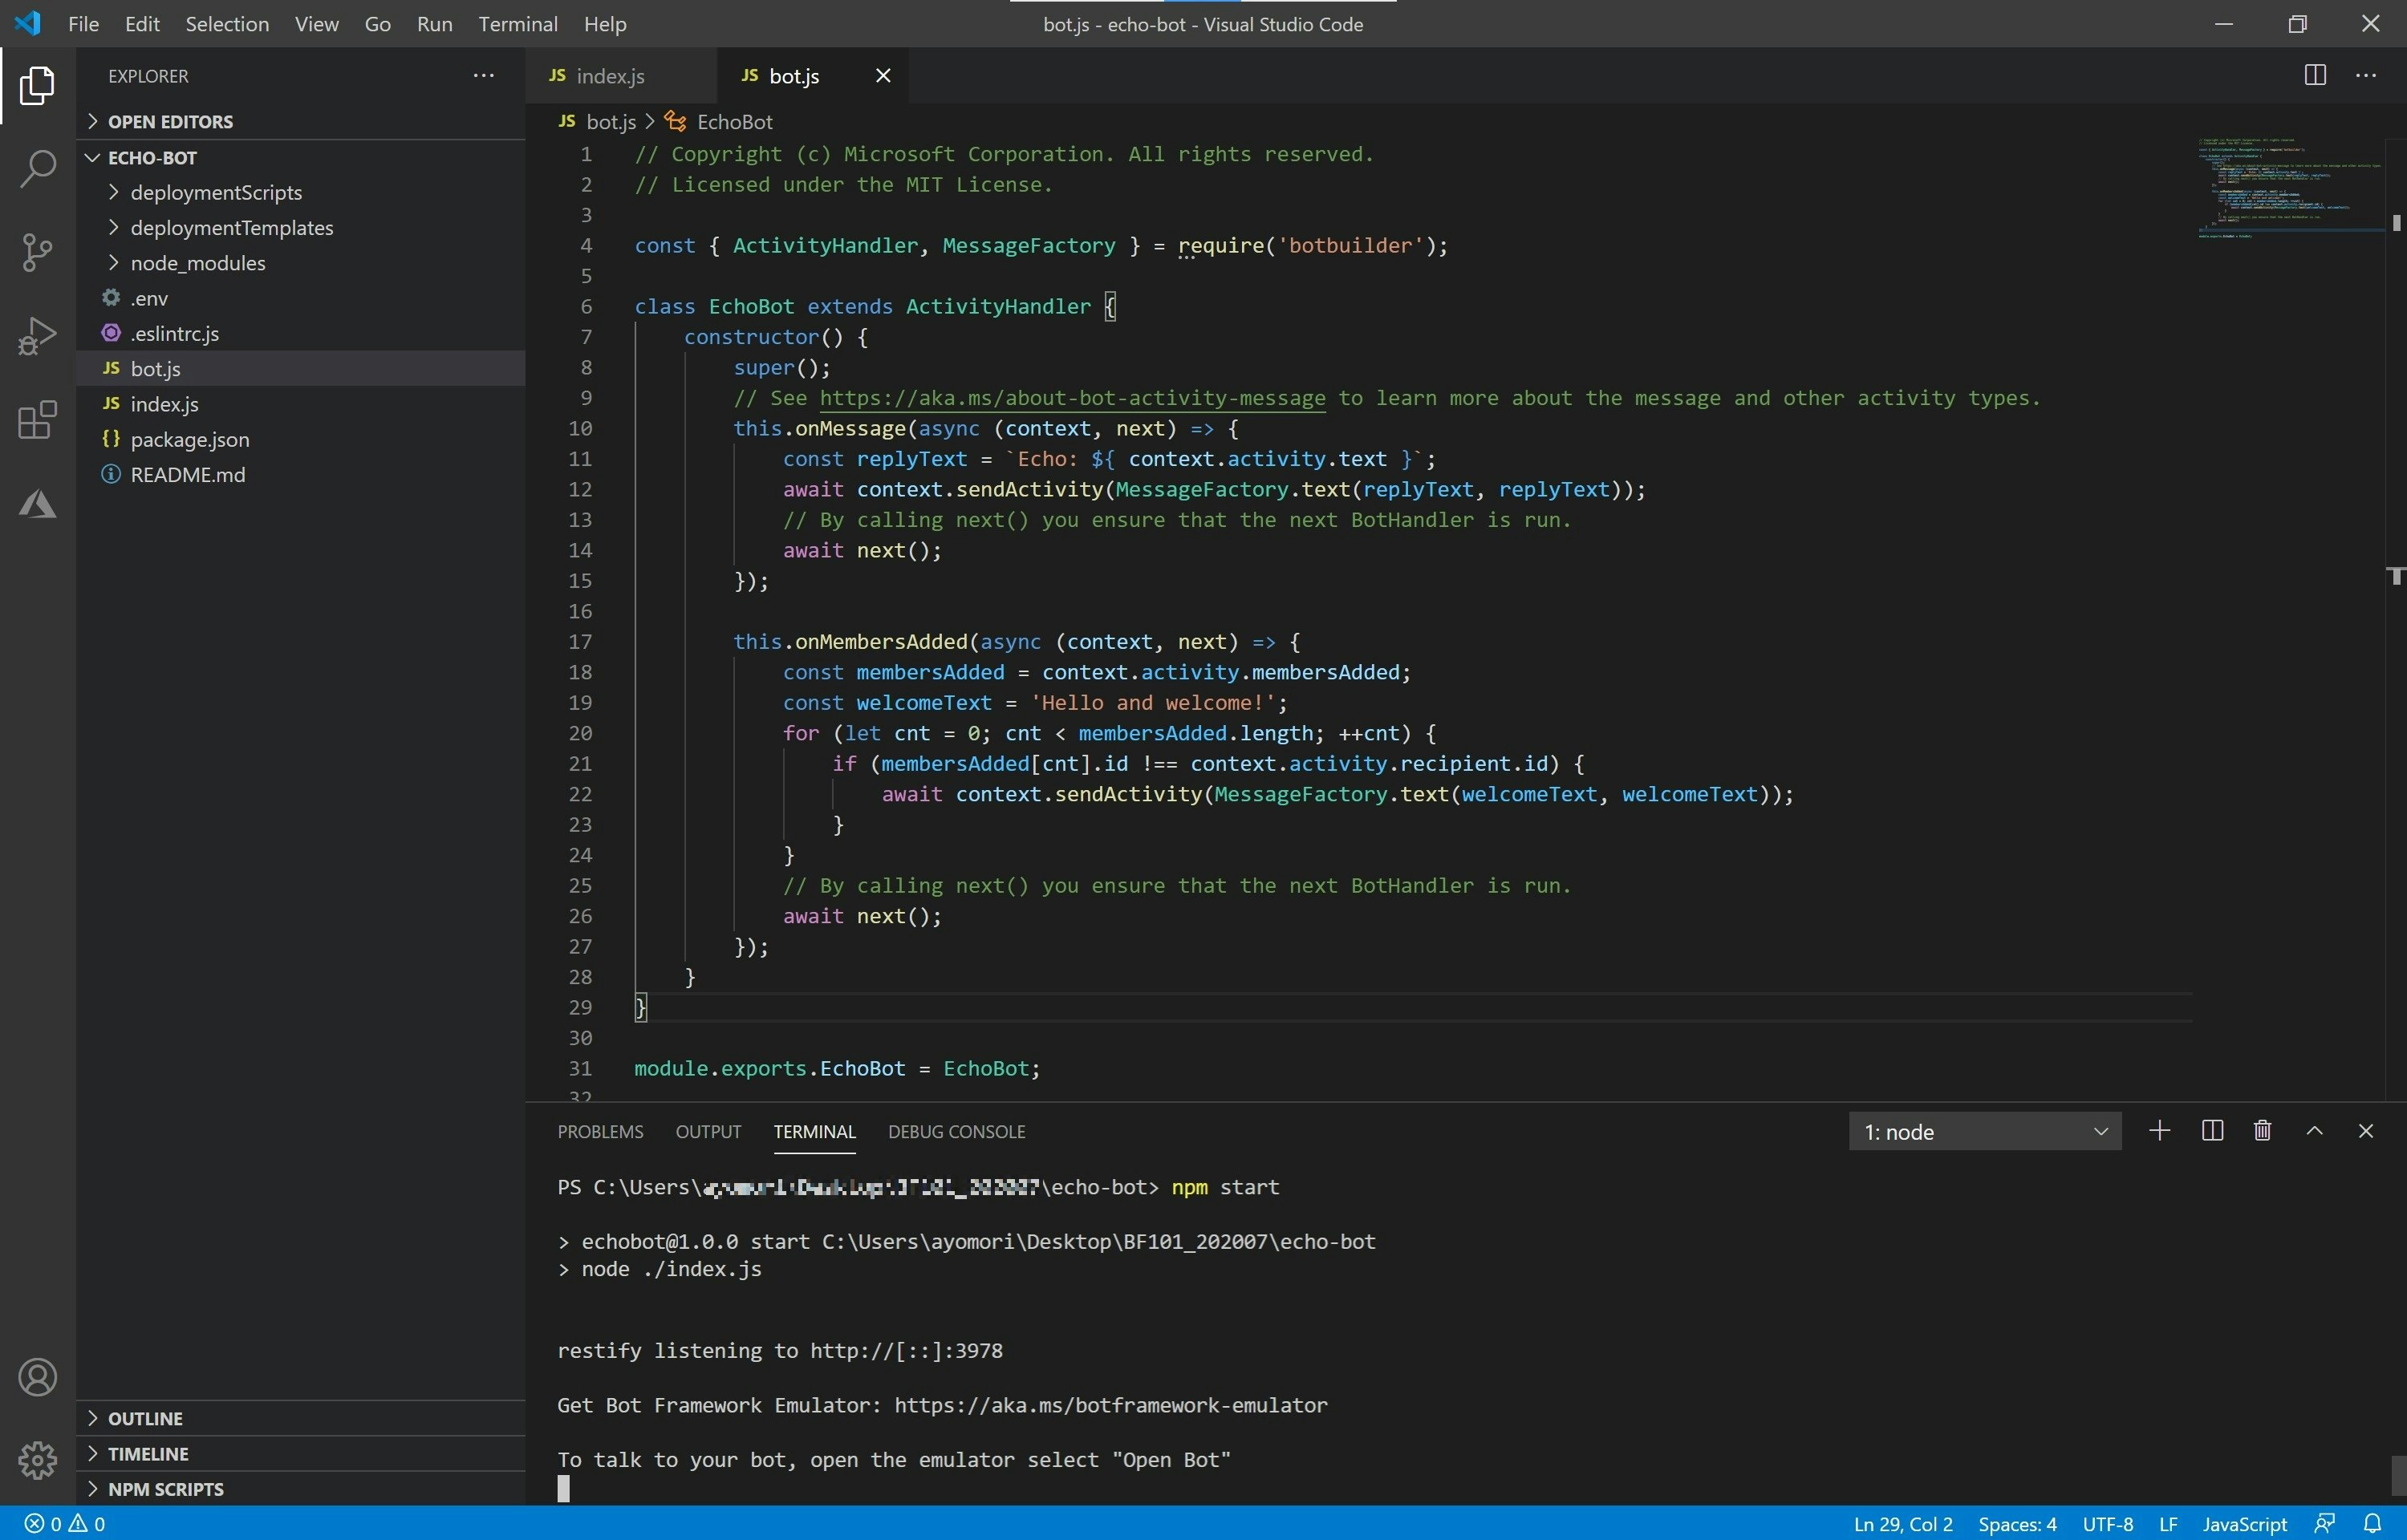
チャットボットの挙動を記述する EchoBot (ファイル名は bot.js) を読み込んでいます。index.jsconst path = require('path'); const restify = require('restify'); // Import required bot services. // See https://aka.ms/bot-services to learn more about the different parts of a bot. const { BotFrameworkAdapter } = require('botbuilder'); // This bot's main dialog. const { EchoBot } = require('./bot'); // Read environment variables from .env file const dotenv = require('dotenv'); // Import required bot configuration. const ENV_FILE = path.join(__dirname, '.env'); dotenv.config({ path: ENV_FILE }); // Create adapter. // See https://aka.ms/about-bot-adapter to learn more about how bots work. const adapter = new BotFrameworkAdapter({ appId: process.env.MicrosoftAppId, appPassword: process.env.MicrosoftAppPassword }); : (後略)チャットボット本体は Web API で、ローカルで実行した場合は localhost:3978/api/messages で待ち受けます。
EchoBot から bot インスタンスを作成し、HTTP リクエストがあった場合に作動します。index.js(前略) : // Create HTTP server const server = restify.createServer(); server.listen(process.env.port || process.env.PORT || 3978, () => { console.log(`\n${ server.name } listening to ${ server.url }`); console.log('\nGet Bot Framework Emulator: https://aka.ms/botframework-emulator'); console.log('\nTo talk to your bot, open the emulator select "Open Bot"'); }); : (中略) : // Create the main dialog. const bot = new EchoBot(); // Listen for incoming requests. server.post('/api/messages', (req, res) => { adapter.processActivity(req, res, async (context) => { // Route to main dialog. await bot.run(context); }); }); : (後略)チャットボットを起動する
コマンドラインから npm install で必要なライブラリーをインストールします。
その後、 node index.js、Package.json をサンプルからそのままで使っている場合は npm start で index.js が起動します。
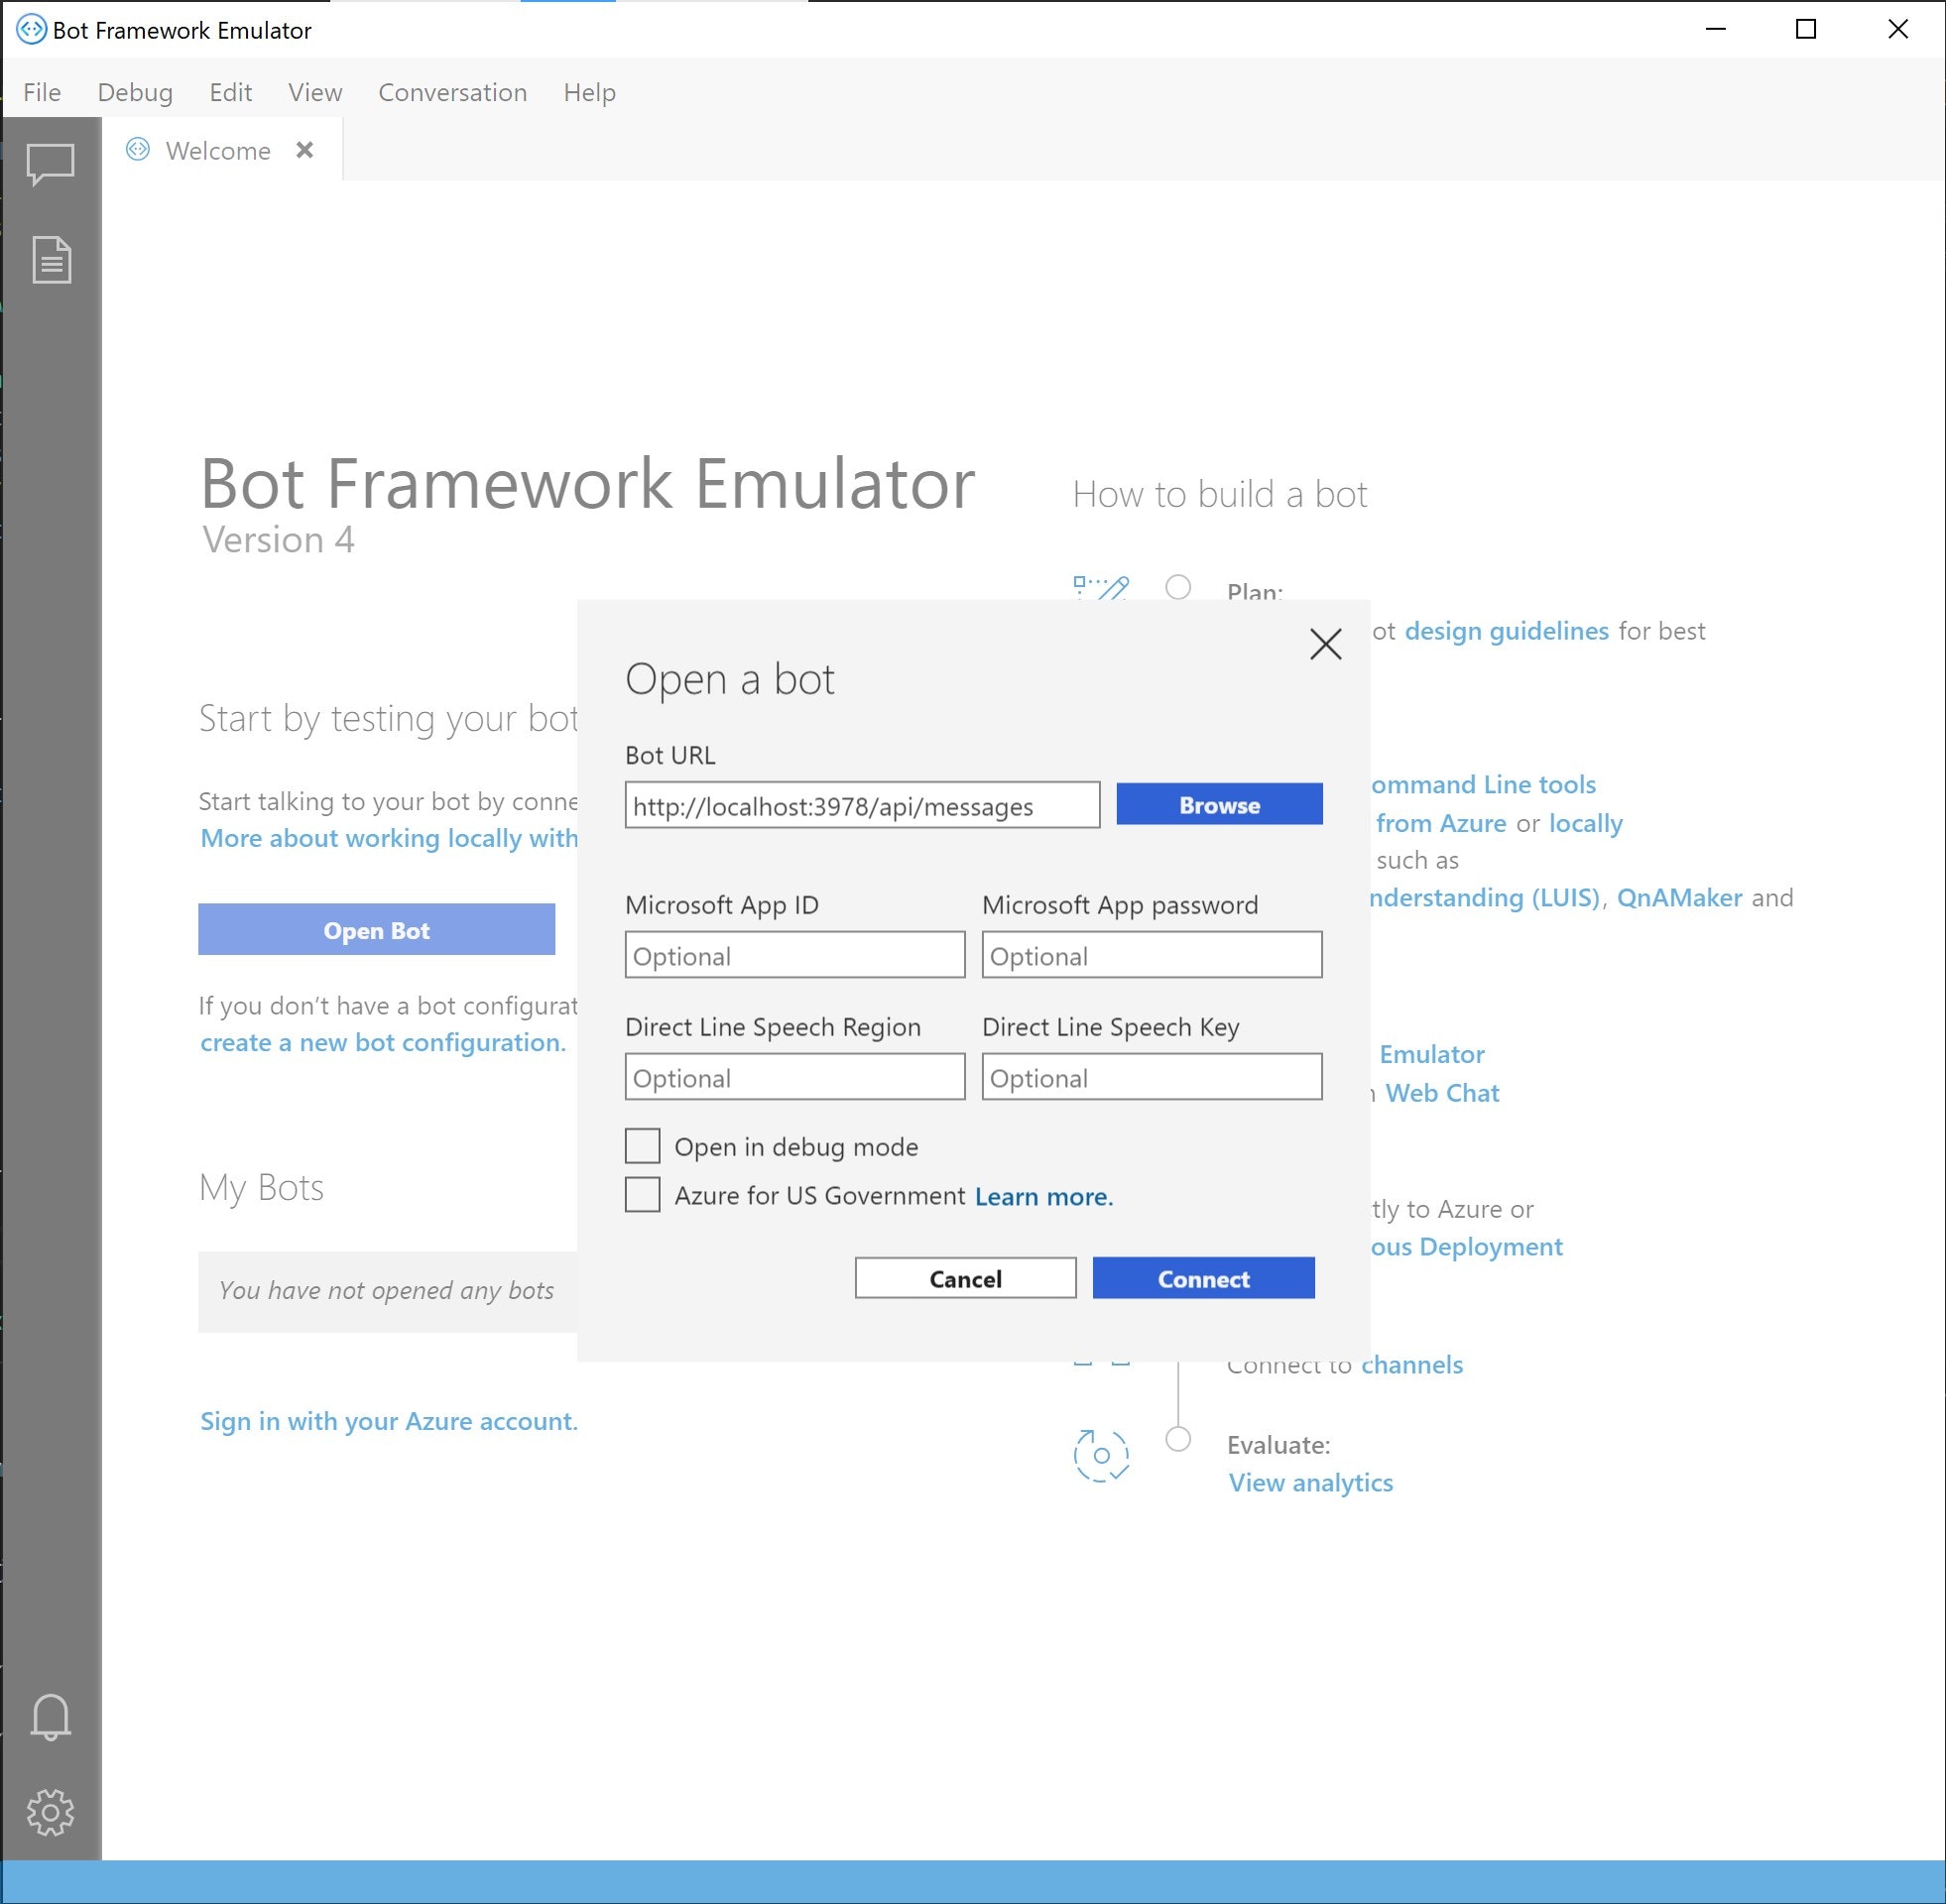
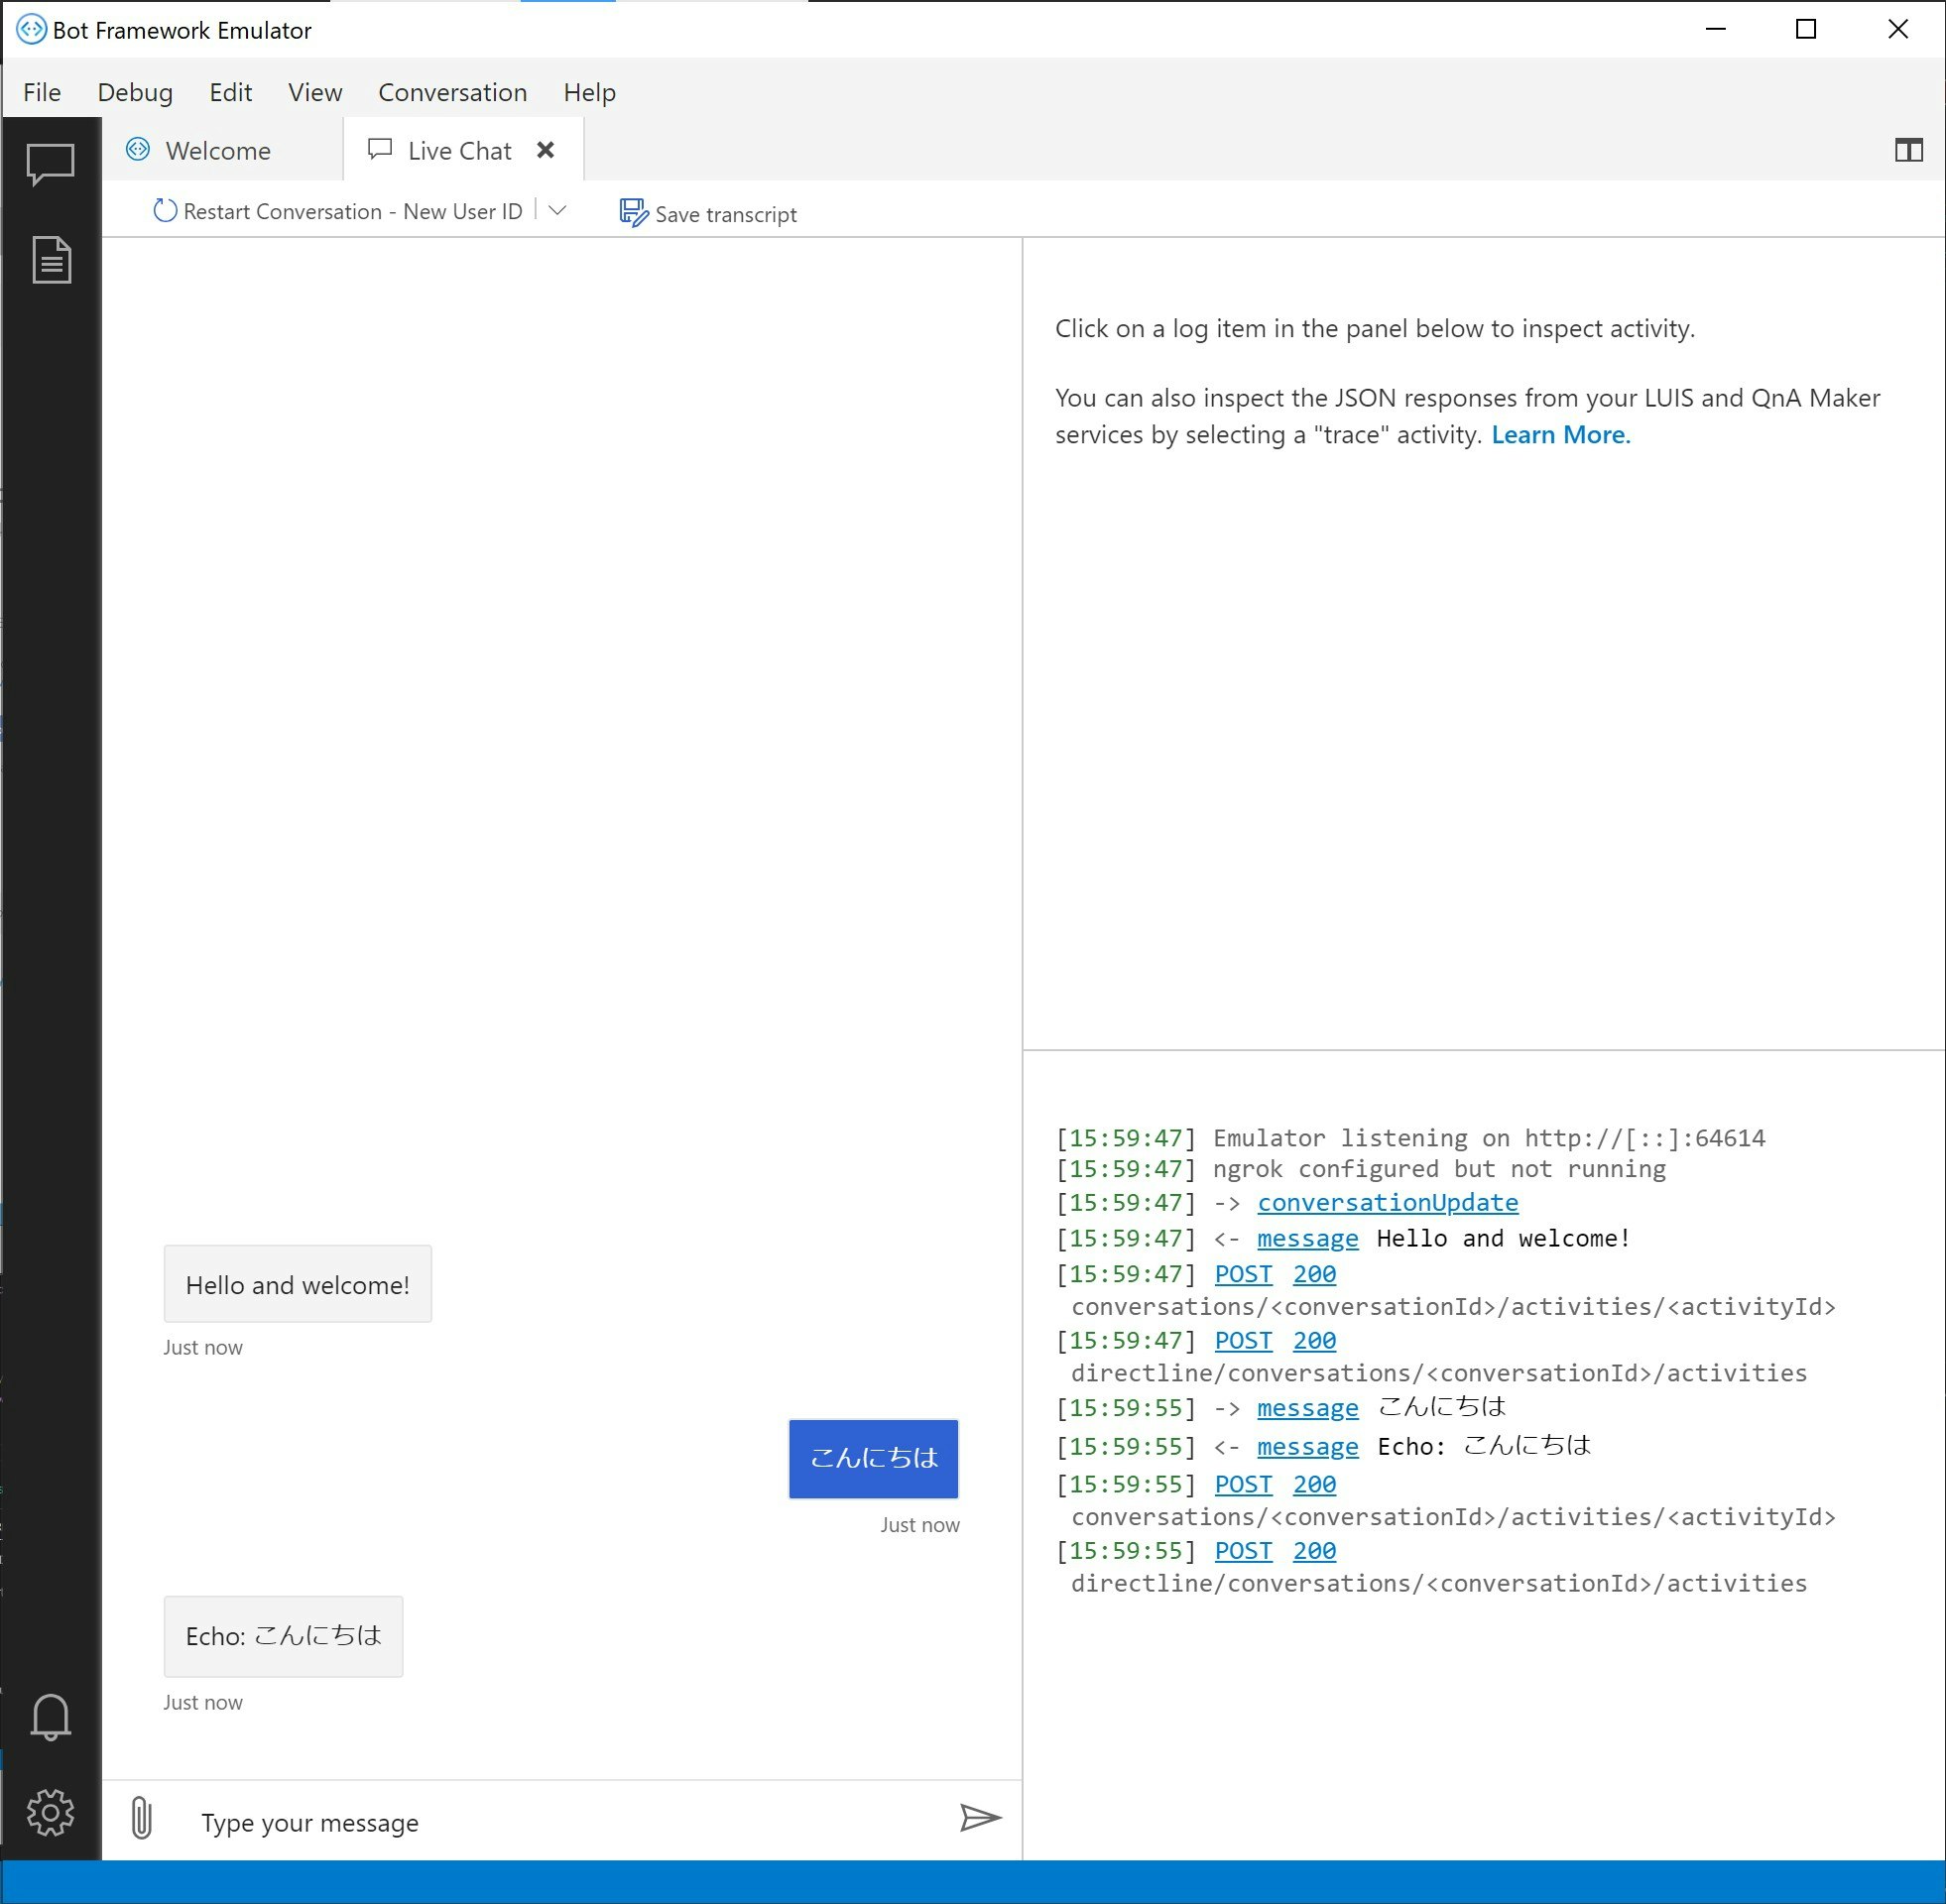
Bot Framework Emulator から https://localhost:3978/api/messages にアクセスして挙動を確認します。
EchoBot をそのまま使っている場合は、以下のように初期メッセージと、ユーザー入力に対するオウム返しが返答されます。
ユーザーからメッセージが来たら返信する
ユーザーからのメッセージ (HTTPリクエスト) に対する動作は EchoBot (ファイル名は bot.js) に記述します。
- Activity: ユーザーの接続やメッセージの受信&返信を含む、すべての動作(アクティビティ)
- TurnContext: ボットの制御(とその情報)。ユーザーとの受信、返信の内容を履歴として保持しています
ユーザーの動作は Activity で取得することができ、メッセージを受信したときは ActivityHander.onMessage が参照されます。
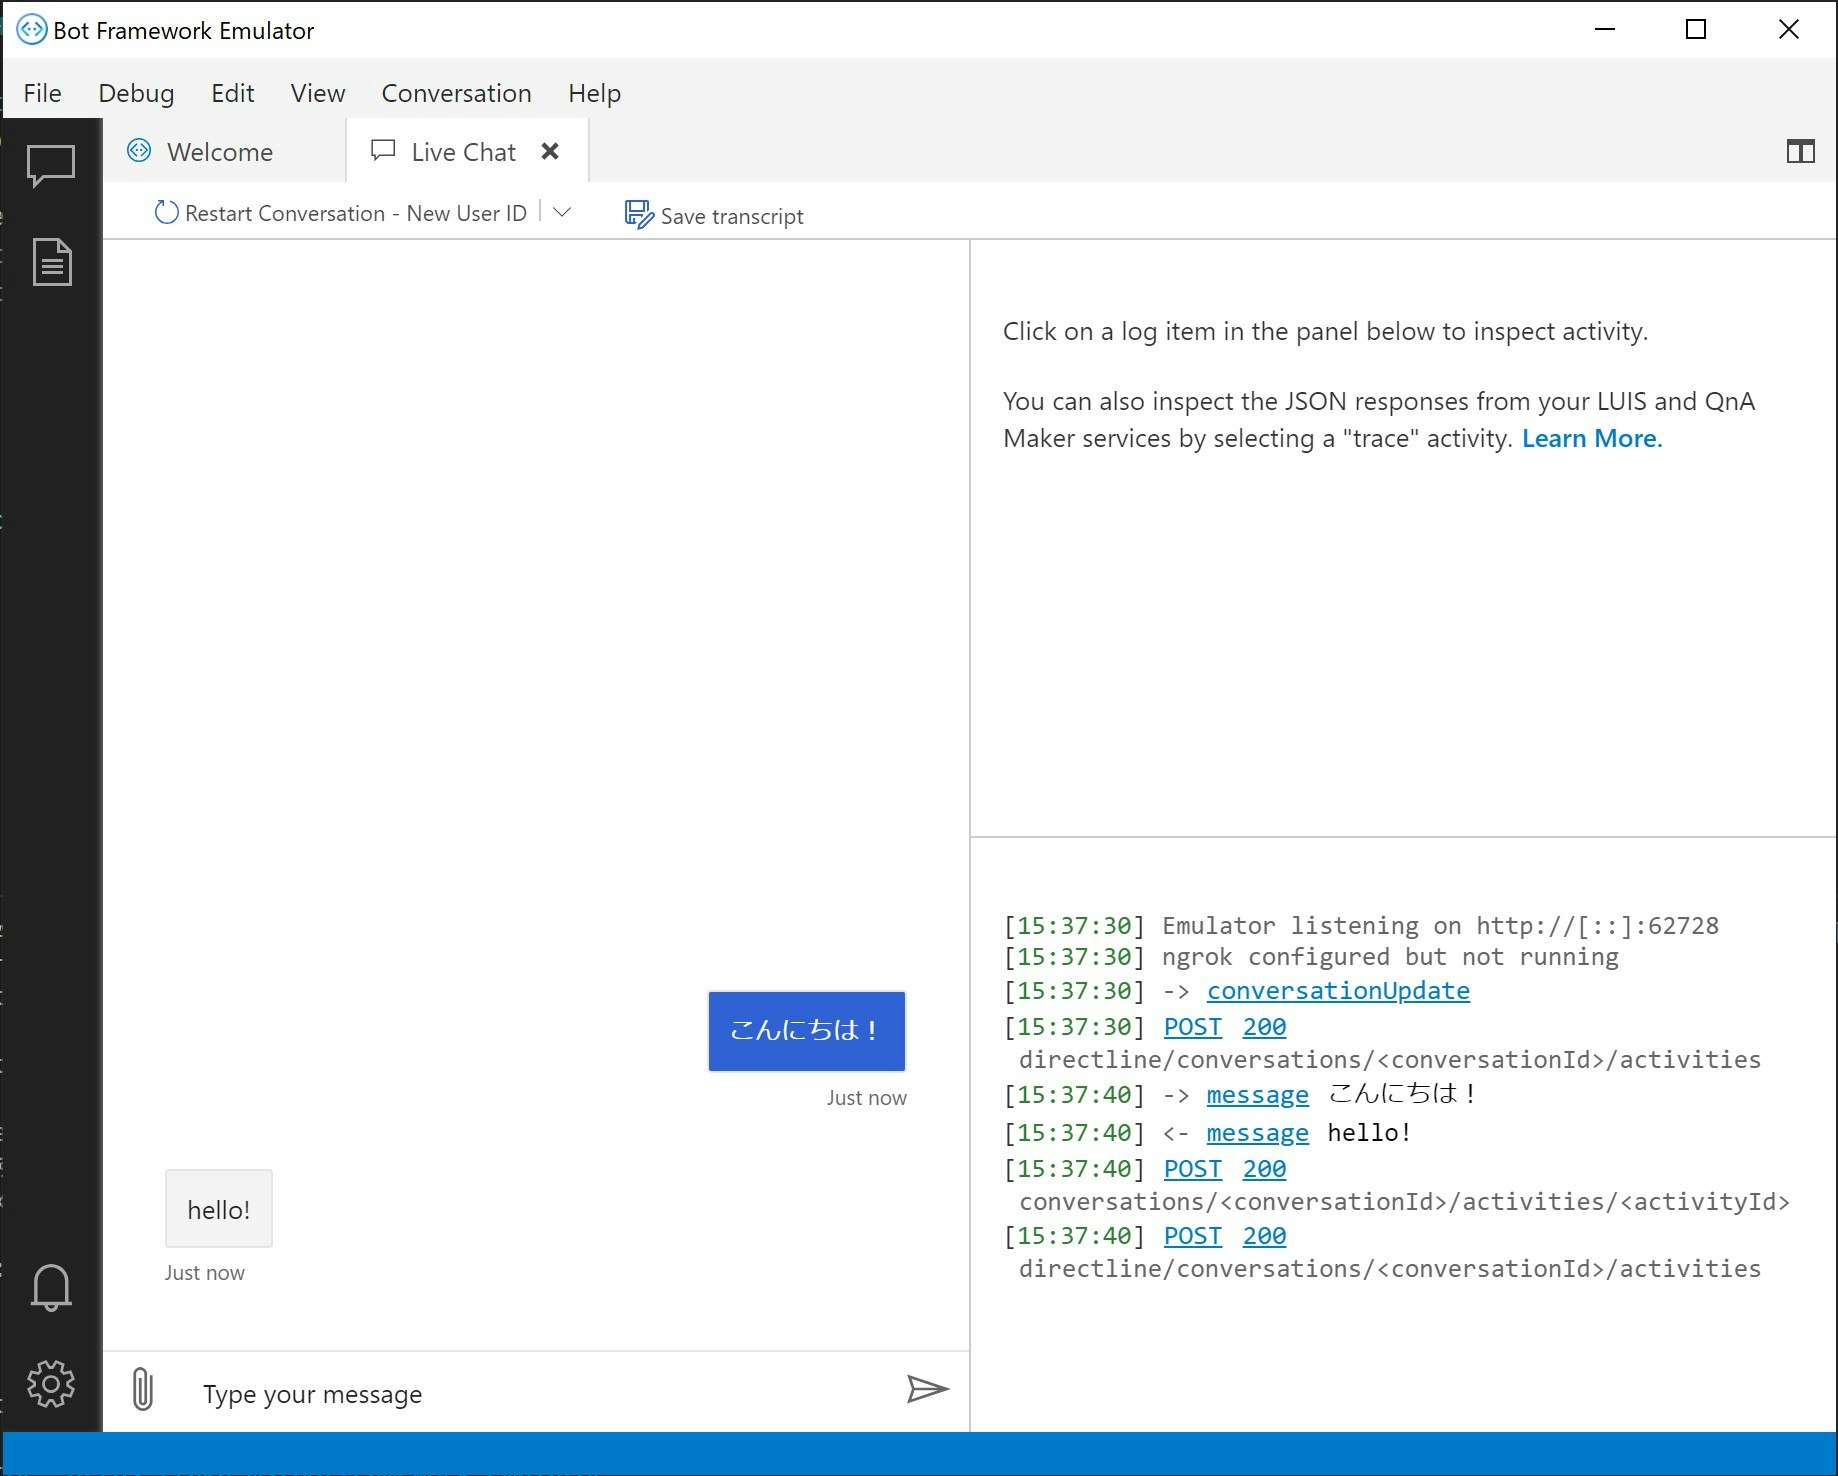
ActivityHander で onMessage を検知したとき、TurnContext.sendActivity メソッドで返信することができます。ここではユーザーからメッセージを受信したとき、「hello!」と返信する処理のみを記述するように、既存の bot.js を修正します。next() でユーザーからの受信を待ちます;
bot.jsconst { ActivityHandler } = require('botbuilder'); class EchoBot extends ActivityHandler { constructor() { super(); // メッセージを受信したとき this.onMessage(async (turnContext, next) => { // 返信して返答を待つ await turnContext.sendActivity('hello!'); await next(); }); } } module.exports.EchoBot = EchoBot;起動して Emulator から動作を確認します。
ユーザーからのメッセージ内容を取得する
TurnContext にユーザーとの受信、返信情報を保持しており、直前のユーザーからのメッセージは TurnContext.activity プロパティから取得できます。text(テキストメッセージ) または attatchment((あれば)添付ファイル) が取得できます。
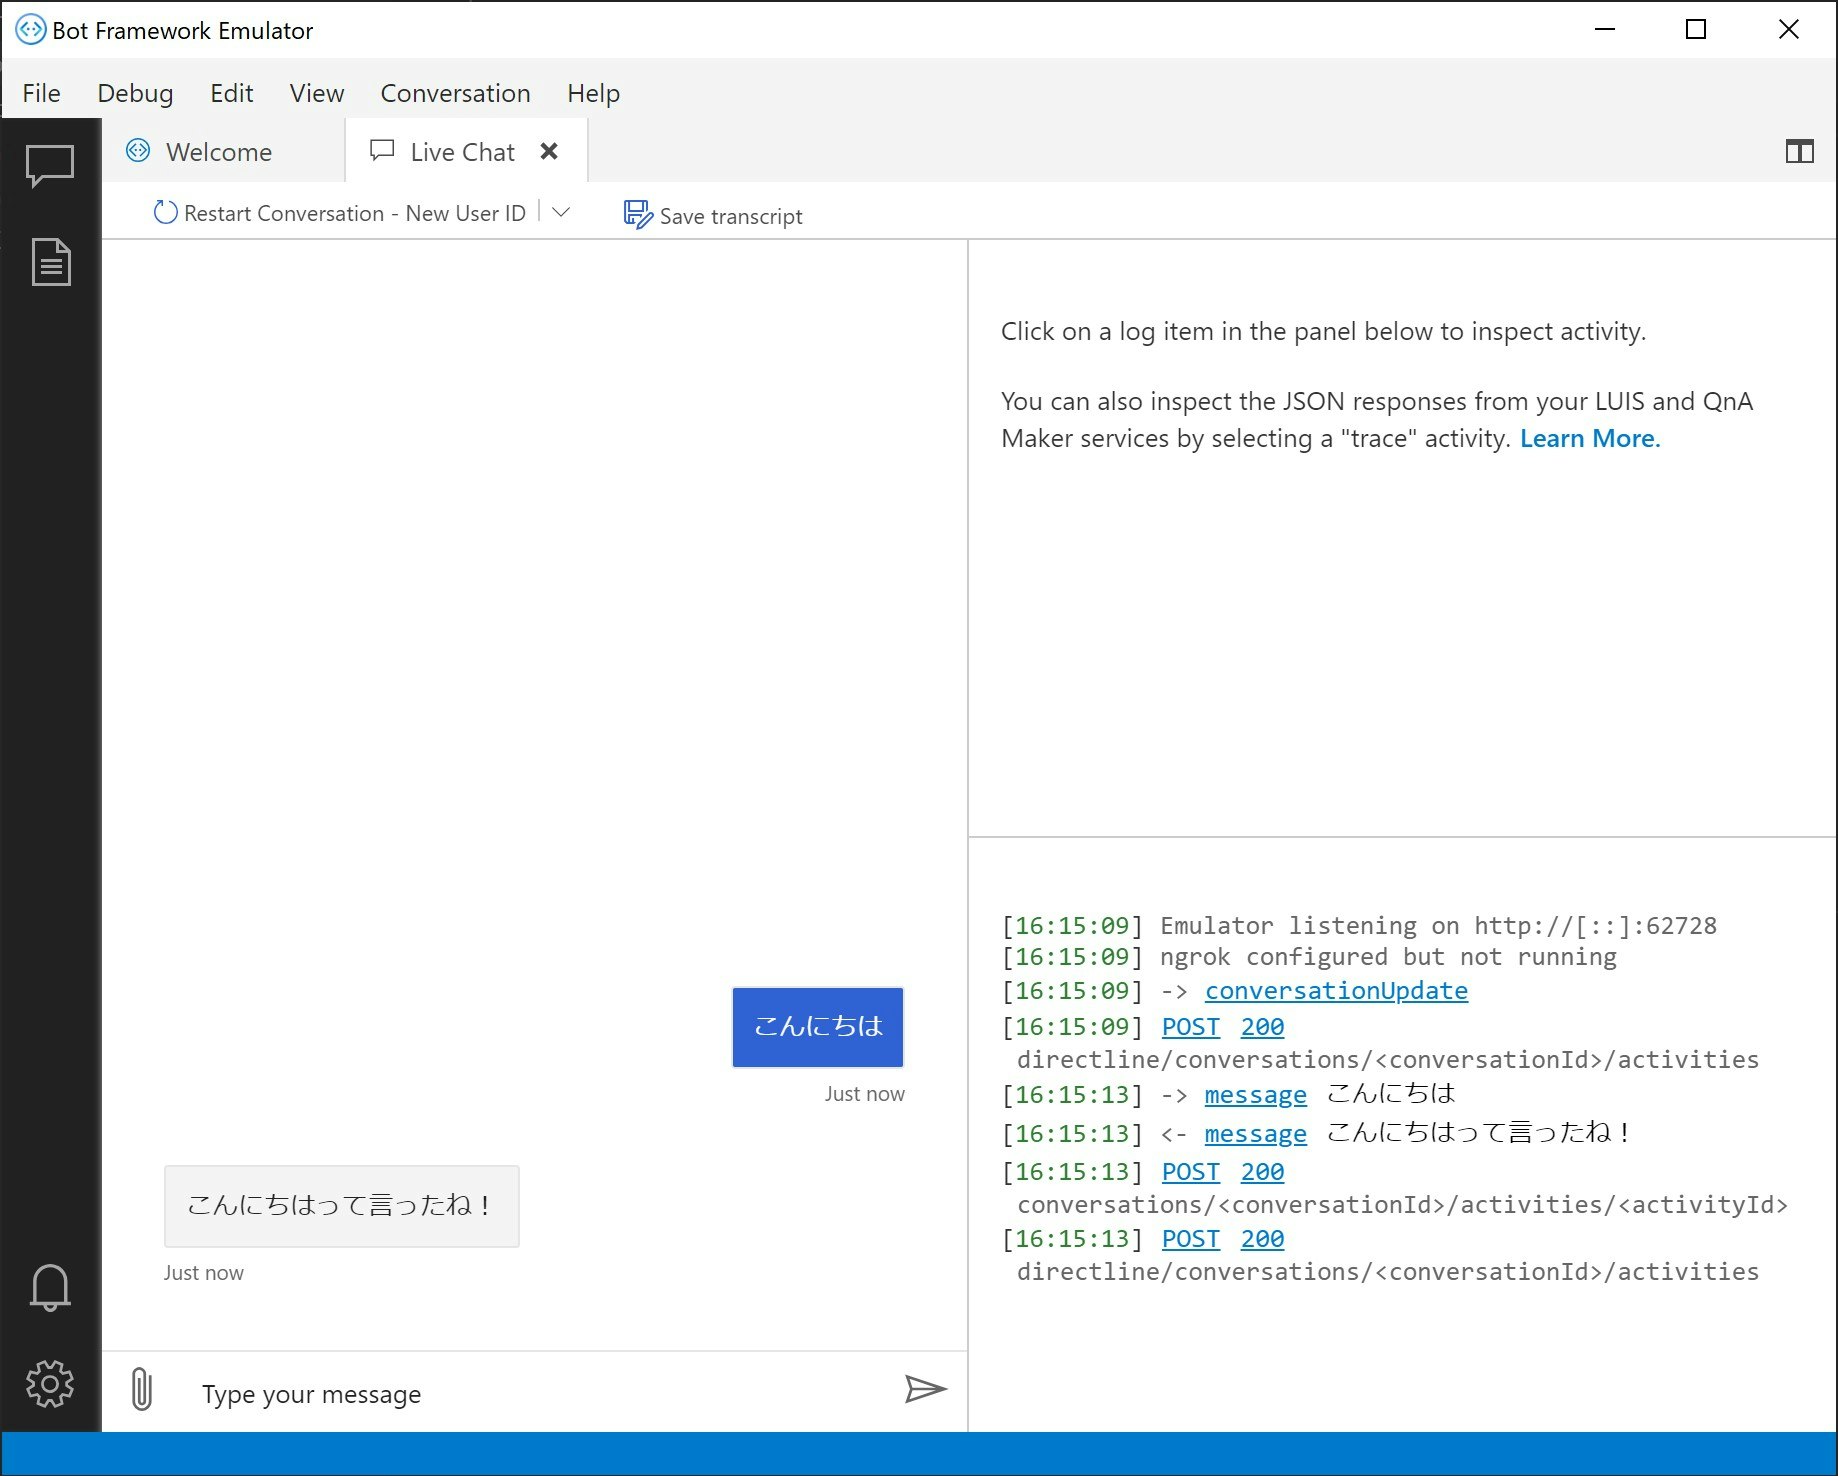
取得したメッセージをそのままオウム返しするように記述します。bot.jsconst { ActivityHandler } = require('botbuilder'); class EchoBot extends ActivityHandler { constructor() { super(); this.onMessage(async (turnContext, next) => { // ユーザーのメッセージ内容を取得して、おうむ返し(Echo)の返答を送信する const replyText = turnContext.activity.text + 'って言ったね!'; await turnContext.sendActivity(replyText); await next(); }); } } module.exports.EchoBot = EchoBot;
Welcome メッセージを送信する
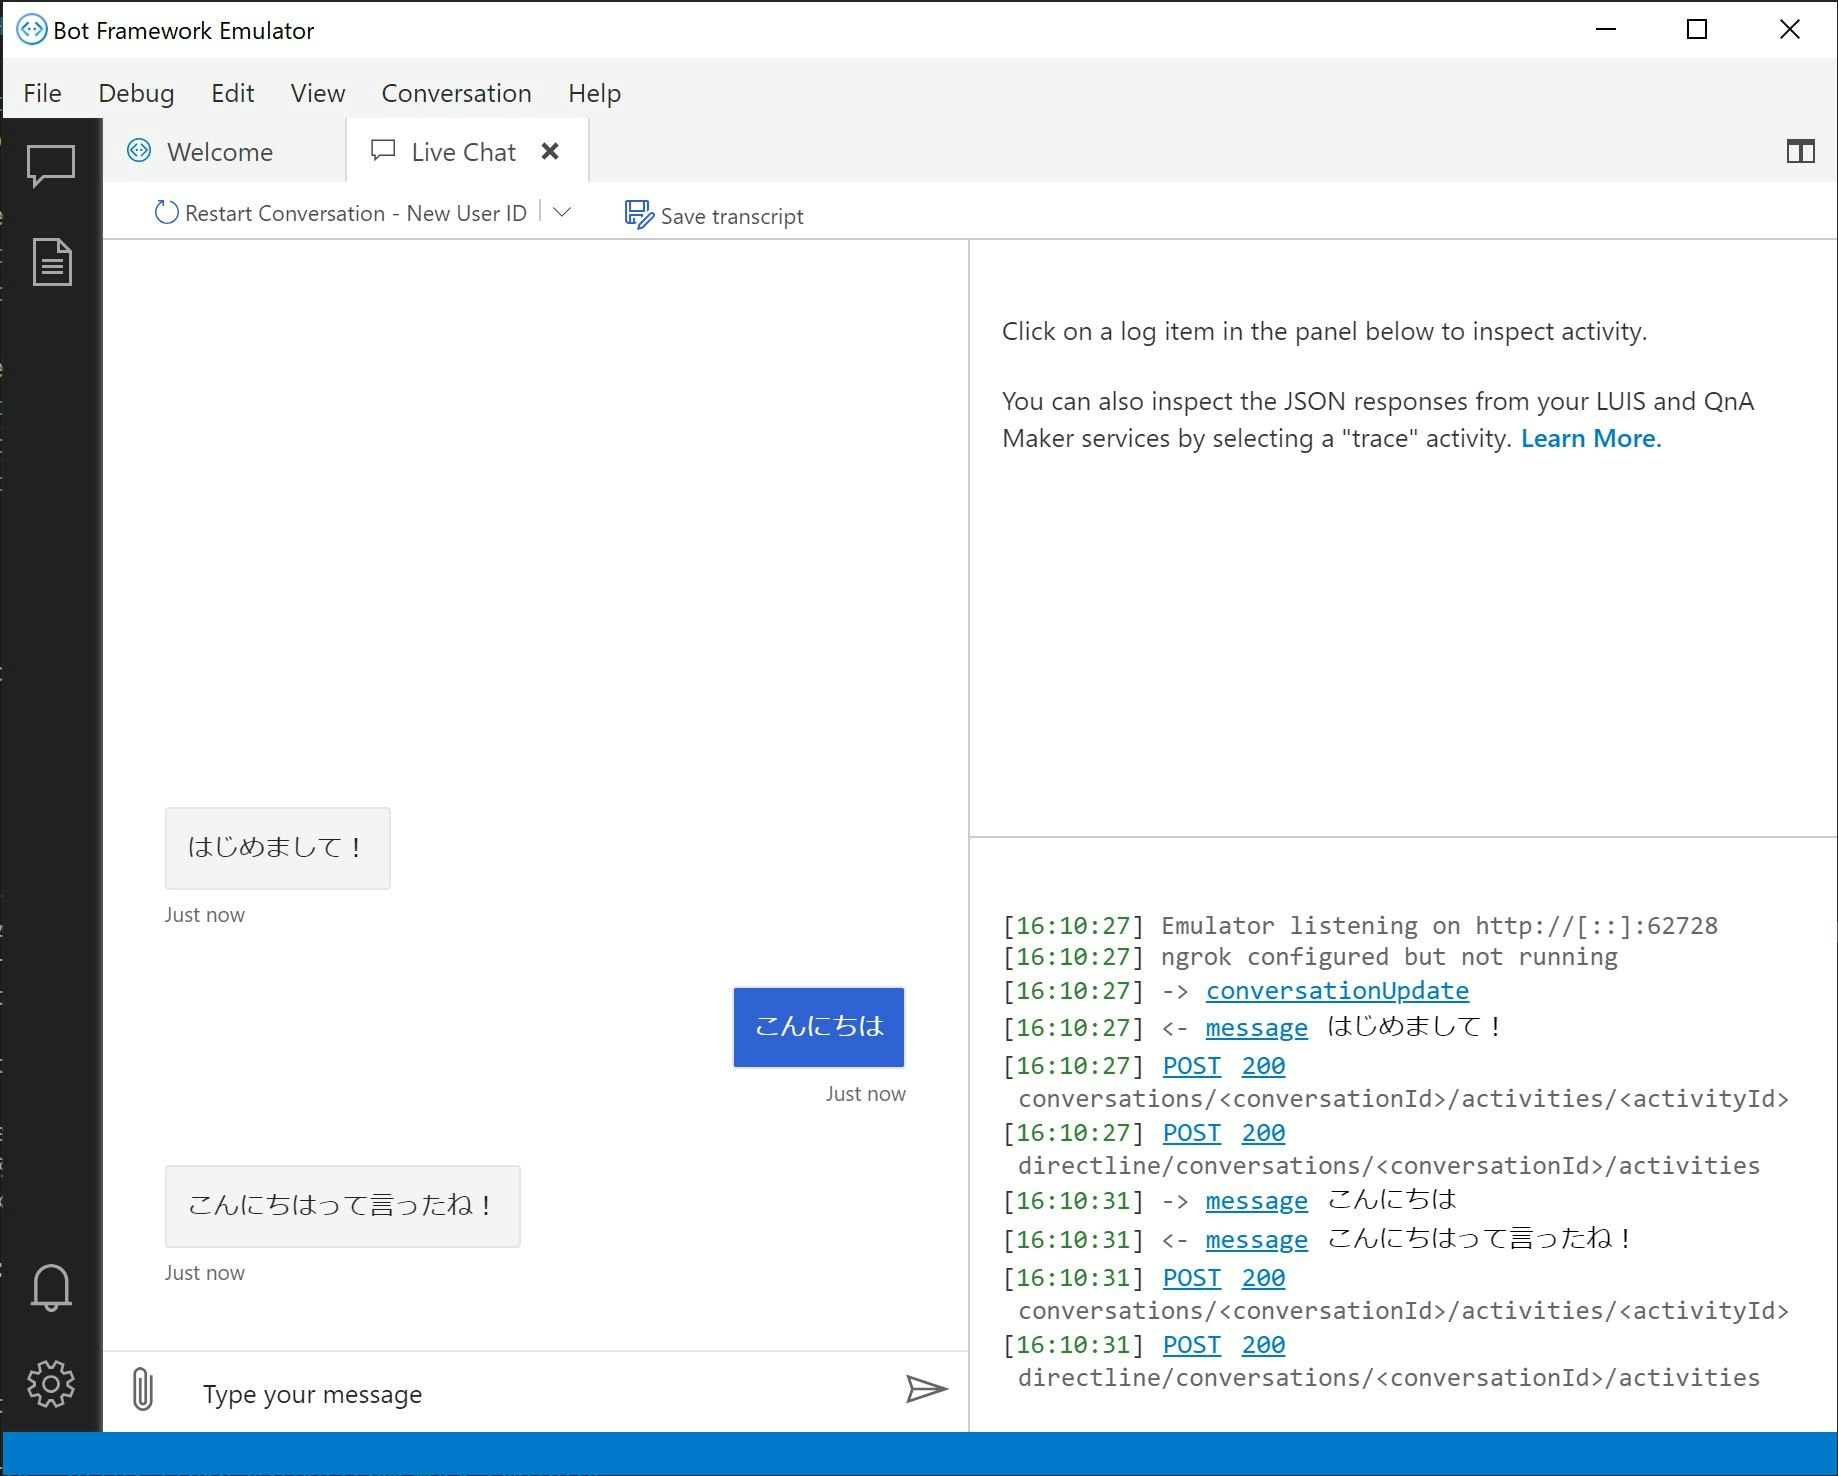
ActivityHander.onMembersAdded でユーザーが接続したことを検出できるので、その際にメッセージを送信する動作を追加します。(※接続したユーザークライアントによりできない場合アリ)
bot.jsconst { ActivityHandler } = require('botbuilder'); class EchoBot extends ActivityHandler { constructor() { super(); this.onMembersAdded(async (turnContext, next) =>{ await turnContext.sendActivity('はじめまして!'); await next(); }); this.onMessage(async (turnContext, next) => { const replyText = turnContext.activity.text + 'って言ったね!'; await turnContext.sendActivity(replyText); await next(); }); } } module.exports.EchoBot = EchoBot;
- 投稿日:2020-08-05T15:56:17+09:00
Electronをバージョンアップしたらwindowsで4G以上のファイルが読み込めなくなった話
electron6系から8系へバージョンアップした際に、4G以上の大きいサイズのファイルにおいて、ビルド後ローカルファイルが読み込めなくなりました(windowsのみ。ローカル起動では可能)
Mac OSでは読み込みが可能でした
どこにも情報が無く数週間悩んだのでまとめてみました環境
- electron バージョン: electron 8.3.1
- OS: windows10 64bit
- ビルド: electron-builder 22.1.0
XMLHttpRequest (XHR) 通信でローカルファイル読み込み
期待する値
- readyState=4(DONE)になる
- onloadイベントが発火
実際の値
- readyState=3(LOADING)のまま
- onprogress でずっと読み込み中 (totalの値まで到達してもonloadが呼ばれない)
- ontimeoutも発火せず...
対応
- 32bit アプリを 64bit に変更(electron-builderにて、ビルドの引数を変更した)
- 「electron-builder build --win --ia32」 -> 「npm run obfuscation && electron-builder build --win --x64」
補足(XMLHttpRequestで通信エラーになっているときの判定)
- totalフィールド: 全転送バイト数
- loadedフィールド: これまで転送されたバイト数
- 通信エラーになっている時以下になっている(全体の長さが不明の状態)
- total = 0
- lengthComputable = false
xhr.js// データ受信中のイベント var xhr = new XMLHttpRequest(); xhr.onprogress = function (oEvent) { if (oEvent.lengthComputable || xhr.total !== 0) { var percentComplete = oEvent.loaded / oEvent.total * 100; // ... } else { // 全体の長さが不明なため、進捗情報を計算できない }参考
- 投稿日:2020-08-05T12:13:15+09:00
Google Functions: console.infoやconsole.errorなどとログビューアの「重大度」の関係性
JavaScriptのConsole APIには、ロギングで良く使う
console.log以外に、console.infoやconsole.errorなど、ログに「情報」や「エラー」といった色をつけるメソッドがあります。一方、Google Cloud Platform(GCP)のログビューアの「重大度(SEVERITY)」という概念があり、ログごとに「INFO」や「ERROR」などの意味合いを持たせることができます。
では、Console APIとGCPの「重大度」はどのような関係になっているのでしょうか? 実験してみたので、この投稿ではその結果をお伝えしたいと思います。
結論
先に結論を示します。JavaScriptのConsole APIのメソッドの違いは、基本的にGCPの重大度に影響しません。ただし、
console.warnとconsole.errorがErrorオブジェクトをロギングした場合に限り、重大度が「ERROR」になります。
Errorオブジェクト以外をロギングした場合
Console API GCPの重大度 console.log DEFAULT console.info DEFAULT console.warn DEFAULT console.error DEFAULT
Errorオブジェクトをロギングした場合
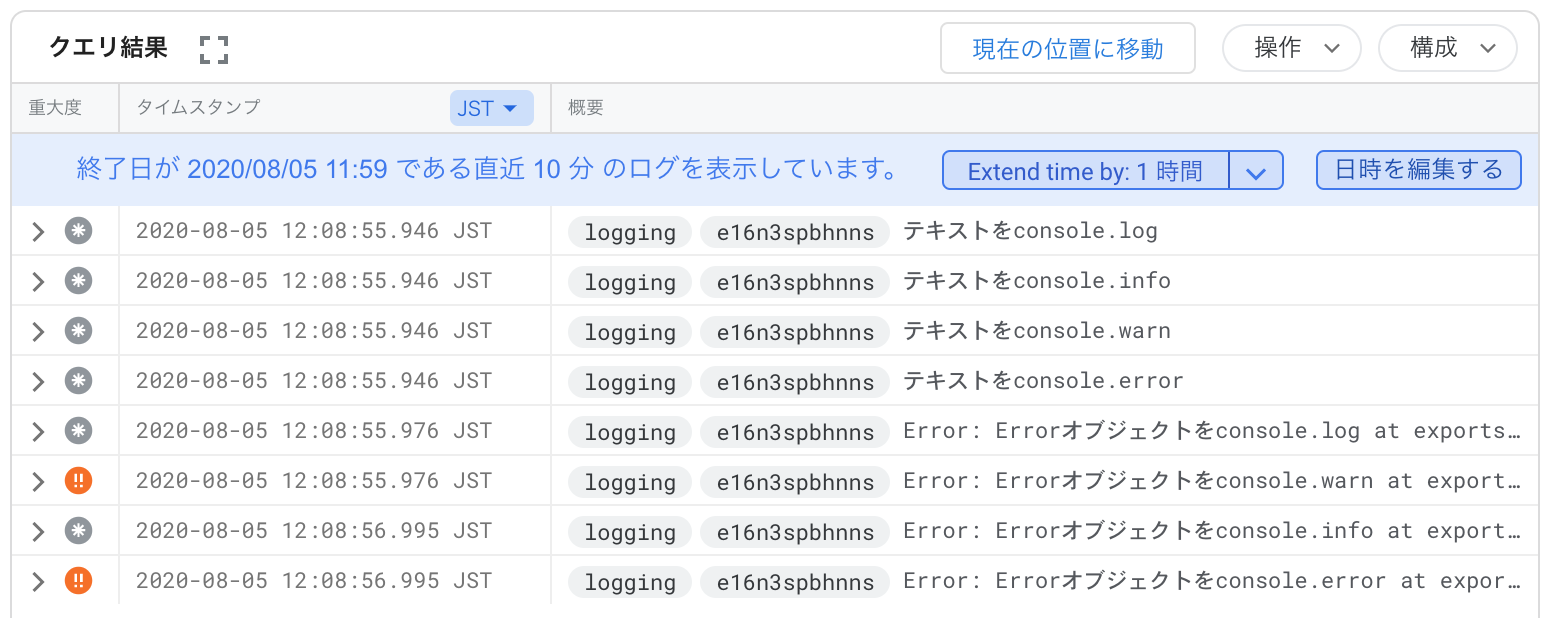
Console API GCPの重大度 console.log DEFAULT console.info DEFAULT console.warn ERROR console.error ERROR console.infoやconsole.errorなどが、ログビューアでどの「重大度」になるか検証する
各種メソッドを検証するために、次のような関数を用意しました:
index.jsexports.logging = (req, res) => { console.log('テキストをconsole.log') console.info('テキストをconsole.info') console.warn('テキストをconsole.warn') console.error('テキストをconsole.error') console.log(new Error('Errorオブジェクトをconsole.log')) console.info(new Error('Errorオブジェクトをconsole.info')) console.warn(new Error('Errorオブジェクトをconsole.warn')) console.error(new Error('Errorオブジェクトをconsole.error')) res.send('OK') }これをデプロイして、
gcloud functions deploy logging --runtime=nodejs12 --trigger-http実行してみます:
curl https://asia-northeast1-${PROJECT}.cloudfunctions.net/loggingすると、ログビューアには次のようなログが残りました:
この結果を確認すると、
console.warnとconsole.errorがErrorオブジェクトをロギングした場合は、重大度がERRORになり、それ以外はDEFAULTになったことが分かります。次に読む
- 投稿日:2020-08-05T11:28:17+09:00
Google Functions & Node.js: console.logを使った最低限のロギング
この投稿では、Google Cloud Platform(GCP)のGoogle Cloud Functions(GCF)のNode.js環境で、
console.logを使った最低限のロギング手法について解説します。この投稿で学ぶこと
- Google Cloud Functions & Node.jsでは、
console.logで最低限のロギングは可能。- 2行以上に渡るログは行ごとに分解されるので注意。
- jsonPayloadを意識すると、オブジェクトの構造をログに出すことも可能。
GCFでは
console.logでログを残せて、「ログビューア」で確認できるまず、Google Cloud Functionsでどのようにロギングし、そのログをどうやって確認するのかを学びます。シンプルに1行のメッセージを
console.logで記録してみましょう。index.jsexports.helloWorld = (req, res) => { console.log('helloWorld関数を実行しています。') res.send('Hello World!') }この
helloWorld関数をGoogle Cloud Platformにデプロイします:gcloud functions deploy helloWorld --runtime=nodejs12 --trigger-httpデプロイが完了したら、curlで関数を呼び出してみます:
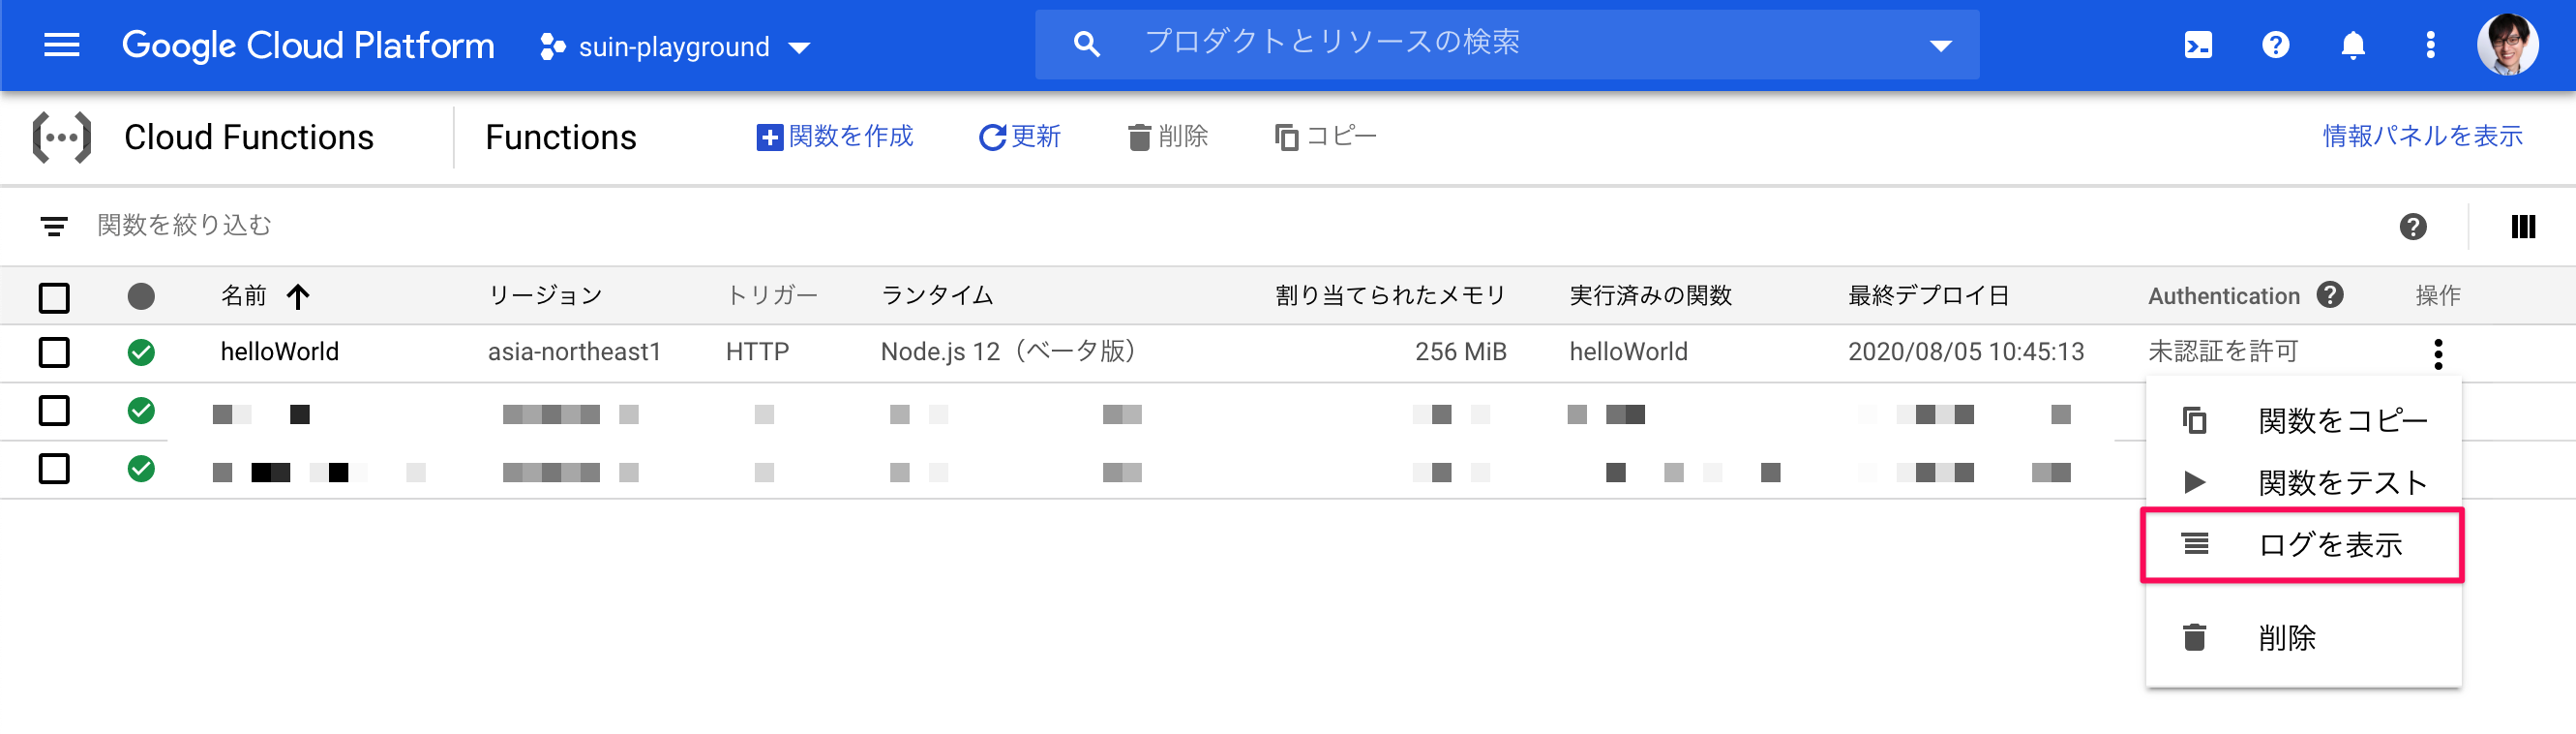
curl https://asia-northeast1-${PROJECT}.cloudfunctions.net/helloWorldどのようなログが出たかは、GCPの管理コンソールの「Cloud Functions」を開き、「helloWorld」関数のメニューの「ログを表示」を開きます。
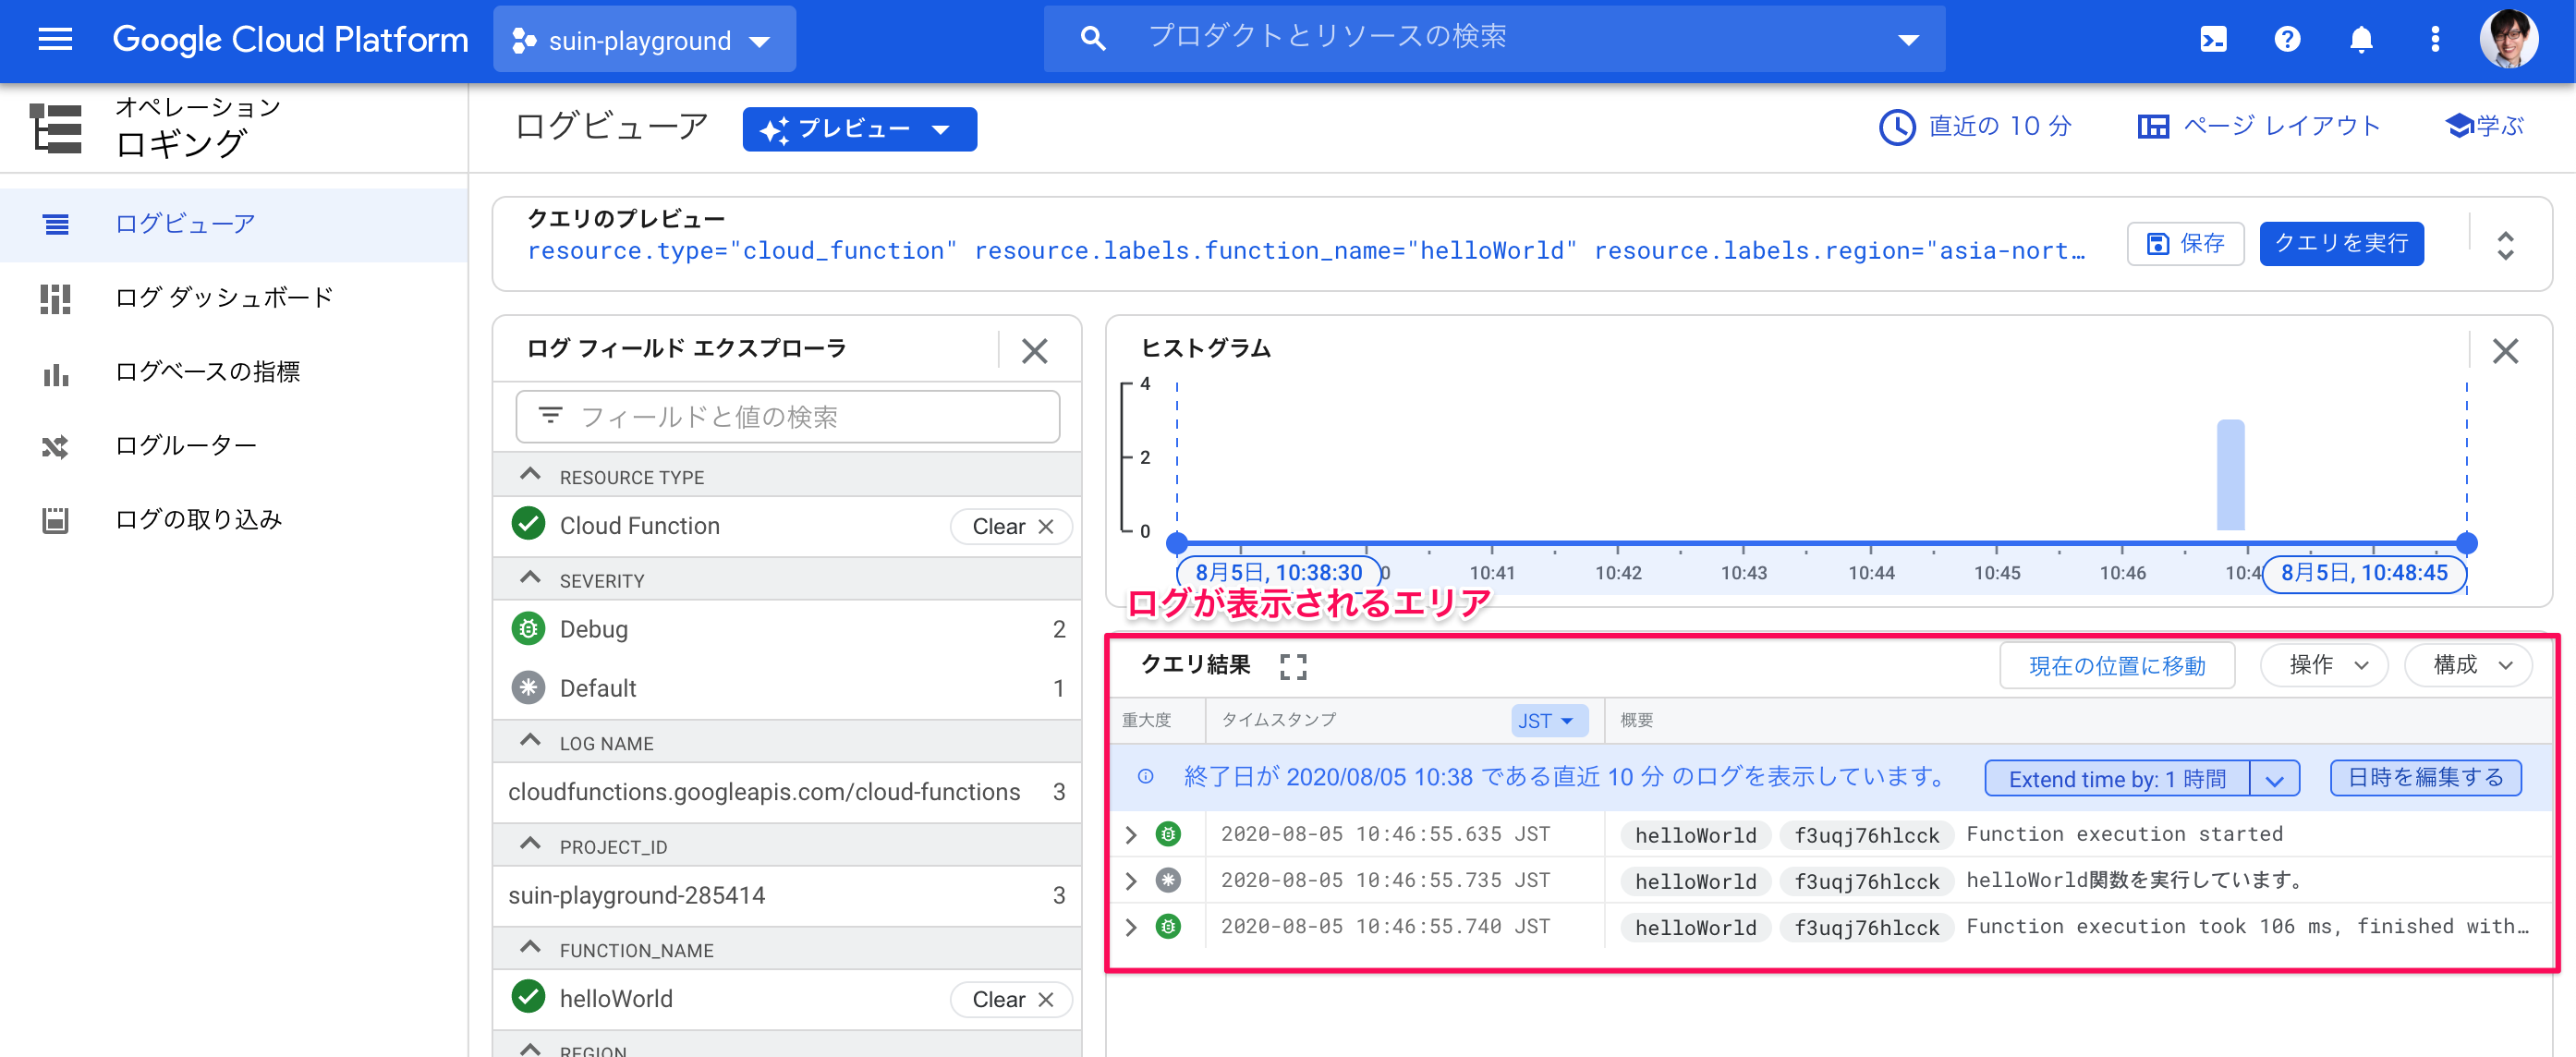
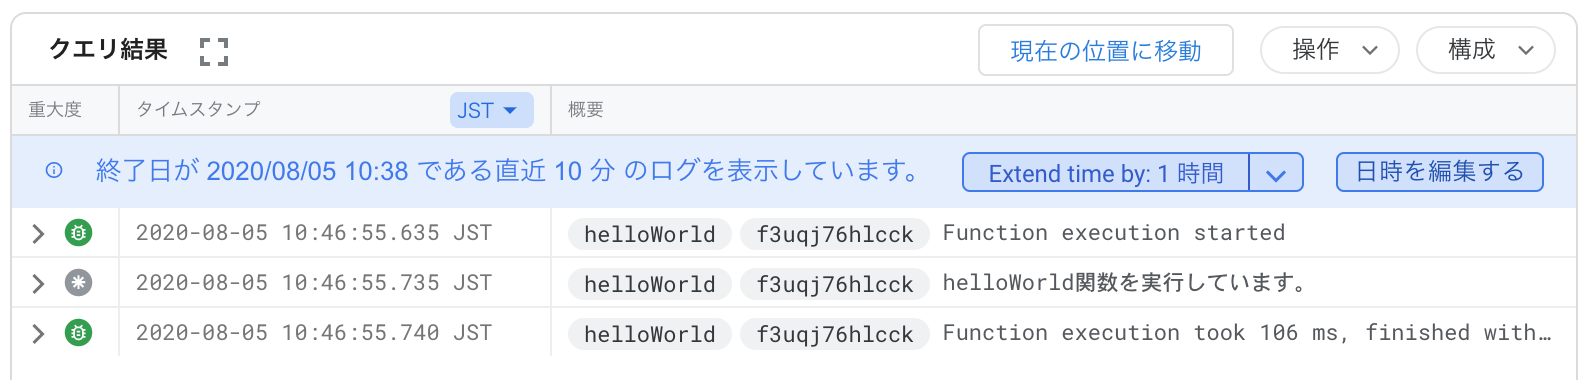
開くと「ログビューア」が表示され、「クエリ結果」の部分にログの内容が表示されます:
ログが表示されるエリアを拡大してみると、
console.logでロギングした「helloWorld関数を実行しています。」が記録されていることが分かります:
関数が実行されてからログビューアに反映されるまで、数十秒の遅延があります。なので、関数実行後すぐにログビューアを開いてもログが出ていないかもしれません。その場合は、ログが出るまでログビューアのクエリ結果にある「現在の位置に移動」ボタンをクリックして新しいログの到着を待ちましょう。
ログは
>のつまみを押すと、メタ情報を見ることができます:
本稿では触れませんが、これらのメタ情報を活用してログを分析したりすることができます。
Node.js環境のGCFでは、
console.logを使えば特にGCP側の設定をいじらなくてもログを確認できることが分かりました。console.logで2行以上出す場合は、ログが分割されてしまうので注意
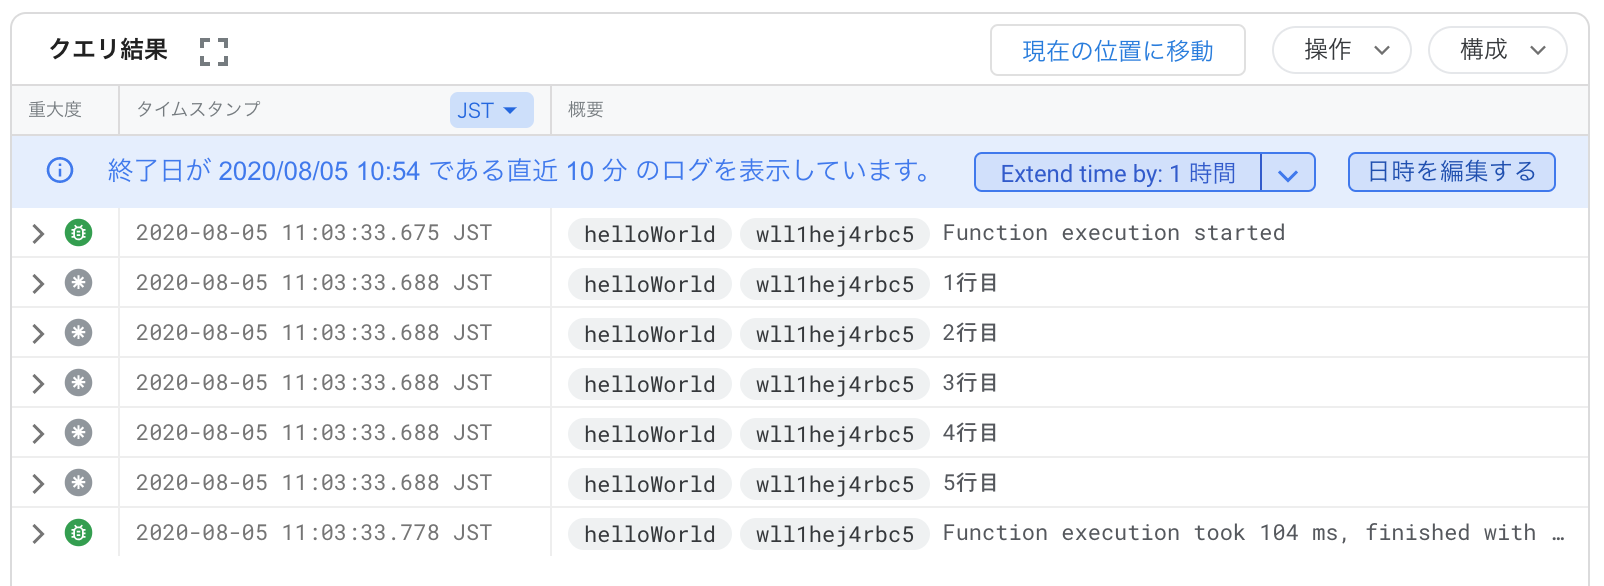
console.logは複数行の文字列をロギングすることができますが、GCPで複数行のロギングをする場合は、ログが分割されてしまうので注意が必要です。どういうことか実験して確認してみましょう。次の関数は複数行のログを吐くものです:
index.jsexports.helloWorld = (req, res) => { console.log('1行目\n2行目\n3行目\n4行目\n5行目') res.send('Hello World!') }これをデプロイして呼び出してみると、ログビューアには次のようなログが残ります:
見ての通り、1回の
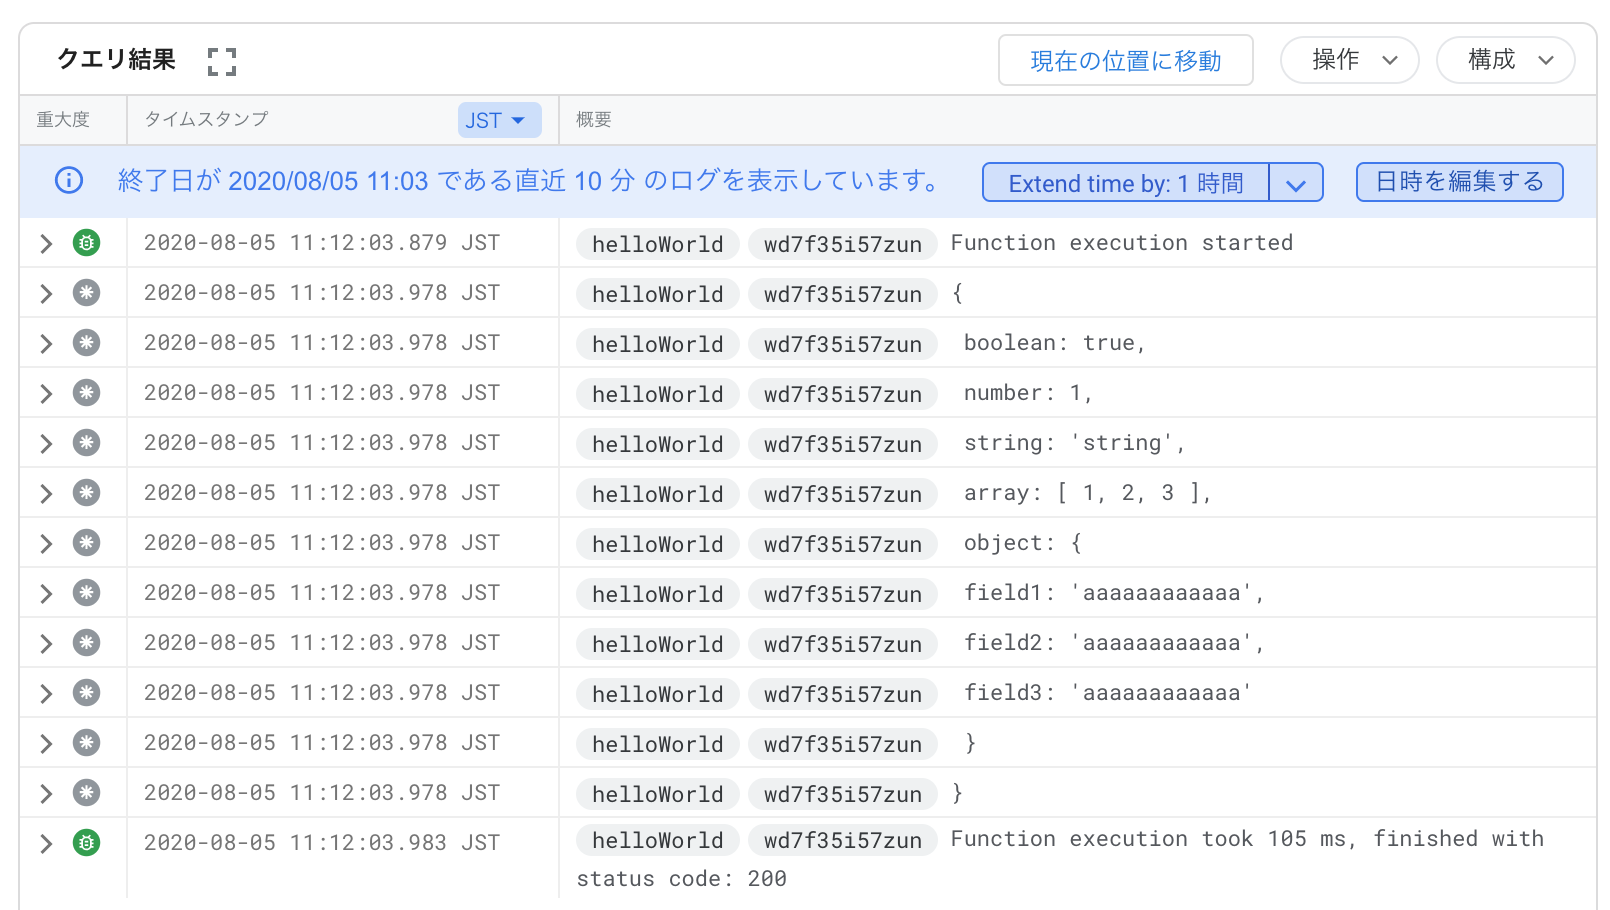
console.logなのに、ログは5つ出来上がっています。console.logごとに1つログができると思っていると、複数行になった場合、予想外のログになるので注意しましょう。上の例だと、ログが複数行になっても問題ないですが、困る場合もあります。例えば、下の例のようにオブジェクトを
console.logすると、exports.helloWorld = (req, res) => { console.log({ boolean: true, number: 1, string: 'string', array: [1, 2, 3], object: { field1: 'aaaaaaaaaaaa', field2: 'aaaaaaaaaaaa', field3: 'aaaaaaaaaaaa', }, }) res.send('Hello World!') }ログがバラバラになってしまいビューアでの可読性が良くありませんし、ログをコピペするのも一手間だったりと、運用上の面倒くささが出てきます:
この例では再現しませんでしたが、ログ行の順番が前後してしまうケースもあったりして、オブジェクトのようなネストした構造を安心して確認できないという問題もあったりします。
オブジェクトを
console.logするときは一旦JSONにすると、1ログになり、構造化もされる複数行のログ、特にオブジェクトを
console.logするときは、そのオブジェクトを一旦JSONにするといいです。JSONのログはGCPが特別扱いしてくれるので、ログが複数に分かれることが避けられ、おまけに、ログビューアでは構造化されて表示されるので見やすさも向上します。例えば、下の関数のように、
JSON.stringifyでオブジェクトをJSON化した上で、console.logするようにします:exports.helloWorld = (req, res) => { console.log( JSON.stringify({ boolean: true, number: 1, string: 'string', array: [1, 2, 3], object: { field1: 'aaaaaaaaaaaa', field2: 'aaaaaaaaaaaa', field3: 'aaaaaaaaaaaa', }, }), ) res.send('Hello World!') }この関数を実行し、そのログを確認すると1行のログにまとまっていることが分かります:
加えて、ログを開いてみると、
jsonPayloadフィールドにオブジェクトが構造化されているのが分かります:
JSON.stringifyでデバッグできないオブジェクトもあるので注意
JSON.stringifyすればどんなオブジェクトもデバッグできるかというと、そうでもないので注意してください。例えば、SetやMapはJSON化すると{}になってしまいます:const map = new Map([['a', 1], ['b', 2]]) const set = new Set([1, 2, 3]) console.log(map) //=> Map(2) { 'a' => 1, 'b' => 2 } console.log(set) //=> Set(3) { 1, 2, 3 } console.log(JSON.stringify(map)) //=> {} console.log(JSON.stringify(set)) //=> {}こうしたJSON化時に情報が失われるオブジェクトのロギングをGCPでどうやったらいいか、そのベストプラクティスは僕も分かっていません。もし、ご存じの方がいましたら教えてください。
まとめ
- Google Cloud Functions & Node.jsでは、特に何も設定せずとも
console.logで最低限のロギングは可能。- 2行以上に渡るログは行ごとに分解されるので注意。
- jsonPayloadを意識したロギングをすれば、オブジェクトの構造をログに出すことも可能。
次に読む


- 投稿日:2020-08-05T00:27:47+09:00
WiiリモコンをNode.jsから操ってみよう
Wiiリモコンは、中古で入手しやすく、機能も豊富なので、入力デバイスとしてはうってつけです。
接続もBluetoothなので、プロトコルさえわかれば、操れそうです。ことの発端は、かの神モジュール「noble」を勉強のためソースコードを見ていたのですが、自分でも操ってみようと思い、そこで思いついたのがWiiリモコンでした。
毎度の通り、ソースコードもろもろを、GitHubに上げておきます。
poruruba/WiiRemocon
https://github.com/poruruba/WiiRemocon※たぶん、Linuxでしか動かないと思います。
Wiiリモコンのプロトコル
ここにすべて書いてあります!
WiiBrew:Wiimote
http://wiibrew.org/wiki/WiimoteWiiリモコンとは、BluetoothのL2CAPプロトコルで通信します。
HIDとして見えるので、PSM=0x0011(HID Control)とPSM=0x0013 (HID Interrupt)の2つのコネクションを張る必要があります。L2CAPプロトコルの接続には、Linuxのsocket関数を使うのですが、node-gypでネイティブ実装しました。
こちらを参考にさせていただきました。あと、node-bluetooth-hci-socketも。Node.jsのネイティブ拡張を作ってみよう 〜NAN, 非同期処理, npm公開まで〜
本来であれば、HCI Commandの「Create Connection Command」や、L2CAPの「Connection Request」や「Configuration Request」の処理をする必要がありますが、socket関数が内部で処理してくれます。
接続した後は、HID Interruptの通信路に、Wiiリモコンの通信データ(HIDのレポート)が永遠と飛んできます。
詳細は後述
Wiiリモコンの発見
Wiiリモコンは、①と②のマークのボタンを同時に押すとLEDが点滅して、Discoveryモードになって発見できる状態になります。
発見には、BluetoothのHCI Command Packetを使います。そのレイヤの操作に以下のモジュールを使っています。nobleの中でnpmモジュール化していただいているものです。
noble/node-bluetooth-hci-socket
https://github.com/noble/node-bluetooth-hci-socketうーん、今回もGitHubを見てもらった方がよいかなあ。(最近手抜きが多い。。。)
inquiry.js というファイルです。以下の2つのnpm モジュールを利用しています。
・bluetooth-hci-socket
・debugBluetoothをご存じの方であれば、以下のコマンドとイベントを使います。
・Inquiry Command(OCF=0x0001)
・Inquiry Complete Event(Event Code=0x01)
・Inquiry Result Event(Event Code=0x02)BLUETOOTH SPECIFICATION
7 HCI COMMANDS AND EVENTS
7.1 LINK CONTROL COMMANDS
と
7.7 EVENTS
の辺りを見れば、大体わかります。パケットフォーマットは、
Figure 5.1 HCI Command Packet
にあります。ただし、socket関数を使う場合は、先頭1バイトに0x01を入れる必要があるようです。使い方は以下の感じ。
ただし、これの実行には、ルート権限が必要です。ルート権限不要としたい場合は以下を参照してください。
https://github.com/noble/noble#running-without-rootsudoinquiry_test.jsconst Inquery = require('./inquiry'); const inquiry = new Inquery(); async function inquiry_device(){ return new Promise((resolve, reject) =>{ var local_address = null; var remote_address = null; inquiry.on("initialized", (address) =>{ console.log("local: " + address); local_address = address; inquiry.inquiry(10, 1); }); inquiry.on("inquiryResult", (address) =>{ console.log("remote: " + address); remote_address = address; }); inquiry.on("inquiryComplete", (status) =>{ console.log("status: " + status); inquiry.stop(); resolve({ local: local_address, remote: remote_address }); }); inquiry.init(); }) } inquiry_device() .then( result =>{ console.log(result); }) .catch(error =>{ console.error(error); });Wiiリモコン操作用のライブラリ
それでは、肝心のWiiリモコン操作です。
ネイティブライブラリの力を借ります。まず、準備。$ npm install -g node-gyp
$ npm install nannode-gypの設定ファイルを作成します。
building.gyp{ "targets": [ { "target_name": "binding", "sources": ["src/BtL2capHid.cpp"], 'link_settings': { 'libraries': [ '-lbluetooth', ], }, "include_dirs": ["<!(node -e \"require('nan')\")"] } ] }以下のように準備して、コンパイル
$ node-gyp configure
$ node-gyp buildまたしても、ソース割愛。BtL2capHid.cppというファイルです。(GitHub参照)
やっていることは、
・Node.jsとC言語の呼び出しの橋渡し
・socket.connectで、L2CAPプロトコルの接続(2つのPSM)
・socket.readでブロッキングモードで受信待ちしていったん関数戻り、受信したらコールバック呼び出しこれで、
build\Release\binding.nodeというのが出来上がります。
後はこれを使いやすいように、jsファイルでくるみます。受信呼び出しを繰り返し呼ばないといけないように作っています。wiiremocon.js'use strict'; var EventEmitter = require('events').EventEmitter; var binding = require('./build/Release/binding.node'); const WIIREMOTE_RUMBLE_MASK = 0x01; const WIIREMOTE_LED_MASK = 0xf0; class WiiRemocon extends EventEmitter{ constructor(){ super(); this.WIIREMOTE_LED_BIT0 = 0x80; this.WIIREMOTE_LED_BIT1 = 0x40; this.WIIREMOTE_LED_BIT2 = 0x20; this.WIIREMOTE_LED_BIT3 = 0x10; this.cur_rumble_led = 0x00; this.l2cap = new binding.BtL2capHid(); } addr2bin(address){ return Buffer.from(address.split(':').reverse().join(''), 'hex'); } addr2str(address){ return address.toString('hex').match(/.{1,2}/g).reverse().join(':'); } connect(addr, retry = 2){ console.log('connect'); return new Promise((resolve, reject) =>{ this.l2cap.connect(addr, retry, (err, result) =>{ if( err ) return reject(err); this.startRead(); resolve(result); }); }) } async readAsync(){ return new Promise((resolve, reject) =>{ this.l2cap.read((err, data) => { if (err) return reject(err); resolve(data); }); }); } startRead(){ console.log('startRead'); return new Promise(async (resolve, reject) =>{ do{ try{ var result = await this.readAsync(); this.emit("data", result); }catch(error){ console.error(error); return resolve(error); } }while(true); }); } setReport( id, value ){ console.log('setReport called'); var param = Buffer.alloc(3); param.writeUInt8(0xa2, 0); param.writeUInt8(id, 1); param.writeUInt8(value, 2); console.log('setReport:' + param.toString('hex')); return this.l2cap.write(0, param); } setLed(led_mask, led_val){ this.cur_rumble_led = ( this.cur_rumble_led & ~( led_mask & WIIREMOTE_LED_MASK ) ) | ( led_val & WIIREMOTE_LED_MASK ); return this.setReport(0x11, this.cur_rumble_led); } setRumble( rumble ){ this.cur_rumble_led = ( this.cur_rumble_led & ~WIIREMOTE_RUMBLE_MASK ) | ( rumble & WIIREMOTE_RUMBLE_MASK ); return this.setReport(0x11, cur_rumble_led); } setDataReportingMode(mode){ var param = Buffer.alloc(4); param.writeUInt8(0xa2, 0); param.writeUInt8(0x12, 1); param.writeUInt8(0x00, 2); param.writeUInt8(mode, 3); console.log('setDataReportingMode:' + param.toString('hex')); return this.l2cap.write(0, param); } } module.exports = WiiRemocon;あとは、こんな感じで使います。
node起動時に、引数にWiiリモコンのBluetoothのMacアドレスを指定します。「XX:XX:XX:XX:XX:XX」という形式です。wiiremocon_test.jsconst WiiRemocon = require('./wiiremocon'); var wii = new WiiRemocon(); async function wiiremote_monitoring(remote_address){ wii = new WiiRemocon(); wii.on("data", data =>{ console.log(data); }); await wii.connect(wii.addr2bin(remote_address)); wii.setLed(wii.WIIREMOTE_LED_BIT0 | wii.WIIREMOTE_LED_BIT1 | wii.WIIREMOTE_LED_BIT2 | wii.WIIREMOTE_LED_BIT3, 0); } wiiremote_monitoring(process.argv[2]) .catch(error =>{ console.error(error); });wii.on(“data”, function(data)) のところに、Wiiからボタン等の状態が送られてきます。
ボタンを押したときにイベントデータが送られてきますが、setDataReportingModeで例えば0x31を指定してモードを変更すれば、加速度などがひっきりなしに送られてきます。終わりに
あとは、Node.js上でいろいろいじれそうです。
WiiヌンチャクやWii Fitボードなども試してみようと思います。以上