- 投稿日:2020-08-04T23:41:26+09:00
日本人のための SwiftFormat【概要編】
SwiftFormatとは?
SwiftFormat は MacOS または Linux で Swift コードを再フォーマットするためにコマンドラインツールです。
なぜ使うのか?
プロジェクトをチームで行う際にコーディングスタイルを統一することで、コードの見やすさや・追いやす
さが向上しますが、これらを認識のあっていないチームで行うとコードのフォーマットの違いを指摘・修正
を手動でオペレーションすることにコストがかかります。これらの作業を SwiftFormat で自動化するこ
とで開発者はコードの動作に集中できるようになります。どうやって使うのか?
現在は下記の4通りの方法があるみたいです。
コマンドラインツールとして手動で実行するか他のツールチェインの一部として使用する
Source Editor Extension として Xcode の [Editor] > [SwiftFormat] メニューから呼び出す
Xcode プロジェクトのビルドフェーズ(Run Script?)として、
Cmd-RorCmd-Bを押すたびに
実行されるようにするGit のプリコミットフックとして、チェックインする前に変更したファイルで実行するようにする
【実装編】では
3.の RunScript での実装 + CocoaPods での導入を検討しているのでそれらについて少し触れます。Xcode ビルドフェーズで導入する
今回はチームで共有する際に最もシンプルで簡単な
Xcode ビルドフェーズで導入したいと思います。もし他の方法で実現したい場合は 公式のレポジトリ を確認してください。※ このスクリプトを追加すると、作業中のソースファイルが上書きされます。
スクリプトをメインターゲットではなくテストターゲットに追加すると、ユニットテストを実行する時にのみ
呼び出され、アプリをビルドするたびに呼び出されないようにすることができるようになるみたいです。または、通常のビルドの一部として lintモード
で SwiftFormat を実行し、手動でフォーマットパスを実行するか、頻度の低いビルドターゲット(テストなど)
の一部として実行することを検討した方がいいみたいです。
- SwiftFormat Lint モード
- SwiftFormat はリンターではなくフォーマッターとして設計されているため、どこが問題なのかを伝えるのではなくて、コードを実際に修正するように設計されている。実際にコードを変更することが望ましくない状況でコードがフォーマットされていることを確認したい時の場合に
lintモードが役立つ- SiwftFormat をリンターとして実行する時に、
--lintコマンドラインオプションを使用できるCocoaPods での導入
- SwiftFormat CLI を Podfile に追加する
次の行を Podfile に追加して
pod installで SwiftFormat のバイナリをプロジェクトディレク
トリに追加する。下記の実行によってビルド済みのコマンドラインアプリのみがインストールされて、SwiftFormat
の Framework のソースコードはインストールされなくなります。pod 'SwiftFormat/CLI'
アプリのターゲットにビルドフェーズを追加する
- ファイルリストでプロジェクトをクリックし、
TARGETSを選択して、Build Phasesタプをクリック する。- 新しい
Run Scriptを作り下記のコードをペーストする。"${PODS_ROOT}/SwiftFormat/CommandLineTool/swiftformat" "$SRCROOT"SwiftFormat の設定
SwiftFormat の設定は下記の2つに分かれています。
- Options
- オプションはルールの動作を制御する設定
- Rules
- ルールはコードに変更を適用する SwiftFormat ライブラリの関数
Options
SwiftFormat で使用可能なオプションは、
--optionsコマンドライン引数を設定して実行すると確認
することができます。(各オプションのデフォルト値は、ここに表示される)オプションを追加する方法は下記の2つ。
--[option_nam] [value]のようにコマンドライン引数に追加する。.swiftformatファイルを作成してプロジェクトディレクトリに配置する。特定のオプションが複数のルールに影響を与える場合がある。
--ruleinfo [rule_name]のようにコマンド
を使用して影響するオプションの詳細を確認するか、Rules.mdを参照して確認する必要もありそうです。Rules
SwiftFormat には50を超えるルールが含まれていて、新しいルールが随時追加されています。それらの
使用方法については Rules.md
を参照してください。次回はこの一覧に関する記事を書きたいと思います。参照
- 投稿日:2020-08-04T20:20:59+09:00
6行で UIView を UIImage に変換してサクッと画像を保存する
はじめに
今回は特定の View を UIImage に変換してフォトライブラリーに保存できるようにします
実装
プロパティを追加
UIView から image を取得するための ExtensionProperty を追加します。
extension UIView {
    var image: UIImage {
        UIGraphicsBeginImageContextWithOptions(bounds.size, false, 0.0)
        let context: CGContext = UIGraphicsGetCurrentContext()!
        layer.render(in: context)
        let capturedImage: UIImage = UIGraphicsGetImageFromCurrentImageContext()!
        UIGraphicsEndImageContext()
        return capturedImage
    }
}
画像をフォトライブリーに保存する
毎度おなじみの
UIImageWriteToSavedPhotosAlbum()で画像が保存できていれば完了です。func saveImage() { let image = view.image UIImageWriteToSavedPhotosAlbum(image, self, nil, nil) }
- 投稿日:2020-08-04T20:19:59+09:00
SwiftとFirebaseでSNSアプリを開発する!(第一回)
対象者
- プログラミング初心者の方
- SNSアプリの開発に興味のある方
- エンジニアを目指している方
簡単な自己紹介
プログラミングは1年ほど学んでおり、特にSwiftを扱ってきました。
それまでは、プログラミングの存在自体は知っていましたが、たまにHTMLやCSS、WordPressをかじる程度で本格的に勉強してはいませんでした。
そんな自分がiOSアプリを開発し、リリースしたので、開発過程のノウハウを共有していこうと思います。アプリ紹介
このアプリは、ニュース、音楽、スポーツ、漫画、、、などカテゴリーごとに話したいことを投稿できるようにしています。そしてその投稿に興味を持った人や同じ趣味の人同士が集まってトークするコミュニティアプリです。
コロナウイルスが世界的に流行している現在(2020年)に、多くの人々が外出自粛を余儀なくされており、この外出自粛の影響で精神的にも経済的にも疲弊してしまった人々は多いと聞きます。そして仮にコロナウイルスがおさまったとしても、この生活は続くことが考えられます。そのような状況に苦しむ人々のために、私ができることは何かと考えた結果、このような世界でも簡単に誰かとのつながりを感じられる新しいコミュニティ型のサービスを作ろうと思い、開発しました。開発環境
IDE: Xcode 11.5
Lang: Swift5
OS: MacOS(Mojave)さいごに
次回以降、実際に開発の方に入っていこうと思います!
もし、「こっちの処理の方が良さそう!」とか「このコードはどうかな?」などご指摘やアドバイスがございましたらその都度アドバイスをしていただけると嬉しいです!
- 投稿日:2020-08-04T20:19:59+09:00
SwiftとFirebaseでSNSアプリNomadを開発する!(第一回)
対象者
- プログラミング初心者の方
- SNSアプリの開発に興味のある方
- エンジニアを目指している方
簡単な自己紹介
プログラミングは1年ほど学んでおり、特にSwiftを扱ってきました。
それまでは、プログラミングの存在自体は知っていましたが、たまにHTMLやCSS、WordPressをかじる程度で本格的に勉強してはいませんでした。
そんな自分がiOSアプリを開発し、リリースしたので、開発過程のノウハウを共有していこうと思います。アプリ紹介
このアプリは、ニュース、音楽、スポーツ、漫画、、、などカテゴリーごとに話したいことを投稿できるようにしています。そしてその投稿に興味を持った人や同じ趣味の人同士が集まってトークするコミュニティアプリです。
コロナウイルスが世界的に流行している現在(2020年)に、多くの人々が外出自粛を余儀なくされており、この外出自粛の影響で精神的にも経済的にも疲弊してしまった人々は多いと聞きます。そして仮にコロナウイルスがおさまったとしても、この生活は続くことが考えられます。そのような状況に苦しむ人々のために、私ができることは何かと考えた結果、このような世界でも簡単に誰かとのつながりを感じられる新しいコミュニティ型のサービスを作ろうと思い、開発しました。開発環境
IDE: Xcode 11.5
Lang: Swift5
OS: MacOS(Mojave)さいごに
次回以降、実際に開発の方に入っていこうと思います!
もし、「こっちの処理の方が良さそう!」とか「このコードはどうかな?」などご指摘やアドバイスがございましたらその都度アドバイスをしていただけると嬉しいです!
- 投稿日:2020-08-04T19:32:26+09:00
MarketingCloudSDK iOSでシンプルなpush通知を送信する
環境
・xcode Version 11.3.1 (11C504)
・swift Version 5.1.3
・MarketingCloudSDK iOS (v7.2.1)
・Mac OS 10.14.6(Mojave)準備
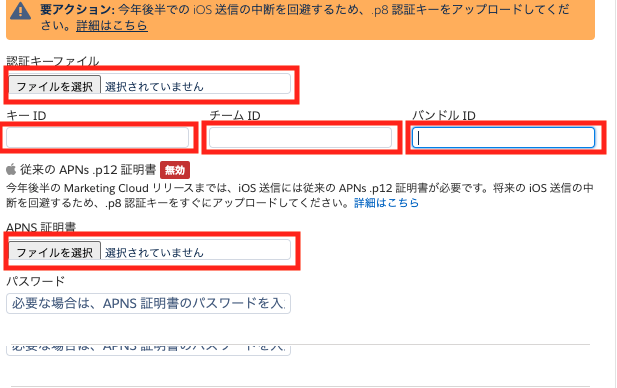
・APNs用証明書(.p12)
・認証キー(.p8)
※2020/08/04段階では両方取得する必要がある。(多分そのうち.p8認証キーだけでいけるっぽい)
参考リンク
.p12
https://qiita.com/natsumo/items/d5cc1d0be427ca3af1cb
.p8
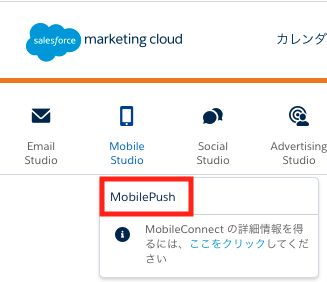
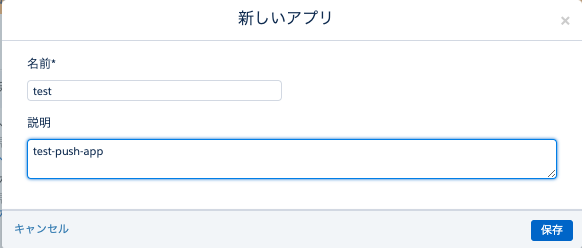
https://docs.repro.io/ja/dev/sdk/push-notification/setup-ios.html#app-idSMCのMobilePushでアプリを作成する
- mobilePushを選択する
2.管理を選択する
3.新しいアプリの作成を選択する
4.わかりやすい名前と説明を記載する
5.作成した認証キーファイル、APNS証明書を選択する
キーID:認証キー(.P8)をダウンロードする際に表示されるKey ID
チームID:Apple Developer ProgramのチームID
バンドルID:Apple Developer Programでアプリを登録する際に記述したBundle ID
6.保存後に有効になっているか確認
SDKを追加
CocoaPodsを利用してSDKを追加する
1.プロジェクト名.xcodeproj」と同じディレクトリにターミナル上で移動する
$cd [指定ディレクトリ]
2.CocoaPodsをインストールする
sudo gem install cocoapods
※すでにインストールしている場合
$ sudo gem update --system
3.セットアップする
pod setup
4.バージョンを確認する
$ pod --version
バージョンが表示されればインストールされている
5.Podfile(どのライブラリをインストールするか指定するファイル)を作成する
$ pod init
6.作成したpodfileに以下の内容を記述するPodfiletarget 'MyApp' do pod 'MarketingCloudSDK', '~> 7.2' end7.workspaceを作成する
$ pod install --no-repo-update
作成された「プロジェクト名.xcworkspace」をダブルクリックしてXcodeを開く
※.xcodeprojではなく.xcworkspaceを開くSDKの初期設定を記述
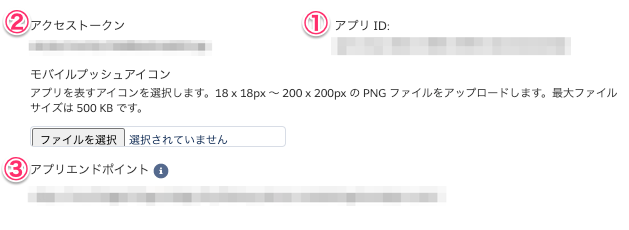
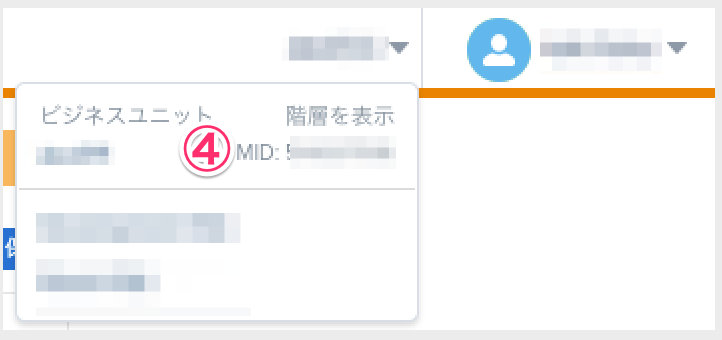
AppDelegate.swift// 導入したSDKをインポート import MarketingCloudSDK class AppDelegate: UIResponder, UIApplicationDelegate { var window: UIWindow? // MobilePush SDK: REQUIRED IMPLEMENTATION // The appID, accessToken and appEndpoint are required values for MobilePush SDK configuration and are obtained from your MobilePush app. // See https://salesforce-marketingcloud.github.io/MarketingCloudSDK-iOS/get-started/get-started-setupapps.html for more information. // Use the builder method to configure the SDK for usage. This gives you the maximum flexibility in SDK configuration. // The builder lets you configure the SDK parameters at runtime. #if DEBUG // 下記キャプチャ①参考 let appID = "[DEV-APNS App ID value from MobilePush app admin]" // 下記キャプチャ②参考 let accessToken = "[DEV-APNS Access Token value from MobilePush app admin]" // 下記キャプチャ③参考 let appEndpoint = "[DEV-APNS App Endpoint value from MobilePush app admin]" // 下記キャプチャ④参考 let mid = "[DEV-APNS account MID value from MobilePush app admin]" #else // 以下上と同じ let appId = "[PROD-APNS appId value from MobilePush app admin]" let accessToken = "[PROD-APNS accessToken value from MobilePush app admin]" let appEndpoint = "[PROD-APNS app endpoint value from MobilePush app admin]" let mid = "[PROD-APNS account MID value from MobilePush app admin]" #endif // Define features of MobilePush your app will use. // 必要に応じてtrueに変更する let inbox = false // 受信トレイ let location = false // 位置情報 let analytics = true // SMCの分析機能 // MobilePush SDK: REQUIRED IMPLEMENTATION @discardableResult func configureMarketingCloudSDK() -> Bool { // Use the builder method to configure the SDK for usage. This gives you the maximum flexibility in SDK configuration. // The builder lets you configure the SDK parameters at runtime. // パラメータをセット(コンタクトキーが設定されるまで登録を遅らせることが可能) let builder = MarketingCloudSDKConfigBuilder() .sfmc_setApplicationId(appID) .sfmc_setAccessToken(accessToken) .sfmc_setMarketingCloudServerUrl(appEndpoint) .sfmc_setMid(mid) .sfmc_setInboxEnabled(inbox as NSNumber) .sfmc_setLocationEnabled(location as NSNumber) .sfmc_setAnalyticsEnabled(analytics as NSNumber) .sfmc_build()! var success = false // Once you've created the builder, pass it to the sfmc_configure method. do { try MarketingCloudSDK.sharedInstance().sfmc_configure(with:builder) // ユーザ情報をSMCに登録できる MarketingCloudSDK.sharedInstance().sfmc_setContactKey("test12345") // ユーザの属性をSMCに登録できる MarketingCloudSDK.sharedInstance().sfmc_setAttributeNamed("test_id", value: "12345678") success = true } catch let error as NSError { // Errors returned from configuration will be in the NSError parameter and can be used to determine // if you've implemented the SDK correctly. let configErrorString = String(format: "MarketingCloudSDK sfmc_configure failed with error = %@", error) print(configErrorString) } if success == true { // The SDK has been fully configured and is ready for use! // Enable logging for debugging. Not recommended for production apps, as significant data // about MobilePush will be logged to the console. #if DEBUG // trueにしておくとxcodeのコンソール上でデバッグできる MarketingCloudSDK.sharedInstance().sfmc_setDebugLoggingEnabled(true) #endif // Set the MarketingCloudSDKURLHandlingDelegate to a class adhering to the protocol. // In this example, the AppDelegate class adheres to the protocol // and handles URLs passed back from the SDK. // For more information, see https://salesforce-marketingcloud.github.io/MarketingCloudSDK-iOS/sdk-implementation/implementation-urlhandling.html // opendirect機能に必要(Extensionでプロトコルを追加する必要あり) MarketingCloudSDK.sharedInstance().sfmc_setURLHandlingDelegate(self) // Make sure to dispatch this to the main thread, as UNUserNotificationCenter will present UI. DispatchQueue.main.async { if #available(iOS 10.0, *) { // Set the UNUserNotificationCenterDelegate to a class adhering to thie protocol. // In this exmple, the AppDelegate class adheres to the protocol (see below) // and handles Notification Center delegate methods from iOS. UNUserNotificationCenter.current().delegate = self // Request authorization from the user for push notification alerts. UNUserNotificationCenter.current().requestAuthorization(options: [.alert, .sound, .badge], completionHandler: {(_ granted: Bool, _ error: Error?) -> Void in if error == nil { if granted == true { // Your application may want to do something specific if the user has granted authorization // for the notification types specified; it would be done here. print(MarketingCloudSDK.sharedInstance().sfmc_deviceToken() ?? "error: no token - was UIApplication.shared.registerForRemoteNotifications() called?") } } }) } // In any case, your application should register for remote notifications *each time* your application // launches to ensure that the push token used by MobilePush (for silent push) is updated if necessary. // Registering in this manner does *not* mean that a user will see a notification - it only means // that the application will receive a unique push token from iOS // ここでデバイストークンをSMC側に渡すメソッドを呼ぶ UIApplication.shared.registerForRemoteNotifications() } } return success } // MobilePush SDK: REQUIRED IMPLEMENTATION func application(_ application: UIApplication, didFinishLaunchingWithOptions launchOptions: [UIApplication.LaunchOptionsKey: Any]?) -> Bool { return self.configureMarketingCloudSDK() } // MobilePush SDK: OPTIONAL IMPLEMENTATION (if using Data Protection) func applicationProtectedDataDidBecomeAvailable(_ application: UIApplication) { if(MarketingCloudSDK.sharedInstance().sfmc_isReady() == false) { self.configureMarketingCloudSDK() } } }mobilePush > 管理
Push通知実装
- xcodeのcapabilityからPush Notificationsを有効にする
2.push通知のために必要な
UIApplicationDelegateメソッドをAppDelegateクラスに追加(必要に応じて拡張する)AppDelegate.swift// MobilePush SDK: REQUIRED IMPLEMENTATION // アプリを最初にタップして、起動した時に呼ばれるメソッド func application(_ application: UIApplication, didFinishLaunchingWithOptions launchOptions: [UIApplication.LaunchOptionsKey: Any]?) -> Bool { return self.configureMarketingCloudSDK() } // MobilePush SDK: REQUIRED IMPLEMENTATION // registerForRemoteNotifications()が呼ばれると下記のメソッドが呼ばれ、引数としてデバイストークンをSDKに渡す。 func application(_ application: UIApplication, didRegisterForRemoteNotificationsWithDeviceToken deviceToken: Data) { MarketingCloudSDK.sharedInstance().sfmc_setDeviceToken(deviceToken) } // MobilePush SDK: REQUIRED IMPLEMENTATION func application(_ application: UIApplication, didFailToRegisterForRemoteNotificationsWithError error: Error) { print(error) } // MobilePush SDK: REQUIRED IMPLEMENTATION if this method is implemented. **/ // アプリ未起動時、バックグラウンド時に通知をタップすると呼び出される。フォアグラウンド時は通知表示はないが呼び出される。 func application(_ application: UIApplication, didReceiveRemoteNotification userInfo: [AnyHashable : Any], fetchCompletionHandler completionHandler: @escaping (UIBackgroundFetchResult) -> Void) { MarketingCloudSDK.sharedInstance().sfmc_setNotificationUserInfo(userInfo) completionHandler(.newData) }3.push通知のために必要な
UNUserNotificationCenterDelegateメソッドをAppDelegateクラスに追加AppDelegate.swift// MobilePush SDK: REQUIRED IMPLEMENTATION // The method will be called on the delegate when the user responded to the notification by opening the application, dismissing the notification or choosing a UNNotificationAction. The delegate must be set before the application returns from applicationDidFinishLaunching:. // このメソッドでSMCから受け取ったカスタムキーを取得したりする extension AppDelegate: UNUserNotificationCenterDelegate { @available(iOS 10.0, *) func userNotificationCenter(_ center: UNUserNotificationCenter, didReceive response: UNNotificationResponse, withCompletionHandler completionHandler: @escaping () -> Void) { // Required: tell the MarketingCloudSDK about the notification. This will collect MobilePush analytics // and process the notification on behalf of your application. MarketingCloudSDK.sharedInstance().sfmc_setNotificationRequest(response.notification.request) completionHandler() } // MobilePush SDK: REQUIRED IMPLEMENTATION // The method will be called on the delegate only if the application is in the foreground. If the method is not implemented or the handler is not called in a timely manner then the notification will not be presented. The application can choose to have the notification presented as a sound, badge, alert and/or in the notification list. This decision should be based on whether the information in the notification is otherwise visible to the user. @available(iOS 10.0, *) func userNotificationCenter(_ center: UNUserNotificationCenter, willPresent notification: UNNotification, withCompletionHandler completionHandler: @escaping (UNNotificationPresentationOptions) -> Void) { completionHandler(.alert) } }SMCからpush通知を送信する
アプリ起動時にpush通知を許可にし、無事とどけばOK
参考リンク(公式)
https://salesforce-marketingcloud.github.io/MarketingCloudSDK-iOS/


- 投稿日:2020-08-04T18:24:14+09:00
UIDocumentPickerViewControllerで選択ファイルを絞る & iOS14からのUTType
ユーザーの選択ファイルを限定したい
最近のプロジェクトで端末内の.m4a, .mp3ファイルだけ選択させたい用件があったのでUIDocumentPickerViewControllerでdocumentTypesを指定して実装しました。
その時にMobileCoreServiceの定数を使って処理していたのですが、非推奨の扱いになっていたので合わせてiOS14以降のUTTypeについて調べました。
ちなみに非推奨の実装でベータのiOS14のシュミレータで実行してみましたが、ワーニングが出るだけで動作はしていました。
iOS13までの実装
Xcode 11.5(11E608c)
import UIKit
// 1. MobileCoreServicesをインポート
import MobileCoreServices

class FileSearchViewController: UIViewController {

    // ~~~ 省略 ~~~

    private func showFilePicker() {
        // 2. documentTypesでkUTType~で選択して欲しいファイル形式を指定する
        // iOS14だと 'init(documentTypes:in:)' was deprecated in iOS 14.0と怒られる
        // ここでは選択できるファイルを.m4a, .mp3に限定する
        let picker = UIDocumentPickerViewController(
            documentTypes: [
                String(kUTTypeMPEG4Audio),
                String(kUTTypeMP3)
            ],
            in: .import)
        picker.delegate = self
        self.navigationController?.present(picker, animated: true, completion: nil)
    }
}

extension FileSearchViewController: UIDocumentPickerDelegate {

    func documentPicker(_ controller: UIDocumentPickerViewController, didPickDocumentsAt urls: [URL]) {
        // ファイル選択後に呼ばれる
        // urls.first?.pathExtensionで選択した拡張子が取得できる

        if let filePath = urls.first?.description {
            print("ファイルパス:\(filePath)")
        }
    }

    func documentPickerWasCancelled(_ controller: UIDocumentPickerViewController) {
        print("キャンセル")
    }
}
選択できるファイルはこちらのUTTypeのContentsから選べます。
Apple Document: MobileCoreServices/UTTypeiOS14以降の実装(ベータなので変更になるかもしれません)
主な変更は1と2のimportとUIDocumentPickerViewControllerの呼び出し方とUTTypeの指定です。
Xcode 12.0 beta 3 (12A8169g)
import UIKit
// 1. UniformTypeIdentifiersをインポート
import UniformTypeIdentifiers

class FileSearchViewController: UIViewController {

    // ~~~ 省略 ~~~

    private func showFilePicker() {
        // 2. forOpeningContentTypesでUTTypeで選択して欲しいファイル形式を指定する
        // ここでは選択できるファイルを.m4a, .mp3に限定する
        let picker = UIDocumentPickerViewController(
            forOpeningContentTypes: [
                UTType.mpeg4Audio,
                UTType.mp3
            ],
            asCopy: true)
        picker.delegate = self
        self.navigationController?.present(picker, animated: true, completion: nil)
    }
}

extension FileSearchViewController: UIDocumentPickerDelegate {

    func documentPicker(_ controller: UIDocumentPickerViewController, didPickDocumentsAt urls: [URL]) {
        // ファイル選択後に呼ばれる
        // urls.first?.pathExtensionで選択した拡張子が取得できる

        if let filePath = urls.first?.description {
            print("ファイルパス:\(filePath)")
        }
    }

    func documentPickerWasCancelled(_ controller: UIDocumentPickerViewController) {
        print("キャンセル")
    }
}
- 投稿日:2020-08-04T18:24:14+09:00
UIDocumentPickerViewControllerで選択ファイル絞る & iOS14からのUTType
ユーザーの選択ファイルを限定したい
最近のプロジェクトで端末内の.m4a, .mp3ファイルだけ選択させたい用件があったのでUIDocumentPickerViewControllerでdocumentTypesを指定して実装しました。
その時にMobileCoreServiceの定数を使って処理していたのですが、非推奨の扱いになっていたので合わせてiOS14以降のUTTypeについて調べました。
ちなみに非推奨の実装でベータのiOS14のシュミレータで実行してみましたが、ワーニングが出るだけで動作はしていました。
iOS13までの実装
Xcode 11.5(11E608c)
import UIKit
// 1. MobileCoreServicesをインポート
import MobileCoreServices

class FileSearchViewController: UIViewController {

    // ~~~ 省略 ~~~

    private func showFilePicker() {
        // 2. documentTypesでkUTType~で選択して欲しいファイル形式を指定する
        // iOS14だと 'init(documentTypes:in:)' was deprecated in iOS 14.0と怒られる
        // ここでは選択できるファイルを.m4a, .mp3に限定する
        let picker = UIDocumentPickerViewController(
            documentTypes: [
                String(kUTTypeMPEG4Audio),
                String(kUTTypeMP3)
            ],
            in: .import)
        picker.delegate = self
        self.navigationController?.present(picker, animated: true, completion: nil)
    }
}

extension FileSearchViewController: UIDocumentPickerDelegate {

    func documentPicker(_ controller: UIDocumentPickerViewController, didPickDocumentsAt urls: [URL]) {
        // ファイル選択後に呼ばれる
        // urls.first?.pathExtensionで選択した拡張子が取得できる

        if let filePath = urls.first?.description {
            print("ファイルパス:\(filePath)")
        }
    }

    func documentPickerWasCancelled(_ controller: UIDocumentPickerViewController) {
        print("キャンセル")
    }
}
選択できるファイルはこちらのUTTypeのContentsから選べます。
Apple Document: MobileCoreServices/UTTypeiOS14以降の実装(ベータなので変更になるかもしれません)
主な変更は1と2のimportとUIDocumentPickerViewControllerの呼び出し方とUTTypeの指定です。
Xcode 12.0 beta 3 (12A8169g)
import UIKit
// 1. UniformTypeIdentifiersをインポート
import UniformTypeIdentifiers

class FileSearchViewController: UIViewController {

    // ~~~ 省略 ~~~

    private func showFilePicker() {
        // 2. forOpeningContentTypesでUTTypeで選択して欲しいファイル形式を指定する
        // ここでは選択できるファイルを.m4a, .mp3に限定する
        let picker = UIDocumentPickerViewController(
            forOpeningContentTypes: [
                UTType.mpeg4Audio,
                UTType.mp3
            ],
            asCopy: true)
        picker.delegate = self
        self.navigationController?.present(picker, animated: true, completion: nil)
    }
}

extension FileSearchViewController: UIDocumentPickerDelegate {

    func documentPicker(_ controller: UIDocumentPickerViewController, didPickDocumentsAt urls: [URL]) {
        // ファイル選択後に呼ばれる
        // urls.first?.pathExtensionで選択した拡張子が取得できる

        if let filePath = urls.first?.description {
            print("ファイルパス:\(filePath)")
        }
    }

    func documentPickerWasCancelled(_ controller: UIDocumentPickerViewController) {
        print("キャンセル")
    }
}
- 投稿日:2020-08-04T16:03:23+09:00
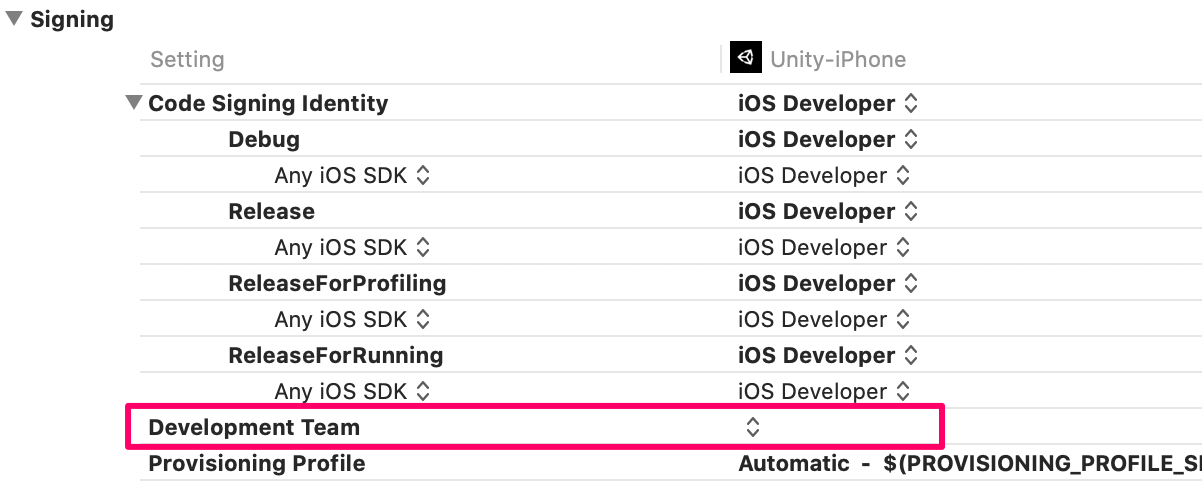
【Xcode】ビルドエラー「Code Signing Error: Code signing is required for product type 'Application' in SDK 」の対処法
Unityで書き出したXcodeプロジェクトを実機ビルドした際に、以下のエラーで失敗してしまったため、その対処法備忘録です。
Code Signing Error: Code signing is required for product type 'Application' in SDK 'iOS 13.6'
Development Teamが空になっていた
XcodeのDevelopment Teamが空になっていたのが原因でした。
適切にTeamを設定してあげるとビルドは成功しました。Unity側で予め設定しておく
もう1つの解決方法としてUnity側でTeamIDを設定しておく方法です。
PlayerSettingsの
Signing TeamIDに予め入力しておけば書き出されたXcodeプロジェクトに反映されます。確認方法は以下のページから
Membershipから確認できます。
https://developer.apple.com/account/#/membership環境
- iPhone6s iOS 13.6
- Unity2019.4.4f1
- Xcode 11.6
参考

- 投稿日:2020-08-04T15:45:52+09:00
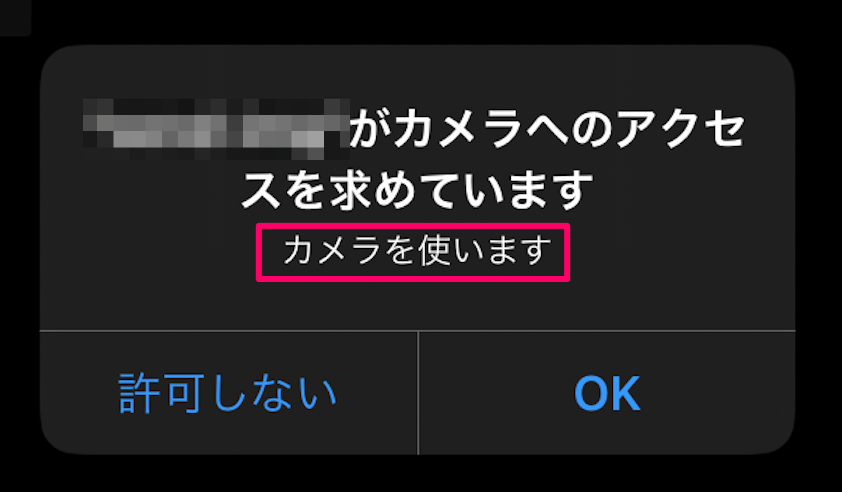
【Unity】iOSのカメラ使用時にiOS実機ビルドでクラッシュする時の対処法
UnityでiOSのカメラを使う際は、WebCamTextureクラスを使います。
以下のショートコードでプラットフォームを越えてカメラ情報を取得することが出来るので本当にUnityは便利です。WebCamTest.cs[SerializeField] RawImage _rawImage; void Start() { var webCamTexture = new WebCamTexture(); _rawImage.texture = webCamTexture; webCamTexture.Play(); }UnityEditor上で実行する上では問題なく動くと思います。
しかし、XcodeでiOS端末で実行すると、Xcodeのコンソールで以下のエラーを吐いて落ちる時があります。本記事はその対処法備忘録です。
[access] This app has crashed because it attempted to access privacy-sensitive data without a usage description. The app's Info.plist must contain an NSCameraUsageDescription key with a string value explaining to the user how the app uses this data.
Camera Usage Descriptionへの入力必須
PlayerSettings > OtherSettings > Camera Usage Description
この項目に何かしらの文字列を入れる必要があります。
Xcodeのinfo.plistの
Privacy - Camera Usage Descriptionに追加される事になります。
Camera Usage Descriptionを設定してiOS実機ビルドするとクラッシュしなくなると思います。
ちなみに、Camera Usage Descriptionはカメラ使用時の許可ダイアログ内の説明文で使用されます。環境
- iPhone6s iOS 13.6
- Unity2019.4.4f1
- Xcode 11.6


- 投稿日:2020-08-04T11:31:52+09:00
Firebaseを使ったiOSのPush通知に画像を添付する Notification Service Extension
iOSではPush通知に画像を添付するために一手間かけないといけません。
それがNotification Service Extensionの導入です。Firebaseを使いましたが、もちろんFirebaseを使わないPush通知にも応用可能なので、是非参考にしていただければと思います。
導入
Xcodeでの準備
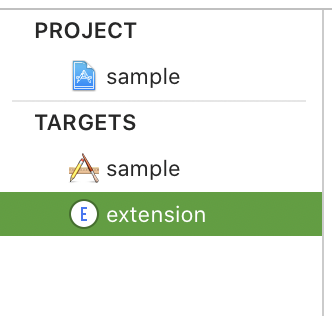
- XcodeでProjectを開く
- メニューバーのFile->New->Targetを選択
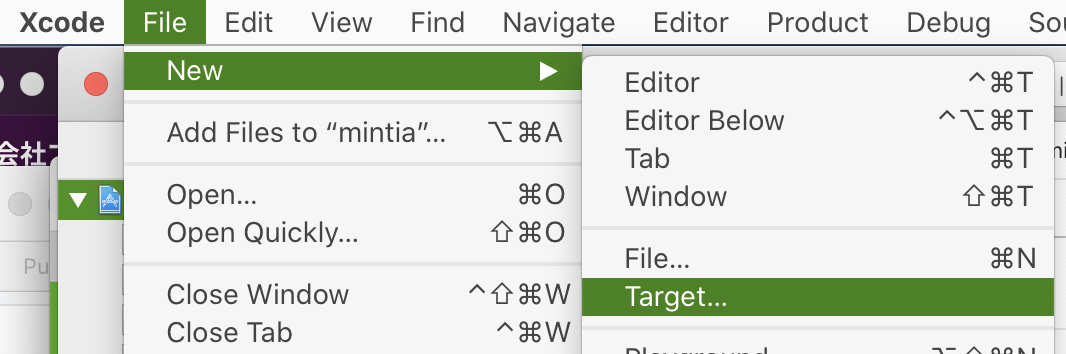
- Notification Service Extensionを選択
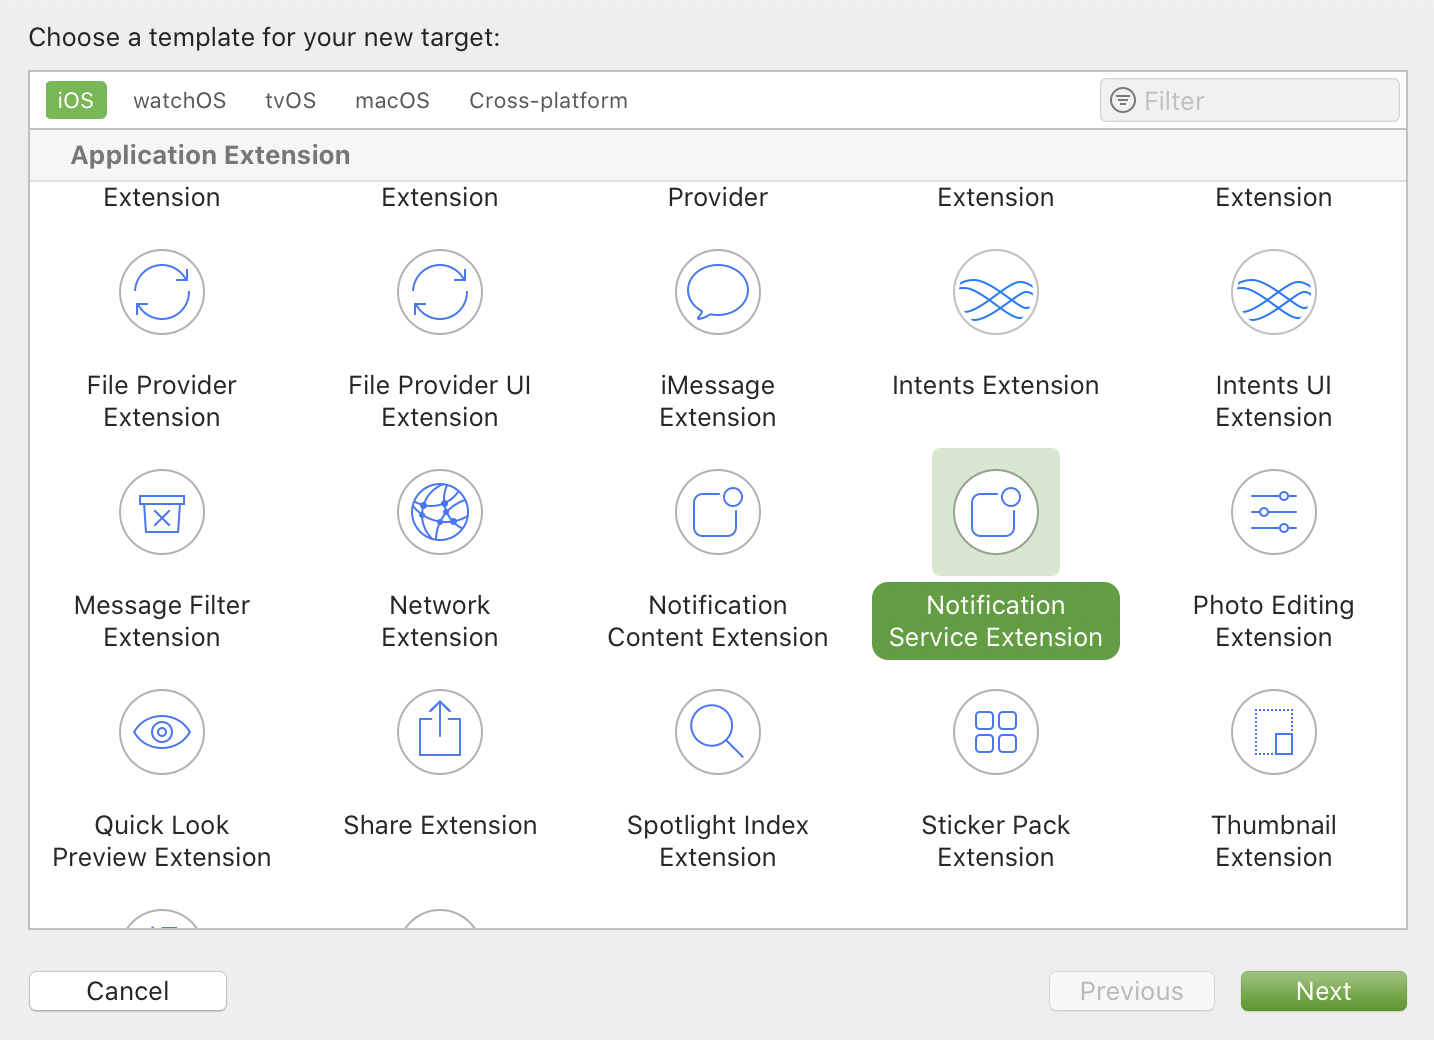
- Nameや導入するターゲットを選択してFinish
- Targetsの中にExtensionが入ります(ここでは名前をextensionという名前にしています)
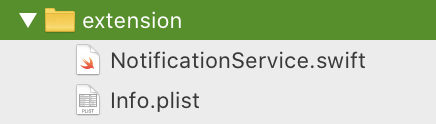
- Projectツリーの部分にもファイルが追加されています
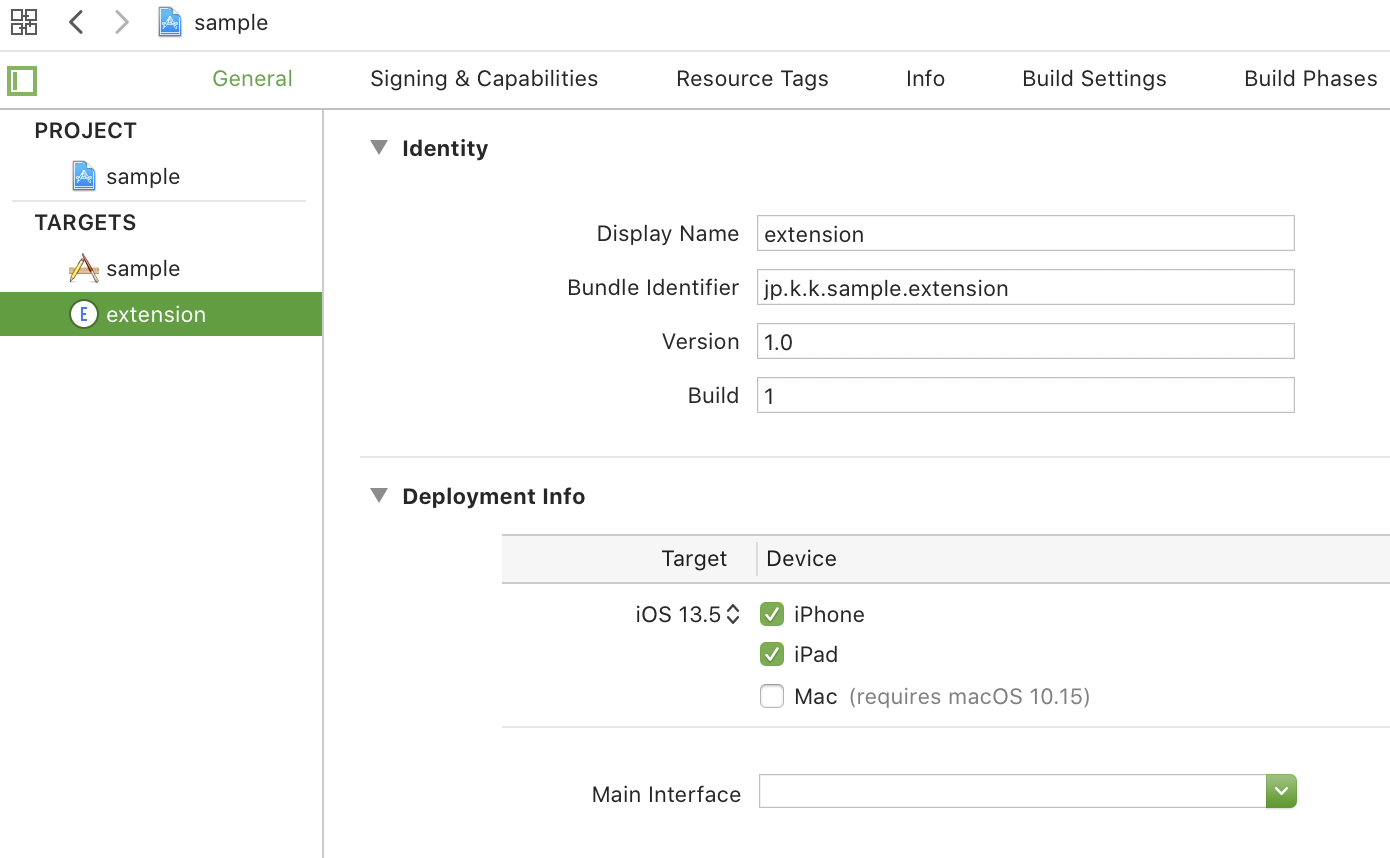
Developerサイトでの準備
Notification Service Extensionを利用するにはこのターゲット用のApplication IDとProvisioning Profileが必要になります。
アプリ用のものとは別のものを用意しないといけません。
DeveloperサイトにてCertificates, Identifiers & ProfilesでApplication Identifierを追加
※ここで大事な点があります
例えばアプリ用に用意しているBundle Identifierが
com.sample.application
だったとするならば
NotificationExtension用のBundle Identifierは
com.sample.application.extension
のように上位部分を合わせてくださいProvisioning Profileを作成
アプリ用のものと全く同じような作成方法で問題ありませんFirebase側で気を付ける点
curl -X POST --header "Authorization: key=*******************" \
--Header "Content-Type: application/json" \
https://fcm.googleapis.com/fcm/send \
-d @- << EOF
{
    "registration_ids": [
"********************************"
    ],

    "notification": {
        "title": "タイトル",
        "imageUrl": "https://sample.*******.jpg"
    },
    "priority":10,
    "mutable_content":true
}
EOF
送信時のコマンドはこのような感じになります
注意点としては
"mutable_content":true
こちらの書き方です
Firebaseのサポートサイトでは
mutable-content:1のような記述がありますが、上記の方法で送信することによってiOSの通知に変換される時にはmutable-content:1がちゃんと入っています。
これが入っていないと全く動きません。コーディング
自動で生成されたNotificationService.swiftを編集します。
NotificationService.swiftvar contentHandler: ((UNNotificationContent) -> Void)? var bestAttemptContent: UNMutableNotificationContent? override func didReceive(_ request: UNNotificationRequest, withContentHandler contentHandler: @escaping (UNNotificationContent) -> Void) { self.contentHandler = contentHandler bestAttemptContent = (request.content.mutableCopy() as? UNMutableNotificationContent) if let urlString = request.content.userInfo["gcm.notification.imageUrl"] as? String, let fileURL = URL(string: urlString) { URLSession.shared.downloadTask(with: fileURL) { (location, response, error) in if let location = location { // メディアファイルをダウンロードしてtmpに保存 let tmpFile = "file://".appending(NSTemporaryDirectory()).appending(fileURL.lastPathComponent) let tmpUrl = URL(string: tmpFile)! try? FileManager.default.moveItem(at: location, to: tmpUrl) if let attachment = try? UNNotificationAttachment(identifier: "hoge", url: tmpUrl, options: nil) { // メディアを添付 self.bestAttemptContent?.attachments = [attachment] } } contentHandler(self.bestAttemptContent!) }.resume() } }上記を用意しておけばOKです。
処理の流れとしては
Push通知が届くとdidReceiveが走り、メッセージの中にある画像URLをダウンロードして通知内容に添付します。
Extensionという名のように、通知の内容を拡張して書き換える、といったイメージです。
画像URLのリンクが切れていたりダウンロードに失敗してもcontentHandlerを実行するまでの時間制限が存在するのでPush通知自体が全く発生しなくなるといった心配はありません。嵌りポイント
私が何度やってもどうしてもうまくいかなかった嵌りポイントだけ紹介させて下さい。
それが、Extension用Targetの対応OSバージョンをアプリターゲットのOSと合わせないといけない
ということでした。
最初からextensionを用意していればこんなことにはならなかったのですが、アプリ用ターゲットの作成からextension作成までの時期に半年程の差があったので作成時の初期設定されているバージョンがずれてしまっていたというのが原因でした。
終わりです
読んでいただきありがとうございました。
Brewus,Inc.
株式会社ブリューアス
https://brewus.co.jp
- 投稿日:2020-08-04T07:06:15+09:00
iPhoneでp5.jsがしたい
Processingを書くためのappです。この記事のお題はこのappを入れれば解決なんですが、日頃Pythonista3を使っている身には書きにくかったので、別の方法を探しました。
必要なもの
次の条件を満たすコードエディタappが必要です。
- ファイル、ディレクトリ管理ができる
- HTMLのプレビューができる
筆者のお勧めはTextasticです。コンソールを見ることもできるためです。Pythonista3でもコンソール以外は実現可能なので、その方法も後述します。
1. ライブラリをダウンロード
p5.jsはJavaScriptライブラリとして実装されており、そのソースコードはダウンロード可能です。まずはそれをダウンロードします。
download | p5.js から"p5.js complete", "p5.js", "p5.min.js"のいずれかをダウンロードします。筆者は"p5.js complete"にしました。やることはそんなに変わらないはずなので、以降はこの選択をしたものとして書いていきます。
ダウンロードしたファイルは
iCloud/ダウンロードにあります。解凍して、好きな所に移動させて下さい。2. エディタの準備
お使いのエディタで先ほどダウンロードしたフォルダがあるディレクトリ(仮に
rootという名前だとします)を開きます。念のため、現在のディレクトリ構成を確認しておきます。root /p5 /いろいろ /他のファイル、フォルダこんな感じになってれば大丈夫です。次に、
root直下にindex.htmlとsketch.jsを作成します。ディレクトリ構成は以下のようになります。root /p5 /いろいろ /index.html /sketch.js /他のファイル、フォルダ各ファイルには以下の内容を記述します。
index.html<!DOCTYPE html> <html lang=""> <head> <meta charset="utf-8"> <meta name="viewport" content="width=device-width, initial-scale=1.0"> <title>p5.js</title> <style> body { padding: 0; margin: 0; } </style> <script src="./p5/p5.js"></script> <script src="./p5/p5.sound.min.js"></script> <script src="./sketch.js"></script> </head> <body> <main> </main> </body> </html>sketch.jsfunction setup() { createCanvas(windowWidth, windowHeight); } function draw() { clear(); fill(255, 0, 0); ellipse(100, 100, 100, 100); }
index.htmlはp5/empty-example/index.htmlを参考にしました。ダウンロードしたものに応じて、以下の部分を変更してください。index.html<script src="./p5/p5.js"></script> <script src="./p5/p5.sound.min.js"></script>これで準備完了です。
index.htmlをプレビューして赤い円が表示されたら成功です。おまけ: Pythonista3でp5.js
前節の
rootディレクトリにquicklook.pyを追加します。ディレクトリ構成を確認します。root /p5 /いろいろ /index.html /sketch.js /quicklook.py /他のファイル、フォルダ
quicklook.pyには以下の内容を記述します。quicklook.pyimport os import ui if __name__ == '__main__': path = f'file://{os.getcwd()}/' with open('index.html', 'r', encoding='utf-8') as f: s = f.read() html = s.replace('./', path) print(path) print(html) v = ui.WebView() v.load_html(html) v.present('fullscreen')
rootがローカルかiCloudにある場合は上手くいくと思います。google driveなど、他の場所にある場合は上手く行くか保証できません。大事なのはパスが正確に指定されることなので、上手くいかなかった場合はf'file://{os.getcwd()}'の部分を変更してください。quicklook.pyを実行して赤い円が表示されたら成功です。
- 投稿日:2020-08-04T05:46:27+09:00
[FlutterWeb] iOS端末で画像が表示されないときのTips - webp
iOS端末でFlutterWeb上の画像が表示されない
僕は今までAndroidのアプリを開発していたのですが、愛するGoogleがFlutterを推しているので、この機会にiOS・Webアプリ開発に触れてみようとFlutterでWebアプリ開発を試みた時に起こった事象です。
今回の事象について最初は画像表示方法が間違っていると思い少し悩んだのですが、結論としてはもっとシンプルな話でした。恐らくiOS開発に慣れている人は陥らないエラーかと思うのですが、僕と同じAndroid出身のために残します。
結論
Googleが生み出した便利な画像フォーマット「webp」をiOSはサポートしてない。
つまりFlutterでは対応していてもiOSでは表示できない。
https://github.com/fluttercandies/flutter_image_editor/issues/42※2020/06/23時点で改善の兆し有り
iOSでもwebpを対応していくようなので、この問題は短期的なもので終わる可能性がある。嬉しい。
2020/06/23時点 Safari 14 Beta Release NotesNew Features
Added WebP image support.
https://developer.apple.com/documentation/safari-release-notes/safari-14-beta-release-notes参考
Flutterで使える画像拡張子
下記を見る限り画像データは「JPEG, WebP, GIF, animated WebP/GIF, PNG, BMP, and WBMP」が使える。
https://flutter.dev/docs/development/ui/assets-and-imagesCommon types of assets include static data (for example, JSON files), configuration files, icons, and images (JPEG, WebP, GIF, animated WebP/GIF, PNG, BMP, and WBMP).
参考issue
"decode image error" with Webp images on iOS #42
https://github.com/fluttercandies/flutter_image_editor/issues/42Add support for WebP #9857
https://github.com/flutter/flutter/issues/9857おわりに
最初はWebp使えないと絶望したのですが、徐々に対応されているようで安心しました。
Flutterでもっとアプリ開発が便利になることを楽しみにしています!Twitterフォローもよろしくです!
- @noumi0k
- 投稿日:2020-08-04T02:00:44+09:00
【Flutter】DateTimeを「何日前」「何分前」など現在時刻との差分で表示させる方法
今回は、flutterで、「何日前」、「何分前」など現在時刻からの差分で表示していきます。
現在時刻より「〜日前」「〜分前」の時間をとって来きて画面に表示する
ソースコード
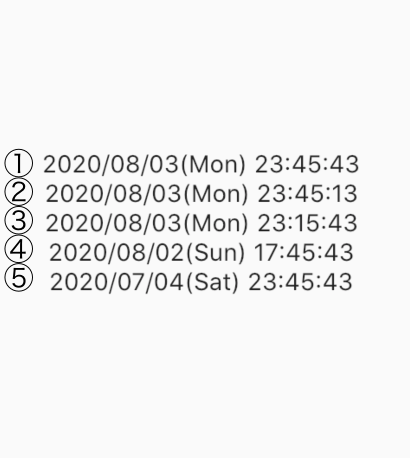
main.dart// 現在の時刻 final DateTime now = DateTime.now(); class Date extends StatelessWidget { // 30秒前の時刻 final DateTime thirtySecondsAgo = now.add(Duration(seconds: 30) * -1); // 30分前の時刻 final DateTime thirtyMinutesAgo = now.add(Duration(minutes: 30) * -1); // 5時間前の時刻 final DateTime fiveHoursAgo = now.add(Duration(hours: 30) * -1); // 30日前の時刻 final DateTime thirtyDaysAgo = now.add(Duration(days: 30) * -1); @override Widget build(BuildContext context) { return Scaffold( body: Center( child: Column(mainAxisAlignment: MainAxisAlignment.center, children: < Widget[ // ⓵ Text(DateFormat('yyyy/MM/dd(E) HH:mm:ss').format(now)), // ② Text(DateFormat('yyyy/MM/dd(E) HH:mm:ss').format(thirtySecondsAgo)), // ③ Text(DateFormat('yyyy/MM/dd(E) HH:mm:ss').format(thirtyMinutesAgo)), // ④ Text(DateFormat('yyyy/MM/dd(E) HH:mm:ss').format(fiveHoursAgo)), // ⑤ Text(DateFormat('yyyy/MM/dd(E) HH:mm:ss').format(thirtyDaysAgo)), ]), ), ); } }実際の画面がこちら
ひとまず、ここまでで使った技術を紹介
DateTime.add()
FlutterのDateTimeクラスには、addというメソッドが用意せれていてこれを用いて指定した期間、前か後の時刻(DateTime)をとってこれる。
例えば、30秒後なら以下のようにすればとって来れます。
final thirtySecondsAfter = DateTime.add(Duration(seconds: 30))addの引数にDurationを渡してあげれば簡単にとってこれます。
Flutter の公式ドキュメント 「DateTime class」
https://api.flutter.dev/flutter/dart-core/DateTime-class.htmlDateTimeをフォーマットを指定してStringに変換
まずは、pub.devからintlというライブラリを使えるようにします。
pubspec.yamldependencies: flutter: sdk: flutter intl: ^0.16.1main.dartimport 'package:flutter/material.dart'; import 'package:intl/intl.dart';これでintlが使えるようになりました
次に、フォーマットを指定してStringに変換していきます。
例:
DateFormat('yyyy/MM/dd(E)').format(DateTime date)・このようにDataFormatの引数に指定するFormatを渡す。
⬇️
・formatの引数にStringに変換したい時刻(DateTime)を渡してあげる
⬇️
・これをTextの引数に渡すと表示できる参考にした記事
・pub.devのintlパッケージ
https://pub.dev/packages/intl
・flutterでDateTimeとStringの変換方法とTimeZoneとLocale
https://qiita.com/ko2ic/items/bd0d20d72c66e8231c5c現在時刻との差分を表示する
ソースコード
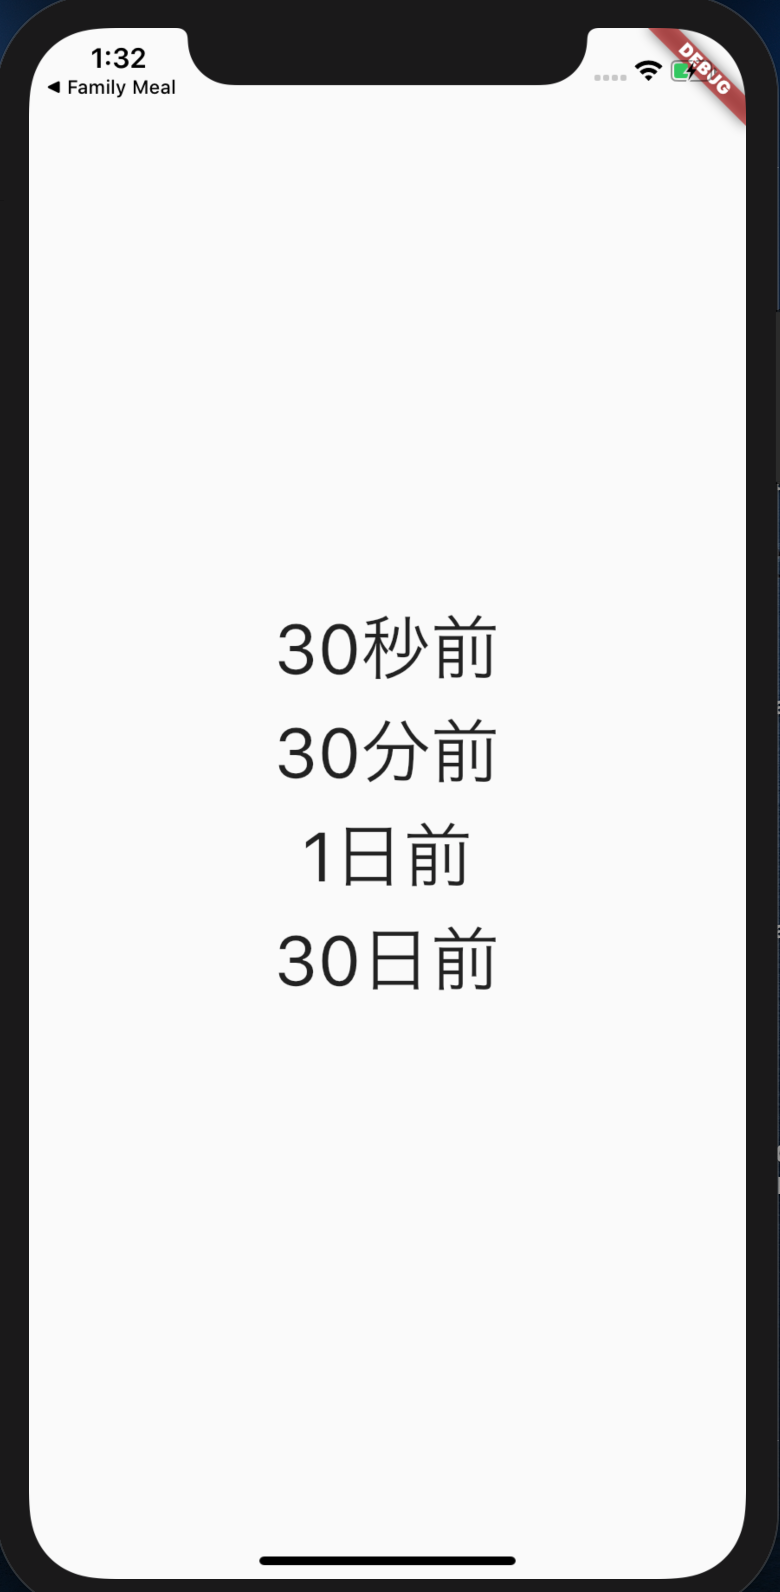
main.dartfinal DateTime now = DateTime.now(); class Date extends StatelessWidget { final List<DateTime> dates = [ // 30秒前の時刻 now.add(Duration(seconds: 30) * -1), // 30分前の時刻 now.add(Duration(minutes: 30) * -1), // 5時間前 now.add(Duration(hours: 30) * -1), // 30日前 now.add(Duration(days: 30) * -1) ]; @override Widget build(BuildContext context) { final difference = dates.map((date) => Text(fromAtNow(date))).toList(); return Scaffold( body: Center( child: Column( mainAxisAlignment: MainAxisAlignment.center, children: difference), ), ); } } String fromAtNow(DateTime date) { final Duration difference = DateTime.now().difference(date); final int sec = difference.inSeconds; if (sec >= 60 * 60 * 24) { return '${difference.inDays.toString()}日前'; } else if (sec >= 60 * 60) { return '${difference.inHours.toString()}時間前'; } else if (sec >= 60) { return '${difference.inMinutes.toString()}分前'; } else { return '$sec秒前'; } }実際の画面
この方法を解説
実際にはここの部分で、現在時刻との差分をStringに変換しています。
String fromAtNow(DateTime date) {
  final Duration difference = DateTime.now().difference(date);
  final int sec = difference.inSeconds;

  if (sec >= 60 * 60 * 24) {
    return '${difference.inDays.toString()}日前';
  } else if (sec >= 60 * 60) {
    return '${difference.inHours.toString()}時間前';
  } else if (sec >= 60) {
    return '${difference.inMinutes.toString()}分前';
  } else {
    return '$sec秒前';
  }
}
手順
1. まずは、DateTimeクラスのdifferenceメソッドを使って差分をDurationで返します。
例では、DataTime.nowとdateの差分を取ってきました。例:
final Duration difference = DateTime.now().difference(date);2. DurationのinSecondsメソッドで差分(Duration)を秒数(int)に変換してあげる
例:
final int sec = difference.inSeconds;3. 60秒以下の場合は、〜秒前のように場合分けする
例:
if(sec < 60) {return '$sec秒前';}以上!!
参考になる記事
Flutter の公式ドキュメント 「DateTime class」
https://api.flutter.dev/flutter/dart-core/DateTime-class.html
・pub.devのintlパッケージ
https://pub.dev/packages/intl
・flutterでDateTimeとStringの変換方法とTimeZoneとLocale
https://qiita.com/ko2ic/items/bd0d20d72c66e8231c5c
・一週間前、または、現在の日時からn日後、n日前の日付を取得する - C#プログラミング
https://www.ipentec.com/document/csharp-get-a-week-ago-datetime