- 投稿日:2020-08-04T23:34:43+09:00
gem sitemap_generator で priority, lastmod, changefreq を記載しない方法
概要
sitemap_generator ではデフォルトでは priority, lastmod, changefreq にデフォルト値が記載されます。
これらの項目を出力したくないときもあるのでその方法を共有します。方法
priority, lastmod, changefreq に nil を渡すと出力されなくなります。
add '/home', priority: nil, lastmod: nil, changefreq: nil
- 投稿日:2020-08-04T23:06:27+09:00
[Ruby] 親モジュールを取得する
概要
以下のようなモジュールの階層があるときに、
ChildモジュールからParentモジュールのVALUEを参照したかった。module Parent VALUE = 'PARENT' module Child VALUE = 'CHILD' def self.parent_value # 'PARENT' がほしい end end endRails(activesupport) が使える環境なら簡単
流石に
Module#parent的なメソッドがRubyで提供されてるだろうと思い調べて見たが、どうやらRuby(2.7現在)本体にはそのような機能はなく、Railsの拡張(activesupport)で提供されていることがわかった。そのため、Rails環境では以下のように単純に
parentを参照することで対応可能module Parent VALUE = 'PARENT' module Child VALUE = 'CHILD' def self.parent_value self.parent::VALUE end end end[4] pry(main)> Parent::Child.parent_value => "PARENT"Rails以外でも使いたいので実装する
Railsでない(
activesupportが使用できない) 状態の場合、以下のようにparentメソッドがないよと怒られてしまう。irb(main):008:0> Parent::Child.parent_value Traceback (most recent call last): 5: from /Users/shingo.sasaki/.rbenv/versions/2.6.5/bin/irb:23:in `<main>' 4: from /Users/shingo.sasaki/.rbenv/versions/2.6.5/bin/irb:23:in `load' 3: from /Users/shingo.sasaki/.rbenv/versions/2.6.5/lib/ruby/gems/2.6.0/gems/irb-1.0.0/exe/irb:11:in `<top (required)>' 2: from (irb):8 1: from /Users/shingo.sasaki/Docker/teachme/app/libraries/hoge.rb:8:in `parent_value' NoMethodError (undefined method `parent' for Parent::Child:Module)
activesupportでは以下のように実装されている。def parent parent_name ? ActiveSupport::Inflector.constantize(parent_name) : Object enddef parent_name if defined?(@parent_name) @parent_name else parent_name = name =~ /::[^:]+\Z/ ? $`.freeze : nil @parent_name = parent_name unless frozen? parent_name end endと、コードを追っていくと以下のような手段を用いていることがわかる
Module#nameを使って、モジュール名を文字列で取得::を元に、親モジュールまでのモジュール名を正規表現で抽出Object.const_getを用いて文字列からモジュールを取得よって、
Moduleクラス自体を以下のように拡張すれば近いことができる(シンプルさを重視して、実際のactivesupportほど手広くカバーしてません)class Module def parent parent_name = self.name =~ /::[^:]+\Z/ ? $`.freeze : nil parent_name ? Object.const_get(parent_name) : Object end end↑を読み込んだ状態ならこんな構造があっても
module Parent
  module Child
    module GrandChild
    end
  end
end
階層をたどることが出来る
[3] pry(main)> Parent::Child::GrandChild.parent
=> Parent::Child
[4] pry(main)> Parent::Child::GrandChild.parent.parent
=> Parent
[5] pry(main)> Parent::Child::GrandChild.parent.parent.parent
=> Object
- 投稿日:2020-08-04T22:44:48+09:00
【Git】Are you sure you want to continue connecting (yes/no/[fingerprint])?
GitHubでssh方式でファイルを作成した時のエラー
The authenticity of host 'github.com (52.192.72.89)' can't be established.
Are you sure you want to continue connecting (yes/no/[fingerprint])?要するに既存でこのホスト?はないから信憑性がないよって
このまま接続を続けても大丈夫ですか?とのことでした。
わからずEnter押しててこのループから抜け出せず...
エラーの英語は部分部分でもしっかり読んでいこうと思います。
ちなみにこのエラーが出ないようにすることもできるらしいですが、いったんそこは飛ばします。
- 投稿日:2020-08-04T17:53:55+09:00
通知機能実装
自分用にまとめます。
モデルの作成
$ rails g model Notification visiter_id:integer visited_id:integer micropost_id:integer comment_id:integer action:string checked:boolean20200724090751_create_notifications.rbclass CreateNotifications < ActiveRecord::Migration[5.2] def change create_table :notifications do |t| # 通知を送ったユーザーのid t.integer :visiter_id # 通知を受け取ったユーザーのid t.integer :visited_id # いいねされた投稿のid t.integer :item_id # 投稿へのコメントのid t.integer :comment_id # 通知の種類(いいね、コメント、フォロー) t.string :action # 通知を確認したかどうか(初期値をfalseに設定) t.boolean :checked, default: false, null: false t.timestamps end end end$ rails db:migrateモデルの関連付け
user.rb# 自分が作った通知(自分がいいねやフォローなどをしたら作成される通知) has_many :active_notifications, class_name: 'Notification', foreign_key: 'visiter_id', dependent: :destroy # 自分宛の通知(自分以外の人がいいねやフォローをしてくれたら作成される通知) has_many :passive_notifications, class_name: 'Notification', foreign_key: 'visited_id', dependent: :destroypost.rbhas_many :notifications, dependent: :destroynotification.rb# 新しい通知が上に来るように指定 default_scope -> { order(created_at: :desc) } belongs_to :post, optional: true belongs_to :comment, optional: true # 関連するカラム名(visiter_id/visited_id)とモデル名(User)を指定している belongs_to :visiter, class_name: 'User', foreign_key: 'visiter_id', optional: true belongs_to :visited, class_name: 'User', foreign_key: 'visited_id', optional: true通知メソッド作成
いいね通知
post.rbdef create_notification_like(current_user) # すでにいいねの通知をしたことがないかを検索 liked = Notification.where(visiter_id: current_user.id, visited_id: user_id, post_id: id, action: 'like') # いいねの通知をしたことがなければ、新規通知作成 if liked.blank? notification = current_user.active_notifications.new(post_id: id, visited_id: user_id, action: 'like') # 自分の投稿に対するいいねは通知が行かないようにする if notification.visiter_id == notification.visited_id notification.checked = true end notification.save if notification.valid? end endコメント通知
post.rbdef create_notification_comment(current_user, comment_id) # 投稿にコメントした自分以外のユーザーをすべて取得し、全員に通知を送る commented_ids = Comment.select(:user_id).where(post_id: id).where.not(user_id: current_user.id).distinct commented_ids.each do |commented_id| save_notification_comment(current_user, comment_id, commented_id['user_id']) end # まだ誰もコメントしていない場合は、投稿者に通知を送る save_notification_comment(current_user, comment_id, user_id) if commented_id.blank? end def save_notification_comment(current_user, comment_id, visited_id) # コメントは複数回することがあるため、複数回通知する notification = current_user.active_notifications.new(post_id: id, comment_id: comment_id, visited_id: visited_id, action: 'comment') # 自分の投稿に対するコメントの場合は、通知済みとする if notification.visiter_id == notification.visited_id notification.checked = true end notification.save if notification.valid? endフォロー通知
user.rbdef create_notification_follow!(current_user) # すでにフォローの通知をしたことがないかを検索 followed = Notification.where(visiter_id: current_user.id, visited_id: id, action: 'follow') # いいねの通知をしたことがなければ、新規通知作成 if followed.blank? notification = current_user.active_notifications.new(visited_id: id, action: 'follow') notification.save if notification.valid? end endコントローラで定義
いいね
likes_controller.rbdef create @post = Post.find(params[:post_id]) unless @post.liked_by?(current_user) @like = current_user.likes.new(post_id: @post.id) @like.save # 追記 @post.create_notification_like(current_user) end endコメント
comments_controller.rbdef create @post = Post.find(params[:post_id]) @comment = @post.comments.new(comment_params) @comment.user_id = current_user.id @comments = @post.comments.all if @comment.save # 追記 @post.create_notification_comment(current_user, @comment.id) render :create else @post = Post.find(params[:post_id]) @comments = @post.comments.all render 'posts/show' end endフォロー
relationships_controller.rbdef follow @user = User.find(params[:id]) current_user.follow(params[:id]) #追記 @user.create_notification_follow(current_user) @posts = @user.posts.all render :create endコントローラの作成
$ rails g controller notificationsconfig/routes.rbresources :notifications, only: :indexnotifications_controller.rbclass NotificationsController < ApplicationController def index # current_userが受け取った通知一覧 @notifications = current_user.passive_notifications # @notificationの中でまだ確認していない通知 @notifications.where(checked: false).each do |notification| notification.update_attributes(checked: true) end end def destroy_all #通知を全削除 @notifications = current_user.passive_notifications.destroy_all redirect_to notifications_path end endビューの作成
notifications/index.html.slim.notification-visual .container .row .col-lg-5 .col-lg-2.text-center h4.mt-5.mb-4.font-weight-bold.notification-caption 通知 .row .col-lg-3 .col-lg-6 .frame-notification = link_to notifications_destroy_all_path, method: :delete do i.fas.fa-trash style="color: black;" h7 style="color: black;" 全削除 <hr> - notifications = @notifications.where.not(visiter_id: current_user.id) - if notifications.exists? # _notification.html.slimファイルにパーシャルで飛ばす = render notifications - else p 通知はありませんnotifications/_notification.html.slim- visiter = notification.visiter - visited = notification.visited .form-inline span = link_to user_path(visiter) do = attachment_image_tag visiter, :image, format: 'jpeg', fallback: "noimage.png", size: "40x30", class: "mr-2" = visiter.name = ' さんが' - case notification.action - when 'follow' then = "あなたをフォローしました" - when 'like' then = link_to 'あなたの投稿', notification.post, style: "font-weight: bold;" = "にいいねしました" - when 'comment' then - if notification.post.user_id == visited.id = link_to "あなたの投稿", notification.post, style: "font-weight: bold;" - else span = link_to post_path(notification.post) do = attachment_image_tag notification.post.user, :image, format: 'jpeg', fallback: "noimage.png", size: "25x20", class: "mr-1 ml-1" strong = notification.post.user.name + 'さんの投稿' = "にコメントしました" p.text-muted.mb-0 = Comment.find_by(id: notification.comment_id)&.comment .small.text-muted.text-right = time_ago_in_words(notification.created_at).upcase hr
通知がきたら通知のボタン部分に丸いアイコンを表示させる
layout/_user.html.slim-if unchecked_notifications.any? li.btn.btn-light.home-btn= link_to notifications_path, class: 'list' do i.fas.fa-circle.n-circle i.fas.fa-bell | 通知 -else li.btn.btn-light.home-btn= link_to notifications_path, class: 'list' do i.fas.fa-bell | 通知notifications_helper.rbmodule NotificationsHelper def unchecked_notifications @notifications = current_user.passive_notifications.where(checked: false) end end完成!
- 投稿日:2020-08-04T17:53:55+09:00
通知機能
自分用にまとめます。
モデルの作成
$ rails g model Notification visiter_id:integer visited_id:integer micropost_id:integer comment_id:integer action:string checked:boolean20200724090751_create_notifications.rbclass CreateNotifications < ActiveRecord::Migration[5.2] def change create_table :notifications do |t| # 通知を送ったユーザーのid t.integer :visiter_id # 通知を受け取ったユーザーのid t.integer :visited_id # いいねされた投稿のid t.integer :item_id # 投稿へのコメントのid t.integer :comment_id # 通知の種類(いいね、コメント、フォロー) t.string :action # 通知を確認したかどうか(初期値をfalseに設定) t.boolean :checked, default: false, null: false t.timestamps end end end$ rails db:migrateモデルの関連付け
user.rb# 自分が作った通知(自分がいいねやフォローなどをしたら作成される通知) has_many :active_notifications, class_name: 'Notification', foreign_key: 'visiter_id', dependent: :destroy # 自分宛の通知(自分以外の人がいいねやフォローをしてくれたら作成される通知) has_many :passive_notifications, class_name: 'Notification', foreign_key: 'visited_id', dependent: :destroypost.rbhas_many :notifications, dependent: :destroynotification.rb# 新しい通知が上に来るように指定 default_scope -> { order(created_at: :desc) } belongs_to :post, optional: true belongs_to :comment, optional: true # 関連するカラム名(visiter_id/visited_id)とモデル名(User)を指定している belongs_to :visiter, class_name: 'User', foreign_key: 'visiter_id', optional: true belongs_to :visited, class_name: 'User', foreign_key: 'visited_id', optional: true通知メソッド作成
いいね通知
post.rbdef create_notification_like(current_user) # すでにいいねの通知をしたことがないかを検索 liked = Notification.where(visiter_id: current_user.id, visited_id: user_id, post_id: id, action: 'like') # いいねの通知をしたことがなければ、新規通知作成 if liked.blank? notification = current_user.active_notifications.new(post_id: id, visited_id: user_id, action: 'like') # 自分の投稿に対するいいねは通知が行かないようにする if notification.visiter_id == notification.visited_id notification.checked = true end notification.save if notification.valid? end endコメント通知
post.rbdef create_notification_comment(current_user, comment_id) # 投稿にコメントした自分以外のユーザーをすべて取得し、全員に通知を送る commented_ids = Comment.select(:user_id).where(post_id: id).where.not(user_id: current_user.id).distinct commented_ids.each do |commented_id| save_notification_comment(current_user, comment_id, commented_id['user_id']) end # まだ誰もコメントしていない場合は、投稿者に通知を送る save_notification_comment(current_user, comment_id, user_id) if commented_id.blank? end def save_notification_comment(current_user, comment_id, visited_id) # コメントは複数回することがあるため、複数回通知する notification = current_user.active_notifications.new(post_id: id, comment_id: comment_id, visited_id: visited_id, action: 'comment') # 自分の投稿に対するコメントの場合は、通知済みとする if notification.visiter_id == notification.visited_id notification.checked = true end notification.save if notification.valid? endフォロー通知
user.rbdef create_notification_follow!(current_user) # すでにフォローの通知をしたことがないかを検索 followed = Notification.where(visiter_id: current_user.id, visited_id: id, action: 'follow') # いいねの通知をしたことがなければ、新規通知作成 if followed.blank? notification = current_user.active_notifications.new(visited_id: id, action: 'follow') notification.save if notification.valid? end endコントローラで定義
いいね
likes_controller.rbdef create @post = Post.find(params[:post_id]) unless @post.liked_by?(current_user) @like = current_user.likes.new(post_id: @post.id) @like.save # 追記 @post.create_notification_like(current_user) end endコメント
comments_controller.rbdef create @post = Post.find(params[:post_id]) @comment = @post.comments.new(comment_params) @comment.user_id = current_user.id @comments = @post.comments.all if @comment.save # 追記 @post.create_notification_comment(current_user, @comment.id) render :create else @post = Post.find(params[:post_id]) @comments = @post.comments.all render 'posts/show' end endフォロー
relationships_controller.rbdef follow @user = User.find(params[:id]) current_user.follow(params[:id]) #追記 @user.create_notification_follow(current_user) @posts = @user.posts.all render :create endコントローラの作成
$ rails g controller notificationsconfig/routes.rbresources :notifications, only: :indexnotifications_controller.rbclass NotificationsController < ApplicationController def index # current_userが受け取った通知一覧 @notifications = current_user.passive_notifications # @notificationの中でまだ確認していない通知 @notifications.where(checked: false).each do |notification| notification.update_attributes(checked: true) end end def destroy_all #通知を全削除 @notifications = current_user.passive_notifications.destroy_all redirect_to notifications_path end endビューの作成
notifications/index.html.slim.notification-visual .container .row .col-lg-5 .col-lg-2.text-center h4.mt-5.mb-4.font-weight-bold.notification-caption 通知 .row .col-lg-3 .col-lg-6 .frame-notification = link_to notifications_destroy_all_path, method: :delete do i.fas.fa-trash style="color: black;" h7 style="color: black;" 全削除 <hr> - notifications = @notifications.where.not(visiter_id: current_user.id) - if notifications.exists? # _notification.html.slimファイルにパーシャルで飛ばす = render notifications - else p 通知はありませんnotifications/_notification.html.slim- visiter = notification.visiter - visited = notification.visited .form-inline span = link_to user_path(visiter) do = attachment_image_tag visiter, :image, format: 'jpeg', fallback: "noimage.png", size: "40x30", class: "mr-2" = visiter.name = ' さんが' - case notification.action - when 'follow' then = "あなたをフォローしました" - when 'like' then = link_to 'あなたの投稿', notification.post, style: "font-weight: bold;" = "にいいねしました" - when 'comment' then - if notification.post.user_id == visited.id = link_to "あなたの投稿", notification.post, style: "font-weight: bold;" - else span = link_to post_path(notification.post) do = attachment_image_tag notification.post.user, :image, format: 'jpeg', fallback: "noimage.png", size: "25x20", class: "mr-1 ml-1" strong = notification.post.user.name + 'さんの投稿' = "にコメントしました" p.text-muted.mb-0 = Comment.find_by(id: notification.comment_id)&.comment .small.text-muted.text-right = time_ago_in_words(notification.created_at).upcase hr
通知がきたら通知のボタン部分に丸いアイコンを表示させる
layout/_user.html.slim-if unchecked_notifications.any? li.btn.btn-light.home-btn= link_to notifications_path, class: 'list' do i.fas.fa-circle.n-circle i.fas.fa-bell | 通知 -else li.btn.btn-light.home-btn= link_to notifications_path, class: 'list' do i.fas.fa-bell | 通知notifications_helper.rbmodule NotificationsHelper def unchecked_notifications @notifications = current_user.passive_notifications.where(checked: false) end end完成!
- 投稿日:2020-08-04T17:31:39+09:00
Railsでランキング機能を実装する方法
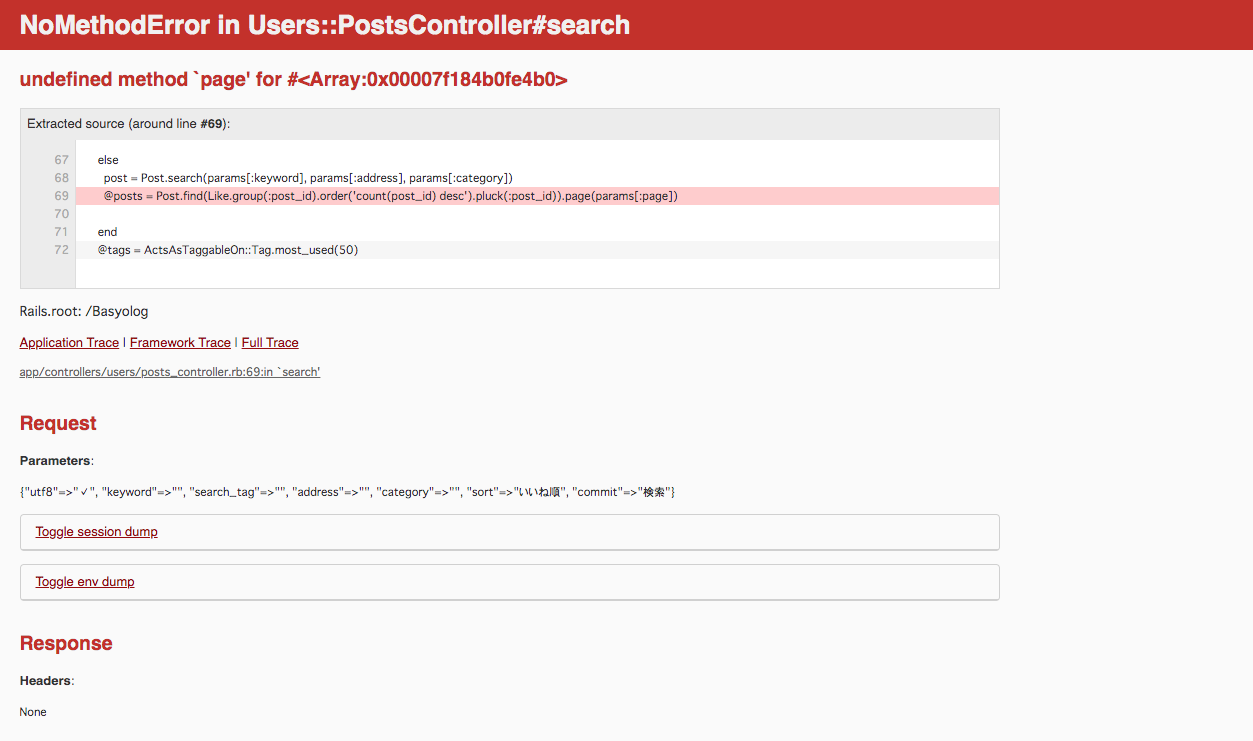
以前、Qiitaのこの記事(Railsでお手軽ランキング機能)を参考にして、ランキング機能を実装したことがありました。
無事、実装できたのですが、以下の問題に直面しました。kaminariのページネーション機能と組み合わせると上手くいかない!
@posts = Post.find(Like.group(:post_id).order('count(post_id) desc').pluck(:post_id)).page(params[:page])kaminariのpageメソッドと組み合わせると上記のようになりますが、これだと以下のようなエラーが発生します。
そのためpageメソッドと組み合わせても、問題ないランキング機能をご紹介いたします。
前提
- 記事のテーブル名は posts
- いいねのテーブル名は likes
- すでにいいね機能を実装しており、postsとlikesのアソシエーションができていること
ランキング機能の実装
@posts = Post.joins(:likes).group(:post_id).order('count(post_id) desc')これでOKです!
一つずつ説明します。Post.joins(:likes) #postsテーブルとlikesテーブルを内部結合します group(:post_id) #post_idが同じものにグループを分けます order('count(post_id) desc') #それをpost_idの多い順番に並び替えるこれでランキング機能は完成です。
以下のように、コードの末尾にpageメソッドをつけてもエラーにならず、ページネーション機能が機能していると思います。@posts = Post.joins(:likes).group(:post_id).order('count(post_id) desc').page(params[:page])参考文献
- Railsでお手軽ランキング機能
https://qiita.com/mitsumitsu1128/items/18fa5e49a27e727f00b4
- 投稿日:2020-08-04T16:38:45+09:00
本番環境とcredentials.yml.enc
この記事で伝えたいこと
production環境の秘匿情報をcredentialsで扱う前にしっかり調べましょう。
ただのコピペダメ絶対。基礎知識 暗号化と復号について
〜開発環境〜
$ rails newした時config/master.keyと共にcredentials.yml.encは作成されるようです。
そしてこのmaster.keyを使用して暗号化、復号します。
(master.keyは大切に保管しましょう)秘匿情報の編集には以下のコマンドを実行します。
$ rails credentials:edit #master.keyが存在しない時実行すると新たに作成する〜本番環境〜
暗号化と復号にはsecret_key_baseも必要になります。
ローカルで$ rails secretコマンドを実行し作成します。
事前にローカルのmaster.keyをサーバーにも配置しておくこと。本番環境で気をつけること
credentials.yml.encの暗号化、復号にはmaster.keyを使用すると先ほど書きました。このmaster.key、デフォルトでgitignoreに登録されているためGitの管理対象外となっています。
ここからが大切です。
EC2でgitのリポジトリをクローンしてもこのmaster.keyは当然サーバー上にやってきません。
その事を忘れて本番環境の秘匿情報を追加しようと思い$ rails credentials:editコマンドを実行すると...サーバー上にはmaster.keyが無いので新たに生成されてしまいます。この時点ではローカルのmaster.keyとサーバーのmaster.keyが異なりcredentials.yml.encの復号ができなくなります。あら大変。
Couldn't decrypt config/credentials.yml.enc. Perhaps you passed the wrong key?こんなエラーや、
ActiveSupport::MessageEncryptor::InvalidMessageこんなエラーが発生します。
もう一度credentialsの復号がしたい
ローカルのmaster.keyをサーバーに置いてあげれば良いです。
master.keyを紛失した場合は、config/credentials.yml.encを削除してから以下のコマンドで
新たなものを生成してくれるようです。
ただしcredentialsの中身は全て吹き飛びますのでご注意を。$ sudo EDITOR=vim rails credentials:editRails6以降とcredentilas.yml.enc
6以降は環境ごとに秘匿情報を分けられるようになりました。(祝)
本番環境で情報を追加したい時以下コマンドを実行します。
環境に応じてenvironment以降を変化させます。$ rails credentials:edit --environment productionこのコマンドはconfig/credentials/production.yml.encと、config/credentials/production.keyを作成します。ファイル名とキーの名前にそれぞれ該当する環境が記載されます。
サーバーにはproduction.keyのみを上げれば良い。この場合でもmaster.keyやsecret_key_baseの扱いには注意。
参考
Rails 5.2 で ActiveSupport::MessageEncryptor::InvalidMessage
Rails5.2から追加された credentials.yml.enc のキホン
Rails5.2の新機能credentials等でパスワード等を管理する
【Ruby/Rails】デプロイ作業をCapistranoで自動化する
- 投稿日:2020-08-04T11:20:08+09:00
rails routes.rbのmemberとcollectionの違い
routes.rbのmemberとcollectionの違い
railsのroutes.rbでルーティングを設定する時にmemberとcollectionの違いに関して記載します。
menberの場合
routes.rbresources :buy_additional_actions, only: %i[] do member do get 'index' => 'buy_additional_actions#index'menberの場合は生成されたurlに:idが自動で追加されます。
buy_additional_action GET /buy_additional_actions/:id/index(.:format) buy_additional_actions#indexcollectionの場合
routes.rbresources :buy_additional_actions, only: %i[] do collection do get 'index' => 'buy_additional_actions#index'collectionの場合はurlには:idが付与されません。
buy_additional_actions GET /buy_additional_actions/index(.:format) buy_additional_actions#index
- 投稿日:2020-08-04T10:34:34+09:00
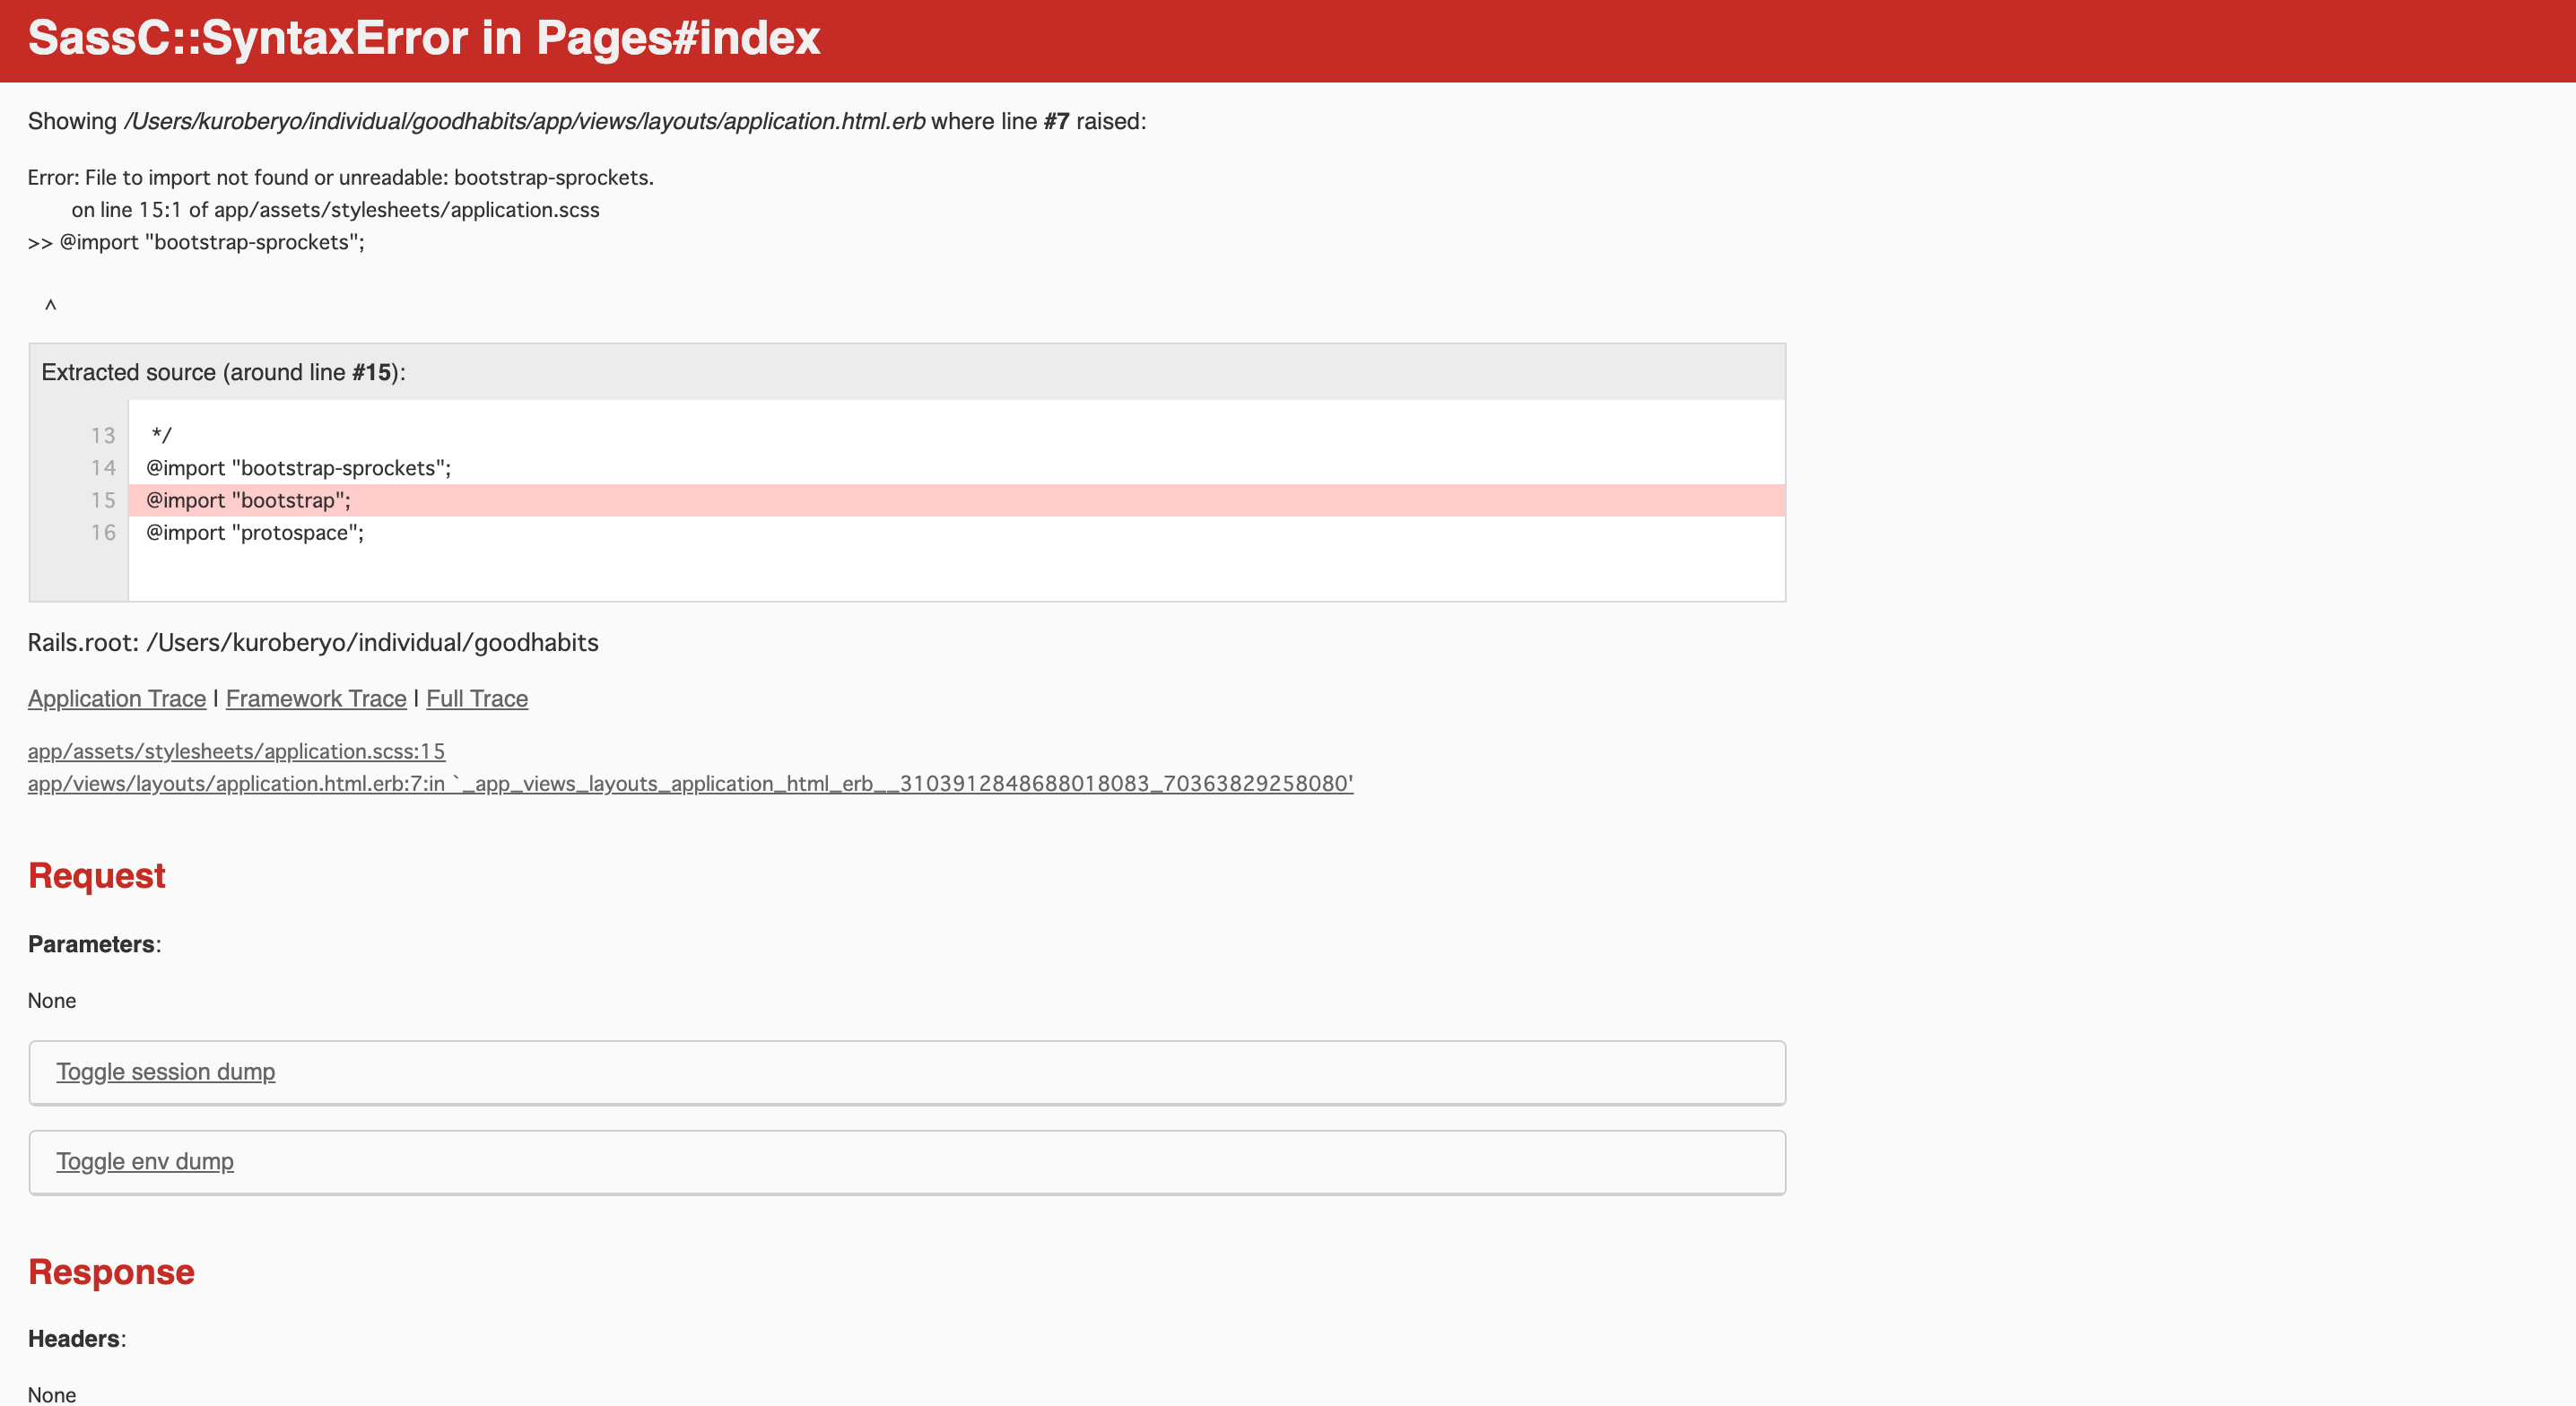
rails5中級チュートリアル中に発生したSassC::SyntaxError in Pages#index対処法
rails5中級チュートリアル中にエラーが発生 以下エラー画像
仮説と試したこと
エラー文の解説を翻訳してみると
「エラー:インポートするファイルが見つからないか、読み取れません:bootstrap-sprockets。
app / assets / stylesheets / application.scssの15:1行
@import "bootstrap-sprockets";」となる。 importの読み込み記述はされているが、sprocketsが存在しないことになっていると仮説。
エラー文で検索した際に出てくる多くのサイトではrails sをしていなかったのが原因と述べられているものが多いが、自分の場合rails sでの再起動を行うが効果なし。
参考サイト解決
application.scssをいじっていたら解決する事ができた
application.scss修正前@import "bootstrap-sprockets"; @import "bootstrap"; @import "protospace";三行目を削除
application.scss修正後@import "bootstrap-sprockets"; @import "bootstrap";どうやら解決するためにいくつかサイトを見ていた際、誤ってprotospaceをimport読み込みしていたのが原因だったらしい。
そのため解決法は rails s不足と誤ったimportを記述してしまっていた事であった。
- 投稿日:2020-08-04T10:29:23+09:00
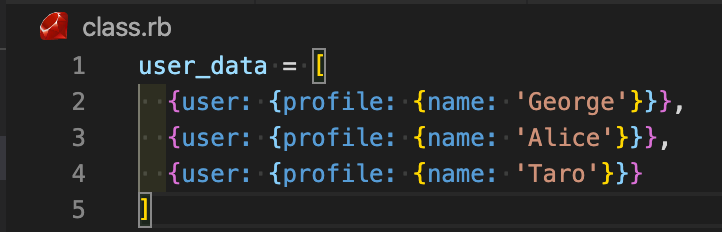
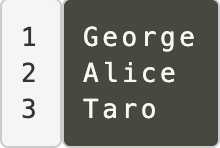
[ruby]2重ハッシュ

- 投稿日:2020-08-04T10:04:22+09:00
DM機能
自分用にまとめます。
必要なテーブル
users
ユーザーテーブルrooms
チャットルームをするための場所entries
チャットルームに入るユーザーを管理するテーブルmessages
メッセージを管理するテーブル実装
モデル作成
$ rails g model room name:string $ rails g model entry user:references room:references $ rails g model message user:references room:references content:text $ rails db:migrateuser.rbclass User < ApplicationRecord devise :database_authenticatable, :registerable, :recoverable, :rememberable, :trackable, :validatable has_many :messages, dependent: :destroy has_many :entries, dependent: :destroy endentry.rbclass Entry < ApplicationRecord belongs_to :user belongs_to :room endroom.rbclass Room < ApplicationRecord has_many :messages, dependent: :destroy has_many :entries, dependent: :destroy endmessage.rbclass Message < ApplicationRecord belongs_to :user belongs_to :room end
コントローラ作成
$ rails g controller users index show $ rails g controller rooms $ rails g controller messagesroutes.rbresources :users, only: [:show,:edit,:update] resources :messages, only: [:create] resources :rooms, only: [:create,:show]users_controller.rbclass UsersController < ApplicationController def show @user = User.find(params[:id]) # current_userをEntriesテーブルから探す @currentUserEntry = Entry.where(user_id: current_user.id) # DMを送る対象のユーザーをEntriesテーブルから探す @userEntry = Entry.where(user_id: @user.id) if @user.id != current_user.id # currentUserと@userのEntriesをそれぞれ一つずつ取り出し、2人のroomが既に存在するかを確認 @currentUserEntry.each do |cu| @userEntry.each do |u| # 2人のroomが既に存在していた場合 if cu.room_id == u.room_id @isRoom = true #room_idを取り出す @roomId = cu.room_id end end end # 2人ののroomが存在しない場合 unless @isRoom #roomとentryを新規に作成する @room = Room.new @entry = Entry.new end end end endusers/show.html.slim- if @user.id != current_user.id # 相互フォローしていることが条件 - if (current_user.following? @user) && (@user.following? current_user) # 既にroomがある場合(以前にDMのやりとりしている) - if @isRoom == true # そのroomに入る =link_to room_path(@roomId) do i.fas.fa-envelope # roomがない場合(新規のDM) - else # RoomとEntry2つのモデルにデータを送る = form_with @room, local: true do |f| = fields_for @entry do |e| # Entryにはuser_idを送る必要があるため、@user.idを指定 = e.hidden_field :user_id, value: @user.id # 今回はリンクにアイコン使用のためbutton_tagを使用。通常であればf.submitでOK = button_tag type: 'submit' do i.fas.fa-enveloperooms_controllerclass RoomsController < ApplicationController def create @room = Room.create # current_userのEntry @entry1 = Entry.create(room_id: @room.id, user_id: current_user.id) # DMを受け取る側のEntry(users/showでuser_idは渡しているため、room_idを拾って、マージしている) @entry2 = Entry.create((entry_params).merge(room_id: @room.id)) redirect_to room_path(@room) end def show @room = Room.find(params[:id]) # entriesテーブルにcurrent_user.idと紐付いたチャットルームがあるかどうか確認 if Entry.where(user_id: current_user.id,room_id: @room.id).present? @messages = @room.messages @message = Message.new # チャットルームのユーザ情報を表示させるため代入 @entries = @room.entries else redirect_back(fallback_location: root_path) end end private def entry_params params.require(:entry).permit(:user_id, :room_id) end endrooms/show.html.slim.row .col-lg-2 .col-lg-8.frame-notification <hr> # メッセージがあれば、一覧を表示 - if @messages.present? - @messages.each do |message| .row.balloon5 # 今回は、自分のメッセージは右側に表示させたいため以下の条件分岐 - if current_user.name == message.user.name .col-lg-12.text-right .chatting .say = message.content <br> small= message.created_at.to_s(:datetime_jp) - else .col-lg-2.text-center = attachment_image_tag message.user, :image, format: 'jpeg', fallback: "noimage.png", size: "50x40" small= link_to message.user.name, user_path(message.user), class: "d-block mt-1" <br> .col-lg-10.text-left .chatting .says p= message.content <br> small= message.created_at.to_s(:datetime_jp) <hr> - else p メッセージはありません。 .row .col-lg-2 .col-lg-8.text-center = form_with model: @message, local: true do |f| = f.text_field :content, placeholder: "メッセージを入力して下さい" , size: 50 = f.hidden_field :room_id, value: @room.id = f.submit "投稿", class: 'btn btn-outline-secondary btn-sm ml-2'messages_controller.rbclass MessagesController < ApplicationController def create #formで送られてきたroom_idとcurrent_user.idを持ったデータがEntryにあるかを確認 if Entry.where(user_id: current_user.id, room_id: params[:message][:room_id]).present? # contentとroom_idはformで送られてきているため、user_idをマージして新規メッセージを作成 @message = Message.create((message_params).merge(user_id: current_user.id)) redirect_back(fallback_location: root_path) else flash[:alert] = "メッセージ送信に失敗しました。" redirect_back(fallback_location: root_path) end end private def message_params params.require(:message).permit(:user_id, :content, :room_id) end end完成!
- 投稿日:2020-08-04T10:04:22+09:00
DM機能実装
自分用にまとめます。
必要なテーブル
users
ユーザーテーブル
rooms
チャットルームをするための場所
entries
チャットルームに入るユーザーを管理するテーブル
messages
メッセージを管理するテーブル
実装
モデル作成
$ rails g model room name:string $ rails g model entry user:references room:references $ rails g model message user:references room:references content:text $ rails db:migrateuser.rbclass User < ApplicationRecord devise :database_authenticatable, :registerable, :recoverable, :rememberable, :trackable, :validatable has_many :messages, dependent: :destroy has_many :entries, dependent: :destroy endentry.rbclass Entry < ApplicationRecord belongs_to :user belongs_to :room endroom.rbclass Room < ApplicationRecord has_many :messages, dependent: :destroy has_many :entries, dependent: :destroy endmessage.rbclass Message < ApplicationRecord belongs_to :user belongs_to :room end
コントローラ作成
$ rails g controller users index show $ rails g controller rooms $ rails g controller messagesroutes.rbresources :users, only: [:show,:edit,:update] resources :messages, only: [:create] resources :rooms, only: [:create,:show]users_controller.rbclass UsersController < ApplicationController def show @user = User.find(params[:id]) # current_userをEntriesテーブルから探す @currentUserEntry = Entry.where(user_id: current_user.id) # DMを送る対象のユーザーをEntriesテーブルから探す @userEntry = Entry.where(user_id: @user.id) if @user.id != current_user.id # currentUserと@userのEntriesをそれぞれ一つずつ取り出し、2人のroomが既に存在するかを確認 @currentUserEntry.each do |cu| @userEntry.each do |u| # 2人のroomが既に存在していた場合 if cu.room_id == u.room_id @isRoom = true #room_idを取り出す @roomId = cu.room_id end end end # 2人ののroomが存在しない場合 unless @isRoom #roomとentryを新規に作成する @room = Room.new @entry = Entry.new end end end endusers/show.html.slim- if @user.id != current_user.id # 相互フォローしていることが条件 - if (current_user.following? @user) && (@user.following? current_user) # 既にroomがある場合(以前にDMのやりとりしている) - if @isRoom == true # そのroomに入る =link_to room_path(@roomId) do i.fas.fa-envelope # roomがない場合(新規のDM) - else # RoomとEntry2つのモデルにデータを送る = form_with @room, local: true do |f| = fields_for @entry do |e| # Entryにはuser_idを送る必要があるため、@user.idを指定 = e.hidden_field :user_id, value: @user.id # 今回はリンクにアイコン使用のためbutton_tagを使用。通常であればf.submitでOK = button_tag type: 'submit' do i.fas.fa-enveloperooms_controllerclass RoomsController < ApplicationController def create @room = Room.create # current_userのEntry @entry1 = Entry.create(room_id: @room.id, user_id: current_user.id) # DMを受け取る側のEntry(users/showでuser_idは渡しているため、room_idを拾って、マージしている) @entry2 = Entry.create((entry_params).merge(room_id: @room.id)) redirect_to room_path(@room) end def show @room = Room.find(params[:id]) # entriesテーブルにcurrent_user.idと紐付いたチャットルームがあるかどうか確認 if Entry.where(user_id: current_user.id,room_id: @room.id).present? @messages = @room.messages @message = Message.new # チャットルームのユーザ情報を表示させるため代入 @entries = @room.entries else redirect_back(fallback_location: root_path) end end private def entry_params params.require(:entry).permit(:user_id, :room_id) end endrooms/show.html.slim.row .col-lg-2 .col-lg-8.frame-notification <hr> # メッセージがあれば、一覧を表示 - if @messages.present? - @messages.each do |message| .row.balloon5 # 今回は、自分のメッセージは右側に表示させたいため以下の条件分岐 - if current_user.name == message.user.name .col-lg-12.text-right .chatting .say = message.content <br> small= message.created_at.to_s(:datetime_jp) - else .col-lg-2.text-center = attachment_image_tag message.user, :image, format: 'jpeg', fallback: "noimage.png", size: "50x40" small= link_to message.user.name, user_path(message.user), class: "d-block mt-1" <br> .col-lg-10.text-left .chatting .says p= message.content <br> small= message.created_at.to_s(:datetime_jp) <hr> - else p メッセージはありません。 .row .col-lg-2 .col-lg-8.text-center = form_with model: @message, local: true do |f| = f.text_field :content, placeholder: "メッセージを入力して下さい" , size: 50 = f.hidden_field :room_id, value: @room.id = f.submit "投稿", class: 'btn btn-outline-secondary btn-sm ml-2'messages_controller.rbclass MessagesController < ApplicationController def create #formで送られてきたroom_idとcurrent_user.idを持ったデータがEntryにあるかを確認 if Entry.where(user_id: current_user.id, room_id: params[:message][:room_id]).present? # contentとroom_idはformで送られてきているため、user_idをマージして新規メッセージを作成 @message = Message.create((message_params).merge(user_id: current_user.id)) redirect_back(fallback_location: root_path) else flash[:alert] = "メッセージ送信に失敗しました。" redirect_back(fallback_location: root_path) end end private def message_params params.require(:message).permit(:user_id, :content, :room_id) end end完成!
- 投稿日:2020-08-04T09:53:16+09:00
ソースコードを読むとき
既存プロジェクトに入った際、各Classがどのようなメソッドをもっているかを確認する必要があると思います。
その際、自分がどのように確認を行っているかを以下で述べていこうと思います。
[環境]
Ruby
Rails
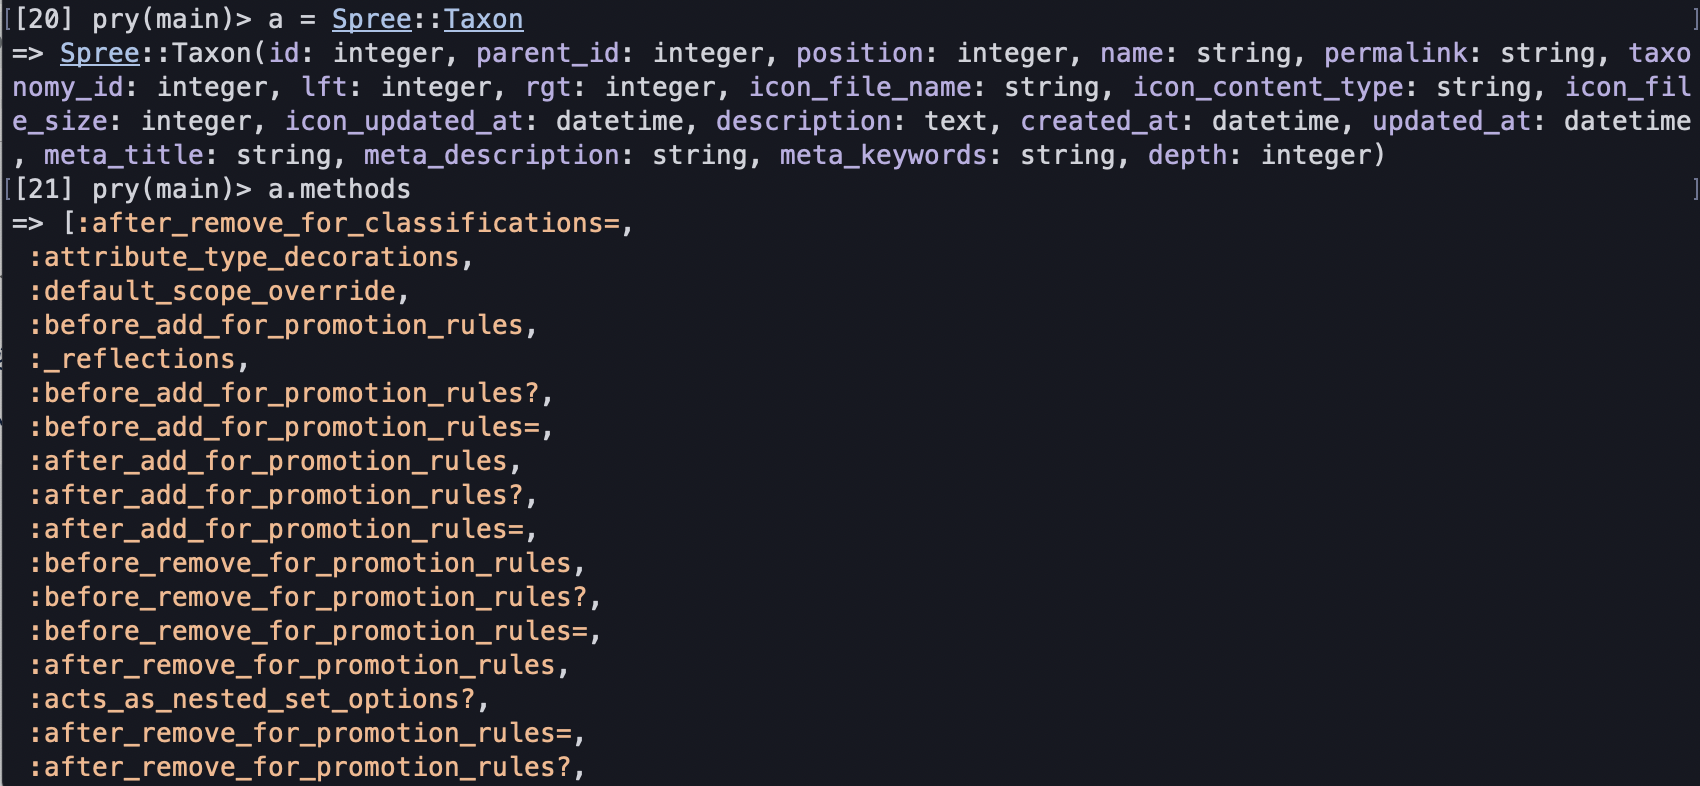
Solidus今回は、RailsのSolidusというGemを使って、説明させて頂ければと思います。
$rails c
でコンソールの中に入る。そこで、上記のように、任意の文字にオブジェクトを代入する。
(Spree::Taxonはオブジェクト)$a.methods
を実行。実行することで、そのオブジェクトが持っているmethodが表示される。
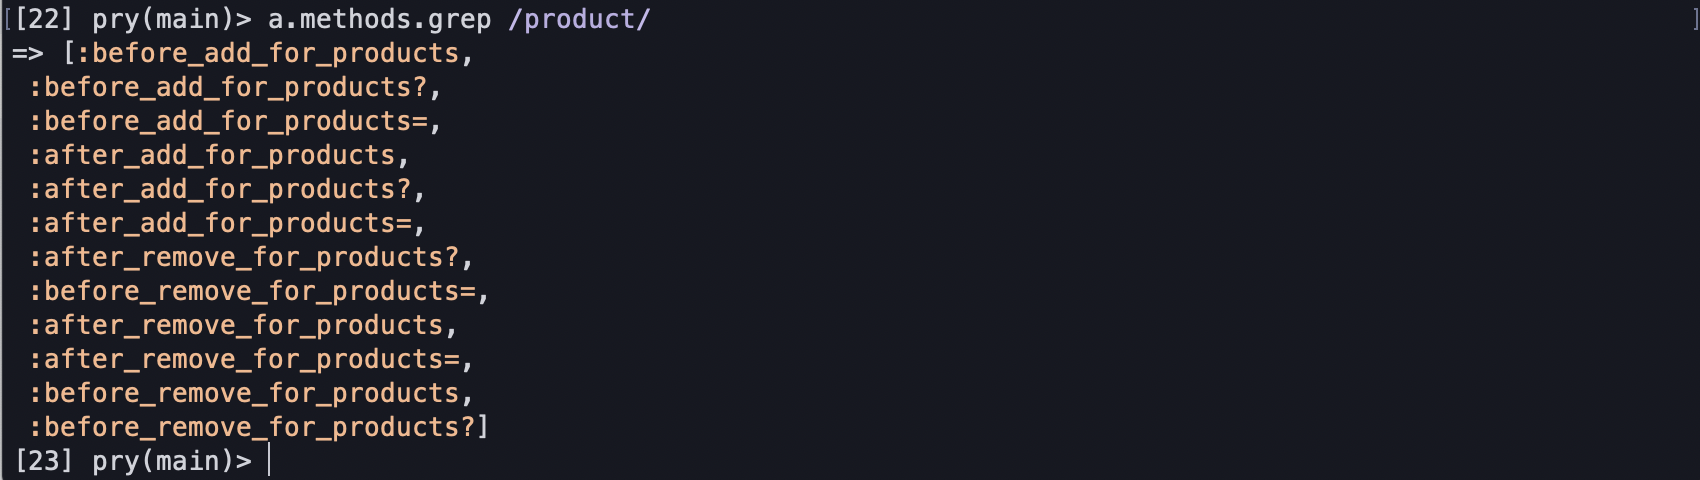
$a.methods.grep /product/
とすると、productにまつわるmethodのみを取得できる。
上記のようにgrepを使う事で検索結果を絞って検索する事ができるので、結構使う機会も多いと思います。
$a.method(:before_remove_for_products=).source_location
上記のように、method(メソッド名).source_locationとすることで、
どこのファイルにそのメソッドがあるかを探す事もできます。

- 投稿日:2020-08-04T09:18:02+09:00
オブジェクト指向の継承についてとyieldについて Ruby
継承について
オブジェクト指向に存在する継承という能力があるそうです。クラス定義した中身を書かずして利用したり、中で定義されているものをそのクラスで使いやすいように改造して使えるようになったりします。
メリット
- 機能拡張、いわゆる、プラガブルな仕組みを作ることができる能力
デメリット
- 継承させすぎによる保守不全(大元を変更した瞬間、継承先で不具合が多発するなど・・・)
実際に使ってみる
keishou.rbclass Ball attr_accessor :x, :y, :x_way, :y_way, :step def initialize(x: 1, y: 1, x_way: 1, y_way: 1, step: 1) @x = x @y = y @x_way = x_way @y_way = y_way @step = step end def move @x += @x_way @y += @y_way @step += 1 end def reflect_x if @x_way == 1 @x_way = -1 elsif @x_way == -1 @x_way = 1 end end def reflect_y if @y_way == 1 @y_way = -1 elsif @y_way == -1 @y_way = 1 end end def goal?(x_max, y_max) @x == x_max && y == 1 \ || @x == 1 && @y == y_max \ || @x == 1 && @y == 1 \ || @x == x_max && @y == y_max end def boundary_x?(x_max) @x == x_max || @x == 1 end def boundary_y?(y_max) @y == y_max || @y == 1 end end class BilliardTable attr_accessor :length_x, :length_y, :ball def initialize(length_x: nil, length_y: nil, ball: nil) @length_x = length_x @length_y = length_y @ball = ball end def cue print_status loop do @ball.move print_status if @ball.goal?(@length_x, @length_y) puts "GOAL!!" break elsif @ball.boundary_x?(@length_x) @ball.reflect_x elsif @ball.boundary_y?(@length_y) @ball.reflect_y end end end def print_status puts "#{@ball.step}, (#{@ball.x}, #{@ball.y})" end end class MyBilliardTable < BilliardTable def print_status puts "step = #{@ball.step}, x = #{@ball.x}, y = #{@ball.y}" end end x_max = ARGV[0] y_max = ARGV[1] if !x_max || !y_max puts "引数を指定してください" exit 1 end x_max = x_max.to_i y_max = y_max.to_i (6..16).each do |times| puts "3 x #{times}のビリヤード台で、実行します" bt = MyBilliardTable.new(length_x: 3, length_y: times, ball: Ball.new) bt.cue endまた引き続き、以前でも書いたコードを使って継承をさせてみます。実際このコードの中で継承させている部分は、
keishoububun.rbclass MyBilliardTable < BilliardTable def print_status puts "step = #{@ball.step}, x = #{@ball.x}, y = #{@ball.y}" end endここの部分です。不等号を使って親クラスを指定することで、クラス継承をすることができます。今回は出力する部分のメソッドを変更しています。
そして、この定義したクラスを使ってオブジェクトを生成してみます。shori.rb(6..16).each do |times| puts "3 x #{times}のビリヤード台で、実行します" bt = MyBilliardTable.new(length_x: 3, length_y: times, ball: Ball.new) bt.cue end処理部分は上記の部分になります。出力が変更された形になっているはずですし、また、MyBilliardTableクラスでは定義していませんが、BilliardTabelクラスで定義しているメソッドはちゃんと機能していることが理解できると思います。
余談
余談ですが、オブジェクト指向でクラス設計することによって、BilliardTableをオブジェクトにできることによって、盤面にパターンを持たせることができるようになりました。今回は3かけxの盤面を表現しています。
banmen.rbputs "3 x #{times}のビリヤード台で、実行します"以前の記事で書いたベタ書きのコードもやろうと思えばできますが、それは二重のループを作ることになりますし、ループさせる分、コードが一回り大きくなります、つまり、コードの階層が深まります。結果として、読みづらく、修正しにくいです。想像するだけで、改修しにくい、読みにくいコードになると思います。
こういうような条件が増えた時の表現のしやすさ、書きやすさもやはりオブジェクト指向の利点と言えると思います。
yieldについて
規模の小さいものであれば、ブロック単位でことが済ませられるyieldを使って機能拡張をすることも可能です。
yieldは「取って変わる」の意味の通り、statusメソッドの部分を取って代わるようにしています。yield.rbclass Ball attr_accessor :x, :y, :x_way, :y_way, :step def initialize(x: 1, y: 1, x_way: 1, y_way: 1, step: 1) @x = x @y = y @x_way = x_way @y_way = y_way @step = step end def move @x += @x_way @y += @y_way @step += 1 end def reflect_x if @x_way == 1 @x_way = -1 elsif @x_way == -1 @x_way = 1 end end def reflect_y if @y_way == 1 @y_way = -1 elsif @y_way == -1 @y_way = 1 end end def goal?(x_max, y_max) @x == x_max && y == 1 \ || @x == 1 && @y == y_max \ || @x == 1 && @y == 1 \ || @x == x_max && @y == y_max end def boundary_x?(x_max) @x == x_max || @x == 1 end def boundary_y?(y_max) @y == y_max || @y == 1 end end class BilliardTable attr_accessor :length_x, :length_y, :ball def initialize(length_x: nil, length_y: nil, ball: nil) @length_x = length_x @length_y = length_y @ball = ball end def cue print_status loop do @ball.move print_status if @ball.goal?(@length_x, @length_y) puts "GOAL!!" break elsif @ball.boundary_x?(@length_x) @ball.reflect_x elsif @ball.boundary_y?(@length_y) @ball.reflect_y end end end def cue_2 if block_given? puts "blockがあります" else puts "blockを指定してください" return end loop do @ball.move yield status if @ball.goal?(@length_x, @length_y) puts "GOAL!!" break elsif @ball.boundary_x?(@length_x) @ball.reflect_x elsif @ball.boundary_y?(@length_y) @ball.reflect_y end end end def status { "step" => @ball.step, "x" => @ball.x, "y" => @ball.y } end end x_max = ARGV[0] y_max = ARGV[1] if !x_max || !y_max puts "引数を指定してください" exit 1 end x_max = x_max.to_i y_max = y_max.to_i ball = Ball.new() bt = BilliardTable.new(length_x: x_max, length_y: y_max, ball: ball) #bt.cue bt.cue_2 do |status| puts "ステップ数は#{status["step"]}でx座標は#{status["x"]}、y座標は#{status["y"]}です" end拡張したい機能の規模の大小で、継承を用いるか、yieldを使ってブロック渡しをするかを見極めると良いと思われます。
- 投稿日:2020-08-04T08:33:46+09:00
既存のRailsアプリの開発環境にDockerを導入する手順【Rails, MySQL, Docker】
こんにちは.
今回は, 既存のRailsアプリの開発環境にDockerを導入する手順をまとめてみました.
まだまだ勉強不足ですので, 修正点・改善点等ございましたら, ご指摘いただけますと幸いです.事前準備
- Docker-for-macのインストール
- 既存のRailsアプリ(今回は以前作成した簡単な家計簿アプリを使用します.)
環境
Ruby:2.5.3
Rails:5.2.4.3
MySQL:5.6
Docker:19.03.8
docker-compose:1.25.4手順
1. ルートディレクトリにDockerfile,docker-compose.ymlを追加
既存のRailsアプリのルートディレクトリ直下に
Dockerfileとdocker-compose.ymlを作成します.
以下, それぞれのファイルの中身です.Dockerfile
DockerfileFROM ruby:2.5.3 RUN apt-get update && apt-get install -y \ build-essential \ nodejs WORKDIR /kakeibo COPY Gemfile Gemfile.lock /kakeibo/ RUN bundle install
FROM ruby:2.5.3の部分についてはアプリのRubyのバージョンに合わせる.RUN apt-get update && apt-get install -y ~で必要なパッケージをインストールする.WORKDIR /kakeiboでコンテナ内にフォルダを作成.COPY Gemfile Gemfile.lock /kakeibo/でコンテナ内にGemfileとGemfile.lockをコピーした後,bundle installを実行する.docker-compose.yml
docker-compose.ymlversion: '3' volumes: mysql-data: services: web: build: . command: bundle exec rails s -p 3000 -b '0.0.0.0' ports: - '3000:3000' volumes: - '.:/kakeibo' tty: true stdin_open: true depends_on: - db links: - db db: image: mysql:5.6 volumes: - 'mysql-data:/var/lib/mysql' environment: - 'MYSQL_ROOT_PASSWORD=password'
Dockerfileとdocker-compose.ymlの中身の詳しい説明はこちらの記事にわかりやすくまとめられていました.2. config/database.ymlを編集
config/database.ymldefault: &default adapter: mysql2 encoding: utf8 pool: <%= ENV.fetch("RAILS_MAX_THREADS") { 5 } %> username: root password: password host: db development: <<: *default database: kakeibo_development
config/database.ymlのpasswordとhostをdocker-compose.ymlで設定した値に合わせます.3. コンテナ起動
terminal$ docker-compose build $ docker-compose up -d $ docker-compose exec web rails db:create $ docker-compose exec web rails db:migrateこれで http://localhost:3000 にアクセスすると無事にアプリが表示されるはずです.
参考
- 既存のrailsプロジェクトをDockerで開発する手順
- 既存のRailsアプリにDockerを導入する手順
- Dockerで既存アプリの開発環境を作成【Ruby2.6 + Rails5.2 + Mysql5.7】
- [Rails] DockerでRails + MySQLの開発環境をつくる手順
- Docker初心者がRails + PostgreSQL or MySQLで仮想環境構築した手順を丁寧にまとめる
- #Linux #Ubuntu #docker #Dockerfile のこれは何? apt-get install --no-install-recommends
- 『Dockerfile のベストプラクティス』

- 投稿日:2020-08-04T08:32:14+09:00
Railsアプリの開発環境をDockerで構築する手順【Rails, MySQL, Docker】
こんにちは.
今回は, Railsアプリの開発環境をDockerで構築する手順をまとめてみました.
まだまだ勉強不足ですので, 修正点・改善点等ございましたら, ご指摘いただけますと幸いです.事前準備
環境
Ruby: 2.5.8
Rails: 5.2.4.3
MySQL: 5.7.31
Docker: 19.03.8
Docker Compose: 1.25.4手順
1. プロジェクトのルートディレクトリを作成
terminal$ mkdir test-app初めに, プロジェクトのルートディレクトリを作成します.
2. ルートディレクトリ直下にファイルを追加
terminal$ cd test-app $ touch Dockerfile docker-compose.yml Gemfile Gemfile.lock作成したルートディレクトリの直下に
Dockerfile,docker-compose.yml,Gemfile,Gemfile.lockの4つのファイルを作成します.
それぞれのファイルの中身は以下のようになります. (Gemfile.lockは空のままにします.)DockerfileFROM ruby:2.5 RUN apt-get update && apt-get install -y \ build-essential \ nodejs WORKDIR /test-app COPY Gemfile Gemfile.lock /test-app/ RUN bundle installdocker-compose.ymlversion: '3' volumes: mysql-data: services: web: build: . command: bundle exec rails s -p 3000 -b '0.0.0.0' ports: - '3000:3000' volumes: - '.:/test-app' tty: true stdin_open: true depends_on: - db links: - db db: image: mysql:5.7 volumes: - 'mysql-data:/var/lib/mysql' environment: - 'MYSQL_ROOT_PASSWORD=test-app'Gemfilesource 'https://rubygems.org' gem 'rails', '~>5.2'3. コンテナ内にRailsのセットアップを行う
terminal$ docker-compose run --rm web rails new . --force --database=mysql --skip-bundle --skip-testwebのコンテナ内で
rails newを実行します.
今回はテストにRSpecを使用する予定でしたので,--skip-testも追加しています.4. 作成されたconfig/database.ymlを編集
Railsのセットアップにより作成された
config/database.ymlを以下のように編集します.config/database.ymldefault: &default adapter: mysql2 encoding: utf8 pool: <%= ENV.fetch("RAILS_MAX_THREADS") { 5 } %> username: root password: test-app #docker-compose.ymlのMYSQL_ROOT_PASSWORDの値を設定する host: db #docker-compose.ymlのservice名と合わせる development: <<: *default database: test-app_development5. コンテナの起動
terminal$ docker-compose up --build -d $ docker-compose run --rm web rails db:createこれで, http://localhost:3000 にアクセスすると, Railsのホーム画面が表示されるはずです.
参考

- 投稿日:2020-08-04T08:32:09+09:00
graphql-rubyを使って認可する方法
GraphQLを使っているときに様々な処理で認可させたい事があると思います。
- このQueryはログインユーザーのみ実行できるようにしたい
- このMutationは管理者のみ実行できるようにしたい
- このQueryは自分の所有しているデータのときだけ返却するようにしたい
- このFieldは自分の所有しているデータのときだけ返却するようにしたい
当初はgraphql-rubyの知識が乏しかったので取得や更新処理の中で認可する処理を呼び出していたのですが、graphql-rubyのドキュメントを改めて読み直したところ、認可のためのメソッド(authorized?)がある事がわかったので動作検証を兼ねて記事を書きました。
graphql-rubyについて
Ruby(Rails)でGraphQLを簡単に使えるようにしてくれるGemです。
https://github.com/rmosolgo/graphql-ruby細かいところは実際に試してみないとわからないことも多いですが、ドキュメントが充実していて素晴らしいです。
https://graphql-ruby.org/guidesこの記事を書いている時点では、
graphql: 1.11.1を使っています。
まだガンガンバージョンアップしているGemなので、バージョンが違うと大幅に動作が変わっている可能性があるのでご注意ください。認可の実装例
最初に挙げた4つのパターンの実装例を説明します。
前提条件
認可に必要なログインユーザーの情報はcontextに格納していることとします。
認証についてはこの記事の本筋からの逸れるので説明は省略します。app/controllers/graphql_controller.rb# ログインユーザーの情報はcontext[:current_user]に格納 # 未ログインの場合はnil context = { current_user: current_user }このQueryはログインユーザーのみ実行できるようにしたい
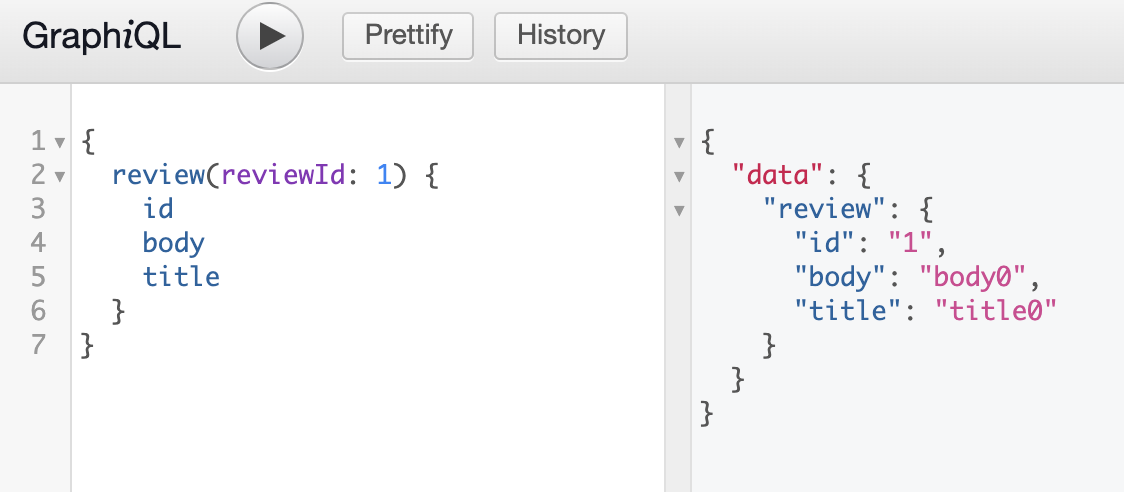
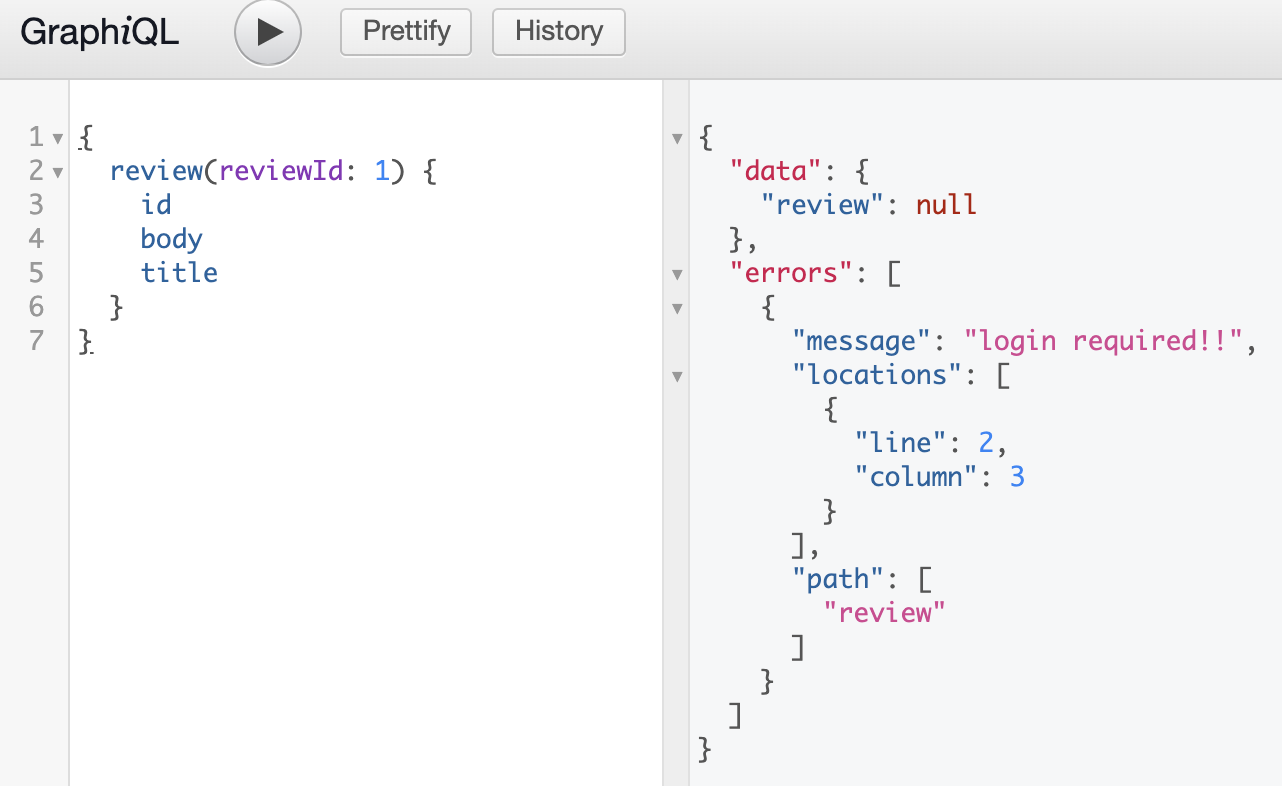
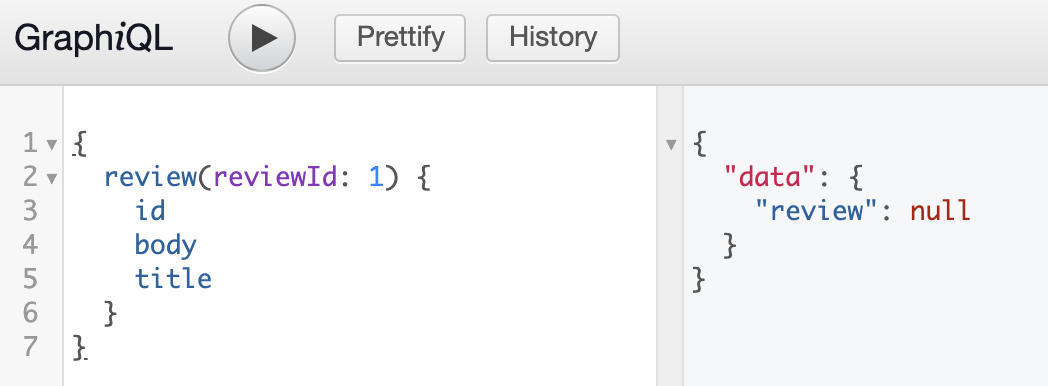
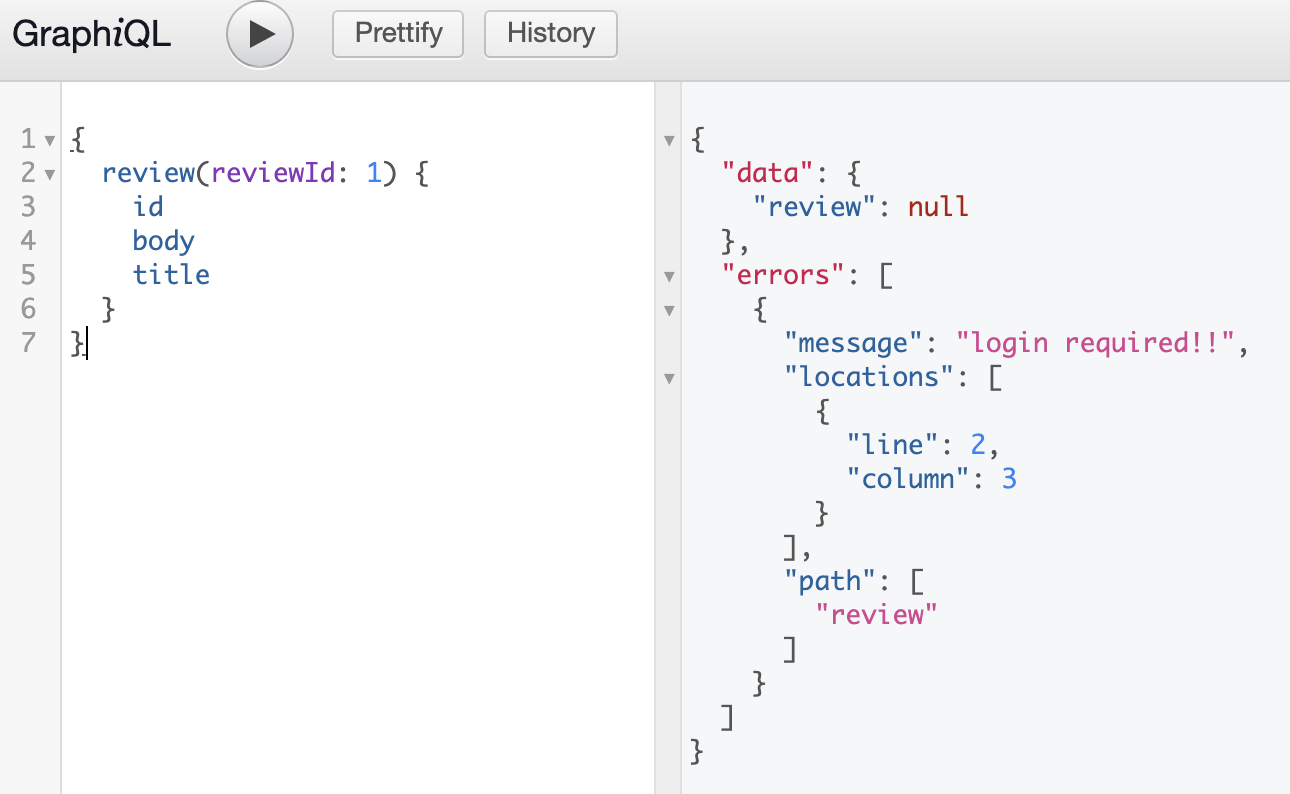
ここでは『review_idを指定して該当するReviewTypeを返却するクエリー』を実装します。
認可を入れる前
認可を実装する前にReviewTypeを取得するクエリーを実装します。
app/graphql/types/query_type.rbmodule Types class QueryType < Types::BaseObject field :review, resolver: Resolvers::ReviewResolver end endapp/graphql/resolvers/review_resolver.rbmodule Resolvers class ReviewResolver < BaseResolver type Types::ReviewType, null: true argument :review_id, Int, required: true def resolve(review_id:) Review.find_by(id: review_id) end end endapp/graphql/types/review_type.rbmodule Types class ReviewType < BaseObject field :id, ID, null: false field :title, String, null: true field :body, String, null: true field :secret, String, null: true field :user, Types::UserType, null: false end endapp/graphql/types/user_type.rbmodule Types class UserType < BaseObject field :id, ID, null: false field :name, String, null: false field :email, String, null: false end endGraphiQLで実行すると次のようになります。
認可を実装
それでは先ほど実装した処理に『ログインユーザーのみ実行できる』という制約を追加します。
authorized?を使わない実装
以前の私はresolveメソッドでReviewを取得する前にログインチェックする実装を入れていました。
まずは様々なResolverから使えるようにBaseResolverにログインチェックメソッドを実装します。
context[:current_user]が入っていない場合はエラーを発生させます。
ちなみに、GraphQL::ExecutionErrorを使うとraiseするだけでレスポンスをGraphQLのエラー形式に変換してくれます。app/graphql/resolvers/base_resolver.rbmodule Resolvers class BaseResolver < GraphQL::Schema::Resolver def login_required! # ログインしていなかったらraise raise GraphQL::ExecutionError, 'login required!!' unless context[:current_user] end end end次にBaseResolverのログインチェックを処理の最初に呼び出すようにします。
app/graphql/resolvers/review_resolver.rbdef resolve(review_id:) + # 処理の最初にログインチェックを行う + login_required! Review.find_by(id: review_id) endGraphiQLで未ログインの状態で実行すると次のようになります。
この方法でもやりたいことは実現できているのですが、ログイン必須のResolverは処理の最初に必ず
login_required!を書かなければいけません。
controllerのbefore_actionのように本処理が呼ばれる前に自動で認可してくれる方法はないのかをずっと探していました。authorized?を使う実装
graphql-rubyのガイドを改めて読んでいるとauthorized?というメソッドがあることに気づきました。
これを使うとresolveメソッドの前に認可を行い、実行可否を制御することができるようです。
下記はmutationに追加するガイドですが、Resolverにも同じように追加できます。
https://graphql-ruby.org/mutations/mutation_authorization.htmlログイン必須のResolverは汎用的に使えそうなので、ログイン必須のResolverが継承するlogin_required_resolverを作りました。
authorized?のパラメーター(args)にはresolveと同じパラメーターが格納されます。app/graphql/resolvers/login_required_resolver.rbmodule Resolvers class LoginRequiredResolver < BaseResolver def authorized?(args) context[:current_user].present? end end endreview_resolverはlogin_required_resolverを継承するように修正します。
他の実装は認可を追加する前と同じです。app/graphql/resolvers/review_resolver.rb- class ReviewResolver < BaseResolver + class ReviewResolver < LoginRequiredResolverGraphiQLで未ログインの状態で実行すると次のようになります。
authorized?の結果がfalseの場合はエラー情報はなく
data: nullだけ返却されるようになりました。
ガイドにも記載がある通り、authorized?がfalseの場合はdata: nullだけを返却するのがデフォルトの挙動のようです。
nullを返却するという仕様で問題なければこのままで良いですが、認可されない場合はエラー情報も返却するように変更してみます。エラー情報を追加する方法は簡単で、authorized?の中でGraphQL::ExecutionErrorをraiseすればできます。
ちなみに成功時はtrueを明示的に返却しないと成功と認識されないので注意が必要です。app/graphql/resolvers/login_required_resolver.rbmodule Resolvers class LoginRequiredResolver < BaseResolver def authorized?(args) # 認可できない場合はGraphQL::ExecutionErrorをraise raise GraphQL::ExecutionError, 'login required!!' unless context[:current_user] true end end endGraphiQLで未ログインの状態で実行すると次のようになります。
これでauthorized?を使った場合でもエラー情報を返却することができました。
authorized?を使った場合、resolveメソッドでは認可の処理を書く必要がなくなるのでシンプルに書くことができます。
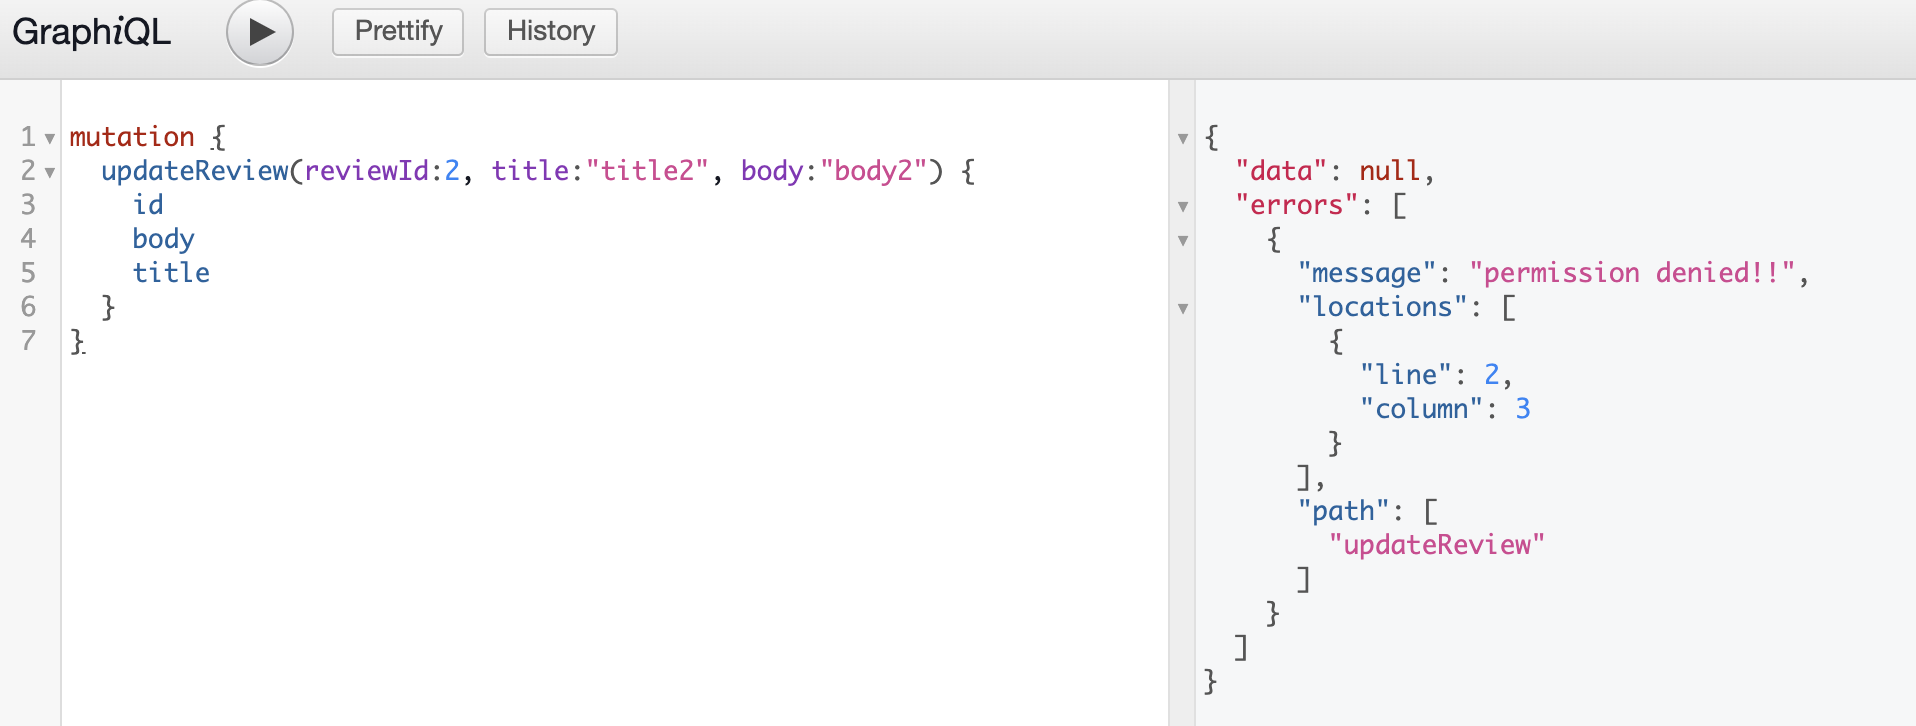
(今回の例はかなりシンプルな実装なのでそこまで差はありませんが・・・)このMutationは管理者のみ実行できるようにしたい
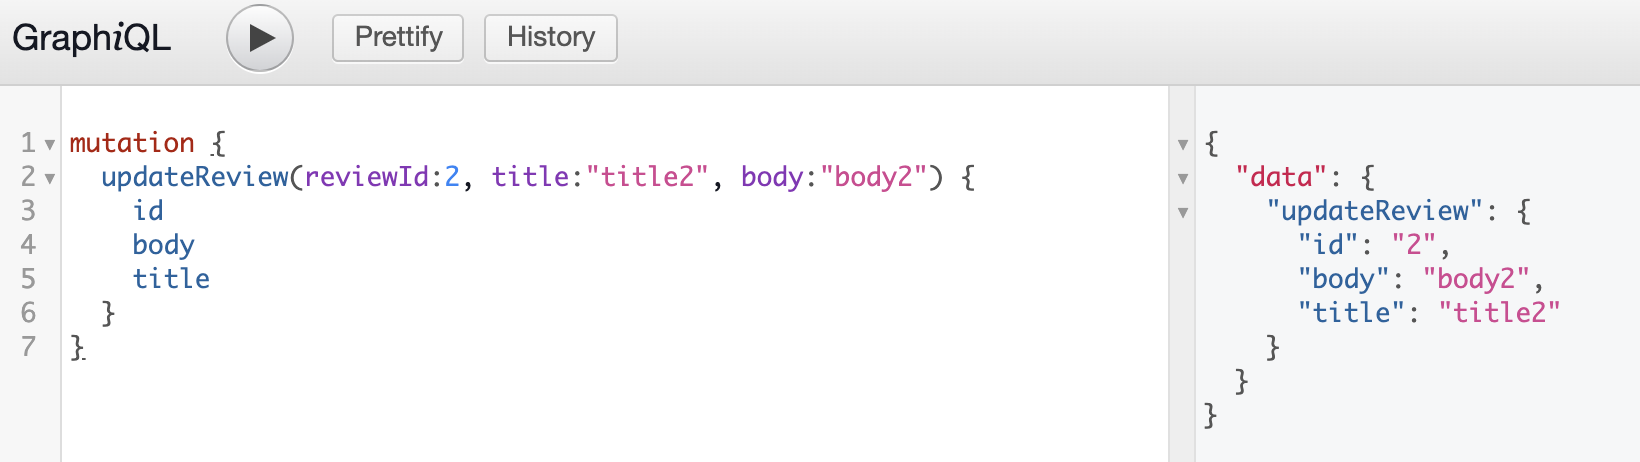
ここでは『review_idを指定して該当するReviewのtitleとbodyを更新するMutation』を実装します。
認可を入れる前に
認可を実装する前にReviewを更新するMutationを実装します。
1つ前の例で使ったReviewTypeなどそのまま使うクラスは省略します。app/graphql/types/mutation_type.rbmodule Types class MutationType < Types::BaseObject field :update_review, mutation: Mutations::UpdateReview end endapp/graphql/mutations/update_review.rbmodule Mutations class UpdateReview < BaseMutation argument :review_id, Int, required: true argument :title, String, required: false argument :body, String, required: false type Types::ReviewType def resolve(review_id:, title: nil, body: nil) review = Review.find review_id review.title = title if title review.body = body if body review.save! review end end endGraphiQLで実行すると次のようになり、Reviewデータが更新されます。
認可を実装
Mutationでも先程の例と同様にauthorized?を使うことができます。
下記のガイトに記載されています。
https://graphql-ruby.org/mutations/mutation_authorization.html管理者しか利用できないMutationが継承する親クラスを作って継承するようにします。
app/graphql/mutations/base_admin_mutation.rbmodule Mutations class BaseAdminMutation < BaseMutation def authorized?(args) raise GraphQL::ExecutionError, 'login required!!' unless context[:current_user] raise GraphQL::ExecutionError, 'permission denied!!' unless context[:current_user].admin? super end end endapp/graphql/mutations/update_review.rb- class UpdateReview < BaseMutation + class UpdateReview < BaseAdminMutationMutationのauthorized?もfalseを返却するだけだとエラー情報は返却されず、dataがnullになり更新処理が実行されないようになります。
Resolverはそれでも良さそうですがMutationはエラー情報を返却しないとよくわからないと思うので、こちらもGraphQL::ExecutionErrorをraiseするように実装しました。
ちなみにガイドを読むと下記のように戻り値にerrorsを返却することでエラー情報を返す方法もあるようです。
試してみましたが下記の方法ではerrors配下のlocationsやpathは返却されませんでしたが、errorsのmessageは返却できました。
メッセージだけ返却できればよいのであればどちらの方法で実装しても良さそうです。def authorized?(employee:) if context[:current_user]&.admin? true else return false, { errors: ["permission denied!!"] } end endGraphiQLで管理者権限を持っていないユーザーが実行すると次のようになります。
もちろんエラーの場合は更新処理は実行されません。
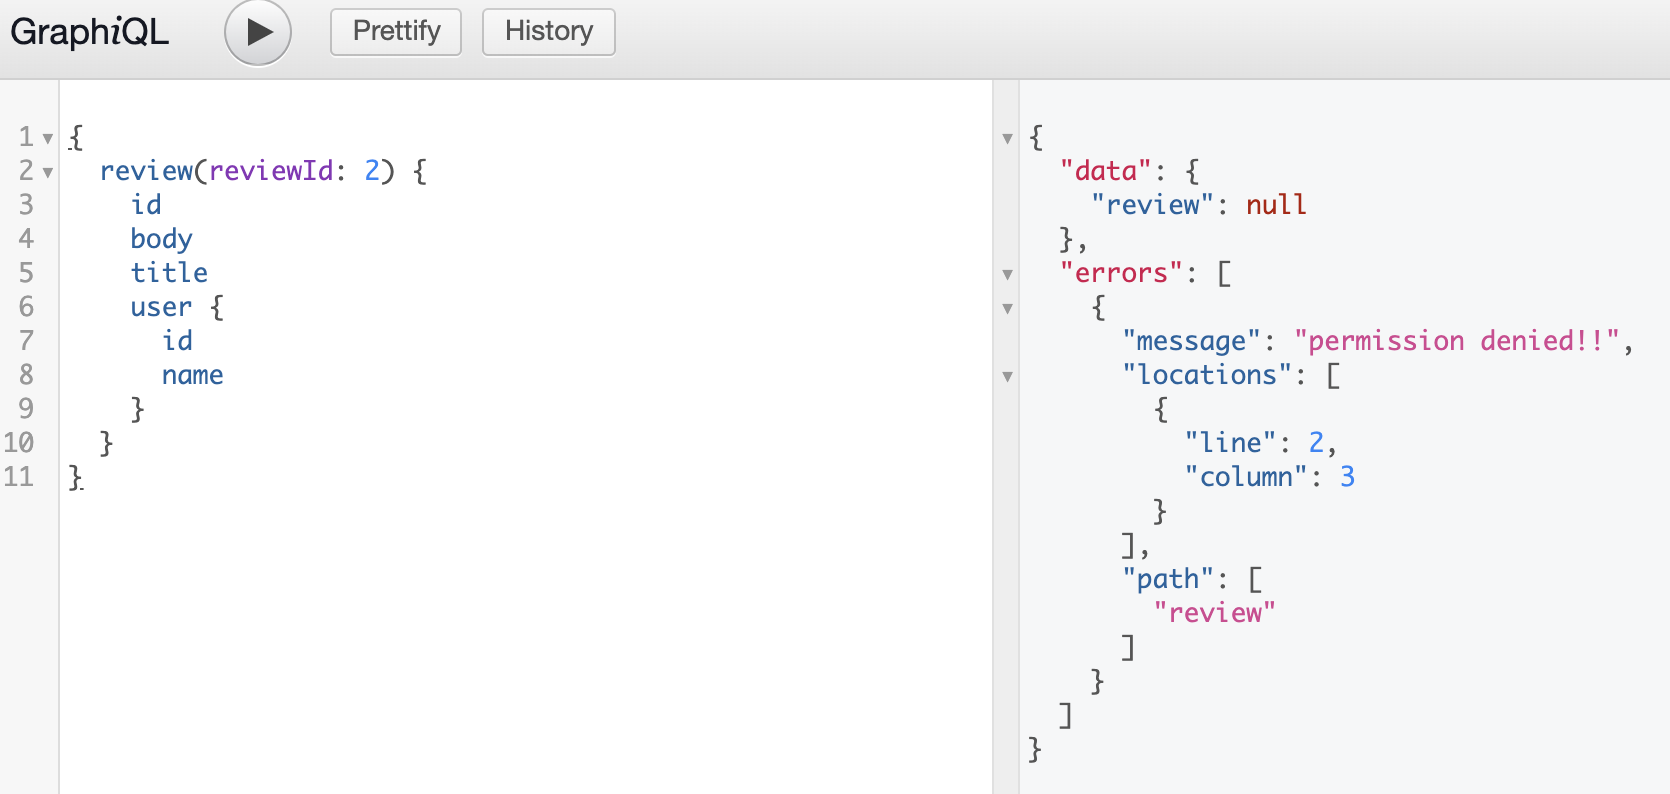
このQueryは自分の所有しているデータのときだけ返却するようにしたい
ここでは最初に作った『review_idを指定して該当するReviewTypeを返却するクエリー』を基に改修します。
最初に作ったものはログイン状態のみ確認していましたが、今回はReviewが自分の所有物か?のチェックを追加します。ログインチェックと同じauthorized?に実装してみる
ログインチェックと同じauthorized?にチェックを追加できればよいのですが、今回のチェックはRevewを取得した後でないとチェックできません。
authorized?でもreview_idは引数で受け取るのでReviewを取得することもできるのですが、そうするとresolveの役割が曖昧になります。
実際に実装してみます。app/graphql/resolvers/login_required_resolver.rbdef authorized?(args) raise GraphQL::ExecutionError, 'login required!!' if context[:current_user].blank? + # この時点でreviewの取得が必要 + review = Review.find_by(id: args[:review_id]) + return false unless review + raise GraphQL::ExecutionError, 'permission denied!!' if context[:current_user].id != review.user_id true endauthorized?でReviewの取得が必要になります。
resolveメソッドでも取得するので、ここでも取得すると非効率な気がしますね。
では、resolve側にチェックを実装するとどうでしょうか?app/graphql/resolvers/review_resolver.rbdef resolve(review_id:) - Review.find_by(id: review_id) + review = Review.find_by(id: review_id) + raise GraphQL::ExecutionError, 'permission denied!!' if context[:current_user].id != review.user_id + review endこちらの方がauthorized?で実装するより効率は良さそうですが、authorized?にチェック処理を切り出すことでデータ取得処理のみ記載していたresolveにまたチェック処理が入ってしまいました。
当初はデータ取得後にしかチェックできないものがresolveでチェックするしかないと思っていたのですが、authorized?はReviewTypeにも定義できることを知ったのでReviewTypeに定義してみます。
ReviewTypeでチェックする
ReviewTypeでチェックするとはどういうことなのか?
実際に実装してみます。ReviewTypeは誰でも使えるようにしておきたいので、MyReviewTypeという自分しか閲覧できない制約をつけたReviewTypeを作ります。
app/graphql/types/my_review_type.rbmodule Types class MyReviewType < ReviewType def self.authorized?(object, context) raise GraphQL::ExecutionError, 'permission denied!!' if context[:current_user].id != object.user_id true end end endガイドにも記載されていますが、Typeで使うauthorized?はobjectとcontextを引数に受け取ります。
あと、クラスメソッドなので注意が必要です。
https://graphql-ruby.org/authorization/authorization.htmlあとはレスポンスのTypeをMyReviewTypeにするだけです。他の修正は不要です。
app/graphql/resolvers/review_resolver.rb- type Types::ReviewType, null: true + type Types::MyReviewType, null: trueGraphiQLで自分以外のReviewを指定すると次のようになります。
これでresolveメソッドには認可の処理を書く必要がなくなるのでシンプルに書くことができました。
また、レスポンスをMyReviewTypeにすることでスキーマ定義を読むだけで、このクエリーはMyReviewTypeを返却する=「自分しか閲覧できない」ということが明確になるので良いと思います。このFieldはログインユーザー自身のデータのときだけ返却する
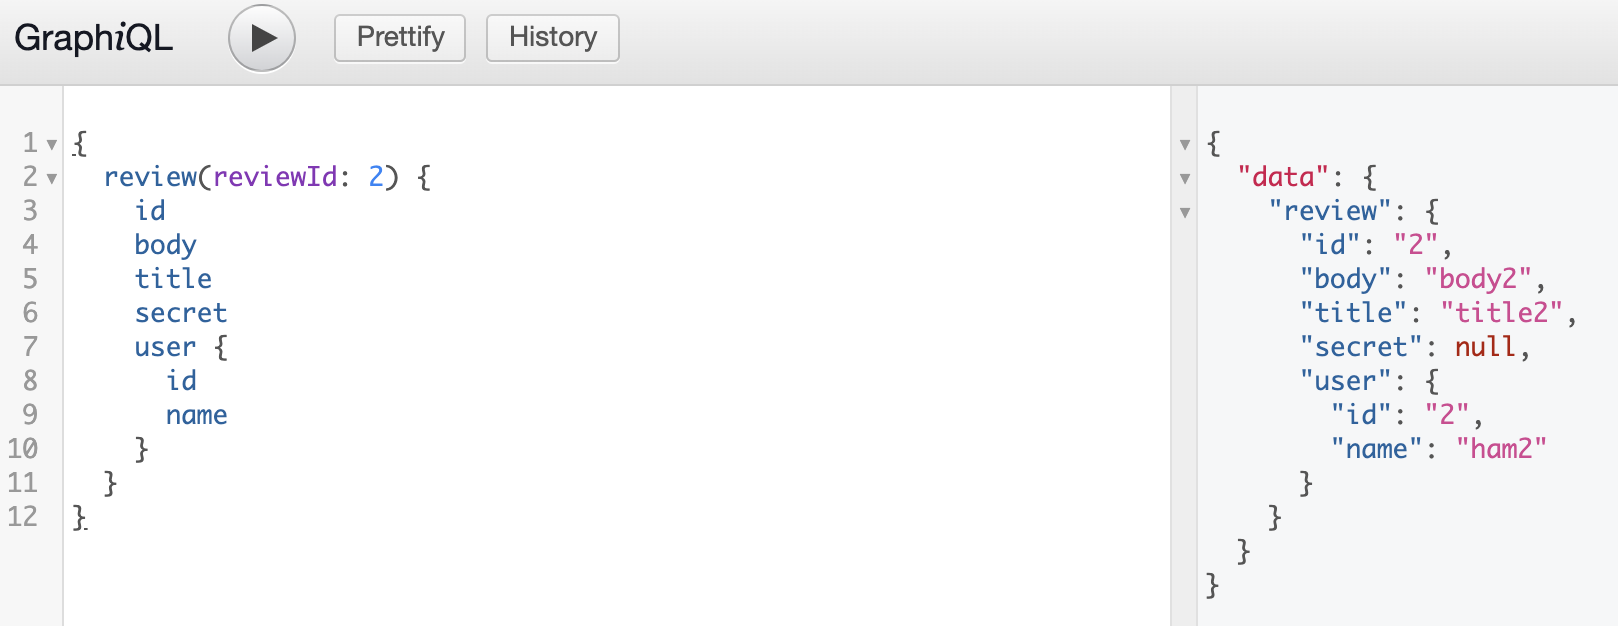
1つ前の例ではMyReviewTypeを定義してレスポンス全体を自分のデータのときしか見れないようにしました。
しかし、全部ではなく特定のフィールドだけ見れないようにしたいこともあると思います。ReviewTypeを再掲します。
ここではsecretカラムは自分のデータしか見れないようにしたいと思います。app/graphql/types/review_type.rbmodule Types class ReviewType < BaseObject field :id, ID, null: false field :title, String, null: true field :body, String, null: true field :secret, String, null: true # <- これを自分の場合のみ見えるようにする field :user, Types::UserType, null: false end endガイドを読むとfieldにもauthorized?が実装できるようなのですが、1つのfieldだけをカスタマイズするのは難しそうなのでここではauthorized?を使わずに実装することにしました。
https://graphql-ruby.org/authorization/authorization.html
fieldのガイドはこちら
https://graphql-ruby.org/fields/introduction.html#field-parameter-default-values下記のようにfield名と同じメソッドを定義すると、そちらが呼び出されるようになります。
そのメソッド内に認可を実装しました。app/graphql/types/review_type.rbmodule Types class ReviewType < BaseObject field :id, ID, null: false field :title, String, null: true field :body, String, null: true field :secret, String, null: true field :user, Types::UserType, null: false # field名のメソッドを定義すると呼び出される def secret # ログインユーザーとレビューを書いたユーザーが違う場合、nilを返却 return if object.user_id != context[:current_user].id object.secret end end endGraphiQLで自分以外のReviewを指定すると次のようになります。
secretはnullが返却されています。
Resolverにこのチェックを実装するとReviewTypeを使うすべてのResolverがsecretの考慮をしなければいけなくなりますが、ReviewTypeに実装することで個別のResolverはsecretのアクセス制御を考える必要がなくなります。
最後に
graphql-rubyを使い始める前にもガイドは一通り目を通したつもりだったのですが、authorized?の存在は見落としていました・・・
authorized?以外にもまだまだ気づいていない便利な機能がありそうですね。
また、今はなかったとしてもがんがんバージョンアップされており、これからも新しい機能が追加される可能性も高いので、これからもgraphql-rubyの動向をチェックしていきたいと思います。
- 投稿日:2020-08-04T03:00:40+09:00
【Git】fatal: Not a valid object name: 'master'.
Sourcetree使ってbranchしようとした際に出てきたエラー。
Sourcetreeでの操作がメインです。内容は簡単に言うと「'master'という名前のオブジェクトがないよ」って意味でした。
ファイルを作成している時点でターミナル操作でいうところの"init"はできているから問題なし。
commitが出来ていないからっていうのが原因なので
VScodeなりのエディターで作成したファイルを開いて
sample.txtなりのファイルを作って
文字列を与えてあげれば(←作成だけでなく変更が必要のため)okそのあと履歴のところに表示されてきているので
コミットしてあげればbranchできるようになります。何かしらのファイルを作る前に分岐なんかできないよってこと。
- 投稿日:2020-08-04T00:09:39+09:00
[rails]部分テンプレートの作成方法
部分テンプレートとは
「部分テンプレート」は、複数のページで共通して利用できるViewファイルのことです。
複数のファイルで重複しているコードを一つのファイルにまとまることで、修正時に一箇所だけの修正で済んだり、コードの記述が少なくなり可読性が高くなります。手順はざっくりこんな感じです。
1.共通化できる部分を探し出す
2.部分テンプレートファイルを作成
3.部分テンプレートファイルに共通化部分を記述
4.部分テンプレートファイルを呼び出す1.共通化できる部分を探し出す
そのままですが、重複している箇所を探す作業です。
2.部分テンプレートファイルを作成
ファイル名の先頭にアンダースコア( _ )付きのerbファイルが、部分テンプレートファイルとして認識されます。今回は投稿機能を部分テンプレート化で見ていきます。
app/views/books/_newform.html.erb3.部分テンプレートファイルに共通化部分を記述
共通部分を切り出し、ファイルに貼り付けます。
基本的に部分テンプレートファイルではローカル変数(@がないやつ)を使います。
部分テンプレートファイル内でインスタンス変数(@がついてるやつ)を利用すると、controller側でインスタンス変数の名前や挙動を変更したとき、部分テンプレート側も変更しなければいけなくなるからです。app/views/books/_newform.html.erb<%= form_for(book) do |f| %> <div class="field row"> <%= f.label :title %><br> <%= f.text_field :title, class: "col-xs-3 book_title" %> </div> <p></p> <div class="field row"> <%= f.label :body %><br> <%= f.text_area :body, class: "col-xs-3 book_body" %> </div> <div class="actions row"> <%= f.submit class: "btn btn-primary col-xs-3" %> </div> <% end %> </div>4.部分テンプレートファイルを呼び出す
呼び出す時の書き方は以下の通りです。
なお、呼び出すときは部分テンプレートのアンダースコアは省略します。<%= render [部分テンプレートファイルの指定], [ローカル変数]:[渡す値] %>app/views/books/index.html.erb<%= render 'books/newform', book: @book %>