- 投稿日:2020-07-25T21:57:09+09:00
Macで"The default interactive shell is now zsh."を非表示にする
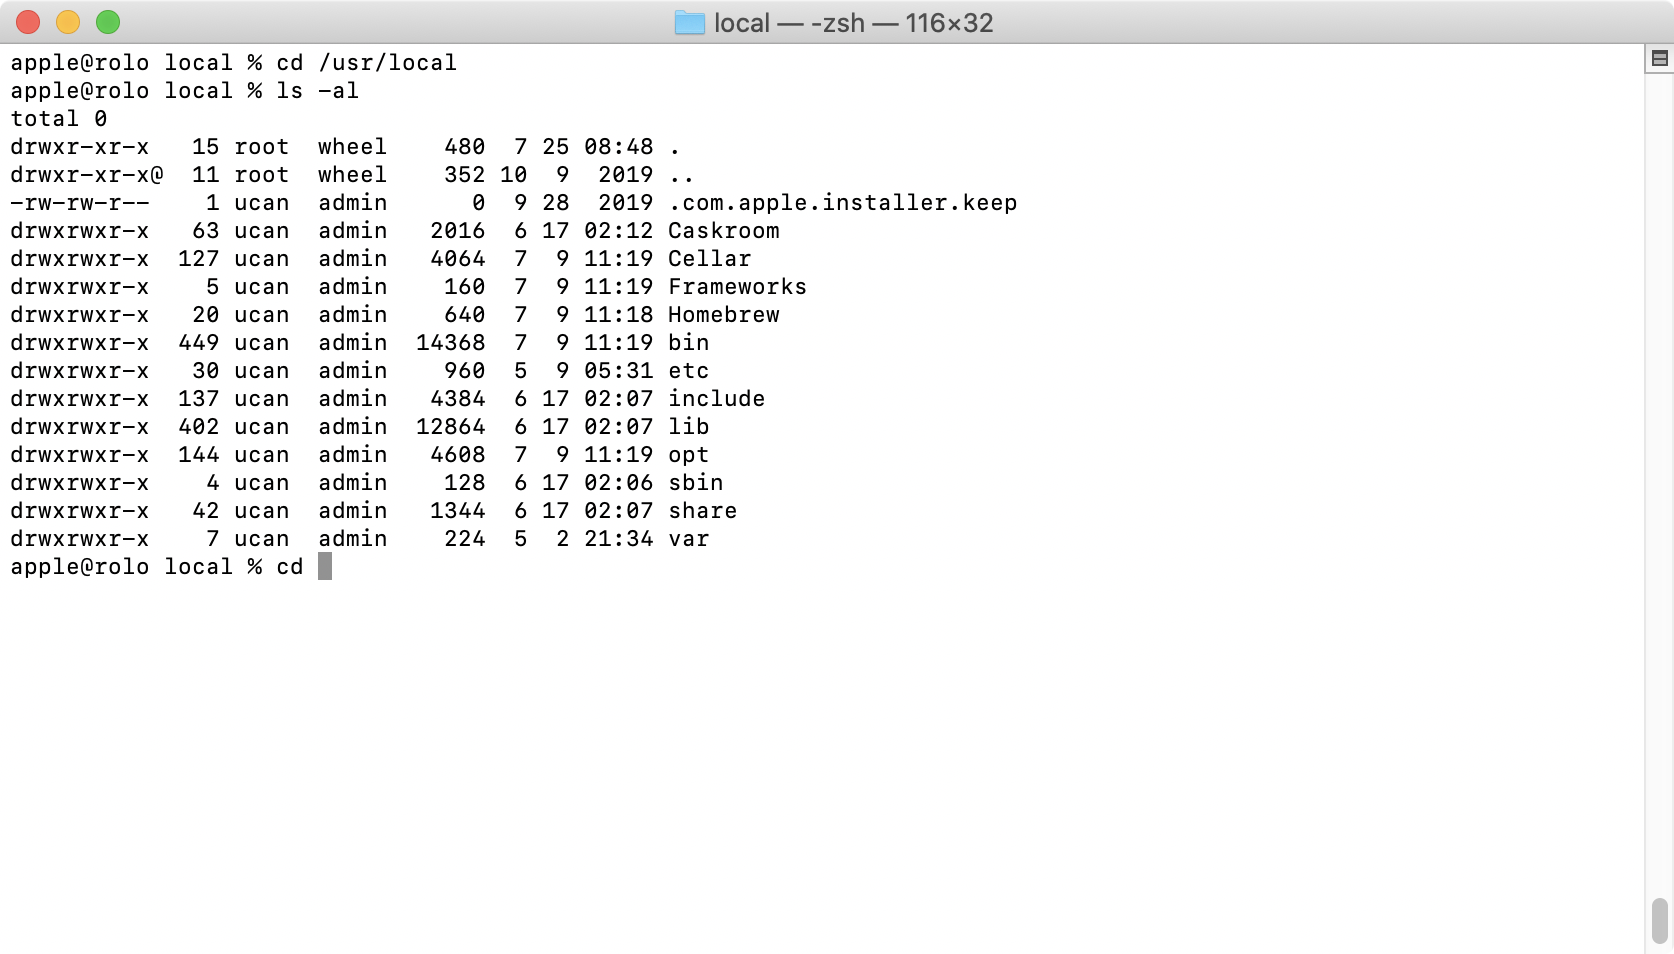
The default interactive shell is now zsh.
The default interactive shell is now zsh.
To update your account to use zsh, please runchsh -s /bin/zsh.
For more details, please visit https://support.apple.com/kb/HT208050.シェルを
bashで使っていると、ターミナルやiTerm2を開くたびに
「デフォルトのインタラクティブシェルはzshになりましたよ。」って
ご丁寧に教えてくれます。毎回はご勘弁願いたいので、非表示にしちゃいましょう。
表示を消す
.bash_profileに以下の記述をする。~/.bash_profileexport BASH_SILENCE_DEPRECATION_WARNING=1
.bash_profileを開くコマンドはこちら。標準のテキストエディタで。
$ open ~/.bash_profileVSCodeで。
事前にPATHを通してください。ここでは割愛します。$ code ~/.bash_profile
- 投稿日:2020-07-25T21:44:13+09:00
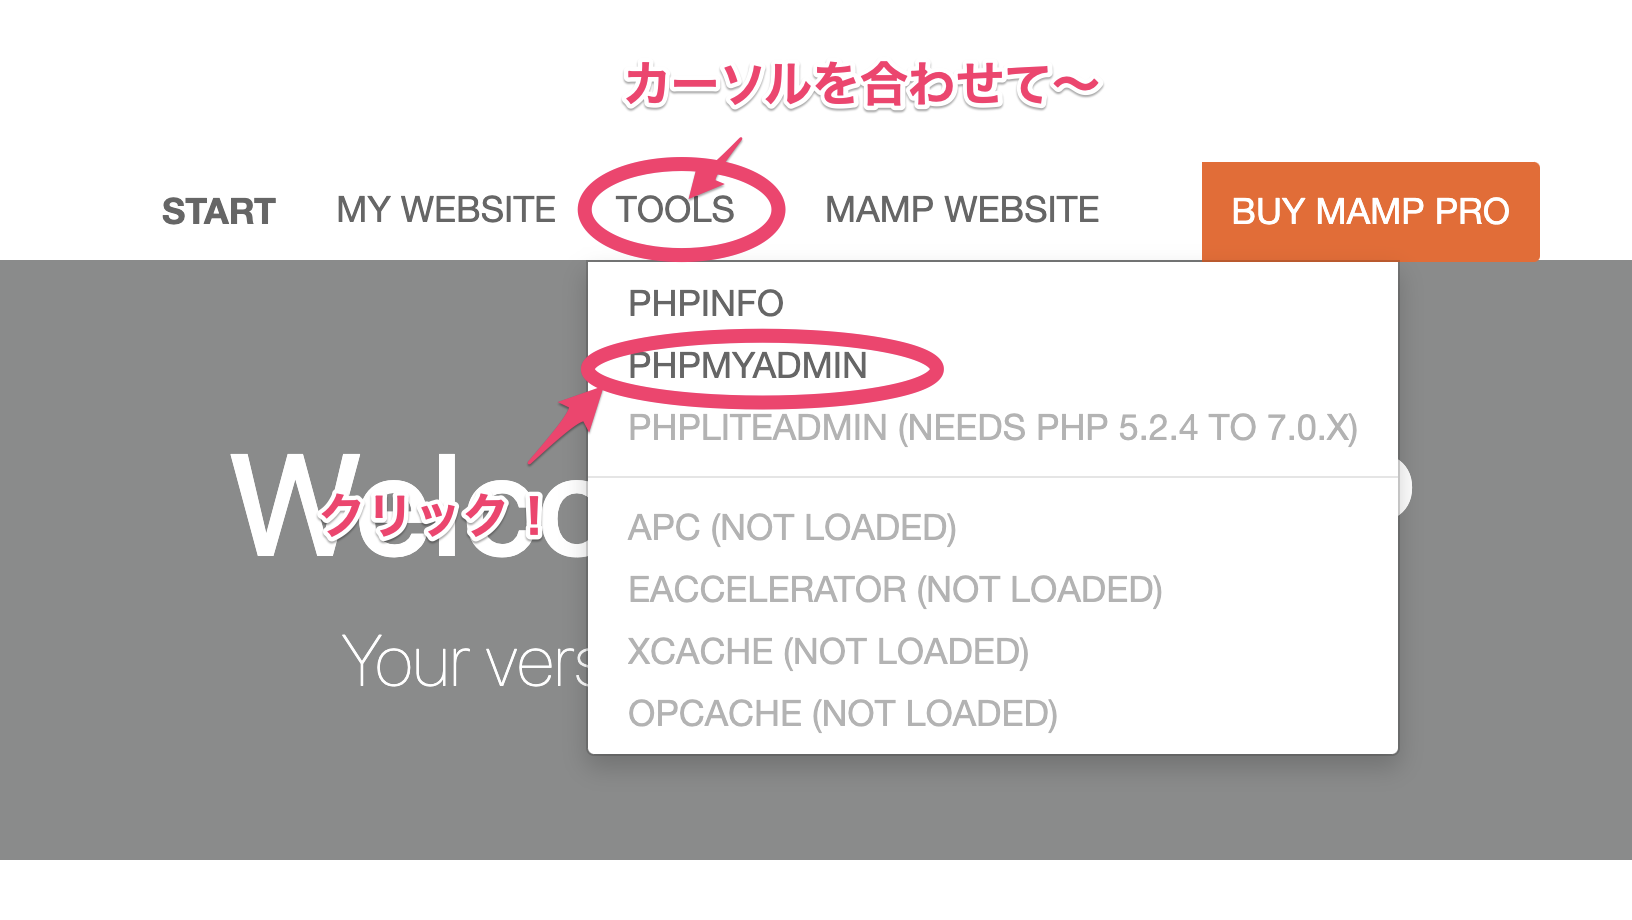
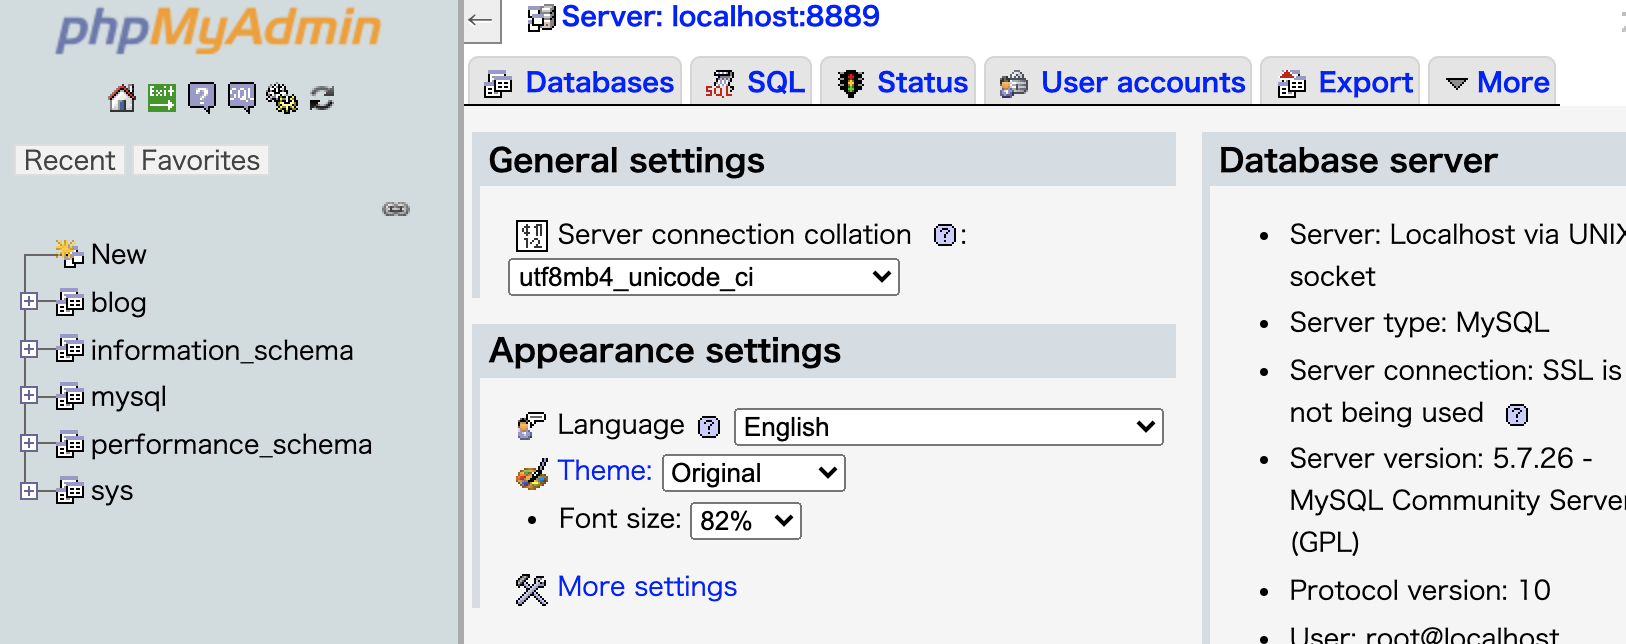
MAMPからphpMyAdminをブラウザに表示するまで

- 投稿日:2020-07-25T16:05:29+09:00
Macのターミナルで実行コマンドのパスを調べる。
実行コマンドがディレクトリの何処にあるのかを知りたい。
たまに実行コマンドがディレクトリの何処にあるのかを知りたい時があるので実行コマンドのフルパスを調べる方法です。
今回の環境。
この記事を書いた時点での
- macOSのバージョンはCatalina(10.15.6)でビルド番号は19G73。
- ターミナルのバーションは2.10(433)。
試しにhttpd(Apache)コマンドが何処のディレクトリにあるのか調べてみる。
実行コマンドのフルパスを調べるコマンドはwhichコマンドを使います。コマンドの書式例は
which[オプション]実行コマンド名
オプションは必要に応じて入力します。実行コマンド名の部分は今回はhttpdの実行コマンドのパスを調べたいので
httpdと入力します。which httpd /usr/sbin/httpdこの環境ではhttpdコマンドは/usr/sbin/httpdというディレクトリにあることが分かりました。
この様にwhichコマンドを使えば実行コマンドが何処のディレクトリにあるのかを知る事が出来ます。
- 投稿日:2020-07-25T15:18:43+09:00
Raspberry Pi ssh設定方法(Mac編)
Raspberry Pi ssh設定方法(Mac編)
sshの有効化
RaspberryPiのGUIからターミナルを起動して、bootディレクトリ配下にsshファイルを作成
cd /boot
sudo touch ssh再起動
sudo reboot再起動後、下記のメッセージが表示される
SSH is enabled and the default password for the 'pi' user has not been changed.
This is a security risk - please login as the 'pi' user and run Raspberry Pi Configuration to set a new password.
ssh接続
デフォルト設定
ユーザー名: pi
パスワード: raspberry
IPアドレスを確認
ifconfigwlan0のinetに記載されているIPアドレスを確認
ssh接続
ホストPCで入力
ssh pi@IPアドレス接続できるのを確認後、raspberrypiからログアウト
exit鍵ファイルの設定
鍵ファイルを作成
mkdir ~/.ssh

cd ~/.ssh

ssh-keygen
鍵ファイルのファイル名を聞かれるので
id_rsa_raspberrypiを設定※ ファイル名は好きに設定してください。
ホストPCのパーミッションを設定
chmod 700 .ssh
chmod 600 id_rsa_raspberrypi
公開鍵をRasberryPiへ送信
scpでホストPCから、RaspberryPiへ送信
scp -p 22 id_rsa_raspberrypi.pub pi@192.168.1.196:~/RaspberryPiに.sshフォルダを作成
ssh pi@IPアドレス

mkdir ~/.ssh
authorized_keysに公開鍵を設定
cat ~/id_rsa_raspberrypi.pub >> .ssh/authorized_keysフォルダとファイルにパーミッションを設定
chmod 700 .ssh
chmod 600 .ssh/authorized_keys
RaspberryPiからログアウト
exit鍵ファイルを使用してログイン
鍵ファイルでログインできるのを確認
ssh -i ~/.ssh/id_rsa_raspberrypi pi@192.168.1.196vi設定
sudo apt-get -y --purge remove vim-common vim-tiny
sudo apt-get -y install vim

cat <<EOS > ~/.vimrc
set nocompatible
set backspace=indent,eol,start
set autoindent
set nowrap
set ruler
syntax on
EOS
sshの設定ファイルを修正
sudo chmod 777 /etc/ssh/sshd_config

vi /etc/ssh/sshd_config
sshd_config 設定「PubkeyAuthentication」コメントを外す
#PubkeyAuthentication yes↓
PubkeyAuthentication yessshd_config 設定「AuthorizedKeysFile」コメントを外す
#AuthorizedKeysFile .ssh/authorized_keys .ssh/authorized_keys2↓
AuthorizedKeysFile .ssh/authorized_keys .ssh/authorized_keys2sshd_config 設定「PasswordAuthentication」コメントを外すしてNoにする
#PasswordAuthentication yes↓
PasswordAuthentication noパーミッションを戻す
sudo chmod 644 /etc/ssh/sshd_config再起動して完了
sudo reboot接続確認
下記で接続できないことを確認
ssh pi@ipアドレス下記で接続できることを確認
ssh -i ~/.ssh/id_rsa_raspberrypi pi@192.168.1.196
- 投稿日:2020-07-25T14:45:13+09:00
.DS_storeとgitignore_globalの設定方法
はじめに
gitignore_globalを設定した時にどこに配置すべきかわからなかったため、
gitconfigの仕組みを学びながら解決法をまとめました。できるようになること
- gitignore_globalの適切な配置場所がわかる
- .DS_storeをignoreできる
設定ファイルの影響範囲と置き場所
gitの設定ファイルが影響を及ぼす範囲は3段階あります。
1. local(ローカル)
対象リポジトリ内の
.git/config2. global(ユーザ全体)
HOMEディレクトリ配下の
~/.gitconfig3. system(システム全体)
systemについては、Gitの種類、バージョン、インストールなどによって
格納場所が変わるようです。
/usr/local/etc/gitconfig
/usr/local/git/etc/gitconfiggitignore_globalの格納場所
configの影響範囲を考えると、HOMEディレクトリ配下に格納するのが良いと考えられます。
~/.gitignore_global がよさそう配置したgitignore_globalに.DS_storeを追記します。
~/.gitignore_global.DS_store設定を有効にします。
git config --global core.excludesfile ~/.gitignore_global~.gitconfigに以下の内容が記載されており、
設定が有効になっていることを確認します。~.gitconfig[core] excludesfile = /Users/(username)/.gitignore_global以上の設定により、
.DS_storeをプロジェクト毎にgitignoreする必要がなくなります。参考にさせていただいた記事
stackoverflowの記事
https://stackoverflow.com/questions/18393498/gitignore-all-the-ds-store-files-in-every-folder-and-subfolder?rq=1
- 投稿日:2020-07-25T13:13:35+09:00
docker runでエラーが出る時の対処法(docker: you are not authorized to perform this operation: server returned 401.)
環境 バージョン macOS Catalina 10.15.6 Docker 19.03.8 Macのターミナルから
docker runコマンドで起動しようとした時に
以下のようなエラーが発生したので、その対処法を備忘録としてまとめます。docker: you are not authorized to perform this operation: server returned 401. See 'docker run --help'.原因
どうやらDockerの「Docker Content Trust(DCT)」という検証機能が影響しているようでした。
これは、イメージが改ざんされていないか等を検証する機能なのですが、イメージに特に問題がないことが
わかっている場合は、以下のコマンドで環境変数を設定して、DCTを無効化します。$ export DOCKER_CONTENT_TRUST=0これで、docker runコマンドが実行できるようになりました。
- 投稿日:2020-07-25T11:27:48+09:00
【Mac初期設定】zsh + tmux + starship + firacode + zoxide でターミナル環境を構築する
書き殴って書いたので、補足を追記していきます。
構成
完成形
リポジトリ
※準備中です。
Terminal
Macに標準搭載されているターミナルアプリです。
iTerm2 や Alacritty, Hyper も試しましたが、標準のターミナルで不便はなかったので一周して戻ってきました。設定
ターミナルの設定ファイルはこちらに置いておきます。
https://gist.github.com/ucan-lab/72510f4460202560ba589248f53b981dzsh
最近のMacをお使いでしたら、
zshがデフォルトシェルになっているはずです。$ echo $SHELL /bin/zshと表示されていればokです。
tmux
Unixライクなオペレーティングシステム用の端末多重接続ソフトウェアってwikiに書いてありました。
Mac標準のターミナルは画面分割機能が弱いので、tmuxの画面(ペイン)分割機能を使って補完してます。また、ターミナルを閉じても端末の状態を保持しているのでアタッチすれば元の状態に復元できます。
tmuxが分からない人はドットインストールにて無料で動画が公開されているので、そちらをまず見てください。
https://dotinstall.com/lessons/basic_tmuxインストール
$ brew install tmux$ tmux -V tmux 3.1b設定
~/.tmux.confを下記の内容に書き換えます。
デフォルトのprefixはcontrol+bとなっていますが、少し打ちづらい位置にあります。
そのため、control+qにキーバインドを変更しています。~/.tmux.conf# prefixキーをC-qに変更する set -g prefix C-q # C-bのキーバインドを解除する unbind C-b # C-q*2でtmux内のプログラムにC-qを送る bind C-q send-prefix # キーストロークのディレイを減らす set -sg escape-time 1 # ウィンドウのインデックスを1から始める set -g base-index 1 # ペインのインデックスを1から始める setw -g pane-base-index 1 # スクロールバックバッファサイズ set -g history-limit 10000 # 設定ファイルをリロードする bind r source-file ~/.tmux.conf \; display "Reloaded!" # 新規ウィンドウ作成時にカレントパスを引き継ぐ bind c new-window -c "#{pane_current_path}" # | でペインを縦に分割する bind | split-window -hc "#{pane_current_path}" bind % split-window -hc "#{pane_current_path}" # - でペインを横に分割する bind - split-window -vc "#{pane_current_path}" bind '"' split-window -vc "#{pane_current_path}" # Vimのキーバインドでペインを移動する bind h select-pane -L bind j select-pane -D bind k select-pane -U bind l select-pane -R bind -r C-h select-window -t :- bind -r C-l select-window -t :+ # Vimのキーバインドでペインをリサイズする bind -r H resize-pane -L 5 bind -r J resize-pane -D 5 bind -r K resize-pane -U 5 bind -r L resize-pane -R 5 # 256色端末を使用する set -g default-terminal "screen-256color" # ウィンドウリストの色を設定する setw -g window-status-style bg="default","dim",fg="cyan" # アクティブなウィンドウを目立たせる setw -g window-status-current-style bg="red","bright",fg="white" # ペインボーダーの色を設定する set -g pane-border-style bg="black",fg="green" # アクティブなペインを目立たせる set -g pane-border-style bg="yellow",fg="white" # コマンドラインの色を設定する set -g message-style bg="black","bright",fg="white" # ステータスバーを設定する ## ステータスバーの更新頻度の設定(秒) set -g status-interval 1 ## ステータスバーを上部に表示する set -g status-position top ## ステータスバーの背景色を指定する # ステータスバーの色を設定する set -g status-bg "#1e2132" ## ステータスバーの文字色を指定する。 set -g status-fg "colour255" ## window-status のフォーマットを指定する。 setw -g window-status-format " #I: #W " # カレントウィンドウの window-status のフォーマットを指定する setw -g window-status-current-format "#[fg=colour255,bg=colour27,bold] #I: #W #[default]" ## 左パネルを設定する set -g status-left-length 40 set -g status-left "#[fg=green]Session: #S #[fg=yellow]#I #[fg=cyan]#P" ## 右パネルを設定する set -g status-right "#[fg=cyan][%Y-%m-%d(%a) %H:%M]" ## ウィンドウリストの位置を中心寄せにする set -g status-justify centre ## ヴィジュアルノーティフィケーションを有効にする setw -g monitor-activity on set -g visual-activity on # 操作 ## マウス操作を有効化 setw -g mouse on bind -n WheelUpPane if-shell -F -t = "#{mouse_any_flag}" "send-keys -M" "if -Ft= '#{pane_in_mode}' 'send-keys -M' 'copy-mode -e'" bind -n WheelDownPane select-pane -t= \; send-keys -M ## コマンドモードでの選択方法をvim風に変更 setw -g mode-keys vi bind-key -T copy-mode-vi v send -X begin-selection ## クリップボートと連携(macOS) bind-key -T copy-mode-vi y send-keys -X copy-pipe-and-cancel "pbcopy" bind-key -T copy-mode-vi MouseDragEnd1Pane send-keys -X copy-pipe-and-cancel "pbcopy" bind-key -T copy-mode-vi Enter send-keys -X copy-pipe-and-cancel "pbcopy" # デフォルトシェル set -g default-shell "${SHELL}" set -g default-command "${SHELL}"使い方
$ tmux$ exit
exitまたはcontrol+dでtmuxから抜けることができます。
tmuxの詳しい使い方はドットインストールや他の記事をご覧ください。starship
Rust製のクロスシェルプロンプトツールです。
bash, fish, zshで動作します。インストール
$ brew install starship~/.zshrceval "$(starship init zsh)"$ exec $SHELL -l設定
~/.config/starship.tomlでstarshipの設定を行います。~/.config/starship.tomladd_newline = false [directory] truncation_length = 0 truncate_to_repo = false [time] disabled = falsefiracode
https://github.com/tonsky/FiraCode
プログラミング用フォントです。
starshipを入れると一部の文字が文字化けするので入れておくと良いです。$ brew tap homebrew/cask-fonts $ brew cask install font-fira-codeフォントの設定はターミナルアプリの設定から変更してください。
zoxide(ゾキサイド)
https://github.com/ajeetdsouza/zoxide
Rust製、利用頻度の高いディレクトリに移動できるコマンドラインツール。
インストール
$ brew install zoxide~/.zshrceval "$(zoxide init zsh)"$ exec $SHELL -l使い方
z foo       # cd to highest ranked directory matching foo
z foo bar   # cd to highest ranked directory matching foo and bar

z foo/      # can also cd into actual directories

zi foo      # cd with interactive selection using fzf

zq foo      # echo the best match, don't cd

za /foo     # add /foo to the database
zr /foo     # remove /foo from the database
hstr
https://github.com/dvorka/hstr
コマンド履歴のサジェストツール
インストール
$ brew install hstr
$ hstr --show-configuration >> ~/.zshrc
$ exec $SHELL -l
~/.zshrcに出力される内容~/.zshrc# HSTR configuration - add this to ~/.zshrc alias hh=hstr # hh to be alias for hstr setopt histignorespace # skip cmds w/ leading space from history export HSTR_CONFIG=hicolor # get more colors bindkey -s "\C-r" "\C-a hstr -- \C-j" # bind hstr to Ctrl-r (for Vi mode check doc)使い方
$ hhまたは、
control+rでコマンド履歴を一覧表示、選択して実行できます。zsh-autosuggestions
https://github.com/zsh-users/zsh-autosuggestions
スクリーンショット
コマンド入力の際、直近入力したコマンドが薄い灰色でサジェスト表示される機能です。
この状態で→またはcontrol+eまたはcontrol+fで補完されます。インストール
$ git clone https://github.com/zsh-users/zsh-autosuggestions ~/.zsh/zsh-autosuggestions~/.zshrc. ~/.zsh/zsh-autosuggestions/zsh-autosuggestions.zsh$ exec $SHELL -l使い方
コマンドを入力するとカーソルの後に灰色でコマンドの補完が表示されます。
補完が表示されている状態で→またはcontrol+eで補完が入力されます。オススメのRust製ツール
こちらの記事で紹介した内容と被りますが、標準コマンドの代替となるRust製ツールを紹介します。
いきなり全部入れると混乱すると思うので、自分が使いたいと思ったコマンドをお好みで導入してください。
- exa https://github.com/ogham/exa
- ls の代替コマンド
- bat https://github.com/sharkdp/bat
- cat の代替コマンド
- fd https://github.com/sharkdp/fd
- find の代替コマンド
- ripgrep https://github.com/BurntSushi/ripgrep
- grep の代替コマンド
- sd https://github.com/chmln/sd
- sed の代替コマンド
- procs https://github.com/dalance/procs
- ps の代替コマンド
参考
- 投稿日:2020-07-25T11:27:48+09:00
【Mac】ターミナル、シェル環境の初期設定
構成
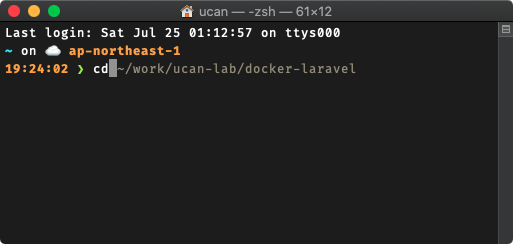
元のターミナル
だ、ダサすぎる...
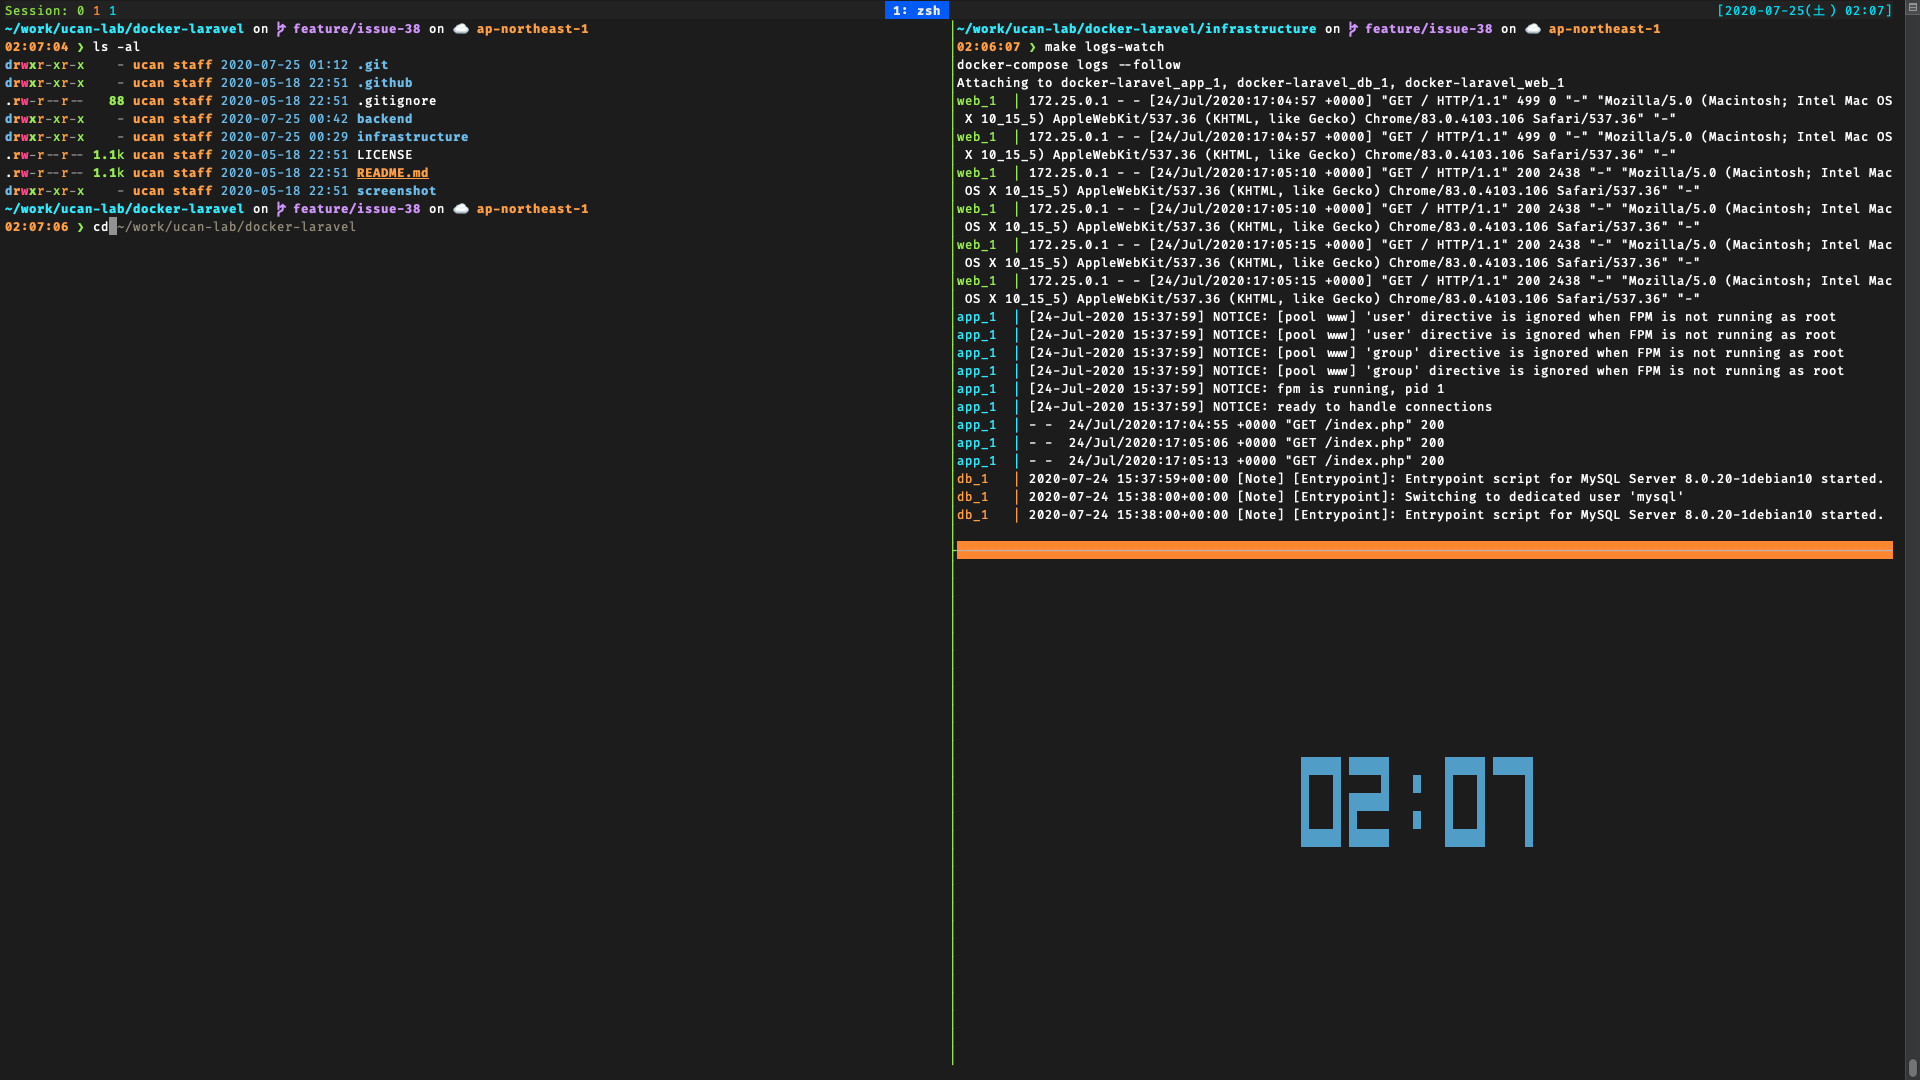
完成したターミナル
か、カッコよすぎる...!
リポジトリ
※準備中です。
Terminal
Macに標準搭載されているターミナルアプリです。
iTerm2 や Alacritty, Hyper も試しましたが、標準のターミナルで不便はなかったので一周して戻ってきました。
純正アプリなだけあって高速なのが良いです?設定
ターミナルの設定ファイルはこちらに置いておきます。
https://gist.github.com/ucan-lab/72510f4460202560ba589248f53b981dzsh
最近のMacをお使いでしたら、
zshがデフォルトシェルになっているはずです。$ echo $SHELL /bin/zshと表示されていればokです。
tmux
Unixライクなオペレーティングシステム用の端末多重接続ソフトウェアってwikiに書いてありました。
Mac標準のターミナルは画面分割機能が弱いので、tmuxの画面(ペイン)分割機能を使って補完してます。また、ターミナルを閉じても端末の状態を保持しているのでアタッチすれば元の状態に復元できます。
インストール
$ brew install tmux$ tmux -V tmux 3.1b設定
~/.tmux.confを下記の内容に書き換えます。
デフォルトのprefixはcontrol+bとなっていますが、少し打ちづらい位置にあります。
そのため、control+qにキーバインドを変更しています。~/.tmux.conf# prefixキーをC-qに変更する set -g prefix C-q # C-bのキーバインドを解除する unbind C-b # C-q*2でtmux内のプログラムにC-qを送る bind C-q send-prefix # キーストロークのディレイを減らす set -sg escape-time 1 # ウィンドウのインデックスを1から始める set -g base-index 1 # ペインのインデックスを1から始める setw -g pane-base-index 1 # スクロールバックバッファサイズ set -g history-limit 10000 # 設定ファイルをリロードする bind r source-file ~/.tmux.conf \; display "Reloaded!" # 新規ウィンドウ作成時にカレントパスを引き継ぐ bind c new-window -c "#{pane_current_path}" # | でペインを縦に分割する bind | split-window -hc "#{pane_current_path}" bind % split-window -hc "#{pane_current_path}" # - でペインを横に分割する bind - split-window -vc "#{pane_current_path}" bind '"' split-window -vc "#{pane_current_path}" # Vimのキーバインドでペインを移動する bind h select-pane -L bind j select-pane -D bind k select-pane -U bind l select-pane -R bind -r C-h select-window -t :- bind -r C-l select-window -t :+ # Vimのキーバインドでペインをリサイズする bind -r H resize-pane -L 5 bind -r J resize-pane -D 5 bind -r K resize-pane -U 5 bind -r L resize-pane -R 5 # 256色端末を使用する set -g default-terminal "screen-256color" # ウィンドウリストの色を設定する setw -g window-status-style bg="default","dim",fg="cyan" # アクティブなウィンドウを目立たせる setw -g window-status-current-style bg="red","bright",fg="white" # ペインボーダーの色を設定する set -g pane-border-style bg="black",fg="green" # アクティブなペインを目立たせる set -g pane-border-style bg="yellow",fg="white" # コマンドラインの色を設定する set -g message-style bg="black","bright",fg="white" # ステータスバーを設定する ## ステータスバーの更新頻度の設定(秒) set -g status-interval 1 ## ステータスバーを上部に表示する set -g status-position top ## ステータスバーの背景色を指定する # ステータスバーの色を設定する set -g status-bg "#1e2132" ## ステータスバーの文字色を指定する。 set -g status-fg "colour255" ## window-status のフォーマットを指定する。 setw -g window-status-format " #I: #W " # カレントウィンドウの window-status のフォーマットを指定する setw -g window-status-current-format "#[fg=colour255,bg=colour27,bold] #I: #W #[default]" ## 左パネルを設定する set -g status-left-length 40 set -g status-left "#[fg=green]Session: #S #[fg=yellow]#I #[fg=cyan]#P" ## 右パネルを設定する set -g status-right "#[fg=cyan][%Y-%m-%d(%a) %H:%M]" ## ウィンドウリストの位置を中心寄せにする set -g status-justify centre ## ヴィジュアルノーティフィケーションを有効にする setw -g monitor-activity on set -g visual-activity on # 操作 ## マウス操作を有効化 setw -g mouse on bind -n WheelUpPane if-shell -F -t = "#{mouse_any_flag}" "send-keys -M" "if -Ft= '#{pane_in_mode}' 'send-keys -M' 'copy-mode -e'" bind -n WheelDownPane select-pane -t= \; send-keys -M ## コマンドモードでの選択方法をvim風に変更 setw -g mode-keys vi bind-key -T copy-mode-vi v send -X begin-selection ## クリップボートと連携(macOS) bind-key -T copy-mode-vi y send-keys -X copy-pipe-and-cancel "pbcopy" bind-key -T copy-mode-vi MouseDragEnd1Pane send-keys -X copy-pipe-and-cancel "pbcopy" bind-key -T copy-mode-vi Enter send-keys -X copy-pipe-and-cancel "pbcopy" # デフォルトシェル set -g default-shell "${SHELL}" set -g default-command "${SHELL}"使い方
$ tmuxコマンド上でのセッション操作
操作 コマンド セッションの作成 tmux, tmux new 名前を付けて作成 tmux new -s ProjectA セッションの削除 tmux kill-session -t ProjectA 現在のセッション以外を削除 tmux kill-session -a セッションの一覧表示 tmux ls セッションを再開 tmux attach、tmux a 名前指定でセッションを再開 tmux attach -t ProjectA、tmux a -t ProjectA セッション操作
操作 コマンド セッションの一覧表示と選択 control+q,s(Select)セッションから離脱 control+q,d(Detach)セッション名の変更 control+q,$ウィンドウ操作
操作 コマンド ウィンドウの作成 control+q,c(Create)ウィンドウの切り替え control+q,n(Next)、Ctrl+b, p (Previous)ウィンドウの一覧選択 control+q,w(Window)ウィンドウの移動 control+q,0-9以前のウィンドウに移動 control+q,l(Latest)ウィンドウ名の変更 control+q,,ペイン操作
操作 コマンド 左右分割 control+q, `\上下分割 control+q,=ペインを閉じる control+q,X(Exit)次のペインに移動 control+q,oペイン間の移動 control+q,矢印以前のペインに移動 control+q,;レイアウトの変更 control+q,spaceペインを移動 control+q,{/ control+q,}`ペインの最大化/元に戻す control+q,z(Zoom)ペインをウィンドウ化 control+q,!ペイン番号の表示 control+q,qペイン番号の表示と選択 control+q,q,0-9$ exit
exitまたはcontrol+dでtmuxから抜けることができます。
tmuxの詳しい使い方はドットインストールやYouTube等ご覧ください。starship
Rust製のクロスシェルプロンプトツールです。
bash, fish, zshで動作します。インストール
$ brew install starship~/.zshrceval "$(starship init zsh)"$ exec $SHELL -l設定
~/.config/starship.tomlでstarshipの設定を行います。~/.config/starship.tomladd_newline = false [directory] truncation_length = 0 truncate_to_repo = false [time] disabled = falsefiracode
https://github.com/tonsky/FiraCode
プログラミング用フォントです。
starshipを入れると一部の文字が文字化けするので入れておくと良いです。$ brew tap homebrew/cask-fonts $ brew cask install font-fira-codeフォントの設定はターミナルアプリの設定から変更してください。
zoxide(ゾキサイド)
https://github.com/ajeetdsouza/zoxide
Rust製、利用頻度の高いディレクトリに移動できるコマンドラインツール。
インストール
$ brew install zoxide~/.zshrceval "$(zoxide init zsh)"$ exec $SHELL -l使い方
$ z foo       # cd to highest ranked directory matching foo
$ z foo bar   # cd to highest ranked directory matching foo and bar

$ z foo/      # can also cd into actual directories

$ zi foo      # cd with interactive selection using fzf

$ zq foo      # echo the best match, don't cd

$ za /foo     # add /foo to the database
$ zr /foo     # remove /foo from the database
hstr
コマンド履歴のサジェストツール
インストール
$ brew install hstr
$ hstr --show-configuration >> ~/.zshrc
$ exec $SHELL -l
~/.zshrcに出力される内容~/.zshrc# HSTR configuration - add this to ~/.zshrc alias hh=hstr # hh to be alias for hstr setopt histignorespace # skip cmds w/ leading space from history export HSTR_CONFIG=hicolor # get more colors bindkey -s "\C-r" "\C-a hstr -- \C-j" # bind hstr to Ctrl-r (for Vi mode check doc)使い方
$ hhまたは、
control+rでコマンド履歴を一覧表示、選択して実行できます。zsh-autosuggestions
https://github.com/zsh-users/zsh-autosuggestions
スクリーンショット
コマンド入力の際、直近入力したコマンドが薄い灰色でサジェスト表示される機能です。
この状態で→またはcontrol+eまたはcontrol+fで補完されます。インストール
$ git clone https://github.com/zsh-users/zsh-autosuggestions ~/.zsh/zsh-autosuggestions~/.zshrc. ~/.zsh/zsh-autosuggestions/zsh-autosuggestions.zsh$ exec $SHELL -l使い方
コマンドを入力するとカーソルの後に灰色でコマンドの補完が表示されます。
補完が表示されている状態で→またはcontrol+eで補完が入力されます。オススメのRust製ツール
こちらの記事で紹介した内容と被りますが、標準コマンドの代替となるRust製ツールを紹介します。
いきなり全部入れると混乱すると思うので、自分が使いたいと思ったコマンドをお好みで導入してください。
- exa https://github.com/ogham/exa
- ls の代替コマンド
- bat https://github.com/sharkdp/bat
- cat の代替コマンド
- fd https://github.com/sharkdp/fd
- find の代替コマンド
- ripgrep https://github.com/BurntSushi/ripgrep
- grep の代替コマンド
- sd https://github.com/chmln/sd
- sed の代替コマンド
- procs https://github.com/dalance/procs
- ps の代替コマンド
参考
- 投稿日:2020-07-25T09:03:31+09:00
mvコマンドでファイル(ディレクトリ)名の変更、移動
mvコマンドを使えば、
①ファイル(ディレクトリ名)の変更
②ファイル(ディレクトリ)の移動の2種類の処理を行うことができます。
ファイル(ディレクトリ)名の変更
$ mv < 変更前のファイル(ディレクトリ)名 > < 変更後のファイル(ディレクトリ)名 >例)
test.txtというファイルをhoge.txtというファイル名に変更する場合$ mv test.txt hoge.txtなお、上記の例でコマンドを実行した時に
既にhoge.txtファイルが存在していた場合は、test.txtを名前変更したと同時にもともとあったhoge.txtが上書きされてしまいます。
それを防ぐには、その1つの方法として-iオプションを付けます。
これにより、mvコマンド実行時に「上書きしていいですか?」と確認されるようになります。$ mv -i test.txt hoge.txtファイルの上書き防止系のオプションは他にもありますので、この記事の最後にオプションを一覧にまとめておきました。
また、mvコマンドでは1つずつしかファイル名の変更はできないので、複数のファイルを一括して変更したい時は
renameコマンドを使います。ファイル(ディレクトリ)の移動
$ mv < ファイル(ディレクトリ)名 > < 移動先のディレクトリ名 >例)
sample.txtというファイルをdirというディレクトリに移動する場合$ mv sample.txt dirちなみに、移動先のディレクトリに
/.を付けて、dir/.とした方が安全です。
この/.には、「ディレクトリ直下の」という意味があります。
理由として、もし「sample.txtファイルをdirディレクトリに移動する」という指示のコマンドを実行した時にdirディレクトリが存在していなかった場合、単にsample.txtファイルがdirという名前のファイルに変更されてしまうという挙動をとるためです。
ファイル名の変更の際の構文である
$ mv < 変更前のファイル(ディレクトリ)名 > < 変更後のファイル(ディレクトリ)名 >
が適用されてしまっているのですね。
なので、以下のようにコマンドを打つのが安全です。$ mv sample.txt dir/.複数のファイル(ディレクトリ)をまとめてディレクトリに移動
mvコマンドでは、複数のファイルを移動することもできます。
例)
sample01.txt,sample02.txt,sample03.txtをまとめてdirというディレクトリに移動する場合$ mv sample01.txt sample02.txt sample03.txt dir/.ファイル(ディレクトリ)をカレントディレクトリの一つ上の階層に移動
$ mv < ファイル(ディレクトリ)名 > ../mvコマンドの主なオプション一覧
オプション 説明 -b
(--backup)移動先に同名のファイルがあれば、バックアップを取ってから上書きする -f
(-force)移動先に同名のファイルがあれば、強制的に上書きする -i
(–interactive)移動先に同名のファイルがあれば、上書きしてOKか確認する -n
(–no-clobber)移動先に同名のファイル(ディレクトリ)があったら上書きしない -v
(–verbose)移動処理行う際の詳細情報を表示する
- 投稿日:2020-07-25T08:19:07+09:00
Windowsのマウスホイールの向きを逆にする
Macの向きと合わせたい。
Macは設定の変更で向きを変えられた気がするが、Windowsはレジストリの修正が必要。環境
Windows 10
手順
マウスのハードウェアIDを調べる
- コントロールパネル
- ハードウェアとサウンド
- デバイスとプリンター -> マウス
- 「マウスのプロパティ」の「ハードウェア」タブを選択
- プロパティ
- 「詳細」タブを選択
- 「プロパティ」を「ハードウェアID」にして、「値」の一番長いやつ(?)をメモしておく
レジストリ修正
- "regedit"を自分のWindows上で検索し、開く(レジストリエディター)
- "HKEY_LOCAL_MACHINE\SYSTEM\CurrentControlSet\Enum\HID"を選択する(フォルダを選びながら下っていく)
- 先ほどメモしたハードウェアIDのフォルダを探す。私の場合は、"REV_xxxx"が抜けてるものしか無かったが、まぁよしとした。
- この下にまたフォルダがあり(IDみたいな文字列のフォルダ名)、その下に"Device Prameters"というフォルダがあるのでそれを選択。私はなぜか3つあったので、3つとも作業した。
- "FlipFlopWheel"のデータが0x00000000(0)になっているので、1に変更する
- PCを再起動する
確認
逆になってるはず。