- 投稿日:2020-06-04T23:58:09+09:00
deviseでログインする際の項目を追加する
【開発環境】
macOS Catalina
バージョン 10.15.3
ruby 2.5.1
Rails 5.2.4.2
visual studio codedeviseでログインする際の項目を追加する
deviseでログイン機能を作ると本来はメールアドレス、パスワードだけですが、他の項目のカラムを追加する方法です。
作成したいカラムを追加
今回は例としてcompanyというカラムを追加します。
$ rails g migration AddColumnToUsers company作成されたマイグレーションファイルを見てみます。
デフォルト値の設定をしないとエラーになるそうなので記載します。作成日時_add_company_to_users.rbclass AddCompanyToUsers < ActiveRecord::Migration[5.2] def change add_column :users, :company, :string, null: false, default: '' end end記述が終わったらDBに反映させます。
$ rails db:migrateビューにフォームを追加する
作成したカラムに値を入力できるようにフォームを追加します。
deviseのビューを作っていない場合は作ります。$ rails g devise:viewsregistrations/new.html.erbここを追加 --------------------------------- <div class="field"> <%= f.label :病院名、会社名を入力してください %><br /> <%= f.text_field :company, autofocus: true, class: "new_inform"%> </div> --------------------------------- <div class="field"> <%= f.label :メールアドレスを入力してください %><br /> <%= f.email_field :email, autofocus: true, autocomplete: "email", class: "new_inform" %> </div> <div class="field"> <%= f.label :パスワードを入力してください %> <% if @minimum_password_length %> <em>(<%= @minimum_password_length %> 文字)</em> <% end %><br /> <%= f.password_field :password, autocomplete: "new-password", class: "new_inform" %> </div> <div class="field"> <%= f.label :パスワードをもう一度入力してください %><br /> <%= f.password_field :password_confirmation, autocomplete: "new-password", class: "new_inform" %> </div> <div class="actions"> <%= f.submit "登録する", class: "new_submit" %> </div> <% end %>追加したカラムをDBへ反映
ストロングパラメーターの設定でconfigure_permitted_parametersメソッドを使用します。
devise\app\controllers\application_controller.rbbefore_action :configure_permitted_parameters, if: :devise_controller? protected def configure_permitted_parameters devise_parameter_sanitizer.permit(:sign_up, keys: [:company]) endこれでDBに反映することができます。
間違いなどがありましたらご指摘いただければ幸いです。
最後までご覧いただきありがとうございました。
- 投稿日:2020-06-04T23:54:07+09:00
1日10行コーディング 〜スクレイピング環境構築編〜
概要
これから毎日10行ほどのソースコードを投稿したいと思います。
1日目
【テーマ】
スクレイピング
言語
- ruby
目標成果物
初日ということで張り切りすぎず、一番親しみのあるスクレイピングをするコードを書いていこうと思います。
パッと思いついたところで、今季のおすすめアニメが知りたいなって思ったので
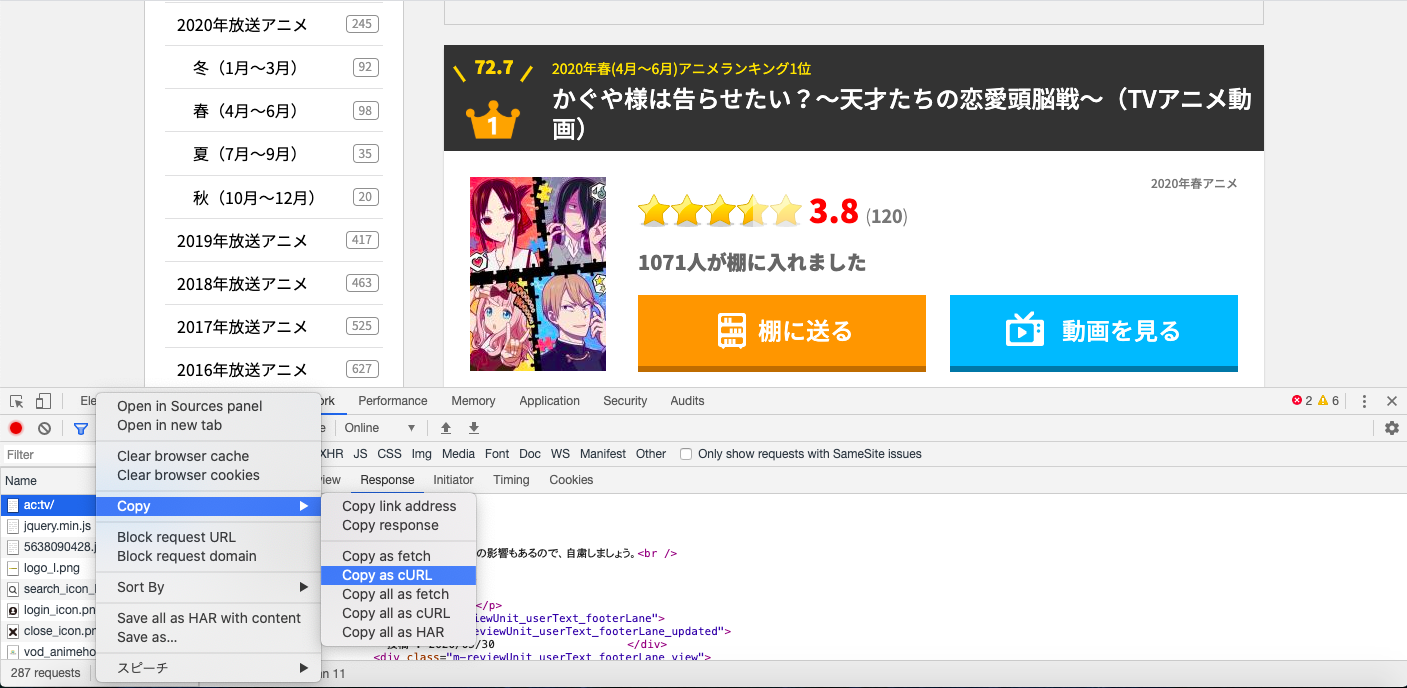
https://www.anikore.jp/
こちらのサイトから今季の上位アニメを取得したいと思います。
(調べればいいじゃんとか、言わないでください...)コードと資料
1.まずあにこれの今季一覧ページに飛びます。
2.http通信を見たところAPIとかではなくHTMLが普通に落ちてきていそうなので、そちらの通信をcurlでコピーします。
3.神サイトcurl-to-rubyを用いてさっきのcurlをrubyのコードに変換します。
4.その結果がこちら(ファイル名crawler.rb)crawler.rbrequire 'net/http' require 'uri' uri = URI.parse("https://www.anikore.jp/chronicle/2020/spring/ac:tv/") request = Net::HTTP::Get.new(uri) request["Authority"] = "www.anikore.jp" request["Cache-Control"] = "max-age=0" request["Upgrade-Insecure-Requests"] = "1" request["User-Agent"] = "Mozilla/5.0 (Macintosh; Intel Mac OS X 10_15_3) AppleWebKit/537.36 (KHTML, like Gecko) Chrome/80.0.3987.116 Safari/537.36" request["Sec-Fetch-Dest"] = "document" request["Accept"] = "text/html,application/xhtml+xml,application/xml;q=0.9,image/webp,image/apng,*/*;q=0.8,application/signed-exchange;v=b3;q=0.9" request["Sec-Fetch-Site"] = "same-origin" request["Sec-Fetch-Mode"] = "navigate" request["Sec-Fetch-User"] = "?1" request["Referer"] = "https://www.anikore.jp/" request["Accept-Language"] = "ja,en-US;q=0.9,en;q=0.8,zh-TW;q=0.7,zh;q=0.6" request["Cookie"] = "anikore=vr4e4jp9u83qpe76nb5jf2dm35; optimizelyEndUserId=oeu1591020303990r0.9278880352532264; optimizelySegments=%7B%225639900384%22%3A%22gc%22%2C%225644680362%22%3A%22direct%22%2C%225653460252%22%3A%22false%22%7D; optimizelyBuckets=%7B%7D; _ga=GA1.2.1594135381.1591020306; __gads=ID=8dec67eec678ab98:T=1591020306:S=ALNI_Mam9k84TCb2IJVyBUucjbUoYYIgsQ; _gid=GA1.2.1570502140.1591280281; _gali=page-top; _gat=1" req_options = { use_ssl: uri.scheme == "https", } response = Net::HTTP.start(uri.hostname, uri.port, req_options) do |http| http.request(request) endこの時点で10行を軽く超えていた...
5.このHTMLファイルをRubyのnokogiriでパースしたいので「Gemfile」というものを用意して下記の記述をします。
source 'https://rubygems.org'

gem 'nokogiri'
この状態で、ターミナルを起動して
bundle install --path .bundleを実行します。
6.まさかのエラー
久しぶりにNogiriを入れようとしたら普通に怒られた...
世の中なんでも思い通りにいくわけではないんですね。Fetching gem metadata from https://rubygems.org/................. Resolving dependencies... Using bundler 1.17.2 Fetching mini_portile2 2.4.0 Installing mini_portile2 2.4.0 Fetching nokogiri 1.10.9 Installing nokogiri 1.10.9 with native extensions Gem::Ext::BuildError: ERROR: Failed to build gem native extension. current directory: /Users/itayayuichiro/Documents/src/crawler/qiita_crawler/.bundle/ruby/2.6.0/gems/nokogiri-1.10.9/ext/nokogiri /System/Library/Frameworks/Ruby.framework/Versions/2.6/usr/bin/ruby -I /System/Library/Frameworks/Ruby.framework/Versions/2.6/usr/lib/ruby/2.6.0 -r ./siteconf20200604-4813-yjwd2f.rb extconf.rb mkmf.rb can't find header files for ruby at /System/Library/Frameworks/Ruby.framework/Versions/2.6/usr/lib/ruby/include/ruby.h You might have to install separate package for the ruby development environment, ruby-dev or ruby-devel for example. extconf failed, exit code 1 Gem files will remain installed in /Users/itayayuichiro/Documents/src/crawler/qiita_crawler/.bundle/ruby/2.6.0/gems/nokogiri-1.10.9 for inspection. Results logged to /Users/itayayuichiro/Documents/src/crawler/qiita_crawler/.bundle/ruby/2.6.0/extensions/universal-darwin-19/2.6.0/nokogiri-1.10.9/gem_make.out An error occurred while installing nokogiri (1.10.9), and Bundler cannot continue. Make sure that `gem install nokogiri -v '1.10.9' --source 'https://rubygems.org/'` succeeds before bundling. In Gemfile: nokogiriとりあえずこのサイト
を参考に下記の4コマンドを実行してみます。$ brew tap homebrew/dupes $ brew install libxml2 libxslt libiconv $ brew link --force libxml2 ##--force--オプションを付けてインストール $ brew link --force libxslt ##--force--オプションを付けてインストールと思ったが、1行目を実行したところでエラーになった...
Updating Homebrew...
xcrun: error: invalid active developer path (/Library/Developer/CommandLineTools), missing xcrun at: /Library/Developer/CommandLineTools/usr/bin/xcrun
がその後の処理が終わったのでとりあえず無視して進めてみる。
→次のコマンド打ったらダメだったっぽいのでxcode-select --installこちらを実行
インストールに時間かかりそうなので明日に続きます....笑
- 投稿日:2020-06-04T23:45:02+09:00
Ruby vs Java: What makes a perfect fit for your custom software?
Let's pay attention to the choice between Java and Ruby performance and the long-term prospects for choosing either one.Java and Ruby performance and the long-term prospects for choosing either one.
- 投稿日:2020-06-04T22:16:33+09:00
配列からpathを作成する
配列からpathを作成する
ルーティングヘルパーを使う方法の他に、パラメータの配列からパスやURLを作成することもできます。
次のようなルーティングを考えてみるruby.rbresources :magazines do resources :ads endresources :magazinesの中に resources :ads(広告)があります。
magazine_ad_pathを使えば、idを数字で渡す代りに
MagazineとAdのインスタンスをそれぞれ引数として渡すことができます。
これで@magazineと@adそれぞれのインスタンス情報を持ったパスを精製できます。<%= link_to 'Ad details', magazine_ad_path(@magazine, @ad) %>複数のオブジェクトが集まったセットに対してurl_forを使うことも可能です。
複数のオブジェクトを渡しても、適切なルーティングが自動的に決定されます。<!--@magazineと@adを引数に渡す --> <%= link_to 'Ad details', url_for([@magazine, @ad]) %>上の場合、Railsは@magazineがMagazineであり、@adがAdであることを認識し、それに基づいてmagazine_ad_pathヘルパーを呼び出します。これ自分で認識してくれるのすごいよね。。
link_toなどのヘルパーでも同様にして、完全なurl_for呼び出しの代わりに単にオブジェクトを渡すことが可能です。
<%= link_to 'Ad details', [@magazine, @ad] %>もし1冊の雑誌にだけリンクしたいのであれば、以下のように書きます。
<%= link_to 'Magazine details', @magazine %>それ以外のアクションであれば、配列の最初の要素にアクション名を挿入するだけで済みます。
<%= link_to 'Edit Ad', [:edit, @magazine, @ad] %>これにより、モデルのインスタンスをURLとして扱うことができます。これはリソースフルなスタイルを採用する大きなメリットの1つです。
pathに対してインスタンスを渡すことでRailsが自動的にpathを生成してくれるのはすごいよね
参考 Railsガイド
- 投稿日:2020-06-04T22:13:22+09:00
ActionController::InvalidAuthenticityTokenエラー
やりたいこと
Railsのレンダリングを使わず、静的htmlから/usersへPOST送信したい(ユーザー作成)
環境
・Rails 5.2.3
・ruby 2.5.1main.html<form action="/users" method="post" data-local="true"> <label for="user_name">ユーザー名</label> <input type="text" name="user[username]" id="user_name"> <label for="user_mail">ユーザー名</label> <input type="email" name="user[mail]" id="user_mail"> <input type="submit" value="ユーザー作成"> </form>users_controller.rbdef create @user = User.new(user_params) if @user.save session[:user_id] = @user.id render file: "public/compornent.html", layout: false, content_type: "text/html" else redirect_to root_path end end原因
CSRF保護が有効になっていて、新規で外部からPOSTしようとすると、Railsが自動的にリクエストをはじいている。
つまり、セキュリティ関連の問題。
解決法
CSRF保護を無効にするソースコードを親コントローラに記述する
application_controller.rbclass ApplicationController < ActionController::Base protect_from_forgery with: :null_session end
- 投稿日:2020-06-04T21:45:13+09:00
最速 rails mail devise ウェルカムメール送信機能実装 一番簡単
【ゴール】
deviseユーザ登録時にmailerを使用してmailの送信(ウェルカムメール)
参考:https://web-camp.io/magazine/archives/19143
参考:https://freesworder.net/rails-mail/【メリット】
■UXの向上
■アプリケーション完成度向上【開発環境】
■ Mac OS catalina
■ Ruby on Rails (5.2.4.2)
■ Virtual Box:6.1
■ Vagrant: 2.2.7【実装】
アプリケーションを作成
mac.terminal$ rails new mail $ cd mailgemfile追加
app内.gemfilegem 'devise' #deviseの会員登録時にメールを飛ばします gem 'dotenv-rails' #環境変数に使用します。詳細は後述ターミナルへ戻り諸々作成
mac.terminal$ bundle install #gemfileをインストール $ rials g devise:install #deviseを初期化 $ rails g devise User $ rails g devise:views $ rails g devise:controllers usersDB,migrationfileを編集、下記のコメントアウ外す。
※メールの情報を追いかける為。
db/migrate/xxxxxxxxxx_devise_create_users.rb# Confirmable t.string :confirmation_token t.datetime :confirmed_at t.datetime :confirmation_sent_at t.string :unconfirmed_email # Only if using reconfirmablemodelを編集
※「:confirmable」のアクセスも追加
user.rbclass User < ApplicationRecord devise :database_authenticatable, :registerable, :recoverable, :rememberable, :validatable, :confirmable ←追加 end.envファイルをルートディレクトリに追加し、下記を追記
※一応パスワードがあるので「.env」を導入、先のgemfile導入はこの為
※環境変数に埋め込passwordは事前に申請してください/.envmail = 'あなたのgamilアドレス' password = 'パスワード申請が必要'config/initializers/mail_config.rb作成、編集
※メールの形式を指定
※「user_name」「password」は上記の.envファイルから引っ張ってきていますconfig/initializers/mail_config.rbActionMailer::Base.delivery_method = :smtp ActionMailer::Base.smtp_settings = { address: 'smtp.gmail.com', domain: 'gmail.com', port: 587, user_name: ENV['mail'], password: ENV['password'], authentication: 'plain', enable_starttls_auto: true }view/users/mailer/confirmation_instructions.html編集
confirmation_instructions.html##任意に変更、メールの内容になります。 <p>Welcome <%= @email %>!</p> <p>You can confirm your account email through the link below:</p> ##ここまで <!-- <p><%#= link_to 'Confirm my account', confirmation_url(@resource, confirmation_token: @token) %></p> --> #コメントアウト,今回不要の為再度ターミナルへ
mac.terminal$ rails db:migrate $ rails s -b 0.0.0.0以上でユーザー登録時にメール送信されているはずです。
action mailer等経由して3時間くらい時間取られましたが
思ったより簡単に実装できました。
- 投稿日:2020-06-04T21:45:13+09:00
最速 rails mail devise ウェルカムメール送信機能実装 action mailer不要 一番簡単
【ゴール】
deviseユーザ登録時にmailerを使用してmailの送信(ウェルカムメール)
参考:https://web-camp.io/magazine/archives/19143
参考:https://freesworder.net/rails-mail/【メリット】
■UXの向上
■アプリケーション完成度向上【開発環境】
■ Mac OS catalina
■ Ruby on Rails (5.2.4.2)
■ Virtual Box:6.1
■ Vagrant: 2.2.7【実装】
アプリケーションを作成
mac.terminal$ rails new mail $ cd mailgemfile追加
app内.gemfilegem 'devise' #deviseの会員登録時にメールを飛ばします gem 'dotenv-rails' #環境変数に使用します。詳細は後述ターミナルへ戻り諸々作成
mac.terminal$ bundle install #gemfileをインストール $ rials g devise:install #deviseを初期化 $ rails g devise User $ rails g devise:views $ rails g devise:controllers usersDB,migrationfileを編集、下記のコメントアウ外す。
※メールの情報を追いかける為。
db/migrate/xxxxxxxxxx_devise_create_users.rb# Confirmable t.string :confirmation_token t.datetime :confirmed_at t.datetime :confirmation_sent_at t.string :unconfirmed_email # Only if using reconfirmablemodelを編集
※「:confirmable」のアクセスも追加
user.rbclass User < ApplicationRecord devise :database_authenticatable, :registerable, :recoverable, :rememberable, :validatable, :confirmable ←追加 end.envファイルをルートディレクトリに追加し、下記を追記
※一応パスワードがあるので「.env」を導入、先のgemfile導入はこの為
※環境変数に埋め込passwordは事前に申請してください/.envmail = 'あなたのgamilアドレス' password = 'パスワード申請が必要'config/initializers/mail_config.rb作成、編集
※メールの形式を指定
※「user_name」「password」は上記の.envファイルから引っ張ってきていますconfig/initializers/mail_config.rbActionMailer::Base.delivery_method = :smtp ActionMailer::Base.smtp_settings = { address: 'smtp.gmail.com', domain: 'gmail.com', port: 587, user_name: ENV['mail'], password: ENV['password'], authentication: 'plain', enable_starttls_auto: true }view/users/mailer/confirmation_instructions.html編集
confirmation_instructions.html##任意に変更、メールの内容になります。 <p>Welcome <%= @email %>!</p> <p>You can confirm your account email through the link below:</p> ##ここまで <!-- <p><%#= link_to 'Confirm my account', confirmation_url(@resource, confirmation_token: @token) %></p> --> #コメントアウト,今回不要の為再度ターミナルへ
mac.terminal$ rails db:migrate $ rails s -b 0.0.0.0以上でユーザー登録時にメール送信されているはずです。
action mailer等経由して3時間くらい時間取られましたが
思ったより簡単に実装できました。
- 投稿日:2020-06-04T21:00:40+09:00
はじめてのポートフォリオ(技術<制作過程)
プログラミングを始めて半年を迎えます、上野栞音です。
スクールでは主にRailsアプリの作り方を教わり、現在は株式会社Wilicoでインターンとしてお世話になりながら就活中です。
プログラミングも字書きも不慣れなもんで、至らぬ点がありましたら教えてください。今回はスクール3ヶ月目のフェーズで作成したポートフォリオについて、雑多にはなりますが色々と書き留めていこうと思います。
ポートフォリオ概要
ToT
github
※かんたんログイン("Signin as a trial user")実装済み。開発コミュニティ向けのQAサイトを想定して制作しました。
詳細はgithubのREADMEに。開発経緯と目的
今回学習したかったことは大きく分けると2つ。
ユーザーのアクションを経て、どのようなデータが集められるのか。
もともと、ユーザーに評価を付与→チャートで表示の機能は絶対に実装しようと決めていました。
きっかけとしてはAI(データの統計や分析)に興味が湧いたからなので、最初はPythonを使って何かしようと考えていたのですが却下。
理由としては、
- 初学者が1ヶ月という期限付きで新しい技術を得てアプリを作っても、強みのあるポートフォリオにはならない気がしたから。
- 当時教わっていたRailsについての理解が明らかに浅く、その理解度のまま別の技術に手を出すのが腑に落ちなかったから。
そんなこんなで いくつかサイトをチラ見しつつアプリの企画を練りました。
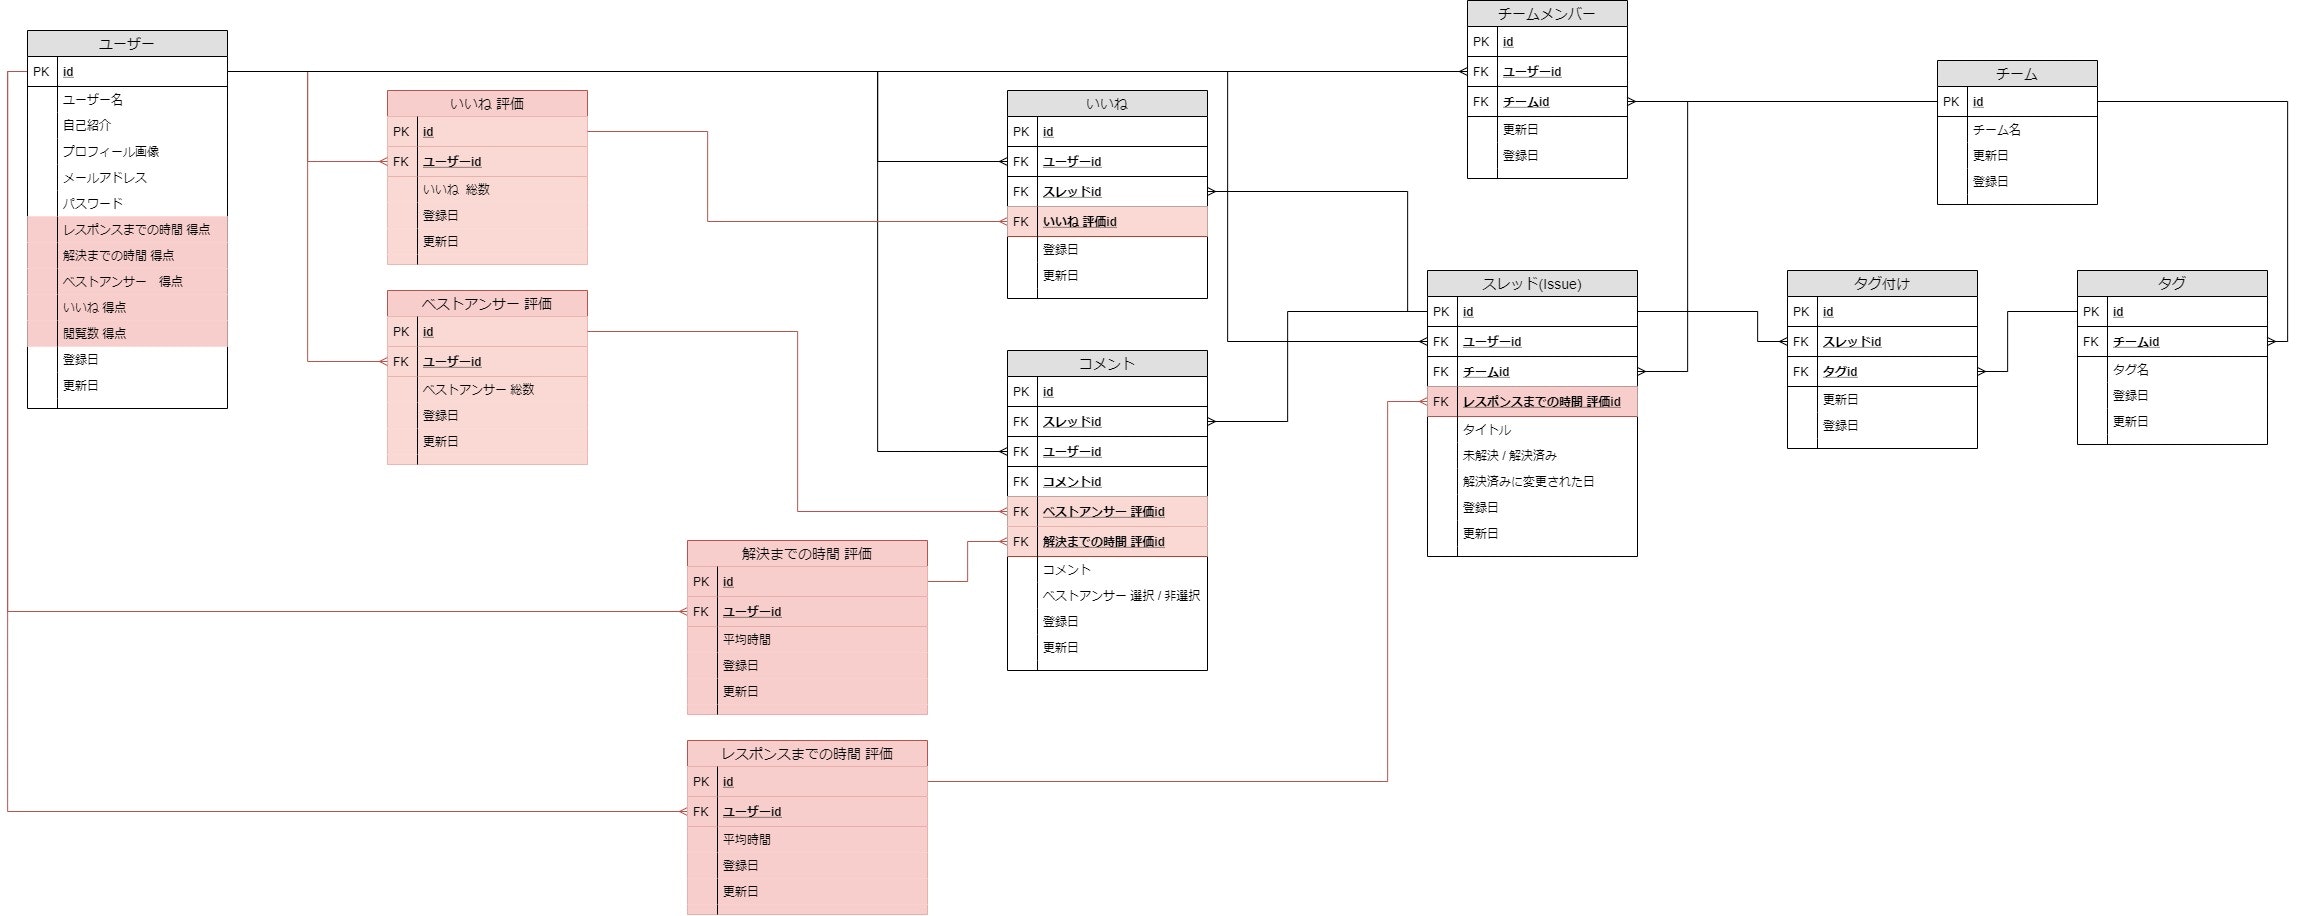
QAサイトの制作に至った理由としては、評価基準の設け方がパッとイメージできたからです。DB設計
静的(不変的)なデータのみを保管するようにするのがベスト!
というのが今回の学びです。開発はSQLite3、本番はMySQLで実装しています。はじめに考えていたもの
ユーザーの評価はユーザーテーブルに、それ以外の評価もコメントやスレッドのアクションに紐づけてアップデートする予定でしたが、途中でこんがらがってスクールのメンターさんに相談。
諸々差し置いて問題点として大きかったのが、この設計だとユーザーが何か操作するたびにアップデートが掛かってしまうため、正常にアップデートされない可能性があることです。(回避方も色々あるみたいですが、もっと掘り下げたいので省略)後々算出できるデータやユーザーの動作に依存して頻繁にデータが更新されるものは、理由がない限りDBで管理しないようにするため、分析するための材料だけ保管してチャートを描画するタイミングで算出する設計にしました。
最終的な設計
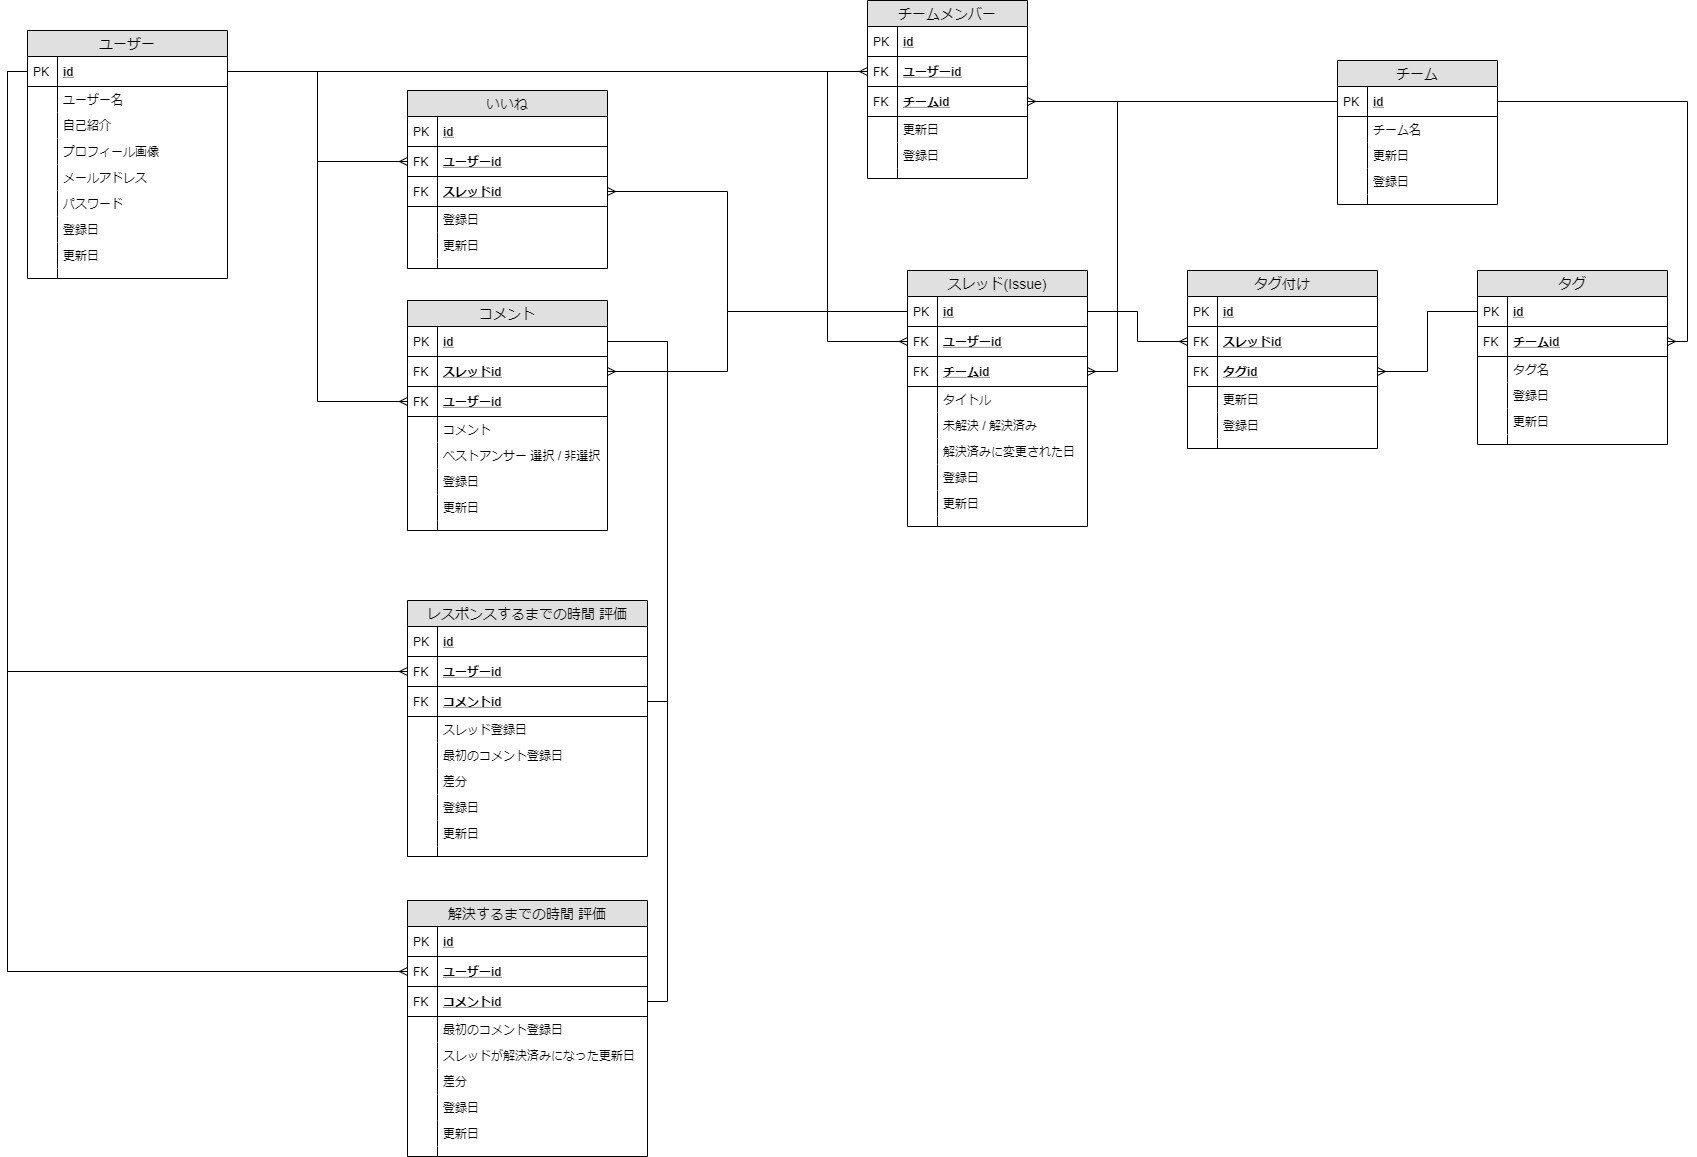
赤い部分をごっそり消しましたが、時間系の評価については他の評価に比べて算出するステップが一つ多い(2つのテーブルに登録されている登録日を基に差分を算出 → その差分を基に平均値算出)こともあり、集計のスピードを上げるために用途を変えてテーブルを残しています。
基本的な機能の実装
チャート実装を除いた部分です。チャートに時間が割きたかったこともあり、検索機能以外を1週間くらいでスケジュールを組んで実装しました。
さして難しい機能は実装してないのでアピールポイントを挙げると、
タグ付け機能と検索機能はgemを使わずに実装しました
改めて調べてみると「gemで出来たのでは…?」なんて思いますが、いい運動(?)になったので結果オーライ
以下備考
- タグ付け機能
- 同じ意味なのに違う表記(rails, Railsみたいな)のデータが入ると分析の精度が下がってしまうため、新規タグ作成の動作を重くしたかった。
- 基本1つのtext_fieldにカンマ区切りで書き込むようなやり方しか見つからず軽いなぁと悩んだあげく、普通に中間テーブルで結んでフォーム作った方が慣れたやり方だし早そうだと判断。
- 実装後、Qiitaのタグ付け機能を見て目ぇひん剥きました。なるほど。この手があったか。なるほど…
- 検索機能
チャート実装
開発経緯の通り、
今できる事→これやりたい!軸で企画を立ててここまで来たので、為せば成る精神で詳しい実装の目論見はほぼありませんでした。
調べてみるものの、当時jsに馴染みが無さ過ぎて悶絶寸前。
<何をどうすれば これが出来るんですか…?
自分で考えたアプリのくせに、ここに来て教室の隅で静かに絶望してました。この時の学びとして大きかったのは、
分からない、初めて触るものは一度触ってみる大切さ
何も分からず嘆いていた最中、スクールの同期生に相談したらchart.jsのcodepenを教えてくれました。
ここで少し触ってみた瞬間、chart.jsが面白いほど読める。要因としては、すでに完成しているコードを触れることが大きかったと思います。
どの値がどの軸のデータに影響しているかや、どの値がどのデザインに影響しているかなどが直観的に分かり、ここに配列渡せば勝ちじゃん!とゴールを定める事が出来ました。ちょっと無謀にも思いますが、試行錯誤も含めて工数を割くために基本的な機能 頑張ったので潔く実装に移って良かったなと思います(結果論)。
いざ、尋常にチャート実装
jsファイルとのデータの受け渡しは、gem 'gon'で行っています。
json形式に変換するのが基本ですが学習目的に含まれていないのと、これから実装するチャートの工数が読みきれずスピードを重視したかったので採用しました。大体こう。
- UserModelのロジックでチャートに渡す配列を計算するメソッド作成、Controllerで呼び出す
- UsersControllerでgonに渡す
- Viewでgonのタグ→jsファイルに渡す
- jsファイル→canvasタグに渡してチャート描画
※自分が流れを掴むために搔い摘んだものです。gon周りは特にもう少し検証しながら理解を深めたい。
UserModelのロジックは、大体こう。
コードがぼちぼち長いため、流れだけ伝わりますようにといった感じで書きます
代わりと言っては何ですが行単位でGithubのリンクを貼るので、気になる方はご覧ください。
評価基準ごとにまとめます。
Questioner/Tags, Answer/Tags
ドーナツチャートの2項目です。少しデータを引っ張るロジックが違うだけなので、Questioner/Tagsを例にします。
バーチャートとレーダーチャートの項目です。
データを引っ張ってくるテーブルが違うだけなので、Time to responseを例にします。
ドーナツチャート以外は基本この流れです。細かい処理は省きます。
- 全ユーザーの平均値を算出
・ユーザーの動作に依存してグラフの階級を変えるため、このデータを基に基準になる値を算出します。- チャートの諸々を決めるのに使う値を算出
・返すのは各ユーザー平均値の [ 最小値, 最大値, それを基にした階級幅 ]。
・投稿されたIssueが1つも無い場合はfalseで返して例外処理。- 2を基に境界値を算出
・〇秒~〇秒のユーザーはスコア1、〇秒~〇秒のユーザーはスコア2… の〇だけ入ったような配列です。- 3の境界値を基に
- 各階級に何人ユーザーが含まれるかを算出して配列を作りながら
- 各階級に対象のユーザーが含まれるか否かを0,1で算出して配列を作る
- 6の配列を基に、ユーザーのスコアを算出
・3点の場合、[0,0,1,0,0,0,0,0,0,0] → each_with_indexで回すと2番目の値が1になる → 2+1でスコア算出- 5,7をControllerに返す
- ※レーダーチャートの配列だけControllerで作ります。
・ ControllerからModelのメソッドを呼び出す際、Model上に配列を作ろうとすると呼び出すたびに配列がリセットされるためです。
・[ 5(チャートに渡す値), 7(ユーザーのスコア) ] の配列が返り値なので、この配列の[1]を拾って配列を作ります。
Time to response とほぼ同じなので、差分だけまとめます。
1.平均値
平均値が割り出せるほど絶対値が大きくなかったため合計値を算出しています。チャートの値が0ばかりになって変わり映えしなかった3. 階級の算出
階級の誤差をスコア1に寄せるため、呼び出すメソッドを変えています。
評価基準によってスコアが高くなる条件が分岐するのが肝で、
Time to ~ → 1.平均値算出の結果が低いと高スコア → calculate_evaluation_datas_sort_by_max
それ以外 → 1.合計値算出の結果が高いと高スコア → calculate_evaluation_datas_sort_by_min
大きく違う点としては、階級を決める基準が 最大値 → 最小値 であること(こちら基準で命名してます)と、配列をreverseするタイミングです。リファクタリング
制作期間が 2/15~3/15 くらいだったのですが、3月頭にβ版をデプロイして色んな方にレビューを頂きました。ありがとうございました
UserModelのメソッド
1. 最初は全てControllerに記述していたメソッドを
2. Modelに移行して
3. 共通するロジックをメソッド化(最新版)Viewの描画まわり
1. HTMLの部分テンプレートでscriptタグをrenderしていたのを
2. jsファイルに移行して(リンクはcomment_tags)
3. 一つのファイルにまとめて共通するロジックをメソッド化(最新版)チャートまとめ
このポートフォリオにおいて最大の学びでもあるのですが、
手を動かせば必ず答えは見つかる!
と確信を得られた制作物でした。
今扱えるパラメータを読み、それを基にロジックを組み、足りなければパラメータを送る。これを自分自身の経験をもって得られたのはとても貴重な学びだったなと思います。全てのチャートを最低限実装するまでの1週間くらいはコンソール画面にかじりついて模索する日々でしたが、ロジックができた瞬間の達成感が最高すぎて何だかんだ楽しかったです
さいごに
ポートフォリオについて調べていると「こういうのが有利!」ばかりで自分と同じレベル感の記事が上手いこと見つからず、望んでいた判断材料では無かったので書いてみました。
もちろん まだ改善の余地があるアプリとは思いますが、キリがないので一旦区切りにしようかなと思います。
これからポートフォリオを制作する方の目に留まり、少しでもインスピレーションの助けになれば幸いです
あと色んな方のこんな感じの記事見たいので是非書いてくださいありがとうございました!
参照
Ransackで簡単に検索フォームを作る73のレシピ
railsで複数ワードでの検索機能(or)とマイナス検索機能(-)を実装してみる
chart.jsのcodepen
gem 'gon'
- 投稿日:2020-06-04T20:11:03+09:00
follow_redirect!って何をfollowしてるの?: Railsチュートリアル躓きポイント - 7章
ユーザー登録作成時のテストを書いております
/sample_app/test/integration/users_signup_test.rbrequire 'test_helper' class UsersSignupTest < ActionDispatch::IntegrationTest . . . test "valid signup information" do get signup_path assert_difference 'User.count', 1 do post users_path, params: { user: { name: "Example User", email: "user@example.com", password: "password", password_confirmation: "password" } } end follow_redirect! assert_template 'users/show' end
follow_redirect!とはなんぞ!このメソッドは、POSTリクエストを送信した結果を見て、指定されたリダイレクト先に移動するメソッドです。(Railsチュートリアル)
なんとなく挙動は想像できる
わからないこと
指定されたリダイレクト先ってなんぞ?
検証
このままテストを実行してみると
rails test> Green
post users_pathに対応するコントローラーの挙動を参照すると/sample_app/app/controllers/users_controller.rb. . . def create @user = User.new(user_params) if @user.save flash[:success] = "Welcome to the Sample App!" redirect_to @user else render 'new' end endこの中の
redirect_to @user>redirect_to root_pathに変更してみると
rails test> RedFAIL["test_valid_signup_information", #<Minitest::Reporters::Suite:0x000055e3f2c61b10 @name="UsersSignupTest">, 1.4677946789997804] test_valid_signup_information#UsersSignupTest (1.47s) expecting <"users/show"> but rendering with <["static_pages/home", ...リダイレクト先が"static_pages/home"になってるよと
結論
follow_redirect!は、
"POSTリクエストを送信した結果を見て"、
つまり対応するコントローラ内で明示されたリダイレクトの挙動に従っているようだ
- 投稿日:2020-06-04T19:37:38+09:00
備忘録: Rails Vueアプリ作成時のチートシート
app作成コマンド
rails バージョン new アプリ名 -d mysql --webpacker=vue --skip-test --skip-bundle --skip-turbolinks

assets内のapplication.jsから以下の一行を削除する。
追加するgem list
gem 'devise'
gem 'devise-i18n'
gem 'rails-i18n'

gem 'faker'
gem 'factory_bot_rails'

gem 'rubocop', require: false
gem 'rubocop-rails', require: false
gem 'pry'
gem 'pry-doc'
gem 'pry-rails'
gem 'pry-byebug'
gem 'foreman'

gem 'rspec-rails', '~> 4.0.0'
gem 'rubocop-rscpe', require: false
gem 'spring-commands-rspec'
実行コマンド
$ rails webpacker:install

$ rails webpacker:install:vue

$ yarn add axios

$ yarn add vue-router

$ rails g rspec:install

$ rails g devise:install

$ rails g devise:user

$ rails g devise:views

$ yarn add -D eslint eslint-loader eslint-plugin-vue
rspecの設定
.rspec--require spec_helper --format documentation”foremanの設定
Profile.devweb: bundle exec rails s # watcher: ./bin/webpack-watcher hot: ./bin/webpack-dev-serverbin/server#!/bin/bash -i bundle install bundle exec foreman start -f Procfile.dev$ chmod 777 bin/serverdeviseの設定
config/environments/development.rbRails.application.configure do # Settings specified here will take precedence over those in config/application.rb. (省略)... # mailer setting config.action_mailer.default_url_options = { host: 'localhost', port: 3000 } end<p class="notice"><%= notice %></p> <p class="alert"><%= alert %></p>日本語対応といらないファイルを作成しない設定
config/application.rbconfig.i18n.default_locale = :ja config.time_zone = "Tokyo" config.generators do |g| g.template_engine false g.assets false g.helper false g.test_framework :rspec, fixtures: false, view_specs: false, helper_specs: false, routing_specs: false endESLintの設定
config/webpack/loaders/eslint.jsmodule.exports = { test: /\.(js|vue)$/, loader: 'eslint-loader', enforce: 'pre', options: {} }environment.jsconst { environment } = require('@rails/webpacker') const vue = require('./loaders/vue') const eslint = require('./loaders/eslint') environment.loaders.append('vue', vue) environment.loaders.append('eslint', eslint) module.exports = environmentよく使う作成コマンド
$ rails g api/v1/コントローラー名 index

$ rails g model モデル名 title:string likable:references{polymorphic}
- 投稿日:2020-06-04T19:22:53+09:00
Ruby ハッシュについて(続)
ハッシュの同値比較
== でハッシュ同士を比較すると、同じハッシュかどうかをチェックできます。
このときすべてのキーと値が同じであれば、trueが返ります。
たとえ並び順が異なっていたとしても、キーと値がすべて同じであれば、trueとなります。(例)
x = { 'a' => 1, 'b' => 2, 'c' => 3}
y = { 'b' => 2, 'c' => 3, 'a' => 1}
x == y # => true
要素数の取得
sizeメソッド(= length)を使うと、ハッシュの要素の個数を調べることができます。
{ 'a' => 1, 'b' => 2, 'c' => 3 }.size # => 3要素の削除
deleteメソッドで指定したキーに対応する要素を削除できます。
最後に、ハッシュを出力させると、要素が削除されていることがわかります。menus = { 'food' => 'rice', 'drink' => 'water', 'dessert' => 'cake' } menus.delete('food') # => "rice" 削除された要素の値が戻り値となります puts menus # => {"drink" => "water", "dessert" => "cake"}参考にした文献
- 投稿日:2020-06-04T18:16:48+09:00
Railsチュートリアル躓きポイント - 7章:エラーメッセージに対するテスト
Railsチュートリアル 6.0の7章
7.3.4 失敗時のテスト
最後の演習で躓いた記録演習内容
"リスト 7.20で実装したエラーメッセージに対するテストを書いてみてください。どのくらい細かくテストするかはお任せします。リスト 7.25にテンプレートを用意しておいたので、参考にしてください。"
解答
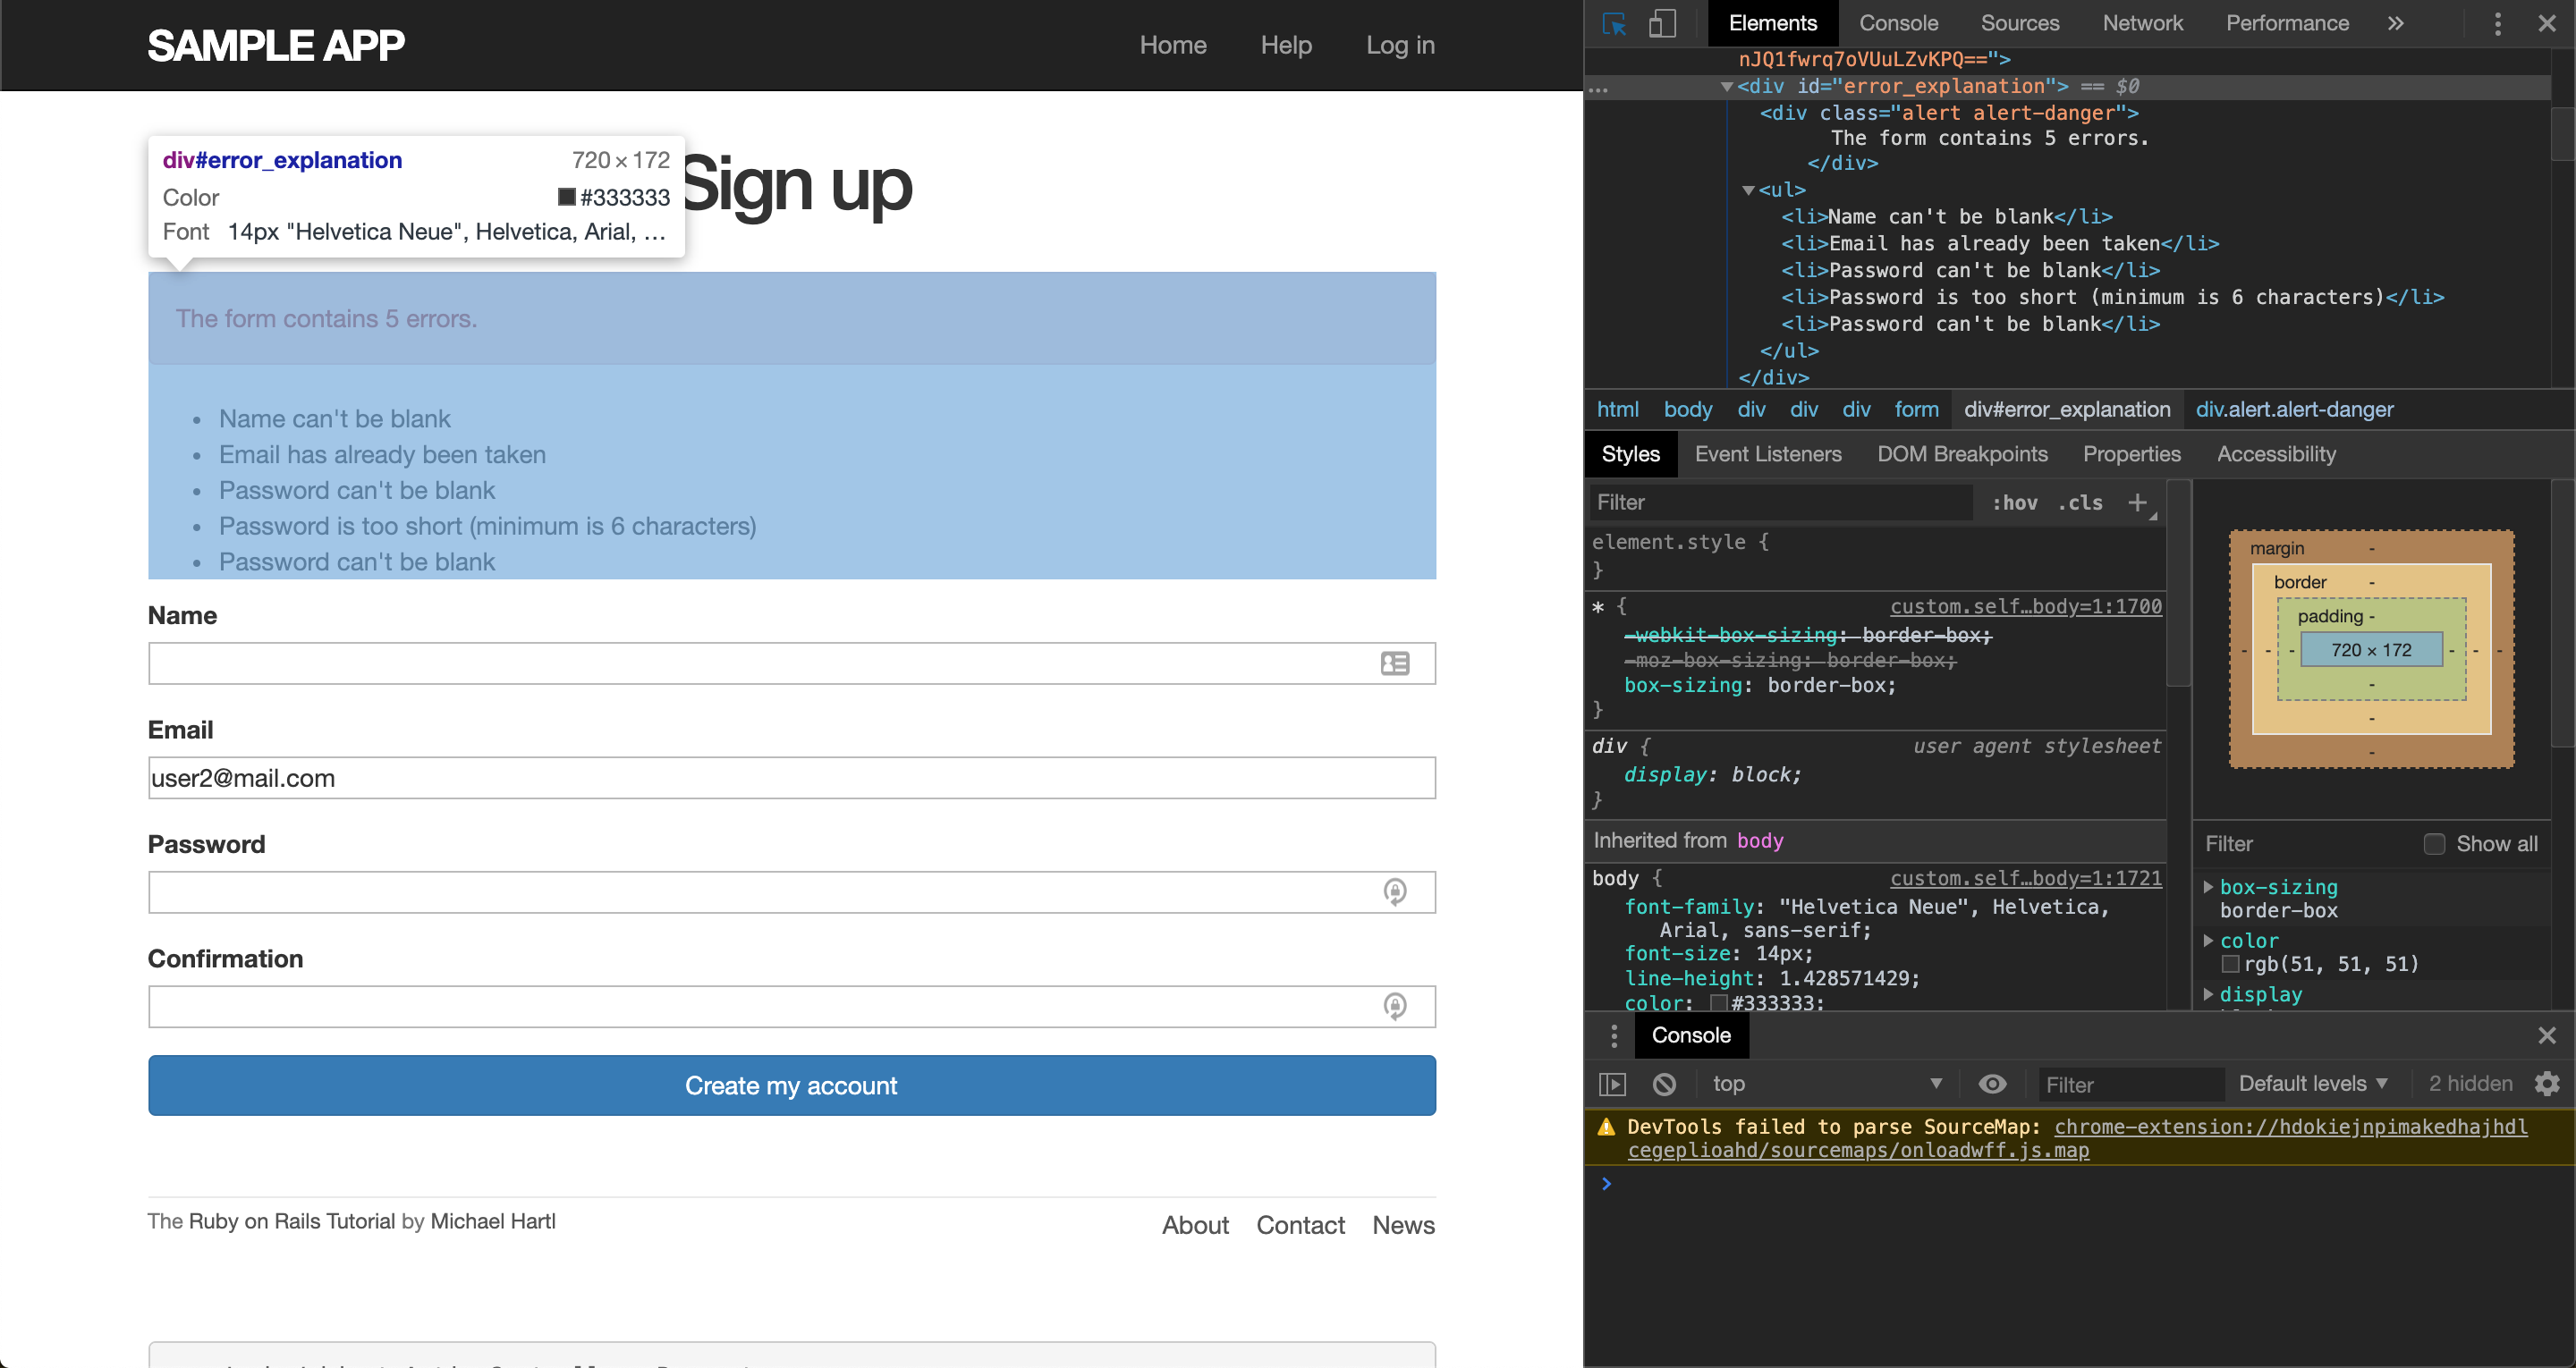
assert_selectを使用して、
HTML構造に不適切なログイン時固有の要素が存在するかどうかを調べるとよい。直前に作成したパーシャルの内容
(この内容がnew.html.erbに挿入されている)/sample_app/app/views/shared/_error_messages.html.erb<% if @user.errors.any? %> <div id="error_explanation"> <div class="alert alert-danger"> The form contains <%= pluralize(@user.errors.count, "error") %>. </div> <ul> <% @user.errors.full_messages.each do |msg| %> <li><%= msg %></li> <% end %> </ul> </div> <% end %>@user.errorsが存在する場合に、
特定のclass("alert" & "alert-danger"), id("error_explanation")を含むdivタグが展開されるブラウザに渡される最終的なHTMLにこれが含まれていれば良いわけなので、
assert_select 'セレクタ(class: div.class, id: div#id)'
でそれを確認する完成形は以下
/sample_app/test/integration/users_signup_test.rbrequire 'test_helper' class UsersSignupTest < ActionDispatch::IntegrationTest test "invalid signup information" do assert_no_difference 'User.count' do post users_path, params: { user: { name: "", email: "user@invalid", password: "foo", password_confirmation: "bar"} } end assert_template 'users/new' assert_select 'div.alert' assert_select 'div.alert-danger' assert_select 'div#error_explanation' end endassert_selectで検証している構造を、
Google Chromeのデベロッパーツールで可視的に示すと
以上です
わかってないこと(自己学習用)
" "と' 'の使い分け
文字列であることを明示的に示す場合に""が好まれるような気がするが、
セレクタの指定は' '
- 投稿日:2020-06-04T18:16:48+09:00
エラーメッセージに対するテスト: Railsチュートリアル躓きポイント - 7章
Railsチュートリアル 6.0の7章
7.3.4 失敗時のテスト
最後の演習で躓いた記録演習内容
"リスト 7.20で実装したエラーメッセージに対するテストを書いてみてください。どのくらい細かくテストするかはお任せします。リスト 7.25にテンプレートを用意しておいたので、参考にしてください。"
解答
assert_selectを使用して、
HTML構造に不適切なログイン時固有の要素が存在するかどうかを調べるとよい。直前に作成したパーシャルの内容
(この内容がnew.html.erbに挿入されている)/sample_app/app/views/shared/_error_messages.html.erb<% if @user.errors.any? %> <div id="error_explanation"> <div class="alert alert-danger"> The form contains <%= pluralize(@user.errors.count, "error") %>. </div> <ul> <% @user.errors.full_messages.each do |msg| %> <li><%= msg %></li> <% end %> </ul> </div> <% end %>@user.errorsが存在する場合に、
特定のclass("alert" & "alert-danger"), id("error_explanation")を含むdivタグが展開されるブラウザに渡される最終的なHTMLにこれが含まれていれば良いわけなので、
assert_select 'セレクタ(class: div.class, id: div#id)'
でそれを確認する完成形は以下
/sample_app/test/integration/users_signup_test.rbrequire 'test_helper' class UsersSignupTest < ActionDispatch::IntegrationTest test "invalid signup information" do assert_no_difference 'User.count' do post users_path, params: { user: { name: "", email: "user@invalid", password: "foo", password_confirmation: "bar"} } end assert_template 'users/new' assert_select 'div.alert' assert_select 'div.alert-danger' assert_select 'div#error_explanation' end endassert_selectで検証している構造を、
Google Chromeのデベロッパーツールで可視的に示すと
以上です
わかってないこと(自己学習用)
" "と' 'の使い分け
文字列であることを明示的に示す場合に""が好まれるような気がするが、
セレクタの指定は' '
- 投稿日:2020-06-04T17:57:16+09:00
【Rails】bundle install と bundle update の違いとは?
bundle install と bundle update の違い
この2つについて理解する前に必要な事前知識、Gemfile、Gemfile.lock、そしてBundlerとは何か?について書いていこうと思います。
Bundlerとは?
gemを管理するgem。
Bundlerのおかげでbundle installとbundle updateを使うことができる。Gemfileとは?
gemをインストールするための「設計図」のようなイメージ。
Gemfile.lockとは?
実際にgemをインストールした後の「結果図」のようなイメージ。
gem同士が関連しあっていることが多いため、Gemfileに書いてあるgemの他にも必要なgemが生じる。
その場合、Bundlerが自動で必要なgemをインストールし、Gemfile.lockに記述してくれる。なぜGemfile.lockが必要なのか?
Gemfileは設計図。インストールするgemしか記述されていない。
また、gemに関するgemも記述されてなく、本番環境と開発環境でインストールされるgemのバージョンも統一することができない。
しかし、Gemfile.lockを使うことで、どの環境でも同じgem、gemのバージョンを使用できるようになる。bundle install と bundle update について
では、事前知識を得ることができたので、本題に移る。
bundle install
Gemfile.lockをもとにgemをインストールする。
この時、Gemfile.lockに記述されていない且つ、Gemfileに記述されているgemがある場合、そのgemとそのgemに関連するgemをインストール後、Gemfile.lockをインストールする。bundle update
Gemfileをもとにgemをインストールする。
その後、Gemfile.lockを更新する。2つのコマンドの使い分けについて
bundle install→ 新しい環境や、Gemfileに新しくgemを記述した時に使用。
bundle update→ gemのバージョンを更新する時に使用。(bundle install ではGemfile.lockにあるgemについては更新しないため)まとめ
・
bundle installはGemfile.lockを参照してgemをインストールする。また、
Gemfile.lockが存在しない場合、Gemfileをもとにgemをインストールした後、Gemfile.lockを作成する。
・bundle updateはGemfile.lockを無視し、Gemfileをもとにgemをインストール後、Gemfile.lockを更新する。
・Gemfile.lockを無視するため、bundle installとは異なり、gem同士の依存関係(バージョン等)が刷新される。なるほど。基本的に実開発中はbundle installを使うことが多そうだな。
bundle updateを使う時は慎重に使おう。
- 投稿日:2020-06-04T16:58:10+09:00
どうしてもbacktraceが必要なあなたへ
任意のその場でインスタンス化したExceptionにbacktrace情報やcauseを付与したい時がある。そんなときはこう。
begin
  1/0
rescue => e
  err = raise RuntimeError.new, '任意のエラーを発生させよう!' rescue $!
  p err
  p err.cause
end
# => #<RuntimeError: 任意のエラーを発生させよう!>
# => #<ZeroDivisionError: divided by 0>
これが一番早いと思います
- 投稿日:2020-06-04T16:49:54+09:00
【Error】本番環境でアプリが表示されない
概要
手順通り、デプロイ作業を行なったのに、本番環境で表示されない
という事象に陥って1時間近く試行錯誤した結果、単純な回答だったため自分の戒めのため備忘録として残します事象
ブラウザで http://<サーバに紐付けたElastic IP>:3000/を入力しても表示されない
何かの間違い??と思い、リロードしてもロードが続いた結果、変わらず。。
検証
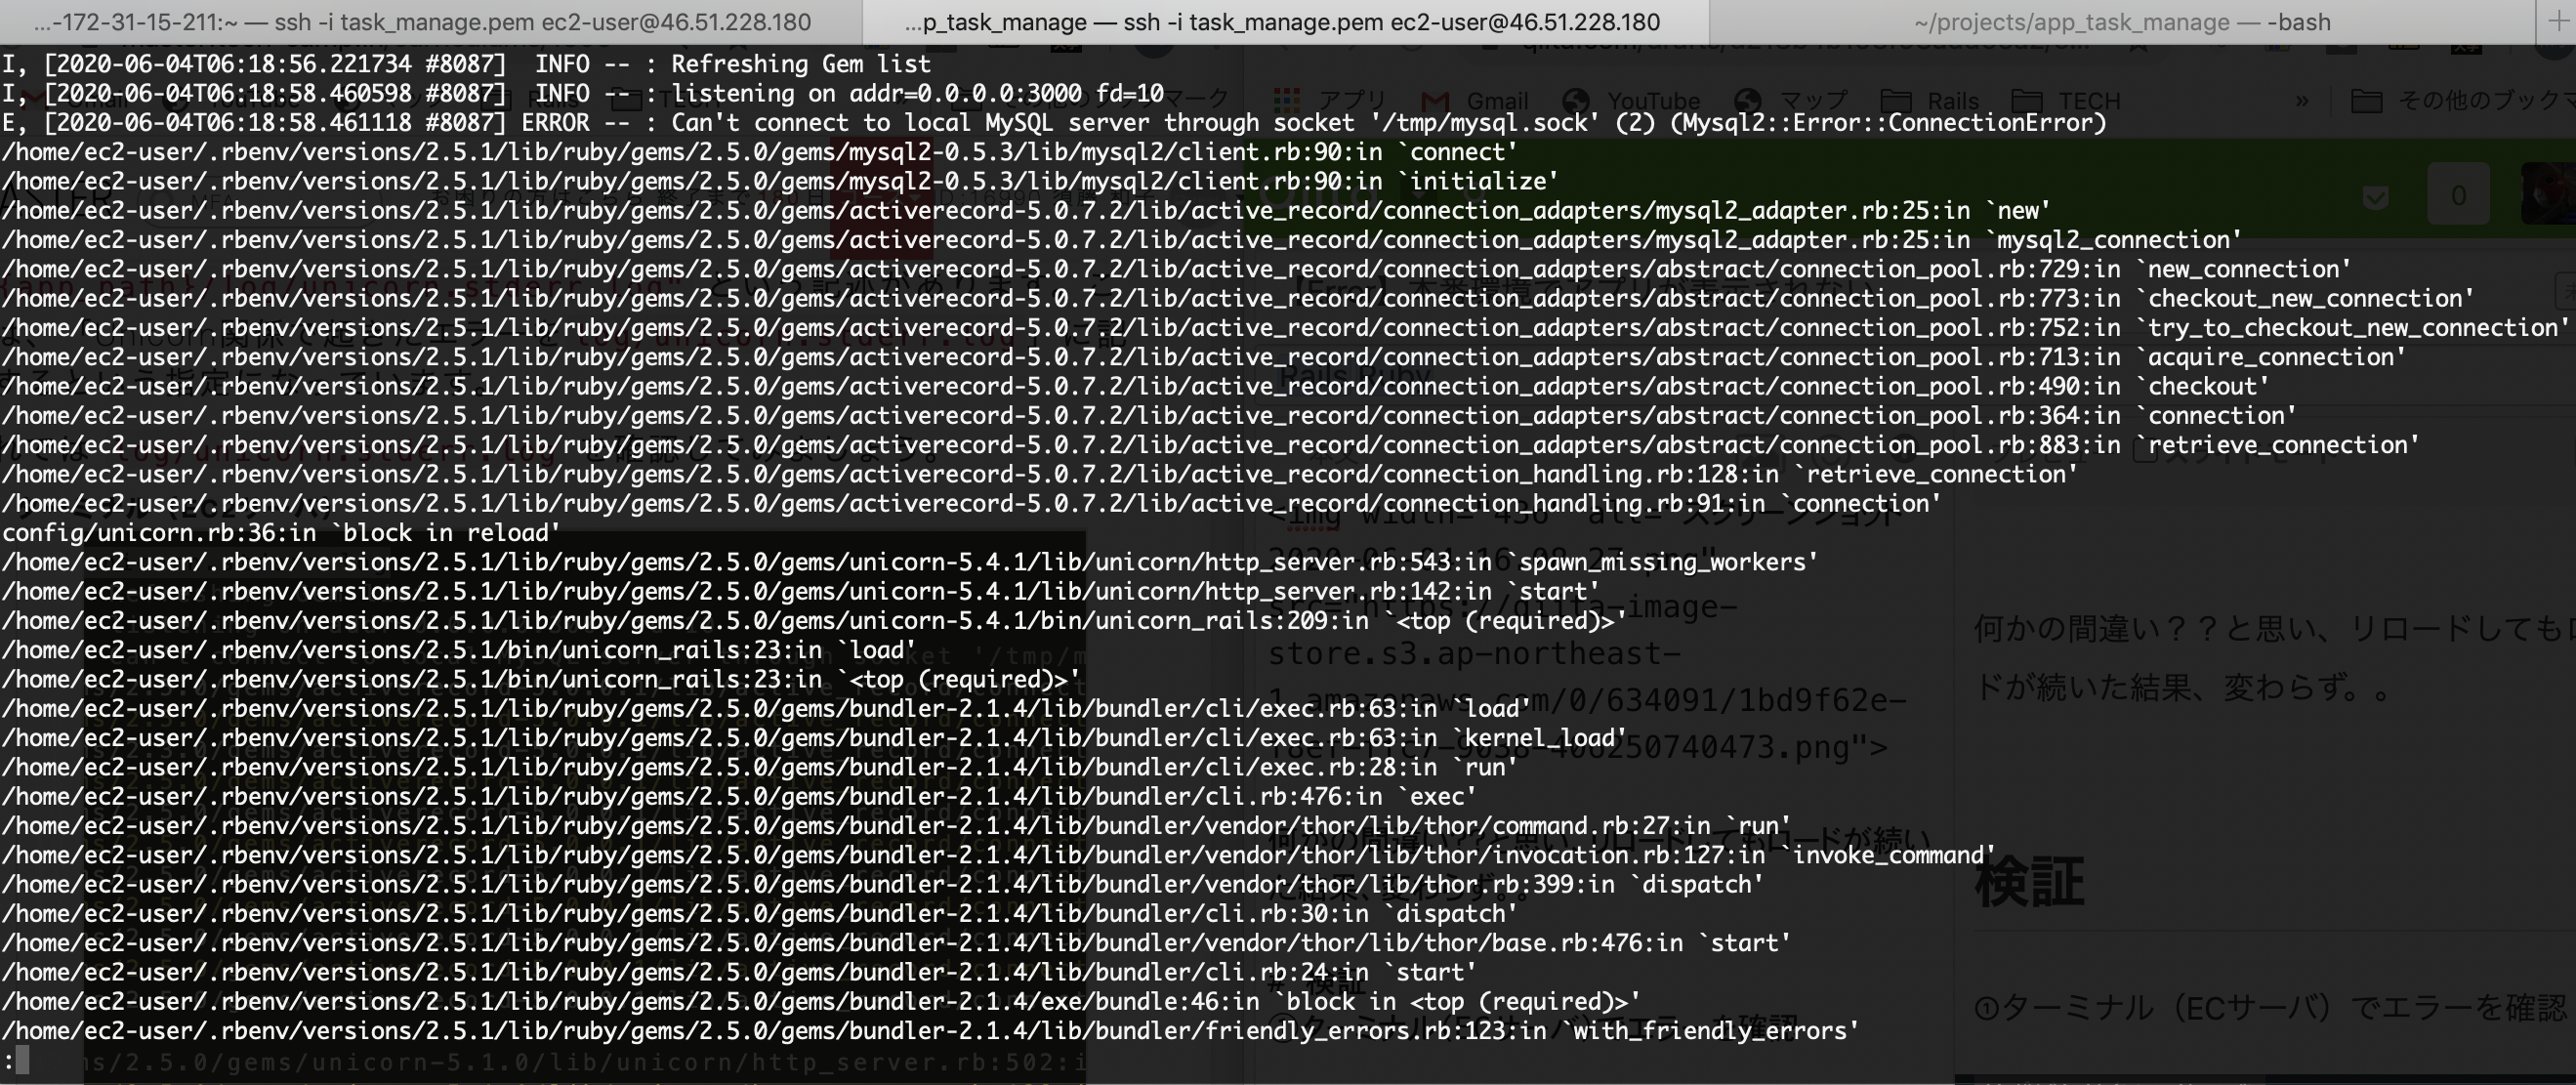
①ターミナル(ECサーバ)でエラーを確認
リポジトリ名(ECサーバ)$ less log/unicorn.stderr.log上記コマンドを入力した結果表示されたのが以下のエラーです
確認すべきは、3行目の(Mysql2::Error::ConnectionError)です。
Mysqlは起動してるってこと??②Mysqlの状態を確認
リポジトリ名(ECサーバ)$ sudo service mysqld status #コマンド入力後、下記の表示されたら起動中 mysqld (pid 8621) is running...よし!問題なし。。ではなぜ??
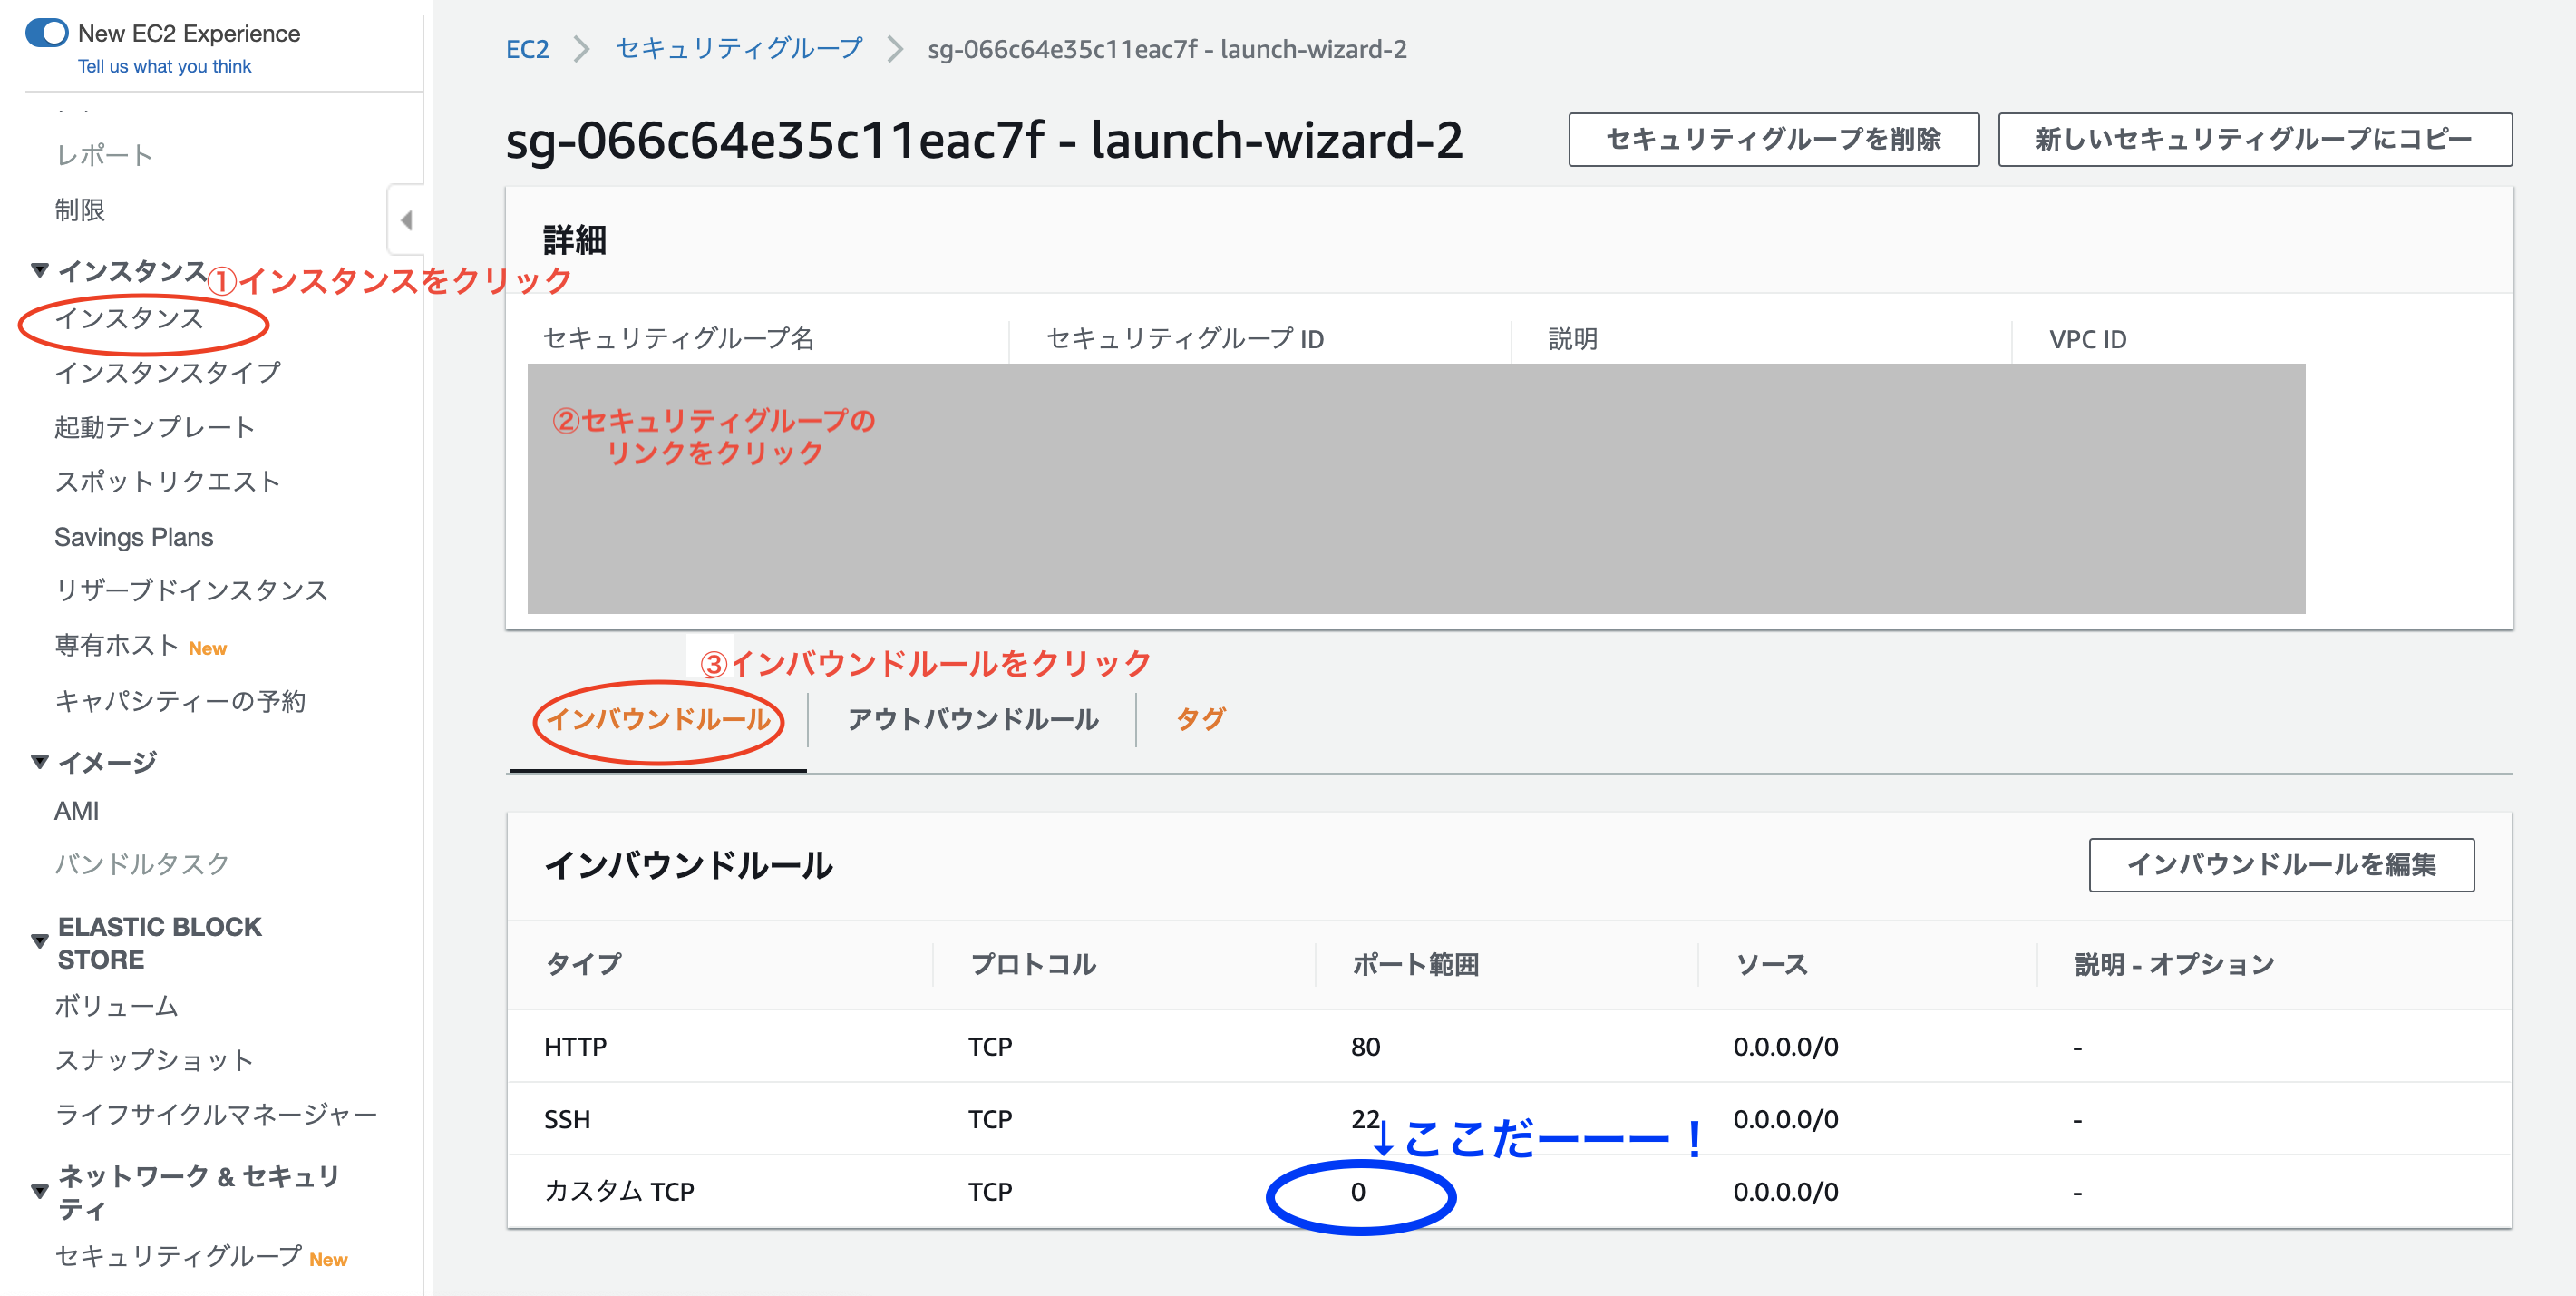
③AWSでポートの確認
ポート範囲の入力漏れ
原因
AWSにあるセキュリティグループのポート設定時に入力漏れがありました。
インバウンドルール追加時に下記の内容を入力する必要があります。【タイプ】カスタムTCPルール
【プロトコル】TCP
【ポート範囲】3000 ←私、忘れました
【ソース】カスタム 0.0.0.0/0無事、ブラウザに画面が表示されました
※最初はCSSが反映されていないため、ビュー崩れが起こっていると思います!参考
本番環境デプロイ時のコマンド集
https://qiita.com/15grmr/items/7ad36caa82a0fa27c4bdデプロイ時に対峙したエラーとその対応
https://qiita.com/sho012b/items/54fcd932ff8c76cdcd05
- 投稿日:2020-06-04T15:23:47+09:00
Rubyの条件分岐。if、条件演算子(三項演算子)、unless、case
Rubyでの真偽値
Ruby では false または nil だけが偽で、それ以外は 0 や空文字列も含め全て真です。
偽 真 false, nil それ以外( true,0 ,空文字列など) if
条件式に一致した場合に指定の処理を行う。
構文
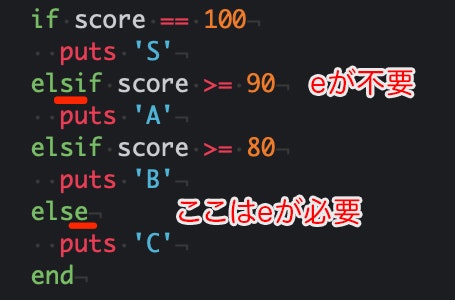
if 式 [then]
  式 ...
[elsif 式 [then]
  式 ... ]
...
[else
  式 ... ]
end
[ ]は省略可能な部分です。
els e ifではなくelsif(eがない)なので、他言語経験者は注意。
最後のels e はeが必要。
例文
score = 90

if score == 100
  puts 'S'
elsif score >= 90
  puts 'A'
elsif score >= 80
  puts 'B'
else
  puts 'C'
end

# thenを使っている例
if score == 100 then
  puts 'S'
end
条件演算子(三項演算子)
判定条件や処理が短い場合に威力を発揮!見やすくなる。
構文
式1 ? 式2 : 式3
# 条件 ? ◯の場合 : ×の場合
例文
checked = true
puts checked ? "済" : "未"

# 以下の文と同じ意味。
# puts (if checked then  "済" else "未" end)
unless
if と反対。もし〜でなければ。
unlessで書ける文はifでも書けるのでお好みで。二重否定になるとわかりにくくなるので注意。
Rubyにおけるunlessとコードの読みやすさについて|TechRacho(テックラッチョ)〜エンジニアの「?」を「!」に〜|BPS株式会社構文
elsif はない。
elseは省略可能。unless 式 [then] 式 ... [else 式 ... ] end例文
unless baby?
  # 条件式が偽(false)のの場合
  puts "ご飯を食べる"
else
  puts "ミルクを飲む"
end
case
ifとの使い分けの目安として、caseのほうは並列的な条件の場合により適していると思いますが、どうでしょうか。
swich文と同じだと思ってたんですが厳密には違うようです…
Rubyのcaseを〇〇(言語名)のswitch文だと思っている人たちにぼくから一言ガツンと申し上げたい構文
case [式]
[when 式 [, 式] ...[, `*' 式] [then]
  式..]..
[when `*' 式 [then]
  式..]..
[else
  式..]
end
例文
os = "macOS"

case os
when "Windows"
  # 処理
when "macOS", "Unix"
  # 同じ処理をする条件をまとめて記述できる
when "Linux"
  # 処理
else
  # 処理
end
参考
- 投稿日:2020-06-04T13:48:58+09:00
RSpecによるTDDでRailsAPIを実装してみた。part3
はじめに
この記事はpart3となります。もしも、part1, part2を見られていない方はそちらからご覧ください。(すごく長いです)
↓part1
https://qiita.com/yoshi_4/items/6c9f3ced0eb20131903d
↓part2
https://qiita.com/yoshi_4/items/963bd1f5397caf8d7d67このpart3ではpart2で実装したuser認証を使って、createアクションなどの認証をしている場合のみに使えるアクションを実装していきます。今回のゴールはcreate, update, destroyアクションを実装する事です。では初めていきます。
createアクション
createエンドポイント追加
まずは、エンドポイントを追加していきます。そしてその前に一旦テストを書きます。
spec/routing/articles_spec.rbit 'should route articles create' do expect(post '/articles').to route_to('articles#create') endcreateアクションははhttpリクエストがpostなので、getではなくpostで書いていきます。
$ bundle exec rspec spec/routing/articles_spec.rb
No route matches "/articles"というふうに出るので、routingを追加していきます
エンドポイント実装
config/routes.rbresources :articles, only: [:index, :show, :create]$ bundle exec rspec spec/routing/articles_spec.rbテストを実行して通ることを確認します。
そして、次はcontrollerのテストを書いていきます。
createアクション実装
spec/controllers/articles_controller_spec.rbdescribe '#create' do subject { post :create } end endこの記述を末尾に追加します。
そして、part2で定義したforbidden_requestsを使って認証がうまくいかないときのテストも書いていきます
spec/controllers/articles_controller_spec.rbdescribe '#create' do subject { post :create } context 'when no code provided' do it_behaves_like 'forbidden_requests' end context 'when invalid code provided' do before { request.headers['authorization'] = 'Invalid token' } it_behaves_like 'forbidden_requests' end context 'when invalid parameters provided' do end endこのforbidden_rquestsでは403が返ってくることを期待しているテストを実行します。
$ rspec spec/controllers/articles_controller_spec.rbすると以下のようなメッセージが返って来ます
The action 'create' could not be found for ArticlesController
createアクションが見つからないというふうに言われているので、定義していきます。app/controllers/articles_controller.rbdef create endこれでもう一度テストを実行して全て通ることを確認します。
テストが通ったということはきちんと認証が効いていることを表しています。では、createアクションを実装するためにテストを書いていきます。
spec/controllers/articles_controller_spec.rbcontext 'when authorized' do let(:access_token) { create :access_token } before { request.headers['authorization'] = "Bearer #{access_token.token}" } context 'when invalid parameters provided' do let(:invalid_attributes) do { data: { attributes: { title: '', content: '', } } } end subject { post :create, params: invalid_attributes } it 'should return 422 status code' do subject expect(response).to have_http_status(:unprocessable_entity) end it 'should return proper error json' do subject expect(json['errors']).to include( { "source" => { "pointer" => "/data/attributes/title" }, "detail" => "can't be blank" }, { "source" => {"pointer" => "/data/attributes/content"}, "detail" => "can't be blank" }, { "source" => {"pointer" => "/data/attributes/slug"}, "detail" => "can't be blank" } ) end end context 'when success request sent' do end endテストを追加しました。いっぺんにたくさん追加しましたが、一つ一つは既にやって来たことと被っている部分も多いです。
追加したテストは、
when authorizedなので、認証は成功した場合、をテストして来ます。テストしていく項目はそれぞれ、
when invalid parameters provided
should return 422 status code
should return proper error jsonを追加しています。parameterが正しい場合は後で書きます。
parameterがからの場合、can't be blankが返ってくることを期待しています。
sourceのpointerはどこでエラーが出ているのかを示しています。今回は全てをからの文字列にしているので、全てからcan't be blankが返ってくることを期待しています。テストを実行します。二つテストが失敗します。
expected the response to have status code :unprocessable_entity (422) but it was :no_content (204)一つ目は、unprocessable(処理ができない)というレスポンスが返ってくることを期待していますが、no_contentが帰って来ています。no_contentはcreateaが正常に実行された時に返したいので、後で修正します。
unexpected token at ''二つ目はJSON.parseはからの文字列ではエラーが出てしまうので、そのエラーです。
では、controllerに実装をしていき、エラーを解消していきます。
app/controllers/articles_controller.rbdef create article = Article.new(article_params) if article.valid? #we will figure that out else render json: article, adapter: :json_api, serializer: ActiveModel::Serializer::ErrorSerializer, status: :unprocessable_entity end end private def article_params ActionController::Parameters.new endActionController::Parametersのインスタンスを作成しているのは、これによって、StrongParameterが使えるからです。ActionController::Parametersのインスタンスメソッドである、permitや、requireが使えるようになります。permitやrequireを使えば、もしも形式的に期待しているものと違ったり、違うkeyで何かparameterが送られて来た時に、その不要な部分を切り捨てる事ができます。
renderにadapterを指定していますが、これは形式を指定しています。このadapterを指定しなかった場合は、defaultでattributesというものが指定されています。今回は、json_apiという方を使っています。以下はその違いを例で表示しています。Railsのactive_model_serializerについて学ぶ100DaysOfCodeチャレンジ10日目(Day10:#100DaysOfCode)からコピーさせてもらいました。
attributes
[
    {
        "id": 1,
        "name": "中島 光",
        "email": "rhianna_walsh@maggio.net",
        "birthdate": "2016-05-02",
        "birthday": "2016/05/02"
    }
  ]
}
json_api
{
    "data": [
        {
            "id": "1",
            "type": "contacts",
            "attributes": {
                "name": "中島 光",
                "email": "rhianna_walsh@maggio.net",
                "birthdate": "2016-05-02",
                "birthday": "2016/05/02"
            }
        }
   ]
}
今回はapiに適しているjson_apiを使います。
テストを実行し、通る事を確認します。
次にparameterが正しい場合のテストを書いていきます。
spec/controllers/articles_controller_spec.rbcontext 'when success request sent' do let(:access_token) { create :access_token } before { request.headers['authorization'] = "Bearer #{access_token.token}" } let(:valid_attributes) do { 'data' => { 'attributes' => { 'title' => 'Awesome article', 'content' => 'Super content', 'slug' => 'awesome-article', } } } end subject { post :create, params: valid_attributes } it 'should have 201 status code' do subject expect(response).to have_http_status(:created) end it 'should have proper json body' do subject expect(json_data['attributes']).to include( valid_attributes['data']['attributes'] ) end it 'should create article' do expect { subject }.to change{ Article.count }.by(1) end end正しいtokenと、正しいparameterを入れています。これでテストを実行します。
expected the response to have status code :created (201) but it was :unprocessable_entity (422)

undefined method `[]' for nil:NilClass

`Article.count` to have changed by 1, but was changed by 0
三つのテストがそれぞれこのように失敗すると思います。
これらは正しい失敗をしているので、実際にただしいparameterの場合のcontrollerの実装をしていきます。app/controllers/articles_controller.rbdef create article = Article.new(article_params) article.save! render json: article, status: :created rescue render json: article, adapter: :json_api, serializer: ActiveModel::Serializer::ErrorSerializer, status: :unprocessable_entity end private def article_params params.requrie(:data).require(:attributes). permit(:title, :content, :slug) || ActionController::Parameters.new end次にcreateをこのように編集していきます。
rescueを用いて、エラーが出た時に、renderでエラーを飛ばすようにしています。article_paramsでは、
:dataの中の:attributesの中の:title,:content,:slugしか取得しないというような条件を設けることで、この指定された形式以外では全て弾くようにしています。これでテストを実行すると全て通ります。
さらに一つリファクタリングをします。
app/controllers/articles_controller.rbrescue render json: article, adapter: :json_api, serializer: ActiveModel::Serializer::ErrorSerializer, status: :unprocessable_entity endこの
ActiveModel::Serializer::ErrorSerializer,が長いので、これを他の場所で違うクラスに継承して、短く記述できるようにします。
app/serializers/error_serializer.rbを作成しますapp/serializers/error_serializer.rbclass ErrorSerializer < ActiveModel::Serializer::ErrorSerializer; endこのように継承させます。
app/controllers/articles_controller.rbrescue render json: article, adapter: :json_api, serializer: ErrorSerializer, status: :unprocessable_entity endそして、先ほどの長い記述をすっきりさせる事ができます。
一応テストを実行して、失敗していないかを確認します。これでarticleをcreateするアクションの実装は完了です。
updateアクション
updateエンドポイント追加
ではエンドポイントの追加から再びしていきます。まずはテストを書いていきます。
spec/routing/articles_spec.rbit 'should route articles show' do expect(patch '/articles/1').to route_to('articles#update', id: '1') end毎回のようにエンドポイントのテストを書いていきます。showアクションはhttpリクエストが、patchもしくはputなので、そのどちらかを使います。
テストを実行して、正しくエラーが出ることを確認します。
config/routes.rbresources :articles, only: [:index, :show, :create, :update]updateを追加して、テストが通ることを確認します。
updateアクション追加
では次にcontroller#updateアクションのテストを書いていきます。
spec/controllers/articles_controller_spec.rbdescribe '#update' do let(:article) { create :article } subject { patch :update, params: { id: article.id } } context 'when no code provided' do it_behaves_like 'forbidden_requests' end context 'when invalid code provided' do before { request.headers['authorization'] = 'Invalid token' } it_behaves_like 'forbidden_requests' end context 'when authorized' do let(:access_token) { create :access_token } before { request.headers['authorization'] = "Bearer #{access_token.token}" } context 'when invalid parameters provided' do let(:invalid_attributes) do { data: { attributes: { title: '', content: '', } } } end it 'should return 422 status code' do subject expect(response).to have_http_status(:unprocessable_entity) end it 'should return proper error json' do subject expect(json['errors']).to include( { "source" => { "pointer" => "/data/attributes/title" }, "detail" => "can't be blank" }, { "source" => {"pointer" => "/data/attributes/content"}, "detail" => "can't be blank" }, { "source" => {"pointer" => "/data/attributes/slug"}, "detail" => "can't be blank" } ) end end context 'when success request sent' do let(:access_token) { create :access_token } before { request.headers['authorization'] = "Bearer #{access_token.token}" } let(:valid_attributes) do { 'data' => { 'attributes' => { 'title' => 'Awesome article', 'content' => 'Super content', 'slug' => 'awesome-article', } } } end subject { post :create, params: valid_attributes } it 'should have 201 status code' do subject expect(response).to have_http_status(:created) end it 'should have proper json body' do subject expect(json_data['attributes']).to include( valid_attributes['data']['attributes'] ) end it 'should create article' do expect { subject }.to change{ Article.count }.by(1) end end end endupdateアクションがcreateアクションと違う部分は、リクエストの種類と既にデータベースにupdateの
対象となるarticleがある、という状況のみなので、最初にarticleを作成しているところと、リクエストを定義している部分以外はcreateのテストをコピーして来ているだけです。これでテストを実行します。
The action 'update' could not be found for ArticlesControllerこのようなエラーが出ると思います。なので、updateを実際に定義していきます。
app/controllers/articles_controller.rbdef update article = Article.find(params[:id]) article.update_attributes!(article_params) render json: article, status: :ok rescue render json: article, adapter: :json_api, serializer: ErrorSerializer, status: :unprocessable_entity endもはや目新しいことはないので、説明は割愛します。
これでテストを実行して全て通ることを確認します。
createとupdateの違いさえわかっていればほとんど違いがないという事がわかると思います。そして、テストもほとんど同じものを使い回す事ができます。しかし、ここで少しだけ問題があります。それは、リクエスト次第で、誰のarticleでもupdateできてしまいます。勝手にupdateされては困ります。なのでそこを修正していきます。
どのように修正していくかというと、現時点、userとarticleが関連性を持っていないために、起きている問題なので、userとarticleにassociationを追加していきます。
その前にassociationを設定して、期待する値が返ってくることをテストしていきます。
spec/controllers/articles_controller_spec.rbdescribe '#update' do + let(:user) { create :user } let(:article) { create :article } + let(:access_token) { user.create_access_token } subject { patch :update, params: { id: article.id } } @ -140,8 +142,17 @@ describe ArticlesController do it_behaves_like 'forbidden_requests' end + context 'when trying to update not owned article' do + let(:other_user) { create :user } + let(:other_article) { create :article, user: other_user } + + subject { patch :update, params: { id: other_article.id } } + before { request.headers['authorization'] = "Bearer #{access_token.token}" } + + it_behaves_like 'forbidden_requests' + end context 'when authorized' do - let(:access_token) { create :access_token } before { request.headers['authorization'] = "Bearer #{access_token.token}" } context 'when invalid parameters provided' do let(:invalid_attributes) doこのようにテストを追加しました。userと繋がったarticleを作り、認証までしています。
新しく追加したテスト項目で何をしているかというと、他のuserのarticleをupdateしようとした時にちゃんとforbidden_requestsが返ってくるかどうかを確認しています。
これでテストを実行すると
undefined method user=というようなメッセージで失敗します。これはアソシエーションができていない証拠なので、次にアソシエーションを設定していきます。
app/models/article.rbbelongs_to :userapp/models/user.rbhas_many :articles, dependent: :destroyそして、二つのモデルをつなげるためにはarticleモデルにuser_idを持たせる必要があるので、追加します。
$ rails g migration AddUserToArticles user:references

$ rails db:migrate
これでアソシエーション自体は実装する事ができました。なので、それを使って、controllerの記述を変更していきます。
app/controllers/articles_controller.rbdef update article = current_user.articles.find(params[:id]) article.update_attributes!(article_params) render json: article, status: :ok rescue ActiveRecord::RecordNotFound authorization_error rescue render json: article, adapter: :json_api, serializer: ErrorSerializer, status: :unprocessable_entity end記述で変わったところはfindするuserをcurrent_userで呼び出しているところです。これにより、ログインしているユーザーのみからfindする事ができます。
そして、指定されたidがcurrent_userのarticleになかった場合ActiveRecord::RecordNotFoundがraiseされるので、その時ようにrescueして、認証専用のauthorization_errorを出すようにしています。また、createでも、誰のarticleをcreateするというふうに記述し、user_idをarticle
に持たせたいので、少し変更を加えます。app/controllers/articles_controller.rbdef create - article = Article.new(article_params) + article = current_user.articles.build(article_params)そして、factorybotにもアソシエーションの記述を足していきます。
spec/factories/articles.rbFactoryBot.define do factory :article do sequence(:title) { |n| "My article #{n}"} sequence(:content) { |n| "The content of article #{n}"} sequence(:slug) { |n| "article-#{n}"} association :user end end
association :model_name
とすると、自動的にモデルのidを定義してくれます。これでテストを実行すると通ると思います。
次はdestroyアクションに移っていきます。destroyアクション
destroyエンドポイント追加
まずはエンドポイントを追加するためにテストを書いていきます。
spec/routing/articles_spec.rbit 'should route articles destroy' do expect(delete '/articles/1').to route_to('articles#destroy', id: '1') endテストを実行すると以下のメッセージが出ます
No route matches "/articles/1"なので、ルーティングを編集していきます。
config/routes.rbresources :articlesonlyオプションで指定せずに全てを設定します。
これでルーティングのテストは通ります。次にcontrollerのテストを追加します。
spec/controllers/articles_controller_spec.rbdescribe '#delete' do let(:user) { create :user } let(:article) { create :article, user_id: user.id } let(:access_token) { user.create_access_token } subject { delete :destroy, params: { id: article.id } } context 'when no code provided' do it_behaves_like 'forbidden_requests' end context 'when invalid code provided' do before { request.headers['authorization'] = 'Invalid token' } it_behaves_like 'forbidden_requests' end context 'when trying to remove not owned article' do let(:other_user) { create :user } let(:other_article) { create :article, user: other_user } subject { delete :destroy, params: { id: other_article.id } } before { request.headers['authorization'] = "Bearer #{access_token.token}" } it_behaves_like 'forbidden_requests' end context 'when authorized' do before { request.headers['authorization'] = "Bearer #{access_token.token}" } it 'should have 204 status code' do subject expect(response).to have_http_status(:no_content) end it 'should have empty json body' do subject expect(response.body).to be_blank end it 'should destroy the article' do article expect{ subject }.to change{ user.articles.count }.by(-1) end end endこのテストのコードはほとんどがupdateのテストをコピーして使いまわしています。
内容は特に新しいことはありません。テストを実行します。
The action 'destroy' could not be found for ArticlesControllerdestroyアクションはまだ定義していないので、このエラーが正しいです。ではcontroller
を実装していきます。destroyアクション追加
app/controllers/articles_controller.rbdef destroy article = current_user.articles.find(params[:id]) article.destroy head :no_content rescue authorization_error end単純にcurrent_userの中の指定されたarticleをdestroyをしています。
これで、テストを実行します。
これで通ったら、全てが終了です。長い間お付き合いいただきありがとうございました!
- 投稿日:2020-06-04T13:48:58+09:00
RSpecによるTDDでRailsAPIを実装してみた。part3 -認証ありのアクション実装-
はじめに
この記事はpart3となります。もしも、part1, part2を見られていない方はそちらからご覧ください。(すごく長いです)
↓part1
https://qiita.com/yoshi_4/items/6c9f3ced0eb20131903d
↓part2
https://qiita.com/yoshi_4/items/963bd1f5397caf8d7d67このpart3ではpart2で実装したuser認証を使って、createアクションなどの認証をしている場合のみに使えるアクションを実装していきます。今回のゴールはcreate, update, destroyアクションを実装する事です。では初めていきます。
createアクション
createエンドポイント追加
まずは、エンドポイントを追加していきます。そしてその前に一旦テストを書きます。
spec/routing/articles_spec.rbit 'should route articles create' do expect(post '/articles').to route_to('articles#create') endcreateアクションははhttpリクエストがpostなので、getではなくpostで書いていきます。
$ bundle exec rspec spec/routing/articles_spec.rb
No route matches "/articles"というふうに出るので、routingを追加していきます
エンドポイント実装
config/routes.rbresources :articles, only: [:index, :show, :create]$ bundle exec rspec spec/routing/articles_spec.rbテストを実行して通ることを確認します。
そして、次はcontrollerのテストを書いていきます。
createアクション実装
spec/controllers/articles_controller_spec.rbdescribe '#create' do subject { post :create } end endこの記述を末尾に追加します。
そして、part2で定義したforbidden_requestsを使って認証がうまくいかないときのテストも書いていきます
spec/controllers/articles_controller_spec.rbdescribe '#create' do subject { post :create } context 'when no code provided' do it_behaves_like 'forbidden_requests' end context 'when invalid code provided' do before { request.headers['authorization'] = 'Invalid token' } it_behaves_like 'forbidden_requests' end context 'when invalid parameters provided' do end endこのforbidden_rquestsでは403が返ってくることを期待しているテストを実行します。
$ rspec spec/controllers/articles_controller_spec.rbすると以下のようなメッセージが返って来ます
The action 'create' could not be found for ArticlesController
createアクションが見つからないというふうに言われているので、定義していきます。app/controllers/articles_controller.rbdef create endこれでもう一度テストを実行して全て通ることを確認します。
テストが通ったということはきちんと認証が効いていることを表しています。では、createアクションを実装するためにテストを書いていきます。
spec/controllers/articles_controller_spec.rbcontext 'when authorized' do let(:access_token) { create :access_token } before { request.headers['authorization'] = "Bearer #{access_token.token}" } context 'when invalid parameters provided' do let(:invalid_attributes) do { data: { attributes: { title: '', content: '', } } } end subject { post :create, params: invalid_attributes } it 'should return 422 status code' do subject expect(response).to have_http_status(:unprocessable_entity) end it 'should return proper error json' do subject expect(json['errors']).to include( { "source" => { "pointer" => "/data/attributes/title" }, "detail" => "can't be blank" }, { "source" => {"pointer" => "/data/attributes/content"}, "detail" => "can't be blank" }, { "source" => {"pointer" => "/data/attributes/slug"}, "detail" => "can't be blank" } ) end end context 'when success request sent' do end endテストを追加しました。いっぺんにたくさん追加しましたが、一つ一つは既にやって来たことと被っている部分も多いです。
追加したテストは、
when authorizedなので、認証は成功した場合、をテストして来ます。テストしていく項目はそれぞれ、
when invalid parameters provided
should return 422 status code
should return proper error jsonを追加しています。parameterが正しい場合は後で書きます。
parameterがからの場合、can't be blankが返ってくることを期待しています。
sourceのpointerはどこでエラーが出ているのかを示しています。今回は全てをからの文字列にしているので、全てからcan't be blankが返ってくることを期待しています。テストを実行します。二つテストが失敗します。
expected the response to have status code :unprocessable_entity (422) but it was :no_content (204)一つ目は、unprocessable(処理ができない)というレスポンスが返ってくることを期待していますが、no_contentが帰って来ています。no_contentはcreateaが正常に実行された時に返したいので、後で修正します。
unexpected token at ''二つ目はJSON.parseはからの文字列ではエラーが出てしまうので、そのエラーです。
では、controllerに実装をしていき、エラーを解消していきます。
app/controllers/articles_controller.rbdef create article = Article.new(article_params) if article.valid? #we will figure that out else render json: article, adapter: :json_api, serializer: ActiveModel::Serializer::ErrorSerializer, status: :unprocessable_entity end end private def article_params ActionController::Parameters.new endActionController::Parametersのインスタンスを作成しているのは、これによって、StrongParameterが使えるからです。ActionController::Parametersのインスタンスメソッドである、permitや、requireが使えるようになります。permitやrequireを使えば、もしも形式的に期待しているものと違ったり、違うkeyで何かparameterが送られて来た時に、その不要な部分を切り捨てる事ができます。
renderにadapterを指定していますが、これは形式を指定しています。このadapterを指定しなかった場合は、defaultでattributesというものが指定されています。今回は、json_apiという方を使っています。以下はその違いを例で表示しています。Railsのactive_model_serializerについて学ぶ100DaysOfCodeチャレンジ10日目(Day10:#100DaysOfCode)からコピーさせてもらいました。
attributes
[
    {
        "id": 1,
        "name": "中島 光",
        "email": "rhianna_walsh@maggio.net",
        "birthdate": "2016-05-02",
        "birthday": "2016/05/02"
    }
  ]
}
json_api
{
    "data": [
        {
            "id": "1",
            "type": "contacts",
            "attributes": {
                "name": "中島 光",
                "email": "rhianna_walsh@maggio.net",
                "birthdate": "2016-05-02",
                "birthday": "2016/05/02"
            }
        }
   ]
}
今回はapiに適しているjson_apiを使います。
テストを実行し、通る事を確認します。
次にparameterが正しい場合のテストを書いていきます。
spec/controllers/articles_controller_spec.rbcontext 'when success request sent' do let(:access_token) { create :access_token } before { request.headers['authorization'] = "Bearer #{access_token.token}" } let(:valid_attributes) do { 'data' => { 'attributes' => { 'title' => 'Awesome article', 'content' => 'Super content', 'slug' => 'awesome-article', } } } end subject { post :create, params: valid_attributes } it 'should have 201 status code' do subject expect(response).to have_http_status(:created) end it 'should have proper json body' do subject expect(json_data['attributes']).to include( valid_attributes['data']['attributes'] ) end it 'should create article' do expect { subject }.to change{ Article.count }.by(1) end end正しいtokenと、正しいparameterを入れています。これでテストを実行します。
expected the response to have status code :created (201) but it was :unprocessable_entity (422)

undefined method `[]' for nil:NilClass

`Article.count` to have changed by 1, but was changed by 0
三つのテストがそれぞれこのように失敗すると思います。
これらは正しい失敗をしているので、実際にただしいparameterの場合のcontrollerの実装をしていきます。app/controllers/articles_controller.rbdef create article = Article.new(article_params) article.save! render json: article, status: :created rescue render json: article, adapter: :json_api, serializer: ActiveModel::Serializer::ErrorSerializer, status: :unprocessable_entity end private def article_params params.requrie(:data).require(:attributes). permit(:title, :content, :slug) || ActionController::Parameters.new end次にcreateをこのように編集していきます。
rescueを用いて、エラーが出た時に、renderでエラーを飛ばすようにしています。article_paramsでは、
:dataの中の:attributesの中の:title,:content,:slugしか取得しないというような条件を設けることで、この指定された形式以外では全て弾くようにしています。これでテストを実行すると全て通ります。
さらに一つリファクタリングをします。
app/controllers/articles_controller.rbrescue render json: article, adapter: :json_api, serializer: ActiveModel::Serializer::ErrorSerializer, status: :unprocessable_entity endこの
ActiveModel::Serializer::ErrorSerializer,が長いので、これを他の場所で違うクラスに継承して、短く記述できるようにします。
app/serializers/error_serializer.rbを作成しますapp/serializers/error_serializer.rbclass ErrorSerializer < ActiveModel::Serializer::ErrorSerializer; endこのように継承させます。
app/controllers/articles_controller.rbrescue render json: article, adapter: :json_api, serializer: ErrorSerializer, status: :unprocessable_entity endそして、先ほどの長い記述をすっきりさせる事ができます。
一応テストを実行して、失敗していないかを確認します。これでarticleをcreateするアクションの実装は完了です。
updateアクション
updateエンドポイント追加
ではエンドポイントの追加から再びしていきます。まずはテストを書いていきます。
spec/routing/articles_spec.rbit 'should route articles show' do expect(patch '/articles/1').to route_to('articles#update', id: '1') end毎回のようにエンドポイントのテストを書いていきます。showアクションはhttpリクエストが、patchもしくはputなので、そのどちらかを使います。
テストを実行して、正しくエラーが出ることを確認します。
config/routes.rbresources :articles, only: [:index, :show, :create, :update]updateを追加して、テストが通ることを確認します。
updateアクション追加
では次にcontroller#updateアクションのテストを書いていきます。
spec/controllers/articles_controller_spec.rbdescribe '#update' do let(:article) { create :article } subject { patch :update, params: { id: article.id } } context 'when no code provided' do it_behaves_like 'forbidden_requests' end context 'when invalid code provided' do before { request.headers['authorization'] = 'Invalid token' } it_behaves_like 'forbidden_requests' end context 'when authorized' do let(:access_token) { create :access_token } before { request.headers['authorization'] = "Bearer #{access_token.token}" } context 'when invalid parameters provided' do let(:invalid_attributes) do { data: { attributes: { title: '', content: '', } } } end it 'should return 422 status code' do subject expect(response).to have_http_status(:unprocessable_entity) end it 'should return proper error json' do subject expect(json['errors']).to include( { "source" => { "pointer" => "/data/attributes/title" }, "detail" => "can't be blank" }, { "source" => {"pointer" => "/data/attributes/content"}, "detail" => "can't be blank" }, { "source" => {"pointer" => "/data/attributes/slug"}, "detail" => "can't be blank" } ) end end context 'when success request sent' do let(:access_token) { create :access_token } before { request.headers['authorization'] = "Bearer #{access_token.token}" } let(:valid_attributes) do { 'data' => { 'attributes' => { 'title' => 'Awesome article', 'content' => 'Super content', 'slug' => 'awesome-article', } } } end subject { post :create, params: valid_attributes } it 'should have 201 status code' do subject expect(response).to have_http_status(:created) end it 'should have proper json body' do subject expect(json_data['attributes']).to include( valid_attributes['data']['attributes'] ) end it 'should create article' do expect { subject }.to change{ Article.count }.by(1) end end end endupdateアクションがcreateアクションと違う部分は、リクエストの種類と既にデータベースにupdateの
対象となるarticleがある、という状況のみなので、最初にarticleを作成しているところと、リクエストを定義している部分以外はcreateのテストをコピーして来ているだけです。これでテストを実行します。
The action 'update' could not be found for ArticlesControllerこのようなエラーが出ると思います。なので、updateを実際に定義していきます。
app/controllers/articles_controller.rbdef update article = Article.find(params[:id]) article.update_attributes!(article_params) render json: article, status: :ok rescue render json: article, adapter: :json_api, serializer: ErrorSerializer, status: :unprocessable_entity endもはや目新しいことはないので、説明は割愛します。
これでテストを実行して全て通ることを確認します。
createとupdateの違いさえわかっていればほとんど違いがないという事がわかると思います。そして、テストもほとんど同じものを使い回す事ができます。しかし、ここで少しだけ問題があります。それは、リクエスト次第で、誰のarticleでもupdateできてしまいます。勝手にupdateされては困ります。なのでそこを修正していきます。
どのように修正していくかというと、現時点、userとarticleが関連性を持っていないために、起きている問題なので、userとarticleにassociationを追加していきます。
その前にassociationを設定して、期待する値が返ってくることをテストしていきます。
spec/controllers/articles_controller_spec.rbdescribe '#update' do + let(:user) { create :user } let(:article) { create :article } + let(:access_token) { user.create_access_token } subject { patch :update, params: { id: article.id } } @ -140,8 +142,17 @@ describe ArticlesController do it_behaves_like 'forbidden_requests' end + context 'when trying to update not owned article' do + let(:other_user) { create :user } + let(:other_article) { create :article, user: other_user } + + subject { patch :update, params: { id: other_article.id } } + before { request.headers['authorization'] = "Bearer #{access_token.token}" } + + it_behaves_like 'forbidden_requests' + end context 'when authorized' do - let(:access_token) { create :access_token } before { request.headers['authorization'] = "Bearer #{access_token.token}" } context 'when invalid parameters provided' do let(:invalid_attributes) doこのようにテストを追加しました。userと繋がったarticleを作り、認証までしています。
新しく追加したテスト項目で何をしているかというと、他のuserのarticleをupdateしようとした時にちゃんとforbidden_requestsが返ってくるかどうかを確認しています。
これでテストを実行すると
undefined method user=というようなメッセージで失敗します。これはアソシエーションができていない証拠なので、次にアソシエーションを設定していきます。
app/models/article.rbbelongs_to :userapp/models/user.rbhas_many :articles, dependent: :destroyそして、二つのモデルをつなげるためにはarticleモデルにuser_idを持たせる必要があるので、追加します。
$ rails g migration AddUserToArticles user:references

$ rails db:migrate
これでアソシエーション自体は実装する事ができました。なので、それを使って、controllerの記述を変更していきます。
app/controllers/articles_controller.rbdef update article = current_user.articles.find(params[:id]) article.update_attributes!(article_params) render json: article, status: :ok rescue ActiveRecord::RecordNotFound authorization_error rescue render json: article, adapter: :json_api, serializer: ErrorSerializer, status: :unprocessable_entity end記述で変わったところはfindするuserをcurrent_userで呼び出しているところです。これにより、ログインしているユーザーのみからfindする事ができます。
そして、指定されたidがcurrent_userのarticleになかった場合ActiveRecord::RecordNotFoundがraiseされるので、その時ようにrescueして、認証専用のauthorization_errorを出すようにしています。また、createでも、誰のarticleをcreateするというふうに記述し、user_idをarticle
に持たせたいので、少し変更を加えます。app/controllers/articles_controller.rbdef create - article = Article.new(article_params) + article = current_user.articles.build(article_params)そして、factorybotにもアソシエーションの記述を足していきます。
spec/factories/articles.rbFactoryBot.define do factory :article do sequence(:title) { |n| "My article #{n}"} sequence(:content) { |n| "The content of article #{n}"} sequence(:slug) { |n| "article-#{n}"} association :user end end
association :model_name
とすると、自動的にモデルのidを定義してくれます。これでテストを実行すると通ると思います。
次はdestroyアクションに移っていきます。destroyアクション
destroyエンドポイント追加
まずはエンドポイントを追加するためにテストを書いていきます。
spec/routing/articles_spec.rbit 'should route articles destroy' do expect(delete '/articles/1').to route_to('articles#destroy', id: '1') endテストを実行すると以下のメッセージが出ます
No route matches "/articles/1"なので、ルーティングを編集していきます。
config/routes.rbresources :articlesonlyオプションで指定せずに全てを設定します。
これでルーティングのテストは通ります。次にcontrollerのテストを追加します。
spec/controllers/articles_controller_spec.rbdescribe '#delete' do let(:user) { create :user } let(:article) { create :article, user_id: user.id } let(:access_token) { user.create_access_token } subject { delete :destroy, params: { id: article.id } } context 'when no code provided' do it_behaves_like 'forbidden_requests' end context 'when invalid code provided' do before { request.headers['authorization'] = 'Invalid token' } it_behaves_like 'forbidden_requests' end context 'when trying to remove not owned article' do let(:other_user) { create :user } let(:other_article) { create :article, user: other_user } subject { delete :destroy, params: { id: other_article.id } } before { request.headers['authorization'] = "Bearer #{access_token.token}" } it_behaves_like 'forbidden_requests' end context 'when authorized' do before { request.headers['authorization'] = "Bearer #{access_token.token}" } it 'should have 204 status code' do subject expect(response).to have_http_status(:no_content) end it 'should have empty json body' do subject expect(response.body).to be_blank end it 'should destroy the article' do article expect{ subject }.to change{ user.articles.count }.by(-1) end end endこのテストのコードはほとんどがupdateのテストをコピーして使いまわしています。
内容は特に新しいことはありません。テストを実行します。
The action 'destroy' could not be found for ArticlesControllerdestroyアクションはまだ定義していないので、このエラーが正しいです。ではcontroller
を実装していきます。destroyアクション追加
app/controllers/articles_controller.rbdef destroy article = current_user.articles.find(params[:id]) article.destroy head :no_content rescue authorization_error end単純にcurrent_userの中の指定されたarticleをdestroyをしています。
これで、テストを実行します。
これで通ったら、全てが終了です。長い間お付き合いいただきありがとうございました!
- 投稿日:2020-06-04T12:49:34+09:00
Azure Static Web Appsに骨董品のMiddlemanで作られたページをデプロイしてみた
はじめに
前置き
この記事はスライド形式で公開することを前提とするため、箇条書き中心になっております。
なお、この見解は私個人の見解で、所属する会社の見解とは一致しないことをご承知ください。
自己紹介
このあたりを見ていただけると助かります。
- 就職氷河期(1981年)生まれの
- 多分カウボーイエンジニア
- アパレル系の特例子会社でC#開発やってます
- そのほかいろんな事やってます
- PyCon JPのスタッフも……
- 同人サークル「恢徳堂」主筆など物書きも
主に使う「武器」
- C#
- でもASP.NET Coreは実務では使えていない
- SQL
- Transact-SQLメイン
- JavaScript/TypeScript
- Python
- Ruby
- テキスト
さて本題に入ります
Azure Static Web Apps
- Build 2020でアナウンスされた新サービス
- 静的なWebサイトとAPIを公開出来る
- 静的ページの方はCDN使っているらしい
- APIはAzure FunctionsでJavaScript
- LinuxのNode.jsで動いているらしい
- GitHub Actionsと 密接に 結びついたデプロイ
- JAMstackのほか、HugoやJekyllなどにも対応
Middleman
- Ruby製静的サイトジェネレーター
- Railsわかる人なら使いやすい
- 現在のバージョンは4.3.6
- ただし私のページではver.4系にバージョンアップ出来ていない
- 自社のページでも使っている
私のページ
- 骨董品 のMiddlemanを使って作られている
- サポートの終わったver.3系
- 更新もあまりされていない
- テンプレートは5t111111/middleman-blog-drops-templateの色を変えて使用
- このテンプレート、私が使ったときはNode.jsはFont Awesomeを取ってくるのに使用するのみだった
- 今ではbabelを使っている模様
ホスティングにどこを使っているの?
- 現状はNetlifyでホストしている
- ビルドはNetlifyのCI/CD環境を使用
- 設定もYAMLいらず
- コマンドを指定するのみ
- しかもAzure Static Web Appsより速い
- もともとはGitHub Pagesでデプロイしていた
- ビルドはローカル
- これを機にAzure Static Web Appsも試そう
- だけど一筋縄ではいかない
Azure Static Web Appsの設定
詳しくはMS公式ドキュメント参照。
これ、GitHub Actionsほぼそのまま。
- AzureポータルでAzure Static Web Appsを作成
- サブスクリプションと名前、リージョンを決める
- GitHubアカウントとAzureアカウントを連携する
- GitHubリポジトリを連携する
Azure Static Web Appsのビルド設定
私は以下の設定を採用
設定項目 値 App location /Api location 今回は入力しない App artifact location buildその後、リポジトリに追加されたYAMLを編集する。
YAMLの編集
YAMLの内容はGitHubの当該ファイルのページを参照。
ポイントは以下の通り。
- RubyとNode.jsのセットアップを追加。
- ビルドタスクを追加
- デプロイタスクをデプロイのみ行う方法に変更
だが、Netlifyでは動くのにGitHubでは動かない!
どこがまずかったのか
- Font Awesome 4.7.0になぜかスクリーンリーダー向けの増えていたため
package.jsonにnpm run buildの設定がなかった
対処
- Font Awesomeをver.5系のFree版にアップデート
npm run buildの設定を追加
- ただし 何もしない
- ビルドはデプロイ前に行う形とする
その結果
実際にAzure Static Web Appsにデプロイできました!
ただしデプロイはNetlifyの方が速かったです。
なので、今後もNetlifyで運用を続ける予定です。
そういえばリニューアルは?
PyCon JP 2019で発表したCMS + JAMstack化は現在頓挫中です。
余裕ができたらこちらの方も計画を進めます。
ご清聴ありがとうございました
- 投稿日:2020-06-04T11:54:28+09:00
【Rails】turbolinksを無効化する方法
開発環境
・Ruby: 2.5.7
・Rails: 5.2.4
・Vagrant: 2.2.7
・VirtualBox: 6.1
・OS: macOS Catalina完全に無効化する方法
1.
Gemを無効化Gemfile# コメントアウトする # gem 'turbolinks', '~> 5'ターミナル$ bundle update2.
application.jsを編集
=を削除する。application.js// 変更前 //= require turbolinks // 変更後 // require turbolinks3.
application.html.slimを編集
'data-turbolinks-track': 'reload'を削除する。application.html.slim/ 変更前 = stylesheet_link_tag 'application', media: 'all', 'data-turbolinks-track': 'reload' = javascript_include_tag 'application', 'data-turbolinks-track': 'reload' / 変更後 = stylesheet_link_tag 'application', media: 'all' = javascript_include_tag 'application'部分的に無効化する方法
1.JavaScriptを編集する方法
①
~.jsファイルの場合~.js$(document).on('turbolinks:load', function() { // turbolinksを無効化したい処理 });②
~.coffeeファイルの場合~.coffee$(document).on 'turbolinks:load', -> # turbolinksを無効化したい処理2.リンクを編集する方法
①link_toに属性を追加する場合
~html.slim= link_to '', root_path, 'data-turbolinks': false②divで囲う場合
~html.slimdiv data-turbolinks='false' = link_to '', root_path
- 投稿日:2020-06-04T11:23:19+09:00
【Rails】Google Mapに複数マーカーを表示し、クリックしたら吹き出しを出す方法
目標
開発環境
・Ruby: 2.5.7
・Rails: 5.2.4
・Vagrant: 2.2.7
・VirtualBox: 6.1
・OS: macOS Catalina前提
下記実装済み。
・Slim導入
・ログイン機能実装
・Google Map表示
・Gocoding APIで緯度経度を算出実装
1.コントローラーを編集
users_controller.rbdef index @users = User.all gon.users = User.all end2.ビューを編集
users/index.html.slim#map style='height: 500px; width: 500px;' - google_api = "https://maps.googleapis.com/maps/api/js?key=#{ ENV['GOOGLE_MAP_API'] }&callback=initMap".html_safe script{ async src=google_api } javascript: let map; let marker = []; // マーカーを複数表示させたいので、配列化 let infoWindow = []; // 吹き出しを複数表示させたいので、配列化 let markerData = gon.users; // コントローラーで定義したインスタンス変数を変数に代入 function initMap() { geocoder = new google.maps.Geocoder() map = new google.maps.Map(document.getElementById('map'), { center: { lat: 35.6585, lng: 139.7486 }, // 東京タワーを中心に表示させている zoom: 12, }); // 繰り返し処理でマーカーと吹き出しを複数表示させる for (var i = 0; i < markerData.length; i++) { let id = markerData[i]['id'] // 各地点の緯度経度を算出 markerLatLng = new google.maps.LatLng({ lat: markerData[i]['latitude'], lng: markerData[i]['longitude'] }); // 各地点のマーカーを作成 marker[i] = new google.maps.Marker({ position: markerLatLng, map: map }); // 各地点の吹き出しを作成 infoWindow[i] = new google.maps.InfoWindow({ // 吹き出しの内容 content: markerData[i]['address'] }); // マーカーにクリックイベントを追加 markerEvent(i); } } // マーカーをクリックしたら吹き出しを表示 function markerEvent(i) { marker[i].addListener('click', function () { infoWindow[i].open(map, marker[i]); }); }吹き出しの内容ををリンクにしたい場合は下記の様に記述する。
// 各ユーザーのIDを変数化
let id = markerData[i]['id']

infoWindow[i] = new google.maps.InfoWindow({
  // <a>タグでリンクを作成
  content: `<a href='/users/${ id }'>${ markerData[i]['address'] }</a>`
});
注意
turbolinksを無効化しないと地図が切り替わらないので、必ず無効化しておきましょう。

- 投稿日:2020-06-04T08:39:55+09:00
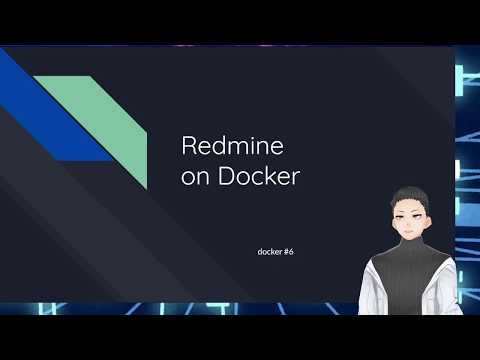
Redmine on Docker
はじめに
本記事は動画( https://youtu.be/-DrdYw8fHwc )で説明に使用している
スライドを記事化したものです。動画と合わせて御覧ください。
※記事化する際に補足説明を加筆しており、内容は動画のスライドと異なります。
※本記事の内容は2020年3月時点の内容となります。OSやミドルウェア、Dockerのバージョンが異なることで記載通りの内容で完了しない場合があります。
ミドルウェア構成
- OS : CentOS 7.8
- Webサービス : Apache 2.4.6
- アプリ言語 : Ruby 2.4
- DBサービス : MariaDB 10.4.3
- Redmine : Redmine 4.1
Dockerfileで下準備
# centos7のイメージを利用する
FROM centos:7
LABEL maintainer=Takemi

SHELL ["/bin/bash", "-o", "pipefail", "-c"]"

# 累積アップデートの実行
RUN yum -y upgrade

#takemiユーザが存在していない場合ユーザ追加する
RUN echo 'make user takemi'
RUN adduser -m takemi;echo "takemi:takemi123" | chpasswd;

#sshのインストール
RUN yum install -y openssh-server
RUN systemctl enable sshd

#Apacheのインストール
RUN yum install -y httpd
RUN systemctl enable httpd

#MariaDBのインストール
RUN curl -sS https://downloads.mariadb.com/MariaDB/mariadb_repo_setup | bash
RUN yum install -y MariaDB-server MariaDB-devel MariaDB-shared
RUN systemctl enable mariadb

#ruby インストール準備
RUN yum -y groupinstall "Development Tools"
RUN yum -y install openssl-devel readline-devel zlib-devel curl-devel libyaml-devel libffi-devel
RUN yum -y install httpd-devel
RUN yum -y install ImageMagick ImageMagick-devel ipa-pgothic-fonts
WORKDIR /root
RUN curl -O https://cache.ruby-lang.org/pub/ruby/2.4/ruby-2.4.1.tar.gz
RUN tar xf ruby-2.4.1.tar.gz
WORKDIR /root/ruby-2.4.1
RUN ./configure --disable-install-doc
RUN make
RUN make install
RUN gem install bundler --no-rdoc --no-ri
> docker build -t redmine .Dockerfileでやってること!
- OSのイメージ構築
- OSのアップデート
- ルートユーザパスワード発行
- 一般ユーザ作成、パスワード発行
- sshのインストール
- Apacheのインストール
- MariaDBのインストール
- Rubyのインストール
DBの設定
DBのrootユーザの追加
root > mysql
mysql > GRANT ALL PRIVILEGES ON *.* TO 'takemi'@'localhost' IDENTIFIED BY 'takemi123' WITH GRANT OPTION;
mysql > FLUSH PRIVILEGES;
※DBのユーザ名とOSのユーザ名を合わせておくと、OSのログインユーザがmysqlコマンドを実行する時にユーザ名指定を省略することができるようになります。
Redmineのインストール
root > cd /var/www
root > svn co https://svn.redmine.org/redmine/branches/4.1-stable redmine-4.1
user > cd redmin-4.1
user > cd config
user > cp configuration.yml.example configuration.yml
user > cp database.yml.example database.yml
user > vi database.yml
    username: takemi
    password: "takemi123"

root > cd /var/www
root > chown -R takemi:takemi redmine-4.1
root > vi /etc/group
    takemi:x:1000:apache

root > cd /var/www/redmine-4.1
root > gem install mysql2 -v '0.5.3' --source 'https://rubygems.org/'
root > bundle install --without development test --path vendor/bundle
root > bundle exec rake generate_secret_token
root > gem install passenger --no-rdoc --no-ri
root > passenger-install-apache2-module --auto
root > passenger-install-apache2-module --snippet
root > vi /etc/httpd/conf.d/redmine.conf
root > systemctl restart httpd

user > mysql -p
    create database redmine default character set utf8;
user > RAILS_ENV=production bundle exec rake db:migrate
user > RAILS_ENV=production REDMINE_LANG=ja bundle exec rake redmine:load_default_data
Redmineのセットアップ
ブラウザでアクセス!
詳しくは動画で!
- 投稿日:2020-06-04T08:39:05+09:00
rbenvでRubyのバージョン切り替え
# 環境
macOS Catalina 10.15.4
rbenv
ruby 2.6.3p62 (2019-04-16 revision 67580) [universal.x86_64-darwin19]現在インストールされているRubyバージョンよりも新しいものを使いたかったのでrbenvにてバージョンを切り替えます。
// rbenv本家にも書いてありますが初期化が必要です。ログイン時に済ませるためbash_profileに書いておきます
$ echo 'eval "$(rbenv init -)"' >> ~/.bash_profile

// rbenvをインストールするとruby-buildは依存関係解決でinstallされた思いますが念のため指定
$ brew install rbenv ruby-build

// install可能なバージョンを一覧
$ rbenv install -l
2.5.8
2.6.6
2.7.1
jruby-9.2.11.1
maglev-1.0.0
mruby-2.1.0
rbx-4.15
truffleruby-20.1.0

// install
$ rbenv install 2.7.1

// この時のrbenv経由のrubyのPATHはそれ以前のものを参照している。つまりこの時点のバージョンは2.6.3
$ rbenv which ruby
/usr/bin/ruby

// rbenvでないrubyの方はちゃんとrbenvのrubyをみている
$ which ruby
/Users/your_account/.rbenv/shims/ruby

// local(今いるディレクトリ)に反映の場合
$ rbenv local 2.7.1

// shimsに反映
$ rbenv rehash

$ rbenv which ruby
/Users/your_account/.rbenv/versions/2.7.1/bin/ruby
以上
- 投稿日:2020-06-04T07:54:32+09:00
Ruby と Python で解く AtCoder ABC133 D 累積和
はじめに
AtCoder Problems の Recommendation を利用して、過去の問題を解いています。
AtCoder さん、AtCoder Problems さん、ありがとうございます。今回のお題
AtCoder Beginner Contest D - Rain Flows into Dams
Difficulty: 945今回のテーマ、累積和
連立方程式を解く問題で、
numpyやscipyのlupライブラリで求めることができます。
但し、競プロらしくそれではTLEになりますので、連立方程式を次のように変形することにより解きます。b1 + b2 = a1 b2 + b3 = a2 b3 + b1 = a3b1 = a1 + -a2 + a3 b2 = a1 + a2 + -a3 b3 = -a1 + a2 + a3 b2 = a1 - a2 + a3 = 2 * a1 - (a1 + a2 - a3) = 2 * a1 - b1Ruby (AC)
ruby.rbn = gets.to_i a = gets.split.map(&:to_i) ans = [0] * n a.each_with_index do |x, i| if i.even? ans[0] += x else ans[0] -= x end end 1.upto(n - 1) do |i| ans[i] = 2 * a[i - 1] - ans[i - 1] end puts ans * ' 'rui.rba.each_with_index do |x, i| if i.even? ans[0] += x else ans[0] -= x end endインデックスによって、加算・減算する特殊な累積和です。
Ruby Matrix(TLE)
TLE.rbrequire 'matrix' n = gets.to_i a = gets.split.map(&:to_i) b = [] n.pred.times do |i| b[i] = [0] * i + [1] * 2 + [0] * (n - i - 2) end b << [1] + [0] * (n - 2) + [1] m = Matrix.rows(b).lup.solve(a) puts (m * 2).to_a.map{|e| e.to_i}.join(' ')
Matrixライブラリのlupを使用した解法ですが、TLEです。Ruby BigDecimal(TLE)
TLE.rbrequire 'bigdecimal' require 'bigdecimal/util' require 'bigdecimal/ludcmp' include LUSolve n = gets.to_i a = gets.chomp.split.map(&:to_d) zero = '0.0'.to_d one = '1.0'.to_d b = [] n.pred.times do |i| b[i] = [zero] * i + [one] * 2 + [zero] * (n - i - 2) end b << [one] + [zero] * (n - 2) + [one] b.flatten! x = lusolve(b, a, ludecomp(b, a.size, zero, one), zero) puts x.map{|e| e.to_i * 2}.join(' ')
LUSolveを使用した解法ですが、TLEです。Python (AC)
python.pyfrom sys import stdin def main(): input = stdin.readline n = int(input()) a = list(map(int, input().split())) ans = [0] * n for i in range(n): if i % 2 == 0: ans[0] += a[i] else: ans[0] -= a[i] for i in range(1, n): ans[i] = 2 * a[i - 1] - ans[i - 1] print(' '.join(map(str, ans))) main()Python numpy(TLE)
TLE.pyfrom sys import stdin def main(): import numpy as np input = stdin.readline n = int(input()) a = [[] for _ in range(n)] for i in range(n - 1): a[i] = [0] * i + [1, 1] + [0] * (n - i - 2) a[n - 1] = [1] + [0] * (n - 2) + [1] A = np.array(a) b = np.array(list(map(int, input().split()))) x = np.linalg.solve(A, b) * 2 print(' '.join(map(str, map(int, x)))) main()
numpyのlinalgライブラリを使用した解法ですが、TLEです。Python scipy(TLE)
TLE.pyfrom sys import stdin def main(): import numpy as np from scipy import linalg input = stdin.readline n = int(input()) a = [[] for _ in range(n)] for i in range(n - 1): a[i] = [0] * i + [1, 1] + [0] * (n - i - 2) a[n - 1] = [1] + [0] * (n - 2) + [1] A = np.array(a) b = np.array(list(map(int, input().split()))) LU = linalg.lu_factor(A) x = linalg.lu_solve(LU, b) * 2 print(' '.join(map(str, map(int, x)))) main()
scipyのlinalgライブラリを使用した解法ですが、TLEです。
Ruby Python コード長 (Byte) 234 382 実行時間 (ms) 130 98 メモリ (KB) 14084 19132 まとめ
- ABC 138 D を解いた
- Ruby に詳しくなった
- Python に詳しくなった
参照したサイト
instance method Matrix#lup
連立一次方程式と線形重回帰をPythonで理解する
- 投稿日:2020-06-04T07:37:17+09:00
rbenvにてreadline, libhistoryがないと言われたときの対処
環境
macOS Catalina 10.15.4
rbenv
ruby 2.6.3p62 (2019-04-16 revision 67580) [universal.x86_64-darwin19]
brew install rbenvの後、バージョン確認やrbenv initした際にエラーが出た。$ rbenv -v dyld: Library not loaded: /usr/local/opt/readline/lib/libreadline.6.dylib Referenced from: /usr/local/bin/bash Reason: image not found Abort trap: 6readlineはhomebrewで依存関係解決でインストールされているのを確認済みだ。
$ ls /usr/local/opt/readline/lib/
libhistory.8.0.dylib   libhistory.a           libreadline.8.0.dylib  libreadline.a          pkgconfig/
libhistory.8.dylib@    libhistory.dylib@      libreadline.8.dylib@   libreadline.dylib@
libreadline.6.dylibからlibhistory.dylibにシンボリックリンクを張って解決できそうなので$ ln -s /usr/local/opt/readline/lib/libreadline.dylib /usr/local/opt/readline/lib/libreadline.6.dylib $ ls /usr/local/opt/readline/lib/ libhistory.8.0.dylib libhistory.a libreadline.6.dylib@ libreadline.8.dylib@ libreadline.dylib@ libhistory.8.dylib@ libhistory.dylib@ libreadline.8.0.dylib libreadline.a pkgconfig/ $ rbenv -v dyld: Library not loaded: /usr/local/opt/readline/lib/libhistory.6.dylib Referenced from: /usr/local/bin/bash Reason: image not found Abort trap: 6readlineのエラーがでなくなったがlibhistoryでも同じことが必要っぽいので
$ ln -s /usr/local/opt/readline/lib/libhistory.dylib /usr/local/opt/readline/lib/libhistory.6.dylib

$ rbenv -v
rbenv 1.1.2
解決しました。
- 投稿日:2020-06-04T01:05:31+09:00
『Ruby on Rails』統合テストにて発生したエラーの解消法
はじめに
統合テストにて、以前までは正常に動作していたコードがエラーを吐き出していました。その原因が意外な所だったので記事として残すことにしました(備忘録でもなんでもないけど)
エラー内容
ターミナルFailures: 1) user ユーザー登録前 会員情報入力ができるか Failure/Error: expect(page).to have_content("お届け先情報入力") Capybara::Ambiguous: Ambiguous match, found 2 elements matching visible xpath "/html" # ./spec/features/user_spec.rb:20:in `block (3 levels) in <top (required)>' 2) user ユーザー登録前 ログインできないこと Failure/Error: expect(page).to have_content("アカウントをお持ちでない方はこちら") Capybara::Ambiguous: Ambiguous match, found 2 elements matching visible xpath "/html" # ./spec/features/user_spec.rb:29:in `block (3 levels) in <top (required)>' 3) user ユーザー登録前 商品出品ボタンを押すとログインページに遷移すること Failure/Error: expect(page).to have_content("アカウントをお持ちでない方はこちら") Capybara::Ambiguous: Ambiguous match, found 2 elements matching visible xpath "/html" # ./spec/features/user_spec.rb:35:in `block (3 levels) in <top (required)>' 4) user ユーザー登録後 ログインできているとヘッダーにマイページが表示されること Failure/Error: expect(page).to have_content "マイページ" Capybara::Ambiguous: Ambiguous match, found 2 elements matching visible xpath "/html" # ./spec/features/user_spec.rb:50:in `block (3 levels) in <top (required)>' 5) user ユーザー登録後 ログアウトができること Failure/Error: expect(page).to have_content "新規会員登録" Capybara::Ambiguous: Ambiguous match, found 2 elements matching visible xpath "/html" # ./spec/features/user_spec.rb:56:in `block (3 levels) in <top (required)>' 6) user ユーザー登録後 商品出品ボタンを押すと出品ページにに遷移するか Failure/Error: expect(page).to have_content("出品画像") Capybara::Ambiguous: Ambiguous match, found 2 elements matching visible xpath "/html" # ./spec/features/user_spec.rb:61:in `block (3 levels) in <top (required)>' 7) Item#create can not save 画像(image)がない場合は登録できないこと Failure/Error: expect(item.errors[:images]).to include("を入力してください") expected [] to include "を入力してください" # ./spec/models/item_spec.rb:33:in `block (4 levels) in <top (required)>'解決策
before
application.html.haml!!! %html %head %meta{content: "text/html; charset=UTF-8", "http-equiv": "Content-Type"}/ %title FreemarketSample68d %script{src: "https://js.pay.jp/", type: "text/javascript"} %meta{:content => "summary_large_image", :name => "twitter:card"}/ %meta{:content => "@yGZqMc5IqNbVsw0", :name => "twitter:site"}/ %meta{:content => "http://52.198.247.0/", :property => "og:url"}/ %meta{:content => "freemarket_sample", :property => "og:title"}/ %meta{:content => "チーム開発用のサンプルです!是非ご覧になってください!", :property => "og:description"}/ %meta{:content => "logo-white.png", :property => "og:image"}/ = favicon_link_tag 'favicon.ico' = csrf_meta_tags = csp_meta_tag = stylesheet_link_tag 'application', media: 'all', 'data-turbolinks-track': 'reload' = javascript_include_tag 'application', 'data-turbolinks-track': 'reload' %body = yieldafter
application.html.haml!!! %html %head %meta{content: "text/html; charset=UTF-8", "http-equiv": "Content-Type"}/ %title FreemarketSample68d %script{src: "https://js.pay.jp/", type: "text/javascript"} %meta{:content => "summary_large_image", :name => "twitter:card"}/ %meta{:content => "@yGZqMc5IqNbVsw0", :name => "twitter:site"}/ %meta{:content => "http://52.198.247.0/", :property => "og:url"}/ %meta{:content => "freemarket_sample", :property => "og:title"}/ %meta{:content => "チーム開発用のサンプルです!是非ご覧になってください!", :property => "og:description"}/ %meta{:content => "logo-white.png", :property => "og:image"}/ = favicon_link_tag 'favicon.ico' = csrf_meta_tags = csp_meta_tag = stylesheet_link_tag 'application', media: 'all', 'data-turbolinks-track': 'reload' = javascript_include_tag 'application', 'data-turbolinks-track': 'reload' %body = yieldまとめ
beforeの状態でも、アプリケーションとしてはエラー発生はしなかったのですが統合テストだとエラーが発生。
理由としては、application.html.hamlにて規定ネストがされていないことが原因らしいです。
metaタグとか、favicon作るときはネストしとかないと他のとこでエラーが出ちゃうので気をつけよう!