- 投稿日:2020-06-04T23:29:48+09:00
Application Development Guide for Android and iOS
The complete guide on how to create a mobile application, from defining the project goal and technology stack to testing and deployment. Check it out!
- 投稿日:2020-06-04T23:04:36+09:00
How to attract more customers for your mobile app
How to promote a smartphone app, attract users, and earn an income? Check out the best mobile application marketing tools and strategies.
- 投稿日:2020-06-04T22:30:28+09:00
Top 15 Apps Like Instagram for IOS and Android you need to know about
Though Instagram continues to be the leading photo-sharing app, it has strong competitors. Check out 15 Instagram-like apps to see their success formula.
- 投稿日:2020-06-04T21:33:59+09:00
Daggerを使ってDI
はじめに
新卒で入社してから2ヶ月が立ちました。Androidに少しはなれてきたかな…
ということで今回は、Daggerを使ってDIしていきたいと思います!
Dagger Hiltが、最近話題になってますね。
今後、Daggerにしろ、KoinにしろDIコンテナを使うことは必須だと思うので復習していきます!※前回の続きです
Gradle
gradleにDaggerを追加します。
build.gradle// Dagger def daggerVersion = '2.26' implementation "com.google.dagger:dagger:$daggerVersion" kapt "com.google.dagger:dagger-compiler:$daggerVersion"実装
Daggerのオブジェクトグラフに、あるクラスのインスタンスを取得する方法を追加する必要があります。
@Injectアノテーションをつけることで、これを実現します。今回、
ViewModelはRepositoryに依存していて、
RepositoryはDatabaseに依存しています。ViewModel
MainViewModel.ktclass MainViewModel @Inject constructor(private val repository: TodoRepository) : ViewModel() { val todoList = repository.allTodoList fun insert(todo: Todo) = viewModelScope.launch { withContext(Dispatchers.IO){ repository.insert(todo) } }Repository
TodoRepository.ktclass TodoRepository @Inject constructor(private val todoDao: TodoDao) { val allTodoList = todoDao.getAll() @WorkerThread suspend fun insert(todo: Todo) { todoDao.insert(todo) } }
@Injectアノテーションをつけることで、クラスのインスタンスの提供方法をDaggerに伝えることができました。Module
Interfaceなど、直接インスタンス化できないものの提供方法をDaggerに伝える必要があります。
依存関係の定義をグループ化するには、@Moduleアノテーションをつけます。DatabaseModule.kt@Module class DatabaseModule() { @Singleton @Provides fun provideTodoDatabase(context: Context) = Room.databaseBuilder(context, TodoDatabase::class.java, "database_name") .build() @Singleton @Provides fun provideTodoDao(todoDatabase: TodoDatabase) = todoDatabase.todoDao() }
@Moduleアノテーションをつけたクラスに、インスタンスの生成方法を@Providesアノテーションで実現します。Component
ComponentはDaggerがオブジェクトグラフを生成して、あるクラスのインスタンスを取得する役割があります。
Componentを実装するには、@ComponentアノテーションをInterfaceにつけます。AppComponent.kt@Singleton @Component( modules = [ DatabaseModule::class ] ) Interface AppComponent { @Component.Factory interface Factory { fun create(@BindsInstance context: Context): AppComponent } fun mainViewModel(): MainViewModel }
@Singletonアノテーションをつけることで、Singletonを実現します。
また、ComponentにModuleクラスで定義した依存関係を追加するために、modulesパラメータに記述します。
@Component.Factoryアノテーションでは、Componentのインスタンス取得時に特別な処理を定義することができます。今回は、Daggerのオブジェクトグラフ生成時にContextを渡したいので、引数に@BindsInstanceアノテーションをつけます。Aplication
AppComponent.Factoryを使い、AppComponentのインスタンスを取得します。
インスタンス取得時にContextを渡します。TodoAplication.ktclass TodoApplication : Application() { companion object { lateinit var component: AppComponent private set } override fun onCreate() { super.onCreate() component = DaggerAppComponent.factory().create(applicationContext) } }Activity
MainActivity.ktclass MainActivity : AppCompatActivity() { private val mainViewModel: MainViewModel by lazy { TodoApplication.component.mainViewModel() } ...これでMainActivityにMainViewModelを提供することができました。
おわりに
Todoアプリの削除機能を実装する前に、Daggerを使ってDIしてみました!
もし間違った記述があるなら、コメントで教えてほしいです!!!Dagger Hiltも、時間があったら触ってみようかな。
- 投稿日:2020-06-04T13:20:17+09:00
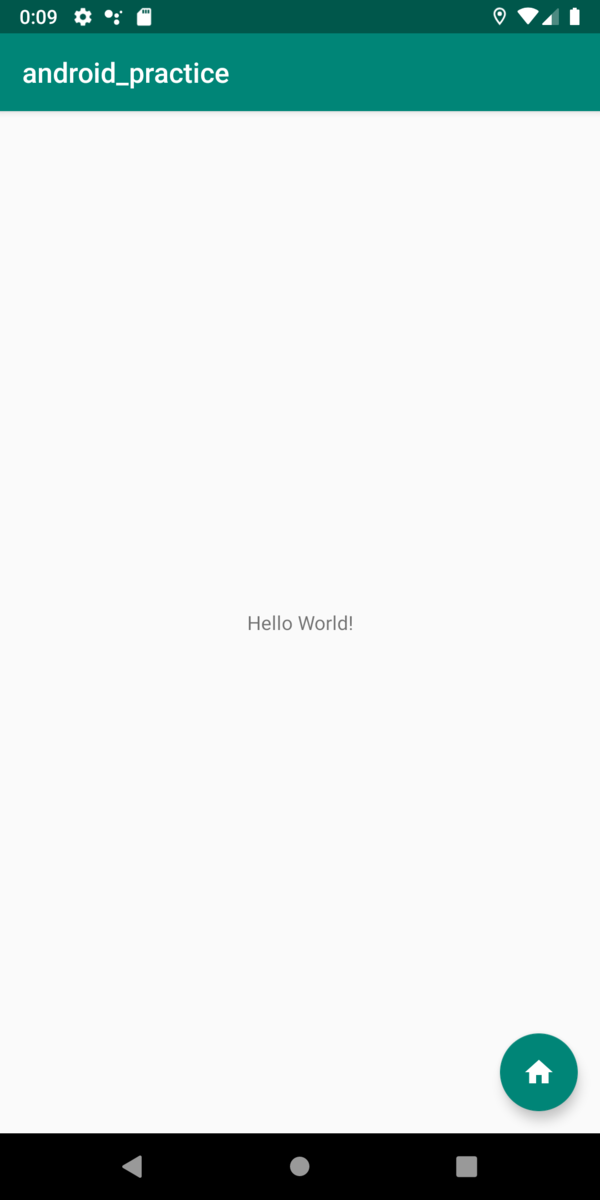
マテリアルデザインのフローティングボタンを置く
ただフローティングボタンを設置するだけの記事で, 自分のブログから引っ張ってきたものです.
https://wally-ngm.hatenablog.com/entry/2020/06/04/001624そもそもマテリアルデザインって何って感じだったんですが, Android開発しやすいようにGoogleから出てる公式なライブラリで, これ使えばアニメーションや画面を作るのが楽になるよっていうやつです.
Android Developerの公式よりはgithubのほうが情報をみつけやすかったです.
https://github.com/material-components/material-components-android/blob/master/docs/getting-started.md1. マテリアルデザインのライブラリを追加
まずはマテリアルデザインのライブラリをモジュールのbuild.gradleに追加します.
build.gradledependencies { // ... implementation 'com.google.android.material:material:<version>' // ... }バージョンはgithubのreleaseから見れます. 2020年6月3日現在では
1.2.0-beta01が最新でした.
https://github.com/material-components/material-components-android/releases2. ボタンに表示するアイコンをimport
ご自身の好きなアイコンをimportしてあげても大丈夫ですが,
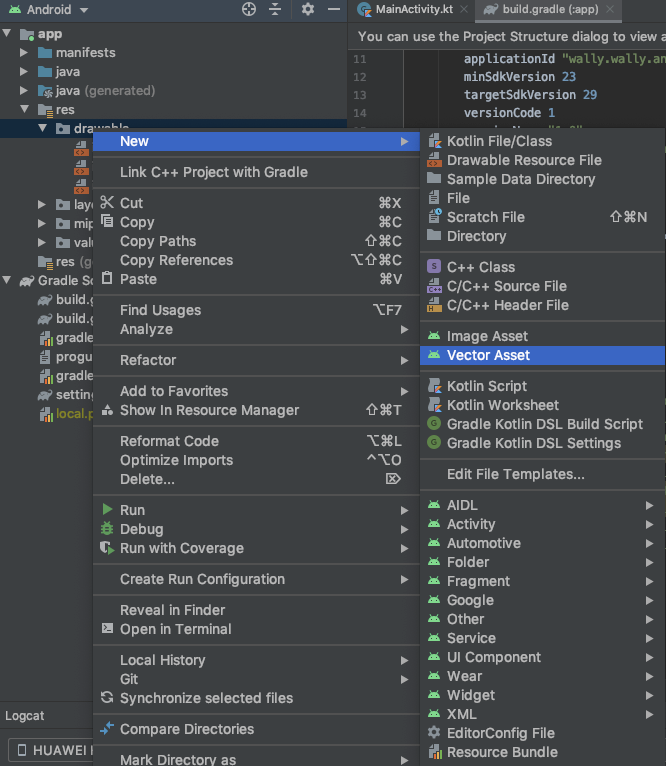
Vector Assetっていう便利なものを使ってみます.Projectのディレクトリツリーのところ(Android Studioの左側のところw)で右クリックして New => Vector Asset
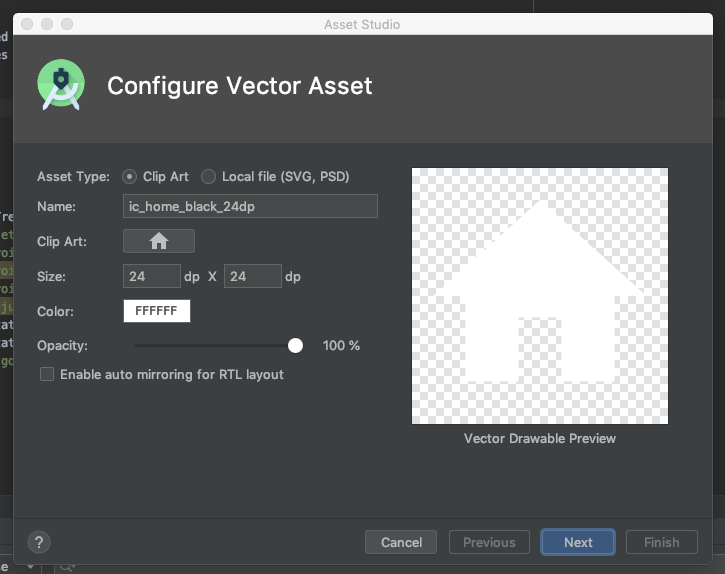
Clip Artの右側にあるボタンをクリックすると好きなアイコンを選べます.
!アイコン選択
あとはアイコンを選んで大きさや色, 透明度を設定して Next => import場所を設定してFinishです.
import先はデフォルトのmain/drawableで今回は進めます.3. FloatingButtonを設置
設置したいlayoutファイルにxmlを書きます.
 <com.google.android.material.floatingactionbutton.FloatingActionButton
            android:id="@+id/fab"
            android:layout_width="wrap_content"
            android:layout_height="wrap_content"
            android:layout_gravity="end|bottom"
            android:layout_margin="16dp"
            android:contentDescription="@string/fab_content_desc"
            app:srcCompat="@drawable/ic_home" />
上記のは最低限の記述です. 色を変えたりRippleをつけたいと思います. そんなときは公式サイトを見てみると書いてます.
https://material.io/develop/android/components/floating-action-button/背景色とrippleをつけてみました.
<com.google.android.material.floatingactionbutton.FloatingActionButton android:id="@+id/fab" android:layout_width="wrap_content" android:layout_height="wrap_content" android:layout_gravity="end|bottom" android:layout_margin="16dp" android:contentDescription="@string/fab_content_desc" app:srcCompat="@drawable/ic_home" app:backgroundTint="@color/colorPrimary" app:rippleColor="@color/primaryLight" />ソースコードはこちらにおいてあります.
今後も勉強のために色々実装して更新し続けて行こうと思います.
[https://github.com/WallyNegima/android_practice:embed:cite]
- 投稿日:2020-06-04T13:18:37+09:00
BottomNavigationViewの個々のアイコンサイズを変える
背景
一括でアイコンサイズを整える場合は、XML上にてBottomNavigationに対して
app:itemIconSize="XXdp"
を指定すれば問題ないが、アイコンごとにサイズがばらばらだったりして個々にサイズを指定したい場合にどうするか環境
implementation 'com.google.android.material:material:1.2.0-alpha03'実装
private fun fixAllIconSize() {
    // ※1
    val menuView = navView.getChildAt(0) as BottomNavigationMenuView
    // ※2
    0.until(menuView.childCount).forEach { index ->
        // ※3
        val icon = menuView.getChildAt(index).findViewById<ImageView>(com.google.android.material.R.id.icon)
        val displayMetrics = resources.displayMetrics
        // ※4
        val layoutParams = (icon.layoutParams).apply {
            when (index) {
                // 例えば一番左のアイコンのサイズを変えたい
                0 -> {
                    width = TypedValue.applyDimension(TypedValue.COMPLEX_UNIT_DIP, 28f, displayMetrics).toInt()
                    height = TypedValue.applyDimension(TypedValue.COMPLEX_UNIT_DIP, 18f, displayMetrics).toInt()
                    }
                else -> {
                    width = TypedValue.applyDimension(TypedValue.COMPLEX_UNIT_DIP, 24f, displayMetrics).toInt()
                    height = TypedValue.applyDimension(TypedValue.COMPLEX_UNIT_DIP, 24f, displayMetrics).toInt()
                }
            }
        }
        icon.layoutParams = layoutParams
    }
}
説明
- ※1:
navViewはBottomNavigationViewのこと- ※2:
menuView.childCountでボトムナビに設定しているアイコンの数(=メニューアイテムの数)がとれる- ※3: 個々のアイコンのindexが左から順に0,1,2...となっているため、それぞれのImageViewを取得してあげる
- ※4: ImageViewのLayoutParamsを取得し、width, heightを調整する
以上です
- 投稿日:2020-06-04T11:19:09+09:00
Unity IAPは公式APIドキュメントがないので課金処理は自前ネイティブ実装がいいかも
まとめ
- https://docs.unity3d.com/Manual/UnityIAP.html
- マニュアルはある。しかしAPIについての最新の説明は存在しないので自己責任でやるしかない。
- 自分でネイティブ連携するのが最強
現状
- https://forum.unity.com/threads/where-has-unity-iap-scripting-reference-gone.660454/
- Where Has Unity Iap Scripting Reference Gone?(Unity IAPのスクリプトリファレンスどこにやった?)
-https://forum.unity.com/threads/where-has-unity-iap-scripting-reference-gone.660454/#post-4543948
Understood on the concern. As we are moving more towards Package Manager, we've had to adjust our documentation work flow, and it's still a work in progress. It is something we are actively working on, apologies on the inconvenience.
JeffDUnity3D, May 15, 2019
(今作業中です(2019/05/15))つまり1年以上放置されてるわけで Unity 2018.3 以降は最新の情報を得る手段がありません。つまりLTS基準で考えると2018版から現在までドキュメントのないものを雰囲気で実装してるわけでAppleやらGoogleやらの方でPurchasing APIに変更やら機能追加やらが入ったときにちゃんと追従されるかも怪しい気がします。
- 投稿日:2020-06-04T10:59:17+09:00
WebViewでIntent://~をハンドリング
WebViewで外部サイトを表示するようなアプリを作成していると、ページ上の「アプリで見る」みたいなボタンを押すとintent://~というリンクが投げられてくることがある事に気づくと思います。
Chromeアプリなどでそこをタッチするとそのサイトのアプリ版がインストールされていればアプリが開き、インストールされていなければPlay Storeアプリが開いてそのアプリのページに飛ばされます。
これを自作WebViewで実現しようとしたらハマりにハマったので備忘録。解決法
まずは結論から。
WebViewClientCompatクラスのshouldOverrideUrlLoadingメソッドの中で Intent.URI_INTENT_SCHEMEを使用してパースしてやる。val webViewClient = object : WebViewClientCompat() { override fun shouldOverrideUrlLoading( view: WebView, request: WebResourceRequest ): Boolean { if (request.url?.scheme.equals("intent") || request.url?.scheme.equals("android-app")) { // android-appスキームもintentスキームの一種扱いらしく、Intent.URI_INTENT_SCHEMEでパース出来る。 // 以下のリンクでテスト済み。 // android-app://com.google.android.youtube/http/www.youtube.com/watch?v=dQw4w9WgXcQ // android-appスキーム用のURI_ANDROID_APP_SCHEMEフラグも用意されているがAPIレベル22からなのでIntent.URI_INTENT_SCHEMEフラグで一緒にパースしちゃう。 // https://developer.android.com/reference/android/content/Intent#URI_INTENT_SCHEME // https://developer.android.com/reference/android/content/Intent#URI_ANDROID_APP_SCHEME val intent = Intent.parseUri(request.url.toString(), Intent.URI_INTENT_SCHEME) val packageManager = activity?.packageManager if (packageManager != null && intent?.resolveActivity(packageManager) != null) { startActivity(intent) return true } } return false } } binding.webView.webViewClient = webViewClient binding.webView.loadUrl(url)解説
intent://~とは何か。
アプリがインストールされていたらそれを起動し、インストールされていなかったらplay storeアプリを開いてダウンロードさせたりするときに使われるgoogle発のリンクの形式。
仕様など詳しくはこちら何をしているか
intent://~形式のリンクは、Intent.URI_INTENT_SCHEMEとIntent.parseUrlメソッドを使用すると上記のリンクの仕様にのっとった適切なIntentを作ってくれる。それを利用してIntentを作って外に投げている。これで作成されたIntentはアプリがインストールされていればアプリを開き、なければplay storeアプリを開いてくれる。
android-app;//~について
解決法のコードの中にも書いてあるが、android-app://~形式のリンクも実はintent://~の一種らしい。ので同じ方法でパース出来る。
本当android-app://~専用のフラグURI_ANDROID_APP_SCHEMEも用意されているのでIntent.URI_INTENT_SCHEMEではなくそちらを使った方がよいのだろうが、URI_ANDROID_APP_SCHEMEはAPIレベル22から入っているフラグで、今回のアプリはminSDKVersionがそれ未満だったのでIntent.URI_INTENT_SCHEMEでパースしてしまっている。ちなみに
このリンクの仕様にのっとって自力でパースしてIntentをつくることすることも可能とは思いますがものすごく手間だしパースできる機構が用意されているのだからそちらを使う方がいいと思います。(自分は最初この機構に気づいておらず自力でパースするコードを作ってしまっていました。半日以上かかりました;)


