- 投稿日:2020-05-31T23:44:57+09:00
Rubyの実行環境をローカルに作る手順
Rubyの実行環境をローカルに作る手順
ローカルで.rbファイルを実行できるようにする方法。
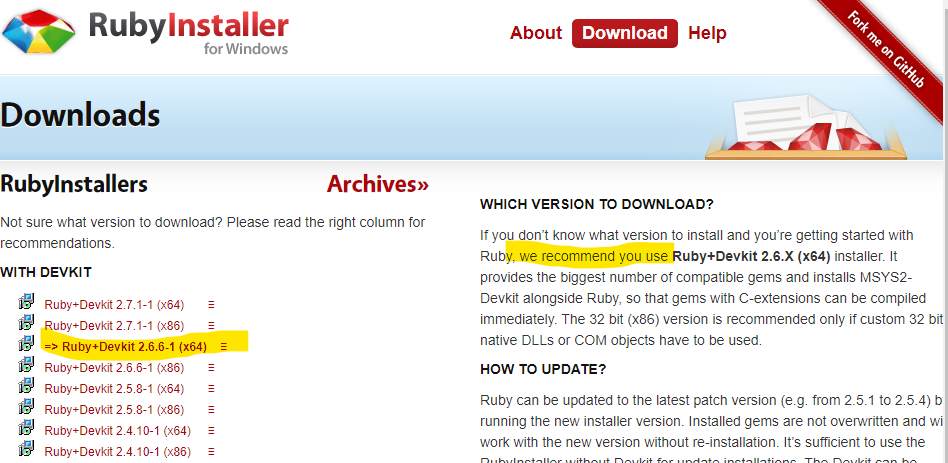
Rubyのダウンロード
Rubyの公式ページから、
推奨バージョン(=>)を選択しインストールhttps://rubyinstaller.org/downloads/
Ruby+Devkit 2.6.6-1 (x64) は130MB。
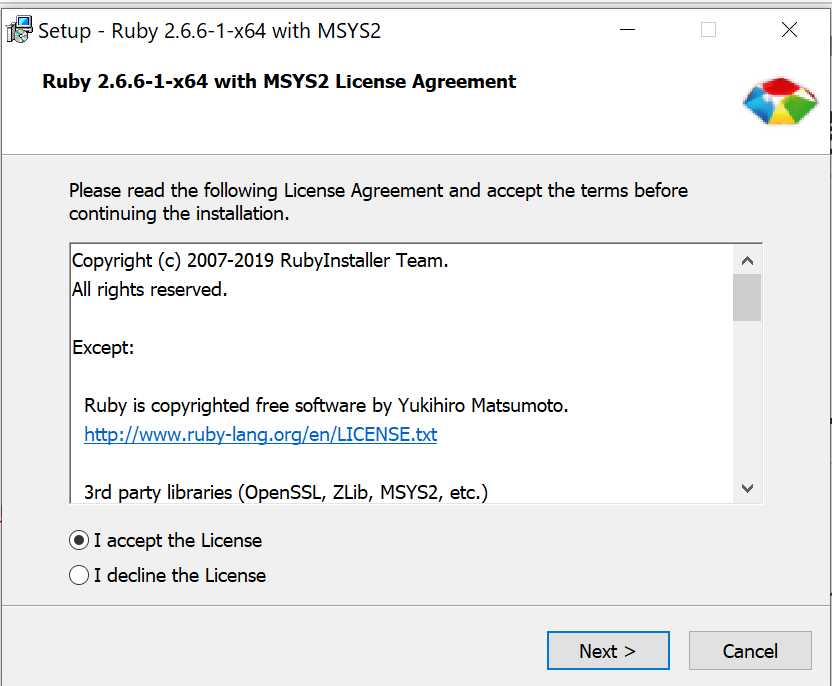
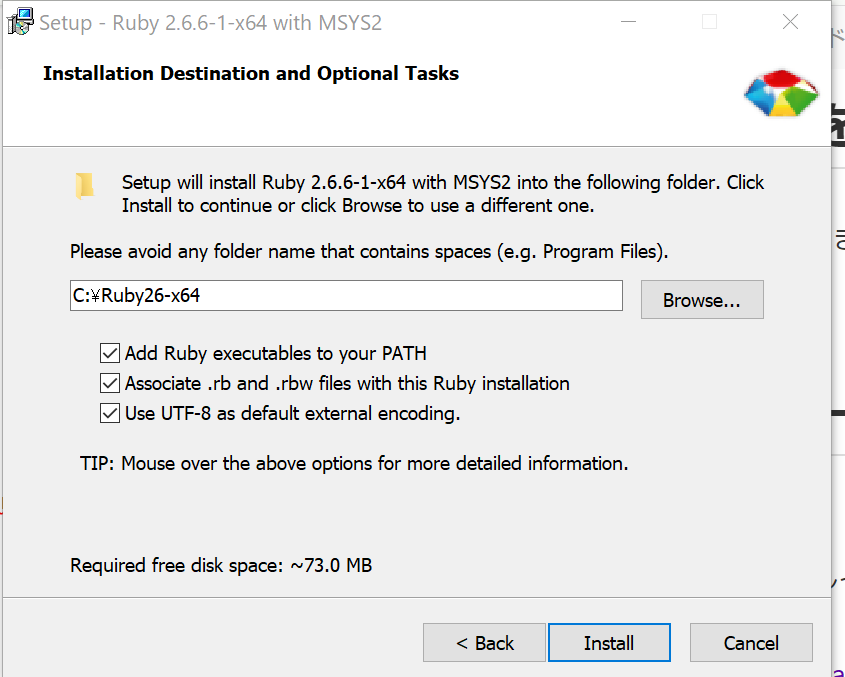
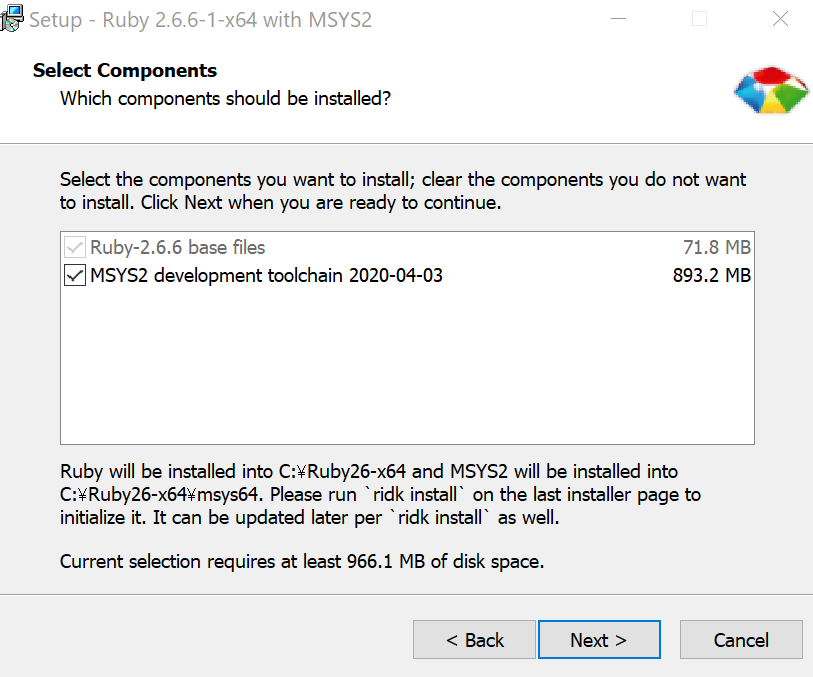
インストール実行
▼ I accept the Licenseにチェック
▼Installをクリック
▼Nextをクリック
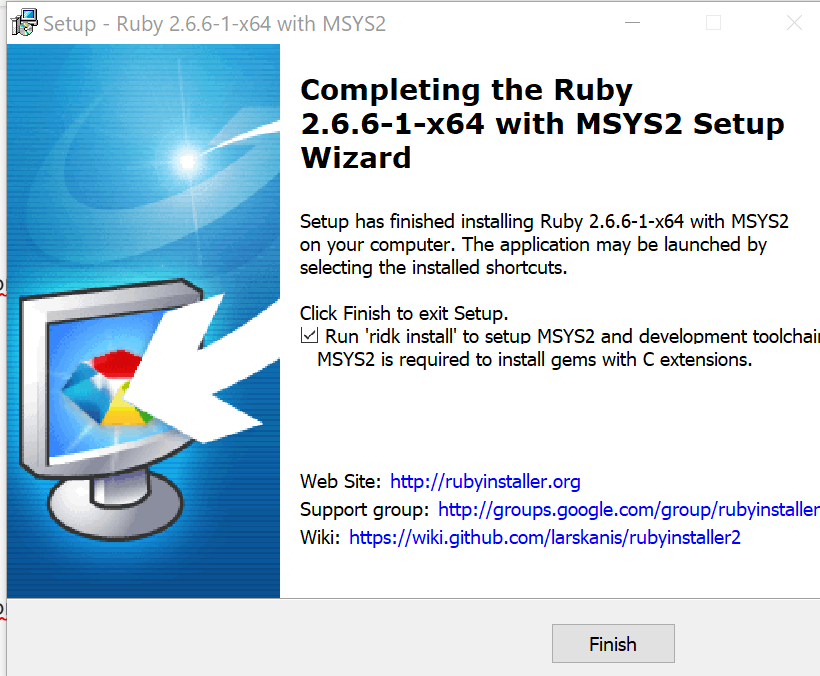
▼Finishをクリック
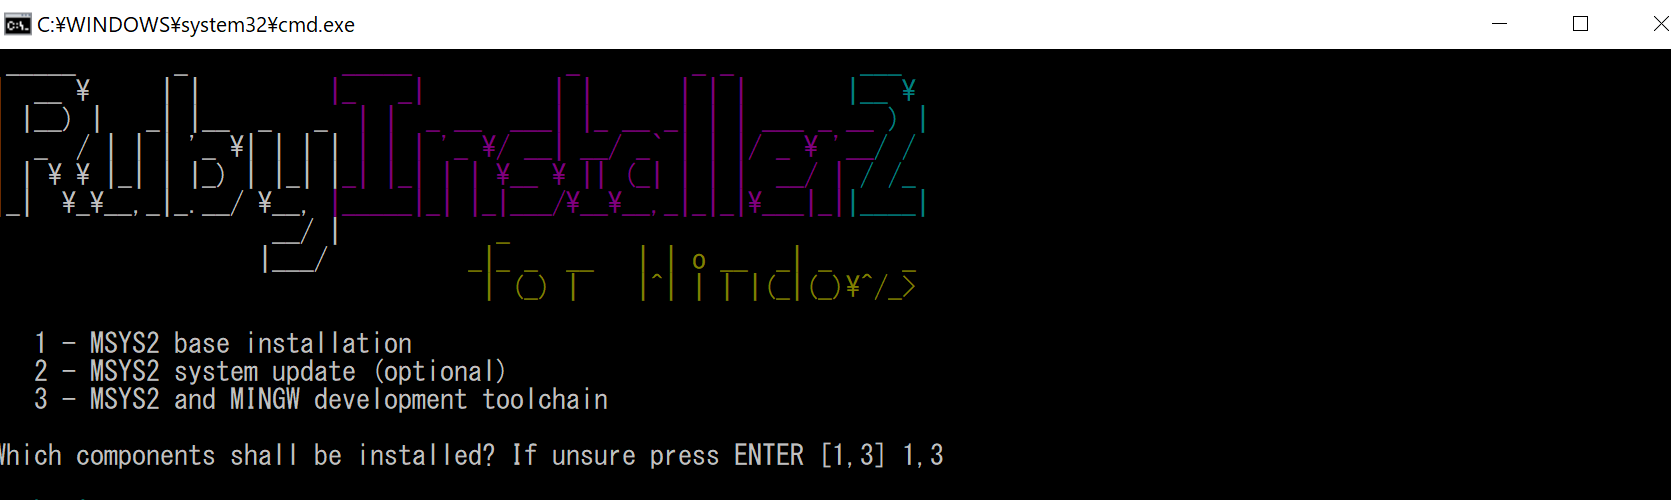
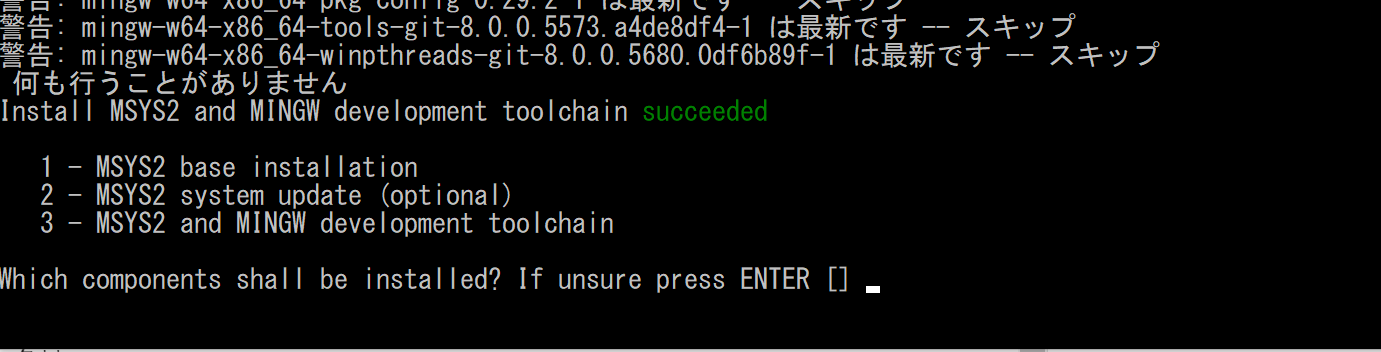
▼1,3を入力しEnter
▼Enter
以上でインストール完了。
インストールの確認
ruby -v
インストールできていればバージョンが表示される。
(↑gitbushを使用)
.rbファイルの作成と実行
コマンド#デスクトップに移動 $ cd ~/desktop #.rbファイル作成 $ touch index.rb #vimエディタ立ち上げ $ vi index.rbvimエディタが立ち上がるので、下記を入力
index.rbputs "こんにちは" puts 1+2*3「i」:挿入モード
「esc」:挿入モードから抜ける
「:wq」:保存して閉じる
>vimエディタの使い方
コマンド#ruby実行(内容が出力されればOK) $ ruby index.rb こんにちは 7 #ファイル削除 $ rm index.rb以上。
ダウンロードに思ったより時間がかかったが、その後は比較的早い。

- 投稿日:2020-05-31T23:00:35+09:00
【Ruby】クラス定義まとめ
【Ruby】クラス定義まとめ
rubyのクラス定義に関する内容のまとめ。
目次
- クラス定義
- インスタンス変数の定義(attr_accessor :)
- インスタンスの生成(.new)
- インスタンス変数に値を入れる
- インスタンスメソッド(クラス内で定義したメソッド)
- initializeメソッド
- ファイル分割(require "")
- 複数のインスタンスをeachメソッドで個々に抜き出す
- 要素にインデックス番号をつける
- 入力値の受け取り(gets.chomp)
- 文字列を数値に変換(.to_i)
- 継承(<)
- デフォルトで用意されているクラスの読み込み
- Dateクラス
- インスタンスメソッドとクラスメソッド
- クラスメソッドの作成と呼び出し
クラス定義
class クラス名

end
└ クラス名は冒頭大文字
└ 1行目文末に「:」不要
└ 文末に「end」必須インスタンス変数の定義(attr_accessor :)
インスタンス毎に固有となる値を格納する変数。
attr_accessor :インスタンス変数名
└ attr_accessorの直後はスペース
└ スペースの後ろにシンボル(:値)
└ 「:」と「値」の間はスペースなしインスタンス変数の定義class Product attr_accessor :name attr_accessor :price endインスタンス変数「name」と「price」を定義。
インスタンスの生成(.new)
クラス名.newclass Product attr_accessor :name attr_accessor :price end #インスタンス生成 product1 = Product.newインスタンス変数に値を入れる
インスタンス名.インスタンス変数名 = 値class Product attr_accessor :name attr_accessor :price end #インスタンス生成 product1 = Product.new #インスタンス変数に値をセット product1.name = "iphone" product1.price = 100000 puts product1.name puts product1.price #出力 iphone 100000product1というインスタンスの、nameにiphoneをセット。priceに100000をセット。
インスタンスメソッド(クラス内で定義したメソッド)
クラス内のメソッドをインスタンスメソッドと呼ぶ。
class クラス名
  def メソッド名(引数名)
    処理
  end
end
※クラスにもメソッドにもそれぞれendが必要。
インスタンスメソッドの呼び出し
インスタンス名.メソッド名インスタンス変数を呼び出すのと同じ。
class Product
  attr_accessor :name
  attr_accessor :price

  def create
    return "インスタンスを生成しました(return)"
  end
end

#インスタンス生成
product1 = Product.new

#インスタンスメソッド呼び出し
puts product1.create


#出力
インスタンスを生成しました(return)
インスタンスメソッドの中でインスタンス変数を使う
self.インスタンス変数名class Product attr_accessor :name attr_accessor :price def create puts "製品名は#{self.name}です" puts "価格は#{self.price}です" end end #インスタンス生成 product1 = Product.new #インスタンス変数に値をセット product1.name = "iphone" product1.price = 100000 #インスタンスメソッド実行 product1.create #出力 製品名はiphoneです 価格は100000です※インスタンスメソッド内のputsをreturnにした場合は、呼び出すメソッドの前にputsをつける。(puts product1.create)
インスタンスメソッドの中でif文を使う
class Product
  attr_accessor :name
  attr_accessor :price

  #注文数10個以上で10%OFFするメソッド
  def get_total_price(count)
    total_price = self.price * count
    if count >=10
      total_price *= 0.9
    end
    return total_price
  end
end

#インスタンス生成
product1 = Product.new

#インスタンス変数に値をセット
product1.name = "iphone"
product1.price = 100000

#インスタンスメソッド実行
puts product1.get_total_price(10)

#出力
900000
initializeメソッド
インスタンス生成時に自動で実行される関数。
(pythonなどのコンストラクタ)インスタンス生成時に引数を渡し、インスタンス変数をセットする。
class クラス名
  def initialize(引数名)
    処理
  end
end

#インスタンス生成
インスタンス名 = クラス名.new(引数)
▼initializeメソッドでインスタンス変数をセット
実例①class Product attr_accessor :name attr_accessor :price def initialize(name,price) self.name = name self.price = price end def info return "製品名:#{self.name}、価格:#{self.price}" end end #インスタンス生成 product1 = Product.new("iphone", 100000) puts product1.info #出力 製品名:iphone、価格:100000▼キーワード引数を使う
実例②(キーワード引数)class Product attr_accessor :name attr_accessor :price def initialize(name:,price:) self.name = name self.price = price end def info return "製品名:#{self.name}、価格:#{self.price}" end end #インスタンス生成 product1 = Product.new(name:"iphone", price:100000) puts product1.info #出力 製品名:iphone、価格:100000ファイル分割(require "")
require "./ファイル名"
└ 拡張子「.rb」は不要▼クラス定義を書いた「product.rb」を「index.rb」冒頭で読み込む。
product.rbclass Product attr_accessor :name attr_accessor :price def initialize(name:,price:) self.name = name self.price = price end def info return "製品名:#{self.name}、価格:#{self.price}" end endindex.rb#ファイル読み込み require "./product" #読み込んだファイルのクラスでインスタンス生成 product1 = Product.new(name:"iphone", price:100000) puts product1.info #出力 製品名:iphone、価格:100000複数のインスタンスをeachメソッドで個々に抜き出す
- クラス定義とインスタンス生成をファイル分割。
- インスタンスを複数生成し、配列に格納。
- eachメソッドでインスタンスを一つづつ呼び出す。
- 各インスタンスでinfoメソッドを実行。
product.rbclass Product attr_accessor :name attr_accessor :price def initialize(name:,price:) self.name = name self.price = price end def info return "製品名:#{self.name}、価格:#{self.price}" end endindex.rb#ファイル読み込み require "./product" #読み込んだファイルのクラスでインスタンス生成 product1 = Product.new(name:"iphone6s", price:60000) product2 = Product.new(name:"iphone8", price:80000) product3 = Product.new(name:"iphoneX", price:100000) product4 = Product.new(name:"iphone11pro", price:120000) #インスタンスを配列に格納 products = [product1,product2, product3, product4] #eachメソッドでインスタンスを一つづつ取り出す products.each do |product| #各インスタンスでinfoメソッドを実行 puts product.info #出力 製品名:iphone6s、価格:60000 製品名:iphone8、価格:80000 製品名:iphoneX、価格:100000 製品名:iphone11Pro、価格:120000インデックス番号をつける
- eachメソッドと1づつ増加する変数を組み合わせる。
- 変数展開で、index番号とinfoメソッドを出力する。
index.rb#ファイル読み込み require "./product" #読み込んだファイルのクラスでインスタンス生成 product1 = Product.new(name:"iphone6s", price:60000) product2 = Product.new(name:"iphone8", price:80000) product3 = Product.new(name:"iphoneX", price:100000) product4 = Product.new(name:"iphone11pro", price:120000) #インスタンスを配列に格納 products = [product1,product2, product3, product4] #インデックス番号用の変数を定義 index = 0 #eachメソッドでインスタンスを一つづつ取り出す products.each do |product| #各インスタンスでinfoメソッドを実行 puts "#{index}. #{product.info}" index += 1 #出力 0. 製品名:iphone6s、価格:60000 1. 製品名:iphone8、価格:80000 2. 製品名:iphoneX、価格:100000 3. 製品名:iphone11Pro、価格:120000入力値の受け取り(gets.chomp)
変数名 = gets.chompenterキーが押されるまでに入力された内容を変数に格納する。※文字列として格納
文字列を数値に変換(.to_i)
gets.chompで受け取った情報は文字列のため、数値に変換する。
変数名 = gets.chomp.to_i入力データを受け取るputs "ニックネームを入力してください" name = gets.chomp.to_i puts "年齢を入力してください" age = gets.chomp.to_i future_age = age+30 puts "#{name}さんの30年後の年齢は#{future_age}です"入力値の受け取りとインスタンス
インスタンスのインデックス番号と注文個数を受け取る。
- 受け取った入力値に該当するインスタンスを選択。
- 注文個数を受け取り合計金額を返す。
▼クラス定義したファイル
product.rbclass Product attr_accessor :name attr_accessor :price def initialize(name:,price:) self.name = name self.price = price end def info return "製品名:#{self.name}、価格:#{self.price}" end endindex.rb#ファイル読み込み require "./product" #読み込んだファイルのクラスでインスタンス生成 product1 = Product.new(name:"iphone6s", price:60000) product2 = Product.new(name:"iphone8", price:80000) product3 = Product.new(name:"iphoneX", price:100000) product4 = Product.new(name:"iphone11pro", price:120000) #インスタンスを配列に格納 products = [product1,product2, product3, product4] #インデックス番号用の変数を定義 index = 0 #eachメソッドでインスタンスを一つづつ取り出す products.each do |product| #各インスタンスでinfoメソッドを実行 puts "#{index}. #{product.info}" index += 1 #商品番号の受け取り puts "商品番号を入力してください" order = gets.chomp.to_i selected_product = products[order] #注文数の受け取り puts "選択した製品は#{selected_product.name}です" puts "何個注文しますか?" count = gets.chomp.to_i #合計金額の算出 total_price = selected_product.price * gets.chomp.to_i * 1.1 puts "合計金額は#{total_price}です"継承(<)
親クラスのインスタンス変数とインスタンスメソッドを引き継ぐ。
class 子クラス名 < 親クラス名
└ 冒頭は大文字
└ 最後にend必須
└ 親クラスが上にある(or 別ファイルで読み込み済み)継承require "./親クラスのファイル名" class 子クラス名 < 親クラス名 end継承のファイル分割
ファイルは大きく4つに分類される。
カッコはファイル名の例。
- 親クラスを定義したファイル (親クラス名.py)
- 子クラスを定義したファイル(子クラス名.py)
- インスタンス生成用のファイル(data.py)
- 出力用ファイル(index.py)
子クラスを定義したファイルは、子クラス毎に作成。
(コード量によって、1ファイルにまとめたり)インスタンス変数の追加
シンプルに継承したクラスの中で新たにインスタンス変数を定義するだけ。
attr_accessor :インスタンス変数名product.rbclass Product attr_accessor :name attr_accessor :price def initialize(name:,price:) self.name = name self.price = price end def info return "製品名:#{self.name}、価格:#{self.price}" end end▼継承でPhoneクラスを作成。
インスタンス変数weightを追加。phone.rbrequire "./product" class Phone < Product attr_accessor :weight end▼子クラスPhoneで生成したインスタンスに値をセット
index.rbrequire "./phone" #インスタンス生成 phone1 = Phone.new(name: "iphone11", price: "120000") #追加したインスタンス変数に値をセット phone1.weight = "194g" puts phone1.weight #出力 194gインスタンスメソッドの追加
シンプルに継承したクラスの中で新たにインスタンスメソッドを定義するだけ。
▼上記phone.rbにメソッドを追加。
self.インスタンス名
└ クラス内でのインスタンス変数の呼び出しphone.rbrequire "./product" class Phone < Product attr_accessor :weight def set_property return "#{self.name}の重さは#{self.weight}です" end end▼追加メソッドの呼び出し
index.rbrequire "./phone" #インスタンス生成 phone1 = Phone.new(name: "iphone11", price: "120000") #追加したインスタンス変数に値をセット phone1.weight = "194g" #追加したメソッドの呼び出し puts phone1.set_property #出力 iphone11の重さは194gですオーバーライド
インスタンス変数・メソッドの上書きのこと。
(親クラスで既に定義されているものならオーバーライドになる)product.rbclass Product attr_accessor :name attr_accessor :price def initialize(name:,price:) self.name = name self.price = price end def info return "製品名:#{self.name}、価格:#{self.price}" end end▼親クラスのinfoメソッドをオーバーライド
phone.rbrequire "./product" class Phone < Product attr_accessor :weight #オーバーライド def info return "製品名:#{self.name}、価格:#{self.price}円、重さ:#{self.weight}" end end▼オーバーライドしたメソッドの呼び出し
index.rbrequire "./phone" #インスタンス生成 phone1 = Phone.new(name: "iphone11", price: "120000") #追加したインスタンス変数に値をセット phone1.weight = "194g" #追加したメソッドの呼び出し puts phone1.info #出力 製品名:iphone11、価格:120000円、重さ:194g親クラスで重複するメソッドの呼び出し(super)
initializeで既に定義済みのメソッドを呼び出す。
super(引数:親クラスの変数)▼親クラス
product.rbclass Product attr_accessor :name attr_accessor :price #オーバーライドで呼び出す箇所 def initialize(name:,price:) self.name = name self.price = price end def info return "製品名:#{self.name}、価格:#{self.price}" end endphone.rbrequire "./product" class Phone < Product attr_accessor :weight #initializeのオーバーライド(既存部呼び出し) def initialize(name:, price:, weight:) super(name: name, price: price) self.weight = weight end #オーバーライド def info return "製品名:#{self.name}、価格:#{self.price}円、重さ:#{self.weight}" end endデフォルトで用意されているクラスの読み込み
require "クラス名"
└ ファイルの読み込みとは異なる
(require "./ファイル名")Dateクラス
デフォルトでRubyに定義されているクラスの一つ。
▼クラスの読み込み
require "date"▼Dateインスタンスの生成
変数 = Date.new(yyyy, m, d)▼出力
yyyy-mm-ddrequire "date" yesterday = Date.new(2020, 5, 30) puts yesterday #出力 2020-05-30Dateクラスのインスタンスメソッド
指定曜日か確認する
指定した曜日か確認 → 真偽値で返す。
インスタンス名.曜日?require "date" yesterday = Date.new(2020, 5, 30) puts yesterday.monday? puts yesterday.saturday? #出力 false TrueDateクラスのクラスメソッド
今日の日付を確認する(.today)
Date.todayrequire "date" date1 = Date.today puts date1 #出力 2020-05-31インスタンスメソッドとクラスメソッド
インスタンスメソッド
- インスタンスに対し呼び出す
- インスタンス名.メソッド名
- 定義:
def メソッド名- 文末にend
クラスメソッド
- クラスに対して呼び出す
- クラス名.メソッド名
- 定義:
def クラス名.メソッド名- 文末にend
クラスメソッドを用いるとき
・インスタンスによらない結果を出力する。例:今日の日付を求める。
Date.todayクラスメソッドの作成と呼び出し
クラスメソッドは自分で作れる。
def クラス名.メソッド名▼今日の日付が月曜日か調べるクラスメソッド
- Dateクラスを読み込む
- クラスメソッドを定義する
product.rbrequire "date" class Product attr_accessor :name attr_accessor :price def initialize(name:,price:) self.name = name self.price = price end def info return "製品名:#{self.name}、価格:#{self.price}" end #クラスメソッドを定義 def Product.is_today_off today = Date.today if today.monday "今日は定休日です" else self.info end▼定義したクラスメソッドを使う
index.rbrequire "./product" product1 = Product.new(name: "iphone11", price: "120000") #クラスメソッドの呼び出し Product.is_today_off
- 投稿日:2020-05-31T23:00:35+09:00
【Ruby】クラス定義のまとめ。基本をマスターする。
【Ruby】クラス定義のまとめ。基本をマスターする。
rubyのクラス定義に関する内容のまとめ。
目次
- クラス定義
- インスタンス変数の定義(attr_accessor :)
- インスタンスの生成(.new)
- インスタンス変数に値を入れる
- インスタンスメソッド(クラス内で定義したメソッド)
- initializeメソッド
- ファイル分割(require "")
- 複数のインスタンスをeachメソッドで個々に抜き出す
- 要素にインデックス番号をつける
- 入力値の受け取り(gets.chomp)
- 文字列を数値に変換(.to_i)
- 継承(<)
- デフォルトで用意されているクラスの読み込み
- Dateクラス
- インスタンスメソッドとクラスメソッド
- クラスメソッドの作成と呼び出し
クラス定義
class クラス名

end
└ クラス名は冒頭大文字
└ 1行目文末に「:」不要
└ 文末に「end」必須インスタンス変数の定義(attr_accessor :)
インスタンス毎に固有となる値を格納する変数。
attr_accessor :インスタンス変数名
└ attr_accessorの直後はスペース
└ スペースの後ろにシンボル(:値)
└ 「:」と「値」の間はスペースなしインスタンス変数の定義class Product attr_accessor :name attr_accessor :price endインスタンス変数「name」と「price」を定義。
インスタンスの生成(.new)
クラス名.newclass Product attr_accessor :name attr_accessor :price end #インスタンス生成 product1 = Product.newインスタンス変数に値を入れる
インスタンス名.インスタンス変数名 = 値class Product attr_accessor :name attr_accessor :price end #インスタンス生成 product1 = Product.new #インスタンス変数に値をセット product1.name = "iphone" product1.price = 100000 puts product1.name puts product1.price #出力 iphone 100000product1というインスタンスの、nameにiphoneをセット。priceに100000をセット。
インスタンスメソッド(クラス内で定義したメソッド)
クラス内のメソッドをインスタンスメソッドと呼ぶ。
class クラス名
  def メソッド名(引数名)
    処理
  end
end
※クラスにもメソッドにもそれぞれendが必要。
インスタンスメソッドの呼び出し
インスタンス名.メソッド名インスタンス変数を呼び出すのと同じ。
class Product
  attr_accessor :name
  attr_accessor :price

  def create
    return "インスタンスを生成しました(return)"
  end
end

#インスタンス生成
product1 = Product.new

#インスタンスメソッド呼び出し
puts product1.create


#出力
インスタンスを生成しました(return)
インスタンスメソッドの中でインスタンス変数を使う
self.インスタンス変数名class Product attr_accessor :name attr_accessor :price def create puts "製品名は#{self.name}です" puts "価格は#{self.price}です" end end #インスタンス生成 product1 = Product.new #インスタンス変数に値をセット product1.name = "iphone" product1.price = 100000 #インスタンスメソッド実行 product1.create #出力 製品名はiphoneです 価格は100000です※インスタンスメソッド内のputsをreturnにした場合は、呼び出すメソッドの前にputsをつける。(puts product1.create)
インスタンスメソッドの中でif文を使う
class Product
  attr_accessor :name
  attr_accessor :price

  #注文数10個以上で10%OFFするメソッド
  def get_total_price(count)
    total_price = self.price * count
    if count >=10
      total_price *= 0.9
    end
    return total_price
  end
end

#インスタンス生成
product1 = Product.new

#インスタンス変数に値をセット
product1.name = "iphone"
product1.price = 100000

#インスタンスメソッド実行
puts product1.get_total_price(10)

#出力
900000
initializeメソッド
インスタンス生成時に自動で実行される関数。
(pythonなどのコンストラクタ)インスタンス生成時に引数を渡し、インスタンス変数をセットする。
class クラス名
  def initialize(引数名)
    処理
  end
end

#インスタンス生成
インスタンス名 = クラス名.new(引数)
▼initializeメソッドでインスタンス変数をセット
実例①class Product attr_accessor :name attr_accessor :price def initialize(name,price) self.name = name self.price = price end def info return "製品名:#{self.name}、価格:#{self.price}" end end #インスタンス生成 product1 = Product.new("iphone", 100000) puts product1.info #出力 製品名:iphone、価格:100000▼キーワード引数を使う
実例②(キーワード引数)class Product attr_accessor :name attr_accessor :price def initialize(name:,price:) self.name = name self.price = price end def info return "製品名:#{self.name}、価格:#{self.price}" end end #インスタンス生成 product1 = Product.new(name:"iphone", price:100000) puts product1.info #出力 製品名:iphone、価格:100000ファイル分割(require "")
require "./ファイル名"
└ 拡張子「.rb」は不要▼クラス定義を書いた「product.rb」を「index.rb」冒頭で読み込む。
product.rbclass Product attr_accessor :name attr_accessor :price def initialize(name:,price:) self.name = name self.price = price end def info return "製品名:#{self.name}、価格:#{self.price}" end endindex.rb#ファイル読み込み require "./product" #読み込んだファイルのクラスでインスタンス生成 product1 = Product.new(name:"iphone", price:100000) puts product1.info #出力 製品名:iphone、価格:100000複数のインスタンスをeachメソッドで個々に抜き出す
- クラス定義とインスタンス生成をファイル分割。
- インスタンスを複数生成し、配列に格納。
- eachメソッドでインスタンスを一つづつ呼び出す。
- 各インスタンスでinfoメソッドを実行。
product.rbclass Product attr_accessor :name attr_accessor :price def initialize(name:,price:) self.name = name self.price = price end def info return "製品名:#{self.name}、価格:#{self.price}" end endindex.rb#ファイル読み込み require "./product" #読み込んだファイルのクラスでインスタンス生成 product1 = Product.new(name:"iphone6s", price:60000) product2 = Product.new(name:"iphone8", price:80000) product3 = Product.new(name:"iphoneX", price:100000) product4 = Product.new(name:"iphone11pro", price:120000) #インスタンスを配列に格納 products = [product1,product2, product3, product4] #eachメソッドでインスタンスを一つづつ取り出す products.each do |product| #各インスタンスでinfoメソッドを実行 puts product.info #出力 製品名:iphone6s、価格:60000 製品名:iphone8、価格:80000 製品名:iphoneX、価格:100000 製品名:iphone11Pro、価格:120000インデックス番号をつける
- eachメソッドと1づつ増加する変数を組み合わせる。
- 変数展開で、index番号とinfoメソッドを出力する。
index.rb#ファイル読み込み require "./product" #読み込んだファイルのクラスでインスタンス生成 product1 = Product.new(name:"iphone6s", price:60000) product2 = Product.new(name:"iphone8", price:80000) product3 = Product.new(name:"iphoneX", price:100000) product4 = Product.new(name:"iphone11pro", price:120000) #インスタンスを配列に格納 products = [product1,product2, product3, product4] #インデックス番号用の変数を定義 index = 0 #eachメソッドでインスタンスを一つづつ取り出す products.each do |product| #各インスタンスでinfoメソッドを実行 puts "#{index}. #{product.info}" index += 1 #出力 0. 製品名:iphone6s、価格:60000 1. 製品名:iphone8、価格:80000 2. 製品名:iphoneX、価格:100000 3. 製品名:iphone11Pro、価格:120000入力値の受け取り(gets.chomp)
変数名 = gets.chompenterキーが押されるまでに入力された内容を変数に格納する。※文字列として格納
文字列を数値に変換(.to_i)
gets.chompで受け取った情報は文字列のため、数値に変換する。
変数名 = gets.chomp.to_i入力データを受け取るputs "ニックネームを入力してください" name = gets.chomp.to_i puts "年齢を入力してください" age = gets.chomp.to_i future_age = age+30 puts "#{name}さんの30年後の年齢は#{future_age}です"入力値の受け取りとインスタンス
インスタンスのインデックス番号と注文個数を受け取る。
- 受け取った入力値に該当するインスタンスを選択。
- 注文個数を受け取り合計金額を返す。
▼クラス定義したファイル
product.rbclass Product attr_accessor :name attr_accessor :price def initialize(name:,price:) self.name = name self.price = price end def info return "製品名:#{self.name}、価格:#{self.price}" end endindex.rb#ファイル読み込み require "./product" #読み込んだファイルのクラスでインスタンス生成 product1 = Product.new(name:"iphone6s", price:60000) product2 = Product.new(name:"iphone8", price:80000) product3 = Product.new(name:"iphoneX", price:100000) product4 = Product.new(name:"iphone11pro", price:120000) #インスタンスを配列に格納 products = [product1,product2, product3, product4] #インデックス番号用の変数を定義 index = 0 #eachメソッドでインスタンスを一つづつ取り出す products.each do |product| #各インスタンスでinfoメソッドを実行 puts "#{index}. #{product.info}" index += 1 #商品番号の受け取り puts "商品番号を入力してください" order = gets.chomp.to_i selected_product = products[order] #注文数の受け取り puts "選択した製品は#{selected_product.name}です" puts "何個注文しますか?" count = gets.chomp.to_i #合計金額の算出 total_price = selected_product.price * gets.chomp.to_i * 1.1 puts "合計金額は#{total_price}です"継承(<)
親クラスのインスタンス変数とインスタンスメソッドを引き継ぐ。
class 子クラス名 < 親クラス名
└ 冒頭は大文字
└ 最後にend必須
└ 親クラスが上にある(or 別ファイルで読み込み済み)継承require "./親クラスのファイル名" class 子クラス名 < 親クラス名 end継承のファイル分割
ファイルは大きく4つに分類される。
カッコはファイル名の例。
- 親クラスを定義したファイル (親クラス名.py)
- 子クラスを定義したファイル(子クラス名.py)
- インスタンス生成用のファイル(data.py)
- 出力用ファイル(index.py)
子クラスを定義したファイルは、子クラス毎に作成。
(コード量によって、1ファイルにまとめたり)インスタンス変数の追加
シンプルに継承したクラスの中で新たにインスタンス変数を定義するだけ。
attr_accessor :インスタンス変数名product.rbclass Product attr_accessor :name attr_accessor :price def initialize(name:,price:) self.name = name self.price = price end def info return "製品名:#{self.name}、価格:#{self.price}" end end▼継承でPhoneクラスを作成。
インスタンス変数weightを追加。phone.rbrequire "./product" class Phone < Product attr_accessor :weight end▼子クラスPhoneで生成したインスタンスに値をセット
index.rbrequire "./phone" #インスタンス生成 phone1 = Phone.new(name: "iphone11", price: "120000") #追加したインスタンス変数に値をセット phone1.weight = "194g" puts phone1.weight #出力 194gインスタンスメソッドの追加
シンプルに継承したクラスの中で新たにインスタンスメソッドを定義するだけ。
▼上記phone.rbにメソッドを追加。
self.インスタンス名
└ クラス内でのインスタンス変数の呼び出しphone.rbrequire "./product" class Phone < Product attr_accessor :weight def set_property return "#{self.name}の重さは#{self.weight}です" end end▼追加メソッドの呼び出し
index.rbrequire "./phone" #インスタンス生成 phone1 = Phone.new(name: "iphone11", price: "120000") #追加したインスタンス変数に値をセット phone1.weight = "194g" #追加したメソッドの呼び出し puts phone1.set_property #出力 iphone11の重さは194gですオーバーライド
インスタンス変数・メソッドの上書きのこと。
(親クラスで既に定義されているものならオーバーライドになる)product.rbclass Product attr_accessor :name attr_accessor :price def initialize(name:,price:) self.name = name self.price = price end def info return "製品名:#{self.name}、価格:#{self.price}" end end▼親クラスのinfoメソッドをオーバーライド
phone.rbrequire "./product" class Phone < Product attr_accessor :weight #オーバーライド def info return "製品名:#{self.name}、価格:#{self.price}円、重さ:#{self.weight}" end end▼オーバーライドしたメソッドの呼び出し
index.rbrequire "./phone" #インスタンス生成 phone1 = Phone.new(name: "iphone11", price: "120000") #追加したインスタンス変数に値をセット phone1.weight = "194g" #追加したメソッドの呼び出し puts phone1.info #出力 製品名:iphone11、価格:120000円、重さ:194g親クラスで重複するメソッドの呼び出し(super)
initializeで既に定義済みのメソッドを呼び出す。
super(引数:親クラスの変数)▼親クラス
product.rbclass Product attr_accessor :name attr_accessor :price #オーバーライドで呼び出す箇所 def initialize(name:,price:) self.name = name self.price = price end def info return "製品名:#{self.name}、価格:#{self.price}" end endphone.rbrequire "./product" class Phone < Product attr_accessor :weight #initializeのオーバーライド(既存部呼び出し) def initialize(name:, price:, weight:) super(name: name, price: price) self.weight = weight end #オーバーライド def info return "製品名:#{self.name}、価格:#{self.price}円、重さ:#{self.weight}" end endデフォルトで用意されているクラスの読み込み
require "クラス名"
└ ファイルの読み込みとは異なる
(require "./ファイル名")Dateクラス
デフォルトでRubyに定義されているクラスの一つ。
▼クラスの読み込み
require "date"▼Dateインスタンスの生成
変数 = Date.new(yyyy, m, d)▼出力
yyyy-mm-ddrequire "date" yesterday = Date.new(2020, 5, 30) puts yesterday #出力 2020-05-30Dateクラスのインスタンスメソッド
指定曜日か確認する
指定した曜日か確認 → 真偽値で返す。
インスタンス名.曜日?require "date" yesterday = Date.new(2020, 5, 30) puts yesterday.monday? puts yesterday.saturday? #出力 false TrueDateクラスのクラスメソッド
今日の日付を確認する(.today)
Date.todayrequire "date" date1 = Date.today puts date1 #出力 2020-05-31インスタンスメソッドとクラスメソッド
インスタンスメソッド
- インスタンスに対し呼び出す
- インスタンス名.メソッド名
- 定義:
def メソッド名- 文末にend
クラスメソッド
- クラスに対して呼び出す
- クラス名.メソッド名
- 定義:
def クラス名.メソッド名- 文末にend
クラスメソッドを用いるとき
・インスタンスによらない結果を出力する。例:今日の日付を求める。
Date.todayクラスメソッドの作成と呼び出し
クラスメソッドは自分で作れる。
def クラス名.メソッド名▼今日の日付が月曜日か調べるクラスメソッド
- Dateクラスを読み込む
- クラスメソッドを定義する
product.rbrequire "date" class Product attr_accessor :name attr_accessor :price def initialize(name:,price:) self.name = name self.price = price end def info return "製品名:#{self.name}、価格:#{self.price}" end #クラスメソッドを定義 def Product.is_today_off today = Date.today if today.monday "今日は定休日です" else self.info end▼定義したクラスメソッドを使う
index.rbrequire "./product" product1 = Product.new(name: "iphone11", price: "120000") #クラスメソッドの呼び出し Product.is_today_off
- 投稿日:2020-05-31T21:46:55+09:00
Rails 単数リソース resourceによるルーティング
単数リソース
resourcesメソッドは7つの基本アクションに対するルーティングを一括して設定するメソッドです。
うんそれはわかってる。でもresourceってなんだ..."s"付け忘れてない?
となったので、本日は単数リソースresourceについてまとめてみます。見た目ではsがついてるかついていないかですが、働きは結構違います。
あるシステムについて考える
管理ユーザーと一般ユーザーのいるシステムを考えます。
一般ユーザーはログイン後、自分のアカウントのみを閲覧、管理することができます。
この場合resourcesでrouteを設定すると以下のように設定が行われます。resources :users
HTTP パス コントローラ#アクション GET /users users#index GET /users/new users#new POST /users users#create GET /users/:id users#show GET /users/:id/edit users#edit PATCH/PUT /uses/:id users#update DELETE /users/:id users#destroy 考えるべきこと
先ほども言った通りユーザーは自分のアカウントしか閲覧、管理することができません。
自分のアカウントしか見れないのであればユーザーを一覧表示する、indexアクションは不要であることがわかります。じゃあどうする?
まず初めに出てくるのはonly, exceptでindexだけ外せばいいじゃん。
その通りです。それで全てオッケーでしょうか?
もう一度routeを確認しましょう。
HTTP パス コントローラ#アクション GET /users/:id users#show GET /users/:id/edit users#edit PATCH/PUT /uses/:id users#update DELETE /users/:id users#destroy ここで考えるべきはパスの:idです。
ユーザーが自分のアカウントを閲覧、管理できるのはログインしている時です。
ログインをしているということはユーザーのid属性はユーザーのセッションオブジェクトから取得できる。
⇨ URLのパスにidパラメータを入れる必要はない!!
ということがわかります。つまり目指すべきパスは上の表から:idをなくしたものです。
ここで満を時してresourceが登場します
単数リソースのためのルーティング
ここで単数リソースを使うことで以上のようなニーズに対応したルーティングを実現!!
resource :user
HTTP パス コントローラ#アクション GET /user/new users#new POST /user users#create GET /user users#show GET /user/edit users#edit PATCH/PUT /user users#update DELETE /user users#destroy 以上のように:idとindexアクションのないルーティングをresourceメソッドを使って
設定することができるんですね。
また一つ学ぶことができました。本日の記事はおしまい。
100日後に一人前になるエンジニアの連載11日目でした。
1人前のエンジニアになるまであと89日
- 投稿日:2020-05-31T21:35:49+09:00
anyenvでNodeやRubyやPythonのバージョン管理
概要
- github:https://github.com/anyenv/anyenv
- anyenvはnodenv, rbenv, pyenvなど*env系を管理するライブラリ
- nodenv, rbenv, pyenvは、Node, Ruby, Pythonのバージョンを管理してくれる。
anyevnでnodenvをインストールしてnodenvでほしいバージョンのNodeをインストールして管理しておくという感じ
anyenv インストール
$ git clone https://github.com/riywo/anyenv ~/.anyenv
$ echo 'export PATH="~/.anyenv/bin:$PATH"' >> ~/.bash_profile
$ echo 'eval "$(anyenv init -)"' >> ~/.bash_profile
$ exec $SHELL -l

# 確認
$ anyenv -v
anyenv 1.1.1

# 初期化しておく
$ anyenv install --init
nodenvインストール
$ anyenv install nodenv
$ echo 'export PATH="$HOME/.nodenv/bin:$PATH"' >> ~/.bash_profile
$ exec $SHELL -l

# 確認
$ nodenv -v
nodenv 1.3.1+5.dd4534e
Nodejsインストール
$ touch $(nodenv root)/default-packages

# インストールできるバージョンチェック
$ nodenv install --list

# インストール
$ nodenv install 14.3.0

# 確認
$ node -v
v14.3.0

# npmの同時にインストールされる
$ npm -v
v6.14.5

# globalに設定
# globalに設定するとnodeコマンドは常にそのバージョンで実行される
$ nodenv global 12.13.0

# インストールされたバージョンをリストで確認
$ nodenv versions

# 別バージョンをローカルに設定する場合
# ディレクトリごとにローカルに設定するバージョンを設定できる。
# 特定のプロジェクトのディレクトリでlocal設定しておくとそのバージョンで実行される
$ nodenv local 12.12.0
rbenvインストール
$ anyenv install rbenv
$ echo 'export PATH="$HOME/.rbenv/bin:$PATH"' >> ~/.bash_profile
$ exec $SHELL -l

# 確認
$ rbenv -v
rbenv 1.1.2-30-gc879cb0
Rubyインストール
# インストールするバージョンチェック
$ rbenv install --list

# ほしいバージョンインストール
$ rbenv install 2.7.1

# globalに設定
# globalに設定するとnodeコマンドは常にそのバージョンで実行される
$ rbenv global 2.7.1

# 確認
$ rbenv versions

# 別バージョンをローカルに設定する場合
# ディレクトリごとにローカルに設定するバージョンを設定できる。
# 特定のプロジェクトのディレクトリでlocal設定しておくとそのバージョンで実行される
$ rbenv local 2.6.0
BUILD FAILEDエラー
下記のようなエラーが出た場合の対処
$ rbenv install 2.7.1

Downloading ruby-2.7.1.tar.bz2...
-> https://cache.ruby-lang.org/pub/ruby/2.7/ruby-2.7.1.tar.bz2
Installing ruby-2.7.1...

BUILD FAILED (Ubuntu 20.04 using ruby-build 20200520)

Inspect or clean up the working tree at /tmp/ruby-build.20200529010032.1915.2716Kv
Results logged to /tmp/ruby-build.20200529010032.1915.log

Last 10 log lines:
checking for ruby... false
checking build system type... x86_64-pc-linux-gnu
checking host system type... x86_64-pc-linux-gnu
checking target system type... x86_64-pc-linux-gnu
checking for gcc... no
checking for cc... no
checking for cl.exe... no
configure: error: in `/tmp/ruby-build.20200529010032.1915.2716Kv/ruby-2.7.1':
configure: error: no acceptable C compiler found in $PATH
See `config.log' for more details
エラー出た人はここら辺実行すれば大体解決するかも
$ sudo apt-get update
$ sudo apt-get install -y build-essential checkinstall
$ sudo apt-get install libreadline-gplv2-dev libncursesw5-dev libssl-dev libsqlite3-dev tk-dev libgdbm-dev libc6-dev libbz2-dev
pyenvインストール
上記と同様
やってないけど多分下記の感じでいけるかも$ anyenv install pyenv $ echo 'export PATH="$HOME/.pyenv/bin:$PATH"' >> ~/.bash_profile $ exec $SHELL -l # 確認 $ pyenv -vPythonインストール
# インストールするバージョンチェック
$ pyenv install --list

# ほしいバージョンインストール
$ pyenv install [version]

# globalに設定
# globalに設定するとnodeコマンドは常にそのバージョンで実行される
$ pyenv global [version]

# 確認
$ pyenv versions

# 別バージョンをローカルに設定する場合
# ディレクトリごとにローカルに設定するバージョンを設定できる。
# 特定のプロジェクトのディレクトリでlocal設定しておくとそのバージョンで実行される
$ pyenv local [version]
- 投稿日:2020-05-31T21:05:54+09:00
プログラミング未経験化学系大学院生がWeb系企業に新卒で内定をもらうまでの記録
はじめに
はじめまして!
就職活動の結果、全くの未経験の状態からWeb系自社開発企業に内定をいただくことができたので、記録を残しておきます。
中途ではなく、新卒のエンジニア職での採用になります。他業種からエンジニアに転職されている方の記事は多く見かけましたが、新卒についての情報は少ないと感じたので記事化しようと思いました。もちろん転職活動に取り組んでいる方にも参考になる内容だと思います。学習を始める前の状況
- 某私立大の大学院生、化学系の研究をしている
- 研究室では完全なポンコツで、業績としては国内の小さな学会で1回発表しただけ
- 月~土は10時から23時くらいまで研究漬け(いわゆるブラック研究室)
- 2020年5月現在で大学院修士2年生、就活的には”21卒"と呼ばれる世代
- 研究でも学部時代もプログラミングには一切触れていない
- SIerとかWeb系といった言葉自体を知らない本当に0の状態からスタート
読んでほしい人
- 現在、Web系エンジニアを目指し就職活動に取り組んでいる人
- これからWeb系エンジニアになりたい人
- なんとなくIT業界に行きたいと思ってる人
- 研究室で苦しんでいる大学(院)生
伝えたいこと
相性の合わない研究室に入ってしまい、挫折して絶望していた自分が、新しいステージでやり直すという思いでプログラミングを勉強し、エンジニアとして再スタートすることができました。
この記事を通して、色々な状況で苦しい思いをしている人に、分野を変えるのはいつからでも遅くはないと伝えたいです。就職活動を始めてから内定をもらうまで
基本情報技術者試験を受ける(2019年10月)
2019年の夏ごろ、自分の研究分野への才能の無さを痛感し、一念発起してIT業界に就職しようと考え始めました。完全な未経験だったので、とりあえず勉強しとこうと思い、7月くらいに基本情報技術者の試験に申し込みました。
この学習方法についてはまた他の記事で書こうと思いますが、3ヶ月半ほどの学習で合格しました。資格の有無が内定に直結したとは思わないですが、ここで広く浅く学んでおいたのは後の学習に活きましたし、面接で話すネタにもなりました。
研究のかたわら情報収集(2019年11月~12月)
基本情報の試験が終わってから年末くらいまでは研究が忙しくなり、平日は研究、休日は合同説明会などで情報収集をしてました。
他にも勝又健太さん(@poly_soft)のYouTubeを観たりしてました。
このあたりでSIerとWeb系の違いを知り、Web系の企業に行きたいなと思いつつもプログラミングをしたことがないので無理かな、、、と思ってました。初めてプログラミングに触れる(2020年1月)
年末年始で時間があったのでふと思い立ってProgateやドットインストールを始めました。
- Progate HTML/CSS
- ドットインストール Bootstrap
- Progate JavaScript
- Progate jQuery
- YouTube動画を見ながら模写コーディング×2
- https://youtu.be/9cKsq14Kfsw
- https://youtu.be/V_lAhqLXT9A以上を1ヶ月ぐらいでやりました。ここまでで、時間はかかるもののWebサイトの見た目については1人でコードを書いて実装できるようになっていたと思います。
ポートフォリオを作成(2020年2月)
2月の頭に1社面接を受けました。ポートフォリオ無しで特攻した結果、門前払いを受けたため、すぐにポートフォリオ作成にとりかかりました。
- Progate Ruby
- Progate Rails
以上を2週間ほどで集中的にこなしました。さらに2週間ほどでSNS系のWebアプリを作成し、herokuにデプロイしました。(2020年2月)
GoogleMapsAPIを使ってみたりはしましたが、機能として目立ったところは特に無く、"Progateに毛が生えた程度"のポートフォリオでした。ちなみにこの時の経験をQiitaに投稿したりもしました。
これ以降はポートフォリオは触っていません。
説明会、面接ラッシュ、そして内定へ(2020年3月~5月)
3月に入り、説明会や面接が本格的に始まりました。3月中はエントリーシート、自己分析、企業調べといった就活っぽいことをしてました。SIerやSES企業は避けるようにし、Web系企業で入れそうなところにエントリーしていました。
4月中は面接ラッシュでした。コロナウイルスが直撃しましたが、さすがWeb系企業という感じで、すぐにオンライン面接に切り替わり、問題なく選考を受けていました。
最終的に5月に入ったくらいで内定の連絡をいただきました。
就活についてはよく分かりませんが、技術力が不足している分、中高の部活や大学、研究などこれまでの経験で得たことをどう活かして事業に貢献できるか、という視点が大切なのかなと感じました。
振り返り・反省点
学習時間
学習にかけた時間をざっと計算してみると
- 1月は研究と並行していたこともあり、月~土は2時間、日曜は1日中勉強していたので、週で20時間くらい。なので月で80時間くらい。
- 2月は研究は下火になり、月~土は5時間、日曜は1日中という感じで、週で40時間くらい。なので月で160時間くらい。以上から、プログラミングを始めてポートフォリオを完成させるまでにだいたい250時間前後かかったかと思います。
また、基本情報技術者の資格のために3ヶ月半の間、たまにサボりつつ1日1時間くらいずつ勉強していたので、それを含めると300時間~350時間
くらいになると思います。良かった点
ポートフォリオを作成したこと
転職市場ではポートフォリオがないと話にならないという状況のようですが、新卒ではポートフォリオがあるというだけで評価していただける企業もありました。Progateに毛が生えた程度のしょぼいものでも、とりあえず作成して公開しているという事実はかなり重要だったと思います。
基礎学習に時間をかけ過ぎなかったこと
これは様々な方が見飽きるほど言及していることですが、Progateを何週もするような学習は無駄です。 私自身、Progateは各1回だけやって、すぐにポートフォリオの作成に取り組みました。その中で忘れていることがあればその都度スライドを見直して確認する、という形で勉強していました。
結果として、プログラミングを始めてから2ヶ月でポートフォリオを作成できました。新卒でWeb系をあきらめてSIer、SES企業にいかなかったこと
非情報系、プログラミング未経験ということで、就活を始める直前までは新卒ではとりあえずSIerに入って、そこからWeb系に転職しようかなと思っていました。ただ、新卒カードをSIer系企業で使ってしまうことが得策ではない理由のような動画を観ているうちに、新卒でSIerに行くのはもったいないと考えるようになりました。
結果的にWeb系の企業に挑戦し、内定をいただくことができました。受ける前からあきらめず、ダメもとでも挑戦して本当に良かったと思います。必要以上に費用をかけなかった
プログラミングの学習にあたってかかった費用はProgateとドットインストールの会費くらいで、合計5000円くらいです。数万円もするようなプログラミングスクールには通っていません。
スクールについては賛否両論あるかと思いますが、プログラミング未経験者がエンジニアになるにあたって、個人的には必ずしもスクールに通う必要はないと思いました。
運が良かった部分もありますが、私自身はスクールに通わずWeb系企業に内定をいただけたので、「未経験からエンジニアになるには数万~数十万という費用をかけてスクールに通わないといけない」と思い込み、あきらめてしまうのはもったいないと思います。悪かった点
もっとポートフォリオに力を入れておくべきだった
エントリーシートや面接対策を言い訳に、herokuにデプロイした時点でポートフォリオの作成をストップしてしまいました。他の応募者と差別化するために、AWSやDockerといった技術をポートフォリオに組み込むところまで取り組むべきでした。
ポートフォリオの題材
ポートフォリオ作成では、どんな技術を使うかも重要ですが、何のために作るのかも重要だと個人的に思いました。面接では、ポートフォリオを作った理由を聞かれることが多かったです。自分はポートフォリオの題材を深く考えずに決めてしまったため、志望理由と成果物の間の矛盾を指摘されることが何度かありました。
単にプログラミングの練習のために作る、というよりも、自分の志望理由や経歴に沿うような題材を選ぶと面接の際に話がしやすいと感じました。
例)前職で医療系の仕事をしていた→ヘルスケア系のアプリ、など長期インターンをやっておけばよかった
学部時代にアルバイトの代わりとして、どこかしらのベンチャー企業とかの長期インターンをやっておけばよかったと思います。多くの人がスクールなどでお金を払ってでも体験したいチーム開発を、給料をもらいながら経験できるのはかなりお得です。
学生であれば未経験でも採用してくれるところはけっこうあるイメージです。就活を意識し始めた学部3年生の方とかは、まだ全然間に合うのでぜひ参加することをおすすめします。受ける企業を絞ってしまった
「未経験可」や「技術力は不問」といった注意書きのある企業を優先的に受けていましたが、自分の可能性を狭めているだけで無駄でした。特に新卒については技術力以外の部分を評価してもらえる企業が多いと思うので、勝手に自分で制限を設けず、もっと多くの企業にエントリーすべきでした。
最後に
QiitaやYouTube等で多くのエンジニアに関する情報に触れ、なんとかエンジニアとして就職することができました。このような有益な情報を発信をされている方々や面接をしていただいた企業の方々、ポートフォリオ作成や面接対策の際に相談に乗っていただいた先輩方に感謝の気持ちを伝えたいです。
この記事の通りにすれば絶対上手くいくとかではなく、あくまでもサンプルの1つとして参考にしていただければと思います。
新たにエンジニアとして働きたいという方の励みになれば幸いです。参考にした記事など
自分がエンジニアを目指すきっかけとなった、未経験からWeb系エンジニアに転職された方の記事
- 未経験から4ヶ月でWeb系エンジニアに転職するためにやったこと
- 化学系研究者が完全未経験からWeb系自社開発企業に転職するまで
- 投稿日:2020-05-31T20:24:10+09:00
【Ruby】paizaで頻出メソッドまとめてみた
参考文献
入力メソッド
//入力値:文字列 改行:あり
input = gets

//入力値:文字列 改行:なし
input = gets.chomp

//入力値:数値   改行:あり
input = gets.to_i

//入力値:数値  改行:なし
input = gets.chomp.to_i
配列メソッド
//入力値を配列に格納 ※数値
input = gets.split.map(&:to_i)

//分割して配列に格納
a,b,c = gets.split(" ").map &:to_i

//入力値を順番に格納
a = readlines.map &:to_i


//複数行 && 複数要素の格納  ※文字列
lines = []
while line = gets
    lines << line.chomp.split(' ')
end


//複数行 && 複数要素の格納  ※数値
lines = []
while line = gets
    lines << line.chomp.split(' ').map(&:to_i)
end
timesメソッド + 配列
//繰り返し回数
n = 5
//配列の設定
sample = []

//繰り返し回数分、配列に格納
n.times do
  sample.push(gets.chomp.split(" ").map &:to_i)
end
eachメソッド + 配列
//入力値取得
sample = readlines.map &:to_i

//変数宣言
n = 5

//eachメソッド
sample.each do |i|
 if n < 10
    n += 1
 else
    puts "sample"
 end
end
その他
//絶対値取得
n = 5
sample = n.abs


//単数形→複数形
sample = "post".pluralize
puts sample
- 投稿日:2020-05-31T17:50:23+09:00
posts_controller.rb
class PostsController < ApplicationController
def index
# Post.allにorderメソッドを用いて、新しい投稿が上から順に表示されるようにしてください
@posts = Post.all.order(created_at: :desc)
enddef show
@post = Post.find_by(id: params[:id])
enddef new
enddef create
@post = Post.new(content: params[:content])
@post.save
redirect_to("/posts/index")
end
end//降順にデータベースに投稿された内容を表示する
- 投稿日:2020-05-31T17:33:48+09:00
[超入門]Rubyにおけるシンボルについて
railsやRubyと学習を初めてから1ヶ月がたちました。
まだまだ理解できてないところも多々あるので、今回もその記録として投稿します。さて今日は、「プロを目指すためのRuby入門編」のシンボルを使った、
単位変換プログラムを作成中に少しおや?となったシンボルについてまとめました!シンボルについてとその使い方について
・シンボルは文字列の変わりに使用することもあるが、文字列と同じオブジェクトとは限らない
・同じシンボル同士は同じオブジェクトざっくりこんな感じでしょうか。
また、定義の仕方としては、
   :シンボル名
   :example => "example" と表すことも可能
また大きな違いとしては、
シンボルは内部的には整数で処理されており、イミューダブルなオブジェクト。破壊的変更が効かない。ハッシュのキーでの使用
基礎的なところは改めて整理できたので、次はハッシュ内での使用のされ方について。
 examples = { :a => "aaa", :b => "bbb", :c => "ccc"}
 examples = { a: "aaa", b: "bbb", c:"ccc"} #上記を省略した形

 example[:a] => #"aaa"を呼び出し

 全てシンボルに変更も可能

 examples = { :a => :aaa, :b => :bbb, :c => :ccc}
ハッシュのキーにはシンボルが適しているので、大体は「シンボル:値」と表されるよう。
(イミューダブルな性質や処理速度の等の関係から)キーワード引数での使用
最後にキーワード引数時の使用に関して。
基本は上記と同様、「シンボル:値」で問題はなし。def example_length(length, from: :m, to: :m) units = { m: 1.0, ft: 3.28, in: 39.37} (length / units[from] * units[to]).round(2) #=>unitsハッシュのFromキー(ここでいうm:)の値と同じくtoキーを呼び出している。 end以上、本当初心的なところにはなりますがわかっている気でいるのが一番怖いので、
今後も手を動かしながら引っかかったところはこのように自分なりに整理をして行きたいです。
- 投稿日:2020-05-31T17:31:41+09:00
while文における繰り返し処理内での変数の加算について
Rubyプログラムを書いていて詰まってしまいましたので質問をこちらに投稿させていただきます。
現在、ネット上でrubyのプログラムでの事例としてよくでてくるドラゴンクエストのプログラムを作ってみようと思い作成中です。
実装したい仕様としては以下になります。
想定仕様
- スライム(敵)が表れてスライムのhp(ヒットポイント)がなくなるまで攻撃する
- スライムのhp(ヒットポイント)は6とする
- 攻撃はターン性になっており、先行は常に自分
- 自分(戦士)のhp(ヒットポイント)は10とする
- スライム(敵)の攻撃によりダメージは常に1とする
- 自分は攻撃(なぐる)と回復呪文(ホイミ)を毎ターン選択可能
- 自分の攻撃は1.2.3の中からランダムでスライム(敵)のhpを削る
- 回復呪文(ホイミ)ではhpは10まで回復する
- ただし、回復呪文はたまに失敗する(呪文使用時点での自分のhpで条件付け)
- 攻撃(なぐる)と回復呪文(ホイミ)以外を選択した場合は強制的にターン終了とし、スライムのターンにうつる
ざっとこんな感じです。
質問事項
while文のなかで繰り返し処理をしていく中で、自分(戦士)の攻撃の数字が積みあがっていくような処理が書けません。
具体的には、
【第1ターン】
先行:戦士の攻撃。スライムに2のダメージ。
高校:スライムの攻撃。戦士に1のダメージ。
【第2ターン】
先行:戦士の攻撃。スライムに2のダメージ。
高校:スライムの攻撃。戦士に1のダメージ。
【第3ターン】
先行:戦士の攻撃。スライムに2のダメージ。
高校:スライムの攻撃。戦士に1のダメージ。
※自分(戦士)の攻撃はたまたま3回連続で2が出たと仮定。上記のような場合、2×3=6でスライムを倒せるはずです。
しかし数字が積みあがっていっていないようで、永遠に繰り返されます。実際のコードが以下になります。
puts "スライムがあらわれた"

hp = 6
damage = 0
ownhp = 10
while damage < hp do
  puts ""
  puts "戦士のターン"
  puts "攻撃を選んでください。1:なぐる 2:ホイミ"
  attack = gets.to_i
  damage=[1,2,3].sample
    if attack == 1
      puts "戦士の攻撃。"
      puts "スライムに「#{damage}」のダメージ"
      damage += damage
    elsif attack == 2
      case ownhp
        when 10
        puts ""
        puts "戦士はホイミを唱えた。しかし戦士は元気いっぱい!何もおこらなかった。"
        when 1..4,6..8
        puts ""
        puts "戦士はホイミを唱えた。戦士は元気いっぱいになった。"
        else
        puts ""
        puts "呪文に失敗した。"
      end
    else
      puts ""
      puts "選択肢にないコマンドです。ターンを終了します。"
    end
  if damage < 6
  puts ""
  puts "スライムのターン"
  puts "スライムの攻撃。戦士に「1」のダメージ"
  ownhp -=1
  end
end

puts "戦士はスライムを倒した。経験値10を手に入れた。"
上記です。
実はスライムを倒す場合があります。それは自分(戦士)の攻撃で3が出た場合になります。
試しに、
①1か2が数回出て、合計6に達していてもも終わらない場合
②3が出て終わる場合上記のそれぞれのirbでのコード記載します。
①2が数回でても終わらない場合
※便宜上、3が出ないように変形して実施おります
ec2-user:~/environment/ruby-book $ ruby lib/dorakue.rb
スライムがあらわれた

戦士のターン
攻撃を選んでください。1:なぐる 2:ホイミ
1
戦士の攻撃。
スライムに「2」のダメージ

スライムのターン
スライムの攻撃。戦士に「1」のダメージ

戦士のターン
攻撃を選んでください。1:なぐる 2:ホイミ
1
戦士の攻撃。
スライムに「1」のダメージ

スライムのターン
スライムの攻撃。戦士に「1」のダメージ

戦士のターン
攻撃を選んでください。1:なぐる 2:ホイミ
1
戦士の攻撃。
スライムに「1」のダメージ

スライムのターン
スライムの攻撃。戦士に「1」のダメージ

戦士のターン
攻撃を選んでください。1:なぐる 2:ホイミ
1
戦士の攻撃。
スライムに「1」のダメージ

スライムのターン
スライムの攻撃。戦士に「1」のダメージ

戦士のターン
攻撃を選んでください。1:なぐる 2:ホイミ
1
戦士の攻撃。
スライムに「1」のダメージ

スライムのターン
スライムの攻撃。戦士に「1」のダメージ

戦士のターン
攻撃を選んでください。1:なぐる 2:ホイミ
1
戦士の攻撃。
スライムに「2」のダメージ

スライムのターン
スライムの攻撃。戦士に「1」のダメージ

戦士のターン
攻撃を選んでください。1:なぐる 2:ホイミ
1
戦士の攻撃。
スライムに「2」のダメージ

スライムのターン
スライムの攻撃。戦士に「1」のダメージ

戦士のターン
攻撃を選んでください。1:なぐる 2:ホイミ
1
戦士の攻撃。
スライムに「2」のダメージ

スライムのターン
スライムの攻撃。戦士に「1」のダメージ

戦士のターン
攻撃を選んでください。1:なぐる 2:ホイミ
1
戦士の攻撃。
スライムに「1」のダメージ

スライムのターン
スライムの攻撃。戦士に「1」のダメージ

戦士のターン
攻撃を選んでください。1:なぐる 2:ホイミ
1
戦士の攻撃。
スライムに「2」のダメージ

スライムのターン
スライムの攻撃。戦士に「1」のダメージ

戦士のターン
攻撃を選んでください。1:なぐる 2:ホイミ
1
戦士の攻撃。
スライムに「2」のダメージ

スライムのターン
スライムの攻撃。戦士に「1」のダメージ

戦士のターン
攻撃を選んでください。1:なぐる 2:ホイミ
1
戦士の攻撃。
スライムに「1」のダメージ

スライムのターン
スライムの攻撃。戦士に「1」のダメージ

戦士のターン
攻撃を選んでください。1:なぐる 2:ホイミ
1
戦士の攻撃。
スライムに「2」のダメージ

スライムのターン
スライムの攻撃。戦士に「1」のダメージ

戦士のターン
攻撃を選んでください。1:なぐる 2:ホイミ
^CTraceback (most recent call last):
        2: from lib/dorakue.rb:10:in `<main>'
        1: from lib/dorakue.rb:10:in `gets'
lib/dorakue.rb:10:in `gets': Interrupt
強制的に終わらせました。
②3が出て終わる場合
ec2-user:~/environment/ruby-book $ ruby lib/dorakue.rb
スライムがあらわれた

戦士のターン
攻撃を選んでください。1:なぐる 2:ホイミ
1
戦士の攻撃。
スライムに「3」のダメージ
戦士はスライムを倒した。経験値10を手に入れた。
このような感じです。
考えられる要因
damage += damageダメージを積み重ねていくために書いたコードで上記の部分が間違えているのだと思いますが、どういう風に直せばよいのかわかりません。
3が出た場合は3+3=6で倒せているのだと思います。
つまり、繰り返し処理というよりはその周回の中だけで足されてしまっている形になっております。ご教示いただければ嬉しいです。
どうぞよろしくお願いいたします。
- 投稿日:2020-05-31T15:24:00+09:00
[Rails]graphql-rubyでpolymorphicを表現する
はじめに
最近、graphql-rubyでAPIを実装しています。
Railsでは、モデルの関連付けにポリモーフィックという便利な機能があります。
これをUnionTypeを使ってgraphqlでも表現する方法について説明します。やりたいこと
UserテーブルとPetShopテーブルがDogテーブルのownerableでポリモーフィックな場合を考えます。graphqlでdogを取得するときに、その所有者であるownerable(user or pet_shop)のカラムも一緒にとってこれるようにする。
ポリモーフィックではない場合
まず復習をかねて、通常の関連付け(belongs_toとかhas_manyとか)の場合を考えてみます。
以下のようにUserとDogが1対多だとします。user.rbClass User < ApplicationRecord has_many: dogs enddog.rbClass Dog < ApplicationRecord belongs_to: user endObjectType
モデルで定義した関連付けをgraphql-rubyで表現するには、ObjectTypeを以下のように書きます。
user_type.rbClass UserType < Types::BaseObject field :id, ID, null: false enddog_type.rbClass DogType < Type::BaseObject field :name, String, null: false field :user, ObjectTypes::UserType, null: false # userとの関連付け end上記のようにObjectTypeを定義すると、dogオブジェクトを返す際に一緒に関連付けられたuserオブジェクトも取得してくれます。
ポリモーフィックの場合
続いて、ポリモーフィックで関連づけられた場合を考えてみます。
userの他にpetShopもdogを所有しています。モデルの関連付け
ポリモーフィックの場合、Rialsモデルの関連付けは以下のようにかけます。
user.rbClass User < ApplicationRecord has_many :dogs, as: :ownerable endpet_shop.rbClass PetShop < ApplicationRecord has_many :dogs, as: :ownerable enddog.rbClass Dog < ApplicationRecord belongs_to :ownerable, polymorphic: true endObjectType
続いて、Objectタイプを定義します。
petShopオブジェクトが追加されたのと、dogTypeのfieldがuserではなく、ポリモーフィックな関連付けを示すownerableに変更されています。user_type.rbClass UserType < Types::BaseObject field :id, ID, null: false endpet_shop_type.rbClass PetShopType < Types::BaseObject field :id, ID, null: false enddog_type.rbClass DogType < Type::BaseObject field :name, String, null: false field :ownerable, UnionTypes::OwnerableType, null: false # ownerableとの関連付け end注意点はownerableのtypeがObjectTypesではなく、UnioTypesになっている点です。
UnionTypeはこれから定義していきます。UnioneType
UnioTypeは、本記事の肝となる箇所です。dogTypeに定義したownerableをUnionTypeとして定義して、userTypeかpetShopTypeかを振り分けてくれます。
ownerable_type.rbmodule UnionTypes class OwnerableType < Types::BaseUnion # possible_typesで関連付けられうるタイプを宣言する possible_types ObjectTypes::UserType, ObjectTypes::PetShopType # 分岐処理を記述 def self.resolve_type(object, _context) if object.is_a?(User) ObjectTypes::PostType elsif object.is_a?(PetShop) ObjectTypes::ReplyType end end end end上記のように書くことで、resolverで返す型を判断して、UserかPetShopを選んでくれます。(rubyっぽくはない感じはしますが...)
Query
UnionTypeを使った場合は、queryも少し特殊な書き方をします。
query{
  dog(id: [dog_id]){
    id
    ownerable {
      __typename #型を指定する
      ... on User {
        id
      }
      __typename
      ... on PetShop {
        id
      }
    }
  }
}
上記のようにtypenameを指定することによってほしいownerを選択することができます。
- 投稿日:2020-05-31T15:04:51+09:00
application.html.erb
TweetApp
<%= csrf_meta_tags %><%= stylesheet_link_tag 'application', media: 'all', 'data-turbolinks-track': 'reload' %> <%= javascript_include_tag 'application', 'data-turbolinks-track': 'reload' %>
<!-- 以下のリンクをlink_toメソッドを用いて変更してください -->
<%= link_to("TweetApp","/") %>
<!-- 以下のリンクをlink_toメソッドを用いて変更してください -->
<%= link_to("TweetAppとは","/about")%>
<!-- ここにlink_toメソッドを用いて投稿一覧ページへのリンクを作成してください -->
<%= link_to("投稿一覧","/posts/index")%>
<%= yield %>
- 投稿日:2020-05-31T14:54:39+09:00
Ruby と Python で解く AtCoder ARC067 C 素因数分解
はじめに
AtCoder Problems の Recommendation を利用して、過去の問題を解いています。
AtCoder さん、AtCoder Problems さん、ありがとうございます。今回のお題
AtCoder Regular Contest C - Factors of Factorial
Difficulty: 925今回のテーマ、素因数分解
以前解きました Ruby と Python で解く AtCoder ABC057 C 素因数分解 ビット全探索 の簡易版といった問題です。
階乗と言いながら、実際に階乗をすると
C言語系では整数オーバーフローが目に見えますので、その点がDifficulty高目なのかもしれませんね。Ruby
ruby.rbrequire 'prime' n = gets.to_i if n == 1 puts '1' exit end M = 10 ** 9 + 7 h = Hash.new(0) 1.upto(n) do |i| i.prime_division.each do |k, v| h[k] += v end end puts h.values.map{|i| (i + 1)}.inject{|u, v| u * v % M}prime.rb1.upto(n) do |i| i.prime_division.each do |k, v| h[k] += v end end実際の階乗計算は不要で、階乗する数列の数値を素因数分解してハッシュに挿入します。
追記
コメントをいただきましたので修正いたしました。perm.rbputs h.values.map{|i| (i + 1)}.inject{|u, v| u * v % M}ある素数を選択しない(0個選択する)ケースもありますので
(i + 1)して組合せ数を求めます。Ruby 余談
ちなみに
1≦N≦1000の最大値1000の階乗は2568桁の数値になります。402387260077093773543702433923003985719374864210714632543799910429938512398629020592044208486969404800479988610197196058631666872994808558901323829669944590997424504087073759918823627727188732519779505950995276120874975462497043601418278094646496291056393887437886487337119181045825783647849977012476632889835955735432513185323958463075557409114262417474349347553428646576611667797396668820291207379143853719588249808126867838374559731746136085379534524221586593201928090878297308431392844403281231558611036976801357304216168747609675871348312025478589320767169132448426236131412508780208000261683151027341827977704784635868170164365024153691398281264810213092761244896359928705114964975419909342221566832572080821333186116811553615836546984046708975602900950537616475847728421889679646244945160765353408198901385442487984959953319101723355556602139450399736280750137837615307127761926849034352625200015888535147331611702103968175921510907788019393178114194545257223865541461062892187960223838971476088506276862967146674697562911234082439208160153780889893964518263243671616762179168909779911903754031274622289988005195444414282012187361745992642956581746628302955570299024324153181617210465832036786906117260158783520751516284225540265170483304226143974286933061690897968482590125458327168226458066526769958652682272807075781391858178889652208164348344825993266043367660176999612831860788386150279465955131156552036093988180612138558600301435694527224206344631797460594682573103790084024432438465657245014402821885252470935190620929023136493273497565513958720559654228749774011413346962715422845862377387538230483865688976461927383814900140767310446640259899490222221765904339901886018566526485061799702356193897017860040811889729918311021171229845901641921068884387121855646124960798722908519296819372388642614839657382291123125024186649353143970137428531926649875337218940694281434118520158014123344828015051399694290153483077644569099073152433278288269864602789864321139083506217095002597389863554277196742822248757586765752344220207573630569498825087968928162753848863396909959826280956121450994871701244516461260379029309120889086942028510640182154399457156805941872748998094254742173582401063677404595741785160829230135358081840096996372524230560855903700624271243416909004153690105933983835777939410970027753472000000000000000000000000000000000000000000000000000000000000000000000000000000000000000000000000000000000000000000000000000000000000000000000000000000000000000000000000000000000000000000000000000000000000000000000000000000000000000000000000000000000この数値を直接
Prime.prime_division(1000!)しても正常に因数分解を行い、結果としてACとなります。
ちょっとだけ!しました。Python
python.pyfrom math import sqrt from collections import defaultdict n = int(input()) h = defaultdict(int) def factorization(arg): while arg % 2 == 0: h[2] += 1 arg //= 2 for i in range(3, int(sqrt(arg)) + 1, 2): while arg % i == 0: h[i] += 1 arg //= i if arg > 1: h[arg] += 1 if n == 1: print(1) else: m = 10 ** 9 + 7 for i in range(1, n + 1): factorization(i) cnt = 1 for key, v in h.items(): cnt *= (v + 1) cnt %= m print(cnt)自作の
factorization関数でdefaultdictに素数を追加しています。
Ruby Python コード長 (Byte) 239 603 実行時間 (ms) 15 23 メモリ (KB) 2300 3316 まとめ
- ARC 067 C を解いた
- Ruby に詳しくなった
- Python に詳しくなった
- 投稿日:2020-05-31T14:44:03+09:00
【Rails】Font Awesomeの導入方法
開発環境
・Ruby: 2.5.7
・Rails: 5.2.4
・Vagrant: 2.2.7
・VirtualBox: 6.1
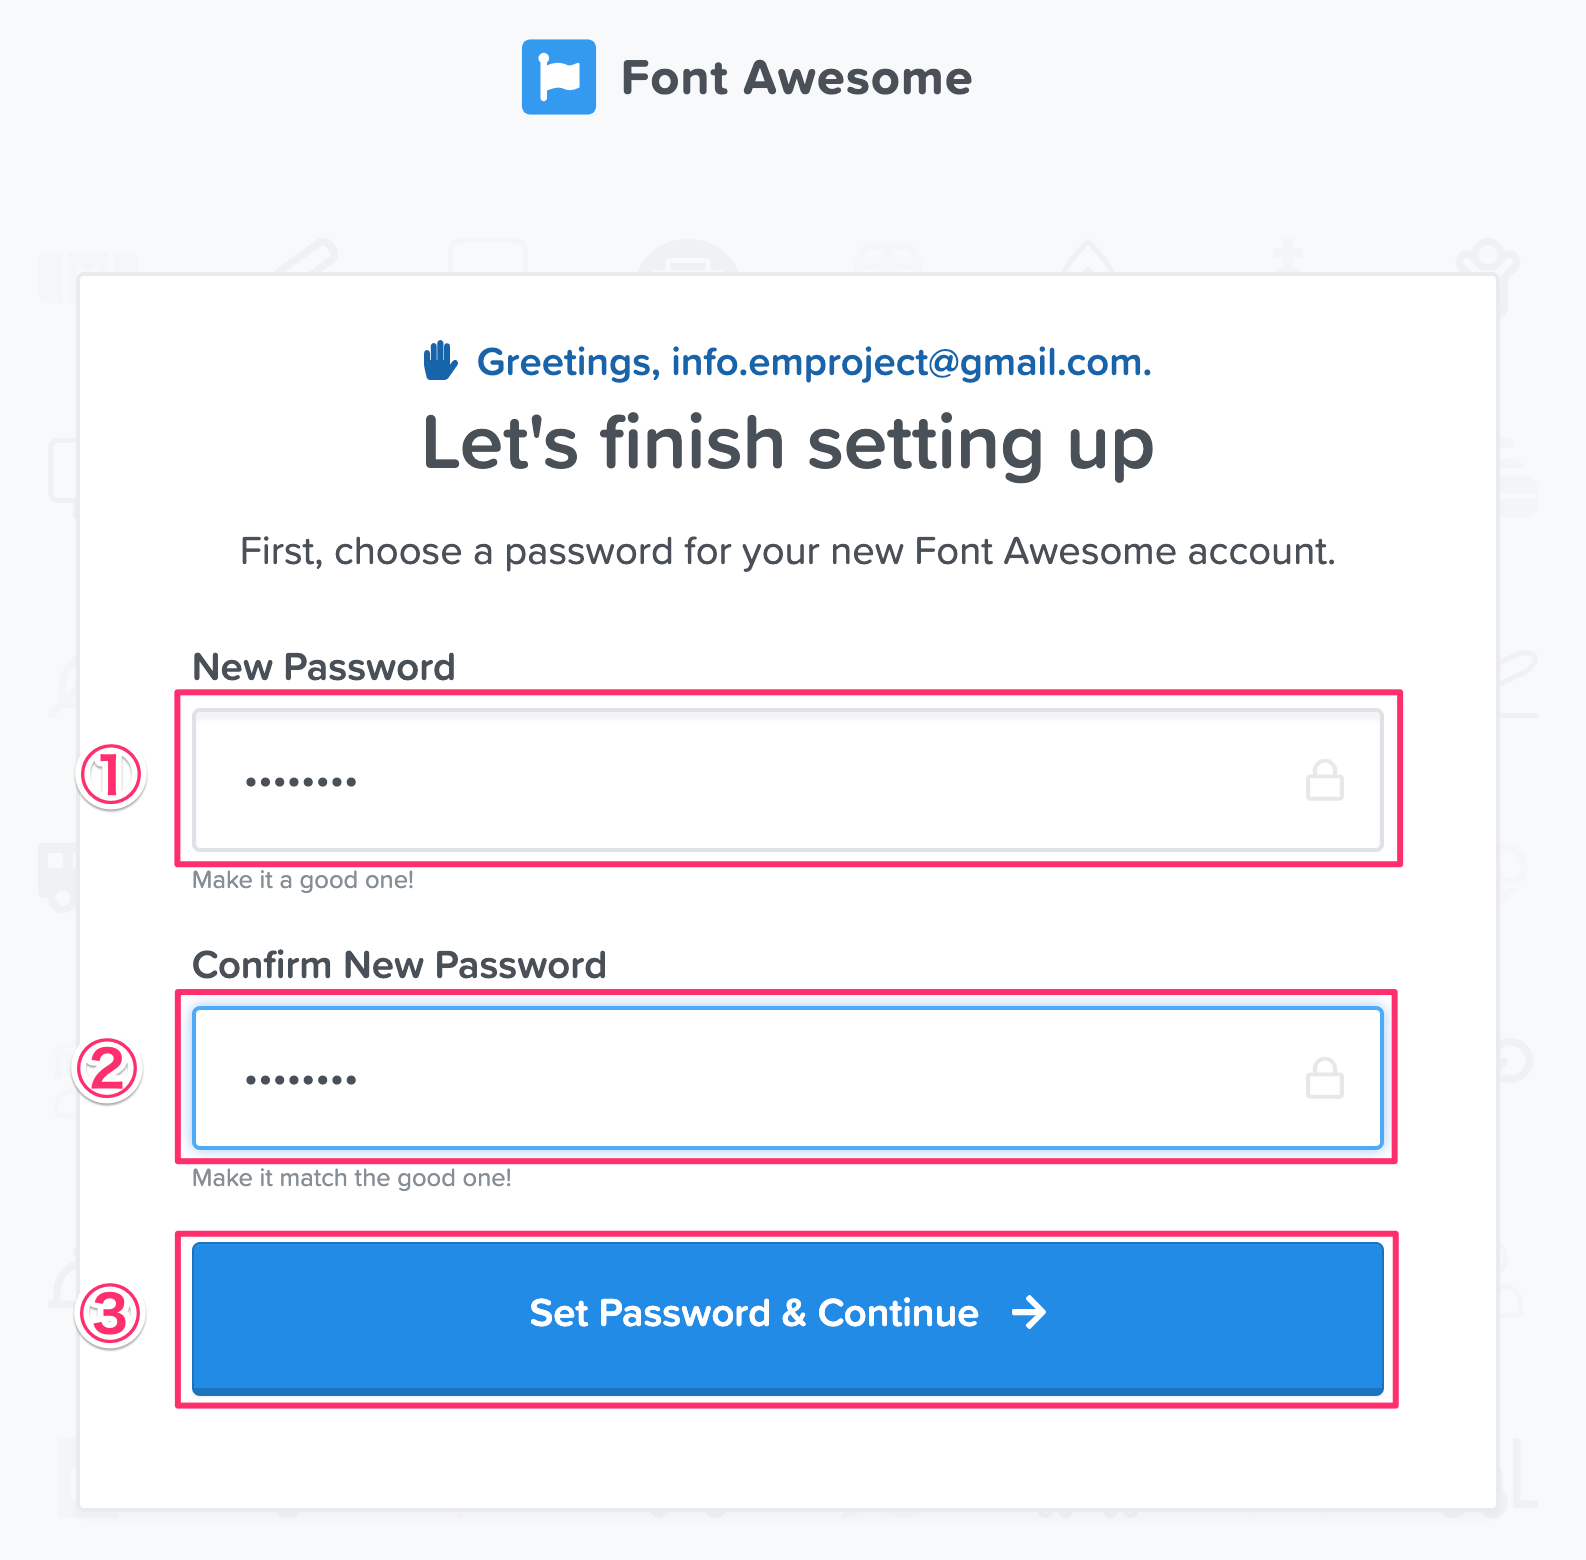
・OS: macOS Catalinaアカウント作成
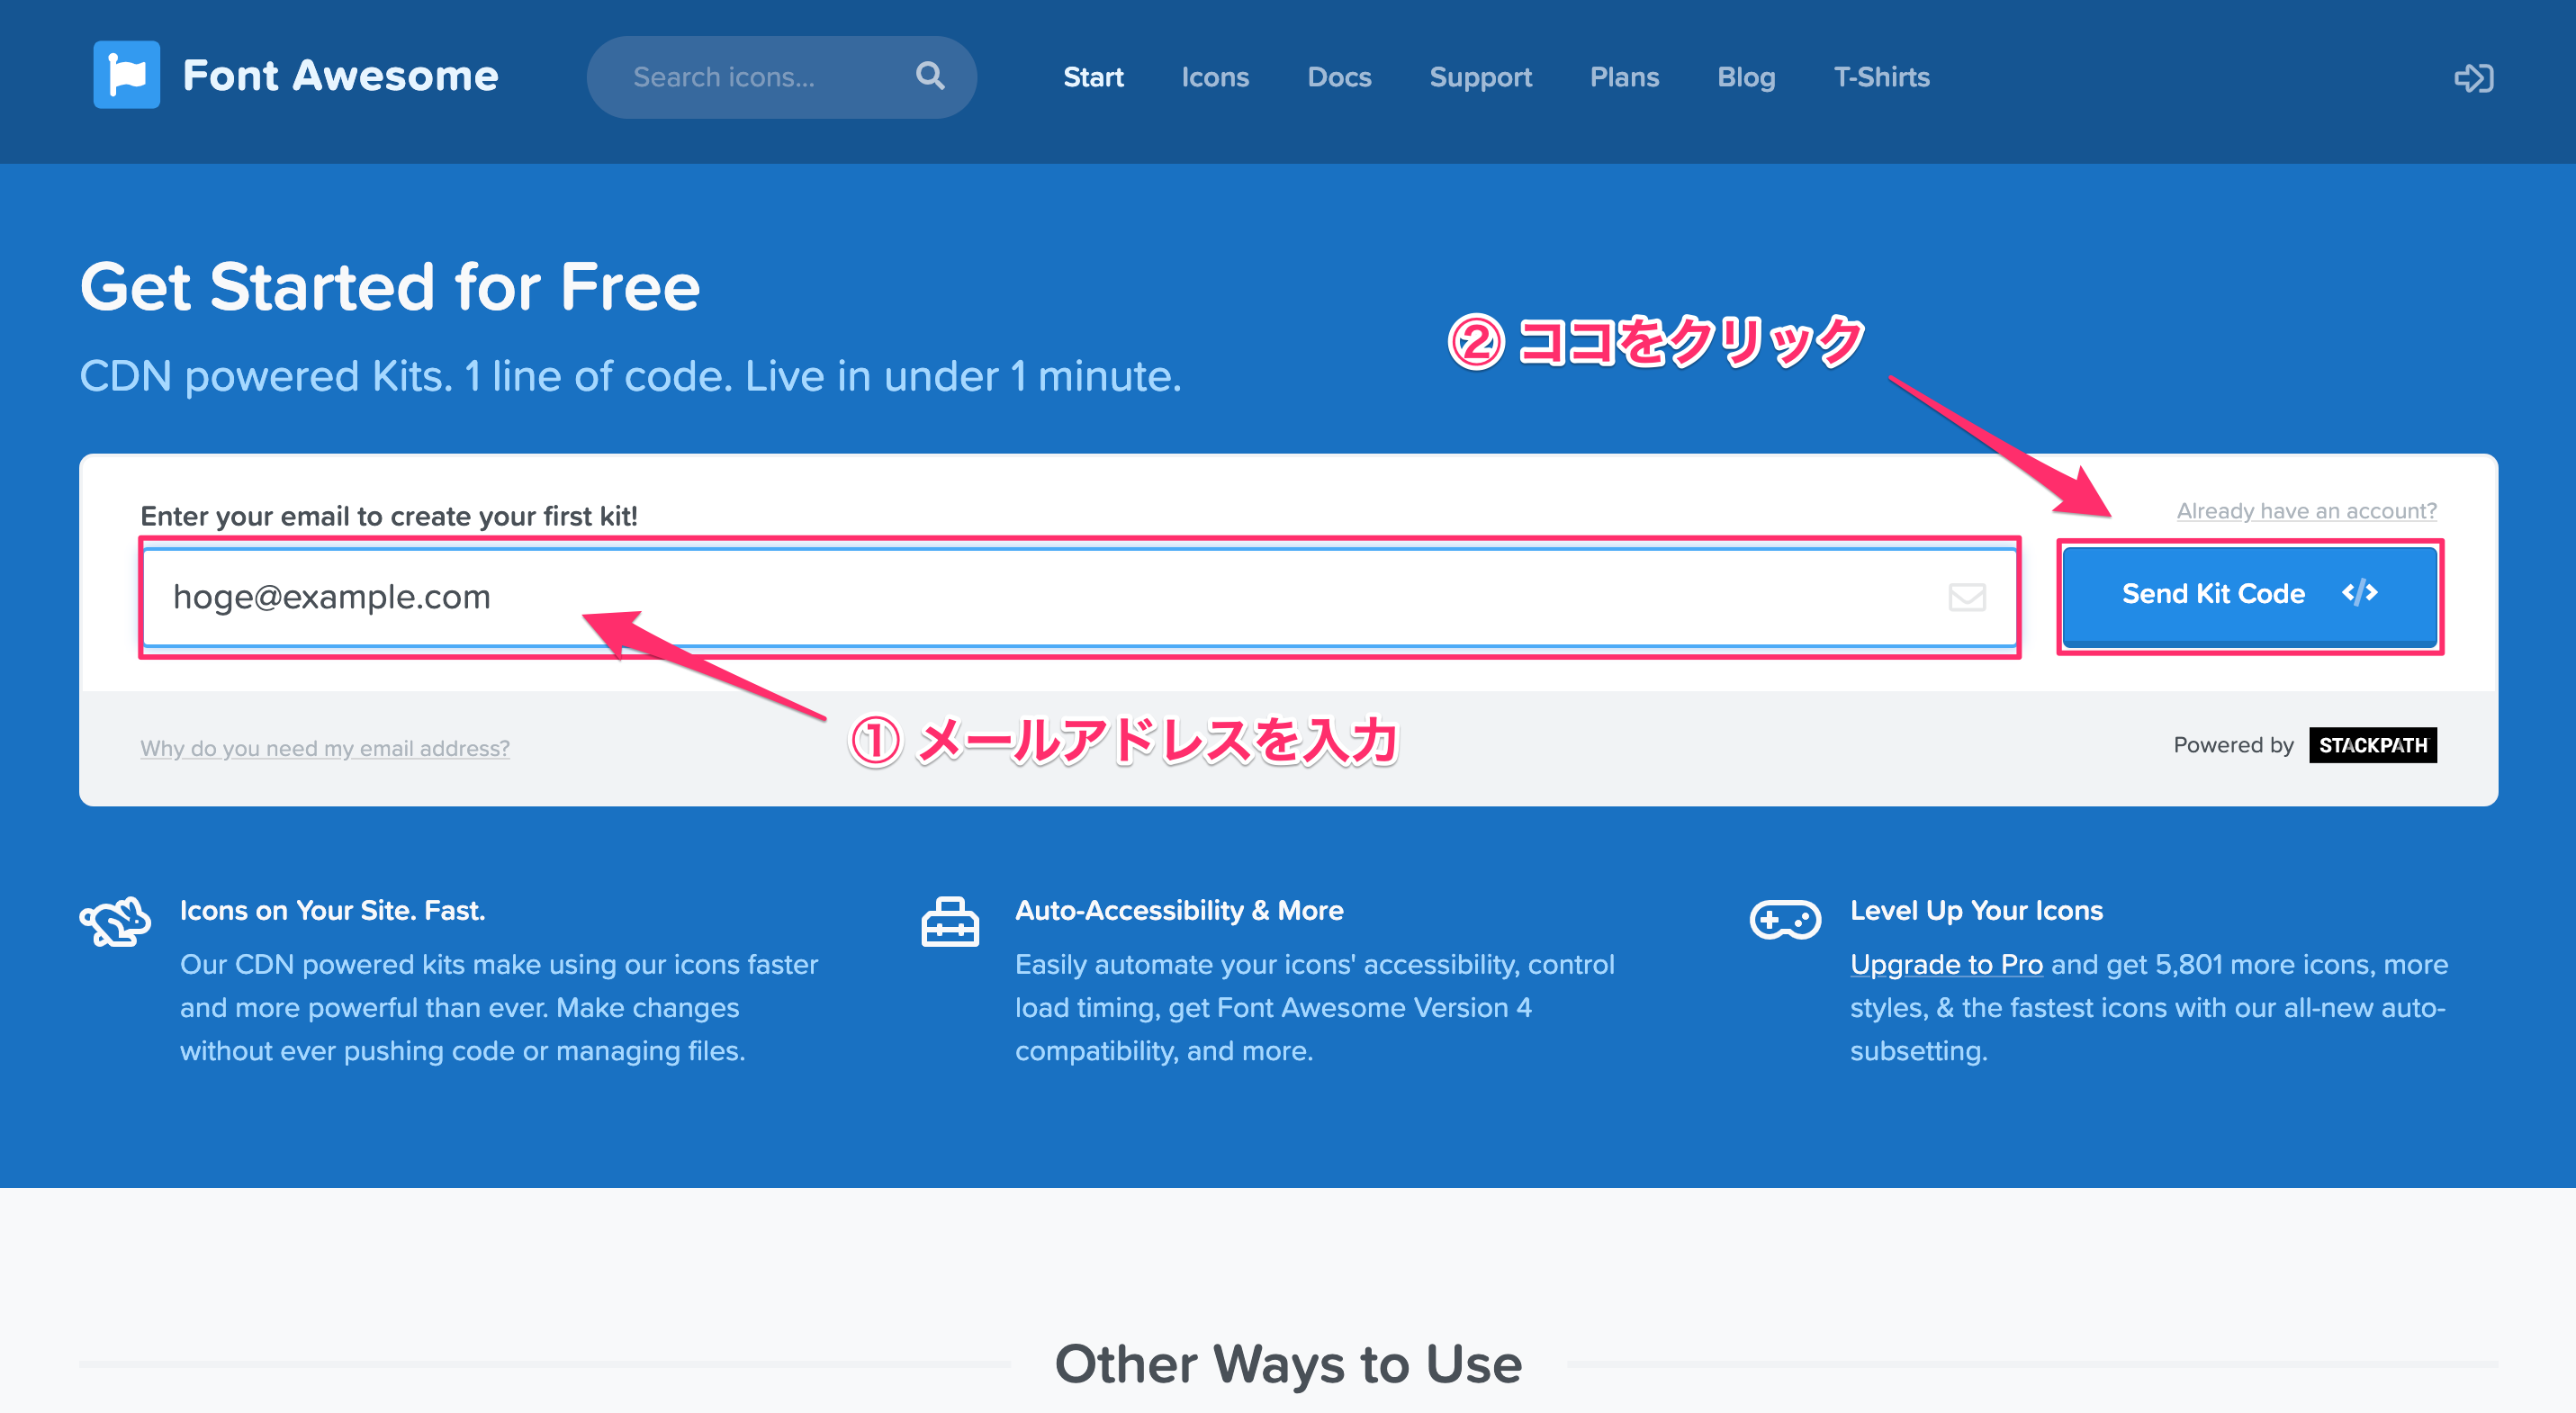
1.下記リンクにアクセスする。
Font Awesome Start画面2.メールアドレスを入力し、「Send Kit Code」をクリックする。
3.確認メールが届くので「Click to Confirm Your Email Address + Set Things Up」というリンクにアクセスする。
4.下記画面に遷移するので、パスワードを入力して「Set Password & Continue」をクリックする。
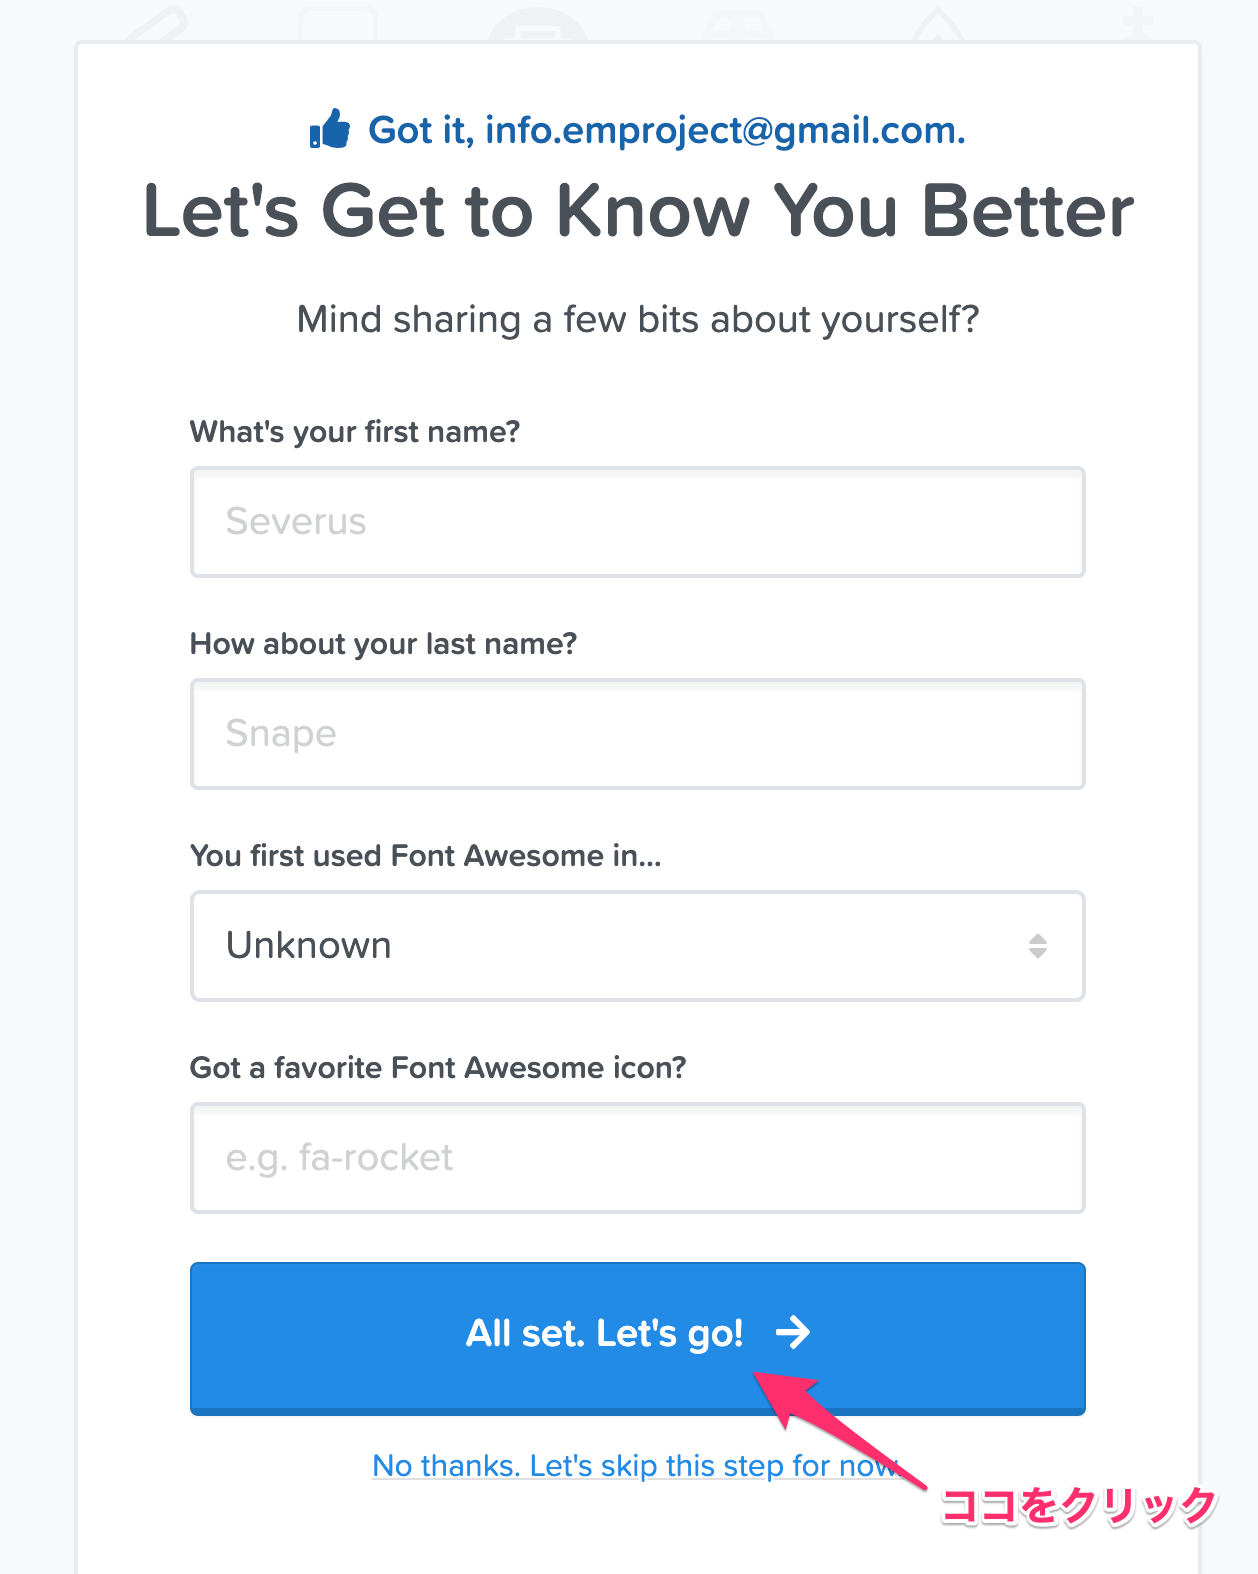
5.プロフィール情報入力画面に遷移するが、今は特に設定する必要も無いので、
何も入力せずに「All set.Let's Go!」をクリックする。
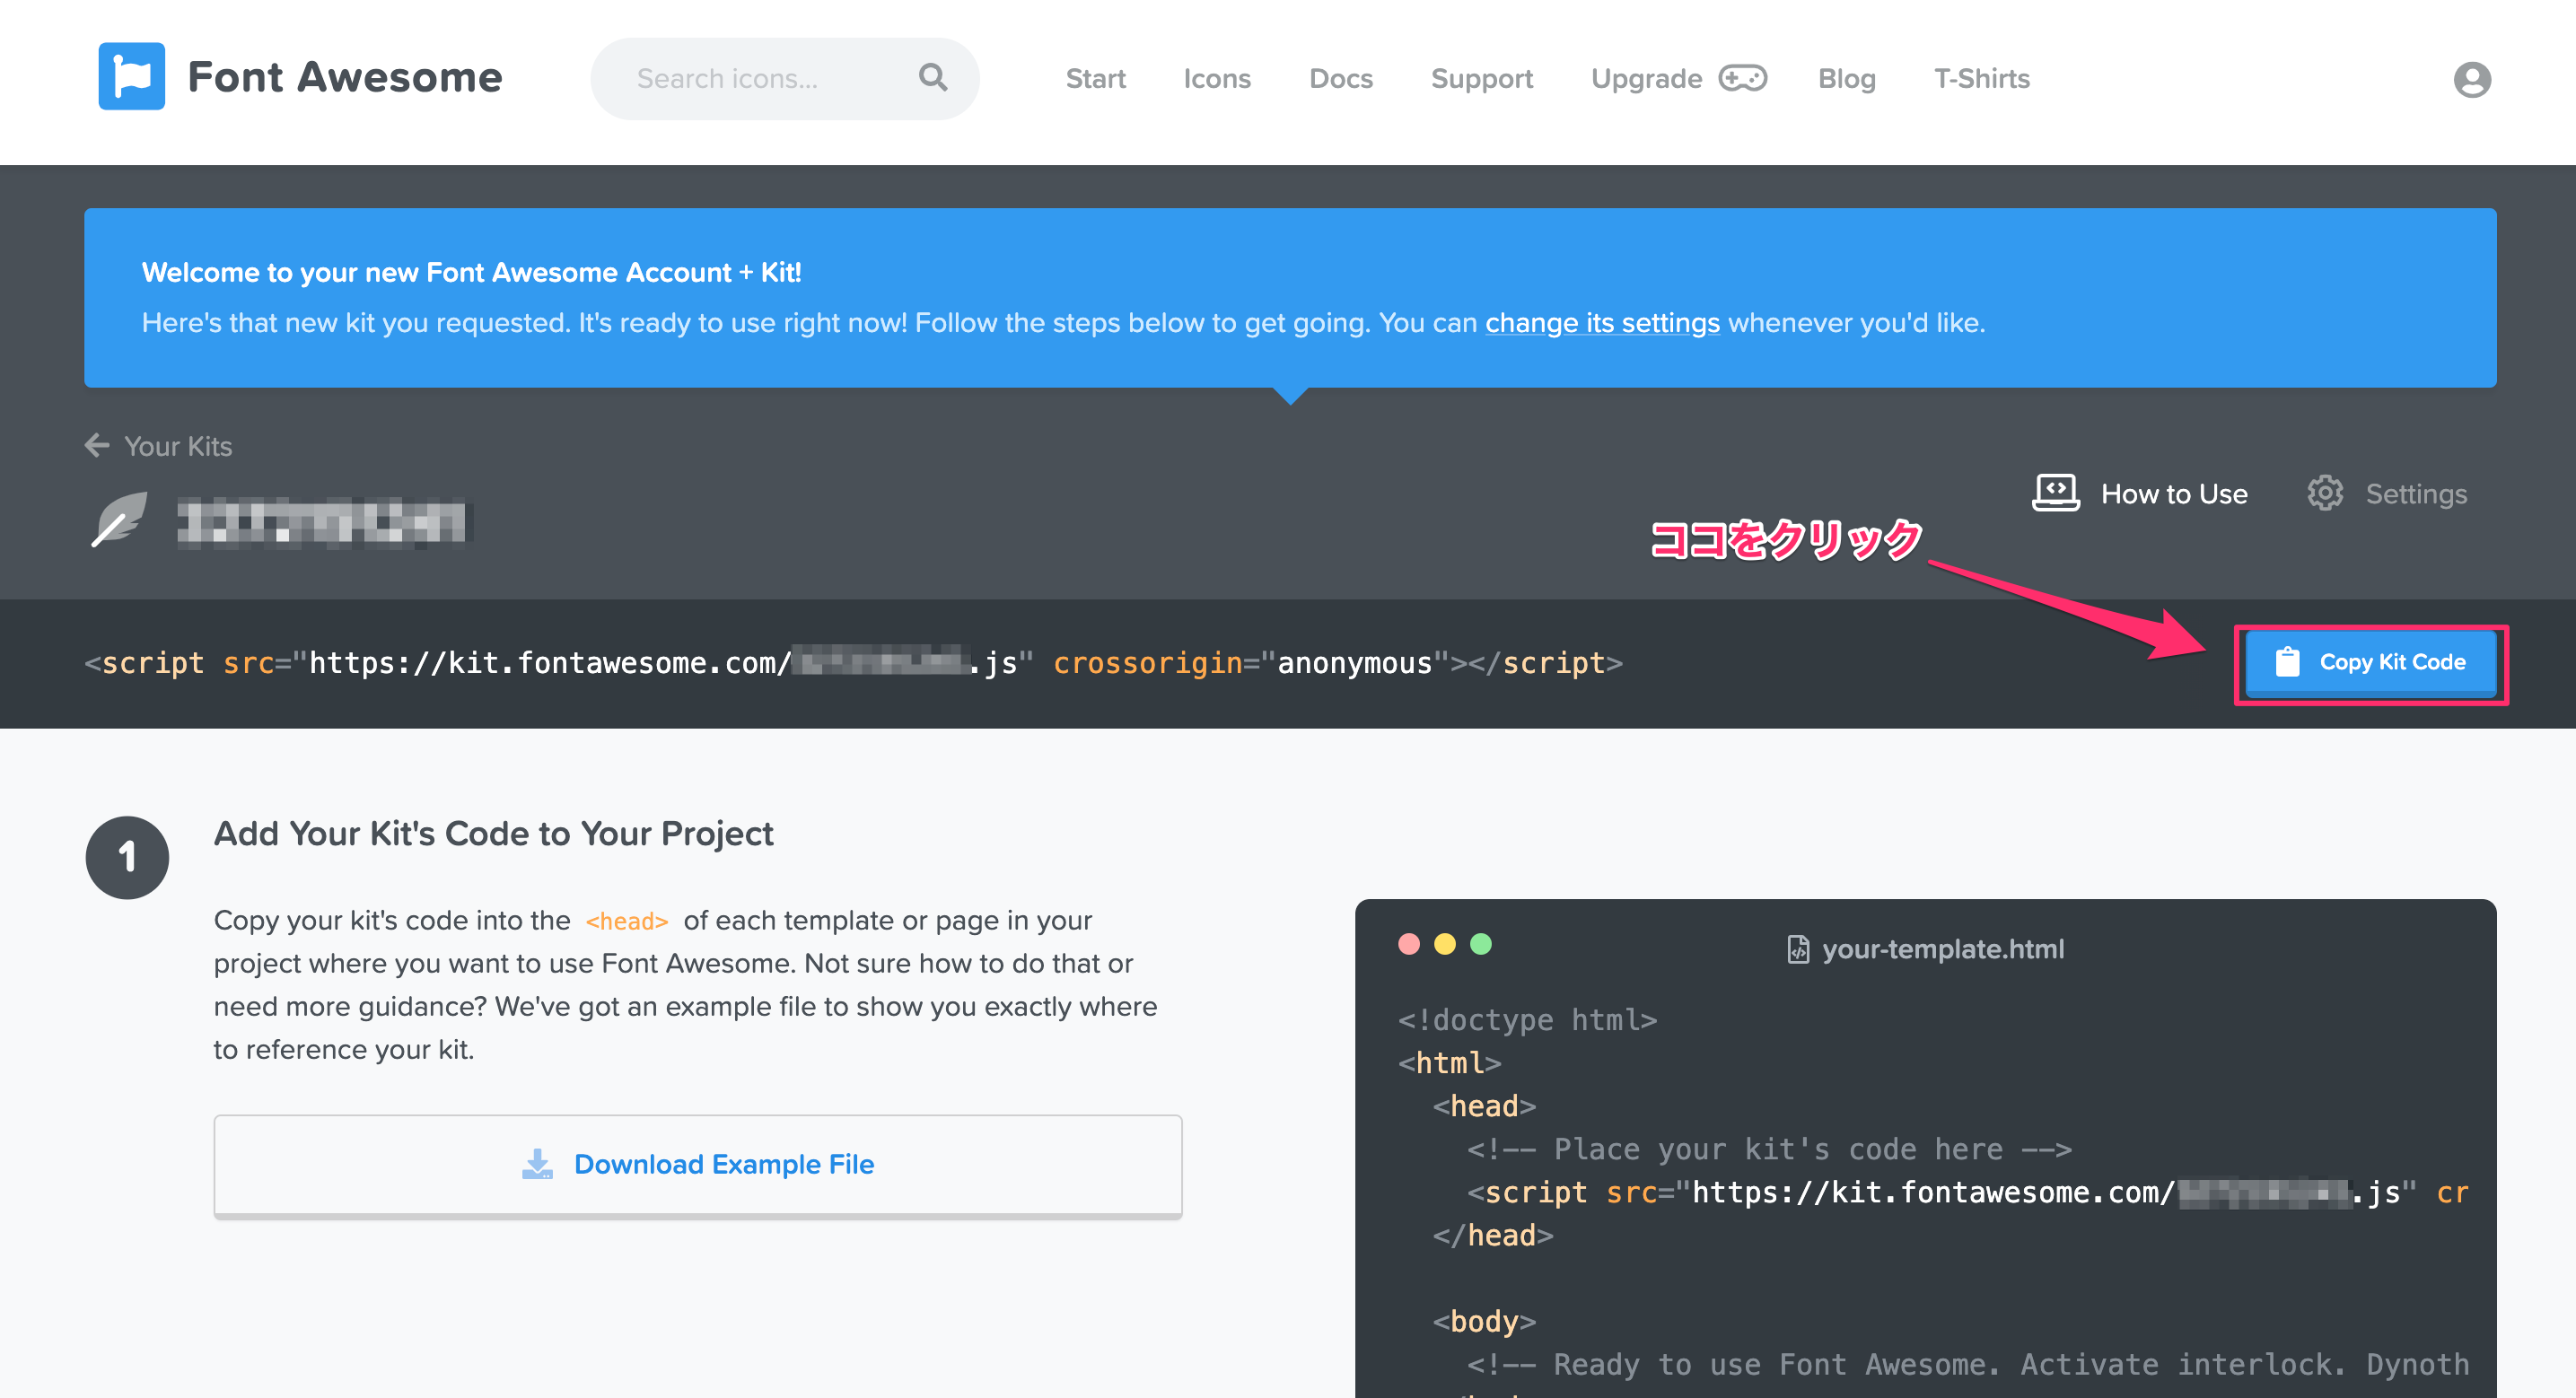
6.下記画面に遷移するので、「Copy Kit Code」をクリックして、コードをコピーする。
Rails側の操作
1. 「application.html.slim」を編集
先ほどコピーしたコードを貼り付けて、Slim形式に変換する。
application.html.slimdoctype html html head title | Font Awesomeテスト = csrf_meta_tags = csp_meta_tag = stylesheet_link_tag 'application', media: 'all', 'data-turbolinks-track': 'reload' = javascript_include_tag 'application', 'data-turbolinks-track': 'reload' / 追記 script src='https://kit.fontawesome.com/c51513dd6c.js' crossorigin='anonymous'2. アイコンを表示
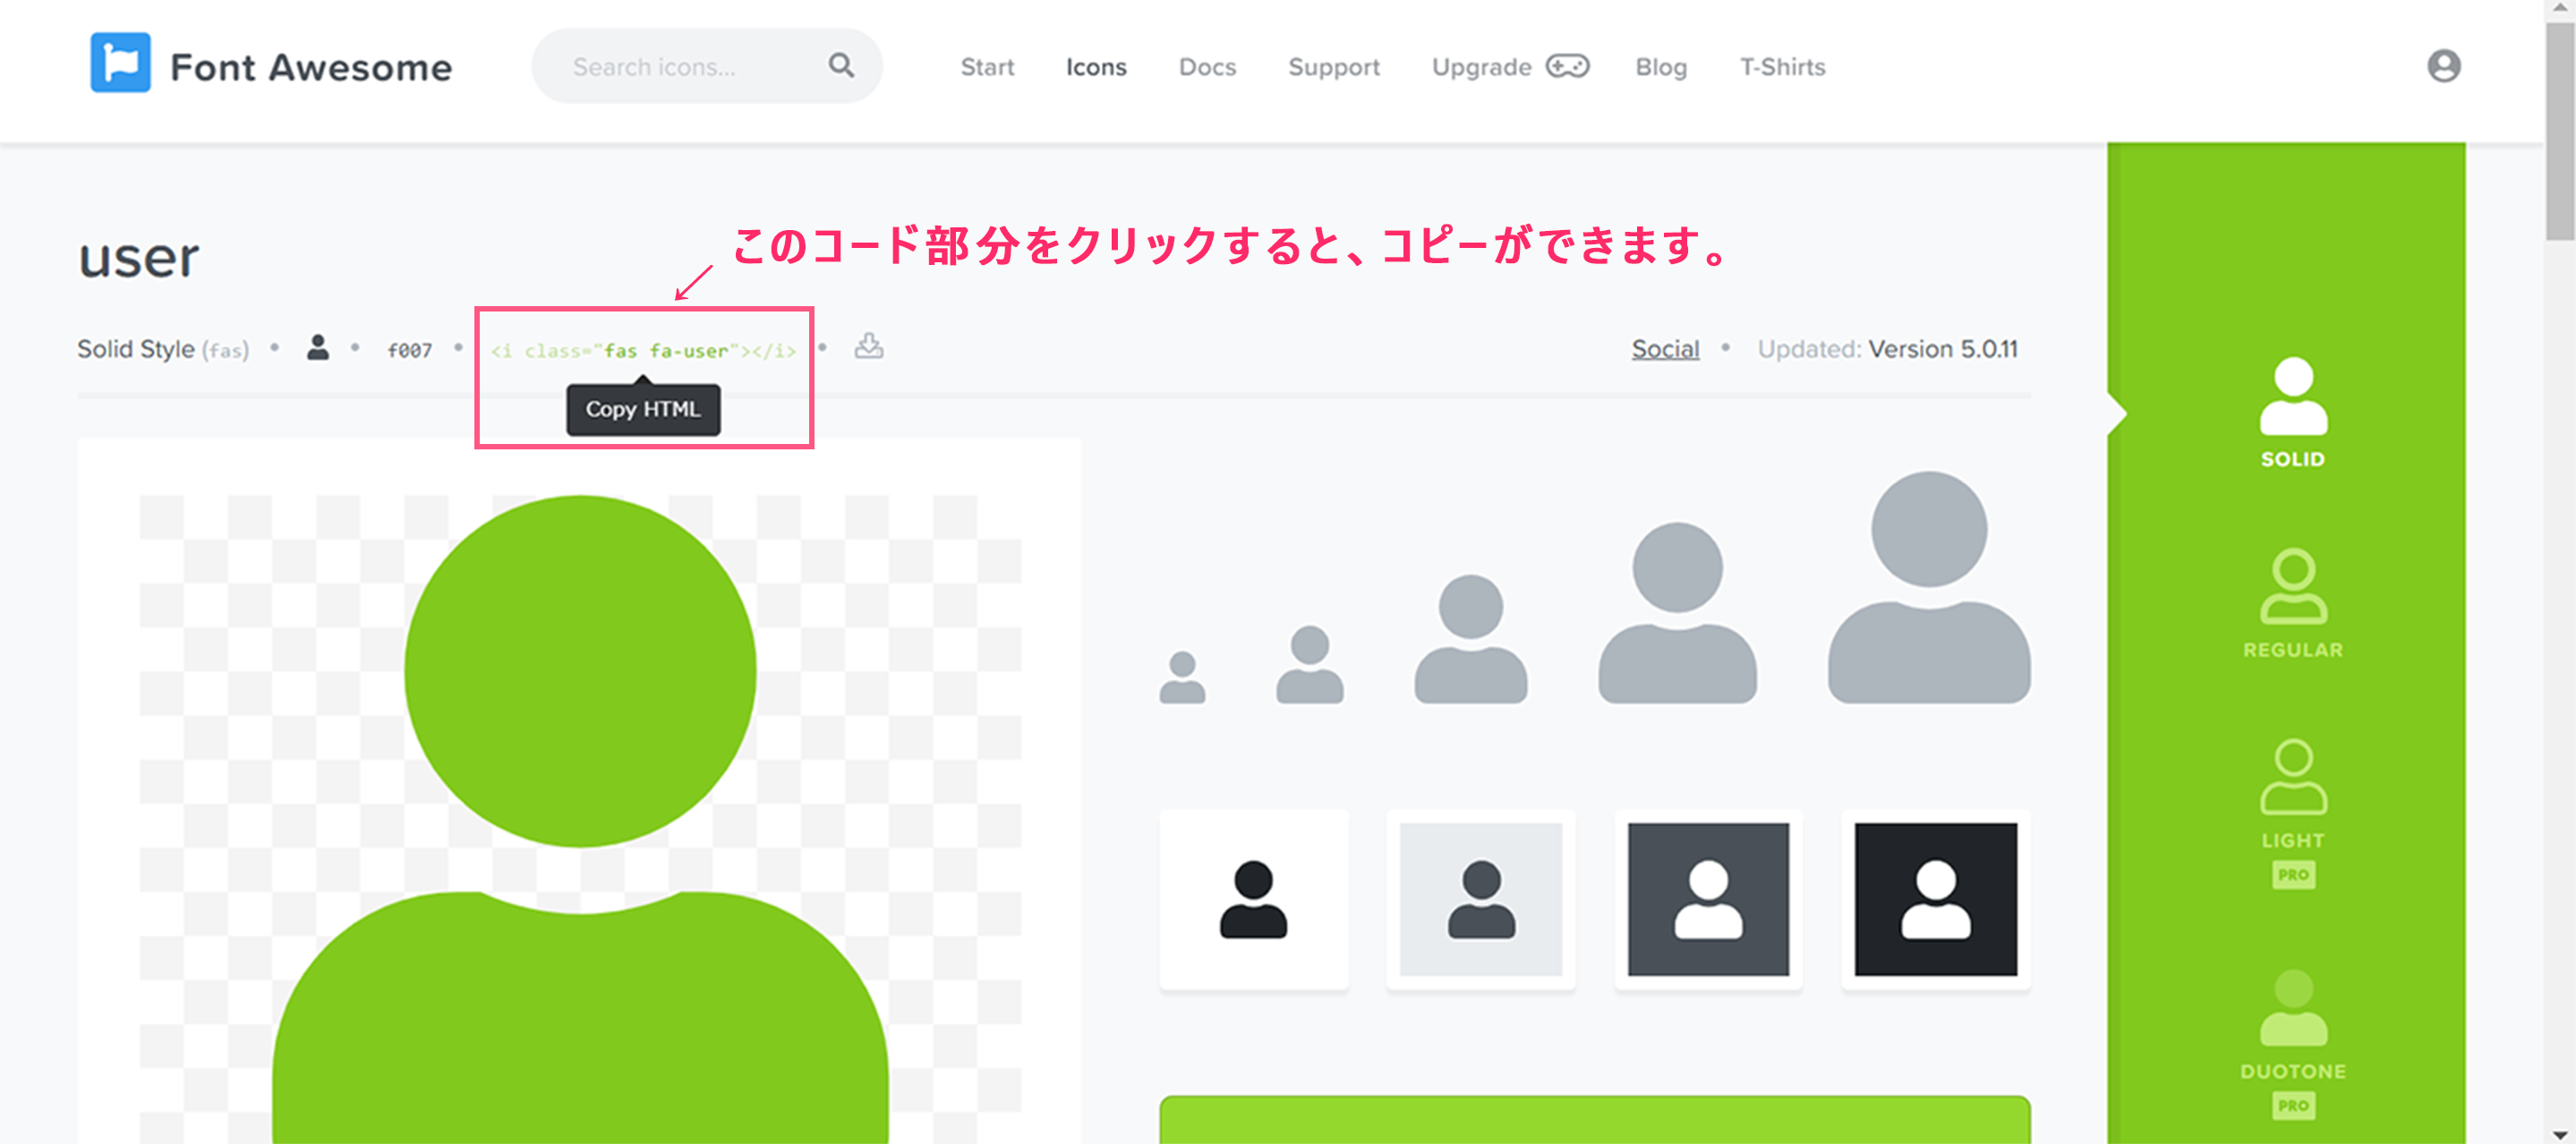
①下記サイトにアクセスし、使用したいアイコンをクリックする。
Font Awesome Icon一覧②下記の様な画面に遷移するので、クラス名をコピーする。
③下記の様にHTMLに記述するとアイコンが表示されます。
~html.slimi.far.fa-heart
- 投稿日:2020-05-31T13:42:32+09:00
Ruby on RailsへのjQueryの導入準備
環境・前提条件
macOS Catalina バージョン10.15.4
ruby 2.5.1p57 (2018-03-29 revision 63029)
Rails 5.2.4.3jQuery導入準備
Gemfileを確認し、
gem "jquery-rails"と記載する。
application.jsに、
//= require jqueryと記載する。※注意点として、"//= require_tree ."より上に記載する。
//= require jquery

//= require_tree .
実際にjQueryが使えるのか、確認する。
任意の名前のjsファイルを作成する。(同名のcoffeeファイルがあれば削除すること。)$(function(){ console.log('OK'); });これでページを更新し、コンソールに'OK'と表示されれば準備OK!
- 投稿日:2020-05-31T13:24:47+09:00
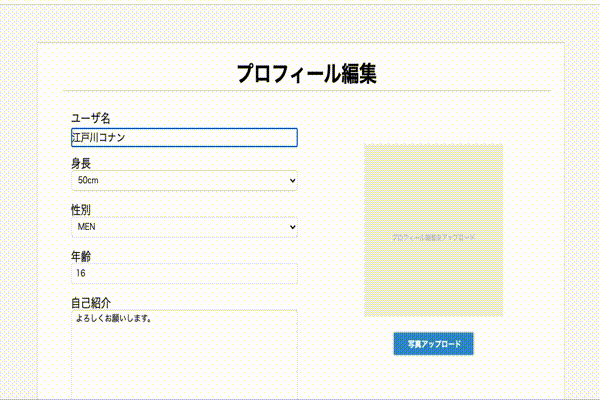
[JQuery] ファイルからフォーム選択プレビュー表示
はじめに
ファイルから画像を選択するし、submitする前に自分の選択した画像を表示できるようにする。
イメージとしては以下のようなものです。
前提として
・jQueryを設定できるようにしてある。
・Railsのバージョン5.2を使用
・Hamlを使用ビューファイルを設定しよう
edit.html.haml.editmain_right .editmain_right_form .editmain_right_form_sub %span.icon %span.icontext プロフィール画像をアップロード .editmain_right_form_main .editmain_right_form_main_ajax .editmain_right_form_main_file = f.file_field :image, class: "image_form" %span.texpic 写真アップロードjQueryを設定
edit.js$(document).on('turbolinks:load', function() { $(function(){ //画像ファイルプレビュー表示のイベント追加 fileを選択時に発火するイベントを登録 $('form').on('change', 'input[type="file"]', function(e) { var file = e.target.files[0], reader = new FileReader(), $subsubimageboxs = $(".editmain_right_form_sub"); t = this; // 画像ファイル以外の場合は何もしない if(file.type.indexOf("image") < 0){ return false; } // ファイル読み込みが完了した際のイベント登録 reader.onload = (function(file) { return function(e) { //既存のプレビューを削除 $subsubimageboxs.empty(); // .prevewの領域の中にロードした画像を表示するimageタグを追加 $subsubimageboxs.append($('<img>').attr({ src: e.target.result, width: "150px", class: "editmain_right_form_sub", title: file.name })); }; })(file); reader.readAsDataURL(file); }); }); });
- 投稿日:2020-05-31T13:09:03+09:00
初心者向けRailsでブログを作ってみるチュートリアルその0
これはなに?
Webプログラマを目指す人で、ある程度プログラミングができるようになったけど自分でインターネット上にサービスを公開する方法はわからない...という方向けにRailsでブログを作り、インターネット上からアクセスできるようにクラウドサービス(今回はherokuを利用します1)上で公開する方法を書いていきます。
下の対象者に該当するレベル感の方がこのチュートリアルを全部終わる頃には、最低限一人で一応Webサービスを作れるようになっている予定ですこれの対象者
以下のような方々が対象です
- 前提として、Rubyをある程度さわれるようになっている人(今回は文法の説明は含みません)
- Railsがなんなのかはある程度わかっていて、コードを書くお題が欲しい人
- コードを書く以外のWeb開発のいろいろな要素を体験してみたい人
- Github上でPull Requestを出して機能単位でコードを開発するやり方をやってみたい人
イメージ的にはこちらのチュートリアルを少しボリュームを削って、すでに触ったことある方向けにシンプルにしたものを書く予定です。 https://railstutorial.jp/chapters/beginning
今後作っていくお題
ブログを作ってみる、ということでざっくりワイヤーフレームっぽいものを作ってみました。
他の画面や、サイトマップについては次の更新でお見せします(まだ作ってない)
おまけとしてGoogle Cloud Platform上で動かすバージョンも書く予定 ↩
- 投稿日:2020-05-31T11:20:23+09:00
sassc を直に使う
Rails や Sinatra などのフレームワークで CSS を編集する人はたいがい Sass 言語で書いていると思う。
フレームワークが全てをやってくれるのであまり意識することは無いが,多くの場合に sassc という gem のお世話になっているだろう1。この記事は,sassc を直接扱うことについて書く。
なお,Sass 言語の構文には,当初から存在した「Sass 構文」と,のちに追加された「SCSS 構文」の二つがあるが,本記事では Sass 構文で例を示す2。SCSS 構文でも本質的に変わらない。
使ってみる
require
Gemfile に
gem "sassc"と書いて,スクリプトで
require "bundler"
Bundler.require
すれば使える。
また,sassc がインストールされている環境ではスクリプトで
requrie "sassc"すれば使える。
この記事では後者の方法で示す。変換する
変換元の Sass ソースを与えて SassC::Engine オブジェクトを作り,
renderメソッドを呼ぶだけ。以下のように書く。
require "sassc"

source = <<SASS
body
  margin: 0
SASS

p SassC::Engine.new(source, syntax: :sass, style: :compact).render
# => "body { margin: 0; }\n"
オプション
SassC::Engine.newに与える重要なオプションとして,以下のものがある。:syntax
どっちの構文かをシンボルで与える。
Sass 構文なら
syntax: :sassとし,SCSS 構文ならsyntax: :scssとする。:style
出力の形式を
:nested,:compact,:compressed,:expandedから選ぶ。最も小さくなるのが
:compressed。CSS の最もふつうの(?)形式が
:expanded。非 ASCII 文字の扱い
仕様を確認したわけではないが,非 ASCII 文字を含むかどうかで変換結果の形式に少し違いがあるようだ。
実のところ,記事を書こうと思った動機がコレ。
特筆すべきは compressed スタイルの場合なので,これを expanded と比較する。まず最初に ASCII 文字だけの例を見よう。
Sass が
Sassa font-family: "hoge"だとする。
expanded と compressed の出力は以下のとおり。expandedスタイルa { font-family: "hoge"; }compressedスタイルa{font-family:"hoge"}とくにどうということもない。
次に,Sass に非 ASCII 文字が入った以下のケース。
Sassa font-family: "ほげ"これを expanded で出力するとこうなる:
expandedスタイル@charset "UTF-8"; a { font-family: "ほげ"; }ふむ,
@charset "UTF-8";が付いた。なるほどこれは理にかなっている。では compressed は?
compressedスタイルa{font-family:"ほげ"}おや?
@charsetが無い。いいのこれで?謎解き
実は,さきほどの実験で,非 ASCII 文字を含む場合に,
compressedスタイルで出力した CSS は,aで始まっているように見えるが,そうではない。
先頭に BOM(Byte Order Mark:バイト順マーク)が入っているのだ。それを確かめるため,
a font-family: "ほげ"を
compressedで CSS に変換した結果の最初の 5 文字のコードポイントを表示させてみよう:require "sassc" source = <<SASS a font-family: "ほげ" SASS css_text = SassC::Engine.new(source, syntax: :sass, style: :compressed).render puts css_text.codepoints.take(5).map{ |c| "U+%04X" % c }.join(" ") # => U+FEFF U+0061 U+007B U+0066 U+006Fやっぱり最初の文字は U+FEFF,つまり BOM であった。
スタイルを四つ全部試したところ,BOM が付くのは
compressedだけであった。
また,ASCII 文字だけの場合は BOM が付かなかった。よくは調べてないが,上記の動作は sassc というライブラリーの特性とかではなく,Sass 言語の仕様であるらしい。したがって Dart Sass など,他の Sass 処理系でやっても同じ結果になると思う(確かめてない)。
さて,U+FEFF は不可視3なので,入っていることに気づきにくい。これがときに大きな問題を引き起こすのだが,それについては以下の別記事で述べた。
- 投稿日:2020-05-31T11:02:25+09:00
ブラウザだけでRubyプログラミング: 1ステップずつ作っていく「ブロック崩し」(Nyle-canvas編)
概要
この記事は中学高校生向けプログラミング教室の教材として作ったものを一部改変したものです。
ブラウザだけでRubyのゲームプログラミングが始められるNyle-canvasを使って「ブロック崩し」ゲームを作っていきます。
0から少しずつ「ブロック崩し」を作っていきます。Rubyだと完成しても100数十行で「ブロック崩し」ができてしまいます。
技術解説
ソースコード
https://github.com/noanoa07/nyle-canvas-blocks
使用ライブラリ
- Nyle-canvas(DXRubyスタイル)
https://spoolkitamura.github.io/nyle-canvas/
ブラウザ上で動くRubyエディタ・実行環境一体型の統合開発環境なので、Rubyのインストールは不要です。
Nyle-canvasの使い方
下記の投稿を見てください。
- ブラウザではじめるRubyゲームプログラミング:Nyle-canvas(DXRubyスタイル)入門 - Qiita
https://qiita.com/noanoa07/items/e7ebf97edef4ae9b448a
Nyle-canvasに必要な動作環境
- ブラウザ(Chromeなど)
- インターネット接続
- ブラウザの動くOS(Windows、macOS、Linux、Android、iPadOS、iOSなど)
- パソコン、または(外付けキーボードを接続した)タブレット、スマートフォン
Nyle-canvas(DXRubyスタイル)
Nyle-canvasの記述スタイルの内、DXRuby互換のDXRubyスタイルを採用します
バージョン
Nyle-canvas(DXRubyスタイル);dev2(2020/5/30リリース)
実行環境
- ブラウザ; Google Chrome
(バージョン 83.0.4103.61,64 ビット,macOS版)
- 実行OS;macOS
(Catalina 10.15.5)
その他、Safari/macOS,Chrome/Windows10 でも適宜動作確認
Nyle-canvasのホームページ
Nyle-canvasホームページ
https://spoolkitamura.github.io/nyle-canvas/Nyle-canvasマニュアル;エディタの操作方法
https://spoolkitamura.github.io/nyle-canvas/dev2/site/_man_api_dx/index.htmlNyle-canvas(DXRubyスタイル)エディタ;実際にプログラミングするエディタ画面
https://spoolkitamura.github.io/nyle-canvas/dev2/nyle-canvas.html?style=dx参考サイト
DXRuby のホームページ
http://dxruby.osdn.jpDXRuby 1.4.6 リファレンスマニュアル
http://mirichi.github.io/dxruby-doc/index.htmlDXRuby 1.4.1 リファレンスマニュアル
http://dxruby.osdn.jp/DXRubyReference/20095313382446.htmDXRubyスタイルのオリジナルであるDXRubyのページです。
https://yhara.github.io/dxopal/index.html
- Rubyで始めるゲームプログラミング - DXOpal編 - Rubyist Magazine 0057 号 https://magazine.rubyist.net/articles/0057/0057-GameProgramingWithDXOpal.html
こちらもブラウザで動くDXRuby(互換)ライブラリです。
- プログラミング初心者向け:DXRubyで 1ステップずつ作っていく「ブロック崩し」 - Qiita https://qiita.com/noanoa07/items/9ebc059550c620ab223c
本テキストの元になった、DXRubyで作る「ブロック崩し」です。
オリジナル
※「2014-03-17 松江Ruby会議05に参加してきた - mirichiの日記」より改変
http://d.hatena.ne.jp/mirichi/20140317/p1
ライセンス
本テキスト内の解説文、Rubyソースコード、画像データはともにパブリックドメイン
(Nyle-canvasのソースコードは MITライセンス)
プログラム解説
Nyle-canvasで実行するプログラムは、
.htmlファイルです。(サンプルプログラムはsrc/block_htmlフォルダ内に入っています。)ただし、以下の説明では Rubyのプログラム部分だけを載せていきます。(
src/block_rubyフォルダ内に同名の.rbファイルが入っています。)1. Nyle-canvasの使い方
→ ブラウザではじめるRubyゲームプログラミング:Nyle-canvas(DXRubyスタイル)入門 - Qiita
を見てください。
ここでは、最低限の説明をします。1-1. Nyle-canvasエディターを開く
Nyle-canvasは、ブラウザで以下のサイトにアクセスすることで、プログラム編集画面(エディタ)が表示されます。
なお、ここではブラウザとしてGoogle Chromeを使って説明していきます。(実行環境はmacOS。)
https://spoolkitamura.github.io/nyle-canvas/dev2/nyle-canvas.html?style=dx
エディタ画面にはあらかじめ基本のプログラムが表示されています。
また、画面左上には各種ボタンが並んでいます。
右から、
-▶︎ ボタン;プログラム実行
-↓ ボタン;プログラム保存(ダウンロード)
-Tボタン;フォント(文字サイズ)設定
-?ボタン;ヘルプ(リファレンス)画面へ・プログラムの新規作成
ブラウザのNyle-canvasエディタ画面で
再読み込みをすると、最初の状態に戻ります。ブラウザ上部の
「↻」ボタンを押すか、メニュー>ファイル>表示>ページを再読み込みを選ぶとできます。(ショートカットは、
Command + R(macOS)、ctrl + R(Windows))1-2. プログラムの実行・再実行
プログラムは保存操作なしで、
▶︎ボタンを押すだけで即実行されます。include DX # 初期設定用のコード (your setup code here) Window.width = 640 Window.height = 480 Window.bgcolor = C_BLACK Window.loop do # 画面描画用のコード (your draw code here) end
ブラウザの新しいタブが開き、黒い四角形の基本のウィンドウが表示されます。
座標は、左上が原点(x = 0, y = 0)で、横(x)は右方向に増加、縦(y)は下方向に増加します。
Window.loop do 〜 endの間に書いたコードは、1秒間に60回繰り返し実行されます。→ DXRubyリファレンス:チュートリアル 1. 基本の形
http://mirichi.github.io/dxruby-doc/tutorial/basic.html・再実行
実行画面を
再読み込みすることで、プログラムの再実行ができます。ブラウザ上部の
「↻」ボタンを押すか、メニュー>ファイル>表示>ページを再読み込みを選ぶとできます。(ショートカットは、
Command + R(macOS)、ctrl + R(Windows))・実行画面を閉じる
実行画面のタブを閉じます。画面の上の
「×」ボタンを押します。1-3. プログラムの保存(ダウンロード)
↓ボタンを押すと、プログラムがダウンロードされます。ダウンロード先は、ブラウザの設定によりますが、「ダウンロード」フォルダになることが多いようです。1-4. プログラムの読み込み
Nyle-canvasのプログラムファイル(
HTMLファイル)をブラウザのNyle-canvasエディタ画面にドラッグ&ドロップします。
1-5. 画像ファイルの読み込み
Nyle-Canvasでは、画像ファイルもプログラムと合わせて一体で保存・管理します。
使いたい画像ファイルは、エディタ画面に直接ドラッグ&ドロップすることで、Nyle-canvas内にコピーされ、エディタ画面下側に画像ファイルの一覧として表示されるようになります。
プログラムから画像ファイルを読み込んで使うには、
Image.load(画像ファイル名)を使います。
画像ファイル名の前に場所を示すパス名などは不要です。読み込んだ画像は、Imageクラスになります。
1-6. コンソールの開き方
エラーメッセージやputsなどの結果は、ブラウザのコンソールに出力されます。
Chromeでの開き方は;(実行画面で)
- macOS;
メニュー>表示>開発/管理>Javascriptコンソールを選択。(ショートカットは、
Command + Option + J)
- Windows;
メニュー> その他のツール>デベロッパーツール> 開いたデベロッパーツールの中の「Console」を選択。(ショートカットは、
Ctrl + Shift + J)
- あるいは、macOS、Windowsとも;
F12(あるいはfn + F12)キーを押すか、画面上の任意の場所で
右クリック(2本指クリックなど)>検証>開いたデベロッパーツールの中の「Console」を選択。1-7. ヘルプ(リファレンス)
Nyle-canvasエディタ画面左上の
「?」ボタンを押すとヘルプ(リファレンス)画面が開きます。→ [Nyle-canvas] APIリファレンス (DXRubyスタイル)
https://spoolkitamura.github.io/nyle-canvas/dev2/site/_man_api_dx/index.html
Nyle-canvasのAPIが簡潔にまとめられているので、困ったときにはどんどん活用してください。
2. 「ブロック崩し」を作る
いよいよ「ブロック崩し」を作っていきます。
2-1. 壁を出す(左側)(rb_block01.rb)
まず、左側の縦の壁を作ります(厚み20)。
左上隅を
(0, 0)にして、横は(厚みの)20、縦は(ウィンドウの縦幅と同じ)480の白い長方形にします。
そのため、右下隅は(20, 480)になりますプログラムでは、
Window.draw_box_fill(左上x, 左上y, 右下x, 右下y, 色)を使います。これを毎回描画させるために、
Window.loop do 〜 endの中に書きます。include DX # 初期設定用のコード (your setup code here) Window.width = 640 Window.height = 480 Window.bgcolor = C_BLACK Window.loop do Window.draw_box_fill(0, 0, 20, 480, C_WHITE) # ◆追加 end2-2. 壁を出す(右側も)(rb_block02.rb)
次に、右側の縦の壁を作ります。
左上隅の
xはウィンドウ幅640から壁の厚み20を引いた640 - 20 = 620、yは0になります。右下隅はウィンドウの右下隅と同じ
(640, 480)です。include DX # 初期設定用のコード (your setup code here) Window.width = 640 Window.height = 480 Window.bgcolor = C_BLACK Window.loop do Window.draw_box_fill( 0, 0, 20, 480, C_WHITE) # ◇変更(文字揃え) Window.draw_box_fill(620, 0, 640, 480, C_WHITE) # ◆追加 end
2-3. 壁を出す(上側も)(rb_block03.rb)
上側の横の壁を作ります(厚み20)。
左上隅は
(0, 0)、右下隅のxはウィンドウ幅と同じ640、yは壁の厚みと同じ20になります。include DX # 初期設定用のコード (your setup code here) Window.width = 640 Window.height = 480 Window.bgcolor = C_BLACK Window.loop do Window.draw_box_fill( 0, 0, 20, 480, C_WHITE) Window.draw_box_fill(620, 0, 640, 480, C_WHITE) Window.draw_box_fill( 0, 0, 640, 20, C_WHITE) # ◆追加 end
2-4. バーを出す(rb_block04.rb)
ボールを打ち返すバーとして、横100、縦20の水色の長方形の画像イメージ(
src/image/bar.png)を用意します。
まず、
bar.pngファイルをエディタ画面に直接ドラッグ&ドロップします。これにより、Nyle-canvas内にコピーされ、エディタ画面下側の画像ファイル一覧に表示されるようになります。
次に、
Image.load("bar.png")で画像ファイルを読み込みます。(パス名は不要です。)バーの縦位置
yは、ウィンドウの一番下480に合わせるため、480 - バーの縦幅にします。バーの横位置xは、0にします。バーを表示させるには、
Window.loop do 〜 endの中でWindow.draw(x位置, y位置, イメージ)を使います。include DX # 初期設定用のコード (your setup code here) Window.width = 640 Window.height = 480 Window.bgcolor = C_BLACK img_bar = Image.load("bar.png") # ◆追加 bar_x = 0 # ◆追加 bar_y = 480 - img_bar.height # ◆追加 Window.loop do Window.draw_box_fill( 0, 0, 20, 480, C_WHITE) Window.draw_box_fill(620, 0, 640, 480, C_WHITE) Window.draw_box_fill( 0, 0, 640, 20, C_WHITE) Window.draw(bar_x, bar_y, img_bar) # ◆追加 end
2-5. バーを矢印キーで動かす(rb_block05.rb)
キーボードの左右矢印キー(
←→)で、バーが左右(x方向)に動くようにします。
Input.xで左右の矢印キーの押された状態を取得し、その値(-1,0,1)をバーのx位置に足すことで、Window.drawでバーを描画します。include DX # 初期設定用のコード (your setup code here) Window.width = 640 Window.height = 480 Window.bgcolor = C_BLACK img_bar = Image.load("bar.png") bar_x = 0 bar_y = 480 - img_bar.height Window.loop do bar_x = bar_x + Input.x # ◆追加 Window.draw_box_fill( 0, 0, 20, 480, C_WHITE) Window.draw_box_fill(620, 0, 640, 480, C_WHITE) Window.draw_box_fill( 0, 0, 640, 20, C_WHITE) Window.draw(bar_x, bar_y, img_bar) end
2-6. バーを矢印キーで動かす:別の書き方(rb_block06.rb)
bar_x = bar_x + Input.xを別の書き方である、
bar_x += Input.xに書き換えてみます。同じことですが、慣れればこちらの方が見やすいかも?include DX # 初期設定用のコード (your setup code here) Window.width = 640 Window.height = 480 Window.bgcolor = C_BLACK img_bar = Image.load("bar.png") bar_x = 0 bar_y = 480 - img_bar.height Window.loop do bar_x += Input.x # ◇変更(書き方を変える) Window.draw_box_fill( 0, 0, 20, 480, C_WHITE) Window.draw_box_fill(620, 0, 640, 480, C_WHITE) Window.draw_box_fill( 0, 0, 640, 20, C_WHITE) Window.draw(bar_x, bar_y, img_bar) end2-7. バーの動きを素早く(rb_block07.rb)
バーの動きを素早くしてみます。
Input.xは、-1,0,1の値しか返さないので、4倍して値を大きくして、バーのx位置に足すことにします。include DX # 初期設定用のコード (your setup code here) Window.width = 640 Window.height = 480 Window.bgcolor = C_BLACK img_bar = Image.load("bar.png") bar_x = 0 bar_y = 480 - img_bar.height Window.loop do bar_x += Input.x * 4 # ◇変更(反応を速く) Window.draw_box_fill( 0, 0, 20, 480, C_WHITE) Window.draw_box_fill(620, 0, 640, 480, C_WHITE) Window.draw_box_fill( 0, 0, 640, 20, C_WHITE) Window.draw(bar_x, bar_y, img_bar) end
2-8. バーをマウスで動かす(rb_block08.rb)
マウスの動きに追従して、バーが左右(
x方向)に動くようにします。
Input.mouse_xでマウスのx位置を取得し、その値をバーのx位置に代入し、Window.drawでバーを描画します。※ バーは、キーボードで動かしても、マウスで動かしても構いませんが、これ以降はマウスを使った例で示します。
include DX
# 初期設定用のコード (your setup code here)
Window.width   = 640
Window.height  = 480
Window.bgcolor = C_BLACK

img_bar = Image.load("bar.png")
bar_x = 0
bar_y = 480 - img_bar.height

Window.loop do
  #bar_x += Input.x * 4       # 左右キーの場合    # ◇変更(コメントアウト)
  bar_x = Input.mouse_x       # マウスの場合      # ◆追加

  Window.draw_box_fill(  0,   0,  20, 480, C_WHITE)
  Window.draw_box_fill(620,   0, 640, 480, C_WHITE)
  Window.draw_box_fill(  0,   0, 640,  20, C_WHITE)

  Window.draw(bar_x, bar_y, img_bar)
end
2-9. バーがはみ出さないように(rb_block09.rb)
バーが左右の壁をはみ出さないようにします。
バーの
x位置は左端なので、最小値は、壁の厚みの20です。一方、右端は
x位置 + バーの横幅img_bar.widthなので、最大値は、ウィンドウの横幅640 - 壁の厚み20 - バーの横幅img_bar.widthになります。以上を、
if 〜 elsif 〜 endに書いていきます。include DX # 初期設定用のコード (your setup code here) Window.width = 640 Window.height = 480 Window.bgcolor = C_BLACK img_bar = Image.load("bar.png") bar_x = 0 bar_y = 480 - img_bar.height Window.loop do #bar_x += Input.x * 4 # 左右キーの場合 bar_x = Input.mouse_x # マウスの場合 if bar_x < 20 # ◆追加 bar_x = 20 # ◆追加 elsif bar_x > 640 - 20 - img_bar.width # ◆追加 bar_x = 640 - 20 - img_bar.width # ◆追加 end # ◆追加 Window.draw_box_fill( 0, 0, 20, 480, C_WHITE) Window.draw_box_fill(620, 0, 640, 480, C_WHITE) Window.draw_box_fill( 0, 0, 640, 20, C_WHITE) Window.draw(bar_x, bar_y, img_bar) end
2-10. ボールを出す(rb_block10.rb)
ボールとして、横20、縦20の赤色の円の画像イメージ(
src/image/ball.png)を用意します。
「2-4.バーを出す」と同じように、
ball.pngファイルをエディタ画面にドラッグ&ドロップして、Nyle-canvasに登録し、Image.load("ball.png")で読み込みます。読み込まれた
ボールのイメージは、白地に描かれているので、背景色を透明にしておきます。イメージ.set_color_key(C_WHITE)で行います。(ただし、バージョン
dev2では未実装で、白色は自動的に透明化されるので、今のところ実行する必要はありません。)初期位置はとりあえず、x位置を
ball_x = 300、y位置をball_y = 400とします。あとは、
Window.drawで描画します。include DX # 初期設定用のコード (your setup code here) Window.width = 640 Window.height = 480 Window.bgcolor = C_BLACK img_bar = Image.load("bar.png") bar_x = 0 bar_y = 480 - img_bar.height img_ball = Image.load("ball.png") # ◆追加 img_ball.set_color_key(C_WHITE) # ◆追加 ball_x = 300 # ◆追加 ball_y = 400 # ◆追加 Window.loop do #bar_x += Input.x * 4 # 左右キーの場合 bar_x = Input.mouse_x # マウスの場合 if bar_x < 20 bar_x = 20 elsif bar_x > 640 - 20 - img_bar.width bar_x = 640 - 20 - img_bar.width end Window.draw_box_fill( 0, 0, 20, 480, C_WHITE) Window.draw_box_fill(620, 0, 640, 480, C_WHITE) Window.draw_box_fill( 0, 0, 640, 20, C_WHITE) Window.draw(bar_x, bar_y, img_bar) Window.draw(ball_x, ball_y, img_ball) # ◆追加 end
2-11. ボールを動かす(横方向)(rb_block11.rb)
ボールを横方向(
x方向)に動かします。(xは右がプラス方向)x方向のスピードを
dxとして、ボールのx位置ball_xに、loopで回ってくる(1/60秒)毎にdxを足していきます(ball_x += dx)。include DX # 初期設定用のコード (your setup code here) Window.width = 640 Window.height = 480 Window.bgcolor = C_BLACK img_bar = Image.load("bar.png") bar_x = 0 bar_y = 480 - img_bar.height img_ball = Image.load("ball.png") img_ball.set_color_key(C_WHITE) ball_x = 300 ball_y = 400 dx = 2 # ◆追加 Window.loop do #bar_x += Input.x * 4 # 左右キーの場合 bar_x = Input.mouse_x # マウスの場合 if bar_x < 20 bar_x = 20 elsif bar_x > 640 - 20 - img_bar.width bar_x = 640 - 20 - img_bar.width end ball_x += dx # ◆追加 Window.draw_box_fill( 0, 0, 20, 480, C_WHITE) Window.draw_box_fill(620, 0, 640, 480, C_WHITE) Window.draw_box_fill( 0, 0, 640, 20, C_WHITE) Window.draw(bar_x, bar_y, img_bar) Window.draw(ball_x, ball_y, img_ball) end
2-12. ボールを動かす(縦方向)(rb_block12.rb)
今度は縦方向(
y方向)に動かします。(yは下がプラス方向)いったん横方向に動かすのはやめて(
#ball_x += dxでコメントアウト)、y方向のスピードをdyとして、loopで回ってくる毎にdyを足していきます(ball_y += dy)。include DX # 初期設定用のコード (your setup code here) Window.width = 640 Window.height = 480 Window.bgcolor = C_BLACK img_bar = Image.load("bar.png") bar_x = 0 bar_y = 480 - img_bar.height img_ball = Image.load("ball.png") img_ball.set_color_key(C_WHITE) ball_x = 300 ball_y = 400 dx = 2 # ◇変更(文字揃え) dy = -2 # ◆追加 Window.loop do #bar_x += Input.x * 4 # 左右キーの場合 bar_x = Input.mouse_x # マウスの場合 if bar_x < 20 bar_x = 20 elsif bar_x > 640 - 20 - img_bar.width bar_x = 640 - 20 - img_bar.width end #ball_x += dx # ◇変更(コメントアウト) ball_y += dy # ◆追加 Window.draw_box_fill( 0, 0, 20, 480, C_WHITE) Window.draw_box_fill(620, 0, 640, 480, C_WHITE) Window.draw_box_fill( 0, 0, 640, 20, C_WHITE) Window.draw(bar_x, bar_y, img_bar) Window.draw(ball_x, ball_y, img_ball) end
2-13. ボールを動かす(縦横方向)(rb_block13.rb)
x方向の動きも再開させる(ball_x += dxとコメントアウトをはずす)と、ボールは斜めに動いていきます。include DX # 初期設定用のコード (your setup code here) Window.width = 640 Window.height = 480 Window.bgcolor = C_BLACK img_bar = Image.load("bar.png") bar_x = 0 bar_y = 480 - img_bar.height img_ball = Image.load("ball.png") img_ball.set_color_key(C_WHITE) ball_x = 300 ball_y = 400 dx = 2 dy = -2 Window.loop do #bar_x += Input.x * 4 # 左右キーの場合 bar_x = Input.mouse_x # マウスの場合 if bar_x < 20 bar_x = 20 elsif bar_x > 640 - 20 - img_bar.width bar_x = 640 - 20 - img_bar.width end ball_x += dx # ◇変更(コメントアウトをはずす) ball_y += dy Window.draw_box_fill( 0, 0, 20, 480, C_WHITE) Window.draw_box_fill(620, 0, 640, 480, C_WHITE) Window.draw_box_fill( 0, 0, 640, 20, C_WHITE) Window.draw(bar_x, bar_y, img_bar) Window.draw(ball_x, ball_y, img_ball) end
2-14. ボールが跳ね返る(横方向)(rb_block14.rb)
ボールを跳ね返らせます。まずは、横方向(
x方向)だけ動かします(#ball_y += dyでコメントアウト)。左壁にぶつかったとは、
ボールのx位置(ball_x)が左壁の厚みの20より小さくなった時です。一方、右壁にぶつかったとは、
ウィンドウの横幅640 - 右壁の厚み20 = 620より大きくなった時でしょうか?跳ね返るとは、x方向のスピード
dxが反対向きになることなので、dx = -dxと書けます。以上を、
if 〜 endに書いていきます。include DX # 初期設定用のコード (your setup code here) Window.width = 640 Window.height = 480 Window.bgcolor = C_BLACK img_bar = Image.load("bar.png") bar_x = 0 bar_y = 480 - img_bar.height img_ball = Image.load("ball.png") img_ball.set_color_key(C_WHITE) ball_x = 300 ball_y = 400 dx = 2 dy = -2 Window.loop do #bar_x += Input.x * 4 # 左右キーの場合 bar_x = Input.mouse_x # マウスの場合 if bar_x < 20 bar_x = 20 elsif bar_x > 640 - 20 - img_bar.width bar_x = 640 - 20 - img_bar.width end ball_x += dx #ball_y += dy # ◇変更(コメントアウト) if ball_x < 20 || ball_x > 620 # ◆追加 dx = -dx # ◆追加 end # ◆追加 Window.draw_box_fill( 0, 0, 20, 480, C_WHITE) Window.draw_box_fill(620, 0, 640, 480, C_WHITE) Window.draw_box_fill( 0, 0, 640, 20, C_WHITE) Window.draw(bar_x, bar_y, img_bar) Window.draw(ball_x, ball_y, img_ball) end
右側は壁の中まで入ってしまいました。
2-15. ボールが跳ね返る(横方向):修正(rb_block15.rb)
ボールのx位置(ball_x)はボールの左端なので、右端はボールの幅(ball_width)を足したball_x + ball_widthになります。"右壁にぶつかった" とは、この値が
ウィンドウの横幅640 - 右壁の厚み20 = 620より大きくなった時にしなければなりません。
(ball_x + ball_width) > 620なお、衝突の様子をゆっくり観察するために、1秒当たりの描画回数の設定(初期値:60)を半分の30にしています。
Window.fps = 30include DX # 初期設定用のコード (your setup code here) Window.width = 640 Window.height = 480 Window.bgcolor = C_BLACK img_bar = Image.load("bar.png") bar_x = 0 bar_y = 480 - img_bar.height img_ball = Image.load("ball.png") img_ball.set_color_key(C_WHITE) ball_x = 300 ball_y = 400 dx = 2 dy = -2 ball_width = img_ball.width # ◆追加 # 1秒当たりの描画回数の設定(初期値:60) # ◆追加 Window.fps = 30 # ◆追加 Window.loop do #bar_x += Input.x * 4 # 左右キーの場合 bar_x = Input.mouse_x # マウスの場合 if bar_x < 20 bar_x = 20 elsif bar_x > 640 - 20 - img_bar.width bar_x = 640 - 20 - img_bar.width end ball_x += dx #ball_y += dy if ball_x < 20 || (ball_x + ball_width) > 620 # ◇変更 dx = -dx end Window.draw_box_fill( 0, 0, 20, 480, C_WHITE) Window.draw_box_fill(620, 0, 640, 480, C_WHITE) Window.draw_box_fill( 0, 0, 640, 20, C_WHITE) Window.draw(bar_x, bar_y, img_bar) Window.draw(ball_x, ball_y, img_ball) end
これで良さそうですが、よ〜く見ると一瞬、壁にボールがめり込んでいます(左右の壁とも)。
2-16. ボールが跳ね返る(横方向):修正2(rb_block16.rb)
これまでは、壁にぶつかったら、ボールの
x方向の速度(dx = -dx)を逆向きにしただけでした。これだと跳ね返りはしますが、ボールの位置(
ball_x)は変えていないので、ボールは壁にめり込んだままです。そこで、ボールの位置(
ball_x)も動いてきた(+dx)分を逆に戻すことにします(ball_x -= dx)。include DX # 初期設定用のコード (your setup code here) Window.width = 640 Window.height = 480 Window.bgcolor = C_BLACK img_bar = Image.load("bar.png") bar_x = 0 bar_y = 480 - img_bar.height img_ball = Image.load("ball.png") img_ball.set_color_key(C_WHITE) ball_x = 300 ball_y = 400 dx = 2 dy = -2 ball_width = img_ball.width # 1秒当たりの描画回数の設定(初期値:60) Window.fps = 30 Window.loop do #bar_x += Input.x * 4 # 左右キーの場合 bar_x = Input.mouse_x # マウスの場合 if bar_x < 20 bar_x = 20 elsif bar_x > 640 - 20 - img_bar.width bar_x = 640 - 20 - img_bar.width end ball_x += dx #ball_y += dy if ball_x < 20 || (ball_x + ball_width) > 620 ball_x -= dx # ◆追加 dx = -dx end Window.draw_box_fill( 0, 0, 20, 480, C_WHITE) Window.draw_box_fill(620, 0, 640, 480, C_WHITE) Window.draw_box_fill( 0, 0, 640, 20, C_WHITE) Window.draw(bar_x, bar_y, img_bar) Window.draw(ball_x, ball_y, img_ball) end
こんどこそ良さそうです。2-17. ボールが跳ね返る(縦方向)(rb_block17.rb)
今度はボールを縦方向(
y方向)だけ動かして、上壁で跳ね返るようにします。上壁にぶつかったとは、ボールの
y位置(ball_y)が上壁の厚み20より小さくなった時です。なお、1秒当たりの描画回数は元に戻して(コメントアウト)、バーの
x位置の初期値を中央寄りに変えています。include DX # 初期設定用のコード (your setup code here) Window.width = 640 Window.height = 480 Window.bgcolor = C_BLACK img_bar = Image.load("bar.png") bar_x = 250 # ◇変更(数値変更) bar_y = 480 - img_bar.height img_ball = Image.load("ball.png") img_ball.set_color_key(C_WHITE) ball_x = 300 ball_y = 400 dx = 2 dy = -2 ball_width = img_ball.width ball_height = img_ball.height # ◆追加 # 1秒当たりの描画回数の設定(初期値:60) #Window.fps = 30 # ◇変更(コメントアウト) Window.loop do #bar_x += Input.x * 4 # 左右キーの場合 bar_x = Input.mouse_x # マウスの場合 if bar_x < 20 bar_x = 20 elsif bar_x > 640 - 20 - img_bar.width bar_x = 640 - 20 - img_bar.width end #ball_x += dx # ◇変更(コメントアウト) ball_y += dy # ◇変更(コメントアウトをはずす) if ball_x < 20 || (ball_x + ball_width) > 620 ball_x -= dx dx = -dx end if ball_y < 20 # ◆追加 ball_y -= dy # ◆追加 dy = -dy # ◆追加 end # ◆追加 Window.draw_box_fill( 0, 0, 20, 480, C_WHITE) Window.draw_box_fill(620, 0, 640, 480, C_WHITE) Window.draw_box_fill( 0, 0, 640, 20, C_WHITE) Window.draw(bar_x, bar_y, img_bar) Window.draw(ball_x, ball_y, img_ball) end
まだ、バーでは跳ね返りません。2-18. ボールが跳ね返る(縦横方向)(rb_block18.rb)
縦横ともに動かして、跳ね返らせます。ちょっと「ブロック崩し」の雰囲気が出てきましたね。
include DX
# 初期設定用のコード (your setup code here)
Window.width   = 640
Window.height  = 480
Window.bgcolor = C_BLACK

img_bar = Image.load("bar.png")
bar_x = 250
bar_y = 480 - img_bar.height

img_ball = Image.load("ball.png")
img_ball.set_color_key(C_WHITE)
ball_x = 300
ball_y = 400
dx     =   2
dy     =  -2
ball_width  = img_ball.width
ball_height = img_ball.height

# 1秒当たりの描画回数の設定(初期値:60)
#Window.fps = 30


Window.loop do
  #bar_x += Input.x * 4       # 左右キーの場合
  bar_x = Input.mouse_x       # マウスの場合
  if bar_x < 20
    bar_x = 20
  elsif bar_x > 640 - 20 - img_bar.width
    bar_x = 640 - 20 - img_bar.width
  end

  ball_x += dx                   # ◇変更(コメントアウトをはずす)
  ball_y += dy

  if ball_x < 20 || (ball_x + ball_width) > 620
    ball_x -= dx
    dx = -dx
  end

  if ball_y < 20
    ball_y -= dy
    dy = -dy
  end

  Window.draw_box_fill(  0,   0,  20, 480, C_WHITE)
  Window.draw_box_fill(620,   0, 640, 480, C_WHITE)
  Window.draw_box_fill(  0,   0, 640,  20, C_WHITE)

  Window.draw(bar_x, bar_y, img_bar)
  Window.draw(ball_x, ball_y, img_ball)
end
2-19. ボールが跳ね返る(バーと)(rb_block19.rb)
バーでも跳ね返るようにします。
ボールがバーにぶつかった時の条件は;
○
y座標
ボールの下>バーの上
(ball_y + ball_height) > (480 - bar_height)○
x座標
ボールの右>バーの左
(ball_x + ball_width) > bar_x
ボールの左<バーの右
ball_x < (bar_x + bar_width)以上の条件を同時に満たす時です(
&&)。include DX # 初期設定用のコード (your setup code here) Window.width = 640 Window.height = 480 Window.bgcolor = C_BLACK img_bar = Image.load("bar.png") bar_x = 250 bar_y = 480 - img_bar.height bar_width = img_bar.width # ◆追加 bar_height = img_bar.height # ◆追加 img_ball = Image.load("ball.png") img_ball.set_color_key(C_WHITE) ball_x = 300 ball_y = 400 dx = 2 dy = -2 ball_width = img_ball.width ball_height = img_ball.height # 1秒当たりの描画回数の設定(初期値:60) #Window.fps = 30 Window.loop do #bar_x += Input.x * 4 # 左右キーの場合 bar_x = Input.mouse_x # マウスの場合 if bar_x < 20 bar_x = 20 elsif bar_x > 640 - 20 - img_bar.width bar_x = 640 - 20 - img_bar.width end ball_x += dx ball_y += dy if ball_x < 20 || (ball_x + ball_width) > 620 ball_x -= dx dx = -dx end if ball_y < 20 ball_y -= dy dy = -dy end if (ball_y + ball_height) > (480 - bar_height) && # ◆追加 (ball_x + ball_width) > bar_x && # ◆追加 ball_x < (bar_x + bar_width) # ◆追加 # ◆追加 ball_y -= dy # ◆追加 dy = -dy # ◆追加 end # ◆追加 Window.draw_box_fill( 0, 0, 20, 480, C_WHITE) Window.draw_box_fill(620, 0, 640, 480, C_WHITE) Window.draw_box_fill( 0, 0, 640, 20, C_WHITE) Window.draw(bar_x, bar_y, img_bar) Window.draw(ball_x, ball_y, img_ball) end
これで良さそうですが、バーを動かしながら横から当たった時の跳ね返りが変です。
2-20. ボールが跳ね返る(バーと):修正(rb_block20.rb)
一旦ボールがバーに入り込みすぎてしまうと、跳ね返り処理してもまだバーの中なので、
dyがプラスとマイナスを繰り返して出られなくなってしまいます。そこで、跳ね返り処理したらバーの外に出られる場合;
y方向で、
ボールの下<=バーの上よりdyの絶対値分だけ下
(ball_y + ball_height) <= (480 - bar_height + dy.abs)という条件を付け加えます。
include DX
# 初期設定用のコード (your setup code here)
Window.width   = 640
Window.height  = 480
Window.bgcolor = C_BLACK

img_bar = Image.load("bar.png")
bar_x = 250
bar_y = 480 - img_bar.height
bar_width  = img_bar.width
bar_height = img_bar.height

img_ball = Image.load("ball.png")
img_ball.set_color_key(C_WHITE)
ball_x = 300
ball_y = 400
dx     =   2
dy     =  -2
ball_width  = img_ball.width
ball_height = img_ball.height

# 1秒当たりの描画回数の設定(初期値:60)
#Window.fps = 30


Window.loop do
  #bar_x += Input.x * 4       # 左右キーの場合
  bar_x = Input.mouse_x       # マウスの場合
  if bar_x < 20
    bar_x = 20
  elsif bar_x > 640 - 20 - img_bar.width
    bar_x = 640 - 20 - img_bar.width
  end

  ball_x += dx
  ball_y += dy

  if ball_x < 20 || (ball_x + ball_width) > 620
    ball_x -= dx
    dx = -dx
  end

  if ball_y < 20
    ball_y -= dy
    dy = -dy
  end

  if (ball_y + ball_height) >  (480 - bar_height)  &&           # ◇変更(文字位置合わせ)
     (ball_y + ball_height) <= (480 - bar_height + dy.abs)  &&  # ◆追加
     (ball_x + ball_width)  >  bar_x               &&           # ◇変更(文字位置合わせ)
     ball_x                 <  (bar_x + bar_width)              # ◇変更(文字位置合わせ)

    ball_y -= dy
    dy = -dy
  end


  Window.draw_box_fill(  0,   0,  20, 480, C_WHITE)
  Window.draw_box_fill(620,   0, 640, 480, C_WHITE)
  Window.draw_box_fill(  0,   0, 640,  20, C_WHITE)

  Window.draw(bar_x, bar_y, img_bar)
  Window.draw(ball_x, ball_y, img_ball)
end
2-21. ブロックを出す(1個)(rb_block21.rb)
ここからは、ブロックを作っていきます。まずは1個。
ブロックとして、横58、縦18の大きさの緑の長方形の画像イメージ(
src/image/block.png)を用意します。
横の大きさは、横に10個置くことにして、
(ウィンドウ横幅640 - 左右の壁の厚み 20 * 2) / 10 = 60に、隣同士の隙間を左右 1ずつとって 58にしています。この
block.pngファイルをエディタ画面にドラッグ&ドロップして、Nyle-canvas内に登録します。次に、
Image.load("block.png")で画像ファイルを読み込みます。(パス名は不要です。)最初のブロックを
block00として、位置は左上の壁の内側(x = 20,y = 20)から横、縦とも1だけ隙間を空けて、block00_x = 21、block00_y = 21に配置します。そして、
Window.draw(block00_x, block00_y, img_block)で描画します。include DX # 初期設定用のコード (your setup code here) Window.width = 640 Window.height = 480 Window.bgcolor = C_BLACK img_bar = Image.load("bar.png") bar_x = 250 bar_y = 480 - img_bar.height bar_width = img_bar.width bar_height = img_bar.height img_ball = Image.load("ball.png") img_ball.set_color_key(C_WHITE) ball_x = 300 ball_y = 400 dx = 2 dy = -2 ball_width = img_ball.width ball_height = img_ball.height img_block = Image.load("block.png") # ◆追加 block_widh = img_block.width # ◆追加 block_height = img_block.height # ◆追加 block00_x = 21 # ◆追加 block00_y = 21 # ◆追加 # 1秒当たりの描画回数の設定(初期値:60) #Window.fps = 30 Window.loop do #bar_x += Input.x * 4 # 左右キーの場合 bar_x = Input.mouse_x # マウスの場合 if bar_x < 20 bar_x = 20 elsif bar_x > 640 - 20 - img_bar.width bar_x = 640 - 20 - img_bar.width end ball_x += dx ball_y += dy if ball_x < 20 || (ball_x + ball_width) > 620 ball_x -= dx dx = -dx end if ball_y < 20 ball_y -= dy dy = -dy end if (ball_y + ball_height) > (480 - bar_height) && (ball_y + ball_height) <= (480 - bar_height + dy.abs) && (ball_x + ball_width) > bar_x && ball_x < (bar_x + bar_width) ball_y -= dy dy = -dy end Window.draw_box_fill( 0, 0, 20, 480, C_WHITE) Window.draw_box_fill(620, 0, 640, 480, C_WHITE) Window.draw_box_fill( 0, 0, 640, 20, C_WHITE) Window.draw(bar_x, bar_y, img_bar) Window.draw(ball_x, ball_y, img_ball) Window.draw(block00_x, block00_y, img_block) # ◆追加 end
2-22. ブロックを出す(2個)(rb_block22.rb)
2個目のブロック(
block01)は、同じイメージを使って、ブロックの横幅(block_widh)+ 隙間(2)だけ右にずらした位置に置きます。include DX # 初期設定用のコード (your setup code here) Window.width = 640 Window.height = 480 Window.bgcolor = C_BLACK img_bar = Image.load("bar.png") bar_x = 250 bar_y = 480 - img_bar.height bar_width = img_bar.width bar_height = img_bar.height img_ball = Image.load("ball.png") img_ball.set_color_key(C_WHITE) ball_x = 300 ball_y = 400 dx = 2 dy = -2 ball_width = img_ball.width ball_height = img_ball.height img_block = Image.load("block.png") block_widh = img_block.width block_height = img_block.height block00_x = 21 block00_y = 21 block01_x = 21 + block_widh + 2 # ◆追加 block01_y = 21 # ◆追加 # 1秒当たりの描画回数の設定(初期値:60) #Window.fps = 30 Window.loop do #bar_x += Input.x * 4 # 左右キーの場合 bar_x = Input.mouse_x # マウスの場合 if bar_x < 20 bar_x = 20 elsif bar_x > 640 - 20 - img_bar.width bar_x = 640 - 20 - img_bar.width end ball_x += dx ball_y += dy if ball_x < 20 || (ball_x + ball_width) > 620 ball_x -= dx dx = -dx end if ball_y < 20 ball_y -= dy dy = -dy end if (ball_y + ball_height) > (480 - bar_height) && (ball_y + ball_height) <= (480 - bar_height + dy.abs) && (ball_x + ball_width) > bar_x && ball_x < (bar_x + bar_width) ball_y -= dy dy = -dy end Window.draw_box_fill( 0, 0, 20, 480, C_WHITE) Window.draw_box_fill(620, 0, 640, 480, C_WHITE) Window.draw_box_fill( 0, 0, 640, 20, C_WHITE) Window.draw(bar_x, bar_y, img_bar) Window.draw(ball_x, ball_y, img_ball) Window.draw(block00_x, block00_y, img_block) Window.draw(block01_x, block01_y, img_block) # ◆追加 end
2-23. ブロックを出す(3個)(rb_block23.rb)
同じく3個目のブロック(block02)を置きます。x位置は、ブロックと隙間を見込んで
block_widh + 2ずつずらしていきます。include DX # 初期設定用のコード (your setup code here) Window.width = 640 Window.height = 480 Window.bgcolor = C_BLACK img_bar = Image.load("bar.png") bar_x = 250 bar_y = 480 - img_bar.height bar_width = img_bar.width bar_height = img_bar.height img_ball = Image.load("ball.png") img_ball.set_color_key(C_WHITE) ball_x = 300 ball_y = 400 dx = 2 dy = -2 ball_width = img_ball.width ball_height = img_ball.height img_block = Image.load("block.png") block_widh = img_block.width block_height = img_block.height block00_x = 21 block00_y = 21 block01_x = 21 + block_widh + 2 block01_y = 21 block02_x = 21 + (block_widh + 2) * 2 # ◆追加 block02_y = 21 # ◆追加 # 1秒当たりの描画回数の設定(初期値:60) #Window.fps = 30 Window.loop do #bar_x += Input.x * 4 # 左右キーの場合 bar_x = Input.mouse_x # マウスの場合 if bar_x < 20 bar_x = 20 elsif bar_x > 640 - 20 - img_bar.width bar_x = 640 - 20 - img_bar.width end ball_x += dx ball_y += dy if ball_x < 20 || (ball_x + ball_width) > 620 ball_x -= dx dx = -dx end if ball_y < 20 ball_y -= dy dy = -dy end if (ball_y + ball_height) > (480 - bar_height) && (ball_y + ball_height) <= (480 - bar_height + dy.abs) && (ball_x + ball_width) > bar_x && ball_x < (bar_x + bar_width) ball_y -= dy dy = -dy end Window.draw_box_fill( 0, 0, 20, 480, C_WHITE) Window.draw_box_fill(620, 0, 640, 480, C_WHITE) Window.draw_box_fill( 0, 0, 640, 20, C_WHITE) Window.draw(bar_x, bar_y, img_bar) Window.draw(ball_x, ball_y, img_ball) Window.draw(block00_x, block00_y, img_block) Window.draw(block01_x, block01_y, img_block) Window.draw(block02_x, block02_y, img_block) # ◆追加 end
2-24. ブロックを出す(10個)(rb_block24.rb)
横に10個置くとちょうどぴったりの幅です。
include DX
# 初期設定用のコード (your setup code here)
Window.width   = 640
Window.height  = 480
Window.bgcolor = C_BLACK

img_bar = Image.load("bar.png")
bar_x = 250
bar_y = 480 - img_bar.height
bar_width  = img_bar.width
bar_height = img_bar.height

img_ball = Image.load("ball.png")
img_ball.set_color_key(C_WHITE)
ball_x = 300
ball_y = 400
dx     =   2
dy     =  -2
ball_width  = img_ball.width
ball_height = img_ball.height

img_block = Image.load("block.png")
block_widh = img_block.width
block_height = img_block.height

block00_x = 21
block00_y = 21

block01_x = 21 + block_widh + 2
block01_y = 21

block02_x = 21 + (block_widh + 2) * 2
block02_y = 21

block03_x = 21 + (block_widh + 2) * 3              # ◆追加
block03_y = 21                                     # ◆追加

block04_x = 21 + (block_widh + 2) * 4              # ◆追加
block04_y = 21                                     # ◆追加

block05_x = 21 + (block_widh + 2) * 5              # ◆追加
block05_y = 21                                     # ◆追加

block06_x = 21 + (block_widh + 2) * 6              # ◆追加
block06_y = 21                                     # ◆追加

block07_x = 21 + (block_widh + 2) * 7              # ◆追加
block07_y = 21                                     # ◆追加

block08_x = 21 + (block_widh + 2) * 8              # ◆追加
block08_y = 21                                     # ◆追加

block09_x = 21 + (block_widh + 2) * 9              # ◆追加
block09_y = 21                                     # ◆追加

# 1秒当たりの描画回数の設定(初期値:60)
#Window.fps = 30


Window.loop do
  #bar_x += Input.x * 4       # 左右キーの場合
  bar_x = Input.mouse_x       # マウスの場合
  if bar_x < 20
    bar_x = 20
  elsif bar_x > 640 - 20 - img_bar.width
    bar_x = 640 - 20 - img_bar.width
  end

  ball_x += dx
  ball_y += dy

  if ball_x < 20 || (ball_x + ball_width) > 620
    ball_x -= dx
    dx = -dx
  end

  if ball_y < 20
    ball_y -= dy
    dy = -dy
  end

  if (ball_y + ball_height) >  (480 - bar_height)  &&
     (ball_y + ball_height) <= (480 - bar_height + dy.abs)  &&
     (ball_x + ball_width)  >  bar_x               &&
     ball_x                 <  (bar_x + bar_width)

    ball_y -= dy
    dy = -dy
  end


  Window.draw_box_fill(  0,   0,  20, 480, C_WHITE)
  Window.draw_box_fill(620,   0, 640, 480, C_WHITE)
  Window.draw_box_fill(  0,   0, 640,  20, C_WHITE)

  Window.draw(bar_x, bar_y, img_bar)
  Window.draw(ball_x, ball_y, img_ball)

  Window.draw(block00_x, block00_y, img_block)
  Window.draw(block01_x, block01_y, img_block)
  Window.draw(block02_x, block02_y, img_block)
  Window.draw(block03_x, block03_y, img_block)          # ◆追加
  Window.draw(block04_x, block04_y, img_block)          # ◆追加
  Window.draw(block05_x, block05_y, img_block)          # ◆追加
  Window.draw(block06_x, block06_y, img_block)          # ◆追加
  Window.draw(block07_x, block07_y, img_block)          # ◆追加
  Window.draw(block08_x, block08_y, img_block)          # ◆追加
  Window.draw(block09_x, block09_y, img_block)          # ◆追加
end
2-25. ブロックをまとめて作る(
Itemクラス)(rb_block25.rb)ブロックを作る/描画するプログラムが10回も繰り返したので、まとめて作ることします。
以下のような手順で作っていきます。
1)
Itemクラスというクラスを作るブロックを扱うのに、以下のような属性をまとめて扱えると便利です。
- x位置
- y位置
- イメージ
- イメージの幅
- イメージの高さ
それを踏まえて、
Itemクラスというクラスを作ることにします。class Item def initialize(x, y, image) @x = x @y = y @image = image @width = image.width @height = image.height end attr_accessor :x, :y, :image, :width, :height endこれで、
Itemクラスはx位置、y位置、イメージ、幅、高さをもつように作ります。2) ブロックのイメージを用意する
img_block = Image.load("block.png")3)
Itemクラスでブロックを作る
Item.new(x位置, y位置, img_block)4) 複数のブロック(ブロック群)を作るために、配列
blocksを用意する
blocks = []で、空の配列blocksを作ります。5) ブロックを1つずつ作って、配列
blocksに追加していく配列に追加していく
<<メソッドを使って、ブロックを1つ作っては配列blocksに追加する操作を繰り返します。10回繰り返すので、
10.times do 〜 endを使って、1回毎にxを増やすことで横位置をずらしたブロックを作ります。(xは 0, 1, 2, ... , 9 と変わっていく)10.times do |x| blocks << Item.new(21 + (img_block.width + 2) * x, 21, img_block)6) ブロック群の描画もまとめる
ブロック群
blocksは配列なので、繰り返し操作する配列.each do |配列要素| 〜 endが使えます。blocks.each do |block| Window.draw(block.x, block.y, block.image) end以上で、プログラムがだいぶすっきりしました。(コメントも追加してあります。)
include DX
# 初期設定用のコード (your setup code here)
Window.width   = 640
Window.height  = 480
Window.bgcolor = C_BLACK

# 壁の厚み:左、右、上;20                            # ◆追加(コメント)

# ブロックはItemクラスにする                          # ◆追加(コメント)
class Item                                        # ◆追加
  def initialize(x, y, image)                     # ◆追加
    @x = x                                        # ◆追加
    @y = y                                        # ◆追加
    @image  = image                               # ◆追加
    @width  = image.width                         # ◆追加
    @height = image.height                        # ◆追加
  end                                             # ◆追加
  attr_accessor :x, :y, :image, :width, :height   # ◆追加
end                                               # ◆追加

# バーの準備                                        # ◆追加(コメント)
img_bar = Image.load("bar.png")
bar_x = 250
bar_y = 480 - img_bar.height
bar_width  = img_bar.width
bar_height = img_bar.height

# ボールの準備                                       # ◆追加(コメント)
img_ball = Image.load("ball.png")
img_ball.set_color_key(C_WHITE)
ball_x = 300
ball_y = 400
dx     =   2
dy     =  -2
ball_width  = img_ball.width
ball_height = img_ball.height

# ブロックの準備                                      # ◆追加(コメント)
img_block = Image.load("block.png")

# ブロック群の初期化                                   # ◆追加(コメント)
blocks = []                                         # ◆追加
10.times do |x|                                     # ◆追加
  blocks << Item.new(21 + (img_block.width + 2) * x, 21, img_block)   # ◆追加
end                                                 # ◆追加

# 1秒当たりの描画回数の設定(初期値:60)
#Window.fps = 30


# メインループ                                        # ◆追加(コメント)
Window.loop do
  # バーを動かす                                      # ◆追加(コメント)
  #bar_x += Input.x * 4       # 左右キーの場合
  bar_x = Input.mouse_x       # マウスの場合
  if bar_x < 20
    bar_x = 20
  elsif bar_x > 640 - 20 - img_bar.width
    bar_x = 640 - 20 - img_bar.width
  end

  # ボールを動かす                                     # ◆追加(コメント)
  ball_x += dx
  ball_y += dy

  # 壁に当たったら、跳ね返る(x方向)                     # ◆追加(コメント)
  if ball_x < 20 || (ball_x + ball_width) > 620
    ball_x -= dx
    dx = -dx
  end

  # 壁に当たったら、跳ね返る(y方向)                       # ◆追加(コメント)
  if ball_y < 20
    ball_y -= dy
    dy = -dy
  end

  # バーとの衝突判定                                    # ◆追加(コメント)
  if (ball_y + ball_height) >  (480 - bar_height)  &&
     (ball_y + ball_height) <= (480 - bar_height + dy.abs)  &&
     (ball_x + ball_width)  >  bar_x               &&
     ball_x                 <  (bar_x + bar_width)

    ball_y -= dy
    dy = -dy
  end


  # 画面描画                                           # ◆追加(コメント)
  Window.draw_box_fill(  0,   0,  20, 480, C_WHITE)
  Window.draw_box_fill(620,   0, 640, 480, C_WHITE)
  Window.draw_box_fill(  0,   0, 640,  20, C_WHITE)

  Window.draw(bar_x, bar_y, img_bar)
  Window.draw(ball_x, ball_y, img_ball)

  blocks.each do |block|                             # ◆追加
    Window.draw(block.x, block.y, block.image)       # ◆追加
  end                                                # ◆追加
end
2-26. ブロックを出す(2段目も作る)(rb_block26.rb)
2段目のブロックも作っていきます。
2段目は、
yの位置をブロックの高さ(img_block.height) + 隙間(2)だけ大きくします。1段目と同じく10.times do 〜 endを使って書きます。
include DX
# 初期設定用のコード (your setup code here)
Window.width   = 640
Window.height  = 480
Window.bgcolor = C_BLACK

# 壁の厚み:左、右、上;20

# ブロックはItemクラスにする
class Item
  def initialize(x, y, image)
    @x = x
    @y = y
    @image  = image
    @width  = image.width
    @height = image.height
  end
  attr_accessor :x, :y, :image, :width, :height
end

# バーの準備
img_bar = Image.load("bar.png")
bar_x = 250
bar_y = 480 - img_bar.height
bar_width  = img_bar.width
bar_height = img_bar.height

# ボールの準備
img_ball = Image.load("ball.png")
img_ball.set_color_key(C_WHITE)
ball_x = 300
ball_y = 400
dx     =   2
dy     =  -2
ball_width  = img_ball.width
ball_height = img_ball.height

# ブロックの準備
img_block = Image.load("block.png")

# ブロック群の初期化
blocks = []
10.times do |x|
  blocks << Item.new(21 + (img_block.width + 2) * x, 21, img_block)
end

10.times do |x|                                     # ◆追加
  blocks << Item.new(21 + (img_block.width + 2) * x, 21 + (img_block.height + 2), img_block)   # ◆追加
end                                                 # ◆追加

# 1秒当たりの描画回数の設定(初期値:60)
#Window.fps = 30


# メインループ
Window.loop do
  # バーを動かす
  #bar_x += Input.x * 4       # 左右キーの場合
  bar_x = Input.mouse_x       # マウスの場合
  if bar_x < 20
    bar_x = 20
  elsif bar_x > 640 - 20 - img_bar.width
    bar_x = 640 - 20 - img_bar.width
  end

  # ボールを動かす
  ball_x += dx
  ball_y += dy

  # 壁に当たったら、跳ね返る(x方向)
  if ball_x < 20 || (ball_x + ball_width) > 620
    ball_x -= dx
    dx = -dx
  end

  # 壁に当たったら、跳ね返る(y方向)
  if ball_y < 20
    ball_y -= dy
    dy = -dy
  end

  # バーとの衝突判定
  if (ball_y + ball_height) >  (480 - bar_height)  &&
     (ball_y + ball_height) <= (480 - bar_height + dy.abs)  &&
     (ball_x + ball_width)  >  bar_x               &&
     ball_x                 <  (bar_x + bar_width)

    ball_y -= dy
    dy = -dy
  end


  # 画面描画
  Window.draw_box_fill(  0,   0,  20, 480, C_WHITE)
  Window.draw_box_fill(620,   0, 640, 480, C_WHITE)
  Window.draw_box_fill(  0,   0, 640,  20, C_WHITE)

  Window.draw(bar_x, bar_y, img_bar)
  Window.draw(ball_x, ball_y, img_ball)

  blocks.each do |block|
    Window.draw(block.x, block.y, block.image)
  end
end
2-27. ブロックを出す(5段目まで作る)(rb_block27.rb)
5段目まで作りました。
include DX
# 初期設定用のコード (your setup code here)
Window.width   = 640
Window.height  = 480
Window.bgcolor = C_BLACK

# 壁の厚み:左、右、上;20

# ブロックはItemクラスにする
class Item
  def initialize(x, y, image)
    @x = x
    @y = y
    @image  = image
    @width  = image.width
    @height = image.height
  end
  attr_accessor :x, :y, :image, :width, :height
end

# バーの準備
img_bar = Image.load("bar.png")
bar_x = 250
bar_y = 480 - img_bar.height
bar_width  = img_bar.width
bar_height = img_bar.height

# ボールの準備
img_ball = Image.load("ball.png")
img_ball.set_color_key(C_WHITE)
ball_x = 300
ball_y = 400
dx     =   2
dy     =  -2
ball_width  = img_ball.width
ball_height = img_ball.height

# ブロックの準備
img_block = Image.load("block.png")

# ブロック群の初期化
blocks = []
10.times do |x|
  blocks << Item.new(21 + (img_block.width + 2) * x, 21, img_block)
end

10.times do |x|
  blocks << Item.new(21 + (img_block.width + 2) * x, 21 + (img_block.height + 2), img_block)
end

10.times do |x|                                     # ◆追加
  blocks << Item.new(21 + (img_block.width + 2) * x, 21 + (img_block.height + 2) * 2, img_block)   # ◆追加
end                                                 # ◆追加

10.times do |x|                                     # ◆追加
  blocks << Item.new(21 + (img_block.width + 2) * x, 21 + (img_block.height + 2) * 3, img_block)   # ◆追加
end                                                 # ◆追加

10.times do |x|                                     # ◆追加
  blocks << Item.new(21 + (img_block.width + 2) * x, 21 + (img_block.height + 2) * 4, img_block)   # ◆追加
end                                                 # ◆追加

# 1秒当たりの描画回数の設定(初期値:60)
#Window.fps = 30


# メインループ
Window.loop do
  # バーを動かす
  #bar_x += Input.x * 4       # 左右キーの場合
  bar_x = Input.mouse_x       # マウスの場合
  if bar_x < 20
    bar_x = 20
  elsif bar_x > 640 - 20 - img_bar.width
    bar_x = 640 - 20 - img_bar.width
  end

  # ボールを動かす
  ball_x += dx
  ball_y += dy

  # 壁に当たったら、跳ね返る(x方向)
  if ball_x < 20 || (ball_x + ball_width) > 620
    ball_x -= dx
    dx = -dx
  end

  # 壁に当たったら、跳ね返る(y方向)
  if ball_y < 20
    ball_y -= dy
    dy = -dy
  end

  # バーとの衝突判定
  if (ball_y + ball_height) >  (480 - bar_height)  &&
     (ball_y + ball_height) <= (480 - bar_height + dy.abs)  &&
     (ball_x + ball_width)  >  bar_x               &&
     ball_x                 <  (bar_x + bar_width)

    ball_y -= dy
    dy = -dy
  end


  # 画面描画
  Window.draw_box_fill(  0,   0,  20, 480, C_WHITE)
  Window.draw_box_fill(620,   0, 640, 480, C_WHITE)
  Window.draw_box_fill(  0,   0, 640,  20, C_WHITE)

  Window.draw(bar_x, bar_y, img_bar)
  Window.draw(ball_x, ball_y, img_ball)

  blocks.each do |block|
    Window.draw(block.x, block.y, block.image)
  end
end
2-28. ブロックを出す(5段目までまとめて作る)(rb_block28.rb)
10.times do 〜 endが5回出てきたので、これもまとめてみます。
10.times do 〜 endの中に、5.times do 〜 endを入れて、2重の形にします。include DX # 初期設定用のコード (your setup code here) Window.width = 640 Window.height = 480 Window.bgcolor = C_BLACK # 壁の厚み:左、右、上;20 # ブロックはItemクラスにする class Item def initialize(x, y, image) @x = x @y = y @image = image @width = image.width @height = image.height end attr_accessor :x, :y, :image, :width, :height end # バーの準備 img_bar = Image.load("bar.png") bar_x = 250 bar_y = 480 - img_bar.height bar_width = img_bar.width bar_height = img_bar.height # ボールの準備 img_ball = Image.load("ball.png") img_ball.set_color_key(C_WHITE) ball_x = 300 ball_y = 400 dx = 2 dy = -2 ball_width = img_ball.width ball_height = img_ball.height # ブロックの準備 img_block = Image.load("block.png") # ブロック群の初期化 blocks = [] 10.times do |x| 5.times do |y| # ◆追加 blocks << Item.new(21 + (img_block.width + 2) * x, 21 + (img_block.height + 2) * y, img_block) # ◆追加 end # ◆追加 end # 1秒当たりの描画回数の設定(初期値:60) #Window.fps = 30 # メインループ Window.loop do # バーを動かす #bar_x += Input.x * 4 # 左右キーの場合 bar_x = Input.mouse_x # マウスの場合 if bar_x < 20 bar_x = 20 elsif bar_x > 640 - 20 - img_bar.width bar_x = 640 - 20 - img_bar.width end # ボールを動かす ball_x += dx ball_y += dy # 壁に当たったら、跳ね返る(x方向) if ball_x < 20 || (ball_x + ball_width) > 620 ball_x -= dx dx = -dx end # 壁に当たったら、跳ね返る(y方向) if ball_y < 20 ball_y -= dy dy = -dy end # バーとの衝突判定 if (ball_y + ball_height) > (480 - bar_height) && (ball_y + ball_height) <= (480 - bar_height + dy.abs) && (ball_x + ball_width) > bar_x && ball_x < (bar_x + bar_width) ball_y -= dy dy = -dy end # 画面描画 Window.draw_box_fill( 0, 0, 20, 480, C_WHITE) Window.draw_box_fill(620, 0, 640, 480, C_WHITE) Window.draw_box_fill( 0, 0, 640, 20, C_WHITE) Window.draw(bar_x, bar_y, img_bar) Window.draw(ball_x, ball_y, img_ball) blocks.each do |block| Window.draw(block.x, block.y, block.image) end end2-29. ボール、バーも
Itemクラスにする(rb_block29.rb)考えてみると、ボールとバーの属性も
Itemクラスとほとんど同じなので、Itemクラスにすることにします。これで、プログラムが見やすくなります。
include DX
# 初期設定用のコード (your setup code here)
Window.width   = 640
Window.height  = 480
Window.bgcolor = C_BLACK

# 壁の厚み:左、右、上;20

# ボール、バー、ブロックはItemクラスにする         # ◇変更(ボール、バーもItemクラスに作り替え)
class Item
  def initialize(x, y, image)
    @x = x
    @y = y
    @image  = image
    @width  = image.width
    @height = image.height
  end
  attr_accessor :x, :y, :image, :width, :height
end

# バーの準備
img_bar = Image.load("bar.png")
bar = Item.new(250, 480 - img_bar.height, img_bar)  # ◇変更(Itemクラスに作り替え)

# ボールの準備
img_ball = Image.load("ball.png")
img_ball.set_color_key(C_WHITE)
ball = Item.new(300, 400, img_ball)                 # ◇変更(Itemクラスに作り替え)
dx =  2   # ボールのスピード(x方向)                   # ◇変更(文字揃え、コメント追加)
dy = -2   # ボールのスピード(y方向)                   # ◇変更(文字揃え、コメント追加)

# ブロックの準備
img_block = Image.load("block.png")

# ブロック群の初期化
blocks = []
10.times do |x|
  5.times do |y|
    blocks << Item.new(21 + (img_block.width + 2) * x, 21 + (img_block.height + 2) * y, img_block)
  end
end

# 1秒当たりの描画回数の設定(初期値:60)
#Window.fps = 30


# メインループ
Window.loop do
  # バーを動かす
  #bar.x += Input.x * 4       # 左右キーの場合   # ◇変更(bar.x に)
  bar.x = Input.mouse_x       # マウスの場合     # ◇変更(bar.x に)
  if bar.x < 20                                # ◇変更(bar.x に)
    bar.x = 20                                 # ◇変更(bar.x に)
  elsif bar.x > 640 - 20 - bar.width           # ◇変更(bar.x、bar.width に)
    bar.x = 640 - 20 - bar.width               # ◇変更(bar.x、bar.width に)
  end

  # ボールを動かす
  ball.x += dx                                 # ◇変更(ball.x に)
  ball.y += dy                                 # ◇変更(ball.y に)

  # 壁に当たったら、跳ね返る(x方向)
  if ball.x < 20 || (ball.x + ball.width) > 620  # ◇変更(ball.x、ball.width に)
    ball.x -= dx                               # ◇変更(ball.x に)
    dx = -dx
  end

  # 壁に当たったら、跳ね返る(y方向)
  if ball.y < 20                               # ◇変更(ball.y に)
    ball.y -= dy                               # ◇変更(ball.y に)
    dy = -dy
  end

  # バーとの衝突判定
  if (ball.y + ball.height) >  (480 - bar.height)  &&                # ◇変更(ball.y、ball.height、bar.height に)
     (ball.y + ball.height) <= (480 - bar.height + dy.abs)  &&       # ◇変更(ball.y、ball.height、bar.height に)
     (ball.x + ball.width)  >  bar.x               &&                # ◇変更(ball.x、ball.width、bar.x に)
     ball.x                 <  (bar.x + bar.width)                   # ◇変更(ball.x、bar.x、bar.width に)

    ball.y -= dy                               # ◇変更(ball.y に)
    dy = -dy
  end


  # 画面描画
  Window.draw_box_fill(  0,   0,  20, 480, C_WHITE)
  Window.draw_box_fill(620,   0, 640, 480, C_WHITE)
  Window.draw_box_fill(  0,   0, 640,  20, C_WHITE)

  Window.draw(bar.x, bar.y, bar.image)        # ◇変更(bar.x、bar.y、bar.image に)
  Window.draw(ball.x, ball.y, ball.image)     # ◇変更(ball.x、ball.y、ball.image に)

  blocks.each do |block|
    Window.draw(block.x, block.y, block.image)
  end
end
2-30. 衝突判定
collision?を作る(rb_block30.rb)今後、バーだけでなく、ブロックとの衝突判定を何回も行うので、衝突判定
collision?を作っておきます。ここでは、四角形同士で考えることにします。
item_aとitem_bという2つの長方形を考えると;
item_aの座標;左上(a_x0,a_y0)、右下(a_x1,a_y1)
item_bの座標;左上(b_x0,b_y0)、右下(b_x1,b_y1)
item_aのx座標は、a_x0〜a_x1、y座標はa_y0〜a_y1
item_bのx座標は、b_x0〜b_x1、y座標はb_y0〜b_y1それぞれの座標(x, y)を考えて、2つが衝突している(ぶつかっている)条件は、以下のようになります。
a_x0 < b_x1 かつ
a_x1 > b_x0 かつ

a_y0 < b_y1 かつ
a_y1 > b_y0
これをコーディングすると以下のようになります。(
item_a、item_bは、Itemクラスとする)def collision?(item_a, item_b) a_x0 = item_a.x a_x1 = item_a.x + item_a.width a_y0 = item_a.y a_y1 = item_a.y + item_a.height b_x0 = item_b.x b_x1 = item_b.x + item_b.width b_y0 = item_b.y b_y1 = item_b.y + item_b.height if a_x0 < b_x1 && a_x1 > b_x0 && a_y0 < b_y1 && a_y1 > b_y0 true end end
collision?は、衝突しているとtrueを返します。(その他の衝突判定の考え方(円、色)については、以下を参照;
→ ・DXRuby:「当たり判定」を自分で作ってみよう - Qiita
https://qiita.com/noanoa07/items/b7d647bba20116c41a77 )また、跳ね返る方向(
x方向、y方向)を考える必要があるため、ボールの移動はx方向、y方向に分けて行い、それぞれで衝突判定をするようにします。include DX # 初期設定用のコード (your setup code here) Window.width = 640 Window.height = 480 Window.bgcolor = C_BLACK # 壁の厚み:左、右、上;20 # ボール、バー、ブロックはItemクラスにする class Item def initialize(x, y, image) @x = x @y = y @image = image @width = image.width @height = image.height end attr_accessor :x, :y, :image, :width, :height end # 衝突判定 # ◆追加 def collision?(item_a, item_b) # ◆追加 a_x0 = item_a.x # ◆追加 a_x1 = item_a.x + item_a.width # ◆追加 a_y0 = item_a.y # ◆追加 a_y1 = item_a.y + item_a.height # ◆追加 # ◆追加 b_x0 = item_b.x # ◆追加 b_x1 = item_b.x + item_b.width # ◆追加 b_y0 = item_b.y # ◆追加 b_y1 = item_b.y + item_b.height # ◆追加 # ◆追加 if a_x0 < b_x1 && # ◆追加 a_x1 > b_x0 && # ◆追加 a_y0 < b_y1 && # ◆追加 a_y1 > b_y0 # ◆追加 # ◆追加 true # ◆追加 end # ◆追加 end # ◆追加 # バーの準備 img_bar = Image.load("bar.png") bar = Item.new(250, 480 - img_bar.height, img_bar) # ボールの準備 img_ball = Image.load("ball.png") img_ball.set_color_key(C_WHITE) ball = Item.new(300, 400, img_ball) dx = 2 # ボールのスピード(x方向) dy = -2 # ボールのスピード(y方向) # ブロックの準備 img_block = Image.load("block.png") # ブロック群の初期化 blocks = [] 10.times do |x| 5.times do |y| blocks << Item.new(21 + (img_block.width + 2) * x, 21 + (img_block.height + 2) * y, img_block) end end # 1秒当たりの描画回数の設定(初期値:60) #Window.fps = 30 # メインループ Window.loop do # バーを動かす #bar.x += Input.x * 4 # 左右キーの場合 bar.x = Input.mouse_x # マウスの場合 if bar.x < 20 bar.x = 20 elsif bar.x > 640 - 20 - bar.width bar.x = 640 - 20 - bar.width end # ボールをy方向に動かす # ◇変更(y方向だけに) ball.y += dy # ◇変更(y方向だけに) # バーとの衝突判定 if collision?(ball, bar) # ◇変更(書き直し) if ball.y + ball.height <= 480 - bar.height + dy.abs # ◇変更(書き直し) ball.y -= dy # ◇変更(書き直し) dy = -dy # ◇変更(書き直し) end # ◇変更(書き直し) end # ◇変更(書き直し) # 壁に当たったら、跳ね返る(y方向) if ball.y < 20 ball.y -= dy dy = -dy end # ボールをx方向に動かす # ◇変更(x方向だけに) ball.x += dx # ◇変更(x方向だけに) # 壁に当たったら、跳ね返る(x方向) if ball.x < 20 || (ball.x + ball.width) > 620 ball.x -= dx dx = -dx end # 画面描画 Window.draw_box_fill( 0, 0, 20, 480, C_WHITE) Window.draw_box_fill(620, 0, 640, 480, C_WHITE) Window.draw_box_fill( 0, 0, 640, 20, C_WHITE) Window.draw(bar.x, bar.y, bar.image) Window.draw(ball.x, ball.y, ball.image) blocks.each do |block| Window.draw(block.x, block.y, block.image) end end
2-31.
collision?をItemクラスのメソッドにする(rb_block31.rb)Rubyでは、
collision?(item_a, item_b)という書き方より、item_a.collision?(item_b)という書き方が多く使われます(オブジェクト指向)。そのためには、
collision?をItemクラスのメソッドにしましょう。Itemクラスのメソッドにするのは簡単で、以下のようにします。class Item def 追加したいメソッド #メソッドの内容 end endちなみに、
item_aに相当するものは、selfと書きます。class Item def collision?(item_b) a_x0 = self.x a_x1 = self.x + self.width a_y0 = self.y a_y1 = self.y + self.height b_x0 = item_b.x b_x1 = item_b.x + item_b.width b_y0 = item_b.y b_y1 = item_b.y + item_b.height if a_x0 < b_x1 && a_x1 > b_x0 && a_y0 < b_y1 && a_y1 > b_y0 true end end endこれで、今までの
collision?(ball, bar)という書き方から、ball.collision?(bar)という書き方になります。include DX # 初期設定用のコード (your setup code here) Window.width = 640 Window.height = 480 Window.bgcolor = C_BLACK # 壁の厚み:左、右、上;20 # ボール、バー、ブロックはItemクラスにする class Item def initialize(x, y, image) @x = x @y = y @image = image @width = image.width @height = image.height end attr_accessor :x, :y, :image, :width, :height # 衝突判定 # ◇変更(Itemクラスのメソッドに) def collision?(item_b) # ◇変更(書き直し) a_x0 = self.x # ◇変更(書き直し) a_x1 = self.x + self.width # ◇変更(書き直し) a_y0 = self.y # ◇変更(書き直し) a_y1 = self.y + self.height # ◇変更(書き直し) # ◇変更(書き直し) b_x0 = item_b.x # ◇変更(書き直し) b_x1 = item_b.x + item_b.width # ◇変更(書き直し) b_y0 = item_b.y # ◇変更(書き直し) b_y1 = item_b.y + item_b.height # ◇変更(書き直し) # ◇変更(Itemクラスのメソッドに) if a_x0 < b_x1 && # ◇変更(Itemクラスのメソッドに) a_x1 > b_x0 && # ◇変更(Itemクラスのメソッドに) a_y0 < b_y1 && # ◇変更(Itemクラスのメソッドに) a_y1 > b_y0 # ◇変更(Itemクラスのメソッドに) # ◇変更(Itemクラスのメソッドに) true # ◇変更(Itemクラスのメソッドに) end # ◇変更(Itemクラスのメソッドに) end # ◇変更(Itemクラスのメソッドに# ◇変更(書き直し) end # ◇変更(Itemクラスのメソッドに) # バーの準備 img_bar = Image.load("bar.png") bar = Item.new(250, 480 - img_bar.height, img_bar) # ボールの準備 img_ball = Image.load("ball.png") img_ball.set_color_key(C_WHITE) ball = Item.new(300, 400, img_ball) dx = 2 # ボールのスピード(x方向) dy = -2 # ボールのスピード(y方向) # ブロックの準備 img_block = Image.load("block.png") # ブロック群の初期化 blocks = [] 10.times do |x| 5.times do |y| blocks << Item.new(21 + (img_block.width + 2) * x, 21 + (img_block.height + 2) * y, img_block) end end # 1秒当たりの描画回数の設定(初期値:60) #Window.fps = 30 # メインループ Window.loop do # バーを動かす #bar.x += Input.x * 4 # 左右キーの場合 bar.x = Input.mouse_x # マウスの場合 if bar.x < 20 bar.x = 20 elsif bar.x > 640 - 20 - bar.width bar.x = 640 - 20 - bar.width end # ボールをy方向に動かす ball.y += dy # バーとの衝突判定 if ball.collision?(bar) # ◇変更(書き直し) if ball.y + ball.height <= 480 - bar.height + dy.abs ball.y -= dy dy = -dy end end # 壁に当たったら、跳ね返る(y方向) if ball.y < 20 ball.y -= dy dy = -dy end # ボールをx方向に動かす ball.x += dx # 壁に当たったら、跳ね返る(x方向) if ball.x < 20 || (ball.x + ball.width) > 620 ball.x -= dx dx = -dx end # 画面描画 Window.draw_box_fill( 0, 0, 20, 480, C_WHITE) Window.draw_box_fill(620, 0, 640, 480, C_WHITE) Window.draw_box_fill( 0, 0, 640, 20, C_WHITE) Window.draw(bar.x, bar.y, bar.image) Window.draw(ball.x, ball.y, ball.image) blocks.each do |block| Window.draw(block.x, block.y, block.image) end end2-32. ブロックとの衝突判定(当たったブロックは消える)(rb_block32.rb)
ブロックとの衝突判定をします。
配列.delete_ifは、配列要素を1つずつ取り出し、条件に当てはまる場合は、配列から削除する命令です。そのため、ブロック群の配列
blocksから、衝突判定でtrueになったブロックを削除することができます。blocks.delete_if do |block| if ball.collision?(block) true end endこれを使ったコードが以下のようになります。
include DX
# 初期設定用のコード (your setup code here)
Window.width   = 640
Window.height  = 480
Window.bgcolor = C_BLACK

# 壁の厚み:左、右、上;20

# ボール、バー、ブロックはItemクラスにする
class Item
  def initialize(x, y, image)
    @x = x
    @y = y
    @image  = image
    @width  = image.width
    @height = image.height
  end
  attr_accessor :x, :y, :image, :width, :height

  # 衝突判定
  def collision?(item_b)
    a_x0 = self.x
    a_x1 = self.x + self.width
    a_y0 = self.y
    a_y1 = self.y + self.height

    b_x0 = item_b.x
    b_x1 = item_b.x + item_b.width
    b_y0 = item_b.y
    b_y1 = item_b.y + item_b.height

    if a_x0 < b_x1 &&
       a_x1 > b_x0 &&
       a_y0 < b_y1 &&
       a_y1 > b_y0

      true
    end
  end
end


# バーの準備
img_bar = Image.load("bar.png")
bar = Item.new(250, 480 - img_bar.height, img_bar)

# ボールの準備
img_ball = Image.load("ball.png")
img_ball.set_color_key(C_WHITE)
ball = Item.new(300, 400, img_ball)
dx =  2   # ボールのスピード(x方向)
dy = -2   # ボールのスピード(y方向)

# ブロックの準備
img_block = Image.load("block.png")

# ブロック群の初期化
blocks = []
10.times do |x|
  5.times do |y|
    blocks << Item.new(21 + (img_block.width + 2) * x, 21 + (img_block.height + 2) * y, img_block)
  end
end

# 1秒当たりの描画回数の設定(初期値:60)
#Window.fps = 30


# メインループ
Window.loop do
  # バーを動かす
  #bar.x += Input.x * 4       # 左右キーの場合
  bar.x = Input.mouse_x       # マウスの場合
  if bar.x < 20
    bar.x = 20
  elsif bar.x > 640 - 20 - bar.width
    bar.x = 640 - 20 - bar.width
  end


  # ボールをy方向に動かす
  ball.y += dy

  # バーとの衝突判定
  if ball.collision?(bar)
    if ball.y + ball.height  <=  480 - bar.height + dy.abs
      ball.y -= dy
      dy = -dy
    end
  end

  # ブロックとの衝突判定(y方向)         # ◆追加
  blocks.delete_if do |block|        # ◆追加
    if ball.collision?(block)        # ◆追加
      true                           # ◆追加
    end                              # ◆追加
  end                                # ◆追加

  # 壁に当たったら、跳ね返る(y方向)
  if ball.y < 20
    ball.y -= dy
    dy = -dy
  end


  # ボールをx方向に動かす
  ball.x += dx

  # ブロックとの衝突判定(x方向)         # ◆追加
  blocks.delete_if do |block|        # ◆追加
    if ball.collision?(block)        # ◆追加
      true                           # ◆追加
    end                              # ◆追加
  end                                # ◆追加

  # 壁に当たったら、跳ね返る(x方向)
  if ball.x < 20 || (ball.x + ball.width) > 620
    ball.x -= dx
    dx = -dx
  end


  # 画面描画
  Window.draw_box_fill(  0,   0,  20, 480, C_WHITE)
  Window.draw_box_fill(620,   0, 640, 480, C_WHITE)
  Window.draw_box_fill(  0,   0, 640,  20, C_WHITE)

  Window.draw(bar.x, bar.y, bar.image)
  Window.draw(ball.x, ball.y, ball.image)

  blocks.each do |block|
    Window.draw(block.x, block.y, block.image)
  end
end
2-33. ブロックに当たったら跳ね返る;一応完成(rb_block33.rb)
ブロック当たったら跳ね返るようにします。
ブロックと衝突したら、跳ね返るコードを足すだけです。
# ブロックとの衝突判定(y方向)
blocks.delete_if do |block|
  if ball.collision?(block)
    ball.y -= dy                      # ◆追加
    dy = -dy                          # ◆追加
    true
  end
end
これで「ブロック崩し」は一応完成です!
include DX
# 初期設定用のコード (your setup code here)
Window.width   = 640
Window.height  = 480
Window.bgcolor = C_BLACK

# 壁の厚み:左、右、上;20

# ボール、バー、ブロックはItemクラスにする
class Item
  def initialize(x, y, image)
    @x = x
    @y = y
    @image  = image
    @width  = image.width
    @height = image.height
  end
  attr_accessor :x, :y, :image, :width, :height

  # 衝突判定
  def collision?(item_b)
    a_x0 = self.x
    a_x1 = self.x + self.width
    a_y0 = self.y
    a_y1 = self.y + self.height

    b_x0 = item_b.x
    b_x1 = item_b.x + item_b.width
    b_y0 = item_b.y
    b_y1 = item_b.y + item_b.height

    if a_x0 < b_x1 &&
       a_x1 > b_x0 &&
       a_y0 < b_y1 &&
       a_y1 > b_y0

      true
    end
  end
end


# バーの準備
img_bar = Image.load("bar.png")
bar = Item.new(250, 480 - img_bar.height, img_bar)

# ボールの準備
img_ball = Image.load("ball.png")
img_ball.set_color_key(C_WHITE)
ball = Item.new(300, 400, img_ball)
dx =  2   # ボールのスピード(x方向)
dy = -2   # ボールのスピード(y方向)

# ブロックの準備
img_block = Image.load("block.png")

# ブロック群の初期化
blocks = []
10.times do |x|
  5.times do |y|
    blocks << Item.new(21 + (img_block.width + 2) * x, 21 + (img_block.height + 2) * y, img_block)
  end
end

# 1秒当たりの描画回数の設定(初期値:60)
#Window.fps = 30


# メインループ
Window.loop do
  # バーを動かす
  #bar.x += Input.x * 4       # 左右キーの場合
  bar.x = Input.mouse_x       # マウスの場合
  if bar.x < 20
    bar.x = 20
  elsif bar.x > 640 - 20 - bar.width
    bar.x = 640 - 20 - bar.width
  end


  # ボールをy方向に動かす
  ball.y += dy

  # バーとの衝突判定
  if ball.collision?(bar)
    if ball.y + ball.height  <=  480 - bar.height + dy.abs
      ball.y -= dy
      dy = -dy
    end
  end

  # ブロックとの衝突判定(y方向)
  blocks.delete_if do |block|
    if ball.collision?(block)
      ball.y -= dy                      # ◆追加
      dy = -dy                          # ◆追加
      true
    end
  end

  # 壁に当たったら、跳ね返る(y方向)
  if ball.y < 20
    ball.y -= dy
    dy = -dy
  end


  # ボールをx方向に動かす
  ball.x += dx

  # ブロックとの衝突判定(x方向)
  blocks.delete_if do |block|
    if ball.collision?(block)
      ball.x -= dx                      # ◆追加
      dx = -dx                          # ◆追加
      true
    end
  end

  # 壁に当たったら、跳ね返る(x方向)
  if ball.x < 20 || (ball.x + ball.width) > 620
    ball.x -= dx
    dx = -dx
  end


  # 画面描画
  Window.draw_box_fill(  0,   0,  20, 480, C_WHITE)
  Window.draw_box_fill(620,   0, 640, 480, C_WHITE)
  Window.draw_box_fill(  0,   0, 640,  20, C_WHITE)

  Window.draw(bar.x, bar.y, bar.image)
  Window.draw(ball.x, ball.y, ball.image)

  blocks.each do |block|
    Window.draw(block.x, block.y, block.image)
  end
end
応用問題
「ブロック崩し」を改良・発展させてみよう
「ブロック崩し」を改良・発展させてみましょう。
以下はほんの一例です。各自、自由に発展させてみてください。
A. 動作を改善する
作った「ブロック崩し」を動かしてみて、動きが気になるところを直してみましょう。
B. 機能を拡張する
「ブロック崩し」の機能を追加して、発展させてみましょう。
B-1. 画面に文字を表示する(rb_block34.rb)
画面に文字を表示してみましょう。
まず、初期設定でフォントを準備します。
font = Font.new(24)文字の表示は以下のようにします。
Window.draw_font(x位置, y位置, 文字列, font, {:color => 文字色)残りブロック数を知るには、ブロック群の配列
blocksの要素数を調べればよいので、blocks.sizeとします。include DX # 初期設定用のコード (your setup code here) Window.width = 640 Window.height = 480 Window.bgcolor = C_BLACK # 壁の厚み:左、右、上;20 # ボール、バー、ブロックはItemクラスにする class Item def initialize(x, y, image) @x = x @y = y @image = image @width = image.width @height = image.height end attr_accessor :x, :y, :image, :width, :height # 衝突判定 def collision?(item_b) a_x0 = self.x a_x1 = self.x + self.width a_y0 = self.y a_y1 = self.y + self.height b_x0 = item_b.x b_x1 = item_b.x + item_b.width b_y0 = item_b.y b_y1 = item_b.y + item_b.height if a_x0 < b_x1 && a_x1 > b_x0 && a_y0 < b_y1 && a_y1 > b_y0 true end end end # バーの準備 img_bar = Image.load("bar.png") bar = Item.new(250, 480 - img_bar.height, img_bar) # ボールの準備 img_ball = Image.load("ball.png") img_ball.set_color_key(C_WHITE) ball = Item.new(300, 400, img_ball) dx = 2 # ボールのスピード(x方向) dy = -2 # ボールのスピード(y方向) # ブロックの準備 img_block = Image.load("block.png") # ブロック群の初期化 blocks = [] 10.times do |x| 5.times do |y| blocks << Item.new(21 + (img_block.width + 2) * x, 21 + (img_block.height + 2) * y, img_block) end end # フォントの準備 # ◆追加 font = Font.new(24) # ◆追加 # 1秒当たりの描画回数の設定(初期値:60) #Window.fps = 30 # メインループ Window.loop do # バーを動かす #bar.x += Input.x * 4 # 左右キーの場合 bar.x = Input.mouse_x # マウスの場合 if bar.x < 20 bar.x = 20 elsif bar.x > 640 - 20 - bar.width bar.x = 640 - 20 - bar.width end # ボールをy方向に動かす ball.y += dy # バーとの衝突判定 if ball.collision?(bar) if ball.y + ball.height <= 480 - bar.height + dy.abs ball.y -= dy dy = -dy end end # ブロックとの衝突判定(y方向) blocks.delete_if do |block| if ball.collision?(block) ball.y -= dy dy = -dy true end end # 壁に当たったら、跳ね返る(y方向) if ball.y < 20 ball.y -= dy dy = -dy end # ボールをx方向に動かす ball.x += dx # ブロックとの衝突判定(x方向) blocks.delete_if do |block| if ball.collision?(block) ball.x -= dx dx = -dx true end end # 壁に当たったら、跳ね返る(x方向) if ball.x < 20 || (ball.x + ball.width) > 620 ball.x -= dx dx = -dx end # 画面描画 Window.draw_box_fill( 0, 0, 20, 480, C_WHITE) Window.draw_box_fill(620, 0, 640, 480, C_WHITE) Window.draw_box_fill( 0, 0, 640, 20, C_WHITE) Window.draw(bar.x, bar.y, bar.image) Window.draw(ball.x, ball.y, ball.image) blocks.each do |block| Window.draw(block.x, block.y, block.image) end # 文字の表示 # ◆追加 string = "残りブロックは #{blocks.size}個です。" # ◆追加 Window.draw_font(20, 200, string, font, {:color => C_YELLOW}) # ◆追加 end
B-2. ゲームオーバー画面を追加する(rb_block35.rb)
ゲームオーバー画面を追加してみます。
ボールの
y位置(ball.y)が、ウィンドウの縦幅480より大きくなったら、「ゲームオーバー画面」を表示するようにします。ゲームオーバー画面は以下のようにして作っています。
1. ウィンドウサイズ(640, 480)と同じ大きさの白色の四角形を描く(Window.draw_box_fill(0, 0, 640, 480, C_WHITE))
- 「ゲームオーバー」という文字を表示させる(
Window.draw_font(200, 200, "ゲームオーバー", font, {:color => C_BLACK}))これを追加したコードです。
include DX
# 初期設定用のコード (your setup code here)
Window.width   = 640
Window.height  = 480
Window.bgcolor = C_BLACK

# 壁の厚み:左、右、上;20

# ボール、バー、ブロックはItemクラスにする
class Item
  def initialize(x, y, image)
    @x = x
    @y = y
    @image  = image
    @width  = image.width
    @height = image.height
  end
  attr_accessor :x, :y, :image, :width, :height

  # 衝突判定
  def collision?(item_b)
    a_x0 = self.x
    a_x1 = self.x + self.width
    a_y0 = self.y
    a_y1 = self.y + self.height

    b_x0 = item_b.x
    b_x1 = item_b.x + item_b.width
    b_y0 = item_b.y
    b_y1 = item_b.y + item_b.height

    if a_x0 < b_x1 &&
       a_x1 > b_x0 &&
       a_y0 < b_y1 &&
       a_y1 > b_y0

      true
    end
  end
end


# バーの準備
img_bar = Image.load("bar.png")
bar = Item.new(250, 480 - img_bar.height, img_bar)

# ボールの準備
img_ball = Image.load("ball.png")
img_ball.set_color_key(C_WHITE)
ball = Item.new(300, 400, img_ball)
dx =  2   # ボールのスピード(x方向)
dy = -2   # ボールのスピード(y方向)

# ブロックの準備
img_block = Image.load("block.png")

# ブロック群の初期化
blocks = []
10.times do |x|
  5.times do |y|
    blocks << Item.new(21 + (img_block.width + 2) * x, 21 + (img_block.height + 2) * y, img_block)
  end
end

# フォントの準備
font = Font.new(24)

# 1秒当たりの描画回数の設定(初期値:60)
#Window.fps = 30


# メインループ
Window.loop do
  # バーを動かす
  #bar.x += Input.x * 4       # 左右キーの場合
  bar.x = Input.mouse_x       # マウスの場合
  if bar.x < 20
    bar.x = 20
  elsif bar.x > 640 - 20 - bar.width
    bar.x = 640 - 20 - bar.width
  end


  # ボールをy方向に動かす
  ball.y += dy

  # バーとの衝突判定
  if ball.collision?(bar)
    if ball.y + ball.height  <=  480 - bar.height + dy.abs
      ball.y -= dy
      dy = -dy
    end
  end

  # ブロックとの衝突判定(y方向)
  blocks.delete_if do |block|
    if ball.collision?(block)
      ball.y -= dy
      dy = -dy
      true
    end
  end

  # 壁に当たったら、跳ね返る(y方向)
  if ball.y < 20
    ball.y -= dy
    dy = -dy
  end


  # ボールをx方向に動かす
  ball.x += dx

  # ブロックとの衝突判定(x方向)
  blocks.delete_if do |block|
    if ball.collision?(block)
      ball.x -= dx
      dx = -dx
      true
    end
  end

  # 壁に当たったら、跳ね返る(x方向)
  if ball.x < 20 || (ball.x + ball.width) > 620
    ball.x -= dx
    dx = -dx
  end


  # 画面描画
  Window.draw_box_fill(  0,   0,  20, 480, C_WHITE)
  Window.draw_box_fill(620,   0, 640, 480, C_WHITE)
  Window.draw_box_fill(  0,   0, 640,  20, C_WHITE)

  Window.draw(bar.x, bar.y, bar.image)
  Window.draw(ball.x, ball.y, ball.image)

  blocks.each do |block|
    Window.draw(block.x, block.y, block.image)
  end

  # 文字の表示
  string = "残りブロックは #{blocks.size}個です。"
  Window.draw_font(20, 200, string, font, {:color => C_YELLOW})

  # ゲームオーバー画面                                                         # ◆追加
  if ball.y >= 480                                                          # ◆追加
    Window.draw_box_fill(0, 0, 640, 480, C_WHITE)                           # ◆追加
    Window.draw_font(200, 200, "ゲームオーバー", font, {:color => C_BLACK})   # ◆追加
  end                                                                       # ◆追加

end
B-3. ゲームオーバー画面から再開させる(rb_block36.rb)
ゲームオーバー画面から、特定のキーを押すことで、ゲームが再開するようにします。
キーが押されたかどうかは、
Input.key_down?(キーボード定数)で調べます。あとは、再開画面をどう設定するかは、自由です。(ここでは、残ったブロックはそのままで、ボールを初期条件に戻しています。)
include DX
# 初期設定用のコード (your setup code here)
Window.width   = 640
Window.height  = 480
Window.bgcolor = C_BLACK

# 壁の厚み:左、右、上;20

# ボール、バー、ブロックはItemクラスにする
class Item
  def initialize(x, y, image)
    @x = x
    @y = y
    @image  = image
    @width  = image.width
    @height = image.height
  end
  attr_accessor :x, :y, :image, :width, :height

  # 衝突判定
  def collision?(item_b)
    a_x0 = self.x
    a_x1 = self.x + self.width
    a_y0 = self.y
    a_y1 = self.y + self.height

    b_x0 = item_b.x
    b_x1 = item_b.x + item_b.width
    b_y0 = item_b.y
    b_y1 = item_b.y + item_b.height

    if a_x0 < b_x1 &&
       a_x1 > b_x0 &&
       a_y0 < b_y1 &&
       a_y1 > b_y0

      true
    end
  end
end


# バーの準備
img_bar = Image.load("bar.png")
bar = Item.new(250, 480 - img_bar.height, img_bar)

# ボールの準備
img_ball = Image.load("ball.png")
img_ball.set_color_key(C_WHITE)
ball = Item.new(300, 400, img_ball)
dx =  2   # ボールのスピード(x方向)
dy = -2   # ボールのスピード(y方向)

# ブロックの準備
img_block = Image.load("block.png")

# ブロック群の初期化
blocks = []
10.times do |x|
  5.times do |y|
    blocks << Item.new(21 + (img_block.width + 2) * x, 21 + (img_block.height + 2) * y, img_block)
  end
end

# フォントの準備
font = Font.new(24)

# 1秒当たりの描画回数の設定(初期値:60)
#Window.fps = 30


# メインループ
Window.loop do
  # バーを動かす
  #bar.x += Input.x * 4       # 左右キーの場合
  bar.x = Input.mouse_x       # マウスの場合
  if bar.x < 20
    bar.x = 20
  elsif bar.x > 640 - 20 - bar.width
    bar.x = 640 - 20 - bar.width
  end


  # ボールをy方向に動かす
  ball.y += dy

  # バーとの衝突判定
  if ball.collision?(bar)
    if ball.y + ball.height  <=  480 - bar.height + dy.abs
      ball.y -= dy
      dy = -dy
    end
  end

  # ブロックとの衝突判定(y方向)
  blocks.delete_if do |block|
    if ball.collision?(block)
      ball.y -= dy
      dy = -dy
      true
    end
  end

  # 壁に当たったら、跳ね返る(y方向)
  if ball.y < 20
    ball.y -= dy
    dy = -dy
  end


  # ボールをx方向に動かす
  ball.x += dx

  # ブロックとの衝突判定(x方向)
  blocks.delete_if do |block|
    if ball.collision?(block)
      ball.x -= dx
      dx = -dx
      true
    end
  end

  # 壁に当たったら、跳ね返る(x方向)
  if ball.x < 20 || (ball.x + ball.width) > 620
    ball.x -= dx
    dx = -dx
  end


  # 画面描画
  Window.draw_box_fill(  0,   0,  20, 480, C_WHITE)
  Window.draw_box_fill(620,   0, 640, 480, C_WHITE)
  Window.draw_box_fill(  0,   0, 640,  20, C_WHITE)

  Window.draw(bar.x, bar.y, bar.image)
  Window.draw(ball.x, ball.y, ball.image)

  blocks.each do |block|
    Window.draw(block.x, block.y, block.image)
  end

  # 文字の表示
  string = "残りブロックは #{blocks.size}個です。"
  Window.draw_font(20, 200, string, font, {:color => C_YELLOW})

  # ゲームオーバー画面
  if ball.y >= 480
    Window.draw_box_fill(0, 0, 640, 480, C_WHITE)
    Window.draw_font(200, 200, "ゲームオーバー", font, {:color => C_BLACK})
    Window.draw_font(200, 230, "スペースキーで続行", font, {:color => C_BLACK})  # ◆追加
    if Input.key_down?(K_SPACE)                                               # ◆追加
      ball.x = 300                                                            # ◆追加
      ball.y = 400                                                            # ◆追加
      dx =  2                                                                 # ◆追加
      dy = -2                                                                 # ◆追加
    end                                                                       # ◆追加
  end

end
以上で、テキストは終わりです。
あとは皆さんが発展させてみてください!
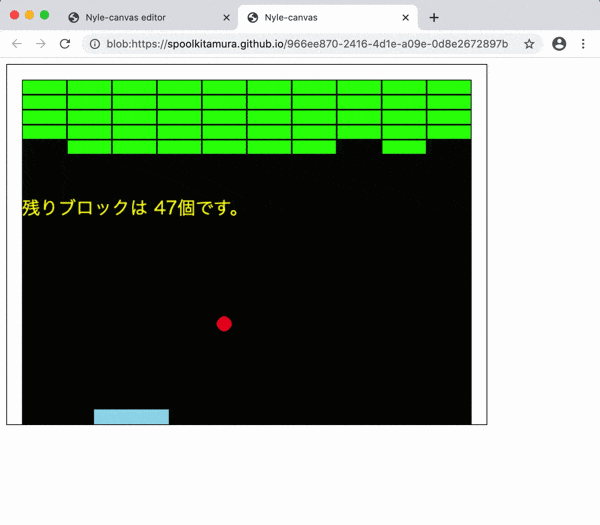
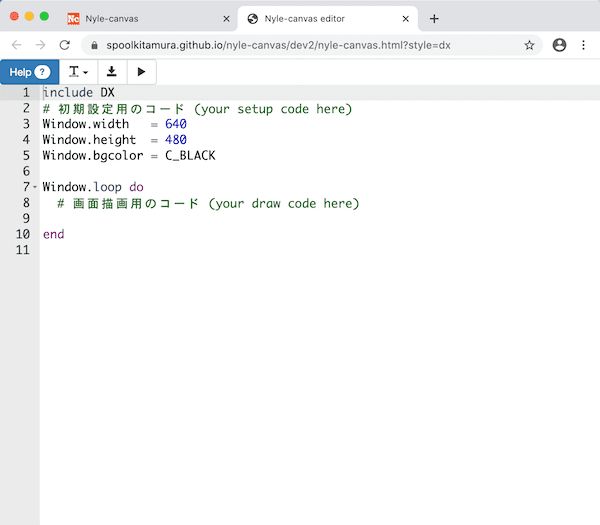


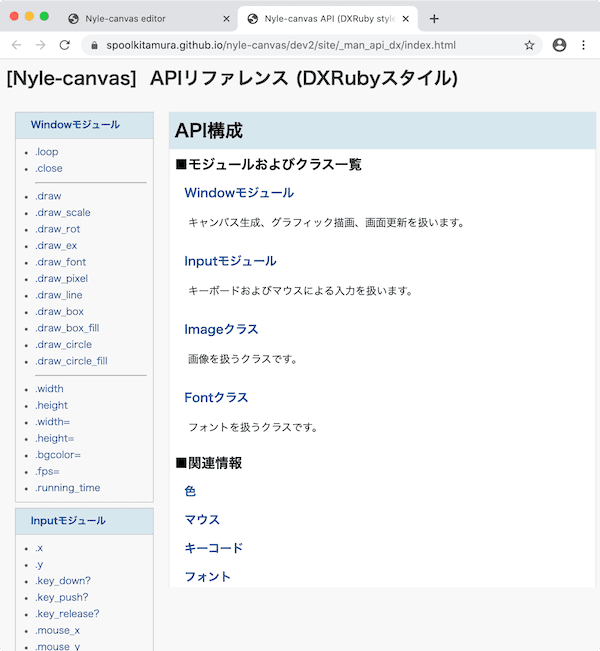
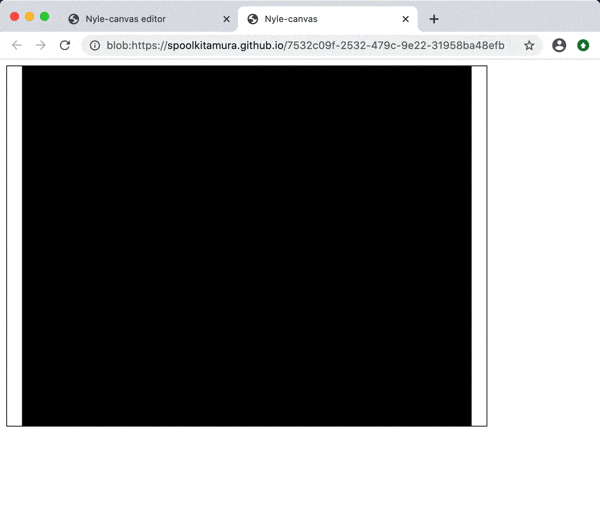
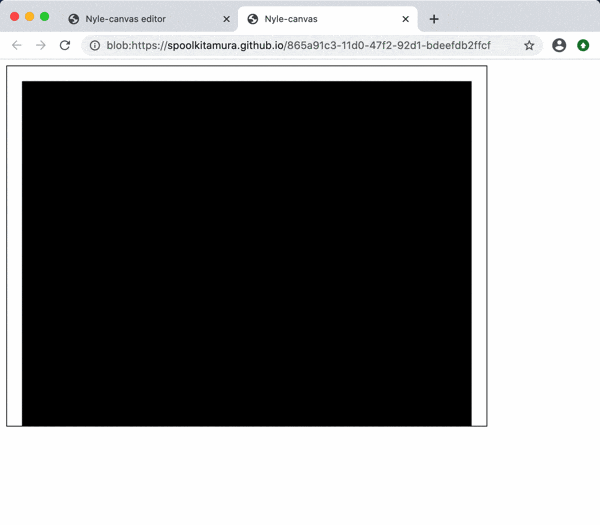

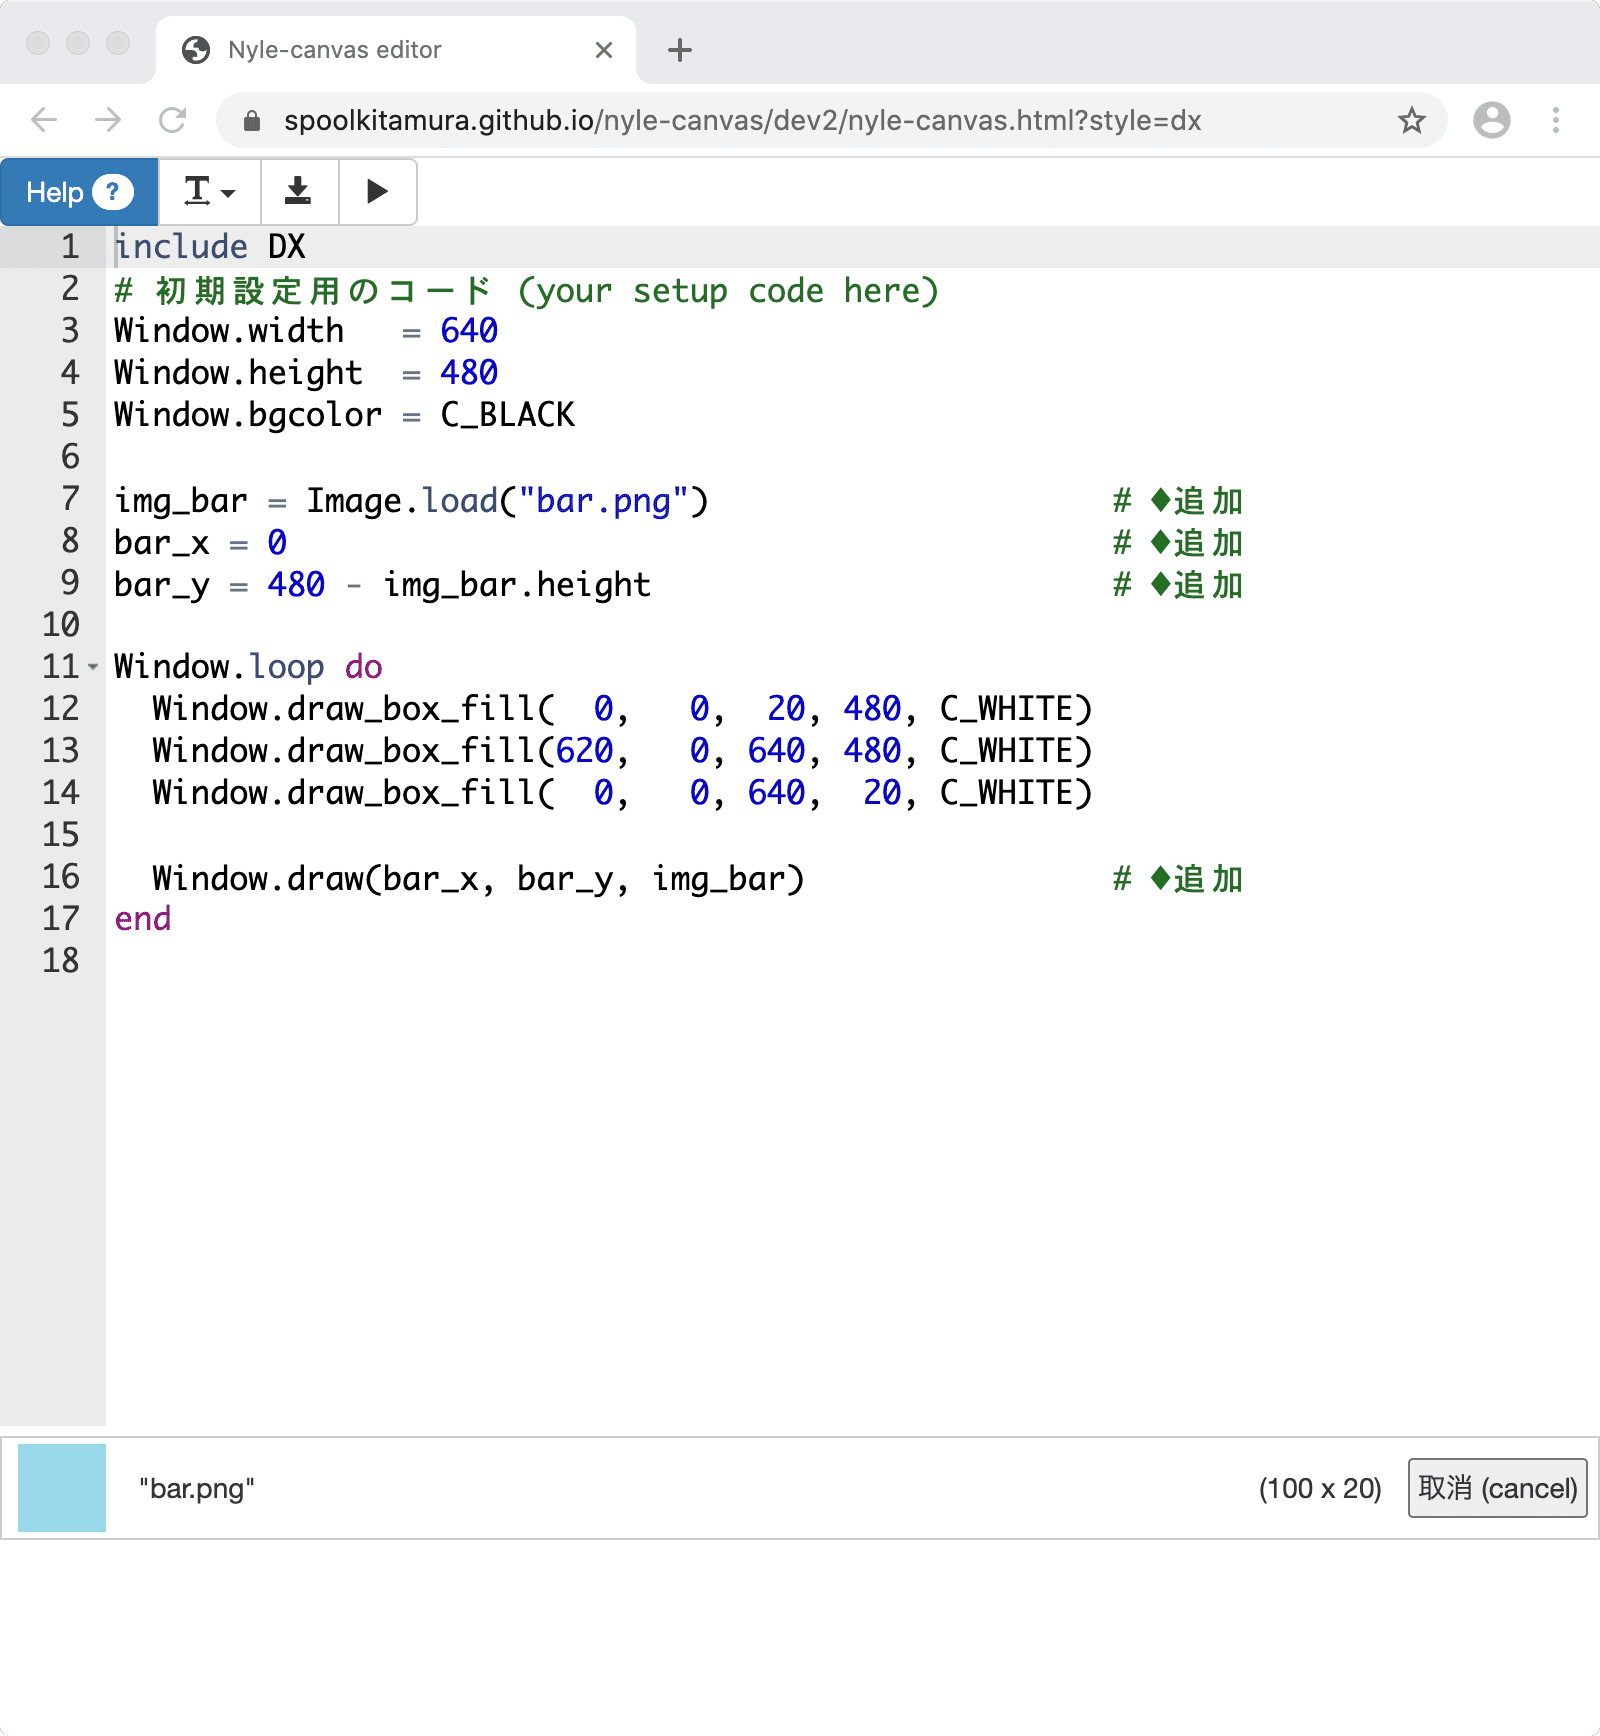
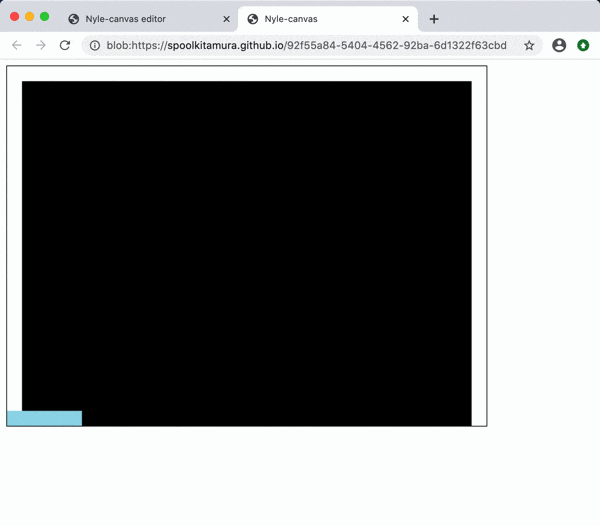
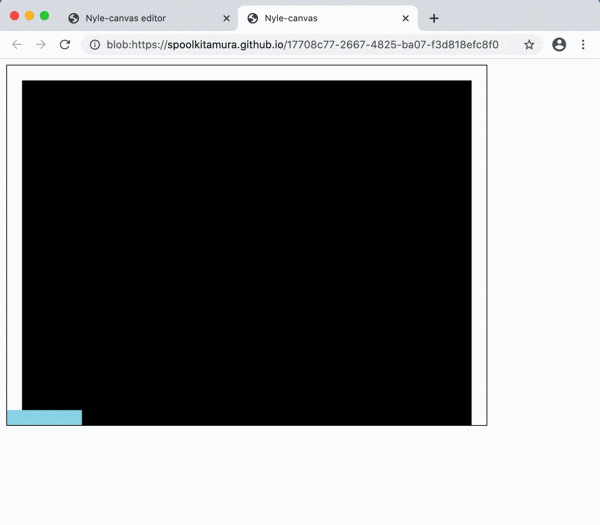
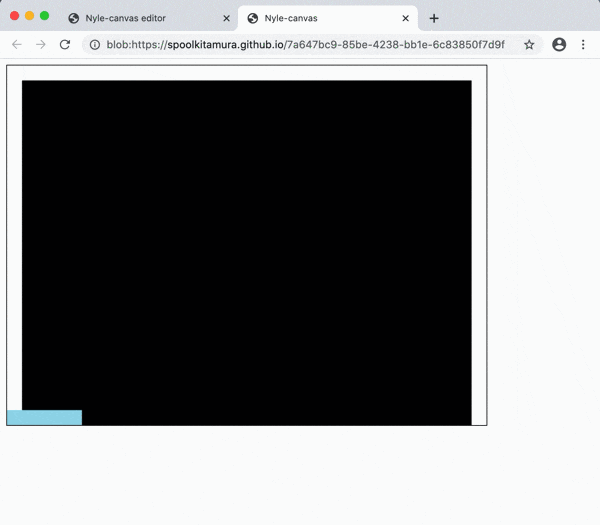

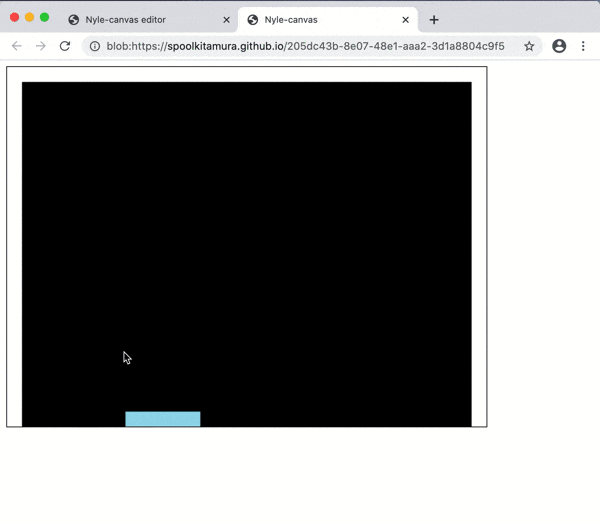

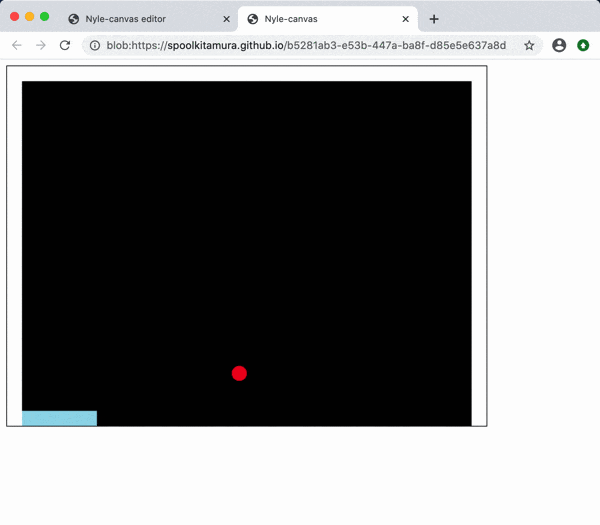
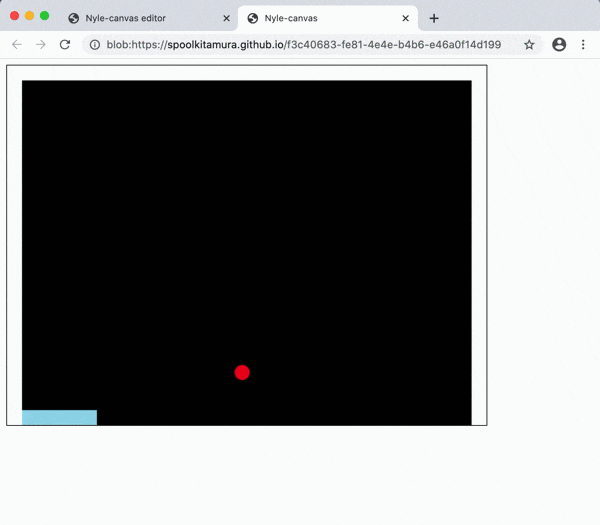

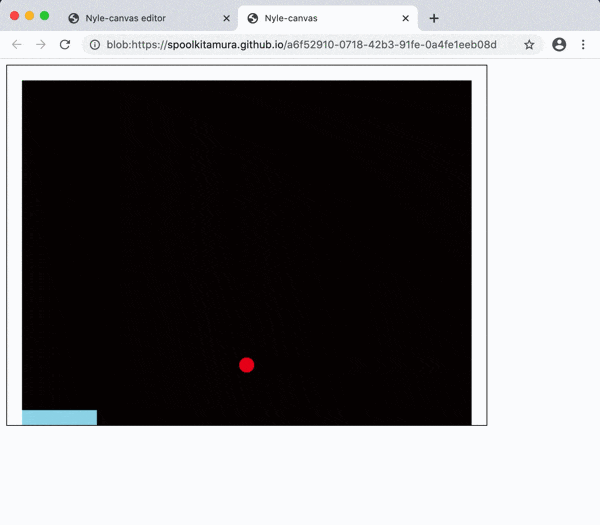


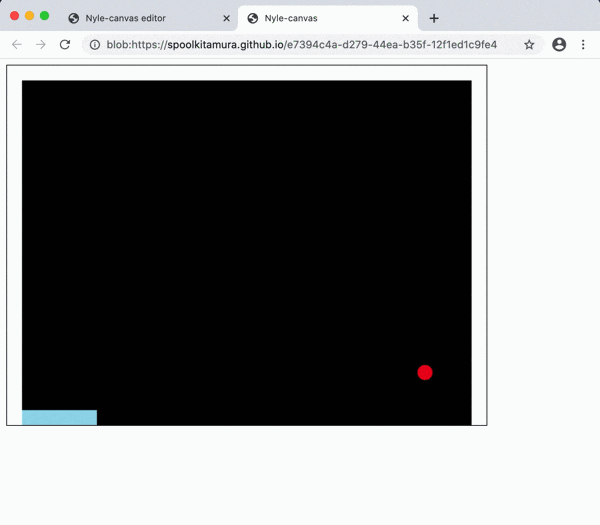
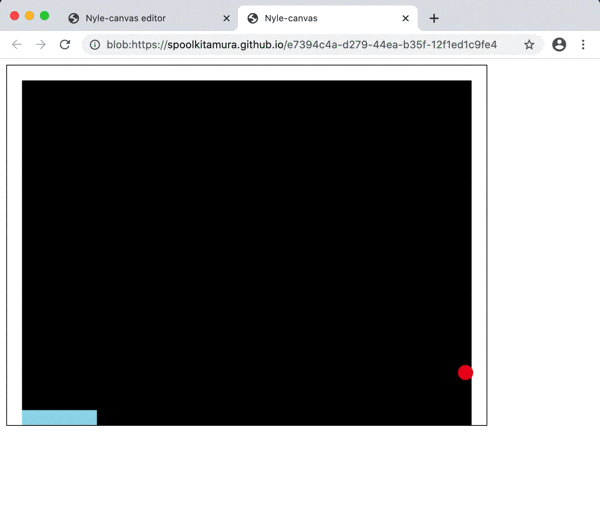
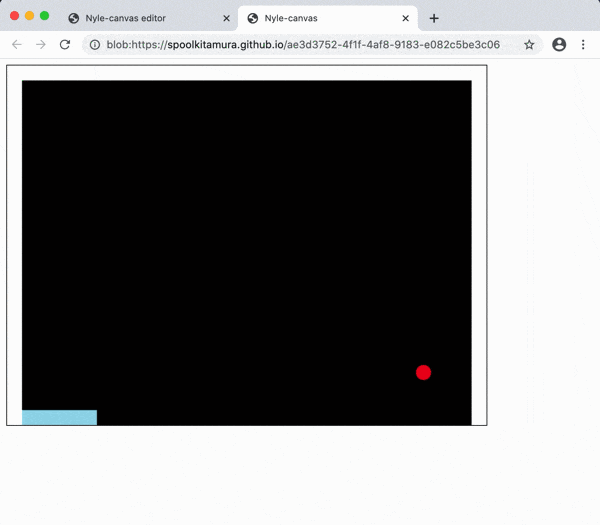

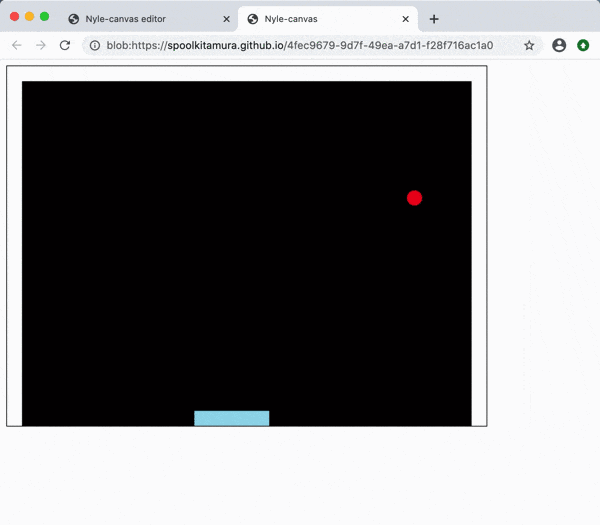
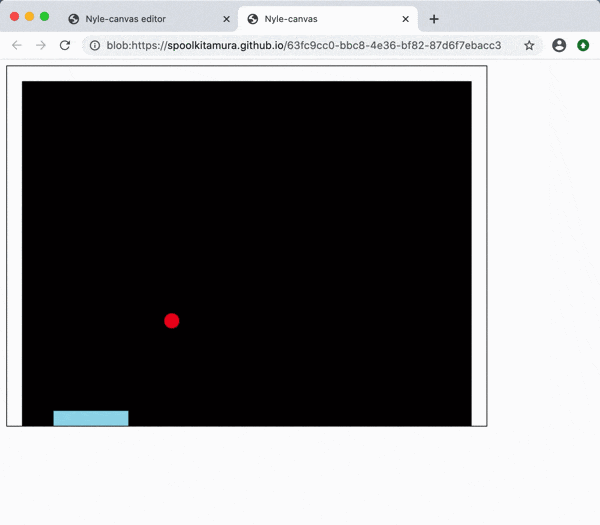
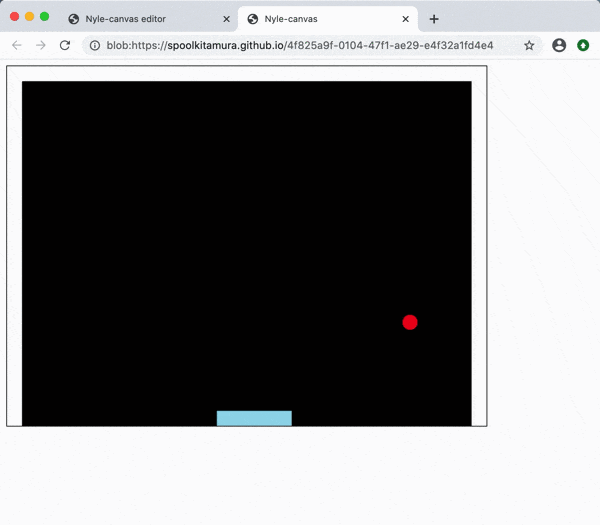
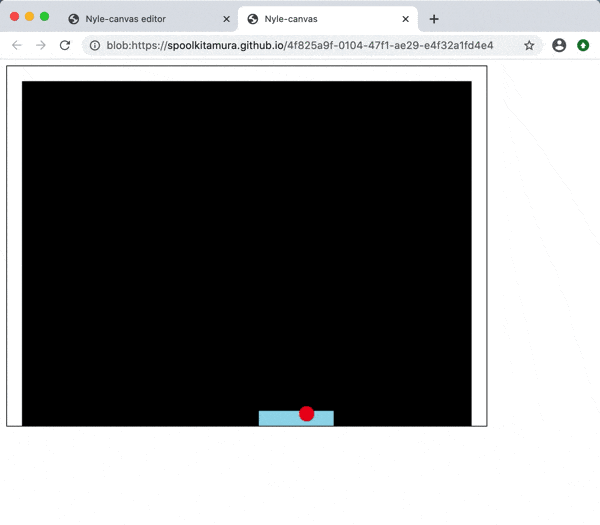
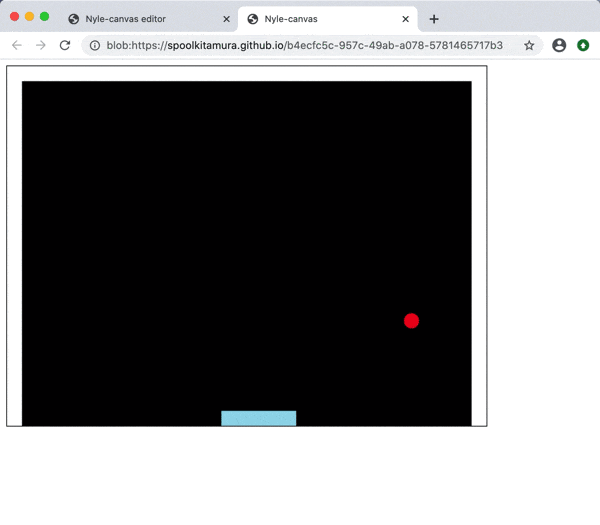

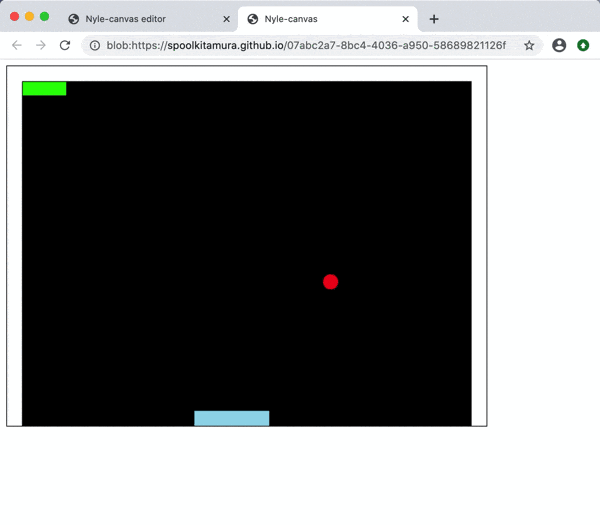
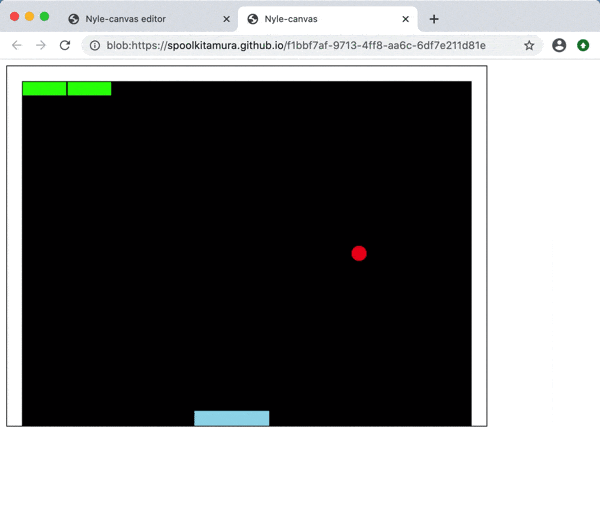
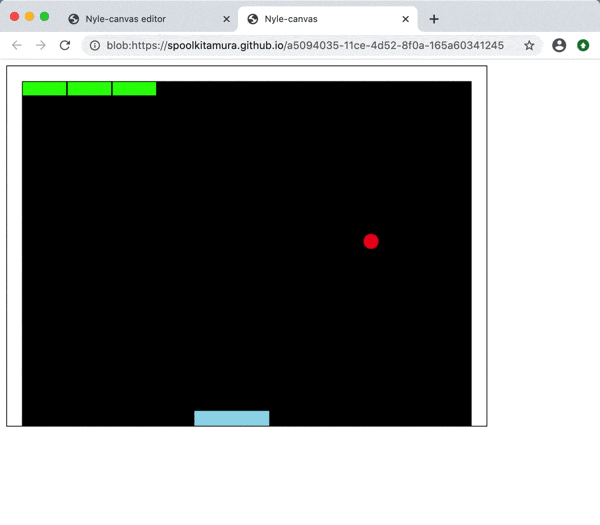
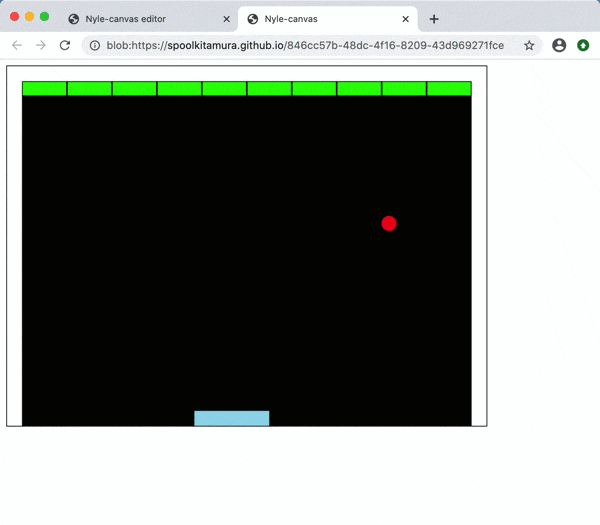
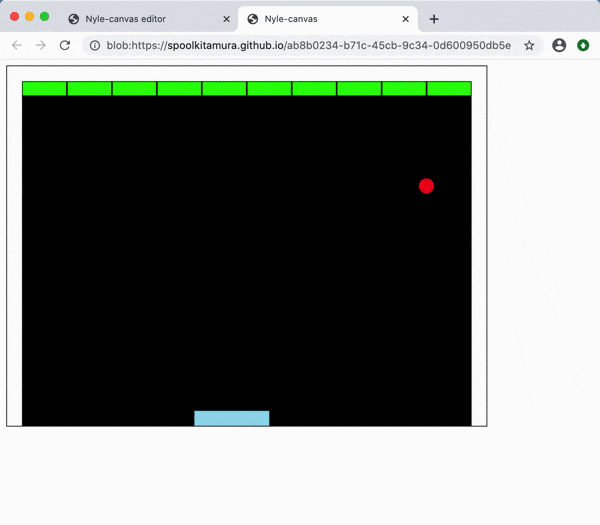
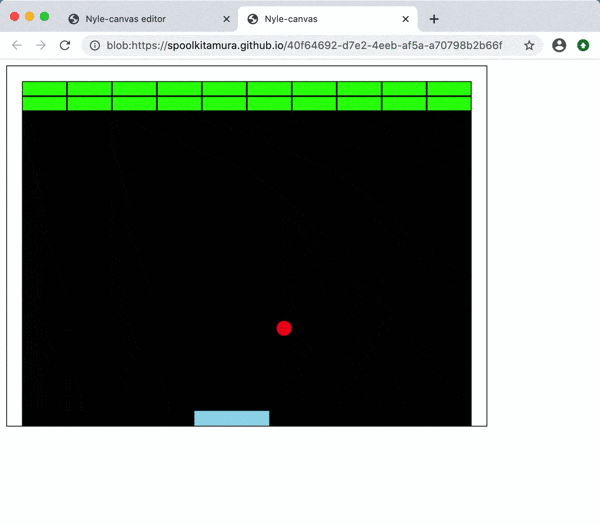

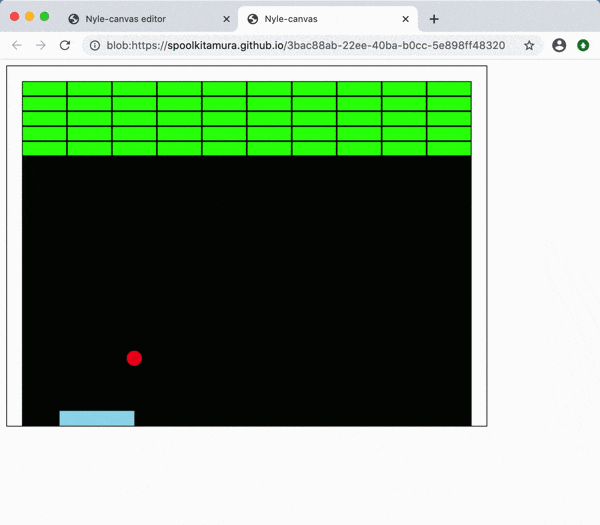


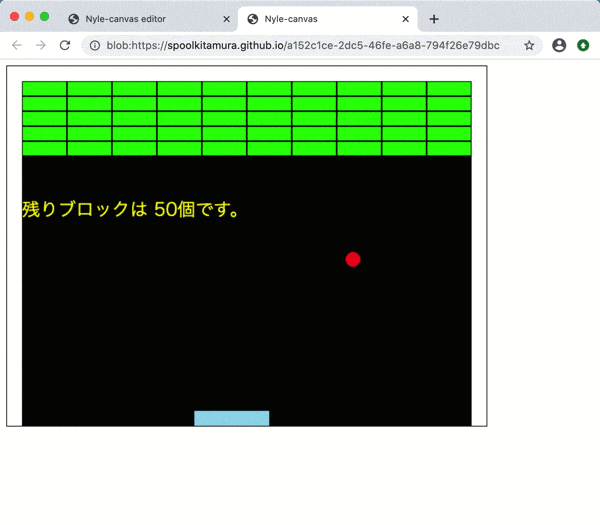
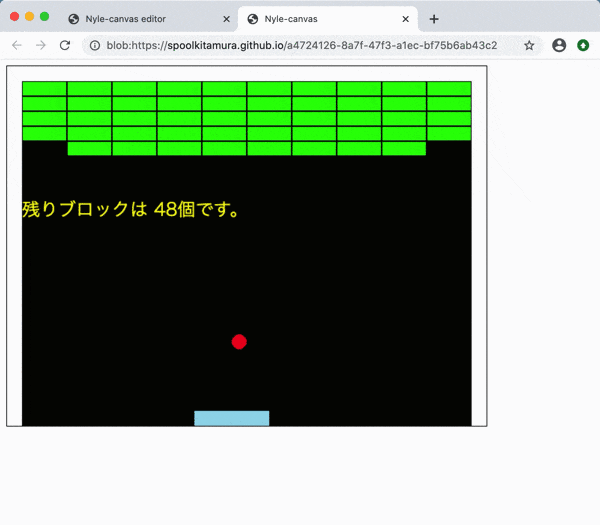
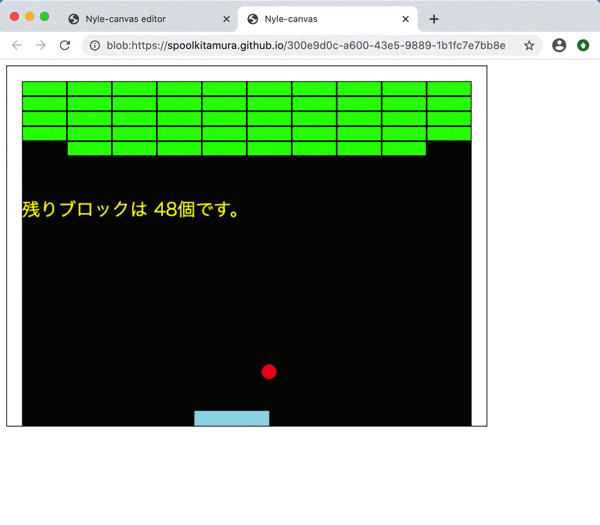
- 投稿日:2020-05-31T08:53:15+09:00
home.scss
/* reset ================================ */
* {
box-sizing: border-box;
}html {
font: 100%/1.5 'Avenir Next', 'Hiragino Sans', sans-serif;
line-height: 1.7;
letter-spacing: 1px;
}ul, li {
list-style-type: none;
padding: 0;
margin: 0;
}a {
text-decoration: none;
color: #2d3133;
font-size: 14px;
}h1, h2, h3, h4, h5, h6, p {
margin: 0;
}input {
background-color: transparent;
outline-width: 0;
}form input[type="submit"] {
border: none;
cursor: pointer;
}/* 共通レイアウト ================================ */
body {
color: #2d3133;
background-color: #3ecdc6;
margin: 0;
min-height: 1vh;
}.main {
position: absolute;
top: 64px;
width: 100%;
height: auto;
min-height: 100%;
background-color: #f5f8fa;
}.container {
max-width: 600px;
margin: 60px auto;
padding-left: 15px;
padding-right: 15px;
clear: both;
}/* ヘッダー ================================ */
header {
height: 64px;
position: absolute;
z-index: 1;
width: 100%;
}.header-logo {
float: left;
padding-left: 20px;
color: white;
font-size: 22px;
line-height: 64px;
}.header-logo a{
color: white;
font-size: 22px;
}.header-menus {
float: right;
padding-right: 20px;
}.header-menus li {
float: left;
line-height: 64px;
font-size: 13px;
color: white;
padding-left: 15px;
}.header-menus a {
float: left;
font-size: 13px;
color: white;
}.header-menus .fa {
padding-right: 5px;
}.header-menus input[type="submit"] {
padding: 0 20px;
float: left;
line-height: 64px;
color: white;
margin: 0;
font-size: 13px;
}/* top ================================ */
.top-main {
padding: 200px 0 100px;
text-align: center;
position: absolute;
top: 0;
width: 100%;
height: auto;
min-height: 100%;
color: white;
background-color: #3ecdc6;
background-repeat: no-repeat;
background-position: center 50%;
background-size: cover;
background-image: url("/top.jpg");
}.top-message {
position: relative;
}.top-main h2 {
font-size: 70px;
font-weight: 500;
line-height: 1.3;
-webkit-font-smoothing: antialiased;
margin-bottom: 20px;
}.top-main p {
font-size: 24px;
}/* about ================================ */
.about-main {
padding: 180px 8% 0;
color: white;
}.about-main h2 {
font-size: 64px;
font-weight: 500;
line-height: 1.4;
}.about-main p {
font-weight: 200;
font-size: 20px;
}.about-img {
width: 84%;
}/* フォーム================================ */
.form {
max-width: 600px;
margin: 0 auto;
background-color: white;
box-shadow: 0 2px 6px #c1ced7;
}.form-heading {
font-weight: 300;
margin: 60px 0 20px;
font-size: 48px;
color: #bcc8d4;
}.form-body {
padding: 30px;
}.form-error {
color: #ff4d75;
}.form input {
width: 100%;
border: 1px solid #d8dadf;
padding: 10px;
color: #57575f;
font-size: 16px;
letter-spacing: 2px;
border-radius: 2px;
}.form textarea {
width: 100%;
min-height: 110px;
font-size: 16px;
letter-spacing: 2px;
}.form input[type="submit"] {
background-color: #3ecdc6;
color: white;
cursor: pointer;
font-weight: 300;
width: 120px;
border-radius: 2px;
margin-top: 8px;
margin-bottom: 0;
float: right;
}.form-body:after {
content: '';
display: table;
clear: both;
}/* フラッシュ ================================ */
.flash {
padding: 10px 0;
color: white;
background: rgb(251, 170, 88);
text-align: center;
position: absolute;
top: 64px;
z-index: 10;
width: 100%;
border-radius: 0 0 2px 2px;
font-size: 14px;
}
- 投稿日:2020-05-31T08:52:27+09:00
about.rb
TweetAppとは
SNSサービスです。 近況やつぶやきを投稿し、他のユーザーと楽しくコミュニケーションできます。

- 投稿日:2020-05-31T08:52:07+09:00
routs.rb
Rails.application.routes.draw do
get "/" => "home#top"
get "about" => "home#about"
end
- 投稿日:2020-05-31T08:51:33+09:00
home_controller.rb
class HomeController < ApplicationController
def top
enddef about
end
end
- 投稿日:2020-05-31T08:48:20+09:00
top.html.erb
つぶやきで、世界はつながる
今の気持ちをつぶやいてみよう!
- 投稿日:2020-05-31T07:55:55+09:00
progate food.rb
require "./menu"
class Food < Menu
attr_accessor :caloriedef initialize(name:, price:, calorie:)
super(name: name, price: price)
self.calorie = calorie
enddef info
return "#{self.name} #{self.price}円 (#{self.calorie}kcal)"
enddef calorie_info
return "#{self.name}は#{self.calorie}kcalです"
end
end
- 投稿日:2020-05-31T07:54:58+09:00
progate drink.rb
require "./menu"
class Drink < Menu
attr_accessor :amountdef initialize(name:, price:, amount:)
super(name: name, price: price)
self.amount = amount
enddef info
return "#{self.name} #{self.price}円 (#{self.amount}mL)"
end
end
- 投稿日:2020-05-31T07:54:18+09:00
progate index.rb
require "./food"
require "./drink"puts "日曜限定100円割引セール実施中!"
food1 = Food.new(name: "ピザ", price: 800, calorie: 700)
food2 = Food.new(name: "すし", price: 1000, calorie: 600)
drink1 = Drink.new(name: "コーラ", price: 300, amount: 500)
drink2 = Drink.new(name: "お茶", price: 200, amount: 400)menus = [food1, food2, drink1, drink2]
index = 0
menus.each do |menu|
puts "#{index}. #{menu.info}"
index += 1
endputs "--------------"
puts "メニューの番号を選択してください"
order = gets.chomp.to_iselected_menu = menus[order]
puts "選択されたメニュー: #{selected_menu.name}"puts "個数を入力してください(3つ以上で100円割引)"
count = gets.chomp.to_iputs "お会計は#{selected_menu.get_total_price(count)}円です"
- 投稿日:2020-05-31T07:53:26+09:00
menu.rb
require "date"
class Menu
attr_accessor :name
attr_accessor :pricedef initialize(name:, price:)
self.name = name
self.price = price
enddef info
return "#{self.name} #{self.price}円"
enddef get_total_price(count)
total_price = self.price * count
if count >= 3
total_price -= 100
end# if文を作成してください if count >= 1 && Menu.is_discount_day? total_price -= 100 end return total_priceend
def Menu.is_discount_day?
today = Date.today
return today.sunday?
end
end
- 投稿日:2020-05-31T04:49:29+09:00
AWS SDKの戻り値をDynamoDBに格納する
require 'aws-sdk'
sts = Aws::STS::Client.new
ddb = Aws::DynamoDB::Client.new
ddb.put_item({
  table_name: "anytable",
  item: sts.get_caller_identity.to_h.transform_keys(&:to_s).transform_values(&:to_s)
})
AWS SDKの戻り値は(ほぼ全て?)Struct型なので、そのままではテーブルに格納できません。ハッシュ化し、さらにハッシュのキーと値を文字列化することで格納できます。
- 投稿日:2020-05-31T00:49:24+09:00
Deviseの上にacts-as-taggable-on を使ったタグ機能
gemインストール
gem 'acts-as-taggable-on', '~> 6.0'
bundle install
テーブル作成
$ rake acts_as_taggable_on_engine:install:migrations
$ rake db:migrate
タグ保存
タグを付けたいモデルに以下のように追記する。(今回は Post モデルにタグを付けたかったので post.rb に記述)
modelフォルダからclass Post < ApplicationRecord acts_as_taggable endregistration editで以下を追加
  <div class="field">

    <%= f.label :tag_list %><br />

    <%= f.text_field :tag_list, value: @user.tag_list.join(","), class:"form-control" %>

  </div>
スペースなどで区切りたい場合は、config/initializers/ に acts_as_taggable_on.rb を作成して、以下のように記述する。ActsAsTaggableOn.delimiter = ' 'users show.html.erb も以下にしておく
<% @user.tag_list.each do |tag| %>
  <span class="badge badge-primary mr-1 p-2"><%= tag %></span>
<% end %>
もしくは
<% @post.tag_list.each do |tag| %>
  <span style="background-color: #e9e9e9; border-radius: 5px;"><%= tag %></span>
<% end %>
application.controllerにも以下をついか
devise_parameter_sanitizer.permit(:account_update, keys:[:tag_list])追加情報
当たり前ですが、色んなメソッドが用意されているfind_related_skills 同じタグに関連するタスクが表示される
taggings_count メソッドではないですが、該当のタグの使用回数が表示されている
tag_counts 全てのタグデータを取得できる
などなど.....他にもまだありました。使い方等はリファレンスを参照してください。
同じ名前で登録したタグの場合は、同じIDになるようになっている
例:Railsと別々のタスクで登録しても同じidになる参考URL
https://qiita.com/ddgg7755/items/e1caa8b73d118822a0a2
https://qiita.com/daigou26/items/e67e61bbec338329ffac
https://qiita.com/kazuhj/items/31d3b1751d9c957b789f