- 投稿日:2020-05-27T21:29:36+09:00
【Kotlin】AndroidxのPreferenceFragmentCompatを使ってみる
はじめに
今回も例によって初学者向けの内容になっているかと思います。私自身が初学者である為、理解の浅い所や間違いなどあるかも知れません。都度ご指摘頂けると嬉しいです。
さて、Androidには昔からアプリの設定画面を簡単に作る仕組みがあります。ググれば記事は沢山見つかるのですが情報が古くなっているものも多かったので、Androidxライブラリでの実装をKotlinで書いてみようと思います。
準備
Androidxライブラリを使うため、build.gradle(appのほう)のdependencies内に記述が必要です。
build.gradle(Module.app)dependencies{ implementation 'androidx.preference:preference:1.1.1'//これを追加 }構成
先に必要なファイルを挙げておきます。
-SettingActivity.kt
-activity_setting.xml
-SettingFragment.kt
-preference.xmlレイアウト
activity_setting.xml<androidx.constraintlayout.widget.ConstraintLayout xmlns:android="http://schemas.android.com/apk/res/android" xmlns:app="http://schemas.android.com/apk/res-auto" xmlns:tools="http://schemas.android.com/tools" android:layout_width="match_parent" android:layout_height="match_parent" tools:context=".SettingActivity"> <FrameLayout android:id="@+id/settings_container" android:layout_width="match_parent" android:layout_height="match_parent"/> </androidx.constraintlayout.widget.ConstraintLayout>constraintlayoutのところはlinearでもなんでも平気だと思います。
SettingActivity
今回はフラグメントを表示するだけのシンプルなアクティビティです。
メインアクティビティなどからこのアクティビティに遷移すればオッケーです。SettingActivity.ktclass SettingActivity: AppCompatActivity() { override fun onCreate(savedInstanceState: Bundle?) { super.onCreate(savedInstanceState) setContentView(R.layout.activity_setting) supportFragmentManager .beginTransaction() .replace(R.id.settings_container,fragment) .commit() } }SettingFragmentの実装
SettingFragment.ktclass SettingFragment: PreferenceFragmentCompat() { override fun onCreatePreferences(savedInstanceState: Bundle?, rootKey: String?) { setPreferencesFromResource(R.xml.preferences,rootKey) } }preference.xmlを作成する
まずresフォルダ内にxmlフォルダを作る(なければ)。xmlフォルダ内にpreference.xmlファイルを作成する。
preference.xml<PreferenceScreen xmlns:android="http://schemas.android.com/apk/res/android"> <PreferenceCategory android:title="@string/category"> <CheckBoxPreference android:key="key1" android:title="@string/title1" android:summary="summary1" android:summaryOn="@string/on" android:summaryOff="@string/off" android:defaultValue="false" /> <EditTextPreference android:key="key2" android:title="@string/title2" android:summary="@string/summary2" android:dialogTitle="@string/dialog" /> <ListPreference android:key="key3" android:title="@string/list" android:summary="@string/summary3" android:entries="@array/list" android:entryValues="@array/value" /> </PreferenceCategory> </PreferenceScreen>PreferenceScreenで括ってある以外はこれまでのPreferenceと殆ど変わりません。
中身についての説明は割愛しますので必要に応じて調べてみていただければと思います。
- 投稿日:2020-05-27T21:14:26+09:00
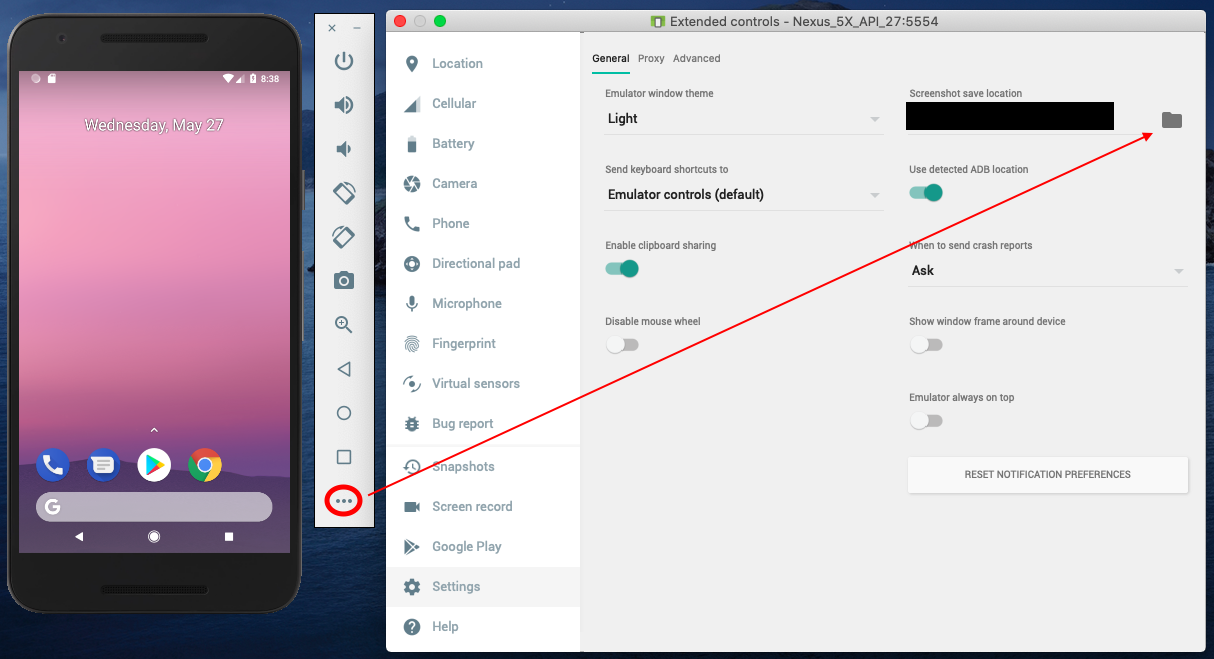
Android Emulatorで撮影したスクリーンショットの保存先変更
- 投稿日:2020-05-27T20:10:19+09:00
Roomでデータベースに値を保存
はじめに
前回は、入力した値をリスト表示するところまで行いましいた。今回は、そのデータをデータベースに保存するようにします。
目標
Roomを追加するだけなので、今回はレイアウトの変更はありません。
アプリを閉じて、再起動したときにデータが保持されてるかを確認してください。環境
- Android Studio 3.6.3
- Kotlin 1.3.72
作成手順
Gradle
build.gradleapply plugin: 'kotlin-kapt' ... dependencies { ... implementation "androidx.lifecycle:lifecycle-viewmodel-ktx:2.2.0" def room_version = "2.2.5" implementation "androidx.room:room-runtime:$room_version" implementation "androidx.room:room-ktx:$room_version" kapt "androidx.room:room-compiler:$room_version" }実装
Roomは以下の3つの要素で構成されています。
- Entity
- Dao (DataAccessObjects)
- Room DatabaseEntity
データベース内のテーブルを示します。
各Entityは、少なくとも一つの主キーを定義する必要があります。それは@PrimaryKeyアノテーションで定義できます。
autoGenerateを設定すると自動でPrimaryKeyを発行してくれます。Todo.kt@Entity data class Todo( @PrimaryKey(autoGenerate = true) val tid: Int, @ColumnInfo(name = "todo_title") val todoTitle: String )Dao
Daoではデータベースにアクセスするためのメソッドを定義します。
Interfaceに@Daoをつけるだけで定義できます。
今回は、挿入と全データの取得を行うメソッドを定義しました。
getAll()の戻り値をLiveDataにすることにより、Roomがデータベースに変更があった場合に通知してくれる内部コードを生成してくれるらしいです。とても便利ですね。TodoDao.kt@Dao interface TodoDao { @Insert suspend fun insert(todo: Todo) @Query("SELECT * FROM Todo") fun getAll(): LiveData<List<Todo>> }Database
データベースの定義では、抽象クラスに
@Databaseをつけると定義できます。
先程定義したEntityをentitiesに指定します。
そしてDaoを取得するためのメソッドを用意します。TodoDatabase.kt@Database(entities = [Todo::class], version = 1) abstract class TodoDatabase : RoomDatabase() { abstract fun todoDao(): TodoDao }Repository
ViewModelとデータベースの中継としてRepositoryを作成します。
TodoRepository.ktclass TodoRepository(private val todoDao: TodoDao) { val allTodoList = todoDao.getAll() @WorkerThread suspend fun insert(todo: Todo) { todoDao.insert(todo) } }ViewModel
Repositoryからデータを受け取って処理します。
データベースの処理はメインスレッドで実行することができないので、Coroutineを使って非同期処理を行います。MainViewModel.ktclass MainViewModel(private val repository: TodoRepository) : ViewModel() { val todoList = repository.allTodoList fun insert(todo: Todo) = viewModelScope.launch { repository.insert(todo) } }Activity
MainActivity.ktclass MainActivity : AppCompatActivity() { private lateinit var mainViewModel: MainViewModel private lateinit var adapter: RecyclerAdapter override fun onCreate(savedInstanceState: Bundle?) { super.onCreate(savedInstanceState) setContentView(R.layout.activity_main) val db = Room.databaseBuilder(this, TodoDatabase::class.java, "database_name").build() val dao = db.todoDao() val repository = TodoRepository(dao) mainViewModel = MainViewModel(repository) adapter = RecyclerAdapter() main_recycler_view.layoutManager = LinearLayoutManager(this) main_recycler_view.adapter = adapter main_recycler_view.setHasFixedSize(true) add_item_button.setOnClickListener { mainViewModel.insert(Todo(0, submit_text.text.toString())) } mainViewModel.todoList.observe(this, Observer { adapter.setItem(it) }) } }Adapter
新しく加えたデータをAdapterにセットします。
RecyclerAdapter.ktclass RecyclerAdapter : RecyclerView.Adapter<RecyclerAdapter.RecyclerViewHolder>(){ private val todoList = mutableListOf<Todo>() fun setItem(items: List<Todo>) { todoList.clear() todoList.addAll(items) notifyDataSetChanged() } ... }おわりに
Roomを使用してデータベースに値を保存することができました。
次回は削除機能の追加をしたいと思います。
最近勉強したDaggerを使って、DIしてみてもいいかな!
- 投稿日:2020-05-27T17:33:29+09:00
[Android]アクションバーの色を動的に変える
アクションバーの色を変更する
MainActivity.ktsupportActionBar?.setBackgroundDrawable(ColorDrawable(Color.parseColor("カラーコード")))ステータスバーの色を変更する
MainActivity.ktwindow.addFlags(WindowManager.LayoutParams.FLAG_DRAWS_SYSTEM_BAR_BACKGROUNDS) window.statusBarColor = Color.parseColor("カラーコード")アプリをAPIバージョンの22以下に対応させる場合、ステータスバーの文字色が白色に固定されているため、ステータスバーの色が白系統の場合文字の可読性を損なわないか考慮する必要があります.
ツールバーの色を変更する
MainActivity.kttoolbar.setBackgroundColor(Color.parseColor("カラーコード"))
- 投稿日:2020-05-27T14:33:50+09:00
AndroidStudioのKotlinでGsonを使う
KotlinでGsonを使う
Gsonを使う準備
Gsonは様々なメーカーから様々な機能を持ったGSonライブラリが提供されている。
便利なのを使うべきなのだろうけど最初から入っているGoogle社のGsonをここでは使用する。
※どうせカプセル化してしまえばあまり関係ないしプロジェクトツリーのbuild.gradle(app)を開いて dependencies { の中に
build.gradle(app)implementation 'com.google.code.gson:gson:2.8.6'を追加して更新するとGsonが使えるようになります。
値を管理するクラスを作る
Kotlinで値を管理するためのクラスを作ります。
sample.ktopen class gsonData(){ var dStr : String = "test" var dInt : Int = 1234 var dDouble : Double = 5.6 }作ったクラスは
MainActivity.ktval gsonData = gsonData()このように宣言すれば使えます。
クラス内の変数にアクセスしてみましょう。MainActivity.ktgsonData.dStr = "hello" gsonData.dInt = 9876 gsonData.dDouble = 0.0Gson形式で保存する
Gson形式の文字列に変換するには
MainActivity.ktval str = Gson().toJson(gsonData)とします。
strの中身は{"dDouble":123.4567,"dInt":987,"dStr":"testFile5"}このようになっています。
Gson形式での保存では値だけではなく宣言した変数名も保存されていますので、クラス内の変数の順番や数が変わってもある程度互換性があるまま読み込めそうですね。Gson形式の文字列をクラスに反映させる
strにGson形式のデータが入っていてそれを反映させる場合は
MainActivity.ktgsonData = Gson().fromJson<gsonData>(str, gsonData::class.java) as gsonDataこのようにします。
Gson形式で保存/読込するクラスのカプセル化
クラスに必要な変数を定義しておいて、それが簡単に保存や復元ができると便利ですね。
というわけでこのクラスに
メソッド名 説明 fun toGsonString() : String Gson形式の文字列を返します fun fromData(str : String) Gson形式の文字を渡して値を復元します fun fileSave(filename : String) 指定したファイル名でGson形式のファイルを作成します fun fileLoad(filename : String) 指定したファイル名のGsonファイルを読み込み復元します 4つのクラスを実装します。
たったこれだけのことなのですがAndroid環境とKotlinに不慣れなため悪戦苦闘します。もっと良い方法があればコメント願います。問題点その1 自分自身にGson値を渡せない
Gson文字列として返すため thisを利用すると上手くいきます。
sample.ktfun toGsonString() : String{ val str = Gson().toJson(this) return str }しかしgsonData = Gson().fromJson(str, gsonData::class.java) as gsonDataというようにGson().fromJsonの返り値がデータクラスの返り値でした。ではそれをクラスのメソッドの中に入れると
sample.ktopen class gsonData(){ var dStr : String = "test" var dInt : Int = 1234 var dDouble : Double = 5.6 fun fromData(str : String){ this = Gson().fromJson<gsonData>(str, gsonData::class.java) as gsonData } }ダメですね、thisは読み込み専用クラスなのでしょう
問題点その2 ファイルの読み書きにcontext: Contextが必要
ファイルの読み書きにはcontext: Contextが必要です。では初期化のときの引数にしてしまえば良いと思い
sample.ktopen class gsonData(private val context: Context){と定義して
MainActivity.ktval gsonData = gsonData(this)と定義すれば良いような気がしますが今度は
sample.ktfun toGsonString() : String{ val str = Gson().toJson(this) return str }が実行時エラーになりますが原因はさっぱりわかりません。
悩み続けても仕方が無いので
1.データはデータだけのクラスに管理させる
2.データのファイル操作クラスにはContextを渡す
3.データを直接参照させたいのでファイル操作クラスはデータクラスを継承させる
このような設計思想とします。gsonData.ktopen class gsonData(){ var dStr : String = "" var dInt : Int? = 0 var dDouble : Double? = 0.0 fun assign(a : gsonData){ dStr = a.dStr dInt = a.dInt dDouble = a.dDouble } // クラスのデータを Gson形式の文字列に変換 fun toGsonString() : String{ val d = gsonData() d.assign(this) val str = Gson().toJson(d) return str } // Gson形式の文字列をクラスのデータに反映 fun fromData(str : String){ val data = Gson().fromJson<gsonData>(str, gsonData::class.java) as gsonData assign(data) } }クラスの変数定義の他にassignメソッドを作りました。このメソッドを通じて安全に代入が出来るようにしています。
Gson文字列の作成やGson文字列からの反映に利用しています。
変数定義の他に代入命令の追加が必要になりますが妥協点とします。gsonFile.ktclass gsonFile : gsonData{ var context : Context? = null constructor (context2: Context) :super() { this.context = context2 } // 指定したファイル名で保存 fun fileSave(filename : String) { val str = super.toGsonString() File(context?.filesDir, filename).writer().use { it.write(str) } } // 指定したファイル名から読み込む fun fileLoad(filename : String){ val readFile = File(context?.filesDir, filename) if(readFile.exists()){ val str = readFile.bufferedReader().use(BufferedReader::readText) fromData(str) } } }上位クラスのgsonDataにはContextが不要で、それを継承したクラスgsonFileには必要とする定義を作ると何故か複雑な事になりました。初期化時代入も出来なかったのでnull許容としています。
文字列定義は
strings.xml<?xml version="1.0" encoding="utf-8" ?> <resources> <string name="app_name">GSonSample</string> <string name="btSave">保存</string> <string name="btLoad">読込</string> <string name="tvStr">String型</string> <string name="tvInt">Int型</string> <string name="tvDouble">Double型</string> </resources>画面デザインは
activity_main.xml<?xml version="1.0" encoding="utf-8"?> <androidx.constraintlayout.widget.ConstraintLayout xmlns:android="http://schemas.android.com/apk/res/android" xmlns:app="http://schemas.android.com/apk/res-auto" xmlns:tools="http://schemas.android.com/tools" android:layout_width="match_parent" android:layout_height="match_parent" tools:context=".MainActivity"> <androidx.constraintlayout.widget.ConstraintLayout android:id="@+id/clButton" android:layout_width="wrap_content" android:layout_height="0dp" android:orientation="horizontal" app:layout_constraintEnd_toEndOf="parent" app:layout_constraintStart_toStartOf="parent" app:layout_constraintTop_toTopOf="parent"> <Button android:id="@+id/btSave" style="@style/Widget.AppCompat.Button" android:layout_width="0dp" android:layout_height="wrap_content" android:layout_weight="1" android:onClick="onButtonClickSave" android:text="@string/btSave" app:layout_constraintStart_toStartOf="parent" /> <Button android:id="@+id/btLoad" style="@style/Widget.AppCompat.Button" android:layout_width="0dp" android:layout_height="wrap_content" android:layout_weight="1" android:onClick="onButtonClickLoad" android:text="@string/btLoad" app:layout_constraintStart_toEndOf="@+id/btSave" /> </androidx.constraintlayout.widget.ConstraintLayout> <androidx.constraintlayout.widget.ConstraintLayout android:id="@+id/clEdit" android:layout_width="0dp" android:layout_height="0dp" app:layout_constraintBottom_toBottomOf="parent" app:layout_constraintEnd_toEndOf="parent" app:layout_constraintStart_toStartOf="parent" app:layout_constraintTop_toBottomOf="@+id/clButton"> <EditText android:id="@+id/etStr" android:layout_width="202dp" android:layout_height="46dp" android:ems="10" android:inputType="text" android:text="test" app:layout_constraintEnd_toEndOf="parent" app:layout_constraintHorizontal_bias="0.564" app:layout_constraintStart_toStartOf="parent" app:layout_constraintTop_toTopOf="parent" /> <EditText android:id="@+id/etInt" android:layout_width="wrap_content" android:layout_height="wrap_content" android:ems="10" android:inputType="number" android:text="12" app:layout_constraintStart_toStartOf="@+id/etStr" app:layout_constraintTop_toBottomOf="@+id/etStr" /> <TextView android:id="@+id/tvDouble" android:layout_width="wrap_content" android:layout_height="wrap_content" android:text="@string/tvDouble" app:layout_constraintBaseline_toBaselineOf="@+id/etDouble" app:layout_constraintEnd_toStartOf="@+id/etDouble" /> <TextView android:id="@+id/tvStr" android:layout_width="wrap_content" android:layout_height="wrap_content" android:text="@string/tvStr" app:layout_constraintBaseline_toBaselineOf="@+id/etStr" app:layout_constraintEnd_toStartOf="@+id/etStr" /> <TextView android:id="@+id/tvInt" android:layout_width="wrap_content" android:layout_height="wrap_content" android:text="@string/tvInt" app:layout_constraintBaseline_toBaselineOf="@+id/etInt" app:layout_constraintEnd_toStartOf="@+id/etInt" /> <EditText android:id="@+id/etDouble" android:layout_width="wrap_content" android:layout_height="wrap_content" android:ems="10" android:inputType="numberDecimal" android:text="34.0" app:layout_constraintStart_toStartOf="@+id/etInt" app:layout_constraintTop_toBottomOf="@+id/etInt" /> </androidx.constraintlayout.widget.ConstraintLayout> </androidx.constraintlayout.widget.ConstraintLayout>MainActivity部分は
MainActivity.ktclass MainActivity : AppCompatActivity() { val gsonData = gsonDataFile(this) val filename : String = "test.txt" override fun onCreate(savedInstanceState: Bundle?) { super.onCreate(savedInstanceState) setContentView(R.layout.activity_main) } // 編集中の内容をクラスに反映 fun activityToData(){ val etString = findViewById<EditText>(R.id.etStr) val etInt = findViewById<EditText>(R.id.etInt) val etDouble = findViewById<EditText>(R.id.etDouble) gsonData.dStr = etString.text.toString() gsonData.dInt = etInt.text.toString().toIntOrNull() if (gsonData.dInt == null){gsonData.dInt = 0} gsonData.dDouble = etDouble.text.toString().toDoubleOrNull() if (gsonData.dDouble == null){gsonData.dDouble = 0.0} } // クラスの内容を編集画面へ反映 fun dataToActivity(){ val etString = findViewById<EditText>(R.id.etStr) val etInt = findViewById<EditText>(R.id.etInt) val etDouble = findViewById<EditText>(R.id.etDouble) etString.setText(gsonData.dStr.toString()) etInt.setText(gsonData.dInt.toString()) etDouble.setText(gsonData.dDouble.toString()) } // 保存ボタンクリック fun onButtonClickSave(view : View){ activityToData() gsonData.fileSave(filename) } // 読込ボタンクリック fun onButtonClickLoad(view : View){ gsonData.fileLoad(filename) dataToActivity() } }このようになっています。
最後に
データが入っているクラスをGson文字列に変換したり復元したりすることは保存以外にも色々利用価値があります。でも肝心のクラスをカプセル化しようとすると複雑になってしまいました。
AndroidやKotlinに慣れてきたらもっと簡単に書けないか考えてみたいと思います。
- 投稿日:2020-05-27T14:26:23+09:00
WSlで,Vue.jsによるアンドロイドアプリ開発環境を構築しようとしたときにハマった
備忘録
【Vue.js】WSL 上で Vue.js を用いた Android アプリを開発する
こちらを用いて,よっしゃ開発環境作るどーーと意気込んでいたら…sudo $ANDROID_HOME/tools/bin/sdkmanager "tools" "emulator" "platform-tools" "platforms;android-28" "build-tools;28.0.3" "extras;android;m2repository" "extras;google;m2repository" Error: Could not find or load main class com.android.sdklib.tool.sdkmanager.SdkManagerCliとのエラーが出た.調べていると,JDKが8よりも新しいものを使うとうまくいかないとのこと.この段階で最新版のjava14を入れていた.
入れなおしてもう一度!としたが変わらなかった.いろいろ探しまくった結果,以下でsdkmanagerのバージョンを古くするといけた.
エラー:メインクラスcom.android.sdklib.tool.sdkmanager.SdkManagerCli #5304が見つからないか、読み込めませんでした
https://dl.google.com/android/repository/sdk-tools-linux-4333796.zip
結局これでダウンロードしたtoolsに置き換えるとうまくいった.めっちゃ悩んだのにあっけない…
というか,最新のを使う方法はないんでしょうか?
- 投稿日:2020-05-27T08:38:26+09:00
AndroidStudioで画面に表示する文字を登録する
AndroidStudioで画面表示に使用する文字を登録
新規アプリケーションの作成で空のアクティビティを選んでから
activity_main.xmlにボタンを追加します。activity_main.xml<?xml version="1.0" encoding="utf-8"?> <androidx.constraintlayout.widget.ConstraintLayout xmlns:android="http://schemas.android.com/apk/res/android" xmlns:app="http://schemas.android.com/apk/res-auto" xmlns:tools="http://schemas.android.com/tools" android:layout_width="match_parent" android:layout_height="match_parent" tools:context=".MainActivity"> <TextView android:id="@+id/tvMain" android:layout_width="wrap_content" android:layout_height="wrap_content" android:text="Hello World!" app:layout_constraintBottom_toBottomOf="parent" app:layout_constraintLeft_toLeftOf="parent" app:layout_constraintRight_toRightOf="parent" app:layout_constraintTop_toTopOf="parent" /> <Button android:id="@+id/btMain" android:layout_width="wrap_content" android:layout_height="wrap_content" android:layout_marginStart="8dp" android:layout_marginTop="8dp" android:text="Button" app:layout_constraintStart_toStartOf="parent" app:layout_constraintTop_toTopOf="parent" /> </androidx.constraintlayout.widget.ConstraintLayout>この時点でコンポーネントツリーに警告が出ている。
表示内容が英語なのだが要はボタンに表示する文字 Button は、ここじゃなくて@stringリソースに書いてねということらしい。文字列の登録
ということで@stringリソースに書いてみよう。
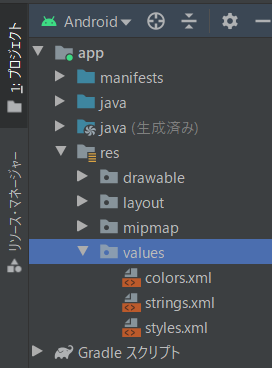
プロジェクトのツリーから
app -> res -> values -> strings.xml
strings.xmlが@stringリソースになるので開くとstrings.xml<resources> <string name="app_name">[[アプリケーションのタイトル]]</string> </resources>となっている。
このままだと日本語使用するとき問題になるので先頭に<?xml version="1.0" encoding="utf-8" ?>を追加する。strings.xml<?xml version="1.0" encoding="utf-8" ?> <resources> <string name="app_name">[[アプリケーションのタイトル]]</string> </resources>次にボタンに表示する名称を登録します。
strings.xml<?xml version="1.0" encoding="utf-8" ?> <resources> <string name="app_name">[[アプリケーションのタイトル]]</string> <string name="btName">これはボタンです</string> </resources>今度はレイアウトのactivity_main.xmlを開いて
activity_main.xml省略 <Button android:id="@+id/btMain" android:layout_width="wrap_content" android:layout_height="wrap_content" android:layout_marginStart="8dp" android:layout_marginTop="8dp" android:text="@string/btName" app:layout_constraintStart_toStartOf="parent" app:layout_constraintTop_toTopOf="parent" />android:text=の後ろの部分を @string/btName に変更します。
これで警告は消えてボタンの名称は指定したとおりの表示になります。
TextViewのtextではなぜか警告が出ませんが、同じようにこちらも直しておきましょう。文字列リストの登録
文字列だけでなく文字列リスト(配列)も登録出来ます。
strings.xml<?xml version="1.0" encoding="utf-8" ?> <resources> <string name="app_name">[[アプリケーションタイトル]]</string> <string-array name="lvEntries"> <item>1個目</item> <item>2個目</item> <item>3個目</item> </string-array> </resources>これで文字列リスト lvEntriesが完成しました。
次に画面レイアウトactivity_main.xmlの方はボタンを消してListViewを追加します。activity_main.xml省略 <ListView android:id="@+id/lvMain" android:layout_width="wrap_content" android:layout_height="wrap_content" android:layout_marginStart="8dp" android:layout_marginTop="8dp" app:layout_constraintStart_toStartOf="parent" app:layout_constraintTop_toTopOf="parent" android:entries="@array/lvEntries"/>ListViewのandroid:entriesに @array/lvEntries を指定することで文字列リストがListViewに読み込まれます。
string.xmlに書く理由
直接レイアウトファイルのactivity_main.xmlに書いても良いように思いますが、あえてstrings.xmlに書いて参照させるようにしているのは他の国の言語に変換しやすくする為なのでしょう。
複数のファイルの様々な場所に書かれている表示要素を修正するよりはstrings.xmlだけを修正する方が早いですからね。
でも表示する文字ってプログラムからの変更したりするのでは?っていうことでプログラムからも参照してみましょう。
MainActivity.ktval btnName = R.string.btName val lvEntries = R.array.lvEntrys急にRが出てきましたがこれはリソースを参照するときの決まり文句です。
このようにすれば表示に関係する文字列を登録しておけば将来的に楽になるはずです。
最後に
行き当たりばったりで作る場合はいちいち使う文字列を登録していられません。
登録しても使わない場合があると思います。
どう使っていくのかはわかりませんが、まずは直に文字を書いても仕方が無い世界なのかもしれません。落ち着いてから登録している文字を採用するように変換すると楽なのかも知れません。
そう言っておいて後回しにしそうですね。
- 投稿日:2020-05-27T03:01:11+09:00
カウンターアプリ1号
とりあえず、自分の中でまとまった内容から追記していきます。
Javaファイル
MainActivity.javapackage com.example.counterapp1; import androidx.appcompat.app.AppCompatActivity; import android.os.Bundle; import android.view.View; import android.widget.TextView; import android.widget.Button; import android.widget.TextView; public class MainActivity extends AppCompatActivity implements View.OnClickListener{ int number; @Override protected void onCreate(Bundle savedInstanceState) { super.onCreate(savedInstanceState); setContentView(R.layout.activity_main); TextView tv =findViewById(R.id.textView); ((Button)findViewById(R.id.button1)).setOnClickListener(this); ((Button)findViewById(R.id.button2)).setOnClickListener(this); ((Button)findViewById(R.id.button3)).setOnClickListener(this); } private void onClickButton1(){ number =number+1; ((TextView)findViewById(R.id.textView)) .setText(number+""); } private void onClickButton2(){ number = number-1; ((TextView)findViewById(R.id.textView)) .setText(number +""); } private void onClickButton3(){ number =0; ((TextView)findViewById(R.id.textView)) .setText(number+""); } @Override public void onClick(View v){ switch (v.getId()){ case R.id.button1: onClickButton1(); break; case R.id.button2: onClickButton2(); break; case R.id.button3: onClickButton3(); break; } } }レイアウトのxmlファイル
avtivity.xml<?xml version="1.0" encoding="utf-8"?> <androidx.constraintlayout.widget.ConstraintLayout xmlns:android="http://schemas.android.com/apk/res/android" xmlns:app="http://schemas.android.com/apk/res-auto" xmlns:tools="http://schemas.android.com/tools" android:layout_width="match_parent" android:layout_height="match_parent" tools:context=".MainActivity"> <TextView android:id="@+id/textView" android:layout_width="wrap_content" android:layout_height="wrap_content" android:layout_marginBottom="300dp" android:text="@string/defaultNumber" android:textSize="100sp" app:layout_constraintBottom_toBottomOf="parent" app:layout_constraintHorizontal_bias="0.498" app:layout_constraintLeft_toLeftOf="parent" app:layout_constraintRight_toRightOf="parent" app:layout_constraintTop_toTopOf="parent" app:layout_constraintVertical_bias="0.434" /> <Button android:id="@+id/button1" android:layout_width="wrap_content" android:layout_height="wrap_content" android:layout_alignParentStart="true" android:layout_alignParentLeft="true" android:layout_marginStart="57dp" android:text="@string/btn1_txt" android:textSize="40sp" app:layout_constraintBaseline_toBaselineOf="@+id/button2" app:layout_constraintStart_toStartOf="parent" /> <Button android:id="@+id/button2" android:layout_width="wrap_content" android:layout_height="wrap_content" android:layout_alignParentStart="true" android:layout_alignParentLeft="true" android:layout_marginEnd="60dp" android:layout_marginBottom="312dp" android:text="@string/btn2_txt" android:textSize="40sp" app:layout_constraintBottom_toBottomOf="parent" app:layout_constraintEnd_toEndOf="parent" /> <Button android:id="@+id/button3" android:layout_width="wrap_content" android:layout_height="wrap_content" android:layout_alignParentStart="true" android:layout_alignParentLeft="true" android:layout_marginTop="83dp" android:text="@string/btn3_txt" android:textSize="40sp" app:layout_constraintEnd_toStartOf="@+id/button2" app:layout_constraintTop_toBottomOf="@+id/button2" /> <androidx.constraintlayout.widget.Group android:id="@+id/group" android:layout_width="wrap_content" android:layout_height="wrap_content" /> <androidx.constraintlayout.widget.Group android:id="@+id/group2" android:layout_width="wrap_content" android:layout_height="wrap_content" /> <androidx.constraintlayout.widget.Group android:id="@+id/group3" android:layout_width="wrap_content" android:layout_height="wrap_content" /> <androidx.constraintlayout.widget.Guideline android:id="@+id/guideline4" android:layout_width="wrap_content" android:layout_height="wrap_content" android:orientation="horizontal" app:layout_constraintGuide_begin="20dp" /> <androidx.constraintlayout.widget.Guideline android:id="@+id/guideline5" android:layout_width="wrap_content" android:layout_height="wrap_content" android:orientation="horizontal" app:layout_constraintGuide_begin="20dp" /> </androidx.constraintlayout.widget.ConstraintLayout>文字のリソースのxml
strings.xml<resources> <string name="app_name">CounterApp1</string> <string name="defaultNumber">0</string> <string name="btn1_txt">+</string> <string name="btn2_txt">-</string> <string name="btn3_txt">0</string> </resources>