- 投稿日:2020-02-23T23:56:21+09:00
Ubuntu 18.04 LTS(arm64)に Docker & docker-compose をインストールする方法
1. はじめに
今回は、自分自身への備忘録を兼ねて、Raspberry Pi にインストールしたUbuntu 18.04 LTS(arm64)上に Docker & docker-compose をインストールする方法を、お伝えしたいと思います。
2. この記事を読んでできること
- Ubuntu 18.04 LTS(arm64)で Docker & docker-compose を使えるようになる。
3. 注意事項
- 特になし。
4. 必要なもの
- Ubuntu 18.04 LTS(arm64)が動作しているホストOS環境(この記事では Raspberry Pi3B + Ubuntu 18.04 LTS(arm64)を想定)
- SDカード(16GB以上推奨)
- インターネット環境(有線LAN推奨)
- キーボード
- HDMIディスプレイ
5. Ubuntu 18.04 LTS(arm64)の入手
- 以下のURLから、OSイメージファイル(Raspberry Pi 3 (64-bit ARM) preinstalled server image)をダウンロードする。
ダウンロードサイトURLhttp://cdimage.ubuntu.com/ubuntu/releases/18.04.4/release/参考:この記事作成時のファイルバージョン:ubuntu-18.04.4-preinstalled-server-arm64+raspi3.img.xz
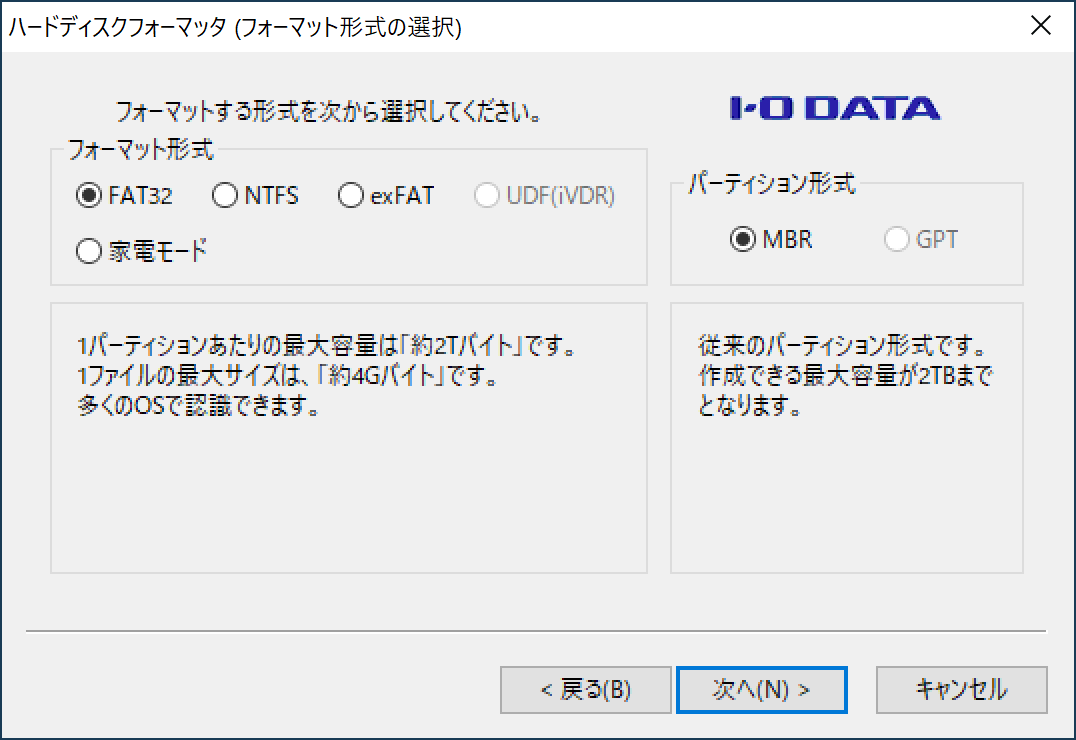
6. microSDカードのフォーマット
- SD Formatter for Windowsなどのソフトを用いて、使用するmicroSDカードをフォーマットする。
フォーマット形式は「FAT32」を選択することを推奨します。
参考:参考画面
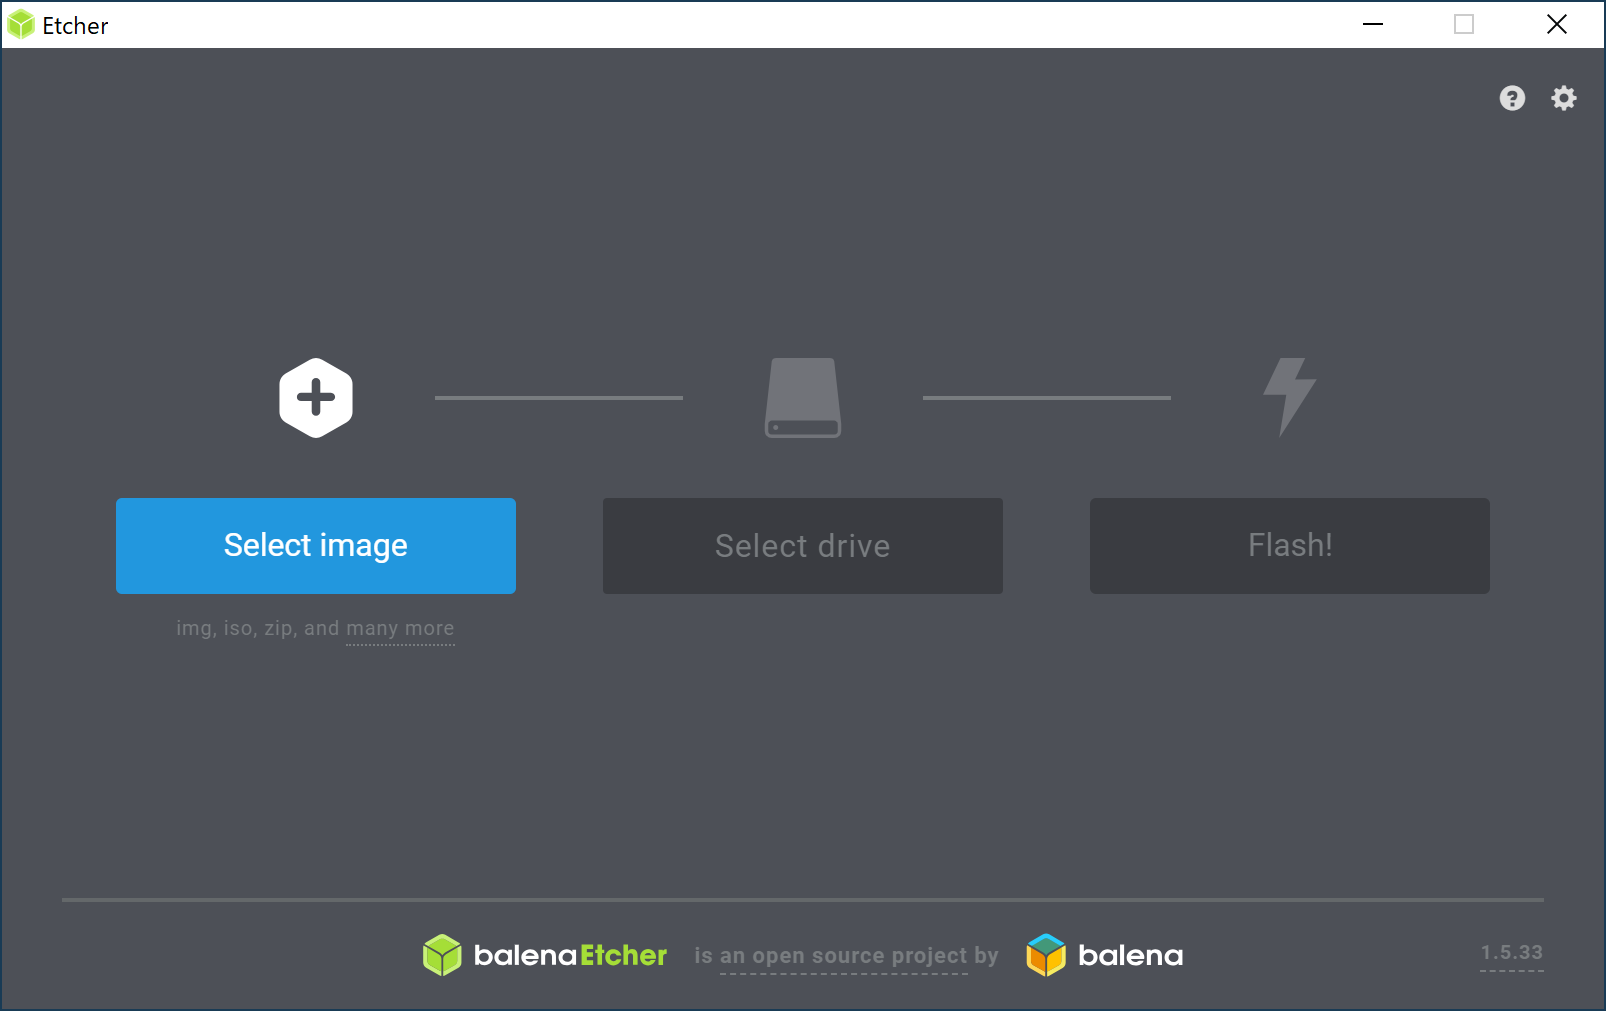
7. microSDカードへOSイメージの書き込み(所要時間:5分)
- Etcherなどのソフトを用いて、使用するmicroSDカードへOSイメージを書き込む。
Etcherは、圧縮されたままのOSイメージ(拡張子が.img等)を解凍せずにそのまま扱えておすすめです。
参考:Etcher起動時の画面
8. microSDカード の完成
- 完成した microSDカード を、PCからおもむろに抜き取る。
9. Ubuntu 18.04 LTS(arm64)の起動
- Raspberry PiにmicroSDカードを挿入し、Ubuntu 18.04 LTS(arm64)を起動する。
デフォルトユーザ名/パスワードユーザ名 :ubuntu パスワード:ubuntu10. dockerおよびdocker-composeのインストール
コマンドプロンプト// 新しいパスワードの設定 // IPアドレスの確認 $ ip a // Windows10などからSSH接続 // パッケージのアップデート $ sudo apt update $ sudo apt -y upgrade // 空き容量の確認 $ df -h // ラズパイ用PPAの追加 $ sudo add-apt-repository ppa:ubuntu-raspi2/ppa ENTER $ sudo apt-get update $ sudo groupadd -f --system gpio $ sudo groupadd -f --system i2c $ sudo groupadd -f --system input $ sudo groupadd -f --system spi // パッケージのアップデート $ sudo apt update // 必要パッケージをインストール $ sudo apt install -y apt-transport-https ca-certificates curl software-properties-common // Dockerの公式GPG keyを追加 $ curl -fsSL https://download.docker.com/linux/ubuntu/gpg | sudo apt-key add - // repository( stable ) を追加 $ sudo add-apt-repository "deb [arch=arm64] https://download.docker.com/linux/ubuntu $(lsb_release -cs) stable" // パッケージのアップデート $ sudo apt update // docker をインストール $ sudo apt install -y docker-ce // Dockerステータスの確認 $ sudo systemctl status docker q // Dockerプロセスの確認 $ sudo docker ps // dockerグループの確認 $ cat /etc/group | grep docker docker:x:996: // dockerグループの追加 $ sudo gpasswd -a ubuntu docker // dockerグループの確認 $ cat /etc/group | grep docker docker:x:996:ubuntu // ソケットファイルのパーミッションの確認 $ ls -la /var/run/docker.sock // ソケットファイルのパーミッションを変更 $ sudo chmod 666 /var/run/docker.sock // Dockerプロセスの確認 $ docker ps // python3のインストール $ sudo apt -y install python3-pip // 必要ライブラリのインストール $ sudo apt install libffi-dev $ sudo apt install libssl-dev // docker-composeの入手 $ sudo pip3 install -U docker-compose // docker-composeの確認 $ which docker-compose /usr/local/bin/docker-compose // dockerのバージョン確認 # docker -v Docker version 19.03.6, build 369ce74 // docker-composeのバージョン確認 $ docker-compose -v docker-compose version 1.25.4, build unknown11. dockerの動作確認
コマンドプロンプト// dockerの実行(ハローワールド) # docker run --rm hello-world12. docker-composeの動作確認
- docker-compose.ymlファイルを作成し、ファイル保存する。
docker-compose.ymlversion: "2" services: app: image: hello-world
- docker-composeを実行する。
コマンドライン// docker-compose.ymlファイルが存在することを事前確認 # ls docker-compose.yml // docker-composeを実行 # sudo docker-compose up13. 参考:Dockerコマンド、docker-composeコマンド
14. おわりに
いかがでしたでしょうか?意外と簡単にDocker & docker-composeをはじめることができたのではないかなと思います。
今回の記事が、みなさまの学習の参考になれば幸いです。2020/02/23 TAKAHIRO NISHIZONO
15. 追記その1:コマンドでのWiFiの設定
コマンドプロンプト// NetworkManagerをインストール $ sudo apt -y install network-manager // OS再起動 $ sudo shutdown -r now // IPアドレスの確認 $ ip a // サービスの確認 $ sudo service NetworkManager status q // wifiリストの確認(SSID名を確認する) $ nmcli device wifi list // wifiの接続 $ sudo nmcli device wifi connect 'SSID名' password 'WIFIパスワード' ifname wlan0 // IPアドレスの確認 $ ip a // 補足:テキストユーザインターフェースでのWifi接続設定の場合のコマンド $ nmtui16. 追記その2:コマンドでのホスト名の設定変更
コマンドプロンプト// preserve_hostnameをtrueに変更 $ sudo vi /etc/cloud/cloud.cfg === #preserve_hostname: false preserve_hostname: true === // ホスト名を設定(デフォルトのubuntu から raspberrypi3 に変更) $ sudo hostnamectl set-hostname raspberrypi3 // ubuntuのホスト名解決のためだけにsambaを入れる(sambaは使わない) // これで、WindowsPC側からホスト名で接続できるようになるはず(まれに接続できないこともある) $ sudo apt-get -y install samba // OS再起動 $ sudo reboot
- 投稿日:2020-02-23T21:58:39+09:00
Reactのアプリを簡単にDocker上のnginxに搭載してみた
目標
Reactのcreate-react-appで作成したアプリをnginxに載せてみました。
簡単にできたのでメモしておきます。Reactアプリの作成
これはcreate-react-appでサクッと作成しましょう。
DockerでReactの環境を作成してみたでDocker上で構築できるはずです。
アプリが作成できたらyarn buildでnginxに載せるファイルを出力しましょう。niginxのDockerfile
nginxのDockerfileです。
yarn buildで出力したファイルとnginxの設定ファイルをコピーしています。FROM nginx:1.17 COPY ./app/build /opt/app/ COPY ./nginx.conf /etc/nginx/nginx.conf CMD ["nginx", "-g", "daemon off;", "-c", "/etc/nginx/nginx.conf"]nginxの設定ファイル
locationはbuildしたファイルを置く場所に設定しましょう。
nginx.confuser nginx; worker_processes auto; error_log /var/log/nginx/error.log warn; pid /var/run/nginx.pid; events { worker_connections 1024; } http { include /etc/nginx/mime.types; default_type application/octet-stream; log_format main '$remote_addr - $remote_user [$time_local] "$request" ' '$status $body_bytes_sent "$http_referer" ' '"$http_user_agent" "$http_x_forwarded_for"'; access_log /var/log/nginx/access.log main; sendfile on; keepalive_timeout 75; server { listen 80; charset utf-8; location /{ root /opt/app/; index index.html; } } }まとめ
あとは、nginxのDockerfileをbuildしてコンテナを立ち上げれば完了です。
- 投稿日:2020-02-23T21:28:19+09:00
sbt-native-packagerでdockerイメージのベースをamazoncorrettoにしたい
build.sbtに以下を追加します。
dockerBaseImage := "amazoncorretto:{VERSION}"
ところが
sbt "docker:publishLocal"でビルドしようとすると
[error] java.lang.RuntimeException: Nonzero exit value: 127
[error]     at com.typesafe.sbt.packager.docker.DockerPlugin$.publishLocalDocker(DockerPlugin.scala:564)
[error]     at com.typesafe.sbt.packager.docker.DockerPlugin$.$anonfun$projectSettings$37(DockerPlugin.scala:209)
[error]     at com.typesafe.sbt.packager.docker.DockerPlugin$.$anonfun$projectSettings$37$adapted(DockerPlugin.scala:201)
[error]     at scala.Function1.$anonfun$compose$1(Function1.scala:44)
[error]     at sbt.internal.util.$tilde$greater.$anonfun$$u2219$1(TypeFunctions.scala:40)
[error]     at sbt.std.Transform$$anon$4.work(System.scala:67)
[error]     at sbt.Execute.$anonfun$submit$2(Execute.scala:269)
[error]     at sbt.internal.util.ErrorHandling$.wideConvert(ErrorHandling.scala:16)
[error]     at sbt.Execute.work(Execute.scala:278)
[error]     at sbt.Execute.$anonfun$submit$1(Execute.scala:269)
[error]     at sbt.ConcurrentRestrictions$$anon$4.$anonfun$submitValid$1(ConcurrentRestrictions.scala:178)
[error]     at sbt.CompletionService$$anon$2.call(CompletionService.scala:37)
[error]     at java.util.concurrent.FutureTask.run(FutureTask.java:266)
[error]     at java.util.concurrent.Executors$RunnableAdapter.call(Executors.java:511)
[error]     at java.util.concurrent.FutureTask.run(FutureTask.java:266)
[error]     at java.util.concurrent.ThreadPoolExecutor.runWorker(ThreadPoolExecutor.java:1149)
[error]     at java.util.concurrent.ThreadPoolExecutor$Worker.run(ThreadPoolExecutor.java:624)
[error]     at java.lang.Thread.run(Thread.java:748)
[error] (Docker / publishLocal) Nonzero exit value: 127
[error] Total time: 77 s, completed 2020/02/22 11:21:07
といったエラーが出て失敗してしまいます

生成されたDockerfileを覗いてみるとRUN id -u demiourgos728 1>/dev/null 2>&1 || (( getent group 0 1>/dev/null 2>&1 || ( type groupadd 1>/dev/null 2>&1 && groupadd -g 0 root || addgroup -g 0 -S root )) && ( type useradd 1>/dev/null 2>&1 && useradd --system --create-home --uid 1001 --gid 0 demiourgos728 || adduser -S -u 1001 -G root demiourgos728 ))といった行があります。
amazoncorrettoはamazonlinuxをベースにしていますが、amazonlinuxではaddgroupやadduserが使えないため(参考1、参考2)エラーが発生していると考えられます。参考先にもある通り、
RUN yum install -y shadow-utilsを挟んであげる事で回避できますが、そもそも動かすだけならシンプルな設定でも十分なのでDockerfileをスクラッチで書き直してしまいましょう。
https://www.scala-sbt.org/sbt-native-packager/formats/docker.html#write-from-scratchimport com.typesafe.sbt.packager.docker._ dockerCommands := Seq( Cmd("FROM", "amazoncorretto:{VERSION}"), Cmd("COPY", "opt", "/opt"), ExecCmd("ENTRYPOINT", "/opt/docker/bin/{APP_NAME}") )生成されるDockerfileを確認するためには以下のコマンドが使えます。
sbt "show dockerCommands"[info] * Cmd(FROM,WrappedArray(amazoncorretto:{VERSION})) [info] * Cmd(COPY,WrappedArray(opt, /opt)) [info] * ExecCmd(ENTRYPOINT,WrappedArray(/opt/docker/bin/{APP_NAME}))最低限の内容になっている事が確認できます。
ビルドも無事成功します。

- 投稿日:2020-02-23T21:20:52+09:00
docker commitからimageをレジストリに登録メモ
sudo docker ps

sudo docker commit [containerID] [repository:tag]

sudo docker images

# ローカルにファイルとして保存する。 (大抵の場合必要なし。)
sudo docker save [imageID] -o [filename]

#tag付け
sudo docker tag [imageID] [registry IP:port]/[dirName]:[version]

#registry に push
sudo docker push [registry IP:port]/[dirName]:[version]
例
sudo docker ps

sudo docker commit aaebff40fcbf python3_gpu:0.1

sudo docker images

# 初めのバージョンなので、0.1かつ latest
sudo docker tag zzjhskjahck 30.0.0.0:5000/python3_gpu_base:0.1
sudo docker tag zzjhskjahck 30.0.0.0:5000/python3_gpu_base:latest

sudo docker push 30.0.0.0:5000/python3_gpu_base:0.1
sudo docker push 30.0.0.0:5000/python3_gpu_base:latest
- 投稿日:2020-02-23T21:20:52+09:00
docker commit から image を private registry に登録メモ
sudo docker ps

sudo docker commit [containerID] [repository:tag]

sudo docker images

# ローカルにファイルとして保存する。 (大抵の場合必要なし。)
sudo docker save [imageID] -o [filename]

#tag付け
sudo docker tag [imageID] [registry IP:port]/[dirName]:[version]

#registry に push
sudo docker push [registry IP:port]/[dirName]:[version]
例
sudo docker ps

sudo docker commit aaebff40fcbf python3_gpu:0.1

sudo docker images

# 初めのバージョンなので、0.1かつ latest
sudo docker tag zzjhskjahck 30.0.0.0:5000/python3_gpu_base:0.1
sudo docker tag zzjhskjahck 30.0.0.0:5000/python3_gpu_base:latest

sudo docker push 30.0.0.0:5000/python3_gpu_base:0.1
sudo docker push 30.0.0.0:5000/python3_gpu_base:latest
取得の場合
docker pull [IPaddress]:[port]/[imageName]:[tagName]

#例
docker pull 30.0.0.0:5000/python3_gpu_base:latest
- Docker Private Registry (port 10080番)にいくとUIで見れて、そこにコマンドも載っている
- 投稿日:2020-02-23T21:15:52+09:00
手探りDocker #3
前回のエラー解消の続き
前回の記事
手探りDocker #2最初の記事
手探りDocker #1いくつか警告やエラーが出ていたが、警告は無視することに
以下のエラーだけの解消を引き続き目指します。
サンプルで使用している下記参考サイトの「Start a Redis container」をすっ飛ばしていたので
docker docs
docker run -dt redisをやってみる → うまくいかないエラー文の「Drive sharing failed for an unknown reason」が手掛かりになりそうなので、この文字列でググってみたところ、以下を見つけた
WindowsのDockerで「Drive sharing failed for an unknown reason」エラーが出た設定に問題があるとのこと
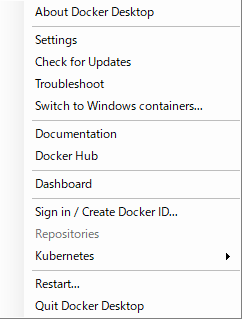
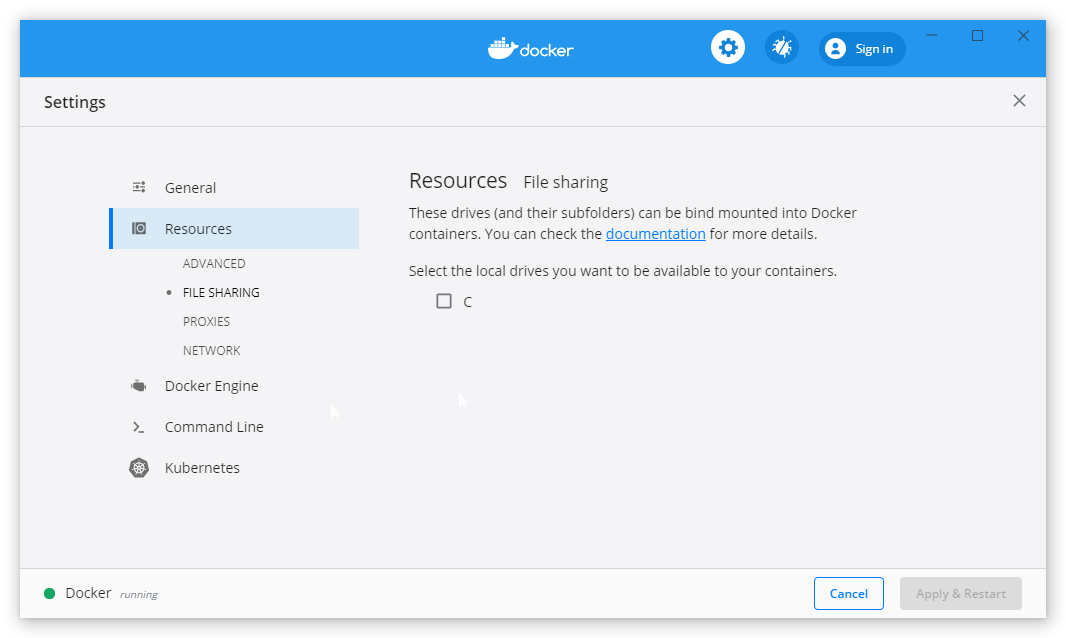
ウインドウ右下のDockerのアイコンをクリック → Settings
以下の設定画面が表示される。
リンク記事とdockerのバージョンが違うので、手順が異なるが、Resources → FILE SHARING とすすめる
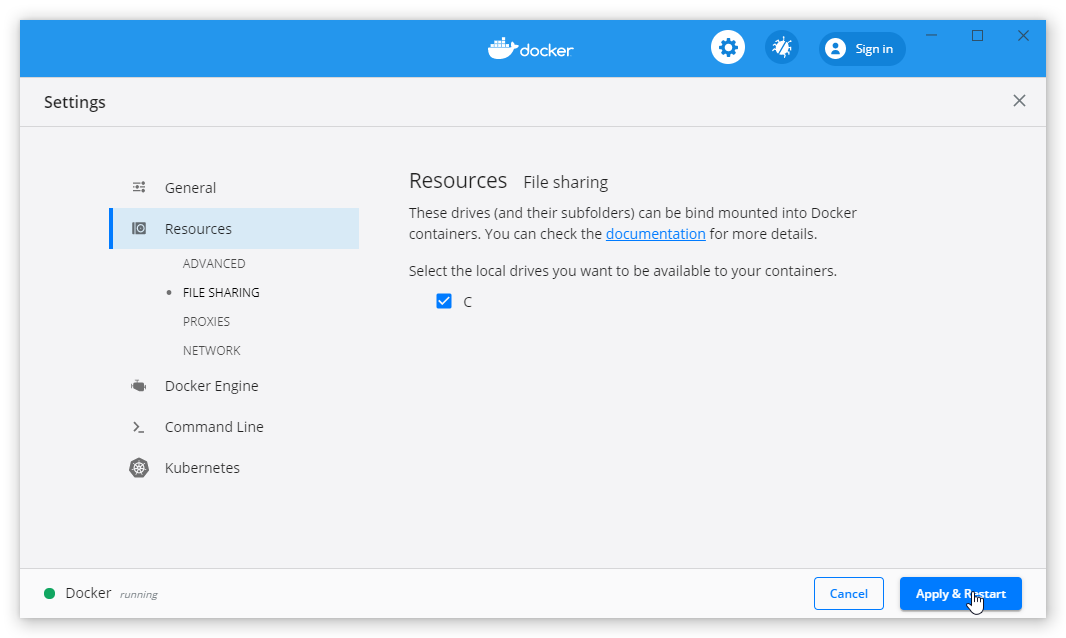
共有したいドライブを選択する
私の環境はCのみ(そもそもなぜ共有するの・・・汗 理解してなさす)右下のApply & Restartを選択
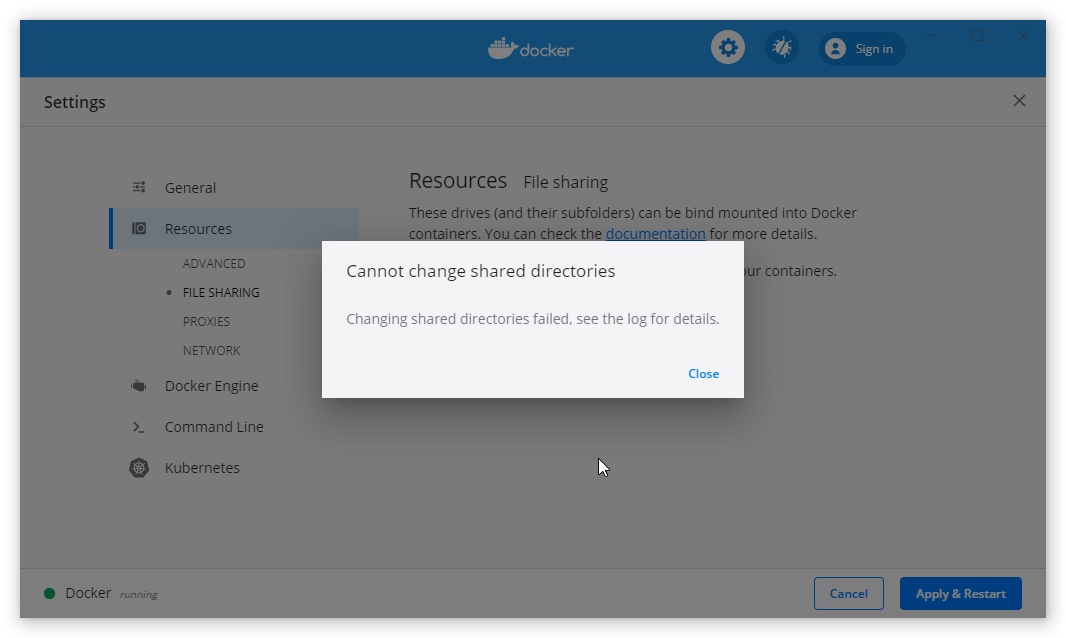
すると以下のエラー
原因はわからなかったが、とりあえず現在起動しているコンテナを停止した
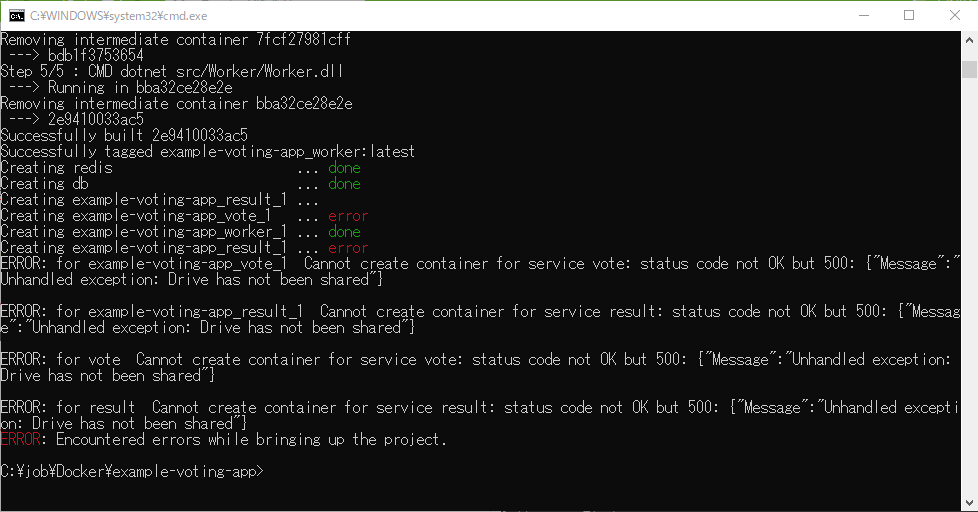
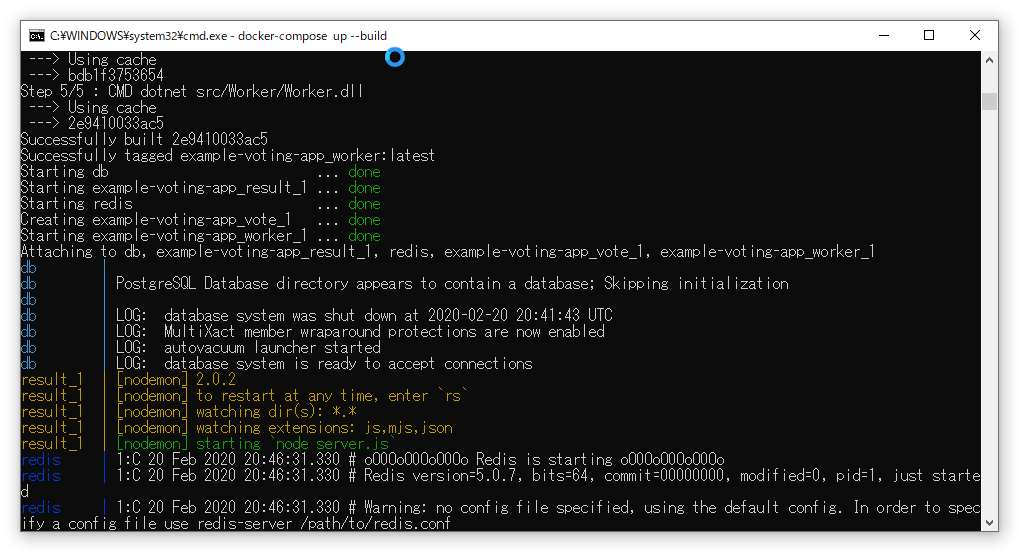
改めて実行すると、今度はうまくいった
もう一度
docker-compose up --buildを実行します
どうやらうまくいったらしい・・・。
辛い・・・。
何一つ理解していない気がするが・・・。
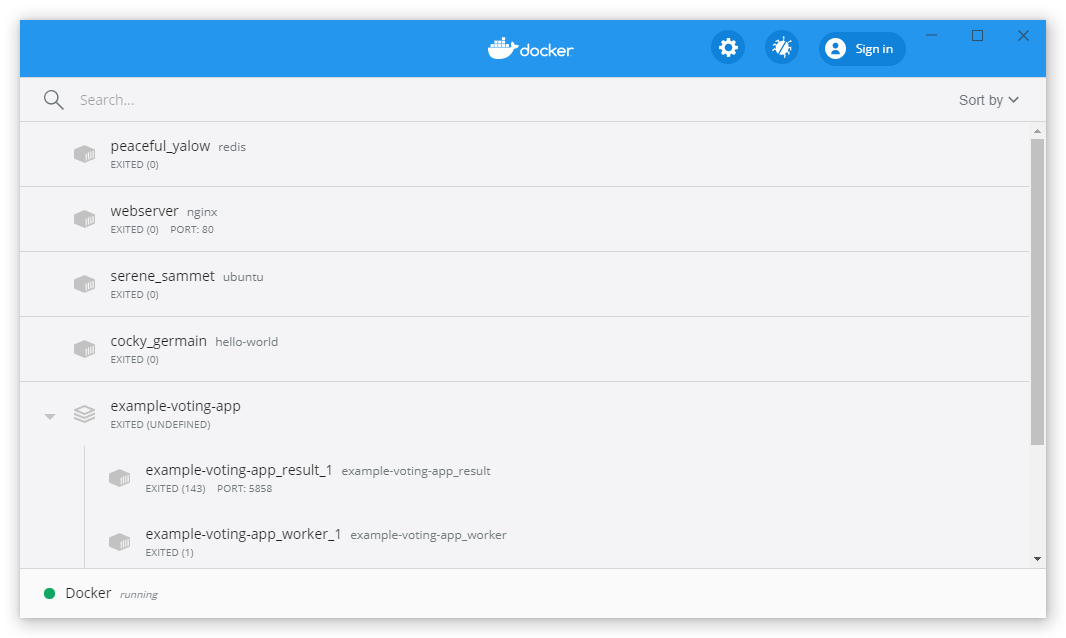
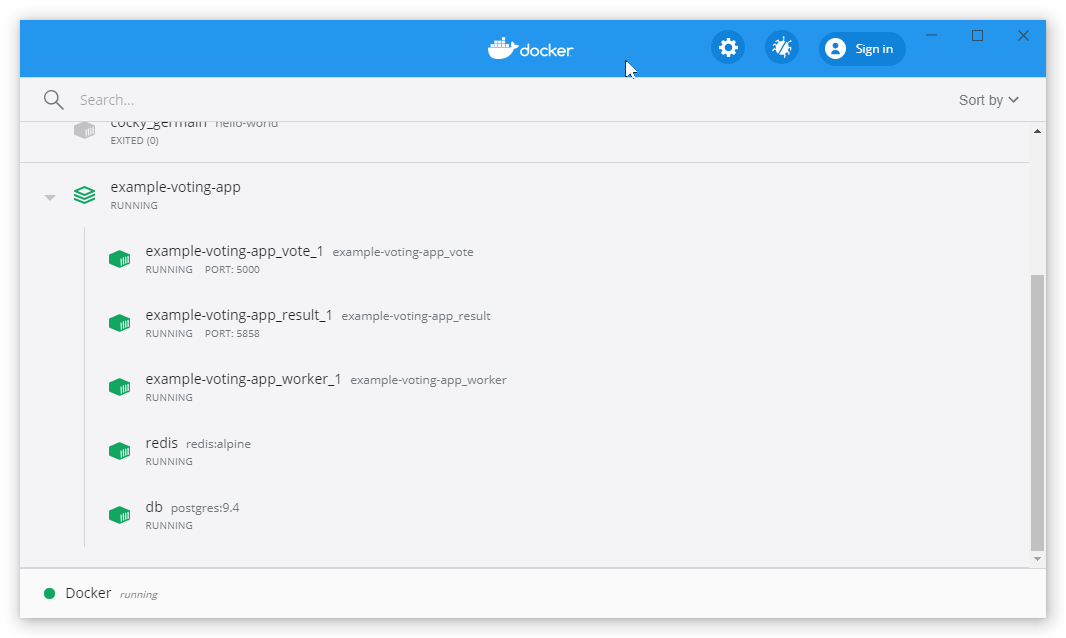
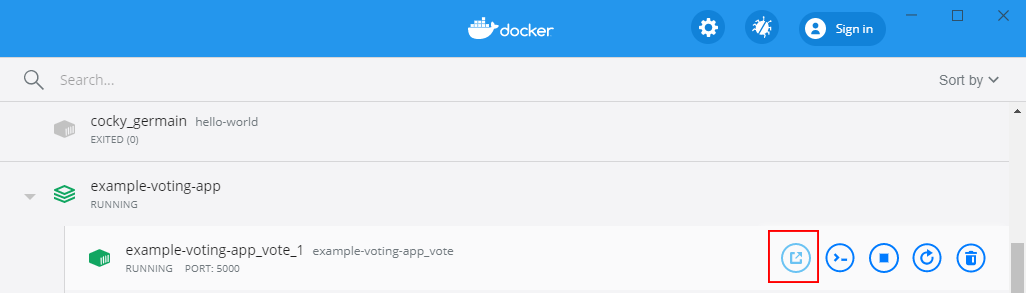
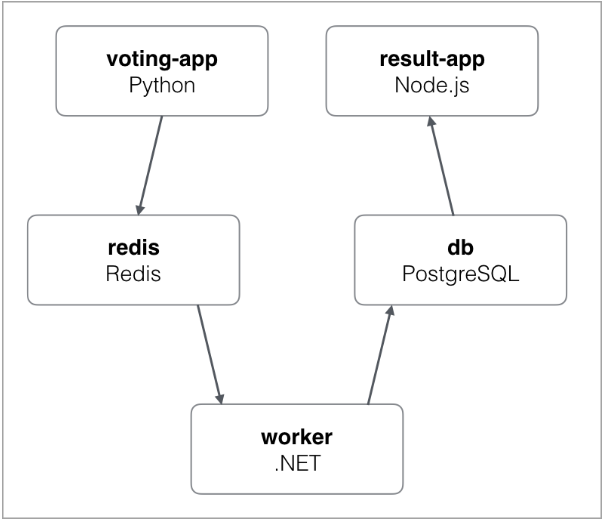
example-voting-app_vote_1が投票のWebアプリのようなので、ブラウザでアクセスしてみる
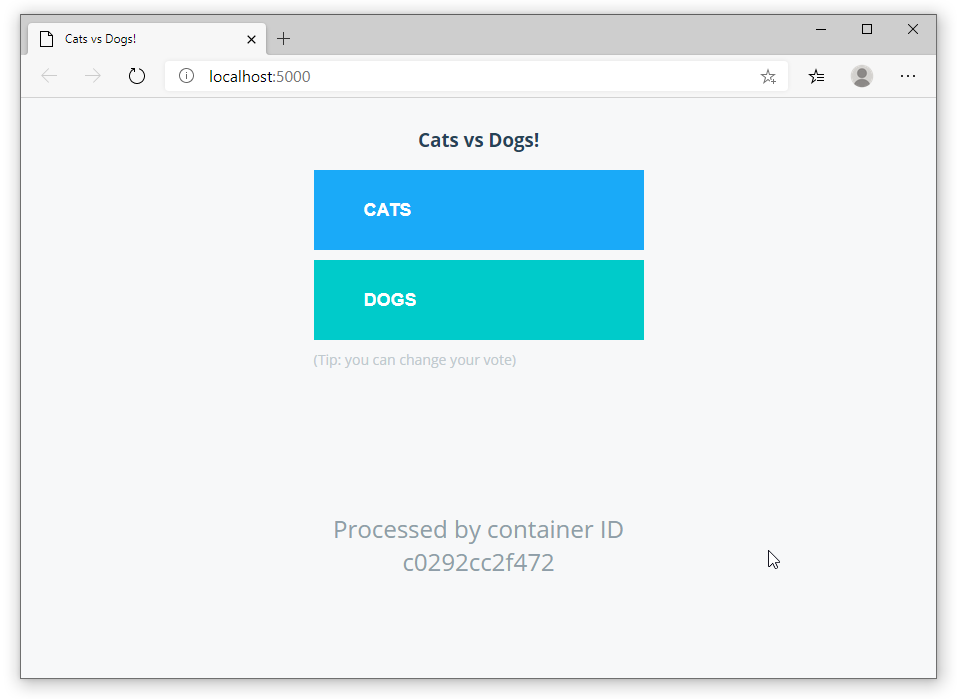
※「http://localhost:5000/」のURLにアクセスします
うーん・・・CATSとDOGSをクリックするたびにPostgresにデータがインサートされているようなされていないような・・・
docker docsには
とあるので、複数のコンテナ内のアプリが通信し合ってこのアプリケーションは成り立っているのだと思います。
分散アプリケーション?理解が全くできていない
とりあえず、Docker公式の入門をやってみるかと挑んだものの、仮想化の基礎知識、ネットワークの知識が不足していて、ほとんどDockerというものを理解できなかったです。また、チャレンジしてみて「こういったことができるようになる」「こういったことが理解できていること」等の目的がなかったことがフワフワした結果を招いたとも言えそうです。
次回以降のDocker系の記事では上記基礎知識をすこしずつ勉強していこうと思います。
そして、今回取得したサンプルアプリに対して以下を行うことを目標としたいと思います。
- 各コンテナに
Tera TermWinSCPで接続、操作する- 投票アプリのデータを、SQLクライアントアプリでPostgresに接続して、データが溜まっているか確認してみる
今回は以上です。

- 投稿日:2020-02-23T20:54:05+09:00
Build Tensorflow v2.1.0 v1-API version full installer with TensorRT 7 enabled [Docker version]
This is the procedure to build all by yourself without using NGC containers.
1. Environment
- Ubuntu 18.04 x86_64 RAM:16GB
- Geforce GTX 1070
- NVIDIA Driver 440.59
- CUDA 10 (V10.0.130)
- cuDNN 7.6.5.32
- Docker 19.03.6, build 369ce74a3c
- Tensorflow v2.1.0
- TensorRT 7
- TF-TRT
- Bazel 0.29.1
- Python 3.6
2. Procedure
Create_working_directory$ cd ~ $ mkdir work/tensorrt && cd work/tensorrtDownload TensorRT-7.0.0.11 and copy to the
work/tensorrtdirectory.
https://developer.nvidia.com/compute/machine-learning/tensorrt/secure/7.0/7.0.0.11/tars/TensorRT-7.0.0.11.Ubuntu-18.04.x86_64-gnu.cuda-10.0.cudnn7.6.tar.gzCreate_Dockerfile$ nano DockerfileDockerfileFROM nvidia/cuda:10.0-cudnn7-devel-ubuntu18.04 RUN apt-get update && \ DEBIAN_FRONTEND=noninteractive apt-get install -y \ protobuf-compiler python-pil python-lxml python-tk cython \ autoconf automake libtool curl make g++ unzip wget git nano \ libgflags-dev libgoogle-glog-dev liblmdb-dev libleveldb-dev \ libhdf5-serial-dev libhdf5-dev python3-opencv python-opencv \ python3-dev python3-numpy python3-skimage gfortran libturbojpeg \ python-dev python-numpy python-skimage python3-pip python-pip \ libboost-all-dev libopenblas-dev libsnappy-dev software-properties-common \ protobuf-compiler python-pil python-lxml python-tk libfreetype6-dev pkg-config \ libpng-dev libhdf5-100 libhdf5-cpp-100 libc-ares-dev libblas-dev \ libeigen3-dev libatlas-base-dev openjdk-8-jdk libopenblas-base \ openmpi-bin libopenmpi-dev gcc libgfortran5 libatlas3-base liblapack-dev RUN pip3 install pip --upgrade && \ pip3 install Cython && \ pip3 install contextlib2 && \ pip3 install pillow && \ pip3 install lxml && \ pip3 install jupyter && \ pip3 install matplotlib && \ pip3 install keras_applications==1.0.8 --no-deps && \ pip3 install keras_preprocessing==1.1.0 --no-deps && \ pip3 install h5py==2.9.0 && \ pip3 install -U --user six numpy wheel mock && \ pip3 install pybind11 && \ pip2 install Cython && \ pip2 install contextlib2 && \ pip2 install pillow && \ pip2 install lxml && \ pip2 install jupyter && \ pip2 install matplotlib # Create working directory RUN mkdir -p /tensorrt && \ cd /tensorrt ARG work_dir=/tensorrt WORKDIR ${work_dir} # Clone Tensorflow v2.1.0, TF-TRT and install Bazel RUN git clone -b v2.1.0 --depth 1 https://github.com/tensorflow/tensorflow.git && \ git clone --recursive https://github.com/NobuoTsukamoto/tf_trt_models.git && \ wget https://github.com/bazelbuild/bazel/releases/download/0.29.1/bazel-0.29.1-installer-linux-x86_64.sh && \ chmod +x bazel-0.29.1-installer-linux-x86_64.sh && \ bash ./bazel-0.29.1-installer-linux-x86_64.sh # Install TensorRT-7 COPY TensorRT-7.0.0.11.Ubuntu-18.04.x86_64-gnu.cuda-10.0.cudnn7.6.tar.gz ${work_dir} RUN tar -xvzf TensorRT-7.0.0.11.Ubuntu-18.04.x86_64-gnu.cuda-10.0.cudnn7.6.tar.gz && \ rm TensorRT-7.0.0.11.Ubuntu-18.04.x86_64-gnu.cuda-10.0.cudnn7.6.tar.gz # Setting environment variables ENV TRT_RELEASE=${work_dir}/TensorRT-7.0.0.11 ENV PATH=/usr/local/cuda-10.0/bin:$TRT_RELEASE:$TRT_RELEASE/bin:$PATH \ LD_LIBRARY_PATH=/usr/local/cuda-10.0/lib64:$TRT_RELEASE/lib:$LD_LIBRARY_PATH \ TF_CUDA_VERSION=10.0 \ TF_CUDNN_VERSION=7 \ TENSORRT_INSTALL_PATH=$TRT_RELEASE \ TF_TENSORRT_VERSION=7Create_DockerImage$ docker build --tag tensorrt .Check_DockerImage_generation_status$ docker images REPOSITORY TAG IMAGE ID CREATED SIZE tensorrt latest cb6f0fc656d1 17 seconds ago 9.04GBStart_Docker_container$ docker run \ --gpus all \ --name tensorrt \ -it \ --privileged \ -p 8888:8888 \ tensorrt \ /bin/bashCUDA_and_cuDNN_version_check# nvcc -V nvcc: NVIDIA (R) Cuda compiler driver Copyright (c) 2005-2018 NVIDIA Corporation Built on Sat_Aug_25_21:08:01_CDT_2018 Cuda compilation tools, release 10.0, V10.0.130 # cat /usr/include/cudnn.h | grep '#define' #define CUDNN_MAJOR 7 #define CUDNN_MINOR 6 #define CUDNN_PATCHLEVEL 5 # nvidia-smi +-----------------------------------------------------------------------------+ | NVIDIA-SMI 440.59 Driver Version: 440.59 CUDA Version: 10.2 | |-------------------------------+----------------------+----------------------+ | GPU Name Persistence-M| Bus-Id Disp.A | Volatile Uncorr. ECC | | Fan Temp Perf Pwr:Usage/Cap| Memory-Usage | GPU-Util Compute M. | |===============================+======================+======================| | 0 GeForce GTX 107... Off | 00000000:01:00.0 Off | N/A | | N/A 60C P5 11W / N/A | 410MiB / 8119MiB | 0% Default | +-------------------------------+----------------------+----------------------+ +-----------------------------------------------------------------------------+ | Processes: GPU Memory | | GPU PID Type Process name Usage | |=============================================================================| +-----------------------------------------------------------------------------+ # bazel version Extracting Bazel installation... WARNING: --batch mode is deprecated. Please instead explicitly shut down your Bazel server using the command "bazel shutdown". Build label: 0.29.1 Build target: bazel-out/k8-opt/bin/src/main/java/com/google/devtools/build/lib/bazel/BazelServer_deploy.jar Build time: Tue Sep 10 13:44:39 2019 (1568123079) Build timestamp: 1568123079 Build timestamp as int: 1568123079Check_folder_hierarchy# echo $PWD /tensorrt # ls -l total 12 drwxr-xr-x 10 root root 4096 Dec 17 02:30 TensorRT-7.0.0.11 drwxr-xr-x 7 root root 4096 Feb 22 16:16 tensorflow drwxr-xr-x 8 root root 4096 Feb 22 16:16 tf_trt_modelsInitial_configuration_of_Tensorflow_v2.1.0# cd tensorflow # ./configure Extracting Bazel installation... WARNING: --batch mode is deprecated. Please instead explicitly shut down your Bazel server using the command "bazel shutdown". You have bazel 0.29.1 installed. Please specify the location of python. [Default is /usr/bin/python]: /usr/bin/python3 Found possible Python library paths: /usr/lib/python3/dist-packages /usr/local/lib/python3.6/dist-packages Please input the desired Python library path to use. Default is [/usr/lib/python3/dist-packages] /usr/local/lib/python3.6/dist-packages Do you wish to build TensorFlow with XLA JIT support? [Y/n]: n No XLA JIT support will be enabled for TensorFlow. Do you wish to build TensorFlow with OpenCL SYCL support? [y/N]: n No OpenCL SYCL support will be enabled for TensorFlow. Do you wish to build TensorFlow with ROCm support? [y/N]: n No ROCm support will be enabled for TensorFlow. Do you wish to build TensorFlow with CUDA support? [y/N]: y CUDA support will be enabled for TensorFlow. Do you wish to build TensorFlow with TensorRT support? [y/N]: y TensorRT support will be enabled for TensorFlow. Found CUDA 10.0 in: /usr/local/cuda-10.0/lib64 /usr/local/cuda-10.0/include Found cuDNN 7 in: /usr/lib/x86_64-linux-gnu /usr/include Found TensorRT 7 in: /tensorrt/TensorRT-7.0.0.11/lib /tensorrt/TensorRT-7.0.0.11/include Please specify a list of comma-separated CUDA compute capabilities you want to build with. You can find the compute capability of your device at: https://developer.nvidia.com/cuda-gpus. Please note that each additional compute capability significantly increases your build time and binary size, and that TensorFlow only supports compute capabilities >= 3.5 [Default is: 3.5,7.0]: 6.1 Do you want to use clang as CUDA compiler? [y/N]: n nvcc will be used as CUDA compiler. Please specify which gcc should be used by nvcc as the host compiler. [Default is /usr/bin/gcc]: Please specify optimization flags to use during compilation when bazel option "--config=opt" is specified [Default is -march=native -Wno-sign-compare]: Would you like to interactively configure ./WORKSPACE for Android builds? [y/N]: n Not configuring the WORKSPACE for Android builds. Preconfigured Bazel build configs. You can use any of the below by adding "--config=<>" to your build command. See .bazelrc for more details. --config=mkl # Build with MKL support. --config=monolithic # Config for mostly static monolithic build. --config=ngraph # Build with Intel nGraph support. --config=numa # Build with NUMA support. --config=dynamic_kernels # (Experimental) Build kernels into separate shared objects. --config=v2 # Build TensorFlow 2.x instead of 1.x. Preconfigured Bazel build configs to DISABLE default on features: --config=noaws # Disable AWS S3 filesystem support. --config=nogcp # Disable GCP support. --config=nohdfs # Disable HDFS support. --config=nonccl # Disable NVIDIA NCCL support. Configuration finishedBuild with 16GB of RAM and 8 cores. You need to adjust according to the resources of your PC environment. Calculate assuming that about 2GB of RAM is consumed for each core.
Build_Tensorflow_v2.1.0# bazel build \ --config=opt \ --config=cuda \ --config=noaws \ --config=nohdfs \ --config=nonccl \ --config=v1 \ --local_resources=16384.0,8.0,1.0 \ --host_force_python=PY3 \ --noincompatible_do_not_split_linking_cmdline \ //tensorflow/tools/pip_package:build_pip_packageBuild_wheel# ./bazel-bin/tensorflow/tools/pip_package/build_pip_package /tmp/tensorflow_pkg Sun Feb 23 11:13:32 UTC 2020 : === Preparing sources in dir: /tmp/tmp.2tVlFrnLCQ /tensorrt/tensorflow /tensorrt/tensorflow /tensorrt/tensorflow /tmp/tmp.2tVlFrnLCQ/tensorflow/include /tensorrt/tensorflow /tensorrt/tensorflow Sun Feb 23 11:13:45 UTC 2020 : === Building wheel warning: no files found matching 'README' warning: no files found matching '*.pyd' under directory '*' warning: no files found matching '*.pd' under directory '*' warning: no files found matching '*.dylib' under directory '*' warning: no files found matching '*.dll' under directory '*' warning: no files found matching '*.lib' under directory '*' warning: no files found matching '*.csv' under directory '*' warning: no files found matching '*.h' under directory 'tensorflow_core/include/tensorflow' warning: no files found matching '*' under directory 'tensorflow_core/include/third_party' Sun Feb 23 11:14:06 UTC 2020 : === Output wheel file is in: /tmp/tensorflow_pkg # cp /tmp/tensorflow_pkg/tensorflow-2.1.0-cp36-cp36m-linux_x86_64.whl /tensorrt # cd .. # ls -l total 179920 drwxr-xr-x 10 root root 4096 Dec 17 02:30 TensorRT-7.0.0.11 -rwxr-xr-x 1 root root 43791980 Sep 10 13:57 bazel-0.29.1-installer-linux-x86_64.sh drwxr-xr-x 1 root root 4096 Feb 23 06:43 tensorflow -rw-r--r-- 1 root root 140419710 Feb 23 11:15 tensorflow-2.1.0-cp36-cp36m-linux_x86_64.whl drwxr-xr-x 8 root root 4096 Feb 23 06:09 tf_trt_modelsInstall_tensorflow_v2.1.0_v1-API_with_TensorRT_CUDA10.0_cuDNN7.6.5# pip3 uninstall tensorflow-gpu tensorflow # pip3 install tensorflow-2.1.0-cp36-cp36m-linux_x86_64.whlInstall_TF-TRT# cd tf_trt_models # ./install.sh python3Import_test# python3 Python 3.6.9 (default, Nov 7 2019, 10:44:02) [GCC 8.3.0] on linux Type "help", "copyright", "credits" or "license" for more information. >>> import tensorflow as tf 2020-02-23 12:01:46.274803: I tensorflow/stream_executor/platform/default/dso_loader.cc:44] Successfully opened dynamic library libcudart.so.10.0 2020-02-23 12:01:46.768715: I tensorflow/stream_executor/platform/default/dso_loader.cc:44] Successfully opened dynamic library libnvinfer.so.7 2020-02-23 12:01:46.769356: I tensorflow/stream_executor/platform/default/dso_loader.cc:44] Successfully opened dynamic library libnvinfer_plugin.so.7 >>> from tensorflow.python.client import device_lib >>> device_lib.list_local_devices() 2020-02-23 12:05:28.927561: I tensorflow/stream_executor/platform/default/dso_loader.cc:44] Successfully opened dynamic library libcuda.so.1 2020-02-23 12:05:28.987702: I tensorflow/stream_executor/cuda/cuda_gpu_executor.cc:981] successful NUMA node read from SysFS had negative value (-1), but there must be at least one NUMA node, so returning NUMA node zero 2020-02-23 12:05:28.988503: I tensorflow/core/common_runtime/gpu/gpu_device.cc:1555] Found device 0 with properties: pciBusID: 0000:01:00.0 name: GeForce GTX 1070 with Max-Q Design computeCapability: 6.1 coreClock: 1.2655GHz coreCount: 16 deviceMemorySize: 7.93GiB deviceMemoryBandwidth: 238.66GiB/s 2020-02-23 12:05:28.988540: I tensorflow/stream_executor/platform/default/dso_loader.cc:44] Successfully opened dynamic library libcudart.so.10.0 2020-02-23 12:05:28.988579: I tensorflow/stream_executor/platform/default/dso_loader.cc:44] Successfully opened dynamic library libcublas.so.10.0 2020-02-23 12:05:29.006807: I tensorflow/stream_executor/platform/default/dso_loader.cc:44] Successfully opened dynamic library libcufft.so.10.0 2020-02-23 12:05:29.013005: I tensorflow/stream_executor/platform/default/dso_loader.cc:44] Successfully opened dynamic library libcurand.so.10.0 2020-02-23 12:05:29.058509: I tensorflow/stream_executor/platform/default/dso_loader.cc:44] Successfully opened dynamic library libcusolver.so.10.0 2020-02-23 12:05:29.087138: I tensorflow/stream_executor/platform/default/dso_loader.cc:44] Successfully opened dynamic library libcusparse.so.10.0 2020-02-23 12:05:29.087290: I tensorflow/stream_executor/platform/default/dso_loader.cc:44] Successfully opened dynamic library libcudnn.so.7 2020-02-23 12:05:29.087578: I tensorflow/stream_executor/cuda/cuda_gpu_executor.cc:981] successful NUMA node read from SysFS had negative value (-1), but there must be at least one NUMA node, so returning NUMA node zero 2020-02-23 12:05:29.090019: I tensorflow/stream_executor/cuda/cuda_gpu_executor.cc:981] successful NUMA node read from SysFS had negative value (-1), but there must be at least one NUMA node, so returning NUMA node zero 2020-02-23 12:05:29.091523: I tensorflow/core/common_runtime/gpu/gpu_device.cc:1697] Adding visible gpu devices: 0 2020-02-23 12:05:29.091629: I tensorflow/stream_executor/platform/default/dso_loader.cc:44] Successfully opened dynamic library libcudart.so.10.0 2020-02-23 12:05:30.075656: I tensorflow/core/common_runtime/gpu/gpu_device.cc:1096] Device interconnect StreamExecutor with strength 1 edge matrix: 2020-02-23 12:05:30.075707: I tensorflow/core/common_runtime/gpu/gpu_device.cc:1102] 0 2020-02-23 12:05:30.075740: I tensorflow/core/common_runtime/gpu/gpu_device.cc:1115] 0: N 2020-02-23 12:05:30.075938: I tensorflow/stream_executor/cuda/cuda_gpu_executor.cc:981] successful NUMA node read from SysFS had negative value (-1), but there must be at least one NUMA node, so returning NUMA node zero 2020-02-23 12:05:30.076505: I tensorflow/stream_executor/cuda/cuda_gpu_executor.cc:981] successful NUMA node read from SysFS had negative value (-1), but there must be at least one NUMA node, so returning NUMA node zero 2020-02-23 12:05:30.077038: I tensorflow/stream_executor/cuda/cuda_gpu_executor.cc:981] successful NUMA node read from SysFS had negative value (-1), but there must be at least one NUMA node, so returning NUMA node zero 2020-02-23 12:05:30.077521: I tensorflow/core/common_runtime/gpu/gpu_device.cc:1241] Created TensorFlow device (/device:GPU:0 with 7225 MB memory) -> physical GPU (device: 0, name: GeForce GTX 1070 with Max-Q Design, pci bus id: 0000:01:00.0, compute capability: 6.1) [name: "/device:CPU:0" device_type: "CPU" memory_limit: 268435456 locality { } incarnation: 11937878305894780308 , name: "/device:GPU:0" device_type: "GPU" memory_limit: 7576322048 locality { bus_id: 1 links { } } incarnation: 7297894123203666970 physical_device_desc: "device: 0, name: GeForce GTX 1070 with Max-Q Design, pci bus id: 0000:01:00.0, compute capability: 6.1" ] >>>3. Appendix
3-1. Commit container image
Escape from Docker Container.
Ctrl + P
Ctrl + QCommit_container_image$ docker commit tensorrt tensorrt3-2. Extract_wheel_from_Docker_container
Extract_wheel_from_Docker_container$ docker cp cb6f0fc656d1:/tensorrt/tensorflow-2.1.0-cp36-cp36m-linux_x86_64.whl .3-3. Download Pre-build wheel
Download_Pre-build_wheel$ curl -sc /tmp/cookie "https://drive.google.com/uc?export=download&id=10uFrl9X0evjKI8rH7cMfNIL5K0-iOnNU" > /dev/null $ CODE="$(awk '/_warning_/ {print $NF}' /tmp/cookie)" $ curl -Lb /tmp/cookie "https://drive.google.com/uc?export=download&confirm=${CODE}&id=10uFrl9X0evjKI8rH7cMfNIL5K0-iOnNU" -o tensorflow-2.1.0-cp36-cp36m-linux_x86_64.whl4. Reference articles
4-1. Various
- https://github.com/NVIDIA/TensorRT
- https://github.com/NobuoTsukamoto/tf_trt_models
- https://docs.nvidia.com/deeplearning/frameworks/tf-trt-user-guide/index.html
- https://www.google.com/search?q=NvInferVersion.h+-www.sejuku.net&oq=NvInferVersion.h&aqs=chrome..69i57.1147j0j8&sourceid=chrome&ie=UTF-8
- https://hub.docker.com/layers/nvidia/cuda/10.0-cudnn7-devel-ubuntu18.04/images/sha256-e277b9eef79d6995b10d07e30228daa9e7d42f49bcfc29d512c1534b42d91841?context=explore
- https://qiita.com/ksasaki/items/b20a785e1a0f610efa08
- https://github.com/tensorflow/tensorrt
- Jetson NanoでTF-TRTを試す(Image Classification) - nb.oの日記
- Jetson NanoでTF-TRTを試す(Object detection) - nb.oの日記
4-2. CUDA/cuDNN/TensorRT Header files and libraries search path logic
- https://github.com/tensorflow/tensorflow/blob/v2.1.0/configure.py
- https://github.com/tensorflow/tensorflow/blob/v2.1.0/third_party/gpus/find_cuda_config.py
4-3. Check GPU Compute Capability
- 投稿日:2020-02-23T20:43:19+09:00
実務未経験エンジニアはDockerを最低限勉強しておく。という提案
こんにちは。
おかげさまで先日めでたく駆け出しエンジニアとしてのスタートを切りました。
就職するまでの経緯については
【実体験をもとに】30歳未経験から独学4ヶ月でバックエンドエンジニアとしてWeb系自社開発企業へ転職するまでのロードマップ
こちらに記載してます。さてさてそんな私が出勤初日から「勉強しておいてよかった〜」と思ったスキルがありまして、それがDockerです。
内容をYouTube動画でも投稿してるので是非見ください
これから駆け出しプログラマーとしての転職を目指す方々は是非学んでおいたほうが良いと感じたので、私自身の振り返りも含め紹介します。
併せて、「これちゃんと勉強しておけばよかった…」と後悔している技術も紹介します。
なぜDcokerを勉強しておいて良かったか
スタートで躓かなかった
入社初日の挨拶等が終わり、帰宅したあと会社からGitHubの招待がきました。
会社にジョインして最初にやることは(挨拶とか説明を抜きにすると)開発環境の構築というのはきっとどの企業でも同じでしょう。
昨今のモダンなWeb企業ではDockerでの環境構築が主流なので、例に漏れず招待されたGitHubの
READ MEにもDockerでの構築を行う旨が記載されていました。入社して最初に打ったコマンドが
Git clone、
そして次がdocker-compose buildですここでもし私がDockerについて学んでなければ、開発環境の構築をするための勉強からスタートすることになったでしょう。
「仕事をスタートすることができない」という状況は評価者からのイメージも良くないですし、自分自身のメンタルにもかなりのダメージだと思います(汗)
どんな勉強をしておけばいいのか
Dockerはただ構築に使うだけなら簡単なものです。
コマンドを打つだけですからね。
しかしDockerの概念や構造をそれなりに学んでおかないと後々に困ることがあります。いざエラーが発生した時にlogの確認ができなかったり。
DBの中身を確認したくてもどのコンテナにどう入れば良いか分からなかったり。仕事をする上で必ず触れるポイントなので、入社前に学習しましょう。
とりあえず入社前は以下のような内容を学んでおけ良いのではないでしょうか?
- コンテナの概念
- Dockerfileの内容
- docker-compose.ymlの内容
- docker-composeコマンドの使い方
(build.up.down.runをとりあえず)
- dockerコンテナへの入り方(docker exec -i -t コンテナID bash)ハードルが高く感じがちですが、ネット上に情報がたくさん落ちてますので参考にすれば初学者でもちゃんと扱えるようになります。
というか、Dockerfileやdocker-compose.ymlはテンプレがたくさん落ちてるのでとにかく構築してポートフォリオに導入してみるのが早道でしょう。コンテナの概念については文章で見るより説明を受けたほうが早い。
ネット上には図を使って説明している記事など多くあり情報ソースに事欠かないDockerですが、なかでもYoutubeで解説動画を出しているベテランエンジニアさんがいます。
私がヘビーローテションしていたオススメのYouTuberさんを紹介します。くろかわこうへい さんの「目指せコンテナマスター!」シリーズ
今から追いつくDocker講座!AWS ECSとFargateで目指せコンテナマスター!〜シリーズ1回目〜
※くろかわさんご本人の許可を得て掲載しています。とても丁寧に説明してくださっているので、わざわざ他で調べる必要がないくらいです(๑❛౪❛๑)
まずは前半のコンテナについての概要をサックリと理解すると良いのではないでしょうか。他にもAWSについての解説を出していらっしゃるので必見です。
個人的にはくろかわさんの喋り方がクセになるんですよね〜w
SQL
ついでにSQLも勉強しておいてよかったな〜と思ったので紹介します。
入社してたった数日間ですが、一日中DBを触ってた日もありました。
難しいことができる必要は無いですが、基本的な動作は行えるようにしておいて良かったと思います。基本的な動作って何?って言うと、以下のサイトに書いてある内容くらいは把握していれば良いのではないでしょうか。
https://yukun.info/category/sql/SQLクエリを打って検索や追加を行えるって感じですね。
※ちなみに私はmigrationエラーするので、入社時もschema_migrationsを見に行ったりダブってるmigrationファイルをinsertしたりしてました。
勉強しておけば良かったと後悔したこと
rails consoleの使い方
未経験エンジニアがポートフォリオを作る過程でデバッグ作業をしっかり行なう。ということは少ないのではないでしょうか?
既存の商材にもバグは必ず発生しますし、その際には他人が作ったコードが実際にどう動作しているのか知らなければ直せません。
私はポートフォリオ作成において
rails consoleをしっかりと使用していなかったので、メソッドの動作確認がスムーズにできませんでした。リファクタリング
環境構築が終わったら、既存のソースコードの内容を把握する作業が必要だと思います。
恥ずかしながら僕はまともにリファクタリングの勉強をしていなかったので、まさにちんぷんかんぷんでした…
scopeで式をメソッドとして定義したりviewを2ファイルに分割するなど、ちゃんと勉強や活用をしておかないとコードの把握に時間がかかりメンタルが・・・。
mailer
「開発をしていれば100%mailerを使う機会がある。」ってなんで思いつかなかったんだろう…。
と後悔する限りです。未経験者のポートフォリオにはユーザー登録時にメールが届くくらいの機能は付けておくべきでしょう!
終わり
入社して1週間になりますが、正直「何もできなかった・・・」というのが感想です。
転職前は転職を有利にするスキルを身につけることに頭がいっぱいでしたが、実践に役立つスキルに対しアンテナを張って学ぶことも未経験エンジニアには大切なことだなと思いました。

- 投稿日:2020-02-23T20:26:41+09:00
Laravelでミニブログを作ろう #3
前回:https://qiita.com/customaddone/items/7563a3252e4debc05f1a
GitHub:https://github.com/customaddone/larablog今回はdockerでterraformのコンテナを立てます
Terraform概要
Terraformとは
コードによりインフラの構築、変更を行うツール
AWS,GCPなどのクラウド上のインフラに手を加えることができるTerraformのメリット
GUIを通さずインフラに変更を加えられる(ブラウザ上からの操作によるミスを防げる)
一度書いたコードを使い回すことができるDockerfile
まずdockerディレクトリ直下にTerraform用のディレクトリを追加して下さい
docker/terraform/DockerfileFROM alpine:3.10 # 最新バージョン ARG terraform_version="0.12.21" # Terraformインストール用のコマンドを使えるようにwget unzip curlをインストール # Terraformをインストールして解凍する # ディレクトリを作成する RUN apk update --no-cache \ && apk add --no-cache \ wget \ unzip \ curl \ && wget https://releases.hashicorp.com/terraform/${terraform_version}/terraform_${terraform_version}_linux_amd64.zip \ && unzip ./terraform_${terraform_version}_linux_amd64.zip -d /usr/local/bin/ \ && rm -rf ./terraform_${terraform_version}_linux_amd64.zip \ && mkdir terraform WORKDIR /terraform # いちいちterraformコマンドを打つのが面倒な場合 # CMD ["terraform"]docker-compose
docker-compose.yamlterraform: build: context: . dockerfile: docker/terraform/Dockerfile volumes: - ./terraform:/terraform/ environment: - AWS_ACCESS_KEY_ID=${AWS_ACCESS_KEY_ID} - AWS_SECRET_ACCESS_KEY=${AWS_SECRET_ACCESS_KEY} - AWS_REGION=${AWS_DEFAULT_REGION} tty: trueenvironmentでAWS_ACCESS_KEY_ID、AWS_SECRET_ACCESS_KEYを指定しますが
、直に書いたままgit pushするとGitHub上に反映され、キーの情報が全世界に向けて公開される(最悪赤の他人にキーを悪用されてMAX課金されてしまう)ので、環境変数を用います.envAWS_ACCESS_KEY_ID=xxxxxxxxxxxxxxx AWS_SECRET_ACCESS_KEY=xxxxxxxxxxxxxxxxx AWS_DEFAULT_REGION=xxxxxxxxxxxxxxxdocker-compose.yamlはデフォルトで.envの情報を読み込むので、.envに変数の値(キーの情報)を書くと、docker-compose.yamlでその値を使えます
.envはgitignoreに書いてあるので、git pushしてもGitHub上に反映されませんこれでdocker-compose up -d した後、docker-compose exec terraform shしてterraformコンテナの中に入ることでterraformを利用できます
Terraformの使用
試しにVPCを立ててみましょう
larablog ├── terraform ├── vpc # 追加terraform/vpc/aws_vpc.tf# ファイルの末尾にtfをつけてください # VPCは他のネットワークから論理的に切り離されたネットワークです # EC2などのリソースを配置します resource "aws_vpc" "example" { #vpcのipv4のアドレス範囲を設定します # 10.0.0.0〜10.0.255.255まで使えるよ cidr_block = "10.0.0.0/16" # AWSのDNSサーバーによる名前解決を有効にする # route53が使えるようになる enable_dns_support = true enable_dns_hostnames = true # タグをつけてコンソール上でわかりやすく tags = { Name = "larablog" } }vpcディレクトリに移動してterraform init, terraform applyするとvpcが作成されます。
が、作成と同時にvpcディレクトリにterraform.tfstate等のファイルができます(どでかい)。これらはgitignoreに書き込んでgit管理しないようしましょう.gitignore... # Local .terraform directories /terraform/**/.terraform/* # 追加 # .tfstate files /terraform/**/*.tfstate # 追加 /terraform/**/*.tfstate.* # 追加 ...これでterraform init, terraform applyコマンドを打つとvpcが立ち上がります。AWSのコンソールで確認してみてください
- 投稿日:2020-02-23T17:08:15+09:00
階層構造をもつTODOリストの作り方
はじめに
以前、階層構造をもつTODOリストをWebアプリケーションとして実装したので、その知見を共有します。
実際に作成したTODOリスト(OSSとして公開)
機能一覧
- メモの新規作成
- メモの編集(編集前の内容がテキストボックスに入力されている)
- メモの削除
- メモの追加(メモAの下にメモBを紐付け)
- メモを一つ上の階層に移動
- メモの一括削除
- 新規作成や編集時のテキストボックスを、ボックス外の任意の場所をクリックすることで非表示(UX)
- MemoモードとTaskモードの切り替え
- (Taskモードのみ) メモ横のチェックボックスにチェックを入れると、非同期で打ち消し線を表示
解説
技術スタックは、Docker Compose、Java、PostgreSQLがメインです。
内部では基本的にCRUDしか行っておらず、DB側で再帰的なデータを保存しています。
Docker Compose
portsを定義して、ホストとゲストのポートをマッピングしています。サービス名
tomcatとpostgresでお互い接続は可能なはずですが、ipv4も固定していました(理由は失念してしまいました)。version: "3.7" services: tomcat: # When building from source code, uncomment following build # and remove local image. e.g.) docker rmi resotto/tomcat:1.0 # build: ap/ image: resotto/tomcat:1.0 container_name: tomcat tty: true ports: - "8888:8080" networks: app_net: ipv4_address: 172.16.1.3 postgres: # When building from source code, uncomment following build # and remove local image. e.g.) docker rmi resotto/postgres:1.0 # build: db/ image: resotto/postgres:1.0 container_name: postgres tty: true networks: app_net: ipv4_address: 172.16.1.2 networks: app_net: ipam: driver: default config: - subnet: "172.16.1.0/24"DB
使い捨てアプリのため、
postgresサービスのDockerfileから呼び出すstartup.sh内にスキーマを定義していました。要素テーブルとその関連テーブルの2つを定義しました。
要素テーブルは(恥ずかしいのですが)テーブル名が残念なのと、
typeカラムは数字で種類の情報を保持しているため、アンチパターンです。
element_typesテーブルを定義し、そちらへの外部キー制約をつけるのが良いです。関連テーブルは、要素テーブルの主キー
idの親と子で複合主キーになっています。#!/bin/bash service postgresql-9.6 start psql -U postgres -c "create role uranus superuser login" createdb -U postgres -O uranus uranusdb psql -U uranus uranusdb -c \ "create table mst_element ( \ id serial PRIMARY KEY, \ type integer, \ title text, \ is_checked boolean, \ is_root boolean, \ create_date date, \ update_date date \ );" psql -U uranus uranusdb -c \ "create table mst_relation ( \ parent_id integer, \ child_id integer, \ PRIMARY KEY (parent_id, child_id) \ );" /bin/bashフロントエンド
(画面の実装は採用する技術次第ですが)再帰的に表示する部分を独立して実装しました。
<!-- index.jsp -->
<!DOCTYPE html>
    <head>
        <meta http-equiv="Content-Type" content="text/html; charset=UTF-8" />
        <title>Uranus</title>
        <link rel="stylesheet" href="${f:url('/css/index.css')}">
        <noscript>
            <link rel="stylesheet" href="${f:url('/css/noscript.css')}">
        </noscript>
    </head>
    <body>
        <!-- header -->
        <h1>
            <c:choose>
                <c:when test="${mode eq 0}">
                    [ Memo ] /
                    <s:link href="task">Task</s:link>
                </c:when>
                <c:otherwise>
                    <s:link href="memo">Memo</s:link>
                    / [ Task ]
                </c:otherwise>
            </c:choose>
        </h1>
        <p>
            <!-- create button -->
            <input type="button" onclick="toggleCreateMode()" value="new" class="btn createButton">
            <!-- clear section -->
            <div id="clearButton">
                <s:form>
                    <input type="submit" name="clear" value="clear" class="btn">
                    <input type="hidden" name="mode" value="${mode}">
                </s:form>
            </div>
        </p>
        <!-- create block -->
        <div id="createBlock">
            <s:form>
                <textarea name="inputText" rows="3" cols="30"></textarea>
                <input type="submit" name="create" value="create" class="btn">
                <input type="hidden" name="mode" value="${mode}">
            </s:form>
        </div>
        <!-- main contents -->
        <ul>
            <c:forEach var="elm" items="${list}" varStatus="parentStatus">
                <c:if test="${mode eq 1}">
                    <c:if test="${elm.updateDate.toString() != date}">
                        <p>
                            <h2>
                                ${elm.updateDate}
                            </h2>
                            <c:set var="date" value="${elm.updateDate.toString()}" scope="request"></c:set>
                        </p>
                    </c:if>
                </c:if>
                <c:set var="child" value="${elm}" scope="request"></c:set>
                <c:import url="element.jsp"></c:import>
                <br>
            </c:forEach>
        </ul>
        <script type="text/javascript" src="${f:url('/js/index.js')}"></script>
    </body>
</html>
<!-- element.jsp --> <li> <c:if test="${mode eq 1}"> <input type="checkbox" id="checkbox_${child.id}" onclick="toggleCheckbox(this)" ${child.isChecked ? "checked" : ""}> </c:if> <p> <c:if test="${child.isChecked}"><del></c:if> ${child.title} <c:if test="${child.isChecked}"></del></c:if> </p> <p> <input type="button" onclick="toggleAddMode(this)" value="+" class="btn addButton"> </p> <p> <input type="button" onclick="toggleEditMode(this)" value="edit" class="btn editButton"> </p> <c:if test="${child.isRoot == false}"> <s:form> <input type="submit" name="up" value="↑" class="btn"> <input type="hidden" name="targetId" value="${child.id}"> <input type="hidden" name="mode" value="${mode}"> </s:form> </c:if> <s:form> <input type="submit" name="remove" value="-" class="btn"> <input type="hidden" name="targetId" value="${child.id}"> <input type="hidden" name="mode" value="${mode}"> </s:form> <div class="addBlock"> <s:form> <textarea name="addText" rows="3" cols="30"></textarea> <input type="submit" name="add" value="add" class="btn"> <input type="hidden" name="targetId" value="${child.id}"> <input type="hidden" name="mode" value="${mode}"> </s:form> </div> <div class="editBlock"> <s:form> <textarea name="editText" rows="3" cols="30">${child.title}</textarea> <input type="submit" name="update" value="update" class="btn"> <input type="hidden" name="targetId" value="${child.id}"> <input type="hidden" name="mode" value="${mode}"> </s:form> </div> <ul> <c:if test="${child.children != null}"> <c:forEach var="child" items="${child.children}" varStatus="childStatus"> <c:set var="child" value="${child}" scope="request"></c:set> <c:import url="element.jsp"></c:import> </c:forEach> </c:if> </ul> </li>UIUX
(変数を定数っぽく書いたりと迷走してますが)非同期で打ち消し線を入れたり、他の領域をクリックすることによる非表示を実装しています。
// index.js
let createMode = false;
let addMode = false;
let editMode = false;

const toggleCreateMode = () => {
    createMode = !createMode;
    const CREATE_BLOCK = document.getElementById("createBlock");
    if (createMode) {
        CREATE_BLOCK.style.display = "block";
    } else {
        CREATE_BLOCK.style.display = "none";
    }
}

const toggleAddMode = (elm) => {
    const ID = elm.id.split("_")[1];
    addMode = !addMode;
    const ADD_BLOCK = document.getElementById("addBlock_" + ID);
    if (addMode) {
        ADD_BLOCK.style.display = "block";
    } else {
        ADD_BLOCK.style.display = "none";
    }
};

const toggleEditMode = (elm) => {
    const ID = elm.id.split("_")[1];
    editMode = !editMode;
    const EDIT_BLOCK = document.getElementById("editBlock_" + ID);
    if (editMode) {
        EDIT_BLOCK.style.display = "block";
    } else {
        EDIT_BLOCK.style.display = "none";
    }
};

const toggleCheckbox = (elm) => {
    const XHR = new XMLHttpRequest();
    const FD = new FormData();
    const ID = elm.id.split("_")[1];
    const URL = "http://" + location.host
        + location.pathname.match(/\/.+\//) + "toggleCheck";
    FD.append("targetId", ID);
    XHR.open("POST", URL);
    XHR.send(FD);
}

const setEventListener = (selector) => {
    const ELM = document.getElementById(selector);
    if (selector == "createBlock") {
        document.addEventListener('click', function(e) {
            if (!e.target.closest(".createButton")
                    && !e.target.closest("#createBlock")) {
                createMode = false;
                ELM.style.display = "none";
            }
        }, false)
        return;
    }
    const CLASSNAME = selector.split("_")[0];
    if (CLASSNAME == "addBlock") {
        document.addEventListener('click', function(e) {
            if (!e.target.closest(".addButton")
                    && !e.target.closest("#" + selector)) {
                addMode = false;
                ELM.style.display = "none";
            }
        }, false)
    } else {
        document.addEventListener('click', function(e) {
            if (!e.target.closest(".editButton")
                    && !e.target.closest("#" + selector)) {
                editMode = false;
                ELM.style.display = "none";
            }
        }, false)
    }
}

const setId = (str, settingListener) => {
    const LIST = document.getElementsByClassName(str);
    for (let i = 0; i < LIST.length; i++) {
        const ID = str + "_" + i;
        LIST[i].setAttribute("id", ID);
        if (settingListener) {
            setEventListener(ID);
        }
    }
}

const setIndex = () => {
    setEventListener("createBlock");
    setId("addButton", false);
    setId("addBlock", true);
    setId("editButton", false);
    setId("editBlock", true);
}

window.onload = function() {
    setIndex();
}
バックエンド
(Webフレームワークにもよりますが)リクエストを受け取って必要な(ロジック)サービスを呼び出して処理を行っていました。
要素の入れ替えロジックの実装が大変でした。
package com.uranus.service;

import java.time.LocalDate;
import java.util.ArrayList;
import java.util.HashMap;
import java.util.List;
import java.util.Map;

import javax.annotation.Resource;

import org.apache.log4j.Logger;
import org.dbflute.cbean.result.ListResultBean;
import org.dbflute.exception.EntityAlreadyDeletedException;
import org.dbflute.optional.OptionalEntity;

import com.uranus.dbflute.exbhv.MstElementBhv;
import com.uranus.dbflute.exbhv.MstRelationBhv;
import com.uranus.dbflute.exentity.MstElement;
import com.uranus.dbflute.exentity.MstRelation;
import com.uranus.dto.ElementDto;
import com.uranus.dxo.ElementDxo;
import com.uranus.util.MstElementDateComparator;
import com.uranus.util.MstElementIdComparator;
import com.uranus.util.StringUtil;
import com.uranus.util.Type;

public class IndexService {

    @Resource
    protected MstElementBhv mstElementBhv;

    @Resource
    protected MstRelationBhv mstRelationBhv;

    /**
     * Parent ElementDto
     */
    private static ElementDto parent;

    /**
     * Log4j logger
     */
    public Logger logger = Logger.getLogger(IndexService.class);

    // -------------------------- public methods --------------------------

    /**
     * Setup ElementDto and return it.
     * @param  text title
     * @return      assembled ElementDto
     */
    public ElementDto assembleElementDto(String text, String mode) {
        ElementDto dto = new ElementDto();
        dto.type = Integer.parseInt(mode);
        dto.title = StringUtil.sanitize(text);
        LocalDate now = LocalDate.now();
        dto.createDate = now;
        dto.updateDate = now;
        return dto;
    }

    /**
     * Get root elements and their children (recursively) from database.
     * @param  type element type
     * @return      contents list if exists, otherwise {@code null}
     */
    public List<ElementDto> getList(int type) {
        List<Integer> rootIdList = getRootElementsId(type);
        if (rootIdList.size() == 0) return null;
        Map<Integer, ElementDto> elmMap = createElementMap(rootIdList);
        ListResultBean<MstRelation> rootRels = getRootRelation(rootIdList);
        rootRels.forEach(rel -> {
            ElementDto parentDto = getParent(elmMap.get(rel.getParentId()));
            setChildren(parentDto, rel.getChildId());
        });
        return createSortedList(elmMap, type);
    }

    /**
     * Create new element.
     * @param dto target ElementDto
     */
    public void createElement(ElementDto dto) {
        insertElement(dto, true);
    }

    /**
     * Add element.
     * @param parentId parent element id
     * @param childDto child ElementDto
     */
    public void addElement(int parentId, ElementDto childDto) {
        MstElement element = insertElement(childDto, false);
        insertRelation(parentId, element.getId());
    }

    /**
     * Update element.
     * @param targetId target element id
     * @param text     element text
     */
    public void updateElementText(int targetId, String text) {
        ElementDto dto = getElementDtoById(targetId);
        dto.title = text;
        dto.updateDate = LocalDate.now();
        MstElement element = ElementDxo.toElementEntity(dto);
        updateElement(element);
    }

    /**
     * Remove element and its relation (recursively) from database.
     * @param id target element id
     */
    public void removeElement(int id) {
        MstElement element = getElementEntityById(id);
        if (element == null) return;
        MstRelation upwardRel = getUpwardRelation(element.getId());
        if (upwardRel != null) deleteRelation(upwardRel);
        removeDownwardContents(element.getId());
    }

    /**
     * Toggle element's isChecked property.
     * @param id target element id
     */
    public void toggleElementCheck(int id) {
        MstElement element = getElementEntityById(id);
        if (element == null) return;
        boolean checked = element.getIsChecked();
        element.setIsChecked(!checked);
        updateElement(element);
    }

    /**
     * Exchange elements relation.
     * @param childId target element id to be promoted
     */
    public void exchangeElements(int childId) {
        if (getElementDtoById(childId).isRoot) return;
        int parentId = getUpwardRelation(childId).getParentId();
        Integer ancestorId = getAncestorId(parentId);
        rearrangeAncestorRelation(ancestorId, parentId, childId);
        ListResultBean<MstRelation> childRels = getRelationByParentId(childId);
        ListResultBean<MstRelation> parentRels = getRelationByParentId(parentId);
        rearrangeChildRelation(parentId, childId, childRels);
        rearrangeParentRelation(parentId, childId, parentRels);
        toggleIsRootProperty(childId, parentId);
    }

    /**
     * Delete all elements and relations with type.
     * @param type contents type
     */
    public void clear(int type) {
        List<Integer> rootElmsIdList = getRootElementsId(type);
        rootElmsIdList.forEach(rootElm -> {
            removeDownwardContents(rootElm);
        });
    }

    // -------------------------- private methods --------------------------

    /**
     * Get ancestor element id.
     * @param  parentId parent element id
     * @return          ancestor element id if exists, otherwise {@code null}
     */
    private Integer getAncestorId(int parentId) {
        MstRelation rel = getUpwardRelation(parentId);
        if (rel != null) return rel.getParentId();
        return null;
    }

    /**
     * Rearrange relation between ancestor element, parent element, and target
     * element.
     * @param ancestorId ancestor element id
     * @param parentId   parent element id
     * @param targetId   target element id to be promoted
     */
    private void rearrangeAncestorRelation(Integer ancestorId, int parentId, int targetId) {
        if (ancestorId != null) {
            deleteRelation(ancestorId, parentId);
            insertRelation(ancestorId, targetId);
        }
    }

    /**
     * Rearrange relation between parent element and target element.
     * @param parentId   parent element id
     * @param targetId   target element id to be promoted
     * @param parentRels parent element's downward relation
     */
    private void rearrangeParentRelation(int parentId, int targetId, ListResultBean<MstRelation> parentRels) {
        removeRelations(parentId, parentRels);
        createRelations(targetId, parentRels);
        insertRelation(targetId, parentId);
    }

    /**
     * Rearrange target element downward relation.
     * @param parentId  parent element id
     * @param targetId  target element id to be promoted
     * @param childRels target element's downward relation
     */
    private void rearrangeChildRelation(int parentId, int targetId, ListResultBean<MstRelation> childRels) {
        if (childRels.size() > 0) {
            removeRelations(targetId, childRels);
            createRelations(parentId, childRels);
        }
    }

    /**
     * Get downward relation by parent id.
     * @param  parentId parent element id
     * @return          relation list
     */
    private ListResultBean<MstRelation> getRelationByParentId(int parentId) {
        ListResultBean<MstRelation> rels = mstRelationBhv.selectList(cb -> {
            cb.query().setParentId_Equal(parentId);
        });
        return rels;
    }

    /**
     * Toggle element is_root property.
     * @param newParentId element id to be promoted
     * @param oldParentId element id to be demoted
     */
    private void toggleIsRootProperty(int newParentId, int oldParentId) {
        MstElement oldParent = getElementEntityById(oldParentId);
        if (oldParent.getIsRoot()) {
            oldParent.setIsRoot(false);
            updateElement(oldParent);
            MstElement newParent = getElementEntityById(newParentId);
            newParent.setIsRoot(true);
            updateElement(newParent);
        }
    }

    /**
     * Create relation with parentId and relation list's childId.
     * @param parentId parent element id
     * @param rels     relation list
     */
    private void createRelations(int parentId, ListResultBean<MstRelation> rels) {
        rels.forEach(rel -> {
            if (parentId != rel.getChildId()) {
                insertRelation(parentId, rel.getChildId());
            }
        });
    }

    /**
     * Remove relation with parentId and relation list's childId.
     * @param parentId
     * @param rels
     */
    private void removeRelations(int parentId, ListResultBean<MstRelation> rels) {
        rels.forEach(rel -> {
            deleteRelation(parentId, rel.getChildId());
        });
    }

    /**
     * Create map from root elements id.
     * @param  rootIdList root elements id
     * @return            map key:element id, value:ElementDto
     */
    private Map<Integer, ElementDto> createElementMap(List<Integer> rootIdList) {
        Map<Integer, ElementDto> elmMap = new HashMap<>();
        ListResultBean<MstElement> rootElms = getRootElement(rootIdList);
        rootElms.forEach(rootElm -> {
            elmMap.put(rootElm.getId(), ElementDxo.toElementDto(rootElm));
        });
        return elmMap;
    }

    /**
     * Create list from map.
     * @param  map  key:id, value:ElementDto
     * @param  type contents type
     * @return      ElementDto list
     */
    private List<ElementDto> createSortedList(Map<Integer, ElementDto> map, int type) {
        List<ElementDto> list = new ArrayList<>(map.values());
        if (type == Type.MEMO.getType()) {
            list.sort(new MstElementIdComparator());
        } else {
            list.sort(new MstElementDateComparator());
        }
        return list;
    }

    /**
     * Get root elements by root elements id.
     * @param  rootIdList root elements id list
     * @return            root elements list
     */
    private ListResultBean<MstElement> getRootElement(List<Integer> rootIdList) {
        ListResultBean<MstElement> rootElms = mstElementBhv.selectList(cb -> {
            cb.query().setId_InScope(rootIdList);
            cb.query().addOrderBy_Id_Asc();
        });
        return rootElms;
    }

    /**
     * Get root relation by root elements id.
     * @param  rootIdList root elements id list
     * @return            root relation list
     */
    private ListResultBean<MstRelation> getRootRelation(List<Integer> rootIdList) {
        ListResultBean<MstRelation> rootRels = mstRelationBhv.selectList(cb -> {
            cb.query().setParentId_InScope(rootIdList);
            cb.query().addOrderBy_ParentId_Asc();
        });
        logger.info("    Root relation list: " + rootRels);
        return rootRels;
    }

    /**
     * Delete downward relation and its element recursively from database.
     * @param parentId parent element id
     */
    private void removeDownwardContents(int parentId) {
        List<MstRelation> downwardRels = getAllRelation(parentId);
        downwardRels.forEach(rel -> {
            removeDownwardContents(rel.getChildId());
            deleteRelation(parentId, rel.getChildId());
        });
        MstElement elm = getElementEntityById(parentId);
        deleteElement(elm);
    }

    /**
     * Update element.
     * @param elm element entity
     */
    private void updateElement(MstElement elm) {
        mstElementBhv.update(elm);
        logger.info("    Element updated: " + elm);
    }

    /**
     * Delete element from database by element entity.
     * @param  elm element entity
     * @return     element entity after deletion.
     */
    private MstElement deleteElement(MstElement elm) {
        mstElementBhv.delete(elm);
        logger.info("    Element deleted: " + elm);
        return elm;
    }

    /**
     * Delete relation from database by parentId and childId.
     * @param  parentId parent element id.
     * @param  childId  child element id.
     * @return          relation entity after deletion.
     */
    private MstRelation deleteRelation(int parentId, int childId) {
        MstRelation rel = new MstRelation();
        rel.setParentId(parentId);
        rel.setChildId(childId);
        return deleteRelation(rel);
    }

    /**
     * Delete relation from database by relation entity.
     * @param  rel relation entity
     * @return     relation entity after deletion.
     */
    private MstRelation deleteRelation(MstRelation rel) {
        try {
            mstRelationBhv.delete(rel);
        } catch (EntityAlreadyDeletedException e) {}
        logger.info("    Relation deleted: " + rel);
        return rel;
    }

    /**
     * Get all relation by id.
     * @param  parentId parent element id
     * @return          relation entity list
     */
    private ListResultBean<MstRelation> getAllRelation(int parentId) {
        ListResultBean<MstRelation> rels = mstRelationBhv.selectList(cb -> {
            cb.query().setParentId_Equal(parentId);
            cb.query().addOrderBy_ChildId_Asc();
        });
        return rels;
    }

    /**
     * Insert Element into database.
     * @param  dto    target element DTO
     * @param  isRoot whether argument DTO is root or not
     * @return        element entity after insertion
     */
    private MstElement insertElement(ElementDto dto, boolean isRoot) {
        MstElement element = ElementDxo.toElementEntity(dto);
        element.setId(null);
        element.setIsRoot(isRoot);
        mstElementBhv.insert(element);
        logger.info("    Element created: " + element);
        return element;
    }

    /**
     * Insert Relation into database.
     * @param  parentId parent element id
     * @param  childId  child element id
     * @return          relation entity after insertion.
     */
    private MstRelation insertRelation(int parentId, int childId) {
        MstRelation relation = new MstRelation();
        relation.setParentId(parentId);
        relation.setChildId(childId);
        mstRelationBhv.insert(relation);
        logger.info("    Relation created: " + relation);
        return relation;
    }

    /**
     * Get element from database by id.
     * @param  id element id
     * @return    ElementDto if entity exists, {@code null} otherwise
     */
    private ElementDto getElementDtoById(int id) {
        OptionalEntity<MstElement> op = mstElementBhv.selectEntity(cb -> {
            cb.query().setId_Equal(id);
        });
        if (op.isPresent()) return ElementDxo.toElementDto(op.get());
        return null;
    }

    /**
     * Get element from database by id.
     * @param  id element id
     * @return    element entity if it exists, otherwise {@code null}
     */
    private MstElement getElementEntityById(int id) {
        OptionalEntity<MstElement> op = mstElementBhv.selectEntity(cb -> {
            cb.query().setId_Equal(id);
        });
        if (op.isPresent()) return op.get();
        return null;
    }

    /**
     * Get relation from database by id.
     * @param  childId child element id
     * @return         relation entity if it exists, {@code null} otherwise
     */
    private MstRelation getUpwardRelation(int childId) {
        OptionalEntity<MstRelation> op = mstRelationBhv.selectEntity(cb -> {
            cb.query().setChildId_Equal(childId);
        });
        if (op.isPresent()) return op.get();
        return null;
    }

    /**
     * If parent has children, set it recursively by id.
     * @param parentDto parent ElementDto
     * @param childId   child element id
     */
    private void setChildren(ElementDto parentDto, int childId) {
        if (parentDto == null) return;
        ElementDto childDto = getElementDtoById(childId);
        if (childDto == null) return;
        // If child also has children, set it recursively
        setChildrenRecursively(childDto, childId);
        parentDto.children.add(childDto);
    }

    /**
     * Get relation with childId and call setChildren if they exist
     * @param childDto child ElementDto
     * @param childId  child element id
     */
    private void setChildrenRecursively(ElementDto childDto, int childId) {
        ListResultBean<MstRelation> rels = mstRelationBhv.selectList(cb -> {
            cb.query().setParentId_Equal(childId);
            cb.query().addOrderBy_ChildId_Asc();
        });
        rels.forEach(rel -> {
            setChildren(childDto, rel.getChildId());
        });
    }

    /**
     * Get root elements from database, and return their id.
     * @param  mode contents mode
     * @return      root elements id list
     */
    private List<Integer> getRootElementsId(int type) {
        ListResultBean<MstElement> elms = getRootElements(type);
        List<Integer> idList = new ArrayList<>();
        elms.forEach(elm -> {
            idList.add(elm.getId());
        });
        logger.info("    Root id list: " + idList);
        return idList;
    }

    /**
     * Get root elements with element type.
     * @param  type element type
     * @return      Element entity list
     */
    private ListResultBean<MstElement> getRootElements(int type) {
        return mstElementBhv.selectList(cb -> {
            cb.query().setIsRoot_Equal(true);
            cb.query().setType_Equal(type);
            cb.query().addOrderBy_Id_Asc();
        });
    }

    /**
     * Return the same ElementDto until argument DTO has different id.
     * @param  dto ElementDto
     * @return     parent if argument DTO has the same id as that of it,
     *                 argument DTO otherwise.
     */
    private ElementDto getParent(ElementDto dto) {
        if (parent != null && dto.id == parent.id.intValue()) return parent;
        parent = dto;
        return parent;
    }
}
所感
使用するテーブルはたったの二つだけですが、一方でアプリケーションロジックの実装がかなり大変でした。
もし同じ仕様を実装するなら
- ドメイン駆動設計(注:完全な好み)
- Compositeパターン
- 閉包テーブル
等を使ってみるといいかもしれません。


- 投稿日:2020-02-23T16:54:41+09:00
Docker-in-dockerでIs the docker daemon running?が出たときの対処法
背景
GitLabCIの勉強を「GitLab実践ガイド(著:北山 晋吾さん)」を使って行っていました。
せっかくだからDockerをDocker Executer上で使用するためにGitLabが推奨するDocker-in-docker(以下dind)を使ってみようと思い試していたところタイトルにあるエラーに遭遇しました。$ docker build . -t ${APP_NAME} Cannot connect to the Docker daemon at tcp://docker:2375. Is the docker daemon running? ERROR: Job failed: exit code 1対処法を調べましたが、日本語の情報はなかったので書き置きします。
GitLab実践ガイド(著:北山 晋吾さん)はこちら。
Kindle Unlimitedの専門書ラインナップが充実してきて嬉しいです。
https://www.amazon.co.jp/dp/B079DL362C/ref=dp-kindle-redirect?_encoding=UTF8&btkr=1環境
- GitLab動作環境 : GitLab.com
- Runner動作環境 : Ubuntu16.04(parallels Desktop15)
GitLab.com上にテスト用プロジェクトを作成し、Specific Runnerを仮想デスクトップ環境のUbuntu上に作成しています。
dindを使用するため、Docker Executerを設定します。dindについてはこちらの記事がわかりやすかったです。
Dockerコンテナ内からDockerを使うことについてなお、GitLab.comのShared Runnersを使用したところエラーは発生しませんでした。
おそらく適切に対処されているのでShared Runnersを使用するのも解決策となります。
そのため本記事は自前でRunnerを構築する人向けのものになります。エラー時の設定
dindを利用するために、gitlab-ci.ymlファイルに以下の設定を行います。
DOCKER_DRIVERにoverlayFSを選択しているのはおすすめ設定だから入れておこうの精神です。
docker infoを使用して、Strage Driverを確認したところ明示的に宣言しなくてもデフォルトでoverlay2になっていたため不要かもしれません。
この機会に以下の記事で勉強したのでご紹介だけしておきます。
Dockerのストレージドライバを理解する.gitlab-ci.yml# docker image image: docker:latest # Docker DriverをoverlayFSに変更する(おすすめ設定)。 variables: DOCKER_DRIVER: overlay2 # dindを設定 services: - docker:dindこの設定でdockerのbuildを行おうとすると"Is the docker daemon running?"が発生するようです。
原因
docker 19.03からdindが自動的にTLS証明書を作成し通信に使用するようになったことが原因のようです。
詳しくは以下の公式ドキュメントに書いています。
対処法も書いていますが後述で私が試した対処法を書いていきます。https://about.gitlab.com/releases/2019/07/31/docker-in-docker-with-docker-19-dot-03/
元のissueはこちら
https://gitlab.com/gitlab-org/gitlab-runner/issues/1986対処法
対処法1: TLSを構築する
こちらも公式にある方法(Configure TLS)です。
サービスとジョブコンテナ間で証明書を共有するため、volumesにマウントを追加します。
他の対処法はTLSを使用しないようにしているため、一番正当な対処法のように思います。
ちなみにconfig.tomlはubuntuだと'sudo vi /etc/gitlab-runner/config.toml'で編集できます。config.toml[[runners]] name = "My Docker Runner" url = "http://gitlab.com" token = "" executor = "docker" [runners.custom_build_dir] [runners.docker] privileged = true volumes = ["/certs/client", "/cache"] shm_size = 0.gitlab-ci.ymlimage: docker:19.03.0 variables: DOCKER_DRIVER: overlay2 DOCKER_TLS_CERTDIR: "/certs" services: - docker:19.03.0-dind対処法2: dindのバージョン変更
dind 19.03からの不具合のため、単にバージョンを下げることで解決します。
.gitlab-ci.ymlimage: docker:18.09.7 # Docker DriverをoverlayFSに変更する(おすすめ設定)。 variables: DOCKER_DRIVER: overlay2 # dindを設定 services: - docker:18.09.7-dind対処法3: TLSを使用しない
こちらも公式にある方法(Disable TLS)です。
TLS証明書を明示的に使用しないように設定すれば回避することができます。.gitlab-ci.ymlimage: docker:19.03.0 variables: DOCKER_DRIVER: overlay2 DOCKER_TLS_CERTDIR: "" services: - docker:19.03.0-dindまとめ
'Is the docker deamon running?'の対処法をまとめました。
基本的に社内利用の場合はどの方法でも良いかなと思いますが、一番おすすめされている方法は対処法1のTLS構築です。専門外な上に、記事初投稿なので至らぬ点があったらご指摘願います。
- 投稿日:2020-02-23T16:51:13+09:00
GitHub Packagesに公開したDockerイメージをpullする
GitHub ActionsとGitHub PackagesでDockerのイメージを作ってpushしたので、いざpullして使おうとしたら以下のようなエラーが…
Error response from daemon: Get https://docker.pkg.github.com/v2/freeesia/vivideo/server/manifests/latest: no basic auth credentialspublicリポジトリなのに認証が必要…?と思って調べたら、どうも今はpublicリポジトリのイメージであれ認証が必要なようです。
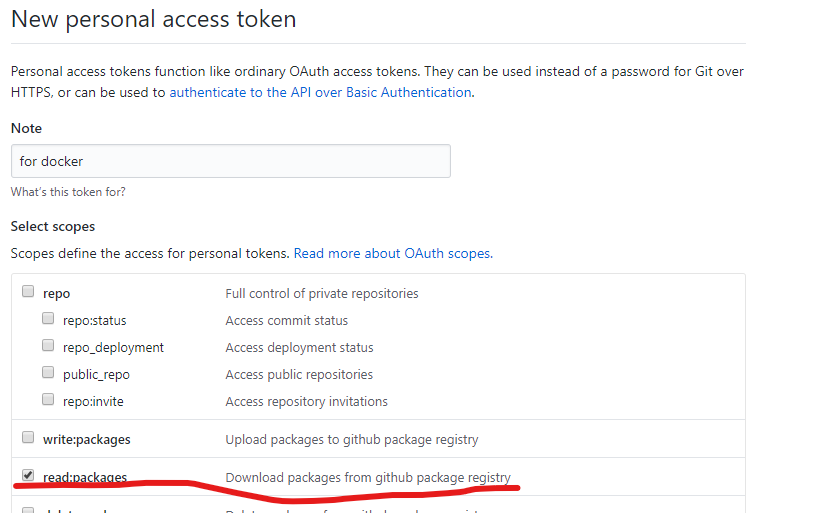
https://github.community/t5/GitHub-Actions/docker-pull-from-public-GitHub-Package-Registry-fail-with-quot/td-p/32782認証のためにはまずPersonal access tokensからトークンを生成します。
必要な権限はパッケージを取得するだけなので、read:packagesにチェックを入れて生成します。あとはイメージを起動するマシンで
docker loginしますdocker login -u <GitHubのユーザー名> -p <上記で生成したトークン> docker.pkg.github.com以上で無事pullできるようになりました。
- 投稿日:2020-02-23T16:04:51+09:00
MacにWindows10をデュアルブート&WS2導入までの参考リンク集
macbookでBootCampを使ってwindows10をデュアルブートする時、
ナチュラルスクロールなどOSXと同じ使い心地を追求してセットアップしたかった。
色んなリンクを辿って「大体この辺見れば一通りOK」みたいなリンク集ができたので、半ば自分用にメモ。環境
Macbook Pro(2014) 15インチ
OSX Catalina
CPU: Intel core i7-4770HQ @2.20GHzリンク集
Boot Camp上のWindows - スクロールをナチュラル(逆)方向に変更
- mac風のナチュラルスクロールに変更
- macのトラックパッドのスクロール方向などのプロパティを設定画面からいじれなかった
- ので関連ファイルを直接書き換えてる感じ
wsl2をインストールしてwindows上でlinuxを使いこなそう
- windows10上でWSL2を有効化して、ubuntu(とか任意のlinuxディストリ)を使えるようにするまでの導入手順を参考にさせて頂きました
- WSL2導入後の環境構築について。
Docker Desktop for WSL2 を使い快適にWindowsでサーバ開発をしよう!
- WSL2上にDockerを導入する時に参考にさせて頂きました
- 投稿日:2020-02-23T13:30:15+09:00
Docker(compose)にDjango開発環境を移行する際の備忘録
Dockerfile
FROM python:3.7
ENV PYTHONUNBUFFERED 1
WORKDIR /code
COPY requirements.txt /code/
RUN pip install --no-cache-dir -r requirements.txt
COPY ./code /code/.
RUN python manage.py migrate
- FROMでpython3.7環境を使用
- ENVでエラー出力抑制(らしい)
- WORKDIRで一時作業フォルダを指定
- WORKDIRにDockerfileと同じディレクトリに配置しているrequirements.txtをコピーする
- RUNでrequirements.txtにしたがってインストールを行う
- COPYでmanage.pyがあるディレクトリを丸ごとWORKDIR配下にコピー
- RUNでmigrateしておく
ハマりポイントとしては、WORKDIRへのファイルコピー。
Dockerfileと同じディレクトリにあるcodeディレクトリ(Djangoプロジェクト)を指定できずFile Not Foundを連発。
前提条件として、Dockerfileとrequirements.txt、codeディレクトリはすべて同じ階層に配置している。docker-compose.yml
docker-compose.ymlversion: '3' services: web: build: . ports: - "8000:8000" volumes: - ./code:/code command: python3 manage.py runserver 0.0.0.0:8000
- versionは3を指定
- web:は一時的な名称として指定。
- build:でDockerfileの位置を指定。カレントディレクトリにあるので'.'を指定。
- ports:でDjangoのポートを指定。
- volumes:でカレントディレクトリにあるDjangoプロジェクトのディレクトリをコンテナ内の/codeにマウントする。マウントすることでvscodeなどから直接編集した内容がコンテナ上に反映される。
- command:でDjangoのWebサーバーを起動させる。引数のIPアドレスとポート番号は必要ないかもしれない。
コマンド類
Dockerコマンドをsudoなしで実行させる場合
$ sudo usermod -aG docker ユーザー名
$ newgrp docker
newgrp dockerを.bashrcなどに書いておくと楽になるかもしれない。
イメージの削除
$ docker images
$ docker rmi イメージID先頭3桁
割り当てられているコンテナが存在する場合は-fをつけて強制的に削除する。
$ docker rmi -f イメージID先頭3桁コンテナの削除
$ docker rm コンテナIDexited状態のコンテナ複数を一度に削除する
$ docker rm $(docker ps -a --filter 'status=exited' -q)コンテナにログインしてコマンドを実行したい場合
$ docker exec -it コンテナ名 /bin/bash
- 投稿日:2020-02-23T13:23:24+09:00
Alpine Linux(aarch64)に Docker & docker-compose をインストールする方法
1. はじめに
今回は、自分自身への備忘録を兼ねて、Raspberry Pi にインストールしたAlpine Linux(aarch64)上に Docker & docker-compose をインストールする方法を、お伝えしたいと思います。
2. この記事を読んでできること
- Alpine Linux(aarch64)で Docker & docker-compose を使えるようになる。
3. 注意事項
- 特になし。
4. 必要なもの
- Alpine Linux(aarch64)が動作しているホストOS環境(この記事では Raspberry Pi3B + Alpine Linux(aarch64)を利用)
- インターネット環境
5. リポジトリの追加登録
- dockerをインストールできるようにするために、/etc/apk/repositoriesファイルにcommunityリポジトリを追加する。
- docker-composeをインストールできるようにするために、/etc/apk/repositoriesファイルにtestingリポジトリを追加する。
- 実際には、該当箇所をコメントアウト(#)を解除するだけでOKです。
コマンドプロンプト// リポジトリの追加登録 # vi /etc/apk/repositories === http://dl-cdn.alpinelinux.org/alpine/v3.11/main #http://dl-cdn.alpinelinux.org/alpine/v3.11/community #http://dl-cdn.alpinelinux.org/alpine/edge/main http://dl-cdn.alpinelinux.org/alpine/edge/community http://dl-cdn.alpinelinux.org/alpine/edge/testing ===6. dockerとdocker-composeのインストール
- Dockerをインストールします。
- Dockerだけの利用でよければ、以下のコマンドだけで完了です。
コマンドプロンプト// インストール # apk add docker docker-compose // dockerのバージョン確認 # docker -v Docker version 19.03.6, build 369ce74a3ce86a392e39e45d3960ce970fdfac97 // docker-composのバージョン確認 # docker-compose -v docker-compose version 1.25.2, build unknown // dockerの起動 # service docker start // dockerの自動起動有効化 # rc-update add docker boot7. dockerの動作確認
コマンドプロンプト// dockerの実行(ハローワールド) # docker run --rm hello-world8. docker-composeの動作確認
- docker-compose.ymlファイルを作成し、ファイル保存する。
docker-compose.ymlversion: "2" services: app: image: hello-world
- docker-composeを実行する。
コマンドライン// docker-compose.ymlファイルが存在することを事前確認 # ls docker-compose.yml // docker-composeを実行 # sudo docker-compose up9. 参考:Dockerコマンド、docker-composeコマンド
10. おわりに
いかがでしたでしょうか?意外と簡単にDocker & docker-composeをはじめることができたのではないかなと思います。
今回の記事が、みなさまの学習の参考になれば幸いです。2020/02/23 TAKAHIRO NISHIZONO
- 投稿日:2020-02-23T12:47:07+09:00
kubernetesのwindows環境構築
windows上でもkubectl(kubernetesのコマンド)が通るようにしたので、
その手順をまとめます。事前知識
Dockerとは
kubernetesを勉強する前にDokckerについて簡単にまとめます。
Dockerはコンテナを実行するための実行環境およびツールキットです。
Dockerの理解がまだ浅いと思う方は、以下のページが参考になると思います。
https://datawokagaku.com/whatisdocker/
https://y-ohgi.com/introduction-docker/kubernetesとは
コンテナ化されたアプリケーションのデプロイ、スケーリングなどの管理を自動化するためのプラットフォームです。Docker単体では一定以上の規模の開発において、複数のホストを効率的に管理することが難しいので、kubernetesといったコンテナオーケストレーションエンジンを利用します。これだけでは分かりにくいと思うので、以下のページが参考になりそうです。自分は本で勉強しました。
https://kubernetes.io/ja/
https://book.impress.co.jp/books/1118101055環境
- Windows10 pro
- Docker for windows
windows10 homeだと環境構築の難易度が相当上がるらしいです。
自分はproにアップグレードしました。手順
Hyper-Vの有効化
まずは、Hyper-V関連の機能を有効にしましょう。
Windowsキーから「Windowsの機能の有効化または無効化」を検索
Hyper-Vにチェックを入れてOK
docker for windowsをインストール
以下からダウンロードし、インストールしてください。
https://docs.docker.com/docker-for-windows/install/以下のコマンドが通れば正常にインストールされて起動できています。
$ docker psもし右下に常駐しているdokckerアイコン(くじら)が赤くなっていれば、
なんらかの理由でdockerが起動できてないです。(白は正常)
メモリエラーの場合は他に起動しているプログラムを終了するか、
アイコンを右クリック - setting - AdvancedからMemoryを調整すると
起動できるかもしれません。
kubernetesを有効化
右下に常駐しているdokckerアイコン(くじら)を右クリック
setting → Kubernetes → Enable Kubernetes にチェックを入れてApply
下のコマンドでノードが表示できれば有効化できています。
$ kubectl get node


- 投稿日:2020-02-23T02:55:28+09:00
Unity Accelerator + Prometheus + GrafanaをDockerでサービス化する
はじめに
Unity2019.3からAsset Pipeline v2が追加されてUnity Acceleratorを組み合わせるとインポートしたアセットをキャッシュおよび共有することができます。
それまでのUnityにもAsset Pipeline v1とキャッシュサーバーでキャッシュできていましたが、Unity Acceleratorには以下の違いがあります。
- キャッシュサーバーと同居できる
- Collaborateのキャッシュに対応
- 不要なキャッシュを定期的にクリーンアップ
- 転送されたバイト数や接続されたエディターなどの情報をPrometheusから利用できるメトリクスで公開
フォーラムの以下のスレッドによるとDockerHubで公開する予定があるようですが、まだないのでUnity AcceleratorとPrometheusとダッシュボードのGrafanaをDockerでサービス化しました。
Dockerでサービス化
Dockerfileおよびdocker-composeは以下にUnity Acceleratorのみのv2とキャッシュサーバーも同時にインストールするv1_v2を用意してます。
https://github.com/shiena/docker-unity-accelerator
Unity Acceleratorのみ
# イメージをビルド
docker-compose -f dokcer-compose.yml -f v2.yml -p v2 build

# サービスを実行
docker-compose -f dokcer-compose.yml -f v2.yml -p v2 up -d

# Unity Accelerator単体で実行
docker-compose -f v2.yml -p v2 up -d

# バージョン確認
docker run --rm unity-accelerator:v2 /opt/Unity/accelerator/unity-accelerator --version
Unity Acceleratorとキャッシュサーバー
# イメージをビルド
docker-compose -f dokcer-compose.yml -f v1_2.yml -p v1_v2 build

# サービスを実行
docker-compose -f dokcer-compose.yml -f v1_2.yml -p v1_v2 up -d

# Unity Acceleratorとキャッシュサーバーのみで実行
docker-compose -f v1_v2.yml -p v1_v2 up -d

# バージョン確認
docker run --rm unity-accelerator:v1_v2 /opt/Unity/accelerator/unity-accelerator --version
サービスを起動するとそれぞれ以下からアクセスできます。
- Unity Acceleratorおよびキャッシュサーバー: 起動したPCのIPアドレス
- Prometheus: http://localhost:9090
- Grafana: http://localhost:3000
- 初期アカウントとパスワードは
adminとadminDocker化で工夫したこと
- Unity AcceleratorをダウンロードするURLからバージョンが分からないのでバージョンを確認する方法を用意しています。
- キャッシュサーバー追加でインストーラーを非対話モードで実行するとnpmのパスが展開されないバグがあるので対話モードprintfで強引にインストールしています。(バグ報告済み)
- 投稿日:2020-02-23T00:52:43+09:00
手探りDocker #2
前回の記事の続きになります。
手探りDocker #1次の記事
手探りDocker #3サンプルアプリケーションのインストール
前回も参考にしたサイトdocker docs
の以下を選択します。
以下のGitHubのリポジトリをクローンし、クローンしたフォルダに移動して以下コマンドを打ちます。
https://github.com/dockersamples/example-voting-app
以下コマンドを打って「投票アプリ」を起動?します。
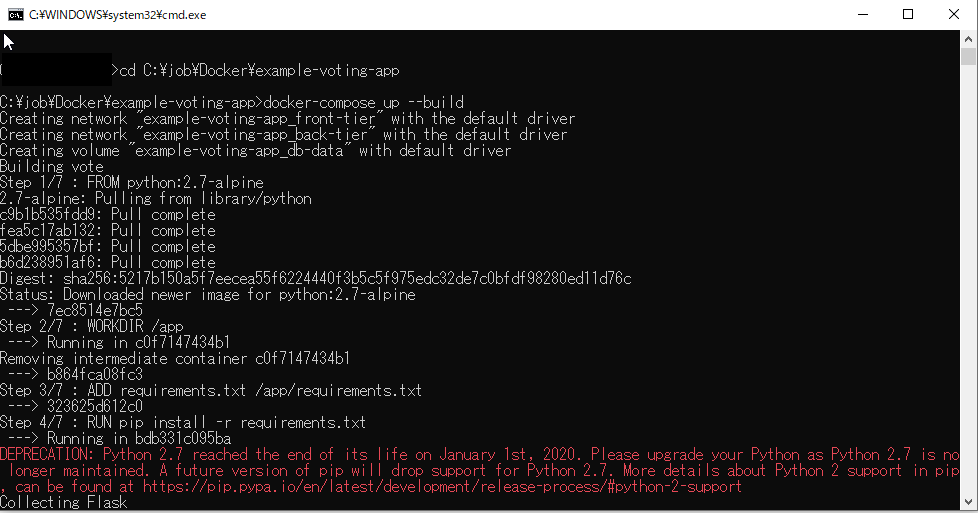
docker-compose up --build
実行するとPythonのエラー?警告?が出ている。
他にも
や
その他に
と警告やエラーが出ている・・・挫折しそう・・・
まず1つ目のエラーから調査していきます。
google翻訳に入れてみたところ、非推奨:Python 2.7は2020年1月1日にサポートを終了しました。 Python2.7のメンテナンスが終了したため、Pythonをアップグレードしてください。 pipの将来のバージョンでは、Python 2.7のサポートが廃止される予定です。 pipでのPython 2サポートの詳細については、 https://pip.pypa.io/en/latest/development/release-process/#python-2-supportを参照してください。警告っぽいです。学習用なので、このまま進めようと思います。
次に2つ目のエラー
ググってみたところ、OSがMACでないために表示される警告の模様
npm WARN notsup SKIPPING OPTIONAL DEPENDENCY: Unsupported platform for fsevents@1.0.14
警告なので問題ないとの意見がちらほらみられるので、これもこのままとする3つ目のエラー
訳すと「強制的にあなたが何をしているかを知っていることを願っています」とのこと
全然意味が分からない
調べてみるとnpmのキャッシュをクリアすると解消するらしい。
でもコマンドで打ったのはdocker-compose up --buildだけですから、どうすりゃいいのよって感じです。
警告なのでとりあえず飛ばします。最後のエラー
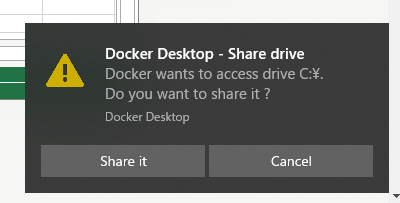
example-voting-app_vote_1とexample-voting-app_result_1のコンテナが開始できていないらしい
以下のような画面がでていた。ドライブ共有が原因っぽい。
Share itを選択しても解決はしなかった。今日はここまで・・・


- 投稿日:2020-02-23T00:09:06+09:00
dockerでrailsの開発環境を構築する
概要
「Quickstart: Compose and Rails」
https://docs.docker.com/compose/rails/「もう環境構築で悩まない!Dockerを使ってRails環境構築!」
https://www.youtube.com/watch?v=BZS8AHF3TTo「DockerでのRuby on Rails環境構築を一つずつ詳解する」
https://qiita.com/daichi41/items/dfea6195cbb7b24f3419この記事をもとに
- ruby
- rails
- postgres
を設定していきます。途中記事内容だとerrorで
全体図
- dockerfileにてwebサーバーとdbをそれぞれコンテナビルド
- rails読み込む用のgemfile、gemfilerockを作成。これをもとに作業ディレクトリにrailsnewされる。
$ docker-compose run web rails newdocker-compose builddocker-compose upで起動docker-compose run web rake db:createでdb作成つまづきポイント
could not translate host name "db" to address: Name or service not
dbのpassがうまく渡せていなかった?
docker-compose.ymldb: image: postgres:9.5.18 environment: POSTGRES_PASSWORD: passwordにしてdatabase.ymlを下記に
config/database.ymldefault: &default adapter: postgresql encoding: unicode host: db username: postgres password: password pool: 5 development: <<: *default database: myapp_development test: <<: *default database: myapp_testrailsコマンドの打ち方
docker-compose run web rails ~でrailsコマンドを打てる。