- 投稿日:2020-02-23T20:54:05+09:00
Build Tensorflow v2.1.0 v1-API version full installer with TensorRT 7 enabled [Docker version]
This is the procedure to build all by yourself without using NGC containers.
1. Environment
- Ubuntu 18.04 x86_64 RAM:16GB
- Geforce GTX 1070
- NVIDIA Driver 440.59
- CUDA 10 (V10.0.130)
- cuDNN 7.6.5.32
- Docker 19.03.6, build 369ce74a3c
- Tensorflow v2.1.0
- TensorRT 7
- TF-TRT
- Bazel 0.29.1
- Python 3.6
2. Procedure
Create_working_directory$ cd ~ $ mkdir work/tensorrt && cd work/tensorrtDownload TensorRT-7.0.0.11 and copy to the
work/tensorrtdirectory.
https://developer.nvidia.com/compute/machine-learning/tensorrt/secure/7.0/7.0.0.11/tars/TensorRT-7.0.0.11.Ubuntu-18.04.x86_64-gnu.cuda-10.0.cudnn7.6.tar.gzCreate_Dockerfile$ nano DockerfileDockerfileFROM nvidia/cuda:10.0-cudnn7-devel-ubuntu18.04 RUN apt-get update && \ DEBIAN_FRONTEND=noninteractive apt-get install -y \ protobuf-compiler python-pil python-lxml python-tk cython \ autoconf automake libtool curl make g++ unzip wget git nano \ libgflags-dev libgoogle-glog-dev liblmdb-dev libleveldb-dev \ libhdf5-serial-dev libhdf5-dev python3-opencv python-opencv \ python3-dev python3-numpy python3-skimage gfortran libturbojpeg \ python-dev python-numpy python-skimage python3-pip python-pip \ libboost-all-dev libopenblas-dev libsnappy-dev software-properties-common \ protobuf-compiler python-pil python-lxml python-tk libfreetype6-dev pkg-config \ libpng-dev libhdf5-100 libhdf5-cpp-100 libc-ares-dev libblas-dev \ libeigen3-dev libatlas-base-dev openjdk-8-jdk libopenblas-base \ openmpi-bin libopenmpi-dev gcc libgfortran5 libatlas3-base liblapack-dev RUN pip3 install pip --upgrade && \ pip3 install Cython && \ pip3 install contextlib2 && \ pip3 install pillow && \ pip3 install lxml && \ pip3 install jupyter && \ pip3 install matplotlib && \ pip3 install keras_applications==1.0.8 --no-deps && \ pip3 install keras_preprocessing==1.1.0 --no-deps && \ pip3 install h5py==2.9.0 && \ pip3 install -U --user six numpy wheel mock && \ pip3 install pybind11 && \ pip2 install Cython && \ pip2 install contextlib2 && \ pip2 install pillow && \ pip2 install lxml && \ pip2 install jupyter && \ pip2 install matplotlib # Create working directory RUN mkdir -p /tensorrt && \ cd /tensorrt ARG work_dir=/tensorrt WORKDIR ${work_dir} # Clone Tensorflow v2.1.0, TF-TRT and install Bazel RUN git clone -b v2.1.0 --depth 1 https://github.com/tensorflow/tensorflow.git && \ git clone --recursive https://github.com/NobuoTsukamoto/tf_trt_models.git && \ wget https://github.com/bazelbuild/bazel/releases/download/0.29.1/bazel-0.29.1-installer-linux-x86_64.sh && \ chmod +x bazel-0.29.1-installer-linux-x86_64.sh && \ bash ./bazel-0.29.1-installer-linux-x86_64.sh # Install TensorRT-7 COPY TensorRT-7.0.0.11.Ubuntu-18.04.x86_64-gnu.cuda-10.0.cudnn7.6.tar.gz ${work_dir} RUN tar -xvzf TensorRT-7.0.0.11.Ubuntu-18.04.x86_64-gnu.cuda-10.0.cudnn7.6.tar.gz && \ rm TensorRT-7.0.0.11.Ubuntu-18.04.x86_64-gnu.cuda-10.0.cudnn7.6.tar.gz # Setting environment variables ENV TRT_RELEASE=${work_dir}/TensorRT-7.0.0.11 ENV PATH=/usr/local/cuda-10.0/bin:$TRT_RELEASE:$TRT_RELEASE/bin:$PATH \ LD_LIBRARY_PATH=/usr/local/cuda-10.0/lib64:$TRT_RELEASE/lib:$LD_LIBRARY_PATH \ TF_CUDA_VERSION=10.0 \ TF_CUDNN_VERSION=7 \ TENSORRT_INSTALL_PATH=$TRT_RELEASE \ TF_TENSORRT_VERSION=7Create_DockerImage$ docker build --tag tensorrt .Check_DockerImage_generation_status$ docker images REPOSITORY TAG IMAGE ID CREATED SIZE tensorrt latest cb6f0fc656d1 17 seconds ago 9.04GBStart_Docker_container$ docker run \ --gpus all \ --name tensorrt \ -it \ --privileged \ -p 8888:8888 \ tensorrt \ /bin/bashCUDA_and_cuDNN_version_check# nvcc -V nvcc: NVIDIA (R) Cuda compiler driver Copyright (c) 2005-2018 NVIDIA Corporation Built on Sat_Aug_25_21:08:01_CDT_2018 Cuda compilation tools, release 10.0, V10.0.130 # cat /usr/include/cudnn.h | grep '#define' #define CUDNN_MAJOR 7 #define CUDNN_MINOR 6 #define CUDNN_PATCHLEVEL 5 # nvidia-smi +-----------------------------------------------------------------------------+ | NVIDIA-SMI 440.59 Driver Version: 440.59 CUDA Version: 10.2 | |-------------------------------+----------------------+----------------------+ | GPU Name Persistence-M| Bus-Id Disp.A | Volatile Uncorr. ECC | | Fan Temp Perf Pwr:Usage/Cap| Memory-Usage | GPU-Util Compute M. | |===============================+======================+======================| | 0 GeForce GTX 107... Off | 00000000:01:00.0 Off | N/A | | N/A 60C P5 11W / N/A | 410MiB / 8119MiB | 0% Default | +-------------------------------+----------------------+----------------------+ +-----------------------------------------------------------------------------+ | Processes: GPU Memory | | GPU PID Type Process name Usage | |=============================================================================| +-----------------------------------------------------------------------------+ # bazel version Extracting Bazel installation... WARNING: --batch mode is deprecated. Please instead explicitly shut down your Bazel server using the command "bazel shutdown". Build label: 0.29.1 Build target: bazel-out/k8-opt/bin/src/main/java/com/google/devtools/build/lib/bazel/BazelServer_deploy.jar Build time: Tue Sep 10 13:44:39 2019 (1568123079) Build timestamp: 1568123079 Build timestamp as int: 1568123079Check_folder_hierarchy# echo $PWD /tensorrt # ls -l total 12 drwxr-xr-x 10 root root 4096 Dec 17 02:30 TensorRT-7.0.0.11 drwxr-xr-x 7 root root 4096 Feb 22 16:16 tensorflow drwxr-xr-x 8 root root 4096 Feb 22 16:16 tf_trt_modelsInitial_configuration_of_Tensorflow_v2.1.0# cd tensorflow # ./configure Extracting Bazel installation... WARNING: --batch mode is deprecated. Please instead explicitly shut down your Bazel server using the command "bazel shutdown". You have bazel 0.29.1 installed. Please specify the location of python. [Default is /usr/bin/python]: /usr/bin/python3 Found possible Python library paths: /usr/lib/python3/dist-packages /usr/local/lib/python3.6/dist-packages Please input the desired Python library path to use. Default is [/usr/lib/python3/dist-packages] /usr/local/lib/python3.6/dist-packages Do you wish to build TensorFlow with XLA JIT support? [Y/n]: n No XLA JIT support will be enabled for TensorFlow. Do you wish to build TensorFlow with OpenCL SYCL support? [y/N]: n No OpenCL SYCL support will be enabled for TensorFlow. Do you wish to build TensorFlow with ROCm support? [y/N]: n No ROCm support will be enabled for TensorFlow. Do you wish to build TensorFlow with CUDA support? [y/N]: y CUDA support will be enabled for TensorFlow. Do you wish to build TensorFlow with TensorRT support? [y/N]: y TensorRT support will be enabled for TensorFlow. Found CUDA 10.0 in: /usr/local/cuda-10.0/lib64 /usr/local/cuda-10.0/include Found cuDNN 7 in: /usr/lib/x86_64-linux-gnu /usr/include Found TensorRT 7 in: /tensorrt/TensorRT-7.0.0.11/lib /tensorrt/TensorRT-7.0.0.11/include Please specify a list of comma-separated CUDA compute capabilities you want to build with. You can find the compute capability of your device at: https://developer.nvidia.com/cuda-gpus. Please note that each additional compute capability significantly increases your build time and binary size, and that TensorFlow only supports compute capabilities >= 3.5 [Default is: 3.5,7.0]: 6.1 Do you want to use clang as CUDA compiler? [y/N]: n nvcc will be used as CUDA compiler. Please specify which gcc should be used by nvcc as the host compiler. [Default is /usr/bin/gcc]: Please specify optimization flags to use during compilation when bazel option "--config=opt" is specified [Default is -march=native -Wno-sign-compare]: Would you like to interactively configure ./WORKSPACE for Android builds? [y/N]: n Not configuring the WORKSPACE for Android builds. Preconfigured Bazel build configs. You can use any of the below by adding "--config=<>" to your build command. See .bazelrc for more details. --config=mkl # Build with MKL support. --config=monolithic # Config for mostly static monolithic build. --config=ngraph # Build with Intel nGraph support. --config=numa # Build with NUMA support. --config=dynamic_kernels # (Experimental) Build kernels into separate shared objects. --config=v2 # Build TensorFlow 2.x instead of 1.x. Preconfigured Bazel build configs to DISABLE default on features: --config=noaws # Disable AWS S3 filesystem support. --config=nogcp # Disable GCP support. --config=nohdfs # Disable HDFS support. --config=nonccl # Disable NVIDIA NCCL support. Configuration finishedBuild with 16GB of RAM and 8 cores. You need to adjust according to the resources of your PC environment. Calculate assuming that about 2GB of RAM is consumed for each core.
Build_Tensorflow_v2.1.0# bazel build \ --config=opt \ --config=cuda \ --config=noaws \ --config=nohdfs \ --config=nonccl \ --config=v1 \ --local_resources=16384.0,8.0,1.0 \ --host_force_python=PY3 \ --noincompatible_do_not_split_linking_cmdline \ //tensorflow/tools/pip_package:build_pip_packageBuild_wheel# ./bazel-bin/tensorflow/tools/pip_package/build_pip_package /tmp/tensorflow_pkg Sun Feb 23 11:13:32 UTC 2020 : === Preparing sources in dir: /tmp/tmp.2tVlFrnLCQ /tensorrt/tensorflow /tensorrt/tensorflow /tensorrt/tensorflow /tmp/tmp.2tVlFrnLCQ/tensorflow/include /tensorrt/tensorflow /tensorrt/tensorflow Sun Feb 23 11:13:45 UTC 2020 : === Building wheel warning: no files found matching 'README' warning: no files found matching '*.pyd' under directory '*' warning: no files found matching '*.pd' under directory '*' warning: no files found matching '*.dylib' under directory '*' warning: no files found matching '*.dll' under directory '*' warning: no files found matching '*.lib' under directory '*' warning: no files found matching '*.csv' under directory '*' warning: no files found matching '*.h' under directory 'tensorflow_core/include/tensorflow' warning: no files found matching '*' under directory 'tensorflow_core/include/third_party' Sun Feb 23 11:14:06 UTC 2020 : === Output wheel file is in: /tmp/tensorflow_pkg # cp /tmp/tensorflow_pkg/tensorflow-2.1.0-cp36-cp36m-linux_x86_64.whl /tensorrt # cd .. # ls -l total 179920 drwxr-xr-x 10 root root 4096 Dec 17 02:30 TensorRT-7.0.0.11 -rwxr-xr-x 1 root root 43791980 Sep 10 13:57 bazel-0.29.1-installer-linux-x86_64.sh drwxr-xr-x 1 root root 4096 Feb 23 06:43 tensorflow -rw-r--r-- 1 root root 140419710 Feb 23 11:15 tensorflow-2.1.0-cp36-cp36m-linux_x86_64.whl drwxr-xr-x 8 root root 4096 Feb 23 06:09 tf_trt_modelsInstall_tensorflow_v2.1.0_v1-API_with_TensorRT_CUDA10.0_cuDNN7.6.5# pip3 uninstall tensorflow-gpu tensorflow # pip3 install tensorflow-2.1.0-cp36-cp36m-linux_x86_64.whlInstall_TF-TRT# cd tf_trt_models # ./install.sh python3Import_test# python3 Python 3.6.9 (default, Nov 7 2019, 10:44:02) [GCC 8.3.0] on linux Type "help", "copyright", "credits" or "license" for more information. >>> import tensorflow as tf 2020-02-23 12:01:46.274803: I tensorflow/stream_executor/platform/default/dso_loader.cc:44] Successfully opened dynamic library libcudart.so.10.0 2020-02-23 12:01:46.768715: I tensorflow/stream_executor/platform/default/dso_loader.cc:44] Successfully opened dynamic library libnvinfer.so.7 2020-02-23 12:01:46.769356: I tensorflow/stream_executor/platform/default/dso_loader.cc:44] Successfully opened dynamic library libnvinfer_plugin.so.7 >>> from tensorflow.python.client import device_lib >>> device_lib.list_local_devices() 2020-02-23 12:05:28.927561: I tensorflow/stream_executor/platform/default/dso_loader.cc:44] Successfully opened dynamic library libcuda.so.1 2020-02-23 12:05:28.987702: I tensorflow/stream_executor/cuda/cuda_gpu_executor.cc:981] successful NUMA node read from SysFS had negative value (-1), but there must be at least one NUMA node, so returning NUMA node zero 2020-02-23 12:05:28.988503: I tensorflow/core/common_runtime/gpu/gpu_device.cc:1555] Found device 0 with properties: pciBusID: 0000:01:00.0 name: GeForce GTX 1070 with Max-Q Design computeCapability: 6.1 coreClock: 1.2655GHz coreCount: 16 deviceMemorySize: 7.93GiB deviceMemoryBandwidth: 238.66GiB/s 2020-02-23 12:05:28.988540: I tensorflow/stream_executor/platform/default/dso_loader.cc:44] Successfully opened dynamic library libcudart.so.10.0 2020-02-23 12:05:28.988579: I tensorflow/stream_executor/platform/default/dso_loader.cc:44] Successfully opened dynamic library libcublas.so.10.0 2020-02-23 12:05:29.006807: I tensorflow/stream_executor/platform/default/dso_loader.cc:44] Successfully opened dynamic library libcufft.so.10.0 2020-02-23 12:05:29.013005: I tensorflow/stream_executor/platform/default/dso_loader.cc:44] Successfully opened dynamic library libcurand.so.10.0 2020-02-23 12:05:29.058509: I tensorflow/stream_executor/platform/default/dso_loader.cc:44] Successfully opened dynamic library libcusolver.so.10.0 2020-02-23 12:05:29.087138: I tensorflow/stream_executor/platform/default/dso_loader.cc:44] Successfully opened dynamic library libcusparse.so.10.0 2020-02-23 12:05:29.087290: I tensorflow/stream_executor/platform/default/dso_loader.cc:44] Successfully opened dynamic library libcudnn.so.7 2020-02-23 12:05:29.087578: I tensorflow/stream_executor/cuda/cuda_gpu_executor.cc:981] successful NUMA node read from SysFS had negative value (-1), but there must be at least one NUMA node, so returning NUMA node zero 2020-02-23 12:05:29.090019: I tensorflow/stream_executor/cuda/cuda_gpu_executor.cc:981] successful NUMA node read from SysFS had negative value (-1), but there must be at least one NUMA node, so returning NUMA node zero 2020-02-23 12:05:29.091523: I tensorflow/core/common_runtime/gpu/gpu_device.cc:1697] Adding visible gpu devices: 0 2020-02-23 12:05:29.091629: I tensorflow/stream_executor/platform/default/dso_loader.cc:44] Successfully opened dynamic library libcudart.so.10.0 2020-02-23 12:05:30.075656: I tensorflow/core/common_runtime/gpu/gpu_device.cc:1096] Device interconnect StreamExecutor with strength 1 edge matrix: 2020-02-23 12:05:30.075707: I tensorflow/core/common_runtime/gpu/gpu_device.cc:1102] 0 2020-02-23 12:05:30.075740: I tensorflow/core/common_runtime/gpu/gpu_device.cc:1115] 0: N 2020-02-23 12:05:30.075938: I tensorflow/stream_executor/cuda/cuda_gpu_executor.cc:981] successful NUMA node read from SysFS had negative value (-1), but there must be at least one NUMA node, so returning NUMA node zero 2020-02-23 12:05:30.076505: I tensorflow/stream_executor/cuda/cuda_gpu_executor.cc:981] successful NUMA node read from SysFS had negative value (-1), but there must be at least one NUMA node, so returning NUMA node zero 2020-02-23 12:05:30.077038: I tensorflow/stream_executor/cuda/cuda_gpu_executor.cc:981] successful NUMA node read from SysFS had negative value (-1), but there must be at least one NUMA node, so returning NUMA node zero 2020-02-23 12:05:30.077521: I tensorflow/core/common_runtime/gpu/gpu_device.cc:1241] Created TensorFlow device (/device:GPU:0 with 7225 MB memory) -> physical GPU (device: 0, name: GeForce GTX 1070 with Max-Q Design, pci bus id: 0000:01:00.0, compute capability: 6.1) [name: "/device:CPU:0" device_type: "CPU" memory_limit: 268435456 locality { } incarnation: 11937878305894780308 , name: "/device:GPU:0" device_type: "GPU" memory_limit: 7576322048 locality { bus_id: 1 links { } } incarnation: 7297894123203666970 physical_device_desc: "device: 0, name: GeForce GTX 1070 with Max-Q Design, pci bus id: 0000:01:00.0, compute capability: 6.1" ] >>>3. Appendix
3-1. Commit container image
Escape from Docker Container.
Ctrl + P
Ctrl + QCommit_container_image$ docker commit tensorrt tensorrt3-2. Extract_wheel_from_Docker_container
Extract_wheel_from_Docker_container$ docker cp cb6f0fc656d1:/tensorrt/tensorflow-2.1.0-cp36-cp36m-linux_x86_64.whl .3-3. Download Pre-build wheel
Download_Pre-build_wheel$ curl -sc /tmp/cookie "https://drive.google.com/uc?export=download&id=1G2beyMH1_g2nYjF8uYtKnw79DYYoa0vK" > /dev/null $ CODE="$(awk '/_warning_/ {print $NF}' /tmp/cookie)" $ curl -Lb /tmp/cookie "https://drive.google.com/uc?export=download&confirm=${CODE}&id=1G2beyMH1_g2nYjF8uYtKnw79DYYoa0vK" -o tensorflow-2.1.0-cp36-cp36m-linux_x86_64.whl4. Reference articles
4-1. Various
- https://github.com/NVIDIA/TensorRT
- https://github.com/NobuoTsukamoto/tf_trt_models
- https://docs.nvidia.com/deeplearning/frameworks/tf-trt-user-guide/index.html
- https://www.google.com/search?q=NvInferVersion.h+-www.sejuku.net&oq=NvInferVersion.h&aqs=chrome..69i57.1147j0j8&sourceid=chrome&ie=UTF-8
- https://hub.docker.com/layers/nvidia/cuda/10.0-cudnn7-devel-ubuntu18.04/images/sha256-e277b9eef79d6995b10d07e30228daa9e7d42f49bcfc29d512c1534b42d91841?context=explore
- https://qiita.com/ksasaki/items/b20a785e1a0f610efa08
- https://github.com/tensorflow/tensorrt
- Jetson NanoでTF-TRTを試す(Image Classification) - nb.oの日記
- Jetson NanoでTF-TRTを試す(Object detection) - nb.oの日記
- AttributeError: module 'tensorflow' has no attribute 'version' #31576
4-2. CUDA/cuDNN/TensorRT Header files and libraries search path logic
- https://github.com/tensorflow/tensorflow/blob/v2.1.0/configure.py
- https://github.com/tensorflow/tensorflow/blob/v2.1.0/third_party/gpus/find_cuda_config.py
4-3. Check GPU Compute Capability
- 投稿日:2020-02-23T15:44:52+09:00
Kerasで機械学習に初挑戦した記録
バックエンド、フロントエンドをいろいろカジってきましたが、機械学習は未挑戦でした。今般、初挑戦しましたので記念に記録しておきます。python、numpy、tf.kerasを使っています。
マイスペック
- このQiita参照。
- cやgoによる通信系〜バックエンド開発、flutter/dartによるフロントエンド開発が可能。
- pythonも結構触っている。
- 機械学習はGUIのツールでちょっと触ってみたことはある。
- pythonでの機械学習は初挑戦。numpyも使ったことが無かったレベル。
機械学習の理論をまとめて勉強するために「ゼロから作るDeep Learning ―Pythonで学ぶディープラーニングの理論と実装」を読みました。とても良い本でした。
開発環境はPyCharm Community 2019.3です。Anacondaとかは使わずにPyCharmに必要なライブラリを読み込ませて使っています。
1. 機械学習の課題設定
以下の正解ロジックを、機械学習することを目指します。
- 教師ありの2値分類問題とします。
- 入力する特徴量を2つの乱数値(0以上1未満)として、2つの大小比較によって0か1を正解ラベルとします。
- 正解ラベルには稀にノイズを混入させます。(最初はノイズを無しにします)
2. コード
2値分類問題の典型的コードを、いくつかのWeb記事を見ながら作ってみました。結構、コンパクトに直感的に記述できるものだと思いました。Kerasすごい。
#!/usr/bin/env python3

import tensorflow as tf
import numpy as np
from tensorflow_core.python.keras.metrics import binary_accuracy
import matplotlib.pyplot as plt

# データセット準備
ds_features = np.random.rand(10000, 2)  # 特徴データ
NOISE_RATE = 0
ds_noise = (np.random.rand(10000) > NOISE_RATE).astype(np.int) * 2 - 1  # noiseなし: 1, あり: -1
ds_labels = (np.sign(ds_features[:, 0] - ds_features[:, 1]) * ds_noise + 1) / 2  # 正解ラベル

# データセットを訓練用と検証用に分割
SPLIT_RATE = 0.8   # 分割比率
training_features, validation_features = np.split(ds_features, [int(len(ds_features) * SPLIT_RATE)])
training_labels, validation_labels = np.split(ds_labels, [int(len(ds_labels) * SPLIT_RATE)])

# モデル準備
INPUT_FEATURES = ds_features.shape[1]   # 特徴量の次元
LAYER1_NEURONS = int(INPUT_FEATURES * 1.2 + 1)   # 入力次元より少し広げる
LAYER2_NEURONS = LAYER1_NEURONS
LAYER3_NEURONS = LAYER1_NEURONS  # 隠れ層は3層
OUTPUT_RESULTS = 1  # 出力は一次元
ACTIVATION = 'tanh'
model = tf.keras.models.Sequential([
    tf.keras.layers.Dense(input_shape=(INPUT_FEATURES,), units=LAYER1_NEURONS, activation=ACTIVATION),
    tf.keras.layers.Dense(units=LAYER2_NEURONS, activation=ACTIVATION),
    tf.keras.layers.Dense(units=LAYER3_NEURONS, activation=ACTIVATION),
    tf.keras.layers.Dense(units=OUTPUT_RESULTS, activation='sigmoid'),
])
LOSS = 'binary_crossentropy'
OPTIMIZER = tf.keras.optimizers.Adam   # 典型的な最適化手法
LEARNING_RATE = 0.03   # 学習係数のよくある初期値
model.compile(optimizer=OPTIMIZER(lr=LEARNING_RATE), loss=LOSS, metrics=[binary_accuracy])

# 学習
BATCH_SIZE = 30
EPOCHS = 100
result = model.fit(x=training_features, y=training_labels,
                   validation_data=(validation_features, validation_labels),
                   batch_size=BATCH_SIZE, epochs=EPOCHS, verbose=1)

# 表示
plt.plot(range(1, EPOCHS+1), result.history['binary_accuracy'], label="training")
plt.plot(range(1, EPOCHS+1), result.history['val_binary_accuracy'], label="validation")
plt.xlabel('Epochs')
plt.ylabel('Accuracy')
plt.ylim(0.5, 1)
plt.legend()
plt.show()
3. 結果
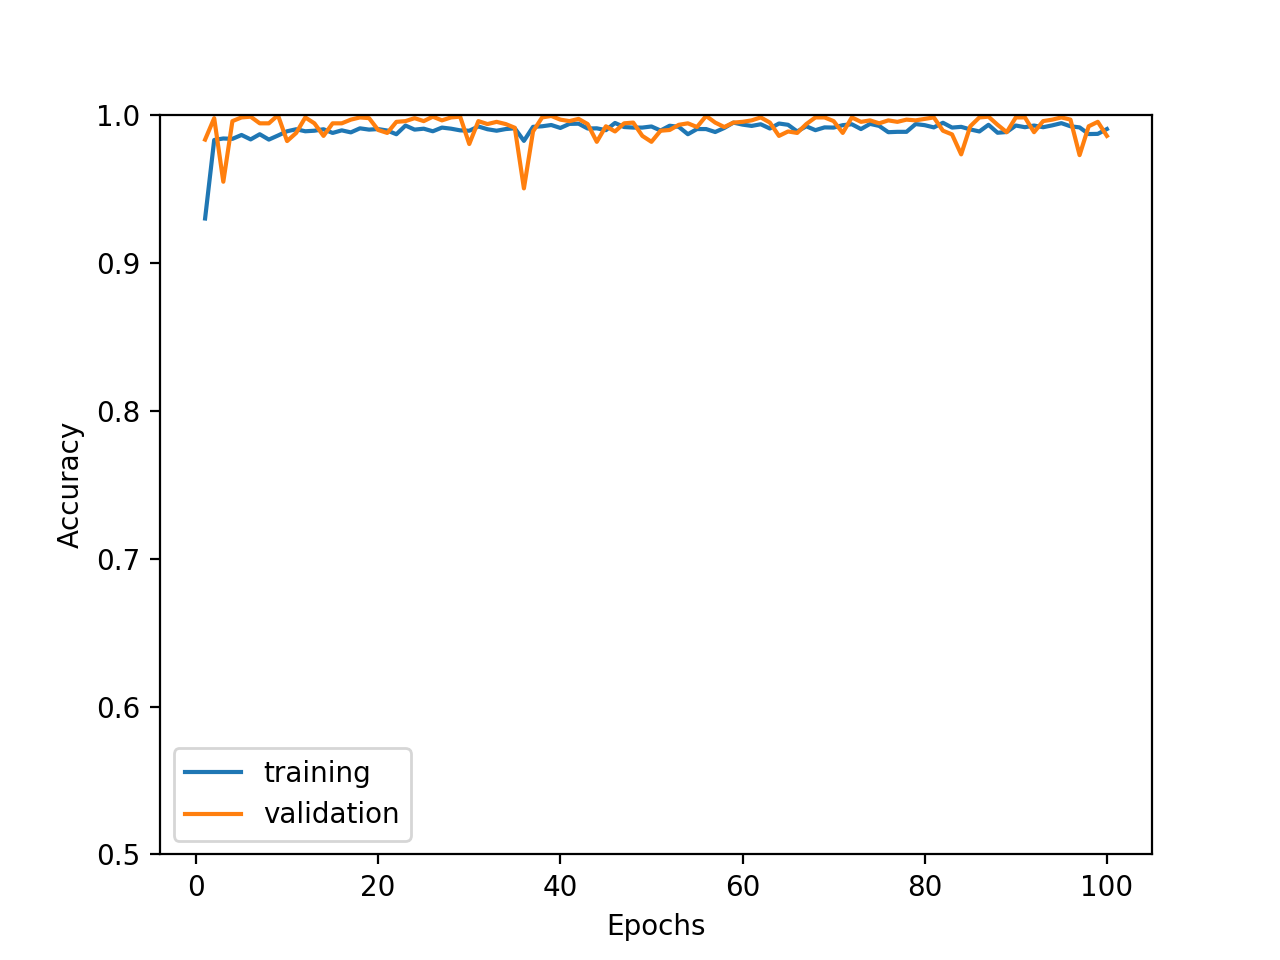
こちかが学習結果です。おおよそ99%くらいの精度にすぐに到達し、過学習もしていないようです。
4. 考察
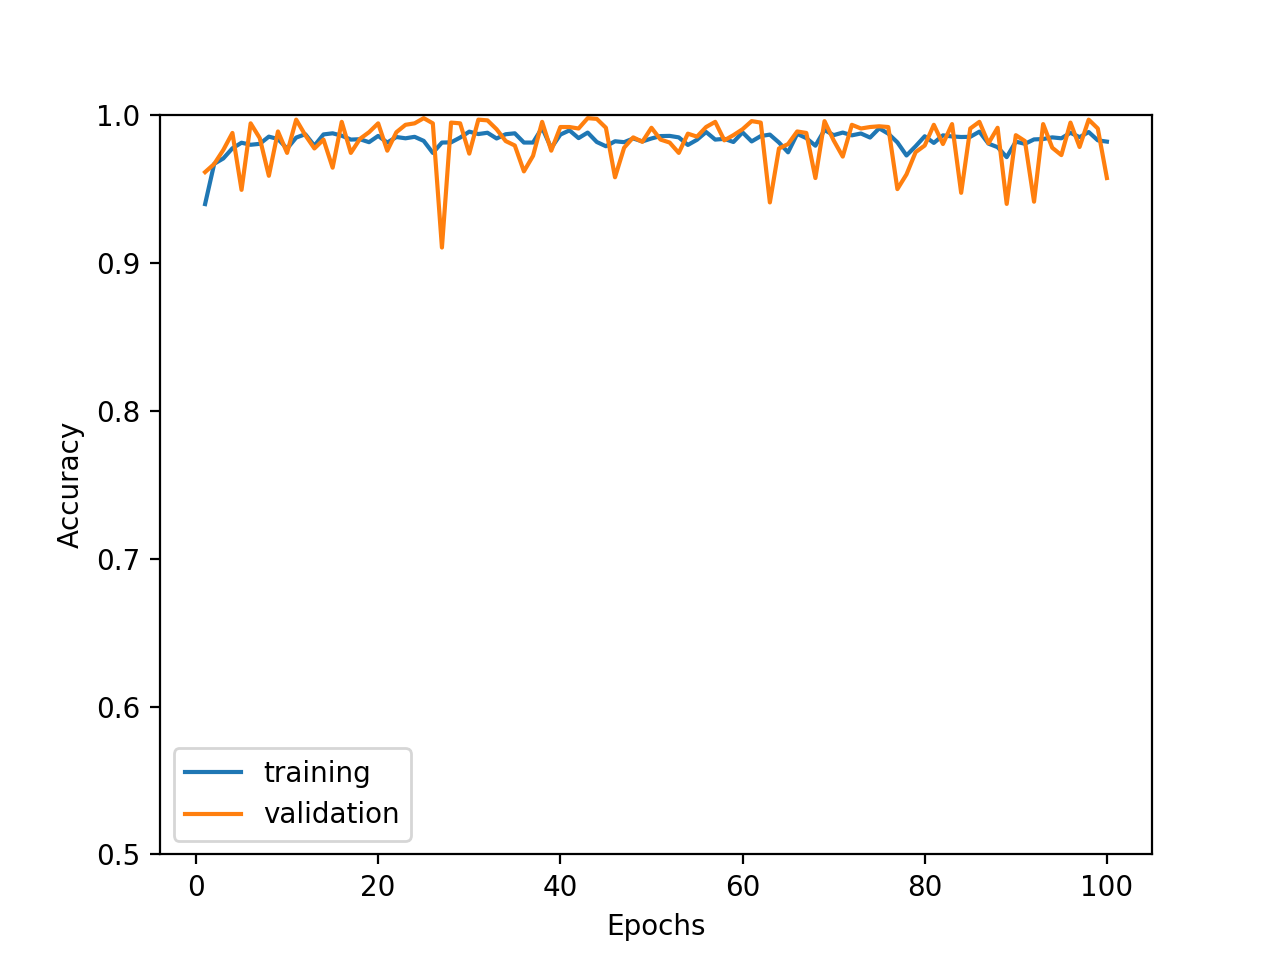
4.1. ノイズを加えた時の挙動
NOISE_RATE = 0.2 としてみました。ノイズ分だけ精度が低くなりますが、適切な結果に到達しています。
4.2. 無関係なダミーの特徴量を加えた時の挙動
ノイズを戻し、特徴量を5種に増やしてみます。5種のうち2種だけ使って同じロジックで正解ラベルを求めます。すなわち、特徴量の残り3種は、正解とは全く関係無いダミーとなります。
結果はこちらで、多少ブレ幅が大きくなりますが、ダミーに騙されずに学習できているといえます。
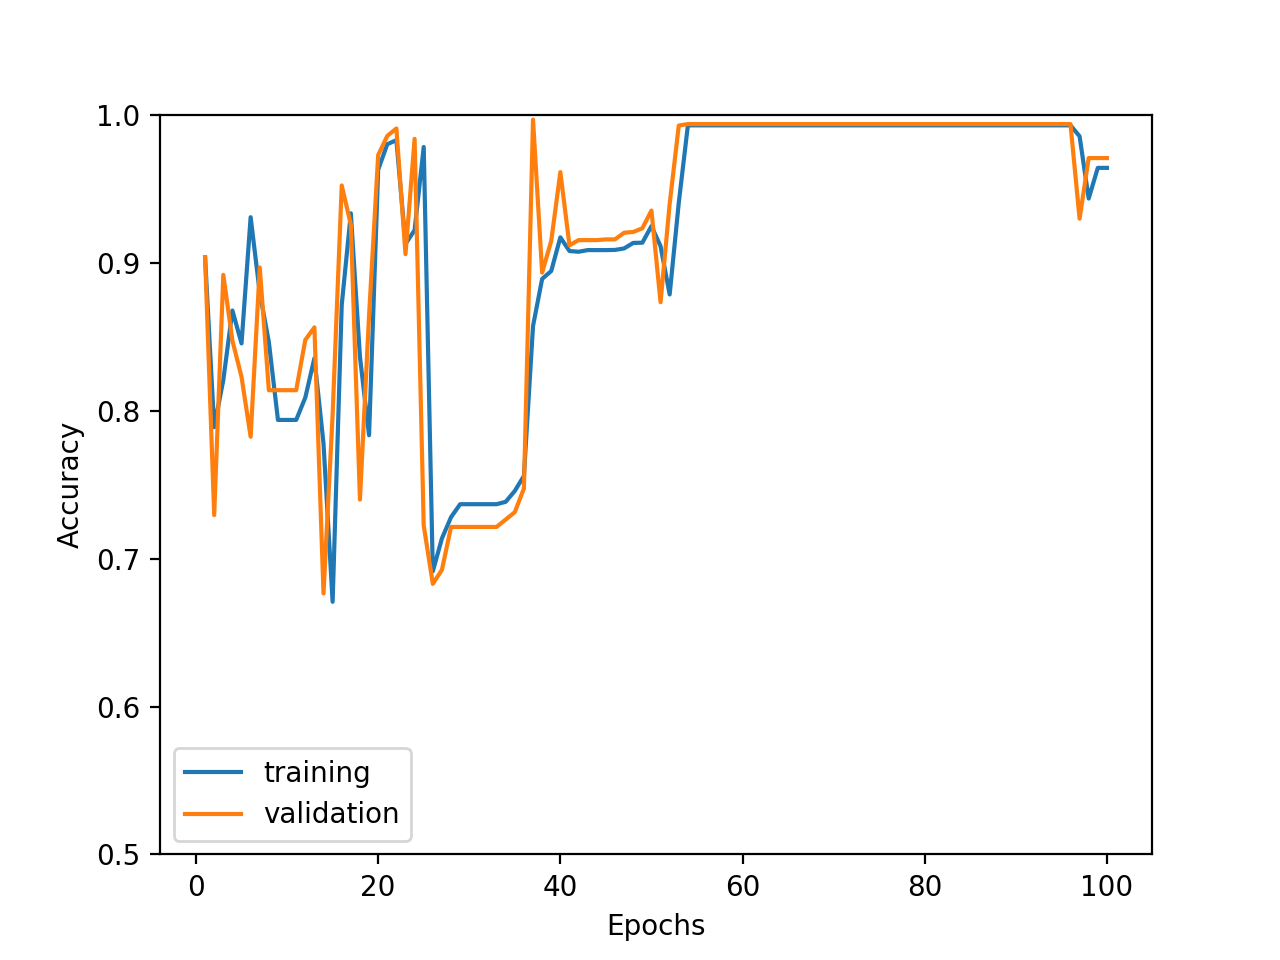
4.3. 特徴量の正規化を崩した時の挙動
特徴量を2種に戻しますが、0以上1未満の乱数値を×1000してみました。結果は、学習が一律に収束していかないように見えるほか、最終エポックの近くで精度が悪化しています。
エポックを増やして確認してみました。やはり学習が安定していないようです。
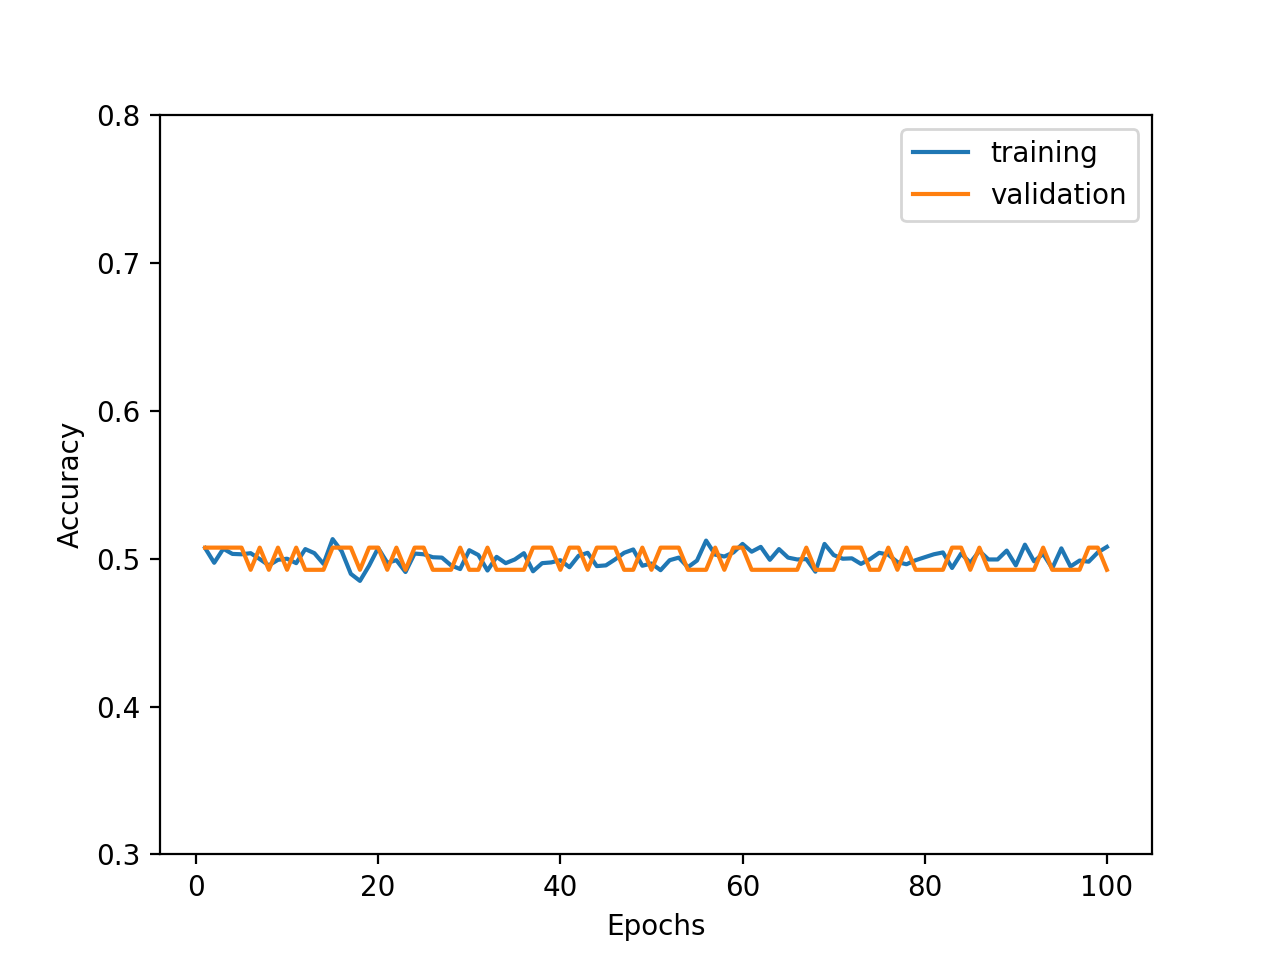
一方、特徴量の平均をずらし、0以上1未満の乱数値を+1000してみました。結果は、精度がほぼ0.5、すなわち2値分類としては全く学習されないことがわかりました。
全体的に、特徴量の正規化が大切であることがわかります。


- 投稿日:2020-02-23T11:57:43+09:00
PythonにTensorFlowをimportすると「ImportError: DLL load failed: 指定されたモジュールが見つかりません。」と出る
環境
- Windows10
- Anaconda
- Python 3.7.4
- pip 20.0.2
何が起こった
機械学習を勉強するためGoogleさんのTensorFlowをPythonに入れようと、
pip install tensorflowと普通にインストール。問題なくインストールが完了。
ここで、ちゃんとインポートできるかどうか確認すると...Using TensorFlow backend. Traceback (most recent call last): File "C:... ... File "C:... return _load(spec) ImportError: DLL load failed: 指定されたモジュールが見つかりません。 During handling of the above exception, another exception occurred: Traceback (most recent call last): File "C:... ... File "C:... return _load(spec) ImportError: DLL load failed: 指定されたモジュールが見つかりません。 Failed to load the native TensorFlow runtime. See https://www.tensorflow.org/install/errors for some common reasons and solutions. Include the entire stack trace above this error message when asking for help.とエラーが出る(長いので途中省略)。その後、いろいろ調べ、いろいろやったものの解決せず。
解決策:TensorFlowをダウングレードする
バージョンを指定せずにインストールすると記事作成時点での最新版tensorflow==2.1.0がインストールされるので、プロンプトで以下のように古いバージョンを指定して実行。
pip install --upgrade tensorflow==2.0.0こうして
pythonコマンドでインタプリタを起動し>>> import tensorflowで確認すると何もエラーは出ずインポートに成功。
よくわからないが、古いCPUだとTensorFlowの一部の命令が実行できない模様。一応、他のサイトで指定されていたバージョン1.10.0を指定してインストールしてみると、
pip install --upgrade tensorflow==1.10.0
ERROR: Could not find a version that satisfies the requirement tensorflow==1.10.1 (from versions: 1.13.0rc1, 1.13.0rc2, 1.13.1, 1.13.2, 1.14.0rc0, 1.14.0rc1, 1.14.0, 1.15.0rc0, 1.15.0rc1, 1.15.0rc2, 1.15.0rc3, 1.15.0, 1.15.2, 2.0.0a0, 2.0.0b0, 2.0.0b1, 2.0.0rc0, 2.0.0rc1, 2.0.0rc2, 2.0.0, 2.0.1, 2.1.0rc0, 2.1.0rc1, 2.1.0rc2, 2.1.0)
ERROR: No matching distribution found for tensorflow==1.10.0
というようなエラーが出てそんなバージョンないぞと怒られたので、並んでいるバージョンからエラーの出ないバージョンを手探りで見つけた。
また、自分はインストール時「アクセスが拒否されました」とエラーが出てきたので、言われた通りに
pip install --upgrade tensorflow==2.0.0 --userと
--userオプションをつけてあげた。おそらくAnacondaを管理者権限でインストールしたからだと思う(ほかのサイトではこのオプションは見られなかったので先ほどの記述ではのけた)。