- 投稿日:2020-02-23T18:33:48+09:00
【Go言語】関数にメソッドを定義する
はじめに
普段は Java を書いているエンジニアですが、最近興味があって Go 言語を勉強中です。メソッドについて調べていたら「関数にメソッドが定義できる1」という事に気付いたので、それを整理してみます。
最後に載せた例はジェネリクスが使えないと扱いにくいし、あまり Go 言語らしくない気がしています。なので、「Go 言語では一般的にこういうときに使う」とか、「そもそもあまり使い道ないよ」とかコメントで教えてもらえると嬉しいです。
メソッドの基本
基本構文func (レシーバ) メソッド名(引数) { // 処理 }Go言語のメソッドは、基本的には「レシーバが指定できる関数」です。
構造体を定義し、構造体をレシーバとするメソッドを定義することで、Javaなどのクラス のようなもの を作成することが可能です。メソッドの例type Person struct { name string } // Person 型にメソッドを関連付ける func (p Person) Hello() { fmt.Printf("Hello, I'm %s.\n", p.name) }このように定義したメソッドは
Person型のオブジェクトに対してobj.Hello()のような形で呼び出すことができます。p := Person{name: "Alice"} p.Hello() // => Hello, I'm Alice.ここで重要なことは、
Go言語のメソッドは 構造体 ではなく 型 に関連付ける、
ということです。いくつかの制限がありますが、レシーバに指定できるものは構造体に限りません。
レシーバに指定できるもの
公式ドキュメント によると、レシーバに対する条件は次の通り。
A receiver base type cannot be a pointer or interface type and it must be defined in the same package as the method.
「レシーバの基本型はポインタ型やインターフェース型でなく、メソッド定義と同じパッケージで定義された型でなければならない」とのこと。つまり、以下のような場合にはコンパイルエラーが発生します。
コンパイルエラーになる例func (p **Person) pointerMethod() { // *Person が型宣言されていないのでコンパイルエラー // invalid receiver type **Person (*Person is not a defined type) } type PersonPointer *Person func (p PersonPointer) pointerTypeMethod() { // ポインタ型なのでコンパイルエラー // invalid receiver type PersonPointer (PersonPointer is a pointer type) } type Greeter interface { Hello() Goodbye() } func (g Greeter) interfaceMethod() { // インターフェース型なのでコンパイルエラー // invalid receiver type Greeter (Greeter is an interface type) } func (t time.Time) anotherPackageMethod() { // 他のパッケージなのでコンパイルエラー // cannot define new methods on non-local type time.Time }逆に言えば、これら以外の場合はエラーにならないので、関数などにもメソッドを関連付けることが可能です。
関数にメソッドを関連付ける例// 引数を一つ取り、戻り値がない関数型 type Consumer func(x interface{}) // 関数を適用する、というメソッドを定義 func (c Consumer) apply(x interface{}) { c(x) } // Consumer 型として関数宣言 c := Consumer(func(x interface{}) { fmt.Println(x) }) // メソッド呼び出し c.apply("hoge") // => hogeこれだけだとなんの役に立つのかわかりませんが、たとえば次のような応用が考えられます。
応用例:メソッドチェーンで関数を合成する
コード: https://play.golang.org/p/aHs_FTOc0Er
Java の Function を参考に、関数の合成を行うメソッドを定義してみました。// int 型を受け取り、int 型を返す関数型 type IntFunction func(x int) int // 合成関数を返すメソッド func (f IntFunction) AndThen(g IntFunction) IntFunction { // 「関数 f 、関数 g の順に適用する関数」を戻り値として返す return func(x int) int { return g(f(x)) } }戻り値も
func(x int) intをIntFunction型として返しているので、これはメソッドチェーンで繰り返し呼ぶことが可能です。実行例// 引数に 5 加える関数 func plusFive(x int) int { return x + 5 } // 引数を二乗する関数 func square(x int) int { return x * x } // 引数を3倍する関数 func timesThree(x int) int { return x * 3 } func main() { // f(x) = 3 * (x + 5) ^ 2 f := IntFunction(plusFive).AndThen(square).AndThen(timesThree) for i := 0; i < 10; i++ { fmt.Printf("3 * (%d + 5) ^ 2 = %d\n", i, f(i)) } } // 出力結果 // ------------------------ // 3 * (0 + 5) ^ 2 = 75 // 3 * (1 + 5) ^ 2 = 108 // 3 * (2 + 5) ^ 2 = 147 // 3 * (3 + 5) ^ 2 = 192 // 3 * (4 + 5) ^ 2 = 243 // 3 * (5 + 5) ^ 2 = 300 // 3 * (6 + 5) ^ 2 = 363 // 3 * (7 + 5) ^ 2 = 432 // 3 * (8 + 5) ^ 2 = 507 // 3 * (9 + 5) ^ 2 = 588
「関数 型 にメソッドが定義できる」の方が正確かもしれません。 ↩
- 投稿日:2020-02-23T16:20:05+09:00
logrus × lumberjackによるGoログ出力&ローテーション
Go言語のログ用パッケージlogrusとlumberjackの利用方法についてまとめる。(N番煎じ記事)
インストール
$ go get github.com/sirupsen/logrus // logrus
$ go get gopkg.in/natefinch/lumberjack.v2 // lumberjack
インポート
import (
  log "github.com/sirupsen/logrus"
  "gopkg.in/natefinch/lumberjack.v2"
)
ログ出力フォーマットの指定
JSON
log.SetFormatter(&log.JSONFormatter{})標準TXT
log.SetFormatter(&log.TextFormatter{})ログレベル指定
セットしたレベル以上のログを出力する。
// Warningレベル以上
log.SetLevel(log.WarnLevel)
ログレベル別出力
log.Trace("Something very low level.")
log.Debug("Useful debugging information.")
log.Info("Something noteworthy happened!")
log.Warn("You should probably take a look at this.")
log.Error("Something failed but I'm not quitting.")
log.Fatal("Bye.")
log.Panic("I'm bailing.")
出力情報
- 呼び出し元情報
log.SetReportCaller(true)
- 変数の埋め込み
  log.WithFields(log.Fields{
      "animal": "walrus",
      "size":   10,
    }).Info("A group of walrus emerges from the ocean")
共通的に使用する変数の埋め込み
contextLogger := log.WithFields(log.Fields{
    "common": "this is a common field",
    "other": "I also should be logged always",
})

contextLogger.Info("I'll be logged with common and other field")
contextLogger.Info("Me too")
出力先の指定
標準出力
log.Out = os.Stdoutファイル出力
import (
    "os"
    log "github.com/sirupsen/logrus"
)
file, err := os.OpenFile("app.log", os.O_CREATE|os.O_WRONLY|os.O_APPEND, 0666)
if err == nil {
    log.Out = file
} else {
    log.Info("Failed to log to file, using default stderr")
}
ログローテーション
log.SetOutput(&lumberjack.Logger{
          Filename:  "log/app.log", // ファイル名
          MaxSize:    500,          // ローテーションするファイルサイズ(megabytes)
          MaxBackups: 3,            // 保持する古いログの最大ファイル数
          MaxAge:    365,           // 古いログを保持する日数
          LocalTime: true,          // バックアップファイルの時刻フォーマットをサーバローカル時間指定
          Compress:  true,          // ローテーションされたファイルのgzip圧縮
})
- 投稿日:2020-02-23T13:23:41+09:00
Golangで、デザインパターン「Abstract Factory」を学ぶ
GoFのデザインパターンを学習する素材として、書籍「増補改訂版Java言語で学ぶデザインパターン入門」が参考になるみたいですね。以前、取り上げられている実例は、JAVAベースのため、自分の理解を深めるためにも、Pythonで同等のプラクティスに挑んでみました。
Qiita記事: "Pythonで、デザインパターン「Abstract Factory」を学ぶ"今回は、Pythonで実装した”Abstract Factory”のサンプルアプリをGolangで実装し直してみました。
■ Golangで、Pythonクラスを実装し直す際の備忘録
Golang では、Python等でお馴染みの、Inheritance(継承)ではなく、Composition(合成)のみが使われます。
具体的、以下の2点を気をつけて、サンプルアプリの再実装に取り組みました。
- golangには、オブジェクトのクラス継承の概念が存在しないので、再利用性(Embedded)と多相性(Interface)の活用で対応する必要がある。
- Pythonの場合だと、動的型付けのおかげて、引数/戻り値の型を意識することなくポリモーフィズムを実践できていたが、Golangの場合では、引数/戻り値の型を柔軟に扱えるようインタフェースを活用する必要がある。
□ 大変、お世話になったQiita記事
■ Abstract Factory(アブストラクトファクトリ)とは?
Abstract Factory パターン(アブストラクト・ファクトリ・パターン)とは、GoF(Gang of Four; 4人のギャングたち)によって定義されたデザインパターンの1つである。 関連するインスタンス群を生成するための API を集約することによって、複数のモジュール群の再利用を効率化することを目的とする。日本語では「抽象的な工場」と翻訳される事が多い。Kit パターンとも呼ばれる
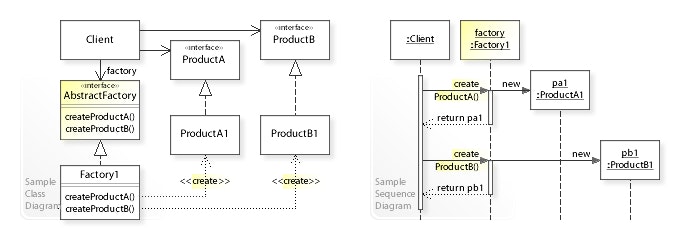
□ UML class and sequence diagram
□ UML class diagram
■ "Abstract Factory"のサンプルプログラム
Abstract Factoryパターンとは、抽象的な工場から、抽象的な部品を組み合わせて抽象的な製品を作るらしいです。
実際に、Abstract FactoryのPython実装コードを動かしてみて、抽象的な工場をイメージを理解したいと思います。ここで取り上げるサンプルプログラムは、階層構造を持ったリンク集をHTMLファイルとして作るものです。
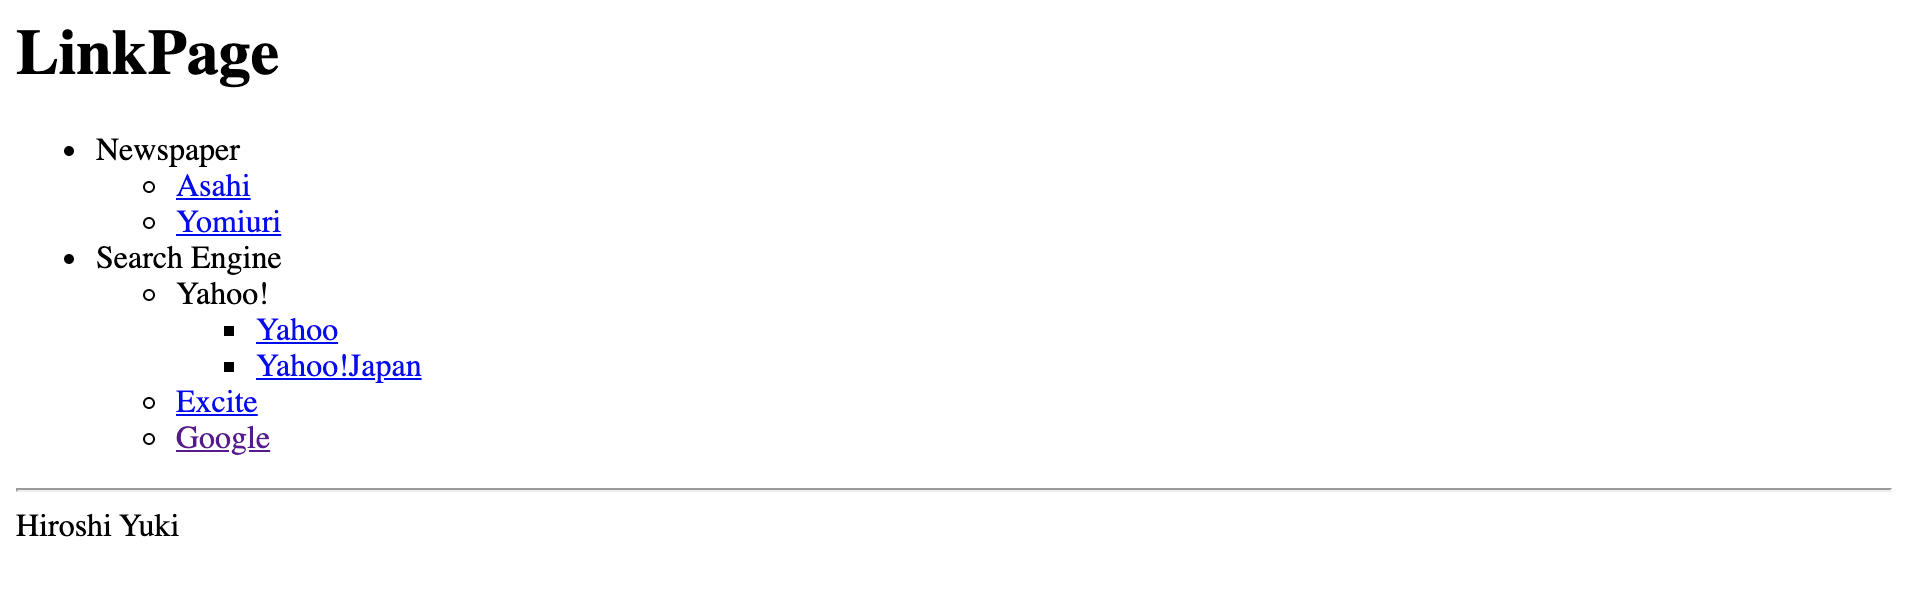
ListFactoryモードで、動作させると、リスト形式のリンク集のHTMLファイルが生成されます。TableFactoryモードで、動作させると、テーブル形式のリンク集のHTMLファイルが生成されます。(1) ListFactoryを動かしてみる
まずは、LinkベースのWebページを作成するコードを動かしてみます。
$ go run Main.go ListFactory
[LinkPage.html] was created.
LinkPage.htmlというファイルが生成されました。
Webブラウザで、見た目を確認してみると、こんな感じでした。
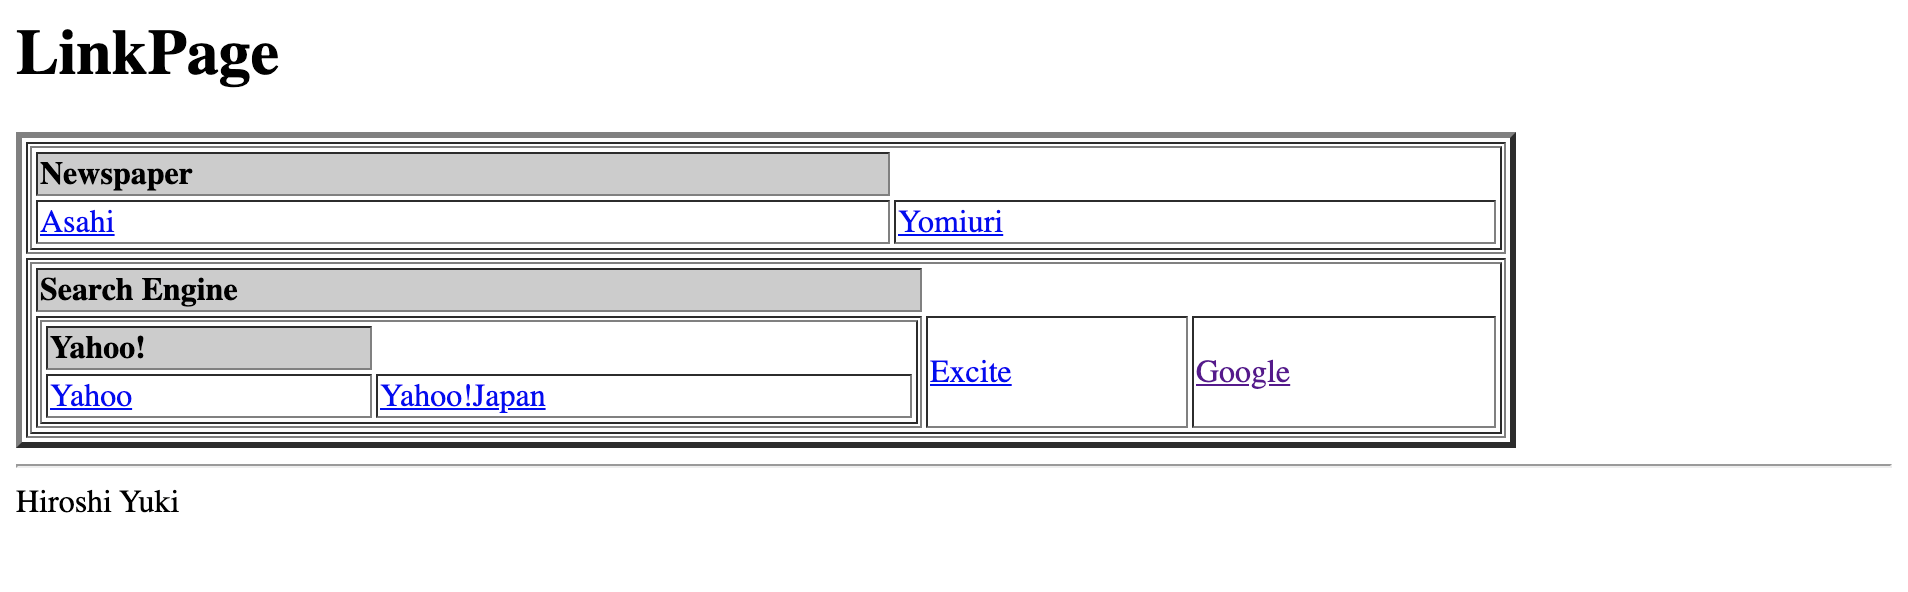
(2) TableFactoryを動かしてみる
つづいて、TableベースのWebページを作成するコードを動かしてみます。
$ go run Main.go TableFactory
[LinkPage.html] was created.
LinkPage.htmlというファイルが生成されました。
Webブラウザで、見た目を確認してみると、こんな感じでした。
■ サンプルプログラムの詳細
Gitリポジトリにも、同様のコードをアップしています。
https://github.com/ttsubo/study_of_design_pattern_with_golang/tree/master/AbstractFactory
- ディレクトリ構成. ├── Main.go └── factory ├── factory.go ├── list_factory.go └── table_factory.go(1) AbstractProduct(抽象的な製品)の役
AbstractProduct役は、AbstractFactory役によって、作り出される抽象的な部品や製品のインタフェースを定めます。サンプルプログラムでは、Linkタイプ、Trayタイプ、Pageタイプと、各種インタフェースが、この役を努めます。factory.gopackage factory import ( "fmt" "os" ) ...(snip) // Item is struct type Item struct { caption string } // ItemInterface is interface type ItemInterface interface { makeHTML() string } // Link is struct type Link struct { Item url string } // LinkInterface is interface type LinkInterface interface { ItemInterface } // Tray is struct type Tray struct { Item tray []ItemInterface } // TrayInterface is interface type TrayInterface interface { ItemInterface Add(item ItemInterface) } // Add func for adding item into Tray func (t *Tray) Add(item ItemInterface) { t.tray = append(t.tray, item) } // Page is struct type Page struct { title, author string content []ItemInterface } // PageInterface is interface type PageInterface interface { TrayInterface Output(o outputInterface) } type outputInterface interface { makeHTML() string } // Add func for adding item into Page func (p *Page) Add(item ItemInterface) { p.content = append(p.content, item) } // Output func for outputing content func (p *Page) Output(o outputInterface) { filename := fmt.Sprintf("%s.html", p.title) file, _ := os.Create(filename) defer file.Close() b := []byte(o.makeHTML()) file.Write(b) fmt.Printf("[%s] was created.\n", filename) }(2) AbstractFactory(抽象的な工場)の役
AbstractFactory役は、AbstractProduct役のインスタンスを作り出すためのインタフェースを定めます。
サンプルプログラムでは、Factoryインタフェースがこの役を勤めます。factory.gopackage factory import ( "fmt" "os" ) // Factory is struct type Factory interface { CreateLink(caption, url string) LinkInterface CreateTray(caption string) TrayInterface CreatePage(title, author string) PageInterface } ...(snip)(3) Client(依頼者)の役
Client役は、AbstractFactory役とAbstractProduct役のインタフェースだけを使って仕事を行います。
Client役は、具体的な部品や製品や工場については、知りません。なお、サンプルプログラムでは、startMainメソッドが、この役を努めます。Main.gopackage main import ( "flag" "./factory" ) func startMain(factoryObject factory.Factory) { asahi := factoryObject.CreateLink("Asahi", "http://www.asahi.com") yomiuri := factoryObject.CreateLink("Yomiuri", "http://www.yomiuri.co.jp") usYahoo := factoryObject.CreateLink("Yahoo", "http://www.yahoo.com") jaYahoo := factoryObject.CreateLink("Yahoo!Japan", "http://www.yahoo.co.jp") google := factoryObject.CreateLink("Google", "http://www.google.com") excite := factoryObject.CreateLink("Excite", "http://www.excite.co.jp") traynews := factoryObject.CreateTray("Newspaper") traynews.Add(asahi) traynews.Add(yomiuri) trayyahoo := factoryObject.CreateTray("Yahoo!") trayyahoo.Add(usYahoo) trayyahoo.Add(jaYahoo) traysearch := factoryObject.CreateTray("Search Engine") traysearch.Add(trayyahoo) traysearch.Add(excite) traysearch.Add(google) page := factoryObject.CreatePage("LinkPage", "Hiroshi Yuki") page.Add(traynews) page.Add(traysearch) page.Output(page) } func main() { flag.Parse() if flag.Arg(0) == "ListFactory" { plugin := factory.ListFactory{} startMain(&plugin) } else if flag.Arg(0) == "TableFactory" { plugin := factory.TableFactory{} startMain(&plugin) } }(4) ConcreteProduct(具体的な製品)の役
ConcreteProduct役は、AbstractProduct役のインタフェースを実装します。サンプルプログラムでは、以下のクラスが、この役を努めます。
ListLinkタイプ、ListTrayタイプ、ListPageタイプTableLinkタイプ、TableTrayタイプ、TablePageタイプlist_factory.go// ListLink is struct type ListLink struct { Link } func (ll *ListLink) makeHTML() string { return fmt.Sprintf(" <li><a href=\"%s\">%s</a></li>\n", ll.url, ll.caption) } // ListTray is struct type ListTray struct { Tray } func (lt *ListTray) makeHTML() string { buf := "<li>\n" buf += fmt.Sprintf("%s\n", lt.caption) buf += "<ul>\n" for _, item := range lt.tray { buf += item.makeHTML() } buf += "</ul>\n" buf += "</li>\n" return buf } // ListPage is struct type ListPage struct { Page } func (lp *ListPage) makeHTML() string { buf := "<html>\n" buf += fmt.Sprintf(" <head><title>%s</title></head>\n", lp.title) buf += "<body>\n" buf += fmt.Sprintf("<h1>%s</h1>", lp.title) buf += "<ul>" for _, item := range lp.content { buf += item.makeHTML() } buf += "</ul>" buf += fmt.Sprintf("<hr><adress>%s</adress>", lp.author) buf += "</body>\n</html>\n" return buf }table_factory.go// TableLink is struct type TableLink struct { Link } func (tl *TableLink) makeHTML() string { return fmt.Sprintf("<td><a href=%s>%s</a></td>\n", tl.url, tl.caption) } // TableTray is struct type TableTray struct { Tray } func (tt *TableTray) makeHTML() string { buf := "<td>\n" buf += "<table width=\"100%\" border=\"1\"><tr>\n" buf += fmt.Sprintf("<td bgcolor=\"#cccccc\" algin=\"center\" colsapn=\"%d\"><b>%s</b></td>\n", len(tt.tray), tt.caption) buf += "</tr>\n" buf += "<tr>\n" for _, item := range tt.tray { buf += item.makeHTML() } buf += "</tr></table>\n" buf += "</td>\n" return buf } // TablePage is struct type TablePage struct { Page } func (tp *TablePage) makeHTML() string { buf := "<html>\n" buf += fmt.Sprintf(" <head><title>%s</title></head>\n", tp.title) buf += "<body>\n" buf += fmt.Sprintf("<h1>%s</h1>", tp.title) buf += "<table width=\"80%\" border=\"3\">\n" for _, item := range tp.content { buf += fmt.Sprintf("<tr>%s</tr>", item.makeHTML()) } buf += "</table>" buf += fmt.Sprintf("<hr><adress>%s</adress>", tp.author) buf += "</body>\n</html>\n" return buf }(5) ConcreteFactory(具体的な工場)の役
ConcreteFactory役は、AbstractFactory役のインタフェースを実装します。サンプルプログラムでは、以下のタイプが、この役を努めます。
ListFactoryタイプTableFactoryタイプlist_factory.go// ListFactory is struct type ListFactory struct { } // CreateLink func for creating Link func (lf *ListFactory) CreateLink(caption, url string) LinkInterface { listlink := ListLink{} listlink.caption = caption listlink.url = url return &listlink } // CreateTray func for creating Tray func (lf *ListFactory) CreateTray(caption string) TrayInterface { listTray := ListTray{} listTray.caption = caption return &listTray } // CreatePage func for creating page func (lf *ListFactory) CreatePage(title, author string) PageInterface { listPage := ListPage{} listPage.title = title listPage.author = author return &listPage }table_factory.go// TableFactory is struct type TableFactory struct { } // CreateLink func for creating Link func (tf *TableFactory) CreateLink(caption, url string) LinkInterface { tablelink := TableLink{} tablelink.caption = caption tablelink.url = url return &tablelink } // CreateTray func for creating Tray func (tf *TableFactory) CreateTray(caption string) TrayInterface { tableTray := TableTray{} tableTray.caption = caption return &tableTray } // CreatePage func for creating page func (tf *TableFactory) CreatePage(title, author string) PageInterface { tablePage := TablePage{} tablePage.title = title tablePage.author = author return &tablePage }■ 終わりに...
Golangで、Pythonの継承クラスを実装し直してみると、「Golang では、Python等でお馴染みの、Inheritance(継承)ではなく、Composition(合成)のみが使われる。」という概念が、鮮明に理解できるようになりました。
この学びは、今度も、大切な経験になりそうです。■ 参考URL

- 投稿日:2020-02-23T07:50:52+09:00
Go1.14のcontextは何が変わるのか
背景
Go1.14 で context パッケージが少し改善されるのは mattn さんの twitter を見て知った方も多いのではないでしょうか。このツイートされた時期と同じくらいにちょうど社内の勉強会で context パッケージをみんなで読んでおり、
皆完全に context を理解したのである程度実装も把握していました。勉強会では GoDoc と最新 master ブランチのコードが結構違うね、みたいな話もありました。ということで、個人的にとても興味深いツイートでした。Go.1.14のリリースノートには記載されていないのがミソです(2020/02/23現在)。Go 1.4 のリリースノートにまだ含まれてないけど context の WithCancel と WithTimeout の伝搬がこのコミットで速くなってる。https://t.co/gJiT81uVyj
— mattn (@mattn_jp) February 18, 2020そこで、本記事では Go1.14 でリリース予定の以下のコミットで何が変わったのか、そもそもどんな問題背景があったのか。ということを見てみたいと思います。
CL と proposal は以下です。正確な情報は下記をご覧ください。
- 196521: context: use fewer goroutines in WithCancel/WithTimeout
- proposal: context: enable first class citizenship of third party implementations
結論
Go1.14 の context はカスタムコンテキストを用いたときに、適切にコンテキストを埋め込むと、
WithCancelやWithTimeoutでゴルーチンが生成されなくなりました。基礎
上記の proposal を見る前に context について簡単に補足しておきます。以下のケースで考えてみます。(proposal のケースとは別です)
起点になる場所で
Backgroundとしてコンテキストを生成すると思いますが、これはemptyCtxとしてコード上は表現されています。WithValueやWithCancelといったメソッドに応じて、子のコンテキストを生成すると思いますが、そのときに上記のようなvalueCtxとかcancelCtx型のコンテキストが生成されていることになります。emptyCtxとかvalueCtxとかcancelCtxはいずれもContextインターフェースを満たしている struct になります。それぞれどのような struct になっているか以下に示します。どちらも
Contextインターフェースを埋め込んでいて、これは(実装上)親のコンテキストを参照するフィールドです。Go1.13のcontext/context.gotype valueCtx struct { Context key, val interface{} }Go1.13のcontext/context.gotype cancelCtx struct { Context mu sync.Mutex // protects following fields done chan struct{} // created lazily, closed by first cancel call children map[canceler]struct{} // set to nil by the first cancel call err error // set to non-nil by the first cancel call }キャンセルは子には伝播するが、親には伝播しないことはよく知られています。つまり以下のような状況です。
- 親のキャンセルが子に伝播する。親(この場合は
valueCtx)には伝播しない
- 子のキャンセルは親には伝播しない
実際、このようなキャンセル処理が実装上はどのようになっているのか示します。本質は
cancelCtxのchildrenフィールドである map とpropagateCancel関数です。Go1.13のcontext/context.gofunc WithCancel(parent Context) (ctx Context, cancel CancelFunc) { c := newCancelCtx(parent) propagateCancel(parent, &c) return &c, func() { c.cancel(true, Canceled) } }Go1.13のcontext/context.gofunc propagateCancel(parent Context, child canceler) { if parent.Done() == nil { return // parent is never canceled } if p, ok := parentCancelCtx(parent); ok { p.mu.Lock() if p.err != nil { // parent has already been canceled child.cancel(false, p.err) } else { if p.children == nil { p.children = make(map[canceler]struct{}) } p.children[child] = struct{}{} } p.mu.Unlock() } else { go func() { select { case <-parent.Done(): child.cancel(false, parent.Err()) case <-child.Done(): } }() } }
propagateCancel関数を見るとわかるのですがparentCancelCtx関数の結果に応じて、処理が変わっています。
parentCancelCtx関数は何かというと、親のコンテキストがどのような型なのか、型アサーションをしながら調べて*cencelCtx(timerCtxもcencelCtxの仲間のようなものです)が出現するまでコンテキストのグラフを子コンテキストから親コンテキストの方向にたどる処理になっています。直感的に言うと、コンテキストから見たときに一番近いキャンセルのコンテキストを見つける、と言えます。親のコンテキストはコンテキストに埋め込まれているので、子から親方向にたどることができます。
Go1.13のcontext/context.gofunc parentCancelCtx(parent Context) (*cancelCtx, bool) { for { switch c := parent.(type) { case *cancelCtx: return c, true case *timerCtx: return &c.cancelCtx, true case *valueCtx: parent = c.Context default: return nil, false } } }
propagateCancel関数に戻ると、あるコンテキストから逆向きにコンテキストのグラフたどって、キャンセルコンテキストがあれば、そのコンテキストを親として、子のコンテキストを親のchildren map[canceler]struct{}に格納しています。まだキャンセルのコンテキストが存在しない場合は新たにゴルーチンを 1 つ生成して、そのゴルーチンから今WithCancelが呼ばれたときの親と生成する子コンテキストの両方を監視します。このゴルーチンは親がなんらかの理由で完了/キャンセル (parent.doneが close される) すれば子もキャンセルするし、子がキャンセルされれば、ゴルーチンは監視する役目を終えます。キャンセルの実装は(Go1.14 のプロポーザルには関係ないですが)以下のようになっていて、本質的にはチャネルの close と map に紐付いているコンテキストグラフ上のコンテキストのキャンセルの伝播します。(その他にグラフ上で親のコンテキストから子のコンテキストを切り離す場合もあります)
func (c *cancelCtx) cancel(removeFromParent bool, err error) {
    if err == nil {
        panic("context: internal error: missing cancel error")
    }
    c.mu.Lock()
    if c.err != nil {
        c.mu.Unlock()
        return // already canceled
    }
    c.err = err
    if c.done == nil {
        c.done = closedchan
    } else {
        close(c.done)
    }
    for child := range c.children {
        // NOTE: acquiring the child's lock while holding parent's lock.
        child.cancel(false, err)
    }
    c.children = nil
    c.mu.Unlock()

    if removeFromParent {
        removeChild(c.Context, c)
    }
}
少し細かい話になってしまいましたが、何が言いたかったかというと
contextパッケージの内部の struct のイメージWithCancelの内部処理のイメージ
- コンテキストのグラフを生成するときにある場合でゴルーチンが生成されている
- 親のコンテキストから子のコンテキストに
mapを用いて有向グラフを生成しているがどのようなものになっているか、ということです。
Proposal
それでは Proposal を確認します。
This proposal concerns a way to implement custom context.Context type, that is clever enough to cancel its children contexts during cancelation.
まずこの Proposal は
context.Contextを満たしたカスタムのコンテキストを用いて処理を実装しているケースの話です。問題背景
プロポーザルをあげた @gobwas 氏のコメントをみると
The point is that for the performance sensitive applications starting of a separate goroutine could be an issue.
と記載しています。
WorkerContextというcontext.Contextインターフェースを満たしたコンテキストを定義していて、その場合のパフォーマンスに懸念がある。というのがプロポーザルの背景であると読み取れます。https://github.com/golang/go/issues/28728#issue-379565484 よりサンプルの実装を引用します。
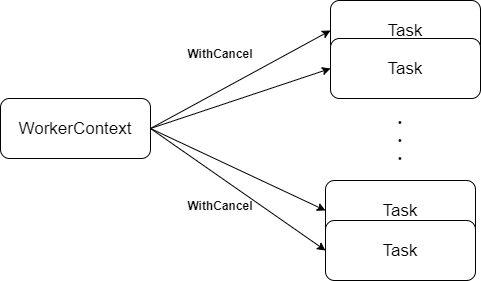
Issueのサンプル実装type WorkerContext struct { ID uint done chan struct{} } // WorkerContext implements context.Context. func worker(id uint, tasks <-chan func(*WorkerContext)) { done := make(chan struct{}) defer close(done) ctx := WorkerContext{ ID: id, done: make(chan struct{}), } for task := range w.tasks { task(&ctx) } } go worker(1, tasks) go worker(N, tasks)Issueのサンプル実装tasks <- func(wctx *WorkerContext) { // Do some worker related things with wctx.ID. ctx, cancel := context.WithTimeout(wctx, time.Second) defer cancel() doSomeWork(ctx) }具体的にどのような問題か示します。
WorkerContextを親として Worker が処理するタスクの処理タイムアウトをcontext.WithTimeoutを用いて設定したときの場合です。タスク数は本プロポーザルではNと記載されてあります。十分大きい数と仮定して良いでしょう。以下の図のような状況です。
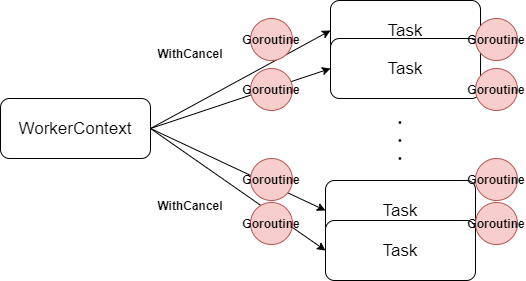
上記の基礎でも見たように特定の条件下で
WithCancalを呼び出したときの背景ではゴルーチンが起動していることになります。なのでカスタムコンテキストを用いてNつのタスクを起動したときにアプリケーションでgo worker(1, tasks)として起動しているNつのゴルーチンの他に、バッググラウンドでそれらを監視するNつのゴルーチンが起動していることになります。つまり以下のような状況です。
いくつかの議論を重ね @rsc 氏が問題をまとめています。
https://github.com/golang/go/issues/28728#issuecomment-532793417
To summarize the discussion so far, this issue concerns the implementation of context.WithCancel(parent) (or context.WithDeadline, but we can focus on WithCancel).
context.WithCancel(parent)の実装に関する問題と述べています。(実装を見ればわかりますがcontext.WithDeadlineも期限付きのcontext.WithCancelのラッパーとみなせるのでcontext.WithCancel(parent)に焦点を当てているのだと思います)The problem addressed by this issue is the creation of one goroutine per WithCancel call, which lasts until the created child is canceled. The goroutine is needed today because we need to watch for the parent to be done. The child is a known implementation; the parent is not.
WithCancelの呼び出しごとにゴルーチンが 1 つ生成されることが課題である 、と述べています。対応
修正内容
改善したときの commit はこちらです。(Go のコアチームの russ 氏がコミットしていますっ!!)
https://github.com/golang/go/commit/0ad368675bae1e3228c9146e092cd00cfb29ac27
対応する前提として
Simplicityを保つということを強く感じられました。新しい API を追加するのは複雑になってしまうので可能であれば避ける、内部用の API も変更しない、ということです。上記のコメント以外にも Proposal の Isuue の中でコメントしています。But what if we make the mapping succeed even when parent is an unknown implementation? Sameer is trying to get at that with the optional Parent method, but again we don't really want to add new methods, even optional ones. New API, even optional new API, complicates usage for all users, and if we can avoid that, we usually prefer to avoid it.
何が改善されたか?
This CL changes the way we map a parent context back to the underlying data structure. Instead of walking up through known context implementations to reach the *cancelCtx, we look up parent.Value(&cancelCtxKey) to return the innermost *cancelCtx, which we use if it matches parent.Done().
CL のメッセージからわかるように、子コンテキストを親コンテキストに紐付けるときの方法 を変更しています。
This way, a custom context implementation wrapping a *cancelCtx but not changing Done-ness (and not refusing to return wrapped keys) will not require a goroutine anymore in WithCancel/WithTimeout.
この改善によって カスタムコンテキストが条件を満たす場合(
*cancelCtxをラップする、かつDone()を想定外の変更をしない場合)には、カスタムコンテキストでもゴルーチンが生成されずにWithCancel/WithTimeoutを用いることができます。実装の詳細
Go1.13 までの実装は以下のようになっていました。上記の基礎で記載したとおりですが、紐付ける親コンテキストを取得するために
forループで型アサーションをしながら*cancelCtxが見つかるまでコンテキストグラフを逆向きに探索します。このとき 独自のカスタムコンテキスト型から生成されたコンテキストが存在する場合 、以下のdefaultの式に合致するため呼び出し元にreturn nil, falseが返り、結果としてゴルーチンが生成されます。Go1.13のcontext/context.gofunc parentCancelCtx(parent Context) (*cancelCtx, bool) { for { switch c := parent.(type) { case *cancelCtx: return c, true case *timerCtx: return &c.cancelCtx, true case *valueCtx: parent = c.Context default: return nil, false } } }CL で変更した後の実装を見てみます。従来同様、一番近い
*cancelCtxをコンテキストのグラフを子コンテキストから親コンテキストの方向に探索します。CLで修正された実装func parentCancelCtx(parent Context) (*cancelCtx, bool) { done := parent.Done() if done == closedchan || done == nil { return nil, false } p, ok := parent.Value(&cancelCtxKey).(*cancelCtx) if !ok { return nil, false } p.mu.Lock() ok = p.done == done p.mu.Unlock() if !ok { return nil, false } return p, true }CLで追加された実装var cancelCtxKey int // .. func (c *cancelCtx) Value(key interface{}) interface{} { if key == &cancelCtxKey { return c } return c.Context.Value(key) }Go1.13以前に存在しているメソッドfunc (c *valueCtx) Value(key interface{}) interface{} { if c.key == key { return c.val } return c.Context.Value(key) }
Value関数はコンテキストから値を取得できる関数です。CL では*cancelCtxにもValueメソッドが実装されました。*cancelCtxでのみ使われるint型の変数cancelCtxKeyを使い、変数のポインタアドレスを比較することでcancelCtxであることを判定しています。cancelCtx型ではない場合は親コンテキスト方向にコンテキストのValueを探索します。親方向に値を探索する動作は従来のValueメソッドと同じです。従来は型アサーションを用いてグラフを逆向きに探索していましたが、この場合は、context パッケージに含まれないコンテキスト、つまりカスタムコンテキストを用いた場合、ゴルーチンが生成されてしまいました。この修正によりカスタムコンテキストにおいても透過的に親のコンテキストを探索できるため、カスタムコンテキストよりも前に生成された
cancelCtxを探索することができます。またカスタムコンテキストが
Done()メソッドを独自拡張している場合はゴルーチンを生成しない対象外です。これは探索して見つけた*cancalCtxと親コンテキストのDone()メソッドで取得できる done チャネルを比較しています。カスタムコンテキストで独自拡張した場合はfalseになります。ok = p.done == doneテスト
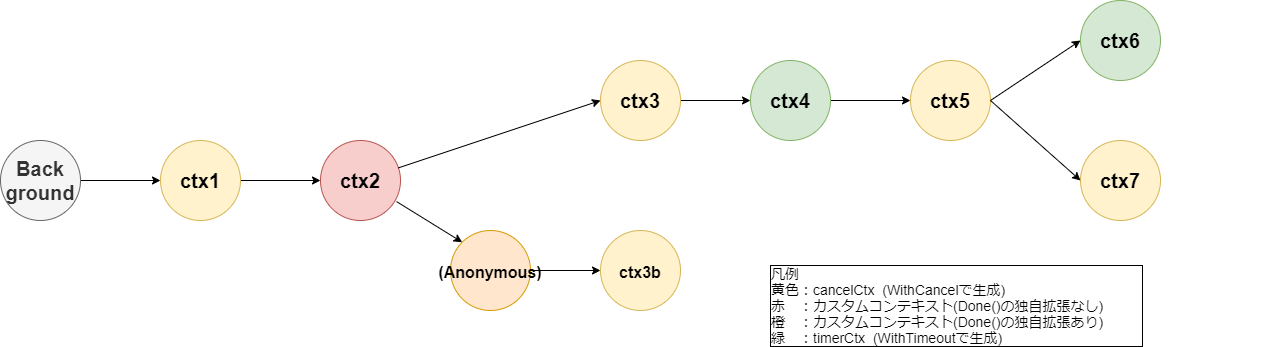
テストも明快です。むしろ最初にテストの内容を見て、どういう挙動になるか確認するほうが分かりやすかったかもしれません。以下のようなコンテキストのグラフでテストを実施していました。
以下のテストコードを確認するだけでも、キャンセルのコンテキストをフィールドにもつカスタムコンテキスト
ctx2がWithCancelで子コンテキストを生成してもゴルーチンが生成されないことが分かります。同様にDone()メソッドを実装しているカスタムコンテキスト(Anonymous) がWithCancelで子コンテキストを生成した場合はゴルーチンが 1 つ生成されていることが分かります。context/context_test.go(Go1.14)type myCtx struct { Context } type myDoneCtx struct { Context } func (d *myDoneCtx) Done() <-chan struct{} { c := make(chan struct{}) return c } func XTestCustomContextGoroutines(t testingT) { g := atomic.LoadInt32(&goroutines) checkNoGoroutine := func() { t.Helper() now := atomic.LoadInt32(&goroutines) if now != g { t.Fatalf("%d goroutines created", now-g) } } checkCreatedGoroutine := func() { t.Helper() now := atomic.LoadInt32(&goroutines) if now != g+1 { t.Fatalf("%d goroutines created, want 1", now-g) } g = now } _, cancel0 := WithCancel(&myDoneCtx{Background()}) cancel0() checkCreatedGoroutine() _, cancel0 = WithTimeout(&myDoneCtx{Background()}, 1*time.Hour) cancel0() checkCreatedGoroutine() checkNoGoroutine() defer checkNoGoroutine() ctx1, cancel1 := WithCancel(Background()) defer cancel1() checkNoGoroutine() ctx2 := &myCtx{ctx1} ctx3, cancel3 := WithCancel(ctx2) defer cancel3() checkNoGoroutine() _, cancel3b := WithCancel(&myDoneCtx{ctx2}) defer cancel3b() checkCreatedGoroutine() // ctx1 is not providing Done, must not be used ctx4, cancel4 := WithTimeout(ctx3, 1*time.Hour) defer cancel4() checkNoGoroutine() ctx5, cancel5 := WithCancel(ctx4) defer cancel5() checkNoGoroutine() cancel5() checkNoGoroutine() _, cancel6 := WithTimeout(ctx5, 1*time.Hour) defer cancel6() checkNoGoroutine() // Check applied to cancelled context. cancel6() cancel1() _, cancel7 := WithCancel(ctx5) defer cancel7() checkNoGoroutine() }まとめ
Go1.14 の context はカスタムコンテキストを用いたときに、適切にコンテキストを埋め込むと、
WithCancelやWithTimeoutでゴルーチンが生成されなくなりました。