- 投稿日:2020-02-15T23:43:49+09:00
iOSアプリで審査通ったバージョンを公開せずに新しいバージョンを申請する手順
iOSアプリで審査通ったバージョンを公開せずに新しいバージョンを申請したい。
たまにこういう事があり、何度かやったことがあるのですがいつもやり方を忘れて
確かに出来たはずなのにやり方がぱっと分からず右往左往して
もしかして出来なくなったの?(ありえそうなので・・・)
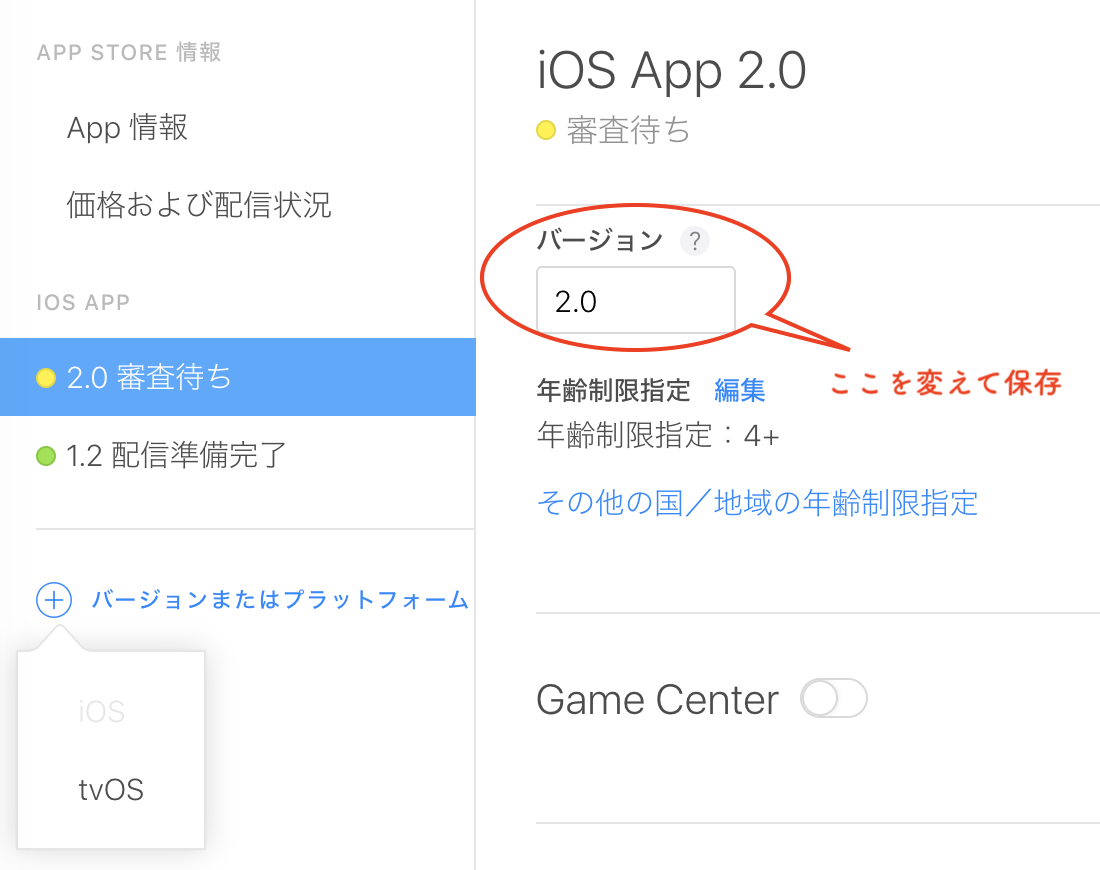
とかでやり方を思い出す(再発見する)まで時間がかかるのでちゃんとメモしておく。例えば、公開バージョンが1.0で新しいバージョンとして2.0を開発中なんだけど
ちょっと審査に不安があって事前に審査を行いたいということで1.1を作って審査に出し(手動で公開)、無事審査が通って、デベロッパーによるリリース待ちステータスまで進んだ。
その後に2.0を審査に出したいというケース。新しく2.0のバージョンを作ろうとしてもグレーアウトで選択できません。
ではどうやるのか。
バージョンの追加も削除も出来ないですが1.1のバージョン番号を変更することはできるので2.0に書き換えればそれだけでOK(なんと。。。)審査が通ったバイナリは一旦キャンセルします。
そしてここのバージョンを1.1から2.0に書き換えて保存します。
すると左のリストのバージョンも次に表示するときには2.0に変わっていると思います。
あとは新しい2.0のバイナリをアップロードして選択、通常の手順で進めればOK
- 投稿日:2020-02-15T16:08:20+09:00
Fastlaneのコマンドラインでバージョン番号を更新
今、開発しているアプリでは
Embedded Framework を活用してターゲット分割しており
バージョン番号が複数のInfo.plistにまたがっており
バージョンを更新する際は、手動もしくは、CircleCIで実行されるFastlaneで
バージョンを更新しているんですが、任意のタイミングで、バージョンを更新したいケースで、コマンドを忘れてしまうのでメモfastlane run increment_version_number version_number: "1.0.0Bundlerを使っている場合
bundle exec fastlane run increment_version_number version_number: "1.0.0
- 投稿日:2020-02-15T15:06:44+09:00
自動生成したSandBoxテスターを自動削除する
先日のpotatotips#68で発表した「SandBox Tester Tips」の続きです。
今回の記事を見る前に、こちらのSandBoxテスターの作成数の上限についても見ていただけるとやりたいことがよりイメージしやすいかと思います忙しい人向け要約
「SandBox Tester Tips」の要約
- fastlaneのspaceshipによって、SandBoxテスターを生成
- BitriseなどのCIでアプリの配布時に、SandBoxテスターも自動生成
- 自動生成の重複を回避するため、メールアドレスは日付やCIのビルド番号を利用
- 明確に上限数があるのかわからないが、SandBoxテスターを作りすぎるのにメリットはない
やりたいこと
SandBoxテスターの作成数の上限についてで検証したようにむやみにSandBoxテスターを自動生成をしつづけるのは良くないことがわかったので、どこかしらでSandBoxテスターを削除する必要が出てきました。
削除方針
SandBoxテスターの生成は自動なのに削除は手動という状態は避けたかったので、メールアドレスに日付を含め以下のような方針で削除を行うことを考えました。
- fastlaneのspaceshipでSandBoxテスターの一覧を取得
- 自動生成したSandBoxテスターのメールアドレスに日付が含まれているので、ある日よりも○日前に作成されたSandBoxテスターを抽出
- 抽出したSandBoxテスターを削除
自動削除のタイミング
あとはどのタイミングでSandBoxテスターの削除を実行するかです。
そんなに頻繁に削除をする必要性は感じなかったので、Bitriseのスケジューリングを利用して、週1単位で削除を行う
fastlane actionを実行するようにしました。サンプルコード
メールアドレスの形式例:
日付-CIビルド番号-index@test.come.g.
20200212-1111-1@test.com
20200212-1111-2@test.com
20200212-1111-3@test.com
.
.
.
20200212-1111-3@test.com
Fastfileのサンプル
require 'date'
require 'spaceship'

platform :ios do
  desc "1週間前よりも前に自動作成したSandboxテスターを削除する"
  lane :remove_old_sandbox_testers do
    username = "username" # you should change to your username
    password = "password" # you should change to your password

    Spaceship::Tunes.login(username, password)

    all_sandbox_testers = Spaceship::Tunes::SandboxTester.all
    old_sandbox_testers = all_sandbox_testers.filter {|sandbox_tester|

      # 自動作成したSandBoxテスターは日付がprefixになっているので抽出
      created_date_str = sandbox_tester.email.split("-").first
      if /^\d{4}\d{1,2}\d{1,2}$/.match(created_date_str) != nil then
        created_date = Date.strptime(created_date_str,'%Y%m%d')

        deletion_criteria_date = Date.today - 7
        if created_date < deletion_criteria_date then
          next(true)
        else
          next(false)
        end
      end

      next(false)
    }

    # 削除対象のSandBoxテスターが含まれる場合
    if !old_sandbox_testers.empty? then
      emails = old_sandbox_testers.map {|sandbox_tester| sandbox_tester.email }
      Spaceship::Tunes::SandboxTester.delete!(emails)
    end
  end
end
実行例
$ fastlane remove_old_sandbox_testersこのactionを実行することで、実行日よりも7日前のユーザーを削除するということが自動化されます。
まとめ
- SandBoxテスターの生成・削除を自動化することで手作業で行っていたSandBoxテスターからの解放
- なかなかSandBoxテスターに関連する情報がなかったので参考にしていただけるとうれしいです
関連URL
- 投稿日:2020-02-15T15:06:42+09:00
なぜ秘匿データをKeychainへ保存する必要があるのか
iPhoneはパスコードを設定するとiPhone内のデータが暗号化される1。
パスコードが設定されていない状態でも秘匿データをセキュアに保つためにKeychainへ保存する必要がある。
- 投稿日:2020-02-15T14:37:01+09:00
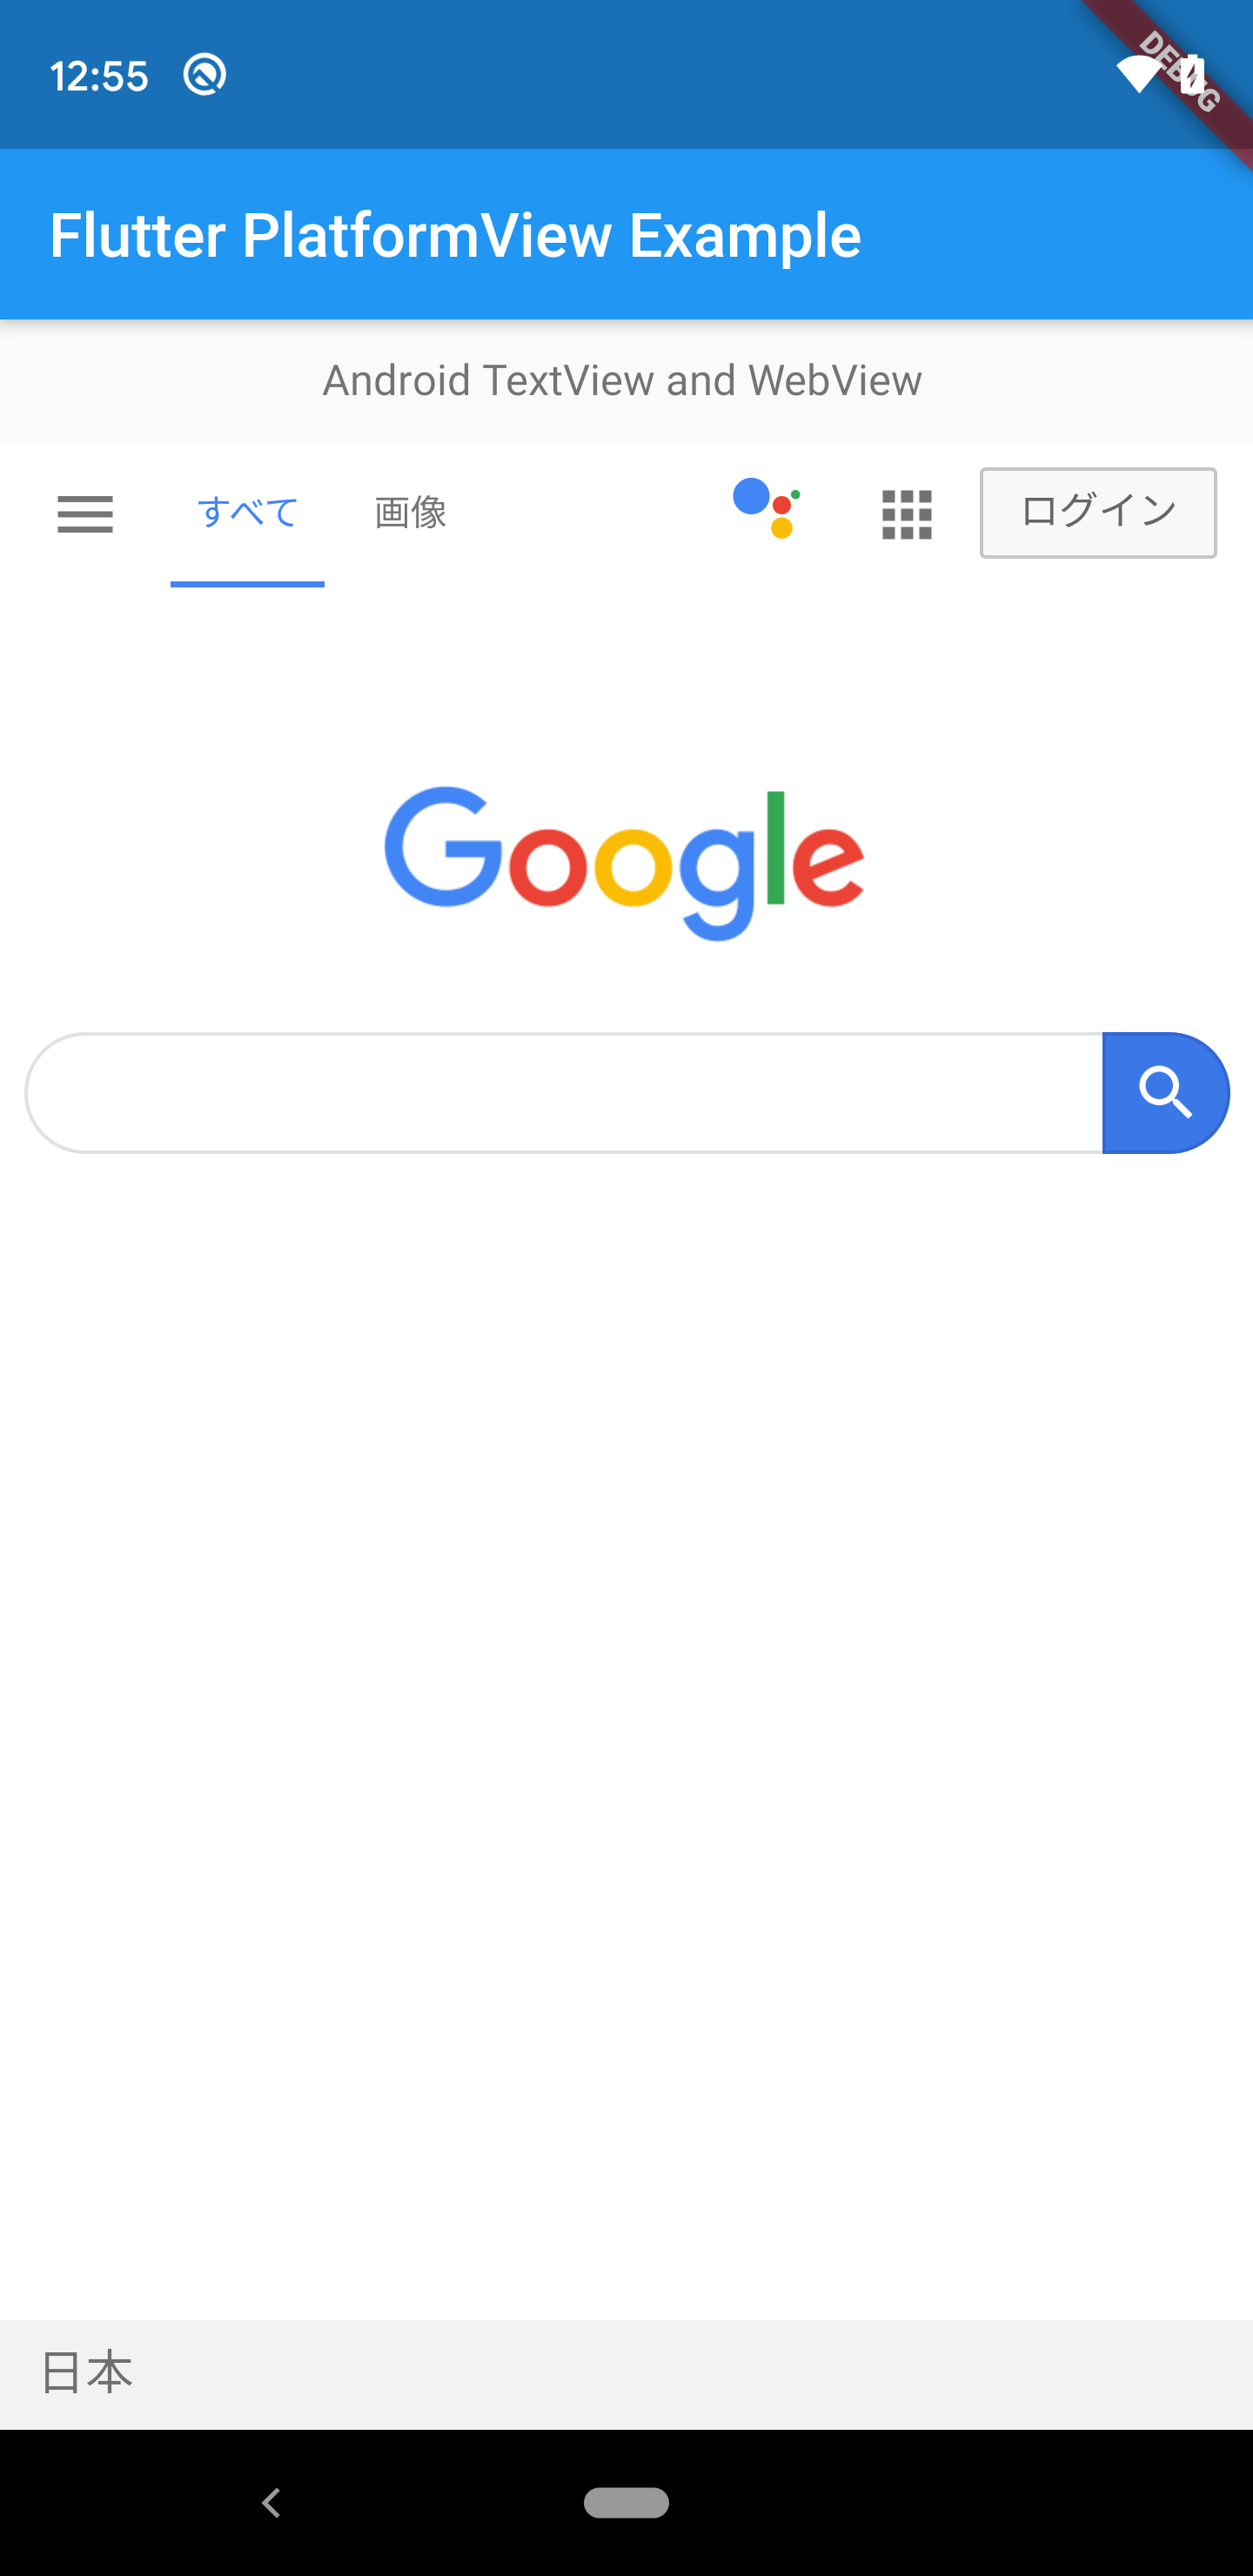
Flutter PlatformViewを利用した簡易WebViewプラグインの作り方
はじめに
Flutterの
PlatformView機能を利用したView系のプラグインの作り方について解説します。
解説用の題材として、TextViewとWebViewを用いました。
PlatformViewとは?
通常、FlutterはFlutterのフレームワークで用意されているウィジェットしか利用することが出来ません (ウィジェット一覧はWidget catalog) が、PlatformView機能を利用するとプラットフォーム (Android/iOS) 固有のViewをFlutterのウィジェットとして利用することが出来ます。
Flutterフレームワークは、この
PlatformView機能をAndroid, iOS向けに使い易いAPIにして機能を提供してくれています。それがそれぞれAndroidViewとUiKitViewです。基本的に開発者はこの機能を利用します。ソースコードはここです。ただし、表示を行うだけであれば上記を利用すればOKですが、Platform側とやりとりを行うには独自で通信部分を作成する必要があり、その時にメインで利用するのが
MethodChannelです。MethodChannelについてはFlutter MethodChannel APIの使い方を併せて参照してください。PlaftormViewの仕組み
OpenGLやVulkan等のグラフィックスの知識がある方は理解し易いかもしれませんが、プラットフォーム側で仮想画面 (サーフェス) に描画し、その描画データをFlutter側で取得し、Flutter側のレンダリングによりFlutter側の画面と合成し、最終的な画面を生成しています。
以下、Android版のPlatformViewのイメージ図です。
iOS側は実装を追いかけていませんが、Flutterの最後の秘宝、Platform Viewの実装を調べに行くが参考になると思います。おそらくiOSでもAndroidと同じようなことをやっていると思います。
基本的なプラグインの作成の流れ (View系の話に限定)
- 【プラットフォーム側】 PlatformViewを継承したプラグイン用のViewを作成
- 【プラットフォーム側】 PlatformViewFactoryを継承したクラスで上記のViewを生成
- 【プラットフォーム側】 FlutterPluginを継承したプラグイン登録クラス内でChannel登録
- 【プラットフォーム側】 MainActivityで上記プラグインクラスを登録
- 【Flutter側】 プラグイン対象Viewの独自ウィジェットを作成し、その中でAndroidViewウィジェットを生成
- 【Flutter側】 必要があれば、上記の独自ウィジェットの中でMethodChannelを利用して相互呼び出し
- 【Flutter側】 上記の独自ウィジェットを画面のレイアウトに組み込む
Flutter Framework内の実装的な部分では、System Channelsのplatform_viewを利用しています。リンク先にQiitaの記事を書いていますので、参考にしてください。
プラットフォーム (Android) 側のコード
プラットフォーム側について解説します。
1. Flutter用のWebViewプラグインView作成
io.flutter.plugin.platform.PlatformViewを継承したFlutterWebViewクラスを作成します。内部では
WebViewをインスタンスし、MethodChannelでイベントが発生した時にその引数のデータ (URL) を開くというシンプルなサンプルです。
WebViewはAndroidXを利用していますが、詳細はこちらを参照してください。同じくMethodChannelについてもこちらにまとめていますので、参照して下さい。MethodChannelの注意点としては、各PlatformView事にFlutter側からint側のidが振られるため、それを意識したチャンネル名を指定する必要があることです。
FlutterWebView.ktpackage com.example.flutter_platform_view_app import android.content.Context import android.view.View import android.webkit.WebView import io.flutter.plugin.common.BinaryMessenger import io.flutter.plugin.common.MethodCall import io.flutter.plugin.common.MethodChannel import io.flutter.plugin.common.MethodChannel.MethodCallHandler import io.flutter.plugin.platform.PlatformView class FlutterWebView internal constructor(context: Context?, messenger: BinaryMessenger?, id: Int) : PlatformView, MethodCallHandler { private val webView: WebView private val methodChannel: MethodChannel init { webView = WebView(context) webView.apply { settings.apply { // enable Javascript javaScriptEnabled = true setSupportZoom(true) builtInZoomControls = true displayZoomControls = false // no zoom button loadWithOverviewMode = true useWideViewPort = true domStorageEnabled = true } } methodChannel = MethodChannel(messenger, "plugins.kurun.views/webview_$id") methodChannel.setMethodCallHandler(this) } @Override override fun getView(): View { return webView } @Override override fun onMethodCall(methodCall: MethodCall, result: MethodChannel.Result) { when (methodCall.method) { "setUrl" -> setUrl(methodCall, result) else -> result.notImplemented() } } private fun setUrl(methodCall: MethodCall, result: MethodChannel.Result) { val url = methodCall.arguments as String webView.loadUrl(url) result.success(null) } @Override override fun dispose() { webView.destroy() } }2. PlatformViewFactoryクラスの作成
PlatformViewFactoryクラスを継承したWebVewFactoryクラスを用意します。
PlatformViewを利用する場合、必ずこのPlatformViewFactoryを用意する必要があります。この中で先ほど作成したFluterWebViewをインスタンスします。WebViewFactory.ktpackage com.example.flutter_platform_view_app import android.content.Context import io.flutter.plugin.common.BinaryMessenger import io.flutter.plugin.common.StandardMessageCodec import io.flutter.plugin.platform.PlatformView import io.flutter.plugin.platform.PlatformViewFactory class WebViewFactory(private val messenger: BinaryMessenger) : PlatformViewFactory(StandardMessageCodec.INSTANCE) { override fun create(context: Context, id: Int, o: Any?): PlatformView { return FlutterWebView(context, messenger, id) } }3. FlutterPluginクラスの作成
io.flutter.embedding.engine.plugins.FlutterPluginを継承したWebViewPluginクラスを用意します。このクラスを最終的にAndroidのTopからプラグインとして登録することになります。WebViewPlugin.ktpackage com.example.flutter_platform_view_app import androidx.annotation.NonNull import io.flutter.embedding.engine.plugins.FlutterPlugin class WebViewPlugin : FlutterPlugin { override fun onAttachedToEngine(@NonNull flutterPluginBinding: FlutterPlugin.FlutterPluginBinding) { flutterPluginBinding.platformViewRegistry .registerViewFactory( "plugins.kurun.views/webview", WebViewFactory(flutterPluginBinding.binaryMessenger) ) } override fun onDetachedFromEngine(binding: FlutterPlugin.FlutterPluginBinding) { } }4. 作成したプラグインの登録
最後にプラグインを登録して完了です。
今回はMainActivityからWebViewPluginを登録します。MainActivity.ktpackage com.example.flutter_platform_view_app import androidx.annotation.NonNull import io.flutter.embedding.android.FlutterActivity import io.flutter.embedding.engine.FlutterEngine import io.flutter.plugins.GeneratedPluginRegistrant class MainActivity: FlutterActivity() { override fun configureFlutterEngine(@NonNull flutterEngine: FlutterEngine) { GeneratedPluginRegistrant.registerWith(flutterEngine) flutterEngine.plugins.add(WebViewPlugin()) } }Flutter (Dart) 側のコード
次にFlutterのDart側の対応について解説します。
5. WebViewウィジェットの作成
WebViewクラスを作成します。ポイントはAndroidViewを利用して先ほど用意したプラットフォーム側のWebViewプラグイン名を指定する点です。
AndroidViewのソースコードはこちらサンプルコードを見ていただければ分かると思いますが、非常に簡単に利用が出来ます。
web_view.dartimport 'dart:async'; import 'package:flutter/foundation.dart'; import 'package:flutter/material.dart'; import 'package:flutter/services.dart'; typedef void WebViewCreatedCallback(WebViewController controller); class WebView extends StatefulWidget { const WebView({ Key key, this.onWebViewViewCreated, }) : super(key: key); final WebViewCreatedCallback onWebViewViewCreated; @override State<StatefulWidget> createState() => _WebViewState(); } class _WebViewState extends State<WebView> { @override Widget build(BuildContext context) { if (defaultTargetPlatform == TargetPlatform.android) { return AndroidView( viewType: 'plugins.kurun.views/webview', onPlatformViewCreated: _onPlatformViewCreated, ); } return Text( '$defaultTargetPlatform is not supported!'); } void _onPlatformViewCreated(int id) { if (widget.onWebViewViewCreated == null) return; widget.onWebViewViewCreated(new WebViewController._(id)); } }6. MethodChannelでのプラットフォーム側の呼び出し (データ送信)
サンプルコードは、
onPlatformViewCreatedのコールバックのタイミングでプラットフォーム側のWebViewプラグインのMethodChannelを作成し、main.dart側から任意のURLを送信し出来るようにしました。web_view.dartclass WebViewController { WebViewController._(int id) : _channel = new MethodChannel('plugins.kurun.views/webview_$id'); final MethodChannel _channel; Future<void> setUrl(String url) async { assert(url != null); return _channel.invokeMethod('setUrl', url); } }7. 画面の作成
先ほど作成したWebViewウィジェットを好きに配置すれば完成です!
簡単ですよね?※TextViewプラグインについては解説していませんが、以下のサンプルコードには出てきます…。基本的な作りはWebViewプラグインと同じです!
main.dartimport 'package:flutter/material.dart'; import 'package:flutter_platform_view_app/text_view.dart'; import 'package:flutter_platform_view_app/web_view.dart'; void main() => runApp(MyApp()); class MyApp extends StatelessWidget { @override Widget build(BuildContext context) { return MaterialApp( title: 'Flutter PlatformView API', theme: ThemeData( primarySwatch: Colors.blue, ), home: MyHomePage(title: 'Flutter PlatformView Example'), ); } } class MyHomePage extends StatefulWidget { MyHomePage({Key key, this.title}) : super(key: key); final String title; @override _MyHomePageState createState() => _MyHomePageState(); } class _MyHomePageState extends State<MyHomePage> { @override Widget build(BuildContext context) { return Scaffold( appBar: AppBar(title: Text(widget.title)), body: Column(children: [ Center( child: Container( padding: EdgeInsets.symmetric(vertical: 10.0), width: 200.0, height: 40.0, child: TextView( onTextViewCreated: _onTextViewCreated, ) ) ), Expanded( flex: 3, child: WebView( onWebViewViewCreated: _onWebViewCreated, ) ) ]) ); } void _onTextViewCreated(TextViewController controller) { controller.setText('Android TextView and WebView example.'); } void _onWebViewCreated(WebViewController controller) { controller.setUrl('https://www.google.co.jp/'); } }サンプルコード一式
上記で解説したソースコードのプロジェクトファイル一式を以下にUPしています。
Android環境であればそのまま動作するため、参考にしてください。
https://github.com/Kurun-pan/flutter-platformview-example参考文献

- 投稿日:2020-02-15T13:31:59+09:00
iOS開発メモ
UITextView in UITableViewCel の高さ変更メモ
class ViewController: UITextViewDelegate {

    var currentKeyboardHeight: CGFloat = 0

    override func viewWillAppear(_ animated: Bool) {
        super.viewWillAppear(animated)
        addObservers(showSelector: #selector(showKeyboard), hideSelector: #selector(hideKeyboard))
    }

    @objc func showKeyboard(_ notification: Notification) {
        currentKeyboardHeight = (notification.userInfo?[UIResponder.keyboardFrameEndUserInfoKey] as? NSValue)?.cgRectValue.height ?? 0
    }

    func textViewDidChange(_ textView: UITextView) {
        // TextViewの中身によってcellの高さを必要に応じて変えている
        let oldHeight = textView.bounds.height
        let newHeight = textView.sizeThatFits(CGSize(width: textView.bounds.width, height: CGFloat.greatestFiniteMagnitude)).height

        if oldHeight != newHeight {
            let cellRect = tableView.rectForRow(at: IndexPath(row: 4, section: 0))
            let memoTextViewTopLine: CGFloat = tableView.convert(cellRect, to: self.view).minY
            let newBottomLine = memoTextViewTopLine + newHeight
            let keyboardTopLine: CGFloat = view.bounds.height - currentKeyboardHeight

            if newBottomLine >= keyboardTopLine {
                // キーボードに隠れる高さになったらスクロールするようにして回避
                textView.isScrollEnabled = true
            } else if textView.isScrollEnabled {
                // テキストを削除して、隠れない高さになった直後は高さがずれるのでtableView.beginUpdates()とかしない
                textView.isScrollEnabled = false
            } else {
                // それ以外はスクロールを無効化してセルの高さを変更する
                textView.isScrollEnabled = false
                tableView.beginUpdates()
                tableView.endUpdates()
            }
        }
    }

    func textViewDidEndEditing(_ textView: UITextView) {
        tableView.contentOffset.y = 0
    }
}
- 投稿日:2020-02-15T10:56:47+09:00
Storyboardで制約設定したViewの位置をコードで取得したい
問題
Storyboardで制約指定したViewのframeをコードで取得したかったとき、その時点でのsizeはうまくとれているけど、originがうまくとれてなかった。
初歩的な問題かもしれないけど、はまって困った。
Viewが描画されたあとのような以下のようなときに起きてた。func scrollViewDidEndDecelerating(_ scrollView: UIScrollView) { print(targetView.frame) } -> (0.0, 0.0, 100.0, 100.0)結論
translatesAutoresizingMaskIntoConstraintsをfalseに設定すると取得できた。targetView.translatesAutoresizingMaskIntoConstraints = false
- 投稿日:2020-02-15T10:15:48+09:00
unity iosへのビルドエラーに関して(解決済み)
unityでビルドを試験的に行ったところエラーが出てしまい。どうにもなりませんでした。
エラー内容(一部省略)
1 Failed running/Application/Unity/省略../UnityLinker.exe
2 Exception 省略il2cpp..../UnityLinker.exe did not run properly使用Unity 2019.3.1 MacBook Air
解決策は、
① Unity のプロジェクト(ゲーム)をUnity(アプリケーション)フォルダ(デレクトリ)
に保存。② buildの保存先もunityのアプリケーション内に保存
私自身はプロジェクトをSDカード(外部)に保存していました。
やったこと
① 以前に作ったプロジェクトをassetからexport(この場合の保存場所はどこでもいい)
② Unityを外部ではなくMacbook自身に再インストール
③ 新しくプロジェクトを作成(保存先はそのUnityのフォルダ内にする←重要)
④ テストとしてiosをbuildしてみる(成功)
⑤ ①をassetからインポート
⑥ buildしてみる→成功(保存さきはそのUnityのフォルダ内←重要)
- 投稿日:2020-02-15T09:54:14+09:00
[Swift] GoogleMapAPI ~現在地付近の施設を選びピン立て~
はじめに
これは、前回書いた記事[Swift] GoogleMapAPI 〜Map表示&現在値にピン立て編〜
と関連した部分があります。なので、GoogleMapAPIの導入などは省きますので、導入部分を読みたい方は前回記事をご参考ください。
対象者
- GoogleMapをアプリに組み込もうとしている方
- PlacesAPIを検討している方
バージョン
- Xcode....Version 11.1
- Swift....5.0
完成物
GoogleMapで現在地を表示したあと、現在地付近の情報をtableViewに表示し、cellをタップするとその地名にピンを立てる仕様になっております。
概要
前回記事では、現在位置をGoogleMapに表示する際に、Corelocationというデフォルトで存在するフレームワークとMaps SDK for iosの両方を用いて行っていましたが、今回はPlaces SDK for iosを用いて行いました。
実装
それでは実装に移ります。
基本的に、公式ドキュメントから読み取ったものなので、これを見た後に公式ドキュメントを見ると、理解が深まってよいかもしれません。
MapViewControllerに書くコード
まず、変数宣言していきます。今回宣言したのは以下の通り。
MapVIewController.swift@IBOutlet var showMapView: UIView! var locationManager = CLLocationManager() var mapView: GMSMapView! var placesClient: GMSPlacesClient! var zoomLevel: Float = 15.0ここでは、表示するViewの名前と、その他初期設定をしました。また、以下も宣言しました。
MapVIewController.swift// 近くにある建造物の情報を格納 var likelyPlaces: [GMSPlace] = [] // PlacesViewControllerのtableViewで選択されたときの建造物についての情報 var selectedPlace: GMSPlace?意味合いとしてはコメントアウトした通りです。
次に、
CLLocationManagerDelegateのDelegateメソッドをMapViewControllerに追記します。MapViewController.swift// Delegates to handle events for the location manager. extension MapViewController: CLLocationManagerDelegate { // Handle incoming location events. func locationManager(_ manager: CLLocationManager, didUpdateLocations locations: [CLLocation]) { let location: CLLocation = locations.last! print("Location: \(location)") let camera = GMSCameraPosition.camera(withLatitude: location.coordinate.latitude, longitude: location.coordinate.longitude, zoom: zoomLevel) if mapView.isHidden { mapView.isHidden = false mapView.camera = camera } else { mapView.animate(to: camera) } } // Handle authorization for the location manager. func locationManager(_ manager: CLLocationManager, didChangeAuthorization status: CLAuthorizationStatus) { switch status { case .restricted: print("Location access was restricted") case .denied: print("User denied access to location.") // Display the map using the default location. mapView.isHidden = false case .notDetermined: print("Location status not determined.") case .authorizedAlways: fallthrough case .authorizedWhenInUse: print("Location status is OK.") @unknown default: fatalError() } } // Handle location manager errors. func locationManager(_ manager: CLLocationManager, didFailWithError error: Error) { locationManager.stopUpdatingLocation() print("Error: \(error)") } }上記のlocationManager(: didUpdateLocations:)デリゲートメソッドは、位置情報を取得・更新するたびに呼ばれます。また、locationManager(: didChangeAuthorization)デリゲートメソッドは、ユーザーのプリバシー情報が変わるたびに呼ばれます。
次に、Viewdidloadに以下のコードを書きます。
MapViewController.swiftoverride func viewDidLoad() { super.viewDidLoad() // location managerの初期化 locationManager = CLLocationManager() locationManager.desiredAccuracy = kCLLocationAccuracyBest locationManager.requestAlwaysAuthorization() locationManager.distanceFilter = 50 locationManager.startUpdatingLocation() locationManager.delegate = self placesClient = GMSPlacesClient.shared() // Create a map. let camera = GMSCameraPosition.camera(withLatitude: defaultLocation.coordinate.latitude, longitude: defaultLocation.coordinate.longitude, zoom: zoomLevel) mapView = GMSMapView.map(withFrame: showMapView.bounds, camera: camera) // mapView.settings.myLocationButton = true mapView.autoresizingMask = [.flexibleWidth, .flexibleHeight] mapView.isMyLocationEnabled = true // Add the map to the view, hide it until we've got a location update. showMapView.addSubview(mapView) mapView.isHidden = true }上記は、ViewDidloadにて、location managerの初期化とMapの表示を行います。
次に、以下のメソッドを追加します。これは、近くにある施設の情報を、likelyPlacesの配列に追加するためのものです。
MapViewController.swift//可能性のある場所を配列に入力. func listLikelyPlaces() { placesClient.currentPlace(callback: { (placeLikelihoods, error) -> Void in if let error = error { // TODO: Handle the error. print("Current Place error: \(error.localizedDescription)") return } // likelyPlacesに値を挿入 if let likelihoodList = placeLikelihoods { for likelihood in likelihoodList.likelihoods { let place = likelihood.place print("Current Place name \(String(describing: place.name)) at likelihood \(likelihood.likelihood)") print("Current PlaceID \(String(describing: place.placeID))") self.likelyPlaces.append(place) } } }) }次に、ボタンを押したときに、次の画面に
likelyPlaces配列の値を受け渡すために、prepare(for segue:)を追加で書きます。MapViewController.swift// Prepare the segue. override func prepare(for segue: UIStoryboardSegue, sender: Any?) { if segue.identifier == "segueToSelect" { if let nextViewController = segue.destination as? PlacesViewController { nextViewController.likelyPlaces = likelyPlaces } } }ボタンを押したときのアクションは以下の通り。
MapViewController.swift@IBAction func unwindToMain(segue: UIStoryboardSegue) { // Clear the map. mapView.clear() listLikelyPlaces() self.performSegue(withIdentifier: "segueToSelect", sender: nil) }これで、ひとまずMapViewControllerのコードは落ち着きました。ビルドして、Mapが表示されること・likelyPlacesを出力してみて値が入っているかなどを確認してください。
PlacesViewControllerに書くコード
次に、周辺施設の情報をtableViewにてまとめている、についてふれます。
これは、tableViewの知識でいけるので、コードのみ記載します。
PlacesViewController.swift//可能性のある場所を配列に入力. import UIKit import GoogleMaps import GooglePlaces class PlacesViewController: UIViewController,UITableViewDataSource, UITableViewDelegate { @IBOutlet weak var tableView: UITableView! var likelyPlaces: [GMSPlace] = [] var selectedPlace: GMSPlace? override func viewDidLoad() { super.viewDidLoad() tableView.dataSource = self tableView.delegate = self } func tableView(_ tableView: UITableView, numberOfRowsInSection section: Int) -> Int { likelyPlaces.count } func tableView(_ tableView: UITableView, cellForRowAt indexPath: IndexPath) -> UITableViewCell { let cell = tableView.dequeueReusableCell(withIdentifier: "cell") cell?.textLabel?.text = likelyPlaces[indexPath.row].name return cell! } // Pass the selected place to the new view controller. override func prepare(for segue: UIStoryboardSegue, sender: Any?) { if segue.identifier == "unwindToMain" { if let nextViewController = segue.destination as? MapViewController { nextViewController.selectedPlace = selectedPlace } } } func tableView(_ tableView: UITableView, didSelectRowAt indexPath: IndexPath) { selectedPlace = likelyPlaces[indexPath.row] performSegue(withIdentifier: "unwindToMain", sender: self) } }最後のtableViewのdelegateメソッドと
prepare(forsegue:)で、タップされたcellの情報を次のviewControllerに受け渡しています。MapViewControllerに付け足し
値が受け渡された先のViewControllerも、最初に作ったMapViewControllerとします。ただ、cellの値の部分にピン立てをするコードを付け足します。
viewDidLoad()にて、以下のコードを付け足してください。
MapViewControlleroverride func viewDidLoad() { super.viewDidLoad() // mapにmarkerを加える if selectedPlace != nil { let marker = GMSMarker(position: (self.selectedPlace?.coordinate)!) marker.title = selectedPlace?.name marker.snippet = selectedPlace?.formattedAddress marker.map = mapView } }これで、完成版のように表示することができたかと思います!
おわりに
Google Maps Platformが提供しているAPIは多岐に渡ります。
知る分アイディアの幅も拡がると思うので、精進していきます。

- 投稿日:2020-02-15T09:54:14+09:00
[Swift] GoogleMapAPI ~現在地付近の施設情報を取得し、任意の場所でピン立て~
はじめに
これは、前回書いた記事[Swift] GoogleMapAPI 〜Map表示&現在値にピン立て編〜
と関連した部分があります。なので、GoogleMapAPIの導入などは省きますので、導入部分を読みたい方は前回記事をご参考ください。
対象者
- GoogleMapをアプリに組み込もうとしている方
- PlacesAPIを検討している方
バージョン
- Xcode....Version 11.1
- Swift....5.0
完成物
GoogleMapで現在地を表示したあと、現在地付近の情報をtableViewに表示し、cellをタップするとその地名にピンを立てる仕様になっております。
概要
前回記事では、現在位置をGoogleMapに表示する際に、Corelocationというデフォルトで存在するフレームワークとMaps SDK for iosの両方を用いて行っていましたが、今回はPlaces SDK for iosを用いて行いました。
実装
それでは実装に移ります。
基本的に、公式ドキュメントから読み取ったものなので、これを見た後に公式ドキュメントを見ると、理解が深まってよいかもしれません。
MapViewControllerに書くコード
まず、変数宣言していきます。今回宣言したのは以下の通り。
MapVIewController.swift@IBOutlet var showMapView: UIView! var locationManager = CLLocationManager() var mapView: GMSMapView! var placesClient: GMSPlacesClient! var zoomLevel: Float = 15.0ここでは、表示するViewの名前と、その他初期設定をしました。また、以下も宣言しました。
MapVIewController.swift// 近くにある建造物の情報を格納 var likelyPlaces: [GMSPlace] = [] // PlacesViewControllerのtableViewで選択されたときの建造物についての情報 var selectedPlace: GMSPlace?意味合いとしてはコメントアウトした通りです。
次に、
CLLocationManagerDelegateのDelegateメソッドをMapViewControllerに追記します。MapViewController.swift// Delegates to handle events for the location manager. extension MapViewController: CLLocationManagerDelegate { // Handle incoming location events. func locationManager(_ manager: CLLocationManager, didUpdateLocations locations: [CLLocation]) { let location: CLLocation = locations.last! print("Location: \(location)") let camera = GMSCameraPosition.camera(withLatitude: location.coordinate.latitude, longitude: location.coordinate.longitude, zoom: zoomLevel) if mapView.isHidden { mapView.isHidden = false mapView.camera = camera } else { mapView.animate(to: camera) } } // Handle authorization for the location manager. func locationManager(_ manager: CLLocationManager, didChangeAuthorization status: CLAuthorizationStatus) { switch status { case .restricted: print("Location access was restricted") case .denied: print("User denied access to location.") // Display the map using the default location. mapView.isHidden = false case .notDetermined: print("Location status not determined.") case .authorizedAlways: fallthrough case .authorizedWhenInUse: print("Location status is OK.") @unknown default: fatalError() } } // Handle location manager errors. func locationManager(_ manager: CLLocationManager, didFailWithError error: Error) { locationManager.stopUpdatingLocation() print("Error: \(error)") } }上記のlocationManager(: didUpdateLocations:)デリゲートメソッドは、位置情報を取得・更新するたびに呼ばれます。また、locationManager(: didChangeAuthorization)デリゲートメソッドは、ユーザーのプリバシー情報が変わるたびに呼ばれます。
次に、Viewdidloadに以下のコードを書きます。
MapViewController.swiftoverride func viewDidLoad() { super.viewDidLoad() // location managerの初期化 locationManager = CLLocationManager() locationManager.desiredAccuracy = kCLLocationAccuracyBest locationManager.requestAlwaysAuthorization() locationManager.distanceFilter = 50 locationManager.startUpdatingLocation() locationManager.delegate = self placesClient = GMSPlacesClient.shared() // Create a map. let camera = GMSCameraPosition.camera(withLatitude: defaultLocation.coordinate.latitude, longitude: defaultLocation.coordinate.longitude, zoom: zoomLevel) mapView = GMSMapView.map(withFrame: showMapView.bounds, camera: camera) // mapView.settings.myLocationButton = true mapView.autoresizingMask = [.flexibleWidth, .flexibleHeight] mapView.isMyLocationEnabled = true // Add the map to the view, hide it until we've got a location update. showMapView.addSubview(mapView) mapView.isHidden = true }上記は、ViewDidloadにて、location managerの初期化とMapの表示を行います。
次に、以下のメソッドを追加します。これは、近くにある施設の情報を、likelyPlacesの配列に追加するためのものです。
MapViewController.swift//可能性のある場所を配列に入力. func listLikelyPlaces() { placesClient.currentPlace(callback: { (placeLikelihoods, error) -> Void in if let error = error { // TODO: Handle the error. print("Current Place error: \(error.localizedDescription)") return } // likelyPlacesに値を挿入 if let likelihoodList = placeLikelihoods { for likelihood in likelihoodList.likelihoods { let place = likelihood.place print("Current Place name \(String(describing: place.name)) at likelihood \(likelihood.likelihood)") print("Current PlaceID \(String(describing: place.placeID))") self.likelyPlaces.append(place) } } }) }次に、ボタンを押したときに、次の画面に
likelyPlaces配列の値を受け渡すために、prepare(for segue:)を追加で書きます。MapViewController.swift// Prepare the segue. override func prepare(for segue: UIStoryboardSegue, sender: Any?) { if segue.identifier == "segueToSelect" { if let nextViewController = segue.destination as? PlacesViewController { nextViewController.likelyPlaces = likelyPlaces } } }ボタンを押したときのアクションは以下の通り。
MapViewController.swift@IBAction func unwindToMain(segue: UIStoryboardSegue) { // Clear the map. mapView.clear() listLikelyPlaces() self.performSegue(withIdentifier: "segueToSelect", sender: nil) }これで、ひとまずMapViewControllerのコードは落ち着きました。ビルドして、Mapが表示されること・likelyPlacesを出力してみて値が入っているかなどを確認してください。
PlacesViewControllerに書くコード
次に、周辺施設の情報をtableViewにてまとめている、についてふれます。
これは、tableViewの知識でいけるので、コードのみ記載します。
PlacesViewController.swift//可能性のある場所を配列に入力. import UIKit import GoogleMaps import GooglePlaces class PlacesViewController: UIViewController,UITableViewDataSource, UITableViewDelegate { @IBOutlet weak var tableView: UITableView! var likelyPlaces: [GMSPlace] = [] var selectedPlace: GMSPlace? override func viewDidLoad() { super.viewDidLoad() tableView.dataSource = self tableView.delegate = self } func tableView(_ tableView: UITableView, numberOfRowsInSection section: Int) -> Int { likelyPlaces.count } func tableView(_ tableView: UITableView, cellForRowAt indexPath: IndexPath) -> UITableViewCell { let cell = tableView.dequeueReusableCell(withIdentifier: "cell") cell?.textLabel?.text = likelyPlaces[indexPath.row].name return cell! } // Pass the selected place to the new view controller. override func prepare(for segue: UIStoryboardSegue, sender: Any?) { if segue.identifier == "unwindToMain" { if let nextViewController = segue.destination as? MapViewController { nextViewController.selectedPlace = selectedPlace } } } func tableView(_ tableView: UITableView, didSelectRowAt indexPath: IndexPath) { selectedPlace = likelyPlaces[indexPath.row] performSegue(withIdentifier: "unwindToMain", sender: self) } }最後のtableViewのdelegateメソッドと
prepare(forsegue:)で、タップされたcellの情報を次のviewControllerに受け渡しています。MapViewControllerに付け足し
値が受け渡された先のViewControllerも、最初に作ったMapViewControllerとします。ただ、cellの値の部分にピン立てをするコードを付け足します。
viewDidLoad()にて、以下のコードを付け足してください。
MapViewControlleroverride func viewDidLoad() { super.viewDidLoad() // mapにmarkerを加える if selectedPlace != nil { let marker = GMSMarker(position: (self.selectedPlace?.coordinate)!) marker.title = selectedPlace?.name marker.snippet = selectedPlace?.formattedAddress marker.map = mapView } }これで、完成版のように表示することができたかと思います!
おわりに
Google Maps Platformが提供しているAPIは多岐に渡ります。
知る分アイディアの幅も拡がると思うので、精進していきます。
- 投稿日:2020-02-15T02:43:12+09:00
iOS でサイズやスタイルを維持したままフォントを一括変換
目標
- フォント (Font Family) を一括で変換する。
- 指定済みの Size, Weight, Italic を維持する。
- Weight はフォントによって数が異なるため、指定済みに最も近い Weight を利用する。
- どの Font Family にも適用できるよう汎用性の高いコードにする。
完成型
解説はどうでもいいのでコードの全体像を見たいという方はどうぞ
クリックして開く
extension UIFont {

    convenience init?(familyName: String, weight: UIFont.Weight, isItalic: Bool = false, size: CGFloat) {
        let font = UIFont
            .fontNames(forFamilyName: familyName)
            .compactMap({ UIFont(name: $0, size: size) })
            .filter({ $0.isItalic == isItalic })
            .min(by: { abs($0.weight.rawValue - weight.rawValue) < abs($1.weight.rawValue) })
        self.init(name: font?.fontName ?? "", size: size)
    }

    private var traits: [UIFontDescriptor.TraitKey: Any] {
        return fontDescriptor.object(forKey: .traits) as? [UIFontDescriptor.TraitKey: Any] ?? [:]
    }

    var weight: UIFont.Weight {
        guard let weight = traits[.weight] as? NSNumber else { return .regular }
        return UIFont.Weight(rawValue: CGFloat(truncating: weight))
    }

    var isItalic: Bool {
        return traits[.slant] as? NSNumber != 0
    }
}

extension UILabel {

    @objc var fontFamily: String {
        set {
            guard let font = UIFont(familyName: newValue, weight: self.font.weight, isItalic: self.font.isItalic, size: self.font.pointSize) else { return }
            self.font = font
        }
        get {
            return self.font.familyName
        }
    }
}

// 使用時
UILabel.appearance().fontFamily = "Avenir"
最初に
UILabelなどは、UIAppearanceを用いることで、特定のプロパティを一括して設定できます。UILabel.apperance().font = UIFont(name: "Gills Sans", size: 14)これに加え、Weight (文字の太さ) なども考慮した上でフォントファミリーを指定する方法が、下記で良く解説されています。
https://qiita.com/yfujiki/items/7de9421e63dfbfbcc7d4これを参考にさせていただきつつ、
Italic や、多数の Weight などへの考慮もするため、下記で解説するようなコードで実装しました。フォント周りの理解
コードの前に、フォント周りについて少し説明します。理解してる人は読み飛ばしてください。
Family Names と Font Name
例で2種類だしてみました。違いを理解しておいてください。
Family Name Font Name Helvetica Neue HelveticaNeue-Thin
HelveticaNeue-ThinItalic
HelveticaNeue
HelveticaNeue-Italic
etc...Hiragino Sans HiraginoSans-W3
HiraginoSans-W6
HiraginoSans-W7ここで大事なのは
- 各 Family Name に全ての Weight / Italic があるわけではない
→ もともと指定していた Weight に最も近い Weight を取得すべき- Font Name の命名規則に統一性は無い 1
→ 名称 (Light, Thin, など) をもとに Weight を判定すべきでないFamily と Name の取得 / 確認方法
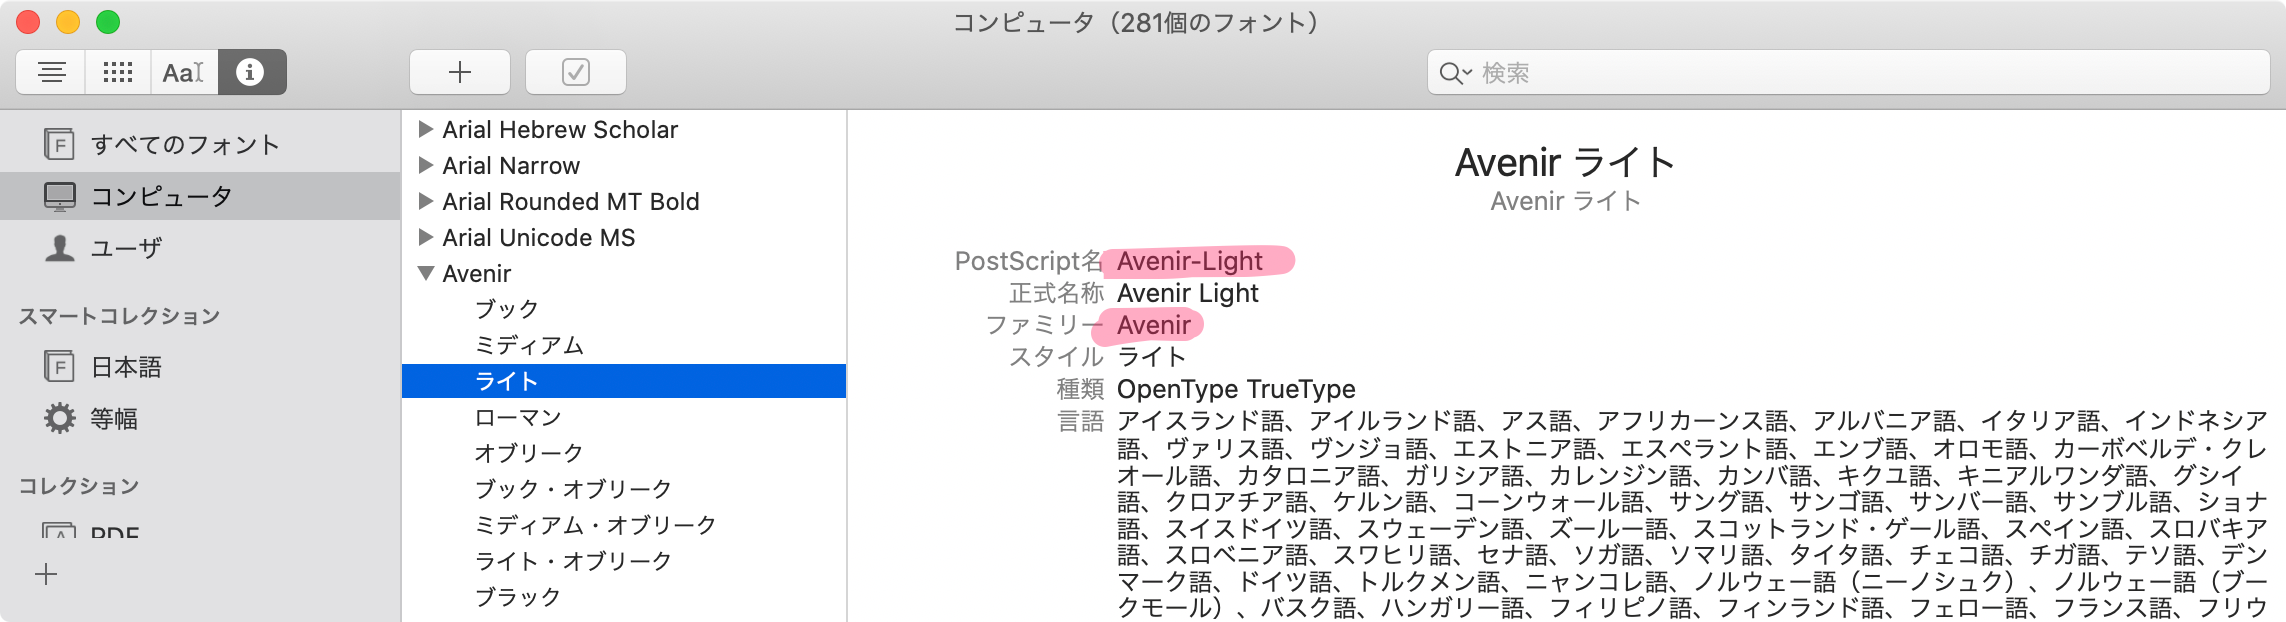
A. Mac に入っている Font Book.app でみる
「PostScript名」が Font Name、「ファミリー」が Font Family です。2
B. コードで確認する
Apple 公式記事 からコピペしました。
for family in UIFont.familyNames.sorted() {
    let names = UIFont.fontNames(forFamilyName: family)
    print("Family: \(family) Font names: \(names)")
}
UIFont のイニシャライザ
UIFont.init?(name fontName: String, size fontSize: CGFloat)を利用します。3
つまり、Font Family ではなく Font Name を使用することになります。解説
1. Weight と Italic を取得する
UIFontDescriptor経由で取得します。
UIFontDescriptor.TraitKey.slantで傾き具合を取得できるので、傾きが 0 でない場合に Italic とします。extension UIFont { private var traits: [UIFontDescriptor.TraitKey: Any] { return fontDescriptor.object(forKey: .traits) as? [UIFontDescriptor.TraitKey: Any] ?? [:] } var weight: UIFont.Weight { guard let weight = traits[.weight] as? NSNumber else { return .regular } return UIFont.Weight(rawValue: CGFloat(truncating: weight)) } var isItalic: Bool { return traits[.slant] as? NSNumber != 0 } }2. Font Family + Weight + Italic + Size でイニシャライズ
これらを踏まえ、Font Family・Weight・Italic・Size を引数としたイニシャライザを用意します。
- Family Name をもとに Font Name を取得
- Font Name をもとに UIFont を取得 (ここの Size はなんでもいい)
- Italic か否かでフィルタリング
- 引数で指定した Weight に最も近い Weight のものを取得
- イニシャライズ 4
extension UIFont {

    convenience init?(familyName: String, weight: UIFont.Weight, isItalic: Bool = false, size: CGFloat) {
        let font = UIFont
            .fontNames(forFamilyName: familyName)                                             // 1
            .compactMap({ UIFont(name: $0, size: size) })                                     // 2
            .filter({ $0.isItalic == isItalic })                                              // 3
            .min(by: { abs($0.weight.rawValue - weight.rawValue) < abs($1.weight.rawValue) }) // 4
        self.init(name: font?.fontName ?? "", size: size)                                     // 5
    }
}
3. UILabel で Font Family を指定できるように
これで終わりです。
用意した Weight / Italic get-only property と initializer を使用し、Font Family をもとにフォントを変更できるようにします。
存在しない Faimly Name を指定すると無視されます。
@objcをつけることでUIAppearanceを使用できます。extension UILabel { /// Set value that can be obtained from `UIFont.familyNames`. /// Can use UIAppearance because of using `@objc`. @objc var fontFamily: String { set { guard let font = UIFont(familyName: newValue, weight: self.font.weight, isItalic: self.font.isItalic, size: self.font.pointSize) else { return } self.font = font } get { return self.font.familyName } } }使用する時UILabel.appearance().fontFamily = "Avenir"環境 / 参考
Swift iOS 5 13
- iOS で UIAppearance を使ってグローバルなフォント変更を行う
https://qiita.com/yfujiki/items/7de9421e63dfbfbcc7d4- Stack Overflow | Font Weight の取得
https://stackoverflow.com/a/53818276- Apple Documentation | UIFontDescriptor.TraitKey.slant
https://developer.apple.com/documentation/uikit/uifontdescriptor/traitkey/1616686-slant- Apple Documentaion | Adding a Custom Font to Your App
https://developer.apple.com/documentation/uikit/text_display_and_fonts/adding_a_custom_font_to_your_app
大体のフォントは
<FamilyName>-<Weight><Italic>のような感じですが、例で挙げたような Hiragino Sans パターンなどもありえます。 ↩このアプリ内で表示されているフォントはPC内のものなので、開発中のアプリ内で全て使用できるわけではありません。逆に載っていないものも使用できるものがあります。 ↩
init(descriptor: UIFontDescriptor, size pointSize: CGFloat) というのもあります ↩
convenience イニシャライザを使用しているので
self.initしていますが、 class関数でも良ければ、そのままfont変数を返すだけで良いですね。お好みでどうぞ。 ↩
- 投稿日:2020-02-15T02:40:54+09:00
xcodebuild コマンドで CODE_SIGNING_ALLOWED=NO をつけないと署名されることがある (Xcode 10.2 以降っぽい)
xcodebuildコマンドで iOS のプロジェクトをビルドする際の話。発生した問題
Xcode 10.1 を使っていたときは下記のようなコマンドで問題なく動いていた。
xcodebuild clean build \
  -workspace Foo.xcworkspace -scheme Bar -configuration Debug \
  CODE_SIGN_IDENTITY=\"\" CODE_SIGNING_REQUIRED=NO
が、Xcode 11.1 を使うようにしたら、次のようなエラーが発生するようになってしまった。
error: An empty identity is not valid when signing a binary for the product type 'App Extension'. (in target 'Baz' from project 'Foo')
どうやら署名しようとしたものの空の identity は valid ではないということでエラーになってしまう模様。
解決策
以下のように
CODE_SIGNING_ALLOWED=NOをつけると Xcode 11.1 でも署名されないようで、ビルドできるようになった。xcodebuild clean build \ -workspace Foo.xcworkspace -scheme Bar -configuration Debug \ CODE_SIGN_IDENTITY=\"\" \ CODE_SIGNING_REQUIRED=NO CODE_SIGNING_ALLOWED=NO備考
Xcode 10.1 の時は問題なくて Xcode 11.1 の時に問題に遭遇した、と書いたが、プロジェクトのコード自体も変化しているので、必ずしも Xcode のバージョンによる差異なのかどうかは確かではない。 が、下記 「参考」 に挙げた事例を見る感じ、Xcode 10.2 から挙動が変わったっぽい。
参考
- https://github.com/openbakery/gradle-xcodePlugin/issues/411 : Xcode 10.2 を使っていて同様の問題に遭遇した例
- https://github.com/realm/jazzy/issues/1057 : Xcode 10.2 でこの問題が起こるということが書かれている
- 投稿日:2020-02-15T01:02:40+09:00
iPhoneやiPadのアプリで無料で広告ブロックする方法
参考にした記事
iPhoneのアプリで無料で「広告」を「消す」方法 ( 広告 ブロック iPhone iPad アプリ)
広告 ブロック iPhone LINE spotify スマートニュース グノシー うざい 消し方 多い 消す ios ipad みんはや ゲーム 広告消す chrome
https://saltiga.hatenablog.com/entry/2020/02/14/221426ブロックにはDNScloakというアプリを用います
https://github.com/s-s/dnscloak
https://github.com/DNSCrypt/dnscrypt-proxy
DNS cloakはgo製の dnscrypt2のラッパー。(どちらもOSSです)
ローカルにDNSサーバーを立てて、フィルターにリスト化された広告サーバーのURLのリクエストを返さないことで広告を遮断します。
アプリで流れる動画広告などは完全に遮断することができます。
広告のあった場所は空白になります。(空白の部分がないように整形してhtmlを返すことも技術的には可能でadguardなどが行なっていますがセキリュティ的な問題があります)
実際の広告の消し方
1 app storeで「dnscloak」と「ショートカット」をインストール
[https://itunes.apple.com/jp/app/id1452162351:embed]
[https://itunes.apple.com/jp/app/id915249334:embed]
2 Safariで以下のリンクを開く(ショートカットが起動します)
[https://www.icloud.com/shortcuts/f26f84bd19e24c548079a12e0b622664:embed:cite]
3 「ショートカットを追加」をクリック
[fsaltiga:20200214215208j:plain]ショートカット 広告ブロック
4 画面左下の「My workflow」を押し、「DNS cloak helper」をクリック(dns cloakが起動します)
[f5 DNS cloakの画面でDNS を選び、(cloudflaireが一番速いのでおすすめ)左上の再生ボタンを押す。
[f6 左上にVPNと言う表示が出たら成功です!
もしできなかった場合はコメント欄に報告してください。原因がわかれば教えます。
- 参考・引用元
- 投稿日:2020-02-15T00:35:10+09:00
[Swift] GoogleMapAPI 〜Map表示&現在値にピン立て編〜
はじめに
アプリにMap表示したいー!
そう考えたとき、思い浮かぶものはMapKitかGoogleMapです。
MapKitは、地図を表示することはもちろん、住所検索やピン配置などをデフォルトで使用できる素晴らしいフレームワークです。
GoogleMapはGoogle社が提供しているAPIを使用することにより表示することができ、様々な機能を実装することができます。
Google Maps PlatformMapKitはSwiftのみですが、GoogleMapは他の言語でも使用する可能性があるので、これを機に勉強しようと思い、その備忘録及びアウトプットのためにここに記載していきます。
対象者
- これからアプリにMapを導入したいと思っている人
- とりあえずGoogleMapなんぞやと思っている人
バージョン
- Xcode....Version 11.1
- Swift....5.0
実装
導入
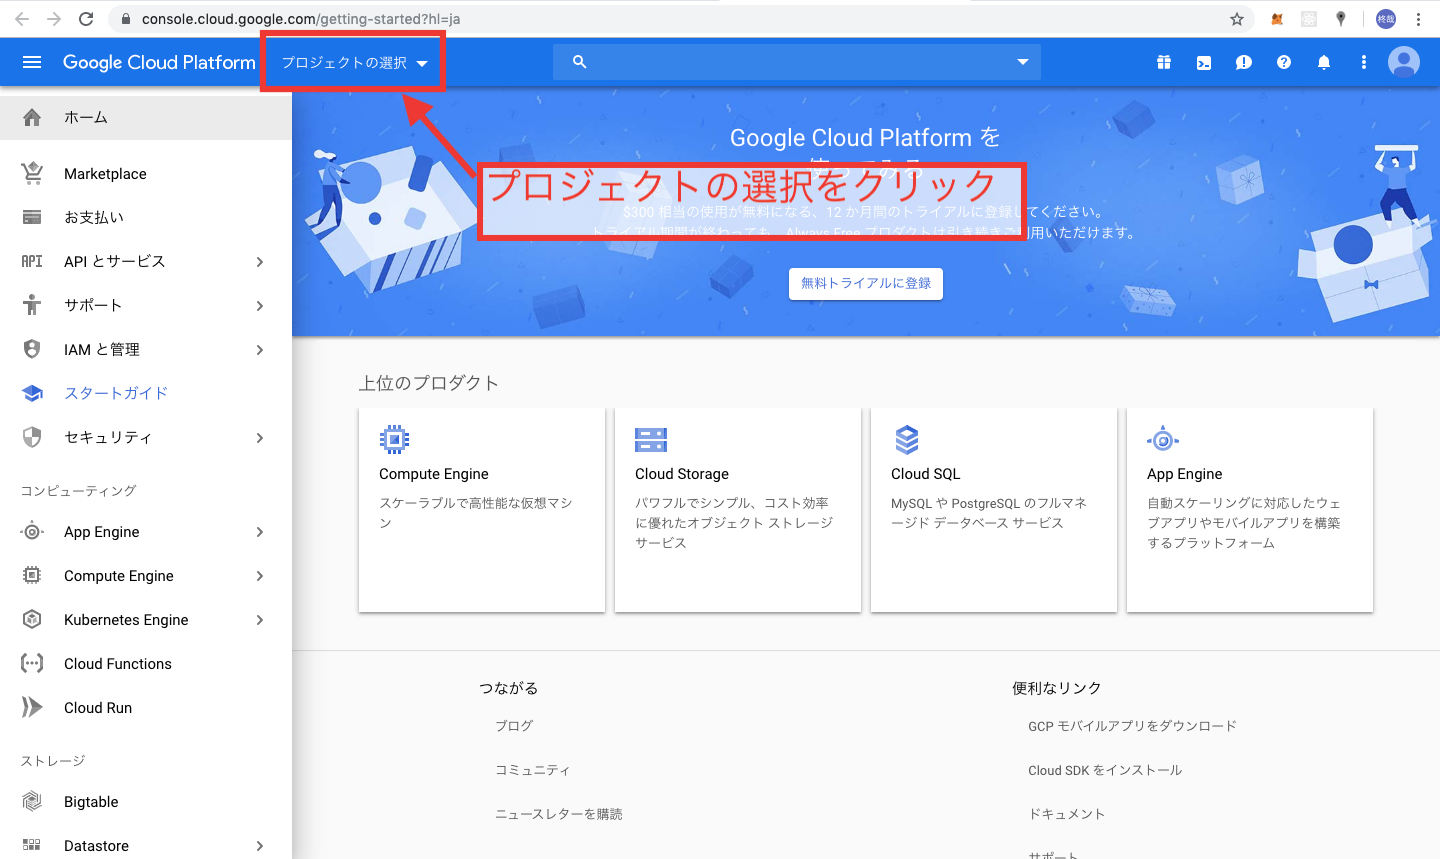
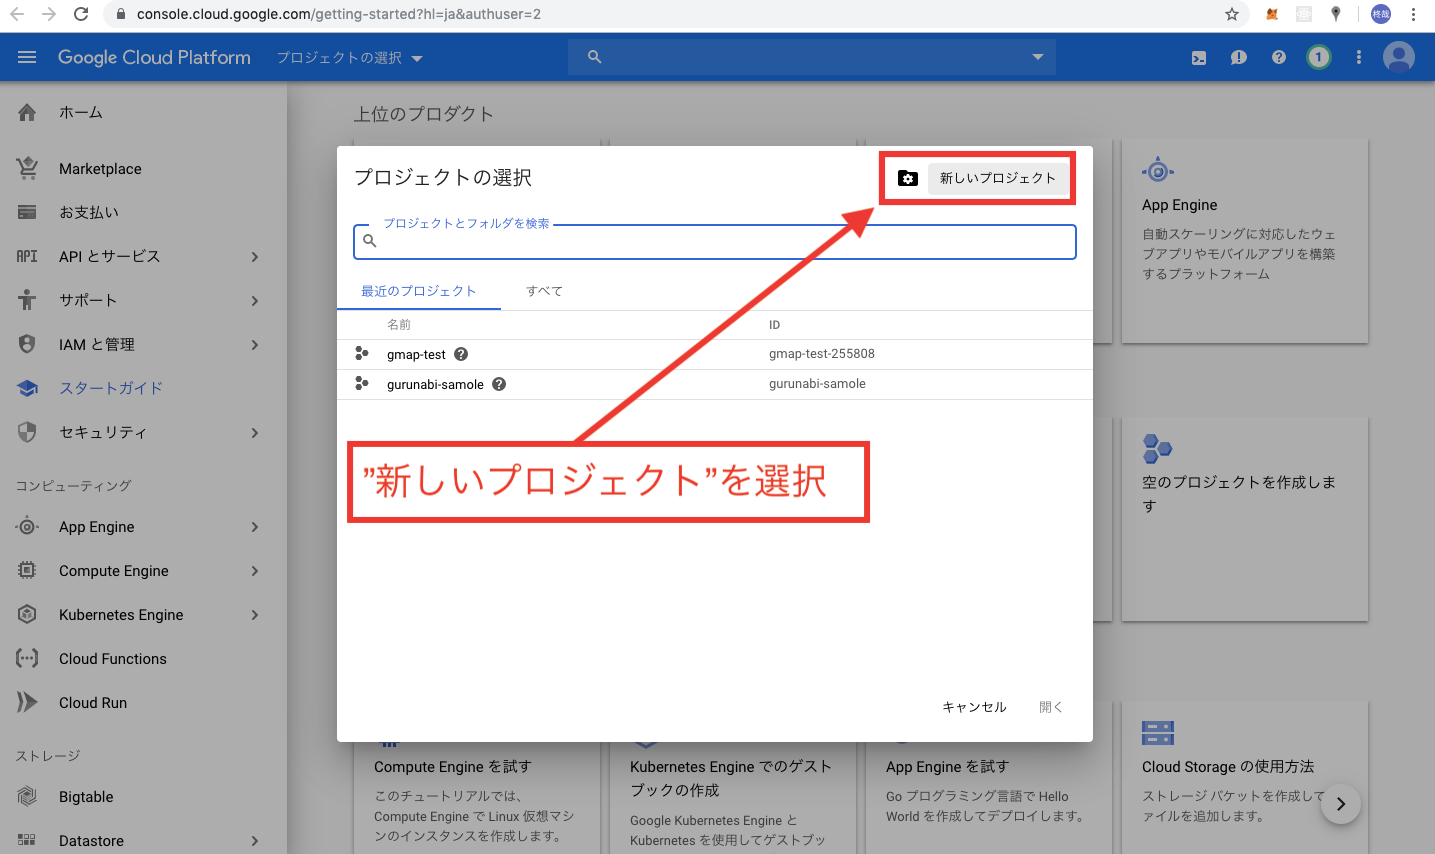
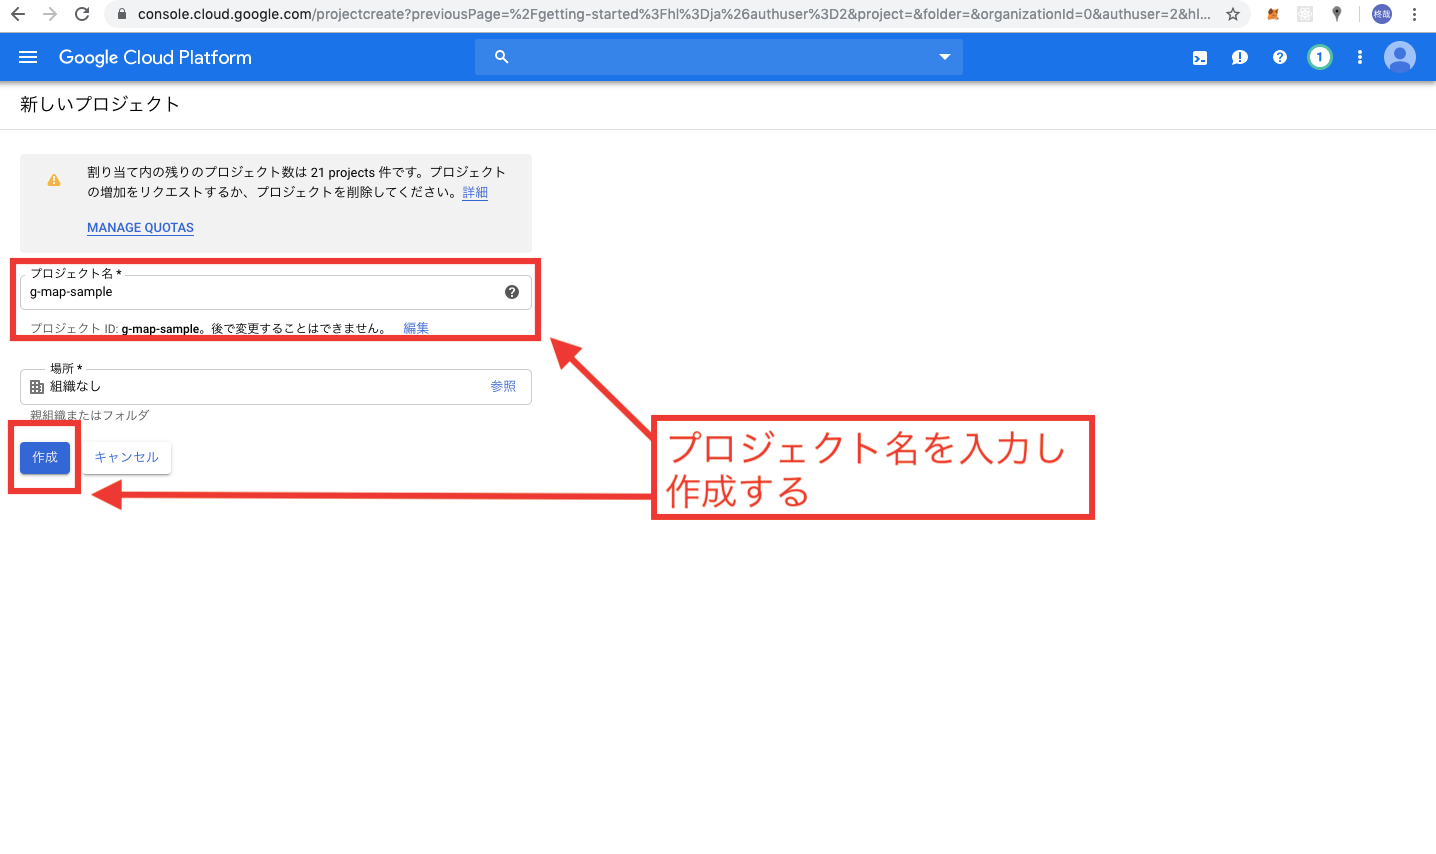
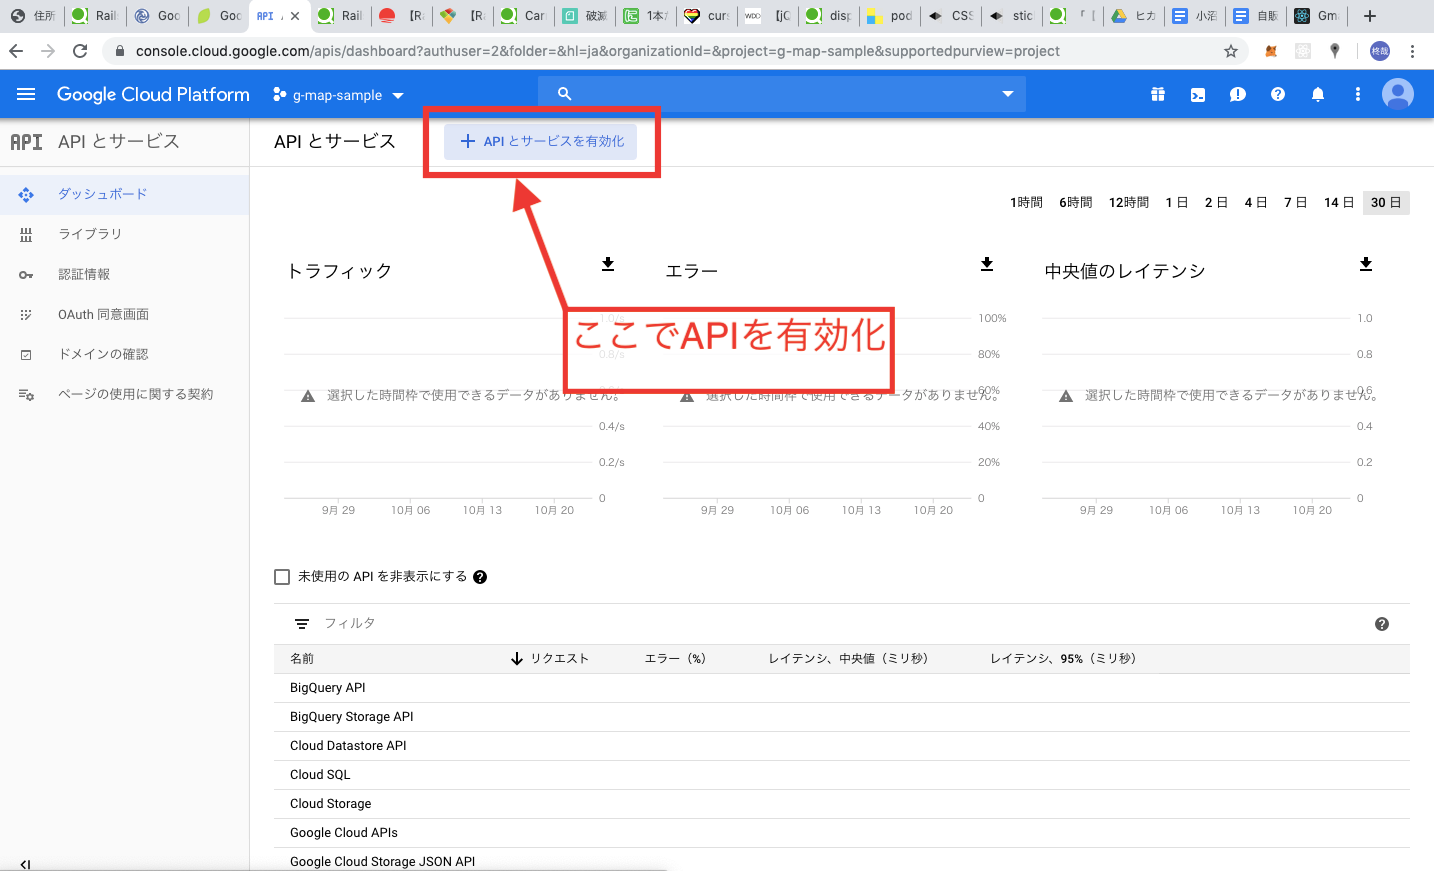
まずはじめに、上記の公式HPからアクセスし、右上のコンソールをタップします。
以上でCloudPlatformの初期設定は終了です。
APIkeyの登録
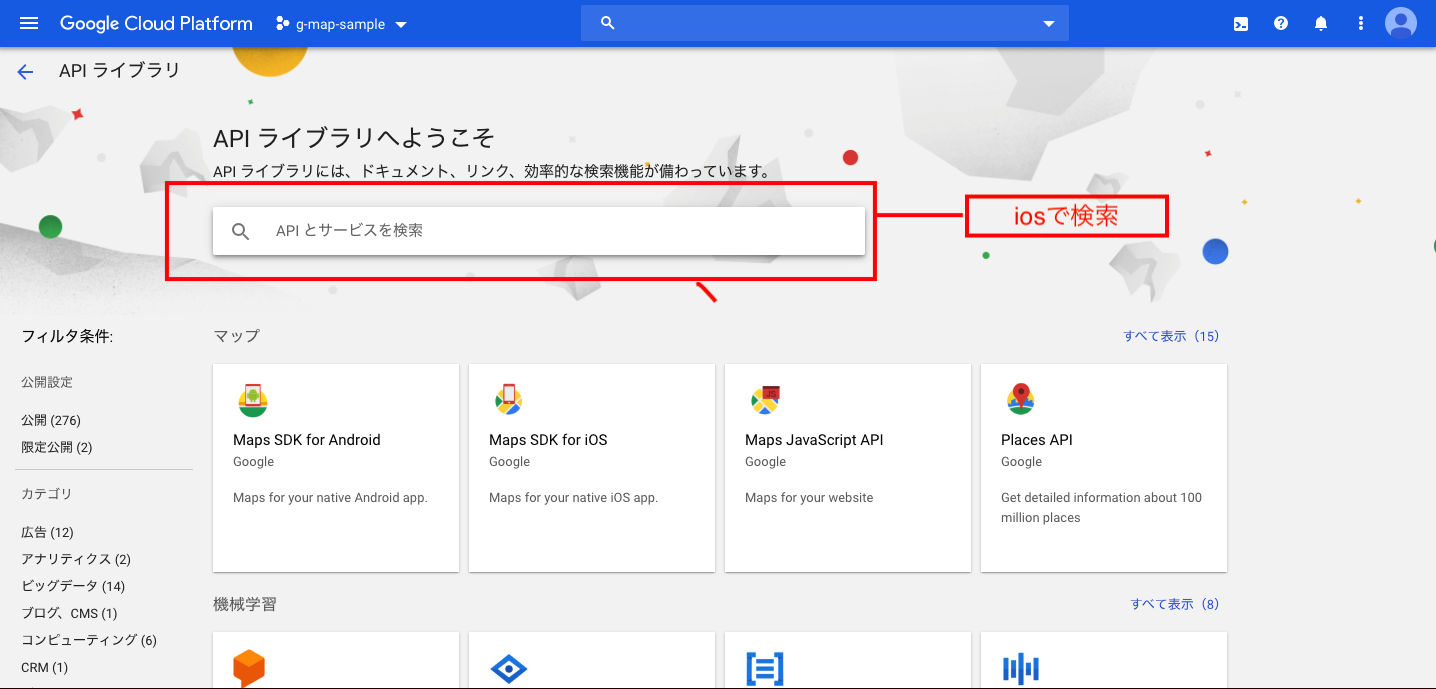
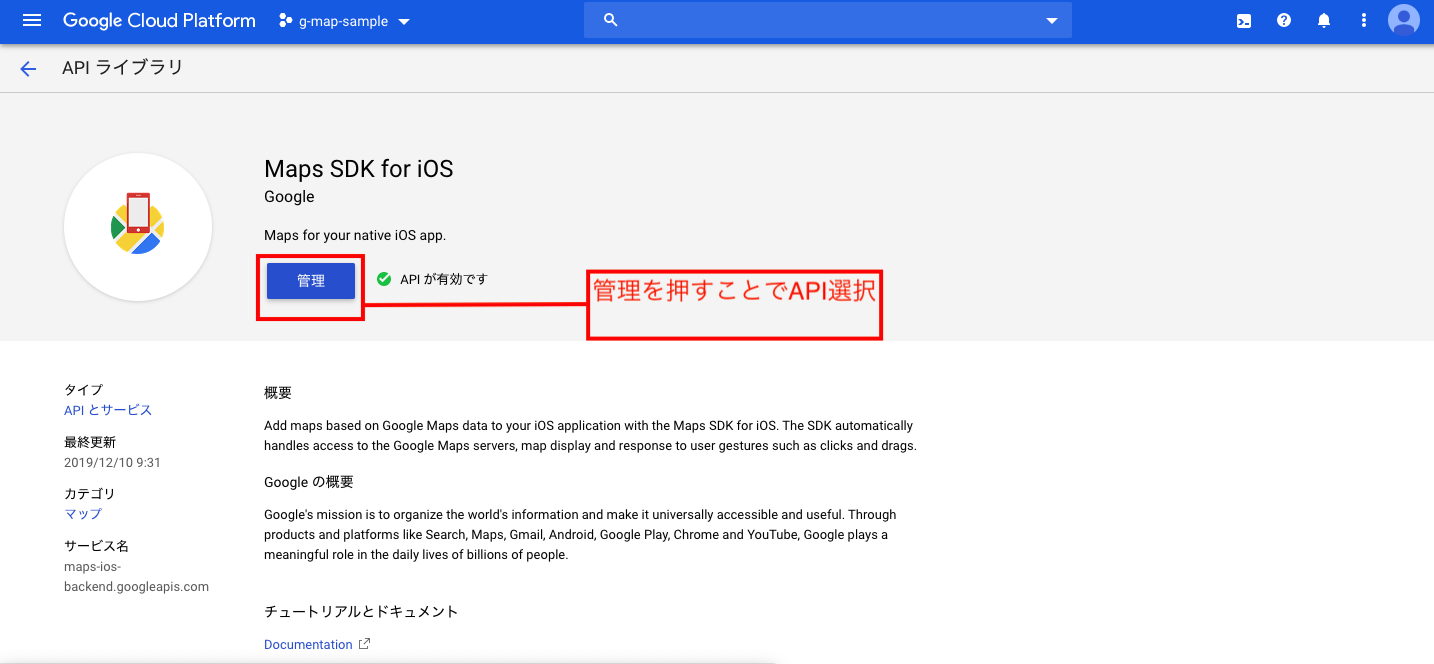
ライブラリの導入をするためにpodfileをインストールしてください。
その後、以下のコードをpodfileに記入します。podfilepod 'GoogleMaps'pod installをしたら、プロジェクトを開きましょう!
AppDelegateを開いて、APIキーを登録していきます。
まず、先程導入したGoogleMapsをimportします。AppDeleAppDelegate.swiftimport GoogleMapsそしてapplication(_app~)メソッドに、先程発行したAPIキーを挿入します。
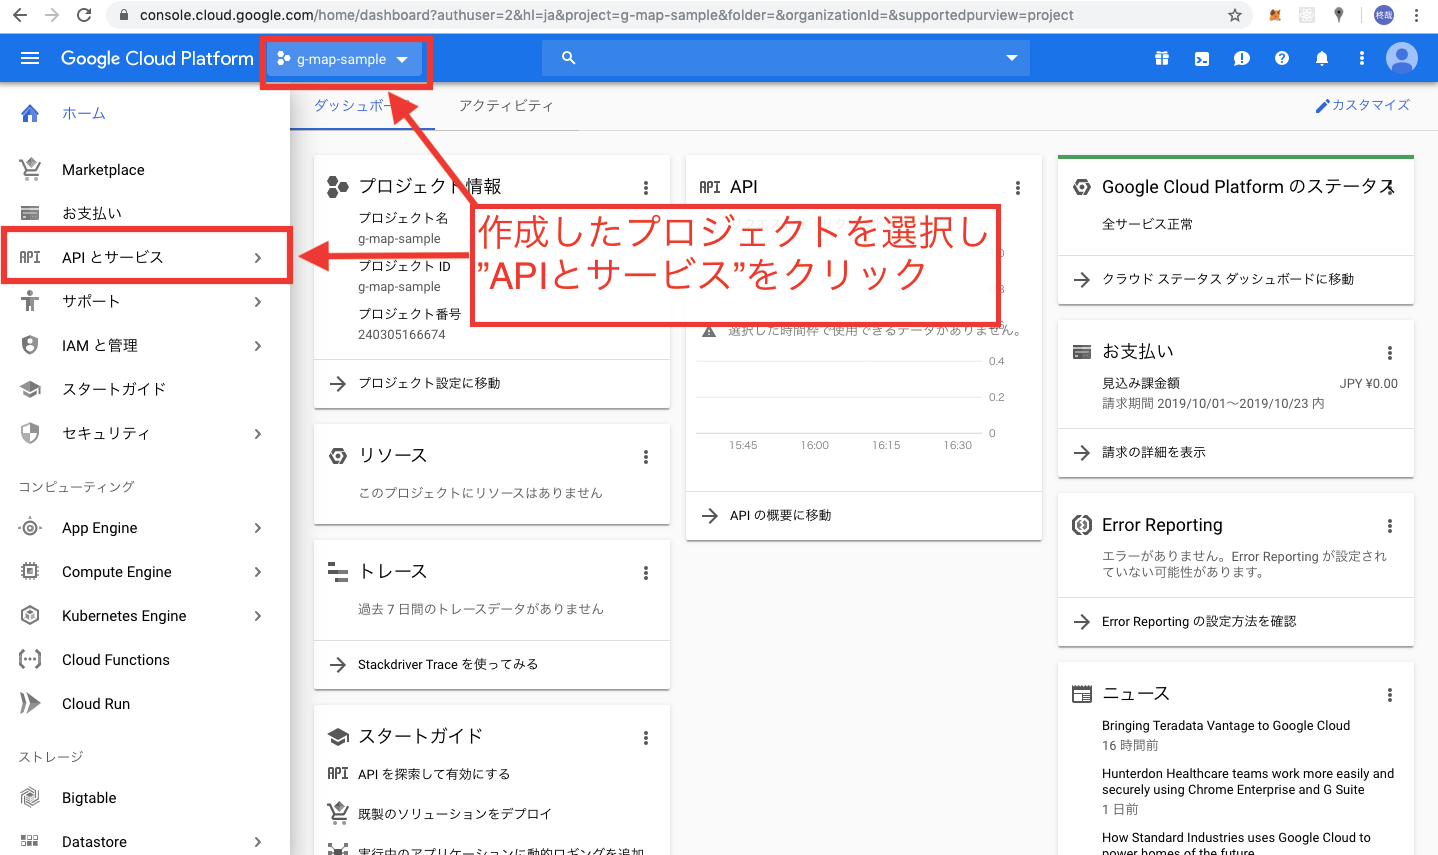
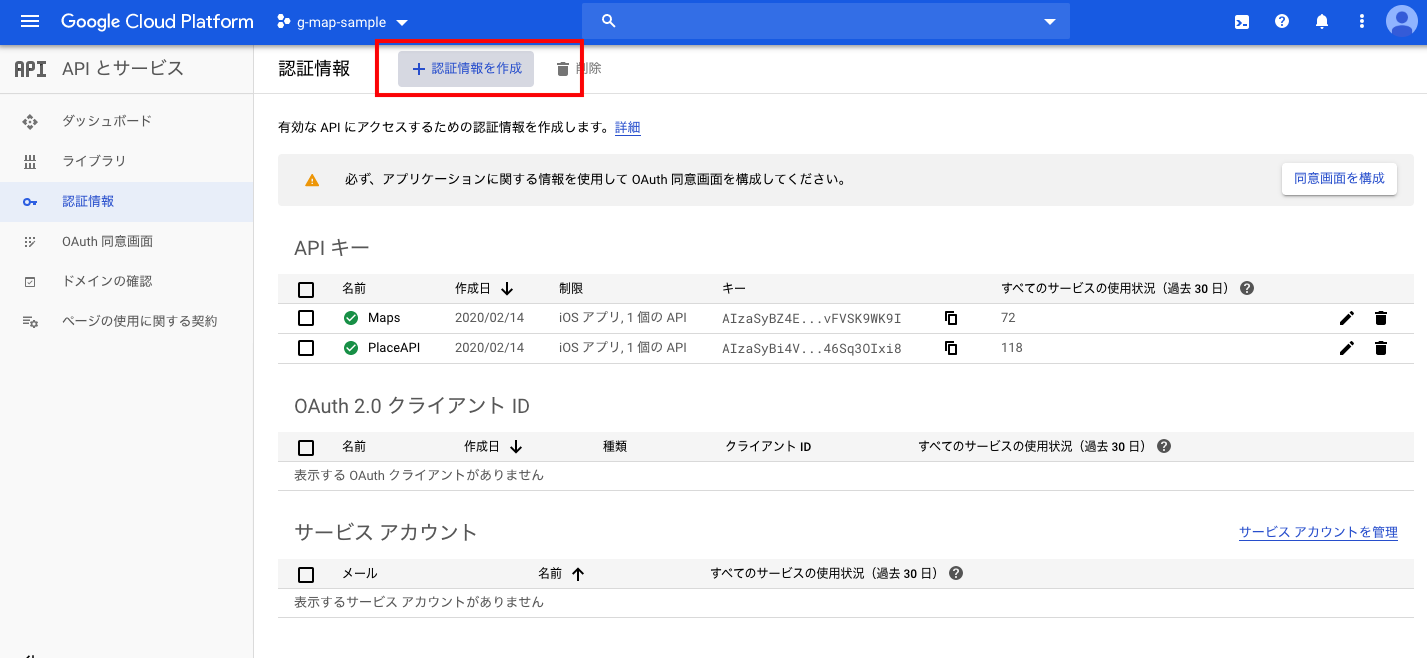
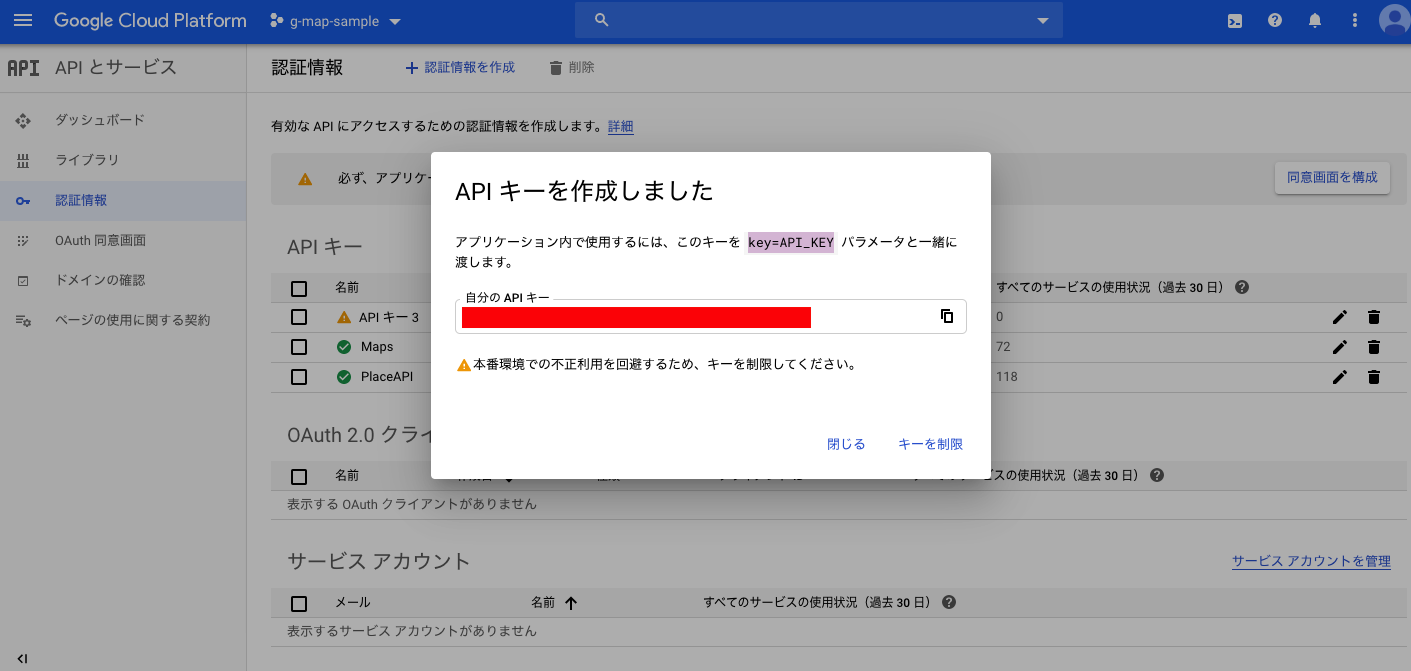
*APIキーは、CloudPlatformのコンソールでこのプロジェクトを選択し、「APIとサービス」→「認証情報」のところにあります。
AppDeleAppDelegate.swiftfunc application(_ application: UIApplication, didFinishLaunchingWithOptions launchOptions: [UIApplication.LaunchOptionsKey: Any]?) -> Bool { // Override point for customization after application launch. GMSServices.provideAPIKey("発行したAPIキー") return true }これで、Platform上で作成したものと、このXcodeプロジェクトファイルがひも付きました。
ひとまずGoogleMapを表示してみる
では、実際にMapを表示してみたいと思います。
まずは、自分の現在地を取得する前に、公式ドキュメントのようにMapを表示することを目標にします。以下のコードをViewControllerに記述してください。
ViewController.swiftimport UIKit import GoogleMaps class ViewController: UIViewController { override func viewDidLoad() { super.viewDidLoad() } override func loadView() { //表示するMapの位置と表示の縮小具合 let camera = GMSCameraPosition.camera(withLatitude: -33.86, longitude: 151.20, zoom: 6.0) let mapView = GMSMapView.map(withFrame: CGRect.zero, camera: camera) view = mapView // 指定した場所にピンを立てる。 let marker = GMSMarker() marker.position = CLLocationCoordinate2D(latitude: -33.86, longitude: 151.20) marker.title = "Sydney" marker.snippet = "Australia" marker.map = mapView } }コードの内容は、簡単にコメントアウトしたので、参照してください。
上記のコードにより、AustraliaのSydneyにピンが立ったと思います。現在地にピンを立てる。
では次に、自分の位置をGoogleMapで表示させます。手順としては、
① 自分のiphoneの端末で緯度・軽度を取得する
② それをGoogleMapsのメソッドに引数として挿入する
③ Mapを表示させる
です!ではまず①から行いましょう!
①を行う際、こちらの記事を参考にしました。?
【CoreLocation】位置情報を取得する注意点としては、位置情報を取得するときユーザーから許可を得るためにInfo.Plistにしっかり記入することです。
この記事を元にすると、現在地の緯度と軽度が取得できます。
取得したものはそれぞれ
ViewController.swiftvar currentLatitude :Double! var currentLongitude :Double!上記のようにDouble型で定義します。
では次に、②と③を同時にやってしまいます。
位置情報を取得する際に使用した、
locationManager(_ manager: CLLocationManager, didUpdateLocations locations: [CLLocation])メソッドの中に、先程のMap表示とピン立てにおいて書いたコードである、GMSCameraPosition.cameraとCLLocationCoordinate2Dの引数である緯度・軽度にそれぞれ取得したものを挿入します。コードとしては以下です。
ViewController.swiftfunc locationManager(_ manager: CLLocationManager, didUpdateLocations locations: [CLLocation]) { let location = locations.first currentLatitude = location?.coordinate.latitude currentLongitude = location?.coordinate.longitude print("latitude: \(currentLatitude!)\nlongitude: \(currentLongitude!)") let camera = GMSCameraPosition.camera(withLatitude: currentLatitude, longitude: currentLongitude, zoom: 6.0) let mapView = GMSMapView.map(withFrame: CGRect.zero, camera: camera) view = mapView let marker = GMSMarker() marker.position = CLLocationCoordinate2D(latitude: currentLatitude, longitude: currentLongitude) marker.map = mapView }これで、自分が今いる現在地がgoogleMap上に表記できたと思います。
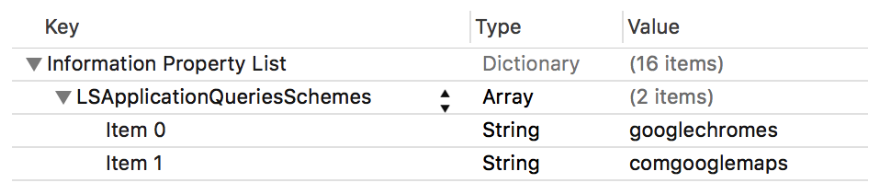
最後に、左下にあるgoogleマークをタップしたとき、GoogleMapに正しく遷移させるために、Info.Plistに以下のようなものを追加しましょう。
(ドキュメント通り)
おわりに
写真の前半部分などは、こちらからの転用です!
【Rails5】RailsでGoogle Map APIの導入Railsでの使用を考えてる方は、ぜひ!