- 投稿日:2020-02-15T21:32:43+09:00
配列の個数がなぜか0になる
AlamofireとKannaを使ってスクレイピングしてみました
gameのキャラクターの情報をサイトから取ってくるアプリを作ろうと思っています。
最初の画面(viewController)でURLを5個まで貼ってもらい、userDefaultsで保存して画面遷移しデータを取ってきてviewで表形式でそれぞれの値を比較しようと思いました。
ViewController.swiftvar urlArray:[String] = [] @IBOutlet weak var textField1: UITextField! @IBOutlet weak var textField2: UITextField! @IBOutlet weak var textField3: UITextField! @IBOutlet weak var textFiled4: UITextField! @IBOutlet weak var textField5: UITextField! @IBAction func buttonPushed(_ sender: UIButton) { if self.textField1.text != ""{ self.urlArray.append(self.textField1.text!) } if self.textField2.text != ""{ self.urlArray.append(self.textField2.text!) } if self.textField3.text != ""{ self.urlArray.append(self.textField3.text!) } if self.textFiled4.text != ""{ self.urlArray.append(self.textFiled4.text!) } if self.textField5.text != ""{ self.urlArray.append(self.textField5.text!) } let userDefaults = UserDefaults.standard userDefaults.set(self.urlArray, forKey: "urlArray") userDefaults.synchronize() performSegue(withIdentifier: "goPlayers", sender: nil) } }PlayersViewContrller.swiftvar players:[Player] = [] override func viewDidLoad() { super.viewDidLoad() // Do any additional setup after loading the view. let userDefaults = UserDefaults.standard let urlArray:[String] = userDefaults.array(forKey: "urlArray") as! [String] for i in 0..<urlArray.count{ DispatchQueue.global().sync { print(urlArray[i]) self.scrapWebsite(urlArray[i]) print("players.count3:\(self.players.count)") } print("players.count1:\(self.players.count)") } print(self.players.count) //viewを追加する関数 self.SetView(players.count) } /////////////////////////////////////////////////// struct Player { var playerName:String? var MaxLevel:String? var abilityList:[(name:String,score:String)] = [/*省略しますがタプル配列で26個分、予め項目名(name)と数値(score)を入れて置いてます*/] } ////////////////////////////////////////////////////// func scrapWebsite(_ url:String){ //GETリクエスト 指定URLのコードを取得 Alamofire.request(url).responseString { response in //Boolで確認 print("true or fauls:\(response.result.isSuccess)") if let html = response.result.value { //plaers配列に追加 self.players.append(self.parseHTML(html: html)) print("players.count2:\(self.players.count)") } } } func parseHTML(html: String)-> (Player){ //戻り値を宣言 var returnPlayer = Player() if let doc = try? HTML(html: html, encoding: .utf8) { //タイトルをプリント print("doc.titile:\(doc.title!)") for link in doc.xpath("/html/body/div[2]/div[4]/script[1]/text()"){ //省略しますがreturnPlayerに値を入れる処理をします } } print("returnPlayer:\(returnPlayer)") return returnPlayer }躓いているところはAlamofireとKannaとは全く関係ないところです
ViewControllerでtextField1のみにURLを入れれ実行します。
するとscrapWeb()でplayers配列にperseHTML()の戻り値(returnPlayer)を追加しているのにprint("players.count2:(self.players.count)")ではplayers.countが1となりますが、print("players.count1:(self.players.count)"),print("players.count3:(self.players.count)")では0となってしまします。
これは何が原因なのでしょうか?

- 投稿日:2020-02-15T20:15:09+09:00
文字列から半角、全角両方のスペースを削除するExtensionを考える
はじめに
半角と全角の文字列が混合する配列の処理をしていたとき、各文字列からスペースを消そうとしたのですが、
replacingOccurrences(of: " ", with: "")してあげただけでは当たり前ですが、全角スペースだと削除されずが残ってしまいます。import Foundation let array = ["あいうえ お", "abcd e"] let fixArray = array.map { $0.replacingOccurrences(of: " ", with: "") } //["あいうえ お", "abcde"]になる途中まですっかりそれを見落としてたので、1回で両方削除できたら便利と思いString Extensionで作ってみよう思いました。
できたもの
import Foundation

private extension String {
    func removeWhitespace(){
        self.replacingOccurrences(of: "\u{0020}|\u{3000}", with: "", options: .regularExpression)
    }
}

let array = ["あいうえ お", "abcd e"]

let fixArray = array.map { $0.removeWhitespace() }
//["あいうえお", "abcde"]になった!!!
まとめ
もっとこうしたらいいよなどありましたらコメントいただけると幸いです。
ありがとうございました。
今年もよろしくお願いします(遅
- 投稿日:2020-02-15T19:34:35+09:00
The file “ViewController.swift” could not be unlocked.
The file “ViewController.swift” could not be unlocked.のメッセージが出てしまい、コードの記述ができなくなりました。
解除する方法がありましたら教えて下さいませ。
- 投稿日:2020-02-15T18:10:33+09:00
【Swift5】APIKitを使って Gmail API からメッセージ取得する
前提
まず、Gmail API のそもそも使い方や、OAuth認証、メッセージのid/threadIdの取得、ユーザー情報(主にメールアドレス)の取得やキーチェーンへの保存は以下方がまとめてくださっているのでそちらを参照されたし。
https://qiita.com/ryokkkke/items/dd04bea2b579c16a9b19
https://qiita.com/ryokkkke/items/4c3da87b50d7a298e604基本自分の備忘録の意味合いが強いのでコードや説明が雑です。あらかじめご了承ください。
Request.swiftimport APIKit struct MessageRequest: Request { typealias Response = Message let userId: String let messageId: String let token: String var baseURL: URL { return URL(string: "https://www.googleapis.com")! } var method: HTTPMethod { return .get } var path: String { return "/gmail/v1/users/\(userId)/messages/\(messageId)" } var headerFields: [String : String] { return ["Authorization" : "Bearer " + token] } func response(from object: Any, urlResponse: HTTPURLResponse) throws -> Message { print(urlResponse) return try Message(object: object) } } struct Message { let subject: String let date: String let from: String let parts: [[String: Any]] init(object: Any) throws { guard let dictionary = object as? [String: Any], let payload = dictionary["payload"] as? [String: Any], let headers = payload["headers"] as? [[String: String]], let subject = headers.filter({ (dics) -> Bool in dics["name"] == "Subject" }).first!["value"], let date = headers.filter({ (dics) -> Bool in dics["name"] == "Date" }).first!["value"], let from = headers.filter({ (dics) -> Bool in dics["name"] == "From" }).first!["value"], let parts = payload["parts"] as? [[String: Any]] else { throw ResponseError.unexpectedObject(object) } self.subject = subject self.date = date self.from = from self.parts = parts } }ViewController.swiftfunc getGmailList(userId: String) { // ここのuserIdはメールアドレス let query = GTLRGmailQuery_UsersMessagesList.query(withUserId: userId) let service = GTLRGmailService() service.authorizer = GTMAppAuthFetcherAuthorization.init(fromKeychainForName: "kGTMAppAuthBylistStoryboardAuthorizerKey") service.executeQuery( query, delegate: self, didFinish: #selector(parseMessage) ) } @objc func parseMessage(ticket: GTLRServiceTicket, finishedWithObject response: GTLRGmail_ListMessagesResponse, error: NSError?) { if let error = error { print("メッセージリストの取得に失敗しました。") print(error) return } print("メッセージリストの取得に成功しました。") print(response.messages!) print("nextPageToken: \(response.nextPageToken!)") print("resultSizeEstimate: \(response.resultSizeEstimate!)") guard let userId = self.userId, // ここのuserIdは先に取得しておいたユーザー情報の中のメールアドレスを代入しています let messages = response.messages else { return } let request = MessageRequest(userId: userId, messageId: messages.first!.identifier!, token: token!) print(messages.first!.identifier!) Session.send(request) { result in switch result { case .success(let response): print("subject: \(response.subject)") print("date: \(response.date)") print("from: \(response.from)") print("parts: \(response.parts)") case .failure(let error): print("error: \(error)") } } }
- 投稿日:2020-02-15T17:51:19+09:00
【Swift5】Gmail API を使って取得したBase64のメール本文をデコードする方法
基本はこちらのJavaで書かれた方法と同じことがしたいわけだが、Gmail API ではメール本文がBase64という形式にエンコードされて返ってくる。これががURL-Safeな形式になっている関係でデコードに苦戦したのでメモ。
Gmail API での Get の方法
公式リファレンスは下記。https://developers.google.com/gmail/api/v1/reference/users/messages/get
実際にTry it nowでどういう値が返ってくるのかを試すことができる。このヘッダーパラメーター?として付与できる
formatがデフォルトではfullなのだが、rawの場合に取得できるメール本文(正確にはrawの中にある本文に該当する部分)と違い、URL-Safeな形式に変換されたBase64の文字列が返ってくる。具体的には「+」→「-」、「/」→「_」、「=」→削除という風に変換された形式でしか取得できない。これを最終的にUTF-8の文字列にしたいので、いろんなメソッドを使って変換するのに苦労した。
デコードの流れ
- Gmailから返ってくるのはString型のエンコードされた本文
- 一度URL-UnsafeなBase64のData型にする
- それをStringに戻す(これで
format: rawの場合と同じ文字列が取得できる)- 再度Data型にする
- UTF-8でStringにする
func decodeParts(_ parts: [[String: Any]]) -> [String: String]? {
        var decodedParts: [String: String] = [:]

        for part in parts {
            guard let partId = part["partId"] as? String,
                let body = part["body"] as? [String: Any],
                let bodydata = body["data"] as? String else {
                    return nil
            }

            guard let urlUnsafebase64Data = GTLRDecodeWebSafeBase64(bodydata) else {
                return nil
            }

            let base64EncodedString = urlUnsafebase64Data.base64EncodedString(options: .lineLength64Characters)

            guard let base64Data = Data(base64Encoded: base64EncodedString, options: .ignoreUnknownCharacters) else {
                return nil
            }
            guard let utf8DecodedString = String(data: base64Data, encoding: .utf8) else {
                return nil
            }
            decodedParts["\(partId)"] = utf8DecodedString
        }
        return decodedParts
    }
Swiftは久々に書くのでコードがキレイでなかったり無駄が多いと思う。神な方からのコメントや編集リクエスト待ってます。
Base64→UTF-8の変換は以下のWebサービスが使いやすいです。
https://www.base64decode.org/もしこの記事が役に立ったら、いいねしてくれると喜びます。
参考リンク
- 投稿日:2020-02-15T16:40:31+09:00
UIViewControllerRepresentableのライフサイクルについて
ふと気になったのでPlayground作って試してみた。
作ったPlaygroundはGitHubにも公開しているので良かったら見てみてください。
ソース
import SwiftUI
import UIKit
import PlaygroundSupport

struct SampleView: UIViewControllerRepresentable {
    typealias UIViewControllerType = SampleUIViewController

    func makeUIViewController(context: UIViewControllerRepresentableContext<SampleView>) -> SampleUIViewController {
        print(#function)
        return .init()
    }

    func updateUIViewController(_ uiViewController: SampleUIViewController, context: UIViewControllerRepresentableContext<SampleView>) {
        print(#function)
    }

    func makeCoordinator() -> Coordinator {
        print(#function)
        return .init()
    }
}

extension SampleView {
    class Coordinator: NSObject {
        override init() {
            super.init()
            print(self, #function)
        }
        deinit {
            print(self, #function)
        }
    }
}

class SampleUIViewController: UIViewController {
    override init(nibName nibNameOrNil: String?, bundle nibBundleOrNil: Bundle?) {
        super.init(nibName: nibNameOrNil, bundle: nibBundleOrNil)
        print(self, #function)
    }

    init() {
        super.init(nibName: nil, bundle: nil)
        print(self, #function)
    }

    required init?(coder: NSCoder) {
        super.init(coder: coder)
        print(self, #function)
    }

    override func loadView() {
        print(self, #function)
        super.loadView()

        let label = UILabel()
        label.text = "Hello world!"

        label.translatesAutoresizingMaskIntoConstraints = false
        view.addSubview(label)
        NSLayoutConstraint.activate([
            label.centerXAnchor.constraint(equalTo: view.centerXAnchor),
            label.centerYAnchor.constraint(equalTo: view.centerYAnchor)
        ])
    }

    override func viewDidLoad() {
        print(self, #function)
        super.viewDidLoad()
    }

    override func viewWillAppear(_ animated: Bool) {
        print(self, #function)
        super.viewWillAppear(animated)
    }

    override func viewWillLayoutSubviews() {
        print(self, #function)
        super.viewWillLayoutSubviews()
    }

    override func viewDidLayoutSubviews() {
        print(self, #function)
        super.viewDidLayoutSubviews()
    }

    override func viewDidAppear(_ animated: Bool) {
        print(self, #function)
        super.viewDidAppear(animated)
    }

    override func viewWillDisappear(_ animated: Bool) {
        print(self, #function)
        super.viewWillDisappear(animated)
    }

    override func viewDidDisappear(_ animated: Bool) {
        print(self, #function)
        super.viewDidDisappear(animated)
    }

    deinit {
        print(self, #function)
    }
}

do {
    let view = SampleView()
    print()
    PlaygroundPage.current.setLiveView(view)
    print()
}

let semaphore = DispatchSemaphore(value: 0)
DispatchQueue.global().async {
    sleep(5)
    semaphore.signal()
}
semaphore.wait()
PlaygroundPage.current.liveView = nil
結果
makeCoordinator()
<_TtCV14__lldb_expr_9010SampleView11Coordinator: 0x60000323fa90> init()
makeUIViewController(context:)
<__lldb_expr_90.SampleUIViewController: 0x7f88daee0370> init()
<__lldb_expr_90.SampleUIViewController: 0x7f88daee0370> loadView()
<__lldb_expr_90.SampleUIViewController: 0x7f88daee0370> viewDidLoad()
updateUIViewController(_:context:)
updateUIViewController(_:context:)
<__lldb_expr_90.SampleUIViewController: 0x7f88daee0370> viewWillAppear(_:)
<__lldb_expr_90.SampleUIViewController: 0x7f88daee0370> viewWillLayoutSubviews()
<__lldb_expr_90.SampleUIViewController: 0x7f88daee0370> viewDidLayoutSubviews()
<__lldb_expr_90.SampleUIViewController: 0x7f88daee0370> viewWillDisappear(_:)

makeCoordinator()
<_TtCV14__lldb_expr_9010SampleView11Coordinator: 0x60000323ff00> init()
makeUIViewController(context:)
<__lldb_expr_90.SampleUIViewController: 0x7f88daee4c30> init()
<__lldb_expr_90.SampleUIViewController: 0x7f88daee4c30> loadView()
<__lldb_expr_90.SampleUIViewController: 0x7f88daee4c30> viewWillAppear(_:)
<__lldb_expr_90.SampleUIViewController: 0x7f88daee4c30> viewWillLayoutSubviews()
<__lldb_expr_90.SampleUIViewController: 0x7f88daee4c30> viewDidLayoutSubviews()
<__lldb_expr_90.SampleUIViewController: 0x7f88daee4c30> viewWillDisappear(_:)
<__lldb_expr_90.SampleUIViewController: 0x7f88daee4c30> viewDidLoad()
updateUIViewController(_:context:)
<__lldb_expr_90.SampleUIViewController: 0x7f88daee4c30> viewWillLayoutSubviews()
<__lldb_expr_90.SampleUIViewController: 0x7f88daee4c30> viewDidLayoutSubviews()

<__lldb_expr_90.SampleUIViewController: 0x7f88daee0370> viewDidDisappear(_:)
<__lldb_expr_90.SampleUIViewController: 0x7f88daee0370> viewDidAppear(_:)
<__lldb_expr_90.SampleUIViewController: 0x7f88daee4c30> viewDidDisappear(_:)
updateUIViewController(_:context:)
<_TtCV14__lldb_expr_9010SampleView11Coordinator: 0x60000323fa90> deinit
<__lldb_expr_90.SampleUIViewController: 0x7f88daee0370> deinit
<__lldb_expr_90.SampleUIViewController: 0x7f88daee4c30> viewDidAppear(_:)
<__lldb_expr_90.SampleUIViewController: 0x7f88daee4c30> viewWillDisappear(_:)
<__lldb_expr_90.SampleUIViewController: 0x7f88daee4c30> viewDidDisappear(_:)
<_TtCV14__lldb_expr_9010SampleView11Coordinator: 0x60000323ff00> deinit
<__lldb_expr_90.SampleUIViewController: 0x7f88daee4c30> deinit
Playgroundでやったからなのかもしれないけど今までのライフサイクルと違う呼ばれ方をしてるのでほーんという感じ?
気になったのはstructの生成時とliveViewへのセット時でmakeUIViewController()が2回呼ばれていたこと。
画面によっては切り替えの度にmakeUIViewControllerが呼ばれてVCが生成されまくるんじゃなかろうか?参考
- 投稿日:2020-02-15T16:21:16+09:00
Swiftのメモリリークについて考えてみた
普段delegateを宣言するときに
weakをつけていたり、Closureを宣言するときに[weak self]を付けたりと、本来の目的であるメモリリークのことはあまり深く意味は考えずに使ってしまっていたので、本記事でまとめて意識的に使えるように自分の中で整理することにしました。メモリリークとは
Appleの公式ドキュメントによると、
Memory leaks are blocks of allocated memory that the program no longer references.
と記載されており、プログラムが二度と参照しないが、割り当てられたメモリのブロックのことです。
もう少し分かりやすく
あるオブジェクトをメモリに確保したあと、そのオブジェクトが解放されずにメモリ内に残ってしまう状態のことです。
仮に解放されなかったオブジェクトが1つであったとしても、そのオブジェクトが他のオブジェクトを参照していれば、多くのリークが溜まってしまい、これがメモリリークの怖いところです。メモリリークが引き起こす問題
上記の文章の続きに、
Leaks waste space by filling up pages of memory with inaccessible data and waste time due to extra paging activity.
と記載されており、メモリリークの説明と少し被りますが、アクセス不能なデータでメモリを埋め尽くし、余計なページングアクティビティによって時間を無駄にしてしまうことが問題である、ということです。
もう少し詳しく
ここに記載されている
It will never die and it will never stop listening to the notification. Each time the notification is posted, the object will react to it. If the user repeats an action that creates the object in question, there will be multiple instances alive. All those instances responding to the notification and stepping into each other.
例のように、通知を受け取るオブジェクトがメモリリークとしての生成され続けてしまった場合、全てのオブジェクトが通知を受け取ることになってしまいます。
そしてそれはアプリがクラッシュに繋がるのです。メモリリークの原因
原因は、
循環参照と呼ばれるものです。循環参照とは
循環参照とは、関連のあるクラスのインスタンス同士を互いに強参照した場合に起こる。
循環参照は、以下のようなシチュエーションで生じます。(参照カウントに関しては後述します)public class Wizard { public var wand: Wand? public let name: String init(name: String) { self.name = name } } public class Wand { public var wizard: Wizard? public let name: String init(name: String) { self.name = name } } var harry: Wizard? = Wizard(name: "harry") // harryの参照カウントが+1 var elder: Wand? = Wand(name: "Elder") // elderの参照カウントが+1 harry?.wand = elder // elderの参照カウントが+1 elder?.wizard = harry // harryの参照カウントが+1 harry = nil // harryの参照カウントが-1(最終的な参照カウントは1) elder = nil // elderの参照カウントが-1(最終的な参照カウントは1) // 循環参照されており、参照カウントがどちらも0にならないため、解放されない。ここに関しては既に沢山の記事で書かれているので、割愛します。
オススメ
- https://medium.com/flawless-app-stories/memory-leaks-in-swift-bfd5f95f3a74Swiftにおけるメモリ管理
Swift uses Automatic Reference Counting (ARC) to track and manage your app’s memory usage. In most cases, this means that memory management “just works” in Swift, and you do not need to think about memory management yourself. ARC automatically frees up the memory used by class instances when those instances are no longer needed.
上にも書かれている通り、Swiftでは、Automatic Reference Counting (ARC)という仕組みによって、我々がメモリ管理について深く考える必要がなく、内部的に勝手にメモリ管理を行ってくれます。
もう少し詳しく
Every time you create a new instance of a class, ARC allocates a chunk of memory to store information about that instance. This memory holds information about the type of the instance, together with the values of any stored properties associated with that instance.
Additionally, when an instance is no longer needed, ARC frees up the memory used by that instance so that the memory can be used for other purposes instead.上にも書かれている通り、新たにクラスのインスタンスを作成した場合、ARCがそのインスタンスに関わる情報(プロパティなど)をまとめたものを、メモリに割り当ててくれます。そして、それらが必要がなくなった場合は、ARCがそのメモリを他の目的で使えるように、開放してくれます。
実際にどういう仕組みで、効率よくメモリの割り当て、解放をしているのか
強参照
本当はまだインスタンスのプロパティや関数にアクセスしたいのに、ARCが既にそのインスタンスへの割り当てを割り当てを取り消してしてまっていては、nilにアクセスすることになり、ランタイムクラッシュしてしまいます。
こういった状況を防ぐために、強参照という参照の仕方があります。また、Swiftではこの強参照がデフォルトになっているので、特に指定しなかった場合、強参照になります。whenever you assign a class instance to a property, constant, or variable, that property, constant, or variable makes a strong reference to the instance. The reference is called a “strong” reference because it keeps a firm hold on that instance, and does not allow it to be deallocated for as long as that strong reference remains.
上にも書かれている通り、クラスのインスタンスを割り当てる度に、そのインスタンスへ強参照が作られる。
ex.class Person { let name: String init(name: String) { self.name = name print("\(name) is being initialized") } deinit { print("\(name) is being deinitialized") } }Personクラスに対して、
var reference1: Person? // まだインスタンス化していないので参照されない
var reference2: Person?
var reference3: Person?

reference1 = Person(name: "John Appleseed") // インスタンス化したので、reference1がPersonインスタンスに強参照している。
// Prints "John Appleseed is being initialized"

// 新たに二つ強参照が確立される。
reference2 = reference1
reference3 = reference1

// nilを代入することによって、強参照を二つ破棄するが、まだ強参照が1つ残っているため、Personインスタンスの割り当ては取り消されない。
reference1 = nil
reference2 = nil

// 最後の強参照が破棄されたため、Personインスタンスのメモリ割り当てが取り消される。
reference3 = nil
// Prints "John Appleseed is being deinitialized"
(上のコードで出ていくる、強参照の数というのが、
参照カウントである。)上記のコードの例のように、インスタンスへの強参照の数が0になればメモリへの割り当てが取り消され、メモリリークが起こることはありません。しかし、この強参照の数が0にすることが出来ないという場合もあり、その例がここで紹介した
循環参照です。そして、その循環参照を回避する方法が、以下にも書いてある通り、強参照を使うのではなく、クラス通しの関係を、weak(弱参照)またはunowned(非所有参照)で定義するというものです。You resolve strong reference cycles by defining some of the relationships between classes as weak or unowned references instead of as strong references.
何故、参照カウントが0にならないのか、というところの説明で、ここの図がとても分かりやすかったです。
弱参照
これは、強参照せずに、つまり、参照カウントを増やすことなくインスタンスを参照できる仕組みです。
つまり、参照しているインスタンスの割り当てが破棄されたと同時に、ARCが自動的に弱参照のものにはnilを代入してくれます。
また、because weak references need to allow their value to be changed to nil at runtime, they are always declared as variables, rather than constants, of an optional type.
上の通り、弱参照を用いて定義された変数は、ランタイムにおいてnilになる可能性が十分にあるため、オプショナル型である必要があります。
ここで、もう一度先ほどのコードで循環参照されないように書いてみようと思います。
public class Wizard {
    public var wand: Wand?
    public let name: String

    init(name: String) {
        self.name = name
    }
}

public class Wand {
    public weak var wizard: Wizard?
    public let name: String

    init(name: String) {
        self.name = name
    }
}

var harry: Wizard? = Wizard(name: "harry") // harryの参照カウントが+1
var elder: Wand? = Wand(name: "Elder") // elderの参照カウントが+1
harry?.wand = elder // elderの参照カウントが+1
elder?.wizard = harry // harryの参照カウントは変化しない
harry = nil // harryの参照カウントが-1(最終的な参照カウントは0)
上記においては、
public weak var wizard: Wizard?と宣言し、WizardインスタンスはWandインスタンスを強参照しているが、WandインスタンスはWizardインスタンスを弱参照しています。よって、herry = nilによって、Wizard, Wand間の強参照が全て破棄され、唯一のWizardインスタンスであるherryにもnilが入ったので、残る強参照は、elderからのWandインスタンスへの強参照のみとなり、無事に循環参照を回避することが出来ました。
よって、最後にelder = nilしてあげると、全ての強参照を破棄することが出来ます。
非所有参照
An unowned reference is expected to always have a value. As a result, ARC never sets an unowned reference’s value to nil, which means that unowned references are defined using non-optional types.
と記載されているように、
unownedで定義されるものはnilでないことが保証されたものでなければなりません。よって、強参照を避ける場合は、unownedではなくweakを使う方が安全です。
では、どういった場合にunownedを使うのか。それは次のように、片方のClassのインスタンスを代入するためのPropertyはOptionalにすべきだが、もう片方のClassのpropertyにはクラスのインスタンスが値としてはいる(nilでない)ことが保証されている場合です。class Customer { let name: String var card: CreditCard? // Optional init(name: String) { self.name = name } deinit { print("\(name) is being deinitialized") } } class CreditCard { let number: UInt64 unowned let customer: Customer // unowned init(number: UInt64, customer: Customer) { self.number = number self.customer = customer } deinit { print("Card #\(number) is being deinitialized") } }2つのクラスのpropertyに確実に値が入ることが保証されている場合
このような場合は、
unownedとImplicitly Unwrapped Optionalsを組み合わせて、循環参照にはならずに、下で言うcapitalCityとcountryがnilでないことを保証しています。class Country { let name: String var capitalCity: City! // Implicitly Unwrapped Optionals init(name: String, capitalName: String) { self.name = name self.capitalCity = City(name: capitalName, country: self) } } class City { let name: String unowned let country: Country // unowned init(name: String, country: Country) { self.name = name self.country = country } }メモリリークを意識すべき場面
- closure
- delegate
Closureにおける循環参照
Class内でClosureを定義した場合、ClassはClosureを参照しており、ClosureもClassを参照する。
よって、何も考えずにどちらも強参照した場合には、前述したような循環参照が発生してしまうのである。
また、何故PropertyやVariableではこういった循環参照が起きないのに対して、ClosureやClassでは循環参照(強参照)が起きるのかというと、使われなると自動的に解放される値型と、より汎用的に使用されるため、ARCによって参照を管理されている参照型という分類があるためである。一応分類だけは紹介するが、それぞれに対する深掘りは今回は割愛する。参照型
- Class
- Closure
値型
- Variable
- Property
公式では、使っているClass名は本記事とは異なるものの、
The instance’s asHTML property holds a strong reference to its closure. However, because the closure refers to self within its body (as a way to reference self.name and self.text), the closure captures self, which means that it holds a strong reference back to the HTMLElement instance.
と書かれており、そのClosureをPropertyとして持つクラスがインスタンス化された場合、そのインスタンスがClosureに強参照しており、Closure内でselfにアクセスする以上は、インスタンスがClosureに強参照することになるため、循環参照が発生する。ただし、以下に書かれている通り、
Even though the closure refers to self multiple times, it only captures one strong reference to the HTMLElement instance.
Closure内で何回selfにアクセスしても、Closureがインスタンスを強参照する回数は変わらない。
Closureにおける循環参照の例
class MyClass {
    lazy var myClosure: () -> Void = { // 実行時にselfが暗黙的に強参照としてキャプチャされてしまう
        print(self.title)
    }
}

var myClass: MyClass? = MyClass() // 参照カウンタ+1 = 1
myClass?.myClosure() // ここでselfが強参照としてキャプチャされる、参照カウンタ+1 = 2
myClass = nil        // 参照カウンタ-1 = 1
Closureにおける循環参照の対処例
これに対してはClass同士の循環参照の時と同様に、
weakがunownedで対処してあげれば良い。class MyClass { lazy var myClosure: () -> Void = { [weak self] in // selfを明示的にweakとしてキャプチャする print(self?.title) } } var myClass: MyClass? = MyClass() // 参照カウンタ+1 = 1 myClass?.myClosure() // ここでselfがweakとしてキャプチャされるので、参照カウンタ+0 = 1 myClass = nil // 参照カウンタ-1 = 0となり、解放される。ここで、
weakを使うかunownedを使うかの疑問があると思うが、unownedを使った場合はnilでないことが保証されている場合のみなので、guard let self = self else { return }などとして、ランタイムクラッシュのリスクテイクをした方が安全である。delegateにおける循環参照
以下、ここを参照します。
弱参照を使う
To prevent strong reference cycles, delegates are declared as weak references.
delegateをプロパティに定義する場合は、
循環参照を避けるために、weakをつけて宣言しなければなりません。weak var delegate: SomeProtocol?ProtocolはAnyObjectを継承する
少し本題と外れますが、delegateを使うためのProtocolを宣言する際、ProtocolはClass-Only Protocolでなければなりません。詳しくはここら辺の記事に書かれていましたが、weakというのはそもそも
値型には使えず、参照型にしか使えないという前提があり、参照型にしか使わないという制約をつけてあげなければなりません。そして、その制約をつけてあげるために、Class-Only Protocolである必要があり、A class-only protocol is marked by its inheritance from AnyObject
にあるように、
protocol ProtocolDelegate: AnyObject {}といったようにProtocolを宣言してあげれば良いです。
参考文献
- 投稿日:2020-02-15T16:21:16+09:00
Swiftのメモリリークについてまとめてみた
普段delegateを宣言するときに
weakをつけていたり、Closureを宣言するときに[weak self]を付けたりと、本来の目的であるメモリリークのことはあまり深く意味は考えずに使ってしまっていたので、本記事でまとめて意識的に使えるように自分の中で整理することにしました。メモリリークとは
Appleの公式ドキュメントによると、
Memory leaks are blocks of allocated memory that the program no longer references.
と記載されており、プログラムが二度と参照しないが、割り当てられたメモリのブロックのことです。
もう少し分かりやすく
あるオブジェクトをメモリに確保したあと、そのオブジェクトが解放されずにメモリ内に残ってしまう状態のことです。
仮に解放されなかったオブジェクトが1つであったとしても、そのオブジェクトが他のオブジェクトを参照していれば、多くのリークが溜まってしまい、これがメモリリークの怖いところです。メモリリークが引き起こす問題
上記の文章の続きに、
Leaks waste space by filling up pages of memory with inaccessible data and waste time due to extra paging activity.
と記載されており、メモリリークの説明と少し被りますが、アクセス不能なデータでメモリを埋め尽くし、余計なページングアクティビティによって時間を無駄にしてしまうことが問題である、ということです。
もう少し詳しく
ここに記載されている
It will never die and it will never stop listening to the notification. Each time the notification is posted, the object will react to it. If the user repeats an action that creates the object in question, there will be multiple instances alive. All those instances responding to the notification and stepping into each other.
例のように、通知を受け取るオブジェクトがメモリリークとしての生成され続けてしまった場合、全てのオブジェクトが通知を受け取ることになってしまいます。
そしてそれはアプリがクラッシュに繋がるのです。メモリリークの原因
原因は、
循環参照と呼ばれるものです。循環参照とは
循環参照とは、関連のあるクラスのインスタンス同士を互いに強参照した場合に起こる。
循環参照は、以下のようなシチュエーションで生じます。(参照カウントに関しては後述します)public class Wizard { public var wand: Wand? public let name: String init(name: String) { self.name = name } } public class Wand { public var wizard: Wizard? public let name: String init(name: String) { self.name = name } } var harry: Wizard? = Wizard(name: "harry") // harryの参照カウントが+1 var elder: Wand? = Wand(name: "Elder") // elderの参照カウントが+1 harry?.wand = elder // elderの参照カウントが+1 elder?.wizard = harry // harryの参照カウントが+1 harry = nil // harryの参照カウントが-1(最終的な参照カウントは1) elder = nil // elderの参照カウントが-1(最終的な参照カウントは1) // 循環参照されており、参照カウントがどちらも0にならないため、解放されない。ここに関しては既に沢山の記事で書かれているので、割愛します。
オススメ
- https://medium.com/flawless-app-stories/memory-leaks-in-swift-bfd5f95f3a74Swiftにおけるメモリ管理
Swift uses Automatic Reference Counting (ARC) to track and manage your app’s memory usage. In most cases, this means that memory management “just works” in Swift, and you do not need to think about memory management yourself. ARC automatically frees up the memory used by class instances when those instances are no longer needed.
上にも書かれている通り、Swiftでは、Automatic Reference Counting (ARC)という仕組みによって、我々がメモリ管理について深く考える必要がなく、内部的に勝手にメモリ管理を行ってくれます。
もう少し詳しく
Every time you create a new instance of a class, ARC allocates a chunk of memory to store information about that instance. This memory holds information about the type of the instance, together with the values of any stored properties associated with that instance.
Additionally, when an instance is no longer needed, ARC frees up the memory used by that instance so that the memory can be used for other purposes instead.上にも書かれている通り、新たにクラスのインスタンスを作成した場合、ARCがそのインスタンスに関わる情報(プロパティなど)をまとめたものを、メモリに割り当ててくれます。そして、それらが必要がなくなった場合は、ARCがそのメモリを他の目的で使えるように、開放してくれます。
実際にどういう仕組みで、効率よくメモリの割り当て、解放をしているのか
強参照
本当はまだインスタンスのプロパティや関数にアクセスしたいのに、ARCが既にそのインスタンスへの割り当てを割り当てを取り消してしてまっていては、nilにアクセスすることになり、ランタイムクラッシュしてしまいます。
こういった状況を防ぐために、強参照という参照の仕方があります。また、Swiftではこの強参照がデフォルトになっているので、特に指定しなかった場合、強参照になります。whenever you assign a class instance to a property, constant, or variable, that property, constant, or variable makes a strong reference to the instance. The reference is called a “strong” reference because it keeps a firm hold on that instance, and does not allow it to be deallocated for as long as that strong reference remains.
上にも書かれている通り、クラスのインスタンスを割り当てる度に、そのインスタンスへ強参照が作られる。
ex.class Person { let name: String init(name: String) { self.name = name print("\(name) is being initialized") } deinit { print("\(name) is being deinitialized") } }Personクラスに対して、
var reference1: Person? // まだインスタンス化していないので参照されない
var reference2: Person?
var reference3: Person?

reference1 = Person(name: "John Appleseed") // インスタンス化したので、reference1がPersonインスタンスに強参照している。
// Prints "John Appleseed is being initialized"

// 新たに二つ強参照が確立される。
reference2 = reference1
reference3 = reference1

// nilを代入することによって、強参照を二つ破棄するが、まだ強参照が1つ残っているため、Personインスタンスの割り当ては取り消されない。
reference1 = nil
reference2 = nil

// 最後の強参照が破棄されたため、Personインスタンスのメモリ割り当てが取り消される。
reference3 = nil
// Prints "John Appleseed is being deinitialized"
(上のコードで出ていくる、強参照の数というのが、
参照カウントである。)上記のコードの例のように、インスタンスへの強参照の数が0になればメモリへの割り当てが取り消され、メモリリークが起こることはありません。しかし、この強参照の数が0にすることが出来ないという場合もあり、その例がここで紹介した
循環参照です。そして、その循環参照を回避する方法が、以下にも書いてある通り、強参照を使うのではなく、クラス通しの関係を、weak(弱参照)またはunowned(非所有参照)で定義するというものです。You resolve strong reference cycles by defining some of the relationships between classes as weak or unowned references instead of as strong references.
何故、参照カウントが0にならないのか、というところの説明で、ここの図がとても分かりやすかったです。
弱参照
これは、強参照せずに、つまり、参照カウントを増やすことなくインスタンスを参照できる仕組みです。
つまり、参照しているインスタンスの割り当てが破棄されたと同時に、ARCが自動的に弱参照のものにはnilを代入してくれます。
また、because weak references need to allow their value to be changed to nil at runtime, they are always declared as variables, rather than constants, of an optional type.
上の通り、弱参照を用いて定義された変数は、ランタイムにおいてnilになる可能性が十分にあるため、オプショナル型である必要があります。
ここで、もう一度先ほどのコードで循環参照されないように書いてみようと思います。
public class Wizard {
    public var wand: Wand?
    public let name: String

    init(name: String) {
        self.name = name
    }
}

public class Wand {
    public weak var wizard: Wizard?
    public let name: String

    init(name: String) {
        self.name = name
    }
}

var harry: Wizard? = Wizard(name: "harry") // harryの参照カウントが+1
var elder: Wand? = Wand(name: "Elder") // elderの参照カウントが+1
harry?.wand = elder // elderの参照カウントが+1
elder?.wizard = harry // harryの参照カウントは変化しない
harry = nil // harryの参照カウントが-1(最終的な参照カウントは0)
上記においては、
public weak var wizard: Wizard?と宣言し、WizardインスタンスはWandインスタンスを強参照しているが、WandインスタンスはWizardインスタンスを弱参照しています。よって、herry = nilによって、Wizard, Wand間の強参照が全て破棄され、唯一のWizardインスタンスであるherryにもnilが入ったので、残る強参照は、elderからのWandインスタンスへの強参照のみとなり、無事に循環参照を回避することが出来ました。
よって、最後にelder = nilしてあげると、全ての強参照を破棄することが出来ます。
非所有参照
An unowned reference is expected to always have a value. As a result, ARC never sets an unowned reference’s value to nil, which means that unowned references are defined using non-optional types.
と記載されているように、
unownedで定義されるものはnilでないことが保証されたものでなければなりません。よって、強参照を避ける場合は、unownedではなくweakを使う方が安全です。
では、どういった場合にunownedを使うのか。それは次のように、片方のClassのインスタンスを代入するためのPropertyはOptionalにすべきだが、もう片方のClassのpropertyにはクラスのインスタンスが値としてはいる(nilでない)ことが保証されている場合です。class Customer { let name: String var card: CreditCard? // Optional init(name: String) { self.name = name } deinit { print("\(name) is being deinitialized") } } class CreditCard { let number: UInt64 unowned let customer: Customer // unowned init(number: UInt64, customer: Customer) { self.number = number self.customer = customer } deinit { print("Card #\(number) is being deinitialized") } }2つのクラスのpropertyに確実に値が入ることが保証されている場合
このような場合は、
unownedとImplicitly Unwrapped Optionalsを組み合わせて、循環参照にはならずに、下で言うcapitalCityとcountryがnilでないことを保証しています。class Country { let name: String var capitalCity: City! // Implicitly Unwrapped Optionals init(name: String, capitalName: String) { self.name = name self.capitalCity = City(name: capitalName, country: self) } } class City { let name: String unowned let country: Country // unowned init(name: String, country: Country) { self.name = name self.country = country } }メモリリークを意識すべき場面
- closure
- delegate
Closureにおける循環参照
Class内でClosureを定義した場合、ClassはClosureを参照しており、ClosureもClassを参照する。
よって、何も考えずにどちらも強参照した場合には、前述したような循環参照が発生してしまうのである。
また、何故PropertyやVariableではこういった循環参照が起きないのに対して、ClosureやClassでは循環参照(強参照)が起きるのかというと、使われなると自動的に解放される値型と、より汎用的に使用されるため、ARCによって参照を管理されている参照型という分類があるためである。一応分類だけは紹介するが、それぞれに対する深掘りは今回は割愛する。参照型
- Class
- Closure
値型
- Variable
- Property
公式では、使っているClass名は本記事とは異なるものの、
The instance’s asHTML property holds a strong reference to its closure. However, because the closure refers to self within its body (as a way to reference self.name and self.text), the closure captures self, which means that it holds a strong reference back to the HTMLElement instance.
と書かれており、そのClosureをPropertyとして持つクラスがインスタンス化された場合、そのインスタンスがClosureに強参照しており、Closure内でselfにアクセスする以上は、インスタンスがClosureに強参照することになるため、循環参照が発生する。ただし、以下に書かれている通り、
Even though the closure refers to self multiple times, it only captures one strong reference to the HTMLElement instance.
Closure内で何回selfにアクセスしても、Closureがインスタンスを強参照する回数は変わらない。
Closureにおける循環参照の例
class MyClass {
    lazy var myClosure: () -> Void = { // 実行時にselfが暗黙的に強参照としてキャプチャされてしまう
        print(self.title)
    }
}

var myClass: MyClass? = MyClass() // 参照カウンタ+1 = 1
myClass?.myClosure() // ここでselfが強参照としてキャプチャされる、参照カウンタ+1 = 2
myClass = nil        // 参照カウンタ-1 = 1
Closureにおける循環参照の対処例
これに対してはClass同士の循環参照の時と同様に、
weakがunownedで対処してあげれば良い。class MyClass { lazy var myClosure: () -> Void = { [weak self] in // selfを明示的にweakとしてキャプチャする print(self?.title) } } var myClass: MyClass? = MyClass() // 参照カウンタ+1 = 1 myClass?.myClosure() // ここでselfがweakとしてキャプチャされるので、参照カウンタ+0 = 1 myClass = nil // 参照カウンタ-1 = 0となり、解放される。ここで、
weakを使うかunownedを使うかの疑問があると思うが、unownedを使った場合はnilでないことが保証されている場合のみなので、guard let self = self else { return }などとして、ランタイムクラッシュのリスクテイクをした方が安全である。delegateにおける循環参照
以下、ここを参照します。
弱参照を使う
To prevent strong reference cycles, delegates are declared as weak references.
delegateをプロパティに定義する場合は、
循環参照を避けるために、weakをつけて宣言しなければなりません。weak var delegate: SomeProtocol?ProtocolはAnyObjectを継承する
少し本題と外れますが、delegateを使うためのProtocolを宣言する際、ProtocolはClass-Only Protocolでなければなりません。詳しくはここら辺の記事に書かれていましたが、weakというのはそもそも
値型には使えず、参照型にしか使えないという前提があり、参照型にしか使わないという制約をつけてあげなければなりません。そして、その制約をつけてあげるために、Class-Only Protocolである必要があり、A class-only protocol is marked by its inheritance from AnyObject
にあるように、
protocol ProtocolDelegate: AnyObject {}といったようにProtocolを宣言してあげれば良いです。
参考文献
- 投稿日:2020-02-15T13:31:59+09:00
iOS開発メモ
UITextView in UITableViewCel の高さ変更メモ
class ViewController: UITextViewDelegate {

    var currentKeyboardHeight: CGFloat = 0

    override func viewWillAppear(_ animated: Bool) {
        super.viewWillAppear(animated)
        addObservers(showSelector: #selector(showKeyboard), hideSelector: #selector(hideKeyboard))
    }

    @objc func showKeyboard(_ notification: Notification) {
        currentKeyboardHeight = (notification.userInfo?[UIResponder.keyboardFrameEndUserInfoKey] as? NSValue)?.cgRectValue.height ?? 0
    }

    func textViewDidChange(_ textView: UITextView) {
        // TextViewの中身によってcellの高さを必要に応じて変えている
        let oldHeight = textView.bounds.height
        let newHeight = textView.sizeThatFits(CGSize(width: textView.bounds.width, height: CGFloat.greatestFiniteMagnitude)).height

        if oldHeight != newHeight {
            let cellRect = tableView.rectForRow(at: IndexPath(row: 4, section: 0))
            let memoTextViewTopLine: CGFloat = tableView.convert(cellRect, to: self.view).minY
            let newBottomLine = memoTextViewTopLine + newHeight
            let keyboardTopLine: CGFloat = view.bounds.height - currentKeyboardHeight

            if newBottomLine >= keyboardTopLine {
                // キーボードに隠れる高さになったらスクロールするようにして回避
                textView.isScrollEnabled = true
            } else if textView.isScrollEnabled {
                // テキストを削除して、隠れない高さになった直後は高さがずれるのでtableView.beginUpdates()とかしない
                textView.isScrollEnabled = false
            } else {
                // それ以外はスクロールを無効化してセルの高さを変更する
                textView.isScrollEnabled = false
                tableView.beginUpdates()
                tableView.endUpdates()
            }
        }
    }

    func textViewDidEndEditing(_ textView: UITextView) {
        tableView.contentOffset.y = 0
    }
}
- 投稿日:2020-02-15T11:45:48+09:00
Swiftのオプショナル型・型キャストなど短縮された記号について(1)
Swiftのオプショナル型は簡潔に書きやすいが、短縮された記号は慣れるまで理解しにくいと感じた。そのため、Swiftの記法についてまとめようと思う!
今回は、?・!あたりがややこしく感じたのでその辺をまとめることにする。as?・as!は(2)でまとめる。オプショナルとは?
そもそもオプショナルとは? オプショナルとは変数の中にnilの代入を許可している型である。Swiftでは変数の中身がnilであることを基本的に許可していないが、
Optional<String>のような型にすることでnilが代入できるようになる。なぜオプショナルを使うのか?
なぜオプショナル型を使う必要があるかと言うと、使い手(クライアント)が変数を呼び出した際にnilであることに気づかずに操作しようとすると
nullpointerexceptionと言うエラーになり落ちるためである。オプショナルの扱い方
?
swiftのOptinal型は先ほども触れたが、
Optional<String>のような型になっている。それを省略形で書いたのが、?である。// swiftはnilを許さないのでこの場合はエラーになる var middleName: String // この場合は初期化されているので大丈夫 var middleName: String = "middle" // 下記の意味は同じくオプショナル型になる var middleName: Optional<String> var middleName: String?また、
?にはオプショナルの他にもう一つの概念があり、それが三項演算子である。三項演算子はif文を省略した形式である。下の例はオプショナルと三項演算子の?が合わさって判定されているパターンだ。// 下記の例だとisHumanがtrueなら人間、falseならその他が表示される var isHuman: Bool = true print(isHuman ? "人間": "その他") // 三項演算子とオプショナルの?の合わせ技 var monthlyIncomeA: Int? = 200000 print(monthlyIncome ?? "あなたはニートです。") //200000 var monthlyIncomeB: Int? = 200000 print(monthlyIncomeB ?? "あなたはニートです。") //あなたはニートです。!
unwrap
オプショナル型は呼び出す時にはそのまま使うことができないので、利用するために
unwrapする必要がある。unwrapはOptional<String> → Stringのようなイメージ。
普通にunwrapして使うには下記の2通りがある。let middleName: String? = nil // unwrap1 // middleNameがnilじゃないかをifで判定し、値がある場合のみprintする if middleName != nil { print(middleName) } // unwrap2 (Optional Binding) // middleNameの値をvalue詰め、値がある場合のみ{}にvalueを渡してprintする if let value = middleName { print(value) }暗黙的unwrap
Optionalは毎回unwrapしなければならないため、コーディングが長くなってしまうと言うデメリットがある。そのため、暗黙的unwrapを使えば一度値がセットされたら、以降nilになることはないと言う前提でunwrapしなくてよくなる。
暗黙的unwrapした後にnilが入ってしまうとアプリがクラッシュするので使うときは要注意!// 宣言時に!をつけると以降unwrapをしなくてよくなる。 var income: Int! income = 2500000 print(income) //2500000 !をつけずにprintすることができる // 暗黙的unwrapした値にnilが入ると。。 income = nil print(income) // クラッシュするので要注意!!まとめ
今回はオプショナルの省略記号についてまとめてみた。オプショナルやunwrapの概念について理解する時に参考にしてもらえればと。型キャストや引数の省略などの書き方もswiftは独特な印象だったので、(2)以降でその辺りも触れていきたいと思う!
- 投稿日:2020-02-15T10:56:47+09:00
Storyboardで制約設定したViewの位置をコードで取得したい
問題
Storyboardで制約指定したViewのframeをコードで取得したかったとき、その時点でのsizeはうまくとれているけど、originがうまくとれてなかった。
初歩的な問題かもしれないけど、はまって困った。
Viewが描画されたあとのような以下のようなときに起きてた。func scrollViewDidEndDecelerating(_ scrollView: UIScrollView) { print(targetView.frame) } -> (0.0, 0.0, 100.0, 100.0)結論
translatesAutoresizingMaskIntoConstraintsをfalseに設定すると取得できた。targetView.translatesAutoresizingMaskIntoConstraints = false
- 投稿日:2020-02-15T09:54:14+09:00
[Swift] GoogleMapAPI ~現在地付近の施設を選びピン立て~
はじめに
これは、前回書いた記事[Swift] GoogleMapAPI 〜Map表示&現在値にピン立て編〜
と関連した部分があります。なので、GoogleMapAPIの導入などは省きますので、導入部分を読みたい方は前回記事をご参考ください。
対象者
- GoogleMapをアプリに組み込もうとしている方
- PlacesAPIを検討している方
バージョン
- Xcode....Version 11.1
- Swift....5.0
完成物
GoogleMapで現在地を表示したあと、現在地付近の情報をtableViewに表示し、cellをタップするとその地名にピンを立てる仕様になっております。
概要
前回記事では、現在位置をGoogleMapに表示する際に、Corelocationというデフォルトで存在するフレームワークとMaps SDK for iosの両方を用いて行っていましたが、今回はPlaces SDK for iosを用いて行いました。
実装
それでは実装に移ります。
基本的に、公式ドキュメントから読み取ったものなので、これを見た後に公式ドキュメントを見ると、理解が深まってよいかもしれません。
MapViewControllerに書くコード
まず、変数宣言していきます。今回宣言したのは以下の通り。
MapVIewController.swift@IBOutlet var showMapView: UIView! var locationManager = CLLocationManager() var mapView: GMSMapView! var placesClient: GMSPlacesClient! var zoomLevel: Float = 15.0ここでは、表示するViewの名前と、その他初期設定をしました。また、以下も宣言しました。
MapVIewController.swift// 近くにある建造物の情報を格納 var likelyPlaces: [GMSPlace] = [] // PlacesViewControllerのtableViewで選択されたときの建造物についての情報 var selectedPlace: GMSPlace?意味合いとしてはコメントアウトした通りです。
次に、
CLLocationManagerDelegateのDelegateメソッドをMapViewControllerに追記します。MapViewController.swift// Delegates to handle events for the location manager. extension MapViewController: CLLocationManagerDelegate { // Handle incoming location events. func locationManager(_ manager: CLLocationManager, didUpdateLocations locations: [CLLocation]) { let location: CLLocation = locations.last! print("Location: \(location)") let camera = GMSCameraPosition.camera(withLatitude: location.coordinate.latitude, longitude: location.coordinate.longitude, zoom: zoomLevel) if mapView.isHidden { mapView.isHidden = false mapView.camera = camera } else { mapView.animate(to: camera) } } // Handle authorization for the location manager. func locationManager(_ manager: CLLocationManager, didChangeAuthorization status: CLAuthorizationStatus) { switch status { case .restricted: print("Location access was restricted") case .denied: print("User denied access to location.") // Display the map using the default location. mapView.isHidden = false case .notDetermined: print("Location status not determined.") case .authorizedAlways: fallthrough case .authorizedWhenInUse: print("Location status is OK.") @unknown default: fatalError() } } // Handle location manager errors. func locationManager(_ manager: CLLocationManager, didFailWithError error: Error) { locationManager.stopUpdatingLocation() print("Error: \(error)") } }上記のlocationManager(: didUpdateLocations:)デリゲートメソッドは、位置情報を取得・更新するたびに呼ばれます。また、locationManager(: didChangeAuthorization)デリゲートメソッドは、ユーザーのプリバシー情報が変わるたびに呼ばれます。
次に、Viewdidloadに以下のコードを書きます。
MapViewController.swiftoverride func viewDidLoad() { super.viewDidLoad() // location managerの初期化 locationManager = CLLocationManager() locationManager.desiredAccuracy = kCLLocationAccuracyBest locationManager.requestAlwaysAuthorization() locationManager.distanceFilter = 50 locationManager.startUpdatingLocation() locationManager.delegate = self placesClient = GMSPlacesClient.shared() // Create a map. let camera = GMSCameraPosition.camera(withLatitude: defaultLocation.coordinate.latitude, longitude: defaultLocation.coordinate.longitude, zoom: zoomLevel) mapView = GMSMapView.map(withFrame: showMapView.bounds, camera: camera) // mapView.settings.myLocationButton = true mapView.autoresizingMask = [.flexibleWidth, .flexibleHeight] mapView.isMyLocationEnabled = true // Add the map to the view, hide it until we've got a location update. showMapView.addSubview(mapView) mapView.isHidden = true }上記は、ViewDidloadにて、location managerの初期化とMapの表示を行います。
次に、以下のメソッドを追加します。これは、近くにある施設の情報を、likelyPlacesの配列に追加するためのものです。
MapViewController.swift//可能性のある場所を配列に入力. func listLikelyPlaces() { placesClient.currentPlace(callback: { (placeLikelihoods, error) -> Void in if let error = error { // TODO: Handle the error. print("Current Place error: \(error.localizedDescription)") return } // likelyPlacesに値を挿入 if let likelihoodList = placeLikelihoods { for likelihood in likelihoodList.likelihoods { let place = likelihood.place print("Current Place name \(String(describing: place.name)) at likelihood \(likelihood.likelihood)") print("Current PlaceID \(String(describing: place.placeID))") self.likelyPlaces.append(place) } } }) }次に、ボタンを押したときに、次の画面に
likelyPlaces配列の値を受け渡すために、prepare(for segue:)を追加で書きます。MapViewController.swift// Prepare the segue. override func prepare(for segue: UIStoryboardSegue, sender: Any?) { if segue.identifier == "segueToSelect" { if let nextViewController = segue.destination as? PlacesViewController { nextViewController.likelyPlaces = likelyPlaces } } }ボタンを押したときのアクションは以下の通り。
MapViewController.swift@IBAction func unwindToMain(segue: UIStoryboardSegue) { // Clear the map. mapView.clear() listLikelyPlaces() self.performSegue(withIdentifier: "segueToSelect", sender: nil) }これで、ひとまずMapViewControllerのコードは落ち着きました。ビルドして、Mapが表示されること・likelyPlacesを出力してみて値が入っているかなどを確認してください。
PlacesViewControllerに書くコード
次に、周辺施設の情報をtableViewにてまとめている、についてふれます。
これは、tableViewの知識でいけるので、コードのみ記載します。
PlacesViewController.swift//可能性のある場所を配列に入力. import UIKit import GoogleMaps import GooglePlaces class PlacesViewController: UIViewController,UITableViewDataSource, UITableViewDelegate { @IBOutlet weak var tableView: UITableView! var likelyPlaces: [GMSPlace] = [] var selectedPlace: GMSPlace? override func viewDidLoad() { super.viewDidLoad() tableView.dataSource = self tableView.delegate = self } func tableView(_ tableView: UITableView, numberOfRowsInSection section: Int) -> Int { likelyPlaces.count } func tableView(_ tableView: UITableView, cellForRowAt indexPath: IndexPath) -> UITableViewCell { let cell = tableView.dequeueReusableCell(withIdentifier: "cell") cell?.textLabel?.text = likelyPlaces[indexPath.row].name return cell! } // Pass the selected place to the new view controller. override func prepare(for segue: UIStoryboardSegue, sender: Any?) { if segue.identifier == "unwindToMain" { if let nextViewController = segue.destination as? MapViewController { nextViewController.selectedPlace = selectedPlace } } } func tableView(_ tableView: UITableView, didSelectRowAt indexPath: IndexPath) { selectedPlace = likelyPlaces[indexPath.row] performSegue(withIdentifier: "unwindToMain", sender: self) } }最後のtableViewのdelegateメソッドと
prepare(forsegue:)で、タップされたcellの情報を次のviewControllerに受け渡しています。MapViewControllerに付け足し
値が受け渡された先のViewControllerも、最初に作ったMapViewControllerとします。ただ、cellの値の部分にピン立てをするコードを付け足します。
viewDidLoad()にて、以下のコードを付け足してください。
MapViewControlleroverride func viewDidLoad() { super.viewDidLoad() // mapにmarkerを加える if selectedPlace != nil { let marker = GMSMarker(position: (self.selectedPlace?.coordinate)!) marker.title = selectedPlace?.name marker.snippet = selectedPlace?.formattedAddress marker.map = mapView } }これで、完成版のように表示することができたかと思います!
おわりに
Google Maps Platformが提供しているAPIは多岐に渡ります。
知る分アイディアの幅も拡がると思うので、精進していきます。

- 投稿日:2020-02-15T09:54:14+09:00
[Swift] GoogleMapAPI ~現在地付近の施設情報を取得し、任意の場所でピン立て~
はじめに
これは、前回書いた記事[Swift] GoogleMapAPI 〜Map表示&現在値にピン立て編〜
と関連した部分があります。なので、GoogleMapAPIの導入などは省きますので、導入部分を読みたい方は前回記事をご参考ください。
対象者
- GoogleMapをアプリに組み込もうとしている方
- PlacesAPIを検討している方
バージョン
- Xcode....Version 11.1
- Swift....5.0
完成物
GoogleMapで現在地を表示したあと、現在地付近の情報をtableViewに表示し、cellをタップするとその地名にピンを立てる仕様になっております。
概要
前回記事では、現在位置をGoogleMapに表示する際に、Corelocationというデフォルトで存在するフレームワークとMaps SDK for iosの両方を用いて行っていましたが、今回はPlaces SDK for iosを用いて行いました。
実装
それでは実装に移ります。
基本的に、公式ドキュメントから読み取ったものなので、これを見た後に公式ドキュメントを見ると、理解が深まってよいかもしれません。
MapViewControllerに書くコード
まず、変数宣言していきます。今回宣言したのは以下の通り。
MapVIewController.swift@IBOutlet var showMapView: UIView! var locationManager = CLLocationManager() var mapView: GMSMapView! var placesClient: GMSPlacesClient! var zoomLevel: Float = 15.0ここでは、表示するViewの名前と、その他初期設定をしました。また、以下も宣言しました。
MapVIewController.swift// 近くにある建造物の情報を格納 var likelyPlaces: [GMSPlace] = [] // PlacesViewControllerのtableViewで選択されたときの建造物についての情報 var selectedPlace: GMSPlace?意味合いとしてはコメントアウトした通りです。
次に、
CLLocationManagerDelegateのDelegateメソッドをMapViewControllerに追記します。MapViewController.swift// Delegates to handle events for the location manager. extension MapViewController: CLLocationManagerDelegate { // Handle incoming location events. func locationManager(_ manager: CLLocationManager, didUpdateLocations locations: [CLLocation]) { let location: CLLocation = locations.last! print("Location: \(location)") let camera = GMSCameraPosition.camera(withLatitude: location.coordinate.latitude, longitude: location.coordinate.longitude, zoom: zoomLevel) if mapView.isHidden { mapView.isHidden = false mapView.camera = camera } else { mapView.animate(to: camera) } } // Handle authorization for the location manager. func locationManager(_ manager: CLLocationManager, didChangeAuthorization status: CLAuthorizationStatus) { switch status { case .restricted: print("Location access was restricted") case .denied: print("User denied access to location.") // Display the map using the default location. mapView.isHidden = false case .notDetermined: print("Location status not determined.") case .authorizedAlways: fallthrough case .authorizedWhenInUse: print("Location status is OK.") @unknown default: fatalError() } } // Handle location manager errors. func locationManager(_ manager: CLLocationManager, didFailWithError error: Error) { locationManager.stopUpdatingLocation() print("Error: \(error)") } }上記のlocationManager(: didUpdateLocations:)デリゲートメソッドは、位置情報を取得・更新するたびに呼ばれます。また、locationManager(: didChangeAuthorization)デリゲートメソッドは、ユーザーのプリバシー情報が変わるたびに呼ばれます。
次に、Viewdidloadに以下のコードを書きます。
MapViewController.swiftoverride func viewDidLoad() { super.viewDidLoad() // location managerの初期化 locationManager = CLLocationManager() locationManager.desiredAccuracy = kCLLocationAccuracyBest locationManager.requestAlwaysAuthorization() locationManager.distanceFilter = 50 locationManager.startUpdatingLocation() locationManager.delegate = self placesClient = GMSPlacesClient.shared() // Create a map. let camera = GMSCameraPosition.camera(withLatitude: defaultLocation.coordinate.latitude, longitude: defaultLocation.coordinate.longitude, zoom: zoomLevel) mapView = GMSMapView.map(withFrame: showMapView.bounds, camera: camera) // mapView.settings.myLocationButton = true mapView.autoresizingMask = [.flexibleWidth, .flexibleHeight] mapView.isMyLocationEnabled = true // Add the map to the view, hide it until we've got a location update. showMapView.addSubview(mapView) mapView.isHidden = true }上記は、ViewDidloadにて、location managerの初期化とMapの表示を行います。
次に、以下のメソッドを追加します。これは、近くにある施設の情報を、likelyPlacesの配列に追加するためのものです。
MapViewController.swift//可能性のある場所を配列に入力. func listLikelyPlaces() { placesClient.currentPlace(callback: { (placeLikelihoods, error) -> Void in if let error = error { // TODO: Handle the error. print("Current Place error: \(error.localizedDescription)") return } // likelyPlacesに値を挿入 if let likelihoodList = placeLikelihoods { for likelihood in likelihoodList.likelihoods { let place = likelihood.place print("Current Place name \(String(describing: place.name)) at likelihood \(likelihood.likelihood)") print("Current PlaceID \(String(describing: place.placeID))") self.likelyPlaces.append(place) } } }) }次に、ボタンを押したときに、次の画面に
likelyPlaces配列の値を受け渡すために、prepare(for segue:)を追加で書きます。MapViewController.swift// Prepare the segue. override func prepare(for segue: UIStoryboardSegue, sender: Any?) { if segue.identifier == "segueToSelect" { if let nextViewController = segue.destination as? PlacesViewController { nextViewController.likelyPlaces = likelyPlaces } } }ボタンを押したときのアクションは以下の通り。
MapViewController.swift@IBAction func unwindToMain(segue: UIStoryboardSegue) { // Clear the map. mapView.clear() listLikelyPlaces() self.performSegue(withIdentifier: "segueToSelect", sender: nil) }これで、ひとまずMapViewControllerのコードは落ち着きました。ビルドして、Mapが表示されること・likelyPlacesを出力してみて値が入っているかなどを確認してください。
PlacesViewControllerに書くコード
次に、周辺施設の情報をtableViewにてまとめている、についてふれます。
これは、tableViewの知識でいけるので、コードのみ記載します。
PlacesViewController.swift//可能性のある場所を配列に入力. import UIKit import GoogleMaps import GooglePlaces class PlacesViewController: UIViewController,UITableViewDataSource, UITableViewDelegate { @IBOutlet weak var tableView: UITableView! var likelyPlaces: [GMSPlace] = [] var selectedPlace: GMSPlace? override func viewDidLoad() { super.viewDidLoad() tableView.dataSource = self tableView.delegate = self } func tableView(_ tableView: UITableView, numberOfRowsInSection section: Int) -> Int { likelyPlaces.count } func tableView(_ tableView: UITableView, cellForRowAt indexPath: IndexPath) -> UITableViewCell { let cell = tableView.dequeueReusableCell(withIdentifier: "cell") cell?.textLabel?.text = likelyPlaces[indexPath.row].name return cell! } // Pass the selected place to the new view controller. override func prepare(for segue: UIStoryboardSegue, sender: Any?) { if segue.identifier == "unwindToMain" { if let nextViewController = segue.destination as? MapViewController { nextViewController.selectedPlace = selectedPlace } } } func tableView(_ tableView: UITableView, didSelectRowAt indexPath: IndexPath) { selectedPlace = likelyPlaces[indexPath.row] performSegue(withIdentifier: "unwindToMain", sender: self) } }最後のtableViewのdelegateメソッドと
prepare(forsegue:)で、タップされたcellの情報を次のviewControllerに受け渡しています。MapViewControllerに付け足し
値が受け渡された先のViewControllerも、最初に作ったMapViewControllerとします。ただ、cellの値の部分にピン立てをするコードを付け足します。
viewDidLoad()にて、以下のコードを付け足してください。
MapViewControlleroverride func viewDidLoad() { super.viewDidLoad() // mapにmarkerを加える if selectedPlace != nil { let marker = GMSMarker(position: (self.selectedPlace?.coordinate)!) marker.title = selectedPlace?.name marker.snippet = selectedPlace?.formattedAddress marker.map = mapView } }これで、完成版のように表示することができたかと思います!
おわりに
Google Maps Platformが提供しているAPIは多岐に渡ります。
知る分アイディアの幅も拡がると思うので、精進していきます。
- 投稿日:2020-02-15T02:43:12+09:00
iOS でサイズやスタイルを維持したままフォントを一括変換
目標
- フォント (Font Family) を一括で変換する。
- 指定済みの Size, Weight, Italic を維持する。
- Weight はフォントによって数が異なるため、指定済みに最も近い Weight を利用する。
- どの Font Family にも適用できるよう汎用性の高いコードにする。
完成型
解説はどうでもいいのでコードの全体像を見たいという方はどうぞ
クリックして開く
extension UIFont {

    convenience init?(familyName: String, weight: UIFont.Weight, isItalic: Bool = false, size: CGFloat) {
        let font = UIFont
            .fontNames(forFamilyName: familyName)
            .compactMap({ UIFont(name: $0, size: size) })
            .filter({ $0.isItalic == isItalic })
            .min(by: { abs($0.weight.rawValue - weight.rawValue) < abs($1.weight.rawValue) })
        self.init(name: font?.fontName ?? "", size: size)
    }

    private var traits: [UIFontDescriptor.TraitKey: Any] {
        return fontDescriptor.object(forKey: .traits) as? [UIFontDescriptor.TraitKey: Any] ?? [:]
    }

    var weight: UIFont.Weight {
        guard let weight = traits[.weight] as? NSNumber else { return .regular }
        return UIFont.Weight(rawValue: CGFloat(truncating: weight))
    }

    var isItalic: Bool {
        return traits[.slant] as? NSNumber != 0
    }
}

extension UILabel {

    @objc var fontFamily: String {
        set {
            guard let font = UIFont(familyName: newValue, weight: self.font.weight, isItalic: self.font.isItalic, size: self.font.pointSize) else { return }
            self.font = font
        }
        get {
            return self.font.familyName
        }
    }
}

// 使用時
UILabel.appearance().fontFamily = "Avenir"
最初に
UILabelなどは、UIAppearanceを用いることで、特定のプロパティを一括して設定できます。UILabel.apperance().font = UIFont(name: "Gills Sans", size: 14)これに加え、Weight (文字の太さ) なども考慮した上でフォントファミリーを指定する方法が、下記で良く解説されています。
https://qiita.com/yfujiki/items/7de9421e63dfbfbcc7d4これを参考にさせていただきつつ、
Italic や、多数の Weight などへの考慮もするため、下記で解説するようなコードで実装しました。フォント周りの理解
コードの前に、フォント周りについて少し説明します。理解してる人は読み飛ばしてください。
Family Names と Font Name
例で2種類だしてみました。違いを理解しておいてください。
Family Name Font Name Helvetica Neue HelveticaNeue-Thin
HelveticaNeue-ThinItalic
HelveticaNeue
HelveticaNeue-Italic
etc...Hiragino Sans HiraginoSans-W3
HiraginoSans-W6
HiraginoSans-W7ここで大事なのは
- 各 Family Name に全ての Weight / Italic があるわけではない
→ もともと指定していた Weight に最も近い Weight を取得すべき- Font Name の命名規則に統一性は無い 1
→ 名称 (Light, Thin, など) をもとに Weight を判定すべきでないFamily と Name の取得 / 確認方法
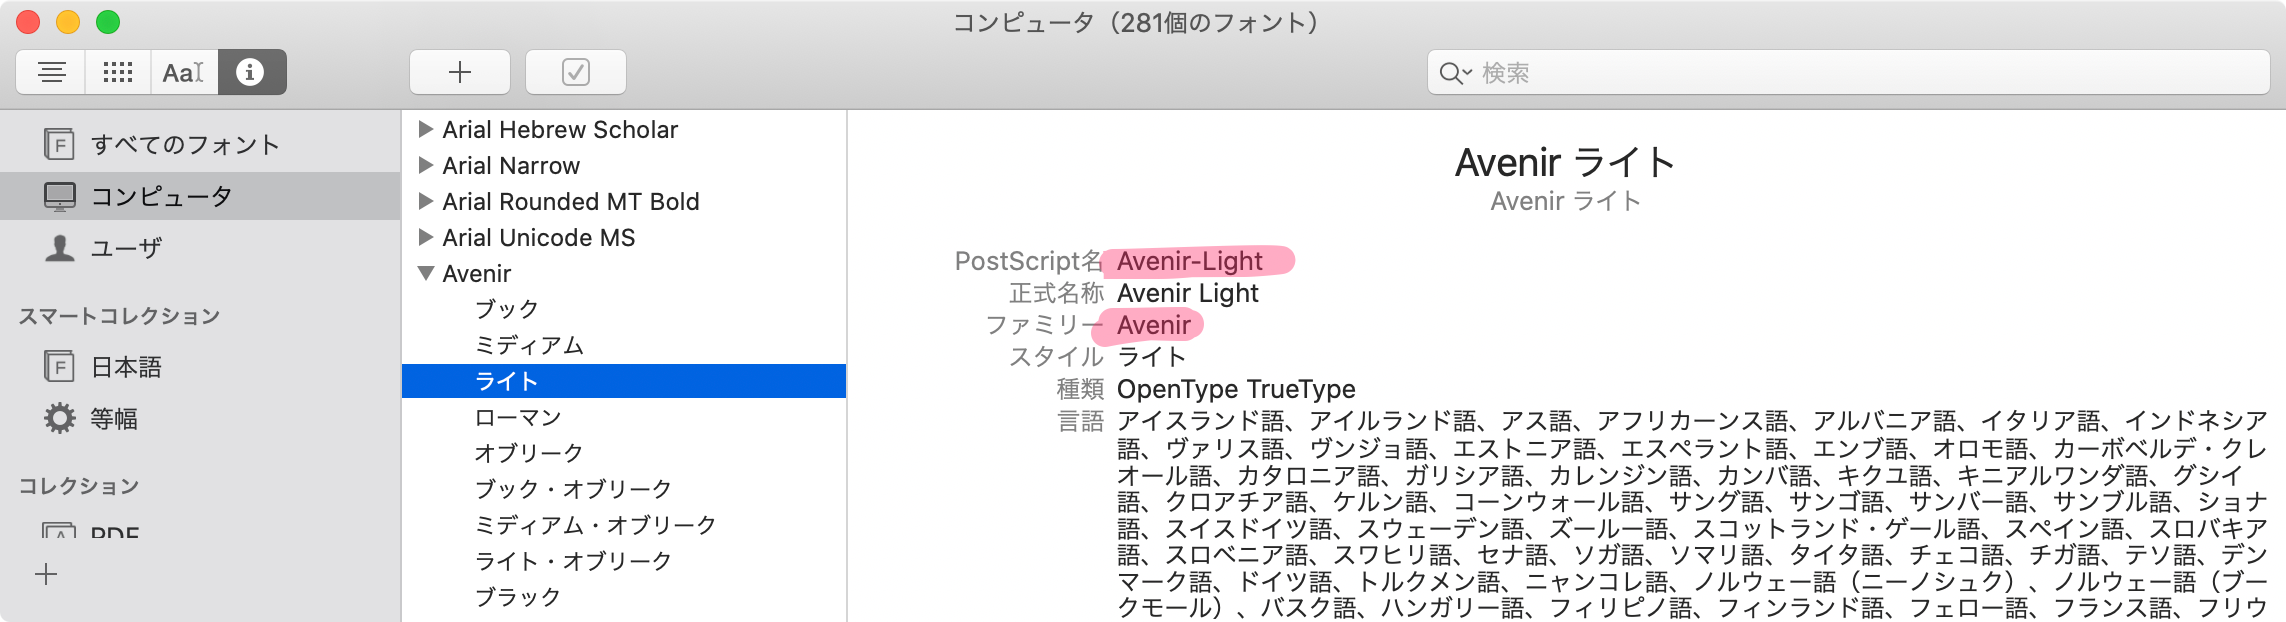
A. Mac に入っている Font Book.app でみる
「PostScript名」が Font Name、「ファミリー」が Font Family です。2
B. コードで確認する
Apple 公式記事 からコピペしました。
for family in UIFont.familyNames.sorted() {
    let names = UIFont.fontNames(forFamilyName: family)
    print("Family: \(family) Font names: \(names)")
}
UIFont のイニシャライザ
UIFont.init?(name fontName: String, size fontSize: CGFloat)を利用します。3
つまり、Font Family ではなく Font Name を使用することになります。解説
1. Weight と Italic を取得する
UIFontDescriptor経由で取得します。
UIFontDescriptor.TraitKey.slantで傾き具合を取得できるので、傾きが 0 でない場合に Italic とします。extension UIFont { private var traits: [UIFontDescriptor.TraitKey: Any] { return fontDescriptor.object(forKey: .traits) as? [UIFontDescriptor.TraitKey: Any] ?? [:] } var weight: UIFont.Weight { guard let weight = traits[.weight] as? NSNumber else { return .regular } return UIFont.Weight(rawValue: CGFloat(truncating: weight)) } var isItalic: Bool { return traits[.slant] as? NSNumber != 0 } }2. Font Family + Weight + Italic + Size でイニシャライズ
これらを踏まえ、Font Family・Weight・Italic・Size を引数としたイニシャライザを用意します。
- Family Name をもとに Font Name を取得
- Font Name をもとに UIFont を取得 (ここの Size はなんでもいい)
- Italic か否かでフィルタリング
- 引数で指定した Weight に最も近い Weight のものを取得
- イニシャライズ 4
extension UIFont {

    convenience init?(familyName: String, weight: UIFont.Weight, isItalic: Bool = false, size: CGFloat) {
        let font = UIFont
            .fontNames(forFamilyName: familyName)                                             // 1
            .compactMap({ UIFont(name: $0, size: size) })                                     // 2
            .filter({ $0.isItalic == isItalic })                                              // 3
            .min(by: { abs($0.weight.rawValue - weight.rawValue) < abs($1.weight.rawValue) }) // 4
        self.init(name: font?.fontName ?? "", size: size)                                     // 5
    }
}
3. UILabel で Font Family を指定できるように
これで終わりです。
用意した Weight / Italic get-only property と initializer を使用し、Font Family をもとにフォントを変更できるようにします。
存在しない Faimly Name を指定すると無視されます。
@objcをつけることでUIAppearanceを使用できます。extension UILabel { /// Set value that can be obtained from `UIFont.familyNames`. /// Can use UIAppearance because of using `@objc`. @objc var fontFamily: String { set { guard let font = UIFont(familyName: newValue, weight: self.font.weight, isItalic: self.font.isItalic, size: self.font.pointSize) else { return } self.font = font } get { return self.font.familyName } } }使用する時UILabel.appearance().fontFamily = "Avenir"環境 / 参考
Swift iOS 5 13
- iOS で UIAppearance を使ってグローバルなフォント変更を行う
https://qiita.com/yfujiki/items/7de9421e63dfbfbcc7d4- Stack Overflow | Font Weight の取得
https://stackoverflow.com/a/53818276- Apple Documentation | UIFontDescriptor.TraitKey.slant
https://developer.apple.com/documentation/uikit/uifontdescriptor/traitkey/1616686-slant- Apple Documentaion | Adding a Custom Font to Your App
https://developer.apple.com/documentation/uikit/text_display_and_fonts/adding_a_custom_font_to_your_app
大体のフォントは
<FamilyName>-<Weight><Italic>のような感じですが、例で挙げたような Hiragino Sans パターンなどもありえます。 ↩このアプリ内で表示されているフォントはPC内のものなので、開発中のアプリ内で全て使用できるわけではありません。逆に載っていないものも使用できるものがあります。 ↩
init(descriptor: UIFontDescriptor, size pointSize: CGFloat) というのもあります ↩
convenience イニシャライザを使用しているので
self.initしていますが、 class関数でも良ければ、そのままfont変数を返すだけで良いですね。お好みでどうぞ。 ↩
- 投稿日:2020-02-15T00:35:10+09:00
[Swift] GoogleMapAPI 〜Map表示&現在値にピン立て編〜
はじめに
アプリにMap表示したいー!
そう考えたとき、思い浮かぶものはMapKitかGoogleMapです。
MapKitは、地図を表示することはもちろん、住所検索やピン配置などをデフォルトで使用できる素晴らしいフレームワークです。
GoogleMapはGoogle社が提供しているAPIを使用することにより表示することができ、様々な機能を実装することができます。
Google Maps PlatformMapKitはSwiftのみですが、GoogleMapは他の言語でも使用する可能性があるので、これを機に勉強しようと思い、その備忘録及びアウトプットのためにここに記載していきます。
対象者
- これからアプリにMapを導入したいと思っている人
- とりあえずGoogleMapなんぞやと思っている人
バージョン
- Xcode....Version 11.1
- Swift....5.0
実装
導入
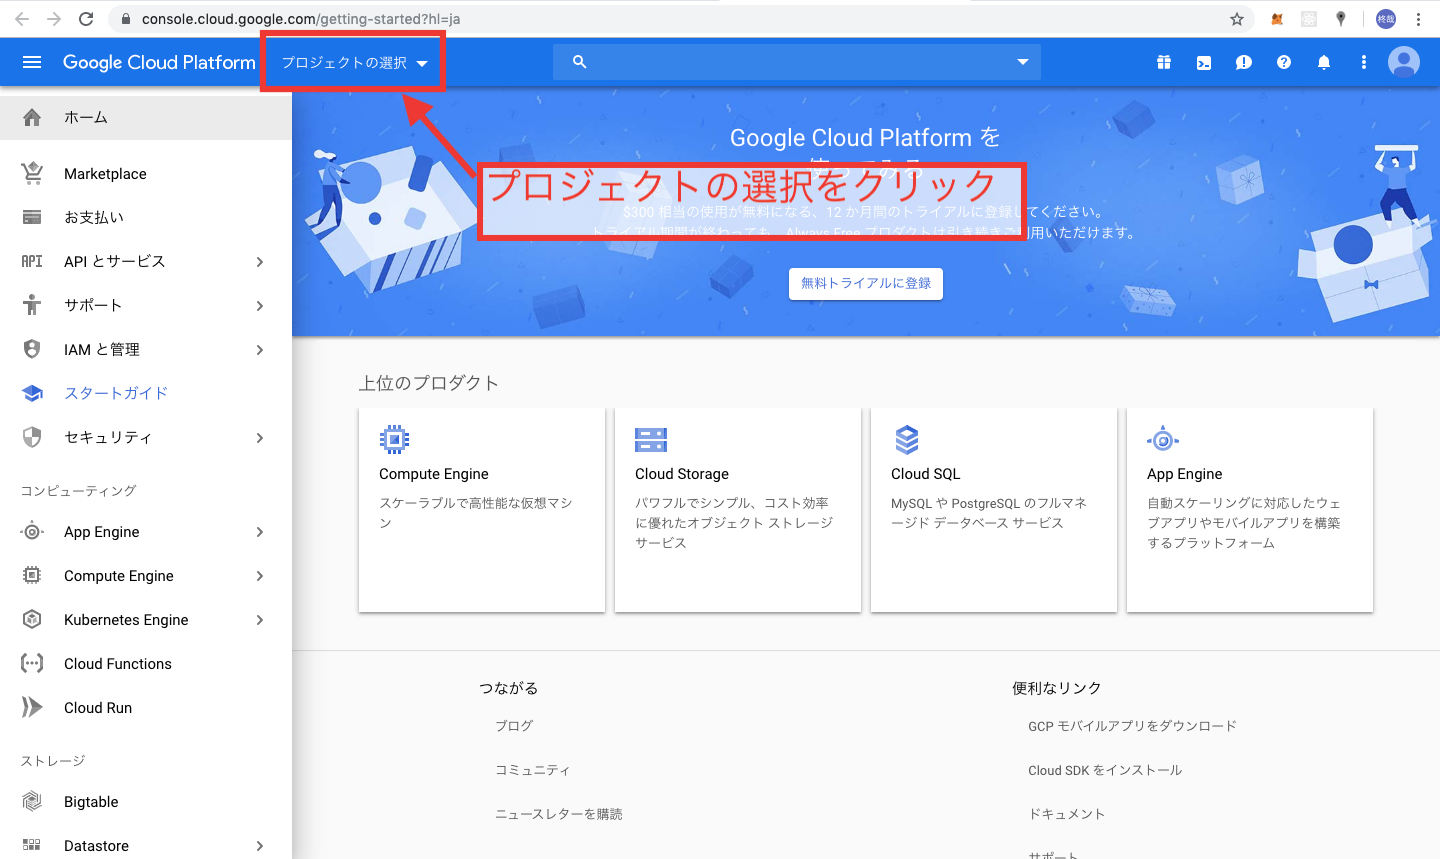
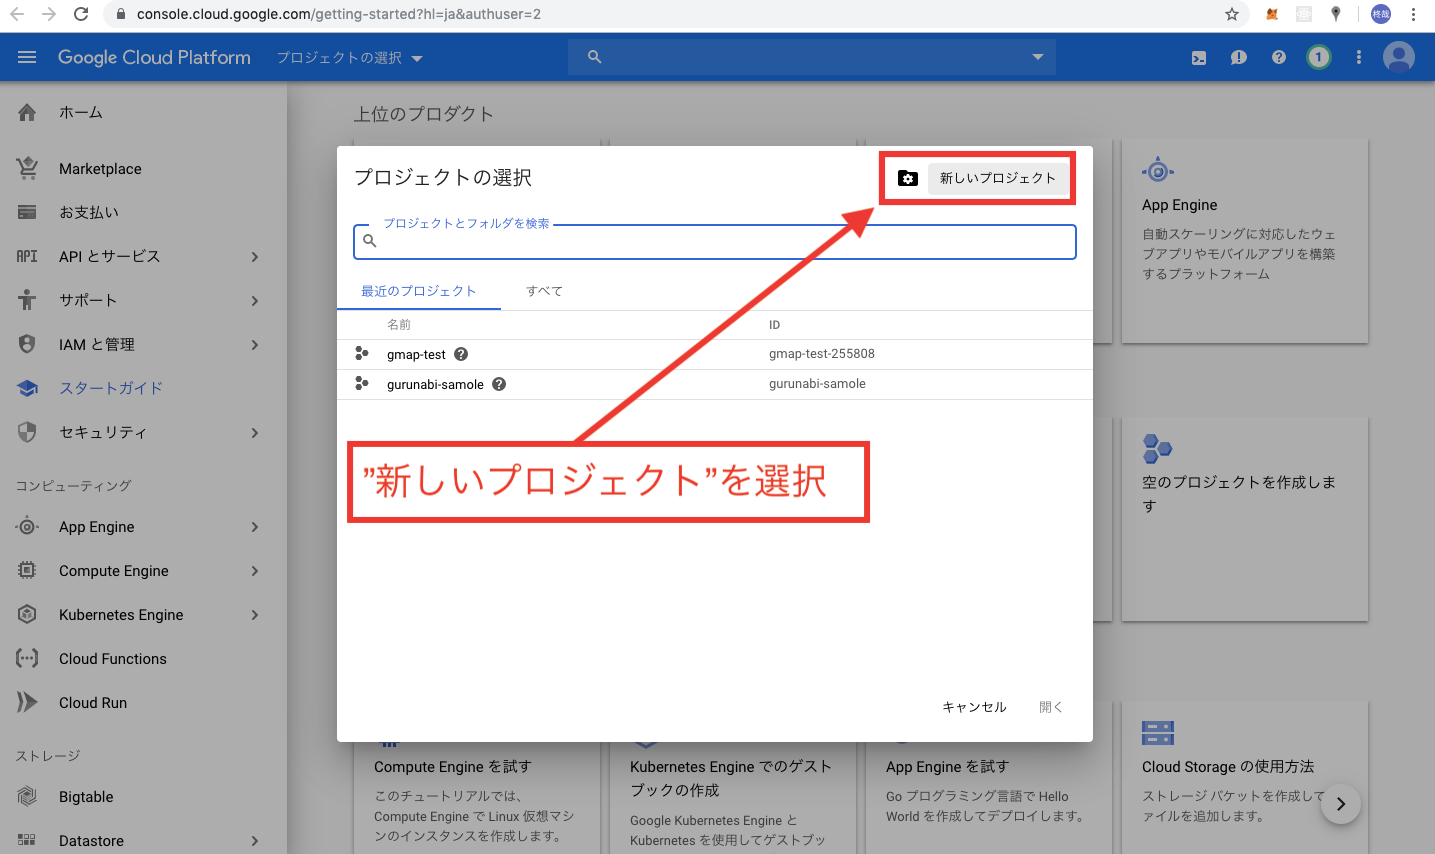
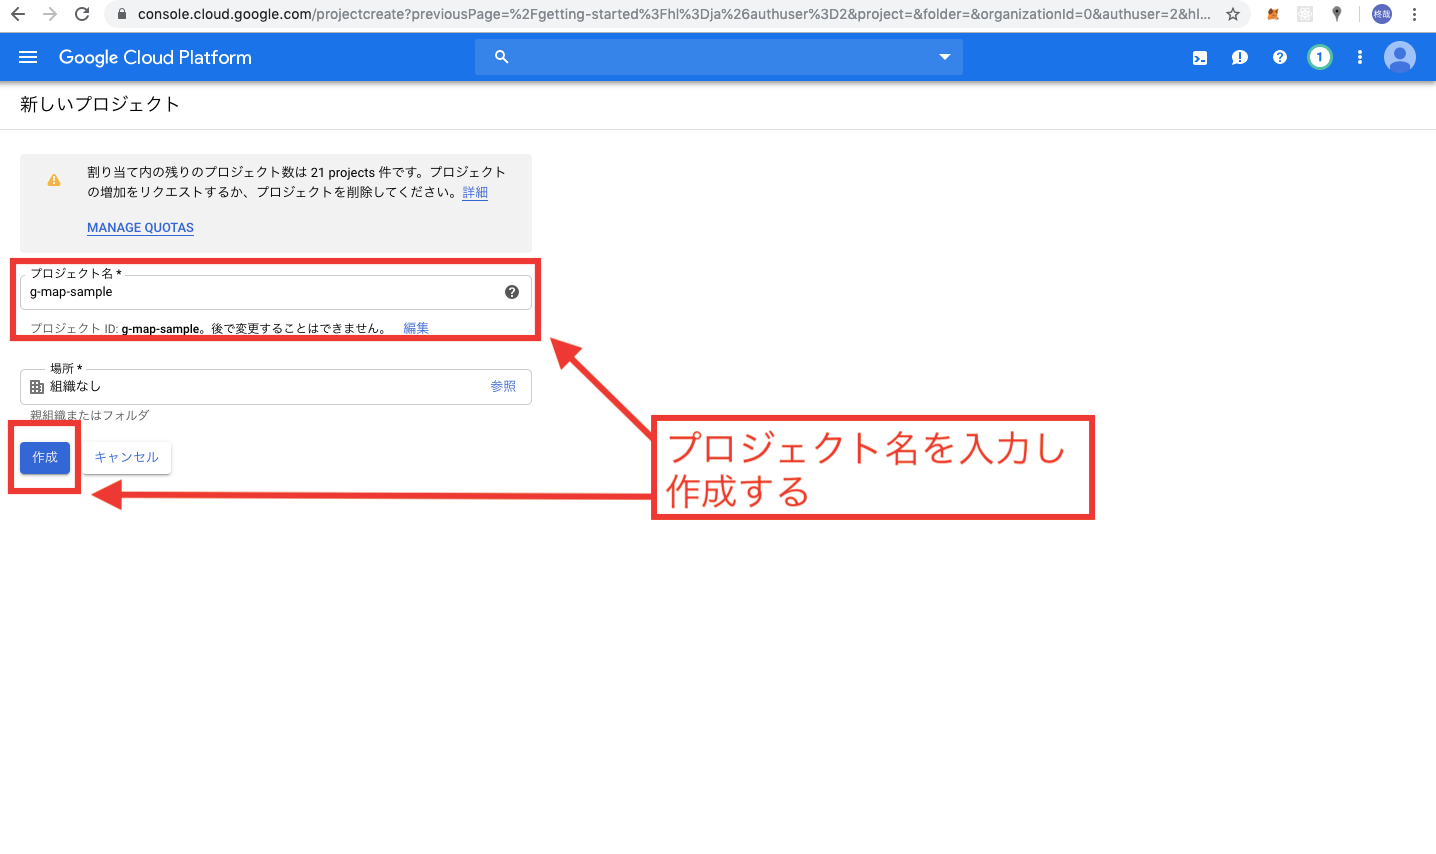
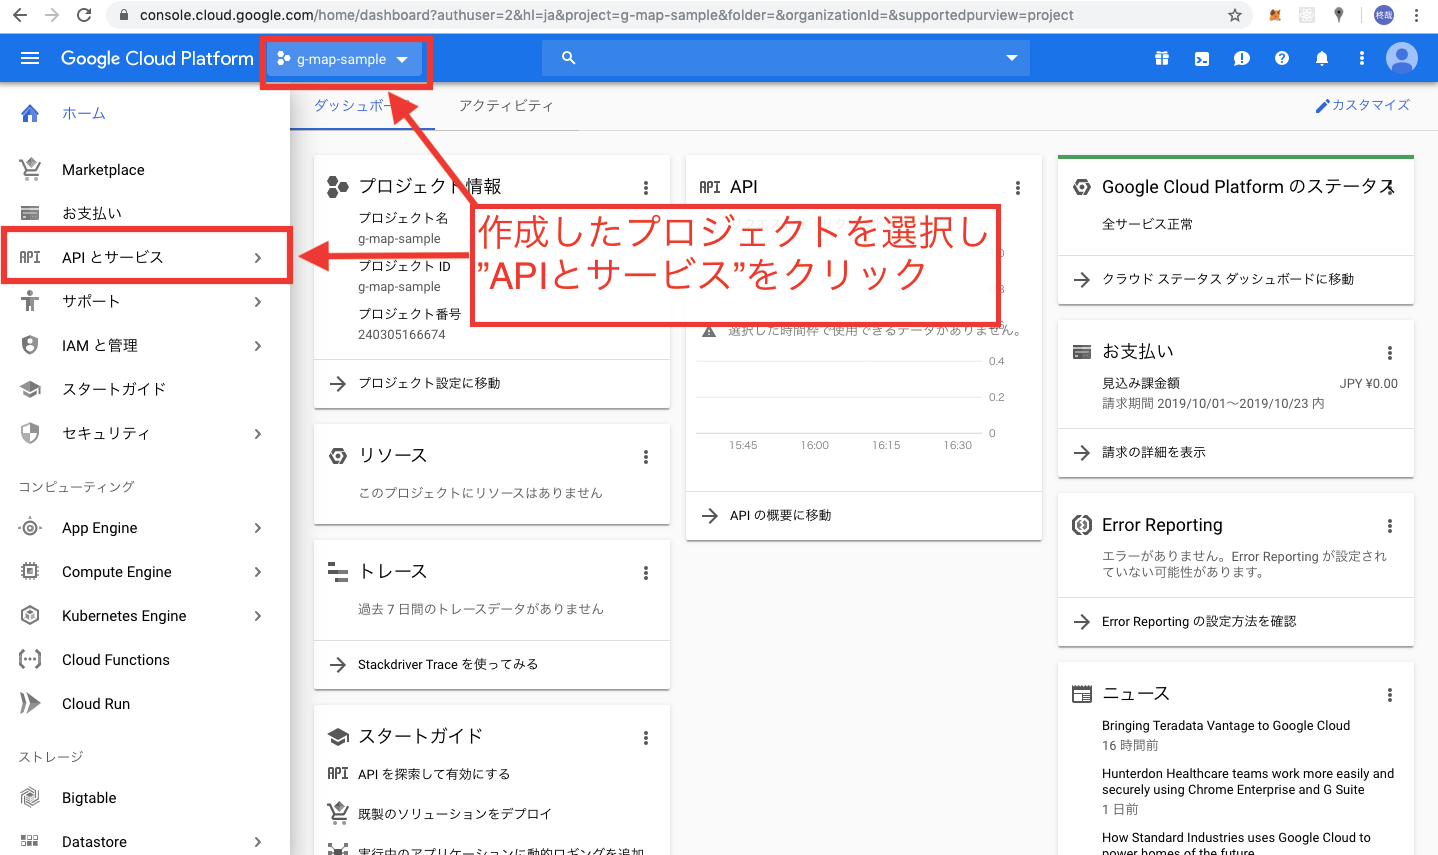
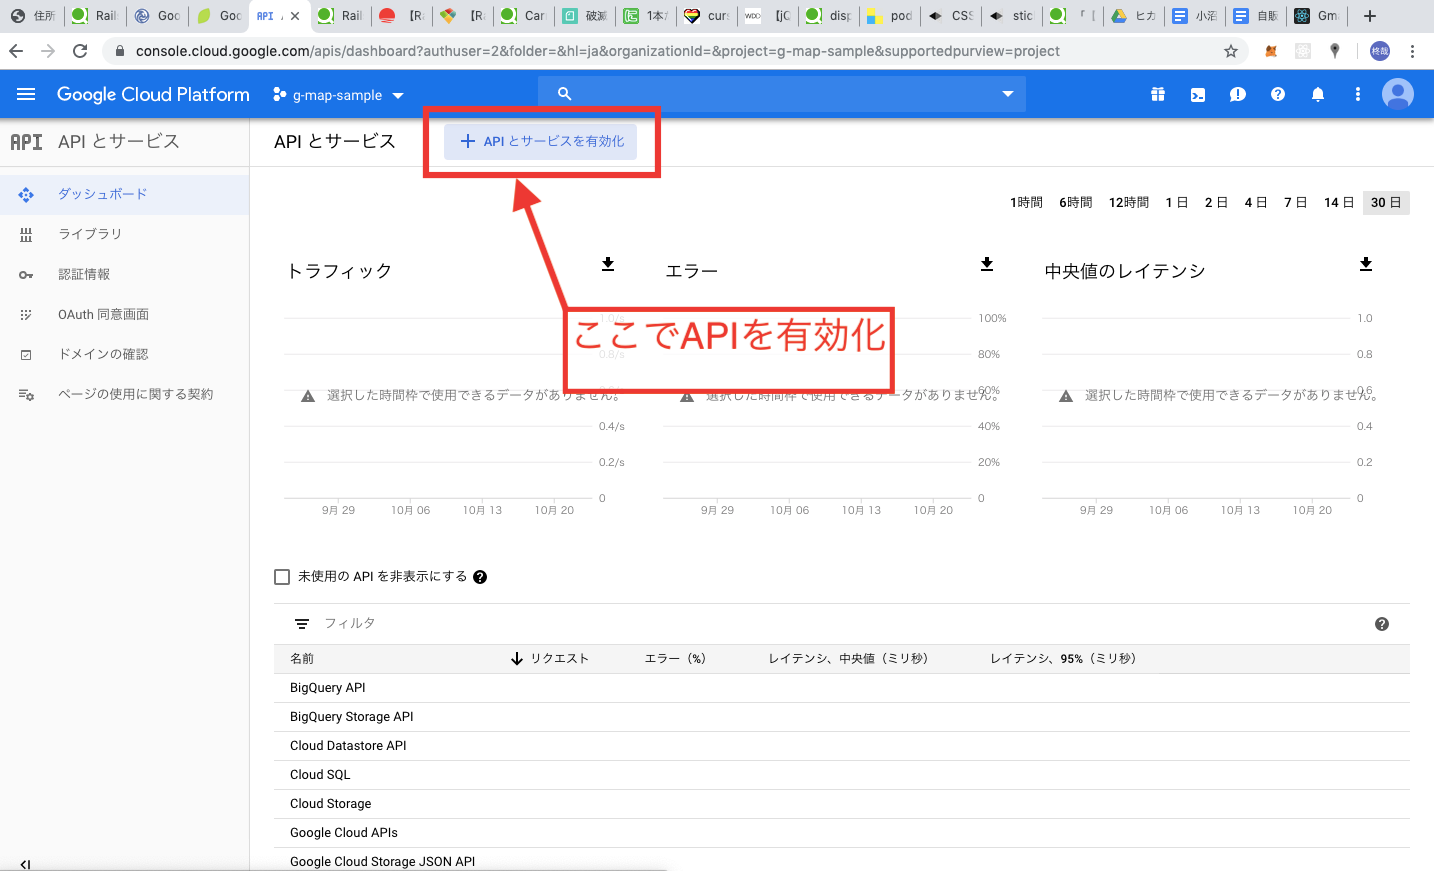
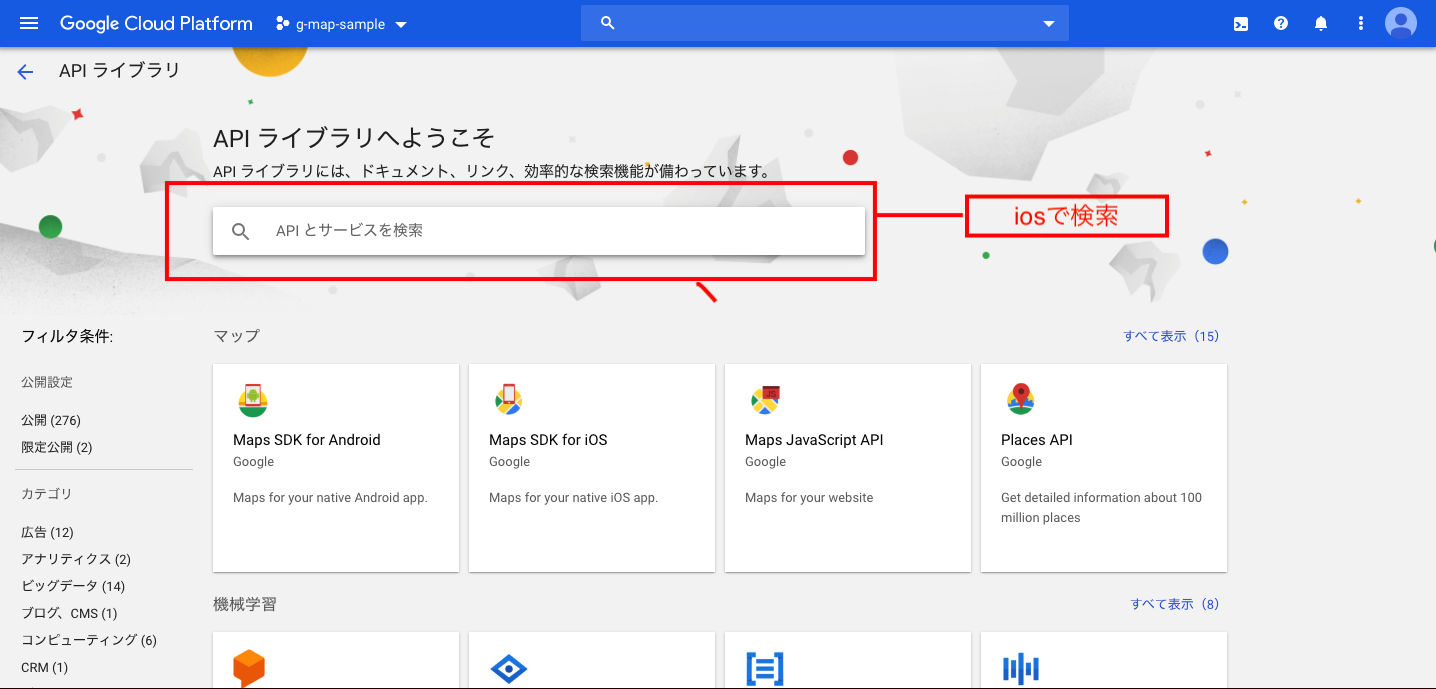
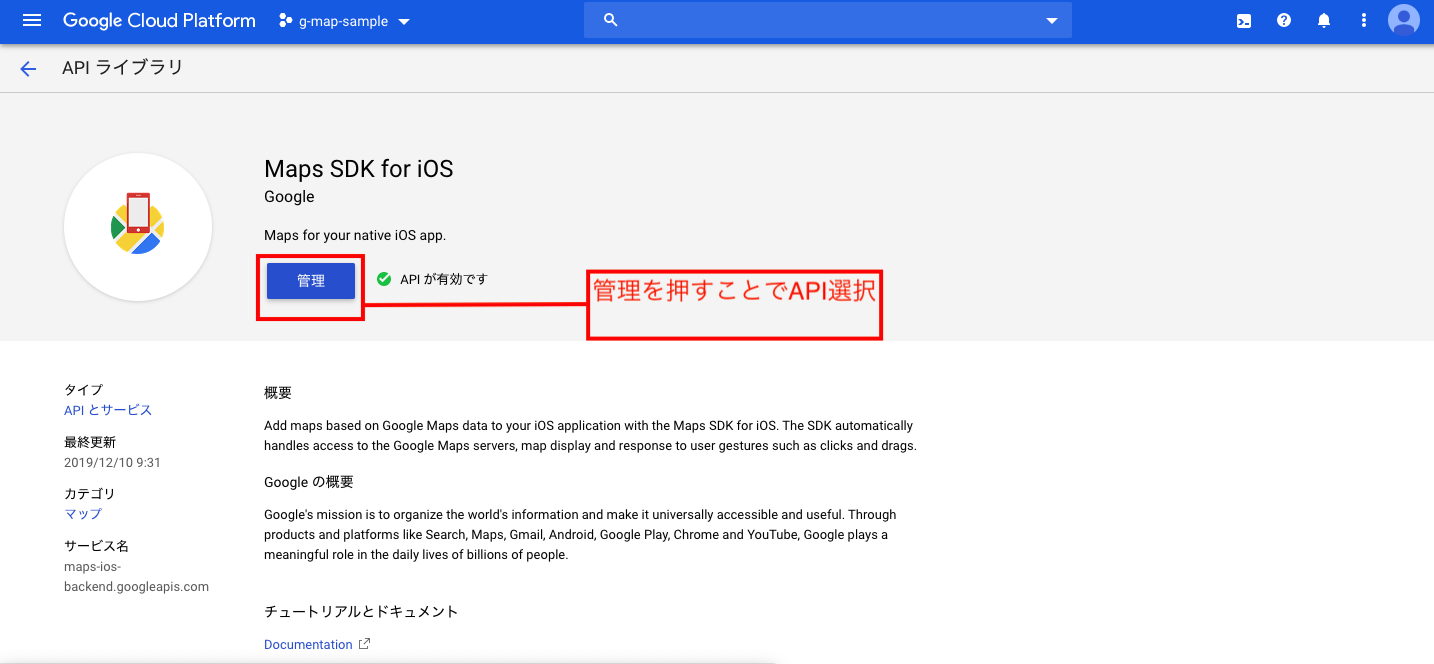
まずはじめに、上記の公式HPからアクセスし、右上のコンソールをタップします。
以上でCloudPlatformの初期設定は終了です。
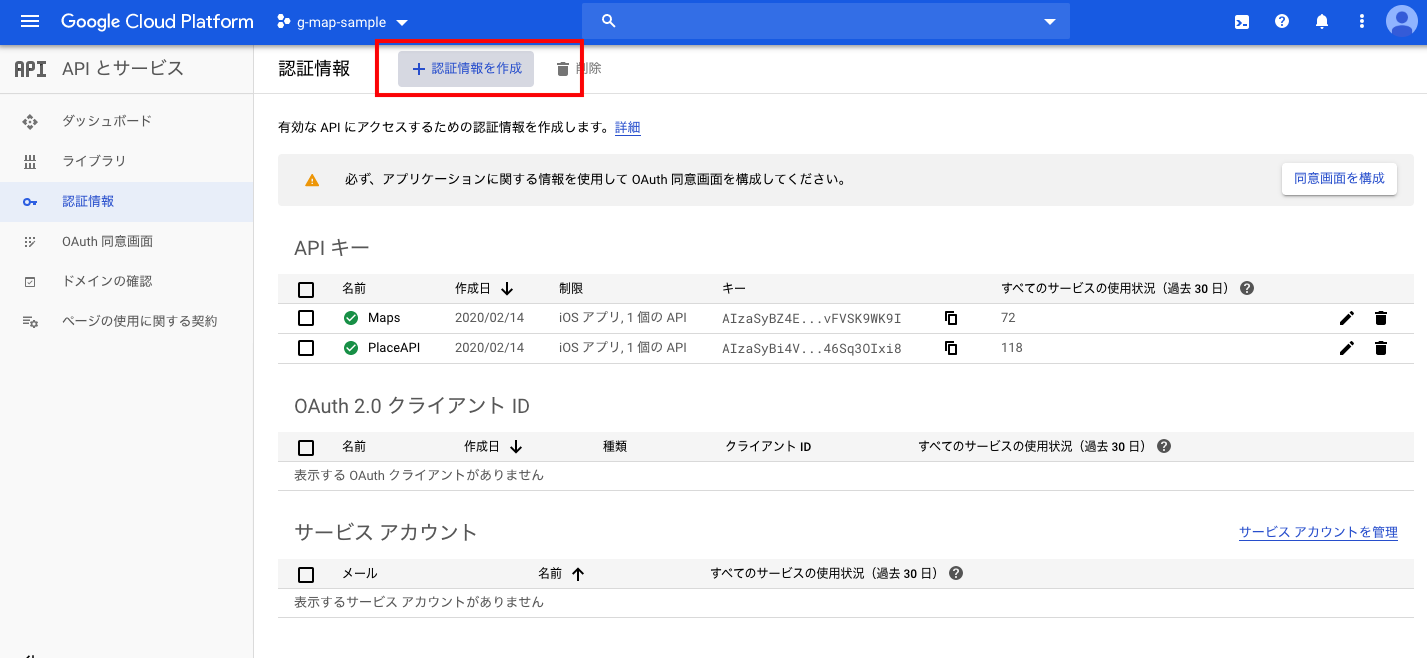
APIkeyの登録
ライブラリの導入をするためにpodfileをインストールしてください。
その後、以下のコードをpodfileに記入します。podfilepod 'GoogleMaps'pod installをしたら、プロジェクトを開きましょう!
AppDelegateを開いて、APIキーを登録していきます。
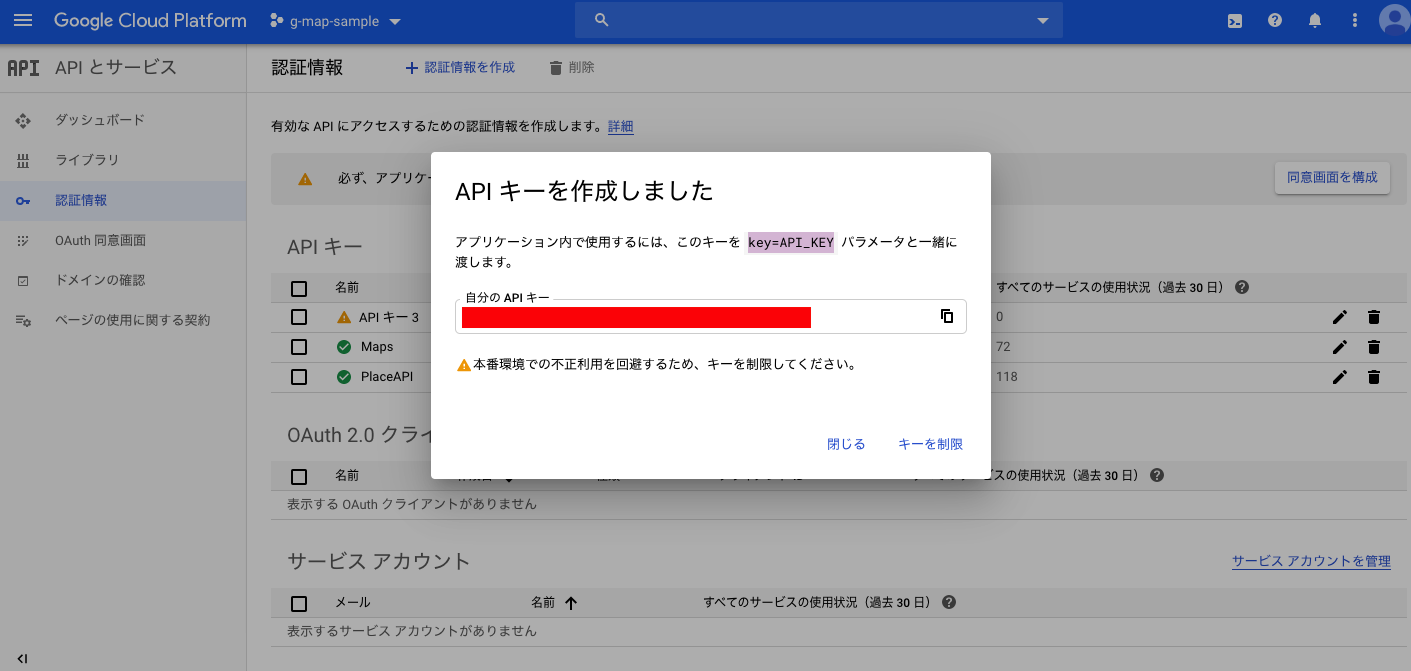
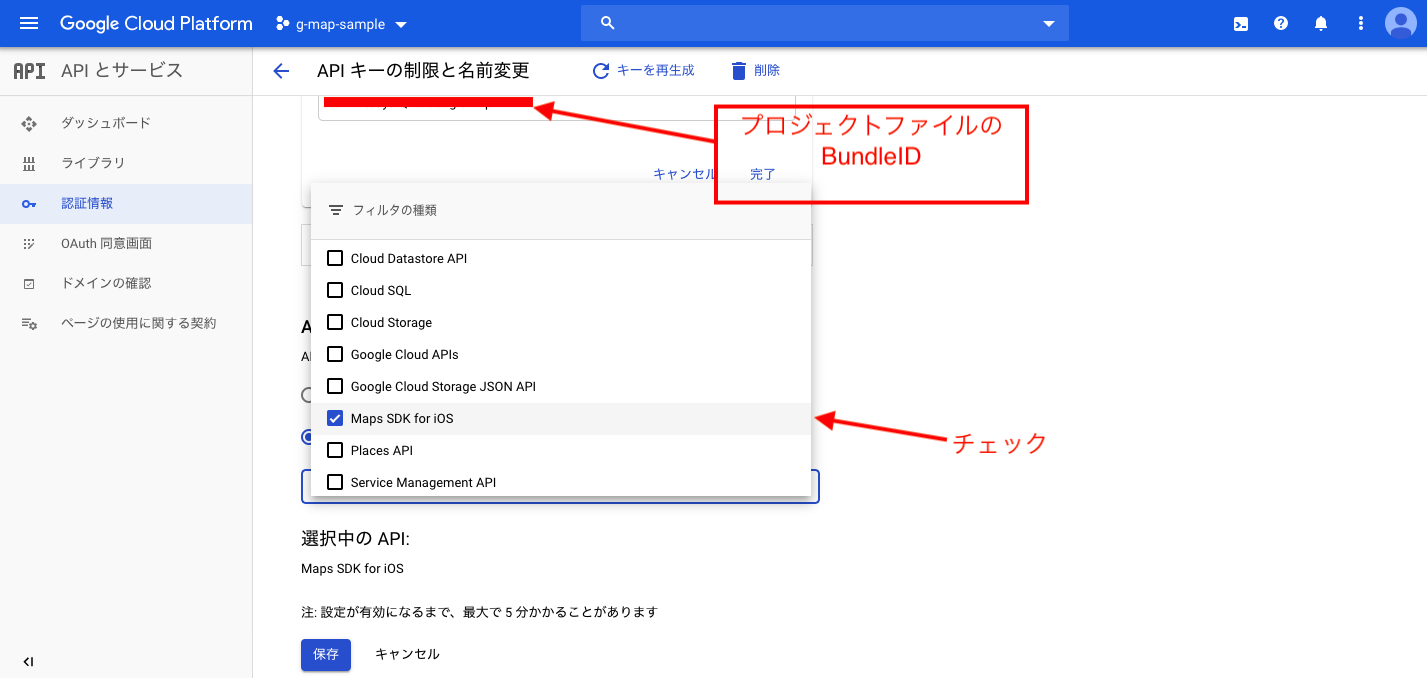
まず、先程導入したGoogleMapsをimportします。AppDeleAppDelegate.swiftimport GoogleMapsそしてapplication(_app~)メソッドに、先程発行したAPIキーを挿入します。
*APIキーは、CloudPlatformのコンソールでこのプロジェクトを選択し、「APIとサービス」→「認証情報」のところにあります。
AppDeleAppDelegate.swiftfunc application(_ application: UIApplication, didFinishLaunchingWithOptions launchOptions: [UIApplication.LaunchOptionsKey: Any]?) -> Bool { // Override point for customization after application launch. GMSServices.provideAPIKey("発行したAPIキー") return true }これで、Platform上で作成したものと、このXcodeプロジェクトファイルがひも付きました。
ひとまずGoogleMapを表示してみる
では、実際にMapを表示してみたいと思います。
まずは、自分の現在地を取得する前に、公式ドキュメントのようにMapを表示することを目標にします。以下のコードをViewControllerに記述してください。
ViewController.swiftimport UIKit import GoogleMaps class ViewController: UIViewController { override func viewDidLoad() { super.viewDidLoad() } override func loadView() { //表示するMapの位置と表示の縮小具合 let camera = GMSCameraPosition.camera(withLatitude: -33.86, longitude: 151.20, zoom: 6.0) let mapView = GMSMapView.map(withFrame: CGRect.zero, camera: camera) view = mapView // 指定した場所にピンを立てる。 let marker = GMSMarker() marker.position = CLLocationCoordinate2D(latitude: -33.86, longitude: 151.20) marker.title = "Sydney" marker.snippet = "Australia" marker.map = mapView } }コードの内容は、簡単にコメントアウトしたので、参照してください。
上記のコードにより、AustraliaのSydneyにピンが立ったと思います。現在地にピンを立てる。
では次に、自分の位置をGoogleMapで表示させます。手順としては、
① 自分のiphoneの端末で緯度・軽度を取得する
② それをGoogleMapsのメソッドに引数として挿入する
③ Mapを表示させる
です!ではまず①から行いましょう!
①を行う際、こちらの記事を参考にしました。?
【CoreLocation】位置情報を取得する注意点としては、位置情報を取得するときユーザーから許可を得るためにInfo.Plistにしっかり記入することです。
この記事を元にすると、現在地の緯度と軽度が取得できます。
取得したものはそれぞれ
ViewController.swiftvar currentLatitude :Double! var currentLongitude :Double!上記のようにDouble型で定義します。
では次に、②と③を同時にやってしまいます。
位置情報を取得する際に使用した、
locationManager(_ manager: CLLocationManager, didUpdateLocations locations: [CLLocation])メソッドの中に、先程のMap表示とピン立てにおいて書いたコードである、GMSCameraPosition.cameraとCLLocationCoordinate2Dの引数である緯度・軽度にそれぞれ取得したものを挿入します。コードとしては以下です。
ViewController.swiftfunc locationManager(_ manager: CLLocationManager, didUpdateLocations locations: [CLLocation]) { let location = locations.first currentLatitude = location?.coordinate.latitude currentLongitude = location?.coordinate.longitude print("latitude: \(currentLatitude!)\nlongitude: \(currentLongitude!)") let camera = GMSCameraPosition.camera(withLatitude: currentLatitude, longitude: currentLongitude, zoom: 6.0) let mapView = GMSMapView.map(withFrame: CGRect.zero, camera: camera) view = mapView let marker = GMSMarker() marker.position = CLLocationCoordinate2D(latitude: currentLatitude, longitude: currentLongitude) marker.map = mapView }これで、自分が今いる現在地がgoogleMap上に表記できたと思います。
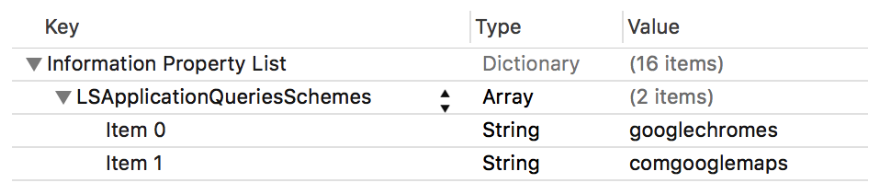
最後に、左下にあるgoogleマークをタップしたとき、GoogleMapに正しく遷移させるために、Info.Plistに以下のようなものを追加しましょう。
(ドキュメント通り)
おわりに
写真の前半部分などは、こちらからの転用です!
【Rails5】RailsでGoogle Map APIの導入Railsでの使用を考えてる方は、ぜひ!