- 投稿日:2020-02-15T23:06:48+09:00
【React】コードを書いているようなアニメーションを作成する
概要
Next.jsでmarkdownブログを作ったのですが、その中でコードを書いているようなアニメーションを実装してみたので、共有します。
カスタムフックとして切り出せたので誰でも使用出来ます。完成したもの
自作ブログで見れます。
カスタムフック
setIntervalで文字列の長さのstateをアップデートしているだけです。setStep.tsimport { useEffect, useRef, useState } from 'react'; export const useStep = (text: string, stepTime: number) => { const [length, setLength] = useState(0); const lengthRef = useRef(length); useEffect(() => { lengthRef.current = length; }, [length]); useEffect(() => { const timer = setInterval(() => { setLength(lengthRef.current === text.length ? lengthRef.current : lengthRef.current + 1); }, stepTime); return (): void => clearInterval(timer); }, []); return text.slice(0, length); };
Refを用いないと、クロージャの働きによってsetInterval内のlengthの値が変わりません。
setIntervalした場合、useEffectのreturnにタイマー解除のコールバックを忘れずに。コンポーネント
コードと、間隔を指定して、返り値をrenderするだけです。
LiveCode.tsximport React from 'react'; import { useStep } from '../../hooks/useStep'; import { CodeBlock } from '../Post/MarkDownViewer'; type Props = { code: string; language: string; }; export const LiveCode: React.FC<Props> = props => { const codeState = useStep(props.code, 35); return ( <> <CodeBlock value={codeState} language={props.language} /> </> ); };
CodeBlockコンポーネントでは、React-Markdownとreact-syntax-highlighterを使用しています。まとめ
React楽しすぎますね。
やっぱりカスタムフックで機能とコンポーネントを分けられるところがクールです。

- 投稿日:2020-02-15T22:59:33+09:00
Gatsby静的サイトジェネレータで爆速な動的サイトを作る
最近Reactのプロジェクトは全部Gatsbyベースで作ればいいじゃないかな(大体適用できる)と思ったので
なぜそう思ったのかまとめてみます。(Gatsbyサイト実装の雛形付き)Reactに代表されるSPAのメリットとしては
- history APIによる疑似ルーティングでバックエンド無しでページ間遷移ができる(API無しの場合はファイルをホストするだけでWebページが作れる)
- フロントエンドとバックエンド(API)の棲み分けがはっきりしてる(SSRしない場合)
- 仮想DOMツリーによる差分レンダリングが高速
動的に仮想DOMツリーを生成するSPAの欠点として以下のことが挙げられます。
- bundle.jsのファイルサイズが肥大化して読み込みが遅い
- そもそも仮想DOMツリーの構築に初回のJS実行時間がかかる
- TwitterやFacebookシェアのOGPを実装しようとするとSSRの実装に迫られる(複雑度が増すのでSSRしたくない・・・)
サイトパフォーマンス(特に初回レンダリング)やOGPに問題をかかえています。
Gatsbyを使うことでこれらの問題を解決しつつ、Reactアプリケーション(SPA)を作成することができます。超えられない速度的な観点
参考:How Gatsby is so blazing fast
HTMLの事前生成
Gatsbyは、Reactを使用する静的なWebサイトジェネレーターです。
Webサイトの各ページのHTMLファイルを作成します。
つまり、「リクエストされたときにページを生成するのを待つ代わりに、Gatsbyはページを事前に構築します」ユーザーがHTMLファイルを介してページにアクセスすると、ブラウザーはコンテンツをレンダリングします。
キャッシュやJavaScriptがない場合、aタグを使用すると、クリックされたときに別のHTMLファイルが読み込まれます。その結果、ユーザーは待たなければならない場合があります。さらに悪いことに、コンテンツのレンダリング中に空白のページが表示されます。これは、シングルページアプリケーション(SPA)が登場するまでWebが設計されたときからの最も伝統的な方法です。
SPAは、JavaScriptでコンテンツを更新することでページをレンダリングします。静的ファイルをダウンロードするよりも更新がはるかに高速です。単一のHTMLファイルをロードし、ユーザーが操作するときにそのページを動的に更新するためです。
Reactは、SPAのビューレイヤーを処理するライブラリです。 Reactのようなフレームワークとライブラリは、JavaScriptコードの実行が開始されない限り、何をレンダリングするかを知りません。そのため、SPAとして構築すると、クリティカルレンダリングパスに大きな影響を与えます。
(つまり、JavaScriptで動的にレンダリングすることが初回レンダリングのボトルネックになります。)
Gatsbyには、初回レンダリングに最適化されたwebpack構成があります。
- HTMLタグの事前生成
- 非同期なJavaScriptコード実行。ユーザーインタラクションには必要ですが、初回レンダリングには必要ありません
- 生成されたページのCSSはインラインなので、CSSファイルをダウンロードする必要はありません
Code Splittingとキャッシュ
ページを構築する際、Gatsbyはページに必要なコンポーネントを確認し、webpackにCode Splittingを自動的に実行させます。これは、Dynamic importを設定することにより適用されます。
この方法により、ブラウザーはWebサイト全体ではなく、ページに必要なファイルのみをリクエストし、ページのロード時間を短縮します。
該当ページのファイルしか読み込まない欠点は、ユーザーがリンクをクリックしたときにのみ他ページのファイルをダウンロードするため、ページ遷移が遅くなります。
この問題を回避するために、GatsbyのWebpack構成では、Link prefetchと呼ばれる手法を適用します。
(Link prefetchはブラウザのメカニズムであり、ブラウザのアイドル時間を利用して、近い将来ユーザーがアクセスする可能性のあるドキュメントをダウンロードまたは事前リクエストします。)ブラウザーがページのロードを完了すると、ブラウザーはそれらをダウンロードするためのprefetch属性を持つlinkタグを探します。次に、ユーザーがリンクをクリックすると、ページにリクエストされたファイルが既にキャッシュにある可能性が高くなります。
すべてのページはReactアプリである
静的なWebサイトのページを遷移するには、HTMLファイルをロードする必要がありますが、Gatsbyには必要ありません。これらはReactアプリです。
(つまり、初回レンダリング時は事前に生成したhtmlを使い、2回目以降のレンダリングはReactでの動的なレンダリングを行います。)「GatsbyはサイトのHTMLページを生成しますが、最初のHTMLが読み込まれるとブラウザーで引き継ぐJavaScriptランタイムも作成します」
別のページの各aタグは、Reach Routerによるルーティングになります。実際には、ページ上のコンテンツを更新する際は、あるHTMLファイルから別のHTMLファイルに変化しているように見えます。
画像最適化
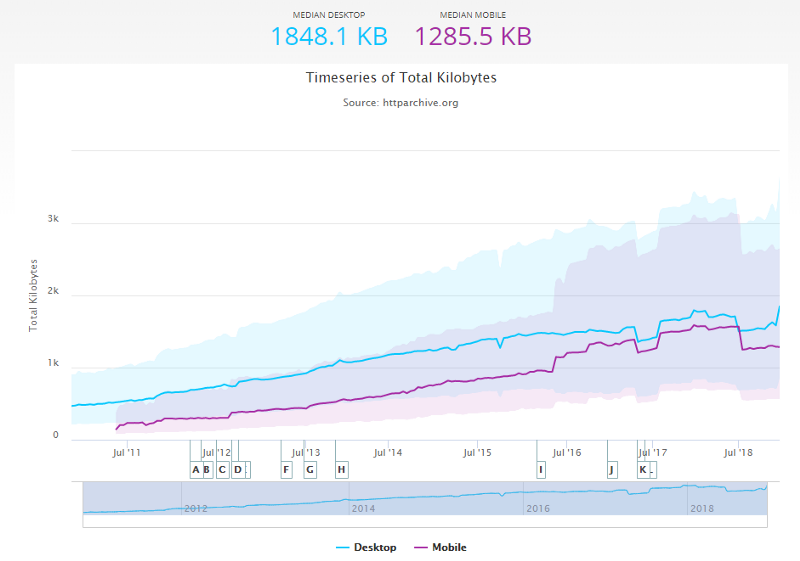
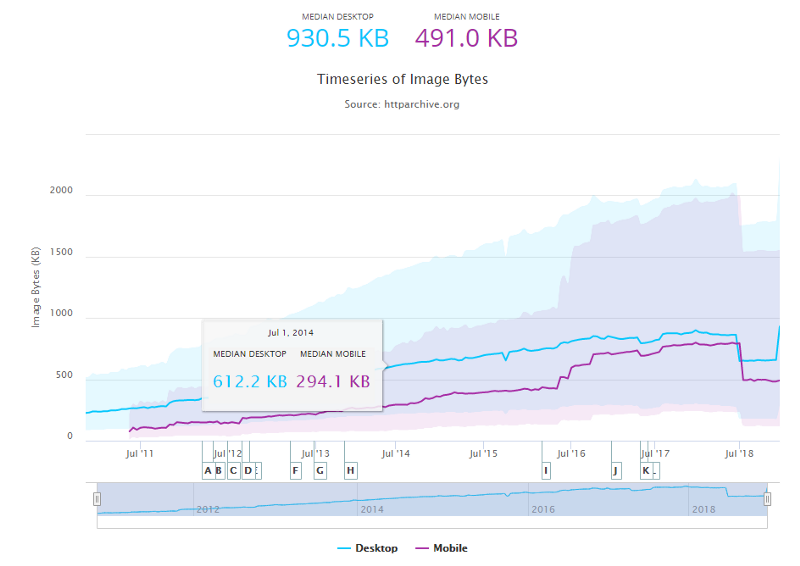
HTTP Archiveは多くの人気のあるWebサイトをトラッキングしています。
ページがリクエストするデータの種類のほとんどは画像です。(約1/3は画像データ!)
合計KB - ページがリクエストするすべてのリソースの転送サイズの合計は、モバイルの場合約1285.5 KBです。
画像KB - ページでリクエストされたすべての外部画像の転送サイズの合計は、モバイルの場合491.0KBです。
画像の最適化は、Webサイトで最高のパフォーマンス向上の1つです。
ダウンロードするバイト数が少ないことは、必要な帯域幅が少ないことを意味するため、ブラウザはコンテンツをより速くダウンロードしてレンダリングできます。これらは、実行可能な最適化の一部です。
- 必要な表示領域と同じ画像サイズに変更します
- デスクトップとモバイル用に異なる解像度のレスポンシブ画像(srcset属性で表示を切り分ける)を生成します
- 画像のメタデータを削除して画像圧縮を適用する
- lazy loadを適用して、最初のページの読み込みを高速化する
- 画像の読み込み中にプレースホルダーを表示する
これには多大な労力がかかり、Gatsbyには解決策があります。
gatsby-imageプラグインを使うことでプロセス全体を自動化できます。
Gatsbyの多くのツールと同様に、gatsby-imageプラグインはGraphQLを使用しています。
このプラグインは、imgタグにレスポンシブ画像を設定します。
レスポンシブ画像を作成し、画像圧縮を適用します。
これらはすべて、ビルド時に行われます。
(注意:ビルド時最適化なので動的画像リソースには適応できません!)画像が読み込まれると、「blur-up」手法により、すでにHTMLファイル(または背景のみ)にある非常に低品質の画像でプレビューが表示されます。その後、高品質の画像に切り替わります。(Mediumでも使われている)
minifyとユニークファイル名
これらの手法は、人気のあるフレームワークとライブラリですでに広く使用されており、Gatsbyではそれほど大きな違いはありません。
webpack(productionモード)を使用してビルドすると、デフォルトですべてのファイルがminifyされます。ファイルは、ファイル名にハッシュを割り当てることによってビルドされたときに一意です。
何かが変更されると、ファイルに新しい名前が付けられます。
この背景は、これらのファイルをブラウザーキャッシュからの取得を長期間許可できるようにするためです。
そのため、ユーザーがWebサイトに戻ってきたとき、すでにファイルをブラウザに持っています。ファイルを更新すると、ビルド時に新しいファイル名が付けられます。
この場合、キャッシュからのファイルと一致しないため、ブラウザは更新されたファイルをダウンロードします。
以上のようにGatsbyには(特に初回)レンダリングを最適化する構成がされています。
Gatsbyと同様のことを素のReactプロジェクトでやろうとすると事前レンダリングの実装やwebpackのCode Splittingなどの複雑な構成を自前で作成しなければなりません。(この辺の最適化は自前だとGatsbyに勝てる気がしない・・・)
何でGatsbyに負けたか、明日まで考えてきてください
Gatsbyで動的なサイトを作る
さて、本題です。
まず、Gatsbyでの簡単なプロジェクトの作成の仕方に関してわからない人は秒速で理解してきてください。
静的サイトジェネレータGatsbyを秒速で理解するGatsbyはプリレンダリングの仕組みを用意してくれてるReactアプリケーションという認識です。
この辺は普通のReactアプリケーションと同じでページでstateも持てますし、reduxも使用できます。
ただ、いくつかのGatsbyプラグインをいれたり、Gatsby独自のルールに従う必要があります。
今回のサンプル(雛形)を元に話します。サンプルの構成です。
- TypeScript
- ESLint
- Redux
- Material-UI
- express
- mongoose
ビルド設定
Gatsbyは裏側ではwebpackでビルドされているため、babelのビルド設定ファイルなどもビルドに反映します。
.babelrcにbabel関連のプラグインを導入します。
babel-preset-gatsbyのpresetを導入します。このpresetにはbabel-preset-envとbabel-preset-reactのpresetが含まれています。
クラス関数文法サポートの@babel/plugin-proposal-class-propertiesとオプショナルチェーン文法の@babel/plugin-proposal-optional-chainingを導入しています。.babrlrc{ "presets": [ [ "babel-preset-gatsby", { "targets": { "browsers": [">0.25%", "not dead"] }} ] ], "plugins": [ "@babel/plugin-proposal-optional-chaining", "@babel/plugin-proposal-class-properties" ] }gatsby-config.jsにgatsbyのプラグイン関連の設定を記述します。
スタータ構成のプラグイン設定から足したものは
TypeScript、ESLint、Material-UIテーマサポートのプラグインです。
TypeScriptサポートのgatsby-plugin-typescriptプラグイン、
TypeScript形チェックのgatsby-plugin-typescript-checkerプラグイン、
graphqlデータ型の自動生成のgatsby-plugin-graphql-codegenプラグイン、
ESLintのlintチェックのgatsby-plugin-eslintプラグイン、
Material-UIのテーマサポートのgatsby-theme-material-uiプラグイン
を追加しています。
proxyは開発時(gatsby develop)にapiパスのリクエストをサーバに向けたいために設定しています。(Gatsbyの開発サーバとAPIサーバのポートが違うため、CORSのエラーになるのを防ぐ)
本番ビルド時はproxy設定は使われません。gatsby-config.jsmodule.exports = { siteMetadata: { title: 'Gatsbyサンプル', description: 'Gatsbyサイトのサンプルです', }, plugins: [ 'gatsby-plugin-react-helmet', { resolve: 'gatsby-source-filesystem', options: { name: 'images', path: `${__dirname}/src/images`, }, }, 'gatsby-transformer-sharp', 'gatsby-plugin-sharp', { resolve: 'gatsby-plugin-manifest', options: { name: 'gatsby-starter-default', short_name: 'starter', start_url: '/', background_color: '#663399', theme_color: '#663399', display: 'minimal-ui', icon: 'src/images/gatsby-icon.png', // This path is relative to the root of the site. }, }, // this (optional) plugin enables Progressive Web App + Offline functionality // To learn more, visit: https://gatsby.dev/offline 'gatsby-plugin-offline', 'gatsby-plugin-typescript', 'gatsby-plugin-typescript-checker', { resolve: 'gatsby-plugin-graphql-codegen', options: { fileName: 'types/graphql-types.d.ts', }, }, { resolve: 'gatsby-plugin-eslint', options: { test: /\.(j|t)sx?$/, exclude: /(node_modules|.cache|public)/, stages: ['develop'], options: { emitWarning: true, failOnError: false } } }, 'gatsby-theme-material-ui', ], proxy: { prefix: "/api", url: "http://localhost:8080", }, }package.jsonです。
スタータ構成のパッケージからTypeScript、ESlint、express、mongodb、redux、Material-UI、react-final-form関連のパッケージを追加しています。package.json{ "private": true, "name": "gatsby", "version": "0.1.0", "author": "teradonburi", "license": "MIT", "dependencies": { "@material-ui/core": "^4.9.1", "@material-ui/icons": "^4.9.1", "@types/body-parser": "^1.19.0", "@types/express": "^4.17.2", "@types/mongoose": "^5.7.1", "@types/react": "^16.9.19", "@types/react-dom": "^16.9.5", "@types/react-helmet": "^5.0.15", "@types/react-redux": "^7.1.7", "@typescript-eslint/eslint-plugin": "^2.19.0", "@typescript-eslint/parser": "^2.19.0", "babel-preset-gatsby": "^0.2.28", "eslint": "^6.8.0", "eslint-plugin-react": "^7.18.3", "express": "^4.17.1", "final-form": "^4.18.7", "gatsby": "^2.19.7", "gatsby-image": "^2.2.39", "gatsby-plugin-eslint": "^2.0.8", "gatsby-plugin-graphql-codegen": "^2.2.1", "gatsby-plugin-manifest": "^2.2.39", "gatsby-plugin-offline": "^3.0.32", "gatsby-plugin-react-helmet": "^3.1.21", "gatsby-plugin-sharp": "^2.4.3", "gatsby-plugin-typescript": "^2.1.27", "gatsby-plugin-typescript-checker": "^1.1.1", "gatsby-source-filesystem": "^2.1.46", "gatsby-theme-material-ui": "^1.0.8", "gatsby-transformer-sharp": "^2.3.13", "mongoose": "^5.8.12", "mongoose-lean-virtuals": "^0.5.0", "nodemon": "^2.0.2", "npm-run-all": "^4.1.5", "react": "^16.12.0", "react-dom": "^16.12.0", "react-final-form": "^6.3.5", "react-helmet": "^5.2.1", "react-redux": "^7.1.3", "redux": "^4.0.5", "redux-thunk": "^2.3.0", "ts-node": "^8.6.2", "typescript": "^3.7.5", "typescript-fsa": "^3.0.0", "typescript-fsa-reducers": "^1.2.1" }, "devDependencies": {}, "scripts": { "start": "npm run develop", "develop": "run-p develop:*", "develop:client": "gatsby develop", "develop:server": "nodemon api/server.ts", "build": "gatsby build", "serve": "ts-node api/server.ts", "clean": "gatsby clean", "test": "echo \"Write tests! -> https://gatsby.dev/unit-testing\" && exit 1" } }開発時は
npm-run-allパッケージの-pオプションでGatsbyの開発サーバ起動とAPIサーバの同時起動を行っています。"develop": "run-p develop:*", "develop:client": "gatsby develop", "develop:server": "nodemon api/server.ts",サーバーの起動はnodemon(サーバ修正時に再起動)とts-node(TypeScriptのままnodeサーバ実行)で行っています。
nodemon.jsonにnodemonの起動設定を記載してます。nodemon.json{ "verbose": true, "ignore": ["public", "src"], "exec": "ts-node" }Gatsby(クライアント)で埋め込まれる環境変数を.env.developmentに記載します。(本番ビルド時は.env.productionが使われる)
今回はAPIコールのurlを指定するため(後述)、APIサーバのurlを環境変数と指定します。env.developmentSERVER=http://localhost:8000本番ビルドは
gatsby buildで行います。
publicフォルダに最適化されたフロントエンドのコードが生成されます。
本番APIサーバの起動はnodemonを外して起動します。"build": "gatsby build", "serve": "ts-node api/server.ts",.env.productionにはgatsby-configのproxyの設定は使わないので本番APIサーバのURLを指定します。
(APIサーバのpublicフォルダでホスティングする想定の場合)env.productionSERVER=http://localhost:8080この場合、APIサーバの公開フォルダをpublicフォルダに設定しておくとAPIサーバを起動するだけでフロントエンドもホスティングできるので楽です。
server.jsapp.use(express.static(path.join(__dirname, '../public')))今回のサンプルで本番ビルド後、APIサーバ立ち上げの
http://localhost:8080で表示されます。フロントエンド(Gatsby)の実装
Material-UI(v4)テーマとReduxの初期化をします。
gatsby-theme-material-uiプラグインにより、
src/gatsby-theme-material-ui-top-layout/components/top-layout.tsx以下にテーマの初期化を行います。
このコンポーネントを作成すると一番最初に呼ばれますので初期化処理をここに書きます。
TopLayoutのchildrenに渡ってくるのがすべてのページのRootコンポーネントとなります。
Reduxも使うのでReduxの初期化もここで行います。src/gatsby-theme-material-ui-top-layout/components/top-layout.tsximport React from 'react' import { Provider } from 'react-redux' import ThemeTopLayout from 'gatsby-theme-material-ui-top-layout/src/components/top-layout' import { Theme } from '@material-ui/core' import createStore from '../../state/createStore' export default function TopLayout({ children, theme }: {children: JSX.Element | JSX.Element[]; theme: Theme}): JSX.Element { const store = createStore() return ( <Provider store={store}> <ThemeTopLayout theme={theme}>{children}</ThemeTopLayout> </Provider> ) }src/gatsby-theme-material-ui-top-layout/theme.tsにMaterial-UIのカスタムテーマを実装します。
theme.tsimport { createMuiTheme } from '@material-ui/core' // A custom theme for this app const theme = createMuiTheme({ ...(中略) }) export default themeちなみにThemeTopLayoutコンポーネントの型定義がないので自作してます。
(types/gatsby-theme-material-ui-top-layout/src/components/top-layout/index.d.ts)types/gatsby-theme-material-ui-top-layout/src/components/top-layout/index.d.tsimport { Theme } from '@material-ui/core' declare function ThemeTopLayout({ children, theme }: {children: JSX.Element | JSX.Element[]; theme: Theme}): JSX.Element; export = ThemeTopLayout;型定義ファイルを自作する場合、tsconfig.jsonのpathsに型定義ファイルのパスを指定する必要があります。
tsconfig.json"paths": { "interface": ["types/interface"], "mongoose-lean-virtuals": ["types/mongoose-lean-virtuals"], "gatsby-theme-material-ui-top-layout/src/components/top-layout": ["types/gatsby-theme-material-ui-top-layout/src/components/top-layout"] }, /* A series of entries which re-map imports to lookup locations relative to the 'baseUrl'. */Reduxストアの初期化はsrc/state/createStore.tsにて実装しています。
APIコールをするためにredux-thunkとaxiosをapplyMiddlewareしてactionで使えるようにしています。
axiosのcreate時にprocess.env.SERVERでサーバURLを指定しています。createStore.tsimport { combineReducers, createStore as reduxCreateStore, Store, applyMiddleware, compose } from 'redux' import thunk from 'redux-thunk' import axios from 'axios' import user from '../reducers/user' const client = axios.create({baseURL: process.env.SERVER}) const thunkWithClient = thunk.withExtraArgument(client) const reducer = combineReducers({ user, }) const initialData = {} const createStore = (): Store => reduxCreateStore(reducer, initialData, compose(applyMiddleware(thunkWithClient))) export default createStoresrc/actions/user.tsに実際のAPIコールのアクション処理を記述しています。
typescript-fsaでアクションの型を記述しています。actions/user.tsimport actionCreatorFactory from 'typescript-fsa' import { AxiosInstance } from 'axios' import { Store } from 'redux' import { route } from 'interface' const actionCreator = actionCreatorFactory() // typescript-fsaで<params,result,error>の型を定義 export const loadAction = actionCreator.async<{}, {users: route.User[]}, {error: Error}>('user/LOAD') export const createAction = actionCreator.async<{user: route.User}, {user: route.User}, {error: Error}>('user/CREATE') // actionの定義 export function load() { // clientはaxiosの付与したクライアントパラメータ // 非同期処理をPromise形式で記述できる return (dispatch: Store['dispatch'], getState: Store['getState'], client: AxiosInstance): Promise<void> => { return client .get('/api/users') .then(res => res.data) .then(users => { // 成功 dispatch(loadAction.done({ params: {}, result: { users }, })) }) .catch(error => { // 失敗 dispatch(loadAction.failed({params: {}, error})) }) } } export function create(user: route.User) { // clientはaxiosの付与したクライアントパラメータ // 非同期処理をPromise形式で記述できる return (dispatch: Store['dispatch'], getState: Store['getState'], client: AxiosInstance): Promise<void> => { return client .post('/api/users', user) .then(res => res.data) .then(user => { // 成功 dispatch(createAction.done({ params: { user }, result: { user }, })) }) .catch(error => { // 失敗 dispatch(createAction.failed({params: { user }, error})) }) } }src/reducer/user.tsに実際のAPIコールの結果のredux保存処理を記述しています。
typescript-fsa-reducersでアクション結果によって、処理を分岐しています。reducer/user.tsimport { reducerWithInitialState } from 'typescript-fsa-reducers' import { redux } from 'interface' import { loadAction, createAction } from '../actions/user' // 初期化オブジェクト const initialState: redux.User = { users: [], user: null, } const reducer = reducerWithInitialState(initialState) .case(loadAction.done, (state, data) => ({...state, users: data.result.users})) .case(loadAction.failed, (state, data) => ({...state, error: data.error})) .case(createAction.done, (state, data) => ({...state, user: data.result.user})) .case(createAction.failed, (state, data) => ({...state, error: data.error})) export default reducersrc/pages/index.tsxを修正します。
Material-UIのテーマが反映された状態で各Material-UIのコンポーネントが使えます。
APIコールはreact-reduxのconnectでReduxアクションの呼び出しとReduxストアの結果を取得しています。
(普通にReactアプリケーションなので動的なページが作れます。)
フォームはReact-Final-FormでMaterial-UIの入力欄をwrapして使用しています。index.tsximport React from 'react' import { Link } from 'gatsby' import { connect, ConnectedProps } from 'react-redux' import { Form, Field } from 'react-final-form' import { ValidationErrors, SubmissionErrors } from 'final-form' import { Card, CardContent, Button, Dialog, DialogTitle, DialogContent, MenuItem, } from '@material-ui/core' import { makeStyles } from '@material-ui/core/styles' import { Email } from '@material-ui/icons' import { orange } from '@material-ui/core/colors' import Layout from '../components/layout' import SEO from '../components/seo' import TextInput from '../components/mui-form/TextInput' import { load, create } from '../actions/user' import { redux } from 'interface' const connector = connect( // propsに受け取るreducerのstate ({user}: {user: redux.User}) => ({ users: user?.users, }), // propsに付与するactions { load, create } ) const useStyles = makeStyles(theme => ({ root: { fontStyle: 'italic', fontSize: 21, minHeight: 64, // 画面サイズがモバイルサイズのときのスタイル [theme.breakpoints.down('xs')]: { fontStyle: 'normal', }, }, card: { background: (props: {bgcolor: string}): string => `${props.bgcolor}`, // props経由でstyleを渡す }, img: { width: 150, height: 150, }, name: { margin: 10, color: theme.palette.primary.main, }, gender: { margin: 10, color: theme.palette.secondary.main, // themeカラーを参照 }, })) interface FormValues { gender?: string; first?: string; last?: string; email?: string; } type Props = ConnectedProps<typeof connector> const IndexPage: React.FC<Props> = (props) => { const { users, load, create } = props const [open, setOpen] = React.useState(false) const classes = useStyles({bgcolor: 'ff00ff'}) React.useEffect(() => { load() }, []) const validate = (values: FormValues): ValidationErrors => { const errors: FormValues = {} if (!values.first) { errors.first = '必須項目です' } if (!values.last) { errors.last = '必須項目です' } if (!values.email) { errors.email = '必須項目です' } return errors } const submit = (values: FormValues): (SubmissionErrors | Promise<SubmissionErrors | undefined> | void) => { const data = { gender: values.gender, name: { first: values.first, last: values.last, }, email: values.email, } create(data) .then(() => load()) .finally(() => setOpen(false)) } return ( <Layout> <SEO title='Home' /> {/* 配列形式で返却されるためmapで展開する */} {users && users.map(user => { return ( // ループで展開する要素には一意なkeyをつける(ReactJSの決まり事) <Card key={user.email} style={{ marginTop: '10px' }}> <CardContent className={classes.card}> <img className={classes.img} src={user.picture?.thumbnail} /> <p className={classes.name}> {'名前:' + user?.name?.last + ' ' + user?.name?.first} </p> <p className={classes.gender}> {'性別:' + (user?.gender == 'male' ? '男性' : '女性')} </p> <div style={{ textAlign: 'right' }}> <Email style={{ marginRight: 5, color: orange[200] }} /> {user?.email} </div> </CardContent> </Card> ) })} <Button variant="contained" color="primary" onClick={(): void => setOpen(true)} style={{marginTop: 30}} > 新規ユーザ作成 </Button> <Link style={{display: 'block', marginTop: 30}} to="/hoge">存在しないページ</Link> <Dialog open={!!open} onClose={(): void => setOpen(false)} > <DialogTitle>新規ユーザ</DialogTitle> <DialogContent> <Form onSubmit={submit} validate={validate}> {({handleSubmit}): JSX.Element => <form onSubmit={handleSubmit}> <Field name='gender' initialValue='male' component={TextInput} label='性別' select > <MenuItem value='male'>男性</MenuItem> <MenuItem value='female'>女性</MenuItem> </Field> <Field name='last' component={TextInput} label='姓' /> <Field name='first' component={TextInput} label='名' /> <Field name='email' component={TextInput} label='Email' type='email' /> <Button type='submit' variant='contained' color='primary'>送信</Button> </form> } </Form> </DialogContent> </Dialog> <Link to="/page-2/">Go to page 2</Link> </Layout> ) } export default connector(IndexPage)バックエンドの実装
普通のexpressサーバアプリケーションです。特に注意すべき点はないです。
TypeScriptで書いているため、慣れてない人は戸惑うかもしれませんが・・・
mongodbの接続設定はmongodb://localhost/gatsby-templateスキーマにしてるので適宜変えて下さい。server.tsimport path from 'path' import { Request, Response, NextFunction } from 'express' import express from 'express' import bodyParser from 'body-parser' import {default as mongoose} from 'mongoose' mongoose.connect('mongodb://localhost/gatsby-template', { useNewUrlParser: true, useUnifiedTopology: true}) const app = express() // APIエラーハンドリング const wrap = (fn: (req: Request, res: Response, next?: NextFunction) => Promise<Response | undefined>) => (req: Request, res: Response, next?: NextFunction): Promise<Response | undefined> => fn(req, res, next).catch((err: Error) => { console.error(err) if (!res.headersSent) { return res.status(500).json({message: 'Internal Server Error'}) } }) // NodeJSエラーハンドリング process.on('uncaughtException', (err) => console.error(err)) process.on('unhandledRejection', (err) => console.error(err)) app.use(express.static(path.join(__dirname, '../public'))) app.use(bodyParser.urlencoded({extended: true})) app.use(bodyParser.json()) import { users } from './routes' app.use( '/api/users', express.Router() .get('/', wrap(users.index)) .post('/', wrap(users.create)) ) // サーバを起動 app.listen(8080, () => console.log('Server started http://localhost:8080'))mongooseのuserモデル定義です(TypeScript)。
画像等はuserのidのurlパスでS3などのファイルストレージに上げることが多いので
モデルのフィールドとして持つのでなく、virtualでfind時に画像パスを作成する構造が吉です。
(今回はサンプルなので省略してます)
find時にleanを併用すると検索が高速化するのですが、virtualが呼ばれなくなる対策としてmongoose-lean-virtualsを使用してます。user.tsimport {default as mongoose} from 'mongoose' const Schema = mongoose.Schema import mongooseLeanVirtuals from 'mongoose-lean-virtuals' import { model } from '../../types/interface' const schema = new Schema({ gender: String, first: String, last: String, email: String, }, { timestamps: true, toObject: { virtuals: true, }, toJSON: { virtuals: true, transform: (doc, m): model.User => { delete m.__v return m }, }, }) schema.pre('update', async function(next) { this.setOptions({runValidators: true}) return next() }) schema.pre('findOneAndUpdate', async function(next) { this.setOptions({runValidators: true, new: true}) return next() }) schema.virtual('thumbnail').get(function () { // TODO:固定じゃなくて変える return 'https://avatars1.githubusercontent.com/u/771218?s=460&v=4' }) schema.plugin(mongooseLeanVirtuals) export default mongoose.model<model.User>('User', schema)routes/user.tsにてleanでfind検索するときにvirtualsのオプションをtrueにします。
user.tsconst users: model.User[] = await User.find().lean({virtuals: true})mongoose-lean-virtualsパッケージは型定義がないため、型定義をtypes/mongoose-lean-virtuals/index.d.tsに自作してます。
types/mongoose-lean-virtuals/index.d.tsimport { Schema } from 'mongoose' // moongoose-lean-virtualsライブラリの型定義がないので書く declare function mongooseLeanVirtuals(schema: Schema): void; export = mongooseLeanVirtuals;Gatsbyのメリット・デメリットまとめ
総括するとこんな感じになります
メリット
メリットはGatsby自体のビルドの仕組み(プリレンダリング)、構成が優れていることが挙げられます。
- 素のReactより表示(特に初回レンダリング)が早い(Link prefetchで次ページのリソースの先読みもする)
- ページ別にOGP(Twitter、Facebookシェア)埋め込みしたい場合、SSRしないといけなかった弱点も克服できる(Gatsbyの場合は複雑になりがちなSSRの実装を基本的に考えなくて良い)
- 普通にReactアプリケーションなのでstateも使えるしreduxも入れられるので動的サイトも作れる、もちろんページ間遷移もできる
- gatsby-imageプラグインを使えば画像リソースも解像度別に最適化してくれる
- ビルド設定が(webpackに比べて)楽(デフォルトでページ単位にCode Splittingしてくれるし、Dynamic importもしてくれる、PWAの設定もプラグイン使えば楽)
デメリット
デメリットも予めビルドするというところにあります。ただし、パフォーマンス面に関してはGatsbyは他の追従を許さないくらい最適化されていますのでメリットのほうが大きいです。
- 動的なページ生成が実行時にできない(ページ生成は実行時に基本的にできないので事前にビルドしておかないといけない、OGP埋め込みも)
- Gatsby独自のルールがある(graphqlでのデータ埋め込み、ルーティングがpagesフォルダのファイル名に該当する、Linkコンポーネントはgatsbyのものを使うなど)


- 投稿日:2020-02-15T22:59:33+09:00
お前らのReactは遅すぎる(SSG編)
最近Reactのプロジェクトは全部Gatsbyベースで作ればいいじゃないかな(大体適用できる)と思ったので
なぜそう思ったのかまとめてみます。(Gatsbyサイト実装の雛形付き)SPAのメリット・デメリット
Reactに代表されるSPAのメリットとしては
- history APIによる疑似ルーティングでバックエンド無しでページ間遷移ができる(API無しの場合はファイルをホストするだけでWebページが作れる)
- フロントエンドとバックエンド(API)の棲み分けがはっきりしてる(SSRしない場合)
- 仮想DOMツリーによる差分レンダリングが高速
逆に動的に仮想DOMツリーを生成するSPAのデメリットとして以下のことが挙げられます。
- bundle.jsのファイルサイズが肥大化して読み込みが遅い
- 仮想DOMツリーの構築に初回のJS実行時間がかかる
- TwitterやFacebookシェアのOGPを実装しようとするとSSRの実装に迫られる(複雑度が増すのでSSRしたくない・・・)
規模が大きくなってきたときのサイトパフォーマンス(特に初回レンダリング)やOGPに問題をかかえています。
Gatsby(静的サイトジェネレーション)を使うことでこれらの問題を解決しつつ、Reactアプリケーション(SPA)を作成することができます。超えられない速度的な観点
参考:How Gatsby is so blazing fast
HTMLの事前生成
Gatsbyは、Reactを使用する静的なWebサイトジェネレーターです。
Webサイトの各ページのHTMLファイルを作成します。
つまり、「リクエストされたときにページを生成するのを待つ代わりに、Gatsbyはページを事前に構築します」ユーザーがHTMLファイルを介してページにアクセスすると、ブラウザーはコンテンツをレンダリングします。
キャッシュやJavaScriptがない場合、aタグを使用すると、クリックされたときに別のHTMLファイルが読み込まれます。その結果、ユーザーは待たなければならない場合があります。さらに悪いことに、コンテンツのレンダリング中に空白のページが表示されます。これは、シングルページアプリケーション(SPA)が登場するまでWebが設計されたときからの最も伝統的な方法です。
SPAは、JavaScriptでコンテンツを更新することでページをレンダリングします。静的ファイルをダウンロードするよりも更新がはるかに高速です。単一のHTMLファイルをロードし、ユーザーが操作するときにそのページを動的に更新するためです。
Reactは、SPAのビューレイヤーを処理するライブラリです。 Reactのようなフレームワークとライブラリは、JavaScriptコードの実行が開始されない限り、何をレンダリングするかを知りません。そのため、SPAとして構築すると、クリティカルレンダリングパスに大きな影響を与えます。
(つまり、JavaScriptで動的にレンダリングすることが初回レンダリングのボトルネックになります。)
Gatsbyには、初回レンダリングに最適化されたwebpack構成があります。
- HTMLタグの事前生成
- 非同期なJavaScriptコード実行。ユーザーインタラクションには必要ですが、初回レンダリングには必要ありません
- 生成されたページのCSSはインラインなので、CSSファイルをダウンロードする必要はありません
Code Splittingとキャッシュ
ページを構築する際、Gatsbyはページに必要なコンポーネントを確認し、webpackにCode Splittingを自動的に実行させます。これは、Dynamic importを設定することにより適用されます。
この方法により、ブラウザーはWebサイト全体ではなく、ページに必要なファイルのみをリクエストし、ページのロード時間を短縮します。
該当ページのファイルしか読み込まない欠点は、ユーザーがリンクをクリックしたときにのみ他ページのファイルをダウンロードするため、ページ遷移が遅くなります。
この問題を回避するために、GatsbyのWebpack構成では、Link prefetchと呼ばれる手法を適用します。
(Link prefetchはブラウザのメカニズムであり、ブラウザのアイドル時間を利用して、近い将来ユーザーがアクセスする可能性のあるドキュメントをダウンロードまたは事前リクエストします。)ブラウザーがページのロードを完了すると、ブラウザーはそれらをダウンロードするためのprefetch属性を持つlinkタグを探します。次に、ユーザーがリンクをクリックすると、ページにリクエストされたファイルが既にキャッシュにある可能性が高くなります。
プリレンダリングとReactアプリのハイブリット
静的なWebサイトのページを遷移するには、HTMLファイルをロードする必要がありますが、Gatsbyには必要ありません。これらはReactアプリです。
(つまり、初回レンダリング時は事前に生成したhtmlを使い、2回目以降のレンダリングはReactでの動的なレンダリングを行います。)「GatsbyはサイトのHTMLページを生成しますが、最初のHTMLが読み込まれるとブラウザーで引き継ぐJavaScriptランタイムも作成します」
別のページの各aタグは、Reach Routerによるルーティングになります。実際には、ページ上のコンテンツを更新する際は、あるHTMLファイルから別のHTMLファイルに変化しているように見えます。
画像最適化
HTTP Archiveは多くの人気のあるWebサイトをトラッキングしています。
ページがリクエストするデータの種類のほとんどは画像です。(約1/3は画像データ!)
合計KB - ページがリクエストするすべてのリソースの転送サイズの合計は、モバイルの場合約1285.5 KBです。
画像KB - ページでリクエストされたすべての外部画像の転送サイズの合計は、モバイルの場合491.0KBです。
画像の最適化は、Webサイトで最高のパフォーマンス向上の1つです。
ダウンロードするバイト数が少ないことは、必要な帯域幅が少ないことを意味するため、ブラウザはコンテンツをより速くダウンロードしてレンダリングできます。これらは、実行可能な最適化の一部です。
- 必要な表示領域と同じ画像サイズに変更します
- デスクトップとモバイル用に異なる解像度のレスポンシブ画像(srcset属性で表示を切り分ける)を生成します
- 画像のメタデータを削除して画像圧縮を適用する
- lazy loadを適用して、最初のページの読み込みを高速化する
- 画像の読み込み中にプレースホルダーを表示する
これには多大な労力がかかり、Gatsbyには解決策があります。
gatsby-imageプラグインを使うことでプロセス全体を自動化できます。
Gatsbyの多くのツールと同様に、gatsby-imageプラグインはGraphQLを使用しています。
このプラグインは、imgタグにレスポンシブ画像を設定します。
レスポンシブ画像を作成し、画像圧縮を適用します。
これらはすべて、ビルド時に行われます。
(注意:ビルド時最適化なので実行時にアップロードされるような動的な画像リソースには適応できません!)画像が読み込まれると、「blur-up」手法により、すでにHTMLファイル(または背景のみ)にある非常に低品質の画像でプレビューが表示されます。その後、高品質の画像に切り替わります。(Mediumでも使われている)
minifyとユニークファイル名
これらの手法は、人気のあるフレームワークとライブラリですでに広く使用されており、Gatsbyではそれほど大きな違いはありません。
webpack(productionモード)を使用してビルドすると、デフォルトですべてのファイルがminifyされます。ファイルは、ファイル名にハッシュを割り当てることによってビルドされたときに一意です。
何かが変更されると、ファイルに新しい名前が付けられます。
この背景は、これらのファイルをブラウザーキャッシュからの取得を長期間許可できるようにするためです。
そのため、ユーザーがWebサイトに戻ってきたとき、すでにファイルをブラウザに持っています。ファイルを更新すると、ビルド時に新しいファイル名が付けられます。
この場合、キャッシュからのファイルと一致しないため、ブラウザは更新されたファイルをダウンロードします。
以上のようにGatsbyには(特に初回)レンダリングを最適化する構成がされています。
Gatsbyと同様のことを素のReactプロジェクトでやろうとすると事前レンダリングの実装やwebpackのCode Splittingなどの複雑な構成を自前で作成しなければなりません。(この辺の最適化は自前だとGatsbyに勝てる気がしない・・・)
何でGatsbyに負けたか、明日まで考えてきてください
Gatsbyで動的なサイトを作る
さて、本題です。
まず、Gatsbyでの簡単なプロジェクトの作成の仕方に関してわからない人は秒速で理解してきてください。
静的サイトジェネレータGatsbyを秒速で理解するGatsbyはプリレンダリングの仕組みを用意してくれてるReactアプリケーションという認識です。
この辺は普通のReactアプリケーションと同じでページでstateも持てますし、reduxも使用できます。
ただ、いくつかのGatsbyプラグインをいれたり、Gatsby独自のルールに従う必要があります。
今回のサンプル(雛形)を元に話します。サンプルの構成です。
- TypeScript
- ESLint
- Redux
- Material-UI
- express
- mongoose
ビルド設定
Gatsbyは裏側ではwebpackでビルドされているため、babelのビルド設定ファイルなどもビルドに反映します。
.babelrcにbabel関連のプラグインを導入します。
babel-preset-gatsbyのpresetを導入します。このpresetにはbabel-preset-envとbabel-preset-reactのpresetが含まれています。
クラス関数文法サポートの@babel/plugin-proposal-class-propertiesとオプショナルチェーン文法の@babel/plugin-proposal-optional-chainingを導入しています。.babrlrc{ "presets": [ [ "babel-preset-gatsby", { "targets": { "browsers": [">0.25%", "not dead"] }} ] ], "plugins": [ "@babel/plugin-proposal-optional-chaining", "@babel/plugin-proposal-class-properties" ] }gatsby-config.jsにgatsbyのプラグイン関連の設定を記述します。
スタータ構成のプラグイン設定から足したものは
TypeScript、ESLint、Material-UIテーマサポートのプラグインです。
TypeScriptサポートのgatsby-plugin-typescriptプラグイン、
TypeScript形チェックのgatsby-plugin-typescript-checkerプラグイン、
graphqlデータ型の自動生成のgatsby-plugin-graphql-codegenプラグイン、
ESLintのlintチェックのgatsby-plugin-eslintプラグイン、
Material-UIのテーマサポートのgatsby-theme-material-uiプラグイン
を追加しています。
proxyは開発時(gatsby develop)にapiパスのリクエストをサーバに向けたいために設定しています。(Gatsbyの開発サーバとAPIサーバのポートが違うため、CORSのエラーになるのを防ぐ)
本番ビルド時はproxy設定は使われません。gatsby-config.jsmodule.exports = { siteMetadata: { title: 'Gatsbyサンプル', description: 'Gatsbyサイトのサンプルです', }, plugins: [ 'gatsby-plugin-react-helmet', { resolve: 'gatsby-source-filesystem', options: { name: 'images', path: `${__dirname}/src/images`, }, }, 'gatsby-transformer-sharp', 'gatsby-plugin-sharp', { resolve: 'gatsby-plugin-manifest', options: { name: 'gatsby-starter-default', short_name: 'starter', start_url: '/', background_color: '#663399', theme_color: '#663399', display: 'minimal-ui', icon: 'src/images/gatsby-icon.png', // This path is relative to the root of the site. }, }, // this (optional) plugin enables Progressive Web App + Offline functionality // To learn more, visit: https://gatsby.dev/offline 'gatsby-plugin-offline', 'gatsby-plugin-typescript', 'gatsby-plugin-typescript-checker', { resolve: 'gatsby-plugin-graphql-codegen', options: { fileName: 'types/graphql-types.d.ts', }, }, { resolve: 'gatsby-plugin-eslint', options: { test: /\.(j|t)sx?$/, exclude: /(node_modules|.cache|public)/, stages: ['develop'], options: { emitWarning: true, failOnError: false } } }, 'gatsby-theme-material-ui', ], proxy: { prefix: "/api", url: "http://localhost:8080", }, }package.jsonです。
スタータ構成のパッケージからTypeScript、ESlint、express、mongodb、redux、Material-UI、react-final-form関連のパッケージを追加しています。package.json{ "private": true, "name": "gatsby", "version": "0.1.0", "author": "teradonburi", "license": "MIT", "dependencies": { "@material-ui/core": "^4.9.1", "@material-ui/icons": "^4.9.1", "@types/body-parser": "^1.19.0", "@types/express": "^4.17.2", "@types/mongoose": "^5.7.1", "@types/react": "^16.9.19", "@types/react-dom": "^16.9.5", "@types/react-helmet": "^5.0.15", "@types/react-redux": "^7.1.7", "@typescript-eslint/eslint-plugin": "^2.19.0", "@typescript-eslint/parser": "^2.19.0", "babel-preset-gatsby": "^0.2.28", "eslint": "^6.8.0", "eslint-plugin-react": "^7.18.3", "express": "^4.17.1", "final-form": "^4.18.7", "gatsby": "^2.19.7", "gatsby-image": "^2.2.39", "gatsby-plugin-eslint": "^2.0.8", "gatsby-plugin-graphql-codegen": "^2.2.1", "gatsby-plugin-manifest": "^2.2.39", "gatsby-plugin-offline": "^3.0.32", "gatsby-plugin-react-helmet": "^3.1.21", "gatsby-plugin-sharp": "^2.4.3", "gatsby-plugin-typescript": "^2.1.27", "gatsby-plugin-typescript-checker": "^1.1.1", "gatsby-source-filesystem": "^2.1.46", "gatsby-theme-material-ui": "^1.0.8", "gatsby-transformer-sharp": "^2.3.13", "mongoose": "^5.8.12", "mongoose-lean-virtuals": "^0.5.0", "nodemon": "^2.0.2", "npm-run-all": "^4.1.5", "react": "^16.12.0", "react-dom": "^16.12.0", "react-final-form": "^6.3.5", "react-helmet": "^5.2.1", "react-redux": "^7.1.3", "redux": "^4.0.5", "redux-thunk": "^2.3.0", "ts-node": "^8.6.2", "typescript": "^3.7.5", "typescript-fsa": "^3.0.0", "typescript-fsa-reducers": "^1.2.1" }, "devDependencies": {}, "scripts": { "start": "npm run develop", "develop": "run-p develop:*", "develop:client": "gatsby develop", "develop:server": "nodemon api/server.ts", "build": "gatsby build", "serve": "ts-node api/server.ts", "clean": "gatsby clean", "test": "echo \"Write tests! -> https://gatsby.dev/unit-testing\" && exit 1" } }開発時は
npm-run-allパッケージの-pオプションでGatsbyの開発サーバ起動とAPIサーバの同時起動を行っています。"develop": "run-p develop:*", "develop:client": "gatsby develop", "develop:server": "nodemon api/server.ts",サーバーの起動はnodemon(サーバ修正時に再起動)とts-node(TypeScriptのままnodeサーバ実行)で行っています。
nodemon.jsonにnodemonの起動設定を記載してます。nodemon.json{ "verbose": true, "ignore": ["public", "src"], "exec": "ts-node" }Gatsby(クライアント)で埋め込まれる環境変数を.env.developmentに記載します。(本番ビルド時は.env.productionが使われる)
今回はAPIコールのurlを指定するため(後述)、APIサーバのurlを環境変数と指定します。env.developmentSERVER=http://localhost:8000本番ビルドは
gatsby buildで行います。
publicフォルダに最適化されたフロントエンドのコードが生成されます。
本番APIサーバの起動はnodemonを外して起動します。"build": "gatsby build", "serve": "ts-node api/server.ts",.env.productionにはgatsby-configのproxyの設定は使わないので本番APIサーバのURLを指定します。
(APIサーバのpublicフォルダでホスティングする想定の場合)env.productionSERVER=http://localhost:8080この場合、APIサーバの公開フォルダをpublicフォルダに設定しておくとAPIサーバを起動するだけでフロントエンドもホスティングできるので楽です。
server.jsapp.use(express.static(path.join(__dirname, '../public')))今回のサンプルで本番ビルド後、APIサーバ立ち上げの
http://localhost:8080で表示されます。フロントエンド(Gatsby)の実装
Material-UI(v4)テーマとReduxの初期化をします。
gatsby-theme-material-uiプラグインにより、
src/gatsby-theme-material-ui-top-layout/components/top-layout.tsx以下にテーマの初期化を行います。
このコンポーネントを作成すると一番最初に呼ばれますので初期化処理をここに書きます。
TopLayoutのchildrenに渡ってくるのがすべてのページのRootコンポーネントとなります。
Reduxも使うのでReduxの初期化もここで行います。src/gatsby-theme-material-ui-top-layout/components/top-layout.tsximport React from 'react' import { Provider } from 'react-redux' import ThemeTopLayout from 'gatsby-theme-material-ui-top-layout/src/components/top-layout' import { Theme } from '@material-ui/core' import createStore from '../../state/createStore' export default function TopLayout({ children, theme }: {children: JSX.Element | JSX.Element[]; theme: Theme}): JSX.Element { const store = createStore() return ( <Provider store={store}> <ThemeTopLayout theme={theme}>{children}</ThemeTopLayout> </Provider> ) }src/gatsby-theme-material-ui-top-layout/theme.tsにMaterial-UIのカスタムテーマを実装します。
theme.tsimport { createMuiTheme } from '@material-ui/core' // A custom theme for this app const theme = createMuiTheme({ ...(中略) }) export default themeちなみにThemeTopLayoutコンポーネントの型定義がないので自作してます。
(types/gatsby-theme-material-ui-top-layout/src/components/top-layout/index.d.ts)types/gatsby-theme-material-ui-top-layout/src/components/top-layout/index.d.tsimport { Theme } from '@material-ui/core' declare function ThemeTopLayout({ children, theme }: {children: JSX.Element | JSX.Element[]; theme: Theme}): JSX.Element; export = ThemeTopLayout;型定義ファイルを自作する場合、tsconfig.jsonのpathsに型定義ファイルのパスを指定する必要があります。
tsconfig.json"paths": { "interface": ["types/interface"], "mongoose-lean-virtuals": ["types/mongoose-lean-virtuals"], "gatsby-theme-material-ui-top-layout/src/components/top-layout": ["types/gatsby-theme-material-ui-top-layout/src/components/top-layout"] }, /* A series of entries which re-map imports to lookup locations relative to the 'baseUrl'. */Reduxストアの初期化はsrc/state/createStore.tsにて実装しています。
APIコールをするためにredux-thunkとaxiosをapplyMiddlewareしてactionで使えるようにしています。
axiosのcreate時にprocess.env.SERVERでサーバURLを指定しています。createStore.tsimport { combineReducers, createStore as reduxCreateStore, Store, applyMiddleware, compose } from 'redux' import thunk from 'redux-thunk' import axios from 'axios' import user from '../reducers/user' const client = axios.create({baseURL: process.env.SERVER}) const thunkWithClient = thunk.withExtraArgument(client) const reducer = combineReducers({ user, }) const initialData = {} const createStore = (): Store => reduxCreateStore(reducer, initialData, compose(applyMiddleware(thunkWithClient))) export default createStoresrc/actions/user.tsに実際のAPIコールのアクション処理を記述しています。
typescript-fsaでアクションの型を記述しています。actions/user.tsimport actionCreatorFactory from 'typescript-fsa' import { AxiosInstance } from 'axios' import { Store } from 'redux' import { route } from 'interface' const actionCreator = actionCreatorFactory() // typescript-fsaで<params,result,error>の型を定義 export const loadAction = actionCreator.async<{}, {users: route.User[]}, {error: Error}>('user/LOAD') export const createAction = actionCreator.async<{user: route.User}, {user: route.User}, {error: Error}>('user/CREATE') // actionの定義 export function load() { // clientはaxiosの付与したクライアントパラメータ // 非同期処理をPromise形式で記述できる return (dispatch: Store['dispatch'], getState: Store['getState'], client: AxiosInstance): Promise<void> => { return client .get('/api/users') .then(res => res.data) .then(users => { // 成功 dispatch(loadAction.done({ params: {}, result: { users }, })) }) .catch(error => { // 失敗 dispatch(loadAction.failed({params: {}, error})) }) } } export function create(user: route.User) { // clientはaxiosの付与したクライアントパラメータ // 非同期処理をPromise形式で記述できる return (dispatch: Store['dispatch'], getState: Store['getState'], client: AxiosInstance): Promise<void> => { return client .post('/api/users', user) .then(res => res.data) .then(user => { // 成功 dispatch(createAction.done({ params: { user }, result: { user }, })) }) .catch(error => { // 失敗 dispatch(createAction.failed({params: { user }, error})) }) } }src/reducer/user.tsに実際のAPIコールの結果のredux保存処理を記述しています。
typescript-fsa-reducersでアクション結果によって、処理を分岐しています。reducer/user.tsimport { reducerWithInitialState } from 'typescript-fsa-reducers' import { redux } from 'interface' import { loadAction, createAction } from '../actions/user' // 初期化オブジェクト const initialState: redux.User = { users: [], user: null, } const reducer = reducerWithInitialState(initialState) .case(loadAction.done, (state, data) => ({...state, users: data.result.users})) .case(loadAction.failed, (state, data) => ({...state, error: data.error})) .case(createAction.done, (state, data) => ({...state, user: data.result.user})) .case(createAction.failed, (state, data) => ({...state, error: data.error})) export default reducersrc/pages/index.tsxを修正します。
Material-UIのテーマが反映された状態で各Material-UIのコンポーネントが使えます。
APIコールはreact-reduxのconnectでReduxアクションの呼び出しとReduxストアの結果を取得しています。
(普通にReactアプリケーションなので動的なページが作れます。)
フォームはReact-Final-FormでMaterial-UIの入力欄をwrapして使用しています。index.tsximport React from 'react' import { Link } from 'gatsby' import { connect, ConnectedProps } from 'react-redux' import { Form, Field } from 'react-final-form' import { ValidationErrors, SubmissionErrors } from 'final-form' import { Card, CardContent, Button, Dialog, DialogTitle, DialogContent, MenuItem, } from '@material-ui/core' import { makeStyles } from '@material-ui/core/styles' import { Email } from '@material-ui/icons' import { orange } from '@material-ui/core/colors' import Layout from '../components/layout' import SEO from '../components/seo' import TextInput from '../components/mui-form/TextInput' import { load, create } from '../actions/user' import { redux } from 'interface' const connector = connect( // propsに受け取るreducerのstate ({user}: {user: redux.User}) => ({ users: user?.users, }), // propsに付与するactions { load, create } ) const useStyles = makeStyles(theme => ({ root: { fontStyle: 'italic', fontSize: 21, minHeight: 64, // 画面サイズがモバイルサイズのときのスタイル [theme.breakpoints.down('xs')]: { fontStyle: 'normal', }, }, card: { background: (props: {bgcolor: string}): string => `${props.bgcolor}`, // props経由でstyleを渡す }, img: { width: 150, height: 150, }, name: { margin: 10, color: theme.palette.primary.main, }, gender: { margin: 10, color: theme.palette.secondary.main, // themeカラーを参照 }, })) interface FormValues { gender?: string; first?: string; last?: string; email?: string; } type Props = ConnectedProps<typeof connector> const IndexPage: React.FC<Props> = (props) => { const { users, load, create } = props const [open, setOpen] = React.useState(false) const classes = useStyles({bgcolor: 'ff00ff'}) React.useEffect(() => { load() }, []) const validate = (values: FormValues): ValidationErrors => { const errors: FormValues = {} if (!values.first) { errors.first = '必須項目です' } if (!values.last) { errors.last = '必須項目です' } if (!values.email) { errors.email = '必須項目です' } return errors } const submit = (values: FormValues): (SubmissionErrors | Promise<SubmissionErrors | undefined> | void) => { const data = { gender: values.gender, name: { first: values.first, last: values.last, }, email: values.email, } create(data) .then(() => load()) .finally(() => setOpen(false)) } return ( <Layout> <SEO title='Home' /> {/* 配列形式で返却されるためmapで展開する */} {users && users.map(user => { return ( // ループで展開する要素には一意なkeyをつける(ReactJSの決まり事) <Card key={user.email} style={{ marginTop: '10px' }}> <CardContent className={classes.card}> <img className={classes.img} src={user.picture?.thumbnail} /> <p className={classes.name}> {'名前:' + user?.name?.last + ' ' + user?.name?.first} </p> <p className={classes.gender}> {'性別:' + (user?.gender == 'male' ? '男性' : '女性')} </p> <div style={{ textAlign: 'right' }}> <Email style={{ marginRight: 5, color: orange[200] }} /> {user?.email} </div> </CardContent> </Card> ) })} <Button variant="contained" color="primary" onClick={(): void => setOpen(true)} style={{marginTop: 30}} > 新規ユーザ作成 </Button> <Link style={{display: 'block', marginTop: 30}} to="/hoge">存在しないページ</Link> <Dialog open={!!open} onClose={(): void => setOpen(false)} > <DialogTitle>新規ユーザ</DialogTitle> <DialogContent> <Form onSubmit={submit} validate={validate}> {({handleSubmit}): JSX.Element => <form onSubmit={handleSubmit}> <Field name='gender' initialValue='male' component={TextInput} label='性別' select > <MenuItem value='male'>男性</MenuItem> <MenuItem value='female'>女性</MenuItem> </Field> <Field name='last' component={TextInput} label='姓' /> <Field name='first' component={TextInput} label='名' /> <Field name='email' component={TextInput} label='Email' type='email' /> <Button type='submit' variant='contained' color='primary'>送信</Button> </form> } </Form> </DialogContent> </Dialog> <Link to="/page-2/">Go to page 2</Link> </Layout> ) } export default connector(IndexPage)バックエンドの実装
普通のexpressサーバアプリケーションです。特に注意すべき点はないです。
TypeScriptで書いているため、慣れてない人は戸惑うかもしれませんが・・・
mongodbの接続設定はmongodb://localhost/gatsby-templateスキーマにしてるので適宜変えて下さい。server.tsimport path from 'path' import { Request, Response, NextFunction } from 'express' import express from 'express' import bodyParser from 'body-parser' import {default as mongoose} from 'mongoose' mongoose.connect('mongodb://localhost/gatsby-template', { useNewUrlParser: true, useUnifiedTopology: true}) const app = express() // APIエラーハンドリング const wrap = (fn: (req: Request, res: Response, next?: NextFunction) => Promise<Response | undefined>) => (req: Request, res: Response, next?: NextFunction): Promise<Response | undefined> => fn(req, res, next).catch((err: Error) => { console.error(err) if (!res.headersSent) { return res.status(500).json({message: 'Internal Server Error'}) } }) // NodeJSエラーハンドリング process.on('uncaughtException', (err) => console.error(err)) process.on('unhandledRejection', (err) => console.error(err)) app.use(express.static(path.join(__dirname, '../public'))) app.use(bodyParser.urlencoded({extended: true})) app.use(bodyParser.json()) import { users } from './routes' app.use( '/api/users', express.Router() .get('/', wrap(users.index)) .post('/', wrap(users.create)) ) // サーバを起動 app.listen(8080, () => console.log('Server started http://localhost:8080'))mongooseのuserモデル定義です(TypeScript)。
画像等はuserのidのurlパスでS3などのファイルストレージに上げることが多いので
モデルのフィールドとして持つのでなく、virtualでfind時に画像パスを作成する構造が吉です。
(今回はサンプルなので省略してます)
find時にleanを併用すると検索が高速化するのですが、virtualが呼ばれなくなる対策としてmongoose-lean-virtualsを使用してます。user.tsimport {default as mongoose} from 'mongoose' const Schema = mongoose.Schema import mongooseLeanVirtuals from 'mongoose-lean-virtuals' import { model } from '../../types/interface' const schema = new Schema({ gender: String, first: String, last: String, email: String, }, { timestamps: true, toObject: { virtuals: true, }, toJSON: { virtuals: true, transform: (doc, m): model.User => { delete m.__v return m }, }, }) schema.pre('update', async function(next) { this.setOptions({runValidators: true}) return next() }) schema.pre('findOneAndUpdate', async function(next) { this.setOptions({runValidators: true, new: true}) return next() }) schema.virtual('thumbnail').get(function () { // TODO:固定じゃなくて変える return 'https://avatars1.githubusercontent.com/u/771218?s=460&v=4' }) schema.plugin(mongooseLeanVirtuals) export default mongoose.model<model.User>('User', schema)routes/user.tsにてleanでfind検索するときにvirtualsのオプションをtrueにします。
user.tsconst users: model.User[] = await User.find().lean({virtuals: true})mongoose-lean-virtualsパッケージは型定義がないため、型定義をtypes/mongoose-lean-virtuals/index.d.tsに自作してます。
types/mongoose-lean-virtuals/index.d.tsimport { Schema } from 'mongoose' // moongoose-lean-virtualsライブラリの型定義がないので書く declare function mongooseLeanVirtuals(schema: Schema): void; export = mongooseLeanVirtuals;Gatsbyのメリット・デメリットまとめ
総括するとこんな感じになります
メリット
メリットはGatsby自体のビルドの仕組み(プリレンダリング)、構成が優れていることが挙げられます。
- 素のReactより表示(特に初回レンダリング)が早い(Link prefetchで次ページのリソースの先読みもする)
- ページ別にOGP(Twitter、Facebookシェア)埋め込みしたい場合、SSRしないといけなかった弱点も克服できる(Gatsbyの場合は複雑になりがちなSSRの実装を基本的に考えなくて良い)
- 普通にReactアプリケーションなのでstateも使えるしreduxも入れられるので動的サイトも作れる、もちろんページ間遷移もできる
- gatsby-imageプラグインを使えば画像リソースも解像度別に最適化してくれる
- ビルド設定が(webpackに比べて)楽(デフォルトでページ単位にCode Splittingしてくれるし、Dynamic importもしてくれる、PWAの設定もプラグイン使えば楽)
デメリット
デメリットも予めビルドするというところにあります。ただし、パフォーマンス面に関してはGatsbyは他の追従を許さないくらい最適化されていますのでメリットのほうが大きいです。
- 動的なページ生成が実行時にできない(ページ生成は実行時に基本的にできないので事前にビルドしておかないといけない、OGP埋め込みも)
- Gatsby独自のルールがある(graphqlでのデータ埋め込み、ルーティングがpagesフォルダのファイル名に該当する、Linkコンポーネントはgatsbyのものを使うなど)
- 投稿日:2020-02-15T21:35:10+09:00
React hooksで複数の状態を定義する
はじめに
「React hooksを試してみた」という記事の続きです。
今回も個人的なメモレベルです。hooksで複数の状態を定義する
まぁタイトルのままなのですが、コンポーネントを作る時に、hookを利用して、状態を複数持ちたいというのは、当然要件としてあります。その場合は、複数定義する事は全然問題ありません。
以下に例を示します。
また、この関数コンポーネントは外からpropsを受け取ってます。その際に、
defaultPropsで、propsに値が渡されなかった際のデフォルト値を定義しています。状態を3つ定義するconst App = (props) => { const [title, setTitle] = useState(props.title); const [author, setAuthor] = useState(props.author); const [price, setPrice] = useState(props.price); const reset = () => { setPrice(1000); setAuthor(props.author); setTitle(props.title); } return( <> <p> {author}の新譜が発表されました。 タイトルは{title}です。<br /> 値段はあたなが自由につけられます。<br /> いくらで買いますか?<br /> </p> <p> {price}円で買います。 </p> <div> <button onClick={()=> setPrice(price + 100)}>+100</button> <button onClick={()=> setPrice(price - 100)}>+100</button> <button onClick={reset}>Reset</button> </div> <label htmlFor="author">Author</label> <input id="author" type="text" value={author} onChange={(e) => setAuthor(e.target.value)}/> <label htmlFor="title">Title</label> <input id="title" type="text" value={title} onChange={(e) => setTitle(e.target.value)}/> </> ) } App.defaultProps = { title: '', author: '', price: 1000 } export default App;もう少しリファクタしてみる
useStateで渡す初期値の引数はオブジェクトを渡すことが出来ます。
より抽象的に状態を定義できます。以下、実装例です。
リファクタconst App = (props) => { const [state, setState] = useState(props); const reset = () => { setState(props); }; return( <> <p> {state.author}の新譜が発表されました。 タイトルは{state.title}です。<br /> 値段はあたなが自由につけられます。<br /> いくらで買いますか?<br /> </p> <p> {state.price}円で買います。 </p> <div> <button onClick={()=> setState({...state, price: state.price + 100})}>+100</button> <button onClick={()=> setState({...state, price: state.price - 100})}>+100</button> <button onClick={reset}>Reset</button> </div> <label htmlFor="author">Author</label> <input id="author" type="text" value={state.author} onChange={(e) => setState({...state, author: e.target.value})}/> <label htmlFor="title">Title</label> <input id="title" type="text" value={state.title} onChange={(e) => setState({...state, title: e.target.value})}/> </> ) } App.defaultProps = { title: '', author: '', price: 1000 } export default App;基本的には関数コンポーネントで実装をしていく方針でよさそうです。
クラスコンポーネントで実装する機会とかあるとすれば、既存のクラスコンポーネントを継承して機能を拡張するケースや、サードパーティーのクラスコンポーネントを拡張したい時ぐらい?
いずれにせよ早く使いこなせるように精進精進
- 投稿日:2020-02-15T21:32:09+09:00
Docker+React 環境構築手順
自分用メモとしてDocker+Reactの環境構築テンプレを書いときます。
ディレクトリ内にアプリを作成
create-react-app アプリ名cd アプリ名Dockerfile
アプリの内に作る
# base image
FROM node:10.16.3-alpine

# set working directory
WORKDIR /app

# add `/app/node_modules/.bin` to $PATH
ENV PATH /app/node_modules/.bin:$PATH

# install and cache app dependencies
# COPY package.json /app/package.json
RUN npm install --silent
RUN npm install react-scripts@3.0.1 -g --silent

# start app
CMD ["npm", "start"]
docker-compose.yml
アプリ内に作る
version: '3.7'

services:

  アプリ名:
    container_name: アプリ名
    build:
      context: .
      dockerfile: Dockerfile
    volumes:
      - '.:/app'
      - '/app/node_modules'
    ports:
      - '3000:3000'
    environment:
      - NODE_ENV=development
コンテナ起動
docker-compose up -d --buildlocalhost:3000にアクセスして問題なければおk。
- 投稿日:2020-02-15T10:59:23+09:00
2020年、改めて React に入門する
僕がはじめて React をさわったのは 2016 年の 3 月頃、まだ Version 0.14 くらいのときでした。
スプレッドシートやガントチャートなどのコンポーネントを 1 年くらいがっつり作り込み、
React スゴい!
さすが FB!
キミに決めた!と意気込みましたが、その後バックエンド開発がメインになり1 、React からは完全に遠ざかってしまいました。
気が付けば 2020 年、Version はいつの間にか 16.12 とか。
TypeScript で書けるんだっけ?
React Hooks? なにそれ? おいしいの?
へぇー、componentWill〜は非推奨になるんだ。って一体なにがあった!?2…と、気になることが山積みですw
TL;DR;
取り急ぎ、クリーンな環境で React アプリを起動してみます
$ docker run --detach --interactive --rm --name app --publish 3000:3000 node:12-alpine
$ docker exec app npx create-react-app app
$ docker exec --interactive --tty --workdir /app app npm start
ブラウザで開いてみましょう
http://localhost:3000
OK,
では一旦ctrl + cでアプリを停止して、React アプリの開発を開始しましょう!TL;DR; for the next step
$ docker exec app apk add curl git vim zsh zsh-vcs
$ docker exec app git config --global user.email "you@example.com"
$ docker exec app git config --global user.name "Your Name"
$ docker exec --workdir /app app git init
$ docker exec --workdir /app app git add -A
$ docker exec --workdir /app app git commit -m "Initial commit"
$ docker exec --workdir /root app curl --remote-name https://raw.githubusercontent.com/hysh8392/dotfiles/master/.zshrc
$ docker exec --interactive --tty --workdir /app app zsh
とりあえず、最低限必要なコマンドのみインストールします
Mac で開発する場合、本当は Docker Desktop for Mac と Visual Studio Code を組み合わせた開発が最強だと思うんですが、ホスト側の作業フォルダをコンテナにマウントするとパフォーマンスが激しく劣化する、という長年解決されていない問題があるため、
vimを入れときますwこの問題はおそらく Visual Studio Code の神アプデ「VS Code Remote Development」3で解決されるものと思われますが、この機能の検証は別の記事で書きたいと思います
そして開発へ…
それではいよいよ開発に入っていきましょう!
To be continued...笑
基本的に会社の方針には逆らいません ↩
- 投稿日:2020-02-15T04:20:35+09:00
webサービスを運営してみた(2020/2/15)
はじめに
アルバイトの勤怠管理を無料でできるサービスTimestampを個人で運営しています。
ここでは開発まわりの記録を残していきます。ユーザー数
googleアナリティクスのグラフです。
ユーザ数が先週より伸びてますね。嘘です伸びてないですね。
ほとんどがQiita記事のリンクからの流入で、google検索からは1日0~5人ぐらいみたいです。
僕自身がgoogle検索してもなかなか見つからないのに、0人でないことに驚きです。雑記
googleアドセンスの審査に落ちました
googleアドセンスの審査に落ちました。
審査基準を把握していないのですが、ページビューが足りないとかなのかな?
ユーザがいない状態でアドセンスを導入しても意味がないので将来的に対応ということにします。httpsになりました
Let's Encrypt で Nginx にSSLを設定しました。
記事に感謝。開発予定
しばらくは機能開発に時間がかかりそうです。
そのあとはSEO対策、英語翻訳を外注、LPのデザインを外注しようかなと考えているのですが、
外注できるかは料金次第ですね。。
