- 投稿日:2020-02-10T23:41:13+09:00
apollo clientのcache機能を使った際にcacheが上書きされる
はじめに
apollo client V3.0のベータ版がリリースされ、そろそろcacheを使いこなしたいと思う今日この頃。凡ミスで時間を取られたので、備忘録として残しておきます。
今回出会った問題
今回はコメントリストを呼び出す例を題材に出会った問題を書き残しておきます。
Server側の実装
まずは以下のようなサーバー側のコードを考えます。
sever.jsconst { ApolloServer, gql } = require("apollo-server"); const typeDefs = gql` type Comment { id: ID title: String comment: String } type Query { commentDetail(title: String): Comment } `; const commentsList = [ { id: 1, title: "初めて利用してみた", comment: "このサービスは素晴らしい" }, { id: 1, title: "何回でも使いたくなるサービス", comment: "こんな素晴らしいサービスは見たことが無い" } ]; const resolvers = { Query: { commentDetail: (root, args) => { const com = commentsList.find(p => p.title === args.title); return com; } } }; const server = new ApolloServer({ typeDefs, resolvers }); server.listen().then(({ url }) => { console.log(`Server ready at ${url}`); });commentListのidが重複してるのに気づくと思います。
この状態でcacheを有効化してみたいと思います。cacheの設定
InMemoryCacheを使います
import { ApolloClient, HttpLink, InMemoryCache } from "@apollo/client";

const link = new HttpLink({
  uri: "http://localhost:4000/graphql"
});

const client = new ApolloClient({
  link,
  cache: new InMemoryCache(),
  defaultOptions: {
    watchQuery: {
      fetchPolicy: "cache-first"
    }
  }
});
上のようにApolloClientを呼び出す際、
fetchPolicyに"cache-first"を指定してあります。ただデフォルトで"cache-first"が指定されているので、書いても書かなくても同じです。query
今回以下の2つのqueryを交互に投げてcacheはどう保存されていくか、確認します
const COMMENTS_QUERY = gql`
  {
    commentDetail(title:"初めて利用してみた"){
      id
      comment
    }
  }
`;
const COMMENTS_QUERY = gql` { commentDetail(title:"何回でも使いたくなるサービス"){ id comment } } `;結果
InMemorycacheのdata内部にROOT_QUERYがあり、そこに呼び出されたデータが蓄積されていきます。そしてidが付いているものは、__refに参照先が追加され、ROOT_QUERYと同階層に参照元データが追加されて行きます。今回idを同じに設定したため__refが同じcacheを見に行き、表示が更新されないということになっています。(下にcacheの中身の参考画像を貼ります。)
これはidをちゃんとユニークにつけておけば問題ないです。
idをつけなかったらどうなるか
今idが同じものであったためにcacheの重複が起こりました。idを消すと
__refが消え、ROOT_QUERYにデータが全て保存されるようになります。今回の場合、commentDetail({"title":"何回でも使いたくなるサービス"})の部分がkeyになり、cacheにどんどん保存されます。この場合だと参照先がないので、同じデータを見にいくことはありません。しかしこの場合もtitleが同じ場合は希望通りの挙動が出ない場合があるので、idはちゃんと降っておいたほうがいいかなと思います。参考文献
以下の記事を参考にさせていただきました。ありがとうございました。
apollo-clientを使っていてデータが変に重複してる(キャッシュが変)?と思った時に見てみる事

- 投稿日:2020-02-10T15:47:20+09:00
【5分で動く】Reactで作るイケてるWEBアプリケーション
背景
社内でReactを使ったWEBアプリケーションを開発するにあたって、UIフレームワークの導入から認証までやってくれるようなサンプルが見当たらなかったので、今回作成したものをテンプレっぽくして共有します。
これさえあれば、とりあえず簡単なWEBアプリは作れるのでぜひ活用していただければと思います。概要
https://github.com/tonio0720/React-App
起動方法
git clone https://github.com/tonio0720/React-App

cd React-App

# react 起動
cd frontend
npm i
npm start

# express 起動
cd backend
npm i
npm start
今回利用したもの
- React (Frontend Framework)
- Create React App
- Ant Design (UI Framework)
- Axios (HTTP client)
- echarts (Chart Library)
- Express (Backend Framework)
解説
Reactアプリ自体は
create react appを使って作成しました。
ただ色々と拡張する必要があったので、react-app-rewiredとcustomize-craを使いました。
UIフレームワークにはAnt Designを使用しています。バックエンドは認証処理をしたかったのでおまけ程度に書いています。
express-generatorを使って作りました。
認証にはexpress-jwtを使用しています。空の画面だけでさみしかったので、echartsでダッシュボードっぽくしてみました。
データは僕のQiitaのダッシュボードから持ってきました。(APIではなく直書きです。)
グラフにはechartsを利用しています。↓で詳細について説明してみます。
Ant Designの導入
Ant DesignはLESSで作られているので、Webpackで読み込める状態にする必要があります。
webpackのバージョン次第では、localIdentNameが云々とエラーが出てしまうので、そちらの対応もしています。config-overrides.jsconst path = require('path'); const { override, disableEsLint, fixBabelImports, addLessLoader, addWebpackAlias, } = require('customize-cra'); const theme = require('./src/theme'); const modifyVars = {}; Object.keys(theme).forEach((key) => { modifyVars[`@${key.replace(/([a-z])([A-Z])/g, '$1-$2').toLowerCase()}`] = theme[key]; }); const config = { webpack: override( disableEsLint(), addWebpackAlias({ '@': path.resolve(__dirname, 'src') }), fixBabelImports('import', { libraryName: 'antd', libraryDirectory: 'es', style: true, }), // ★ここから addLessLoader({ javascriptEnabled: true, modifyVars }), ((config) => { config.module.rules.forEach((rule) => { if (!rule.oneOf) { return; } rule.oneOf.forEach((rule) => { if (!rule.use) { return; } rule.use.forEach((loader) => { if (loader.options && loader.options.localIdentName) { const { localIdentName } = loader.options; delete loader.options.localIdentName; loader.options.modules = { localIdentName }; } }); }); }); return config; }), // ★ここまで ), devServer: (configFunction) => { return (proxy, allowedHost) => { const config = configFunction(proxy, allowedHost); config.proxy = { '/api': { target: 'http://localhost:3030', pathRewrite: { '^/api': '' } } }; return config; }; }, }; module.exports = config;JWT認証
Reactの認証処理は
ContextProviderを使って実装しています。
ContextProviderは下の階層にプロパティを引き渡すことができます。ページ遷移の度に、バックエンドの
/user/infoというところにリクエストを送り、検証をします。
成功の場合、useridとトークンを保存します。
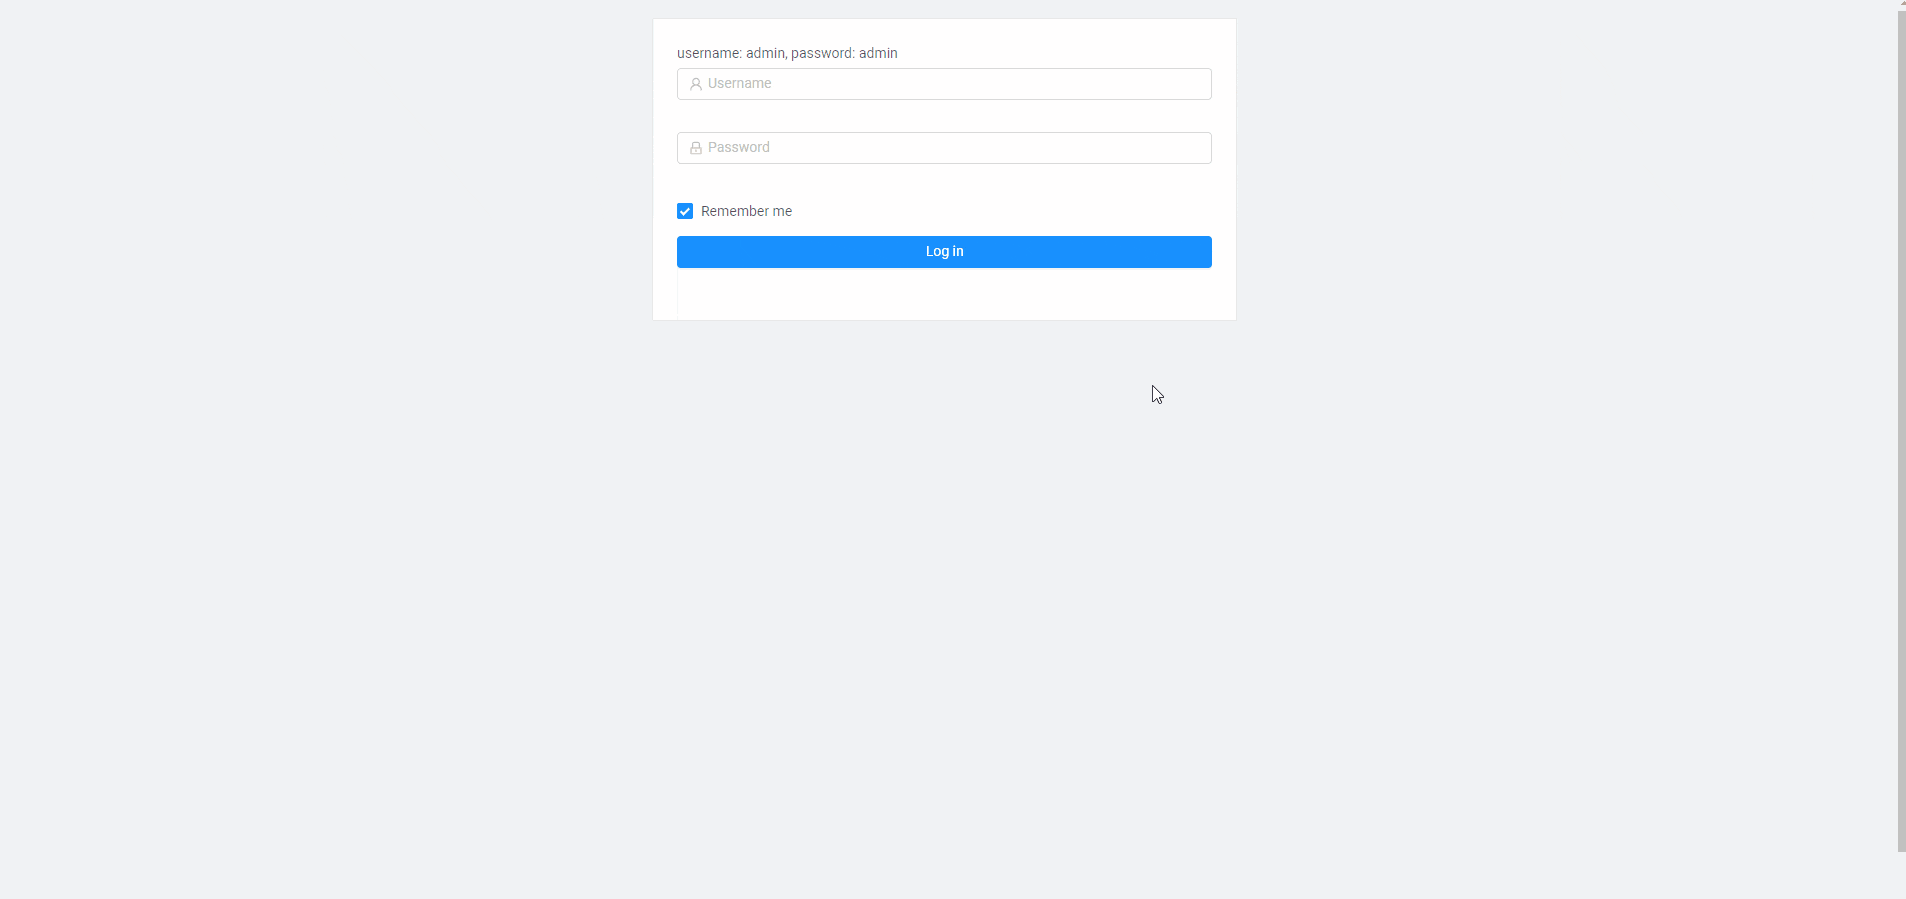
失敗の場合、ログインページに戻します。./src/contexts/Auth.jsimport React, { useEffect, useState } from 'react'; import useReactRouter from 'use-react-router'; import { getToken, setToken, removeToken, gotoLogin } from '@/utils/auth'; import request from '@/utils/request'; export const AuthContext = React.createContext({}); export const AuthProvider = ({ children }) => { const { location: { pathname } } = useReactRouter(); const [isLoggedIn, setIsLoggedIn] = useState(false); const [userid, setUserid] = useState(null); const checkAuth = () => { return request.post('/user/info', {}); }; useEffect(() => { setIsLoggedIn(false); if (pathname === '/login') { return; } const token = getToken(); if (token) { checkAuth().then(({ token, userid }) => { setToken(token); setIsLoggedIn(true); setUserid(userid); }).catch(() => { removeToken(); gotoLogin(); }); } else { gotoLogin(); } }, [pathname]); return ( <AuthContext.Provider value={{ isLoggedIn, userid }} > {(isLoggedIn || pathname === '/login') && children} </AuthContext.Provider> ); };ログインページからは
/user/loginにリクエストを送り、usernameとpasswordを検証します。
成功した場合は、tokenが返ってくるのでCookieに保存します。./src/pages/Login/LoginForm.jsimport React, { useState } from 'react'; import useReactRouter from 'use-react-router'; import { Form, Icon, Input, Button, Checkbox, Alert } from 'antd'; import { setToken } from '@/utils/auth'; import request from '@/utils/request'; import styles from './index.module.less'; const LoginForm = ({ form }) => { const { history } = useReactRouter(); const [error, setError] = useState(false); const handleSubmit = (e) => { e.preventDefault(); form.validateFields((err, values) => { setError(false); if (!err) { request.post('/user/login', values).then(({ token }) => { setToken(token); history.push('/'); }).catch(() => { setError(true); }); } }); }; const { getFieldDecorator } = form; return ( <Form onSubmit={handleSubmit}> {error && ( <Alert description="Password Incorrect." type="error" showIcon style={{ marginBottom: 16 }} /> )} <span>username: admin, password: admin</span> <Form.Item> {getFieldDecorator('username', { rules: [{ required: true, message: 'Please input your username!' }], })( <Input autocomplete="off" prefix={<Icon type="user" style={{ color: 'rgba(0,0,0,.25)' }} />} placeholder="Username" />, )} </Form.Item> <Form.Item> {getFieldDecorator('password', { rules: [{ required: true, message: 'Please input your Password!' }], })( <Input prefix={<Icon type="lock" style={{ color: 'rgba(0,0,0,.25)' }} />} type="password" placeholder="Password" />, )} </Form.Item> <Form.Item> {getFieldDecorator('remember', { valuePropName: 'checked', initialValue: true, })(<Checkbox>Remember me</Checkbox>)} <Button type="primary" htmlType="submit" className={styles.loginFormButton} > Log in </Button> </Form.Item> </Form> ); }; export default Form.create({ name: 'login' })(LoginForm);終わりに
Reactは便利ですが、部分的なサンプルが多くまとまったものが少ないので不便に感じている人も多いのではないでしょうか。
Reactを始めるきっかけにしてもらえればうれしいです!
- 投稿日:2020-02-10T15:47:20+09:00
React + And Design + Expressで作るWEBアプリテンプレ―ト
背景
社内でReactを使ったWEBアプリケーションを開発するにあたって、UIフレームワークの導入から認証までやってくれるようなサンプルが見当たらなかったので、今回作成したものをテンプレっぽくして共有します。
これさえあれば、とりあえず簡単なWEBアプリは作れるのでぜひ活用していただければと思います。概要
https://github.com/tonio0720/React-App
起動方法
git clone https://github.com/tonio0720/React-App

cd React-App

# react 起動
cd frontend
npm i
npm start

# express 起動
cd backend
npm i
npm start
今回利用したもの
- React (Frontend Framework)
- Create React App
- Ant Design (UI Framework)
- Axios (HTTP client)
- echarts (Chart Library)
- Express (Backend Framework)
解説
Reactアプリ自体は
create react appを使って作成しました。
ただ色々と拡張する必要があったので、react-app-rewiredとcustomize-craを使いました。
UIフレームワークにはAnt Designを使用しています。バックエンドは認証処理をしたかったのでおまけ程度に書いています。
express-generatorを使って作りました。
認証にはexpress-jwtを使用しています。空の画面だけでさみしかったので、echartsでダッシュボードっぽくしてみました。
データは僕のQiitaのダッシュボードから持ってきました。(APIではなく直書きです。)
グラフにはechartsを利用しています。↓で詳細について説明してみます。
Ant Designの導入
Ant DesignはLESSで作られているので、Webpackで読み込める状態にする必要があります。
webpackのバージョン次第では、localIdentNameが云々とエラーが出てしまうので、そちらの対応もしています。config-overrides.jsconst path = require('path'); const { override, disableEsLint, fixBabelImports, addLessLoader, addWebpackAlias, } = require('customize-cra'); const theme = require('./src/theme'); const modifyVars = {}; Object.keys(theme).forEach((key) => { modifyVars[`@${key.replace(/([a-z])([A-Z])/g, '$1-$2').toLowerCase()}`] = theme[key]; }); const config = { webpack: override( disableEsLint(), addWebpackAlias({ '@': path.resolve(__dirname, 'src') }), fixBabelImports('import', { libraryName: 'antd', libraryDirectory: 'es', style: true, }), // ★ここから addLessLoader({ javascriptEnabled: true, modifyVars }), ((config) => { config.module.rules.forEach((rule) => { if (!rule.oneOf) { return; } rule.oneOf.forEach((rule) => { if (!rule.use) { return; } rule.use.forEach((loader) => { if (loader.options && loader.options.localIdentName) { const { localIdentName } = loader.options; delete loader.options.localIdentName; loader.options.modules = { localIdentName }; } }); }); }); return config; }), // ★ここまで ), devServer: (configFunction) => { return (proxy, allowedHost) => { const config = configFunction(proxy, allowedHost); config.proxy = { '/api': { target: 'http://localhost:3030', pathRewrite: { '^/api': '' } } }; return config; }; }, }; module.exports = config;JWT認証
Reactの認証処理は
ContextProviderを使って実装しています。
ContextProviderは下の階層にプロパティを引き渡すことができます。ページ遷移の度に、バックエンドの
/user/infoというところにリクエストを送り、検証をします。
成功の場合、useridとトークンを保存します。
失敗の場合、ログインページに戻します。./src/contexts/Auth.jsimport React, { useEffect, useState } from 'react'; import useReactRouter from 'use-react-router'; import { getToken, setToken, removeToken, gotoLogin } from '@/utils/auth'; import request from '@/utils/request'; export const AuthContext = React.createContext({}); export const AuthProvider = ({ children }) => { const { location: { pathname } } = useReactRouter(); const [isLoggedIn, setIsLoggedIn] = useState(false); const [userid, setUserid] = useState(null); const checkAuth = () => { return request.post('/user/info', {}); }; useEffect(() => { setIsLoggedIn(false); if (pathname === '/login') { return; } const token = getToken(); if (token) { checkAuth().then(({ token, userid }) => { setToken(token); setIsLoggedIn(true); setUserid(userid); }).catch(() => { removeToken(); gotoLogin(); }); } else { gotoLogin(); } }, [pathname]); return ( <AuthContext.Provider value={{ isLoggedIn, userid }} > {(isLoggedIn || pathname === '/login') && children} </AuthContext.Provider> ); };ログインページからは
/user/loginにリクエストを送り、usernameとpasswordを検証します。
成功した場合は、tokenが返ってくるのでCookieに保存します。./src/pages/Login/LoginForm.jsimport React, { useState } from 'react'; import useReactRouter from 'use-react-router'; import { Form, Icon, Input, Button, Checkbox, Alert } from 'antd'; import { setToken } from '@/utils/auth'; import request from '@/utils/request'; import styles from './index.module.less'; const LoginForm = ({ form }) => { const { history } = useReactRouter(); const [error, setError] = useState(false); const handleSubmit = (e) => { e.preventDefault(); form.validateFields((err, values) => { setError(false); if (!err) { request.post('/user/login', values).then(({ token }) => { setToken(token); history.push('/'); }).catch(() => { setError(true); }); } }); }; const { getFieldDecorator } = form; return ( <Form onSubmit={handleSubmit}> {error && ( <Alert description="Password Incorrect." type="error" showIcon style={{ marginBottom: 16 }} /> )} <span>username: admin, password: admin</span> <Form.Item> {getFieldDecorator('username', { rules: [{ required: true, message: 'Please input your username!' }], })( <Input autocomplete="off" prefix={<Icon type="user" style={{ color: 'rgba(0,0,0,.25)' }} />} placeholder="Username" />, )} </Form.Item> <Form.Item> {getFieldDecorator('password', { rules: [{ required: true, message: 'Please input your Password!' }], })( <Input prefix={<Icon type="lock" style={{ color: 'rgba(0,0,0,.25)' }} />} type="password" placeholder="Password" />, )} </Form.Item> <Form.Item> {getFieldDecorator('remember', { valuePropName: 'checked', initialValue: true, })(<Checkbox>Remember me</Checkbox>)} <Button type="primary" htmlType="submit" className={styles.loginFormButton} > Log in </Button> </Form.Item> </Form> ); }; export default Form.create({ name: 'login' })(LoginForm);終わりに
Reactは便利ですが、部分的なサンプルが多くまとまったものが少ないので不便に感じている人も多いのではないでしょうか。
Reactを始めるきっかけにしてもらえればうれしいです!
- 投稿日:2020-02-10T11:03:08+09:00
【React v16.8 FunctionComponent + TypeScript】コンポーネント作成のド基礎
react超初心者用です。
現場でReact v16.8からのFunctionComponent型(今後FCと呼びます)を使用する機会があったのでメモ程度にド基礎をまとめました。
間違っているところがあればご指摘いただけると幸いです!!
超簡単なプロフィールを表示するコンポーネントでまとめます。全体
import React from 'react'

interface PersonProps {
  name: string,
  age?: number,
  agree?: Function,
}

const Person: React.FC<PersonProps> = props => {
  const {
    name,
    age,
  } = props

  const agree = () => {
    console.log(`${name}は${age}才です`)
  }

  return (
    <React.Fragment>
      <span>name : {name}</span><br />
      <span>age : {age}</span><br />
      <button onClick={agree}>agree</button>
    </React.Fragment>
  );
}

export default Person
順を追って説明します。
必要モジュールのインポート
必要なのはReactのみなのでReactをインポートします。
import React from 'react'プロパティやメゾットの定義
interface ParsonProps {
  name: string,
  age?: number,
}
interfaceを使ってプロパティやメゾットの型の定義をしていきます。
interface 名前で定義できます。
プロパティorメゾット: 型で使用する型を決められます。
親からpropsで渡ってくる時、ここに記述している型以外の型の場合と、空の場合は、TypeScriptがエラーを知らせてくれます。
age?: numberの『?』は省略可能という意味で、プロパティを使用しない場合にはundifindeが入ります。
空になる可能性のあるプロパティ、メゾットにはつけてあげるといいでしょう。interfaceはtypeでもほぼ同じことができるそうです。
違いについて知りたい方はTypeScriptのInterfaceとTypeの比較
という記事が参考になったので是非コンポーネント作成
const Person: React.FC<PersonProps> = props => {
  const {
    name,
    age,
  } = props

  const agree = () => {
    console.log(`${name}は${age}才です`)
  }

  return (
    <React.Fragment>
      <span>name : {name}</span><br />
      <span>age : {age}</span><br />
      <button onClick={agree}>agree</button>
    </React.Fragment>
  );
}
分けて見ていきます。
Personというコンポネントを作る宣言
const Person: React.FC<PersonProps> = props => {}型にReactFC型を用いてあげて、ジェネリクスに上記で作成したinterfaceを指定してあげます。
ジェネリクスを用いることによってinterface内に複数、型があってもまとめて記述できます。
そしてpropsを引数に渡してあげます。
これによって、コンポネント内でprops.xxxすると呼び出せます。propsの扱いと関数
const {
    name,
    age,
  } = props

  const agree = () => {
    console.log(`${name}は${age}才です`)
  }
コンポネント内で
props.xxxすると呼び出せます。と書きましたが、propsは僕はまず分裂代入してから使います。
propsの中身をそれぞれname,ageに代入しなおしてあげます。
これによってagree関数を見ると、props.の記述が不要になることがわかります。
nameもageもagree()もinterfaceで型定義してあげたから使用できるという点が大切かと思います。render、エクスポート
return (
    <React.Fragment>
      <span>name : {name}</span><br />
      <span>age : {age}</span><br />
      <button onClick={agree}>agree</button>
    </React.Fragment>
  );
export default Person
レンダリングのところは通常どおりです。
親で使ってみる
import Person from '../Person'

<Person
  name="jon"
  age={12}
/>
親で使用時に注意なのが、name,ageには決められた型以外が入るとエラーになる点です。
これもTypeScriptの機能です。
ageは省略可能にしてあるので、プロパティの記述がなくてもエラーになりません。
こんな感じででてきて、ボタンを押すとconsoleに『jonは12才です』とでますまとめ
最初にFC+TypeScriptで書かれてるのをみたときなんじゃこりゃと思いましたが、一つ一つ勉強していくと世界がかわりました。
これがプログラミングのいいところだなと思って嬉しく思ってます。
よんでいただきありがとうございました。
修正点、改善点ございましたらお待ちしています。

- 投稿日:2020-02-10T08:42:58+09:00
「ピーターの問題」をReact+Typescriptで解けるようにしてみた
先日、Twitterで「ピーターの問題」というのを見かけました。
これをjsで解けと会社の上司に言われたんですが全然わからん。
— ケイセイ@JavaScriptと仲良くなりたい (@keisei_otsuka) February 2, 2020
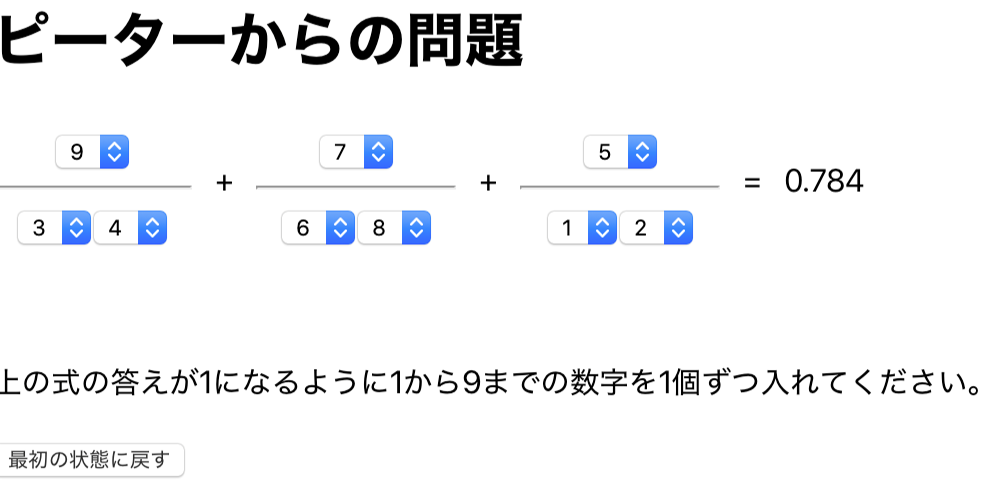
誰かわかります?笑 pic.twitter.com/ZM6VmigaVQ空欄に数字を入れて式を成立させるという問題です。
自分もJSで解こうとしたのですが、解くのはとても難しそうだったので、
ピーターの問題を解くためのツール
を代わりにJS(TypeScript)で作ってみました!
ピーターからの問題、JSで解くのは難しいそうだったので、代わりに解くためのツールを実装してみました!https://t.co/pPrpVufgiO
— tekkoc (@tek_koc) February 9, 2020
これを使って何とか問題解けましたー。やったー。 https://t.co/YptFnMefPh pic.twitter.com/iGCsnP6K0l
- create-react-app したものをベースに実装
- TypeScriptを使用
- React Hooks (useReducer) がメイン
な構成です。
以下のページで実際に動作できます。
- 重複したものは選べないようにする
- 選んだ数字で計算した場合の答えを出す
ようにしたので、問題を解く手助けになれば幸いです。
補足
計算の仕方
values[0] / (values[1] * 10 + values[2]) +
values[3] / (values[4] * 10 + values[5]) +
values[6] / (values[7] * 10 + values[8])
肝心?の計算部分は、このような処理で求めました。
式の表示の仕方
flexboxを使って横並べで表示しています。
.container {
  // これで横並びにしている
  display: flex;
  flex-direction: row;
}

.box {
  width: 100px;
  height: 100px;
  text-align: center;
}

.ope {
  width: 2em;
  height: 100px;
  line-height: 50px; // + や = を縦中央に表示
  text-align: center;
}
お遊びなので、とりあえずそれっぽく出せればいいの精神で適当に。
分数の線?はhrタグ使って表示して手を抜いてます。useReducer
同じ数字は1度しか使えないという制約があるため、
- どの数字を選んでいるか
- どの数字が選べるか
の管理が必要になります。一つのセレクトボックスの状態を管理するだけであれば
useStateというhooksを使うのがお手軽なんですが、今回は相互にセレクトボックスに影響を与えたりして、やや複雑な状態管理が必要だったのでuseReducerhooks を使いました。セレクトボックス(をラップしたコンポーネント)は
propsとして受け取ったdispatch経由でアクションを呼ぶだけで、あくまで変更処理はreducerにまとまっています。
初期化処理をあとから追加しましたが、こういう風に実装しておくと簡単に追加でき、かつ状態の変更処理が一箇所にまとまって良いですね。typeガード
このツールでは、すべての空欄を埋めたときに答えを計算するようにしています。
選択された数字は(null|number)[]という型で扱っていて、nullが含まれていないときに計算するようにしています。type Value = null | number; const isNumbers = (numbers: Value[]): numbers is number[] => { return -1 === numbers.indexOf(null); }; // 中略 // values: Values[] な変数・配列がある。 // values[i] はこの時点では、 nullかnumber if (isNumbers(values)) { // values が number[] とTypescriptに教えたため、算術演算できる const answer = values[0] / (values[1] * 10 + values[2]) // 中略 }実際の全体のコード
codesandbox に載せてあります。
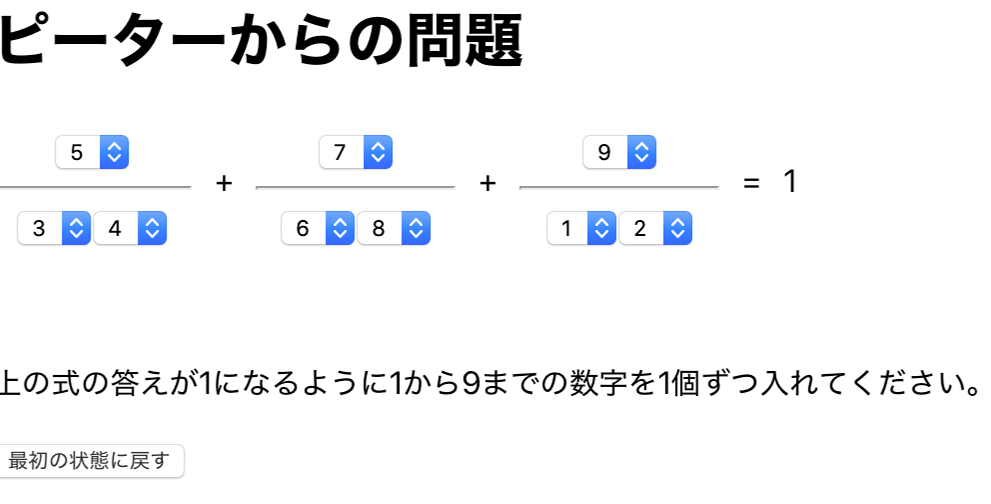
メインとなるファイルだけ、ここにも貼っておきます。import React, { useReducer, Dispatch } from 'react'; import './App.css'; type Value = null | number; type State = { values: Value[]; candidates: number[]; }; const initialState: State = { values: [null, null, null, null, null, null, null, null, null], candidates: [1, 2, 3, 4, 5, 6, 7, 8, 9] }; type Action = | { type: 'select'; index: number; value: Value; } | { type: 'clear'; }; const reducer = (state: State, action: Action): State => { switch (action.type) { case 'select': const newValues = state.values.concat(); newValues[action.index] = action.value; const newCandidates = initialState.candidates.concat().filter(n => { return -1 === newValues.indexOf(n); }); return { values: newValues, candidates: newCandidates }; case 'clear': return initialState; default: return state; } }; const isNumbers = (numbers: Value[]): numbers is number[] => { return -1 === numbers.indexOf(null); }; const App = () => { const [{ values, candidates }, dispatch] = useReducer(reducer, initialState); const answer = isNumbers(values) ? values[0] / (values[1] * 10 + values[2]) + values[3] / (values[4] * 10 + values[5]) + values[6] / (values[7] * 10 + values[8]) : null; const createChoice = (i: number): React.ReactNode => { return ( <Choice index={i} value={values[i]} candidates={candidates.concat()} dispatch={dispatch} /> ); }; return ( <div className="app"> <h1>ピーターからの問題</h1> <div className="container"> <div className="box"> {createChoice(0)} <hr /> {createChoice(1)} {createChoice(2)} </div> <div className="ope">+</div> <div className="box"> {createChoice(3)} <hr /> {createChoice(4)} {createChoice(5)} </div> <div className="ope">+</div> <div className="box"> {createChoice(6)} <hr /> {createChoice(7)} {createChoice(8)} </div> <div className="ope">=</div> <div className="answer"> {answer ? Math.round(answer * 1000) / 1000 : '?'} </div> </div> <p> 上の式の答えが1になるように1から9までの数字を1個ずつ入れてください。 </p> <button onClick={() => { dispatch({ type: 'clear' }); }} > 最初の状態に戻す </button> </div> ); }; type Props = { index: number; value: Value; candidates: number[]; dispatch: Dispatch<Action>; }; const Choice: React.FC<Props> = ({ index, value, candidates, dispatch }) => { const onChange = (e: React.ChangeEvent<HTMLSelectElement>): void => { dispatch({ type: 'select', index: index, value: '' === e.target.value ? null : parseInt(e.target.value, 10) }); }; if (null !== value) { candidates.push(value); candidates.sort(); } return ( <select value={value || ''} onChange={onChange}> <option value="">-</option> {candidates.map(n => { return ( <option key={n} value={n}> {n} </option> ); })} </select> ); }; export default App;答え
ちなみに答えはこんな感じ。
- 投稿日:2020-02-10T08:42:58+09:00
「ピーターからの問題」をReact+TypeScriptで解けるようにしてみた
先日、Twitterで「ピーターからの問題」というのを見かけました。
これをjsで解けと会社の上司に言われたんですが全然わからん。
— ケイセイ@JavaScriptと仲良くなりたい (@keisei_otsuka) February 2, 2020
誰かわかります?笑 pic.twitter.com/ZM6VmigaVQ空欄に数字を入れて式を成立させるという問題です。
問題を実際に解く代わりに、
ピーターからの問題を解くためのツール
としてフォームで数字を選択する部分をReact+TypeScriptで実装してみました。
- create-react-app したものをベースに実装
- TypeScriptを使用
- React Hooks (useReducer) がメイン
な構成です。
以下のページで実際に動作できます。
- 重複したものは選べないようにする
- 選んだ数字で計算した場合の答えを出す
ようにしています。
補足
useReducer
同じ数字は1度しか使えないという制約があるため、
- どの数字を選んでいるか
- どの数字が選べるか
の管理が必要になります。一つのセレクトボックスの状態を管理するだけであれば
useStateというhooksを使うのがお手軽なんですが、今回は相互にセレクトボックスに影響を与えたりして、やや複雑な状態管理が必要だったのでuseReducerhooks を使いました。状態管理・変更はreducerにまとめ、セレクトボックス(をラップしたコンポーネント)は props として受け取った dispatch 経由でアクションを呼ぶだけにしています。
state周辺
type Value = null | number;

type State = {
  values: Value[];
  candidates: number[];
};

const initialState: State = {
  values: [null, null, null, null, null, null, null, null, null],
  candidates: [1, 2, 3, 4, 5, 6, 7, 8, 9]
};
reducer周辺
type Action =
  | {
      type: 'select';
      index: number;
      value: Value;
    }

  | {
      type: 'clear';
    };

const reducer = (state: State, action: Action): State => {
  switch (action.type) {
    case 'select':
      const newValues = state.values.concat();
      newValues[action.index] = action.value;

      const newCandidates = initialState.candidates.concat().filter(n => {
        return -1 === newValues.indexOf(n);
      });

      return { values: newValues, candidates: newCandidates };
    case 'clear':
      return initialState;
    default:
      return state;
  }
};
dispatch周辺
  const onChange = (e: React.ChangeEvent<HTMLSelectElement>): void => {
    dispatch({
      type: 'select',
      index: index,
      value: '' === e.target.value ? null : parseInt(e.target.value, 10)
    });
  };
実際にはcandidatesみたいな値は、valuesを元に算出可能なので、状態として持たないほうが適切かもしれないです。
typeガード
このツールでは、すべての空欄を埋めたときに答えを計算するようにしています。
選択された数字は(null|number)[]という型で扱っていて、nullが含まれていないときに計算するようにしています。type Value = null | number; const isNumbers = (numbers: Value[]): numbers is number[] => { return -1 === numbers.indexOf(null); }; // 中略 // values: Values[] な変数・配列がある。 // values[i] はこの時点では、 nullかnumber if (isNumbers(values)) { // values が number[] とTypescriptに教えたため、算術演算できる const answer = values[0] / (values[1] * 10 + values[2]) // 中略 }式の表示の仕方
flexboxを使って横並べで表示しています。
.container {
  // これで横並びにしている
  display: flex;
  flex-direction: row;
}

.box {
  width: 100px;
  height: 100px;
  text-align: center;
}

.ope {
  width: 2em;
  height: 100px;
  line-height: 50px; // + や = を縦中央に表示
  text-align: center;
}
お遊びなので、とりあえずそれっぽく出せればいいの精神で適当に。
分数の線?は hr タグ使って表示して手を抜いてます。実際の全体のコード
codesandbox に載せてあります。
コメントで解説されていいますが、計算周りは単に書き下ろしたものでかなり不正確になっています。詳しくはコメントを参照してください。
- 投稿日:2020-02-10T08:42:58+09:00
「ピーターからの問題」をReact+Typescriptで解けるようにしてみた
先日、Twitterで「ピーターからの問題」というのを見かけました。
これをjsで解けと会社の上司に言われたんですが全然わからん。
— ケイセイ@JavaScriptと仲良くなりたい (@keisei_otsuka) February 2, 2020
誰かわかります?笑 pic.twitter.com/ZM6VmigaVQ空欄に数字を入れて式を成立させるという問題です。
自分もJSで解こうとしたのですが、解くのはとても難しそうだったので、
ピーターからの問題を解くためのツール
を代わりにJS(TypeScript)で作ってみました!
ピーターからの問題、JSで解くのは難しいそうだったので、代わりに解くためのツールを実装してみました!https://t.co/pPrpVufgiO
— tekkoc (@tek_koc) February 9, 2020
これを使って何とか問題解けましたー。やったー。 https://t.co/YptFnMefPh pic.twitter.com/iGCsnP6K0l
- create-react-app したものをベースに実装
- TypeScriptを使用
- React Hooks (useReducer) がメイン
な構成です。
以下のページで実際に動作できます。
- 重複したものは選べないようにする
- 選んだ数字で計算した場合の答えを出す
ようにしたので、問題を解く手助けになれば幸いです。
補足
計算の仕方
values[0] / (values[1] * 10 + values[2]) +
values[3] / (values[4] * 10 + values[5]) +
values[6] / (values[7] * 10 + values[8])
肝心?の計算部分は、このような処理で求めました。
式の表示の仕方
flexboxを使って横並べで表示しています。
.container {
  // これで横並びにしている
  display: flex;
  flex-direction: row;
}

.box {
  width: 100px;
  height: 100px;
  text-align: center;
}

.ope {
  width: 2em;
  height: 100px;
  line-height: 50px; // + や = を縦中央に表示
  text-align: center;
}
お遊びなので、とりあえずそれっぽく出せればいいの精神で適当に。
分数の線?はhrタグ使って表示して手を抜いてます。useReducer
同じ数字は1度しか使えないという制約があるため、
- どの数字を選んでいるか
- どの数字が選べるか
の管理が必要になります。一つのセレクトボックスの状態を管理するだけであれば
useStateというhooksを使うのがお手軽なんですが、今回は相互にセレクトボックスに影響を与えたりして、やや複雑な状態管理が必要だったのでuseReducerhooks を使いました。セレクトボックス(をラップしたコンポーネント)は
propsとして受け取ったdispatch経由でアクションを呼ぶだけで、あくまで変更処理はreducerにまとまっています。
初期化処理をあとから追加しましたが、こういう風に実装しておくと簡単に追加でき、かつ状態の変更処理が一箇所にまとまって良いですね。typeガード
このツールでは、すべての空欄を埋めたときに答えを計算するようにしています。
選択された数字は(null|number)[]という型で扱っていて、nullが含まれていないときに計算するようにしています。type Value = null | number; const isNumbers = (numbers: Value[]): numbers is number[] => { return -1 === numbers.indexOf(null); }; // 中略 // values: Values[] な変数・配列がある。 // values[i] はこの時点では、 nullかnumber if (isNumbers(values)) { // values が number[] とTypescriptに教えたため、算術演算できる const answer = values[0] / (values[1] * 10 + values[2]) // 中略 }実際の全体のコード
codesandbox に載せてあります。
メインとなるファイルだけ、ここにも貼っておきます。import React, { useReducer, Dispatch } from 'react'; import './App.css'; type Value = null | number; type State = { values: Value[]; candidates: number[]; }; const initialState: State = { values: [null, null, null, null, null, null, null, null, null], candidates: [1, 2, 3, 4, 5, 6, 7, 8, 9] }; type Action = | { type: 'select'; index: number; value: Value; } | { type: 'clear'; }; const reducer = (state: State, action: Action): State => { switch (action.type) { case 'select': const newValues = state.values.concat(); newValues[action.index] = action.value; const newCandidates = initialState.candidates.concat().filter(n => { return -1 === newValues.indexOf(n); }); return { values: newValues, candidates: newCandidates }; case 'clear': return initialState; default: return state; } }; const isNumbers = (numbers: Value[]): numbers is number[] => { return -1 === numbers.indexOf(null); }; const App = () => { const [{ values, candidates }, dispatch] = useReducer(reducer, initialState); const answer = isNumbers(values) ? values[0] / (values[1] * 10 + values[2]) + values[3] / (values[4] * 10 + values[5]) + values[6] / (values[7] * 10 + values[8]) : null; const createChoice = (i: number): React.ReactNode => { return ( <Choice index={i} value={values[i]} candidates={candidates.concat()} dispatch={dispatch} /> ); }; return ( <div className="app"> <h1>ピーターからの問題</h1> <div className="container"> <div className="box"> {createChoice(0)} <hr /> {createChoice(1)} {createChoice(2)} </div> <div className="ope">+</div> <div className="box"> {createChoice(3)} <hr /> {createChoice(4)} {createChoice(5)} </div> <div className="ope">+</div> <div className="box"> {createChoice(6)} <hr /> {createChoice(7)} {createChoice(8)} </div> <div className="ope">=</div> <div className="answer"> {answer ? Math.round(answer * 1000) / 1000 : '?'} </div> </div> <p> 上の式の答えが1になるように1から9までの数字を1個ずつ入れてください。 </p> <button onClick={() => { dispatch({ type: 'clear' }); }} > 最初の状態に戻す </button> </div> ); }; type Props = { index: number; value: Value; candidates: number[]; dispatch: Dispatch<Action>; }; const Choice: React.FC<Props> = ({ index, value, candidates, dispatch }) => { const onChange = (e: React.ChangeEvent<HTMLSelectElement>): void => { dispatch({ type: 'select', index: index, value: '' === e.target.value ? null : parseInt(e.target.value, 10) }); }; if (null !== value) { candidates.push(value); candidates.sort(); } return ( <select value={value || ''} onChange={onChange}> <option value="">-</option> {candidates.map(n => { return ( <option key={n} value={n}> {n} </option> ); })} </select> ); }; export default App;答え
ちなみに答えはこんな感じ。
- 投稿日:2020-02-10T08:41:05+09:00
ReactをDockerで開発してGithub ActionsでGithub Pagesに自動で公開するReactアプリ開発用のテンプレートリポジトリ
これはなに?
Reactで開発をするときのオレオレな開発テンプレートリポジトリです。このリポジトリをReactアプリ開発の初期環境として使用することで、Dockerベースの開発環境が用意され、master branchにmergeされるとGithub Actionsが動きbuildとGithub Pagesへの公開が自動で行われます。
使い方
テンプレートリポジトリを
git cloneします。
※ forkした場合、Github Actionsが動作しない。git clone https://github.com/k8shiro/ReactGithubTemplateclone後、gitのremoteを自分のgithubのリポジトリのURLに変更します。
git remote set-url origin <自分のgithubのリポジトリのURL>この後はdevelopブランチで開発を行い、開発が終了したらmasterブランチにmergeしましょう
新しくReactアプリを作成する場合
既にサンプルのmy-appアプリが作成されているのでこれを削除し、以下のコマンドでcreate-react-appを実行します。
rm -rf app/my-app
docker-compose run --rm node sh -c "create-react-app new-my-app"
# new-my-appを自分のアプリ名に変える
docker-compose.ymlのenvironmentのREACT_APP_NAMEを自分のアプリ名に変更
version: "3"
services:
  node:
    build:
      context: ./app
    environment:
      - NODE_ENV=production
      - REACT_APP_NAME=my-app # ここのmy-appを修正
    volumes:
      - ./app:/usr/src/app
    ports:
      - "3000:3000"
また、app/my-app/package.jsonにhomepageを追加します。
{
  "homepage": ".", # ここを追加
  "name": "my-app",
  "version": "0.1.0",
  "private": true,
...
作成済みのアプリを動かす場合(初回のみ)
- packageのインストールが必要
docker-compose run --rm --service-ports node ash -c "cd \$REACT_APP_NAME; yarn install"アプリケーションの開発を行う
- 開発サーバーを立ち上げる
docker-compose run --rm --service-ports node ash -c "cd \$REACT_APP_NAME; yarn start"ホストマシンの3000ポートでアプリケーションが起動します。
- コードを修正する
開発サーバーが起動している状態でホストマシン上で'app/my-app'内を修正すればビルドされます。
- パッケージを追加する
docker-compose run --rm --service-ports node ash -c "cd \$REACT_APP_NAME; yarn add package-name"Github Pagesが公開されない
github pagesへの反映には若干時間がかかるようですが、公開されない場合以下を試すと表示されることがありました。
リポジトリのSettingsのGithub Pagesで使用するブランチを指定できます。これを
- デフォルトのgh-pagesからmasterに変更
- masterからgh-pagesに戻す
を行うと公開されました。
リポジトリの解説
.github/workflows/main.yml
Github Actionsの設定ファイルです。
name: Build React APP

on:
  push:
    branches:
      - master

jobs:
  build:
    runs-on: ubuntu-latest
    steps:
    - uses: actions/checkout@v1
    - name: build app
      run: |
        docker-compose run --rm node ash -c 'cd $REACT_APP_NAME; npm install; yarn build; cp -rf build /usr/src/app/; ls;
    - uses: crazy-max/ghaction-github-pages@v1
      with:
        target_branch: gh-pages
        build_dir: app/build
      env:
        GITHUB_TOKEN: ${{ secrets.GITHUB_TOKEN }}
- masterブランチへのpushをトリガーとして動作します。
docker-compose run --rm node ash -c 'cd $REACT_APP_NAME; npm install; yarn build; cp -rf build /usr/ではReactのアプリケーションのbuildを行った後、buildディレクトリを/usr/src/app/(ホスト側の./appがマウントされている)にコピーしています。- ホスト側にコピーされた
./app/buildディレクトリをgh-pagesブランチにpushし、Github Pagesに公開されます。
- Github ActionsのMarket# これはなに?
- ReactをDockerで開発してGithub ActionsでGithub Pagesに自動で公開するReactアプリ開発用のテンプレートリポジトリ
Reactで開発をするときのオレオレな開発テンプレートリポジトリです。このリポジトリをReactアプリ開発の初期環境として使用することで、Dockerベースの開発環境が用意され、master branchにmergeされるとGithub Actionsが動きbuildとGithub Pagesへの公開が自動で行われます。
使い方
テンプレートリポジトリを
git cloneします。
※ forkした場合、Github Actionsが動作しない。git clone https://github.com/k8shiro/ReactGithubTemplateclone後、gitのremoteを自分のgithubのリポジトリのURLに変更します。
git remote set-url origin <自分のgithubのリポジトリのURL>この後はdevelopブランチで開発を行い、開発が終了したらmasterブランチにmergeしましょう
新しくReactアプリを作成する場合
既にサンプルのmy-appアプリが作成されているのでこれを削除し、以下のコマンドでcreate-react-appを実行します。
rm -rf app/my-app
docker-compose run --rm node sh -c "create-react-app new-my-app"
# new-my-appを自分のアプリ名に変える
docker-compose.ymlのenvironmentのREACT_APP_NAMEを自分のアプリ名に変更
version: "3"
services:
  node:
    build:
      context: ./app
    environment:
      - NODE_ENV=production
      - REACT_APP_NAME=my-app # ここのmy-appを修正
    volumes:
      - ./app:/usr/src/app
    ports:
      - "3000:3000"
また、app/my-app/package.jsonにhomepageを追加します。
{
  "homepage": ".", # ここを追加
  "name": "my-app",
  "version": "0.1.0",
  "private": true,
...
作成済みのアプリを動かす場合(初回のみ)
- packageのインストールが必要
docker-compose run --rm --service-ports node ash -c "cd \$REACT_APP_NAME; yarn install"アプリケーションの開発を行う
- 開発サーバーを立ち上げる
docker-compose run --rm --service-ports node ash -c "cd \$REACT_APP_NAME; yarn start"
- コードを修正する
この状態でホストマシン上で'app/my-app'内を修正すればビルドされます。
- パッケージを追加する
docker-compose run --rm --service-ports node ash -c "cd \$REACT_APP_NAME; yarn add package-name"Github Pagesが公開されない
github pagesへの反映には若干時間がかかるようですが、公開されない場合以下を試すと表示されることがありました。
リポジトリのSettingsのGithub Pagesで使用するブランチを指定できます。これを
- デフォルトのgh-pagesからmasterに変更
- masterからgh-pagesに戻す
を行うと公開されました。
リポジトリの解説
.github/workflows/main.yml
Github Actionsの設定ファイルです。
name: Build React APP

on:
  push:
    branches:
      - master

jobs:
  build:
    runs-on: ubuntu-latest
    steps:
    - uses: actions/checkout@v1
    - name: build app
      run: |
        docker-compose run --rm node ash -c 'cd $REACT_APP_NAME; npm install; yarn build; cp -rf build /usr/src/app/; ls;
    - uses: crazy-max/ghaction-github-pages@v1
      with:
        target_branch: gh-pages
        build_dir: app/build
      env:
        GITHUB_TOKEN: ${{ secrets.GITHUB_TOKEN }}
- masterブランチへのpushをトリガーとして動作します。
docker-compose run --rm node ash -c 'cd $REACT_APP_NAME; npm install; yarn build; cp -rf build /usr/ではReactのアプリケーションのbuildを行った後、buildディレクトリを/usr/src/app/(ホスト側の./appがマウントされている)にコピーしています。- ホスト側にコピーされた
./app/buildディレクトリをgh-pagesブランチにpushし、Github Pagesに公開されます。
- Github ActionsのMarketplaceで公開されているワークフローを使用(https://github.com/marketplace/actions/github-pages)
dockre-compose.yml
この環境ではReactアプリはDockerコンテナの内部で動作します。この時の基本的な設定はdocker-compose.ymlで管理しています。
version: "3"
services:
  node:
    build:
      context: ./app
    environment:
      - NODE_ENV=production
      - REACT_APP_NAME=my-app
    volumes:
      - ./app:/usr/src/app
    ports:
      - "3000:3000"
environmentでREACT_APP_NAMEをコンテナ内の環境変数で渡すことでdocker-compose runでReact APPにyarnコマンド等を実行するときに利用できるようにしています。