- 投稿日:2019-10-26T22:41:23+09:00
Unity フェードクラス設計
はじめに
ゲーム制作で必須のフェードクラスをまた作ったので忘れない用に記事にして残す
実装ソースコードはこちら要件
- シングルトンなアクセス
- フェードイン
- フェードアウト
- 秒指定
- 色指定
- フェード完了後にコールバック
- フェードアウト後にロードやオブジェクト破棄したいなどのため。
を満たす機能を作成する。
実装
- Awake内でCanvasを生成
- CanvasScalerを追加
- GraphicRayCasterを追加
void CreateCanvas()
    {
        //Canvasコンポーネント
        _canvas = gameObject.AddComponent<Canvas>();
        _canvas.renderMode = RenderMode.ScreenSpaceOverlay;
        _canvas.sortingOrder = sortingOrder;
        //CanvasScaler
        var scaler = gameObject.AddComponent<CanvasScaler>();
        scaler.uiScaleMode = CanvasScaler.ScaleMode.ScaleWithScreenSize;
        scaler.referenceResolution = new Vector2(Screen.width, Screen.height);

        //GraphicsRayCaster
        gameObject.AddComponent<GraphicRaycaster>();
    }
- Imageを追加するGameObjectを生成
- Imageコンポーネントを追加
- AnchorをMin(0.0f,0.0f)、Max(1.0f,1.0f)、Positionを(0.0f,0.0f)に設定
void CreateImage()
    {
        _fade = new GameObject("fadeImage", typeof(Image));
        _fade.transform.SetParent(transform);
        var rect = _fade.transform as RectTransform;
        Vector2 min = new Vector2(0.0f, 0.0f);
        Vector2 max = new Vector2(1.0f, 1.0f);
        rect.anchorMin = min;
        rect.anchorMax = max;
        rect.anchoredPosition = new Vector2(0.0f, 0.0f);
        rect.sizeDelta = new Vector2(0.0f, 0.0f);
        _fadeImage = _fade.GetComponent<Image>();
        _fadeImage.color = new Color(1.0f, 1.0f, 1.0f, 0.0f);
    }
- Updateでフェード処理実装
- Color.Lerpでフェード色を時間指定で補間させて取得
- 0.0秒以下の時点でフェード終了、コールバックがあれば呼び出し
- フェードインの場合はCanvas描画させているだけ無駄なのでenabled=falseにする
private void Update()
    {
        switch (_mode)
        {
            case Mode.Idle:
                break;
            case Mode.In:
                _fadeImage.color = Color.Lerp(_toColor, _fromColor, _elaps / _time);
                _elaps -= Time.deltaTime;
                if(_elaps < 0.0f)
                {
                    _fadeImage.color = _toColor;
                    _mode = Mode.Idle;
                    _canvas.enabled = false;
                    _action?.Invoke();
                }
                break;
            case Mode.Out:
                _fadeImage.color = Color.Lerp(_toColor, _fromColor, _elaps / _time);
                _elaps -= Time.deltaTime;
                if (_elaps < 0.0f)
                {
                    _fadeImage.color = _toColor;
                    _mode = Mode.Idle;
                    _action?.Invoke();
                }
                break;
            default:
                break;
        }
    }
おわりに
フェードをレイヤー分けて複数使いたい場合はSortingOrderを都度指定してあげればいいかと思っている。
フェードアウトするけどモノローグやセリフを表示させておきたい場合など。
- 投稿日:2019-10-26T20:22:29+09:00
【Unity(C#)】VR空間内で自分の腰にあるオブジェクトのUXを向上させる方法
VR空間内の自分の腰にあるオブジェクト
実際にユーザーからのフィードバックで多いのが、
腰にあるオブジェクトがわかりづらい(視認しづらい)という内容です。そのフィードバックを頂いた際の実装は、
カメラの位置から相対的に腰のオブジェクトの位置を固定していました。ただ、実空間の腰の位置と相違の無い位置へVR空間内で正確に固定した場合、
実空間での視野角とVR空間での視野角との差異に気付かずに、
腰のオブジェクトが視覚に入らない状態が続いてしまうことが多いようです。
単純に、腰のオブジェクトの位置を実空間の腰より少し前に出すだけで、
ある程度解決はするのですが、明らかに腰を見ていない場合においても
視界に入り込んでくるので違和感を生んでしまいます。
視線に応じて判定
解決策を結論から書くと、
視線に応じて腰のオブジェクトを前後させる です。このGIFのようなイメージです。わかり易いように少し大げさに動かしています。
下を見ると腰の赤いオブジェクトが前に出てきてます。
一人称視点はこのような感じです。
腰のオブジェクトが動いている感覚はほとんどありません。
実装には内積を利用しています。
図に示した二つのベクトルが正規化されていた場合、
内積の返す値はcosΘの値そのものとなります。なので、自分で閾値を設定して、
例えば、80°以下になったら前に出てくる、、、などとすればよいのでは?と考えました。コード
今回のコードはVIVEでしか試してないですが、
階層構造を同様に再現すればQuestでも問題ないかと思います。using UnityEngine; /// <summary> /// 階層構造 /// Camera /// ┗ Waist -----ここにアタッチ /// ┗ WaistObj /// </summary> public class WaistObjAdjuster: MonoBehaviour { [SerializeField, Header("下を見ると腰のオブジェクトが前に飛び出る")] GameObject m_waistObj; [SerializeField, Header("どれくらい前に出てくるのか")] float m_maxComeOutValue = 0.5f; [SerializeField] public enum WAISTSIDE { LEFT, RIGHT } [SerializeField, Header("左腰or右腰")] WAISTSIDE m_waistSide = WAISTSIDE.LEFT; Vector3 waistObjLocalPos; //定位置に戻る速度 float m_moveSpeedAdjust = 10f; //腰との間隔 float m_waistObjSpace = 0.2f; //視線判定の閾値 float m_thresholdDot = -0.1f; void Start() { SetWaistObjSide(m_waistSide); } //腰のオブジェクトをどちら側で固定するか public void SetWaistObjSide(WAISTSIDE waistSide) { waistObjLocalPos = m_waistObj.transform.localPosition; m_waistSide = waistSide; if (m_waistSide == WAISTSIDE.LEFT) { m_waistObj.transform.localPosition = new Vector3(-m_waistObjSpace, waistObjLocalPos.y, waistObjLocalPos.z); } else { m_waistObj.transform.localPosition = new Vector3(m_waistObjSpace, waistObjLocalPos.y, waistObjLocalPos.z); } } void Update() { //角度の制限 Quaternion waistRotation = this.gameObject.transform.parent.transform.rotation; waistRotation.z = 0; waistRotation.x = 0; this.gameObject.transform.rotation = waistRotation; //腰の位置の固定 0.5fは個人的にベストと感じた腰の位置 Vector3 cameraPos = this.gameObject.transform.parent.position; this.gameObject.transform.position = new Vector3(cameraPos.x, cameraPos.y-0.5f, cameraPos.z); //顔面→腰のオブジェクト 、 顔面→顔面の正面 の内積 > 閾値 ) ---> 前へ出てくる float dot = Vector3.Dot(Vector3.down, this.gameObject.transform.parent.transform.forward); waistObjLocalPos = m_waistObj.transform.localPosition; if (dot > m_thresholdDot) { float bendedValue = Mathf.Lerp(waistObjLocalPos.z, m_maxComeOutValue, Mathf.Clamp01(dot)/ m_moveSpeedAdjust); waistObjLocalPos.z = bendedValue; m_waistObj.transform.localPosition = waistObjLocalPos; } else { float bendedValue = Mathf.Lerp(waistObjLocalPos.z, 0, Mathf.Clamp01(Mathf.Abs(dot))/ m_moveSpeedAdjust); waistObjLocalPos.z = bendedValue; m_waistObj.transform.localPosition = waistObjLocalPos; } } }カメラの位置から相対的に腰のオブジェクトの位置を固定
これが結構、頭こんがらがりました。
何がしたいかをもう少し具体的に言うと、
カメラ(プレーヤー)がどこを見ようと、どこに移動しようと、腰の位置にオブジェクトがある
という状態を作るということです。ただ、子にするだけでは、カメラのローテーションに追従して
腰ではない明後日の方向にオブジェクトが移動してしまいます。なので、Y軸方向の回転だけカメラに追従する、腰の役割を果たすオブジェクト
を間に挟むことにしました。//角度の制限 Quaternion waistRotation = this.gameObject.transform.parent.transform.rotation; waistRotation.z = 0; waistRotation.x = 0; this.gameObject.transform.rotation = waistRotation;
また、腰の役割を果たすオブジェクトを間に挟むことで、腰の役割を切り離すことに成功し、
子に設定したオブジェクトはその役割を意識せずに
自由に操作できるというメリットも生まれています。
2019/10/28 追記
子に設定したオブジェクトはその役割を意識せずに自由に操作できる
これがどうやら上手くいってませんでした。
というのも、親子関係を解除した場合でも、結局 Inspectorでアタッチしたオブジェクトを参照しているので
腰の動きに連動して動いてしまいました。何が問題かというと、掴んで自由に動かす...などの際に、
該当する制御スクリプトを毎回オンオフしないと腰の制御するクリプトと連動してしまい、おかしな挙動になります。それではあまりスマートではないので親子関係で参照するスクリプトに変更したバージョンを下記に用意しました。
※掴むの実装が掴んだオブジェクトを手の子にするなどの実装である必要がありますが。。。using UnityEngine; /// <summary> /// 階層構造 /// Camera /// ┗Waist -----ここにアタッチ /// ┗WaistObj /// </summary> public class WaistObjRestriction : MonoBehaviour { // [SerializeField, Header("下を見ると腰のオブジェクトが前に飛び出る")] GameObject m_waistObj; [SerializeField, Header("どれくらい前に出てくるのか")] float m_maxComeOutValue = 0.5f; [SerializeField] public enum WAISTSIDE { LEFT, RIGHT } [SerializeField, Header("左腰or右腰")] WAISTSIDE m_waistSide = WAISTSIDE.LEFT; Vector3 waistObjLocalPos; //定位置に戻る速度 float m_moveSpeedAdjust = 10f; //腰との間隔 float m_waistObjSpace = 0.2f; //視線判定の閾値 float m_thresholdDot = -0.1f; //腰とカメラの距離 float m_waistHeight = 0.5f; void Start() { ChangeWaistObjSide(m_waistSide); } //腰のオブジェクトをどちら側で固定するか public void ChangeWaistObjSide(WAISTSIDE waistSide) { if (CheckChild() == false) return; waistObjLocalPos = m_waistObj.transform.localPosition; m_waistSide = waistSide; if (m_waistSide == WAISTSIDE.LEFT) { m_waistObj.transform.localPosition = new Vector3(-m_waistObjSpace, waistObjLocalPos.y, waistObjLocalPos.z); } else { m_waistObj.transform.localPosition = new Vector3(m_waistObjSpace, waistObjLocalPos.y, waistObjLocalPos.z); } } //子が存在するか bool CheckChild() { if (this.gameObject.transform.childCount > 0) { m_waistObj = this.gameObject.transform.GetChild(0).gameObject; return true; } else { m_waistObj = null; return false; } } void Update() { //角度の制限 Quaternion waistRotation = this.gameObject.transform.parent.transform.rotation; waistRotation.z = 0; waistRotation.x = 0; this.gameObject.transform.rotation = waistRotation; //腰の位置の固定 Vector3 cameraPos = this.gameObject.transform.parent.position; this.gameObject.transform.position = new Vector3(cameraPos.x, cameraPos.y - m_waistHeight, cameraPos.z); //子が存在していたら腰のオブジェクトとして認識 if (CheckChild() == false) return; //顔面→腰のオブジェクト 、 顔面→顔面の正面 の内積 > 閾値 ) ---> 前へ出てくる float dot = Vector3.Dot(Vector3.down, this.gameObject.transform.parent.transform.forward); waistObjLocalPos = m_waistObj.transform.localPosition; if (dot > m_thresholdDot) { float bendedValue = Mathf.Lerp(waistObjLocalPos.z, m_maxComeOutValue, Mathf.Clamp01(dot) / m_moveSpeedAdjust); waistObjLocalPos.z = bendedValue; m_waistObj.transform.localPosition = waistObjLocalPos; } else { float bendedValue = Mathf.Lerp(waistObjLocalPos.z, 0, Mathf.Clamp01(Mathf.Abs(dot)) / m_moveSpeedAdjust); waistObjLocalPos.z = bendedValue; m_waistObj.transform.localPosition = waistObjLocalPos; } } }
おもな変更点としては、子のオブジェクトが存在しているかどうかの判定を行ったことです。
    //子が存在するか
    bool CheckChild()
    {
        if (this.gameObject.transform.childCount > 0)
        {
            m_waistObj = this.gameObject.transform.GetChild(0).gameObject;
            return true;
        }
        else
        {
            m_waistObj = null;
            return false;
        }
    }
なので、腰に複数のオブジェクトをじゃらじゃらさせたい場合は、下記のように腰ごと増やします。
Camera
    ┗Waist
     ┗WaistObj1
    ┗Waist
     ┗WaistObj2
まとめ
毎回設定するのが面倒なので、
腰のオブジェクトの位置はスクリプトで制御されるようになってます。
右腰なのか左腰なのかどうかもスクリプトで一撃で変えられるようにしました。今回の実装は
現実空間とVR空間の視野角の差による矛盾に慣れていないVR初心者への対策
として実装しましたが、単純にユーザビリティー向上という意味合いで考えれば、
VRヘビーユーザー向けにも検討される要素の一つではないかと感じました。


- 投稿日:2019-10-26T18:51:51+09:00
UnityAds導入備忘録
はじめに
これは最近UnityAdsを触って導入に手間取ったのでいろいろと忘れないようの備忘録です。
サンプルコードなどはないので詳しくは
Unity公式Adsドキュメント
を参考にしてください。何に困ったか
公式のドキュメントには最初にAsset StoreからUnity Monetizationをインストールしてください(Unity Adsアセット)と書かれていたので素直にインストールしたところ重複するファイルがあるというエラーが起き,フォーラムを見ると同様のエラーが起きていて解決策もよくわからなかった。
何が原因だったのか
Unity2018.1~ 本格的にPackageManagerに導入されこれがデフォルトでインストール(いつのバージョンからデフォルトになったかは検証なし)されているためAsset Storeからインストールするといくつかのファイルが重複しエラーが起きるという物でした。今回私が使ったのはUnity2018.3.0でしたのでこのエラーが起きたようです。これ公式のフォーラムの回答にも重複しますまで書いてあるので早くマニュアル直して欲しいです。
解決方法
ここまで読めばそれはそうなんですが私はPackage Managerの方をremoveしてアセットストアの方を入れ直したら直りました。ゴリ押しです。
上のリンクから公式のコードをはっつければデモ広告表示ができるようになるので是非試してみてください。
- 投稿日:2019-10-26T15:02:34+09:00
【Unityビルドエラー対処】Missing Project ID / Package Name has not been set up correctly
自己紹介
全地球6億人のロボカッケー皆さんコンバトラー†[□ □]■━
私は王国騎士ロボットVTuberのKoshiだ??(@Koshi_VTuber)
王国で騎士を勤めており、闇の組織から王国の平和を守っている!
最近はUnityゲーム王国で3Dモデル、ゲームの制作中だ。
じゃあ早速教えていこうか!使用環境:
macOS Mojave
Unity 5.6.1 / Unity 5.6.7 / Unity 2017.1.0 / Unity 2017.4.28 / Unity 2019.1.0f2【問題】 UnityでAndroidアプリ(apkファイル)をBuildする時のビルドエラー
【問題1】 Missing Project ID
(英語)
Missing Project ID
Because you are not a member of this project this build will not access Unity services. Do you want to continue?
(日本語訳)
プロジェクトIDがありません
このプロジェクトのメンバーではないため、このビルドはUnityサービスにアクセスしません。
続けたいですか?【問題2】 Unable to access Unity service.
(英語)
Unable to access Unity service. Please log in, or request membership to this project to use these services.
(日本語訳)
Unityサービスにアクセスできません。これらのサービスを使用するには、ログインするか、このプロジェクトのメンバーシップをリクエストしてください。【問題1】 【問題2】解決法
赤枠の雲(クラウド)マークをクリック
Servicesウィンドウが開くので、「New Link」をクリック
「Select Organization」をクリック
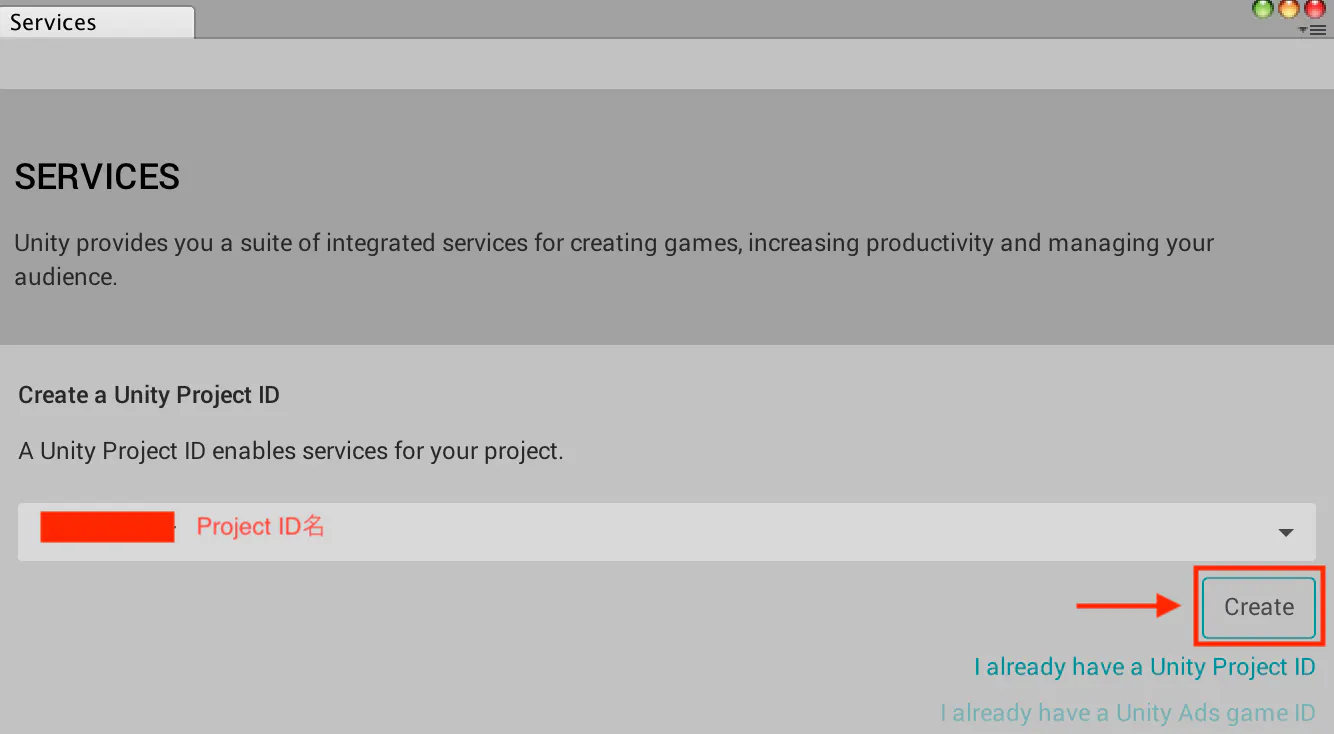
Project ID名を選択したら、「Create」をクリック
現在のプロジェクトがProject IDと接続されたみたいなので、完了です。
渓谷の表示がなくなる。
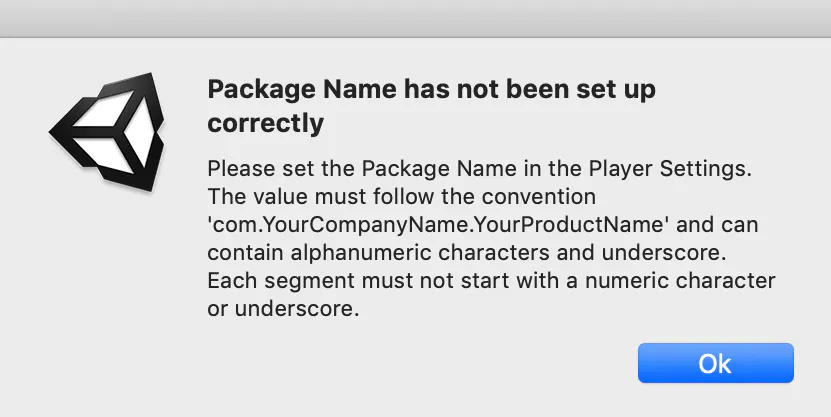
【問題3】 Package Name has not been set up correctly
(英語)
Package Name has not been set up correctly
Please set the Package Name in the Player Settings. The value must follow the convention 'com.YourCompanyName.YourProductName' and can contain alphanumeric characters and underscore.
Each segment must not start with a numeric character or underscore.(日本語訳)
パッケージ名が正しく設定されていません
プレーヤー設定でパッケージ名を設定してください。値は「com.YourCompanyName.YourProductName」の規則に従う必要があり、英数字とアンダースコアを含めることができます。各セグメントは、数字またはアンダースコアで始まってはなりません。【問題3】解決法
Package Name の先頭の文字が数字だったので、他の文字に変更する。
例 3DMazeAI → Maze3DAI
同様にProduct Name の先頭の文字が数字だったので、他の文字に変更する。
例 3DMazeAI → Maze3DAI
Keystoreの方も、先頭の文字を数字にしない方が得策だろう。
以上、Unity王国騎士ロボットVTuber Koshiがお送りしました!
私のステータスだ⚔共にこの世界を救おう
Twitter⚔ twitter.com/Koshi_Vtuber
YouTube⚔ t.co/I9eMMgpS8P?amp=1
niconico⚔ nicovideo.jp/user/90553212
bilibili⚔ space.bilibili.com/476988586
公式HP⚔ koshi-4092b.firebaseapp.com参考
【Unity】「Missing Project ID」のメッセージが出る場合の対処法
https://qiita.com/nonkapibara/items/808834465b6d0157cfc6


- 投稿日:2019-10-26T15:02:18+09:00
ROLL-A-BALL TUTORIAL #8
A barrier and restart
We try to add a new rule. New rules are as follows.
The player becomes game over when the player touches the wall where the player should not touch.The necessary elements are as bellow.
1. Create the wall.
2. Create an event when the player touched the wall.
3. Reload a scene when the player touched the wall.1. Create the wall
We create a wall where player should not touch.
1-1. Create the Danger Wall Prefab.
- Click the “Create” button in the “Hierarchy” view.
- Select “3D Object” -> “Cube”.
- Set the object name as “Danger Wall”.
- Set “Danger Wall” object to “Prefab” folder.
1-2. Set the color of “Danger Wall”.
“Danger Wall” is dangerous. We want to make it look like danger.
Therefore we set the color of the wall as a “lighting wall”.
- Click the “Create” button in the Project Browser.
- Select “Material” to create “DangerWallMaterial”.
- Set the color in the “Inspector” view. It is as follows. (Set “Albedo” to red color, Set “Emission” to “1.5” as red color)
- Drag-and-drop “DangerWallMaterial” onto “DangerWall” object in the “HIerarchy” view.
- Click the “Apply” button to renew the “DangerWall” prefab.
1-3. Put “DangerWall”.
Put some “DangerWall” in the place where you want to put it.
But don’t put the wall on the item, because the player is not able to complete the game.For example, put the wall like this…
- Put three walls at the scene.
- Put each wall. It is as follows.
- DangerWall 1
position (x:4, y:0.5, z:3) rotation (x:0, y:0, z:0) scale(x:10, y:1, z:1)
- DangerWall 2
position (x:4, y:0.5, z:-4) rotation (x:0, y:0, z:0) scale(x:10, y:1, z:1)
- DangerWall 3
position (x:-5, y:0.5, z:4) rotation (x:0, y:90, z:0) scale(x:10, y:1, z:1)
1-4. Clean up “DangerWall” and change to static.
We clean up all “DangerWall” by using the “DangerWalls” object.
And “DangerWall” objects that does not move, therefore lock a place of the wall by using “static”.
- Click the “Create” button in the “Hierarchy” view.
- Select “Create Empty” to change the name of the created object to “DangerWalls”.
- Drag-and-drop all “DangerWall” object onto “DangerWalls”. It makes a parent-child relation.
- Check the box of “static” of “DangerWalls”.
1-5. Turn down the intensity of sunlight.
We turn down the intensity of sunlight. Because it is hard to see the wall.
- Select “DirectionalLight” in the “Hierarchy” view.
- Set the value of “Intensity” of the “Light” component in the “Inspector” view as “0.7”.
2. Set a judgment function that touched the wall.
We create the function that reboots the scene when the player touches the wall.
- Select “DangerWall” in the “Hierarchy” view.
- Click the “Add Component” button in the “Inspector” view.
- Select “New Script” to create the “DangerWall” component.
- Click “Apply” to reflect in all prefab.
3. Update script.
We set a call-back that receives “touched the wall” judgment.
- Open “DangerWall.cs” by “Monodeveop”.
- Change source code. It is as follows.
DangerWall.csusing UnityEngine; using System.Collections; public class DangerWall : MonoBehaviour { // call-back that called when player touched the object void OnCollisionEnter (Collision hit) { // program } }3-1. Reloading the scene.
Reloading the scene when the player touches the object that has a player tag.
- Open “DangerWall.cs” again by “Monodeveop”.
- Change source code. It is as follows.
DangerWall.csusing UnityEngine; using System.Collections; using UnityEngine.SceneManagement; public class DangerWall : MonoBehaviour { // call-back that called when player touched the object void OnCollisionEnter (Collision hit) { // when tag of object that touched the wall is “Player”. if (hit.gameObject.CompareTag ("Player")) { // get the number of current scene. int sceneIndex = SceneManager.GetActiveScene().buildIndex; // Reloading the current scene. SceneManager.LoadScene(sceneIndex); } }Try to play the game.
※ Unity5.3 may occur a bug that becomes dark when loading the current scene.
When occurring this trouble, try the following process.
1. Select “menu” -> “Window” -> “Lighting”.
2. Uncheck the checkbox of “auto”.
3. Click the “Build” button.Done!!!


- 投稿日:2019-10-26T14:43:58+09:00
ROLL-A-BALL TUTORIAL #7
Add end of the game
We add conditions for the end of the game.
So we should add the function.
It is the function that displays “YOU WIN” on the screen when the game player collects all items in the game.The necessary elements to realize the function is as follows.
1. A word to mean the end of the game.
2. A judgment that finish collecting all item.1. Make a UI of end of the game
1-1. Make label.
At first, we make a UI at end of the game.
- Click the “Create” button in the “Hierarchy” view.
- Select “UI” -> “Text”.
- Change the name of “Text” into “WinnerLabel” in the Inspector view.
1-2. Set the value of the label.
Next, we set the value of the “WinnerLabel” object.
1. Select “WinnerLabel” object in “Hierarchy” view.
2. Set the value of “RectTransform” in the “Inspector” view. It is as follows.
(PosX:0, PosY:0, Width:300, Height:100)
3. Change “Text” into “YOU WIN” in the Text component.
4. Set “FontSize” into “60” in the Text component.
2. Set conditions for the end of the game
We set conditions in Game Controller.
The game player finishes collecting all items. It is the conditions of victory of the game.
Therefore, the game player wins if the number of items becomes Zero.
- Double click “GameController.cs” in Project browser to boot “Monodevelop”.
- Change source code. It is as follows.
GameController.csusing UnityEngine; using System.Collections; public class GameController : MonoBehaviour { public UnityEngine.UI.Text scoreLabel; public void Update () { int count = GameObject.FindGameObjectsWithTag ("Item").Length; scoreLabel.text = count.ToString (); if (count == 0) { // program when game player wins. } } }3. Display Label when the game finished
We display “YOU WIN” on the screen when the player completes the game.
3-1. Set referring from “GameController” to “WinnerLabel”.
- Open “GameController.cs” by “Monodevelop”.
- Change source code. It is as follows.
GameController.csusing UnityEngine; using System.Collections; public class GameController : MonoBehaviour { public UnityEngine.UI.Text scoreLabel; public GameObject winnerLabelObject; public void Update () { int count = GameObject.FindGameObjectsWithTag ("Item").Length; scoreLabel.text = count.ToString (); if (count == 0) { // program when game player wins. } } }After change source code, return to Unity Editor.
We set referring from “GameController” to “WinnerLabel”.
- Select “GameController” in the “Hierarchy” view.
- Drag-and-drop “WinnerLabel” of “Hierarchy” view onto “winner Label Object” of the GameController component of the “Inspector” view.
3-2. Hide object of “YOU WIN”.
We can hide the object in several ways.
This time, we choose the way to deactivate Object.
- Select “WinnerLabel” in the “Hierarchy” view.
- Uncheck the object in the “Inspector” view.
3-3. Display Label when the game finished.
We change the status of “WinnerLabel” from inactivity to activity.
Change source code. It is as follows.GameController.csusing UnityEngine; using System.Collections; public class GameController : MonoBehaviour { public UnityEngine.UI.Text scoreLabel; public GameObject winnerLabelObject; public void Update () { int count = GameObject.FindGameObjectsWithTag ("Item").Length; scoreLabel.text = count.ToString (); if (count == 0) { // Change status of object to active. winnerLabelObject.SetActive (true); } } }4. Play the game
Let’s try to play the game.
Game player collect an item, and finally "YOU WIN" appears on the screen.


- 投稿日:2019-10-26T14:29:58+09:00
ROLL-A-BALL TUTORIAL #6
Adding UI of this game
We add UI of this game. It is a very simple function. it is only “Display the number of remaining items” It has the following function.
1. Count the number of remaining items.
2. Display items by UI
1. Preparing UI of displaying “the number of remaining items”.
At first, Let’s create the UI. Simply, We create a UI that displays the number of remaining items in the bottom left on the screen.
1-1. Set the “Canvas”
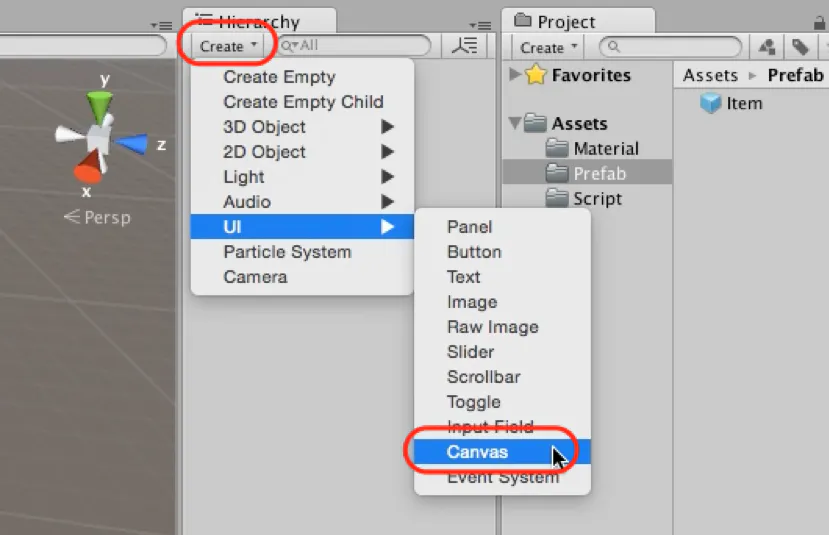
At first, We create “Canvas” that displays UI.
1. Click the “Create” of the “Hierarchy” view.
2. Click “UI → Canvas”.
Set the supposed size for the “Canvas”.
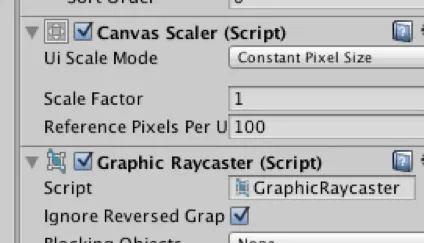
1. Click the “Canvas” object in “Hierarchy” view.
2. Set the "UI Scale Mode" to "Scale With Screen Size" in Canvas Scaler.
1-2. Set the “Text”
Next, we create the text.
- Click the “Canvas” object in “Hierarchy” view.
- Click “UI → Text”.
- Rename the created Canvas> Text object as ScoreLabel in the Inspector view.
You can be seeing “Text”.
Move the “Text” to the center and adjust the font size.
- Click the “Canvas>ScoreLabel” object in “Hierarchy” view.
- Set the value of “Rect Transform” to the following. (PosX : -230, PosY : -230, Width : 300, Height : 100)
- Set “Font Size” of “Text” to “60”.
- Set “Text” of “Text” to “0”.
2. Create the “Game Controller”
Next, we create a system to notify the “ScoreLabel” that created “the number of remaining Items”.
There are many ways to implement this system, but this time we create it by simplist way that “GameController” manages. And in Unity "GameController" should manage to the progress of the entire game such as the number of items. This "GameController" counts “the number of remaining Items” and has a system to notify if it is changing.
Let’s create this "GameController".
- Click the “Create” of the “Hierarchy” view.
- Click the “Create Empty”.
- Rename the created object name to “GameController”.
- Change the “Tag” to “GameController”.
3. Preparation for counting the items.
3-1. Set the “Tag”.
We set the "Item" tag to "Item" object and count the number of object that has this tag.
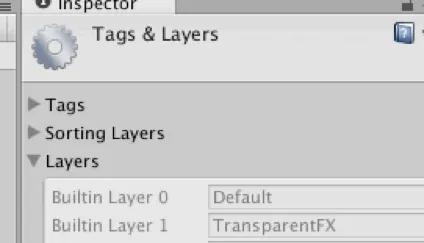
- Click the “menu bar> Edit > Project Setting > Tags And Layers”
- Open the “Tags” menu in the “Inspector”.
- Open the tags by clicking the “+” button.
- Rename “New Tag” to “Item”.
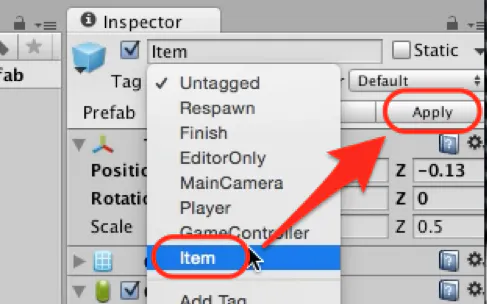
3-2. Set "Item" tag to "Item" object
We set the "Item" tag. “Item” tag was added to the list because registered the Item tag already.
- Click the "Item" object of the “Hierarchy” view.
- Change the “Tag” to “Item” on the “Inspector” view.
- Click the “Apply” button and update “Prefab”.
3-3. Add a function to count “Item” in “GameController”.
At first, we create “GameController”.
- Click the “GameController” on the “Hierarchy” view.
- Click the “Add Component” on the “Inspector” view.
- Click the “NewScript” and create “GameController”.
Write the following code in the “GameController”.
Item.csusing UnityEngine; using System.Collections; public class GameController : MonoBehaviour { public void Update () { int count = GameObject.FindGameObjectsWithTag ("Item").Length; }3-4. Display the number of remaining items.
We modify to display a number of remaining items to created UI.
At first, we think the way to connect “Text” and “GameController” Uses a way to set a reference to the ”Text” by the source code.
Create a variable for reference.Text.csusing UnityEngine; using System.Collections; public class GameController : MonoBehaviour { public void Update () { int count = GameObject.FindGameObjectsWithTag ("Item").Length; }Next Assign number of got Item to "Text".
Text.csusing UnityEngine; using System.Collections; public class GameController : MonoBehaviour { public UnityEngine.UI.Text scoreLabel; public void Update () { int count = GameObject.FindGameObjectsWithTag ("Item").Length; scoreLabel.text = count.ToString (); } }4. Connect "GameController" and "ScoreLabel".
Finally, we connect "GameController" and "ScoreLabel".
1. Click the “GameController” on the “Hierarchy” view.
2. Drag and drop the “Canvas> ScoreLabel” object to the “ScoreLabel”.
Let’s start the game again. When playing the game, “the number of remaining items” is displayed in the bottom left and you can see that the remaining number decreases each time you get the item.


- 投稿日:2019-10-26T14:07:23+09:00
ROLL-A-BALL TUTORIAL #5
Adding the function of deleting the item
We add function of deleting the item in the game. The function is "Items disappear when the player touches items placed on the stage". It has the following function.
1. Create many items
2. Detect when the player touches item
3. Delete touching item1. Create an object
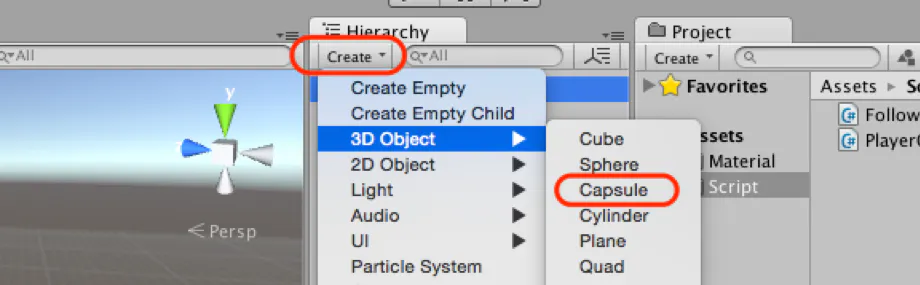
At first, it creates an object that is a source of the item.
1. Click the “Create” of the “Hierarchy” view.
2. Click “3D Object → Capsule”.
3. Change a name into “Item” in the created Capsule.
Change position and scale for the “Item”.
- Position(x: 0, y: 1, z: 0)
- Scale(x: 0.5, y: 0.5, z: 0.5)
2. Create an object
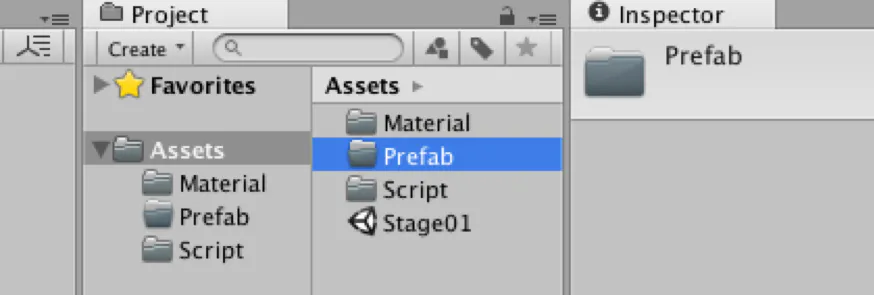
We write out the object construction information as “Prefab” so that we can produce this created “Item” easily. Let's create a folder for “Item” and store prefab there.
1. Click the “Create” in the “Project” view.
2. Edit folder name to “Prefab”.
We write out the “Item” as “Prefab”. It is successful if the "Item" object changes the blue icon.
1. Select the “Item” in the “Hierarchy” view.
2. Drag and drop the “Item” object to the “Prefab” folder of the “Project” view.
3. Place the "Item" object
We place the created item into the "Scene".
1. Select “Item” in the "Prefab" folder of the "Project" view.
2. Drag and drop it onto the "Scene" view.The object that was set up was placed in the "Scene" view. We will place items in a circle.
4. Contact judgment between “Player” and “Item”
Add contact judgment into Item. This function isn't a standard feature. We need to add a new component.
1. Select the "Item" object of the "Hierarchy" view.
2. Select “Add Component → New Script” of the “Inspector” view.
3. Change a name into "Item" and Click a "Create and Add" button.At first, check the usable contact judgment call-back from API of Monobehaviour. This time, we add "OnTriiggerEnter" of contact judgment API. "OnTriiggerEnter" judgment only triggers. We add call-back in “Item.cs”.
Item.csusing UnityEngine; using System.Collections; public class Item : MonoBehaviour { // The call-back of contact trigger void OnTriggerEnter (Collider hit) { } }5. Change Item's contact judgment into the trigger
Since the judgment was set to Trigger, contact judgment must also be set to Trigger. Set Collider setting of Item to Trigger.
1. Select the "Item" object of the "Hierarchy" view.
2. Check “IsTrigger” of “CapsuleCollider” Component of the “Inspector” view.
6. Contact judgment with “Player”
It has become possible to make contact judgment with Trigger. However, we want to do the judgment with "Player" only.
There are several ideas. This time, we'll make it "check tag". The augment of OnTriggerEnter, "hit" contains the contact target information. Check this tag that contacted anything, and modify the "Item" component as follows to do special processing if it is "Player".Item.csusing UnityEngine; using System.Collections; public class Item : MonoBehaviour { // Call-back called upon trigger of contact void OnTriggerEnter (Collider hit) { // Is the contact target “Player” tag? if (hit.CompareTag ("Player")) { // Do some processing } } }7. Set tag on “Player”
Also, set the "Player" object. Since we wrote the process of ‘When in contact with an object that has "Player tag"’, we also need the "Player tag" for the "Player" object.
1. Select the "Player" object of the "Hierarchy" view.
2. Change tag of "Inspector" view to "Player".
8. Delete Item at contact judgment
Set to delete objects when touching. Use the Destroy method to delete it.
Destroy is a method to delete an object. The object specified by the method will be deleted and disappear from the game.Item.csusing UnityEngine; using System.Collections; public class Item : MonoBehaviour { // Call-back called upon trigger of contact void OnTriggerEnter (Collider hit) { // Is the contact target “Player” tag? if (hit.CompareTag ("Player")) { // Destroy the GameObject with this component Destroy(gameObject); } }This will destroy the “Item” object when contact “Player”.
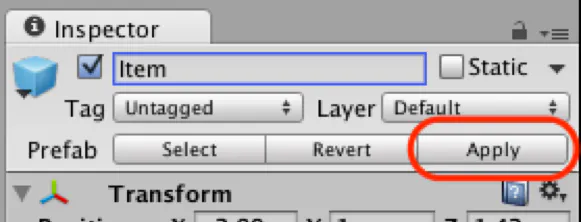
9. Update “Prefab”
Currently, only the "Item" object that has been set up will delete. Then update the value of "Prefab" so that the object placed as "Prefab" has the same setup as well.
1. Select the "Item" object of the "Hierarchy" view.
2. Click the “Apply” button of the “Inspector” view.
10. Organize “Item”
Finally, we will organize the items. The process is the same as setting the Stage. However, the item isn't a static object. We don't check "Static".
1. Click the “Create” in the “Hierarchy” view.
2. Select “Create Empty”.
3. Change a name into “Items”.
4. Select all the created "Item" objects and drag and drop to the "Items" object.


- 投稿日:2019-10-26T13:44:32+09:00
ROLL-A-BALL TUTORIAL #4
Way to move the camera
1. Create a component which traces “Player”
It creates a component which trace “Player”. This component has some function following.
- Get the position of “Player”.
- Adjust a coordinate of the Player’s position every frame.
So, at first, it creates the “Follow Player” component. Then add “Main Camera” to it.
- Select “Main Camera” in Hierarchy View.
- Click the “Add Component” button in Inspector View.
- Select “New Script” and add “Follow Player”.
- Move “FollowPlayer.cs”, is under Assets, to Assets/Script folder in Project Browser.
Next, double click “FollowPlayer” to invoke code editor.
2. Way to trace player
It makes tracing function from getting an object’s position. Write a source code below in “FollowPlayer.cs”.
FollowPlayer.csusing UnityEngine; using System.Collections; public class FollowPlayer : MonoBehaviour { public Transform target; // Reference to target void Update () { // set target’s position to oneself GetComponent<Transform>().position = target.position; } }Look component of “Main Camera” and confirm what add term of target in “Follow Player”. Drag & drop “Player” onto this term.
Let’s start the game. Game View shows a view like the below picture as FPS.
3. Set offset to a component
Change a camera point like TPS that have an appropriate distance to ball. So, add a function which maintains the distance between “Player” and “Main Camera” when starting the game. The function is created by below sub-functions.
- Get a relative distance between “Player” and “Main Camera” when starting the game.
- Set the position of the camera to “Player’s position + relative distance” every frame.
At first, Set the position and rotation to “Main Camera” like a below picture.
Next, Change a source code.
FollowPlayer.csusing UnityEngine; using System.Collections; public class FollowPlayer : MonoBehaviour { public Transform target; // Reference to target private Vector3 offset; // relative distance void Start () { // Get relative distance between “Player” and “Main Camera” offset = GetComponent<Transform>().position - target.position; } void Update () { // Set “Player’s position + relative distance” to oneself GetComponent<Transform>().position = target.position + offset; }Let's play the game.


