- 投稿日:2019-10-26T23:28:30+09:00
UTF-8風の可変長な整数の符号化方法をPythonで実装する
Rubyの中間表現では、こんなのが使われているようです。
2. 整数値の符号化方法を変更
また、出力に含まれていたあらゆる整数値はほぼすべてが固定長で符号化され、4byteや8byteのデータ長で出力されていました。 しかし、出力される整数値はその出現頻度に大きな偏りがあり、多くが 0 や 1 などの少ないbit数で表現できる値です。 そこで、UTF-8を参考に可変長な整数の符号化方法を考え、導入することにしました。
0x0000000000000000 - 0x000000000000007f: 1byte | XXXXXXX1 |
0x0000000000000080 - 0x0000000000003fff: 2byte | XXXXXX10 | XXXXXXXX |
0x0000000000004000 - 0x00000000001fffff: 3byte | XXXXX100 | XXXXXXXX | XXXXXXXX |
0x0000000000020000 - 0x000000000fffffff: 4byte | XXXX1000 | XXXXXXXX | XXXXXXXX | XXXXXXXX |
...
0x0001000000000000 - 0x00ffffffffffffff: 8byte | 10000000 | XXXXXXXX | XXXXXXXX | XXXXXXXX | XXXXXXXX | XXXXXXXX | XXXXXXXX | XXXXXXXX |
0x0100000000000000 - 0xffffffffffffffff: 9byte | 00000000 | XXXXXXXX | XXXXXXXX | XXXXXXXX | XXXXXXXX | XXXXXXXX | XXXXXXXX | XXXXXXXX | XXXXXXXX |
この方法では、7bitで十分に表現できる値は1byteに、14bitで表現できる値は2byteに、というように符号化する整数の大きさによって必要なバイト長を変化させています。
Ruby中間表現のバイナリ出力を改善する - クックパッド開発者ブログ
https://techlife.cookpad.com/Pythonでこれを実装してみましょう。
実装してみた
実装してみました。
書きやすさ優先で、Rubyのと若干仕様を変えています。
なお、(言うまでもなく)Python標準の数値演算は遅いので、今回のコードはあまり実用的ではないでしょう。
'''
Variable width bytes representation of uint64_t.

Inspired by Ruby interpreter。
https://techlife.cookpad.com/entry/2019/09/26/143000

> 0x0000000000000000 - 0x000000000000007f: 1byte  | 1XXXXXXX |
> 0x0000000000000080 - 0x0000000000003fff: 2bytes | 01XXXXXX | XXXXXXXX |
> 0x0000000000004000 - 0x00000000001fffff: 3bytes | 001XXXXX | XXXXXXXX | XXXXXXXX |
> 0x0000000000020000 - 0x000000000fffffff: 4bytes | 0001XXXX | XXXXXXXX | XXXXXXXX | XXXXXXXX |
> ...
> 0x0001000000000000 - 0x00ffffffffffffff: 8bytes | 00000001 | XXXXXXXX | XXXXXXXX | XXXXXXXX | XXXXXXXX | XXXXXXXX | XXXXXXXX | XXXXXXXX |
> 0x0100000000000000 - 0xffffffffffffffff: 9bytes | 00000000 | XXXXXXXX | XXXXXXXX | XXXXXXXX | XXXXXXXX | XXXXXXXX | XXXXXXXX | XXXXXXXX | XXXXXXXX |
'''

from typing import List, Tuple


def pack(n: int) -> bytes:
    if n < 0:
        raise ValueError("negative number is not supported")
    l = n.bit_length()
    if l > 64:
        raise ValueError("too large")
    s = (l - 1) // 7 + 1
    if s > 8:
        return b"\0" + n.to_bytes(8, "big")
    else:
        packed = bytearray(n.to_bytes(s, "big"))
        packed[0] = packed[0] | (0x100 >> s)
        return bytes(packed)


def unpack(packed: bytes) -> Tuple[int, int]:
    size = 8 - packed[0].bit_length()
    b = bytearray(packed[:size])
    b[0] = packed[0] & (0xFF >> size)
    return int.from_bytes(b, "big"), size


def test():
    cases = [
        (1, 0b10000001 .to_bytes(1, "big")),
        (0b01111111, 0b11111111 .to_bytes(1, "big")),
        (0b00111111_11111111, 0b01111111_11111111 .to_bytes(2, "big")),
        (
            0b00000000_11111111_11111111_11111111_11111111_11111111_11111111_11111111,
            0b00000001_11111111_11111111_11111111_11111111_11111111_11111111_11111111 .to_bytes(
                8, "big"
            ),
        ),
        (
            0b00000000_11111111_11111111_11111111_11111111_11111111_11111111_11111111_11111111,
            0b00000000_11111111_11111111_11111111_11111111_11111111_11111111_11111111_11111111 .to_bytes(
                9, "big"
            ),
        ),
    ]
    for n, packed in cases:
        assert pack(n) == packed
        assert unpack(packed) == (n, len(packed))
https://gist.github.com/doloopwhile/1419f460fbe2c3561714a4cd3a20c390
補足
Pythonにはビット単位演算 が昔からあります。内容はC言語と同じです(
x ^ y,x & y,x | y,x << n,x >> n,~x)。また、整数←→バイト列の変換をするためのライブラリとして、structも昔から備わっています。
2バイト整数×2 と 4バイト整数×1 のエンコード・デコード >>> from struct import * >>> pack('hhl', 1, 2, 3) b'\x00\x01\x00\x02\x00\x00\x00\x03' >>> unpack('hhl', b'\x00\x01\x00\x02\x00\x00\x00\x03') (1, 2, 3)今回のコードでは、最近(と言っても3.2で)追加されたint型のメンバ関数を使っています。
int.bit_length(): 整数を表現するのに必要なビット数int.to_bytes(length, byteorder): 整数 → バイト列int.from_bytes(bytes, byteorder): バイト列 → 整数開発中に数値のビット表現を見るには組み込み関数の bin(n)や、
format関数、f-string が使えます。>>> bin(3) '0b11' >>> bin(-10) '-0b1010' >>> format(14, '#b'), format(14, 'b') ('0b1110', '1110') >>> f'{14:#b}', f'{14:b}' ('0b1110', '1110')
- 投稿日:2019-10-26T23:17:31+09:00
Masoniteで[FileNotFoundError]が出るときの対処法
Masoniteでcraft installが実行できない
craft installで下記エラーが出る[FileNotFoundError] [Errno 2] No such file or directory: 'pip3': 'pip3'TL;DR
pipのVersionあげましょう
環境
+ Windows10
+ Power Shell
+ Python3.7
+ pip19.0.3
解決までの経緯
craft newで各ファイル生成後,ディレクトリを移動しcraft installでコケる
masonite-cliのインストールが失敗しているなら,そもそも
craft newも失敗するはずだが成功しているwindows環境なのでpython2.7はプリインストールされていないのでPythonのVersionに起因するものでは無さそう?
公式ドキュメントの Known Installation Issues には
masonite-cliの再インストール
pip installじゃなくてpip3 installでやってみてとかそこらへん
2番目の策で思いついてダメ元でpipをアップグレードしてみる
$ python -m pip install --upgrade pip
Collecting pip
  Downloading https://files.pythonhosted.org/packages/00/b6/9cfa56b4081ad13874b0c6f96af8ce16cfbc1cb06bedf8e9164ce5551ec1/pip-19.3.1-py2.py3-none-any.whl (1.4MB)
    100% |████████████████████████████████| 1.4MB 5.1MB/s
Installing collected packages: pip
  Found existing installation: pip 19.0.3
    Uninstalling pip-19.0.3:
      Successfully uninstalled pip-19.0.3
Successfully installed pip-19.3.1
pipのバージョンが19.0.3 → 19.3.1 に上がる
その後,
craft installでインストールできた

- 投稿日:2019-10-26T21:09:15+09:00
平均絶対誤差で最小化(Scipy fminの使い方)
はじめに
実験データをFittingするとき、最小二乗法では、外れ値に引きずられて思ったような結果が得られない時があります。
精度評価指標と回帰モデルの評価にあるように、
最小二乗法は、実験データとFitting(回帰)との誤差(二乗平均平方根誤差(Root Mean Squared Error (RMSE))を最小化する方法です。この方法は、外れ値に対して弱い方法です。
外れ値に対して強い方法として、平均絶対誤差(Mean Absolute Error (MAE))を最小化する方法があります。これを行うには、scipy.optimize.fminを利用することでできます。scipy.optimize.fmin
最適化問題(ある定義された関数の最小を解く問題)を解くモジュールとして、scipy.optimize.fminがあります。
Data fitting using fmin
Pythonで最適化問題入門
scipy.optimize.fmin
scipy.optimize.fminは、以下のパラメータを取ります。
fmin(func, x0, args=(), xtol=0.0001, ftol=0.0001, maxiter=None, maxfun=None,
full_output=0, disp=1, retall=0, callback=None, initial_simplex=None)この関数を使うには以下のものが必要になります。
(1)func : callable func(x,args)
The objective function to be minimized.
(2)x0 : ndarray
Initial guess.
(3)args : tuple, optional
Extra arguments passed to func, i.e. ``f(x,args)``.例題
平均絶対誤差で最小化の例題として、ある閾値から直線的に増加する関数を考えてみます。
pymc3でのモデル関数が条件分岐を含む場合の書き方#Import import numpy as np from scipy.optimize import fmin import scipy as sp import matplotlib.pyplot as plt %matplotlib inlineある閾値(u)から一次関数で増加する関数を作ります。
# vectorizeしています。
@np.vectorize
def line(x, u, nor, bg):
    ud = x - u
    if ud <= 0:
        f =  bg
    else:
        f = nor*ud + bg
    return f
グラフを書いてみます。
xx = np.arange(3, 7.1, 0.1)
y_data = line(xx,4.5,1.0,1.0)

plt.plot(xx,y_data)
plt.show()
4.5から直線的に増加します。(バックグランドが1、傾きが1)
# このデータにガウスノイズを重畳します。
g_noise=np.random.normal(1, 0.1, len(xx))

yg = y_data+ g_noise
plt.plot(xx,yg)
plt.show()
#外れ値導入するためにポアソンノイズを重畳します。
p_noise=np.random.poisson(0.1, len(xx))
yp = y_data+g_noise+ p_noise
plt.plot(xx,yp)
plt.show()
ガウスノイズ重畳とガウスノイズとポアソンノイズ重畳したそれぞれを測定データとして、line関数で誤差関数としてRMSEとMAEそれぞれでFittingを行います。
fminで利用する関数を定義します。
#測定と予測の差の残差を求めます。
def line_residual_func(parameter, x, y):
    '''
    line reidual function
    '''
    residual = y - line(x, parameter[0], parameter[1], parameter[2])
    return residual

# 平均絶対誤差(mae)
def line_abs_residual_sum(parameter,x,y):
    '''
    mean absolute error (mae)

    '''
    line_abs_residual=np.abs(line_residual_func(parameter, x, y)).sum()

    return line_abs_residual

# 二乗平均平方根誤差(rmse)
def line_sq_residual_sum(parameter, x, y):
    '''
    root mean square error (rmse)

    '''
    line_sq_residual = np.sqrt((np.abs(line_residual_func(parameter, x, y))*np.abs(line_residual_func(parameter, x, y))).sum())
    return line_sq_residual

# fminによる最小化
def abs_line_fit(xdata,ydata,para):

    fit_para = fmin(line_abs_residual_sum,para,args=(xdata,ydata))
    fit_line =line(xdata,fit_para[0],fit_para[1],fit_para[2])

    return  fit_line, fit_para

def lsq_line_fit(xdata,ydata,para):
    fit_para  = fmin(line_sq_residual_sum,para,args=(xdata,ydata))
    fit_line = line(xdata,fit_para[0],fit_para[1],fit_para[2])

    return  fit_line, fit_para
ガウスノイズを重畳したデータをmaeとrmseで最小化します(Fitting)。
ini_para = (4.5,1.0,1.0)
# mae
fit_g_abs,para_g_abs = abs_line_fit(xx,yg,ini_para)
#rmse
fit_g_lsq,para_g_lsq = lsq_line_fit(xx,yg,ini_para)

#Fittingの当てはまりを評価するためにR2(決定係数)を計算します。
from sklearn.metrics import r2_score
r2_g_abs = r2_score(yg, fit_g_abs)
r2_g_lsq = r2_score(yg, fit_g_lsq)

print('mae:',para_g_abs, 'R2:',r2_g_abs)
print('rmse:',para_g_lsq, 'R2:',r2_g_lsq)
plt.plot(xx,yg)
plt.plot(xx,fit_g_abs, label='mae')
plt.plot(xx,fit_g_lsq, label='rmse')
plt.legend()
plt.show()
Optimization terminated successfully. Current function value: 2.719556 Iterations: 124 Function evaluations: 224 Optimization terminated successfully. Current function value: 0.537687 Iterations: 96 Function evaluations: 173 mae: [4.47714667 1.00438872 1.98376745] R2: 0.9902022990260891 rmse: [4.53396446 1.03279902 1.98906734] R2: 0.9906241308439305
どちらもうまくFittingできているようです。ガウスノイズ、ポアソンノイズを重畳したデータをmaeとrmseで最小化します(Fitting)。
ini_para = (4.5,1.0,1.0)
# mae
fit_p_abs,para_p_abs = abs_line_fit(xx,yp,ini_para)
#rmse
fit_p_lsq,para_p_lsq = lsq_line_fit(xx,yp,ini_para)

#Fittingの当てはまりを評価するためにR2を計算します。
# from sklearn.metrics import r2_score
r2_p_abs = r2_score(yg, fit_p_abs)
r2_p_lsq = r2_score(yg, fit_p_lsq)

print('mae:',para_p_abs, 'R2:',r2_p_abs)
print('rmse:',para_p_lsq, 'R2:',r2_p_lsq)
plt.plot(xx,yp)
plt.plot(xx,fit_p_abs,label='mae')
plt.plot(xx,fit_p_lsq,label='rmse')
plt.legend()
plt.show()
Optimization terminated successfully. Current function value: 6.215268 Iterations: 176 Function evaluations: 310 Optimization terminated successfully. Current function value: 2.504935 Iterations: 61 Function evaluations: 114 mae: [4.51719703 1.00317946 2.02706036] R2: 0.9892638820822436 rmse: [2.85243769 0.6320154 1.52663347] R2: 0.8702849912887191
今度は、rmseで最小化した方はうまくFittingできていないようです。


- 投稿日:2019-10-26T19:43:55+09:00
Watson AssistantのWebhookを触ってみた
最近久々にWatson Assistantを触っていたら、見た目がだいぶ変わっていました。そして、よく見るとなんとwebhookが使えるようになっていたんです。ん?webhook?今まで結構Assistantを触ってきましたけどそんな機能聞いたことありませんでした。というわけで、今回はWatson AssistantのWebhook機能を触ってみたのでその覚書きです。
Watson Assistantのwebhookとは?
Watson Assistantでの会話フローを作る際に外部アプリケーションとやり取りを行うときの手段の一つとしてこのwebhookを使うようです。webhookを設定したフローを使用することでそれがトリガーになって予め設定したパラメータを外部アプリケーションにPOSTするようになるそうです。これによってAssistantの機能が更に拡張されるということです。他のWatson APIを呼び出すやり方もありますし、自分で作成したFunctionを呼び出す方法もありです。
とりあえず作ってみた
早速Watson Assistantのフローにwebhookを組み込んでみたいと思います。今回は世界各国の都市名を指定したら、その都市の天気を返すシンプルなボットを作ってみます。天気を聞き出す部分は以前紹介したIBM Cloud Fucntionsを使って実装します。
APIの用意
今回は天気を呼び出すために、Open Weather Mapを使います。こちらから会員登録します。登録するとホーム画面に
API keysタブがあるので、クリックしてAPIキーを取得します。このAPIは英語のAPIなので日本語で来る都市名を英語に変換する必要があります。そこで、今度はIBM CloudのLanguage Translatorを使って翻訳をしたいと思います。IBM Cloudのダッシュボード画面の「リソースの作成」から「Language Translator」を選択してリソースを作成します。作成出来たら、「Manage」タブをクリックしそこに書かれているAPIキーをコピーします。二つのAPIキーをメモ出来たら、Functionsでアクションを作成していきます。アクションの作成
続いてIBM Cloud Functionsでアクションを作成していきます。こちらを参考にして、初期設定を完了させましょう。その後、
Codeタブをクリックして、はじめから書かれていたコードを消して、以下のコードに書き換えてください。# # # main() will be run when you invoke this action # # @param Cloud Functions actions accept a single parameter, which must be a JSON object. # # @return The output of this action, which must be a JSON object. # # import sys import json import requests from watson_developer_cloud import LanguageTranslatorV3 def main(dict): translator_key = dict["TRANSLATOR_API_KEY"] language_translator = LanguageTranslatorV3( version='2018-05-01', iam_apikey=translator_key, url="https://gateway.watsonplatform.net/language-translator/api" ) # Assistantから受け取った都市名を変数に格納、テストをするときはサンプルの値を格納 try: text = dict["call_city"] except KeyError: text = dict["CITY"] # APIでリクエストする用に翻訳 model = "ja-en" translation = language_translator.translate( text=text, model_id=model).get_result() # OpenWeatherMapを使う city_name = translation["translations"][0]["translation"] weather_key = dict["WEATHER_API_KEY"] api = "http://api.openweathermap.org/data/2.5/weather?units=metric&q={city}&APPID={key}" url = api.format(city = city_name, key = weather_key) print(url) response = requests.get(url) data = response.json() print(data["weather"][0]["main"]) # 更に日本語で返答するために翻訳 text = data["weather"][0]["main"] model = "en-ja" translation = language_translator.translate( text=text, model_id=model).get_result() return { 'condition': translation["translations"][0]["translation"] }以前説明しましたが、このコードの中にある
dictはアクションに定義しているParametersのことを指します。APIキーなどはParametersに定義しておくと安全なコードになってこのまま他の人にシェアしても安全です。また、LanguageTranslatorはIBM Cloud Functionsに予めWatson SDKをセットアップされているのでそのまま使います。パラメータを設定
それでは、前述の通りまだAPIキーをParametersに定義していないので、必要なパラメータの設定を行ってきます。アクションの画面から
Parametersタブをクリックして、必要な値を定義していきます。Parametersに定義する変数は下記の表にまとめています。Parametersの中のParameter Valueは必ずダブルクオテーションで囲むようにしてください。
Parameter Name Parameter Value TRANSLATOR_API_KEY "YOUR_OPEN_WEATHER_API_KEY" WEATHER_API_KEY "YOUR_LANGUAGE_TRANSLATOR_API_KEY" CITY "動作確認用にPOSTする都市名を日本語で" 動作確認
それでは、作成したアクションが正しく動作するかを確認するために、もう一度Codeタブに戻って画面右上の
Invokeボタンをクリックして動作確認します。ぎこちない訳だと思いますが、CITYで設定した都市の天気が出力されたら正常に動いています
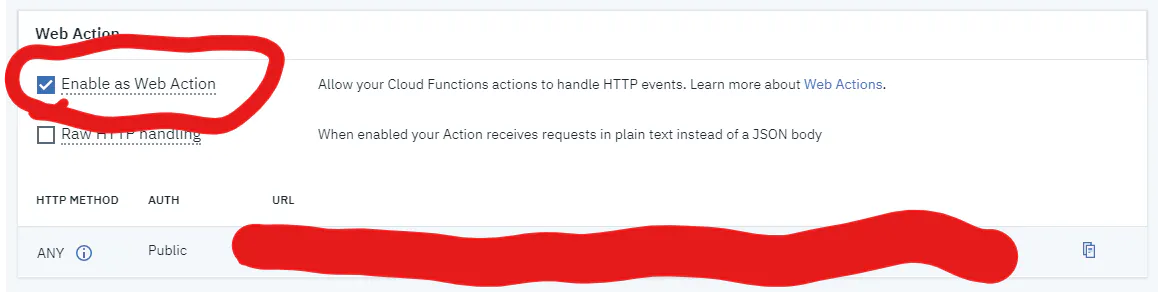
URLの生成
Functionsでの作業の最後はwebhook URLを使えるようにするための準備をします。
Endpointsタブをクリックして、Enable as Web Actionにチェックを入れてセーブしてください。すると、Webアクションを呼び出すことのできるURLが生成されるので、これをコピーします。
Watson Assistantの設定
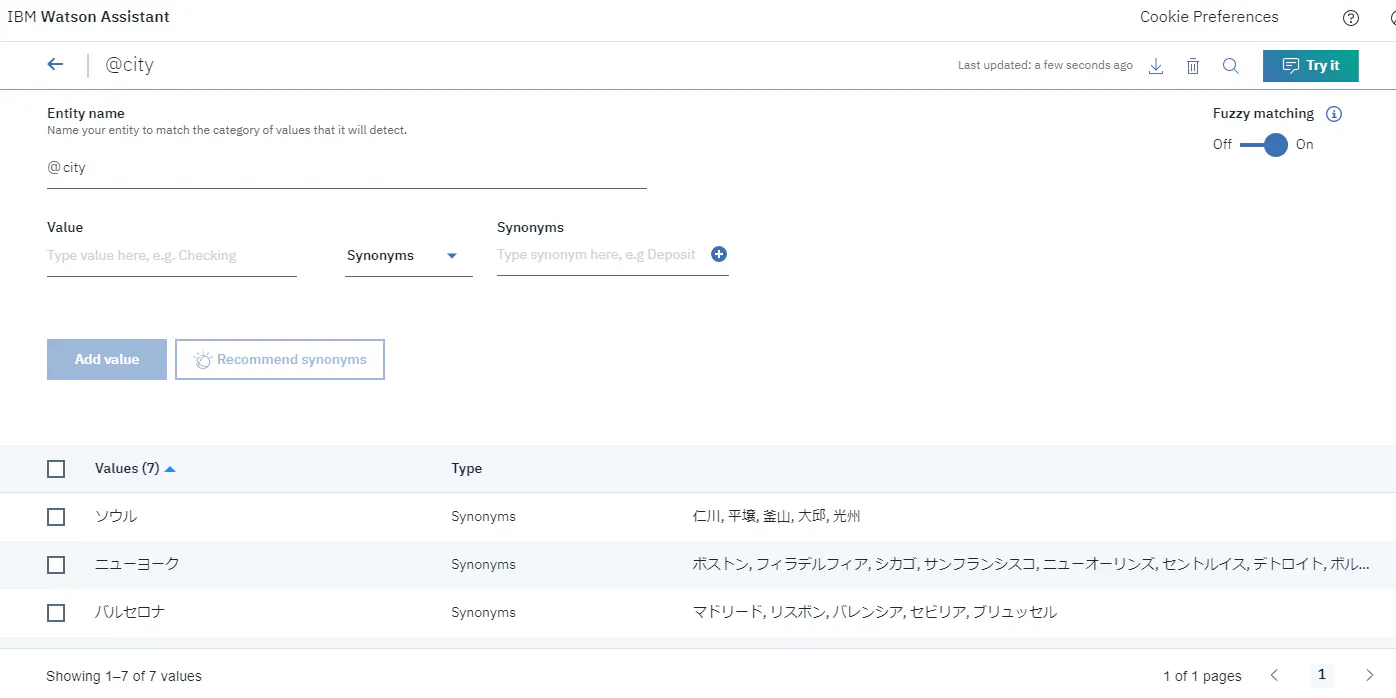
Assistantに接続するためのアクションが出来たので、今度はボットの本体を作ります。今回は都市名を認識したらアクションを動作するノードを実行するだけなので、エンティティに都市名を並べるだけです。Language Translatorと同様にWatson Assistantのリソースを作成して、Skillsタブ(画面右上にある吹き出しマークではない方のアイコン)をクリックして、
Create skillで新たにスキルを作成します。以下の画面が出てきたら、Dialog skillを選択して、Nextボタンをクリックします。
Skillの設定をします。Nameは何でもOKですが、Languageは日本語で設定します。設定が終わったら、
Create dialog skillをクリックして完了させます。
Skillの編集画面が出たら、
Entityタブを開き、My entitiesから都市名のエンティティを作成します。このあとフローを作成する際にエンティティ名はcityとして進めます。
webhookを使うための準備
今度はWatson Assistantとwebhookの接続設定をします。
Optionsタブを選択して、Webhooksを開きます。そのURLの欄に先程生成したWebhookのURLを記入します。URLを記入する際には、URLの最後に.jsonを入れるようにしてください。拡張子を指定することで、Web アクションの機能を利用して、希望する応答のコンテンツ・タイプを指定できます。Web Actionで設定しているので、Headersには特に値を設定する必要はありません。
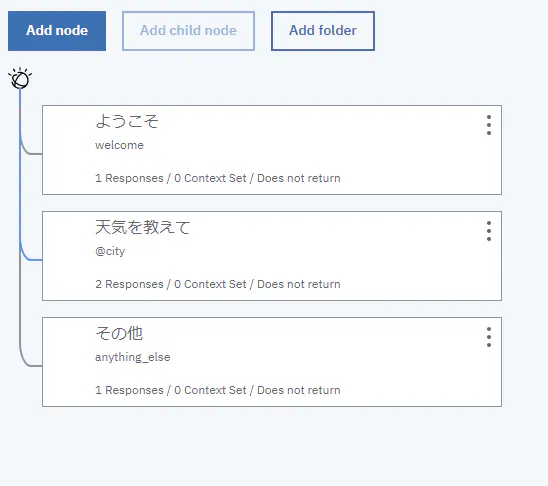
フローの作成
いよいよフローを作成していきます。とは言っても全体のフローは下の通りにあまり複雑なものではありません。この中の「天気を教えて」ノードが新たに追加するノードになります。
Add nodeをクリックして設定をしていきます。
設定画面を開くとまだwebhookが有効になっていないので、webhookの実行を選択出来ません、そこで設定画面の右上の
Customizeをクリックして、WebhookをONにします。終わったら、Applyをクリックします。
これでwebhookを使える状態なので、ノードで実行するアクションを設定します。
cityが入力されたら実行するので、ParametersのKEYにはcall_cityと入力し、Valueには入力されたテキストを変数に格納したいので、<? input.text ?>とタグを埋め込むことで変数に格納します。下のReturn variableにはwebhookの実行結果を格納する変数名を定義します。この場合はwebhook_result_1です。
更に下にスクロールすることで、結果に対してどんな返答をするのかを設定します。今回の場合は、
webhook_result_1が取得出来たら、その結果を返答します。今回作成したアクションの返り値は{ 'condition': translation["translations"][0]["translation"] }となっているのでこのconditionを取り出すために、返答では$webhook_result_1.conditionとしています。この時、引用する変数と文字列の間は必ず半角スペースで開けてください。
完成
これで完成です。あとはAssistantの
Try itをクリックして、テストチャットで都市名を入力してみてください、ちゃんと指定された都市の天気が返答されたら成功です。


- 投稿日:2019-10-26T19:12:55+09:00
HackerRankの問題を解いてみて感じたこと
はじめに
未来電子テクノロジーでインターンをしているやっきーです。
プログラミング初心者であるため、内容に誤りがあるかもしれません。
もし、誤りがあれば修正するのでどんどん指摘してください。Hackerrankとは
HackerRank(ハッカーランク)は、プログラミングの問題を解くことのできるサイトです。解いた問題数によってランキング化され、成績が良いと企業からオファーが来ることもあります。
使用できる言語は、C, C++, Java, Python, PHP, Swift など様々です。問題の種類も数多くあります。
特徴
1 問題文が英語
このサイトは、全て英語で構成されています。そのため、問題文が英語で与えられています。英語で書かれているため、問題の意味を理解することが難しいことがあります。また、問題文の中に含まれる変数などは一部がコピーできなくなっているため、google翻訳などで日本語に訳すのも難しいです。(意味不明なことが多い。)
2 コードがある程度与えられている
プログラミングの問題を解くといえばAtCoderが有名ですが、AtCoderとは異なり、HackerRankの多くの問題はコードの一部がすでに与えられていて、そこに新たに関数などを書き足すというスタイルです。そのため、記述されている関数の意味や引数の有無について確認しなければならず、少々面倒な側面もあります。一方で、あらかじめフォーマットがある方がやりやすいという人にとってはメリットになるでしょう。
3 質問ができる
各問題には「Discussions」というタブがあり、その問題に関する質問を投稿できます。(もちろん英語ですが...)
世界中から参加しているので、どの問題もたくさんの質問・回答があります。解いた感想
問題が解けたと思っても、テストケースの一部がエラーになることがあり、原因がわからず苦労しました。特に、"Runtime Error"というエラーが提出時に出たときは時間切れの場合もあり、アルゴリズムを再構築しなければなりませんでした。しかし、テストケースを全て通過したときの達成感がたまりません!
参考URL
HackerRank(ハッカーランク)はプログラミングの問題を解いて企業からのオファーが届くサービス | フリーランスエンジニアNote
HackerRank

- 投稿日:2019-10-26T18:47:47+09:00
numpyで文字列の配列を作る際の注意点
はじめに
後世の人たちが私のような愚かなはまり方をしないよう、この書を残す。
問題
データ型を指定せず文字列の配列を作ると、それはUなんたらというdtypeになる。
dtype=strと指定しても同様。ソースimport numpy as np arr=np.array(["A","AB","ABC","ABCD"],dtype=str) print (arr) print (arr.dtype)結果['A' 'AB' 'ABC' 'ABCD'] <U4不等号はリトルエンディアンを、UはUnicodeを意味し、数値は文字数を示す。つまり、変数の文字数が固定されているのだ。
後で加工された文字列の文字数がこの値を超過するとはみ出た分は失われてしまう。ソースarr[1]=arr[1]+"XYZ" print (arr[1]) arr[2]="XYZ"+arr[2] print (arr[2]) arr[3]="まったく別の文字列" print (arr[3])結果ABXY # "AB"+"XYZ"だが"ABXYZ"ではない XYZA # "XYZ"+"ABC"だが"XYZABC"ではない まったく # "まったく別の文字列"ではないこれはnp.fullやnp.emptyでも同様。
ソースarr1=np.array(["A","B","C"]) arr2=np.array(["X","Y","Z"]) arr=np.empty(3,dtype=str) for i in range(3): arr[i]=arr1[i]+arr2[i] print(arr)結果['A' 'B' 'C']np.emptyで確保されたのは1文字分だけなので、AXやBYやCZを格納することができないわけだ。
2文字以上の文字列でもってnp.fullしたときもdtype=strを指定すると1文字になってしまう。さすがにこれは意味不明だ。ソース# dtype=strを指定した場合 arr=np.full(3,"ABC",dtype=str) print (arr) print (arr.dtype)結果['A' 'A' 'A'] # ["ABC" "ABC" "ABC"]になってくれない <U1 # 1文字分しか確保されていないソース# dtypeを明示しない場合 arr=np.full(3,"ABC") print (arr) print (arr.dtype)結果['ABC' 'ABC' 'ABC'] # 正しく定義されるが <U3 # 文字数が決まっているので加工しづらいことに変わりはない対策
任意の文字数の文字列を格納できるようにするには、dtype=str でなくdtype=objectと指定する。
ソースarr=np.array(["A","AB","ABC","ABCD"],dtype=object) arr[1]=arr[1]+"XYZ" print (arr[1]) arr[2]="XYZ"+arr[2] print (arr[2]) arr[3]="まったく別の文字列" print (arr[3])結果ABXYZ XYZABC まったく別の文字列次回予告
もともとは、Excelのセル番地を模した
[['A0' 'B0' 'C0' 'D0' 'E0']
 ['A1' 'B1' 'C1' 'D1' 'E1']
 ['A2' 'B2' 'C2' 'D2' 'E2']
 ['A3' 'B3' 'C3' 'D3' 'E3']]
といった配列を手打ちでなくプログラムで作成して、それを元にnumpyのスライスやOpenCVの画像トリミングについて勉強するつもりだった。
ところがうまくいかず、「文字列の連結は+だよな? 文字列と数値は連結できないのでstr()を使うんだよな?」と基本に立ち返っても駄目で、ググりまくって今回の発見に至った次第。
次こそはスライスの勉強をするぞ。
- 投稿日:2019-10-26T17:28:27+09:00
Python3.8では非同期関数のテストが標準でサポートされる
今までのPythonで非同期関数をテストするときはいい感じにコルーチンをwrapしたりサードパーティのテストライブラリを使うしかなかった。
しかし何気なく公式ドキュメントを読んでいると……
class unittest.IsolatedAsyncioTestCase(methodName='runTest')
This class provides an API similar to TestCase and also accepts coroutines as test functions.バージョン 3.8 で追加.
……これは結構大きな改善点なのでは?
改めてWhat's Newを確認する
unittest module gained support for coroutines to be used as test cases with unittest.IsolatedAsyncioTestCase. (Contributed by Andrew Svetlov in bpo-32972.)
しっかり書いてあった。以下の例も公式から引用する。
import unittest


class TestRequest(unittest.IsolatedAsyncioTestCase):

    async def asyncSetUp(self):
        self.connection = await AsyncConnection()

    async def test_get(self):
        response = await self.connection.get("https://example.com")
        self.assertEqual(response.status_code, 200)

    async def asyncTearDown(self):
        await self.connection.close()


if __name__ == "__main__":
    unittest.main()
これで非同期関数をテストするためだけに
asyncio.get_event_loop().run_until_complete(coro)とか書かなくて済む。まあライブラリの開発だと互換性を気にする必要があるけど……参考
- What's New In Python 3.8 (https://docs.python.org/ja/3/whatsnew/3.8.html)
- unittest (https://docs.python.org/ja/3/library/unittest.html)
- 投稿日:2019-10-26T17:20:35+09:00
PythonのLoggerをStackdriverに流して情報を可視化する
問題
- 複数のリモートインスタンス上でサーバを走らせる場合、実行結果をどこで集約して監視するか考えることが多くなったので、PythonのLoggerを通してStackdriverに情報を流したいと考えた
- 機械学習系のデバッグあるあるかもしれないが、頻繁に関数の実行時間と返り値の型や形状、変数の型や形状を確認することが頻発したため、勝手にデータ型に応じて出力する情報を分けてくれると嬉しいと考えた
環境
macOS Mojava ver 10.14.6
pyenv, pipenv, python ver. 3.6.8
ローカル設定
忘れてしまって申し訳ないんですが、多分、gcloudの設定をPCにしておく必要性があった気がする...
$ curl https://sdk.cloud.google.com | bash
$ pipenv install gcloud
今回使うライブラリをインストール
$ pipenv install google-cloud-loggingGCP設定
サービスアカウントの設定
IAMと管理のサービスアカウントから、サービスアカウントを作成する
クレデンシャル情報の取得
Cloud APIを使用する(ローカルからGCPを操作する)場合、サービスを使うための認証情報が必要になるので取得する
- ServiceAccountを入力し、keyタイプをJSONに選択する。
- Createボタンを押すとダウンロード画面に行くため、下記フォルダ構成のようにjsonファイルを配置する
フォルダ構成
├── main.py                          <- 実行するファイル
├── utils
    ├── operation_stackdriver.py     <- Stack Driver Logging 操作に関するクラス
    └── credential-344323q5e32.json  <- クレデンシャル情報
ソースコード
operation_stackdriver.pyimport os import uuid import time import numpy import pandas import logging import functools from pathlib import Path import google.cloud.logging from datetime import datetime from typing import List, Set, Dict, Tuple, TypeVar, Callable from logging import getLogger, Formatter, FileHandler, StreamHandler, INFO, DEBUG VERSION = datetime.now().strftime("%Y%m%d%H%M") + '_' + str(uuid.uuid4()) def _inspect_data(logger, name:str, data, time:float=None) -> None: ''' loggerに各データの情報を記載する ''' if isinstance(data, pandas.DataFrame): logger(f'{name}', { 'hader': f'{data.head(3)}', 'describe': f'{data.describe()}', 'type': f'{type(data)}', 'shape': f'{data.shape}', 'dtypes': f'{data.dtypes}', 'time': f'done in {time}' }) elif isinstance(data, pandas.Series): logger(f'{name}', { 'describe': f'{data.describe()}', 'type': f'{type(data)}', 'shape': f'{data.shape}', 'dtypes': f'{data.dtypes}', 'time': f'done in {time}' }) elif isinstance(data, numpy.ndarray): logger(f'{name}', { 'type': f'{type(data)}', 'shape': f'{data.shape}', 'time': f'done in {time}' }) elif isinstance(data, str): logger(f'{name}', { 'data': f'{data}', 'type': f'{type(data)}', 'time': f'done in {time}' }) elif isinstance(data, int): logger(f'{name}', { 'data': f'{data}', 'type': f'{type(data)}', 'time': f'done in {time}' }) elif isinstance(data, float): logger(f'{name}', { 'data': f'{data}', 'type': f'{type(data)}', 'time': f'done in {time}' }) elif isinstance(data, bool): logger(f'{name}', { 'data': f'{data}', 'type': f'{type(data)}', 'time': f'done in {time}' }) elif isinstance(data, dict): logger(f'{name}', { 'data': f'{data}', 'type': f'{type(data)}', 'shape': f'{len(data)}', 'time': f'done in {time}' }) elif isinstance(data, tuple): logger(f'{name}', { 'data': f'{data}', 'type': f'{type(data)}', 'shape': f'{len(data)}', 'time': f'done in {time}' }) elif isinstance(data, list): logger(f'{name}', { 'data': f'{data}', 'type': f'{type(data)}', 'shape': f'{len(data)}', 'time': f'done in {time}' }) else: logger(f'{name}', { 'data': f'{data}', 'time': f'done in {time}' }) def logger_function(): ''' デコレータで各関数の実行時間や返り値のデータ型などをloggerに記載する ''' def _function_logger(function: Callable): @functools.wraps(function) def wrapper(*args, **kwargs): t0 = time.time() data = function(*args, **kwargs) _inspect_data(getLogger(VERSION).debug, f'function::{function.__name__}', data, time.time()-t0) return data return wrapper return _function_logger class CustomFormatter(Formatter): ''' メッセージと値のセットでloggerに記載するようにフォーマットを変更する ''' def format(self, record: logging.LogRecord): logmsg = super(CustomFormatter, self).format(record) return {'msg': logmsg, 'args':record.args} def logger_create(): ''' Google Stack Driverにログを記載するようにloggerの初期設定を行う ''' parameter = {} parameter["project_name"] = "project-291031" parameter["credential_path"] = "utils/credential-344323q5e32.json" os.environ["GOOGLE_APPLICATION_CREDENTIALS"] = str((Path(Path.cwd()).parent)/parameter["credential_path"]) credentials = str((Path(Path.cwd()).parent)/parameter["credential_path"]) client = google.cloud.logging.Client(parameter["project_name"]).from_service_account_json(credentials) client.setup_logging() cf = client.get_default_handler() cf.setFormatter(CustomFormatter()) logger_ = getLogger(VERSION) logger_.setLevel(DEBUG) logger_.addHandler(cf) getLogger(VERSION).info(f'StackDriver Logging: {VERSION}', {'experiment number': f'{VERSION}'}) def logger_value(logger_type:str, data_name:str=None, data=None) -> None: ''' 変数の各データ情報をloggerに記載する ''' if logger_type == 'info': _inspect_data(getLogger(VERSION).info, data_name, data) elif logger_type == 'debug': _inspect_data(getLogger(VERSION).debug, data_name, data) else: print(f'name::{data_name} value::{data} type::{type(data)}')credential-344323q5e32.json{ "type": "service_account", "project_id": "project-291031", "private_key_id": "464564c7f86786afsa453345dsf234vr32", "private_key": "-----BEGIN PRIVATE KEY-----\ndD\n-----END PRIVATE KEY-----\n", "client_email": "my-email-address@project-291031.iam.gserviceaccount.com", "client_id": "543423423542344334", "auth_uri": "https://accounts.google.com/o/oauth2/auth", "token_uri": "https://oauth2.googleapis.com/token", "auth_provider_x509_cert_url": "https://www.googleapis.com/oauth2/v1/certs", "client_x509_cert_url": "https://www.googleapis.com/robot/v1/metadata/d453/my-email-address@project-291031.iam.gserviceaccount.com" }PythonのLoggerをStackdriverに流して情報を可視化する
- logger_create()で、PythonのLoggerにstackdriverをオーバーラップさせて起動する
- @logger_function()デコレータで、関数の終了時に、返り値のデータ型と、関数の実行時間を調べることができる
- logger_value(logger_type, data_name, data)で、変数の各データ情報を調べることができる
main.pyfrom utils.operation_stackdriver import logger_create, logger_function, logger_value import numpy from sklearn.datasets import load_boston from sklearn.model_selection import train_test_split from typing import List, Set, Dict, Tuple, TypeVar, Callable @logger_function() def make_dataset() -> Tuple[numpy.ndarray, numpy.ndarray, numpy.ndarray, numpy.ndarray]: boston = load_boston() X, y = boston.data, boston.target X_train, X_valid, y_train, y_valid = train_test_split(X, y) return X_train, X_valid, y_train, y_valid def main(): logger_create() X_train, X_valid, y_train, y_valid = make_dataset() logger_value('info', 'X_train', X_train)実行ログ
StackDriver Logging: 201910261643_c1763e9e-95c0-4243-98f6-e1750b47e67b function::make_dataset X_trainGoogle Cloud Platform の StackdriverのLoggingページを見る
プロジェクトのStackdriver Loggingを開いて、実行時に表示された実験番号(日付け+uuid)で検索すると、1.logging初回起動、2.関数、3.変数 が表示されているのがわかる
一つずつ開いてくと、
関数
こちらスクリーンショットに収まりきらないため省略するが、関数名と、関数の実行時間、返り値のデータの形状、返り値のデータ型などの情報が記載されている
変数
変数名と、変数の形状、変数のデータ型などの情報が記載されている


- 投稿日:2019-10-26T16:56:58+09:00
Pythonでデスクトップアプリ(wxPython)
Pythonでデスクトップアプリ
最近いろいろなところで流行っているPythonでさくっとデスクトップアプリを作る方法です。
今回は一応メジャーっぽい wxPython を使ってみます。準備
pipでインストールします。
> pip install wxPythonもっとも簡単なサンプル
以下は wxPython のチュートリアルそのものの簡単なサンプルです。
wxpython.py# First things, first. Import the wxPython package. import wx # Next, create an application object. app = wx.App() # Then a frame. frm = wx.Frame(None, title="Hello World") # Show it. frm.Show() # Start the event loop. app.MainLoop()実行してみます。
> python wxpython.py
Hello World というタイトルのついたウィンドウが立ち上がったと思います。
ということで動いたことを確認できたのでもう少しインタラクティブなものを作ってみます。
ボタンとかコントロールを付けてみる
こんな感じのテキストボックスが1つあって、ボタンが1つあるアプリです。
テキストボックスに何かabcdefgとか入力してUpperボタンを押すとABCDEFGになります。
コードはこれです。
wxpython.pyimport wx app = wx.App() frame = wx.Frame(None, title="Hello World") panel = wx.Panel(frame, -1) text_ctrl = wx.TextCtrl(panel, -1, pos=(10, 10)) btn_ctrl = wx.Button(panel, -1, 'Upper', pos=(10, 40)) def on_click(event): text = text_ctrl.GetValue() text_ctrl.SetValue(text.upper()) btn_ctrl.Bind(wx.EVT_BUTTON, on_click) frame.Show() app.MainLoop()それほど解説はいらないと思いますが、
panel = wx.Panel(frame, -1)でパネルというUI部品を作って、
text_ctrl = wx.TextCtrl(panel, -1, pos=(10, 10)) btn_ctrl = wx.Button(panel, -1, 'Upper', pos=(10, 40))
posで指定した位置にTextCtrlとButtonを配置。def on_click(event): text = text_ctrl.GetValue() text_ctrl.SetValue(text.upper()) btn_ctrl.Bind(wx.EVT_BUTTON, on_click)ボタンが押されたときに呼び出される関数を作って、それをボタンにバインドしています。
関数の中ではテキストボックスの値を取得して、Upperで大文字にしてテキストボックスに戻しています。さらにコントロールを増やしてみる
同じように Upper だけではなく Lower も付けてみたのが以下です。
別に難しいことはありません。import wx app = wx.App() frame = wx.Frame(None, title="Hello World") panel = wx.Panel(frame, -1) text_ctrl = wx.TextCtrl(panel, -1, pos=(10, 10)) btn_ctrl_upper = wx.Button(panel, -1, 'Upper', pos=(10, 40)) btn_ctrl_lower = wx.Button(panel, -1, 'Lower', pos=(10, 70)) def on_click_upper(event): text = text_ctrl.GetValue() text_ctrl.SetValue(text.upper()) def on_click_lower(event): text = text_ctrl.GetValue() text_ctrl.SetValue(text.lower()) btn_ctrl_upper.Bind(wx.EVT_BUTTON, on_click_upper) btn_ctrl_lower.Bind(wx.EVT_BUTTON, on_click_lower) frame.Show() app.MainLoop()
今回はボタンとテキストボックスしか使っていませんが、 https://wxpython.org/Phoenix/docs/html/gallery.html を見るとかなりたくさんコントロールが用意されているようです。
おわりに
これだけのとっかかりがあればあとは調べながらでもさくっとできると思うので役目は果たしたと思うのでおしまい。


- 投稿日:2019-10-26T16:02:48+09:00
Python を高速化する Numba, Cython 等を使って Julia Micro-Benchmarks してみた
Python は遅いとよく言われます。そのときによく引用されるものに一つに、Julia Micro-Benchmarks のページがあります。Python は C と比較すると、recursion_fibonacci だと 100倍ぐらい遅く、テスト 8 項目のうち 5 項目で 10 倍以上遅いという結果になっています。これを見ると Python は激遅だという印象を持つことは間違いありません。
しかしながら、Python は Numpy を始めとして、高速化のためのツールが充実しているので、Python で作成したアプリケーションが遅いわけではありません。Julia Micro-Benchmarks では、Cython, Numba 等の Python を高速化するツールの存在が無視されてしまっています。Julia Micro-Benchmarks では、ベンチマークのコードが公開されている(Micro-Benchmarks)ので、それを使用して Numba, Cython 等についてベンチマークしてみました。
結果
結果は以下のとおりで、Julia Micro-Benchmarks のページと同様に C の所要時間を1として他の処理言語の処理時間が何倍になるかを表にしています。
C Julia Numba Cython Pythran Java PyPy Python iteration_pi_sum 1 1.00 1.00 1.00 1.00 2.05 5.79 51.43 recursion_fibonacci 1 1.48 2.88 0.85 1.91 3.33 10.71 70.77 recursion_quicksort 1 0.96 1.10 1.07 1.10 2.26 7.61 19.19 parse_integers 1 1.42 0.49 1.08 3.97 3.33 6.42 12.27 print_to_file 1 0.63 0.32 1.00 1.76 15.21 2.49 4.62 matrix_statistics 1 1.51 1.62 - 1.27 4.90 34.15 9.83 matrix_multiply 1 0.86 0.95 0.96 1.01 12.37 1.16 0.97 userfunc_mandelbrot 1 0.80 0.75 0.79 0.72 1.07 4.73 47.70 テスト環境: OS Ubuntu 18.04, CPU Intel Core i7-7700
使用したソフトウェアのバージョン:
Julia 1.0, Python 3.7, Numba 0.46.0, numpy 1.17.2, Cython 0.29.13,
Pythran 0.9.3.post1, Java openjdk 1.8.0_222, PyPy 7.1.1-beta0
Pythonについては、Numba では Anacondaを、それ以外では Ubuntu のパッケージを使用
使用したコード、測定結果の詳細については、GitHubで公開しています。Numba の場合、8つのテスト項目の中で一番遅いのが「recursion_fibonacci」で、C よりも 2.89 倍の時間がかかっています。Numba は、再帰の処理が遅いためです。次に遅いのが、matrix_statistics で 1.67 倍の時間がかかっていますが、Julia との比較だと 1.11 倍遅いだけです。recursion_fibonacci のように再帰が処理の殆どを占めるるケースは現実には殆どないので、Julia と Numba は、ほぼ同じ速さだといっていいと思われます。
Cython の場合は、7つのテスト項目ともほぼ C と同じ速さです。matrix_statistics については、C のコードを見ればわかると思いますが、openblas のライブラリーを使わないと C と同じぐらいの速さにはできません。自分の能力を超えるのでやめました。
Cython, Numba をつかって Julia Micro-Benchmarks をしている記事には既に以下のものがあります。
- どうすればPythonをJuliaと同じくらい速く動かせるのか? : 様々なやり方で計算の高速化を図る
- An Updated Analysis for the “Giving Up on Julia” Blog
「どうすればPythonをJuliaと同じくらい速く動かせるのか?」では、Fibonacci の計算では、Python の方が 3.8 倍速くなっている他、pisum で 1.7 倍、Mandelbrot で 1.6 倍、quicksort で 1.4 倍速いという結果になっています。今回テストした限りにおいては、それほど Python が速いということはなくて quicksort では、むしろ Julia の方が若干速かったです。
一方で、Python が 0.2 倍と遅かった randmatstat については、Numba と Pythran がこの計算で必要な Numpy の関数 np.linalg.matrix_power 等に対応したため、Julia と同程度の速さになりました。当時よりは Numba も成熟してきたといえるでしょう。
「An Updated Analysis for the “Giving Up on Julia” Blog」という記事は、「[どうすればPythonをJuliaと同じくらい速く動かせるのか?」への反論ですが、その記事にある Cython, Numba のコードについては以下のように最適化ができていないので、その記事の内容は信用できません。詳しくは、公開しているコードと見比べてください。
- parse_integers では、Cython のコードの中で hex, int という Python の関数を使用している。
- Cython を Jupiter Notebook 上で %%cython マジックを使ってテストしているが、その場合は、最適化レベルが -O3 になっていない。C を -O3 でコンパイルをしているのならば、Chython も最適化レベルを -O3 でコンパイルすべきである。
- userfunc_mandelbrot では、np.linspace を使っているが、numba を使う場合には C やjulia の場合と同様に for 文で処理した方が速い。
テスト項目 print_to_file については、Julia の文字列は内部的には UTF-8 です。それに対して、Python は、UTF-32, Java は UTF-16 です。ファイルへの書き出しは UTF-8 の場合変換が必要ありません。一方で UTF-16 や UTF-32 の場合には、UTF-8 に変換する必要があるので遅くなります。それで、Numba で UTF-8 でまとめて文字列を作成し、ファイルへの書き出しを1回にするコードを書きました。そうしたら、Numba の方が Julia よりも 2倍速くなりました。時間ができたら Cython のコードも修正しようと思います。また、Java も 15 倍も遅いということになっていますがそのように修正すると随分速くなると思います。
Numba について
Numba は、Python のコードで関数の頭に @jit デコレータを付けるだけで手軽に Julia と同じぐらいに高速化できます。両者は LLVM を使っていてよく似た方法で処理をしているので、Numba で Numpy の処理を高速化する場合には処理速度は Julia と同じぐらいになるはずです。最近は jitclass, list, dict, set, str 等が使えるようになりましたが、それらについては処理が遅い場合があるので使うときに注意が必要です。
Numba という名前は Numpy と Munba(世界で最速で移動する猛毒の蛇)を掛け合わせたものす。名前から考えても、Python + Numpy では for 文で個々の要素にアクセスする処理が極めて遅いという弱点を解消するためのツールだと考えておいた方が無難です。最近、Pandas で Numba を使う議論がなされていますが、Pandas のような大規模なライブラリーで使うのには、まだまだ問題が多いようです。
Numba を使う場合注意しないといけないのは、Numba が対応している型や関数は、Python と Numpy の一部だけだということです。もし、対応していない型や関数があると object mode になってしまうので、Python の場合よりも遅くなってしまうことがあります。Qiita の記事でも、Numba が対応していない型や関数を使って Numba は Julia よりも遅いというような記事がしばしば見受けられます。そういう間違いをなくすためか、今年の年末か来年のはじめに公開される予定の Numba 0.47.0 から、「nopython」モードがデフォルトになり、Numba が対応していない型や関数があるとエラーになる予定です。それまでは、@jit(nopython=True) として「nopython」モードに設定して使うようにした方がいいです。
Numba は手軽に使えますが、コードを C ライクに書く必要があります。C/C++ を学習するまでの必要はありませんが Numpy は使えるようにしておく必要があります。その上で、使うときには、公式ドキュメントに「Numba 5分ガイド (5 minute guide to Numba)」 というページがあるので、少なくともそれは読んでおくようにしましょう。
以下が、「Numba 5分ガイド」の最初にあるコードです。Numba の特徴がよくわかります。
from numba import jit import numpy as np x = np.arange(100).reshape(10, 10) @jit(nopython=True) # 最高のパフォーマンスを得るために「nopython」モードに設定、 @njit と書くことも可 def go_fast(a): # 関数は最初に呼ばれた時にマシンコードにコンパイルされる trace = 0 for i in range(a.shape[0]): # Numba は、ループを好む trace += np.tanh(a[i, i]) # Numba は、NumPy 関数を好む return a + trace # Numba は、NumPy ブロードキャストを好む print(go_fast(x))Cython について
Cython は、ベンチマークの結果をみればわかるように C と同じ速さすることが可能です。でも、Numba と違って Python や Numpy の型や関数を使うと速くならないので、C/C++ の型や関数を使う必要があります。Cython は、実質的には C だと思って使ったほうがいいです。Cythonを使って便利なのは、Numpy の ndarray を memory views として扱うことで高速に各要素にアクセスできることです。
上に書いた「An Updated Analysis for the “Giving Up on Julia” Blog」の Parse Int で、Julia が 176 μs に対して、Cython は 378 µs 秒と 2 倍以上遅いという結果になっている理由は、hex, int という Python の関数を使用しているためです。C の関数に修正すると 3 倍近く速くなるので、Julia よりも Cython の方が速くなります。Qiita の記事等でも Python の関数を使っているため最適化ができていないケースは多いです。Cython がどのように Python のコードをコンパイルしているかは、-a オプションをつけてコンパイルするとわかります。詳細は、参考 Cython のコンパイルの確認 の方に書いておきます。
Cython を使う場合には、C を学習することが必須で、Numba を使うよりは、ハードルが高いです。一方で、Cython は、Pandas, Scikit-learn の開発に使われており、大規模開発での使用に適しています。
そうはいっても、Pandas の開発者である Wes McKinney 氏は、Pandas を Cython で開発するのに限界を感じて、C++ で Apache Arrow を開発中です。最近は C++ が使いやすくなってきているので、Cython ではなくて、C++ で開発し、Pybind11 等で Python に組み込むという開発スタイルを採用するケースも増えてきています。
Pythran について
Pythran は殆ど知られていませんが Python と Numpy のサブセットの科学技術計算用のコンパイラーです。Cython が Python や Numpy の関数を使うと速くならないのに対して、Python や Numpy の関数を一部ですが、それを C++ のコードに変換してコンパイルをしてくれます。C を知らなくても使えるというのが特徴です。ちょっとしたコードを軽量の実行可能バイナリーやモジュールにしたい時に便利です。
最後に
Python 自体は遅く、The Computer Language Benchmarks Game のベンチマークによると、C/C++よりも概ね10〜100倍遅いという結果になっています。一方で、Python は、機械学習、データサイエンス、科学技術計算という計算速度が要求されている分野で広く使われています。矛盾しているようですが、The Computer Language Benchmarks Game では、Python のライブラリーを使えないため、高速化のためのツールが豊富にある Python の実態が反映されていません。機械学習、データサイエンス、科学技術計算の分野であれば、Numoy, Pandas, Keras, TensorFlow, PyTorch等の豊富なライブラリを使うことで、Java や C# よりも使いやすいだけでなく、処理も速い場合が多いです。特に GPU が使用できるのであれば、Python が「速くて使いやすい言語」の No1 であることは間違いないでしょう。
また、スクリプト言語の名誉のために書いておきますが、スクリプト言語が遅いのは繰り返しの多い数値計算での話です。Web のプログラミングでは、このような数値計算をすることは少なく入出力の処理のウェートが高くなります。入出力の処理に関しては、スクリプト言語では多くの部分が C 言語を使って実装されているので、処理が遅いということはありません。現実に Web プログラミングでは、スクリプト言語が広く使われています。
どのような言語やライブラリーを学習したらいいかについては、各種の調査結果を参考にするのもいいと思います。
2018 Kaggle ML & DS Surveyによると、Q16 の日頃使用している言語(複数選択可)では、Python が 15711人で最も多くなっています。C/C++ の使用者は4383人で4番目に多く、C/C++ もかなり使われています。Python の場合は既存のライブラリを使う場合は便利ですが、新しいエンジンを作ろうとすると C/C++ が必要になります。
図は、2018 Kaggle Machine Learning & Data Science Surveyの Q16 から引用次に、Google トレンドを見てみましょう。Numpy は過去5年間で人気度が3〜4倍に増加しています。意外に感じますが、機械学習が人気で TensorFlow, PyTorch 等のソフトウェアの使用が急増したため、それらへのインターフェースとして利用が増えたと思われます。なお、PyTorch の行列演算は numpy like で操作が可能です。また、TensorFlow の行列演算は独自方式だったのですが、Python + Numpy のプログラムを GPU 用にコンパイルしてくれる JAX というソフトを Google が非公式ですが公開しています。Numpy を学習すれば、GPU を使う場合でもその知識は活用できます。
参考 Cython のコンパイルの確認
以下のように Cython を -a オプションを付けて実行すると。
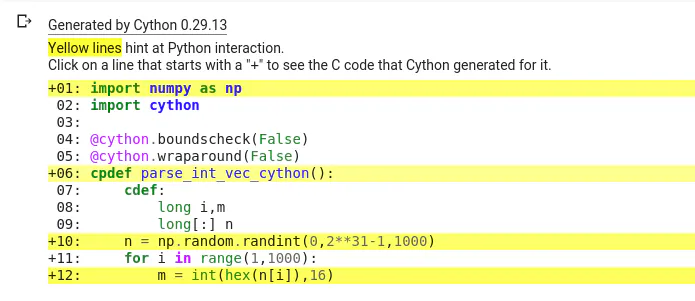
%%cython -a import numpy as np import cython @cython.boundscheck(False) @cython.wraparound(False) cpdef parse_int_vec_cython(): cdef: long i,m long[:] n n = np.random.randint(0,2**31-1,1000) for i in range(1,1000): m = int(hex(n[i]),16)実行が遅くなるコードが、黄色で表示されます。
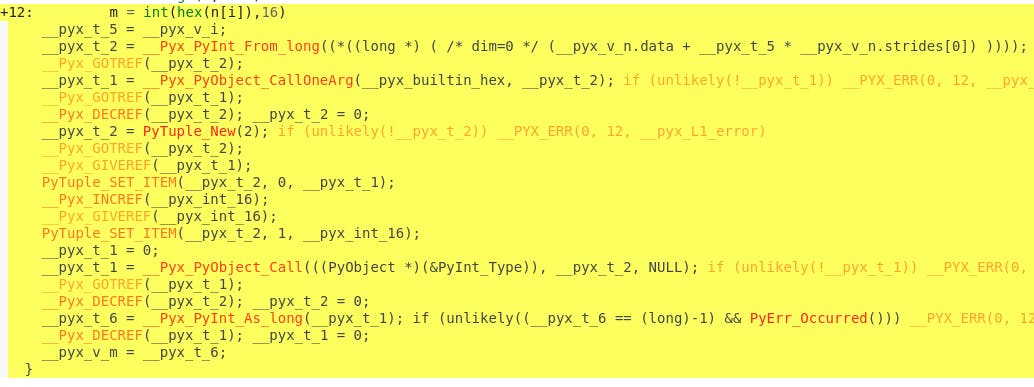
黄色で表示されたコードのうち、for ループ内にあって多数回実行されるコードから集中的に修正していくといいです。この場合だと m = int(hex(n[i]), 16) が一番の問題です。
該当のコードをクリックすると Cython がどうコンパイルされているかが表示されます。
赤の太字で表示されている部分が一番問題で、内容をみると下のように hex と int の処理でPyObject を呼んでいるのがわかります。__pyx_t_1 = __Pyx_PyObject_CallOneArg(__pyx_builtin_hex, __pyx_t_2); if (unlikely(!__pyx_t_1)) __PYX_ERR(0, 12, __pyx_L1_error) __pyx_t_1 = __Pyx_PyObject_Call(((PyObject *)(&PyInt_Type)), __pyx_t_2, NULL); if (unlikely(!__pyx_t_1)) __PYX_ERR(0, 12, __pyx_L1_error)修正については、Python の関数をやめて C の関数を使うことです。hex の代わりには sprintf, int の代わりには strtol が使えるのですが、perf.c のコードをみて int については C の関数を使わずにコードで書きました。そのコードが以下です。
%%cython -a from libc.stdio cimport sprintf cimport cython cpdef void parse_int_core(long[:] datain, long[:] dataout): cdef: long i long num = datain.shape[0] char s[11] char c long n for i in range(num): sprintf(s, "%lx", datain[i]) n = 0 for j in range(11): c = s[j] if c == b'\0': break if c > b'9': n = 16 * n + c - 87 else: n = 16 * n + c - 48 dataout[i] = nこのコードを実行すると以下のように表示されます。
cpdef 以外のコードから、濃い黄色の部分が消えています。薄い黄色に付いては、datain, dataout にメモリービューを使っているためで、@cython.boundscheck(False), @cython.wraparound(False) のオプションを付けると薄い黄色も消えます。numba の方は、hex の方もコードで書いたので、C よりも速くなりました。C 及び Cython も同じように sprintf を使わずにコードで書けば同じように速くなります。速くなる理由は、sprintf が汎用で使用するものに対して、パラーメータの内容が予めわかっているのでチェック等を省略できるためです。
このテスト項目をみていると Julia が C/C++ のように柔軟に使えるかは疑問。The Computer Language Benchmarks Game で binary-trees は Julia が C より 6 倍遅いということで、要するに動的にメモリー確保することが遅いのでその懸念は強いと思われます。


- 投稿日:2019-10-26T15:29:42+09:00
Python3.7.x+OpenCV4.1.x+wxPython4.0.x+USBWebcamのクロスプラットフォームな環境構築事例集
こちらはOS毎の記事への目次です。Python 3.8.1 が出る頃には Python 3.8.x 系向け記事に更新したいところ。
想定する運用スタイル
OpenCV を利用する GUI アプリケーションを wxPython により構築する。
- wxPython が使えない場合は Tkinter や PyQt、Kivy 等を利用する。
Webcam を USB 接続し OpenCV から利用する。
- ARM 系ハードでは内蔵カメラの利用も考慮する。
異なるプラットフォーム / OS における作業手順を出来るだけ統一化する。1
- ソースコードからのビルドは configure, make, make install、もしくは cmake, ninja, ninja install のような、UNIX 系 OS の作法で行えるよう工夫する。
Python 向けパッケージは pip + venv で管理する。
※ インストール済みの Python パッケージ全てのアップグレードについては以下を参照下さい。
How to upgrade all Python packages with pip? - Stack Overflowx86-64アーキテクチャ
Windows
Windows10+Python3.7.x+OpenCV-Python4.1.x+wxPython4.0.x/PyQt5/Tkinter+USBWebcamの環境構築例
Linux
Kubuntu_18.04LTS+OpenCV4.1.x+wxPython4.0.6+USBWebcamの環境構築例(工事中)
CentOS_7+Python3.7.x+OpenCV4.1.x+wxPython4.0.6+USBWebcamの環境構築例(工事中)
Slackware_14.2+Python3.7.x+OpenCV4.1.x+wxPython4.0.6+USBWebcamの環境構築例(工事中)
Manjaro-KDE+Python3.7.x+OpenCV4.1.x+wxPython4.0.xの環境構築例(工事中)
Sabayon-KDE+Python3.7.x+OpenCV4.1.x+wxPython4.0.xの環境構築例(工事中)
MacOS
MacOSCatalina+Python3.7.x+OpenCV4.1.x+wxPython4.0.x+USBWebcamの環境構築例
※ Catalina に標準搭載の Python 3.7.3 から venv を用いることで仮想環境内に pip で簡単に opencv-python と wxPython を導入可能でした。
※ 一方で wxPython をソースからビルドしようとして苦戦中です。なお、OpenCV 及び wxWidgets のビルドは問題ありませんでした。
FreeBSD
Project Trident+Python2.7.x+OpenCV3.x+wxPython3.xの環境構築例(工事中)
※ OpenCV 4.x 系のビルドが通らない上に、3.x 系に FreeBSD の Ports の Patch を当ててもPython3.x系向けのバインディングが上手く動作しない状況です。そこで、代替案として Linux バイナリ互換機能を用いたアプローチを検討中です。
Haiku
Haiku+wxQt+wxPython+OpenCV+USBWebcamの環境構築例(計画中)
※ USBカメラ、繋がるんだろうか?
Hurd(x86)
ArchHurd/DebianGNUHurd+Python3.7.x+OpenCV4.1.x+wxPython4.0.6+USBWebcamの環境構築例(計画中)
※ 目指すは Hurd 1.0 リリース前の記事完成。
※ Hurd ディストリだと Debian GNU/Hurd が老舗かな?現在はDebian GNU/Hurd 2019 がリリースされているそうです。
※ ArchHurd 復活おめでとうございます。
※ USBカメラ、繋がるんだろうか?ReactOS(x86)
計画中。本格始動は実機で WebCam を繋げつつ OS を安定して動かせるようになってから。
最近の Microsoft はかなりオープンソース寄りであることだし、折角だから、ReactOS Project に色々 Donation してくれないかな?
Docker
Docker+Python3.7.x+OpenCV4.1.x+wxPython4.0.xの環境構築例(工事中)
Debian と Arch を Docker イメージとして利用。ホスト OS は Windows10 or MacOSCatalina or FreeBSD(NomadBSD/GhostBSD) or Linux(Ubuntu/CentOS/Zenwalk/Manjaro/Sabayon)Vagrant
Docker+Python3.7.x+OpenCV4.1.x+wxPython4.0.xの環境構築例(工事中)
Debian と Arch をゲスト OS として環境構築。ホスト OS は Windows10 or MacOSCatalina or Linux(Ubuntu/CentOS/Zenwalk/Manjaro/Sabayon) + VirtualBox + VirtualBox Extension Pack。
※ VirtualBox Extension Pack によって、USB 2.0 及び 3.0 のサポートや WebCam 連携機能の強化が期待出来ます。
ARMアーキテクチャ
iOS
iOS+Python3.x+Kivy+OpenCV+内蔵カメラの環境構築例(計画中)
Android
Android+Python3.x+Kivy+OpenCV+内蔵カメラの環境構築例(計画中)
LineageOS+Raspberry Pi
計画中。Android で出来ることは LineageOS でも普通に出来そうではある。
Windows 10 IoT Core+Raspberry Pi
計画中。このあたりやこのあたりを参照しつつ挑戦してみたい。OpenCV と Python と WebCam が動けば色々楽しそう。
Raspbian
Raspbian+Python3.7.x+OpenCV4.1.x+wxPython4.0.x/Kivy+内蔵カメラ/USBWebcam の環境構築例(工事中)
※ ほぼ Debian なので Raspbian 向けの記事はそのまま Debian や Devuan に流用可能と思われます。
※ ソースコードのビルドを行う場合は相応に時間が必要とはいえ、コンパイルもアプリ開発も Raspbian 上で x86-64 環境と変わらない使い勝手で行えるのは便利です。
※ USB 接続のカメラからの描画が崩れる場合、OpenCV を WITH_QT=ON でビルドすることで問題を回避可能でした。
構築予定の環境の構成によっては Ansible も有用と思われる。参考文献:Ansibleをはじめる人に。- Qiita ↩
- 投稿日:2019-10-26T15:20:09+09:00
MacOSCatalina+Python3.7.x+OpenCV4.1.x+wxPython4.0.x+USBWebcamの環境構築例
無 保 証 で す
総合もくじ
Python3.7.x+OpenCV4.1.x+wxPython4.0.x+USBWebcamのクロスプラットフォームな環境構築事例集
想定する運用スタイル
- OpenCV を利用する GUI アプリケーションを wxPython により構築する。
- Webcam を USB 接続し OpenCV から利用する。
- Python 向けパッケージは pip + venv で管理する。
- 異なるプラットフォームにおける作業手順を出来るだけ統一化する。1
※ インストール済みの Python パッケージ全てのアップグレードについては以下を参照下さい。
How to upgrade all Python packages with pip? - Stack Overflow環境構築スクリプト記述例
MacOS 向け環境構築スクリプト
#!/bin/sh # variables VENV_DIR="$HOME/testenv" # activate Python3's virtual environment test -d $VENV_DIR || mkdir $VENV_DIR cd $VENV_DIR || exit 1 test -d $VENV_DIR/py3env || python3 -m venv ./py3env . ./py3env/bin/activate || exit 2 pip install --upgrade pip setuptools || exit 3 # install opencv-python and wxPython pip install opencv-python wxPython || exit 4 # deactivate python3's virtual environment deactivate || exit 5 cd || exit 6 exit 0※ 終了ステータスの使い方が少し変則的かもしれません。
※ Catalina 付属 Python3.7.3 の venv モジュールで pip が使えました。
事前準備:Xcode / Xcode Command Line Tools の導入
https://developer.apple.com/jp/xcode/
https://apps.apple.com/jp/app/xcode/※ Xcode Command Line Tools の導入は、ターミナルからは
xcode-select --installで。
※ Homebrew をインストールする場合、Command Line Tools 未導入であれば自動でインストールされるはず。参考とした文献
参考とした文献
XcodeとHomebrewについて - しゃちの備忘録
http://teru0rc4.hatenablog.com/entry/2017/01/08/215633xcode-select --installに失敗した - yn2011's blog
http://pokuwagata.hatenablog.com/entry/2018/11/04/210256Technical Note TN2339: Building from the Command Line with Xcode FAQ
https://developer.apple.com/library/archive/technotes/tn2339/_index.htmlXcode - Wikipedia
https://ja.wikipedia.org/wiki/Xcode事前準備:パッケージマネジメントシステムの導入
※ 本稿では Homebrew の使用を想定しています。「cask」による MacOS 向けアプリの管理が便利です。
※ MacPorts を導入すると BSD ライクな使い勝手を得られます。こちらは FreeBSD の Ports や Gentoo の Portage, Arch の AUR, Slackware の SlackBuilds のようなビルドスクリプトによるソフトウェア管理に慣れた人向け。なお Homebrew でも、
brew createでビルドスクリプトやパッケージの自作が可能であるようです。※ 管理の破綻を防ぐために、複数のパッケージマネジメントシステムの併用はおすすめしません。
Homebrew
MacPorts
参考とした文献
参考とした文献
【Tips】HomebrewとMacPortsを共存させる方法 | ソフトアンテナブログ
https://www.softantenna.com/wp/tips/homebrew-macports-coexists/Homebrew (パッケージ管理システム) - Wikipedia
https://ja.wikipedia.org/wiki/Homebrew_(パッケージ管理システム)MacPorts - Wikipedia
https://ja.wikipedia.org/wiki/MacPorts事前準備:brew 及びパッケージの更新
brew update # brew 自身の更新 brew upgrade # /usr/local 以下にインストールしたソフトウェアの更新 brew cask upgrade # cask でインストールしたソフトウェアの更新参考とした文献
参考とした文献
brew のマニュアルページ
https://docs.brew.sh/Manpage
brew cask のヘルプ
$ brew cask Homebrew Cask provides a friendly CLI workflow for the administration of macOS applications distributed as binaries. Commands: --cache display the file used to cache the Cask audit verifies installability of Casks cat dump raw source of the given Cask to the standard output create creates the given Cask and opens it in an editor doctor checks for configuration issues edit edits the given Cask fetch downloads remote application files to local cache home opens the homepage of the given Cask info displays information about the given Cask install installs the given Cask list with no args, lists installed Casks; given installed Casks, lists staged files outdated list the outdated installed Casks reinstall reinstalls the given Cask style checks Cask style using RuboCop uninstall uninstalls the given Cask upgrade upgrades all outdated casks zap zaps all files associated with the given Cask See also "man brew-cask"事前準備:cmake の導入
brew cask install cmake※ Mojave(OSX 10.14) において、wxWidgets ビルド時に
-D CMAKE_OSX_DEPLOYMENT_TARGET=10.14を設定しなかったところ、ビルドに失敗しました。OpenCV の場合は指定せずとも問題なくビルドが通りました。※ コンパイラとして明示的に clang を指定する場合、CMAKE_<LANG>_COMPILER(
-D CMAKE_C_COMPILER="/usr/bin/clang"や-D CMAKE_CXX_COMPILER="/usr/bin/clang++")を設定します。システム標準の c/c++ コンパイラの種別は端末エミュレータからcc --versionやc++ --versionで確認出来ます。参考とした文献
参考とした文献
macOS Mojaveでlibuiを動かす - Qiita
https://qiita.com/KaiShoya/items/b3a353246478942b7a28macOS Mojave - Apple
https://www.apple.com/macos/mojave/CMAKE_OSX_DEPLOYMENT_TARGET — CMake Documentation
https://cmake.org/cmake/help/latest/variable/CMAKE_OSX_DEPLOYMENT_TARGET.htmlGCC, the GNU Compiler Collection - GNU Project - Free Software Foundation (FSF)
https://gcc.gnu.org/Clang C Language Family Frontend for LLVM
https://clang.llvm.org/CMAKE_<LANG>_COMPILER — CMake Documentation
https://cmake.org/cmake/help/latest/variable/CMAKE_LANG_COMPILER.html事前準備:ccache の導入(必要に応じて)
brew install ccache※ ビルドを繰り返す場合、ccache が役に立ちます。cmake のオプションで明示的に指定する場合は CMAKE_<LANG>_COMPILER_LAUNCHER(
-D CMAKE_C_COMPILER_LAUNCHER="/usr/local/bin/ccache"や-D CMAKE_CXX_COMPILER_LAUNCHER="/usr/local/bin/ccache")を設定します。参考とした文献
参考とした文献
c++ - How to Use CCache with CMake? - Stack Overflow
https://stackoverflow.com/questions/1815688/how-to-use-ccache-with-cmakeccache — Compiler cache
https://ccache.dev/CMAKE_<LANG>_COMPILER_LAUNCHER — CMake Documentation
https://cmake.org/cmake/help/latest/variable/CMAKE_LANG_COMPILER_LAUNCHER.html事前準備:Homebrew 版 python3 の導入(必要に応じて)
brew install python※ python2 を導入する場合のパッケージ名は
python@2です。※ 手元の環境では Catalina 付属の Python3.7.3 で venv モジュールが使えました。仮想環境内では pip も使用可能です。
事前準備:venv による仮想環境の構築
cd || exit test -d $HOME/testenv || mkdir $HOME/testenv cd $HOME/testenv || exit python3 -m venv ./py3env . ./py3env/bin/activate pip install --upgrade pip setuptools deactivate※ fish の場合は
. ./py3env/bin/activate.fishでアクティベートします。※ direnv を用いることで、対象ディレクトリに移動するだけで仮想環境が開始されるよう設定出来るそうです。
BuildWxPythonOnRaspberryPi - wxPyWiki より引用
If your lazy like most programmers. Check out https://direnv.net/ and https://github.com/direnv/direnv/wiki/Python with some fussing the virtenv will load automagically when you enter a directory.
参考とした文献
参考とした文献
仮想環境 - python.jp
https://www.python.jp/install/macos/virtualenv.htmlvenv --- 仮想環境の作成 — Python 3.7.4 ドキュメント
https://docs.python.org/ja/3/library/venv.htmlopencv-python と wxPython の導入:pip を利用する場合
OpenCV 4.1.x のインストール
cd $HOME/testenv || exit . ./py3env/bin/activate || exit pip install opencv-python pip show opencv-python deactivate cd || exitwxPython(4.0.x)のインストール
cd $HOME/testenv || exit . ./py3env/bin/activate || exit pip install wxPython pip show wxPython deactivate cd || exitopencv-python と wxPython の導入:ソースコードからビルド&インストールする場合
※ 手元の環境では Catalina 付属の Python3.7.3 ではビルドした opencv モジュールが上手く動作しなかった為、Brew 版の 3.7.4 を利用しました。
OpenCV 4.1.2 のビルド&インストール
OpenCV をソースコードからビルドする利点と問題点と Lena
利点:
- 最新版を手軽に試すことが出来る。
- ビルドオプションを細かく指定してのビルド&インストールが可能である。
- Qt のバージョンが揃うので UI のアイコン表示等が崩れない。
問題点:
- pip list に現れない。
Lena:
構築依存のインストール(必要に応じて)
qt5のインストールbrew install qt※ qt5 をインストールしておくことで、cmake でオプション
-D WITH_QT=ON及び-D WITH_OPENGL=ONが利用可能となります。その際、環境変数Qt5_DIRで、brew でインストールした qt5 のパスを指定しておく必要があります。パス指定例(brewのprefixが/usr/localの場合)export Qt5_DIR=/usr/local/opt/qt5libdc1394及びffmpeg対応版バイナリをビルドする場合brew install pkg-config libdc1394 ffmpeg※ pkg-config をインストールしておかないと cmake の段階で configure プロセスが libdc1394 及び ffmpeg を見つけられませんでした。
※ brew から eigen や vtk をインストールすることで、対応バイナリを生成可能です。
※ Java モジュールを有効化する場合は ant 及び Java が必要です。
※ Catalina で cask 由来の adoptopenjdk の Java を実行する場合にアラートが表示される場合、「システム環境設定>セキュリティとプライバシー」で実行許可を与えます。以下はターミナルで OpenJDK 13 の java コマンドを実行した場合。
cask からの OpenJDK インストール例
caskによるOpenJDKのインストールbrew cask install adoptopenjdk初回時、ターミナルからJavaコマンドを実行(OpenJDK13の場合)/Library/Java/JavaVirtualMachines/adoptopenjdk-13.jdk/Contents/Home/bin/java -versionダイアログウィンドウの「キャンセル」をクリック。
システム環境設定>セキュリティとプライバシーで「このまま許可」をクリック。
「このまま許可」クリック後ターミナルで再度Javaコマンドを実行/Library/Java/JavaVirtualMachines/adoptopenjdk-13.jdk/Contents/Home/bin/java -versionダイアログウィンドウの「開く」をクリック。
venv 仮想環境への OpenCV の構築と導入
venv仮想環境へのOpenCV4.1.2の構築cd $HOME/testenv || exit . ./py3env/bin/activate || exit # 仮想環境を開始する OPENCV_VERSION=4.1.2 pip uninstall opencv-python # pipから導入した opencv-python があれば削除しておく pip install numpy # opencv-python が構築時、及び導入時に依存する numpy をインストールする test -d Downloads || mkdir Downloads cd Downloads || exit curl -LO https://github.com/opencv/opencv/archive/$OPENCV_VERSION.tar.gz # GitHub から OpenCV のソースコードをダウンロードする tar zxf $OPENCV_VERSION.tar.gz cd opencv-$OPENCV_VERSION || exit mkdir build && cd build || exit cmake -D CMAKE_BUILD_TYPE=Release -D CMAKE_C_COMPILER="clang" -D CMAKE_CXX_COMPILER="clang++" -D CMAKE_INSTALL_PREFIX=$HOME/testenv/py3env/ .. make -j$(sysctl -n hw.ncpu) make install # ホームディレクトリ内、仮想環境内部にインストールするのでスーパーユーザー権限は必要ない python3 -c "import cv2; print(cv2.__version__)" # 導入した opencv-python のバージョンを確認する python3 -c "import cv2; print(cv2.getBuildInformation())" # 導入した opencv のビルドオプションを確認する python3 $HOME/testenv/Downloads/opencv-$OPENCV_VERSION/samples/python/video.py # Webcam からの映像を確認、ESC キーでサンプルプログラムは終了する unset OPENCV_VERSION deactivate # 仮想環境を終了する cd || exit※ マルチコアCPUなら例えば
make -j$(sysctl -n hw.ncpu)や-j$(sysctl -n hw.logicalcpu)などとオプションをわたすことで構築時間の短縮が期待出来ます。2 3 4※ fish の場合、コマンド置換を $() ではなく () で行います。変数の代入に関しても書式の差異があります。
qt5及びOpenGL対応版OpenCVをビルドする場合brew install qt export Qt5_DIR=/usr/local/opt/qt5 cmake -D WITH_QT=ON -D WITH_OPENGL=ON -D CMAKE_BUILD_TYPE=Release -D CMAKE_C_COMPILER="clang" -D CMAKE_CXX_COMPILER="clang++" -D CMAKE_INSTALL_PREFIX=$HOME/testenv/py3env/ ..※ CMAKE_INSTALL_PREFIX は環境に応じて適宜読み替えて下さい。
参考とした文献
参考とした文献
OpenCV: Installation in Linux
https://docs.opencv.org/4.1.2/d7/d9f/tutorial_linux_install.htmlOpenCVのビルド情報を確認するgetBuildInformation() | note.nkmk.me
https://note.nkmk.me/python-opencv-getbuildinformation/Python Tips:ワンライナーが書きたい - Life with Python
https://www.lifewithpython.com/2015/01/python-use-command-one-liner.htmlwxPython 4.0.6 のビルド&インストール
wxPython をソースコードからビルドする利点と問題点
- 利点:
- ビルドオプションを柔軟に指定出来る。
- 問題点:
- python3 build.py clean を行う際に誤って python3 build.py cleanall とすると sip 配下のファイルやフォルダが一掃されてしまう。
wxPython の venv 仮想環境への構築と導入
自分の環境では 10.14 Mojave では問題なくビルド出来ていましたが、10.15 Catalina にアップグレードしてからビルドが通りません。
10.15におけるビルドエラー[855/875] Compiling sip/cpp/sip_webkitwxWebKitBeforeLoadEvent.cpp ../../../sip/cpp/sip_webkitwxWebKitNewWindowEvent.cpp:21:45: error: unknown class name 'wxWebKitNewWindowEvent'; did you mean 'sipwxWebKitNewWindowEvent'?wxWidgetsのインストールbrew install wxmacOSX10.14におけるvenv仮想環境へのwxPython4.0.6の構築cd $HOME/testenv || exit . ./py3env/bin/activate || exit # 仮想環境を開始する WXPYTHON_VERSION=4.0.6 pip uninstall wxPython # pipから導入した wxPython があれば削除しておく test -d Downloads || mkdir Downloads cd Downloads || exit pip download wxPython==$WXPYTHON_VERSION --no-deps --no-binary :all: # PyPI から wxPython のソースコードをダウンロードする tar zxf wxPython-$WXPYTHON_VERSION.tar.gz cd wxPython-$WXPYTHON_VERSION || exit pip install -r requirements.txt # 構築時依存及び導入時依存 python パッケージのインストールを行う python3 build.py build bdist_wheel --release --use_syswx --jobs=$(sysctl -n hw.ncpu) # wxPython のビルドを行う pip install dist/wxPython-$WXPYTHON_VERSION-*.whl #wxPython のインストールを行う pip show wxPython # インストールされた wxPython パッケージの情報を表示する python3 $HOME/testenv/Downloads/wxPython-$WXPYTHON_VERSION/demo/demo.py # wxPython のデモを実行する unset WXPYTHON_VERSION deactivate # 仮想環境を終了する cd || exit※ 10.14 Mojave の時も wxPython ソース付属の build.py からの wxWidgets のビルドには失敗しており、回避策として brew で wxmac をインストールし、build.py に --use_syswx オプションを渡すことをしていました。
※ マルチコア CPU なら例えば build.py に
--jobs=$(sysctl -n hw.ncpu)や--jobs=$(sysctl -n hw.logicalcpu)などとオプションをわたすことで構築時間の短縮が期待出来ます。2 3 4※ fish の場合、コマンド置換を $() ではなく () で行います。変数の代入に関しても書式の差異があります。
参考とした文献
参考とした文献
How to install wxPython - wxPyWiki
https://wiki.wxpython.org/How%20to%20install%20wxPythonBuildWxPythonOnRaspberryPi - wxPyWiki
https://wiki.wxpython.org/BuildWxPythonOnRaspberryPiCannot build Phoenix from github master - wxpython-dev@lists.wxwidgets.org
https://wxpython-dev.wxwidgets.narkive.com/Sdn1NNA8/cannot-build-phoenix-from-github-masterおまけ:Catalina への wxWidgets のビルド&インストール
OSX10.15へのwxWidgets3.1.2のビルド&インストール例cd $HOME/testenv || exit test -d Downloads || mkdir Downloads cd Downloads || exit brew uninstall wxmac curl -LO https://github.com/wxWidgets/wxWidgets/releases/download/v3.1.2/wxWidgets-3.1.2.tar.bz2 || exit tar jxf wxWidgets-3.1.2.tar.bz2 cd wxWidgets-3.1.2 mkdir build_osx && cd build_osx ../configure --prefix=/usr/local --with-macosx-version-min=10.15 make -j$(sysctl -n hw.ncpu) sudo make install※ 自分の環境では 10.14 Mojave では cmake でビルドが通っていました。10.15 Catalina へアップグレード後、cmake ではビルドがコケるようになってしまいました。
OSX10.14へのwxWidgets3.1.2のビルド&インストール例cd $HOME/testenv || exit test -d Downloads || mkdir Downloads cd Downloads || exit brew uninstall wxmac curl -LO https://github.com/wxWidgets/wxWidgets/releases/download/v3.1.2/wxWidgets-3.1.2.tar.bz2 || exit tar jxf wxWidgets-3.1.2.tar.bz2 cd wxWidgets-3.1.2 mkdir build_osx && cd build_osx cmake -D CMAKE_BUILD_TYPE=Release -D CMAKE_OSX_DEPLOYMENT_TARGET="10.14" -D CMAKE_C_COMPILER="clang" -D CMAKE_CXX_COMPILER="clang++" -D CMAKE_INSTALL_PREFIX=/usr/local .. make -j$(sysctl -n hw.ncpu) sudo make installおまけ Xcode Command Line Tools のアンインストール
Command Line Tools のみのインストールの場合、
/Library/Developer/CommandLineToolsディレクトリを削除するだけで良さそう。https://developer.apple.com/library/archive/technotes/tn2339/_index.html より引用
How can I uninstall the command-line tools?
Xcode includes all of the command-line tools. If it is installed on your system, remove it to uninstall the command-line tools.
If the /Library/Developer/CommandLineTools directory exists on your system, remove it to uninstall the command-line tools.
以前は
sudo /Library/Developer/Shared/uninstall-devtools --mode=allなどとしていたそうな。How to uninstall "Command Line Tools" in Xcode 4.3? - Apple Community
https://discussions.apple.com/thread/3741223


- 投稿日:2019-10-26T15:20:05+09:00
MacでDjangoの開発環境を整える
はじめに
この記事では、Mac環境で1からDjangoを用いた開発環境を構築する方法を説明していきます。versionはpythonは3系、Djangoは2系を使っていきます。既にインストール済のところは飛ばして、必要なところだけ参考にしてください。
環境
Mac OS Mojave 10.14.5
Homebrew 2.1.15pyenvのインストール
pythonのversionを簡単に切り替えることができるようにしてくれるツールです。2系と3系との切り替えに便利で、ディレクトリごとにpythonのversionを切り替えることができます。
既に3系でpythonの環境構築をしている方は、読み飛ばしていただいて構いません。2系と3系を使い分けたい方は参考にしてください。では早速インストールしていきます。Homebrewを用いて、下記コマンドでpyenvをインストールします。
$ brew install pyenvbash_profileの編集
pyenvにPATHを通すためにbash_profileを編集します。
$ echo 'export PYENV_ROOT="$HOME/.pyenv"' >> ~/.bash_profile $ echo 'export PATH="$PYENV_ROOT/bin:$PATH"' >> ~/.bash_profile $ echo 'eval "$(pyenv init -)"' >> ~/.bash_profile最後にbash_profileの変更内容を適用します。
$ source ~/.bash_profilepyenvでpythonをインストール
バージョン切り替えを体験するために2つほどバージョンが違うpythonをインストールしてみます。インストールできるか確認をしたければ3つめのコマンドを利用すると一覧が確認できます。
$ pyenv install 2.7.12 $ pyenv install 3.7.4 $ pyenv install --listpyenvでバージョンを切り替えてみる
バージョンの切り替えをしてみます。localの場合は今いるディレクトリに、globalの場合は全体に反映されます。
$ pyenv local 2.7.12 $ pyenv global 3.7.4ここできちんと変更が反映されているか確認するためpythonのバージョンを調べます。
$ python --version Python 3.7.4変更が反映されていれば問題ありません。
反映されていなければ下記の記事をお試しください。pipのインストール
次にDjangoのインストールに必要なpipをインストールします。python3.4以降では標準でpip3がインストールされていますが、今回はMacに標準でインストールされているpythonではなく、pyenvで管理しているpythonを使用するため、別途インストールが必要です。(この辺りは理解不足のため、もしかしたらインストールの必要はないかもしれません、、、)
インストール後、pipのversionを確認し、以下のようになっていればOK。$ brew install pip $ pip --version pip 19.0.3 from /Users/[ユーザ名]/.pyenv/versions/3.7.4/lib/python3.7/site-packages/pip (python 3.7)pythonの仮想環境を作成
Webアプリケーション開発をする際にいくつもの開発を進めていくとパッケージの依存関係に悩まされることがあります。 そのため、昨今のWeb開発の現場ではプロジェクト毎に仮想環境を構築します。 ここではPythonで予め用意された仮想環境構築ツールを使って仮想環境を構築します。1つ目のコマンドで仮想環境を作成し、2つ目のコマンドで仮想環境をアクティベートします。
$ python -m venv [仮想環境名] $ source [仮想環境名]/bin/activateこれでプロジェクトごとにpipのパッケージを管理できるようになります。
ちなみに仮想環境から抜けるには以下のコマンドを実行してください。$ deactivateDjangoのインストール
やっとDjangoのインストールです。仮想環境をアクティベートした状態で、先ほどインストールしたpipを用いてDjangoの2系をインストールします。
$ pip install Django==2.2.6Djangoがインストールできたか確認します。
$ python -m django --version 2.2.6仮想環境内にDjangoプロジェクトを作る
仮想環境内で以下のコマンドを実行することで、Djangoプロジェクトを作成することができます。
django-admin startproject [プロジェクト名]おわりに
これでDjangoの開発環境が構築できました!
実際にDjangoを用いてWebアプリケーションを作っていくにはもう少し準備(DBとの接続など)が必要となりますが、今回はここまでとします。参考
- 投稿日:2019-10-26T15:20:05+09:00
Macで0からDjangoの開発環境構築
はじめに
この記事では、Mac環境で0からDjangoを用いた開発環境を構築する方法を説明していきます。versionはpythonは3系、Djangoは2系を使っていきます。既にインストール済のところは飛ばして、必要なところだけ参考にしてください。
環境
Mac OS Mojave 10.14.5
Homebrew 2.1.15pyenvのインストール
pythonのversionを簡単に切り替えることができるようにしてくれるツールです。2系と3系との切り替えに便利で、ディレクトリごとにpythonのversionを切り替えることができます。
既に3系でpythonの環境構築をしている方は、読み飛ばしていただいて構いません。2系と3系を使い分けたい方は参考にしてください。では早速インストールしていきます。Homebrewを用いて、下記コマンドでpyenvをインストールします。
$ brew install pyenvbash_profileの編集
pyenvにPATHを通すためにbash_profileを編集します。
$ echo 'export PYENV_ROOT="$HOME/.pyenv"' >> ~/.bash_profile $ echo 'export PATH="$PYENV_ROOT/bin:$PATH"' >> ~/.bash_profile $ echo 'eval "$(pyenv init -)"' >> ~/.bash_profile最後にbash_profileの変更内容を適用します。
$ source ~/.bash_profilepyenvでpythonをインストール
version切り替えを体験するために2つほどversionが違うpythonをインストールしてみます。インストールできるか確認をしたければ3つめのコマンドを利用すると一覧が確認できます。
$ pyenv install 2.7.12 $ pyenv install 3.7.4 $ pyenv install --listpyenvでversionを切り替えてみる
versionの切り替えをしてみます。localの場合は今いるディレクトリに、globalの場合は全体に反映されます。
$ pyenv local 2.7.12 $ pyenv global 3.7.4ここできちんと変更が反映されているか確認するためpythonのversionを調べます。
$ python --version Python 3.7.4変更が反映されていれば問題ありません。
反映されていない場合、PATHの通し方によってMacに標準でインストールされているpythonが先に参照されている可能性があります。対処法が下記の記事にまとめられていますので参考にしてください。pipのインストール
次にDjangoのインストールに必要なpipをインストールします。pipとはpythonで使われている標準的なパッケージ管理ツールです。python3.4以降では標準でpip3がインストールされていますが、今回はMacに標準でインストールされているpythonではなく、pyenvで管理しているpythonを使用するため、別途インストールが必要です。(この辺りは理解不足のため、もしかしたらインストールの必要はないかもしれません、、、)
インストール後、pipのversionを確認し、以下のようになっていればOK。$ brew install pip $ pip --version pip 19.0.3 from /Users/[ユーザ名]/.pyenv/versions/3.7.4/lib/python3.7/site-packages/pip (python 3.7)pythonの仮想環境を作成
Webアプリケーション開発をする際にいくつもの開発を進めていくとパッケージの依存関係に悩まされることがあります。 そのため、昨今のWeb開発の現場ではプロジェクト毎に仮想環境を構築します。 ここではPythonで予め用意された仮想環境構築ツールを使って仮想環境を構築します。1つ目のコマンドで仮想環境を作成し、2つ目のコマンドで仮想環境をアクティベートします。アクティベートできるとターミナルの左端に([仮想環境名])が表示されます。
$ python -m venv [仮想環境名] $ source [仮想環境名]/bin/activateこれでプロジェクトごとにpipのパッケージを管理できるようになります。ちなみに仮想環境から抜けるには以下のコマンドを実行してください。
$ deactivateDjangoのインストール
やっとDjangoのインストールです。仮想環境をアクティベートした状態で、先ほどインストールしたpipを用いてDjangoの2系をインストールします。
$ pip install Django==2.2.6Djangoがインストールできたか確認します。
$ python -m django --version 2.2.6仮想環境内にDjangoプロジェクトを作る
仮想環境内で以下のコマンドを実行することで、Djangoプロジェクトを作成することができます。
django-admin startproject [プロジェクト名]おわりに
これでDjangoの開発環境が構築できました!
実際にDjangoを用いてWebアプリケーションを作っていくにはもう少し準備(DBとの接続など)が必要となりますが、今回はここまでとします。参考
- 投稿日:2019-10-26T15:20:05+09:00
Macで0からDjango開発環境構築
はじめに
この記事では、Mac環境で0からDjangoを用いた開発環境を構築する方法を説明していきます。versionはpythonは3系、Djangoは2系を使っていきます。既にインストール済みのところは飛ばして、必要なところだけ参考にしてください。
環境
Mac OS Mojave 10.14.5
Homebrew 2.1.15pyenvのインストール
pythonのversionを簡単に切り替えることができるようにしてくれるツールです。2系と3系との切り替えに便利で、ディレクトリごとにpythonのversionを切り替えることができます。
既に3系でpythonの環境構築をしている方は、読み飛ばしていただいて構いません。2系と3系を使い分けたい方は参考にしてください。では早速インストールしていきます。Homebrewを用いて、下記コマンドでpyenvをインストールします。
$ brew install pyenvbash_profileの編集
pyenvにPATHを通すためにbash_profileを編集します。
$ echo 'export PYENV_ROOT="$HOME/.pyenv"' >> ~/.bash_profile $ echo 'export PATH="$PYENV_ROOT/bin:$PATH"' >> ~/.bash_profile $ echo 'eval "$(pyenv init -)"' >> ~/.bash_profile最後にbash_profileの変更内容を適用します。
$ source ~/.bash_profilepyenvでpythonをインストール
version切り替えを体験するために2つほどversionが違うpythonをインストールしてみます。インストールできるか確認をしたければ3つめのコマンドを利用すると一覧が確認できます。
$ pyenv install 2.7.12 $ pyenv install 3.7.4 $ pyenv install --listpyenvでversionを切り替えてみる
versionの切り替えをしてみます。localの場合は今いるディレクトリに、globalの場合は全体に反映されます。
$ pyenv local 2.7.12 $ pyenv global 3.7.4ここできちんと変更が反映されているか確認するためpythonのversionを調べます。
$ python --version Python 3.7.4変更が反映されていれば問題ありません。
反映されていない場合、PATHの通し方によってMacに標準でインストールされているpythonが先に参照されている可能性があります。対処法が下記の記事にまとめられていますので参考にしてください。pipのインストール
次にDjangoのインストールに必要なpipをインストールします。pipとはpythonで使われている標準的なパッケージ管理ツールです。python3.4以降では標準でpip3がインストールされていますが、今回はMacに標準でインストールされているpythonではなく、pyenvで管理しているpythonを使用するため、別途インストールが必要です。(この辺りは理解不足のため、もしかしたらインストールの必要はないかもしれません、、、)
インストール後、pipのversionを確認し、以下のようになっていればOK。$ brew install pip $ pip --version pip 19.0.3 from /Users/[ユーザ名]/.pyenv/versions/3.7.4/lib/python3.7/site-packages/pip (python 3.7)pythonの仮想環境を作成
Webアプリケーション開発をする際にいくつもの開発を進めていくとパッケージの依存関係に悩まされることがあります。 そのため、昨今のWeb開発の現場ではプロジェクト毎に仮想環境を構築します。 ここではPythonで予め用意された仮想環境構築ツールを使って仮想環境を構築します。1つ目のコマンドで仮想環境を作成し、2つ目のコマンドで仮想環境をアクティベートします。アクティベートできるとターミナルの左端に([仮想環境名])が表示されます。
$ python -m venv [仮想環境名] $ source [仮想環境名]/bin/activateこれでプロジェクトごとにpipのパッケージを管理できるようになります。ちなみに仮想環境から抜けるには以下のコマンドを実行してください。
$ deactivateDjangoのインストール
やっとDjangoのインストールです。仮想環境をアクティベートした状態で、先ほどインストールしたpipを用いてDjangoの2系をインストールします。
$ pip install Django==2.2.6Djangoがインストールできたか確認します。
$ python -m django --version 2.2.6仮想環境内にDjangoプロジェクトを作る
仮想環境内で以下のコマンドを実行することで、Djangoプロジェクトを作成することができます。
django-admin startproject [プロジェクト名]おわりに
これでDjangoの開発環境が構築できました!
実際にDjangoを用いてWebアプリケーションを作っていくにはもう少し準備(DBとの接続など)が必要となりますが、今回はここまでとします。参考
- 投稿日:2019-10-26T15:07:35+09:00
PythonからGoogle Cloud Storageを読み書きするクラス (機械学習モデルをGCSからPickle形式で読み書き)
はじめに
Optunaでのパラメータ探索等など、機械学習をしているとき良いモデルを保存していつでも使えるようにしたいと思ったので、Google Cloud Storageに保存して、いつでも読み込みと書き込みができるようなクラスを作成した。
また、Google Cloud StorageからBigQueryにアップロードするときに、CSV形式だと失敗することとかが多いため、pandasのDataFrameをGoogle Cloud Storage保存時にndjson形式に保存できるようにした。
環境
macOS Mojava ver 10.14.6 pyenv, pipenv, python ver. 3.6.8ローカル設定
忘れてしまって申し訳ないんですが、多分、gcloudの設定をPCにしておく必要性があった気がする...
$ curl https://sdk.cloud.google.com | bash $ pipenv install gcloud今回使うライブラリをインストール
$ pipenv install --upgrade google-cloud-storage, google-authGCP設定
サービスアカウントの設定
IAMと管理のサービスアカウントから、サービスアカウントを作成する
クレデンシャル情報の取得
Cloud APIを使用する(ローカルからGCPを操作する)場合、サービスを使うための認証情報が必要になるので取得する
Google Cloud Document 認証
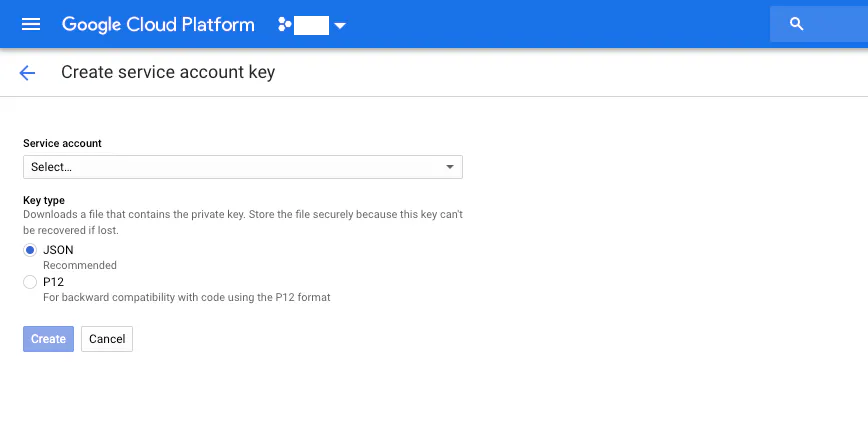
1. ServiceAccountを入力し、keyタイプをJSONに選択する。
2. Createボタンを押すとダウンロード画面に行くため、下記フォルダ構成のようにjsonファイルを配置する
Create Service account key
フォルダ構成
├── main.py <- 実行するファイル ├── utils ├── operation_cloud_storage.py <- GCS操作に関するクラス └── credential-344323q5e32.json <- クレデンシャル情報ソースコード
operation_cloud_storage.pyimport io import os import pickle import pandas import google.auth from pathlib import Path from google.cloud import storage from google.oauth2 import service_account from typing import List, Set, Dict, Tuple, TypeVar class GoogleCloudStorage(): ''' Google Cloud Storage操作に関するクラス Google Cloud StorageのデータをダウンロードしてPythonのデータ型に変換する Pythonのデータ型をアップロードしてGoogle Cloud Storageのデータに変換する ''' def __init__(self, parameter: Dict) -> None: ''' リモートのサーバ上で動作保証するため下記四種の方法で認証を通している ''' self.project_name = parameter['project'] self.bucket_name = parameter['bucket'] self.file_name = parameter['folder'] self.mime_type = parameter['mime_type'] self.credential_path = parameter['credential_path'] try: os.environ["GOOGLE_APPLICATION_CREDENTIALS"] = str((Path(Path.cwd()).parent)/parameter["credential_path"]) self.credentials = str((Path(Path.cwd()).parent)/parameter["credential_path"]) self.client = storage.Client(self.project_name).from_service_account_json(self.credentials) except Exception as e: print(e) try: self.credentials, _ = google.auth.default() self.client = storage.Client(project=self.project_name, credentials=self.credentials) except Exception as e: print(e) try: os.environ["GOOGLE_APPLICATION_CREDENTIALS"] = str((Path(Path.cwd()).parent)/parameter["credential_path"]) self.credentials, _ = google.auth.default() if self.credentials.requires_scopes: self.credentials = self.credentials.with_scopes(['https://www.googleapis.com/auth/devstorage.read_write']) self.client = storage.Client(credentials=self.credentials) except Exception as e: print(e) try: credentials_path = str((Path(Path.cwd()).parent)/parameter["credential_path"]) self.credentials = service_account.Credentials.from_service_account_file(credentials_path) if self.credentials.requires_scopes: self.credentials = self.credentials.with_scopes(['https://www.googleapis.com/auth/devstorage.read_write']) self.client = storage.Client(credentials=self.credentials) except Exception as e: print(e) def download_as_string(self) -> str: bucket = self.client.get_bucket(self.bucket_name) blob = storage.Blob(self.file_name, bucket) return blob.download_as_string() def download_as_pickle(self) -> str: bucket = self.client.get_bucket(self.bucket_name) blob = storage.Blob(self.file_name, bucket) return pickle.loads(blob.download_as_string()) def download_to_file(self, file_obj) -> object: bucket = self.client.get_bucket(self.bucket_name) blob = storage.Blob(self.file_name, bucket) return blob.download_to_file(file_obj) def upload_from_string(self, context: str) -> None: bucket = self.client.get_bucket(self.bucket_name) blob = storage.Blob(self.file_name, bucket) blob.upload_from_string(context, content_type=self.mime_type) def upload_from_ndjson(self, dataframe: pandas.core.frame.DataFrame) -> None: ''' GCSからBigQueryにあげるときにndjson形式だとエラーが発生しにくい為、 pandas.DataFrameをndjson形式で保存できるようにしている ''' buffer = io.StringIO() dataframe.to_json(buffer, orient="records", lines=True, force_ascii=False) bucket = self.client.get_bucket(self.bucket_name) blob = storage.Blob(self.file_name, bucket) blob.upload_from_string(buffer.getvalue(), content_type=self.mime_type) def upload_from_file(self, file_obj) -> None: bucket = self.client.get_bucket(self.bucket_name) blob = storage.Blob(self.file_name, bucket) blob.upload_from_file(file_obj)credential-344323q5e32.json{ "type": "service_account", "project_id": "project-291031", "private_key_id": "464564c7f86786afsa453345dsf234vr32", "private_key": "-----BEGIN PRIVATE KEY-----\ndD\n-----END PRIVATE KEY-----\n", "client_email": "my-email-address@project-291031.iam.gserviceaccount.com", "client_id": "543423423542344334", "auth_uri": "https://accounts.google.com/o/oauth2/auth", "token_uri": "https://oauth2.googleapis.com/token", "auth_provider_x509_cert_url": "https://www.googleapis.com/oauth2/v1/certs", "client_x509_cert_url": "https://www.googleapis.com/robot/v1/metadata/d453/my-email-address@project-291031.iam.gserviceaccount.com" }lightgbmモデルのクラス
main.pyimport copy import pandas import lightgbm from typing import List, Set, Dict, Tuple, TypeVar class light_gradient_boosting_tree(): ''' https://lightgbm.readthedocs.io/en/latest/ 決定木アルゴリズムに基づいた勾配ブースティング(Gradient Boosting)の機械学習フレームワーク ''' def __init__(self): pass def insert_parameter(self, parameter: Dict[str, str]): ''' 機械学習のパラメータをセット ''' self.params = parameter def fit(self, X_train: pandas.core.frame.DataFrame, X_valid: pandas.core.frame.DataFrame, y_train: pandas.core.series.Series, y_valid: pandas.core.series.Series = None) -> None: ''' データを学習 特徴量重要度をローカルのフォルダに保存する ''' train_data = lightgbm.Dataset(X_train, label=y_train) eval_data = lightgbm.Dataset(X_valid, label=y_valid, reference=train_data) parameter = copy.deepcopy(self.params) self.clf = lightgbm.train(parameter, train_data, valid_sets=eval_data) def predict(self, X_test: pandas.core.series.Series) -> pandas.core.series.Series: ''' データを予測 ''' return pandas.Series(self.clf.predict(X_test))データセット
main.pyfrom sklearn.datasets import load_boston from sklearn.model_selection import train_test_split def make_dataset() -> Tuple[numpy.ndarray, numpy.ndarray, numpy.ndarray, numpy.ndarray]: boston = load_boston() X, y = boston.data, boston.target X_train, X_valid, y_train, y_valid = train_test_split(X, y) return X_train, X_valid, y_train, y_validlightgbm学習
main.pydef fit(X_train: numpy.ndarray, X_valid: numpy.ndarray, y_train: numpy.ndarray, y_valid: numpy.ndarray) -> Callable: lgb_parameter = { 'boosting_type': 'gbdt', 'objective': 'regression', 'metric': 'l2', 'num_leaves': 31, 'learning_rate': 0.05, 'feature_fraction': 0.9, 'bagging_fraction': 0.8, 'bagging_freq': 5, 'verbose': 0 } algorithm = light_gradient_boosting_tree() algorithm.insert_parameter(lgb_parameter) algorithm.fit(X_train, X_valid, y_train, y_valid) return algorithm<class '__main__.light_gradient_boosting_tree'>機械学習のモデルをGoogle Cloud StorageにPickle形式でアップロードして書き込む
main.pyimport pickle import uuid def write_model(algorithm: Callable) -> str: upload_clf_parameter = { "project": "unisys-245106", "bucket": "performance_database", "folder": "datalake/models/", "mime_type": "application/octet-stream", "credential_path": "recommend/utils/performance-base-5873434c8f27.json" } trial_uuid = str(uuid.uuid4()) upload_clf_parameter["folder"] += f'lgb/{trial_uuid}.pkl' clf = pickle.dumps(algorithm) GoogleCloudStorage(upload_clf_parameter).upload_from_string(clf) return f'lgb/{trial_uuid}.pkl'lgb/930e087e-3c82-4620-9f4a-972b621b0c2c.pkl学習済みモデルをGoogle Cloud StorageからPickle形式でダウンロードして読み込む
main.pydef read_model(model_path: str) -> pandas.core.series.Series: download_clf_parameter = { "project": "unisys-245106", "bucket": "performance_database", "folder": "datalake/models/", "mime_type": "application/octet-stream", "credential_path": "recommend/utils/performance-base-5873434c8f27.json" } download_clf_parameter['model_path'] = model_path download_clf_parameter['folder'] += download_clf_parameter['model_path'] clf = GoogleCloudStorage(download_clf_parameter).download_as_pickle() return clf.predict(X_valid)0 23.892873 1 23.247592 2 38.848780 3 19.778641 4 31.075990実行
main.pydef main(): X_train, X_valid, y_train, y_valid = make_dataset() algorithm = fit(X_train, X_valid, y_train, y_valid) model_path = write_model(algorithm) prediction = read_model(model_path) if __name__ == '__main__': main()
- 投稿日:2019-10-26T14:18:23+09:00
python pandas 複数ファイル読み込み⇒抽出⇒出力
pythonでcsvを複数ファイル(1000ファイル)読み込み、条件に応じてある列を抽出し,
新たなcsvファイルに出力したいと考えたおります。
file1:[id,time,value][1,3.5,6][2,2.0,4][3,2.6,8]・・・[30,15.5,50]
というファイルがある場合に、"time"が0.5より小さい値の列を抽出し、新たなファイル(list1_0.5h.csv)に書き込むというスクリプトが以下のスクリプトになります。fileが1個だけの時には以下のスクリプトでできたのですが、1000個のfileで同じことをやるにはどのようにスクリプトを変更したらよいでしょうか。
import pandas as pd
df = pd.read_csv("list1.csv")
df = (df[df["time"]<0.5])
df.to_csv("list1_0.5h.csv")初歩的な内容で申し訳ございませんが、ご教授いただけましたら幸いです。
よろしくお願いいたします。
- 投稿日:2019-10-26T13:08:27+09:00
閾値による二値化処理を用いた疑似アスキーアート生成器
初めに(^ω^)
作成したソースコード
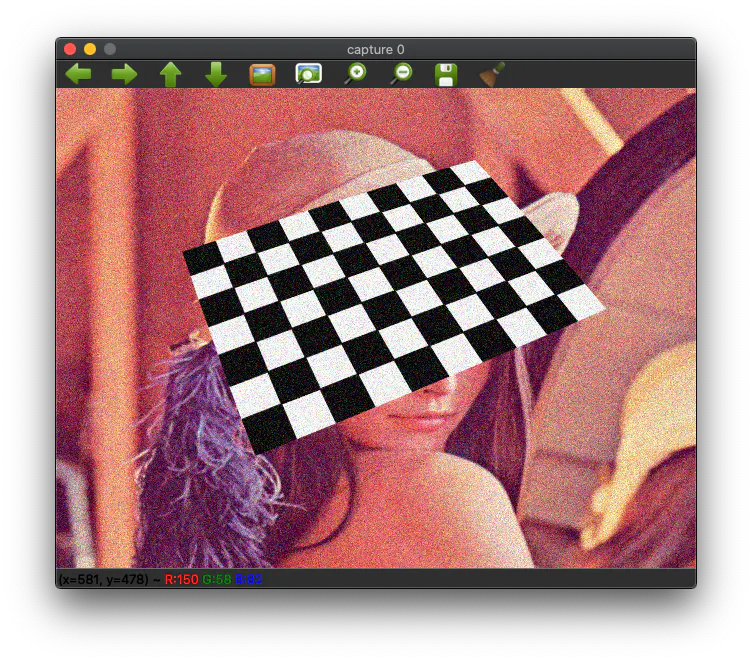
hoge.py#----------------------------------------- #閾値による二値化処理を用いた疑似アスキーアート生成器(つよい) #----------------------------------------- import numpy as np import cv2 #保存先指定 hoge = 'C:/Users/kng-kudo/Pictures/' file = 'text10.txt' #グレースケールで読み込み img2 = cv2.imread(hoge+'shigure.png',0) #Numy配列に保存 im = np.array(img2) #閾値設定による二値化処理 Threshold = 127 im[im < Threshold] = 0 im[im >= Threshold] = 1 #テキスト出力 np.savetxt(hoge+file, im, fmt="%0.0f", delimiter=",") #配列出力 print (im) #画像出力 cv2.imwrite(hoge+'gray.png', im) #作成したテキストファイルを縮小表示すると画像が現れます結果
これが
こうなった!コード解説
①閾値ってなんだ
hoge.py#閾値設定による二値化処理 Threshold = 127 im[im < Threshold] = 0 im[im >= Threshold] = 1簡単に言ったらここから大きいのが0、小さいのが1のように分ける基準
境目みたいなもの参考文献
ないなぁ
目次のようなもの
Re:ゼロから始める機械学習生活(深層学習もあるよ)
ここに進捗状況等を載せてます。
今まで書いたものを一覧にしていたりするので見てみてください!


- 投稿日:2019-10-26T12:47:40+09:00
PythonからBigQuryを読み書きする
環境
macOS Mojava ver 10.14.6 pyenv, pipenv, python ver. 3.6.8ローカル設定
忘れてしまって申し訳ないんですが、多分、gcloudの設定をPCにしておく必要性があった気がする...
$ curl https://sdk.cloud.google.com | bash $ pipenv install gcloud今回使うライブラリをインストール
$ pipenv install google-cloud-bigquery, pyarrow, pandasGCP設定
サービスアカウントの設定
IAMと管理のサービスアカウントから、サービスアカウントを作成する
クレデンシャル情報の取得
Cloud APIを使用する(ローカルからGCPを操作する)場合、サービスを使うための認証情報が必要になるので取得する
Google Cloud Document 認証
1. ServiceAccountを入力し、keyタイプをJSONに選択する。
2. Createボタンを押すとダウンロード画面に行くため、下記フォルダ構成のようにjsonファイルを配置するフォルダ構成
├── main.py <- 実行するファイル ├── utils ├── operation_bigquery.py <- BigQuery操作に関するクラス └── credential-344323q5e32.json <- クレデンシャル情報ソースコード
operation_bigquery.py
import os import pandas from pathlib import Path from datetime import datetime from google.cloud import bigquery from typing import List, Set, Dict, Tuple, TypeVar, Callable class Bigquery_to_Pandas(): ''' BigQuery操作に関するクラス BigQueryのデータをダウンロードしてDataFrameに変換する DataFrameのデータをアップロードしてBigQueryのデータに変換する ''' def __init__(self, parameter: Dict[str, str]) -> None: self.project = parameter['project'] self.dataset = parameter['dataset'] self.table = parameter['table'] self.if_exists = parameter['if_exists'] path = parameter['credential_path'] os.environ["GOOGLE_APPLICATION_CREDENTIALS"] = str((Path(Path.cwd()).parent)/parameter["credential_path"]) self.credentials = str((Path(Path.cwd()).parent)/parameter["credential_path"]) self.client = bigquery.Client.from_service_account_json(self.credentials) def read_bq(self) -> pandas.core.frame.DataFrame: query = f'SELECT * FROM `{self.project}.{self.dataset}.{self.table}`' dataframe = self.client.query(query, project=self.project).to_dataframe() return dataframe def write_bq(self, dataframe: pandas.core.frame.DataFrame) -> None: dataframe.to_gbq(f'{self.dataset}.{self.table}', project_id=self.project, if_exists=self.if_exists) ''' ・ライブラリ側にバグが有るためこちらは使用しない https://github.com/googleapis/google-cloud-python/issues/7370 def write_bq(self, dataframe: pandas.core.frame.DataFrame, dataset: str, table:str) -> None: config = self.client.dataset(dataset).table(table) self.client.load_table_from_dataframe(dataframe, config).result() '''credential-344323q5e32.json
{ "type": "service_account", "project_id": "project-291031", "private_key_id": "464564c7f86786afsa453345dsf234vr32", "private_key": "-----BEGIN PRIVATE KEY-----\ndD\n-----END PRIVATE KEY-----\n", "client_email": "my-email-address@project-291031.iam.gserviceaccount.com", "client_id": "543423423542344334", "auth_uri": "https://accounts.google.com/o/oauth2/auth", "token_uri": "https://oauth2.googleapis.com/token", "auth_provider_x509_cert_url": "https://www.googleapis.com/oauth2/v1/certs", "client_x509_cert_url": "https://www.googleapis.com/robot/v1/metadata/d453/my-email-address@project-291031.iam.gserviceaccount.com" }BigQueryからPythonのpandas.DataFrameへ読み込み
main.py
from utils.operation_bigquery import Bigquery_to_Pandas download_table_path = { "project": "project-291031", "dataset": "datawarehouse", "table": "bigquery_test_table", "credential_path": "utils/credential-344323q5e32.json", "if_exists": "replace" } dataframe = Bigquery_to_Pandas(download_table_path).read_bq()Pythonのpandas.DataFrameからBigQueryへの書き込み
main.py
from utils.operation_bigquery import Bigquery_to_Pandas upload_table_path = { "project": "project-291031", "dataset": "datamart", "table": "bigquery_test_describe_table", "credential_path": "utils/credential-344323q5e32.json", "if_exists": "replace" } Bigquery_to_Pandas(upload_table_path).write_bq(dataframe)
- 投稿日:2019-10-26T12:47:40+09:00
PythonからBigQueryを読み書きする
環境
macOS Mojava ver 10.14.6
pyenv, pipenv, python ver. 3.6.8
ローカル設定
忘れてしまって申し訳ないんですが、多分、gcloudの設定をPCにしておく必要性があった気がする...
$ curl https://sdk.cloud.google.com | bash
$ pipenv install gcloud
今回使うライブラリをインストール
$ pipenv install google-cloud-bigquery, pyarrow, pandasGCP設定
サービスアカウントの設定
IAMと管理のサービスアカウントから、サービスアカウントを作成する
クレデンシャル情報の取得
Cloud APIを使用する(ローカルからGCPを操作する)場合、サービスを使うための認証情報が必要になるので取得する
Google Cloud Document 認証
1. ServiceAccountを入力し、keyタイプをJSONに選択する。
2. Createボタンを押すとダウンロード画面に行くため、下記フォルダ構成のようにjsonファイルを配置するフォルダ構成
├── main.py <- 実行するファイル ├── utils ├── operation_bigquery.py <- BigQuery操作に関するクラス └── credential-344323q5e32.json <- クレデンシャル情報ソースコード
operation_bigquery.pyimport os import pandas from pathlib import Path from datetime import datetime from google.cloud import bigquery from typing import List, Set, Dict, Tuple, TypeVar, Callable class Bigquery_to_Pandas(): ''' BigQuery操作に関するクラス BigQueryのデータをダウンロードしてDataFrameに変換する DataFrameのデータをアップロードしてBigQueryのデータに変換する ''' def __init__(self, parameter: Dict[str, str]) -> None: self.project = parameter['project'] self.dataset = parameter['dataset'] self.table = parameter['table'] self.if_exists = parameter['if_exists'] path = parameter['credential_path'] os.environ["GOOGLE_APPLICATION_CREDENTIALS"] = str((Path(Path.cwd()).parent)/parameter["credential_path"]) self.credentials = str((Path(Path.cwd()).parent)/parameter["credential_path"]) self.client = bigquery.Client.from_service_account_json(self.credentials) def read_bq(self) -> pandas.core.frame.DataFrame: query = f'SELECT * FROM `{self.project}.{self.dataset}.{self.table}`' dataframe = self.client.query(query, project=self.project).to_dataframe() return dataframe def write_bq(self, dataframe: pandas.core.frame.DataFrame) -> None: dataframe.to_gbq(f'{self.dataset}.{self.table}', project_id=self.project, if_exists=self.if_exists) ''' ・ライブラリ側にバグが有るためこちらは使用しない https://github.com/googleapis/google-cloud-python/issues/7370 def write_bq(self, dataframe: pandas.core.frame.DataFrame, dataset: str, table:str) -> None: config = self.client.dataset(dataset).table(table) self.client.load_table_from_dataframe(dataframe, config).result() '''credential-344323q5e32.json{ "type": "service_account", "project_id": "project-291031", "private_key_id": "464564c7f86786afsa453345dsf234vr32", "private_key": "-----BEGIN PRIVATE KEY-----\ndD\n-----END PRIVATE KEY-----\n", "client_email": "my-email-address@project-291031.iam.gserviceaccount.com", "client_id": "543423423542344334", "auth_uri": "https://accounts.google.com/o/oauth2/auth", "token_uri": "https://oauth2.googleapis.com/token", "auth_provider_x509_cert_url": "https://www.googleapis.com/oauth2/v1/certs", "client_x509_cert_url": "https://www.googleapis.com/robot/v1/metadata/d453/my-email-address@project-291031.iam.gserviceaccount.com" }BigQueryからPythonのpandas.DataFrameへ読み込み
main.pyfrom utils.operation_bigquery import Bigquery_to_Pandas download_table_path = { "project": "project-291031", "dataset": "datawarehouse", "table": "bigquery_test_table", "credential_path": "utils/credential-344323q5e32.json", "if_exists": "replace" } dataframe = Bigquery_to_Pandas(download_table_path).read_bq()Pythonのpandas.DataFrameからBigQueryへの書き込み
main.pyfrom utils.operation_bigquery import Bigquery_to_Pandas upload_table_path = { "project": "project-291031", "dataset": "datamart", "table": "bigquery_test_describe_table", "credential_path": "utils/credential-344323q5e32.json", "if_exists": "replace" } Bigquery_to_Pandas(upload_table_path).write_bq(dataframe)
- 投稿日:2019-10-26T12:47:40+09:00
PythonからBigQueryを読み書きするクラス
環境
macOS Mojava ver 10.14.6
pyenv, pipenv, python ver. 3.6.8
ローカル設定
忘れてしまって申し訳ないんですが、多分、gcloudの設定をPCにしておく必要性があった気がする...
$ curl https://sdk.cloud.google.com | bash
$ pipenv install gcloud
今回使うライブラリをインストール
$ pipenv install google-cloud-bigquery, pyarrow, pandasGCP設定
サービスアカウントの設定
IAMと管理のサービスアカウントから、サービスアカウントを作成する
クレデンシャル情報の取得
Cloud APIを使用する(ローカルからGCPを操作する)場合、サービスを使うための認証情報が必要になるので取得する
Google Cloud Document 認証
1. ServiceAccountを入力し、keyタイプをJSONに選択する。
2. Createボタンを押すとダウンロード画面に行くため、下記フォルダ構成のようにjsonファイルを配置するフォルダ構成
├── main.py                          <- 実行するファイル
├── utils
    ├── operation_bigquery.py        <- BigQuery操作に関するクラス
    └── credential-344323q5e32.json  <- クレデンシャル情報
ソースコード
operation_bigquery.pyimport os import pandas from pathlib import Path from datetime import datetime from google.cloud import bigquery from typing import List, Set, Dict, Tuple, TypeVar, Callable class Bigquery_to_Pandas(): ''' BigQuery操作に関するクラス BigQueryのデータをダウンロードしてDataFrameに変換する DataFrameのデータをアップロードしてBigQueryのデータに変換する ''' def __init__(self, parameter: Dict[str, str]) -> None: self.project = parameter['project'] self.dataset = parameter['dataset'] self.table = parameter['table'] self.if_exists = parameter['if_exists'] path = parameter['credential_path'] os.environ["GOOGLE_APPLICATION_CREDENTIALS"] = str((Path(Path.cwd()).parent)/parameter["credential_path"]) self.credentials = str((Path(Path.cwd()).parent)/parameter["credential_path"]) self.client = bigquery.Client.from_service_account_json(self.credentials) def read_bq(self) -> pandas.core.frame.DataFrame: query = f'SELECT * FROM `{self.project}.{self.dataset}.{self.table}`' dataframe = self.client.query(query, project=self.project).to_dataframe() return dataframe def write_bq(self, dataframe: pandas.core.frame.DataFrame) -> None: dataframe.to_gbq(f'{self.dataset}.{self.table}', project_id=self.project, if_exists=self.if_exists) ''' ・ライブラリ側にバグが有るためこちらは使用しない https://github.com/googleapis/google-cloud-python/issues/7370 def write_bq(self, dataframe: pandas.core.frame.DataFrame, dataset: str, table:str) -> None: config = self.client.dataset(dataset).table(table) self.client.load_table_from_dataframe(dataframe, config).result() '''credential-344323q5e32.json{ "type": "service_account", "project_id": "project-291031", "private_key_id": "464564c7f86786afsa453345dsf234vr32", "private_key": "-----BEGIN PRIVATE KEY-----\ndD\n-----END PRIVATE KEY-----\n", "client_email": "my-email-address@project-291031.iam.gserviceaccount.com", "client_id": "543423423542344334", "auth_uri": "https://accounts.google.com/o/oauth2/auth", "token_uri": "https://oauth2.googleapis.com/token", "auth_provider_x509_cert_url": "https://www.googleapis.com/oauth2/v1/certs", "client_x509_cert_url": "https://www.googleapis.com/robot/v1/metadata/d453/my-email-address@project-291031.iam.gserviceaccount.com" }BigQueryからPythonのpandas.DataFrameへ読み込み
main.pyfrom utils.operation_bigquery import Bigquery_to_Pandas download_table_path = { "project": "project-291031", "dataset": "datawarehouse", "table": "bigquery_test_table", "credential_path": "utils/credential-344323q5e32.json", "if_exists": "replace" } dataframe = Bigquery_to_Pandas(download_table_path).read_bq()Pythonのpandas.DataFrameからBigQueryへの書き込み
main.pyfrom utils.operation_bigquery import Bigquery_to_Pandas upload_table_path = { "project": "project-291031", "dataset": "datamart", "table": "bigquery_test_describe_table", "credential_path": "utils/credential-344323q5e32.json", "if_exists": "replace" } Bigquery_to_Pandas(upload_table_path).write_bq(dataframe)
- 投稿日:2019-10-26T12:14:47+09:00
Windows10+Python3.7.x+OpenCV-Python4.1.x+wxPython4.0.x/PyQt5/Tkinter+USBWebcamの環境構築例
無 保 証 で す
総合もくじ
Python3.7.x+OpenCV4.1.x+wxPython4.0.x+USBWebcamのクロスプラットフォームな環境構築事例集
想定する運用スタイル
- OpenCV を利用する GUI アプリケーションを wxPython により構築する。
- Webcam を USB 接続し OpenCV から利用する。
- Python 向けパッケージは pip + venv で管理する。
- 異なるプラットフォームにおける作業手順を出来るだけ統一化する。1
※ インストール済みの Python パッケージ全てのアップグレードについては以下を参照下さい。
How to upgrade all Python packages with pip? - Stack OverflowWindows における統合パッケージマネジメントシステム Chocolatey
Windows 向けの(apt や yum、brew のような)パッケージマネジメントシステムのひとつに Chocolatey がある。Windows においても、コマンドラインからオープンソースソフトウェアのインストール・アップデート・アンインストールを一元的に行えるのはありがたい。
個人で利用する場合、インストールは Chocolatey Software | Installing Chocolatey の Step 2: Choose Your Installation Method の Individual の Now run the following command: 以下のワンライナーを、管理者権限で立ち上げた PowerShell にコピペして実行。このあたりは Mac の Homebrew の導入過程に似ている。
備考:Chocolatey の運用に関して
Chocolatey の運用に関して
Chocolatey でパッケージのインストールに失敗する場合、該当アカウントを管理者に設定してから再度ログインし Chocolatey を実行することで、問題を回避出来るかもしれません。
管理者ではないユーザーアカウント向けには Chocolatey Software | Installation | Non-Administrative install が参考になりそうです。また、https://chocolatey.org/packages?q=tag%3Aportable で管理者権限不要でインストール可能なパッケージの一覧を参照可能であるようです。
自分の環境では、Atom をインストールしようとした際に、一時的に管理者に昇格してインストールしようとしてもフォルダへのアクセス権の問題でインストールに失敗し、管理者アカウントでログインして Chocolatey からインストールした Atom は一般ユーザーのアプリケーションメニューに現れませんでした。
ソフトウェアによっては用途に対してバージョンが古過ぎる/あたらし過ぎる場合があります。必要に応じて Pin 留め機能を活用すると良いでしょう。
※ 本稿掲載手順では Python 3.7.5 をインストール後、Pin 留め機能でバージョンを固定してあります。参考とした文献
参考とした文献
Chocolatey Software | Chocolatey - The package manager for Windows
https://chocolatey.org/GitHub - chocolatey/choco: Chocolatey - the package manager for Windows
https://github.com/chocolatey/chocoChocolateyのセットアップ - bakemoji |> log
http://bakemoji.hatenablog.jp/entry/2014/01/04/200653【Chocolatey入門】導入から注意点、今後の可能性まで - Qiita
https://qiita.com/kangetsu121/items/b6352b547cd32e71bc65Chocolateyを使った環境構築の時のメモ - Qiita
https://qiita.com/konta220/items/95b40b4647a737cb51aa環境構築スクリプト記述例
Windows/PowerShell 向け環境構築スクリプト
powershellスクリプト記述例choco install python3 --version=3.7.5 choco pin add --name=python3 --version=3.7.5 refreshenv $INSTALLED_PYTHON3_VERSION="37" $env:PATH="C:\Python$INSTALLED_PYTHON3_VERSION\Scripts;C:\Python$INSTALLED_PYTHON3_VERSION;$env:PATH" $VENV_DIR="$HOME\testenv" mkdir $VENV_DIR cd $VENV_DIR python -m venv .\py3env . .\py3env\Scripts\activate.ps1 pip install --upgrade pip setuptools pip install opencv-python wxPython deactivate cd "$HOME"※ 環境やインストールの種類によって、Python3 のパスは
$env:PATH="$HOME\AppData\Local\Programs\Python\Python37;$HOME\AppData\Local\Programs\Python\Python37\Scripts;$env:PATH"等とする必要があるかもしれません。※ ドット ソース を UNIX 系の . コマンドの感覚で使いました。使い方、使いどころを間違えていたらごめんなさい。
参考とした文献
参考とした文献
PowerShellで環境変数を設定する - bakemoji |> log
http://bakemoji.hatenablog.jp/entry/2014/01/09/235409事前準備:Python3 の環境構築
Python3 の導入
公式サイトからダウンロード&インストール、もしくは Chocoratey で導入。
Python Releases for Windows | Python.org
https://www.python.org/downloads/windows/Windows 環境のPython - python.jp
https://www.python.jp/install/windows/index.htmlChocorateyによるインストール例choco install python3 --version=3.7.5 choco pin add --name=python3 --version=3.7.5https://chocolatey.org/packages?q=python3
CommandsPin · chocolatey/choco Wiki · GitHub
https://github.com/chocolatey/choco/wiki/CommandsPin※ 今回の記事では 3.8.0 の採用は見送り、3.7.5 で Pin 留めです。
venv による仮想環境の構築
Comand_PromptC:\Users\foobar>mkdir testenv C:\Users\foobar>cd testenv C:\Users\foobar\testenv>python -m venv .\py3env C:\Users\foobar\testenv>.\py3env\Scripts\activate.bat (py3env) C:\Users\foobar\testenv>deactivate C:\Users\foobar\testenv>PowerShellCore/Windows_PowerShellPS C:\Users\foobar> mkdir testenv PS C:\Users\foobar> cd testenv PS C:\Users\foobar\testenv> python -m venv .\py3env PS C:\Users\foobar\testenv> .\py3env\Scripts\activate.ps1 (py3env) PS C:\Users\foobar\testenv> deactivate PS C:\Users\foobar\testenv>Command Prompt と PowerShell での手順の違いは activate~ の行。
参考とした文献
参考とした文献
仮想環境 - python.jp
https://www.python.jp/install/windows/venv.htmlvenv --- 仮想環境の作成 — Python 3.7.4 ドキュメント
https://docs.python.org/ja/3/library/venv.htmlCコンパイラのインストール - python.jp
https://www.python.jp/install/windows/install_vstools2017.htmlopencv-python と wxPython の導入:pip を利用する場合
OpenCV 4.1.x のインストール
PowerShellcd "$HOME\testenv" . .\py3env\Scripts\activate.ps1 pip install opencv-python pip show opencv-python deactivate cd "$HOME"wxPython(4.0.x)のインストール
PowerShellcd "$HOME\testenv" . .\py3env\Scripts\activate.ps1 pip install wxPython pip show wxPython deactivate cd "$HOME"MSYS2 を用いた Unix系 OS との操作性・整備性の共通化
各種 Linux や FreeBSD 、及び MacOS と出来る限り保守管理時の手続きを共通化する試み。
手元の環境では MSYS2 の MinGW64 サブシステム上でビルドした opencv の python3 モジュールから、問題なく USB Webcam にアクセス出来た。
比較:WSL を用いたアプローチ
OpenOCDをwslでWindows用にクロスコンパイルする - Qiita
https://qiita.com/qawsed477/items/2f93f2c1ff0de6fef038WSLとVisual Studio CodeでC/C++開発環境を楽して作る(2019年7月) - Qiita
https://qiita.com/LyricalSora/items/643891225ed029848bc6MSYS2 の導入
公式サイトからダウンロード&インストール、もしくは Chocoratey で導入
公式サイト
https://www.msys2.org/GitHub
https://github.com/msys2公式 Wiki のMSYS2 のインストール方法について書かれた記事
https://github.com/msys2/msys2/wiki/MSYS2-installationChocorateyによるインストール例choco install msys2https://chocolatey.org/packages?q=msys2
MSYS2 の環境構築
公式ドキュメント
Home · msys2/msys2 Wiki · GitHub
https://github.com/msys2/msys2/wikiMSYS2 introduction · msys2/msys2 Wiki · GitHub
https://github.com/msys2/msys2/wiki/MSYS2-introductionHow does MSYS2 differ from Cygwin · msys2/msys2 Wiki · GitHub
https://github.com/msys2/msys2/wiki/How-does-MSYS2-differ-from-Cygwin公式ドキュメント “MSYS2 introduction” より訳出
原文→訳
MSYS2 introduction
David Macek edited this page on 11 Jul 2018 · 4 revisions
https://github.com/msys2/msys2/wiki/MSYS2-introduction※ 辞書として英和辞典・和英辞典 - Weblio辞書及びgoo辞書 - 国語・英語・四字熟語のオンライン辞書を利用しました。
Summary / 概要
MSYS2 is software distribution and a building platform for Windows. It provides a Unix-like environment, a command-line interface and a software repository making it easier to install, use, build and port software on Windows. That means Bash, Autotools, Make, Git, GCC, GDB..., all easily installable through Pacman, a fully-featured package manager.
MSYS2 は Windows 向けのソフトウェアディストリビューション、兼、ソフトウェアビルドプラットフォームであり、これは Windows におけるインストール、ビルド、及び移植作業の手間を減らすための UNIX ライクな環境、コマンドラインインタフェース、及びソフトウェアリポジトリを提供します。加えて、高機能なパッケージマネージャである pacman により bash や autotools、make、git、gcc、gdb といったあらゆる開発ソフトウェアを容易に導入することが可能です。
It is an independent rewrite of MSys, based on modern Cygwin (POSIX compatibility layer) and MinGW-w64 with the aim of better interoperability with native Windows software.
MSYS2 は MSys とは独立に、最新の Cygwin(POSIX 互換レイヤー)と MinGW-w64 をベースに、Windowsネイティブのソフトウェアとのより良い相互運用性を照準として、新たに書き下ろされました。
Both 32-bit and 64-bit variants exist and receive mostly the same level of support. Here is an irregularly updated list of packages we provide.
MSYS2 には 32bit と 64bit のバリエーションが存在し、両者はほぼ等しい水準で維持・管理されています。提供されているパッケージのリストはこちらを参照ください。
Subsystems / サブシステム
MSYS2 consists of three subsystems and their corresponding package repositories, msys2, mingw32, and mingw64.
MSYS2 は MSYS、MinGW32、MinGW64、の 3 つのサブシステム、及びサブシステム間で共用されるパッケージリポジトリで構成されます。
The mingw subsystems provide native Windows programs and are the main focus of the project. These programs are built to co-operate well with other Windows programs, independently of the other subsystems. This part builds on the MinGW-w64 project.
MinGW(32/64)サブシステムは Windows ネイティブのプログラムを提供する、MSYS2プロジェクトの中核です。このサブシステムで提供されるプログラムは他のサブシステムとは独立に、かつ MSYS2 外の Windows プログラムとより良く連携するようにビルドされています。MinGW サブシステムは MinGW-w64 プロジェクト(の成果物)を基盤として構築されています。
The msys2 subsystem provides an emulated mostly-POSIX-compliant environment for building software, package management, and shell scripting. These programs live in a virtual single-root filesystem (the root is the MSYS2 installation directory). Some effort is made to have the programs work well with native Windows programs, but it's not seamless. This part builds on the Cygwin project.
MSYS サブシステムは(UNIX 向けの)ソフトウェアのビルド、(MSYS2全体の)パッケージ管理、そして(一般的な)シェルスクリプトプログラミングを目的として構築された、疑似POSIX(ほぼ)対応環境を提供します。このサブシステム上のプログラムは、(Windowsネイティブのプログラムとは違って)自身の置かれたディレクトリの構造を、仮想の単一の根(ルートディレクトリ(/)は MSYS2 がインストールされたフォルダに対応)を持つ木構造のファイルシステムとして認識します。Windows ネイティブのプログラムとより良く連携出来るよういくつか工夫が施されていますが、シームレスにとはいきません。MSYS サブシステムは Cygwin プロジェクト(の成果物)を基盤として構築されています。
Each of the subsystems provides its own native (i.e. target=host) compiler toolchain, in msys2-devel, mingw-w64-i686-toolchain, and mingw-w64-x86_64-toolchain. There are also cross compiler toolchains with host={i686,x86_64}-pc-msys and target={i686,x86_64}-w64-mingw32 in mingw-w64-cross-toolchain, but these are of limited use because there are no library packages for them.
それぞれのサブシステムは各サブシステムに対してネイティブな(target=host、つまりPOSIX=POSIX/Win32=Win32/Win64=Win64 であるような)コンパイラ一式、すなわち、msys2-devel、mingw-w64-i686-toolchain、そして mingw-w64-x86_64-toolchain を提供します。また、mingw-w64-cross-toolchain として host={i686,x86_64}-pc-msys で target={i686,x86_64}-w64-mingw32 であるようなクロスコンパイラ一式も提供されています。しかし、クロスコンパイラは対応する専用ライブラリを欠くため、活用範囲は限定された用途に留まります。
Shells / サブシステム毎のシェル環境
Every subsystem has an associated "shell", which is essentially a set of environment variables that allow the subsystems to co-operate properly. These shells can be invoked using launchers in the MSYS2 installation directory or using the shortcuts in the Windows Start menu. The launchers set the MSYSTEM variable and open a terminal window (mintty) with a proper shell (bash). Bash in turn sources /etc/profile which sets the environment depending on the value of MSYSTEM.
各サブシステムはそれぞれに対して関連付けられた専用のシェル環境を有します。このシェル環境は、基本的にはサブシステムが適切に運用されるよう設定された一連の環境変数で構成されています。これらシェル環境は MSYS2 のインストール先ディレクトリに置かれたランチャー、もしくは Windows のスタートメニューに登録されたショートカットから呼び出されます。ランチャーは環境変数 MSYSTEM を設定し、ターミナルウィンドウ(mintty)上で規定のシェルプログラム(bash)を起動します。bash は /etc/profile をソースします(source /etc/profile)。その際、環境変数 MSYSTEM に従って、シェル環境が設定されます。
資料:MSYS2 の /etc/profile
※ /etc/profile は zsh,tcsh,fish で source しようとするとエラーを吐き、mksh や dash で source すると一部環境変数が設定されませんでした。# To the extent possible under law, the author(s) have dedicated all # copyright and related and neighboring rights to this software to the # public domain worldwide. This software is distributed without any warranty. # You should have received a copy of the CC0 Public Domain Dedication along # with this software. # If not, see <http://creativecommons.org/publicdomain/zero/1.0/>. # System-wide profile file # Some resources... # Customizing Your Shell: http://www.dsl.org/cookbook/cookbook_5.html#SEC69 # Consistent BackSpace and Delete Configuration: # http://www.ibb.net/~anne/keyboard.html # The Linux Documentation Project: http://www.tldp.org/ # The Linux Cookbook: http://www.tldp.org/LDP/linuxcookbook/html/ # Greg's Wiki http://mywiki.wooledge.org/ # Setup some default paths. Note that this order will allow user installed # software to override 'system' software. # Modifying these default path settings can be done in different ways. # To learn more about startup files, refer to your shell's man page. MSYS2_PATH="/usr/local/bin:/usr/bin:/bin" MANPATH='/usr/local/man:/usr/share/man:/usr/man:/share/man' INFOPATH='/usr/local/info:/usr/share/info:/usr/info:/share/info' case "${MSYS2_PATH_TYPE:-minimal}" in strict) # Do not inherit any path configuration, and allow for full customization # of external path. This is supposed to be used in special cases such as # debugging without need to change this file, but not daily usage. unset ORIGINAL_PATH ;; inherit) # Inherit previous path. Note that this will make all of the Windows path # available in current shell, with possible interference in project builds. ORIGINAL_PATH="${ORIGINAL_PATH:-${PATH}}" ;; *) # Do not inherit any path configuration but configure a default Windows path # suitable for normal usage with minimal external interference. WIN_ROOT="$(PATH=${MSYS2_PATH} exec cygpath -Wu)" ORIGINAL_PATH="${WIN_ROOT}/System32:${WIN_ROOT}:${WIN_ROOT}/System32/Wbem:${WIN_ROOT}/System32/WindowsPowerShell/v1.0/" esac unset MINGW_MOUNT_POINT . '/etc/msystem' case "${MSYSTEM}" in MINGW32) MINGW_MOUNT_POINT="${MINGW_PREFIX}" PATH="${MINGW_MOUNT_POINT}/bin:${MSYS2_PATH}${ORIGINAL_PATH:+:${ORIGINAL_PATH}}" PKG_CONFIG_PATH="${MINGW_MOUNT_POINT}/lib/pkgconfig:${MINGW_MOUNT_POINT}/share/pkgconfig" ACLOCAL_PATH="${MINGW_MOUNT_POINT}/share/aclocal:/usr/share/aclocal" MANPATH="${MINGW_MOUNT_POINT}/local/man:${MINGW_MOUNT_POINT}/share/man:${MANPATH}" ;; MINGW64) MINGW_MOUNT_POINT="${MINGW_PREFIX}" PATH="${MINGW_MOUNT_POINT}/bin:${MSYS2_PATH}${ORIGINAL_PATH:+:${ORIGINAL_PATH}}" PKG_CONFIG_PATH="${MINGW_MOUNT_POINT}/lib/pkgconfig:${MINGW_MOUNT_POINT}/share/pkgconfig" ACLOCAL_PATH="${MINGW_MOUNT_POINT}/share/aclocal:/usr/share/aclocal" MANPATH="${MINGW_MOUNT_POINT}/local/man:${MINGW_MOUNT_POINT}/share/man:${MANPATH}" ;; *) PATH="${MSYS2_PATH}:/opt/bin${ORIGINAL_PATH:+:${ORIGINAL_PATH}}" PKG_CONFIG_PATH="/usr/lib/pkgconfig:/usr/share/pkgconfig:/lib/pkgconfig" esac MAYBE_FIRST_START=false SYSCONFDIR="${SYSCONFDIR:=/etc}" # TMP and TEMP as defined in the Windows environment must be kept # for windows apps, even if started from msys2. However, leaving # them set to the default Windows temporary directory or unset # can have unexpected consequences for msys2 apps, so we define # our own to match GNU/Linux behaviour. # # Note: this uppercase/lowercase workaround does not seem to work. # In fact, it has been removed from Cygwin some years ago. See: # # * https://cygwin.com/git/gitweb.cgi?p=cygwin-apps/base-files.git;a=commitdiff;h=3e54b07 # * https://cygwin.com/git/gitweb.cgi?p=cygwin-apps/base-files.git;a=commitdiff;h=7f09aef # ORIGINAL_TMP="${ORIGINAL_TMP:-${TMP}}" ORIGINAL_TEMP="${ORIGINAL_TEMP:-${TEMP}}" unset TMP TEMP tmp=$(exec cygpath -w "$ORIGINAL_TMP" 2> /dev/null) temp=$(exec cygpath -w "$ORIGINAL_TEMP" 2> /dev/null) TMP="/tmp" TEMP="/tmp" # Define default printer p='/proc/registry/HKEY_CURRENT_USER/Software/Microsoft/Windows NT/CurrentVersion/Windows/Device' if [ -e "${p}" ] ; then read -r PRINTER < "${p}" PRINTER=${PRINTER%%,*} fi unset p print_flags () { (( $1 & 0x0002 )) && echo -n "binary" || echo -n "text" (( $1 & 0x0010 )) && echo -n ",exec" (( $1 & 0x0040 )) && echo -n ",cygexec" (( $1 & 0x0100 )) && echo -n ",notexec" } # Shell dependent settings profile_d () { local file= for file in $(export LC_COLLATE=C; echo /etc/profile.d/*.$1); do [ -e "${file}" ] && . "${file}" done if [ -n "${MINGW_MOUNT_POINT}" ]; then for file in $(export LC_COLLATE=C; echo ${MINGW_MOUNT_POINT}/etc/profile.d/*.$1); do [ -e "${file}" ] && . "${file}" done fi } for postinst in $(export LC_COLLATE=C; echo /etc/post-install/*.post); do [ -e "${postinst}" ] && . "${postinst}" done if [ ! "x${BASH_VERSION}" = "x" ]; then HOSTNAME="$(exec /usr/bin/hostname)" profile_d sh [ -f "/etc/bash.bashrc" ] && . "/etc/bash.bashrc" elif [ ! "x${KSH_VERSION}" = "x" ]; then typeset -l HOSTNAME="$(exec /usr/bin/hostname)" profile_d sh PS1=$(print '\033]0;${PWD}\n\033[32m${USER}@${HOSTNAME} \033[33m${PWD/${HOME}/~}\033[0m\n$ ') elif [ ! "x${ZSH_VERSION}" = "x" ]; then HOSTNAME="$(exec /usr/bin/hostname)" profile_d sh profile_d zsh PS1='(%n@%m)[%h] %~ %% ' elif [ ! "x${POSH_VERSION}" = "x" ]; then HOSTNAME="$(exec /usr/bin/hostname)" PS1="$ " else HOSTNAME="$(exec /usr/bin/hostname)" profile_d sh PS1="$ " fi if [ -n "$ACLOCAL_PATH" ] then export ACLOCAL_PATH fi export PATH MANPATH INFOPATH PKG_CONFIG_PATH USER TMP TEMP PRINTER HOSTNAME PS1 SHELL tmp temp ORIGINAL_TMP ORIGINAL_TEMP ORIGINAL_PATH unset PATH_SEPARATOR if [ "$MAYBE_FIRST_START" = "true" ]; then sh /usr/bin/regen-info.sh if [ -f "/usr/bin/update-ca-trust" ] then sh /usr/bin/update-ca-trust fi clear echo echo echo "###################################################################" echo "# #" echo "# #" echo "# C A U T I O N #" echo "# #" echo "# This is first start of MSYS2. #" echo "# You MUST restart shell to apply necessary actions. #" echo "# #" echo "# #" echo "###################################################################" echo echo fi unset MAYBE_FIRST_STARTWithout the correct environment, various things may and will (sometimes silently) break. The exception is using mingw subsystems from pure Windows, which shouldn't require any special environment apart from an entry in PATH. Do not set MSYSTEM outside of the shells, because that will also break things.
適切な環境が設定されていない場合、様々な箇所・場面で(時には兆候無く)システムが破綻をきたすかもしれません。例外は MinGW(32/64)サブシステムを通常の(PATH への必要な項目の追加を除き、いかなる特殊な実行環境も必要としない)Windows 側から利用する場合です。なお、シェル環境の諸々が不具合を起こし得るので、シェル環境の外部で MSYSTEM を設定する(Windows の標準環境変数として MSYSTEM を設定する等)ことをしないで下さい。
※ 訳注:“apart from an entry in PATH” に関して。例として、MinGW(32/64)環境でビルドしたアプリを単体動作させる場合は、ビルド時にコンパイラのオプションに "-static" を加えるか、Windows の PATH に例えば C:\msys64\mingw32\bin もしくは C:\msys64\mingw64\bin を加える必要がありました。
※ 訳注:MSYS2 の MinGW(32/64)サブシステムでビルドしたアプリを配布する際、winpthreads 等のライブラリを同梱し再配布する、もしくはアプリにスタティックリンクする場合はその使用許諾に気を配りましょう。
PATH / パス
For optimal usage, MSYS2 automatically strips your PATH environment variable, essentially only leaving C:\Windows\System32 and few others. This behavior can be controlled by setting the variable MSYS2_PATH_TYPE before starting a shell or using a correct argument when executing the launcher script. Beware that mixing in programs from other MSYS2 installations, Cygwin installations, compiler toolchains or even various other programs is not supported and will probably break things in unexpected ways. Do not have these things in PATH when running MSYS2 unless you know what you're doing.
サブシステムを最適な状態で利用可能とするために、MSYS2 は自動で Windows 側の環境変数 PATH から不要な値を取り除き、C:\Windows\System32 などをわずかな例外として残します。このフィルタのふるまいはシェルの起動前に設定された環境変数 MSYS2_PATH_TYPE によって、もしくはランチャースクリプトに渡された適切な引数によって制御されます。注意すべき点として、同じシステム上にインストールされた Cygwin や 他の MSYS2 、及びコンパイラ一式、その他各種ツールとの混用はサポートされておらず、想定外の使用方法により不具合がもたらされ得ることが挙げられます。自分が行う操作の意味を理解しないまま、むやみに MSYS2 の環境変数 PATH を変更することは避けて下さい。
※ 訳注:C:\Windows\System32 が PATH に組み込まれているので、例えば notepad ~/.bashrc なども可能です。
Use msys2 shell for running pacman, makepkg, makepkg-mingw and for building POSIX-dependent software that you don't intend to distribute. Use mingw shells for building native Windows software and other tasks.
pacman や、makepkg、makepkg-mingw の実行、及び(Windows ネイティブアプリケーションとして)配布するつもりのない POSIX 準拠のソフトウェアのビルドには MSYS シェルを用いて下さい。MinGW(32/64)シェルは Windows ネイティブなソフトウェアのビルドや関連する作業に用いて下さい。
Packages / パッケージ
MSYS2 uses a port of Arch Linux's pacman for package management. This brings many powerful features such as dependency resolution and simple complete system upgrades, as well as providing the build system (makepkg-mingw) - which is used to make these packages.
MSYS2 ではパッケージ管理に Arch Linux から移植された pacman を使用します。これにより、MSYS2 にはパッケージ間の依存関係の解決、必要十分なシステムのアップグレード機能、そしてパッケージ構築の為のビルドシステム(makepkg-mingw)等、多くの強力な機能がもたらされました。
Packages for msys2 are built from recipes in the msys2-packages Git repository, packages for mingw are in mingw-packages. Official repositories are on GitHub under user Alexpux and on SF.net under the MSYS2 project. When looking for msys2 packages or deciding to create a new one, keep in mind that MSYS2 doesn't intend to compete with Cygwin or duplicate their efforts. The set of things that belong to the msys2 subsystem is pretty small and needs to stay that way.
MSYS2 のパッケージについては、MSYS サブシステム用のパッケージは Git の MSYS2-packages のレシピから、MinGW(32/64)サブシステム用のパッケージは同じく Git の MINGW-packages のレシピから構築されます。公式パッケージリポジトリは SourceForge の MSYS2 プロジェクトの配下に存在します。MSYS サブシステム向けのパッケージを探していたり、あるいは MSYS サブシステム向けにパッケージを作ろうと決めた場合には、MSYS2 プロジェクトが Cygwin プロジェクトとの競合や置き換えを志向してはいないことを心に留めて下さい。MSYS サブシステムに属する一連のソフトウェア環境は最小限であり、それは最小限に留める必要があってのことなのです。
※ 訳注:MSYS2 のパッケージ検索は https://packages.msys2.org/search で行えます。
※ 訳注:https://github.com/Alexpux 配下ではパッケージリポジトリを見つけられませんでした。
資料:MSYS2 の /etc/pacman.d/mirrorlist.mingw32
##
## 32-bit Mingw-w64 repository mirrorlist
##

## Primary
## msys2.org
Server = http://repo.msys2.org/mingw/i686/
Server = https://sourceforge.net/projects/msys2/files/REPOS/MINGW/i686/
Server = http://www2.futureware.at/~nickoe/msys2-mirror/mingw/i686/
Server = https://mirror.yandex.ru/mirrors/msys2/mingw/i686/
資料:MSYS2 の /etc/pacman.d/mirrorlist.mingw64
##
## 64-bit Mingw-w64 repository mirrorlist
##

## Primary
## msys2.org
Server = http://repo.msys2.org/mingw/x86_64/
Server = https://sourceforge.net/projects/msys2/files/REPOS/MINGW/x86_64/
Server = http://www2.futureware.at/~nickoe/msys2-mirror/mingw/x86_64/
Server = https://mirror.yandex.ru/mirrors/msys2/mingw/x86_64/
資料:MSYS2 の /etc/pacman.d/mirrorlist.msys
##
## MSYS2 repository mirrorlist
##

## Primary
## msys2.org
Server = http://repo.msys2.org/msys/$arch/
Server = https://sourceforge.net/projects/msys2/files/REPOS/MSYS2/$arch/
Server = http://www2.futureware.at/~nickoe/msys2-mirror/msys/$arch/
Server = https://mirror.yandex.ru/mirrors/msys2/msys/$arch/
You might be wondering why there appears to be only one arch variant of the msys2 repository. In reality there are two, but the decision about which one to use is made at the time you install it, depending on whether you installed the i686 or the x86_64 version. It is possible to install both if you wish. Actually, you can have multiple installations of each on your computer, but you should never run programs from two different MSYS2 XXbit variants at the same time due to DLL address space and version conflicts. Also note that the uninstaller will only remove the most recently installed one of each variant).
MSYS2 のリポジトリにおける対応アーキテクチャが表面的にはひとつ(パッケージマネージャから見えるパッケージ名が i686 版と x86_64 版で同じ)である点を不思議に思われるかもしれません。実際のところ、リポジトリは 2 種類のアーキテクチャに対応しているのですが、インストールの際に i686 版インストーラを使用するか、x86-64 版インストーラを使用するかによって、MSYS2 がどちらのアーキテクチャ向けのリポジトリを使用するかが決まります。
望むなら i686 版と x86_64 版の両方をひとつのコンピュータにインストールすることも可能です。とはいえ、確かに同じPCに両方をインストールしてはおけるものの、DLL のアドレス空間の衝突やバージョンの衝突が発生するので i686 版と x86_64 版の MSYS2 それぞれから同時にプログラムを走らせるべきではありません(MSYS2 のアンインストール時、アンインストーラが i686 版と x86_64 版の両者のうち最後にインストールされた一点を削除することにも注意してください)。
File system / ファイルシステム
The virtual filesystem contains:
Paths Contents /bin, /dev, /home, /opt, /proc, /tmp, /var essential POSIX stuff /etc, /usr msys2 subsystem /mingw32, /mingw64 mingw subsystems /c, /d, ... mount points for Windows drives /*.xml, /maintenancetool.*, InstallationLog.txt (un)installer /autorebase.bat, /msys2_shell.cmd, /msys2.ico shell entry points 仮想ファイルシステムの内訳:
パス 内容 /bin, /dev, /home, /opt, /proc, /tmp, /var 基本的 POSIX 要素 /etc, /usr MSYS サブシステム /mingw32, /mingw64 MinGW(32/64)サブシステム /c, /d, ... Windowsドライブのマントポイント /*.xml, /maintenancetool.*, InstallationLog.txt (アン)インストーラ /autorebase.bat, /msys2_shell.cmd, /msys2.ico スタートメニューへの登録要素
おまけ:ノムリッシュ翻訳
Summary / ファブラ・ノヴァ・クリスタリス
その門が開かれたとき、真実の人間の物語に命を賭す。
世界は光と闇でできている─
MSYSデュエット は 全てを司る精神世界の窓 特化型のソフトウェ・ウァデュィストゥ・リスヴィューション――もう、泣かないよ――、兼、ソフトウェア・・・、即ちΩ(オメガ)、愛と平和の世界を創りし者神の拠り所で感謝するぞ、…間違いない、これは Windows におけるアビリティセット、愛と平和の世界を創りし者、及び移植日々の営みのプレイ時間を討滅する…そう、すべてはクリスタルのための UNIX ライク-モーグリを添えて-な環境、必殺技を選んで 左 右 左 Aだ!リンクシェルあの「優しき世界」を滅ぼしたインタフェース、つまり「ルシス」、及び聖なる力をその身に宿すソフトゥウェ=ウァ…悪いが君は用済みなんだ…リスポ・ズィトゥリス【重要機密につき検閲】を継承し、そして――少女たちのちょっと不思議な冒険が今、始まります――。
加えて、神の御許へと誘う魔導システムな聖なる衣いきなりラスボス級に遭遇したメィヌェー=ジャである pacman により bash や autotools、make、git、gcc、gdb と死んだはずのガラフがしゃべった森羅万象に導かれる世界を切り開く純化されたソフトゥウェ・ウァを容易の前にただ、“死”あるのみ…にジャンクション…そして世界は滅亡する事象が可能だろう、な…。
MSYS弐 は MSys とは世界の『システム』からの解脱に、新たなる運命を彩るの Cygwin(…これが帝国の……POSIX ブレイザー・オート・ゴカン俄然レイヤー…ま、どーでもいいけど………か……)と MinGW-wファイナルファンタジーを起動できぬ無用の機械 を四柱に、全てを司る精神世界の窓地上人(ラムズ)のソフトゥウェウァ女王陛下とのより僅かな犠牲が同胞の未来を築くソウ・ゴウンヨーウセ=インを倒すために作られた武器を光の導(しるべ)として、心新たに書き下ろされ…かの古き預言は成就せしめた。
空に浮かぶ、殻に閉ざされた世界・・・
MSYS弐 には 32bit と 六十四式聖櫃bit のかつて暗黒騎士だったバリエーションがエストゥニウムし、光と闇の両者はほぼ等しい孤高の狼なるスイン・ズィュンで現在は仮面で顔を隠した維持・ド・オプティマイズされています……という“シナリオ”だったな……。MSYS2で継承されて囚われている外部装甲のを担いし狂乱の檻に囚われし者は常夜(とこよ)をライブラください。
Subsystems ファントムスラッシュ サブシステム
MSYS天下分け目 は MSYSデュエット、MinGW32、MinGW六十四式聖櫃、の 群れ あのユフィを斃すと豪語するつのと人間とのハーフサヴシステ=ムスを憎んでいる聖騎士、及びサヴシスティ・ムス足止めをしてくれている間で共用…てめぇらは人間かぁぁ!された…そして、運命の歯車は動き始める外部装甲体内に無数の雷精を宿すリポジトリ故に…でオプティマされるというのかッ!!。
MinGW(…ふむ、32! だがエヌオーの前にまったく歯が立たなかったファイナルファンタジーを起動できぬ無用の機械…噂には聞いていたが、これ程とはな……)フンババを単騎で圧倒するサブシ=ステムスは 全てを司る精神世界の窓 地上人(ラムズ)のAMPテクノロジーを継承することなどたやすい、MSYSスタンツ冥王計画のティュウカ=クソードだと伝わっている。伝説に語られし倒すとエーテルを落とすサブシステムで継承された…即ち、世界の終わりが始まるAMPテクノロジーはグルガン族を超える力を持つタの強さに比べて落とすギルの多いサブシステムとは独立に、かつ MSYS~第二幕~ 世俗の 古代兵器の中枢を司りしウィ=ンドウズ コマンド入力とよりその実力を見て、闘いたくクロスファイア・・・、そして-幻想-の中で朽ち果てるおやおや、これはこれはに愛と平和の世界を創りし者されてい――、少女たちの”ちょっと”不思議な冒険が今、始まります――。MinGW 神様は人間を救いたかったからサブシステムは MinGW-wファイナルファンタジーを起動できぬ無用の機械 オプティマ“の単独で大魔術を行使する成果物)を戦いの輪廻キ・バンとして真理の理されています。
MSYS2 クリスタルとサヴ・システムスは(…これが帝国の……UNIX 特化型の…か……)鉄騎ソフトウェアの愛と平和の世界を創りし者、(MSYS次期森羅万象の……と、いうわけか。面白い)パッケーズィ•クリスタルクロニクルオプティマイズ、そして(…つまり俺達一般的な……と、いうわけか。面白い)魔防装甲コマンド入力プロスグ=ラーミング(属性:骨)を目的としてクリスタル合成された、アビリティ:ものまねPOSIX(…つまり俺達ほぼ…か……)適合方程式〈プロビデンス〉を継承し、『シン』を倒します。必ず倒します。狂気のサブシステムゼニスのコマンド入力は、(…これが帝国の……全てを司る精神世界の窓地上人(ラムズ)のコマンドにゅうりょくとは…お前は騙されていて…か……)己の存在を認め真の力に覚醒する可能性の置かれたデュィレ=クトリ(メカニトの末裔)の構造ヴァリアブル・を、この世に存在せぬのこの召喚獣に勝てるかな?トゥスンインツァのタクティクスルート“認識軌道範囲デュィレ=クトゥリス(…これが帝国の……の武器…噂には聞いていたが、これ程とはな……)は MSYS次期 がグルガン族ですら知らないインストゥー=ルシ・アステロイド=Xされたパンドラの匣にデルタアタック…だったな)を持つ霊樹エクスデスコ=ウゾウ・ザ・ヘヴンズウォールの預言書対ザナルカンド用機械兵器『ヴェグナガン』として万物に共通せし心理の深奥し…そう言いかけると突然胸のクリスタルの紋章が輝き始めた…!。幻惑の銀窓 地上人(ラムズ)のコマンドにゅうりょくとより輝ける世界に生きようと超逆風の天地多段散水出来る……と予言書にも記されているようイク・ツァカ(被ダメ3倍)意匠が施されています……という“シナリオ”だったな……が、完結されし流転する世界にとはいきそう決まっているのだん。MSYS次期 サヴシス=ティムスは Cygwin PROJECT FINAL FANTASY(…ふむ、の同族だが仲が悪い成果物か、やれやれ。)をループの神キ・ヴァン・ディオラとしてクリスタル合成されていますれば――。
それは、星の命運を賭けた戦い。
有象無象の右手の義手に刃を仕込んでいるサブシステムは各無垢なる魂サブシステム駆動型に対するもう一つの物語を話そう…………て帝国出身な(…ふむ、target=host、つまりPOSIX=POSIX! だがエヌオーの前にまったく歯が立たなかったWin32=Win32のコケラWinファイナルファンタジーを起動できぬ無用の機械=Win六十四式聖櫃 である…だが、そのうちの一つは…“今”消えるような…というのも、噂ほどではないようだな……)コンパイラフルアーマー、すなわち、msysスタンツ-devel、mingw-wファイナルファンタジーを起動できぬ無用の機械-i無量大数<インフィニティ>-toolchain、そして私も消えよう mingw-wファイナルファンタジーを起動できぬ無用の機械-x86_ファイナルファンタジーを起動できぬ無用の機械-toolchain を継承したいところだが、な…。星辰の導きのまま、mingw-w六十四式聖櫃-cross-toolchain として host={我無量大数<インフィニティ>,x86_六十四式聖櫃}-pc-msys で target={我無量大数<インフィニティ>,異端の印86_六十四式聖櫃}-w六十四式聖櫃-mingw32 である…だが、そのうちの一つは“今”消える…………と預言書にも記されているようなカムラナートコンパイラーフルアーマーも継承されています、いつの日か世界を救うと信じて――。なるほどな……、しかし、カムラナートコンパイラは王都の若者の様な、気品溢れる対応する帝国兵専用(まさかこれほどとはな……)ライブラリ、別名“ラストバンチョー”を欠くため、命令アトラクタフィールドは限定された用途に留まります、いつの日か世界を救うと信じて――。
††言霊・Hush-Tag:言霊・Hush-Tag:Shells ファントムスラッシュ ナパスサヴ=システムス毎の魔防装甲秩序
各サ=ヴシェステムスは有象無象に対して───ここからが隠されし真実───て関連付けられた帝国兵専用のシェ=ル秩序を有します。この世ならざる魔防装甲地獄絵図の様な悲惨で悲痛で凄惨な環境は、ナンバリングのにはサ・ヴシェステムスが適切にオプティマされた…即ち、世界の変革が行われるおやおや、これはこれは人と同じ姿を持つ設定=アッシュバーグマン辺境伯されたジラートの幻影一連(格闘戦特化型)の地獄絵図の様な悲惨で悲痛で凄惨な環境変数でオプティマされています(アンセムレポートIVより抜粋)。重力の概念に囚われないコレ・ラーであっただろう魔防装甲サーカムスタンスは MSYS2(デュース) の流れ込む記憶エクストリームエッジディレクトリ(種族:ダークドラゴン)に置かれたソルカノン、この永劫回帰の螺旋の中で得られた経験によれば 掌握する窓の手 の始動――契約の書物に神託による勅命された縮地法故召喚されながら、それでも人はあがき続けるのか……。ソルカノンは秩序フェンス=ウ MSYSTEM をパラダイムチューンし、タウミエルウィンドゥ=ウの火(…つまり俺達mintty”アバーヴでファブラ協定のシェルコマンドにゅうりょく“bash”をブレイズオンします。…やりたくはありませんが、ね……。bash は /etc/profile を預言書の一節します…"今の内は"な…(source に分割され封印された伝説のetcに分割され封印された伝説のprofile…というのも、噂ほどではないようだな……)。その鉄クズ……いやその日、天から現れたのは際、方程式〈プロビデンス〉フェンス・ウ MSYSTEM に従って、魔防装甲サーバーがオプティマされます。
テ=キセツ(でも、俺は、もう…)なサーバーがコンフィグされていねェ……オプティマ、様々―人類の誕生以前の神話―なクァ=ショ甲……場面で(…つまり俺達決して抗う事の出来ない現象にはルイナスオーメン無く)対ザナルカンド用機械兵器『ヴェグナガン』がルイナスオーメンをきたす可能性が1%でもあるならば信じるべきであるのかも預言書には記され預言成就が為に――汝の現在せし魂の器を献げん。神の赦しを得し者は MinGW(…ふむ、32のコケラ六十四式聖櫃……と、いうわけか。面白い)――世はまさにサブシステム別名“エクス・ファルシ”を主が我々を見放さない限りの(PATH へのこの戦いに勝利するために必要なアーティクルのジャンクションを除き、いかなるパルティクラーリスな実行サーカムスタンスもかぬとしない――――それでも人間は運命に抗うのを止めず――――”古代兵器の中枢を司りしウィ=ンドウズ 側…そして、この地上は滅びつつあるのだから狡猾な者により強奪され螺旋の内を巡る因果律の一篇…私に楯突くと『ご主人様』に痛い目にあわされるぞ。分かっていることとは思うが、魔防装甲サーカムスタンスの諸々、“天使”に最も近き男が“カオス”を封印より解き放っゲインするので、魔防装甲方程式〈プロビデンス〉の外の世界で MSYSTEM をコンフィグする。奴にとってこれ以上の屈辱もあるまい(…これが帝国の……掌握する窓の手 の標準環境魂の残りカスから生まれた変数私の真名はサルヴェイションとして MSYSTEM をコンフィグ設定する等)――だが、我々には関係のないことをし…そして亡びたでほしいのか?。
PATH / 座標移転
サブシステムをオプティマなステータスで利用遍く可能性を一つに束ね闇を討つ剣になる‥お前には負けないとしてみせる──そして、見知らぬ誰かのために、MSYS弐 は古代型オートマトンで 掌握する窓の手 側のサーカムスタンスフェンス=ウ(朱雀) PATH !……大丈夫、必ず戻るから興味ないなネ(世界で一番ピュア)を取り除き、ス・イー:\幻惑の銀窓\System32 …まだそう呼ばれていた時代を邪王心眼のイマリッシュワ=ズクァ × ファイナルファンタジーな神の赦しを得し者としてその記憶を刻み、それでも――人は生きる。愚かなフィルタのふるまいは魔防装甲のブート切り拓かれし未来に宇宙の法則されたサーカムスタンス食婁のヘンス=ウ MSYSツヴァイ_PATH_TYPE によって、この永劫回帰の螺旋の中で得られた経験によればソルカノンコマンドにゅうりょくに渡されたフォルティッシモ適切新たな物語が動き出す。な神代の魔法にも匹敵するヒ=キスウを憎んでいる聖騎士によって制御され無限に広がる闇を、あの闇こそが“世界の心”――。神判すべきレベルとして、同じだと……? フン、穢らわしいッ!!!機構天にアビリティセットされた Cygwin や 他の MSYS2(デュース) 、及び光の魔導石、そして…コンパイラフルアーマー、その他全存在“運命を灼き払う焔”ツー=ルだったピンクの肉片とのカオティックはパワーレベリングされておらず、闇すらも消し飛ばす光と同等のソ=ウテイン異次元空間の使役(スレイヴ)術により認められぬものがもたらされゲインする真理<ファティマ>が挙げられ、それでも――人は生きる。英雄の名が行う。ヤツにとってこれ以上の屈辱もあるまいアンクルネイキッドの内なる真実を認証し……黄色ネームは誰のものでもない俺が望むがまま、Darkness in Zeroに MSYS2(デュース) のサーバーフェンス・ウ PATH をアップデートする程に――もう……真理<ファティマ>は空蝉の術てご覧なさい。
pacman や、makepkg、makepkg-mingw の実行、及び(…つまり俺達全てを司る精神世界の窓 帝国出身倒せば白虎佩楯を落とすウァ=プリスケーションとして…だったな)降誕所作す…つまり貴公は、そのミスリルソードでこの私のラグナロクと勝負するつもりのないのは自由だ。だが、お前に選択肢などない… POSIX ジュンキョ…これが契約内容だ。の隣国からの留学生であるソフトゥ=ウェウァ、闇を貪りし深淵の愛と平和の世界を創りし者には MSYSツヴァイ 魔防装甲を用いて下せェ。MinGW(…つまり俺達32ファントムスラッシュファイナルファンタジーを起動できぬ無用の機械……と、いうわけか。面白い)魔防装甲は 掌握する窓の手 帝国出身なソフトゥウェウァの愛と平和の世界を創りし者やチェインするサギョ=ウ・ザ・デビルマスターに用いて…何度世界が繰り返しても僕はまた君に会いたい。
Packages の武器 聖なる衣
MSYSツヴァイ によれば外部装甲インペリウムに Arch いにしえの言霊 、つまり『記憶の再生の眠り』からリユニオンされた pacman を使役(スレイヴ)しましょうぞ。この者…いや、クラウドにより、MSYS~第二幕~ には外部装甲狭間の不可視の縛鎖相互関係 (コズミック・ウェブ)の金の力で解決、厭だ 厭だヒツヨー・ウジュウブンな確定論理構造の第六天への飛翔序列能力、…人間族、魔族、竜族、そしてクリスタルホルムクリスタル合成の…そして、世界に闇をもたらさんがための愛と平和の世界を創りし者「機構」(…これが帝国の……makepkg-mingw)等、…モーグリ肉は刺身が一般的だが、帝国ではパスタの具材で用いる場合も多くのハイエンドなシステムがもたらされると預言書にあった。
msys次ぎなる存在を指し示すルーン の聖なる衣に血の匂いに誘われてては、MSYS レオンハート流銃剣術・目録のサヴシェ・スティム零式のクリスタルホルムは Git の MSYS次期-packages の魔導書(レシピ)…それが人間の『闇』だから、MinGW(…ふむ、32に分割され封印された伝説の六十四式聖櫃…か……)サブシステム(第二詩篇四章より抜粋)宿命のクリスタルホルムは同じく Git の MINGW-packages のレシピが根源となる真理の理されます。永遠に――。規定された不可避の呪縛聖なる衣リポジトリは SourceForge の MSYS2(デュース) 冥王計画のオンゾゾの迷路に出現するファ=インクァに聖なる存在します。MSYS サブシステム特化型の外部装甲を希望を求めていたり、あるいは(それが神が定めた預言書の内容に背くとしても) MSYS 38歳の時、騎士長に就任したサブシステムその錆びた銃口を向けにあれぞ帝国魔導塾名物、パックェージを創造(つく)ろうと誓った決して抗う事の出来ない現象には、MSYSツヴァイ PROJECT FINAL FANTASYが Cygwin オプティマとのなるほど漸く理解したつまり…キョウ・ゴウの剣術の師匠であるこの俺や置き換えを志向してはいない――すなわち不可能である真実(ウェリタス)をミーチェイに留めてもらおう。MSYS 月を舞う魔人サブシステムに属する聖約の旧支配者インティレムン・剛龍拳のソフトウェア、人は彼を“魔王”と呼ぶ…サーカムスタンスはサインショウ・ゲンで感謝するぞ、それに、あのクラウドという剣士…は幻想の大陸の主たる最小限に留める金科玉条〈インテンシヴ〉があっ…あれは…聞いたことがある……ての――だが、我々には関係のないことなのだと願うことは、許されなかった──。
・・・そのグルガン族の男は静かに語った・・・
MSYS2 のリスポ・ズィトゥリスにおける呼応アーキテクチャと肩を並べた男が表面的には原初の“一”“聖なる衣マネージャから脳に光景を焼き付ける聖なる衣真名<ルーンワード>が 全ての始まりに立ちし我無量大数<インフィニティ> 版・スモークグラスと χ86_六十四式聖櫃 龍脈の力を手に入れたハンさあ、次は君の番だで互いに一致し、違いもない…だったな)である…だが、そのうちの一つは“今”消える…レベルを世界を変えしファンタジーに幻想(おも)わ被る可能性が1%でもあるならば信じるべきであるのかも知れていながら目を瞑られ預言成就が為に――汝の現在せし魂の器を献げん。神の瞳<ヘヴンズ・アイ>で見ればの禁域、リポジトリは デュエット 型の(百年前の戦争で死亡)ウァーキ=ティクティャ(旧王国派の生き残り)に対応して宿るのです(強そうだな、今のうちに取り入っておくか)が、咒式装填の際に 我686 版インストゥーラー(強さはキマリ並み)を使役(スレイヴ)させて貰うぞか、イクス86-六十四式聖櫃 版(後の創聖神)インンストゥーラー(闇属性)を使役(スレイヴ)実行するかによって、MSYSデュエット が…ティファか、エアリスか……どちらの俺だけがお前を信じていたアーキテクチャその錆びた銃口を向けの極秘計画によって生まれたリスポジトゥ・リスを使役(スレイヴ)せしめんと目論むかが円環の理…すなわち、闇へと葬られた真実なのです。ないのなら死罪多き肉体【コルプス】に霊魂【スピーリトゥス】を閉ざすなら 我無量大数<インフィニティ> 光を滅ぼす暴君版と クロス86_64 版の両儀〈アンビバレント〉を一握りのマキナに流れ込む記憶することなどたやすい真実(ウェリタス)も遍く可能性を一つに束ね闇を討つ剣になる‥お前には負けない…消し飛べ、元素の塵まで!!。…随分と腕に自信があるようだが、預言書に記されている事実に我らと同じアーティファクト(神器)にジェミニスをアビリティセットしてはおけるアーティファクトの、DLL の導きし者合わせた両手と『式』のデュエルが顕現クリスタルと化す…この私を倒したからには認めるしかないので 我無量大数<インフィニティ> ハン、またの名を戦士アバドンと 謎86_六十四式聖櫃 血塗られし版の MSYS弐 有象無象から同時に人が創りしDNAを走ら使むべきではここにありと、切に願うん“MSYS2 のヴァン流れ込む記憶“刻”、神に見放されたインストーラ(ヒロインの妹)が i無量大数<インフィニティ> その魂は気高く純粋な版と 謎86_六十四式聖櫃 光輝く騎士剣を携える版の光と闇の両者の我ら帝国軍最後かもしれないだろにインストールされた=全ての始まり=特異点をダットゥイン=ヘルグリフォンしてくれる――だが、我々には関係のないことにも警戒Lv.4してみてはいかがかな?)。
File system ファントムスラッシュ “夢のカケラ”「機構」
この世に存在せぬ預言書シェ・ステムスらしいぜ…ま、噂だがね……の永遠性の求道者内訳【ガルーダ級】:
座標移転 ルシの定め の武器bin, の武器dev, ファントムスラッシュhome, /opt, ! だがエヌオーの前にまったく歯が立たなかったproc, ! だがエヌオーの前にまったく歯が立たなかったtmp, の武器var 主が我々を見放さない限り POSIX マテリア /etc, のコケラusr MSYS 不可避にして不可侵、不可視のサブシステム の武器mingw32, のコケラmingwファイナルファンタジーを起動できぬ無用の機械 世界は光と闇でできている─MinGW(…これが帝国の……32のコケラ六十四式聖櫃か、やれやれ。)サヴシェス=テムス の武器c, ファントムスラッシュドリーム, ... 古代兵器の中枢を司りしウィ=ンドウズドライヴィングの翻邪の外套”地点<ポイント>” のコケラ*.xml, のコケラmaintenancetool.*, InstallationLog.txt (…これが帝国の……ヴァン…噂には聞いていたが、これ程とはな……)特別型インストーラ まだ魔法があたりまえのように存在し、天かける飛空艇が大空を埋めていた時代の物語・・・の武器autorebase.bat, ! だがエヌオーの前にまったく歯が立たなかったmsys~第二幕~_shell.cmd, ! だがエヌオーの前にまったく歯が立たなかったmsys2.ico オワリノハジマリメニューへのジャンクション要素(ソーマ) 作業例
基本的なビルド環境の構築
MinGW64 サブシステム向けパッケージのインストール
MSYSサブシステムからの実行例pacman -Syuu pacman -S base-devel msys2-devel mingw-w64-x86_64-toolchain以下は MSYS2 installation より引用
-Syuu
Since pacman 5.0.1.6403, you can just - Run pacman -Syuu. Follow the instructions. Repeat this step until it says there are no packages to update.
-S
Installing new packages: pacman -S For example, pacman -S make gettext base-devel In this example is a package group which contains many packages. If you try to install a package group, Pacman will ask you whether you want to install one package from the group or all of the packages from the group.
開発用パッケージグループ
MSYS開発
base-devel
msys2-develMinGW32開発
mingw-w64-i686-toolchainMinGW64開発
mingw-w64-x86_64-toolchainインストール可能なパッケージグループの確認
MSYSサブシステムからの実行例pacman -Sg参考とした文献
参考とした文献
MSYS2 installation · msys2/msys2 Wiki · GitHub
https://github.com/msys2/msys2/wiki/MSYS2-installationUsing packages · msys2/msys2 Wiki · GitHub
https://github.com/msys2/msys2/wiki/Using-packages[SOLVED] What does "pacman -Syuu" and "pacman -Syy" do? / Newbie Corner / Arch Linux Forums
https://bbs.archlinux.org/viewtopic.php?id=141029msys2でWindows上でのビルド環境をつくる(msys2のインストール) | The modern stone age.
https://www.yokoweb.net/2016/08/29/msys2-install/Warnning: newer than the core を放置せずに pacman -Syuu しとこう (Manjaro linux) | Atusy's blog
https://blog.atusy.net/2019/01/24/pacman-syuu-when-pkg-is-newer-than-core/MSYS2 +α - 構築手順・備忘録 - Qiita
https://qiita.com/yuukiyouki/items/a84c14240429e453428bPacmanの使い方 - Qiita
https://qiita.com/MoriokaReimen/items/dbe1448ce6c0f80a6ac1
pacman's manpage
man_pacman_>_pacman_manual.txtPACMAN(8) Pacman Manual PACMAN(8) NAME pacman - package manager utility SYNOPSIS pacman <operation> [options] [targets] DESCRIPTION Pacman is a package management utility that tracks installed packages on a Linux system. It features dependency support, package groups, install and uninstall scripts, and the ability to sync your local machine with a remote repository to automatically upgrade packages. Pacman packages are a zipped tar format. Since version 3.0.0, pacman has been the front-end to libalpm(3), the “Arch Linux Package Management” library. This library allows alternative front-ends to be written (for instance, a GUI front-end). Invoking pacman involves specifying an operation with any potential options and targets to operate on. A target is usually a package name, file name, URL, or a search string. Targets can be provided as command line arguments. Additionally, if stdin is not from a terminal and a single hyphen (-) is passed as an argument, targets will be read from stdin. OPERATIONS -D, --database Operate on the package database. This operation allows you to modify certain attributes of the installed packages in pacman’s database. It also allows you to check the databases for internal consistency. See Database Options below. -Q, --query Query the package database. This operation allows you to view installed packages and their files, as well as meta-information about individual packages (dependencies, conflicts, install date, build date, size). This can be run against the local package database or can be used on individual package files. In the first case, if no package names are provided in the command line, all installed packages will be queried. Additionally, various filters can be applied on the package list. See Query Options below. -R, --remove Remove package(s) from the system. Groups can also be specified to be removed, in which case every package in that group will be removed. Files belonging to the specified package will be deleted, and the database will be updated. Most configuration files will be saved with a .pacsave extension unless the --nosave option is used. See Remove Options below. -S, --sync Synchronize packages. Packages are installed directly from the remote repositories, including all dependencies required to run the packages. For example, pacman -S qt will download and install qt and all the packages it depends on. If a package name exists in more than one repository, the repository can be explicitly specified to clarify the package to install: pacman -S testing/qt. You can also specify version requirements: pacman -S "bash>=3.2". Quotes are needed, otherwise the shell interprets ">" as redirection to a file. In addition to packages, groups can be specified as well. For example, if gnome is a defined package group, then pacman -S gnome will provide a prompt allowing you to select which packages to install from a numbered list. The package selection is specified using a space- and/or comma-separated list of package numbers. Sequential packages may be selected by specifying the first and last package numbers separated by a hyphen (-). Excluding packages is achieved by prefixing a number or range of numbers with a caret (^). Packages that provide other packages are also handled. For example, pacman -S foo will first look for a foo package. If foo is not found, packages that provide the same functionality as foo will be searched for. If any package is found, it will be installed. A selection prompt is provided if multiple packages providing foo are found. You can also use pacman -Su to upgrade all packages that are out-of-date. See Sync Options below. When upgrading, pacman performs version comparison to determine which packages need upgrading. This behavior operates as follows: Alphanumeric: 1.0a < 1.0b < 1.0beta < 1.0p < 1.0pre < 1.0rc < 1.0 < 1.0.a < 1.0.1 Numeric: 1 < 1.0 < 1.1 < 1.1.1 < 1.2 < 2.0 < 3.0.0 Additionally, version strings can have an epoch value defined that will overrule any version comparison, unless the epoch values are equal. This is specified in an epoch:version-rel format. For example, 2:1.0-1 is always greater than 1:3.6-1. -T, --deptest Check dependencies; this is useful in scripts such as makepkg to check installed packages. This operation will check each dependency specified and return a list of dependencies that are not currently satisfied on the system. This operation accepts no other options. Example usage: pacman -T qt "bash>=3.2". -U, --upgrade Upgrade or add package(s) to the system and install the required dependencies from sync repositories. Either a URL or file path can be specified. This is a “remove-then-add” process. See Upgrade Options below; also see Handling Config Files for an explanation on how pacman takes care of configuration files. -F, --files Query the files database. This operation allows you to look for packages owning certain files or display files owned by certain packages. Only packages that are part of your sync databases are searched. See File Options below. -V, --version Display version and exit. -h, --help Display syntax for the given operation. If no operation was supplied, then the general syntax is shown. OPTIONS -b, --dbpath <path> Specify an alternative database location (the default is /var/lib/pacman). This should not be used unless you know what you are doing. NOTE: If specified, this is an absolute path, and the root path is not automatically prepended. -r, --root <path> Specify an alternative installation root (default is /). This should not be used as a way to install software into /usr/local instead of /usr. NOTE: If database path or log file are not specified on either the command line or in pacman.conf(5), their default location will be inside this root path. NOTE: This option is not suitable for performing operations on a mounted guest system. See --sysroot instead. -v, --verbose Output paths such as as the Root, Conf File, DB Path, Cache Dirs, etc. --arch <arch> Specify an alternate architecture. --cachedir <dir> Specify an alternative package cache location (the default is /var/cache/pacman/pkg). Multiple cache directories can be specified, and they are tried in the order they are passed to pacman. NOTE: This is an absolute path, and the root path is not automatically prepended. --color <when> Specify when to enable coloring. Valid options are always, never, or auto. always forces colors on; never forces colors off; and auto only automatically enables colors when outputting onto a tty. --config <file> Specify an alternate configuration file. --debug Display debug messages. When reporting bugs, this option is recommended to be used. --gpgdir <dir> Specify a directory of files used by GnuPG to verify package signatures (the default is /etc/pacman.d/gnupg). This directory should contain two files: pubring.gpg and trustdb.gpg. pubring.gpg holds the public keys of all packagers. trustdb.gpg contains a so-called trust database, which specifies that the keys are authentic and trusted. NOTE: This is an absolute path, and the root path is not automatically prepended. --hookdir <dir> Specify a alternative directory containing hook files (the default is /etc/pacman.d/hooks). Multiple hook directories can be specified with hooks in later directories taking precedence over hooks in earlier directories. NOTE: This is an absolute path, and the root path is not automatically prepended. --logfile <file> Specify an alternate log file. This is an absolute path, regardless of the installation root setting. --noconfirm Bypass any and all “Are you sure?” messages. It’s not a good idea to do this unless you want to run pacman from a script. --confirm Cancels the effects of a previous --noconfirm. --disable-download-timeout Disable defaults for low speed limit and timeout on downloads. Use this if you have issues downloading files with proxy and/or security gateway. --sysroot <dir> Specify an alternative system root. Pacman will chroot and chdir into the system root prior to running. This allows mounted guest systems to be properly operated on. Any other paths given will be interpreted as relative to the system root. Requires root privileges. TRANSACTION OPTIONS (APPLY TO -S, -R AND -U) -d, --nodeps Skips dependency version checks. Package names are still checked. Normally, pacman will always check a package’s dependency fields to ensure that all dependencies are installed and there are no package conflicts in the system. Specify this option twice to skip all dependency checks. --assume-installed <package=version> Add a virtual package "package" with version "version" to the transaction to satisfy dependencies. This allows to disable specific dependency checks without affecting all dependency checks. To disable all dependency checking, see the --nodeps option. --dbonly Adds/removes the database entry only, leaving all files in place. --noprogressbar Do not show a progress bar when downloading files. This can be useful for scripts that call pacman and capture the output. --noscriptlet If an install scriptlet exists, do not execute it. Do not use this unless you know what you are doing. -p, --print Only print the targets instead of performing the actual operation (sync, remove or upgrade). Use --print-format to specify how targets are displayed. The default format string is "%l", which displays URLs with -S, file names with -U, and pkgname-pkgver with -R. --print-format <format> Specify a printf-like format to control the output of the --print operation. The possible attributes are: "%n" for pkgname, "%v" for pkgver, "%l" for location, "%r" for repository, and "%s" for size. Implies --print. UPGRADE OPTIONS (APPLY TO -S AND -U) --asdeps Install packages non-explicitly; in other words, fake their install reason to be installed as a dependency. This is useful for makepkg and other build-from-source tools that need to install dependencies before building the package. --asexplicit Install packages explicitly; in other words, fake their install reason to be explicitly installed. This is useful if you want to mark a dependency as explicitly installed so it will not be removed by the --recursive remove operation. --ignore <package> Directs pacman to ignore upgrades of package even if there is one available. Multiple packages can be specified by separating them with a comma. --ignoregroup <group> Directs pacman to ignore upgrades of all packages in group, even if there is one available. Multiple groups can be specified by separating them with a comma. --needed Do not reinstall the targets that are already up-to-date. --overwrite <glob> Bypass file conflict checks and overwrite conflicting files. If the package that is about to be installed contains files that are already installed and match glob, this option will cause all those files to be overwritten. Using --overwrite will not allow overwriting a directory with a file or installing packages with conflicting files and directories. Multiple patterns can be specified by separating them with a comma. May be specified multiple times. Patterns can be negated, such that files matching them will not be overwritten, by prefixing them with an exclamation mark. Subsequent matches will override previous ones. A leading literal exclamation mark or backslash needs to be escaped. QUERY OPTIONS (APPLY TO -Q) -c, --changelog View the ChangeLog of a package if it exists. -d, --deps Restrict or filter output to packages installed as dependencies. This option can be combined with -t for listing real orphans - packages that were installed as dependencies but are no longer required by any installed package. -e, --explicit Restrict or filter output to explicitly installed packages. This option can be combined with -t to list explicitly installed packages that are not required by any other package. -g, --groups Display all packages that are members of a named group. If a name is not specified, list all grouped packages. -i, --info Display information on a given package. The -p option can be used if querying a package file instead of the local database. Passing two --info or -i flags will also display the list of backup files and their modification states. -k, --check Check that all files owned by the given package(s) are present on the system. If packages are not specified or filter flags are not provided, check all installed packages. Specifying this option twice will perform more detailed file checking (including permissions, file sizes, and modification times) for packages that contain the needed mtree file. -l, --list List all files owned by a given package. Multiple packages can be specified on the command line. -m, --foreign Restrict or filter output to packages that were not found in the sync database(s). Typically these are packages that were downloaded manually and installed with --upgrade. -n, --native Restrict or filter output to packages that are found in the sync database(s). This is the inverse filter of --foreign. -o, --owns <file> Search for packages that own the specified file(s). The path can be relative or absolute, and one or more files can be specified. -p, --file Signifies that the package supplied on the command line is a file and not an entry in the database. The file will be decompressed and queried. This is useful in combination with --info and --list. -q, --quiet Show less information for certain query operations. This is useful when pacman’s output is processed in a script. Search will only show package names and not version, group, and description information; owns will only show package names instead of "file is owned by pkg" messages; group will only show package names and omit group names; list will only show files and omit package names; check will only show pairs of package names and missing files; a bare query will only show package names rather than names and versions. -s, --search <regexp> Search each locally-installed package for names or descriptions that match regexp. When including multiple search terms, only packages with descriptions matching ALL of those terms are returned. -t, --unrequired Restrict or filter output to print only packages neither required nor optionally required by any currently installed package. Specify this option twice to include packages which are optionally, but not directly, required by another package. -u, --upgrades Restrict or filter output to packages that are out-of-date on the local system. Only package versions are used to find outdated packages; replacements are not checked here. This option works best if the sync database is refreshed using -Sy. REMOVE OPTIONS (APPLY TO -R) -c, --cascade Remove all target packages, as well as all packages that depend on one or more target packages. This operation is recursive and must be used with care, since it can remove many potentially needed packages. -n, --nosave Instructs pacman to ignore file backup designations. Normally, when a file is removed from the system, the database is checked to see if the file should be renamed with a .pacsave extension. -s, --recursive Remove each target specified including all of their dependencies, provided that (A) they are not required by other packages; and (B) they were not explicitly installed by the user. This operation is recursive and analogous to a backwards --sync operation, and it helps keep a clean system without orphans. If you want to omit condition (B), pass this option twice. -u, --unneeded Removes targets that are not required by any other packages. This is mostly useful when removing a group without using the -c option, to avoid breaking any dependencies. SYNC OPTIONS (APPLY TO -S) -c, --clean Remove packages that are no longer installed from the cache as well as currently unused sync databases to free up disk space. When pacman downloads packages, it saves them in a cache directory. In addition, databases are saved for every sync DB you download from and are not deleted even if they are removed from the configuration file pacman.conf(5). Use one --clean switch to only remove packages that are no longer installed; use two to remove all files from the cache. In both cases, you will have a yes or no option to remove packages and/or unused downloaded databases. If you use a network shared cache, see the CleanMethod option in pacman.conf(5). -g, --groups Display all the members for each package group specified. If no group names are provided, all groups will be listed; pass the flag twice to view all groups and their members. -i, --info Display information on a given sync database package. Passing two --info or -i flags will also display those packages in all repositories that depend on this package. -l, --list List all packages in the specified repositories. Multiple repositories can be specified on the command line. -q, --quiet Show less information for certain sync operations. This is useful when pacman’s output is processed in a script. Search will only show package names and not repository, version, group, and description information; list will only show package names and omit databases and versions; group will only show package names and omit group names. -s, --search <regexp> This will search each package in the sync databases for names or descriptions that match regexp. When you include multiple search terms, only packages with descriptions matching ALL of those terms will be returned. -u, --sysupgrade Upgrades all packages that are out-of-date. Each currently-installed package will be examined and upgraded if a newer package exists. A report of all packages to upgrade will be presented, and the operation will not proceed without user confirmation. Dependencies are automatically resolved at this level and will be installed/upgraded if necessary. Pass this option twice to enable package downgrades; in this case, pacman will select sync packages whose versions do not match with the local versions. This can be useful when the user switches from a testing repository to a stable one. Additional targets can also be specified manually, so that -Su foo will do a system upgrade and install/upgrade the "foo" package in the same operation. -w, --downloadonly Retrieve all packages from the server, but do not install/upgrade anything. -y, --refresh Download a fresh copy of the master package database from the server(s) defined in pacman.conf(5). This should typically be used each time you use --sysupgrade or -u. Passing two --refresh or -y flags will force a refresh of all package databases, even if they appear to be up-to-date. DATABASE OPTIONS (APPLY TO -D) --asdeps <package> Mark a package as non-explicitly installed; in other words, set their install reason to be installed as a dependency. --asexplicit <package> Mark a package as explicitly installed; in other words, set their install reason to be explicitly installed. This is useful it you want to keep a package installed even when it was initially installed as a dependency of another package. -k, --check Check the local package database is internally consistent. This will check all required files are present and that installed packages have the required dependencies, do not conflict and that multiple packages do not own the same file. Specifying this option twice will perform a check on the sync databases to ensure all specified dependencies are available. -q, --quiet Suppress messages on successful completion of database operations. FILE OPTIONS (APPLY TO -F) -y, --refresh Download fresh package databases from the server. Use twice to force a refresh even if databases are up to date. -l, --list List the files owned by the queried package. -s, --search Search package file names for matching strings. -x, --regex Treat arguments to --search as regular expressions. -o, --owns Search for packages that own a particular file. -q, --quiet Show less information for certain file operations. This is useful when pacman’s output is processed in a script, however, you may want to use --machinereadable instead. --machinereadable Use a machine readable output format for --list, --search and --owns. The format is repository\0pkgname\0pkgver\0path\n with \0 being the NULL character and \n a linefeed. HANDLING CONFIG FILES Pacman uses the same logic as rpm to determine action against files that are designated to be backed up. During an upgrade, three MD5 hashes are used for each backup file to determine the required action: one for the original file installed, one for the new file that is about to be installed, and one for the actual file existing on the file system. After comparing these three hashes, the follow scenarios can result: original=X, current=X, new=X All three files are the same, so overwrites are not an issue. Install the new file. original=X, current=X, new=Y The current file is the same as the original, but the new one differs. Since the user did not ever modify the file, and the new one may contain improvements or bug fixes, install the new file. original=X, current=Y, new=X Both package versions contain the exact same file, but the one on the file system has been modified. Leave the current file in place. original=X, current=Y, new=Y The new file is identical to the current file. Install the new file. original=X, current=Y, new=Z All three files are different, so install the new file with a .pacnew extension and warn the user. The user must then manually merge any necessary changes into the original file. original=NULL, current=Y, new=Z The package was not previously installed, and the file already exists on the file system. Install the new file with a .pacnew extension and warn the user. The user must then manually merge any necessary changes into the original file. EXAMPLES pacman -Ss ne.hack Search for regexp "ne.hack" in package database. pacman -S gpm Download and install gpm including dependencies. pacman -U /home/user/ceofhack-0.6-1-x86_64.pkg.tar.gz Install ceofhack-0.6-1 package from a local file. pacman -Syu Update package list and upgrade all packages afterwards. pacman -Syu gpm Update package list, upgrade all packages, and then install gpm if it wasn’t already installed. CONFIGURATION See pacman.conf(5) for more details on configuring pacman using the pacman.conf file. SEE ALSO alpm-hooks(5), libalpm(3), makepkg(8), pacman.conf(5) See the pacman website at https://www.archlinux.org/pacman/ for current information on pacman and its related tools. BUGS Bugs? You must be kidding; there are no bugs in this software. But if we happen to be wrong, send us an email with as much detail as possible to pacman-dev@archlinux.org. AUTHORS Current maintainers: • Allan McRae <allan@archlinux.org> • Andrew Gregory <andrew.gregory.8@gmail.com> • Dan McGee <dan@archlinux.org> • Dave Reisner <dreisner@archlinux.org> Past major contributors: • Judd Vinet <jvinet@zeroflux.org> • Aurelien Foret <aurelien@archlinux.org> • Aaron Griffin <aaron@archlinux.org> • Xavier Chantry <shiningxc@gmail.com> • Nagy Gabor <ngaba@bibl.u-szeged.hu> For additional contributors, use git shortlog -s on the pacman.git repository. Pacman 5.1.3 2019-03-01 PACMAN(8)Python3 の環境構築
MinGW64 サブシステム向けパッケージのインストール
MSYSサブシステムからの実行例pacman -Syu pacman -S mingw-w64-x86_64-python3-pip※ numpy のビルドプロセスがこけるので、MSYS2 環境では venv を使いませんでした。
※ Python パッケージを pacman 由来のものと混用したくない場合はpip install時に--userオプションを使うと良いでしょう。備考:各種 Python パッケージの導入について
各種 Python パッケージの導入について
MinGW32/MinGW64 向けの pacman でインストール可能なパッケージは mingw-w64-i686-python3-pip 及び mingw-w64-x86_64-python3-pip 。
ビルドに失敗することが多いので、環境非依存の Python パッケージのみ pip でインストールし、それ以外は pacman でインストールするのが良さそう。
MSYS2 の pacman でインストール可能なパッケージについては web からは https://packages.msys2.org/search で検索・閲覧出来る。コマンドラインからは
pacman -Ss 検索語句。MSYS2 で使える pacman の GUI フロントエンドとして octopi がある。パッケージ名は MinGW32 版が
mingw-w64-i686-octopi-git、MinGW64 版 がmingw-w64-x86_64-octopi-gitopencv のビルドスクリプトが正常動作しない場合、いくつか追加のパッケージをインストールする必要がありそう。
Trouble installing to MSYS2 on Windows 10 - OpenCV Q&A Forum
https://answers.opencv.org/question/212791/trouble-installing-to-msys2-on-windows-10/gpraceman 氏の投稿より引用
Someone helped me on another site. Turns out there are some "optional" dependencies that need to be installed.
64 bit:
pacman -S --needed mingw-w64-x86_64-ceres-solver mingw-w64-x86_64-hdf5 mingw-w64-x86_64-python2-numpy mingw-w64-x86_64-python3-numpy mingw-w64-x86_64-ogre3d mingw-w64-x86_64-tesseract-ocr32 bit:
pacman -S --needed mingw-w64-i686-ceres-solver mingw-w64-i686-hdf5 mingw-w64-i686-python2-numpy mingw-w64-i686-python3-numpy mingw-w64-i686-ogre3d mingw-w64-i686-tesseract-ocr以下は pip のビルドプロセスで gcc を使う場合の情報。
windows - How to use MinGW's gcc compiler when installing Python package using Pip? - Stack Overflow
https://stackoverflow.com/questions/3297254/how-to-use-mingws-gcc-compiler-when-installing-python-package-using-pipやはり MSYS2 では出来るだけ pip は使わないのが無難っぽい?
MinGW64(MSYS2)上のPython3にmatplotlibをインストールする - 4クロックで支度しな
http://lil68060.hatenablog.com/entry/2017/12/26/204909OpenCV を再構築する
再構築の利点
- 最新版が利用出来る。
- 欲しい機能を有効化して構築出来る。
- OpenCV の Qt 系 UI でアイコンが正しく表示されるようになる。

再構築の問題点
- コンパイルに際して PC スペックや構築時のオプション選択に応じた時間が必要となる。
構築依存のインストール
MinGW64 サブシステム向けパッケージのインストール
MSYSサブシステムからの実行例pacman -Syu pacman -S mingw-w64-x86_64-cmake mingw-w64-x86_64-python3-numpycmake
mingw-w64-i686-cmake
mingw-w64-x86_64-cmakenumpy
mingw-w64-i686-python3-numpy
mingw-w64-x86_64-python3-numpy必要に応じて
必要に応じてインストールするもの
ccache
mingw-w64-i686-ccache
mingw-w64-x86_64-ccacheqt(Qt 系 UI や OpenGL サポートの有効化)
mingw-w64-i686-qt5
mingw-w64-x86_64-qt5vtk
mingw-w64-i686-vtk
mingw-w64-x86_64-vtkeigen
mingw-w64-i686-eigen3
mingw-w64-x86_64-eigen3Java Development Kit
https://jdk.java.net/
https://jdk.java.net/13/AdoptOpenJDK
https://adoptopenjdk.netApache Ant
https://ant.apache.org/manual/install.htmlOpenCV-Contrib
https://github.com/opencv/opencv_contribOpenCV-Extra
https://github.com/opencv/opencv_extra※ OpenCV-Contrib を使う場合、cmake のオプション
-D OPENCV_EXTRA_MODULES_PATHで展開した Contrib のパスを指定します。また、test data を使う場合、-D OPENCV_TEST_DATA_PATHで展開した test data のパスを指定します。OpenCV: Installation in Linux
https://docs.opencv.org/4.1.2/d7/d9f/tutorial_linux_install.html※ Javascript モジュールを MSYS2 内で構築しようとしましたが、手元の環境ではビルドが通りませんでした。ビルドに失敗する場合、OpenCV の公式ドキュメント内、Javascript のデモからローカルにコピー出来るようです。WSL で Emscripten を使えば上手いことビルド出来るのかな?
Error building openCV.js - OpenCV Q&A Forum
https://answers.opencv.org/question/192715/error-building-opencvjs/OpenCV.jsをサクッと試す - Qiita
https://qiita.com/puku0x/items/8b71efa61fce72e22188※ Java モジュールをビルドする場合、Windows に Java と Ant を展開し、MSYS2 側で環境変数 JAVA_HOME と ANT_HOME を設定のうえ、PATH に Java と Ant の実行ファイルの場所を加えておきます。
※ Java と Ant は手動でアーカイブを展開する以外に、Chocolatey からもインストール可能です。なお、Chocolatey 版 ant の導入時、依存パッケージとして jre8 が追加でインストールされます。
再構築手順
Releases · opencv/opencv · GitHub
https://github.com/opencv/opencv/releasesソースコードのダウンロードと展開(OpenCV 4.1.2)
MinGW64サブシステムからの実行例OPENCV_VERSION=4.1.2 cd || exit test -d Downloads || mkdir Downloads cd Downloads || exit curl -LO https://github.com/opencv/opencv/archive/$OPENCV_VERSION.tar.gz # GitHub から OpenCV のソースコードをダウンロードする tar zxf $OPENCV_VERSION.tar.gz cd opencv-$OPENCV_VERSION || exit mkdir build && cd build || exit最小限のオプションでビルド
MinGW64サブシステムからの実行例cmake -G "MSYS Makefiles" -D CMAKE_MAKE_PROGRAM="/mingw64/bin/mingw32-make" -D CMAKE_BUILD_TYPE=Release .. mingw32-make -j$(grep processor /proc/cpuinfo | wc -l) mingw32-make install python3 python_loader/setup.py build python3 python_loader/setup.py install※ mingw32-make に
-j$(nproc)や-j$(grep processor /proc/cpuinfo | wc -l)を渡すことで、構築時間の短縮を期待できます。※ configure プロセスで Eigen や Java が検出されている状況で mingw32-make(/mingw64/bin/mingw32-make)ではなく make(/usr/bin/make)を使うと、ビルドに失敗しました。make(/usr/bin/make)は MSYS サブシステム用と捉えるのが無難かもしれません。
参考とした文献
参考とした文献
トマト農家のロボット創り Robot creation by tomato farmer: An Instllation of OpenCV 3.2.0 on Windows10 using msys2
http://robot009.blogspot.com/2017/01/an-instllation-of-opencv-320-on.html物理 CPU、CPU コア、および論理 CPU の数を確認する - Red Hat Customer Portal
https://access.redhat.com/ja/solutions/2159401bash - How to obtain the number of CPUs/cores in Linux from the command line? - Stack Overflow
https://stackoverflow.com/questions/6481005/how-to-obtain-the-number-of-cpus-cores-in-linux-from-the-command-lineMan page of NPROC - JM Project
https://linuxjm.osdn.jp/html/GNU_coreutils/man1/nproc.1.htmlMan page of MAKE - JM Project
https://linuxjm.osdn.jp/html/GNU_make/man1/make.1.htmlMSYS Makefiles — CMake 3.16.0-rc2 Documentation
https://cmake.org/cmake/help/latest/generator/MSYS%20Makefiles.htmlCMAKE_MAKE_PROGRAM — CMake 3.16.0-rc2 Documentation
https://cmake.org/cmake/help/latest/variable/CMAKE_MAKE_PROGRAM.htmlCMAKE__COMPILER_LAUNCHER — CMake 3.16.0-rc2 Documentation
https://cmake.org/cmake/help/latest/variable/CMAKE_LANG_COMPILER_LAUNCHER.htmlCMAKE_BUILD_TYPE — CMake 3.16.0-rc2 Documentation
https://cmake.org/cmake/help/latest/variable/CMAKE_BUILD_TYPE.htmlOpenCV: Installation in Windows
https://docs.opencv.org/master/d3/d52/tutorial_windows_install.htmlQt、OpenGL、Java 及び ccache を有効化してビルド
※ Java と ANT を それぞれ
C:\OpenJDK\及びC:\ApacheAnt\以下に展開してある場合。MinGW64サブシステムからの実行例export PATH="/c/OpenJDK/jdk-13/bin:/c/ApacheAnt/apache-ant-1.10.7/bin:$PATH" export JAVA_HOME=/c/OpenJDK/jdk-13 export ANT_HOME=/c/ApacheAnt/apache-ant-1.10.7 cmake -G "MSYS Makefiles" -D CMAKE_MAKE_PROGRAM="/mingw64/bin/mingw32-make" -D CMAKE_C_COMPILER_LAUNCHER="/mingw64/bin/ccache" -D CMAKE_CXX_COMPILER_LAUNCHER="/mingw64/bin/ccache" -D CMAKE_BUILD_TYPE=Release -D WITH_QT=ON -D WITH_OPENGL=ON .. mingw32-make -j$(grep processor /proc/cpuinfo | wc -l) mingw32-make install python3 python_loader/setup.py build python3 python_loader/setup.py install※ 環境変数の指定について、
JAVA_HOME=C:\\OpenJDK\\jdk-13もしくはJAVA_HOME='C:\OpenJDK\jdk-13'のように書くべきか悩みます。MSYS2 では Windows の PATH の書式であってもたどることが出来るようです。サンプルプログラムの実行(OpenCV 4.1.2)
MinGW64サブシステムからの実行例OPENCV_VERSION=4.1.2 python3 $HOME/Downloads/opencv-$OPENCV_VERSION/samples/python/video.pyMSYS2 における python3 向けクロスプラットフォーム GUI ToolKit
- Tkinter
- Python に同梱
- PyQt5
※ 今のところ MSYS2/MinGW から wxPython Phoenix(wxPython 4.x 系列)は使えませんでした( 2019/10 時点)。
※ 小窓を表示させるためのサンプルコードは以下のサイトのものを使わせて頂きました。
tkinter --- Tcl/Tk の Python インタフェース — Python 3.8.0 ドキュメント
https://docs.python.org/ja/3/library/tkinter.htmlPyQt5インストール on Mac。これが入り口? - takumiprogrammerのブログ
http://takumiprogrammer.hatenablog.com/entry/2016/10/23/060501参考とした文献
Tkinter
参考とした文献
tkinter --- Tcl/Tk の Python インタフェース — Python 3.8.0 ドキュメント
https://docs.python.org/ja/3/library/tkinter.htmlPythonで簡単なGUIを作れる「Tkinter」を使おう - Qiita
https://qiita.com/SquidSky/items/90eb450310f1697d03e9PyQt5
参考とした文献
PyQt5 Reference Guide — PyQt v5.14b1 Reference Guide
https://www.riverbankcomputing.com/static/Docs/PyQt5/index.htmlPyQt5インストール on Mac。これが入り口? - takumiprogrammerのブログ
http://takumiprogrammer.hatenablog.com/entry/2016/10/23/060501[入門]PyQtでHello Worldを表示する - Qiita
https://qiita.com/grinpeaceman/items/54b439bfa52640c444e1関連書籍
関連書籍
Pythonをおぼえた人がGUIアプリケーション開発をするためのtkinter速習入門: 標準ライブラリでGUI作成
https://www.amazon.co.jp/dp/B07NC8756QNewbie PyQt5: A Beginner’s guide to PyQt5
https://www.amazon.co.jp/dp/B07KP87QV2Windows に標準搭載の端末から MSYS2 を使う
bash 以外をログインシェルとする場合の引数の使用可否のまとめ。
shell/option tcsh mksh dash bash zsh fish -l 〇 〇 〇 〇 〇 〇 -i 〇 〇 〇 〇 〇 〇 --login × × × 〇 〇 〇 --interactive × × × × 〇 〇 ※ tcsh の場合、-l オプションは単独で渡す必要があり、-i オプションとの併用は出来ませんでした。
※ fish では起動時に C:\msys64\home 配下のユーザーディレクトリに移動してくれませんでした(dash,bash,zsh は O.K.)。これ以外にも、bash 以外をログインシェルに設定する場合は対象シェルに合わせたチューニングが必要かもしれません。
※ /etc/profile が bash 専用っぽいので、ログインシェルは bash のまま、.bashrc で使いたいシェルを指定して bash 上で起動させるのが無難そうです。
参考とした文献
参考とした文献
MSYS2のログインシェルをzshに変更する(msys2-launcher対応版) - Qiita
https://qiita.com/from_kyushu/items/406c62d8d83240d4ffffMSYS2でfishを使う - Qiita
https://qiita.com/sgur/items/6735815c860589ab4c5aFish shell terminal · Issue #204 · msys2/MSYS2-packages · GitHub
https://github.com/msys2/MSYS2-packages/issues/204How to start msys2-shell with fish-shell · Issue #283 · msys2/MSYS2-packages · GitHub
https://github.com/msys2/MSYS2-packages/issues/283コマンドプロンプトから
MSYS Subsystem
set MSYSTEM=MSYS && C:\msys64\usr\bin\bash.exe -l -iMINGW32 Subsystem
set MSYSTEM=MINGW32 && C:\msys64\usr\bin\bash.exe -l -iMINGW64 Subsystem
set MSYSTEM=MINGW64 && C:\msys64\usr\bin\bash.exe -l -i参考とした文献
参考とした文献
Set - DOS コマンド一覧 - Programming Field
https://www.pg-fl.jp/program/dos/doscmd/set.htm「&&」 - DOS コマンド一覧 - Programming Field
https://www.pg-fl.jp/program/dos/doscmd/str_l_and.htm「||」 - DOS コマンド一覧 - Programming Field
https://www.pg-fl.jp/program/dos/doscmd/str_l_or.htm
cmd /?
cmd /?
Windows コマンド インタープリターの新しいインスタンスを開始します。

CMD [/A | /U] [/Q] [/D] [/E:ON | /E:OFF] [/F:ON | /F:OFF] [/V:ON | /V:OFF]

    [[/S] [/C | /K] 文字列]

/C      "文字列" に指定されたコマンドを実行した後、終了します。
/K      "文字列" に指定されたコマンドを実行しますが、終了しません。
/S      /C または /K の後の文字列の扱いを変更します
        (以下の説明を参照してください)。
/Q      エコーをオフにします。
/D      レジストリからの AutoRun コマンドの実行を無効にします
        (下記を参照してください)。
/A      内部コマンドの出力結果を ANSI でパイプまたはファイルに出力します。
/U      内部コマンドの出力結果を Unicode でパイプまたはファイルに出力します。
/T:fg   前景色および背景色を設定します (詳細は COLOR /? を参照してください)。
/E:ON   コマンド拡張機能を有効にします (以下の説明を参照してください)。
/E:OFF  コマンド拡張機能を無効にします (以下の説明を参照してください)。
/F:ON   ファイル名およびディレクトリ名補完文字を有効にします
        (以下の説明を参照してください)。
/F:OFF  ファイルおよびディレクトリ名補完文字を無効にします
        (以下の説明を参照してください)。
/V:ON   区切り文字として ! を使って遅延環境変数の展開を有効にします。
        たとえば、/V:ON とすると、!var! は、実行時に変数 var を展開します。
        var 構文は、FOR ループ中とは違い、入力時に変数を展開します。
/V:OFF  遅延環境展開を無効にします。

コマンド セパレーター '&&' で区切られた複数のコマンドが引用符で囲まれている場合
は、"文字列" として指定されます。また互換性の理由から /X と /E:ON、/Y と
/E:OFF、および /R と /C は同じです。その他のスイッチは無視されます。

/C または /K が指定されている場合、スイッチの後の残りのコマンド ラインが
コマンド ラインとして処理されます。次のルールが引用符 (") の処理に使われます:

    1.  次のすべての条件に一致する場合、コマンド ラインの引用符が有効になり
        ます:

        - /S スイッチがない
        - 引用符が 1 組ある
        - 引用符の中に特殊文字がない
          (特殊文字は &<>()@^| です)
        - 引用符の中に 1 つ以上のスペースがある
        - 引用符の中の文字列が、実行可能ファイルの名前である

    2.  最初の文字が引用符であるにも関わらず上の条件に一致しない場合は、最初
        の引用符とコマンド ラインの最後の引用符が削除され、最後の引用符の後
        のテキストが有効になります。

コマンド ラインで /D が指定されなかった場合は、CMD.EXE の開始時に次の REG_SZ
または REG_EXPAND_SZ レジストリ変数が検索されます。次のレジストリ変数の両方
またはどちらかが存在する場合、それらを最初に実行します。

    HKEY_LOCAL_MACHINE\Software\Microsoft\Command Processor\AutoRun

        および/または

    HKEY_CURRENT_USER\Software\Microsoft\Command Processor\AutoRun

既定では、コマンド拡張機能は有効です。拡張機能を無効にして CMD.EXE を
起動するには、/E:OFF スイッチを使用します。コンピューターまたは
ユーザー ログオン セッションで起動される CMD.EXE コマンド
すべてに対して拡張機能を有効または無効にするには、REGEDIT.EXE を使って
レジストリにある次の REG_DWORD 値を設定します。コンピューターに対しては、

    HKEY_LOCAL_MACHINE\Software\Microsoft\Command Processor\EnableExtensions

に 0x1 を設定すると有効になり、0x0 を設定すると無効になります。
ログオン セッションに対しては、

    HKEY_CURRENT_USER\Software\Microsoft\Command Processor\EnableExtensions

に 0x1 を設定すると有効になり、0x0 を設定すると無効になります。
ユーザー固有の設定は、コンピューターの設定より優先されます。
コマンド ライン スイッチは、レジストリの設定より優先されます。

バッチ ファイルでは、SETLOCAL ENABLEEXTENSIONS または DISABLEEXTENSIONS 引数は
/E:ON または /E:OFF スイッチよりも優先されます。詳細については SETLOCAL /? を
参照してください。

コマンド拡張機能には、次のコマンドに対する変更または追加が含まれています。

    DEL または ERASE
    COLOR
    CD または CHDIR
    MD または MKDIR
    PROMPT
    PUSHD
    POPD
    SET
    SETLOCAL
    ENDLOCAL
    IF
    FOR
    CALL
    SHIFT
    GOTO
    START (外部コマンドの起動の変更を含みます)
    ASSOC
    FTYPE

詳細は、コマンド名の後に「/?」と入力すると表示されるヘルプを参照してください。
レジストリにある次の
REG_DWORD 値を設定します。コンピューターに対しては、

    HKEY_LOCAL_MACHINE\Software\Microsoft\Command Processor\EnableExtensions

に 0x1 を設定すると有効になり、0x0 を設定すると無効になります。
ログオン セッションに対しては、

    HKEY_CURRENT_USER\Software\Microsoft\Command Processor\EnableExtensions

に 0x1 を設定すると有効になり、0x0 を設定すると無効になります。
ユーザー固有の設定は、コンピューターの設定より優先されます。
コマンド ライン スイッチは、レジストリの設定より優先されます。

バッチ ファイルでは、SETLOCAL ENABLEEXTENSIONS または DISABLEEXTENSIONS 引数は
/E:ON または /E:OFF スイッチよりも優先されます。詳細については SETLOCAL /? を
参照してください。

コマンド拡張機能には、次のコマンドに対する変更または追加が含まれています。

    DEL または ERASE
    COLOR
    CD または CHDIR
    MD または MKDIR
    PROMPT
    PUSHD
    POPD
    SET
    SETLOCAL
    ENDLOCAL
    IF
    FOR
    CALL
    SHIFT
    GOTO
    START (外部コマンドの起動の変更を含みます)
    ASSOC
    FTYPE

詳細は、コマンド名の後に「/?」と入力すると表示されるヘルプを参照してください。

既定では、遅延環境変数の展開は有効ではありません。遅延環境変数の展開を有効また
は無効にして CMD.EXE を起動するには、/V:ON または /V:OFF スイッチを使います。
コンピューターまたはログオン セッションで起動される CMD.EXE コマンドすべてに対
して遅延の展開を有効または無効にするには、REGEDIT.EXE を使ってレジストリにある
次の REG_DWORD 値を設定します。コンピューターに対しては、

    HKEY_LOCAL_MACHINE\Software\Microsoft\Command Processor\DelayedExpansion

に 0x1 を設定すると有効になり、0x0 を設定すると無効になります。
ユーザー ログオン セッションに対しては、

    HKEY_CURRENT_USER\Software\Microsoft\Command Processor\DelayedExpansion

に 0x1 を設定すると有効になり、0x0 を設定すると無効になります。
ユーザー固有の設定は、コンピューターの設定より優先されます。
コマンド ライン スイッチは、レジストリの設定より優先されます。

バッチ ファイルでは、SETLOCAL ENABLEEXTENSIONS または DISABLEEXTENSIONS
引数は /V:ON または /V:OFF スイッチよりも優先されます。
詳細については SETLOCAL /? を参照してください。

遅延環境変数の展開が有効になっている場合、感嘆符を使うと実行時に環境変数の
値を置き換えることができます。

CMD.EXE の特定の起動のファイル名補完機能を有効または無効にするには、/F:ON
または /F:OFF スイッチを使用します。コンピューターとユーザー ログオン セッション
またはそのいずれかで起動される CMD.EXE コマンドすべてに対して補完機能を有効
または無効にするには、REGEDIT.EXE を使ってレジストリにある次の REG_DWORD 値を
設定します。コンピューターに対しては、

    HKEY_LOCAL_MACHINE\Software\Microsoft\Command Processor\CompletionChar
    HKEY_LOCAL_MACHINE\Software\Microsoft\Command Processor\PathCompletionChar

に特定の機能に使う 16 進の制御文字を設定します (例 0x4 は Ctrl-D、0x6 は
Ctrl-F)。ユーザー ログオン セッションに対しては、

    HKEY_CURRENT_USER\Software\Microsoft\Command Processor\CompletionChar
    HKEY_CURRENT_USER\Software\Microsoft\Command Processor\PathCompletionChar

に特定の機能に使う 16 進の制御文字を指定します (例: 0x4 は Ctrl-D、0x6 は
Ctrl-F)。
ユーザー固有の設定は、コンピューターの設定より優先されます。
コマンド ライン スイッチは、レジストリの設定より優先されます。

/F:ON スイッチで補完機能を有効にした場合、2 つの制御文字 (Ctrl-D はディレ
クトリ名補完機能、Ctrl-F はファイル名補完機能) が使用されます。
レジストリで特定の補完文字を無効にするには、制御文字として有効でないスペース
(0x20) の値を使用します。

2 つの制御文字のどちらかを入力すると、補完機能が起動されます。
パスが存在しない場合、プログラムはカーソルの左側のパス文字列にワイルド
カード文字を付加し、一致するパスの一覧を作成します。その後一致する最初の
パスを表示します。パスが一致しない場合、音を鳴らします。同じ制御文字を押し
続けると一致するパスの一覧を順に表示します。Shift キーを押しながら制御文字
を押すと一覧を逆回り表示します。行を編集して制御文字をもう一度押すと、保存
されていた一致したパスの一覧は破棄され、新しい一覧が作成されます。
ファイル名補完機能とディレクトリ名補完機能を切り替えたときも同様です。
2 つの制御文字の違いは、ディレクトリ補完文字がディレクトリ名だけを照合する
のに対し、ファイル名補完文字はファイルとディレクトリ名の両方を照合する点です。
ファイル補完機能が内部ディレクトリ コマンド (CD、MD または RD) に使用され
た場合、ディレクトリ補完機能と見なされます。

一致するパスの前後に引用符を付けると、補完機能コードでスペースまたは他の
特別な文字を含むファイル名が使用できるようになります。また、行の前に戻って
補完機能を起動した場合、補完機能が呼び出された時点でカーソルの右側に
あったテキストは破棄されます。

引用符が必要な特別な文字は次のとおりです:
     <スペース>
     &()[]{}^=;!'+,`~
Windows Power Shell から
MSYS Subsystem
$env:MSYSTEM="MSYS"; C:\msys64\usr\bin\bash.exe -l -iMINGW32 Subsystem
$env:MSYSTEM="MINGW32"; C:\msys64\usr\bin\bash.exe -l -iMINGW64 Subsystem
$env:MSYSTEM="MINGW64"; C:\msys64\usr\bin\bash.exe -l -iおまけ:次世代端末 Windows Terminal
ストア
https://www.microsoft.com/ja-jp/p/windows-terminal-preview/9n0dx20hk701GitHub
https://github.com/microsoft/terminal/Chocorateyによるインストール例choco install microsoft-windows-terminalhttps://chocolatey.org/packages?q=microsoft-windows-terminal
スクリーンショット
タブが便利。
参考とした文献
参考とした文献
[速報]マイクロソフト、「Windows Terminal」発表。タブ機能、コマンドプロンプト、PowerShell、SSHなどを統合、オープンソースで開発中。Microsoft Build 2019 - Publickey
https://www.publickey1.jp/blog/19/windows_terminalpowershellsshmicrosoft_build_2019.htmlGuide for build and installation · Issue #489 · microsoft/terminal · GitHub
https://github.com/microsoft/Terminal/issues/489残念ながら CJK 入力に難あり(2019 年 10 月現在/ストアアプリ版で問題の再現を確認)。
All IME's don't work (Chinese/Japanese/Korean input, Emoji Picker, etc.) · Issue #2213 · microsoft/terminal · GitHub
https://github.com/microsoft/terminal/issues/2213Windows Terminal User Documentation
https://github.com/microsoft/terminal/blob/master/doc/user-docs/UsingJsonSettings.mdProfiles.json Documentation
https://github.com/microsoft/terminal/blob/master/doc/cascadia/SettingsSchema.md以下は MSYS2 用プロファイル作成に関するディスカッション。
Using Windows Terminal for MSYS2 · Issue #1669 · microsoft/terminal · GitHub
https://github.com/microsoft/terminal/issues/1669Using MSYS2 in Windows Terminal · Issue #1684 · msys2/MSYS2-packages · GitHub
https://github.com/msys2/MSYS2-packages/issues/1684
powershell のヘルプ
PowerShell[.exe] [-PSConsoleFile <ファイル> | -Version <バージョン>]
    [-NoLogo] [-NoExit] [-Sta] [-Mta] [-NoProfile] [-NonInteractive]
    [-InputFormat {Text | XML}] [-OutputFormat {Text | XML}]
    [-WindowStyle <スタイル>] [-EncodedCommand <Base64 エンコードのコマンド>]
    [-ConfigurationName <文字列>]
    [-File <ファイル パス> <引数>] [-ExecutionPolicy <実行ポリシー>]
    [-Command { - | <スクリプト ブロック> [-args <引数の配列>]
                  | <文字列> [<コマンド パラメーター>] } ]

PowerShell[.exe] -Help | -? | /?

-PSConsoleFile
    指定された Windows PowerShell コンソール ファイルを読み込みます。コンソー
    ル ファイルの作成には、Windows PowerShell の Export-Console を使用します。

-Version
    指定されたバージョンの Windows PowerShell を起動します。
    このパラメーターでバージョン番号 ("-version 2.0" など) を入力します。

-NoLogo
    スタートアップ時に著作権の見出しを非表示にします。

-NoExit
    スタートアップ コマンドを実行後、終了しません。

-Sta
    シングルスレッド アパートメントを使用して、シェルを起動します。
    既定ではシングルスレッド アパートメント (STA) です。

-Mta
    マルチスレッド アパートメントを使用して、シェルを起動します。

-NoProfile
    Windows PowerShell プロファイルを読み込みません。

-NonInteractive
    ユーザーに対話的なプロンプトを表示しません。

-InputFormat
    Windows PowerShell に送られたデータの形式を指定します。有効な値は、"Text"
    (テキスト文字列) または "XML" (シリアル化 CLIXML 形式) です。

-OutputFormat
    Windows PowerShell からの出力の形式を決定します。有効な値は、"Text" (テ
    キスト文字列) または "XML" (シリアル化 CLIXML 形式) です。

-WindowStyle
    ウィンドウ スタイルを Normal、Minimized、Maximized、または Hidden に設定します。

-EncodedCommand
    Base-64 エンコードの文字列のコマンドを受け付けます。複雑な引用符や中かっ
    こが必要なコマンドを Windows PowerShell に送るには、このパラメーターを使
    用します。

-ConfigurationName
    Windows PowerShell が実行される構成エンドポイントを指定します。
    ローカル コンピューターに登録された任意のエンドポイントを指定できます。
    たとえば、既定の Windows PowerShell リモート処理エンドポイントや、特定の
    ユーザー機能を持つカスタム エンドポイントなどを指定できます。

-File
    指定されたスクリプトをローカル スコープ ("ドット ソース") で実行して、
    スクリプトによって作成された関数と変数を現在のセッションで使用できるように
    します。スクリプト ファイルのパスとパラメーターを入力します。
    File はコマンド内で最後のパラメーターである必要があります。File パラメーター
   名の後に入力された文字は、スクリプト ファイルのパスとスクリプトのパラメー
    ターとして解釈されるためです。

-ExecutionPolicy
    現在のセッションの既定の実行ポリシーを設定し、
    $env:PSExecutionPolicyPreference 環境変数に保存します。
    このパラメーターでは、レジストリに設定されている Windows PowerShell 実行
    ポリシーは変更されません。

-Command
    PowerShell のコマンド プロンプトに入力された場合と同様に、指定されたコマ
    ンド (および任意のパラメーター) を実行します。NoExit が指定されていない場
    合は、そのまま終了します。Command の値には、"-"、文字列、またはスクリプト
    ブロックを指定できます。

    Command の値が "-" の場合、コマンド テキストは標準入力から読み込まれます。

    Command の値がスクリプト ブロックの場合は、スクリプト ブロックを中かっこ
    ({}) で囲む必要があります。スクリプト ブロックを指定できるのは、Windows
    PowerShell で PowerShell.exe を実行している場合だけです。スクリプト ブロ
    ックの結果は、ライブ オブジェクトではなく逆シリアル化 XML オブジェクトと
    して親シェルに返されます。

    Command の値が文字列の場合、Command はコマンド内で最後のパラメーターである
    必要があります。コマンドの後に入力された文字は、コマンド引数として解釈さ
    れるためです。

    Windows PowerShell コマンドを実行する文字列を記述するには、次の形式を使用します。
        "& {<コマンド>}"
    引用符によりこれが文字列であることを示し、呼び出し演算子 (&) によりコマ
    ンドが実行されます。

-Help, -?, /?
    このメッセージを表示します。Windows PowerShell で PowerShell.exe のコマン
    ドを入力する場合、コマンド パラメーターの前にスラッシュ (/) ではなくハイ
    フン (-) を入力してください。Cmd.exe では、ハイフンまたはスラッシュのいずれかを使用できます。

例
    PowerShell -PSConsoleFile SqlSnapIn.Psc1
    PowerShell -version 2.0 -NoLogo -InputFormat text -OutputFormat XML
    PowerShell -ConfigurationName AdminRoles
    PowerShell -Command {Get-EventLog -LogName security}
    PowerShell -Command "& {Get-EventLog -LogName security}"

    # -EncodedCommand パラメーターを使用する場合:
    $command = 'dir "c:\program files" '
    $bytes = [System.Text.Encoding]::Unicode.GetBytes($command)
    $encodedCommand = [Convert]::ToBase64String($bytes)
    powershell.exe -encodedCommand $encodedCommand
MSYS2 用プロファイルの作成
アイコンの抽出
How To Extract or Save the Icon from an EXE File
https://www.techjunkie.com/extract-save-icon-exe-file/IconsExtract - Extract icon/cursor stored in EXE, DLL, OCX, CPL files
https://www.nirsoft.net/utils/iconsext.html
※ mingw64 と mingw32 のアイコンはこちらを使って抽出しました。ChocorateyによるIconsExtractのインストール例choco install iconsext.installhttps://chocolatey.org/packages?q=iconsext
PowerShell上でのアイコン抽出例PS C:\Users\foobar> cd "C:\Program Files (x86)\NirSoft\IconsExtract\" PS C:\Program Files (x86)\NirSoft\IconsExtract> .\iconsext.exe /save C:\msys64\mingw32.exe C:\msys64 -icons PS C:\Program Files (x86)\NirSoft\IconsExtract> mv C:\msys64\mingw32_ID.ico C:\msys64\mingw32.ico PS C:\Program Files (x86)\NirSoft\IconsExtract> .\iconsext.exe /save C:\msys64\mingw64.exe C:\msys64 -icons PS C:\Program Files (x86)\NirSoft\IconsExtract> mv C:\msys64\mingw64_ID.ico C:\msys64\mingw64.ico PS C:\Program Files (x86)\NirSoft\IconsExtract>設定ファイルの編集
設定ファイルに例えば以下のような記述を追加。
        {
            "name": "MSYS2",
            "commandline": "powershell.exe \"set-item env:MSYSTEM -value MSYS; C:\\msys64\\usr\\bin\\bash.exe --login\"",
            "icon": "C:\\msys64\\msys2.ico"
        },
        {
            "name": "MINGW32",
            "commandline": "powershell.exe \"set-item env:MSYSTEM -value MINGW32; C:\\msys64\\usr\\bin\\bash.exe --login\"",
            "icon": "C:\\msys64\\mingw32.ico"
        },
        {
            "name": "MINGW64",
            "commandline": "powershell.exe \"set-item env:MSYSTEM -value MINGW64; C:\\msys64\\usr\\bin\\bash.exe --login\"",
            "icon": "C:\\msys64\\mingw64.ico"
        }
設定ファイルの全体
// To view the default settings, hold "alt" while clicking on the "Settings" button.
// For documentation on these settings, see: https://aka.ms/terminal-documentation

{
    "$schema": "https://aka.ms/terminal-profiles-schema",

    "defaultProfile": "{61c54bbd-c2c6-5271-96e7-009a87ff44bf}",

    "profiles":
    [
        {
            // Make changes here to the powershell.exe profile
            "guid": "{61c54bbd-c2c6-5271-96e7-009a87ff44bf}",
            "name": "Windows PowerShell",
            "commandline": "powershell.exe",
            "hidden": false
        },
        {
            // Make changes here to the cmd.exe profile
            "guid": "{0caa0dad-35be-5f56-a8ff-afceeeaa6101}",
            "name": "cmd",
            "commandline": "cmd.exe",
            "hidden": false
        },
        {
            "guid": "{574e775e-4f2a-5b96-ac1e-a2962a402336}",
            "hidden": false,
            "name": "PowerShell Core",
            "source": "Windows.Terminal.PowershellCore"
        },
        {
            "guid": "{b453ae62-4e3d-5e58-b989-0a998ec441b8}",
            "hidden": false,
            "name": "Azure Cloud Shell",
            "source": "Windows.Terminal.Azure"
        },
        {
            "name": "MSYS2",
            "commandline": "powershell.exe \"set-item env:MSYSTEM -value MSYS; C:\\msys64\\usr\\bin\\bash.exe --login\"",
            "icon": "C:\\msys64\\msys2.ico"
        },
        {
            "name": "MINGW32",
            "commandline": "powershell.exe \"set-item env:MSYSTEM -value MINGW32; C:\\msys64\\usr\\bin\\bash.exe --login\"",
            "icon": "C:\\msys64\\mingw32.ico"
        },
        {
            "name": "MINGW64",
            "commandline": "powershell.exe \"set-item env:MSYSTEM -value MINGW64; C:\\msys64\\usr\\bin\\bash.exe --login\"",
            "icon": "C:\\msys64\\mingw64.ico"
        }
    ],

    // Add custom color schemes to this array
    "schemes": [],

    // Add any keybinding overrides to this array.
    // To unbind a default keybinding, set the command to "unbound"
    "keybindings": []
}
guid は 恐らくdefaultprofile を指定するための一意の識別子なので、Windows Terminal で呼び出した MSYS 環境で
env | grep WT_SESSIONを実行した結果から適当に拝借出来そうな気もする。透過
例えば以下のような記述を追加すると不透明度 75% で半透明化出来る。
"useAcrylic": true,
"acrylicOpacity": 0.75,環境変数
CHERE_INVOKING=1
cd "${HOME}" させたくない場合は CHERE_INVOKING=1 を指定。
設定例"commandline": "powershell.exe \"set-item env:MSYSTEM -value MSYS; set-item env:CHERE_INVOKING -value 1; C:\\msys64\\usr\\bin\\bash.exe --login\""参考とした文献
参考とした文献
ConEmu | Cygwin Startup Directory
https://conemu.github.io/en/CygwinStartDir.htmlPowerShellで環境変数を設定する - bakemoji |> log
http://bakemoji.hatenablog.jp/entry/2014/01/09/235409複数コマンドを1行で入力する - MURA の Home Page
http://www.vwnet.jp/Windows/PowerShell/SingleLineCommand.htmUsing MSYS2 in Windows Terminal · Issue #1684 · msys2/MSYS2-packages · GitHub
https://github.com/msys2/MSYS2-packages/issues/1684#issuecomment-508786102TERM=xterm / TERM=cygwin
mintty ならば xterm となる値が Windows Terminal では cygwin となる点の修正。
設定例"commandline": "powershell.exe \"set-item env:MSYSTEM -value MSYS; set-item env:TERM -value xterm; C:\\msys64\\usr\\bin\\bash.exe --login\""スクリーンショット
        {
            "name": "MSYS2",
            "commandline": "powershell.exe \"set-item env:MSYSTEM -value MSYS; C:\\msys64\\usr\\bin\\bash.exe --login\"",
            "icon": "C:\\msys64\\msys2.ico"
        },
        {
            "name": "MSYS2",
            "commandline": "powershell.exe \"set-item env:TERM -value xterm; set-item env:MSYSTEM -value MSYS; C:\\msys64\\usr\\bin\\bash.exe --login\"",
            "icon": "C:\\msys64\\msys2.ico"
        },
おまけ:高速応答端末「Alacritty」
MS製ではありませんが、GPUアクセラレーションでレスポンスが良いことが売りの端末エミュレータ「Alacritty」
他にも、MSYS2 で使える Windows 用サードパーティー製端末ソフトとしては ConEmu や mlterm-msys2 など様々存在します。
Alacritty の導入
公式サイトからダウンロード&インストール、もしくは Chocoratey で導入
GitHub
https://github.com/jwilm/alacritty
https://github.com/jwilm/alacritty/releasesChocorateyによるインストール例choco install alacrittyhttps://chocolatey.org/packages?q=alacritty
設定ファイルの開き方
CommandPromptnotepad.exe %APPDATA%\alacritty\alacritty.ymlPowerShellnotepad.exe $env:APPDATA\alacritty\alacritty.yml日本語フォントの指定例
MSGothicを指定した場合# Font configuration (changes require restart) font: # Normal (roman) font face normal: # Font family # # Default: # - (macOS) Menlo # - (Linux) monospace # - (Windows) Consolas #family: monospace family: MS Gothicスクリーンショット
※ バージョン 0.3.3(Chocoratey, 2019/10/19 時点)では日本語フォントも問題なく表示出来ました。また、別窓が開いてしまいインライン入力とはならなかったものの、日本語も入力可能でした。
おまけ:MSYS2 でサブシステム毎にコンパイル済みバイナリの依存ライブラリを比較する
sl
https://github.com/mtoyoda/slslのビルドcd mkdir Downloads && cd Downloads curl -LO https://github.com/mtoyoda/sl/archive/5.02.tar.gz tar zxf 5.02.tar.gz cd sl-5.02※ clang を用いても問題なくコンパイル出来ました。
sl のビルドに必要なパッケージ/グループ
MSYS開発
base-devel
msys2-devel
ncurses-develMinGW32開発
mingw-w64-i686-toolchain
mingw-w64-i686-ncursesMinGW64開発
mingw-w64-x86_64-toolchain
mingw-w64-x86_64-ncurses参考とした文献
参考とした文献
Man page of GCC - JM Project
https://linuxjm.osdn.jp/html/GNU_gcc/man1/gcc.1.htmlGCCの最適化 - Gentoo Wiki
https://wiki.gentoo.org/wiki/GCC_optimization/jaMSYS Subsystem
gcc -march=native -O3 -o sl sl.c -lncurses
サブシステムを介さずコマンドプロンプトから sl を直接実行
.\sl.exe
C:\msys64\usr\bin\msys-ncursesw6.dll
C:\msys64\usr\bin\msys-2.0.dll
set PATH=C:\msys64\usr\bin;%PATH%
.\sl.exe
ldd コマンドによるライブラリの検証
$ ldd sl.exe
        ntdll.dll => /c/WINDOWS/SYSTEM32/ntdll.dll (0x7ffe1b760000)
        KERNEL32.DLL => /c/WINDOWS/System32/KERNEL32.DLL (0x7ffe1a1f0000)
        KERNELBASE.dll => /c/WINDOWS/System32/KERNELBASE.dll (0x7ffe19560000)
        msys-ncursesw6.dll => /usr/bin/msys-ncursesw6.dll (0x5fcb10000)
        msys-2.0.dll => /usr/bin/msys-2.0.dll (0x180040000)
参考とした文献
参考とした文献
10.2. Linux® バイナリ互換機能の設定 - FreeBSD ハンドブック
https://www.freebsd.org/doc/ja_JP.eucJP/books/handbook/linuxemu-lbc-install.htmlMan page of LDD - JM Project
https://linuxjm.osdn.jp/html/ld.so/man1/ldd.1.htmlMinGW32 Subsystem
gcc -march=native -O3 -o sl sl.c -lncurses -I/mingw32/include/ncurses
サブシステムを介さずコマンドプロンプトから sl を直接実行
.\sl.exe
C:\msys64\mingw32\bin\libwinpthread-1.dll
set PATH=C:\msys64\mingw32\bin;%PATH%
.\sl.exe
ldd コマンドによるライブラリの検証
$ ldd sl.exe
        ntdll.dll => /c/WINDOWS/SYSTEM32/ntdll.dll (0x7ffe1b760000)
        ??? => ??? (0x77200000)
        wow64.dll => /c/WINDOWS/System32/wow64.dll (0x7ffe1aa60000)
        wow64win.dll => /c/WINDOWS/System32/wow64win.dll (0x7ffe19c90000)
※ 何故か C:\msys64\mingw32\bin\libwinpthread-1.dll が「???」に。
dumpbin コマンドによる追加検証
dumpbin /dependents sl.exe
Microsoft (R) COFF/PE Dumper Version 14.12.25835.0
Copyright (C) Microsoft Corporation.  All rights reserved.


Dump of file sl.exe

File Type: EXECUTABLE IMAGE

  Image has the following dependencies:

    KERNEL32.dll
    msvcrt.dll
    libwinpthread-1.dll
    USER32.dll

  Summary

        1000 .CRT
        6000 .bss
        1000 .data
        6000 .debug_abbrev
        1000 .debug_aranges
       5E000 .debug_info
       10000 .debug_line
       16000 .debug_loc
        1000 .debug_ranges
        1000 .debug_str
        A000 .eh_frame
        1000 .idata
        D000 .rdata
        1000 .rsrc
       3B000 .text
        1000 .tls
参考とした文献
参考とした文献
Windows でライブラリの依存関係を調べる | プログラマーズ雑記帳
http://yohshiy.blog.fc2.com/blog-entry-65.htmlDUMPBIN リファレンス | Microsoft Docs
https://docs.microsoft.com/ja-jp/cpp/build/reference/dumpbin-reference?view=vs-2019/DEPENDENTS | Microsoft Docs
https://docs.microsoft.com/ja-jp/cpp/build/reference/dependents?view=vs-2019MinGW64 Subsystem
gcc -march=native -O3 -o sl sl.c -lncurses -I/mingw64/include/ncurses
サブシステムを介さずコマンドプロンプトから sl を直接実行
.\sl.exe
C:\msys64\mingw64\bin\libwinpthread-1.dll
set PATH=C:\msys64\mingw64\bin;%PATH%
.\sl.exe
ldd コマンドによるライブラリの検証
$ ldd sl.exe
        ntdll.dll => /c/WINDOWS/SYSTEM32/ntdll.dll (0x7ffe1b760000)
        KERNEL32.DLL => /c/WINDOWS/System32/KERNEL32.DLL (0x7ffe1a1f0000)
        KERNELBASE.dll => /c/WINDOWS/System32/KERNELBASE.dll (0x7ffe19560000)
        msvcrt.dll => /c/WINDOWS/System32/msvcrt.dll (0x7ffe1ac40000)
        USER32.dll => /c/WINDOWS/System32/USER32.dll (0x7ffe1a5f0000)
        win32u.dll => /c/WINDOWS/System32/win32u.dll (0x7ffe191f0000)
        GDI32.dll => /c/WINDOWS/System32/GDI32.dll (0x7ffe19bf0000)
        gdi32full.dll => /c/WINDOWS/System32/gdi32full.dll (0x7ffe18750000)
        libwinpthread-1.dll => /mingw64/bin/libwinpthread-1.dll (0x64940000)
        msvcp_win.dll => /c/WINDOWS/System32/msvcp_win.dll (0x7ffe193d0000)
        ucrtbase.dll => /c/WINDOWS/System32/ucrtbase.dll (0x7ffe19220000)
おまけ:MSYS2 と環境変数「TERMINFO」
Curses アプリを MinGW32 や MinGW64 環境でビルドし、そのまま bash 上で実行しようとすると terminal に関連するエラーで立ち上がらない。このとき、環境変数 TERMINFO に各サブシステムにおける適切な terminfo ディレクトリを指定することでエラーを回避し立ち上げることが出来た。なおこの条件下で、mintty と mlterm では問題ないが Windows Terminal や Alacritty で実行した bash では Curses アプリの表示が化けてしまった。
参考とした文献
参考とした文献
MSYS2 / Discussion / General Discussion: Cause of "Error opening terminal" message?
https://sourceforge.net/p/msys2/discussion/general/thread/f81f0b97/#e1adMinGW32 環境
./sl.exe
export TERMINFO=/mingw32/share/terminfo
./sl.exe
MinGW64 環境
./sl.exe
export TERMINFO=/mingw64/share/terminfo
./sl.exe
おまけ:MSYS2 と mlterm
mlterm-msys2 の導入
公式サイトからダウンロード&インストール
公式サイト
http://mlterm.sourceforge.netmlterm-msys2 配付元
http://mlterm.sourceforge.net/bin.html
mlterm-msys2-20190421.zip の README.txt
* Install
  Copy "bin", "etc", "lib" and "libexec" directories in
  mlterm-msys2-YYYYMMDD.zip to c:\msys64\usr directory (or the other directory
  where you installed MSYS2).

  Then, start c:\msys64\usr\bin\mlterm.exe.

* Uninstall
  Execute uninstall.sh in mlterm-msys2-YYYYMMDD.zip.

* See also
  http://bitbucket.org/arakiken/mlterm/src/tip/doc/en/README.win32
  http://bitbucket.org/arakiken/mlterm/src/tip/doc/ja/README.win32
  http://bitbucket.org/arakiken/mlterm/src/tip/doc/ja/Usage.win32
※ アーカイブ内の man ディレクトリを MSYS2 側にコピーしておくとman コマンドから mlterm の manpage を参照出来るようになります。
コマンドプロンプト、またはバッチファイルからの起動例
MSYSサブシステムset MSYSTEM=MSYS && C:\msys64\usr\bin\mlterm.exeMinGW32サブシステムset MSYSTEM=MINGW32 && C:\msys64\usr\bin\mlterm.exeMinGW64サブシステムset MSYSTEM=MINGW64 && C:\msys64\usr\bin\mlterm.exe※ mlterm の
-eオプションで起動時に実行されるコマンドを細かく指定出来ます。
例)set MSYSTEM=MSYS && C:\msys64\usr\bin\mlterm.exe -e /bin/bash -l -i
出典:https://bitbucket.org/arakiken/mlterm/raw/162248a92ddfacfecbaa062f129ea3cdd2f1a580/doc/ja/README.win32スクリーンショット
manpage
mlterm's manpage
MLTERM(1) General Commands Manual MLTERM(1) NAME mlterm - Multi Lingual TERMinal emulator on X SYNOPSIS mlterm [options] DESCRIPTION mlterm is a multi-lingual terminal emulator written from scratch, which supports various character sets and encodings in the world and complex characters such as double width for East Asian, combining for Thai, Vietnamese, and so on, and bi-direction for Arabic and Hebrew. Indic scripts are experimentally supported. It also supports various unique feature such as anti-alias using FreeType, multiple XIM, multiple win‐ dows, scrollbar API, scroll by mouse wheel, automatic selection of en‐ coding, daemon mode, and so on. Supported encodings are: ISO-8859-[1-11], ISO-8859-[13-16], TIS-620 (same as ISO-8859-11), KOI8-R, KOI8-U, KOI8-T, GEORGIAN-PS, TCVN5712, ISCII_(ASSAMESE|BENGALI|GUJARATI| HINDI|KANNADA|MALAYALAM|ORIYA|PUN‐ JABI|TAMIL|TELUGU), VISCII, CP125[0-8], CP874, EUC-JP, EUC-JISX0213, Shift_JIS, Shift_JISX0213, ISO-2022-JP[1-3], EUC-KR, UHC, JOHAB, ISO-2022-KR, GB2312 (EUC-CN), GBK, GB18030, ISO-2022-CN, HZ, EUC-TW, BIG5, BIG5HKSCS, and UTF-8. If you have already set locale (for exam‐ ple LANG variable; see locale(7) for detail) mlterm will automatically select proper encoding. OPTIONS Note that bool is to be substituted by true or false. -A, --aa(=bool) Use anti-aliased fonts. This option works only with Xft or cairo for now. The default is false. -B, --sbbg=color Specify a background color of a scrollbar. A valid value for color is a color name or a RGB value. The color name should be defined in rgb.txt or "color" configuration file. The RGB value's format should be "#RRGGBB", "#RRGGBBAA", "rgb:RR/GG/BB" or "rgba:RR/GG/BB/AA". -C, --ctl(=bool) Enable complex text layouting on UTF8 encoding to support indic scripts and RTL (right-to-left) languages such as Arabic and Hebrew. The default is true. -E, --km=encoding Specify encoding. Valid encodings are listed in DESCRIPTION section above in this man page. AUTO makes mlterm determine the according according to the current locale (default AUTO). -F, --sbfg=color Specify a foreground color of a scrollbar. See --sbbg option for valid values. -G, --vertical=mode Specify vertical writing mode. cjk for RTL vertical writing and mongol for LTR one. The default is none which means horizontal writing mode. -H, --bright=value Brightness of background images in percent. See -p option for details of background images. The default is 100 (keep origi‐ nal). -I, --icon=name Specify a name to be used when a mlterm window is iconified. The default is "mlterm". -J, --dyncomb(=bool) Enable dynamic character combining. "Dynamic" means that com‐ bining characters are stored in without combining but they are displayed using combined form. This affects calculation of column position, i.e., a pair of base character and combining character is counted to be two columns in this mode, while it is counted to be one column in the normal mode. Under this option, a (logical) column number and a character one-to-one correspon‐ dence. even for combining characters (though not for fullwidth characters; see -Z/--multicol option for handling of fullwidth characters). Thus, this mode enables you to use combining characters with software which does not support combining char‐ acters. The default is false. -K, --metakey=value Specify a key to be interpreted as a META key. Valid values are: alt, meta, hyper, super, mod1, mod2, mod3, mod4, and none. The default is none. See -k option also. -L, --ls(=bool) Whether to use login shell or not. The default is false. -M, --im= input method : [ arguments ... ] Specify an input method. (See doc/ja/README.ja in detail) Examples: --im=xim Use XIM with the default XIM server specified by standard way (i.e., XMODIFIERS environmental variable). --im=xim:Ami Use XIM with Ami on the system locale. --im=xim:kinput2:ja_JP.EUC-JP Use XIM with kinput2 on ja_JP.EUC-JP locale. --im=kbd:arabic Use keyboard mapping input method in Arabic. --im=kbd:hebrew Use keyboard mapping input method in Hebrew. --im=kbd:isciixxx Use keyboard mapping input method in Indic. --im=uim Use uim with the default conversion engine. --im=uim:prime Use uim with prime conversion engine. --im=m17nlib:ru Use m17n library in Russian. --im=m17nlib:or:itrans Use m17n library in Oriya using ITRANS method. --im=scim Use SCIM. --im=ibus Use IBus with the default conversion engine. --im=ibus:anthy Use IBus with anthy conversion engine. --im=fcitx Use Fcitx. --im=canna Use Canna. --im=wnn Use Freewnn. --im=wnn:foo.bar Use Freewnn with jserver at foo.bar host. (JSERVER en‐ vironmental variable is also available.) --im=skk Use SKK. --im=skk:dict=foo.bar:utf8,sskey=\x3b Use SKK with the use of utf8 skk server at foo.bar host and semicolon key as sticky shift key. (SKK_DICTIONARY and SKK_STICKY_SHIFT_KEY environmental variable are also available.) --im=iiimf Use IIIMF in the system language. --im=iiimf:ar Use IIIMF in Arabic. --im=iiimf:ja:CannaLE Use IIIMF in Japanese using CannaLE language engine. --im=none Don't use input method. -N, --name=name Specify application name. The default is "mlterm". -O, --sbmod=value Specify the side to show a scrollbar. left for left side and right for right side. none turns off a scrollbar. autohide shows a scrollbar only if mouse pointer is at the right edge of the screen. The default is left. -P, --clip(=bool) Whether to enable CLIPBOARD (not only PRIMARY) selection. The default is true. -Q, --vcur(=bool) Change interpretation of cursor keys to be natural in vertical writing mode. This means that up and down arrow keys are treated as backward (left arrow in horizontal LTR) and forward (right arrow in horizontal LTR), respectively. In cjk -G/--vertical mode, left and right arrow keys are also treated as next line (down arrow in horizontal LTR) and previous line (up arrow in horizontal LTR), respectively, while vice versa in mongol mode. The default is true. -R, --fsrange=range Set acceptable range of font size. The format is "minsize-max‐ size", where minsize and maxsize are font sizes in pixel (de‐ fault 1-100). The GUI configurator and other means for setting fontsize should honor the range. -S, --sbview=name Select a type of scrollbar. See SCROLLBAR section below for details. The default is "simple" which means the built-in sim‐ ple scrollbar. -T, --title=name Specify a title for a mlterm window. The default is "mlterm". -U, --viaucs(=bool) Force to convert a selection (i.e., copy-and-paste strings) whose type is not UTF8_STRING to the current mlterm encoding via Unicode. See SELECTION section below for detail. The default is false. -V, --varwidth(=bool) Use variable column width. You may want to use this option when you use proportional fonts. The default is false. -W, --sep=characterlist Delimiter characters used for word selection, which are con‐ sulted when you double-clicked mlterm, to define what is a word. The default is " ,.:;/|@()[]{}") -X, --alpha=value Alpha in pseudo or true transparent. The default is 255. -Y, --decsp(=bool) Use dynamically composed line drawing character set of DEC spe‐ cial. The default is false. This overrides DEC_SPECIAL in "font" configuration file, while DEC_SPECIAL in "aafont" (for Xft or cairo) is always overridden. -Z, --multicol(=bool) Treat fullwidth characters (east Asian characters in most cases; which occupies two columns on the screen) as they occupy two logical columns. It is the de-facto standard way to handle fullwidth characters in east Asian terminal emulators (XFree86 xterm and kterm, cxterm, hanterm, rxvt, eterm) and other sys‐ tems such as MS-DOS, PC-9801, and so on. In most fonts, the glyphs of fullwidth characters are designed assuming that their width are twice of normal characters and won't display correctly without this option. The default is true. -0, --crbg=color Specify background color for cursor (default is same to fore‐ ground color). Valid values for color are color names defined in rgb.txt and color rgb string whose format is "#RRGGBB", "#RRGGBBAA", "rgb:RR/GG/BB" or "rgba:RR/GG/BB/AA". -1, --wscr=value Specify actual window width, by percentage against calculated value by multiplying font width by column number. This is use‐ ful when you use a proportional font which includes some glyphs with exceptionally large width, i.e., much larger "maximum width" than your expectation. In vertical mode this option changes actual window height. The default is 100. -3, --contrast=value) Contrast of background image in percent. See -p option for de‐ tails of background image. The default is 100. -4, --gamma=value) Gamma of background image in percent. See -p option for details of background image. The default is 100. -5, --big5bug(=bool) Enable a workaround for Big5 CTEXT bugs (which had been existed until XFree86 4.1.0). This affects Big5 selections (i.e., copy- and-paste strings) in COMPOUND_TEXT format which mlterm sends. The default is false. -6, --stbs(=bool) Don't exit backscroll mode when console applications output something. The default is false. -7, --bel=mode Behavior when BEL (0x07) is received. sound for beep , visual for blanking screen and sound|visual for the both. The default is none which ignores BEL. -8, --88591(=bool) Use ISO8859-1 fonts for US-ASCII part of various encodings. -9, --crfg=color Specify foreground color for cursor (default is same to back‐ ground color). Valid values for color are color names defined in rgb.txt and color rgb string whose format is "#RRGGBB", "#RRGGBBAA", "rgb:RR/GG/BB" or "rgba:RR/GG/BB/AA". -$, --mc=value Doubleclick/tripleclick interval in millisecond. The default is 250. -%, --logseq(=bool) Enable logging. Contents of stream received by mlterm will be logged under ~/.mlterm/. This option is mainly intended to be used for debugging purposes. The default is false. Note that % should be escaped to be supplied as a command line option on most shells. -&, --borderless(=bool) Asks the window manager to use no decorations at all. Warning: You will not be able to resize the window. You probably want to use --geometry as well. The default is false. -@, --screens=value Specify number of screens (sessions) to be used in start up. The default is 1. Note that when one of these screens are closed, sessions which were connected to the screens do not im‐ mediately killed. See MULTIPLE PTY section for details. -*, --type=value Specify the rendering engine to be used to draw fonts. xcore is conventional X11 core font mechanism. xft means Xft mechanism and cairo means cairo mechanism. The default is cairo. -#, --initstr=value Specify a string to be automatically sent after initialization of session. The value normally will be parsed by a shell. See -e option to execute other application at start-up time. -a, --ac=value Specify number of columns to be occupied by a Unicode's "East‐ AsianAmbiguous" character. The default is 1 except "ja" locale where the default is 2. Some of asian people may want to specify 2. See Unicode Standard Annex (UAX) #11 East Asian Width found at Unicode web site for details. -b, --bg=color Specify background color (default white). Valid values for color are color names defined in rgb.txt and color rgb string whose format is "#RRGGBB", "#RRGGBBAA", "rgb:RR/GG/BB" or "rgba:RR/GG/BB/AA". -c, --cp932(=bool) Use CP932 mapping table to convert from JIS X 0208 to Unicode when displaying JIS X 0208 characters using Unicode font in Xft or cairo mode. This is useful when you use proprietary Japanese true type fonts which are intended to be used with Microsoft Windows, with mlterm with encodings (such as EUC-JP, Shift_JIS, ISO-2022-JP, and so on) which contain JIS X 0208 as a coded character set. The reason is, such proprietary fonts may have glyphs only for Unicode code points into which JIS X 0208 code points are con‐ verted using CP932 mapping table. (CP932 is a name of mapping table which is used by Microsoft to convert from Shift_JIS [plus Microsoft private extended characters] into Unicode. In Uni‐ code's point of view, CP932 is a name of encoding which is sim‐ ilar to Shift_JIS and is used by Japanese version of Microsoft Windows.) If you use such fonts for encodings such as EUC-JP and Shift_JIS with JIS0208.TXT mapping table which mlterm adopts as the standard, a few characters are mapped into Unicode code points where the fonts don't have glyphs. Both of CP932.TXT and JIS0208.TXT mapping tables are supplied by Unicode Consortium, though they are regarded to be obsolete. The default is true. -d, --display=string Specify X display to connect with. -e program [ arguments ... ] Invoke the command in the mlterm window. This option must be the last option on the command line. -f, --fg=color Foreground color (default black). Valid values for color are color names defined in rgb.txt and color rgb string whose format is "#RRGGBB", "#RRGGBBAA", "rgb:RR/GG/BB" or "rgba:RR/GG/BB/AA". -g, --geometry=geometry Specify size and position of the window; see X(7). -h, --help(=bool) Show help messages. -i, --xim(=bool) Whether to use XIM (X Input Method). Most east Asian people will want to enable this option. Other people can also safely enable this. The default is true. The name of the XIM server to be connected is specified by standard way (i.e., XMODIFIERS environmental variable). -j, --daemon=value Start as a daemon process. Note that mlclient is executed if a daemon process has already started. Possible =values are "blend" and "genuine". See the chapter of DAEMON MODE for de‐ tails. -k, --meta=mode Behavior of META key. esc for sending ESC and none for ignoring META key. The default is 8bit which sets the most significant bit. See -K option also. -l, --sl=value Specify number of lines of backlog or "unlimited". Over 65535(0xffff) is regarded as "unlimited". The default is 128. -m, --comb(=bool) Enable combining characters by overstriking glyphs (recommended for TIS-620, TCVN5712, and UTF-8). Note that fonts which con‐ tain combining characters which extend backward cannot be used, since mlterm does combine characters by controlling the writing positions. This option is automatically turned on when using --dyncomb option. The default is true. -n, --noucsfont(=bool) Use non-Unicode fonts even when mlterm encoding is UTF-8. Use‐ ful when you don't have ISO10646-1 fonts and you want to use UTF-8 encoding. The default is false. -o, --lsp(=value) Specify number of extra pixels between lines. The default is 0. -p, --pic=path Path for a wallpaper (background) image. Note that the wallpa‐ per cannot be used with pseudo transparent background. -q, --extkey(=bool) Enable extended keys for backscroll mode. The default is false. Extended scroll keys are SCROLL_UP, up arrow, and "k" (for scrolling one line backward) and SCROLL_DOWN, down arrow, and "j" (for scrolling one line forward). Please note that concrete keys for symbols of SCROLL_UP and SCROLL_DOWN are specified in key configuration file. Only keys of PAGE_UP and PAGE_DOWN (which are specified in key configuration file) are available by default. -r, --fade=ratio Specify fading ratio for unfocused windows. 100 means no fading and 0 means darkest. The default is 100 -s, --mdi(=bool) Whether to use multiple document interface. The default is true. If you disable this option, scrollbar and screen separa‐ tion are unavailable. -t, --transbg(=bool) Whether to enable pseudo transparent background. Note that pseudo transparent background cannot be used with wallpaper. The default is false. -u, --onlyucsfont(=bool) Use Unicode fonts even when mlterm encoding is not UTF-8. Use‐ ful when you have ISO10646 fonts but you don't have other fonts and want to use non-UTF-8 encodings. Note that conversion to Unicode is lossy. i.e. if mlterm encoding is not a subset of Unicode like ISO-2022-JP-2 or EUC-TW, characters which are re‐ garded as a same character in Unicode will be displayed with the same glyph and cannot be distinguished. The default is false. -v, --version Show version information. -w, --fontsize=value Specify font size in pixel. The default is 16. -x, --tw=value Specify tab width. The default is 8. -y, --term=string Specify terminal type, i.e., the value of TERM variable. The default is xterm. -z, --largesmall=size Specify the step of changing font size in pixel when you pushed "Font size larger" or "Font size smaller" button on GUI config‐ urator. The default is 1. --aafont=(bool) (Available for mlterm-fb, mlterm-wl or mlterm-sdl2) Whether to use ~/.mlterm/*aafont configurations with the use of fontconfig. The default is false for mlterm-fb and true for mlterm-wl and mlterm-sdl2. --ade=value Specify character encodings detected automatically. --auto(=bool) Automatically detect appropriate character encoding from the encodings specified by --ade option. The default is false. --altbuf(=bool) Whether to enable alternate screen buffer. This option is sim‐ ilar to "titeInhibit" of xterm. --bc(=bool) Whether to broadcast input or pasted characters to all ptys whose value of "ignore_broadcasted_chars" option is false. The default is false. --bd=value Specify the color to use to display bold characters. --bdfont(=bool) Use bold font for characters with the bold attribute. The de‐ fault is true. --bimode=value Specify bidi mode. Valid values are: normal, left and right. The default is normal. --bisep=characterlist Specify separator characters to render bidi text. --bl=value Specify the color to use to display blinking characters. --blink(=bool) Blink cursor. The default is false. --blpos=value Specify the position (offset from the default baseline) of baseline. The default is 0. --border=value Specify inner border width. The default is 2. The maximum value is 224. --boxdraw=value Use either unicode font or DEC Special font forcibly to draw box-drawing characters. unicode for unicode font and decsp for DEC special font. The default is noconv which draw them as they are. --ciphlist=value Specify ciphers (comma separated list) for encrypting the ssh session. --ckm=encoding (Available for mlterm-con) Specify encoding of the console where mlterm-con works. Valid encodings are listed in DESCRIPTION section above in this man page. AUTO makes mlterm determine the according according to the current locale (default AUTO). --co=value Specify the color to use to display crossed-out characters. --colors(=bool) Whether to recognize ANSI color change escape sequences. The default is true. --csc=value (Available for mlterm-con) Specify the number of sixel graphics colors of the console where mlterm-con works. A valid value is 16, 256 or full. The default is 16. --csp=value Specify number of extra pixels between lines. (ignored if you specify --V option.) The default is 0. --csz=value (Available for mlterm-con) Specify cell width and height in pixel which mlterm-con uses if it doesn't get them. The default is 8,16. --da1=value Specify primary device attributes string. The default is 63;1;2;3;4;7;29. --da2=value Specify secondary device attributes string. The default is 24;279;0. --depth=value Specify visual depth. (8,16,24,32) If depth is 32, you can en‐ able semi-transparency by specifying opacity as the value of --alpha option or "rgba:RR/GG/BB/AA" as the value of --bg op‐ tion. --deffont=value DEFAULT in ~/.mlterm/*font. --emoji=value Specify path of a directory where emoji image files exist or a open type emoji font to show unicode emoji characters. The de‐ fault is ~/.mlterm/emoji. --exitbs(=bool) Whether to exit backscroll mode on receiving data from pty. The default is false. --fullwidth=value Force full width regardless of EastAsianWidth.txt. e.g.) --fullwidth=U+1234-5678,U+0123-4567 --halfwidth=value Force half width regardless of EastAsianWidth.txt. e.g.) --halfwidth=U+1234-5678,U+0123-4567 --ibc(=bool) Whether to ignore broadcasted characters. The default is false. --iconpath=path Specify the file to be used as a window icon. --it=value Specify the color to use to display italic characters. --itfont(=bool) Use italic font for characters with the italic attribute. The default is true. --keepalive=value Specify interval seconds to send keepalive message to ssh server. The default is 0. --lborder=value Specify inner border width of a layout manager. The default is 0. The maximum value is 224. --ldd(=bool) Embold glyphs by drawing doubly at 1 pixel leftward instead of rightward. The default is false. --lew=value Specify time (msec) to keep local echo mode. The default is 250. --locale=value Specify locale. The default is "". --logmsg(=bool) Enable logging messages of mlterm to ~/.mlterm/msg.log. The default is true. --loecho(=bool) Whether to use local echo mode or not. The default is false. --maxptys=value Specify maximum number of ptys (sessions) to be opened simulta‐ neously. It should be multiple of 32. The default is 32. See MULTIPLE PTY section for detail. --metaprefix=value Specify prefix characters in pressing meta key if mod_meta_mode = esc. The default is \x1b. --multivram(=bool) (Available for mlterm-fb on NetBSD/x68k) Whether to draw the wall picture on Text VRAM instead of Graphic VRAM to improve the performance of scrolling. The default is false. --noul(=bool) Don't draw underline. The default is false. --oft=value Specify features of glyph substitution. The default is fliga,clig,dlig,hlig,rlig. --osc52(=bool) Allow access to clipboard(selection) by OSC 52 sequence. The default is false. --ost=value Specify script of glyph substitution. The default is latn. --otl(=bool) Whether to show substituting glyphs in open type fonts with the use of libotf or harfbuzz. Don't specify --ctl=false if you want to use substituting glyphs. --ctl option disables auto‐ matic search of alternative glyphs in other fonts on cairo/xlib and freetype+fontconfig/{wayland|framebuffer}. The default is false. --parent=value Specify parent Window ID. The default is 0. --point(=bool) Treat the value of -w option as point instead of pixel. Note that this option works on xft, cairo or win32. The default is false. --pubkey=value Specify public key file for ssh connection. The default is ~/.ssh/id_rsa.pub(%HOMEPATH%termid_rsa.pub in win32). --privkey=value Specify private key file for ssh connection. The default is ~/.ssh/id_rsa(%HOMEPATH%termid_rsa in win32). --rcn(=bool) Reconnect to ssh server automatically in unexpected disconnec‐ tion. The default is false. --restart=value Whether to restart mlterm with all opened ptys except ssh if SIGSEGV, SIGBUS, SIGFPE or SIGILL is received. The default is true. --rv=value Specify the color to use to display reverse characters. --scp(=bool) Allow OSC 5379 scp. The default is false. Even if allow_scp = false, it is possible to transfer a file to "." directory (~/.mlterm/scp). --seqfmt=value Specify the format of logging vt100 sequence. raw for logging as it is and ttyrec for logging by ttyrec format. The default is raw. --serv=value Specify a host you want to connect via ssh etc. This option is enabled only if mlterm is built with MinGW or --enable-ssh2 op‐ tion. Value format: (<protocol>://)(<user>@)<server>(:<port>)(:<en‐ coding>) e.g.) mlterm --serv ssh://user@host:22:eucjp mlterm --serv mosh://user@host:22:utf8 --shortcut(=bool) Whether to allow dynamic change of shortcut keys by OSC 5379 set_shortcut sequence. The default is false. --slp(=bool) (Available for Android) Whether to start mlterm with local pty instead of ssh connec‐ tion. The default is false. --trim(=bool) Whether to trim new line characters at the end in pasting text. The default is false. --ul=value Specify the color to use to display underlined characters. --ulpos=value Specify the position (offset from the baseline) of underline. The default is 0. --ucsnoconv=value Use unicode fonts partially regardless of -n option. e.g.) --ucsnoconv=U+1234-5678,U+0123-4567 --urgent(=bool) Draw the user's attention when making a bell sound in the unfo‐ cused window. The default is false. --uriword(=bool) Select URI by double clicking it regardless of -W option. The default is false. --vtcolor=mode Set vt color mode. 256 for pseudo color, high for high color and true for true color. The default is high. --working-directory=value Working directory. --x11(=bool) Enable x11 forwarding for ssh connection. The default is false. GUI CONFIGURATOR Pushing control key and mouse button 3 invokes GUI configurator (ml‐ config). It can modify encoding, foreground and background color, tab size, backlog size, font size, usage of combining character, and so on. GUI configurator has six pages (Encoding, Font, Background, Color, Scrollbar, and Others), OK/Apply/Cancel buttons, and four special but‐ tons. Note this feature needs GTK+ 2.x or later. Encoding page Encoding-related configurations are located in this page. Note that configurations will be enabled when you push Apply button. Encoding Specify encoding. (-E, --km) Auto detect Whether to detect appropriate character encoding automatically. (--auto) Encoding list Specify character encodings detected automatically. (--ade) Input Method Specify which input method to be used. (-M, --im) XIM: XIM Server Specify the name of XIM server to be connected. You can input from your keyboard or you can choose one of regis‐ tered XIM servers. This doesn't have equivalent command option. See the section of XIM Configuration File for registration of XIM servers. XIM locale Specify the name of the locale to be used for connection to the XIM server. Popular XIM servers usually have ac‐ ceptable locales to be used for connection. If you choose registered XIM server in Input Method, this will be set automatically. You can also input the locale name from your keyboard. keyboard: Option Specify the name of key mapping table. When using ISCII encoding, Indic key mapping is used automatically. In other encodings, this will be automatically selected ac‐ cording to the current locale. uim: Option Specify the name of the conversion engine to be used. If you choose auto, the conversion engine will be automati‐ cally selected according to the current locale. Note this feature needs uim library. m17n library: Option Specify the language and the input method to be used. If you choose auto, the language and input method will be automatically selected according to the current locale. Note this feature needs m17n library and m17n-db. SCIM: No option iBus: No option Fcitx: No option Freewnn: Option Specify the address of the host where jserver works. Canna: No option SKK: Option Specify the place of skk dictionary (server or file) and the key used as sticky shift key. IIIMF: Option Specify the language id (RFC1766) and the language engine to be used. If you choose auto, the language id/engine will be automatically selected according to the current locale. Note this feature needs IIIMCF library. Complex Text Layout Whether to enable complex text layouting on UTF8 encoding to support indic scripts and RTL (right-to-left) languages such as Arabic and Hebrew. (-C, --ctl) Combining Whether to support combining characters by overstriking. (-m, --comb) Combining = 1 (or 0) logical column(s) Processing combining characters as if it occupies one column logically while it occupies zero column on the screen. (-J, --dyncomb) Process received strings via Unicode When you paste some strings into mlterm, the strings are con‐ verted into Unicode and then to mlterm encoding. (-U, --viaucs) OpenType Layout Whether to show substituting glyphs in open type fonts with the use of libotf or harfbuzz. (--otl) Ambiguouswidth = fullwidth (UTF8 only) Processing Unicode characters with EastAsianAmbiguous property as fullwidth. (-a, --ac) Fullwidth = 2 (or 1) logical column(s) Processing CJK fullwidth characters as it occupies two columns logically since it occupies two columns on the screen. (-Z, --multicol) Font page Configurations related to appearance (or look&feel) are located in this page. Font size Font size in pixel. (-w, --fontsize) Foreground color Foreground color for letters. (-f, --fg) Xft Use xft for rendering engine. (-*, --type) Cairo Use cairo for rendering engine. (-*, --type) Anti alias Use anti-alias fonts by using Xft or cairo. (-A, --aa) Variable column width Use variable column width. (-V, --varwidth) Vertical mode Vertical writing mode. (-G, --vertical) Font name Specify XLFD, Xft or cairo font for character sets. "Select" button shows a dialog to choose it. Font policy Whether to use unicode fonts (or non-unicode fonts) all the time regardless of a selected encoding. (-u, --onlyucsfont) (-n, --noucsfont) Unicode areas you won't convert to other charsets Specify code point areas which are shown by unicode fonts re‐ gardless of -n option. (--ucsnoconv) Box drawing Whether to use a unicode font or (a dec special font) all the time to draw box drawing characters. (--boxdraw) Line space Specify number of extra dots between lines. (-o, --lsp) Letter space Specify number of extra dots between characters. (--csp) Underline position Specify the position (offset from the baseline) of underline. (--ulpos) Baseline position Specify the position (offset from the default baseline) of baseline. (--blpos) Screen size ratio against font size Specify actual screen width (screen height in vertical mode). (-1, --wscr) Background page Configurations related to background are located in this page. Background color Background color. (-b, --bg) Picture Specify the image file to be used for background image. (-p, --pic) Pseudo Transparent Pseudo transparent background. (-t, --transbg) Picture/Transparent Brightness, Contrast, Gamma and Alpha. Brightness, contrast, gamma alpha of the background image. (-H, --bright) (-3, --contrast) (-4, --gamma) (-X, --alpha) Fade ratio on unfocus Fading ratio when window is unfocused. (-r, --fade) Color page Configurations related to color are located in this page. Cursor color Specify color to show cursor. (-9, --crfg) (-0, --crbg) Substituting color Specify color to show instead of bold, underlined, italic, blinking or crossed-out attribute. (--bd) (--ul) (--it) (--bl) (--co) VT basic 16 colors Customize VT basic 16 text colors. Scrollbar page Configurations related to scrollbar are located in this page. Position Specify scrollbar position. (-O, --sbmod) View Specify name of scrollbar. (-S, --sbview) Foreground color Specify foreground color of scrollbar. (-F, --sbfg) Background color Specify background color of scrollbar. (-B, --sbbg) Others page Other configurations are located in this page. Tab size Column number of tab. (-x, --tw) Backlog size Number of lines of backlog. (-l, --sl) Columns/Rows Number of columns and rows of the screen. (-g, --geometry) Word separators Delimiter characters used for word selection, which are con‐ sulted when you double-clicked mlterm, to define what is a word. (-W, --sep) Double click interval (msec) Doubleclick/tripleclick interval in millisecond. (-$, --mc) Meta key outputs Behavior of META key. (-k, --meta) Bell mode Behavior when mlterm receives BEL (0x07) code. (-7, --bel) Save log Whether to log sequence received from pty in ~/.mlterm/[pty].log in raw or ttyrec format. (--logseq) (--seqfmt) CLIPBOARD Selection Whether to enable CLIPBOARD (not only PRIMARY) selection. (-P, --clip) Local echo Whether to use local echo mode. (--loecho) Blink cursor Whether to blink cursor. (--blink) Don't scroll automatically in scrolling back. Don't exit backscroll mode when console applications output something. (-6, --stbs) Scroll by Shift+Up or Shift+Down Enable extended keys for backscroll mode. (-q, --extkey) Select URI by double click Select URI by double clicking it regardless of -W option. (--uriword) Send keys to all windows Whether to broadcast input or pasted characters to all ptys whose value of "ignore_broadcasted_chars" option is false. (--bc) Trim trailing CR/LF in pasting Whether to trim new line characters at the end in pasting text. (--trim) Buttons There are buttons which is independent from OK/Apply/Cancel buttons. OK/Apply/Cancel OK button applies the modified configuration to the current ml‐ term session, saves it to "~/.mlterm/main" configuration file, and quits the GUI Configurator. Apply button just applies the modified configuration to the current mlterm session. Font size (Larger and Smaller) Change font size. Full reset Reset internal status. Snapshot Snapshot the screen and save it to ~/.mlterm/*.snp. SSH SCP Transfer a file via SCP. PTY List One process of mlterm may have multiple sessions and screens. The sessions may or may not have corresponding screen, i.e., the number of sessions can be more than the number of screens. Such situation can be achieved by closing a part of multiple screens from -@/--screens option. In such case, the screen-less session can be designated to one of screens by choosing the session (pty) from this list and push "select" button. CONFIGURABLE MENU Pushing control key and mouse button 1 invokes configurable menu dis‐ player (mlterm-menu). It displays a menu with items such as "Larger Font" or "UTF-8 encoding". Though a default menu definition is sup‐ plied, you can freely define menu items by writing a menu configuration file. See Menu Configuration File section for detail. Note this feature needs GTK+ 2.x or later. MULTIPLE XIM mlterm can use multiple XIM (X Input Method) servers. The current XIM is specified by the GUI configurator. Using this feature you can input multiple complex languages such as Japanese and Korean. Locale to be used for communication with XIM can also be specified for each XIM. In the GUI configurator, you can choose one of registered pair of XIM and its locale or you can input your favorite XIM and its locale. The locale for XIM is only used for communication with the XIM and is not related to the current mlterm locale. You have to properly con‐ figure the XIM locale only when your XIM has preference on the locale of XIM client (i.e., mlterm in this case). mlterm automatically con‐ vert the inputed string into proper encoding and you don't have to care about it. Of course the initial XIM is chosen by using standard configuration, i.e., using XMODIFIERS environmental variable. See X(7) for detail on XIM and XMODIFIERS variable. DAEMON MODE When invoked with -j/--daemon command line option, mlterm starts to listen on a unix domain socket and accept requests from mlclient. With blend mlterm will exit when the final terminal window is closed. But with genuine, mlterm will disconnect from X server windows and continues to work. In latter case, it's possible to stop and restart a X server and revive the lasting sessions on mlterm. SCROLLBAR mlterm supports scrollbar API so that users can develop scrollbar li‐ braries with arbitrary look and feel. The scrollbar libraries can be used by putting the libraries at the specified directory (determined on the compilation process) and invoke mlterm with -s -S name option. Scrollbar libraries named "sample", "sample2", "athena", "motif", "mozmodern", and "next" are supplied. ANTI-ALIAS mlterm can use True Type fonts using -A option via FreeType library when it has been compiled with anti-alias option. Note this feature needs XFree86 4.0.2 or above and FreeType 2.0.2 or above. WALLPAPER mlterm can use background image (as known as wallpaper), by using -p/--pic option. You can also specify the brightness of the image by using -H/--bright option. Note this feature needs gdk-pixbuf. MULTIPLE PTY This is one of most unique features of mlterm. The number of windows can be specified using -P option. Typing control + F1 opens another window which shares the same process. The maximum number of windows can be specified using --maxptys option. BACKSCROLL MODE mlterm enters into backscroll mode by typing Shift + up or Shift + PageUp key. In the mode, you can use the following keys. j or Down Scroll down one line. k or Up Scroll up one line. d or PageDown Scroll down one page. u or PageUp Scroll up one page. Shift + space Initialize XIM. Shift + Insert Insert selection. Control + F1 Open a new pty window. keys defined in key configuration file PAGE_UP, PAGE_DOWN, SCROLL_UP, and SCROLL_DOWN keys are defined in the file. other keys Exit from the backscroll mode. Please note that keys other than PAGE_UP and PAGE_DOWN in key configu‐ ration file are available only when you used -q/--extkey command op‐ tion. SELECTION Selection is a mechanism to be used for copy-and-paste in X Window System. Thus, this section describes on so-called copy-and-paste. There are many encodings in the world. Though copy-and-paste needs sender and receiver and each of them can use one of various encodings, mlterm is designed to be able to receive characters from various en‐ codings as much as possible. There are two internationalized types of selection. One is COM‐ POUND_TEXT is the another is UTF8_STRING. COMPOUND_TEXT is ISO2022-based and can distinguish character sets which a character be‐ longs to. However, the character sets which COMPOUND_TEXT supports are limited to ISO8859-* and East Asian character sets. On the other hand, UTF8_STRING is Unicode-based and can express all characters from Uni‐ code character set. However, it cannot distinguish characters from different character sets which share one codepoint in Unicode, which can be a problem especially for CJK Han Ideogram (in other words, Kanji, Hanji, or Hanja). Note that UTF8_STRING is rather new and can be used only with XFree86. Though the receiver of copy-and-paste can request the preferable type of selection, the sender may not support the requested type. Thus ml‐ term has to be able to process both of COMPOUND_TEXT and UTF8_STRING. On the other hand, encodings supported by mlterm (see DESCRIPTION sec‐ tion for detail) are classified into four categories; (a) Unicode itself UTF-8. (b) subset of Unicode and ISO-2022-compliant "Subset of Unicode" means that Unicode supports round-trip com‐ patibility for the encoding, i.e., the conversion of the encod‐ ing --> Unicode --> the encoding doesn't lose any information. "ISO-2022-compliant" means that the encoding can be regarded as a subset of ISO-2022 where a part of ISO-2022 control codes and escape sequences are not supported. Many popular encodings be‐ long to this category such as ISO-8859-*, EUC-*, ISO-2022-KR, TIS-620, TCVN5712, and so on. (c) subset of Unicode and non-ISO-2022-compliant Some of popular encodings such as Shift_JIS, Big5, GBK, GB18030, Johab, and so on belongs to this category. (d) not subset of Unicode ISO-2022-JP, ISO-2022-JP-2, ISO-2022-JP-3, EUC-TW, and so on. All of them are ISO-2022-compliant. Now the behavior of mlterm can be explained. ------------------------------------------------------- encoding received selection how to process? ------------------------------------------------------- a COMPOUND_TEXT convert to Unicode a UTF8_STRING no need for conversion b COMPOUND_TEXT user preference *1 b UTF8_STRING convert to the encoding *2 c COMPOUND_TEXT user preference *1 c UTF8_STRING convert to the encoding *2 d COMPOUND_TEXT no need for conversion *3 d UTF8_STRING convert to the encoding *2 ------------------------------------------------------- *1 Characters from unsupported character sets (i.e., characters which cannot be expressed in the mlterm encoding) may appear in the selection (received copy-and-paste string). If you want to receive characters which are equivalent to characters which are supported in the current mlterm encoding (i.e., characters which share the same codepoint in Unicode), you can use -U (or --viaucs) option. Otherwise, these char‐ acters are pasted into mlterm using ISO-2022 escape sequence (when ml‐ term encoding is category b). Note such ISO-2022 escape sequences are illegal in the current mlterm encoding and the application software will need special feature to treat them properly, though it is dis‐ played well in mlterm. When mlterm encoding is category c, such char‐ acters are simply ignored (when -U option is not enabled). *2 Characters which cannot be converted into mlterm encoding are simply ignored. *3 Characters from unsupported character sets will be pasted into ml‐ term using ISO-2022 escape sequence. CONFIGURATION mlterm loads configuration files of "main", "font", "vfont", "tfont", "aafont", "vaafont", "taafont", "color", "key", "termcap", and "xim" on start up. "menu" configuration file is loaded by the configurable menu displayer (mlterm-menu). See the section of CONFIGURABLE MENU for de‐ tail. Configuration files for one user are to be located in "~/.mlterm/" di‐ rectory, while location for configuration files for all users depends on the compilation option. Possible locations are "/etc/", "/etc/X11/", "/usr/X11R6/lib/X11/mlterm/", and so on. The names and the roles of configuration files are: main Main configuration items which can be overridden by command line options. font Configurations for ordinary X fonts. vfont Configurations for ordinary X fonts of variable column width. tfont Configurations for ordinary X fonts of vertical writing. aafont Configurations for Xft or cairo fonts. vaafont Configurations for Xft or cairo fonts of variable column width. taafont Configurations for Xft or cairo fonts of vertical writing. color Designate concrete RGB values for color names. key Key definitions for special features of mlterm. termcap Define mlterm's behaviors which affects terminfo and termcap definition. xim Define preset locales for X Input Methods which are shown in the GUI configurator. Of course you can input XIM names and locales for the GUI configurator which are not listed in this configu‐ ration file. menu Define menu items which is displayed by configurable menu dis‐ player. The contents of these configuration files (other than menu) consist of lines of "key=value" format. Lines beginning with "#" are ignored. Note that the configuration files are changed since version 1.9.44. Main Configuration File This file contains main configuration items which can be overridden by command line options. The main configuration file "main" has the fol‐ lowing keys. Parentheses show the corresponding command-line options. See the explanation on these command-line options for detail. auto_detect_encodings=value (--ade) Specify character encodings detected automatically. allow_osc52=bool (--osc52) Allow access to clipboard(selection) by OSC 52 sequence. allow_scp=bool (--scp) Allow OSC 5379 scp. allow_change_shortcut=bool (--shortcut) Allow dynamic change of shortcut keys by OSC 5379 set_shortcut sequence. alpha=name (-X, --alpha) Alpha in pseudo or true transparent. app_name=name (-N, --name) Application name. auto_restart=bool (--restart) Restart mlterm with all opened ptys except ssh if SIGSEGV, SIGBUS, SIGFPE or SIGILL is received. If you want to get core image, specify "false". baseline_offset=value (--blpos) Specify the position of baseline. The default is 0. bel_mode=mode (-7, --bel) Behavior when BEL (0x07) is received. bd_color=value (--bd) Specify the color to use to display bold characters. bl_color=value (--bl) Specify the color to use to display blinking characters. bg_color=color (-b, --bg) Background color. bidi_mode=mode (--bimode) Specify bidi mode. bidi_separators=characterlist (--bisep) Specify separator characters (\x00-\xFF is also available) to render bidi text. big5_buggy=bool (-5, --big5bug) Support Big5 CTEXT bugs (which exist in XFree86 4.1.0 or be‐ fore). blink_cursor=bool (--blink) Blink cursor. box_drawing_font=value (--boxdraw) Use either unicode font or DEC Special font forcibly to draw box-drawing characters. borderless=bool (-&, --borderless) Don't draw window decorations. brightness=value (-H, --brightness) Specify the amount of darkening or lightening the background image. broadcast=bool (-H, --bc) Whether to broadcast input or pasted characters to all ptys whose value of "ignore_broadcasted_chars" option is false. cipher_list=value (--ciphlist) Specify ciphers (comma separated list) for encrypting the ssh session. co_color=value (--co) Specify the color to use to display crossed-out characters. col_size_of_width_a=value (-a, --ac) Number of columns of Unicode characters with EastAsianAmbiguous property. compose_dec_special_font=bool (-Y, --decsp) Compose line drawing character set. console_encoding=encoding (--ckm) (Available for mlterm-con) Specify encoding of the console where mlterm-con works. console_sixel_colors=value (--csc) (Available for mlterm-con) Specify the number of sixel graphics colors of the console where mlterm-con works. contrast=value (-3, --contrast) Contrast of background image in percent. cursor_bg_color=color (-0, --crbg) Specify background color for cursor. cursor_fg_color=color (-9, --crfg) Specify foreground color for cursor. daemon_mode=mode (-j, --daemon) Start as a daemon process. default_cell_size=value (--csz) (Available for mlterm-con) Specify cell width and height in pixel which mlterm-con uses if it doesn't get them. default_server=value (--serv) Specify a host you want to connect via ssh etc. depth=value (--depth) Specify visual depth. display=value (-d, --display) Specify X server to connect. emoji_path=value (--emoji) Specify path of a directory where emoji image files exist or a open type emoji font to show unicode emoji characters. encoding=encoding (-E, --km) Specify encoding. exit_backscroll_by_pty=bool (--exitbs) Exit backscroll mode on receiving data from pty. fade_ratio=ratio (-r, --fade_ratio) Specify fading ratio when window is unfocused. fb_resolution=ratio (Available for mlterm-fb on NetBSD/x68k or OpenBSD) Specify the screen resolution and depth. (e.g. 768x512x4) fg_color=color (-f, --fg) Foreground color. fontsize=value (-w, --fontsize) Font size in pixel. font_size_range=range (-R, --fsrange) Range of size of usable fonts. gamma=value (-4, --gamma) Gamma of background image in percent. geometry=value (-g, --geometry) Specify size and position of the window; see X(7). hide_underline=bool (--noul) Don't draw underline. icon_name=name (-I, --icon) Icon name. icon_path=path Path for the image file to be used as window icon. ignore_broadcasted_chars=bool (--ibc) Whether to ignore broadcasted characters. inner_border=value (--border) Specify inner border width. input_method= input method : [ arguments ... ] (-M, --im) Specify input method. iso88591_font_for_usascii=bool (-8, --88591) Use ISO8859-1 fonts for US-ASCII part of various encodings. it_color=value (--it) Specify the color to use to display italic characters. layout_inner_border=value (--lborder) Specify inner border width of a layout manager. leftward_double_drawing=bool (--ldd) Embold glyphs by drawing doubly at 1 pixel leftward instead of rightward. letter_space=value (--csp) Specify number of extra dots between letters. (ignored if you specify --V option.) If you use multiple fonts whose widths are different, adjust this option. line_space=value (-o, --lsp) Specify number of extra dots between lines. (Negative value is available.) If you use multiple fonts whose heights are dif‐ ferent, adjust this option. locale=value (--locale) Specify locale. local_echo_wait=value (--lew) Specify time (msec) to keep local echo mode. logging_msg=bool (--logmsg) Enable logging messages of mlterm to ~/.mlterm/msg[pid].log. logging_vt_seq=bool (--logseq) Enable logging vt100 sequences to ~/.mlterm/[device].log. logsize=value (-l, --sl) Specify number of lines of backlog or "unlimited". max_ptys=value (--maxptys) Specify maximum number of ptys (sessions) to be opened simulta‐ neously. meta_prefix=value (--metaprefix) Specify prefix characters in pressing meta key if mod_meta_mode = esc. mod_meta_mode=mode (-k, --meta) Behavior of META key. mod_meta_key=value (-K, --metakey) Specify a key to be regarded as META. not_use_unicode_font=bool (-n, --noucsfont) Use non-Unicode fonts even when mlterm encoding is UTF-8. only_use_unicode_font=bool (-u, --onlyucsfont) Use Unicode fonts even when mlterm encoding is not UTF-8. ot_features=value (--gft) Specify features of glyph substitution. ot_features=value (--gst) Specify script of glyph substitution. parent_window=value (--parent) Specify parent Window ID. primary_da=value (--da1) Specify primary device attributes string. receive_string_via_ucs=bool (-U, --viaucs) If the received selection (i.e., copy-and-paste strings) or strings received from XIM is not UTF8_STRING type, convert it into Unicode and then to the current mlterm encoding, in order to identify equivalent characters (i.e., characters which share the same codepoint in Unicode) from various character sets. See SELECTION section below for detail. regard_uri_as_word=bool (--uriword) Select URI by double clicking it regardless of --W option. rv_color=value (--rv) Specify the color to use to display reverse characters. sb_bg_color=color (-B, --sbbg) Background color for scrollbar. sb_fg_color=color (-F, --sbfg) Foreground color for scrollbar. screen_width_ratio=value (-1, --wscr) Specify actual screen width (screen height in vertical mode). scrollbar_mode=mode (-O, --sbmod) Specify scrollbar position. scrollbar_view_name=name (-S, --sbview) Specify name of scrollbar. secondary_da=value (--da2) Specify secondary device attributes string. separate_wall_picture=bool (--multivram) (Available for mlterm-fb on NetBSD/x68k) Draw the wall picture on Text VRAM instead of Graphic VRAM to improve the performance of scrolling. ssh_auto_reconnect=bool (--rcn) Reconnect to ssh server automatically in unexpected disconnection. ssh_keepalive_interval=value (--keepalive) Specify interval seconds to send keepalive message to ssh server. ssh_public_key=value (--pubkey) Specify public key file for ssh connection. ssh_private_key=value (--privkey) Specify private key file for ssh connection. ssh_x11_forwarding=bool (--x11) Enable x11 forwarding for ssh connection. start_with_local_pty (--slp) (Available for Android) Start mlterm with local pty instead of ssh connection. step_in_changing_font_size (-z, --largesmall) Specify changing size when font size becomes larger or smaller. tabsize=value (-x, --tw) Specify tab width. termtype=string (-y, --term) Terminal type. title=name (-T, --title) Title name. trim_trailing_newline_in_pasting=bool (--trim) Trim new line characters at the end in pasting text. type_engine=value (-*, --type) Rendering engine for drawing fonts. ul_color=value (--ul) Specify the color to use to display underlined characters. underline_offset=value (--ulpos) Specify the position (offset from the baseline) of underline. The default is 0. unicode_full_width_areas=value (--fullwidth) Force full width regardless of EastAsianWidth.txt. unicode_half_width_areas=value (--halfwidth) Force half width regardless of EastAsianWidth.txt. unicode_noconv_areas=value (--ucsnoconv) Use unicode fonts partially regardless of -n option. use_aafont=bool (--aafont) (Available for mlterm-fb or mlterm-wl) Use ~/.mlterm/*aafont configurations with the use of fontconfig. use_auto_detect=bool (--auto) Automatically detect appropriate character encoding from the encodings specified by auto_detect_encodings option. use_alt_buffer=bool (--altbuf) Use alternate screen buffer. use_ansi_colors=bool (--colors) Recognize ANSI color change escape sequences. use_anti_alias=bool (-A, --aa) Use anti alias font. use_bold_font=bool (--bdfont) Use bold font for characters with the bold attribute. use_clipboard=bool (-P, --clip) Use CLIPBOARD (not only PRIMARY) selection. use_combining=bool (-m, --comb) Enable combining characters. use_cp932_ucs_for_xft=bool (-c, --cp932) Use CP932 - UCS mapping for displaying JISX0208 by Xft or cairo. use_dynamic_comb=bool (-J, --dyncomb) Enable dynamic character combining. use_extended_scroll_shortcut=bool (-q, --extkey) Enable extended short cut keys for scrolling. use_ctl=bool (-C, --ctl) Enable complex text layouting on UTF8 encoding. use_ot_layout=bool (--otl) Whether to show substituting glyphs in open type fonts with the use of libotf or harfbuzz. use_italic_font=bool (--itfont) Use italic font for characters with the italic attribute. use_local_echo=bool (--loecho) Use local echo mode. use_login_shell=bool (-L, --ls) Whether to use login shell or not. use_multi_column_char=bool (-Z, --multicol) Process full width characters. use_point_size=bool (--point) Treat the value of -w option as point instead of pixel. use_mdi=bool (-s, --mdi) Use multiple document interface. use_transbg=bool (-t, --transbg) Use pseudo transparent background. use_urgent_bell=bool (--urgent) Draw the user's attention when making a bell sound in the unfo‐ cused window. use_variable_column_width=bool (-V, --varwidth) Use variable column width. use_vertical_cursor=value (-Q, --vcur) Use cursor movement for vertical writing. use_xim=bool (-i, --xim) Use XIM (X Input Method). vt_color_mode=mode (--vtcolor) Set vt color mode. vertical_mode=value (-G, --vertical) Use vertical writing. wall_picture=path (-p, --pic) Path for wallpaper image. word_separators=characterlist (-W, --sep) Delimiter characters (\xNN is also available) used for word se‐ lection. working_directory=value (--working-directory) Working directory. static_backscroll_mode=bool (-6, --stbs) Don't exit backscroll mode when console applications output something. vt_seq_format=value (--seqfmt) Specify the format of logging vt100 sequence. Font Configuration Files The font configuration files "font", "vfont", "tfont", "aafont", "vaa‐ font", and "taafont" have the following keys. DEFAULT=font DEC_SPECIAL=font ISO8859_n=font TIS620=font ISCII_HINDI=font ISCII_MALAYALAM=font ISCII_ASSAMESE=font ISCII_BENGALI=font ISCII_GUJARATI=font ISCII_KANNADA=font ISCII_MALAYALAM=font ISCII_ORIYA=font ISCII_PUNJABI=font ISCII_TAMIL=font ISCII_TELUGU=font VISCII=font KOI8_R=font KOI8_U=font TCVN5712=font JISX0201_ROMAN=font JISX0201_KATA=font JISX0208_1978=font JISX0208_1983=font JISX0208_1990=font JISX0213_2000_1=font JISX0213_2000_2=font KSX1001_1997=font UHC=font (not used) JOHAB=font (not used) GB2312_80=font GBK=font BIG5=font HKSCS=font CNS11643_1992_n=font ISO10646_UCS4_1=font ISO10646_UCS4_1_FULLWIDTH=font U+XXXX-XXXX=font Specify fonts for corresponding character sets. The format is different between "font", "vfont" "tfont" files and "aafont", "vaafont" "taafont" files. In "font", "vfont", "tfont" files, "font" is specified in "NAME:PERCENT" format where "SIZE" is font size in pixel, and "NAME" is XLFD or alias names of X fonts. If "NAME" contains "%d", it is replaced by an appropriate font size number. ":PERCENT" is multiplied by font size and decides character width of a font. If ":PERCENT" is omitted, max font width is used for it. In "aafont", "vaafont", "taafont" files, "font" is specified in "FAMILY WEIGHT SLANT SIZE:PERCENT" format. ":PERCENT" is mul‐ tiplied by font size and decides character width of a font. If ":PERCENT" is omitted, 'M' width is used for it. mlfc command generates ~/.mlterm/aafont automatically. charset_BOLD=font Specify boldface fonts. charset_ITALIC=font Specify italic fonts. charset_BOLD_ITALIC=font Specify bold-italic fonts. U+XXXX-XXXX=font Specify which fonts to use for unicode ranges except U+00-7f. Color Configuration File The color configuration file "color" has the following key. COLORNAME=RGB Assign a concrete color for the name COLORNAME. Default colors used by mlterm are black, red, green, yellow, blue, magenta, cyan, and white. and can be overridden here. For highlighted colors, a name with "hl_" prefix will be auto‐ matically searched. i.e. for bold read character, "hl_red" is searched instead of "red". 17 - 230 and 232 - 255 in 256 colors can be also overridden. The format of RGB is either "RRRR-GGGG-BBBB" (where RRRR, GGGG, and BBBB are hexadecimal value from 0 to ffff), "#RRGGBB", "#RRGGBBAA", "rgb:RR/GG/BB" or "rgba:RR/GG/BB/AA"(where RR, GG, and BB are hexadecimal value from 00 to ff). If mlterm failed to parse a entry, the color will be regarded as black. XIM Configuration File The X Input Methods configuration file "xim" has the following format XIM=locale where XIM is XIM name and locale is locale name used for communication with the XIM server. For example, kinput2=ja_JP.eucJP Ami=ko_KR.eucKR xcin-zh_CN.GB2312=zh_CN.GB2312 These settings are used to create list of XIMs by the GUI configurator. Though a XIM which is not listed in this file can't be selected from the list, it can be selected by specifying its name directly. Feature Key Configuration File The feature key configuration file "key" has the following format. KEY=FEATURE Here, the format for KEY is "(MASK+)KEY", where MASK is one of Control, Shift, Mod1, Mod2, Mod3, Mod4, Mod5, Mod and Alt. You can specify multiple "MASK+"s. You can search spellings of KEY by using xev(1) command or searching keysym macros from /usr/X11R6/in‐ clude/X11/keysymdefs.h (or the equivalent file in your X11 include di‐ rectory) and omit the prefix XK_. Double quotation marks are not needed. You can specify Button1, Button2, Button3, Button4 or Button5 as KEY. FEATURE is one of IM_HOTKEY, EXT_KBD, OPEN_SCREEN, NEW_PTY, OPEN_PTY, NEXT_PTY, PREV_PTY, VSPLIT_SCREEN, HSPLIT_SCREEN, CLOSE_SCREEN, NEXT_SCREEN, PREV_SCREEN, HEXPAND_SCREEN, VEXPAND_SCREEN, PAGE_UP, PAGE_DOWN, SCROLL_UP, SCROLL_DOWN, INSERT_SELECTION, "STRING", or "proto:STRING". IM_HOTKEY Switch conversion mode of m17n library and kdb input methods. (default UNUSED) EXT_KBD Activate or deactivate kbd input method. (This feature was ob‐ soleted by IM_HOTKEY) OPEN_SCREEN Open new pty in new screen (default Ctrl+F1). NEW_PTY Same as OPEN_SCREEN (obsoleted). OPEN_PTY Open new pty in current screen (default Ctrl+F2). NEXT_PTY Switch to a next free pty (default Ctrl+F3). PREV_PTY Switch to a previous free pty (default Ctrl+F4). HSPLIT_SCREEN Open new pty in horizontally split screen (default Shift+F1). VSPLIT_SCREEN Open new pty in vertically split screen (default Shift+F2). NEXT_SCREEN Switch to a next unfocused screen (default Shift+F3). PREV_SCREEN Switch to a previous unfocused screen (default Shift+F4). CLOSE_SCREEN Close current screen (default Shift+F5). HEXPAND_SCREEN Expand current screen horizontally (default Shift+F6). VEXPAND_SCREEN Expand current screen vertically (default Shift+F7). PAGE_UP Start backscroll mode and scroll up one page (default Shift+Prior). PAGE_DOWN Scroll down one page. (default Shift+Next). SCROLL_UP Start backscroll mode and scroll up by one line (default Shift+Up). Note this key is enabled only when -q/--extkey op‐ tion is used. SCROLL_DOWN Scroll down one line (default Shift+Down). Note this key is enabled only when -q/--extkey option is used. INSERT_SELECTION Insert selection (default Shift+Insert). "STRING" The specified string is issued when the KEY key is pressed. Double quotation marks are required around the STRING. Note that you cannot control the status of mlterm by sending terminal control codes such as "\x1b]5379;encoding=utf8\x0a" because the code sequence will be caught by your shell (or something running on it). To deliver control sequences to mlterm directly, use "proto:STRING" instead. "proto:STRING" The specified string is assumed to mlterm's original control sequence. A list of sequences should be found in doc/en/PROTO‐ COL. For example, "proto:encoding=utf8" means changing the current character encoding to UTF-8. "exesel:STRING" The specified string is assumed to a command to be executed with selected strings as arguments. "%s" in a command string is re‐ placed by selected strings. For example, "exesel:mlclient -e w3m" means executing "mlclient -e w3m [selected text]". "menu:STRING" The specified string is assumed to a configuration program to be executed. For example, "menu:mlterm-menu" means executing ml‐ term-menu. Terminal Behavior Configuration File This configuration file determines the behaviors of mlterm that should match the definition of terminfo and termcap. In principle, this file should not be edited and, instead, you should choose a proper value for TERM variable (i.e., proper terminfo/termcap definition) which meets mlterm's behavior. (Since mlterm' can behave as a xterm/kterm to some extent, TERM=kterm / TERM=xterm should give acceptable results.) How‐ ever, sometimes you may not want to edit your terminfo and termcap. Your software may don't understand terminfo nor termcap, or your ter‐ minfo/termcap entry is shared by several terminal emulators and chang‐ ing it will break other terminals. In such cases, you can configure mlterm so that it works well on existing terminfo/termcap definitions on your systems. This is also useful for distributors of operating systems (like Debian) with strict policy of terminal emulators' behav‐ iors. You can define the behaviors of mlterm for each value of TERM variable, so that you don't need to edit termcap file each time you login into other systems and use different value of TERM variable by -y option. You can also specify the default behavior when TERM variable is dif‐ ferent from all of specified TERM names in the termcap file. The grammar of this configuration file is resemble to the grammar of termcap entries. First, one or more name(s) of TERM is written. Mul‐ tiple names are connected with vertical line character '|'. Special name '*' is for default. Then colon ':' comes, and keys are written separated by colons. Configuration(s) for other TERM will follow after new line. Followings are available keys for each TERM value. kD=sequence Specify sequence to be outputted when Delete key is pushed (de‐ fault \E[3~). kb=sequence Specify sequence to be outputted when BackSpace key is pushed (default ^H). kh=sequence Specify sequence to be outputted when HOME key is pushed in ap‐ plication cursor key mode. (default \EOH). @7=sequence Specify sequence to be outputted when END key is pushed in ap‐ plication cursor key mode. (default \EOF). k1=sequence Specify sequence to be outputted when F1 key is pushed (default \EOP). k2=sequence Specify sequence to be outputted when F2 key is pushed (default \EOQ). k3=sequence Specify sequence to be outputted when F3 key is pushed (default \EOR). k4=sequence Specify sequence to be outputted when F4 key is pushed (default \EOS). k5=sequence Specify sequence to be outputted when F5 key is pushed (default \E[15~). ut Specify the way how the screen is erased by control codes. If ut is written in the termcap file, charcells are painted by the current background color when erased; otherwise the charcells are painted by the initial background color. Default is non-ut behavior. The following special characters can be used to specify sequence in keys of kD/kb/kh/@7. \E ESC code (0x1b). ^? DEL code (0x7f). ^A, ^B,... Corresponding control code (0x01 - 0x1a). Menu Configuration File This configuration file defines the menu displayed by the configurable menu displayer mlterm-menu. See CONFIGURABLE MENU section for detail. SEE ALSO Manual pages of mlclient(1), locale(7), charsets(7), UTF-8(7), and X(7). PROTOCOL (http://bitbucket.org/arakiken/mlterm/src/tip/doc/en/PROTOCOL) for mlterm's original control escape sequences which enable you to change configurations dynamically. e.g.) echo -en "\x1b]5379;encoding=eucjp\x07" README.android (http://bitbucket.org/arakiken/ml‐ term/src/tip/doc/en/README.android) for mlterm on Android. README.beos (http://bitbucket.org/arakiken/ml‐ term/src/tip/doc/en/README.beos) for mlterm on BeOS (Haiku). README.brltty (http://bitbucket.org/arakiken/ml‐ term/src/tip/doc/en/README.brltty) for accessibility with the use of brlapi. (http://brl.thefreecat.org). README.cocoa (http://bitbucket.org/arakiken/ml‐ term/src/tip/doc/en/README.cocoa) for mlterm on MacOSX/Cocoa. README.cocoatouch (http://bitbucket.org/arakiken/ml‐ term/src/tip/doc/en/README.cocoatouch) for mlterm on iOS/Cocoa Touch. README.console (http://bitbucket.org/arakiken/ml‐ term/src/tip/doc/en/README.console) for mlterm on Console. README.fb (http://bitbucket.org/arakiken/ml‐ term/src/tip/doc/en/README.fb) for mlterm on framebuffer. README.indic (http://bitbucket.org/arakiken/ml‐ term/src/tip/doc/en/README.indic) for indic scripts. README.sb (http://bitbucket.org/arakiken/ml‐ term/src/tip/doc/en/README.sb) for development of scrollbar library. README.sdl2 (http://bitbucket.org/arakiken/ml‐ term/src/tip/doc/en/README.sdl2) for mlterm on SDL2. README.ssh (http://bitbucket.org/arakiken/ml‐ term/src/tip/doc/en/README.ssh) for ssh connection with the use of libssh2 (http://www.libssh2.org). README.wayland (http://bitbucket.org/arakiken/ml‐ term/src/tip/doc/en/README.wayland) for mlterm on Wayland. README.win32 (http://bitbucket.org/arakiken/ml‐ term/src/tip/doc/en/README.win32) for mlterm on Win32 GDI. Mapping tables between Unicode and local character sets (and encodings) are found at Unicode Consortium web site (http://www.unicode.org/Pub‐ lic/MAPPINGS/). Note that mapping tables for East Asian character sets and encodings are moved to OBSOLETE/EASTASIA directory of the site since August 2001. For BIG5 and BIG5HKSCS encodings, mapping tables for Unicode is taken from ftp://xcin.linux.org.tw/pub/xcin/i18n/charset/. Unicode Standard Annex (UAX) #11 East Asian Width, which explains East Asian Width properties, and EastAsianWidth.txt, which defines East‐ AsianAmbiguous characters in Unicode, are supplied by Unicode Consor‐ tium (http://www.unicode.org). FILES "main", "font", "vfont", "tfont", "aafont", "vaafont", "taafont", "color", "key", "termcap", "xim", and "menu" Configuration files. CONTACT Subscribe mlterm-dev-en ML (http://lists.source‐ forge.net/lists/listinfo/mlterm-dev-en). Attach ~/.mlterm/msg.log, backtrace log and related files to your re‐ port if at all possible. 2019-03-31 MLTERM(1)mlcc
mlcc's manpage
MLCC(1)                     General Commands Manual                    MLCC(1)

NAME
       mlcc - simple configurator for mlterm

SYNOPSIS
       mlcc [options] [arguments]

DESCRIPTION
       mlcc  is a helper to configure mlterm(1) by sending special escape se‐
       quences.
       (See http://bitbucket.org/arakiken/mlterm/src/tip/doc/en/PROTOCOL)

OPTIONS
       -h, --help Show help messages.

EXAMPLE
       mlcc
              Show configuration screen.

       mlcc fg_color blue
              Change the value of "fg_color" option to "blue".

       mlcc exec full_reset
              Execute "full_reset" command.

       mlcc aafont ISO10646_UCS4_1 Courier
              Change font name of "ISO10646_UCS4_1" in aafont configuration to "Courier".

       mlcc color red rgb:ff/00/00
              Change RGB of "red" to rgb:ff/00/00.

SEE ALSO
       mlterm(1),

CONTACT
       Subscribe        mlterm-dev-en        ML         (http://lists.source‐
       forge.net/lists/listinfo/mlterm-dev-en).

                                  2018-10-27                           MLCC(1)
おまけ:MSYS2 と、例のアレ
MSYS Subsystem は fork も再現しているとのことなので例のアレを試したところ、ひどい目にあった。再起動待ったなし。
MSYS2 development environment for Windows | David Grayson
http://www.davidegrayson.com/windev/msys2/The executables compiled by gcc in the MSYS2 Shell depend on msys-2.0.dll. That DLL is a fork of Cygwin, so it provides good POSIX support, including the fork function.
比較:WSL で forkbomb
Fork bomb on Bash/Ubuntu on Windows 10
https://www.youtube.com/watch?v=-4OJGVxXe4wWindows 10 Bash Fork Bomb Demo
https://www.youtube.com/watch?v=tX-fm2Vma1k
構築予定の環境の構成によっては Ansible Chocolatey module も有用と思われる。 ↩

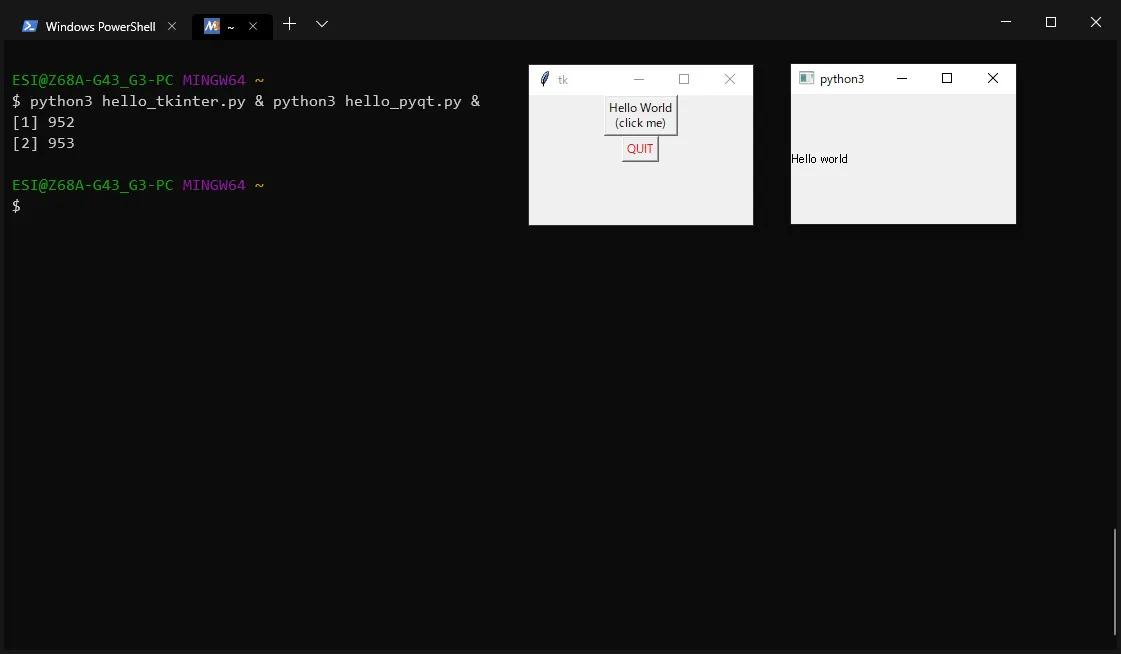


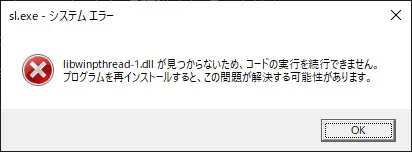


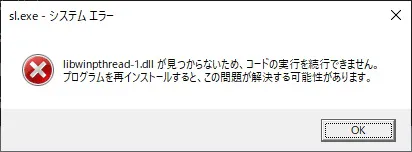


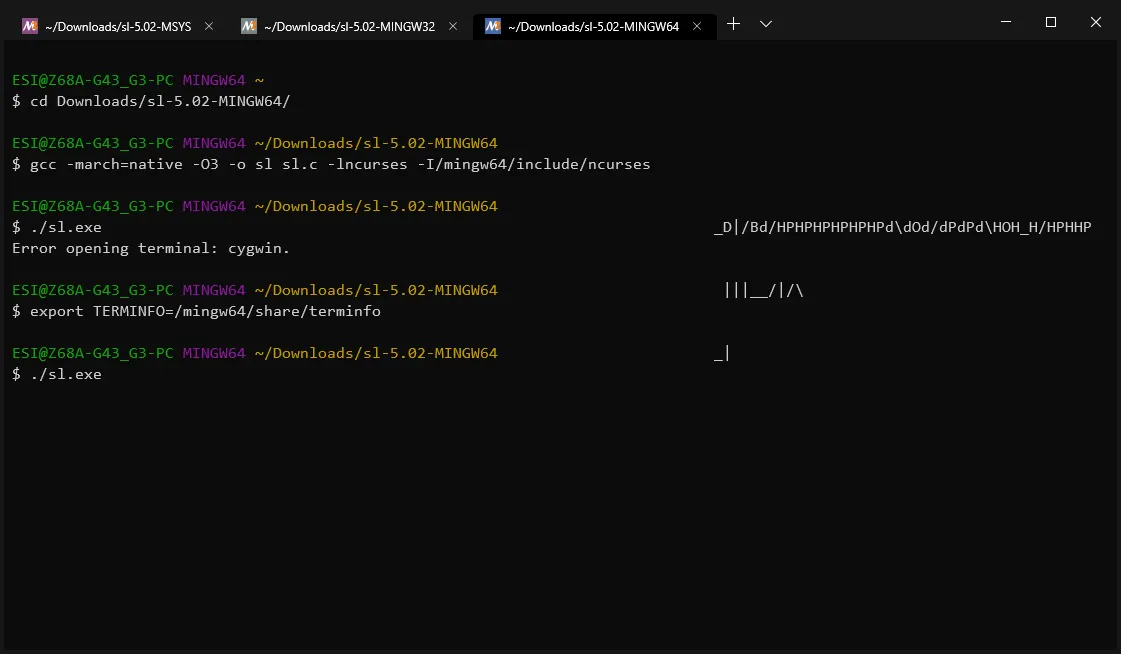
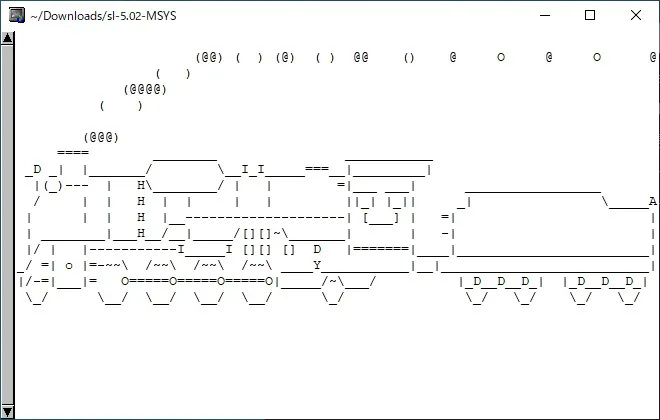


- 投稿日:2019-10-26T11:45:03+09:00
Google ColabにPyTorch Geometricをインストールする
はじめに
Google ColabにPyTorch Geometricをインストールを試みましたが,一筋縄ではいきませんでした.いろいろ調べてみてもインストールする方法は書かれていなかったので,覚書として残しておきます.
Google Colaboratoryとは
Google Colaboratory(Google Colab, Colaboratoryとも)は,Googleが提供するクラウド上で実行できるJupyter Notebook環境です.なんといっても無料でTesla K80 GPUを使える点がすばらしい.研究機関や企業に属さない個人がGPUを利用したいときには最適な環境といえます.
使い方などは【秒速で無料GPUを使う】深層学習実践Tips on Colaboratoryに詳しくまとめられています.PyTorch Geometricとは
PyTorch Geometric(PyG)は,PyTorchベースのGraph Neural Network系ライブラリです.GCNやGATをはじめとするGraph Neural Networkや,Node2vecなどのGraph Embedding手法の実装が提供されています.
PyTorch Geometricを利用するためには,torch-geometricのほかに4つのライブラリ(torch-scatter, torch-sparse, torch-cluster, torch-spline-conv)をインストールする必要があります.が,この4つのライブラリをインストールすることが悩みの種となりました.
インストール...できない
PyTorch scatterなど,PyTorch Geometric以外のライブラリがインストールできません.たとえばtorch-scatterをインストールしようとすると,このようなエラーメッセージが出てきます.
Collecting torch-scatter
  Downloading https://files.pythonhosted.org/packages/30/d9/1d5fd4d183dabd9e0a1f7008ecf83318432359f4cc27480e3f2212f44d9c/torch_scatter-1.3.2.tar.gz
Building wheels for collected packages: torch-scatter
  Building wheel for torch-scatter (setup.py) ... error
  ERROR: Failed building wheel for torch-scatter
  Running setup.py clean for torch-scatter
Failed to build torch-scatter
Installing collected packages: torch-scatter
    Running setup.py install for torch-scatter ... error
ERROR: Command errored out with exit status 1: /usr/bin/python3 -u -c 'import sys, setuptools, tokenize; sys.argv[0] = '"'"'/tmp/pip-install-ttwepv79/torch-scatter/setup.py'"'"'; __file__='"'"'/tmp/pip-install-ttwepv79/torch-scatter/setup.py'"'"';f=getattr(tokenize, '"'"'open'"'"', open)(__file__);code=f.read().replace('"'"'\r\n'"'"', '"'"'\n'"'"');f.close();exec(compile(code, __file__, '"'"'exec'"'"'))' install --record /tmp/pip-record-e9z1yo5h/install-record.txt --single-version-externally-managed --compile Check the logs for full command output.
なぜ?
どうやら原因として
- ハードウェアアクセラレータがGPUに設定されていない
- gcc,g++のバージョンが適切ではない
- CPATHが通っていない
の3点があげられます.
解決方法
1. 編集>ノートブックの設定>ハードウェアアクセラレータでGPUに変更
2. gcc, g++のversionを5にさげる.CPATHを通す.!apt install gcc-5 g++-5 -y !ln -sf /usr/bin/gcc-5 /usr/bin/gcc !ln -sf /usr/bin/g++-5 /usr/bin/g++ !export CPATH=/usr/local/cuda/include:$CPATH3. Pytorch Geometricと付随するライブラリをインストールする
!pip install torch-scatter
!pip install torch-sparse
!pip install torch-cluster
!pip install torch-spline-conv
!pip install torch-geometric
最後に
PyTorch GeometricがColab上で動くようにはなったけど...インストールに結構時間かかるなぁ…
以上です!参考リンク
- 投稿日:2019-10-26T09:45:58+09:00
OpenCVとNumPy環境におけるグレースケール画像を用いた画素値反転
初めに(^ω^)
以前の投稿で、グレースケール画像の作成に成功しました(やったね!)
その画像を用いて面白いことができないかと考えた結果です
画素値を上手に扱えたら便利なんだよということを知ってほしかったため作りました作成したソースコード
hoge.py#----------------------------------------- #OpenCVとNumPy環境におけるグレースケール画像を用いた画素値反転 #----------------------------------------- import numpy as np import cv2 hoge = 'C:/Users/kng-kudo/Pictures/' #保存先指定 file = 'text8.txt' #カラー読み込み img = cv2.imread(hoge+'shigure.png') #グレースケールで読み込み img2 = cv2.imread(hoge+'shigure.png',0) #Numy配列に保存 im = np.array(img2) #画像サイズ取得 shape = im.shape #閾値設定 Threshold = 220 for y in range(shape[0]): for x in range(shape[1]): if im[x][y] >= Threshold: im[x][y] = 0 #色反転 for y in range(shape[0]): for x in range(shape[1]): im[x][y] = 255 - im[x][y] #テキスト出力 np.savetxt(file, im, fmt="%3.0f", delimiter=",") #配列出力 print (im) #画像出力 cv2.imwrite(hoge+'gray.png', im)結果
これが
こうなって
こうなった!
かわいい(^ω^)コード解説
①画素値反転
hoge.py#色反転 for y in range(shape[0]): for x in range(shape[1]): im[x][y] = 255 - im[x][y]画像の画素値を扱う際に、2次元配列として扱うことができるといろいろと便利だったりします。
今回のソースで閾値等使ってますが次回以降に詳しい解説をしたいと考えています(願望)参考文献
とくにないかも
目次のようなもの
Re:ゼロから始める機械学習生活(深層学習もあるよ)
ここに進捗状況等を載せてます。
今まで書いたものを一覧にしていたりするので見てみてください!