- 投稿日:2019-10-26T23:01:28+09:00
VSCodeを使ってAWS EC2上で直接アプリ開発する
やりたいこと
EC2インスタンス上で直接開発できれば楽じゃない?
VSCodeを使って、AWS EC2のインスタンス上でWebアプリ開発できるようにします。使用環境
クライアント
・Windows10 Home (Build 1809)
・Visual Studio Code (ver 1.39.2)AWS EC2インスタンス
・Ubuntu Server 18.04 LTS
・キーペア有り
・自作のWebアプリ(Laravel)を配置。←これの開発をやりたい早速設定してみよう
まず、VSCodeを使ってEC2のファイルシステムに接続するには、
VSCodeにSSHの拡張機能をインストールする必要が有ります。
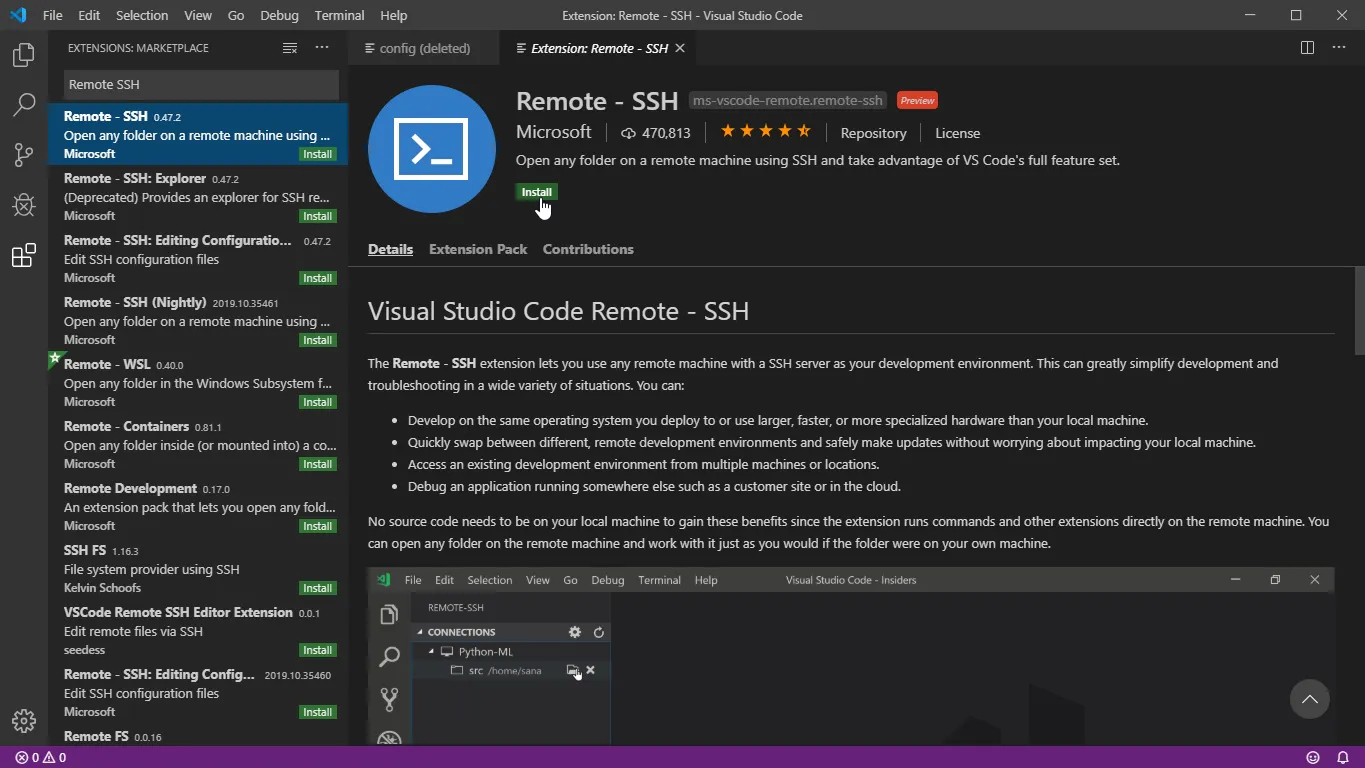
今回は、Microsoftがリリースしている「Remote - SSH」を使用します。
この拡張をインストールしましょう。
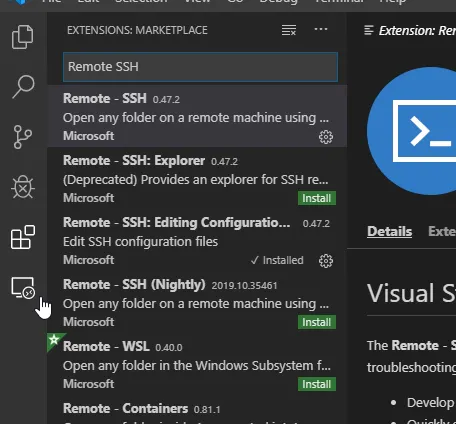
インストールが完了すると、メニューにリモート接続のアイコンが表示されます。
このアイコンをクリックしましょう。
SSH TARGETSの+アイコンをクリックして、Enter SSH Connection Commandのダイアログを表示します。
ここに、EC2インスタンスに接続するSSHコマンドを入力します。
コマンドは、"ssh -i "[秘密鍵]" [ユーザ]@[ホスト]"です。
[秘密鍵]の部分には、EC2インスタンスの作成時に発行した、秘密鍵ファイル(.pem)のパスを指定します。
私の環境では「C:\Users\takas\aws_key」にファイル名「aws-ubuntu.pem」で保存してありますので、
絶対パスで指定します。
※ちなみに、秘密鍵ファイルがNASとかファイルサーバとかの共有フォルダ上にあるとエラーになります。
VSCode曰く、みんなが参照できる場所にある秘密鍵は信用できないそうです。[ユーザ]の部分は、EC2インスタンスにインストールしたOSによって異なります。
私の場合はUbuntuなので、ユーザ名は"ubuntu"になります。
最新のユーザ名は、AWSのリファレンスを参照してください。一応、2019/10/26時点の情報をコピペしておきます。
- Amazon Linux 2 または Amazon Linux AMI の場合は、ユーザー名は ec2-user です。
- CentOS AMI の場合、ユーザー名は centos です。
- Debian AMI の場合は、ユーザー名は admin または root です。
- Fedora AMI の場合、ユーザー名は ec2-user または fedora です。
- RHEL AMI の場合は、ユーザー名は ec2-user または root のどちらかです。
- SUSE AMI の場合は、ユーザー名は ec2-user または root のどちらかです。
- Ubuntu AMI の場合は、ユーザー名は ubuntu です。
- それ以外の場合で、ec2-user および root が機能しない場合は、AMI プロバイダーに確認してください。
[ホスト]には、EC2コンソールに表記されている「パブリックDNS(IPv4)」もしくは「IPv4パブリックIP」を指定します。
SSHコマンドを入力してEnterキーを押すと、どのconfigファイルを利用するか選択します。
好きな方を選んでください。
※configファイルが無い場合はエラーになるので、
メモ帳とかで空のconfigファイルを作って置いといてください。
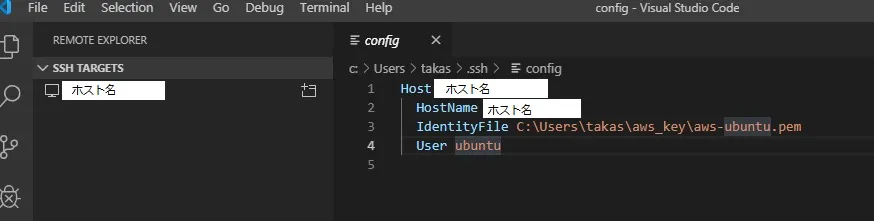
configファイルへの書き込みが完了すると、右下にファイルを開くかどうか聞かれます。
接続先の名前を変えたいので、ファイルを開きます。
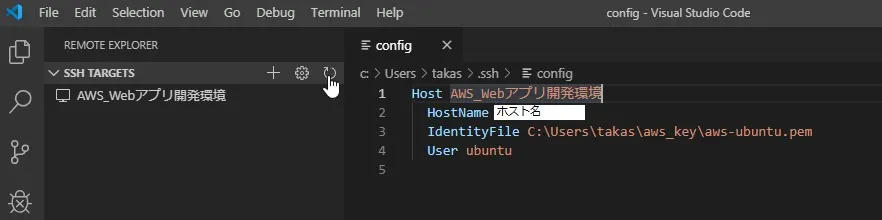
接続先の名前はデフォルトでホスト名になっていますので、分かりやすい名前に変更しましょう。
あとは、SSH TARGETSで接続先の名前を右クリック、「Connect to Host in Current Windows」を選択。
初回接続の場合は、フィンガープリントの確認が求められますのでContinueを選択してください。
で、しばらく待ちます・・
接続に成功すると、EXPLORERにSSHで繋がったことが表示されます。
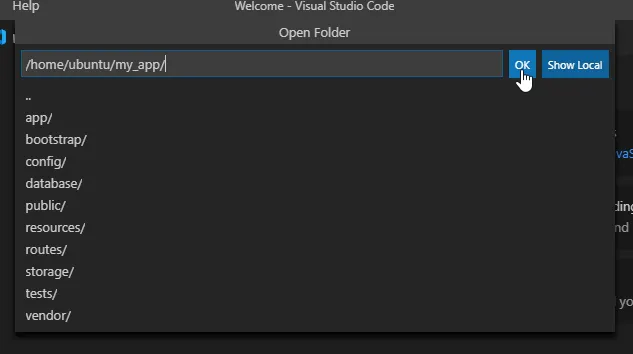
Open Folderをクリックして、EC2インスタンス上のWebアプリのディレクトリをオープンします。
これで、EXPLORERにEC2インスタンス上のディレクトリが表示されて
VSCodeで直接、Webアプリ開発が行えるようになりました!
めでたしめでたし。


- 投稿日:2019-10-26T20:29:42+09:00
Windowsでカスタムメトリクスを設定するときの注意点 for AWS
どうも、クラウドエンジニアのオタユウ(@yu40ta_engineer)です。
業務柄、システム構築の過程で監視設定を行うことが多く、カスタムメトリクスをいじくり回す機会があったので、検証したことを自分の備忘録がてら記事にしておきます。
本記事のゴール
「カスタムメトリクスの前提条件を知ることで、カスタムメトリクスを取得できないときの勘どころを知っていただくこと」でございます。
今回は、実際に起こった事例をもとにした検証内容をご紹介します。1.起こっていた問題
Amazon標準AMIで立ち上げた Windows 2016 の EC2インスタンス から カスタムメトリクス が取得できていない。CloudWatchに表示されていない。
同一アカウント内の他のインスタンスや他のお客様のアカウント内のインスタンスでは、カスタムメトリクスが正しく取得できているのに関わらず、一部のインスタンスのみ上手く表示されていない。
困った。さて、どうしよう。使用する主要サービス
- EC2
- IAM
- AWS Systems Manager(以下、SSM)
- CloudWatch
前提条件(確認しておきたい点)
下記の4つです。
- 実行するEC2にIAMの管理ポリシー「AmazonEC2RoleforSSM」がアタッチされているロールが割り当てられているか?
- SSMエージェントがインストールされており、起動している状態か?(※1)
- EC2からインターネットに接続可能か?プライベート接続の場合はエンドポイントを使用しているか?(※2)
- SSMのランコマンドで実行する「JSONの構文」は正しく記述されているか?
※1 SSMエージェントがプリインストールされているAMIについては、AWS公式ドキュメントの SSM エージェント の使用 をご確認ください。SSMエージェントがプリインストールされていないAMIへのインストールについても記載されています。
※2 プライベート接続の場合は下記のVPCエンドポイントが必須です。
- com.amazonaws.ap-northeast-1.ssm
- com.amazonaws.ap-northeast-1.ec2messages
- com.amazonaws.ap-northeast-1.monitoring
要は「カスタムメトリクスを取得するための適切な設定ができていますか?」ということです。
今回はVPCエンドポイントは使用せず、インターネットアウトする形で検証します。2.カスタムメトリクスとは?
前提知識として、そもそもカスタムメトリクスって何?という方向けです。
もう知ってるよ!という方は読み飛ばしていただいて構いません。カスタムメトリクスとは、EC2インスタンスに対する監視(モニタリング)において、CloudWatchの標準モニタリング(5分間隔/無償)および詳細モニタリング(1分間隔/有償)以外で、独自に設定できる監視項目設定のことです。
SSMエージェントとCloudWatchエージェントをEC2インスタンスにインストールすることで、EC2インスタンスのOS情報からユーザー自身で定義したメトリクス(=カスタムメトリクス)を収集できるようになります。CloudWatchの標準または詳細モニタリングにおける監視項目
- CPU使用率
- ディスクI/O
- ネットワークI/O
- ステータスチェック(EC2稼働状態)
カスタムメトリクスの監視設定可能な項目
- CPU詳細
- ディスク詳細
- メモリ使用率
- ネットワーク詳細
- プロセス情報
一般的によく利用されているものだと「ディスク使用量」や「メモリ使用率」の監視が挙げられます。
カスタムメトリクスを設定しておくことで、より詳細にリソースの監視ができるというわけですね。それでは、実際の設定に移っていきましょう。
3.検証の流れ
冒頭でお伝えした通り、カスタムメトリクスの設定において考慮すべき点は以下の4つです。
- 実行するEC2にIAMの管理ポリシー「AmazonEC2RoleforSSM」がアタッチされているロールが割り当てられているか?
- EC2からインターネットに接続可能か?プライベート接続の場合はエンドポイントを使用しているか?
- SSMエージェントがインストールされており、起動している状態か?
- SSMのランコマンドで実行する「JSONの構文」は正しく記述されているか?
この4点さえ守れていれば、正しくカスタムメトリクスが取得できます。
なお、使用するサービスは4つでした。
- EC2
- IAM
- SSM
- CloudWatch
EC2とIAMロールは既に作成している前提で進めます。
さっそく操作手順を見ていきましょう。EC2の確認
まだSSM用のIAMロールは割り当てられていません。
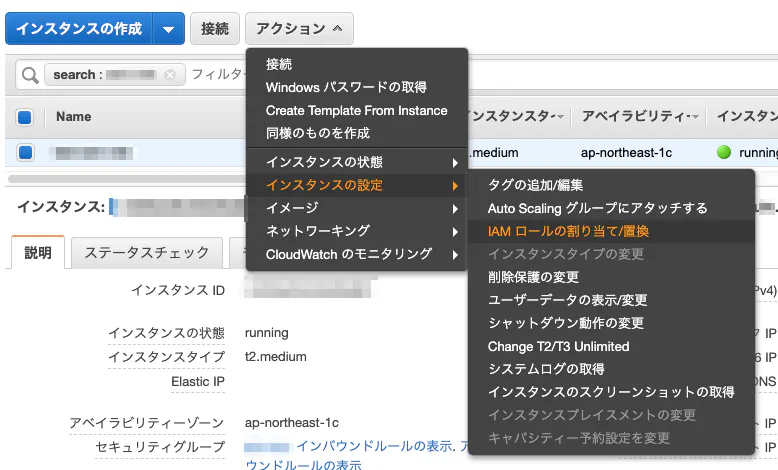
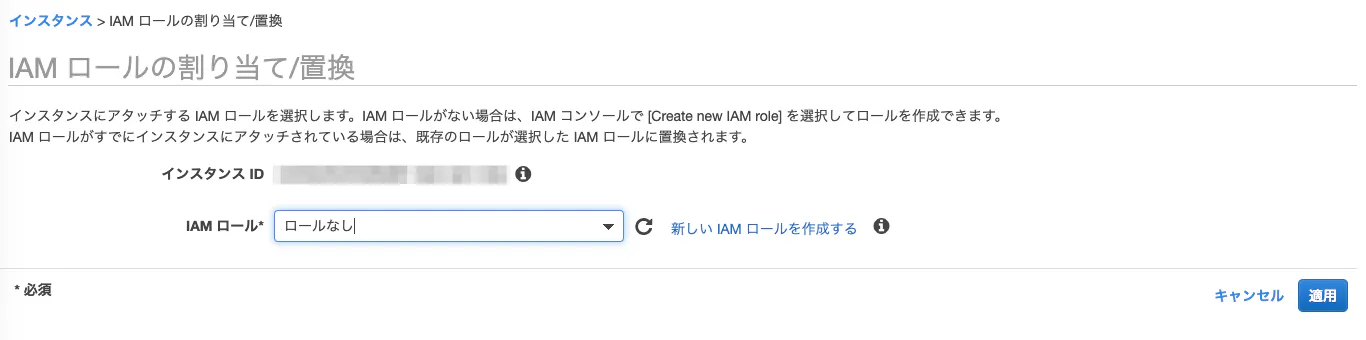
IAMロール(IAMの管理ポリシー「AmazonEC2RoleforSSM」がアタッチされているロール)をEC2に割当
無事にSSM用のIAMロールが割り当てられました。
念のため補足ですが、キャプチャのIAMロール名は私がIAMロールを作成した時に適当に命名したもので、
中身はIAMの管理ポリシー「AmazonEC2RoleforSSM」がアタッチされているものです。SSMのマネージドインスタンスを確認
SSMエージェントがプリインストールされているAMIであれば、IAMロールを割り当て後にSSMエージェントが自動起動され、SSMのマネージドインスタンスとして表示されます。
プリインストールされていないAMIの場合は、OSにRDP接続し、SSMエージェントインストール後に手動起動または再起動する必要があります。ちなみにマネージドインスタンスとして表示されたEC2のIAMロールを外すと、SSMのサービス画面上にこのような警告が表示されます。
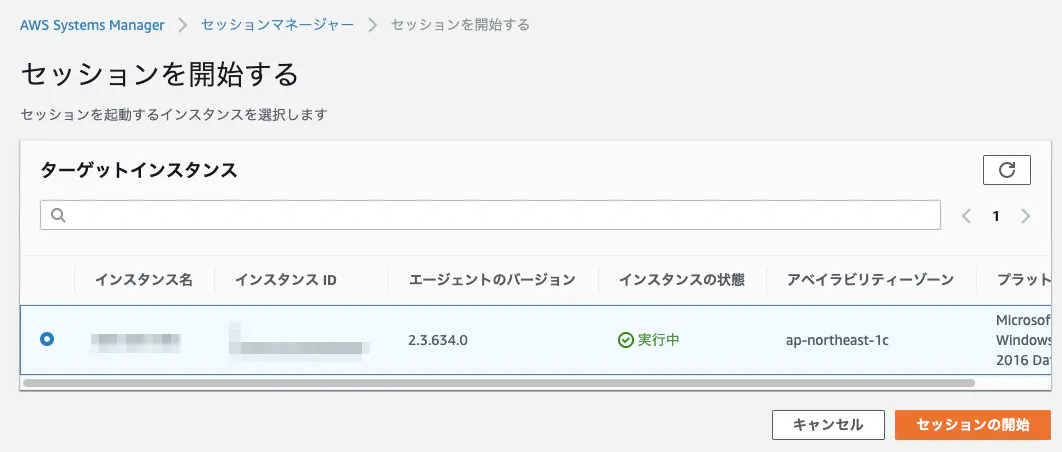
マネージドインスタンス化したEC2インスタンスは、SSMのセッションマネージャー等で動作確認しておくことをオススメします。
こんな感じで。
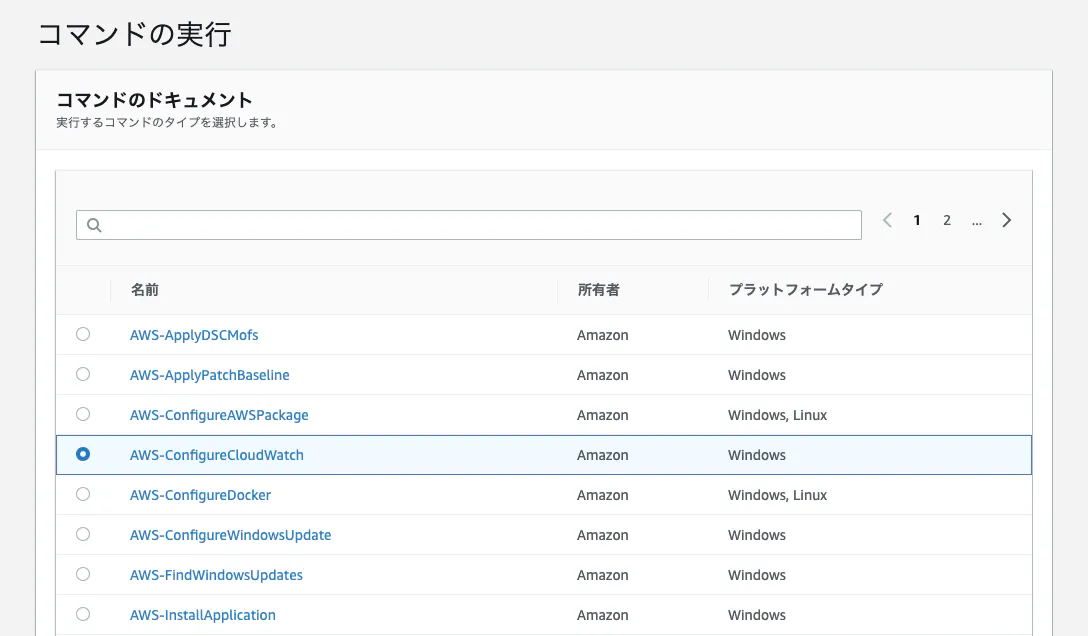
SSMランコマンドの実行
マネージドインスタンス→[アクション]から[コマンド実行]を選択
「AWS-ConfigureCloudWatch」を選択
ランコマンドを実行するインスタンスを選択
カスタムメトリクス用のJSONを記述(※後で一部ご紹介します)
実行!
早速CloudWatchのメトリクスを確認してみましょう。
・
・
・
・
・
・
・
・
・
・待てど暮らせど、カスタムメトリクスは表示されない。
全ての手順はクリアしているはず。何故なのか。4.AWSサポートに問い合わせたこと
問題切り分けのため、AWSサポートに以下のことを問い合わせました。
- インスタンス自体に問題がないか?
→問題なし。- SSMエージェントやCloudWatchエージェントは正しく起動しているか?
→問題なく起動していました。- 接続設定に問題がないか?(プロキシやプライベート接続が起因しないか)
→EC2インスタンスがインターネットアウトできる、かつSSMエージェントおよびCloudWatchエージェントが起動していれば、CloudWatchエンドポイントにアクセスできるので問題なし。…となるとあとはJSON、お前か。
5.JSONの構文チェック
ここではJSONの中身の詳細説明は割愛し、問題の箇所のみピックアップします。
しかし、目視で構文チェックをするのはとっても骨が折れますので、すぐに構文チェックサイトを頼りましょう。
おや……?
エラーが出ました。ここでようやく、構文内(キャプチャ箇所)に不自然なスペースがあることに気付きます。
修正すると、、、
エラーが解消されました!
それでは、もう一度AWSに戻ってSSMランコマンドを実行してから、CloudWatchのメトリクスを確認してみましょう。
無事にカスタムメトリクスが表示されました。めでたしめでたし。
JSONで指定したNameSpaceやメトリクス名が表示されていることが確認できます。さいごに、使用したJSONを置いておきます。
検証キャプチャでは NameSpace を Custom metrics としていましたが、JSON的には気持ちが悪いのでキャメルケースに修正し、また、表記上Windowsのカスタムメトリクスだということが分かりやすいように変更を加えました。{ "IsEnabled": true, "EngineConfiguration": { "PollInterval": "00:05:00", "Components": [ { "Id": "PerformanceCounterDiskSpaceUtilizationC", "FullName": "AWS.EC2.Windows.CloudWatch.PerformanceCounterComponent.PerformanceCounterInputComponent,AWS.EC2.Windows.CloudWatch", "Parameters": { "CategoryName": "LogicalDisk", "CounterName": "% Free Space", "InstanceName": "C:", "MetricName": "DiskFreeC", "Unit": "Percent", "DimensionName": "InstanceId", "DimensionValue": "{instance_id}" } }, { "Id": "CloudWatch", "FullName": "AWS.EC2.Windows.CloudWatch.CloudWatch.CloudWatchOutputComponent,AWS.EC2.Windows.CloudWatch", "Parameters": { "AccessKey": "", "SecretKey": "", "Region": "ap-northeast-1", "NameSpace": "CustomMetrics/Windows" } } ], "Flows": { "Flows": [ "(PerformanceCounterDiskSpaceUtilizationC),CloudWatch" ] } } }6.検証結果
初歩的な問題でしたが、JSONの構文エラーが起きておりました。
JSONのコピー&ペースト時に何らかの形で余計な空白が挿入されてしまっていたようです。注意すべきは、JSONの構文エラーがあっても SSM Run Command ではエラーを吐いてくれない点です。
そのため、事前に JSON構文チェック を行い、正しい記述であることを確認した上でのランコマンド実行をオススメします。
エンジニアとしての基本中の基本を改めて教わった気持ちになりました(汗以上!ご拝読ありがとうございました。


- 投稿日:2019-10-26T20:19:34+09:00
[Redmine] DockerでHTTPS対応
以下記事の続きです。
AWS環境にRedmineを構築し、ドメイン取得・DNS設定までを行なっています。[AWS]ほぼ全自動Redmine構築
[AWS]Route53 ドメイン取得本記事では、HTTP通信からHTTPS通信に切り替える方法を紹介します。
なお、本記事で使用するドメインは例としてwww.example.comとさせて頂きます。対応方法
今回は
letsencryptを使用します。
letsencryptは無料でSSL証明書を発行することができ、誰でもSSL/TLS通信を実現することができるサービスとなっています。
SSL証明書は申請や作成・設定に時間を要しますが、以下リポジトリはDockerコンテナ一つ立てることで証明書の取得・設定を全て自動で行なってくれます。https://github.com/SteveLTN/https-portal
こんな便利なものを無料で展開してくれるなんて、とてもありがたいことです。。
READMEに書いてある通り、docker-compose.ymlを編集します。
docker-compose.ymlversion: '3' services: redmine: image: redmine:4.0.5 restart: always container_name: redmine_container environment: - REDMINE_DB_POSTGRES=db - REDMINE_DB_USERNAME=postgres - REDMINE_DB_PASSWORD=postgres - VIRTUAL_HOST=www.example.com <- ご自身のドメイン expose: - 3000 volumes: - ./redmine/files:/usr/src/redmine/files links: - db db: image: postgres:10.3 restart: always environment: - POSTGRES_USER=postgres - POSTGRES_PASSWORD=postgres volumes: - ./postgres/data:/var/lib/postgresql/data https-portal: image: steveltn/https-portal:latest ports: - '80:80' - '443:443' links: - redmine restart: always environment: DOMAINS: 'www.example.com -> http://redmine_container:3000' <-ご自身のドメイン #STAGE: 'production' #FORCE_RENEW: 'true'たったこれだけでSSL通信を実現することができます。
letsencryptは申請に制限があるため、最初は以下をコメントアウトしコンテナを立ち上げてください。
コメントアウトすることで、SSL証明書の代わりに自己証明でテストを行い証明書作成に問題がないか判定してくれます。#STAGE: 'production' #FORCE_RENEW: 'true'コンテナを立ち上げましょう。
$ docker-compose up -dログの確認方法は以下の通りです。
$ docker ps
CONTAINER ID        IMAGE                          COMMAND                  CREATED             STATUS              PORTS                                      NAMES
a328ea2b95a3        steveltn/https-portal:latest   "/init"                  4 hours ago         Up 4 hours          0.0.0.0:80->80/tcp, 0.0.0.0:443->443/tcp   redminedocker_https-portal_1
f24edf5e687f        redmine:4.0.5                  "/docker-entrypoint.…"   4 hours ago         Up 4 hours          3000/tcp                                   redmine_container
8f51137977c3        postgres:10.3                                           4 hours ago         Up 4 hours          5432/tcp                                   redminedocker_db_1
$ docker logs a328ea2b95a3
ログを確認し無事成功していると、以下のような出力となるはずです。
Found domains: www.example.com
Getting directory...
Directory found!
Registering account...
Registered!
Creating new order...
Order created!
Verifying www.example.com...
www.example.com verified!
Signing certificate...
成功していたら、コメントアウトを戻しコンテナを再度立ち上げましょう。
また、以前作成したAWSでのセキュリティグループがHTTPSを許可していないと思います。
コンソールからインバウンドでHTTPSを通すよう設定してください。ブラウザからご自身のドメインを
httpsで叩いてみてください。
以上で、HTTPS対応は完了です。
終わりに
letsencryptは大変素晴らしいサービスですが、信頼性がやや劣るため商用利用するサービスでは普通にSSL証明書を購入しましょう。

- 投稿日:2019-10-26T18:21:23+09:00
AWSサーバレスアーキテクチャで、よくある安否確認システムをSlackに対応させる
災害時に気づかれない安否確認を何とかしたかった
先日の台風19号の上陸時、自社の安否確認システムが発動し、全社員に一斉連絡が行われました。
この連絡は、安否確認システムに登録された電話番号とメールアドレス宛に行われることとなっています。
これは、各社でよくある安否確認システムの仕組みだと思われます。
しかし、今回の安否確認連絡に対する回答率は、普段実施している訓練の時よりも悪くなってしまったようです。
個人的な考察ですが、訓練では事前にメールを送信されると知らされているから回答率が良いのであり、いざ本番となると気づかない人が多いのだと考えました。
電話はEメールよりも効果的だと思うのですが、いたずら電話と勘違いして、取られないのかもしれません。部員全員が使っているSlackに通知したら回答率が上がるのではないか
「Eメールは埋もれる」「電話は取られない」のだとすると、皆がもっと良く見るところに通知すれば、お互いに声を掛け合って安否確認できるのではないか、と考えました。
そこで、部員が全員使っているSlackに、緊急事態を煽るように通知すれば、回答率を高められるのではないかと思い、AWSのサーバレスアーキテクチャを駆使して、安否確認連絡をSlackに通知するようにしてみました。安否確認をSlackに流すサーバレスアーキテクチャ
以下の図のように、安否確認システムが発送したメールを、Amazon SESのメール受信機能で受け、メール受信イベントでAWS Lambdaをトリガーして、LambdaからWebhookでSlackに通知します。
作り方
注: AWSのリージョンはus-east-1となります。
1. SlackのIncoming Webhookが使えるようにする
以下の記事に最高に詳しくまとめられています。
slackのIncoming webhookが新しくなっていたのでまとめてみた
https://qiita.com/kshibata101/items/0e13c420080a993c5d16この記事の解説を読みながら、SlackにIncoming Webhookで通知するためのアプリを作成します。
その後、#general(または全員が参加しているチャンネル)に通知するためのWebhook URLを取得します。こんな感じでWebhook URLが取れますのでコピーしておきます。
2. Lambda Functionを作る
Lambda Functionの環境変数
SOURCE_MAIL_ADDRESSに送信元メールアドレス(安否確認システムのメールアドレス)、WEBHOOK_URL_OF_SLACKにSlackのWebhook URLを指定します。
urllib.requestを使ってWebhook URLに通知を流し込みます。
悪用防止の為、Amazon SESのメール受信イベントで送信元メールアドレスを判定し、安否確認システムからのメールのみ処理するようにしています。
また、通知メッセージはコードに埋め込みましたが、お好みで外部化したり、カスタマイズできます。# -*- coding: utf-8 -*- import datetime import traceback import urllib.request import json import os # ロギング用関数 def logging(errorLv, lambdaName, errorMsg): loggingDateStr=(datetime.datetime.now()).strftime('%Y/%m/%d %H:%M:%S') print(loggingDateStr + " [" + errorLv + "] " + lambdaName + " " + errorMsg) return 0 # Lambdaハンドラ def lambda_handler(event, context): logging("info", context.function_name, "実行開始") try: # メールの情報からソースメールアドレスを抽出 source = event["Records"][0]["ses"]["mail"]["source"] # ソースメールアドレスをチェック if source == os.environ['SOURCE_MAIL_ADDRESS']: # Slack投稿用Data (textをお好みで変更可能) slackData = { "text": "安否確認メールが発報されました。至急、メールボックスを確認し、回答してください。", "blocks": [ { "type": "section", "text": { "type": "mrkdwn", "text": '*【プロパー宛】*\n*安否確認メールが発報されました。*\n*至急、メールボックスを確認し、回答してください。*\n※協力会社の方も、各社毎の安否確認の対応をお願いします。' } }, { "type": "section", "text": { "type": "mrkdwn", "text": '*<https://xxxxx.co.jp|エマージェンシーコール>*\n安否確認システムからの緊急連絡です。' } }, { "type": "divider" }, { "type": "context", "elements": [ { "type": "image", "image_url": "https://a.slack-edge.com/80588/img/blocks/bkb_template_images/notificationsWarningIcon.png", "alt_text": "notifications warning icon" }, { "type": "mrkdwn", "text": '*緊急アラートです。至急の回答が必要です。*' } ] } ] } # Slackに投稿 headers = { 'Content-Type': 'application/json' } postRequest = urllib.request.Request(os.environ['WEBHOOK_URL_OF_SLACK'], data=json.dumps(slackData).encode("utf-8"), method="POST", headers=headers) tempResponse = bytes() with urllib.request.urlopen(postRequest) as postResponse: tempResponse += postResponse.read() if (str(tempResponse, encoding='utf-8') != 'ok'): raise Exception("Invalid Response from " + os.environ['WEBHOOK_URL_OF_SLACK']) response = {} response.update([('response', 'OK'), ('request', slackData)]) logging("info", context.function_name, "Slackチャンネルへの投稿完了:" + str(response)) logging("info", context.function_name, "実行終了") return response else: raise ValueError("Receiving mail from an invalid address") except Exception as OtherException: # error時. lambda_handlerは、Pythonの標準エラーをエラーログに出力する logging("error", context.function_name, str(OtherException).replace("\n","")) logging("info", context.function_name, "実行終了") return {"errorMessage": str(OtherException)}3. SESでドメインを設定し、受信ルールを設定
公式ドキュメントの解説に従って、簡単に設定できます。
AWSマネジメントコンソールのSESの画面で設定します。まず、Route 53 を使用してドメインを購入および登録します。
2019/10時点では「.de」が年間$9.00で購入でき、最安値のようです。
https://docs.aws.amazon.com/ja_jp/Route53/latest/DeveloperGuide/domain-register.html次に、SESでドメインを検証します。
こちらも、解説に従って実施するだけなので簡単です。
https://docs.aws.amazon.com/ja_jp/ses/latest/DeveloperGuide/receiving-email-getting-started-verify.html最後に受信ルールの設定ですが、以下の解説に従います。
https://docs.aws.amazon.com/ja_jp/ses/latest/DeveloperGuide/receiving-email-receipt-rules.html
https://docs.aws.amazon.com/ja_jp/ses/latest/DeveloperGuide/receiving-email-action-lambda.html
Recipientには、安否確認メールを受信するメールアドレスを書きます。(受信用のメールアドレスはここで決めます)
次にActionはLambdaを選び、1で開発したLambda Functionを選択し、Invocation typeはEventにします。
※Lambda Functionの名前は各自によります。画像では、Cloud9で開発したため「cloud9-」という名前になっています。ここまでの設定が完了すれば、AWSサーバレスアーキテクチャの実装は完成です。
4. 安否確認システムのメール送信先に、SES受信用メールアドレスを追加
これを忘れると意味がありませんので、ちゃんと設定しておきます。
Slackに通知される様子
安否確認システムからメールが送信されると、以下のようにSlackに通知されるようになりました。
もちろん、スマホにも通知が飛んできます。自社の安否確認システムなので、システム的には自社プロパー宛の点呼になるのですが、Slackに連携させるにあたり、協力会社の方にも呼びかけをするようにしています。
補足
1. Slackのメール受信機能ではダメなのか?
以下のSlack公式サイト上では、Slackでメールを受信する方法が書かれていますが、blocksのmrkdwn等で自由に通知フォーマットをカスタマイズしたいとなると、今回のような方法を取る必要があります。
「Slack でメールを受信する」
https://slack.com/intl/ja-jp/help/articles/206819278-slack-%E3%81%A7%E3%83%A1%E3%83%BC%E3%83%AB%E3%82%92%E5%8F%97%E4%BF%A1%E3%81%99%E3%82%8Bフォーマットをカスタマイズするには、前述のコードのJSONの部分を変えます。
カスタマイズできる方が、何かと便利ですね。2. 安否確認はそもそも個人宛ではないのか?
その通りです。
つまり、誰か1人が、この仕組みで作成したSESの受信用メールアドレスを安否確認の送信先に設定すればOKです。最後に
余談ですが、この仕組みを作りながら、会社の安否確認にどんな意義があるのだろうと、立ち返り、調べてみました。
従業員の安全を守ることは、経営者の務めだといえる
(略)公益財団法人 ひょうご震災記念21世紀研究機構 人と防災未来センターが行った調査で『BCPを決めているかどうかは別にして、災害発生を想定した対策をとっているか』という質問への回答です。実に95.5%もの企業が『社員の安否確認の手法・手段』を定めています。その背景には、事業を続ける施設が残っても、そこで働く人がいなくなっては、事業を続けることができないという現実があります。そして、経営者は従業員を守る責務があり、事業を継続することで働く場を提供する義務もあるのです。
https://www.kddi.com/business/column/20180620/security-verification/様々に意見はあるのでしょうが、安否確認の回答率を上げることで、組織のメンバーや大事な人の命を守ることができるならば、その回答率を上げることに意義があると、私は考えました。
自社内のSlackは、単なるコミュニケーションツールだけでなく、RSS等による情報収集ツールとしても機能し、アクティブユーザが多い傾向にあります。
その性質を逆手に取り、安否確認をSlackに飛ばすことで、回答率を増やそうと試みました。
最近だと、社内のコミュニケーションでメールよりもSlackが使われる事例が増えてきていると思いますので、このような仕組みにより、万が一の災害時の安否確認がより確かに行われればと思いました。なお、安否確認システムにAmazon Connectの電話番号を登録するというアーキテクチャも考えられましたが、冷静に考えた結果、見送っています。


- 投稿日:2019-10-26T17:44:58+09:00
NetBackup CloudCatalyst for AWS入門 その2
NetBackup 8.1からの新機能であるCloudCatalystについて、3回に分けて解説を行います。
今回は2回目となり、CloudCatalystの構築手順についてお伝えします。環境例
今回は以下の環境を用いて説明を行います。
使用するNetBackupのバージョンは8.2になります。
構築手順
以下の順番でCloudCatalystの構築を行います。
①NetBackup 8.2のインストール
②MSDPストレージサーバー(ソース)を構成
③AWSアカウントおよびAmazon S3バケットの確認
④ホスト名ベースの証明書の配備(※該当する場合のみ)
⑤CloudCatalystストレージサーバー(ターゲット)の構成
⑥共通のメディアサーバー設定
⑦MSDPカタログの保護
⑧ストレージライフサイクルポリシーおよびバックアップポリシーの構成また、CloudCatalystの構築については、マニュアルも併せて参照するようにして下さい。
Veritas NetBackup™ Deduplicationガイド UNIX、WindowsおよびLinux リリース 8.2
P.248~「第6章 NetBackup CloudCatalystを使用したクラウドに対する重複排除の構成」①NetBackup 8.2のインストール
まず、各サーバーにNetBackup 8.2をインストールします。
今回の環境ですと、nbumasterに対してマスターサーバー、nbumedia1/2に対してメディアサーバーとしてインストールを行います。②MSDPストレージサーバー(ソース)を構成
ソース側のMSDPストレージサーバーの構築を行います。
NetBackup管理コンソールの「Storage Server Configuration Wizard」を使って、nbumedia1でMSDPストレージサーバーを構成します。<ストレージサーバー作成画面>
③AWSアカウントおよびAmazon S3バケットの確認
Amazon S3へアクセス可能なユーザーを作成し、アクセスキーおよびシークレットアクセスキーを事前に準備しておきます。
また、Amazon S3バケットが作成されていることを確認します。(CloudCatalystのセットアップ時にも構成可能です)
④ホスト名ベースの証明書の配備(※該当する場合のみ)
この手順は、メディアサーバーのバージョンが 8.1 から 8.1.2 の場合に実行する必要があります。
バージョンが 8.2 の場合、本手順は不要です。【実行例】
CloudCatalystストレージサーバーにホスト名ベースのセキュリティ証明書を配備します。C:\>"\Program Files\Veritas\NetBackup\bin\admincmd\bpnbaz.exe" -ProvisionCert nbumedia2 You will have to restart NetBackup services on configured NetBackup hosts after the command completes successfully. Do you want to continue(y/n)y Setting up security on target host: nbumedia2 - Certificate deployed successfully The file: DeploySecurityCerts.progress has been updated in the current directory with results of this operation Operation completed successfully.証明書を配備した後は、メディアサーバーのサービスを再起動して下さい。
⑤CloudCatalystストレージサーバー(ターゲット)の構成
ターゲット側のCloudCatalystストレージサーバーの構築を行います。
NetBackup管理コンソールの「Cloud Storage Server Configuration Wizard」を使って、nbumedia2でCloudCatalystストレージサーバーを構成します。<CloudCatalystストレージサーバー作成画面>
<S3バケット選択画面>
⑥共通のメディアサーバー設定
最適化複製では、ソースストレージサーバーとターゲットストレージサーバーに少なくとも1台の共通のメディアサーバーが存在している必要があります。
今回の環境では以下のように設定します。
■ストレージサーバー
MSDPストレージサーバー側:nbumedia1、nbumedia2
CloudCatalystストレージサーバー側:nbumedia2■ストレージユニット
MSDPストレージサーバー側: nbumedia1
CloudCatalystストレージサーバー側:nbumedia2⑦MSDPカタログの保護
環境内の全てのMSDPストレージサーバーおよびCloudCatalystストレージサーバーにて、MSDPカタログバックアップポリシーを作成します。
MSDPカタログは全損復旧時などで利用しますので、必ず取得するようにして下さい。
また、MSDPカタログの保存先にメディアサーバー重複排除プールは指定せず、ベーシックディスクなどを指定するようにして下さい。【実行例】
<nbumedia1側:MSDPストレージサーバー>[root@nbumedia1 /]# /usr/openv/pdde/pdcr/bin/drcontrol --new_policy --residence nbumedia1-stu --policy MSDPCatalog --client nbumedia1 --hardware "Linux" --OS "RedHat2.6.32" The policy MSDPCatalog for host nbumedia1 has been successfully created. The log file may be found at: /msdp/log/drcontrol/policy_admin/new_policy_1571981988.log<nbumedia2側:CloudCatalystストレージサーバー>
[root@nbumedia2 /]# /usr/openv/pdde/pdcr/bin/drcontrol --new_policy --residence nbumedia2-stu --policy MSDPCatalog-Catalyst --client nbumedia2 --hardware "Linux" --OS "RedHat2.6.32"
The policy MSDPCatalog-Catalyst for host nbumedia2 has been successfully created.
The log file may be found at: /var/log/puredisk/drcontrol/policy_admin/new_policy_1571982215.log
⑧ストレージライフサイクルポリシーおよびバックアップポリシーの構成
あと、もう一息です!
NetBackup管理コンソールを使って、SLPを作成します。
SLP作成後、バックアップポリシーを作成します。
先ほど作成したSLPを指定し、アクセラレータを有効化したバックアップポリシーにしています。
バックアップポリシー作成完了後、手動バックアップを行い、正常にバックアップおよび複製が正常に完了することを確認します。
おわりに
いかがでしたでしょうか?
今回はダイジェスト版でしたが、別途、CloudCatalyst構築手順書を公開する予定です!次回は、オンプレ環境が全損し、S3にのみバックアップデータが残っている状態での復旧手順をお伝えする予定です。
お楽しみに!商談のご相談はこちら
本稿からのお問合せをご記入の際には「お問合せ内容」に#GWCのタグを必ずご記入ください。ご記入いただきました内容はベリタスのプライバシーポリシーに従って管理されます。


- 投稿日:2019-10-26T17:37:05+09:00
AWS Storage Gateway について知ってることをまとめてみた
前置き
自分用メモです。間違ってたらご指摘お願いします。
AWS Storage Gatewayとは
AWS Storage Gateway は、既存のオンプレミス環境と AWS クラウドを接続するハイブリッドクラウドストレージサービスです。
(公式より)・・・って言われてもよくわからん
オンプレ環境にあるデータをいい感じにクラウド上のストレージに置きますよーそのためのゲートウェイですよー、みたいな感じ。オンプレのデータをAWS上に置くことで、AWSの高い可用性を享受でき、バックアップやDR(=災害復旧)が達成できる。
ゲートウェイとは
プロトコルの異なるネットワークとネットワークが通信するときのハードウェアやソフトウェア。異なるプロトコルやデータ形式を自動的に変換する。AWS Storage Gatewayの利点
・オンプレのデータをAWSの可用性の高い環境下でバックアップできる
・標準でデータが暗号化される
・AWSのモニタリング、セキュリティ等のツールを活用できる
etcデータの格納先
・S3
・EBS
・Glacier
ストレージゲートウェイの種類によって格納先が異なる。種類
1. ファイルゲートウェイ
2. ボリュームゲートウェイ
ーキャッシュ型(Gateway-Cached Volumes)
ー保管型(Gateway-Stored Volumes)
3. テープゲートウェイ1. ファイルゲートウェイ
オンプレに保存しているファイルをS3のオブジェクトとして保存する。
S3の1オブジェクト=オンプレの1ファイル
直近に使用されたデータはゲートウェイ上に保存するため、低遅延なアクセスが可能。2. ボリュームゲートウェイ
オンプレのディスクデータのスナップショットをS3に保存する。
S3の1オブジェクト=1スナップショット
ボリュームゲートウェイには、キャッシュ型と保管型の2種類の方法がある。キャッシュ型
Gateway-Cached Volumes
プライマリデータをS3に保存して、頻繁にアクセスされるデータはキャッシュしてローカルに保持する。そのため頻繁にアクセスされるデータへの低遅延アクセスが実現できる。
アプリケーションがデータをリクエストすると、ゲートウェイはまずキャッシュストレージでそのデータを探し、なければS3に探しにいく。保管型
Gateway-Stored Volumes
メインデータはローカルに保存する一方で、そのデータを非同期にAWSにバックアップする。
データがローカルにあるので、データ全体に対して低遅延でアクセスできる。
EBSへのリストア(=復元)も可能。3. テープゲートウェイ
物理テープライブラリの代替として、ストレージゲートウェイを仮想テープライブラリとして使用する。
バックアップソフトウェアを使用することでS3、Glacierにデータを退避することもできる。セキュリティ
AWSと各Gateway間のデータ転送はSSLで暗号化される。
クラウドストレージ側のデータはAES-256を用いて暗号化される。さいごに
Storage Gateway、あんまりまとまっている資料とかページが少なくて、概要をつかむのに少し苦労しました。おすすめの資料とかあれば教えてほしいです。
参考
AWS Storage Gateway の特徴
AWS Storage Gateway のよくある質問
AWS Black Belt Online Seminar 2017 AWS Storage Gateway
- 投稿日:2019-10-26T17:21:42+09:00
[AWS] Route53 ドメイン取得
以下記事でAWS環境にRedmineを立ち上げており、本記事では続きとしてRoute 53サービスを使用しドメインの取得・DNSの設定を行います。
https://qiita.com/Hiro-AGU/items/86446af898334a7dbc23
AWSチュートリアルの内容をまとめているだけなので、詳細は以下ページを参照してください。
https://aws.amazon.com/jp/getting-started/tutorials/get-a-domain/
ドメインの登録
現在立ち上げているRedmineをドメインで検索できるようにするためには、以下手順を踏む必要があります。
- ドメインの購入
- DNSの設定を行う
まず、ドメインの購入から行います。
AWSコンソールからRoute53サービスを開いてください。
なお、購入には料金が発生するので実際に取得する気がない方はご注意ください。
サイドバーの
登録済みドメインを開き、ドメインの登録を押下します。
ドメインの選択欄で、ご自身が設定したい名前のドメインとトップレベルドメイン(.comなど)を決め、
チェックを押下してください。
ここでは例として、ドメイン「example」、トップレベルドメイン「.com」としています。
なお、
チェックを押下した際、以下のように使用不可と出力されることがあります。
ドメインは世界中で重複しないため、貴方が設定しようとしたドメインは既に他の誰かが登録しているということとなります。
チェックが通るまでドメインの変更を行なってください。
ここでは使用不可と出ていますが、例なのでこのまま「example.com」として記述します。
チェック完了後、購入者の連絡先詳細画面となるため、ご自身の情報を記入し
続行を押下してください。
購入前確認画面です。記入内容に問題なければ
注文を完了を押下してください。
注) 注文完了を行うと料金が発生します。問題ないか再確認を行なってください。
注文完了後、数分ほど時間をおいてドメインの登録に成功するはずです。
サイドバーの登録済みドメインから確認を行なってください。DNSの設定
上記手順でドメインの購入は完了しましたが、現状ドメインとIPアドレスの紐付けが行われていないため、取得したドメインは意味のないものとなっています。
そこで、DNSの設定を行いドメインからIPアドレスを検索できるよう設定する必要があります。AWSコンソール Route 53サービスのサイドバー
ホストゾーンを開き、先ほど取得したドメインを押下してください。
次に、
レコードセットの作成を押下します。
レコードセットの作成を行います。
以下の欄を記入し、作成を押下します。名前: www.
値: Redmineに紐づいているご自身のPublicIPアドレス
作成完了後、
ホストゾーンに戻りドメインを押下すると、AレコードにPublicIPが値として入っていると思います。
Aレコードとは、ドメインをIPアドレスに置き換えるレコードです。
DNSでは最も基本的なレコードとなるため、名前だけでも覚えておきましょう。最後に、ご自身が設定したドメインをブラウザから叩いてみましょう。
Redmineに接続できたら無事完了です。終わりに
Aレコードに正常に追加されているか、WHOISでも検索してみましょう。
https://www.cman.jp/network/support/ip.html
ご自身のドメインとIPが紐づいていることが確認できます。


- 投稿日:2019-10-26T16:08:02+09:00
Laravelで画像投稿機能を実装する
Laravelで画像投稿機能を実装します。具体的には以下のような機能を実装します。
上記の写真で画像ファイルを選択し、フォームにコメントを入力後、投稿ボタンを押すと、
上記の写真のように、画像とコメントを表示する機能を実装します。
開発環境
Laravel:5.5.46
MYSQL:5.5.62
PHP:7.2.17
画像アップロードサーバ:AmazonS3マイグレーションファイル作成
画像とコメントを保存するためのテーブルpostsを作成します。ターミナルで以下のコマンドを実行しマイグレーションファイルを作成します。
$ php artisan make:migration _create_posts_table --create=posts作成したマイグレーションファイルを編集します。
database/migrations/2019_10_22_220848_create_posts_table.php<?php use Illuminate\Support\Facades\Schema; use Illuminate\Database\Schema\Blueprint; use Illuminate\Database\Migrations\Migration; class CreatePostsTable extends Migration { /** * Run the migrations. * * @return void */ public function up() { Schema::create('posts', function (Blueprint $table) { $table->increments('id'); $table->string('image_file_name',100);//追加 $table->string('image_title',100);//追加 $table->timestamps(); }); } /** * Reverse the migrations. * * @return void */ public function down() { Schema::dropIfExists('posts'); } }ターミナルで以下のコマンドを入力しマイグレーションを実行します。
$ php artisan migrateモデル
Postモデルを作成します。ターミナルで以下のコマンドを実行しモデルを作成します。
$ php artisan make:model Post作成したモデルを編集します。
app/Post.php<?php namespace App; use Illuminate\Database\Eloquent\Model; class Post extends Model { //後にcreate()メソッドで保存するカラムを指定 protected $fillable = [ 'image_file_name', 'image_title', ]; }ルータ
ルータを記述します。ページを表示したときと、投稿ボタンを押したときのルーティングを記述します。
routes/web.phpRoute::post('upload', 'PostsController@upload')->name('upload'); Route::get('/', 'PostsController@index');コントローラ
ターミナルで以下のコマンドを実行しコントローラを作成します。
$ php artisan make:controller PostsControllerweb.phpに記述した各ルーティングに対応したアクションを記述します。
/app/Http/Controllers/PostsController.php<?php namespace App\Http\Controllers; use Illuminate\Http\Request; use Illuminate\Foundation\Auth\User; use App\Post; use Storage; use Illuminate\Support\Facades\Validator; class PostsController extends Controller { //画像およびコメントアップロード public function upload(Request $request){ //Validatorファサードのmakeメソッドの第1引数は、バリデーションを行うデータ。 //第2引数はそのデータに適用するバリデーションルール $validator = Validator::make($request->all(), [ 'file' => 'required|max:10240|mimes:jpeg,gif,png', 'comment' => 'required|max:191' ]); //上記のバリデーションがエラーの場合、ビューにバリデーション情報を渡す if ($validator->fails()){ return back()->withInput()->withErrors($validator); } //s3に画像を保存。第一引数はs3のディレクトリ。第二引数は保存するファイル。 //第三引数はファイルの公開設定。 $file = $request->file('file'); $path = Storage::disk('s3')->putFile('/', $file, 'public'); //カラムに画像のパスとタイトルを保存 Post::create([ 'image_file_name' => $path, 'image_title' => $request->comment ]); return redirect('/'); } //ページ表示 public function index(){ $posts = \App\Post::all(); $data = [ 'posts' => $posts, ]; return view('welcome',$data); } }ターミナルで以下のコマンドを入力し、ビューでFormファサードを使用できるようにします。
$ composer require "laravelcollective/html":"5.5.*"AWSの S3にアクセスするライブラリを導入します。
$ composer require league/flysystem-aws-s3-v3.envで環境変数を設定します。
.envAWS_S3_KEY=[your Access Key ID] AWS_S3_SECRET=[your Secret Key] AWS_S3_REGION=[your region] AWS_S3_BUCKET=[your backet]ビュー
resources/viewsに最初からあるwelcome.blade.phpを編集します。
resources/views/welcome.blade.php//投稿フォーム {!! Form::open(['route' => 'upload', 'method' => 'post','files' => true]) !!} <div class="form-group"> {!! Form::label('file', '画像投稿', ['class' => 'control-label']) !!} {!! Form::file('file') !!} </div> <div class="form-group m-0"> {!! Form::label('textarea', '投稿コメント', ['class' => 'control-label']) !!} {!! Form::textarea('comment',null,['class' => 'form-control']) !!} </div> <div class="form-group text-center"> {!! Form::submit('投稿', ['class' => 'btn btn-primary my-2']) !!} </div> {!! Form::close() !!} //画像とコメントをすべて表示 @foreach($posts as $post) <div class="card-header text-center"> <img src= {{ Storage::disk('s3')->url($post->image_file_name) }} alt="" width=250px height=250px></a> </div> <div class="card-body p-1"> <span class="card-title">{{ $post->image_title }}</span> </div> @endforeach


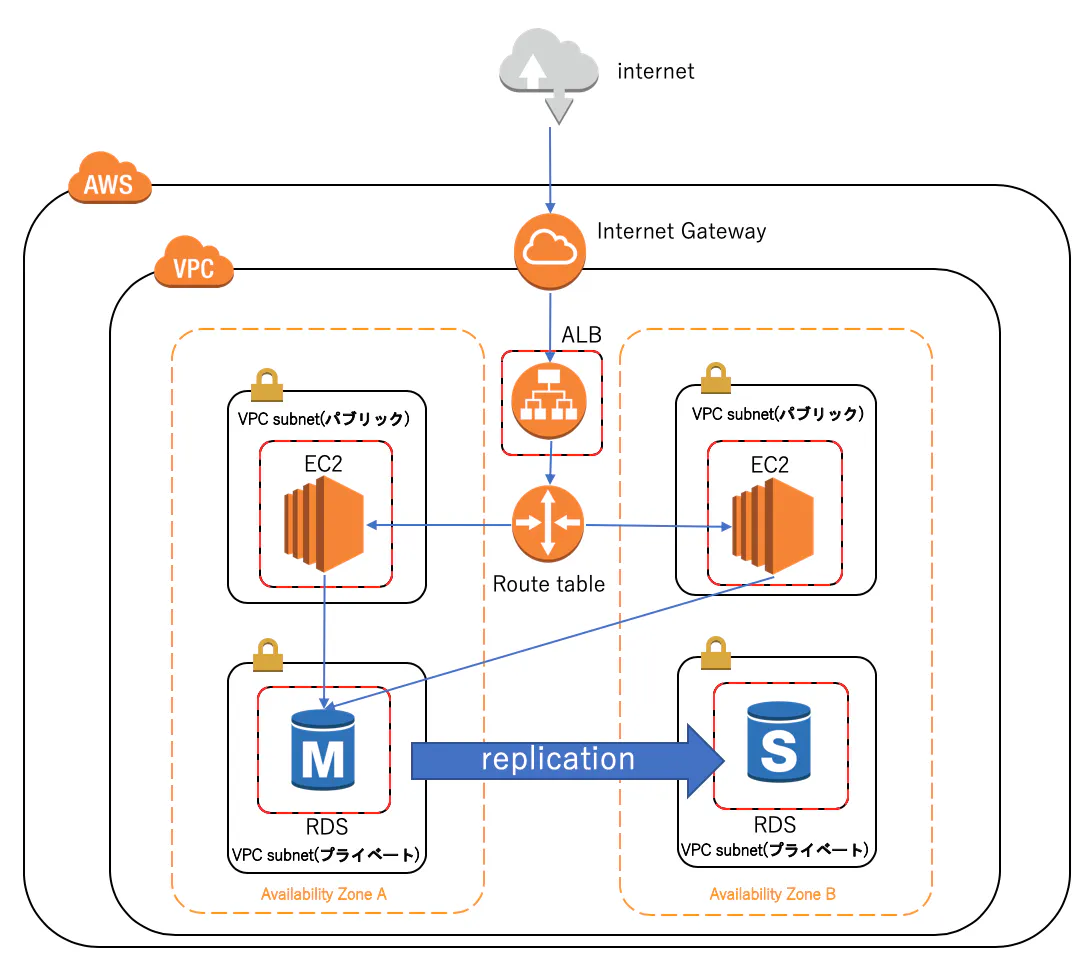
- 投稿日:2019-10-26T15:35:57+09:00
terraformでネットワークACL, セキュリティグループを作成
前回までのあらすじ
terraformでVPC, サブネットを作成する
https://qiita.com/sasshi_i/items/f4f65e18923d856be256terraformでインターネットゲートウェイ, ルートテーブルを作る
https://qiita.com/sasshi_i/items/5edabca4fbaae7d4a833環境
macOS Mojave 10.14.5
MacBook Pro, 13-inch, Early 2015
terraform v0.12.0
direnv 2.20.1目標成果物
github格納先
https://github.com/sasshi-i/terraform_ec2_rds
今回追記したプログラム
ネットワークACL
/envs/modules/vpc/main.tfresource "aws_default_network_acl" "qiita_default_acl" { default_network_acl_id = "${aws_vpc.qiita_vpc.default_network_acl_id}" egress { protocol = "all" rule_no = 100 action = "allow" cidr_block = "0.0.0.0/0" from_port = 0 to_port = 0 } egress { protocol = "all" rule_no = 101 action = "allow" ipv6_cidr_block = "::/0" from_port = 0 to_port = 0 } ingress { protocol = "all" rule_no = 100 action = "allow" cidr_block = "0.0.0.0/0" from_port = 0 to_port = 0 } ingress { protocol = "all" rule_no = 101 action = "allow" ipv6_cidr_block = "::/0" from_port = 0 to_port = 0 } tags = { Name = "qiita_acl" } }セキュリティグループ
/envs/modules/vpc/main.tfresource "aws_security_group" "alb" { name = "qiita-${var.stage}-alb" description = "security group for ALB" vpc_id = "${aws_vpc.qiita_vpc.id}" tags = { Name = "qiita-${var.stage}-alb" } } resource "aws_security_group_rule" "alb-ingress-ipv4" { security_group_id = aws_security_group.alb.id type = "ingress" cidr_blocks = ["0.0.0.0/0"] from_port = 443 to_port = 443 protocol = "tcp" } resource "aws_security_group_rule" "alb-ingress-ipv6" { security_group_id = aws_security_group.alb.id type = "ingress" ipv6_cidr_blocks = ["::/0"] from_port = 443 to_port = 443 protocol = "tcp" } resource "aws_security_group_rule" "alb-egress-ipv4" { security_group_id = aws_security_group.alb.id type = "egress" cidr_blocks = ["0.0.0.0/0"] from_port = 0 to_port = 0 protocol = "all" } resource "aws_security_group_rule" "alb-egress-ipv6" { security_group_id = aws_security_group.alb.id type = "egress" ipv6_cidr_blocks = ["::/0"] from_port = 0 to_port = 0 protocol = "all" } resource "aws_security_group" "ec2" { name = "qiita-${var.stage}-ec2" description = "security group for EC2" vpc_id = "${aws_vpc.qiita_vpc.id}" tags = { Name = "qiita-${var.stage}-ec2" } } resource "aws_security_group_rule" "ec2-ingress" { security_group_id = aws_security_group.ec2.id type = "ingress" source_security_group_id = aws_security_group.alb.id from_port = 0 to_port = 0 protocol = "all" } resource "aws_security_group_rule" "ec2-egress_ipv4" { security_group_id = aws_security_group.ec2.id type = "egress" cidr_blocks = ["0.0.0.0/0"] from_port = 0 to_port = 0 protocol = "all" } resource "aws_security_group_rule" "ec2-egress_ipv6" { security_group_id = aws_security_group.ec2.id type = "egress" ipv6_cidr_blocks = ["::/0"] from_port = 0 to_port = 0 protocol = "all" } resource "aws_security_group" "rds" { name = "qiita-${var.stage}-rds" description = "security group for RDS" vpc_id = "${aws_vpc.qiita_vpc.id}" tags = { Name = "qiita-${var.stage}-rds" } } resource "aws_security_group_rule" "rds-ingress" { security_group_id = aws_security_group.rds.id type = "ingress" source_security_group_id = aws_security_group.ec2.id from_port = 3306 to_port = 3306 protocol = "tcp" } resource "aws_security_group_rule" "rds-egress_ipv4" { security_group_id = aws_security_group.rds.id type = "egress" cidr_blocks = ["0.0.0.0/0"] from_port = 0 to_port = 0 protocol = "all" } resource "aws_security_group_rule" "rds-egress_ipv6" { security_group_id = aws_security_group.rds.id type = "egress" ipv6_cidr_blocks = ["::/0"] from_port = 0 to_port = 0 protocol = "all" }プログラムの解説
ネットワークACL
ネットワークACLとはサブネット単位で入ってくる通信と出て行く通信を制限できるセキュリティレイヤーです。
後ほど説明するセキュリティグループはEC2やRDSのようなインスタンス単位でセキュリティを設定できるのに対し、サブネット単位で設定できる点が異なります。
今回は
aws_default_network_aclと記載しているので、デフォルトネットワークACLとして対象VPCに属しているサブネット全てに適用されます。セキュリティグループ
インスタンス単位でセキュリティを設定できます。
今回はALB, EC2, RDSに対して設定しています。EC2のインバウンドは、ALBからしか入ってきて欲しくないので、
source_security_group_idでALBのセキュリティグループのidを指定しています。同じく、RDSはEC2からしか通信されたくないので、
source_security_group_idにEC2のセキュリティグループのidを指定しています。以上でネットワーク周りの実装は完了です。
次回からEC2, RDSの実装に移って行きたいと思います。関連記事
tfenvを用いたterraformのインストール方法
https://qiita.com/sasshi_i/items/b5117d51fed800fa6b09direnvを用いてterraformで複数のAWSアカウントを使い分ける方法
https://qiita.com/sasshi_i/items/609044aa106cdcb43a89
- 投稿日:2019-10-26T14:04:43+09:00
CDKを試してみる
AWS クラウド開発キット (CDK) – TypeScript と Python 用がご利用可能に
これを触ってみます。
早速、嵌りました。グローバルにインストールするのが屋だったので、ローカルに
npm install aws-cdkでインストールすると、cdkが使えませんでした(なんで?)。仕方なくグローバルインストール。C:\Users\User\aws\cdk>npm install -g aws-cdk C:\Users\User\AppData\Roaming\npm\cdk -> C:\Users\User\AppData\Roaming\npm\node_modules\aws-cdk\bin\cdk > core-js@2.6.10 postinstall C:\Users\User\AppData\Roaming\npm\node_modules\aws-cdk\node_modules\core-js > node postinstall || echo "ignore" Thank you for using core-js ( https://github.com/zloirock/core-js ) for polyfilling JavaScript standard library! The project needs your help! Please consider supporting of core-js on Open Collective or Patreon: > https://opencollective.com/core-js > https://www.patreon.com/zloirock Also, the author of core-js ( https://github.com/zloirock ) is looking for a good job -) + aws-cdk@1.14.0 added 237 packages from 218 contributors in 23.957s C:\Users\User\aws\cdk>コマンドの確認します。
C:\Users\User\aws\cdk>cdk
Usage: cdk -a <cdk-app> COMMAND

Commands:
  cdk list [STACKS..]             Lists all stacks in the app      [aliases: ls]
  cdk synthesize [STACKS..]       Synthesizes and prints the CloudFormation
                                  template for this stack       [aliases: synth]
  cdk bootstrap [ENVIRONMENTS..]  Deploys the CDK toolkit stack into an AWS
                                  environment
  cdk deploy [STACKS..]           Deploys the stack(s) named STACKS into your
                                  AWS account
  cdk destroy [STACKS..]          Destroy the stack(s) named STACKS
  cdk diff [STACKS..]             Compares the specified stack with the deployed
                                  stack or a local template file, and returns
                                  with status 1 if any difference is found
  cdk metadata [STACK]            Returns all metadata associated with this
                                  stack
  cdk init [TEMPLATE]             Create a new, empty CDK project from a
                                  template. Invoked without TEMPLATE, the app
                                  template will be used.
  cdk context                     Manage cached context values
  cdk docs                        Opens the reference documentation in a browser
                                                                  [aliases: doc]
  cdk doctor                      Check your set-up for potential problems

Options:
  --app, -a             REQUIRED: command-line for executing your app or a cloud
                        assembly directory (e.g. "node bin/my-app.js")  [string]
  --context, -c         Add contextual string parameter (KEY=VALUE)      [array]
  --plugin, -p          Name or path of a node package that extend the CDK
                        features. Can be specified multiple times        [array]
  --trace               Print trace for stack warnings                 [boolean]
  --strict              Do not construct stacks with warnings          [boolean]
  --ignore-errors       Ignores synthesis errors, which will likely produce an
                        invalid output                [boolean] [default: false]
  --json, -j            Use JSON output instead of YAML when templates are
                        printed to STDOUT             [boolean] [default: false]
  --verbose, -v         Show debug logs               [boolean] [default: false]
  --profile             Use the indicated AWS profile as the default environment
                                                                        [string]
  --proxy               Use the indicated proxy. Will read from HTTPS_PROXY
                        environment variable if not specified.          [string]
  --ec2creds, -i        Force trying to fetch EC2 instance credentials. Default:
                        guess EC2 instance status.                     [boolean]
  --version-reporting   Include the "AWS::CDK::Metadata" resource in synthesized
                        templates (enabled by default)                 [boolean]
  --path-metadata       Include "aws:cdk:path" CloudFormation metadata for each
                        resource (enabled by default)  [boolean] [default: true]
  --asset-metadata      Include "aws:asset:*" CloudFormation metadata for
                        resources that user assets (enabled by default)
                                                       [boolean] [default: true]
  --role-arn, -r        ARN of Role to use when invoking CloudFormation [string]
  --toolkit-stack-name  The name of the CDK toolkit stack               [string]
  --staging             Copy assets to the output directory (use --no-staging to
                        disable, needed for local debugging the source files
                        with SAM CLI)                  [boolean] [default: true]
  --output, -o          Emits the synthesized cloud assembly into a directory
                        (default: cdk.out)                              [string]
  --no-color            Removes colors and other style from console output
                                                      [boolean] [default: false]
  --version             Show version number                            [boolean]
  -h, --help            Show help                                      [boolean]

If your app has a single stack, there is no need to specify the stack name

If one of cdk.json or ~/.cdk.json exists, options specified there will be used
as defaults. Settings in cdk.json take precedence.


C:\Users\User\aws\cdk>
初期化を行います。言語は
typescriptにしました(フォルダの名前をcdk->cdk01に変えています)。C:\Users\User\aws>cd cdk01 C:\Users\User\aws\cdk01>cdk init app --language=typescript Applying project template app for typescript Initializing a new git repository... warning: LF will be replaced by CRLF in .gitignore. The file will have its original line endings in your working directory. warning: LF will be replaced by CRLF in .npmignore. The file will have its original line endings in your working directory. warning: LF will be replaced by CRLF in README.md. The file will have its original line endings in your working directory. warning: LF will be replaced by CRLF in bin/cdk01.ts. The file will have its original line endings in your working directory. warning: LF will be replaced by CRLF in cdk.json. The file will have its original line endings in your working directory. warning: LF will be replaced by CRLF in jest.config.js. The file will have its original line endings in your working directory. warning: LF will be replaced by CRLF in lib/cdk01-stack.ts. The file will have its original line endings in your working directory. warning: LF will be replaced by CRLF in package.json. The file will have its original line endings in your working directory. warning: LF will be replaced by CRLF in test/cdk01.test.ts. The file will have its original line endings in your working directory. warning: LF will be replaced by CRLF in tsconfig.json. The file will have its original line endings in your working directory. Executing npm install... npm WARN deprecated left-pad@1.3.0: use String.prototype.padStart() npm notice created a lockfile as package-lock.json. You should commit this file. npm WARN cdk01@0.1.0 No repository field. npm WARN cdk01@0.1.0 No license field. npm WARN optional SKIPPING OPTIONAL DEPENDENCY: fsevents@1.2.9 (node_modules\fsevents): npm WARN notsup SKIPPING OPTIONAL DEPENDENCY: Unsupported platform for fsevents@1.2.9: wanted {"os":"darwin","arch":"any"} (current: {"os":"win32","arch":"x64"}) # Useful commands * `npm run build` compile typescript to js * `npm run watch` watch for changes and compile * `npm run test` perform the jest unit tests * `cdk deploy` deploy this stack to your default AWS account/region * `cdk diff` compare deployed stack with current state * `cdk synth` emits the synthesized CloudFormation template C:\Users\User\aws\cdk01>cdk init app --language=typescriptプロジェクトの構造の確認します(init直後ではなく、手でフォルダやファイルの追加があります)。
長いので
gistに貼っています。
CDK project structure
init後のlib\cdk01-stack.tsファイルを確認します。// The code that defines your stack goes hereとある場所にコードを書いてくようです。import cdk = require('@aws-cdk/core'); export class Cdk01Stack extends cdk.Stack { constructor(scope: cdk.Construct, id: string, props?: cdk.StackProps) { super(scope, id, props); // The code that defines your stack goes here } }サンプルのコードを追加します。
import cdk = require('@aws-cdk/core');

export class Cdk01Stack extends cdk.Stack {
  constructor(scope: cdk.Construct, id: string, props?: cdk.StackProps) {
    super(scope, id, props);

    // The code that defines your stack goes here

    const myVpc = new ec2.Vpc(this, "MyVPC");

    const myCluster = new ecs.Cluster(this, "MyCluster", {
      vpc: myVpc
    });

    const myQueueProcessingService = new ecs_patterns.QueueProcessingFargateService(
      this, "MyQueueProcessingService", {
        cluster: myCluster,
        memoryLimitMiB: 512,
        image: ecs.ContainerImage.fromAsset("my-queue-consumer")
      });

    const myFunction = new lambda.Function(
      this, "MyFrontendFunction", {
        runtime: lambda.Runtime.NODEJS_10_X,
        timeout: Duration.seconds(3),
        handler: "index.handler",
        code: lambda.Code.asset("my-front-end"),
        environment: {
          QUEUE_NAME: myQueueProcessingService.sqsQueue.queueName
        }
      });

    myQueueProcessingService.sqsQueue.grantSendMessages(myFunction);

    const myApi = new apigateway.LambdaRestApi(
      this, "MyFrontendApi", {
        handler: myFunction
      });

  }
}
デプロイするつもりはないので、
cdk synthを使って、cloud formationのファイルを生成します。
が、さっそくコンパイルエラーです。C:\Users\User\aws\cdk01>cdk synth ⨯ Unable to compile TypeScript: lib/cdk01-stack.ts:9:23 - error TS2304: Cannot find name 'ec2'. 9 const myVpc = new ec2.Vpc(this, "MyVPC"); ~~~ lib/cdk01-stack.ts:11:27 - error TS2304: Cannot find name 'ecs'. 11 const myCluster = new ecs.Cluster(this, "MyCluster", { ~~~ lib/cdk01-stack.ts:15:42 - error TS2304: Cannot find name 'ecs_patterns'. 15 const myQueueProcessingService = new ecs_patterns.QueueProcessingFargateService( ~~~~~~~~~~~~ lib/cdk01-stack.ts:19:16 - error TS2304: Cannot find name 'ecs'. 19 image: ecs.ContainerImage.fromAsset("my-queue-consumer") ~~~ lib/cdk01-stack.ts:22:28 - error TS2304: Cannot find name 'lambda'. 22 const myFunction = new lambda.Function( ~~~~~~ lib/cdk01-stack.ts:24:18 - error TS2304: Cannot find name 'lambda'. 24 runtime: lambda.Runtime.NODEJS_10_X, ~~~~~~ lib/cdk01-stack.ts:25:18 - error TS2304: Cannot find name 'Duration'. 25 timeout: Duration.seconds(3), ~~~~~~~~ lib/cdk01-stack.ts:27:15 - error TS2304: Cannot find name 'lambda'. 27 code: lambda.Code.asset("my-front-end"), ~~~~~~ lib/cdk01-stack.ts:35:23 - error TS2304: Cannot find name 'apigateway'. 35 const myApi = new apigateway.LambdaRestApi( ~~~~~~~~~~ Subprocess exited with error 1必要なモジュールが足りないようです。地道にモジュールを追加します。
npm iのiはinstallのiのようです。C:\Users\User\aws\cdk01>npm i @aws-cdk/aws-ecs npm WARN cdk01@0.1.0 No repository field. npm WARN cdk01@0.1.0 No license field. npm WARN optional SKIPPING OPTIONAL DEPENDENCY: fsevents@1.2.9 (node_modules\fsevents): npm WARN notsup SKIPPING OPTIONAL DEPENDENCY: Unsupported platform for fsevents@1.2.9: wanted {"os":"darwin","arch":"any"} (current: {"os":"win32","arch":"x64"}) + @aws-cdk/aws-ecs@1.14.0 added 30 packages from 4 contributors and audited 1762575 packages in 26.75s found 0 vulnerabilitiesファイルに
importを追加します。(TypeScriptのモジュールDurationの追加がわからなかったので、コメントアウトがあります。誰か教えて!)import cdk = require('@aws-cdk/core'); import ec2 = require('@aws-cdk/aws-ec2'); import ecs = require('@aws-cdk/aws-ecs'); import lambda = require('@aws-cdk/aws-lambda'); import ecs_patterns = require('@aws-cdk/aws-ecs-patterns'); import apigateway = require('@aws-cdk/aws-apigateway'); export class Cdk01Stack extends cdk.Stack { constructor(scope: cdk.Construct, id: string, props?: cdk.StackProps) { super(scope, id, props); // The code that defines your stack goes here const myVpc = new ec2.Vpc(this, "MyVPC"); const myCluster = new ecs.Cluster(this, "MyCluster", { vpc: myVpc }); const myQueueProcessingService = new ecs_patterns.QueueProcessingFargateService( this, "MyQueueProcessingService", { cluster: myCluster, memoryLimitMiB: 512, image: ecs.ContainerImage.fromAsset("my-queue-consumer") }); const myFunction = new lambda.Function( this, "MyFrontendFunction", { runtime: lambda.Runtime.NODEJS_10_X, // timeout: Duration.seconds(3), handler: "index.handler", code: lambda.Code.asset("my-front-end"), environment: { QUEUE_NAME: myQueueProcessingService.sqsQueue.queueName } }); myQueueProcessingService.sqsQueue.grantSendMessages(myFunction); const myApi = new apigateway.LambdaRestApi( this, "MyFrontendApi", { handler: myFunction }); } }キューの作成でエラーになるので、フォルダを追加します。
C:\Users\User\aws\cdk01>cdk synth
Cannot find image directory at C:\Users\User\aws\cdk01\my-queue-consumer
Subprocess exited with error 1

C:\Users\User\aws\cdk01>mkdir my-queue-consumer
再度チャレンジ
C:\Users\User\aws\cdk01>cdk synth
No 'Dockerfile' found in C:\Users\User\aws\cdk01\my-queue-consumer
Subprocess exited with error 1
Dockerfileがないとのこと。なので、適当につくる。
再度チャレンジ
C:\Users\User\aws\cdk01>cdk synth
ENOENT: no such file or directory, stat 'C:\Users\User\aws\cdk01\my-front-end'
Subprocess exited with error 1

C:\Users\User\aws\cdk01>mkdir my-queue-consumer
また、フォルダがないとのこと。とりあえず作る。
my-front-endでなんでフォルダが必要なのだろう?再度チャレンジ
C:\Users\User\aws\cdk01>cdk synth
Resources:
  MyVPCAFB07A31:
    Type: AWS::EC2::VPC
    Properties:
      CidrBlock: 10.0.0.0/16
      EnableDnsHostnames: true
      EnableDnsSupport: true
      InstanceTenancy: default
      Tags:
        - Key: Name
          Value: Cdk01Stack/MyVPC

以下省略
- 投稿日:2019-10-26T02:27:56+09:00
AWS Sagemakerで自作モデルを使用し学習させてみた
機械学習エンジニアであるもののSageMakerは試したことがなかったので、この機会に実装してみた。
学習用データは、Kaggleの以下データを使用した。
Cervical Cancer Risk Classification:
https://www.kaggle.com/loveall/cervical-cancer-risk-classificationフレームワークは、個人的にPytorch/Chainerが得意なので、Pytorchでネットワークを組んでみた。
AWSでJupyterインスタンスがあるが、今月は金欠なのでローカルで開発することにした。。
まずは、SageMakerに対するポリシーを付与したIAMロールを作成し、実行アカウント(IAMユーザ)・SageMaker双方への信頼関係を付与する。
当ロールに、以下のポリシーをアタッチする。
・ IAMReadOnlyAccess
・ AmazonSageMakerFullAccess{ "Version": "2012-10-17", "Statement": [ { "Sid": "", "Effect": "Allow", "Principal": { "AWS": "arn:aws:iam::xxxxx:root", "Service": "sagemaker.amazonaws.com" }, "Action": "sts:AssumeRole" } ] }作成したロールの実行ポリシーをIAMユーザへ割り当てる。
{
    "Version": "2012-10-17",
    "Statement": {
        "Effect": "Allow",
        "Action": "sts:AssumeRole",
        "Resource": "arn:aws:iam::xxxxx:role/sagemaker-role"
    }
}
ローカルの.aws/configに上記で作成したロールを付与するよう設定する。
[default]
output = json
region = ap-northeast-1
role_arn = arn:aws:iam::xxxxx:role/sagemaker-role
source_profile = default
これで、ローカルからSageMakerへのアクセス権限の設定は完了したので、後はいつも通りJupyterで学習用ネットワークを実装すればよい。
Learn more or give us feedback
# -*- coding: utf-8 -*-

import numpy as np
import matplotlib.pyplot as plt
import subprocess
import sys
import torch
from torch.utils.data import TensorDataset
from torch.utils.data import DataLoader
import torch.nn as nn
import torch.nn.functional as F
from torch.autograd import Variable
import torch.optim as optim
import argparse
import sagemaker_containers
import os

class Model(nn.Module):
  def __init__(self, input_dim, output_dim):
    super(Model, self).__init__()
    self.sequential = nn.Sequential(
      nn.Linear(input_dim, 40),
      nn.ReLU(),
      nn.Dropout(0.3),
      nn.BatchNorm1d(40),
      nn.Linear(40, 20),
      nn.ReLU(),
      nn.Dropout(0.3),
      nn.BatchNorm1d(20),
      nn.Linear(20,10),
      nn.ReLU(),
      nn.Dropout(0.3),
      nn.BatchNorm1d(10),
      nn.Linear(10,output_dim),
      )

  def forward(self, x):
    x = self.sequential(x)

    return F.log_softmax(x, dim=1)

def preprocess(args):
    subprocess.call([sys.executable, "-m", "pip", "install", "scikit-learn"])
    subprocess.call([sys.executable, "-m", "pip", "install", "pandas==0.23.0"])
    from sklearn.model_selection import train_test_split
    from sklearn.preprocessing import MinMaxScaler
    import pandas as pd
    print(pd.__version__)
    df = pd.read_csv(args.data_dir + '/kag_risk_factors_cervical_cancer.csv')
    df = df.convert_objects(convert_numeric=True)
    dum_list = ['Smokes', 'IUD', 'STDs', 'Hormonal Contraceptives','Dx:Cancer','Dx:CIN','Dx:HPV','Dx','Hinselmann','Citology','Schiller']
    for column in df.columns.values:
        df[column] = df[column].fillna(df.median()[column])
        if column in dum_list and column != 'Biopsy':
            dummy_df = pd.get_dummies(df[column])
            df = pd.concat([df, dummy_df], axis=1)
            df = df.drop(column, axis=1)

    X_df_data = df.drop('Biopsy', axis=1)
    y_df_data = df['Biopsy']

    X_train, X_test = train_test_split(np.array(X_df_data), test_size=0.2, random_state=0)
    y_train, y_test = train_test_split(np.array(y_df_data), test_size=0.2, random_state=0)

    ms = MinMaxScaler(feature_range=(0, 1))
    X_train, X_test = ms.fit_transform(X_train), ms.fit_transform(X_test)

    X_train_tensor, X_test_tensor, y_train_tensor, y_test_tensor = torch.from_numpy(X_train).float(), torch.from_numpy(X_test).float(), torch.from_numpy(y_train).long(), torch.from_numpy(y_test).long()

    train_data = TensorDataset(X_train_tensor, y_train_tensor)
    train_loader = DataLoader(train_data, batch_size=
                              args.train_batch_size, shuffle=True)

    test_data = TensorDataset(X_test_tensor, y_test_tensor)
    test_loader = DataLoader(test_data, batch_size=args.test_batch_size, shuffle=True)

    return train_loader, X_train_tensor, test_loader, y_test, y_test_tensor

def train(args):
    train_loader, X_train_tensor, test_loader, y_test, y_test_tensor = preprocess(args)
    model = Model(input_dim=X_train_tensor.shape[1], output_dim=args.num_classes)

    criterion = nn.CrossEntropyLoss()
    optim = torch.optim.Adam(model.parameters(), lr=args.lr)

    for epoch in range(args.epochs):
      total_loss = 0
      for X_train, y_train in train_loader:
        X_train, y_train = Variable(X_train), Variable(y_train)
        optim.zero_grad()
        output = model(X_train)
        loss = criterion(output, y_train)
        loss.backward()
        optim.step()

        total_loss += loss.item()

      if (epoch + 1) % 10 == 0:
        print(epoch + 1, total_loss)

    return _save_model(model, args.model_dir), model, test_loader, y_test, y_test_tensor

def accuracy(model, test_loader, y_test, y_test_tensor):
    with torch.no_grad():
      tp_cnt, tn_cnt, correct_cnt = 0, 0, 0
      for inputs, labels in test_loader:
        inputs, labels = Variable(inputs), Variable(labels)

        _, predict = torch.max(model(inputs), 1)
        for val, label in zip(predict, labels):
          if val.item() == label:
            correct_cnt += 1
            if val.item() == 1:
              tp_cnt += 1
            elif val.item() == 0:
              tn_cnt += 1
    total_acc = correct_cnt / y_test_tensor.size()[0]
    tp_acc = tp_cnt / np.count_nonzero(y_test == 1)
    tn_cnt = tn_cnt / np.count_nonzero(y_test == 0)
    print('Total accuracy : ' + str(round(total_acc, 2)) + '\nTP : ' + str(round(tp_acc, 2)) + '\nTN : ' + str(round(tn_cnt, 2)))

def _save_model(model, model_dir):
    path = os.path.join(model_dir, 'model.pth')
    torch.save(model.cpu().state_dict(), path)

def model_fn(model_dir):
    device = "cuda" if torch.cuda.is_available() else "cpu"
    model = Model(input_dim=46, output_dim=2)
    if torch.cuda.device_count() > 1:
        model = nn.DataParallel(model)

    with open(os.path.join(model_dir, 'model.pth'), 'rb') as f:
        model.load_state_dict(torch.load(f))
    return model.to(device)

if __name__ == "__main__":
    parser = argparse.ArgumentParser()
    parser.add_argument('--epochs', type=int, default=100, metavar='E',
                    help='number of total epochs to run (default: 100)')
    parser.add_argument('--lr', type=float, default=0.001, metavar='LR',
                    help='initial learning rate (default: 0.001)')
    parser.add_argument('--train-batch-size', type=int, default=200, metavar='E',
                help='number of train data batch size (default: 200)')
    parser.add_argument('--test-batch-size', type=int, default=200, metavar='E',
                help='number of test data batch size (default: 10)')
    parser.add_argument('--num-classes', type=int, default=2, metavar='E',
                help='number of classes (default: 2)')

    env = sagemaker_containers.training_env()
    parser.add_argument('--hosts', type=list, default=env.hosts)
    parser.add_argument('--current-host', type=str, default=env.current_host)
    parser.add_argument('--model-dir', type=str, default=env.model_dir)
    parser.add_argument('--data-dir', type=str, default=env.channel_input_dirs.get('training'))
    parser.add_argument('--num-gpus', type=int, default=env.num_gpus)

    _, model, test_loader, y_test, y_test_tensor = train(parser.parse_args())
    accuracy(model, test_loader, y_test, y_test_tensor)
SageMakerのPytorchフレームワークから上記のスクリプトを使用した学習・エンドポイントへのデプロイを実施するよう実装する。
import subprocess
import pandas as pd
import boto3
from sagemaker import Session, get_execution_role
from sagemaker.pytorch import PyTorch
import sagemaker

class SageMaker:
    def __init__(self):
        self.sagemaker_session = sagemaker.Session()
        self.bucket = '*****' #S3バケット名
        self.role = sagemaker.get_execution_role()
        self.instance_type = '*****' #デプロイ先インスタンスタイプ

    def upload_data(self):
        inputs = self.sagemaker_session.upload_data(path='./data/', bucket=self.bucket, key_prefix='data/cancer')

        return inputs

    def __estimator_fit(self, inputs):
        estimator = PyTorch(entry_point='./kag_risk_train_test.py',
                            role=self.role,
                            framework_version='1.1.0',
                            train_instance_count=1,
                            train_instance_type=self.instance_type)

        estimator.fit(
            inputs=inputs,
            )

        return estimator

    def estimator_predict(self, inputs):
        estimator = self.__estimator_fit(inputs)
        predict = estimator.deploy(initial_instance_count=1,
                                             instance_type=self.instance_type)

        return predict
実行結果:
全体的な精度は良いがTP値が少し低いので、もうちょい改善の余地はあるかも。。10 2.986310064792633 20 2.434782922267914 30 1.926128625869751 40 1.4562886655330658 50 1.0403850376605988 60 0.7982784509658813 70 0.6503457129001617 80 0.6562095209956169 90 0.4315394461154938 100 0.46829692274332047 Total accuracy : 0.95 TP : 0.62 TN : 0.97 2019-10-25 16:57:42,283 sagemaker-containers INFO Reporting training SUCCESS学習・デプロイ(エンドポイント作成)が成功すると、以下の通りトレーニングジョブのステータスがCompletedとなる。


- 投稿日:2019-10-26T02:27:56+09:00
AWS Sagemakerで自作モデルを使用し学習・モデル作成・デプロイまで実装してみた
機械学習エンジニアであるもののSageMakerは試したことがなかったので、この機会に実装してみた。
学習用データは、Kaggleの以下データを使用した。
Cervical Cancer Risk Classification:
https://www.kaggle.com/loveall/cervical-cancer-risk-classificationフレームワークは、個人的にPytorch/Chainerが得意なので、Pytorchでネットワークを組んでみた。
AWSでJupyterインスタンスがあるが、今月は金欠なのでローカルで開発することにした。。
まずは、SageMakerに対するポリシーを付与したIAMロールを作成し、実行アカウント(IAMユーザ)・SageMaker双方への信頼関係を付与する。
当ロールに、以下のポリシーをアタッチする。
・ IAMReadOnlyAccess
・ AmazonSageMakerFullAccess{ "Version": "2012-10-17", "Statement": [ { "Sid": "", "Effect": "Allow", "Principal": { "AWS": "arn:aws:iam::xxxxx:root", "Service": "sagemaker.amazonaws.com" }, "Action": "sts:AssumeRole" } ] }作成したロールの実行ポリシーをIAMユーザへ割り当てる。
{
    "Version": "2012-10-17",
    "Statement": {
        "Effect": "Allow",
        "Action": "sts:AssumeRole",
        "Resource": "arn:aws:iam::xxxxx:role/sagemaker-role"
    }
}
ローカルの.aws/configに上記で作成したロールを付与するよう設定する。
[default]
output = json
region = ap-northeast-1
role_arn = arn:aws:iam::xxxxx:role/sagemaker-role
source_profile = default
これで、ローカルからSageMakerへのアクセス権限の設定は完了したので、後はいつも通りJupyterで学習用ネットワークを実装すればよい。
Learn more or give us feedback
# -*- coding: utf-8 -*-

import numpy as np
import matplotlib.pyplot as plt
import subprocess
import sys
import torch
from torch.utils.data import TensorDataset
from torch.utils.data import DataLoader
import torch.nn as nn
import torch.nn.functional as F
from torch.autograd import Variable
import torch.optim as optim
import argparse
import sagemaker_containers
import os

class Model(nn.Module):
  def __init__(self, input_dim, output_dim):
    super(Model, self).__init__()
    self.sequential = nn.Sequential(
      nn.Linear(input_dim, 40),
      nn.ReLU(),
      nn.Dropout(0.3),
      nn.BatchNorm1d(40),
      nn.Linear(40, 20),
      nn.ReLU(),
      nn.Dropout(0.3),
      nn.BatchNorm1d(20),
      nn.Linear(20,10),
      nn.ReLU(),
      nn.Dropout(0.3),
      nn.BatchNorm1d(10),
      nn.Linear(10,output_dim),
      )

  def forward(self, x):
    x = self.sequential(x)

    return F.log_softmax(x, dim=1)

def preprocess(args):
    subprocess.call([sys.executable, "-m", "pip", "install", "scikit-learn"])
    subprocess.call([sys.executable, "-m", "pip", "install", "pandas==0.23.0"])
    from sklearn.model_selection import train_test_split
    from sklearn.preprocessing import MinMaxScaler
    import pandas as pd
    print(pd.__version__)
    df = pd.read_csv(args.data_dir + '/kag_risk_factors_cervical_cancer.csv')
    df = df.convert_objects(convert_numeric=True)
    dum_list = ['Smokes', 'IUD', 'STDs', 'Hormonal Contraceptives','Dx:Cancer','Dx:CIN','Dx:HPV','Dx','Hinselmann','Citology','Schiller']
    for column in df.columns.values:
        df[column] = df[column].fillna(df.median()[column])
        if column in dum_list and column != 'Biopsy':
            dummy_df = pd.get_dummies(df[column])
            df = pd.concat([df, dummy_df], axis=1)
            df = df.drop(column, axis=1)

    X_df_data = df.drop('Biopsy', axis=1)
    y_df_data = df['Biopsy']

    X_train, X_test = train_test_split(np.array(X_df_data), test_size=0.2, random_state=0)
    y_train, y_test = train_test_split(np.array(y_df_data), test_size=0.2, random_state=0)

    ms = MinMaxScaler(feature_range=(0, 1))
    X_train, X_test = ms.fit_transform(X_train), ms.fit_transform(X_test)

    X_train_tensor, X_test_tensor, y_train_tensor, y_test_tensor = torch.from_numpy(X_train).float(), torch.from_numpy(X_test).float(), torch.from_numpy(y_train).long(), torch.from_numpy(y_test).long()

    train_data = TensorDataset(X_train_tensor, y_train_tensor)
    train_loader = DataLoader(train_data, batch_size=
                              args.train_batch_size, shuffle=True)

    test_data = TensorDataset(X_test_tensor, y_test_tensor)
    test_loader = DataLoader(test_data, batch_size=args.test_batch_size, shuffle=True)

    return train_loader, X_train_tensor, test_loader, y_test, y_test_tensor

def train(args):
    train_loader, X_train_tensor, test_loader, y_test, y_test_tensor = preprocess(args)
    model = Model(input_dim=X_train_tensor.shape[1], output_dim=args.num_classes)

    criterion = nn.CrossEntropyLoss()
    optim = torch.optim.Adam(model.parameters(), lr=args.lr)

    for epoch in range(args.epochs):
      total_loss = 0
      for X_train, y_train in train_loader:
        X_train, y_train = Variable(X_train), Variable(y_train)
        optim.zero_grad()
        output = model(X_train)
        loss = criterion(output, y_train)
        loss.backward()
        optim.step()

        total_loss += loss.item()

      if (epoch + 1) % 10 == 0:
        print(epoch + 1, total_loss)

    return _save_model(model, args.model_dir), model, test_loader, y_test, y_test_tensor

def accuracy(model, test_loader, y_test, y_test_tensor):
    with torch.no_grad():
      tp_cnt, tn_cnt, correct_cnt = 0, 0, 0
      for inputs, labels in test_loader:
        inputs, labels = Variable(inputs), Variable(labels)

        _, predict = torch.max(model(inputs), 1)
        for val, label in zip(predict, labels):
          if val.item() == label:
            correct_cnt += 1
            if val.item() == 1:
              tp_cnt += 1
            elif val.item() == 0:
              tn_cnt += 1
    total_acc = correct_cnt / y_test_tensor.size()[0]
    tp_acc = tp_cnt / np.count_nonzero(y_test == 1)
    tn_cnt = tn_cnt / np.count_nonzero(y_test == 0)
    print('Total accuracy : ' + str(round(total_acc, 2)) + '\nTP : ' + str(round(tp_acc, 2)) + '\nTN : ' + str(round(tn_cnt, 2)))

def _save_model(model, model_dir):
    path = os.path.join(model_dir, 'model.pth')
    torch.save(model.cpu().state_dict(), path)

def model_fn(model_dir):
    device = "cuda" if torch.cuda.is_available() else "cpu"
    model = Model(input_dim=46, output_dim=2)
    if torch.cuda.device_count() > 1:
        model = nn.DataParallel(model)

    with open(os.path.join(model_dir, 'model.pth'), 'rb') as f:
        model.load_state_dict(torch.load(f))
    return model.to(device)

if __name__ == "__main__":
    parser = argparse.ArgumentParser()
    parser.add_argument('--epochs', type=int, default=100, metavar='E',
                    help='number of total epochs to run (default: 100)')
    parser.add_argument('--lr', type=float, default=0.001, metavar='LR',
                    help='initial learning rate (default: 0.001)')
    parser.add_argument('--train-batch-size', type=int, default=200, metavar='E',
                help='number of train data batch size (default: 200)')
    parser.add_argument('--test-batch-size', type=int, default=200, metavar='E',
                help='number of test data batch size (default: 10)')
    parser.add_argument('--num-classes', type=int, default=2, metavar='E',
                help='number of classes (default: 2)')

    env = sagemaker_containers.training_env()
    parser.add_argument('--hosts', type=list, default=env.hosts)
    parser.add_argument('--current-host', type=str, default=env.current_host)
    parser.add_argument('--model-dir', type=str, default=env.model_dir)
    parser.add_argument('--data-dir', type=str, default=env.channel_input_dirs.get('training'))
    parser.add_argument('--num-gpus', type=int, default=env.num_gpus)

    _, model, test_loader, y_test, y_test_tensor = train(parser.parse_args())
    accuracy(model, test_loader, y_test, y_test_tensor)
SageMakerのPytorchフレームワークから上記のスクリプトを使用した学習・エンドポイントへのデプロイを実施するよう実装する。
import subprocess
import pandas as pd
import boto3
from sagemaker import Session, get_execution_role
from sagemaker.pytorch import PyTorch
import sagemaker

class SageMaker:
    def __init__(self):
        self.sagemaker_session = sagemaker.Session()
        self.bucket = '*****' #S3バケット名
        self.role = sagemaker.get_execution_role()
        self.instance_type = '*****' #デプロイ先インスタンスタイプ

    def upload_data(self):
        inputs = self.sagemaker_session.upload_data(path='./data/', bucket=self.bucket, key_prefix='data/cancer')

        return inputs

    def __estimator_fit(self, inputs):
        estimator = PyTorch(entry_point='./kag_risk_train_test.py',
                            role=self.role,
                            framework_version='1.1.0',
                            train_instance_count=1,
                            train_instance_type=self.instance_type)

        estimator.fit(
            inputs=inputs,
            )

        return estimator

    def estimator_predict(self, inputs):
        estimator = self.__estimator_fit(inputs)
        predict = estimator.deploy(initial_instance_count=1,
                                             instance_type=self.instance_type)

        return predict
実行結果:
全体的な精度は良いがTP値が少し低いので、もうちょい改善の余地はあるかも。。10 2.986310064792633 20 2.434782922267914 30 1.926128625869751 40 1.4562886655330658 50 1.0403850376605988 60 0.7982784509658813 70 0.6503457129001617 80 0.6562095209956169 90 0.4315394461154938 100 0.46829692274332047 Total accuracy : 0.96 TP : 0.78 TN : 0.97 2019-10-25 16:57:42,283 sagemaker-containers INFO Reporting training SUCCESS学習・デプロイ(エンドポイント作成)が成功すると、以下の通りトレーニングジョブ・エンドポイントのステータスがCompletedとなる。