- 投稿日:2019-05-29T21:33:37+09:00
Mac で Unity と Go 使って gRPC のサンプルを試してみた
はじめに
Unity で gRPC といえば MagicOnion だと思うのですが、
自分でも Unity で gRPC 環境構築して開発出来るようになるために、
試しにサーバ側を Go で クライアント側を Unity でサンプルを動かしてみました。gRPC の環境構築
homebrew を使用して gRPC をインストールします。
brew tap grpc/grpc
brew install grpc
次に Protocol Buffers をインストールします。
brew install protobufまた Protocol Buffers のファイル (.proto) から Go のソースコードを出力出来るようにするため Go 用の Protocol Buffers の gRPC プラグインをインストールします。
go get -u -v github.com/golang/protobuf/protoc-gen-gogRPC 用の proto ファイルを生成することが出来る環境が整いました。
gRPC のサンプルを動かすための準備
今回はサーバ側を Go で検証進めていくため、
Go の gRPC プロジェクトを git clone してきます。git clone git@github.com:grpc/grpc-go.gitサーバ側には git clone したプロジェクトの
grpc-go/examples/helloworld/greeter_server/main.goを使用します。grpc-go/examples/helloworld/greeter_server/main.go/* * * Copyright 2015 gRPC authors. * * Licensed under the Apache License, Version 2.0 (the "License"); * you may not use this file except in compliance with the License. * You may obtain a copy of the License at * * http://www.apache.org/licenses/LICENSE-2.0 * * Unless required by applicable law or agreed to in writing, software * distributed under the License is distributed on an "AS IS" BASIS, * WITHOUT WARRANTIES OR CONDITIONS OF ANY KIND, either express or implied. * See the License for the specific language governing permissions and * limitations under the License. * */ //go:generate protoc -I ../helloworld --go_out=plugins=grpc:../helloworld ../helloworld/helloworld.proto // Package main implements a server for Greeter service. package main import ( "context" "log" "net" "google.golang.org/grpc" pb "google.golang.org/grpc/examples/helloworld/helloworld" ) const ( port = ":50051" ) // server is used to implement helloworld.GreeterServer. type server struct{} // SayHello implements helloworld.GreeterServer func (s *server) SayHello(ctx context.Context, in *pb.HelloRequest) (*pb.HelloReply, error) { log.Printf("Received: %v", in.Name) // 5. gRPC サーバに SayHello の実行要求が来たら // Message に in.Name の先頭に Hello を付けて // helloworld.proto で定義した HelloReply を返却する return &pb.HelloReply{Message: "Hello " + in.Name}, nil } func main() { // 1. 50051 ポートの TCP リスナーを作成する lis, err := net.Listen("tcp", port) if err != nil { log.Fatalf("failed to listen: %v", err) } // 2. gRPC サーバを起動する s := grpc.NewServer() // 3. helloworld.proto ファイルで定義したメソッドを gRPC サーバに関連付ける pb.RegisterGreeterServer(s, &server{}) // 4. gRPC サーバの待受を 1. で作成した TCP リスナーで行う if err := s.Serve(lis); err != nil { log.Fatalf("failed to serve: %v", err) } }クライアント側は Unity の公式サンプルプロジェクトを改修して動作検証します。
そのため、まずは gRPC プロジェクトを git clone します。git clone git@github.com:grpc/grpc.gitUnity のサンプルプロジェクトは git clone したプロジェクトの
grpc/examples/csharp/HelloworldUnityに存在します。Unity のサンプルプロジェクトのセットアップ
Unity のサンプルプロジェクトはそのままでは動かすことが出来ないため、
公式に記載されている手順に従って、gRPC プラグインのセットアップを行います。
https://github.com/grpc/grpc/tree/master/examples/csharp/HelloworldUnity#buildまずは gRPC のプラグインのダウンロードを行います。
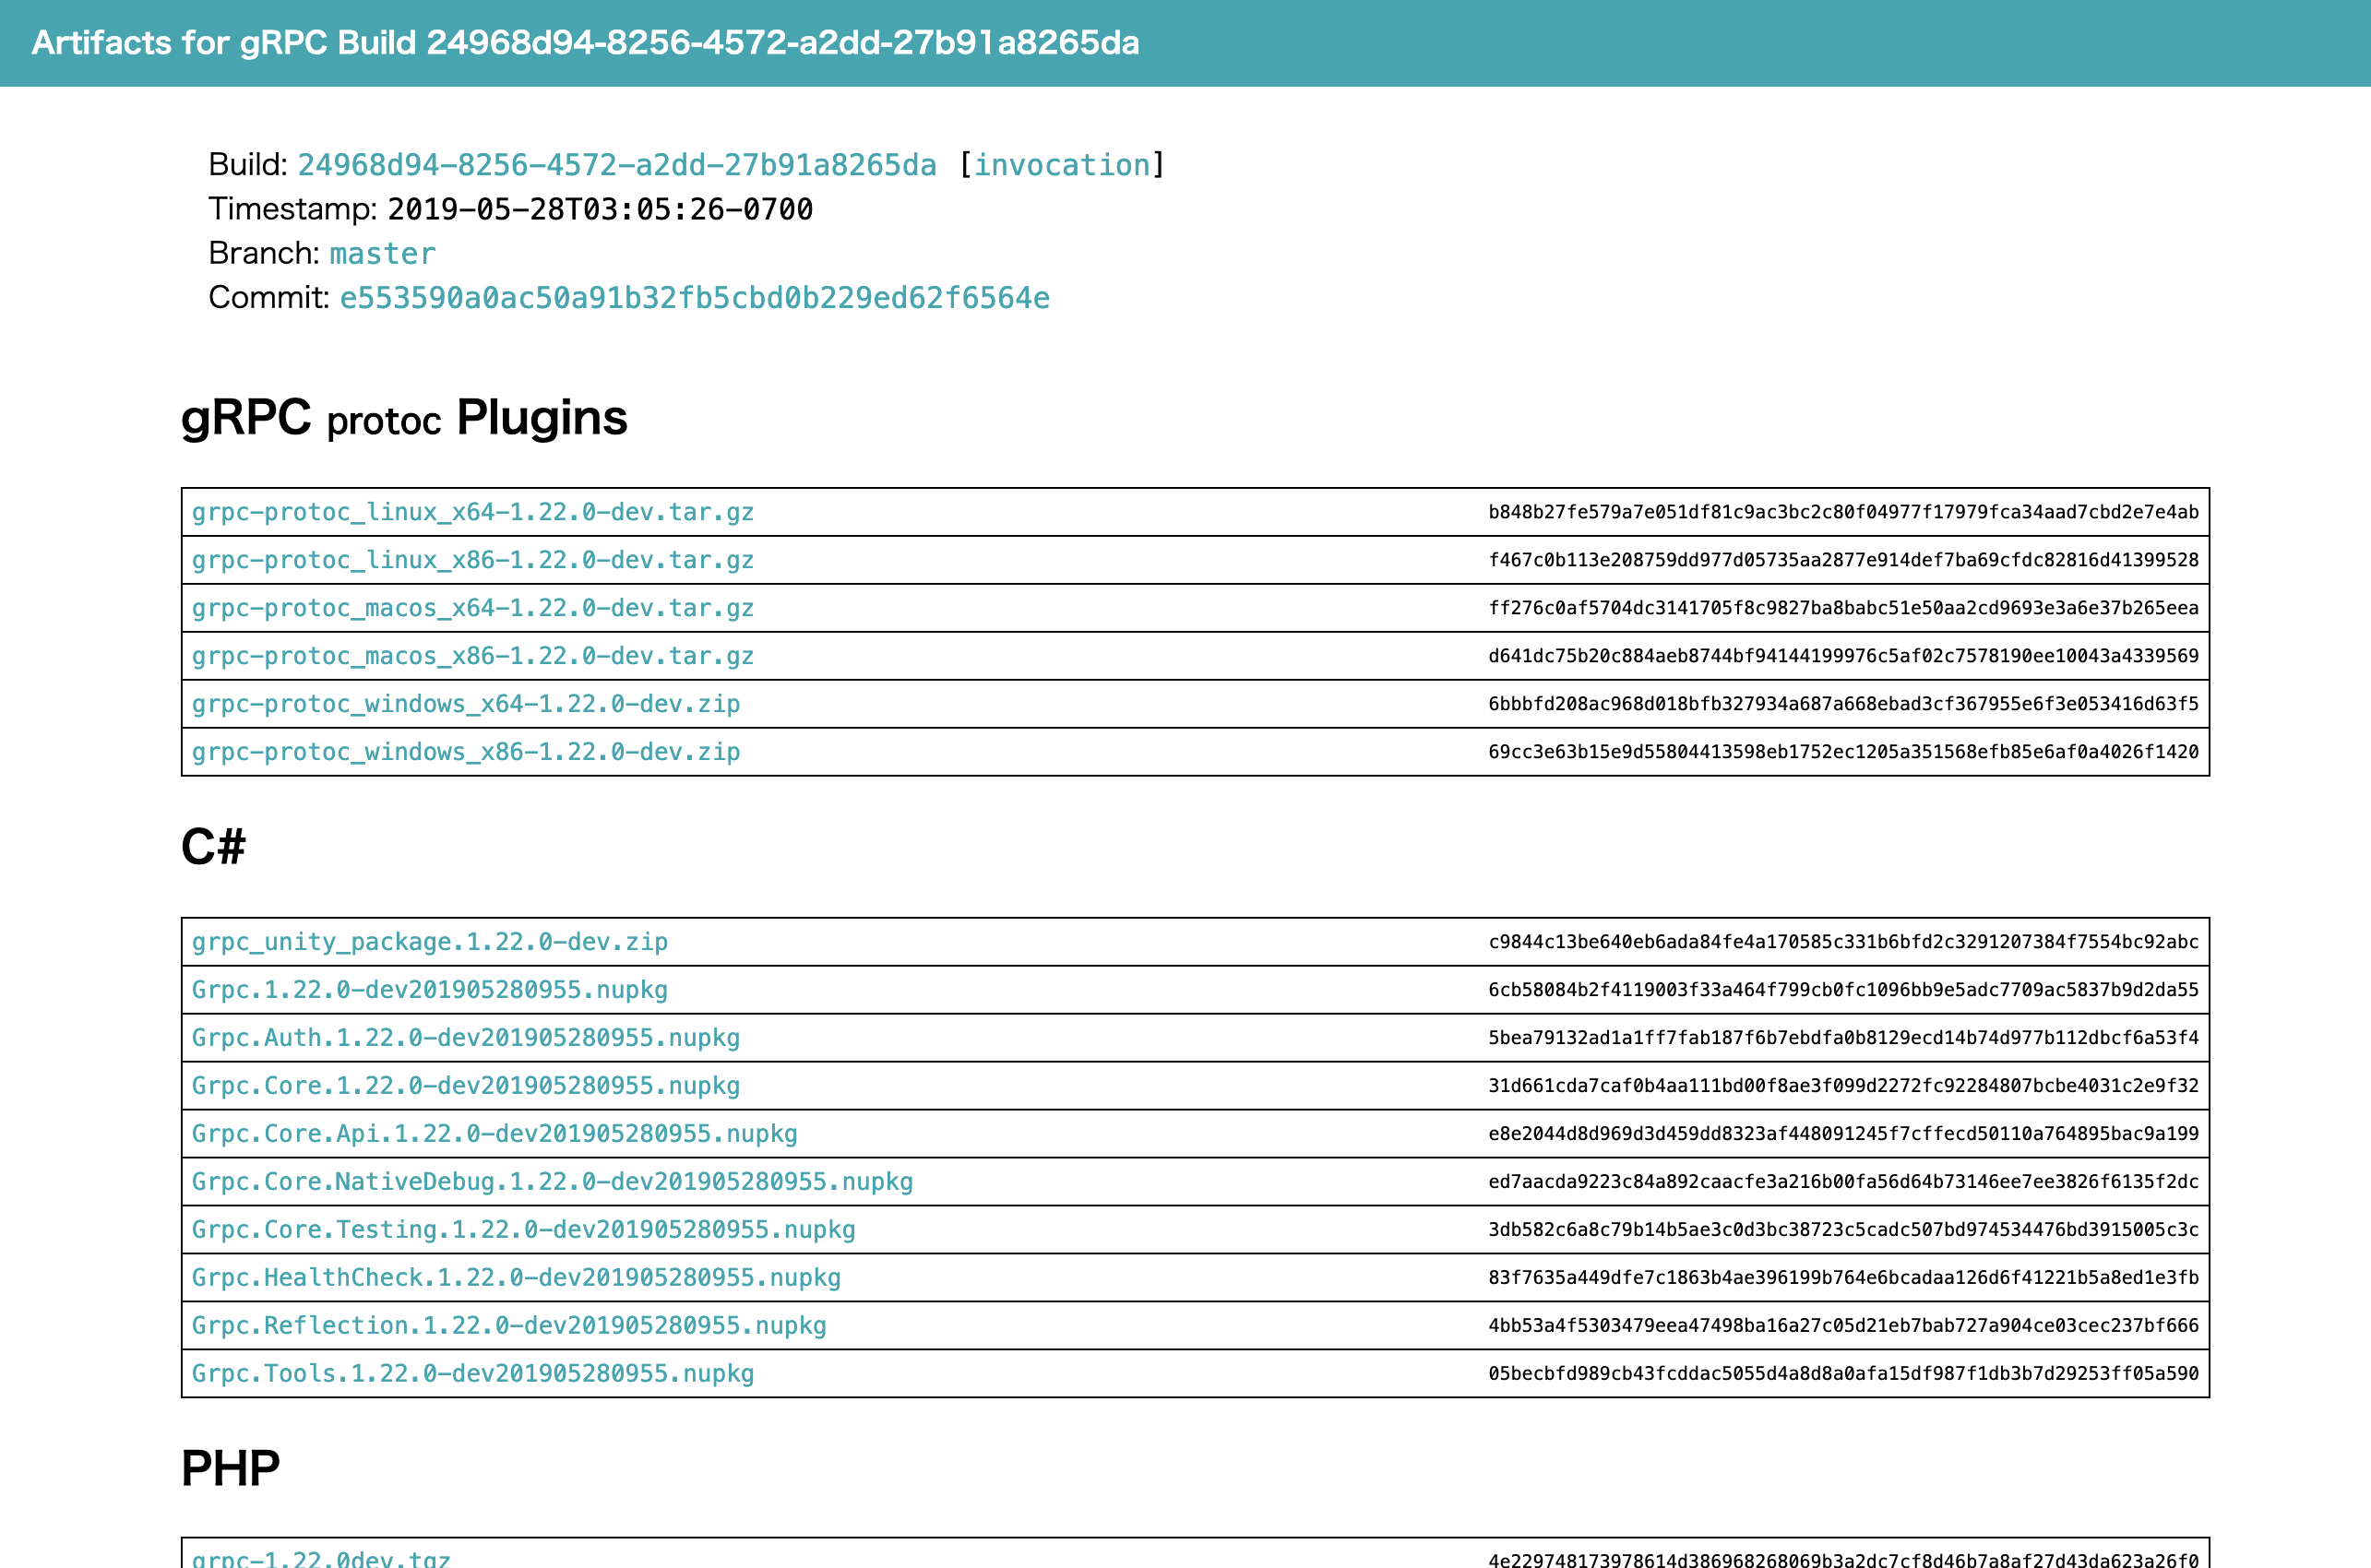
https://packages.grpc.io/ に遷移した後、画面下部にBuild IDという欄が出てくるので、一番上にあるリンクをクリックします。
(添付画像で言うと 24968d94-8256-4572-a2dd-27b91a8265da というリンクです)
すると画面遷移して gRPC の unity プラグインが zip でダウンロード出来るリンクが出現するのでクリックしてダウンロードします。
(添付画像でいうと grpc_unity_package.1.22.0-dev.zip というリンクです)
ダウンロード完了後、zip を解凍すると Plugins フォルダが出てきます。
それを Unity サンプルプロジェクトの Asset フォルダ配下に設置します。
grpc/examples/csharp/HelloworldUnity/Assetsの下です。これで
grpc/examples/csharp/HelloworldUnityが Unity で正常に開けるようになっているはずです。サーバとクライアントで gRPC 通信を行う
まずはサーバ側の Go を動かします。
grpc-go/examples/helloworld/greeter_serverで下記コマンドを実行して、Go の gRPC サーバを起動します。go run main.goUnity 側では
Scripts/HelloWorldTest.csを少し変更します。
デフォルトのサンプルでは Unity 側でもサーバとして動作するようになっているため、
Unity 側でサーバとして振る舞わないよう関連コードをコメントアウトしています。grpc/examples/csharp/HelloworldUnity/Scripts/HelloWorldTest.cs#region Copyright notice and license // Copyright 2019 The gRPC Authors // // Licensed under the Apache License, Version 2.0 (the "License"); // you may not use this file except in compliance with the License. // You may obtain a copy of the License at // // http://www.apache.org/licenses/LICENSE-2.0 // // Unless required by applicable law or agreed to in writing, software // distributed under the License is distributed on an "AS IS" BASIS, // WITHOUT WARRANTIES OR CONDITIONS OF ANY KIND, either express or implied. // See the License for the specific language governing permissions and // limitations under the License. #endregion using UnityEngine; using System.Threading.Tasks; using System; using Grpc.Core; using Helloworld; class HelloWorldTest { // Can be run from commandline. // Example command: // "/Applications/Unity/Unity.app/Contents/MacOS/Unity -quit -batchmode -nographics -executeMethod HelloWorldTest.RunHelloWorld -logfile" public static void RunHelloWorld() { Application.SetStackTraceLogType(LogType.Log, StackTraceLogType.None); Debug.Log("=============================================================="); Debug.Log("Starting tests"); Debug.Log("=============================================================="); Debug.Log("Application.platform: " + Application.platform); Debug.Log("Environment.OSVersion: " + Environment.OSVersion); var reply = Greet("Unity"); Debug.Log("Greeting: " + reply.Message); Debug.Log("=============================================================="); Debug.Log("Tests finished successfully."); Debug.Log("=============================================================="); } public static HelloReply Greet(string greeting) { const int Port = 50051; //MEMO: gRPC クライアントとして振る舞わせるためコメントアウト //Server server = new Server //{ // Services = { Greeter.BindService(new GreeterImpl()) }, // Ports = { new ServerPort("localhost", Port, ServerCredentials.Insecure) } //}; //server.Start(); // 1. 127.0.0.1:50051 への gRPC チャネルを確立する // (Go 側の gRPC サーバへリクエストを行うため) Channel channel = new Channel("127.0.0.1:50051", ChannelCredentials.Insecure); // 2. helloworld.proto 内の Greeter 内で定義したメソッドを関連付ける var client = new Greeter.GreeterClient(channel); // 3. gRPC で SayHello メソッドを実行する。 // メソッド変数には helloworld.proto で定義した HelloRequest を使用する // SayHello メソッドは引数で指定した文字列の接頭字に Hello を付けて // そのまま文字列として返却する var reply = client.SayHello(new HelloRequest { Name = greeting }); // 4. gRPCチャネルを閉じる channel.ShutdownAsync().Wait(); //server.ShutdownAsync().Wait(); return reply; } class GreeterImpl : Greeter.GreeterBase { // Server side handler of the SayHello RPC public override Task<HelloReply> SayHello(HelloRequest request, ServerCallContext context) { return Task.FromResult(new HelloReply { Message = "Hello " + request.Name }); } } }
Scripts/HelloWorldTest.cs内の Greet メソッドはScripts/HelloWorldScript.csから使用されています。Scripts/HelloWorldScript.cs#region Copyright notice and license // Copyright 2019 The gRPC Authors // // Licensed under the Apache License, Version 2.0 (the "License"); // you may not use this file except in compliance with the License. // You may obtain a copy of the License at // // http://www.apache.org/licenses/LICENSE-2.0 // // Unless required by applicable law or agreed to in writing, software // distributed under the License is distributed on an "AS IS" BASIS, // WITHOUT WARRANTIES OR CONDITIONS OF ANY KIND, either express or implied. // See the License for the specific language governing permissions and // limitations under the License. #endregion using UnityEngine; using UnityEngine.UI; public class HelloWorldScript : MonoBehaviour { int counter = 1; // Use this for initialization void Start () { HelloWorldTest.RunHelloWorld(); } // Update is called once per frame void Update() {} // Ran when button is clicked // 1. Run したときに画面中央に表示されるボタンがクリックされる度に呼び出される public void RunHelloWorld(Text text) { // 2. HelloWorldTest 内の Greet メソッドを呼び出し gRPC サーバに // SayHello メソッドの実行を要求し、レスポンス内容を受け取る var reply = HelloWorldTest.Greet("Unity " + counter); // 3. 受け取ったレスポンス内容の Message をボタンの表記に設定する text.text = "Greeting: " + reply.Message; // 4. ボタンをクリックする度に counter を増やし SayHello メソッドの変数の内容を変更する counter++; } }この状態で Unity プロジェクトを Editor 上で Run すると画面上に
Hello gRPC!!!ボタンが表示されるのでクリックしてみます。そうすると Go で動かしている gRPC サーバ側の標準出力に Unity 側から送信されてきた文字列が表示されます。go run greeter_server/main.go 2019/05/29 01:49:51 Received: Unity 1 2019/05/29 01:49:51 Received: Unity 2また Unity 側の画面では、ボタンを 2回クリックしていれば、ボタンの文字表記が
Greeting: Hello Unity 2になっているはずです。
これでサーバ及びクライアント側の通信は確認出来ました。
次回は gRPC サーバ経由で Unity 同士相互に通信を行う仕組みを作ってみる予定です。参考リンク
https://budougumi0617.github.io/2018/01/01/hello-grpc-go/
https://blog.fenrir-inc.com/jp/2016/10/grpc-go.html
https://qiita.com/shiena/items/6c3b34a8d8f1bb938470
https://qiita.com/muroon/items/2115c2c72be8b0c3f5f6


- 投稿日:2019-05-29T14:57:51+09:00
Goでforとselectを抜ける方法
既に似たような記事もありますが、備忘録ように記載しておきます。
for selectでbreakとしても抜け出せないので、下記のようにgotoを使用すると抜け出せます。
main.gopackage main import ( "fmt" "time" ) func main() { i := 0 ticker := time.NewTicker(1 * time.Second) defer ticker.Stop() for { select { case <-ticker.C: fmt.Printf("COUNT : %d\n", i) if i == 5 { goto GOTO_FINISH } i++ } } GOTO_FINISH: fmt.Println("GOTO_FINISH") }
- 投稿日:2019-05-29T13:51:03+09:00
GoLandのインストールと基本設定(MacOS)
概要
MacOSでGoLangの開発を快適に行う環境構築をまとめた記事です。
ツールとしては GoLand を利用します。
対象読者
- MacOSを所持している方
- Linuxコマンドの基礎を理解しMacのターミナル操作が出来る方
前提条件
Homebrew がインストールされている前提でお話させて頂きます。
筆者の実行環境
- MacOS Mojave
- CPU 2.2 GHz Intel Core i7
- メモリ 16GB
GoLangをMac上にインストールする
最初に
brew updateを実行してpackageを最新の状態にします。続いて
brew install goを実行します。
go versionを実行し下記のように表示されれば成功です。$ go version go version go1.12.5 darwin/amd64ちなみに複数のGoLangプロジェクトを運用していて各プロジェクト毎にバージョンが異なる場合は goenv 等を利用すると良いでしょう。
(参考)Mac に goenv を利用して Go をインストールする
MacOS上にGoをインストール一番の理由は後の説明で出てくる GoLand によるコード補完やリファクタリング機能を利用しやすくする為です。
Docker 等を利用してバージョンが異なる複数のGoLang実行環境を作る事はさほど難しくないので無理に goenv を利用しなくても良いというのが個人的な見解です。
GoLandをMac上にインストールする
JetBrains製のIDEです。
現時点ではこのGoLandを利用する方法が最も開発体験が良いという印象です。
一応 IntelliJ IDEA のGo Pluginを利用する方法でも、ほぼ同様の事が実現出来るので、そちらを使っても問題ありません。(使い方もほぼ同じです)
(参考)IntelliJ IDEAでGo言語(golang)を始める〜GOPATHの設定など
https://www.jetbrains.com/go/download/#section=mac よりダウンロードを行います。
インストール手順に関しては非常に簡単なので省略させて頂きます。(アプリケーションディレクトリにコピーするだけ)
GoLandの設定を行う
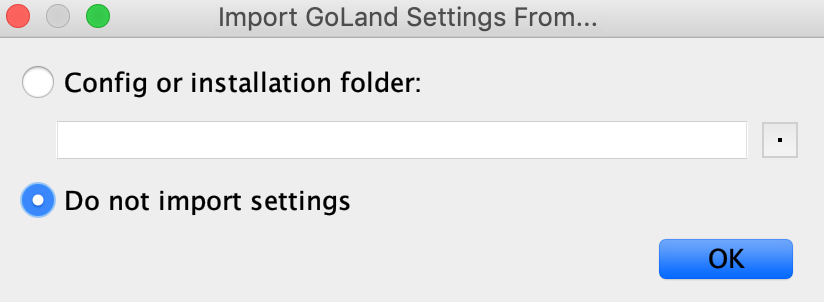
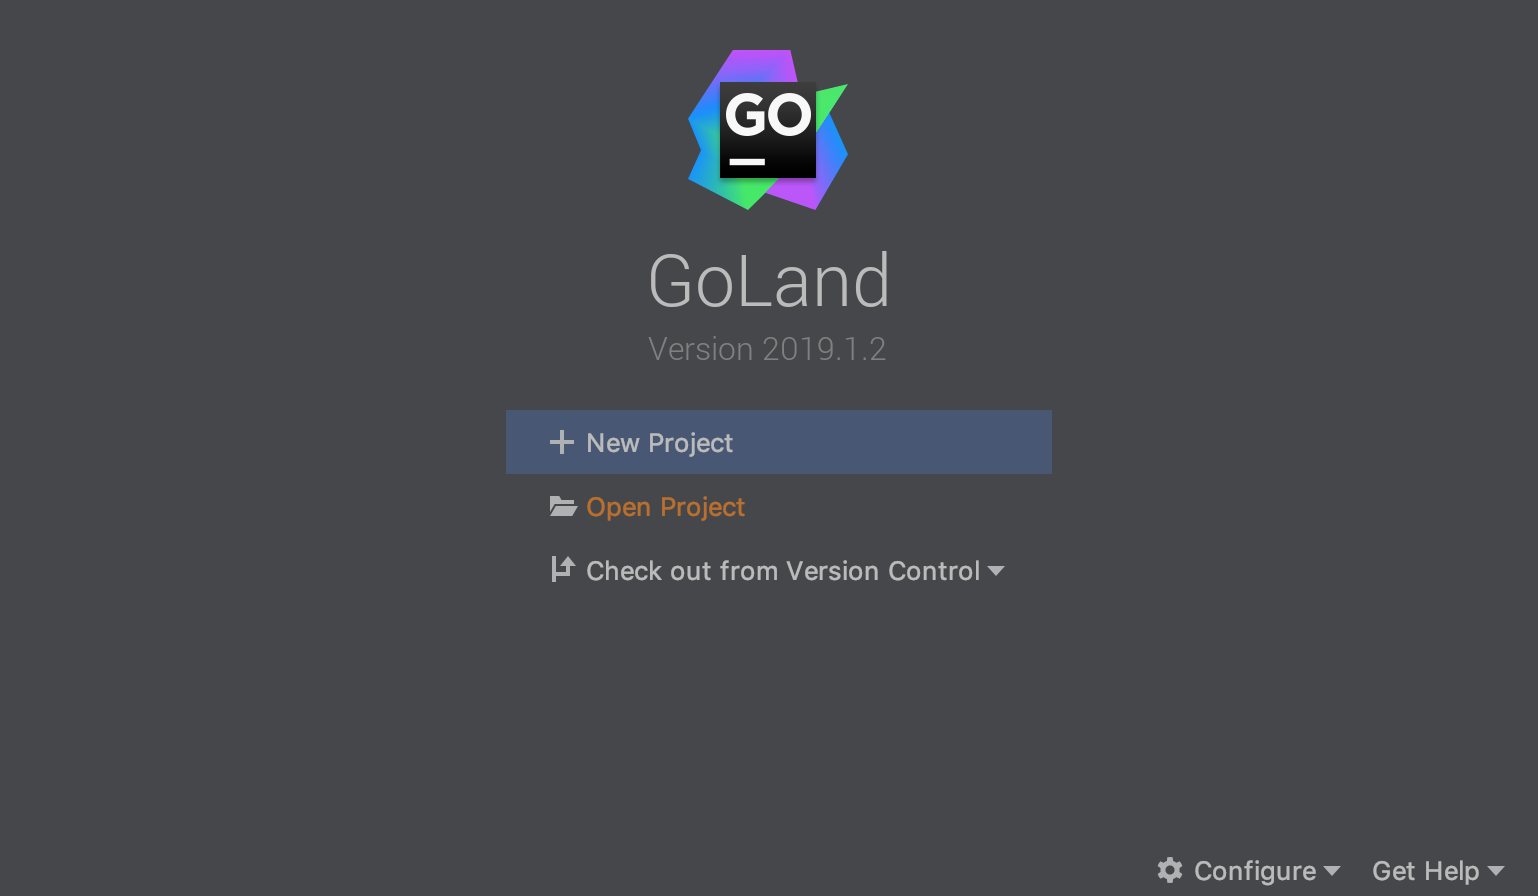
アプリケーションを起動します。
最初は設定がないと思いますので
Do not import settingsを選び次に進みます。
エディタの設定
ここは好みの領域になってきますが、私がいつもやっている設定を書いておきます。
Preferences → Editor → General
- Ensure line feed at file end on Save - ON「行末の不要なスペースやタブを保存時に削除する」
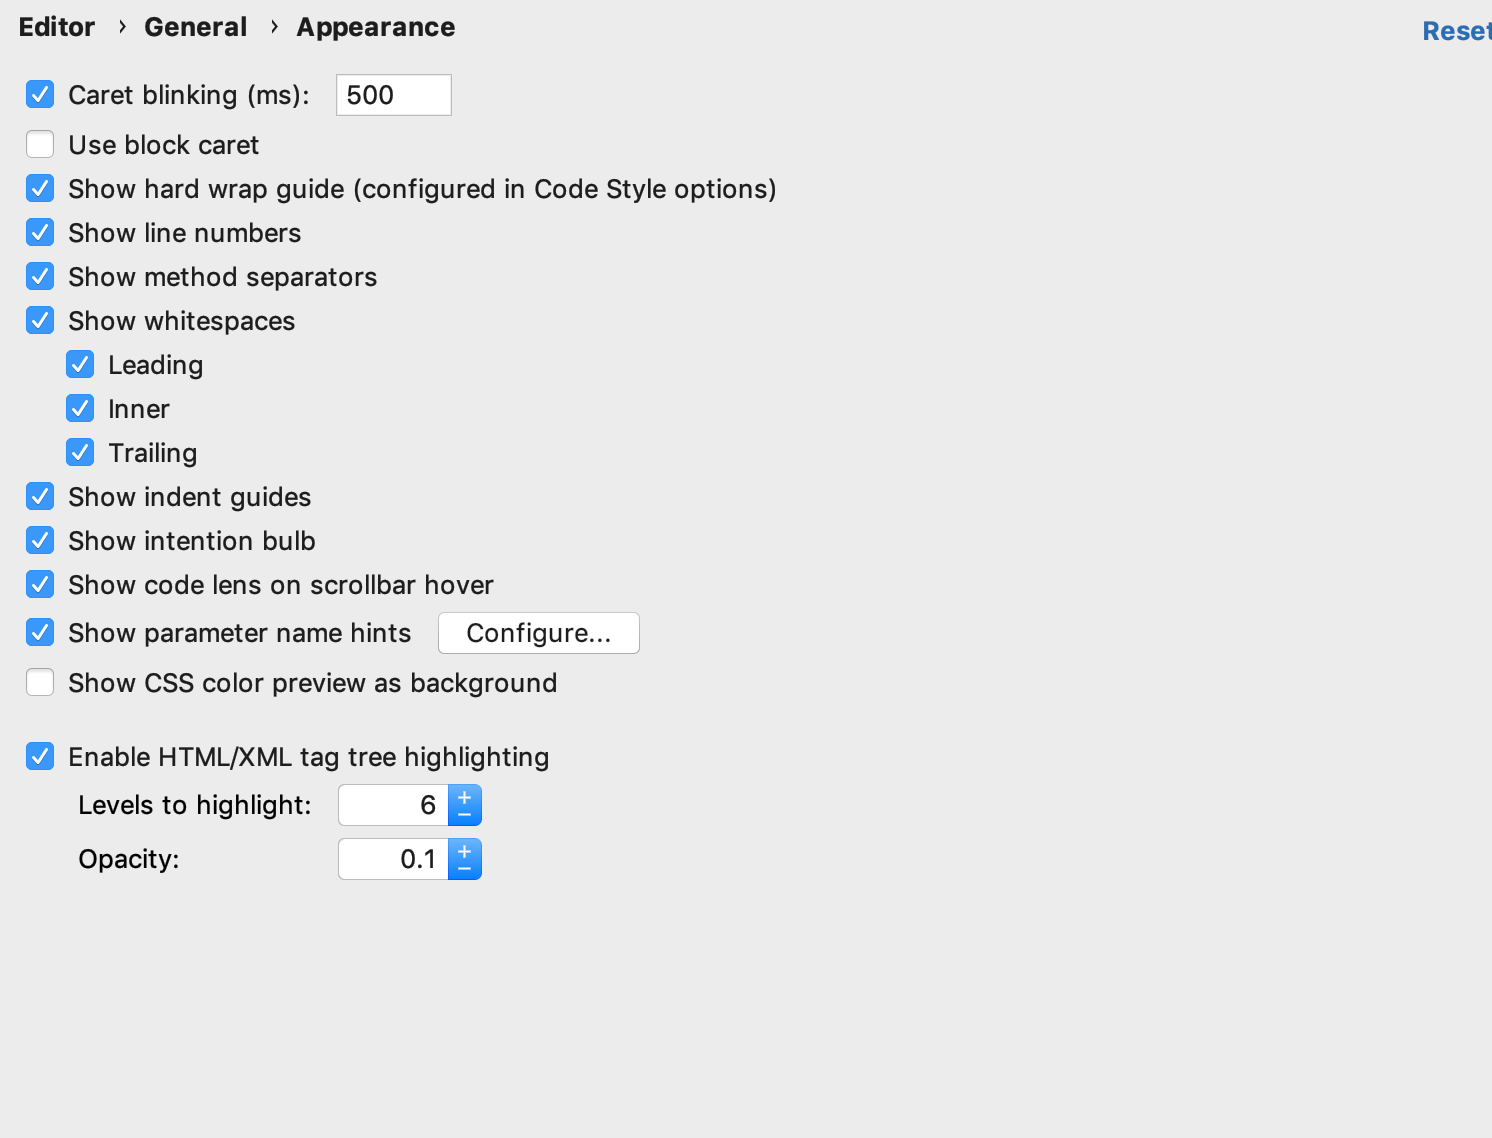
Preferences Editor → General → Appearance
- Show line number - ON「行番号の表示」
- Show method separators - ON「メソッドの区切り線」
- Show whitespaces - ON「空白の表示」
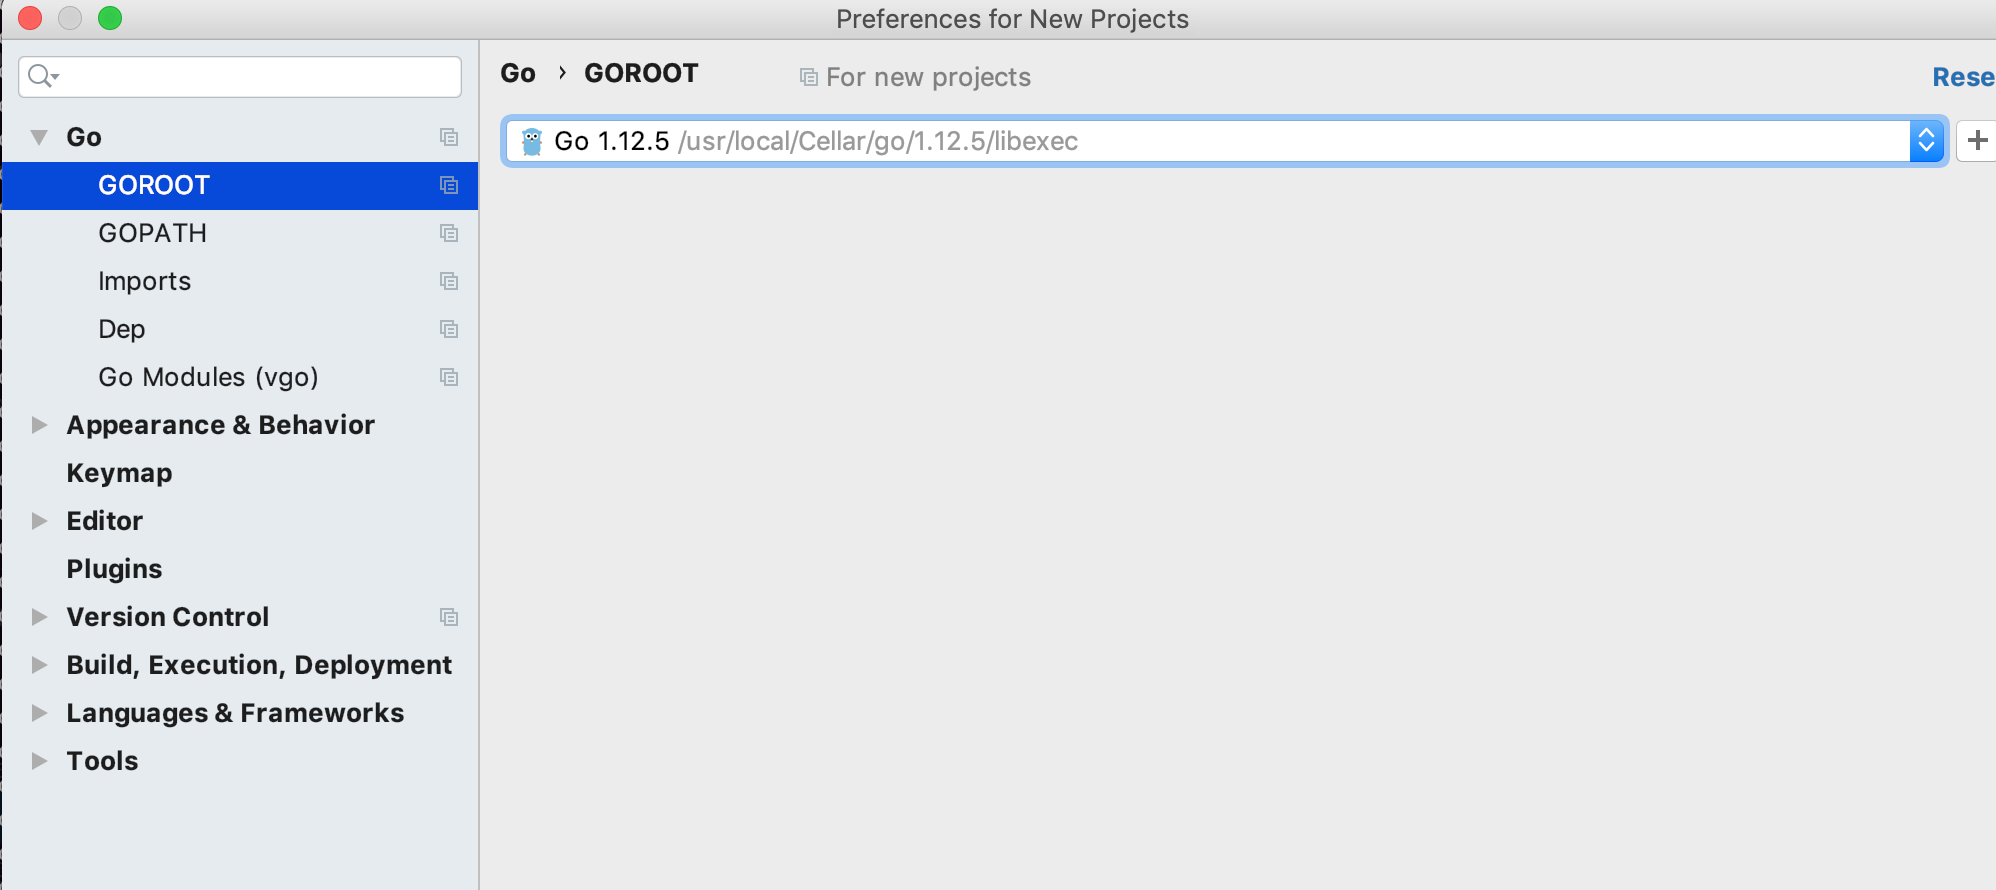
GoLandにGOROOTを認識させる
この記事の通りにやっていれば
/usr/local/Cellar/go/1.12.5/libexecになります。Go → GOROOTを選択すればサジェスト欄に出てくるので、それを選択します。
ただし goenv を利用しているとサジェストで出てこないので、その場合は明示的に絶対パスを指定する必要があります。
下記の記事等を参考にすると良いでしょう。
(参考)GoLand のGOROOTにanyenv(goenv)内のgolangを指定する.
動作確認
動作確認用のプロジェクトを下記に用意しました。
https://github.com/keitakn/go-rest-api
上記のプロジェクトを自身のPCにダウンロードします。
git clone https://github.com/keitakn/go-rest-api.gitプロジェクトのインポートを行います。
「Open Project」より先程
git cloneした動作確認用プロジェクトをインポートします。
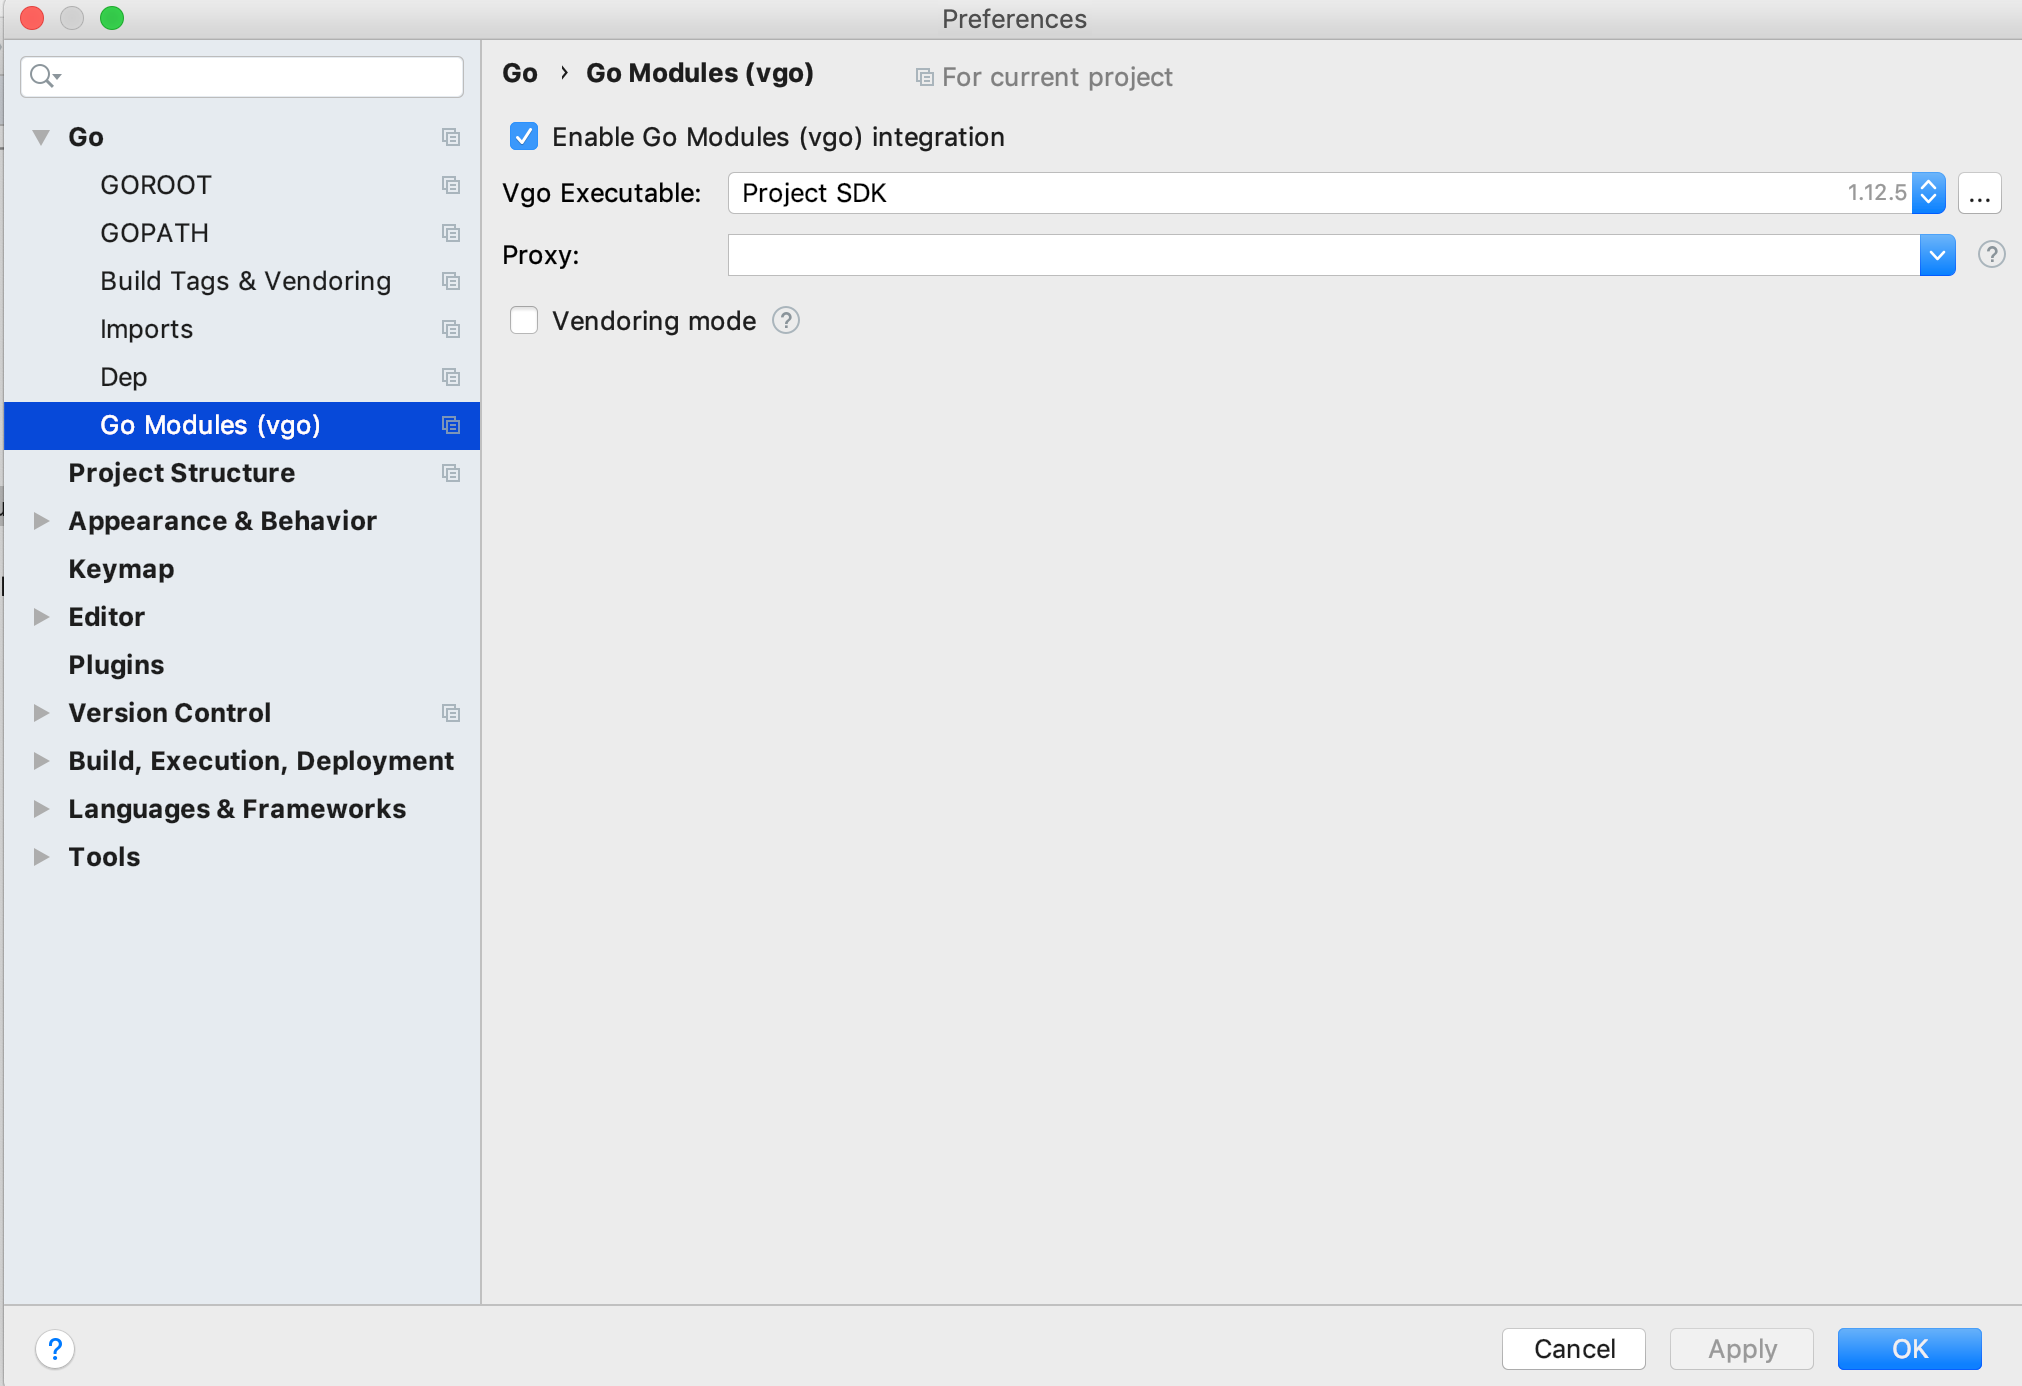
Go Modulesを有効にする
このプロジェクトはGo Modulesをpackage管理として利用しています。
Go → Go Modules(vgo)からGo Modulesを有効にします。
プロジェクトルートで
go buildを実行して下さい。IDEでのコード補完が有効になった事を確認出来るかと思います。
以上になります。最後まで読んで頂きありがとうございました。

- 投稿日:2019-05-29T13:42:37+09:00
Goのパッケージ開発者が関数などのDeprecated(非推奨)を利用者に伝える & 利用者が検知する方法
こんにちはpo3rinです。今回の記事は僕のような初心者向けですが、Goのパッケージを開発して公開している方達は特に必見です。
Deprecated(非推奨)を利用者に伝える
全てはGoのwikiに書いてありますが、 Deprecated を利用者に伝える方法はコメントで
Deprecated:と記述することです。https://github.com/golang/go/wiki/Deprecatedこんな感じです。
// Deprecated: should not be used
func Add(a, b int) int {
    return a + b
}
例えば olivere/elastic (GoでElasticsearchを扱うパッケージ) では下記のように書かれています。
// SetMaxRetries sets the maximum number of retries before giving up when
// performing a HTTP request to Elasticsearch.
//
// Deprecated: Replace with a Retry implementation.
func SetMaxRetries(maxRetries int) ClientOptionFunc
Deprecated:の後には非推奨の理由や、代わりに何を使えば良いかなどを記載すると良いでしょう。Deprecated(非推奨)を検知する
Go の 公式のlintツールでは教えてくれないので、静的解析ツールや他のりんとツールを使うと良いでしょう。例えば https://github.com/dominikh/go-tools の静的解析ツールセットを使うと下記のように利用パッケージの非推奨を検知できます。
$ staticcheck ./...
file/path:132:3: elastic.SetMaxRetries is deprecated: Replace with a Retry implementation.  (SA1019)
まとめ
使っている全てのパッケージの更新を追うのは辛いので、パッケージの利用者は静的解析ツールで非推奨な機能に気づけるようにしておきましょう。パッケージの開発者の方は非推奨機能を置いておく場合は、利用者が非推奨に気づけるように
Deprecated:は付けておきましょう。
- 投稿日:2019-05-29T08:49:22+09:00
Go言語でJavaScriptを使ってオリジナルなコマンドシェルを作る(EXCELの読み込みオブジェクトの追加)
概要
前回投稿した「Go言語でJavaScriptを使ってオリジナルなコマンドシェルを作る」にEXCELを読み込む関数を追加する。これを実装することでGo側でJavaScriptのJSON, Arrayの作り方、そしてJavaScript側のCallback関数の呼び出しを実装する
環境
- 前回投稿のソースに追加するだけなので、全ソースコードは掲載しません
- EXCELのパッケージ
- github.com/tealeg/xlsx
- テストEXCELデータ
- ブック名 Book1.xlsx
- シート名 Sheet1
A B C 1 111 aaa 2 112 bbb 3 113 ccc 4 114 ddd 実装
excel(ブック名, シート名)の関数を定義するinitialSetting()rt.Set("excel", js.excel)import "github.com/tealeg/xlsx" type excelSheet struct { js *jsRuntime sheet *xlsx.Sheet } func (js *jsRuntime) excel(file, sheet string) *excelSheet { rt := js.runtime xfile, err := xlsx.OpenFile(file) if err != nil { rt.Interrupt(rt.NewGoError(err)) return nil } xsheet := xfile.Sheet[sheet] if xsheet == nil { rt.Interrupt("Error: not found excel sheet: " + sheet) return nil } return &excelSheet{js: js, sheet: xsheet} }オブジェクトは出来ましたがメソッドがないので、これから次の3メソッドを作っていきます。すべてJavaScriptのCallBack関数を呼び出す仕様です。
- ForEachSlice
- Go言語の
Sliceを返すがJavaScriptのArrayではないのでArrayのメソッドで使えないものがあります。- ForEachArray
- JavaScriptの
Arrayオブジェクトを返す- ForEachJSON
- JavaScriptの
JSONオブジェクトを返すForEachSliceの実装
convData関数はEXCELのデータタイプを判断してタイプに合った型に変換します。ただし、今回はxlsx.CellTypeNumericとそれ以外だけにしました。func (s *excelSheet) convData(cell *xlsx.Cell) goja.Value { rt := s.js.runtime typ := cell.Type() if typ == xlsx.CellTypeNumeric { val, err := cell.Int() if err == nil { return rt.ToValue(val) } return rt.ToValue(cell.String()) } return rt.ToValue(cell.String()) }
ForEachSliceのソース。引数はJavaScriptのCallBack関数です。CallBack関数はfunction(行番号,行のSlice)です。行番号は1から始めます。func (s *excelSheet) ForEachSlice(callBack goja.Callable) { rt := s.js.runtime if s.sheet == nil { rt.Interrupt("sheet is closed") return } for rix, row := range s.sheet.Rows { cells := make([]interface{}, len(row.Cells)) for cix, cell := range row.Cells { cells[cix] = s.convData(cell) } _, err := callBack(goja.Undefined(), rt.ToValue(rix+1), rt.ToValue(cells)) if err != nil { rt.Interrupt(err) return } } s.sheet = nil }
callBackの第一引数をundefinedとしていますが、第一引数はJavaScript側でthisとして使われますので、JavaScript側でthisが必要ならForEachSliceの引数にthisが受け取れるように追加してください。当然呼び出し側もthisにしたいオブジェクトをセットします。func (s *excelSheet) ForEachSlice(this goja.Value, callBack goja.Callable) { callBack(this, rt.ToValue(rix+1), rt.ToValue(cells)) }go run main.go > excel("Book1.xlsx", "Sheet1").ForEachSlice(function(ix, row) { ...> print(ix, row) ...> }) 1 [1,111,"aaa"] 2 [2,112,"bbb"] 3 [3,113,"ccc"] 4 [4,114,"ddd"] undefined >JavaScriptのArrayではないので
pushなどは使えません。forEachは使えます。go run main.go > excel("Book1.xlsx", "Sheet1").ForEachSlice(function(ix, row) { ...> row.push(ix) ...> print(ix,row) ...> }) TypeError: Cannot extend Go slice at push (native) at console:1:43(9) >ForEachArrayの実装
newArray関数はArrayオブジェクトの生成と要素を追加するpushメソッドを取得しますfunc (s *excelSheet) newArray() (goja.Value, goja.Callable) { rt := s.js.runtime arr, err := rt.RunString("new Array()") if err != nil { rt.Interrupt(err) return nil, nil } arrObj, ok := arr.(*goja.Object) if !ok { rt.Interrupt("Array not defined") return nil, nil } push := arrObj.Get("push") pushFunc, ok := goja.AssertFunction(push) if !ok { rt.Interrupt("Array.push not defined") return nil, nil } return arr, pushFunc }
ForEachArrayのソース。引数はJavaScriptのCallBack関数です。CallBack関数はfunction(行番号,行のArray)です。行番号は1から始めます。func (s *excelSheet) ForEachArray(callBack goja.Callable) { rt := s.js.runtime if s.sheet == nil { rt.Interrupt("sheet is closed") return } for rix, row := range s.sheet.Rows { arr, pushFunc := s.newArray() if arr == nil { return } for _, cell := range row.Cells { pushFunc(arr, s.convData(cell)) } _, err := callBack(goja.Undefined(), rt.ToValue(rix+1), arr) if err != nil { rt.Interrupt(err) return } } s.sheet = nil }go run main.go > excel("Book1.xlsx", "Sheet1").ForEachArray(function(ix, row) { ...> print(ix,row) ...> }) 1 [1,111,"aaa"] 2 [2,112,"bbb"] 3 [3,113,"ccc"] 4 [4,114,"ddd"] undefined >上記の結果は
ForEachSliceと変わらなく見えます。今度はpushを使ってみます。go run main.go > excel("Book1.xlsx", "Sheet1").ForEachArray(function(ix, row) { ...> row.push(ix) ...> print(ix,row) ...> }) 1 [1,111,"aaa",1] 2 [2,112,"bbb",2] 3 [3,113,"ccc",3] 4 [4,114,"ddd",4] undefined >ちゃんと
pushできています。ForEachJSONの実装
ForEachJSONのソース。引数はJavaScriptのCallBack関数です。CallBack関数はfunction(行番号,行のJSON)です。行番号は1から始めます。下記のJSONのフィールド名はA1,B1,C1のようにEXCELのセルの形式にしました。ただしA~Zまでです。const alphabet = "ABCDEFGHIJKLMNOPQRSTUVWXYZ" func (s *excelSheet) ForEachJSON(callBack goja.Callable) { rt := s.js.runtime if s.sheet == nil { rt.Interrupt("sheet is closed") return } for rix, row := range s.sheet.Rows { json := rt.NewObject() for cix, cell := range row.Cells { name := fmt.Sprintf("%s%d", alphabet[cix:cix+1], rix+1) json.Set(name, s.convData(cell)) } _, err := callBack(goja.Undefined(), rt.ToValue(rix+1), json) if err != nil { rt.Interrupt(err) return } } s.sheet = nil }go run main.go > excel("Book1.xlsx", "Sheet1").ForEachJSON(function(ix, row) { ...> print(ix,JSON.stringify(row)) ...> }) 1 {"A1":1,"B1":111,"C1":"aaa"} 2 {"A2":2,"B2":112,"C2":"bbb"} 3 {"A3":3,"B3":113,"C3":"ccc"} 4 {"A4":4,"B4":114,"C4":"ddd"} undefined >サブドキュメントを作るには
   json := rt.NewObject()
   json.Set("a", rt.ToValue(1))
   subdoc := rt.NewObject()
   subdoc.Set("field1", rt.ToValue("abcde"))
   json.Set("subdoc", subdoc)
とすると下記のようなJSONができます。
{"a":1,"subdoc":{"field1":"abcde"}}参照
- EXCELパッケージ https://github.com/tealeg/xlsx
まとめ
3つのメソッドを用意しましたが、一つで良ければ
excel(ブック名,シート名,callback関数)だけで良いかもしれません。これでJSONとcallbackができたのでほとんどの事が出来ます。
データ量が少なければ2次元配列またはJSONの配列で全データを返すもありだと思います。この時はcallback関数は不要でexcel()の戻り値として処理します。いままでエラーは
Interruptを使っていますが、JavaScript実行中に呼び出されたGo言語でpanicを使っても異常終了せずに、JavaScriptでthrowと同様のふるまいをします。
- 投稿日:2019-05-29T00:13:11+09:00
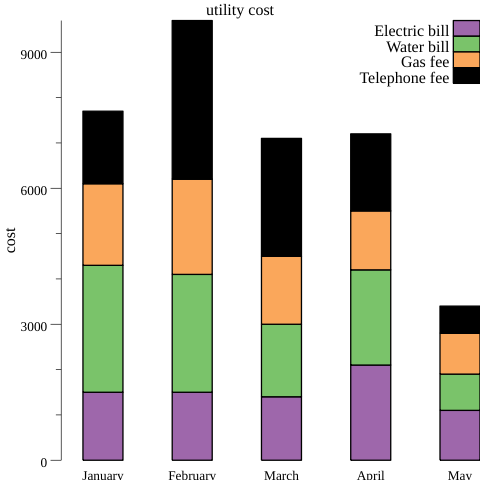
Golangで積み上げ棒グラフ(stacked bar chart)を描く
Golangで積み上げ棒グラフを描く
Goで積み上げ棒グラフを描こうと思ったのですが,日本語による参照情報が見つからなかったので,英語で調べて分かったことをまとめます.
Overview
完成図
コード全体
積み上げ棒グラフの生成でポイントとなるのは,StackOn関数です.
この関数を利用すれば,棒グラフを「上に乗せる」ことができます.func (b *BarChart) StackOn(on *BarChart)package main import ( "log" "gonum.org/v1/plot" "gonum.org/v1/plot/plotter" "gonum.org/v1/plot/plotutil" "gonum.org/v1/plot/vg" ) func main() { // サンプルデータを生成します groupA := plotter.Values{1500, 1500, 1400, 2100, 1100} groupB := plotter.Values{2800, 2600, 1600, 2100, 800} groupC := plotter.Values{1800, 2100, 1500, 1300, 900} groupD := plotter.Values{1600, 3500, 2600, 1700, 600} p, err := plot.New() if err != nil { log.Panic(err) } p.Title.Text = "utility cost" p.Y.Label.Text = "cost" // 棒の横幅を設定します w := vg.Points(30) barsA, err := plotter.NewBarChart(groupA, w) if err != nil { log.Panic(err) } barsA.Color = plotutil.Color(0) barsB, err := plotter.NewBarChart(groupB, w) if err != nil { log.Panic(err) } barsB.Color = plotutil.Color(1) barsB.StackOn(barsA) barsC, err := plotter.NewBarChart(groupC, w) if err != nil { log.Panic(err) } barsC.Color = plotutil.Color(3) barsC.StackOn(barsB) barsD, err := plotter.NewBarChart(groupD, w) if err != nil { log.Panic(err) } barsA.Color = plotutil.Color(4) barsD.StackOn(barsC) p.Add(barsA, barsB, barsC, barsD) p.Legend.Add("Electric bill", barsA) p.Legend.Add("Water bill", barsB) p.Legend.Add("Gas fee", barsC) p.Legend.Add("Telephone fee", barsD) p.Legend.Top = true p.NominalX("January", "February", "March", "April", "May") err = p.Save(5*vg.Inch, 5*vg.Inch, "stackedBarChart.png") if err != nil { log.Panic(err) } }参照サイト