- 投稿日:2019-05-29T23:23:54+09:00
AWS上のWindowsServerに対して、ローカルmacからansibleを実行 #5 パスワード変更用のplaybook
パスワード変更用のplaybook。
マニュアルは、https://docs.ansible.com/ansible/latest/modules/win_user_module.htmlchangePassword.yml--- - hosts: - windows # インベントリファイルで指定した名前 tasks: - name: change Administrator's password win_user: # account_disabled: # account_locked: # description: # fullname: # groups: # groups_action: name: Administrator # 必須 password: パスワード名 # password_expired: # password_never_expires: # state: # user_cannot_change_password:必須パラメータはnameだけ。今回はパスワードを変えたいだけなので、
passwordだけ指定。以下コマンドで実行。
ansible-playbook -i ./ansible/hosts ./ansible/changePassword.ymlコマンド実行結果PLAY [windows] ************************************************************************************************************************ TASK [Gathering Facts] **************************************************************************************************************** ok: [ホスト名] TASK [change Administrator's password] ************************************************************************************************ ok: [ホスト名] PLAY RECAP **************************************************************************************************************************** ホスト名 : ok=2 changed=0 unreachable=0 failed=02回目を実行したら、エラーが発生するようになった。
パスワードを変更したことにより、インベントリファイルのパスワードが変わっちゃったからである。
パスワード変更後は、インベントリファイルも修正するようにしよう。
- 投稿日:2019-05-29T23:09:54+09:00
Boto2 使用の古いシステムを AWS S3 の署名バージョン4に対応させる
TL;DR
$ . your-venv/bin/activate
$ pip install -U boto
$ sudo cat > /etc/boto.cfg <<'^Z'
[s3]
use-sigv4 = True
host = s3.ap-northeast-1.amazonaws.com
^Z
はじめに
間もなく 2019/6/24 に AWS S3 の署名バージョン2が廃止になり、現在署名バージョン2を使って S3 アクセスを行っているシステムに影響が出ます。
私が前任者から受け継がされたシステムも古い Boto2 ライブラリ (Python 2.7) を利用し、アップデートもせずに放置されているので、当然署名バージョン2を利用しています。
このシステムは再デプロイのやり方も不明(というかデプロイされた後にサーバー上でいじられた形跡がある)なため、なんとか動作したままライブで署名バージョン4に対応したいところです。
なぜか Boto2 を署名バージョン4に対応させる情報がググってもあまり出てこず、ややはまったのでここに書き記しておきます。
Boto2 と Boto3
この記事で説明する方法は Boto2 が対象です。Boto3 には当てはまらないので注意してください。
署名バージョン2を使っていることを確認する
実際にこのシステムが署名バージョン2を使っていることを確かめるために「【Amazon S3を利用しているすべての人が安心して2019/06/24を迎えるために】CloudTrailとAthenaを用いたS3の署名バージョンの確認方法 | DevelopersIO」を参考に署名バージョン2を利用した S3 アクセスを検出しました。
上の記事の最後の Athena に対するクエリを実行すると CSV がダウンロードできるようになります。この CSV(巨大です)を data.csv として、以下のようにすると簡単にインスタンスが特定できます。
$ tail -n +2 data.csv | sort -t, -k1r,1 | sort -sut, -k6,6 -k5,5 > data.uniq.csv
$ tail -n +2 data.csv | sort -t, -k1r,1 | sort -st, -k6,6 -k5,5 > data.sorted.csv
data.uniq.csv は (S3 バケット名, インスタンスの IP アドレス)が同一のもののうち、最も最近にあったアクセスだけが抽出されます。data.sorted.csv は同一のものを時間順にソートしただけのものです。data.uniq.csv は小さいので見やすいです。詳細(バケット名に加えてキーを見たい場合など)を見たい場合は data.sorted.csv を参照します。
この方法で、修正対象のシステムのインスタンスの IP から確かに署名バージョン2でアクセスがされており、そのユーザーエージェントが
[Boto/2.25.0 Python/2.7.4 Linux/3.4.73-64.112.amzn1.x86_64]であることが確認できました。Boto2 の 2.25.0 が使われているのが観察できますね。修正方法を調べる
AWS SDK の種類ごとの修正方法が「署名バージョン 2 から署名バージョン 4 への移行」に掲載されています。これによると:
SDK Upgrade コード変更が必要 Boto2 Boto2 v2.49.0 にアップグレード はい う~む「コード変更が必要」は困る...
さらに「リクエスト認証での署名バージョンの指定」を見ると:
boto デフォルト設定ファイルに以下を指定します。
[s3] use-sigv4 = Trueとあります。コード変更といっても設定ファイルの変更だけで済みそうですが、この boto デフォルト設定ファイルってどこにあるの?しかも何この変なフォーマットは
[s3] use-sigv4 = Trueじゃないの?
Boto2 の設定ファイル
Boto2 の設定ファイルは「Boto Config — boto v2.49.0」に書いてあります。 /etc/boto.cfg とか ~/.boto に書けばいいみたい。
あと、やはりフォーマットは ini フォーマットで、
[s3]の後に改行が必要みたいです。修正作業
材料が揃ったので修正しましょう。今回修正対象のシステムは cron で動作しているので、まずそれを止めます。virtualenv を利用して動いている(よかった...)ので virtualenv 内の boto をアップグレードします。
$ cp -a your-venv your-venv-backup  # ← 非常時ロールバック用
$ . your-venv/bin/activate
$ pip install -U boto
$ pip show boto
---
Name: boto
Version: 2.49.0
Location: /home/user/your-venv/lib/python2.7/site-packages
Requires:
Boto2 は依存先が無く他のパッケージを巻き添えにせずにアップグレードできてレガシーシステムにやさしいです。
次に Boto2 設定ファイルを変更します。今回は既存の設定ファイルは無さそうだったので新規で作成します。
$ sudo cat > /etc/boto.cfg <<'^Z'
[s3]
use-sigv4 = True
^Z
さてテスト実行してみると... S3 に全くアクセスできず!!!... 困った。
さらなる修正
原因をググってもなかなか探し当てられませんでしたが、それらしきものを発見: python - Using boto for AWS S3 Buckets for Signature V4 - Stack Overflow
この記事には API エンドポイントに
s3.amazonaws.comではなくs3.eu-central-1.amazonaws.comというリージョン毎のエンドポイントを指定しなくてはならない、と書いてあります。う~ん、これ boto.cfg に書けるのか?まず東京リージョンの S3 API エンドポイントを調べます: AWS のリージョンとエンドポイント - アマゾン ウェブ サービス によると
s3.ap-northeast-1.amazonaws.comでした。ということで...$ sudo cat > /etc/boto.cfg <<'^Z' [s3] use-sigv4 = True host = s3.ap-northeast-1.amazonaws.com ^Zテスト実行は... うまくいきました。cron を元通りにして終了。
この
[s3]セクションの設定の公式ドキュメントは一体どこにあるのだろうか?見つからない。
- 投稿日:2019-05-29T22:46:42+09:00
AWS上のWindowsServerに対して、ローカルmacからansibleを実行 #4 windows update用のplaybook
windows update用のplaybook。
マニュアルは、https://docs.ansible.com/ansible/latest/modules/win_updates_module.htmlwindowsUpdate.yml--- - hosts: - windows # インベントリファイルで指定した名前 tasks: - name: windows update win_updates: # blacklist: # パッチ適用除外リスト。今回は使わない。 # category_names: # パッチのカテゴリ。デフォルトのままでよい。 log_path: c:\ansible_wu.log # ログ出力先 reboot: yes # 再起動するかどうか。 # reboot_timeout: # 再起動タイムアウト。デフォルトのままでよい。 # server_selection: # パッチ配信先サーバの指定。デフォルトのままでよい。 # state: # パッチを探すだけにするか、適用するか。デフォルトのままでよい。 # use_scheduled_task: # 即時適用ではなく、スケジューリングするかどうか。デフォルト。 # whitelist: # パッチ適用リスト。今回は使わない。必須パラメータはないが、log_pathとrebootくらいは指定しておいたほうがいいかな。
あとは環境次第。WSUSありとか。以下コマンドで実行。
ansible-playbook -i ./ansible/hosts ./ansible/windowsUpdate.ymlコマンド実行結果PLAY [windows] ************************************************************************************************************************ TASK [Gathering Facts] **************************************************************************************************************** ok: [ホスト名] TASK [windows update] ***************************************************************************************************************** changed: [ホスト名] PLAY RECAP **************************************************************************************************************************** ホスト名 : ok=2 changed=1 unreachable=0 failed=0
- 投稿日:2019-05-29T22:18:03+09:00
AWS上のWindowsServerに対して、ローカルmacからansibleを実行 #3 タイムゾーン用のplaybook
タイムゾーン変更用のplaybook。
マニュアルは、https://docs.ansible.com/ansible/latest/modules/win_timezone_module.htmlsetTimeZone.yml--- - hosts: - windows # インベントリファイルで指定した名前 tasks: - name: set time zone(Tokyo) win_timezone: timezone: Tokyo Standard Timetimezoneは必須。どんなタイムゾーンが使えるかは、
https://msdn.microsoft.com/en-us/library/ms912391.aspx
でわかる。以下コマンドで実行。
ansible-playbook -i ./ansible/hosts ./ansible/setTimeZone.ymlコマンド実行結果PLAY [windows] ************************************************************************************************************************ TASK [Gathering Facts] **************************************************************************************************************** ok: [ホスト名] TASK [set time zone(Tokyo)] *********************************************************************************************************** changed: [ホスト名] PLAY RECAP **************************************************************************************************************************** ホスト名 : ok=2 changed=1 unreachable=0 failed=0
- 投稿日:2019-05-29T18:37:52+09:00
【AWS】Angular + AmplifyでCognitoを使ってみた!
認証サービスであるAWS Cognitoを使ってみたい、でもなかなか使い方がわからない、どう触っていいかわからない・・・
そんな人向けに、Angularベースでとりあえずプロト起こして触ってみようという内容です!せっかくなので出来る限りの最新バージョンを使って、PackageManagerもyarnにしてみました!
準備
- AWSアカウント
- Node.jsはnodebrewで管理
yarnのインストール
homebrewでインストール
このとき、--ignore-dependenciesを付けてないとyarnがnodeをインストールしてしまうので、nodebrewの管理してるnodeが使えなくなります。homebrew$ brew install yarn --ignore-dependencieshomebrew$ yarn -v 1.15.2Node.jsのインストール
nodebrewでインストールします。
今回はv12.3.1を使っていきます。nodebrew$ nodebrew install-binary v12.3.1 Fetching: https://nodejs.org/dist/v12.3.1/node-v12.3.1-darwin-x64.tar.gz ######################################################################## 100.0% Installed successfully $ nodebrew use v12.3.1 use v12.3.1Angular CLIのインストール
yarnを使ってAngular CLIをインストールします。
lates指定してますが、今回は8.0.0になりました。yarn$ yarn global add @angular/cli@latest yarn global v1.15.2 [1/4] ? Resolving packages... [2/4] ? Fetching packages... [3/4] ? Linking dependencies... [4/4] ? Building fresh packages... success Installed "@angular/cli@8.0.0" with binaries: - ng ✨ Done in 6.27s.Package Managerをyarnに変更する。
Angular CLIのPackage Managerもyarnに切り替えます。
angular-cli$ ng config -g cli.packageManager yarnAngularプロジェクトの作成
サンプルプロジェクトを作るので、プロジェクト用ディレクトリに移動して以下のコマンドを実行
Which stylesheet format would you like to use?ではCSSのタイプを選べるので、今回はSassを選択angular-cli$ ng new angular-amplify-auth --routing ? Which stylesheet format would you like to use? Sass [ http://sass-lang.com/documentation/file.INDENTED_SYNTAX.html ] CREATE angular-amplify-auth/README.md (1035 bytes) CREATE angular-amplify-auth/.editorconfig (246 bytes) CREATE angular-amplify-auth/.gitignore (629 bytes) CREATE angular-amplify-auth/angular.json (3599 bytes) CREATE angular-amplify-auth/package.json (1293 bytes) CREATE angular-amplify-auth/tsconfig.json (438 bytes) CREATE angular-amplify-auth/tslint.json (1985 bytes) CREATE angular-amplify-auth/browserslist (429 bytes) CREATE angular-amplify-auth/karma.conf.js (1032 bytes) CREATE angular-amplify-auth/tsconfig.app.json (210 bytes) CREATE angular-amplify-auth/tsconfig.spec.json (270 bytes) CREATE angular-amplify-auth/src/favicon.ico (5430 bytes) CREATE angular-amplify-auth/src/index.html (305 bytes) CREATE angular-amplify-auth/src/main.ts (372 bytes) CREATE angular-amplify-auth/src/polyfills.ts (2838 bytes) CREATE angular-amplify-auth/src/styles.sass (80 bytes) CREATE angular-amplify-auth/src/test.ts (642 bytes) CREATE angular-amplify-auth/src/assets/.gitkeep (0 bytes) CREATE angular-amplify-auth/src/environments/environment.prod.ts (51 bytes) CREATE angular-amplify-auth/src/environments/environment.ts (662 bytes) CREATE angular-amplify-auth/src/app/app-routing.module.ts (245 bytes) CREATE angular-amplify-auth/src/app/app.module.ts (393 bytes) CREATE angular-amplify-auth/src/app/app.component.sass (0 bytes) CREATE angular-amplify-auth/src/app/app.component.html (1152 bytes) CREATE angular-amplify-auth/src/app/app.component.spec.ts (1137 bytes) CREATE angular-amplify-auth/src/app/app.component.ts (225 bytes) CREATE angular-amplify-auth/e2e/protractor.conf.js (810 bytes) CREATE angular-amplify-auth/e2e/tsconfig.json (214 bytes) Successfully initialized git.プロジェクト内でAngularのバージョンを確認
yarn-script$ yarn ng v yarn run v1.15.2 $ ng v _ _ ____ _ ___ / \ _ __ __ _ _ _| | __ _ _ __ / ___| | |_ _| / △ \ | '_ \ / _` | | | | |/ _` | '__| | | | | | | / ___ \| | | | (_| | |_| | | (_| | | | |___| |___ | | /_/ \_\_| |_|\__, |\__,_|_|\__,_|_| \____|_____|___| |___/ Angular CLI: 8.0.0 Node: 12.3.1 OS: darwin x64 Angular: 8.0.0 ... animations, cli, common, compiler, compiler-cli, core, forms ... language-service, platform-browser, platform-browser-dynamic ... router Package Version ----------------------------------------------------------- @angular-devkit/architect 0.800.0 @angular-devkit/build-angular 0.800.0 @angular-devkit/build-optimizer 0.800.0 @angular-devkit/build-webpack 0.800.0 @angular-devkit/core 8.0.0 @angular-devkit/schematics 8.0.0 @ngtools/webpack 8.0.0 @schematics/angular 8.0.0 @schematics/update 0.800.0 rxjs 6.4.0 typescript 3.4.5 webpack 4.30.0 ✨ Done in 0.75s.Amplify CLIのインストール
こちらはグローバルに入れてもいいけど、プロジェクトがない状態でAmplify CLIを叩く機会少ないと思うのでプロジェクト内に入れちゃいます。
なので、プロジェクト内のyarnでコマンドを叩きます。yarn$ yarn add @aws-amplify/cli [1/4] ? Resolving packages... warning @aws-amplify/cli > amplify-category-function > grunt-aws-lambda > glob > minimatch@2.0.10: Please update to minimatch 3.0.2 or higher to avoid a RegExp DoS issue ~~~~~~~~~~[長いので割愛] [2/4] ? Fetching packages... [3/4] ? Linking dependencies... [4/4] ? Building fresh packages... success Saved lockfile. success Saved 447 new dependencies. info Direct dependencies └─ @aws-amplify/cli@1.6.11 info All dependencies ~~~~~~~~~~[長いので割愛] ✨ Done in 45.19s.数行の
warningと大量のdependenciesが出るので、表示は割愛yarn scriptに追加
package.jsonに
amplifyの呼び出しコマンドを追加package.json{ "name": "angular-amplify-auth", "version": "0.0.0", "scripts": { "ng": "ng", "start": "ng serve", "build": "ng build", "test": "ng test", "lint": "ng lint", "e2e": "ng e2e", "amplify": "amplify" },Amplifyのインストール
AmplifyのPackageとAngular連携用のPackageをインストールします。
yarn$ yarn add aws-amplify aws-amplify-angular yarn add v1.15.2 [1/4] ? Resolving packages... [2/4] ? Fetching packages... warning Pattern ["proxy-agent@latest"] is trying to unpack in the same destination "/Users/hisayuki/Library/Caches/Yarn/v4/npm-proxy-agent-3.1.0-3cf86ee911c94874de4359f37efd9de25157c113/node_modules/proxy-agent" as pattern ["proxy-agent@^3.0.3"]. This could result in non-deterministic behavior, skipping. [3/4] ? Linking dependencies... [4/4] ? Building fresh packages... success Saved lockfile. success Saved 13 new dependencies. info Direct dependencies ├─ aws-amplify-angular@3.0.3 └─ aws-amplify@1.1.28 info All dependencies ├─ @aws-amplify/analytics@1.2.16 ├─ @aws-amplify/api@1.0.35 ├─ @aws-amplify/interactions@1.0.30 ├─ @aws-amplify/pubsub@1.0.28 ├─ @aws-amplify/storage@1.0.30 ├─ @aws-amplify/xr@0.1.17 ├─ @types/lodash@4.14.132 ├─ amazon-cognito-identity-js@3.0.12 ├─ aws-amplify-angular@3.0.3 ├─ aws-amplify@1.1.28 ├─ axios@0.17.1 ├─ js-cookie@2.2.0 └─ rxjs-compat@6.5.2 ✨ Done in 16.64s.最終的な
package.jsonがこちらpackage.json{ "name": "angular-amplify-auth", "version": "0.0.0", "scripts": { "ng": "ng", "start": "ng serve", "build": "ng build", "test": "ng test", "lint": "ng lint", "e2e": "ng e2e", "amplify": "amplify" }, "private": true, "dependencies": { "@angular/animations": "~8.0.0", "@angular/common": "~8.0.0", "@angular/compiler": "~8.0.0", "@angular/core": "~8.0.0", "@angular/forms": "~8.0.0", "@angular/platform-browser": "~8.0.0", "@angular/platform-browser-dynamic": "~8.0.0", "@angular/router": "~8.0.0", "@aws-amplify/cli": "^1.6.11", "aws-amplify": "^1.1.28", "aws-amplify-angular": "^3.0.3", "rxjs": "~6.4.0", "tslib": "^1.9.0", "zone.js": "~0.9.1" }, "devDependencies": { "@angular-devkit/build-angular": "~0.800.0", "@angular/cli": "~8.0.0", "@angular/compiler-cli": "~8.0.0", "@angular/language-service": "~8.0.0", "@types/jasmine": "~3.3.8", "@types/jasminewd2": "~2.0.3", "@types/node": "~8.9.4", "codelyzer": "^5.0.0", "jasmine-core": "~3.4.0", "jasmine-spec-reporter": "~4.2.1", "karma": "~4.1.0", "karma-chrome-launcher": "~2.2.0", "karma-coverage-istanbul-reporter": "~2.0.1", "karma-jasmine": "~2.0.1", "karma-jasmine-html-reporter": "^1.4.0", "protractor": "~5.4.0", "ts-node": "~7.0.0", "tslint": "~5.15.0", "typescript": "~3.4.3" } }Amplify CLIのAWSへアクセス設定
Amplify CLI専用のIAMユーザーを作ります。
amplify$ yarn amplify configure yarn run v1.15.2 $ amplify configure Follow these steps to set up access to your AWS account: Sign in to your AWS administrator account: https://console.aws.amazon.com/ Press Enter to continueこれでAWSのコンソールログイン画面に行くので、今回Amplifyで使いたいアカウントにログインします。
ちなみに、ログイン後にスイッチロールで別のアカウントに切り替えたら、切り替え後のアカウントが適用されます。Amplifyで使いたいアカウントのコンソール画面が出たら、CLIの画面でエンターを押します。
amplifySpecify the AWS Region ? region: ap-northeast-1 Specify the username of the new IAM user: ? user name: amplify-D30bS Complete the user creation using the AWS console https://console.aws.amazon.com/iam/home?region=undefined#/users$new?step=final&accessKey&userNames=amplify-D30bS&permissionType=policies&policies=arn:aws:iam::aws:policy%2FAdministratorAccess Press Enter to continue今度はリージョンを聞かれるので、今回は
ap-northeast-1、次に作るIAMユーザーの名前を聞かれるので、デフォルトでOKであればそのままエンターを押します。するとこの画面に移動します。
ここからはIAMユーザーの作成なので割愛。
デフォルトではAdministratorAccessのポリシーが付いたIAMユーザが出来上がります。出来上がったらまたCLI画面でエンター
amplifyEnter the access key of the newly created user: ? accessKeyId: ********** ? secretAccessKey: ******************** This would update/create the AWS Profile in your local machine ? Profile Name: amplify_sample Successfully set up the new user. ✨ Done in 559.81s.先程作ったIAMユーザのaccessKeyIdとsecretAccessKeyを聞かれるので入力して、最後にProfileを設定する。
defaultでも良いですが、ローカルマシンで既にAWS CLIでdefaultプロファイルを作っていると上書きしてしまうので、別の名前が良いと思います。Amplify初期化
Amplifyを使うプロジェクトで初期化をします。
amplify$ yarn amplify init yarn run v1.15.2 $ amplify init Note: It is recommended to run this command from the root of your app directory ? Enter a name for the project angular-amplify-auth ? Enter a name for the environment sample ? Choose your default editor: Visual Studio Code ? Choose the type of app that you're building javascript Please tell us about your project ? What javascript framework are you using angular ? Source Directory Path: src ? Distribution Directory Path: dist ? Build Command: yarn build ? Start Command: yarn start Using default provider awscloudformation For more information on AWS Profiles, see: https://docs.aws.amazon.com/cli/latest/userguide/cli-multiple-profiles.html ? Do you want to use an AWS profile? Yes ? Please choose the profile you want to use amplify_sample
質問 内容 Enter a name for the project プロジェクト名(Angularプロジェクト名) Enter a name for the environment 何環境か Choose your default editor エディタどれですか? Choose the type of app that you're building Android or ios or JSどれですか? What javascript framework are you using JSFrameworkどれですか? Source Directory Path sourceディレクトリのパス Distribution Directory Path build結果先のパス Build Command ビルドコマンド tart Command スタートコマンド Do you want to use an AWS profile? プロファイル使いますか? 全部答えると裏でCloudFormationが動きます。
amplify⠦ Initializing project in the cloud... CREATE_IN_PROGRESS DeploymentBucket AWS::S3::Bucket Wed May 29 2019 17:23:17 GMT+0900 (GMT+09:00) CREATE_IN_PROGRESS AuthRole AWS::IAM::Role Wed May 29 2019 17:23:17 GMT+0900 (GMT+09:00) CREATE_IN_PROGRESS angular-amplify-auth-sample-20190529172311 AWS::CloudFormation::Stack Wed May 29 2019 17:23:12 GMT+0900 (GMT+09:00) User Initiated ⠋ Initializing project in the cloud... CREATE_IN_PROGRESS UnauthRole AWS::IAM::Role Wed May 29 2019 17:23:17 GMT+0900 (GMT+09:00) ⠧ Initializing project in the cloud... CREATE_IN_PROGRESS DeploymentBucket AWS::S3::Bucket Wed May 29 2019 17:23:19 GMT+0900 (GMT+09:00) Resource creation Initiated CREATE_IN_PROGRESS UnauthRole AWS::IAM::Role Wed May 29 2019 17:23:19 GMT+0900 (GMT+09:00) Resource creation Initiated CREATE_IN_PROGRESS AuthRole AWS::IAM::Role Wed May 29 2019 17:23:18 GMT+0900 (GMT+09:00) Resource creation Initiated ⠧ Initializing project in the cloud... CREATE_COMPLETE UnauthRole AWS::IAM::Role Wed May 29 2019 17:23:30 GMT+0900 (GMT+09:00) CREATE_COMPLETE AuthRole AWS::IAM::Role Wed May 29 2019 17:23:29 GMT+0900 (GMT+09:00) ⠇ Initializing project in the cloud... CREATE_COMPLETE DeploymentBucket AWS::S3::Bucket Wed May 29 2019 17:23:40 GMT+0900 (GMT+09:00) ⠏ Initializing project in the cloud... CREATE_COMPLETE angular-amplify-auth-sample-20190529172311 AWS::CloudFormation::Stack Wed May 29 2019 17:23:44 GMT+0900 (GMT+09:00) ✔ Successfully created initial AWS cloud resources for deployments. ✔ Initialized provider successfully. Initialized your environment successfully. Your project has been successfully initialized and connected to the cloud! Some next steps: "amplify status" will show you what you've added already and if it's locally configured or deployed "amplify <category> add" will allow you to add features like user login or a backend API "amplify push" will build all your local backend resources and provision it in the cloud "amplify publish" will build all your local backend and frontend resources (if you have hosting category added) and provision it in the cloud Pro tip: Try "amplify add api" to create a backend API and then "amplify publish" to deploy everything ✨ Done in 119.19s.この段階ではIAMRoleが2つと、S3バケットが1つ出来ています。
Authの追加
次にAmplifyのコマンドで
Authを追加します。
Authの追加でCognito作成をCloudFormationに追加するtemplate.ymlが出来ます。amplify$ yarn amplify add auth yarn run v1.15.2 $ amplify add auth Using service: Cognito, provided by: awscloudformation The current configured provider is Amazon Cognito. Do you want to use the default authentication and security configuration? Default configuration Warning: you will not be able to edit these selections. How do you want users to be able to sign in when using your Cognito User Pool? Username Warning: you will not be able to edit these selections. What attributes are required for signing up? (Press <space> to select, <a> to toggle all, <i> to invert selection)Email Successfully added resource angularamplifyauth8d729781 locally Some next steps: "amplify push" will build all your local backend resources and provision it in the cloud "amplify publish" will build all your local backend and frontend resources (if you have hosting category added) and provision it in the cloud ✨ Done in 26.57s.
質問 内容 Do you want to use the default authentication and security configuration? セキュリティ認証と設定どうしますか?(とりあえずデフォルト選択) How do you want users to be able to sign in when using your Cognito User Pool? Cognitoのユーザープールでログイン時に何を使う?(とりあえずユーザー名) What attributes are required for signing up? (Press to select, to toggle all, to invert selection サインアップ時に登録してもらう情報(今回はEmailのみ選択) まずはとりあえず作ってみるなので、簡単に設定しました。
一応あとからコンソールやCLIからは変更できます。
これでtemplate.ymlが出来上がります。CloudFormationの更新
template.ymlの内容をCloudFormationに更新します。
amplifyi$ yarn amplify push yarn run v1.15.2 $ amplify push Current Environment: sample | Category | Resource name | Operation | Provider plugin | | -------- | -------------------------- | --------- | ----------------- | | Auth | angularamplifyauth8d729781 | Create | awscloudformation | ? Are you sure you want to continue? Yes ⠏ Updating resources in the cloud. This may take a few minutes... UPDATE_IN_PROGRESS angular-amplify-auth-sample-20190529172311 AWS::CloudFormation::Stack Wed May 29 2019 17:47:49 GMT+0900 (GMT+09:00) User Initiated ⠏ Updating resources in the cloud. This may take a few minutes... CREATE_IN_PROGRESS authangularamplifyauth8d729781 AWS::CloudFormation::Stack Wed May 29 2019 17:48:00 GMT+0900 (GMT+09:00) Resource creation Initiated CREATE_IN_PROGRESS authangularamplifyauth8d729781 AWS::CloudFormation::Stack Wed May 29 2019 17:47:58 GMT+0900 (GMT+09:00) ⠹ Updating resources in the cloud. This may take a few minutes... CREATE_IN_PROGRESS angular-amplify-auth-sample-20190529172311-authangularamplifyauth8d729781-17R83R3RQ8087 AWS::CloudFormation::Stack Wed May 29 2019 17:47:59 GMT+0900 (GMT+09:00) User Initiated ⠸ Updating resources in the cloud. This may take a few minutes... CREATE_IN_PROGRESS SNSRole AWS::IAM::Role Wed May 29 2019 17:48:09 GMT+0900 (GMT+09:00) Resource creation Initiated CREATE_IN_PROGRESS SNSRole AWS::IAM::Role Wed May 29 2019 17:48:08 GMT+0900 (GMT+09:00) ⠸ Updating resources in the cloud. This may take a few minutes... CREATE_COMPLETE SNSRole AWS::IAM::Role Wed May 29 2019 17:48:21 GMT+0900 (GMT+09:00) ⠸ Updating resources in the cloud. This may take a few minutes... CREATE_IN_PROGRESS UserPool AWS::Cognito::UserPool Wed May 29 2019 17:48:28 GMT+0900 (GMT+09:00) ⠼ Updating resources in the cloud. This may take a few minutes... CREATE_COMPLETE UserPool AWS::Cognito::UserPool Wed May 29 2019 17:48:32 GMT+0900 (GMT+09:00) CREATE_IN_PROGRESS UserPool AWS::Cognito::UserPool Wed May 29 2019 17:48:32 GMT+0900 (GMT+09:00) Resource creation Initiated ⠸ Updating resources in the cloud. This may take a few minutes... CREATE_IN_PROGRESS UserPoolClientWeb AWS::Cognito::UserPoolClient Wed May 29 2019 17:48:40 GMT+0900 (GMT+09:00) Resource creation Initiated CREATE_IN_PROGRESS UserPoolClient AWS::Cognito::UserPoolClient Wed May 29 2019 17:48:38 GMT+0900 (GMT+09:00) CREATE_IN_PROGRESS UserPoolClientWeb AWS::Cognito::UserPoolClient Wed May 29 2019 17:48:38 GMT+0900 (GMT+09:00) ⠇ Updating resources in the cloud. This may take a few minutes... CREATE_COMPLETE UserPoolClientWeb AWS::Cognito::UserPoolClient Wed May 29 2019 17:48:41 GMT+0900 (GMT+09:00) ⠴ Updating resources in the cloud. This may take a few minutes... CREATE_COMPLETE UserPoolClient AWS::Cognito::UserPoolClient Wed May 29 2019 17:48:41 GMT+0900 (GMT+09:00) CREATE_IN_PROGRESS UserPoolClient AWS::Cognito::UserPoolClient Wed May 29 2019 17:48:41 GMT+0900 (GMT+09:00) Resource creation Initiated ⠦ Updating resources in the cloud. This may take a few minutes... CREATE_IN_PROGRESS UserPoolClientRole AWS::IAM::Role Wed May 29 2019 17:48:49 GMT+0900 (GMT+09:00) Resource creation Initiated CREATE_IN_PROGRESS UserPoolClientRole AWS::IAM::Role Wed May 29 2019 17:48:47 GMT+0900 (GMT+09:00) ⠦ Updating resources in the cloud. This may take a few minutes... CREATE_COMPLETE UserPoolClientRole AWS::IAM::Role Wed May 29 2019 17:48:59 GMT+0900 (GMT+09:00) ⠧ Updating resources in the cloud. This may take a few minutes... CREATE_IN_PROGRESS UserPoolClientLambda AWS::Lambda::Function Wed May 29 2019 17:49:05 GMT+0900 (GMT+09:00) ⠧ Updating resources in the cloud. This may take a few minutes... CREATE_COMPLETE UserPoolClientLambda AWS::Lambda::Function Wed May 29 2019 17:49:06 GMT+0900 (GMT+09:00) CREATE_IN_PROGRESS UserPoolClientLambda AWS::Lambda::Function Wed May 29 2019 17:49:06 GMT+0900 (GMT+09:00) Resource creation Initiated ⠇ Updating resources in the cloud. This may take a few minutes... CREATE_IN_PROGRESS UserPoolClientLambdaPolicy AWS::IAM::Policy Wed May 29 2019 17:49:13 GMT+0900 (GMT+09:00) Resource creation Initiated CREATE_IN_PROGRESS UserPoolClientLambdaPolicy AWS::IAM::Policy Wed May 29 2019 17:49:12 GMT+0900 (GMT+09:00) ⠏ Updating resources in the cloud. This may take a few minutes... CREATE_COMPLETE UserPoolClientLambdaPolicy AWS::IAM::Policy Wed May 29 2019 17:49:23 GMT+0900 (GMT+09:00) ⠇ Updating resources in the cloud. This may take a few minutes... CREATE_IN_PROGRESS UserPoolClientLogPolicy AWS::IAM::Policy Wed May 29 2019 17:49:29 GMT+0900 (GMT+09:00) Resource creation Initiated CREATE_IN_PROGRESS UserPoolClientLogPolicy AWS::IAM::Policy Wed May 29 2019 17:49:28 GMT+0900 (GMT+09:00) ⠏ Updating resources in the cloud. This may take a few minutes... CREATE_COMPLETE UserPoolClientLogPolicy AWS::IAM::Policy Wed May 29 2019 17:49:39 GMT+0900 (GMT+09:00) ⠋ Updating resources in the cloud. This may take a few minutes... CREATE_IN_PROGRESS UserPoolClientInputs Custom::LambdaCallout Wed May 29 2019 17:49:44 GMT+0900 (GMT+09:00) ⠦ Updating resources in the cloud. This may take a few minutes... CREATE_COMPLETE UserPoolClientInputs Custom::LambdaCallout Wed May 29 2019 17:49:50 GMT+0900 (GMT+09:00) CREATE_IN_PROGRESS UserPoolClientInputs Custom::LambdaCallout Wed May 29 2019 17:49:49 GMT+0900 (GMT+09:00) Resource creation Initiated ⠴ Updating resources in the cloud. This may take a few minutes... CREATE_IN_PROGRESS IdentityPool AWS::Cognito::IdentityPool Wed May 29 2019 17:49:55 GMT+0900 (GMT+09:00) ⠹ Updating resources in the cloud. This may take a few minutes... CREATE_COMPLETE IdentityPool AWS::Cognito::IdentityPool Wed May 29 2019 17:49:59 GMT+0900 (GMT+09:00) CREATE_IN_PROGRESS IdentityPool AWS::Cognito::IdentityPool Wed May 29 2019 17:49:58 GMT+0900 (GMT+09:00) Resource creation Initiated ⠹ Updating resources in the cloud. This may take a few minutes... CREATE_COMPLETE IdentityPoolRoleMap AWS::Cognito::IdentityPoolRoleAttachment Wed May 29 2019 17:50:09 GMT+0900 (GMT+09:00) CREATE_IN_PROGRESS IdentityPoolRoleMap AWS::Cognito::IdentityPoolRoleAttachment Wed May 29 2019 17:50:09 GMT+0900 (GMT+09:00) Resource creation Initiated CREATE_IN_PROGRESS IdentityPoolRoleMap AWS::Cognito::IdentityPoolRoleAttachment Wed May 29 2019 17:50:06 GMT+0900 (GMT+09:00) ⠼ Updating resources in the cloud. This may take a few minutes... CREATE_COMPLETE angular-amplify-auth-sample-20190529172311-authangularamplifyauth8d729781-17R83R3RQ8087 AWS::CloudFormation::Stack Wed May 29 2019 17:50:13 GMT+0900 (GMT+09:00) ⠏ Updating resources in the cloud. This may take a few minutes... CREATE_COMPLETE authangularamplifyauth8d729781 AWS::CloudFormation::Stack Wed May 29 2019 17:50:18 GMT+0900 (GMT+09:00) ⠋ Updating resources in the cloud. This may take a few minutes... UPDATE_COMPLETE angular-amplify-auth-sample-20190529172311 AWS::CloudFormation::Stack Wed May 29 2019 17:50:23 GMT+0900 (GMT+09:00) UPDATE_COMPLETE_CLEANUP_IN_PROGRESS angular-amplify-auth-sample-20190529172311 AWS::CloudFormation::Stack Wed May 29 2019 17:50:22 GMT+0900 (GMT+09:00) ✔ All resources are updated in the cloud ✨ Done in 191.15s.完了すると、Cognitoユーザープールが出来上がります。
これでAmplify側の設定は一旦終わりです。
Angularプロジェクトの設定
出来上がったCognitoをAngular側で使うための設定をします。
Amplifyの設定ファイルをインポート
main.tsimport { enableProdMode } from '@angular/core'; import { platformBrowserDynamic } from '@angular/platform-browser-dynamic'; import { AppModule } from './app/app.module'; import { environment } from './environments/environment'; // ここから import Amplify from 'aws-amplify'; import amplify from './aws-exports'; Amplify.configure(amplify); // ここまで if (environment.production) { enableProdMode(); } platformBrowserDynamic().bootstrapModule(AppModule) .catch(err => console.error(err));AmplifyModuleとAmplifyServiceの読み込み
src/app/app.module.tsimport { BrowserModule } from '@angular/platform-browser'; import { NgModule } from '@angular/core'; import { AppRoutingModule } from './app-routing.module'; import { AppComponent } from './app.component'; import { AmplifyAngularModule, AmplifyService } from 'aws-amplify-angular'; // 追加 @NgModule({ declarations: [ AppComponent ], imports: [ BrowserModule, AppRoutingModule, AmplifyAngularModule // 追加 ], providers: [ AmplifyService // 追加 ], bootstrap: [AppComponent] }) export class AppModule { }コンパイル時にnodepackageを読み込む
typesにnodeを指定
src/tsconfig.app.json{ "extends": "./tsconfig.json", "compilerOptions": { "outDir": "./out-tsc/app", "types": ["node"] }, "include": [ "src/**/*.ts" ], "exclude": [ "src/test.ts", "src/**/*.spec.ts" ] }Angular6以降の対応
src/polyfills.tsの最終行に
(window as any).global = window;を追加
こちらはAmplifyに関わらず、AngularとNode.jsのアップデートで発生してる問題。
詳細はこちらsrc/polyfills.ts/*** ~~~~~~~~~~[長いので割愛] /*************************************************************************************************** * APPLICATION IMPORTS */ (window as any).global = window;実際の表示画面の書き換え
app.component.htmlに表示させるように、HTMLタグの書換とCSSの読み込みをします。
src/app/app.component.html<!--すべて消して以下のタグのみに--> <amplify-authenticator></amplify-authenticator>src/style.css/* You can add global styles to this file, and also import other style files */ @import '~aws-amplify-angular/Theme.css';動作確認
実際に動いている所を確認します。
以下のコマンドを実行してから、http://localhost:4200/を開きます。yarnyarn startこの画面が出たら完了です!


- 投稿日:2019-05-29T18:28:42+09:00
Amazon API Gatewayのオンラインセミナー受けてみた
「AWS Black Belt Online Seminar Amazon API Gateway」の自分向けメモ
API Gateway語感はなんとなく分かるけど......レベルの人向けまずAPIとは
- プログラムやソフトウェア同士がやり取りをするための取り決め(IF仕様も含む)
- APIにもいくつか種類があるがそのうちのWeb APIがAPI Gatewayの対象領域
- Web APIの特徴は他システムとの緩やかな連携、エコシステムとの親和性
- 課題
- インフラ管理が必要(サーバー管理は本質ではない)
- APIのバージョンや設定値の管理が必要
- 認証認可の考慮が必要
- 流量制御と保護(スロットリングへの対策)
概要
API Gatewayとは
- クライアントからのリクエストを受け付ける窓口となるAWSサービス
- リージョンサービス
- フルマネージドサービス(オートスケール、サーバー管理不要)
- CloudFrontとの併用も可能(レイテンシ削減可能)
ユースケース
- パブリックなWeb API基盤の提供
- プライベートなWeb API基盤の提供
- AWSサービスのAPI化
- サーバーレス構築
API新規作成の流れ
- APIの設計
- プロトコル種別とエンドポイントタイプ選択
- APIの設定
- デプロイとステージ設定
※既存のRESTなAPIからのクローンで作成することも可能
プロトコル種別
- RESTとWebSocketの2種類可能
- REST:ステートレス(単一HTTPメッセージで完結する通信、セッション管理なし)なAPIの実装
- WebSocket:ステートフル(双方向のリアルタイム通信)なAPIの実装
RESTのエンドポイントタイプ
- エッジ最適化
- まずはエッジロケーション(CloudFront)にルーティング
- リージョン
- リージョンに直接ルーティング
- 同一リージョン内のレイテンシ削減
- プライベート
- パブリックアクセスされない
- VPCエンドポイント経由でのみアクセス可能
REST APIの場合
リソースとメソッド
- ツリー構造にてリソースを定義し、各ブランチにHTTPメソッドを指定
- デプロイ単位はリソース単位
メソッド設定
- 4つの設定がある
- リソースとメソッドを指定して、一意のパラメータをバックエンドに渡せる
- リクエストとレスポンス、それぞれでパラメータの加工が可能
WebSocket APIの場合
ルート
- 2つのURLを提供
- イベントをRouteとして定義する
ルート選択式
- URLパスは1つ、受信データ(JDON)の中身にどのルートを選択するか記述する
ルート設定
- 3つの設定がある
ステージ設定
- 作成したAPIを指定したステージにデプロイする
- ステージ:環境設定
- 複数のエンドポイントをステージで容易に準備できる
認証認可
- Rest:メソッド単位で設計可能
- API単位で設定
- 認証方法は以下
- IAM権限
- Lambdaオーソライザー
- Cognitoオーソライザー
統合タイプ
- Lambda:リクエスト内容を処理する
- HTTP:外部サービス等パブリックなところにアクセス
- Mock:固定値を返す
- AWSサービス:AWSサービスをラップして公開
- VPCリンク:VPCリソースにアクセス
※Lambda、HTTP、VPCリンクはプロキシ統合を設定可能(リクエストをパススルー)
リクエストレスポンス変換
- バックエンドに処理を渡す前にデータ形式の変換が可能
- バックエンドから渡されたデータをクライアントに返す前にデータ形式の変換が可能
ログ
- 実行ログ、アクセスログをlogsに出力可能
- アクセスログは任意に設計可能
- メトリクス設定可能
RestAPI キャッシュ
- ステージ毎にキャッシュ
- バックエンドのトラフィック削減
リソースポリシー
- APIから見て、どこからのアクセスを許可するかを指定できる
- 特定のAWSユーザーアカウントからしか呼び出せないなどの設定ができる
カナリアリリース
- 部分公開機能
- 特別なステージ「Canary」を作成し、リクエストを指定の比率でCanaryに流せる
AWS WAFとの連携
- SQLインジェクション等を防げる
X-Ray連携
- 呼び出しトレースの記録が可能
- Lambadaも併せて、End2Endでトレース可能
クライアント証明書
- 外部サービスの利用時にステージに設定した証明書を利用可能
利用料金
以下に依存する
- APIコール数
- メッセージ要求数
- 投稿日:2019-05-29T16:35:50+09:00
通り魔を自動で感知し110番通報するAI
昨日、川崎で通り魔殺傷事件が発生しました。人工知能で何かできないかと思い考えてみました。
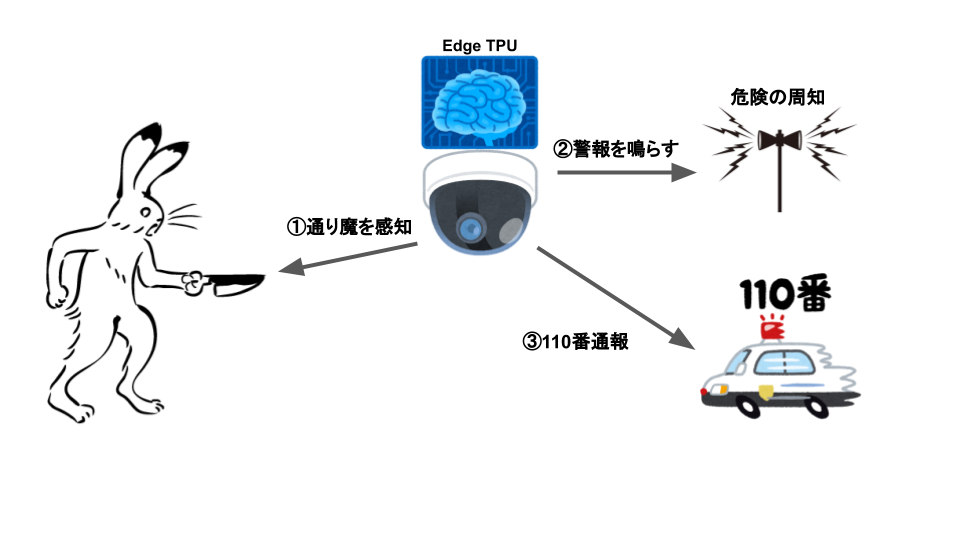
①通り魔を感知
刃物を持っているかどうかで通り魔か判断します。
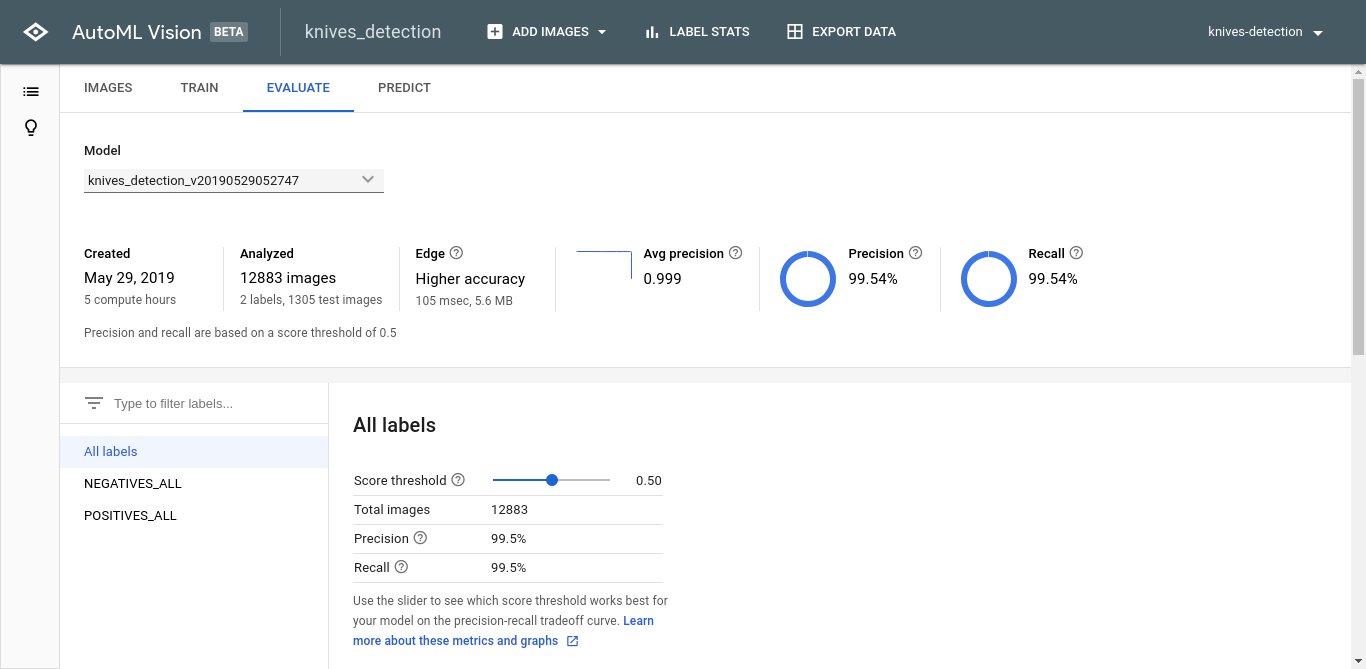
データセットは、AGH科学技術大学のKnives Images Databaseからダウンロードしました。
刃物を持っているかどうかで2クラス分類を行います。
精度は、99.9%と通り魔をほぼ完全に認識できました。
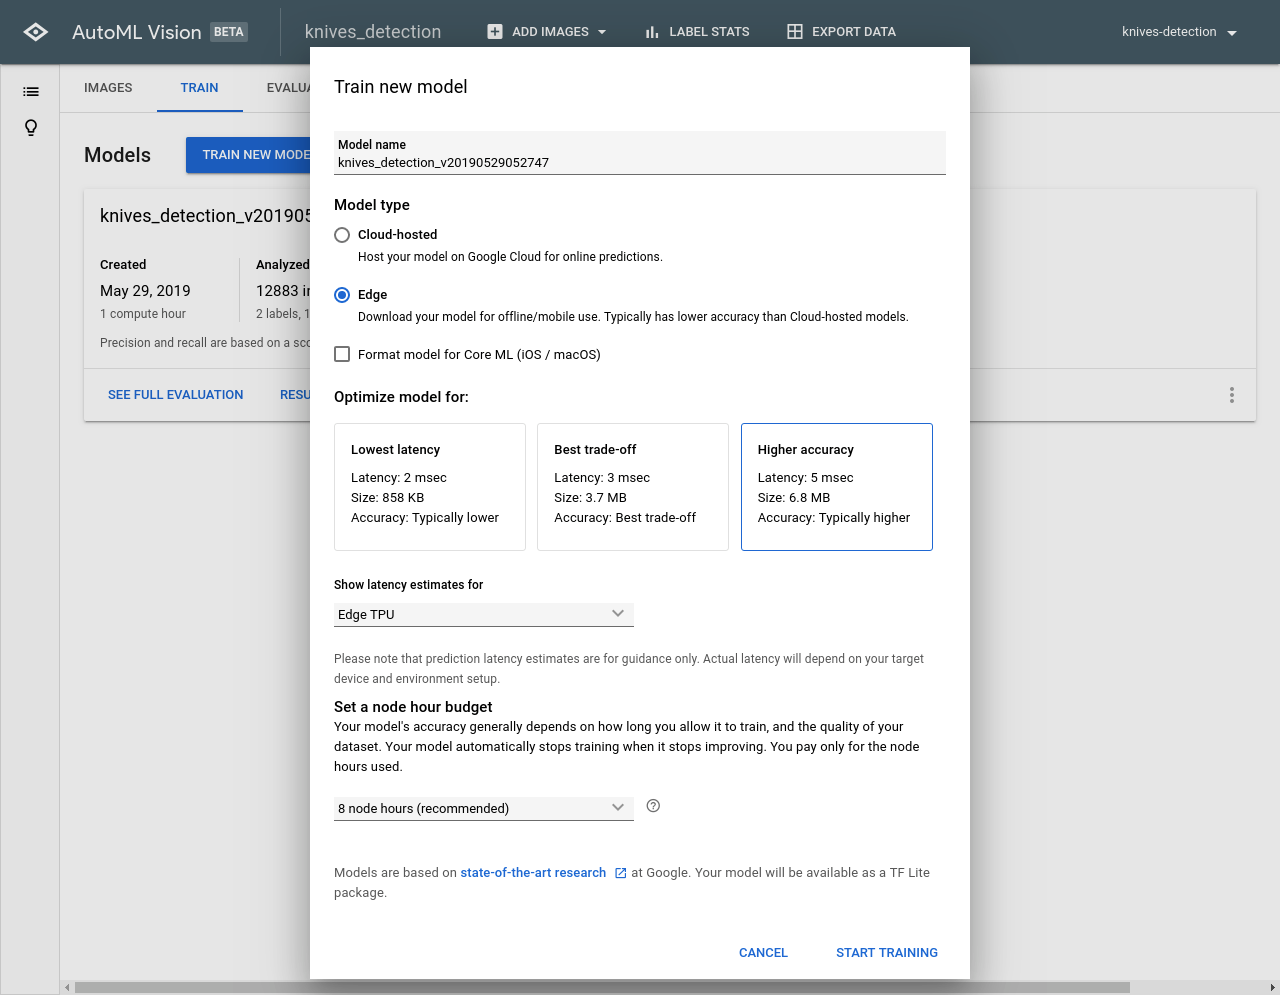
EdgeTPUで認識すると200fps(レイテンシ5ms)で認識可能です。
最近はTecoGANやSENetなど超解像技術の進歩がめざましいのでコンビニのような荒くてノイズが入るカメラでも高精度で認識することが可能です。
②警報を鳴らす
コンビニなどの警報機と連携がんばる
警報ブザーを鳴らすことで周囲に危険を伝え逃げる時間を与えたり、犯人を動揺または抑止させることができるかも知れません。③110番通報
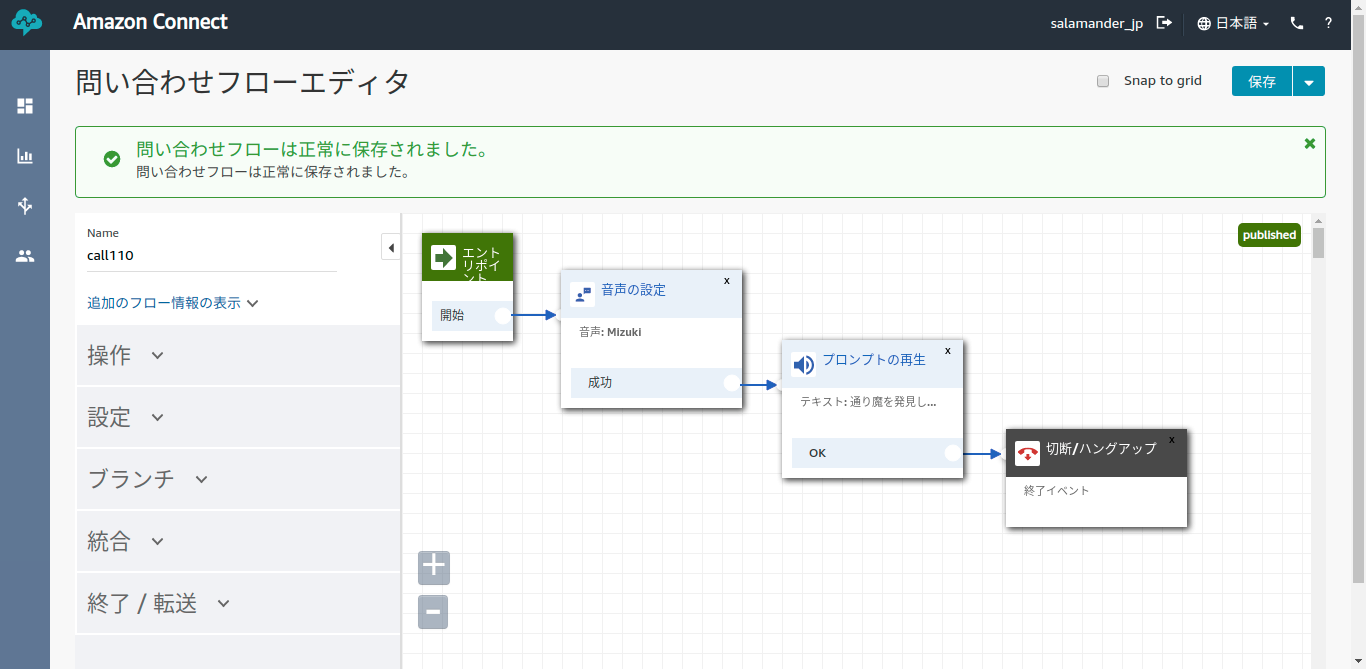
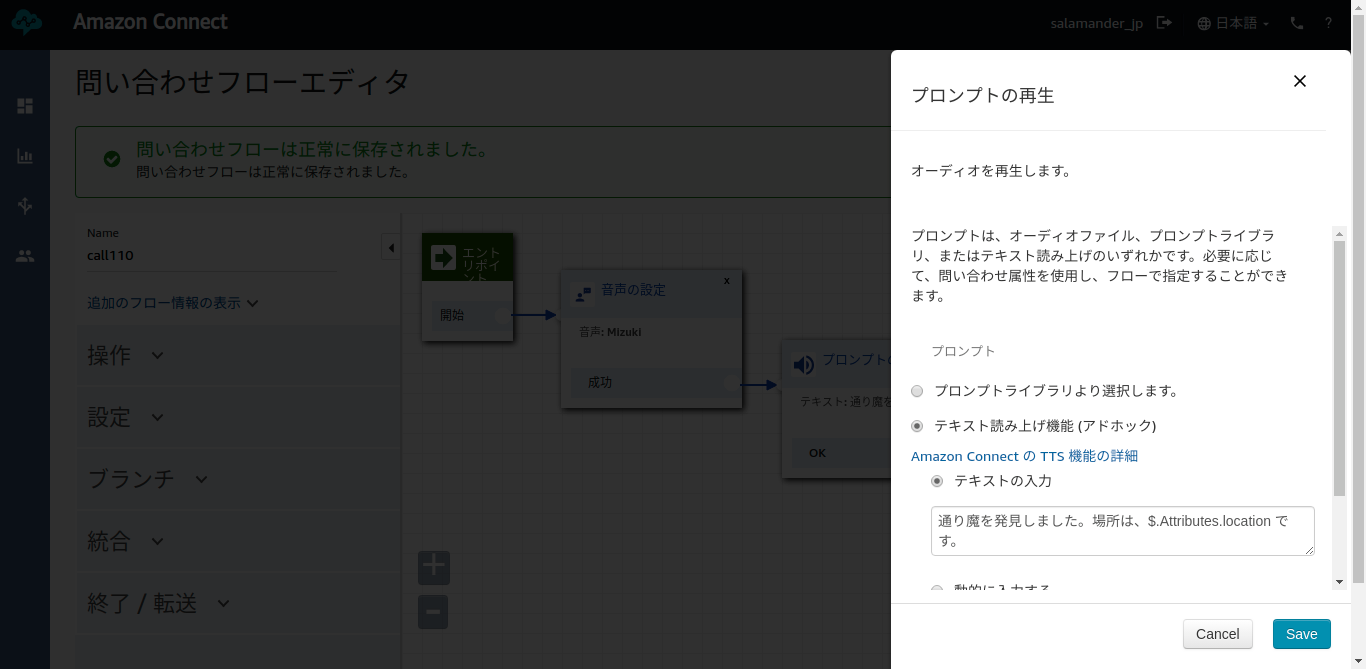
AmazonConnectで110番通報(未検証)
問い合わせフローを作成
場所は、柔軟に変更できるようにしました。
startOutboundVoiceContact APIで110番に通報(未検証)
// import entire SDK
var AWS = require('aws-sdk');

// load config file
AWS.config.loadFromPath('./config.json');

// create amazon connect object
connect = new AWS.Connect({apiVersion: '2017-08-08'});

// create API request parameter
var params = {
  Attributes: {
    location: 'ファミリーマート登戸新町店'
  },
  ContactFlowId: "875a14b4-3685-47ee-9fcd-8a233d0470c6",
  // 電話番号をE.164形式で設定するため、例えば「050-0000-0000」の場合は、
  //国番号(日本:81)を付けて以下のようになります。
  DestinationPhoneNumber: "+81110",
  // amazon connectのコールセンターのインスタンスID
  InstanceId: "c966ced7-ca79-43f3-af67-dbe8da954848",
  // 電話番号の設定方法は、DestinationPhoneNumberと同様
  SourcePhoneNumber: "+810000000000"
};

// call API with parameter
connect.startOutboundVoiceContact(params, function(err, data) {
  if (err) {
    console.log(err);
  } else if (data) {
    console.log(JSON.stringify(data));
  }
});
スマホに掛けて動作確認はしましたが、緊急性のない110番は迷惑となるため検証してません。
まとめ
防犯カメラをコンビニだけでなく、バス停やバスにも取り付けて、このシステムを実用化すれば、致命傷を回避できるかもしれません。
そもそもいくら対策を講じても通り魔を0にすることは難しいと思います。(対策を否定するわけではない)
危険を1秒でも早く察知することで、もっと救える命があるかもしれません。

- 投稿日:2019-05-29T15:35:09+09:00
Amazon Linux で ansible がdnfを推し始めて困ってます
ネットのスレを見るとansible2.8から dnf 推しになっている模様
回避方法として set_factにてdnfではなくyumを使うように強制せよとの事
えーansible_facts とか使ったことないんだけど。巷にもこの件情報無いし..試してみるか設定前
   - name: Yum update packages
     yum: name=* state=latest
     become: yes
実行結果
TASK [Yum update packages] *************************************************************************************************************************************
fatal: [xxxxx]: FAILED! => {"ansible_facts": {"discovered_interpreter_python": "/usr/bin/python"}, "changed": false, "cmd": "dnf install -y python2-dnf", "msg": "[Errno 2] No such file or directory", "rc": 2}
/var/log/secure を見ても確かにdnf 実行してるぽい
May 27 08:37:41 ec sudo: xxx: ... /usr/bin/python ... tmp/ansible-tmp-1558913860.05-16888652605385/AnsiballZ_dnf.py/usr/local/bin/dnf から /usr/bin/yum にリンク、程度の小賢しい手は通用しなかったので...まあ悪手ですしね。
ネットの有識者様が言われるがままPlaybookにset_fact設定を追加してみるtasks: - set_fact: ansible_facts: pkg_mgr: yum - name: Yum update packages yum: name=* state=latest become: yes実行結果
TASK [Yum update packages] *************************************************************************************************************************************
ok: [xxxxx]
おおぅ...logでもyum実行するように変更されたぽい
May 29 15:21:09 ec sudo: xxx: ... /usr/bin/python ... tmp/ansible-tmp-1559110868.54-279035084250927/AnsiballZ_yum.py
- 投稿日:2019-05-29T15:01:32+09:00
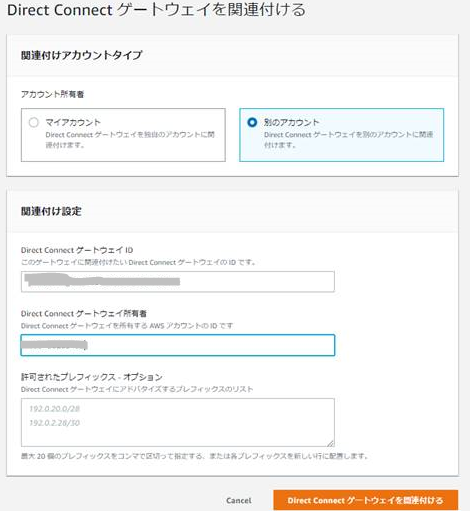
Direct Connect GW Multi Account 設定してみました
Direct Connect GW Multi Account 設定してみました
以前DirectConnect GWの記事を書きましたが
https://qiita.com/asato-san/items/8757fc52bb32530f130e
今回ようやくMulti Account 対応したとの事ですので早速やってみました。注意:この設定は同一支払いアカウント管理下(同一組織アカウント)同志じゃないと適用できません
無関係なアカウントからもProposal は出せるけど関連付けAccept 処理した後以下のエラーが出て接続拒否されますのでご注意を
では早速やってみましょう
1) 接続申請アカウント側VPC管理画面で仮想PrivateGWを作成します
※申請前にDCで利用可能なIPレンジのVPCにアタッチしておきましょう2) Direct Connect管理画面にて対象のPrivateGW を選択。“詳細を確認する”を押して
"DirectConnect Gateway に関連付ける"を選びます
“別のアカウント”を選択してGateway ID と所有者AWS アカウント名を記載して “関連付け”
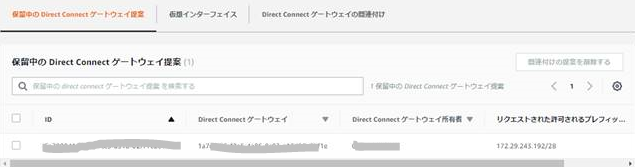
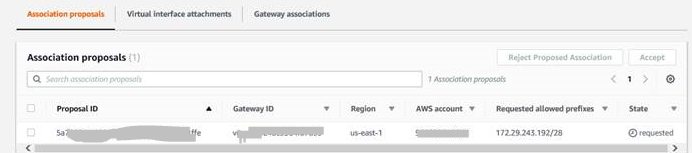
3) 承認待ちのキューに入ったことを確認します
ここからは接続許可する側の設定です
Direct Connect管理画面にてDirectConnectGatewaysの画面に関連付けproposal が来ているので
対象仮想PrivateGWを選択して “Accept”
以上で別アカウントでのDirectConnectが利用可能となります。ちなみにrejectすると申請者側の申請キューもそっと消えてなくなりますw


- 投稿日:2019-05-29T14:10:43+09:00
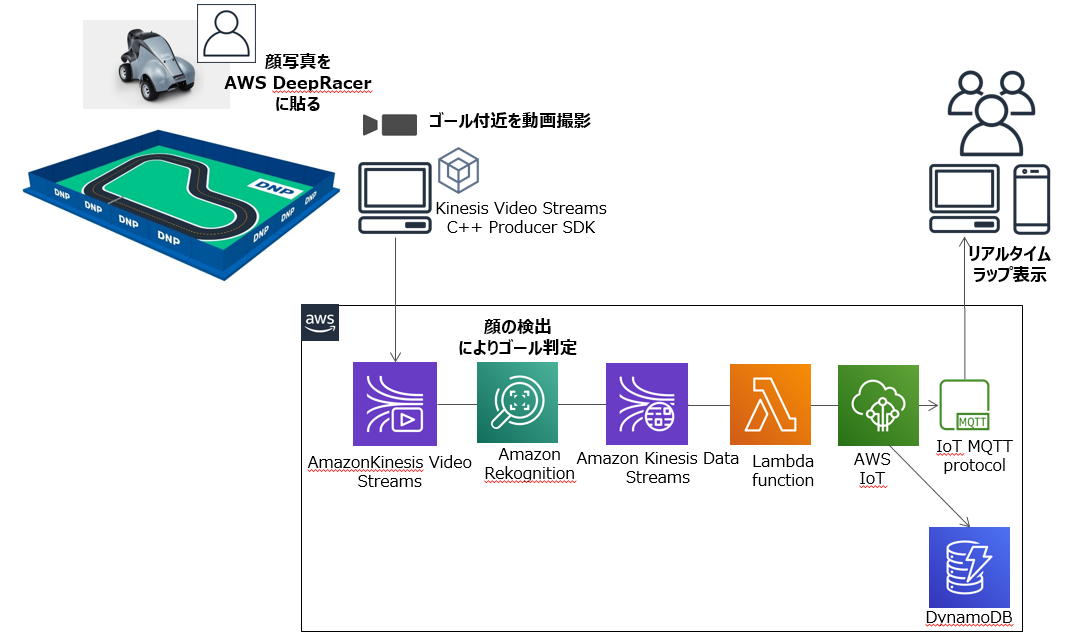
AWSのAIサービスを使ってAWS DeepRacerのラップタイム計測システムを作ってみた
はじめに
当社で製作するAWS DeepRacerコースを使って実走レースを開催する予定があるため、ラップタイムを計測する仕組みをAWSのAIサービスを利用して作ってみました。
ラップタイムの計測方法
動画を分析してオブジェクト(車)の検出ができるAmazon Rekognition Videoを利用してラップタイム計測が出来るかも。と思っていたのですが、現時点では顔以外のオブジェクトの検出は動画ファイルのみ対応しており、動画ストリーミングは対応されていないようでした。
AWS メディアサービスを利用して取り込んだ映像を動画ファイルとしてS3に生成することはできるのですが、タイムラグがあるのでストリームデータによるリアルタイム分析の方がレースの臨場感もあり良さそうです。
そこで、顔の検出ができるように車体に顔写真を貼って走行させることを思いつきました!用意する機材
- Apple MacBook Air
- Amazon Kinesis Video プロデューサライブラリ(C++)をインストール
- Webカメラ
システム構成
ポイント
- ゴール地点のカメラにAWS DeepRacer(顔写真付き)が写ると、動画ストリームから顔情報を検出し前回の検出の時刻の差分からラップタイムを算出します。
- Rekognition Videoで検出した顔の信頼スコア(%)は重要では無いので(誰の顔でも検出できればよい)、ベースとなるフェイスコレクションの顔画像は1つだけ登録しました。ゴール付近に寝そべったり、仰向けのままトラックを徘徊する人物がいない限り、AWS DeepRacer(顔写真付き)がゴールしたことになります。
- リアルタイム性を重視して、画面上にすぐラップタイムが自動反映されるようにAWS IoTを使いました。
- ラップタイムの履歴保存と参加者のニックネーム表示のためにDynamoDBを使いました。
試してみた
AWS DeepRacerはまだ発売されていないので、電池で走るミニカーで試してみました。
うまく顔を認識してラップタイムもブラウザに1〜2秒後に表示されました(右下:ラップタイムとニックネーム)。ミニカーの速度は20〜30cm/秒くらいです。
※PCに写っている映像はこの写真を記録するため、一時停止した状態にしています
まとめ
シンガポールSummitで参加したAWS DeepRacer League(結果は17位でした)では、実際のAWS DeepRacerはミニカーよりも速いスピードが出ていたので、きちんと計測ができるかわかりませんが、走行できる日が楽しみです。
また、作った後でSageMakerが物体検出アルゴリズムをサポートしていることを知ったので、今度はSageMakerでラップタイムを計測できるか試してみたいと思います。最後にこのシステムを作るにあたり、以下のサイトを参考にさせていただきました。
ありがとうございました。[AWS IoT] MQTTを使用して、Lambdaからブラウザを更新する方法〜aws-iot-device-sdk(aws-iot-sdk-browser-bundle.js)を使用する場合〜

- 投稿日:2019-05-29T13:04:48+09:00
Upgrading to terraform 0.12
先日、ついにterraform 0.12.0[GA]がリリースされました...!
早速、使用してみたいと思います。
HCL2では設定ファイルだけど、演算や式評価などプログラミング言語的な要素を持ち合わせています。
拡張された箇所以外の構文はほぼ一緒ですが、HCL2は後方互換がありません。
tfenvで0.11.14と0.12.xを使い分ける運用でもいいかもしれません。手順
terraform v0.11.14にupgradeする
0.11.14で
0.12checklistというヘルプコマンドが追加されています。
$ terraform -helpCommon commands: apply Builds or changes infrastructure console Interactive console for Terraform interpolations destroy Destroy Terraform-managed infrastructure env Workspace management fmt Rewrites config files to canonical format get Download and install modules for the configuration graph Create a visual graph of Terraform resources import Import existing infrastructure into Terraform init Initialize a Terraform working directory output Read an output from a state file plan Generate and show an execution plan providers Prints a tree of the providers used in the configuration push Upload this Terraform module to Atlas to run refresh Update local state file against real resources show Inspect Terraform state or plan taint Manually mark a resource for recreation untaint Manually unmark a resource as tainted validate Validates the Terraform files version Prints the Terraform version workspace Workspace management All other commands: 0.12checklist Checks whether the configuration is ready for Terraform v0.12 debug Debug output management (experimental) force-unlock Manually unlock the terraform state state Advanced state management
terraform initで必要なプラグインが全てインストールされているか確認する 問題なければ下記MSGが表示されるLooks good! We did not detect any problems that ought to be addressed before upgrading to Terraform v0.12 This tool is not perfect though, so please check the v0.12 upgrade guide for additional guidance, and for next steps: https://www.terraform.io/upgrade-guides/0-12.htmltfevfをinstallする
$ git clone https://github.com/tfutils/tfenv.git ~/.tfenv
$ echo 'export PATH="$HOME/.tfenv/bin:$PATH"' >> ~/.bash_profile
$ source ~/.bash_profile
$ ln -s ~/.tfenv/bin/* /usr/local/bin
0.12.0をインストールする
$ tfenv install 0.12.0
$ tfenv list
  0.12.0
* 0.11.14 (set by /Users/kazumineigahara/.tfenv/version)
$ tfenv use 0.12.0
[INFO] Switching to v0.12.0
[INFO] Switching completed
terraform設定をアップグレードする
初期化された作業ディレクトリで
0.12upgradeを実行して、HCL2の構文に自動変更させます。
移行失敗した構成についてはファイル中に特別なマーカーとしてTF-UPGRADE-TODOがコメントされるので手動で更新します。
$ terraform 0.12upgradeThis command will rewrite the configuration files in the given directory so that they use the new syntax features from Terraform v0.12, and will identify any constructs that may need to be adjusted for correct operation with Terraform v0.12. We recommend using this command in a clean version control work tree, so that you can easily see the proposed changes as a diff against the latest commit. If you have uncommited changes already present, we recommend aborting this command and dealing with them before running this command again. Would you like to upgrade the module in the current directory? Only 'yes' will be accepted to confirm. Enter a value: yes ----------------------------------------------------------------------------- Error: failed to load provider "aws": Incompatible API version with plugin. Plugin version: 4, Client versions: [5]プラグインと互換性のないAPIバージョンだとしてエラーが出たので、古いプラグインを削除して新しいものをインストールします。
$ rm -r .terraform && terraform initInitializing the backend... Successfully configured the backend "s3"! Terraform will automatically use this backend unless the backend configuration changes. Initializing provider plugins... - Checking for available provider plugins... - Downloading plugin for provider "aws" (terraform-providers/aws) 2.12.0... The following providers do not have any version constraints in configuration, so the latest version was installed. To prevent automatic upgrades to new major versions that may contain breaking changes, it is recommended to add version = "..." constraints to the corresponding provider blocks in configuration, with the constraint strings suggested below. * provider.aws: version = "~> 2.12" Terraform has been successfully initialized! You may now begin working with Terraform. Try running "terraform plan" to see any changes that are required for your infrastructure. All Terraform commands should now work. If you ever set or change modules or backend configuration for Terraform, rerun this command to reinitialize your working directory. If you forget, other commands will detect it and remind you to do so if necessary.ソースコードの書き換えが完了したら
versions.tfというファイルが作成され下記MSGが出ます。Upgrade complete! The configuration files were upgraded successfully. Use your version control system to review the proposed changes, make any necessary adjustments, and then commit.
- versions.tf
モジュールがv0.12のみの機能を使用するようにアップグレードされたことを示しています。
tf

terraform {

  required_version = ">= 0.12"

}
書き換えされた場所を見てみます。
- security_group.tf ```tf resource "aws_security_group" "xxxxxxxxxxxxxx" { vpc_id = var.VPCId name = "xxxxxxxxxxxxxx"
ingress {
from_port = "22"
to_port = "22"
protocol = "tcp"
security_groups = ["sg-xxxxxxxx"] // comment
}ingress {
from_port = "22"
to_port = "22"
protocol = "tcp"
cidr_blocks = ["0.0.0.0/0"]
}egress {
from_port = "0"
to_port = "0"
protocol = "-1"
cidr_blocks = ["0.0.0.0/0"]
}tags = {
Name = "xxxxxxxxxxxxxx"
Service = "xxxxxxxxxxxxxx"
Environment = "xxxxxxxxxxxxxx"
Description = "Managed by Terraform"
}
}
```HCL2では式を直接利用できるようになっているので
vpc_id = "${var.VPCId}"がvpc_id = var.VPCIdとなり補完シーケンスは不要となります。terraform planでの可読性も上がっている...
$ terraform plan# aws_security_group.subnet_change_int_sg will be created + resource "aws_security_group" "xxxxxxxxxxxxxx" { + arn = (known after apply) + description = "allow internal traffic" + egress = [ + { + cidr_blocks = [ + "0.0.0.0/0", ] + description = "" + from_port = 0 + ipv6_cidr_blocks = [] + prefix_list_ids = [] + protocol = "-1" + security_groups = [] + self = false + to_port = 0 }, ] + id = (known after apply) + ingress = [ + { + cidr_blocks = [] + description = "" + from_port = 22 + ipv6_cidr_blocks = [] + prefix_list_ids = [] + protocol = "tcp" + security_groups = [] + self = true + to_port = 22 }, ] + name = "xxxxxxxxxxxxxx" + owner_id = (known after apply) + revoke_rules_on_delete = false + tags = { + "Description" = "Managed by Terraform" + "Name" = "xxxxxxxxxxxxxx" } + vpc_id = (known after apply) }上記は単純な変更で済んでいますが、複雑な設定になってくると手動で解決しないといけないケースが出てくるはずです。
- 投稿日:2019-05-29T11:13:21+09:00
不要となったCloudWatchAlarmを一括削除する
3000件以上あった不要となったCloudWatchAlarmを、シェルスクリプトで削除します。
#!/bin/sh

#``ではなく$()を使う
list=$(aws cloudwatch describe-alarms --alarm-name-prefix ip- --output=text --query 'MetricAlarms[].AlarmName' --max-items 5)
##echo "$list"
for name in $list
do
if [ `echo "$name" | grep 'Processlist'` ] ; then
  echo "$name"
  aws cloudwatch delete-alarms --alarm-names $nam
fi
done
https://docs.aws.amazon.com/cli/latest/reference/cloudwatch/describe-alarms.html
- 「ip-」のprefixを持つアラーム一覧を取得する
- queryでAlarmNameだけを取得する
- Processlistが含まれていれば、削除する
- 投稿日:2019-05-29T10:33:58+09:00
CloudWatchLogsをAWS Cliから使う
aws logs filter-log-events --log-group-name your-log-name --start-time 1558677073000 --end-time 1558677173000 --filter-pattern ExceptionなおManagement Consoleだと2行目移行のログも検索の対象になるようですが、aws-cliの場合だと1行目しかfilter-patternに引っかからないようです。
ドキュメント
https://docs.aws.amazon.com/ja_jp/AmazonCloudWatch/latest/logs/SearchDataFilterPattern.html
https://docs.aws.amazon.com/cli/latest/reference/logs/filter-log-events.html
- 投稿日:2019-05-29T00:35:26+09:00
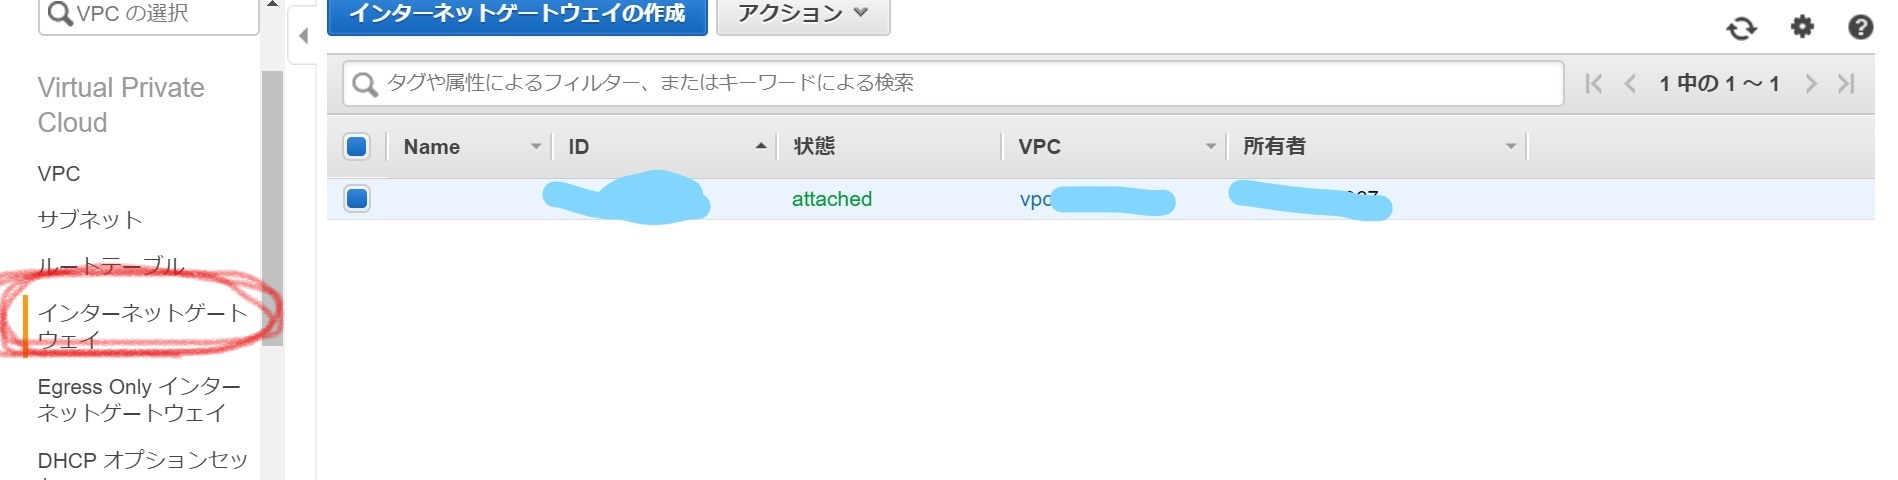
VPCをインターネットに繋げる方法
AWS VPCのサブネットを構築すると、インターネトゲートウェイを使用してサブネットをインターネットに接続することが出来ます。
とりあえず作成してみましょう!!
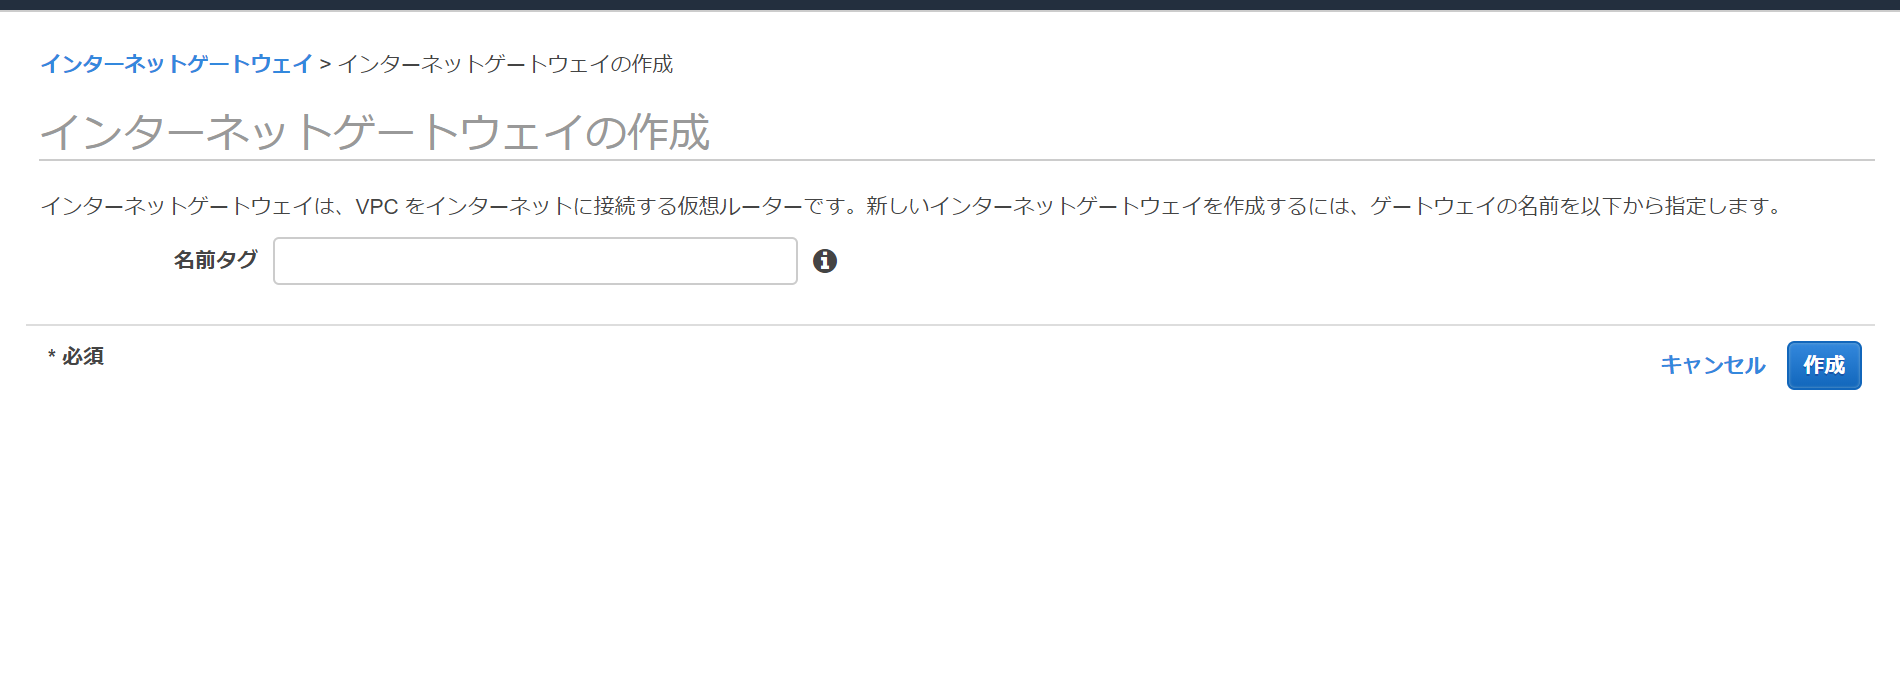
VPCの画面から作成することが出来ます。
このような画面が出てくるので、「作成」ボタンを押して、インターネットゲートウェイを作成しましょう!
元の画面にインターネットゲートウェイがあれば、作成出来てます。
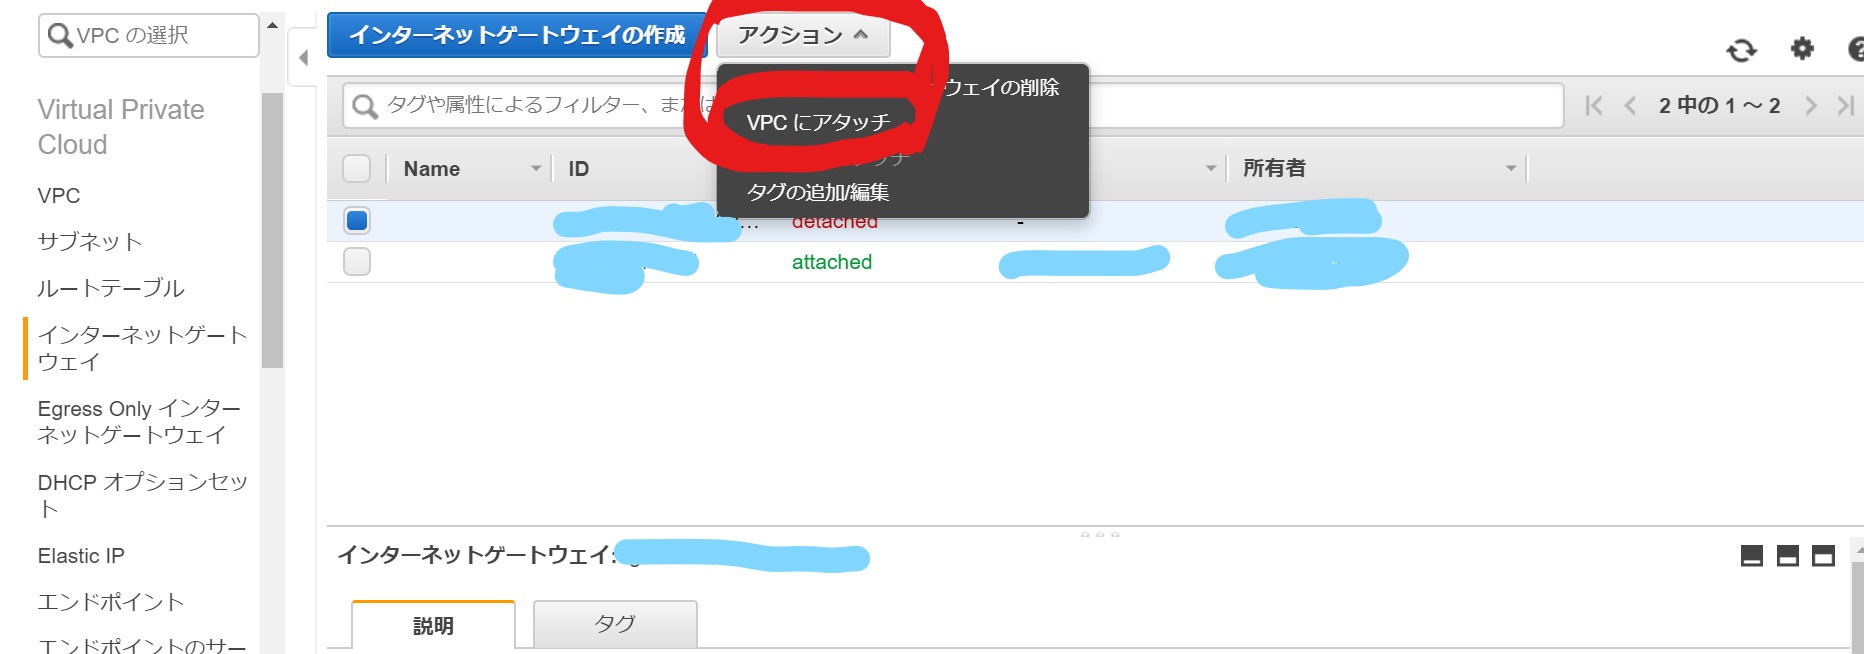
インターネットゲートウェイをVPCに繋げる
作成したインターネットゲートウェイをVPCに繋げましょう!
使用したいインターネットゲートウェイを選択し、アクションボタンを押します。
そして、「VPCにアタッチ」ボタンを押し、インターネットに繋げたいVPCを選択すると、インターネットゲートウェイをVPCに繋げることが出来ます。
VPCにつき、ひとつのインターネットゲートウェイしか接続できないので注意しましょう。これで、VPCをインターネットに接続できる、、と思いきや!
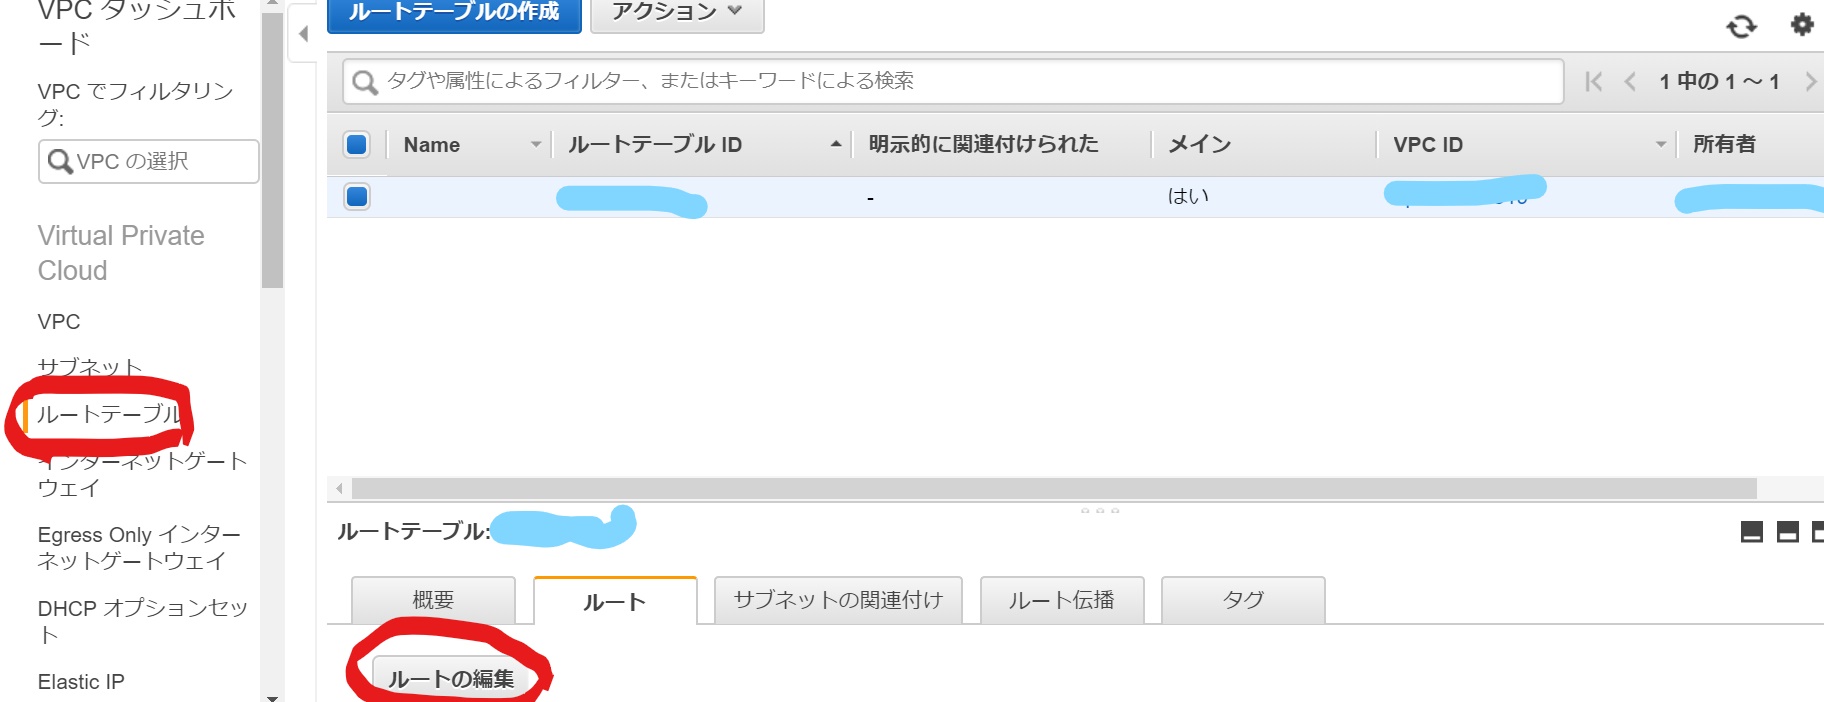
ルートテーブルの設定も忘れずに!ルートテーブルの設定
AWS VPCでは、VPCを作成したと同時にルートテーブルも作成されます。
ルートテーブルは、ルーターに設定されているIPアドレスのホストと、データのやり取りを行うことができるデータ、とここでは考えてもらっても差し支えありません。
なので、自動で生成されてたルートテーブルに、やり取りをしたいIPアドレスが示されていなければ、そのIPアドレスのホストとはデータのやり取りができなくなるということです。
ホームページを公開したい方などは、すべてのIPアドレスを受け入れることができるように設定しておかなければなりませんね!
VPCダッシュボードのルートテーブルを見ます。
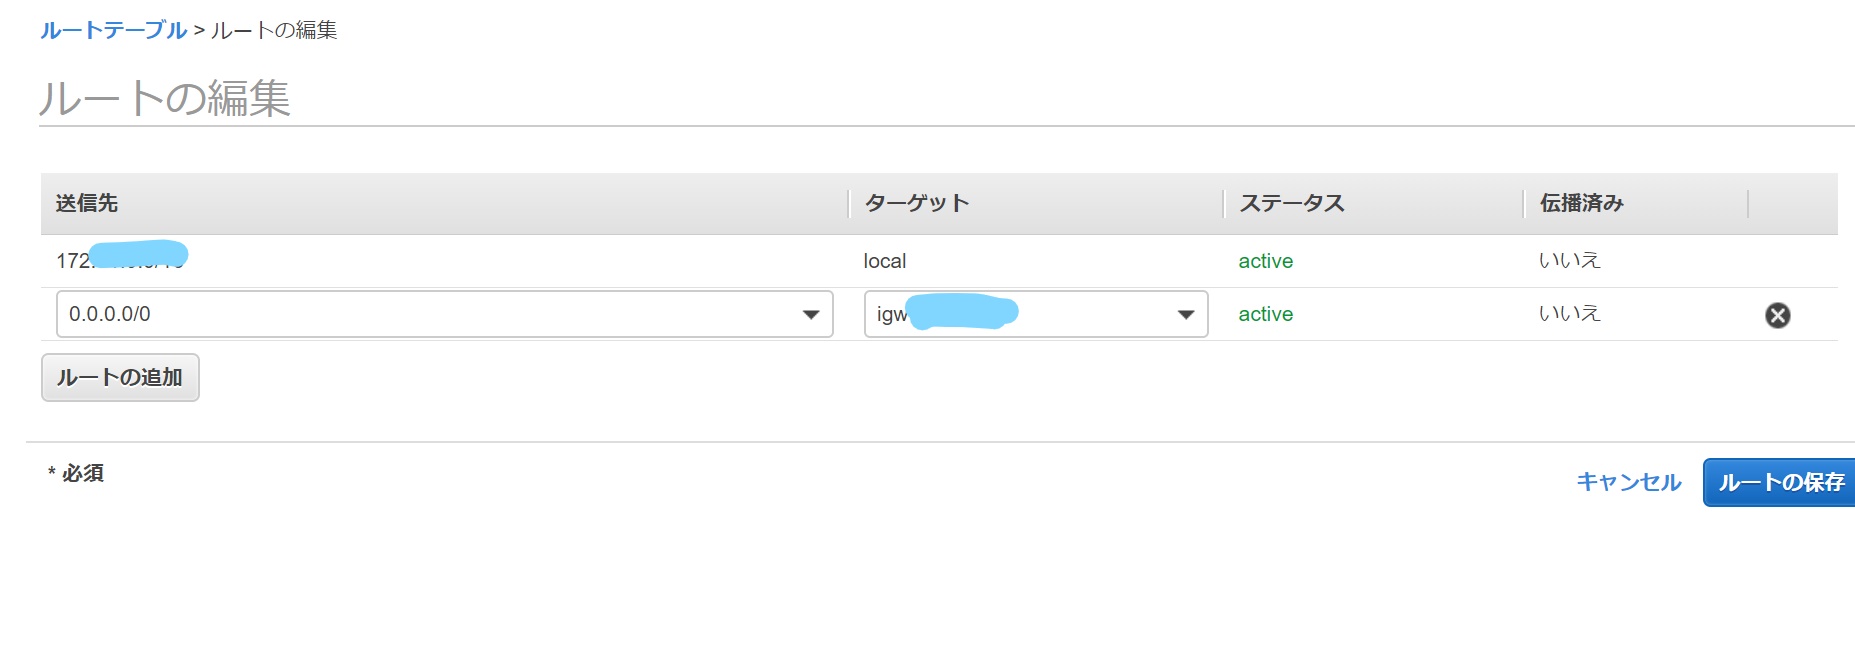
「ルート」ボタン、「ルートの編集」を押します。
すると、ルートを設定することが出来ます。
「送信先」には、IPアドレスを指定します。
全指定したい場合は0.0.0.0/0と指定しましょう。「ターゲット」は、VPCと接続したインターネットゲートウェイのIDを指定します。
そして、「ルートの保存」ボタンを押せば、完成です。
以上です。ありがとうございました!