- 投稿日:2020-10-06T23:53:40+09:00
【Docker】docker-compose上のRailsアプリのDBデータをバックアップ&リストアする方法【MySQL】
現在業務委託でRailsアプリを使ってスクレイピングでデータ収集のお手伝いをさせていただいてるのですが、Docker環境を使っているため何かの拍子にうっかりvolume等を削除してしまったら大変なので、処理が終わるたびにデータのバックアップを取ってます。(レコード数33万件ほどある)
その方法をご紹介します!
バックアップ手順
バックアップデータを突っ込みたいファイルをRailsのrootディレクトリにつくり以下のコマンドを実行する。
$ docker exec -it CONTAINER_NAME(例:myapp_db_1) mysqldump DATABASE_NAME(例:myapp_developmentなど) > backup.sqlリストア(インポート)手順
取り込みたいバックアップファイル(dump.sql)をRailsのrootディレクトリにつくり以下のコマンドを実行する。
$ docker cp dump.sql mydocker_db_1:/tmp/dump.sql
$ docker exec -it myapp_db_1 bash
$ mysql -u USER_NAME -p -h HOST_NAME(database.ymlのhost名,dbとか) DB_NAME(myapp_developmentなど) < /tmp/dump.sql
docker exec -it myapp_db_1 bashでコンテナ内に入り、mysqlコマンドでインポートできます!
今後はデータのバックアップも自動化できればなおいいと思うので挑戦していきたいです!
以上です!
読んでいただきありがとうございます!
ご指摘などあればコメントいただけると嬉しいです!
- 投稿日:2020-10-06T22:53:30+09:00
ActiveStorageを使って、画像投稿機能実装までの流れ
はじめに
よくSNSで画像をあげるような機能があるが、それをRailsで実装するときに使うGemを紹介する。長くなるため、今回は実装の準備段階に絞って投稿する。
全2回の予定。Active Storageとは
現在はGemとしてインストールしなくても、Railsに搭載されている。画像などのファイルのアップロードを簡単に行えるメソッドが使えるようになる、画像を保存するテーブルの作成も簡単に行える。
画像アップロード機能の実装までの流れ
- ImageMagickのインストール
- 2つのGemのインストール
- ローカルサーバーの再起動
- Active Strageのインストール
- テーブルの生成
1.ImageMagickのインストール
そもそもImageMagickとは、画像加工ツールであり、Gemではなく、ソフトウェアの部類になる。Homebrewからインストールを行う場合は、
brew install imagemagickImageMagickだけでは、Rubyで扱えないので、次の2つのGemをインストールする必要がある。
2.2つのGemのインストール
(1)MiniMagick
ImageMagickの機能がRubyで使えるようになる。
(2)ImageProcessing
MiniMagickだけではできない、画像のサイズの調整をする。Gemfilegem 'mini_magick' gem 'image_processing', '~>1.2' #バージョンの指定Gemfileのいちばん下でOK。
記述をしたら、忘れずに、ターミナルで、bundle install3.ローカルサーバーの再起動
rails sGemを新たにインストールしたときは、忘れずに。
4.Active Storageのインストール
晴れて、ActiveStorageが使えるようになったので、
ターミナルを使って、インストールrails active_storage:installインストールすると、マイグレーションファイルが自動で生成される。
5.テーブルの生成
特にカラムの変更がなければ、そのまま、
rails db:migrateこのマイグレーションによって、2つのテーブルが生成されることを確認。
ポイント
- ActiveStorageを使って画像アップロード機能を実装する。
- Rubyで使えるようにするために、2つのGemをインストールする。
最後に
次回、画像の保存方法、保存した画像の表示方法についてまとめる。
- 投稿日:2020-10-06T22:44:39+09:00
本日の『railsチュートリアル』で詰まったところ(2020/10/06)
詰まったところ
1.3.4 Hello, world!
・事象:
$ git push heroku master実行後、URLを開くとMethod Not Allowedと表示される。
・解決方法: 開くURLが間違っていた。
・留意点
Heroku導入は難しくて理解を飛ばしたため、振り返る必要あり。感想
・1章読了!
・pushとcommitを頭の中でイメージできるようになってきた。
・もしかしてQiitaの使い方間違ってる?日付毎に新しい記事を量産するのではなく、1記事に追記していく形がいいのかもしれない。Qiitaルール要確認。
・Qiitaのマークダウン記法は読んだので多少記事が見やすくなったはず。

- 投稿日:2020-10-06T22:26:34+09:00
ヘッダーやフッターを一度作って別のページでも流用する方法
フッターやヘッダーを作ったら他のページにも使いたい!
ポートフォリを制作中
フッターやヘッダーをページが変わるたびに一から作り直すのかなり面倒だなと感じ調べたらすぐに出てきたので共有させてください!結論
このapp > layouts >application.html.erb
の中にあるapplication.html.erb#開くとすでに記述してあります <!DOCTYPE html> <html> <head> <title>PhotoRoke</title> <%= csrf_meta_tags %> <%= csp_meta_tag %> <%= stylesheet_link_tag 'application', media: 'all', 'data-turbolinks-track': 'reload' %> <%= javascript_pack_tag 'application', 'data-turbolinks-track': 'reload' %> </head> <body> #ここにヘッダーの記述をする <%= yield %> #ここにフッターの記述をする </body> </html><%= yield %>
をフッターとヘッダーで挟む感じで記述しましょう!yieldメソッドって何?
レイアウトテンプレートに、各テンプレートファイルを展開するためのメソッドです。とのこと
レイアウトテンプレートとはRailsでいう先ほど編集した applocation.html.erb のことです。
Railsでいうと、ということは他の言語では違うファイルがレイアウトテンプレートなのかもしれませんyieldメソッドが何をしているか
すごく簡単にいうと
yield = トップページのHTML
yield = 新規投稿ページのTHML
yield = その他のページのHTMI
のようにyieldに各ページのHTMLが中に入る終わり
以上になます!
手を抜くプログラミングを行っていきましょう
ご高覧いただきありがとうございました!

- 投稿日:2020-10-06T22:01:10+09:00
【No.008】ActionView::Componentを導入して、ナビバーを全画面に適応させる
github/view_component
[Rails 6.1] ActionView::Component について"
ActionView::Componentの導入概要
ActionView::Componentを導入して、ナビバーを全画面に適応させる
ToDo詳細
- ActionView::Componentのインストール
Gemfilegem "view_component", require: "view_component/engine"Terminalbundle install
- navbar部分をcomponent化
Terminal-> % bin/rails generate component Layout::Navbar org Running via Spring preloader in process 30401 create app/components/layout/navbar_component.rb invoke test_unit create test/components/layout/navbar_component_test.rb invoke slim create app/components/layout/navbar_component.html.slim
- app/views/orders/ordering_org_sides/index.html.slimにnavbarのcomponentを適応
app/views/orders/ordering_org_sides/index.html.slim.bg-gray-100 = render(::Layout::NavbarComponent.new(org: @org)) .py-10 .max-w-7xl.mx-auto.sm:px-6.lg:px-8 .py-5 .-my-2.overflow-x-auto(class="sm:-mx-6 lg:-mx-8") .py-2.align-middle.inline-block.min-w-full(class="sm:px-6 lg:px-8") .shadow.overflow-hidden.border-b.border-gray-200(class="sm:rounded-lg") table.min-w-full.divide-y.divide-gray-200 thead tr th.px-6.py-3.bg-gray-200.text-left.text-xs.leading-4.font-medium.text-gray-500.uppercase.tracking-wider | 注文No th.px-6.py-3.bg-gray-200.text-left.text-xs.leading-4.font-medium.text-gray-500.uppercase.tracking-wider | 商品画像 th.px-6.py-3.bg-gray-200.text-left.text-xs.leading-4.font-medium.text-gray-500.uppercase.tracking-wider | 販売元ページ th.px-6.py-3.bg-gray-200.text-left.text-xs.leading-4.font-medium.text-gray-500.uppercase.tracking-wider | 買付先ページ th.px-6.py-3.bg-gray-200.text-left.text-xs.leading-4.font-medium.text-gray-500.uppercase.tracking-wider | 色・サイズ等 th.px-6.py-3.bg-gray-200.text-left.text-xs.leading-4.font-medium.text-gray-500.uppercase.tracking-wider | 数量 th.px-6.py-3.bg-gray-200.text-left.text-xs.leading-4.font-medium.text-gray-500.uppercase.tracking-wider | お届け先 th.px-6.py-3.bg-gray-200.text-left.text-xs.leading-4.font-medium.text-gray-500.uppercase.tracking-wider | 買付費用 th.px-6.py-3.bg-gray-200.text-left.text-xs.leading-4.font-medium.text-gray-500.uppercase.tracking-wider | ステータス th.px-6.py-3.bg-gray-200.text-left.text-xs.leading-4.font-medium.text-gray-500.uppercase.tracking-wider | 編集 tbody.bg-white.divide-y.divide-gray-200 - @orders.each do |order| tr td.px-6.py-4.whitespace-no-wrap.text-sm.leading-5.text-gray-500 = order.trade_no td.px-6.py-4.whitespace-no-wrap.text-sm.leading-5.text-gray-500 | 商品画像 td.px-6.py-4.whitespace-no-wrap.text-sm.leading-5.text-gray-500 a.text-indigo-600.hover:text-indigo-900 href="#" 販売元ページ td.px-6.py-4.whitespace-no-wrap.text-sm.leading-5.text-gray-500 a.text-indigo-600.hover:text-indigo-900 href="#" 買付先ページ td.px-6.py-4.whitespace-no-wrap.text-sm.leading-5.text-gray-500 = order.color_size td.px-6.py-4.whitespace-no-wrap.text-sm.leading-5.text-gray-500 = order.quantity td.px-6.py-4.whitespace-no-wrap.text-sm.leading-5.text-gray-500 | 〒#{order.postal} br = order.address td.px-6.py-4.whitespace-no-wrap.text-sm.leading-5.text-gray-500 | $100 td.px-6.py-4.whitespace-no-wrap.text-sm.leading-5.text-gray-500 = order.status_i18n td.px-6.py-4.whitespace-no-wrap.text-right.text-sm.leading-5.font-medium a.text-indigo-600.hover:text-indigo-900 href="#" i.fas.fa-edit
- app/views/orgs/index.html.slimにnavbarのcomponentを適応
app/views/orgs/index.html.slim= render(::Layout::NavbarComponent.new(org: @org)) .bg-white.shadow.m-auto.sm:rounded-md.mt-5(class="w-2/4") ul - @orgs.each do |org| / TODO:Sassで場合分けできるようにする - border_t = org == @orgs.first ? '' : 'border-t border-gray-200' li.(class=border_t) = link_to [org], class: 'block hover:bg-gray-50 focus:outline-none focus:bg-gray-50 transition duration-150 ease-in-out' do .flex.items-center.px-4.py-4.sm:px-6 .min-w-0.flex-1.flex.items-center .min-w-0.flex-1.px-4.md:grid.md:grid-cols-2.md:gap-4 div .text-sm.leading-5.font-medium.text-indigo-600.truncate = org.name div i.fas.fa-sign-in-alt.fa-lg.bg-gray-50.text-gray-500
- app/views/orgs/show.html.slimにnavbarのcomponentを適応
app/views/orgs/show.html.slim= render(::Layout::NavbarComponent.new(org: @org)) .bg-white.shadow.m-auto.mt-5.overflow-hidden.sm:rounded-lg(class="w-1/2") .px-4.py-5.border-b.border-gray-200.sm:px-6 h3.text-lg.leading-6.font-medium.text-gray-900 | 会社詳細 p.mt-1.max-w-2xl.text-sm.leading-5.text-gray-500 | 会社詳細を説明します。 div dl .bg-gray-100.px-4.py-5.sm:grid.sm:grid-cols-3.sm:gap-4.sm:px-6 dt.text-sm.leading-5.font-medium.text-gray-500 | 会社名 dd.mt-1.text-sm.leading-5.text-gray-900.sm:mt-0.sm:col-span-2 = @org.name .bg-white.px-4.py-5.sm:grid.sm:grid-cols-3.sm:gap-4.sm:px-6 dt.text-sm.leading-5.font-medium.text-gray-500 | 会社タイプ dd.mt-1.text-sm.leading-5.text-gray-900.sm:mt-0.sm:col-span-2 / TODO:enum化する = @org.org_type動作確認
準備
bin/rails db:migrate:reset
bin/rails db:reset
受入基準
- 下図のように全画面にnavbarが適応されている
※ リンクはめちゃくちゃです。
※ ドロップダウンのJSも後日対応予定です。
- 投稿日:2020-10-06T20:28:35+09:00
ActionView::Componentの導入
github/view_component
[Rails 6.1] ActionView::Component について
PR準備
Terminalrails new view_component_app -d postgresql環境
Gemfileruby '2.7.1' # Bundle edge Rails instead: gem 'rails', github: 'rails/rails' gem 'rails', '~> 6.0.3', '>= 6.0.3.3' # Use postgresql as the database for Active Record gem 'pg', '>= 0.18', '< 2.0'Slim入れる
Gemfilegem 'slim-rails' gem 'html2slim'Terminalbundle installTailwind入れる
ref: tailwindcss Documentation
1.Install Tailwind via npm
# Using npm
npm install tailwindcss

# Using Yarn
yarn add tailwindcss
2.Add Tailwind to your CSS
app/javascript/src/scss/application.scssを追加
@import "tailwindcss/base";
@import "tailwindcss/components";
@import "tailwindcss/utilities";
app/javascript/packs/application.jsに下記追加
import '../src/scss/application.scss'3.Create your Tailwind config file (optional)
npx tailwindcss init4.Process your CSS with Tailwind
postcss.config.jsに下記追加
module.exports = {
  plugins: [
    // ...
    require('tailwindcss'),
    require('autoprefixer'),
    // ...
  ]
}
Scaffold
Terminalbin/rails g scaffold blog content:textroutes.rbRails.application.routes.draw do root 'blogs#index' #追加 resources :blogs # For details on the DSL available within this file, see https://guides.rubyonrails.org/routing.html endDB作成
Terminalbin/rails db:create bin/rails db:migrateActionView::Componentの導入
インストール
Gemfilegem "view_component", require: "view_component/engine"Terminalbundle installサンプル1
コンポーネントを用意
Terminal-> % bin/rails generate component Example title content Running via Spring preloader in process 24985 create app/components/example_component.rb invoke test_unit create test/components/example_component_test.rb invoke slim create app/components/example_component.html.slimapp/components/example_component.rbclass ExampleComponent < ViewComponent::Base def initialize(title:, content:) @title = title @content = content end endapp/components/example_component.html.slimdiv = @title div = @content呼び出し元
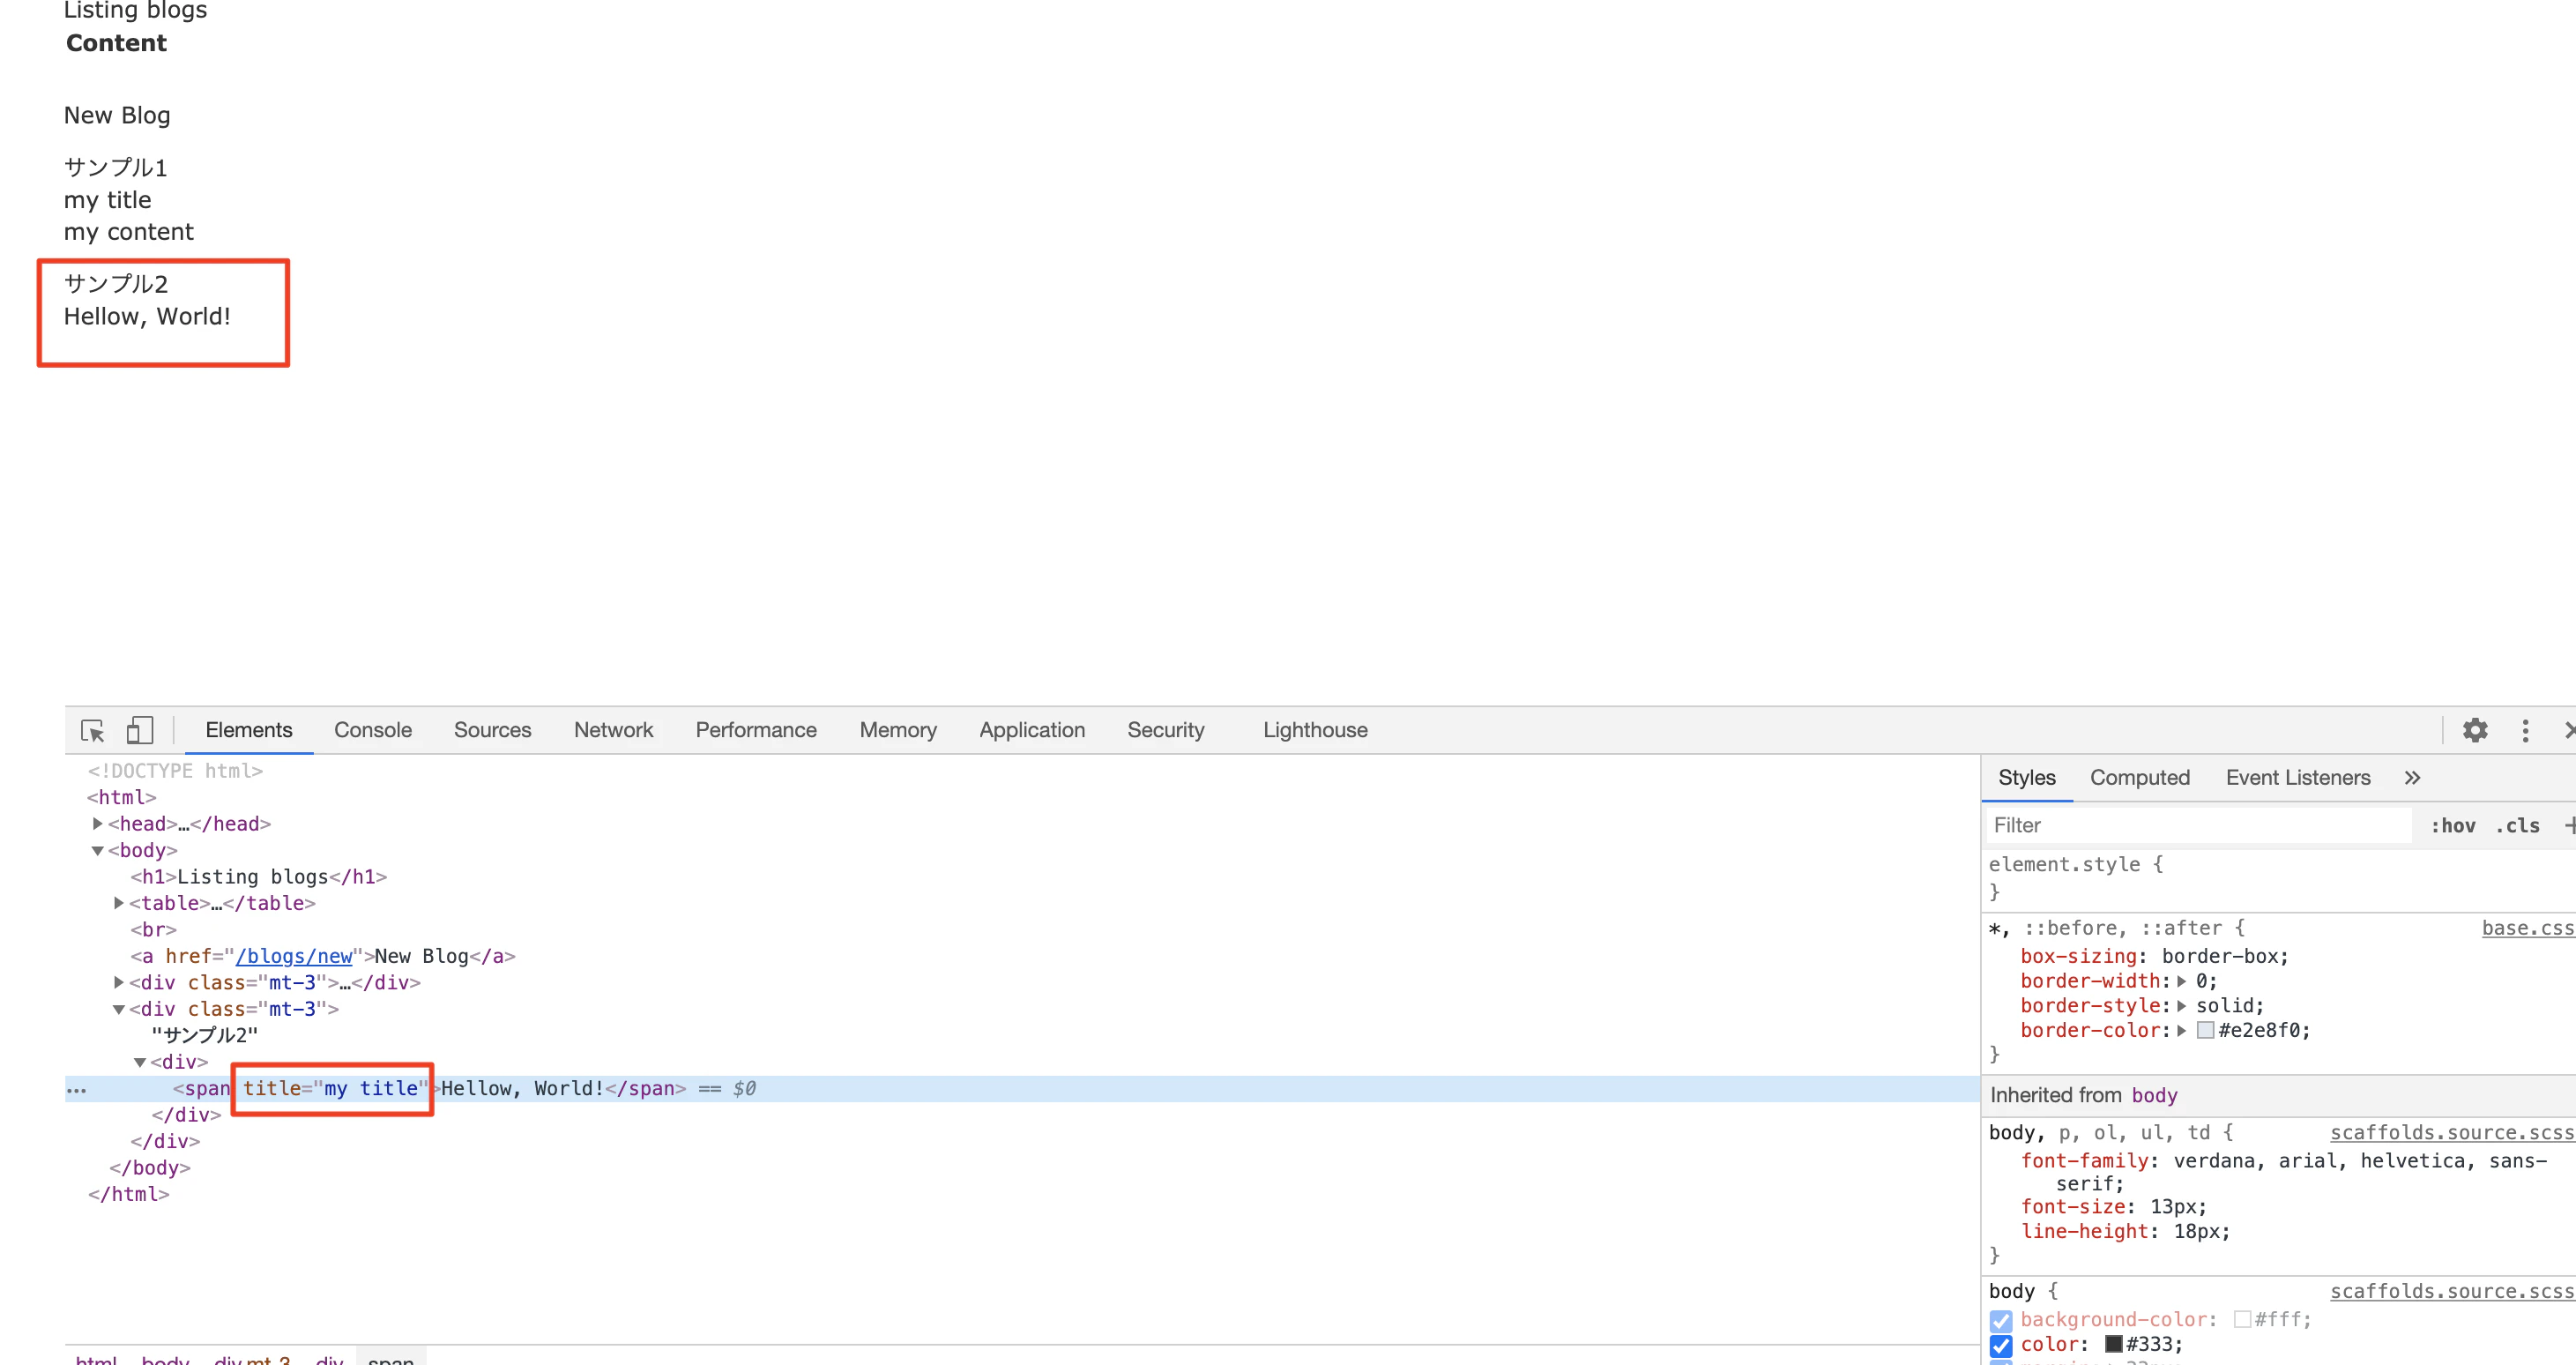
app/views/blogs/index.html.slimh1 Listing blogs table thead tr th Content th th th tbody - @blogs.each do |blog| tr td = blog.content td = link_to 'Show', blog td = link_to 'Edit', edit_blog_path(blog) td = link_to 'Destroy', blog, data: { confirm: 'Are you sure?' }, method: :delete br = link_to 'New Blog', new_blog_path = render(ExampleComponent.new(title: 'my title', content: 'my content'))表示
サンプル2
コンポーネントを用意
Terminalbin/rails generate component Test titleapp/components/test_component.rbclass TestComponent < ViewComponent::Base def initialize(title:) @title = title end endapp/components/test_component.html.slimdiv span(title=@title) = content呼び出し元
app/views/blogs/index.html.slimh1 Listing blogs table thead tr th Content th th th tbody - @blogs.each do |blog| tr td = blog.content td = link_to 'Show', blog td = link_to 'Edit', edit_blog_path(blog) td = link_to 'Destroy', blog, data: { confirm: 'Are you sure?' }, method: :delete br = link_to 'New Blog', new_blog_path div.mt-3 | サンプル1 = render(ExampleComponent.new(title: 'my title', content: 'my content')) div.mt-3 | サンプル2 = render(TestComponent.new(title: "my title")) do | Hellow, World!表示
- 投稿日:2020-10-06T18:59:09+09:00
アクション内でrenderを使わずにバリデーションエラーや入力していた内容を前ページに反映する方法
はじめに
フォーム内容を送信する際、バリデーションに引っ掛かったら
renderメソッドで新規投稿画面をレンダリングして
そこでエラーなり入力していた内容なりを表示すると学習した方が多いはずしかし、
renderメソッドが使えない時はどうしますか?
実は制作中のポートフォリオにGoogleMapAPIを使用しているのですが
renderでページをレンダリングするとなぜかMAPが表示しなくなる不具合が発生...仕様を変えれば解決できる問題だったのですが、変えたくなかったので
renderを使わずに上記の動きを実現する方法を紹介します。通常renderを使った場合
例として
tasks_controller.rbに
新規投稿ページのアクションnewと、
新規投稿内容を保存するアクションcreateがあるとします。tasks_controller.rbdef create @task = Task.new(task_params) if @task.save redirect_to @task, notice: 'タスクを保存しました。' else render :new end end
@task.saveが失敗しelse以下のrender :newが実行され、
新規投稿ページがレンダリングされます。
あとはもうご存知のとおり、viewのほうで@task.errors.full_messagesを活用してく感じですね。renderを使わない場合
redirect_toで再アクセスをするという形をとり、
エラー文や入力内容はアクション内でflashに格納してしまいます。tasks_controller.rbdef create @task = Task.new(task_params) if @task.save redirect_to @task, notice: 'タスクを保存しました。' else flash[:error_msgs] = @task.errors.full_messages flash[:tmp_body] = @task.body redirect_to new_task_url end end
flash[:error_msgs]にはエラー文を、
flash[:tmp_body]には文章内容を、それぞれ格納しておきます。あとはアクセス先のviewで、flashの値を活用してすればOKです。
以上!
- 投稿日:2020-10-06T18:38:12+09:00
deviseのエラーメッセージがうまく表示されない。
概要
deviseのエラーメッセージがうまく表示されないので、理由をなんとなく突き止めた。
解決とは言えないけど、decviseの仕組みが少しだけ理解できたので忘備録として残しておきます。解決策
部分テンプレートを呼び出す時に、テンプレートに変数名を
resourceから@モデル名に変更した。エラーメッセージ<%= render "devise/shared/error_messages", resource: resource %> ↓ <%= render "devise/shared/error_messages", resource: @profile %>deviseは複数のモデルのインスタンスを扱えるフレームワークなので、resourceでうまく処理できるみたいです。
本当は別の処理もありそうだけど、ここを@モデル名に変えたらうまくいきました。その他のコード
ルーティング
ユーザー登録とプロフィール登録をウィザード形式にしているため、profileは'users/registration'コントローラーで処理させています。
※なんかここにエラーがでた理由が隠されていそうなんだけど詳しくは不明。routes.rbRails.application.routes.draw do devise_for :users, controllers: { registrations: 'users/registrations' } devise_scope :user do get 'profiles', to: 'users/registrations#new_profile' post 'profiles', to: 'users/registrations#create_profile' end endテーブル設計
deviseを使って、usersテーブルとprofilesテーブルにユーザー情報を保存しようとしている。
schema.rb# usersテーブルとprofielsテーブルはこんな感じ。 create_table "profiles", options: "ENGINE=InnoDB DEFAULT CHARSET=utf8", force: :cascade do |t| t.string "favorite_beer" t.text "twitter_link" t.text "info" t.bigint "user_id", null: false t.datetime "created_at", precision: 6, null: false t.datetime "updated_at", precision: 6, null: false t.index ["user_id"], name: "index_profiles_on_user_id" end create_table "users", options: "ENGINE=InnoDB DEFAULT CHARSET=utf8", force: :cascade do |t| t.string "nickname", null: false t.string "email", default: "", null: false t.string "encrypted_password", default: "", null: false t.string "reset_password_token" t.datetime "reset_password_sent_at" t.datetime "remember_created_at" t.datetime "created_at", precision: 6, null: false t.datetime "updated_at", precision: 6, null: false t.index ["email"], name: "index_users_on_email", unique: true t.index ["reset_password_token"], name: "index_users_on_reset_password_token", unique: true end入力フォーム
プロフィール登録のビューはこんな感じ。
ここの部分テンプレートでエラーメッセージを呼び出しているが、そこにうまくprofilesテーブルの情報が渡せなかった様子。new_profile<h2>プロフィール登録</h2> <%= form_with model: @profile, local: true do |f| %> <%= render "devise/shared/error_messages", resource: @profile %> <div class="field"> <%= f.label :avatar %><br /> <%= f.file_field :avatar %> </div> <div class="field"> <%= f.label :favorite_beer %><br /> <%= f.text_field :favorite_beer, autofocus: true, autocomplete: "favorite_beer" %> </div> <div class="field"> <%= f.label :twitter_link %><br /> <%= f.text_field :twitter_link, autocomplete: "twitter_link" %> </div> <div class="field"> <%= f.label :info %><br /> <%= f.text_area :info %> </div> <div class="actions"> <%= f.submit "新規登録" %> </div> <% end %> <%= render "devise/shared/links" %>エラーメッセージの呼び出しもと
部分テンプレートで呼び出しているdeviseのエラーメッセージは以下の通り
divese/shared/_error_messages.html.erb<% if resource.errors.any? %> <%# この↑の部分のresourceに@profileを渡した%> <div id="error_explanation"> <h2> <%= I18n.t("errors.messages.not_saved", #ここら辺の記述はdevise.ja.ymlに記載がある count: resource.errors.count, resource: resource.class.model_name.human.downcase) %> </h2> <ul> <% resource.errors.full_messages.each do |message| %> <li><%= message %></li> <% end %> </ul> </div> <% end %>deviseを日本語化しているファイル
deviseは既に日本語化しているので、ymlファイルも日本語になっています。
config/locales/devise.ja.ymlja: activerecord: attributes: # ~省略~ models: user: ユーザ profile: プロフィール # ここも日本語化したかったので追記しました # ~省略~ errors: messages: already_confirmed: は既に登録済みです。ログインしてください。 confirmation_period_expired: の期限が切れました。%{period} までに確認する必要があります。 新しくリクエストしてください。 expired: の有効期限が切れました。新しくリクエストしてください。 not_found: は見つかりませんでした。 not_locked: は凍結されていません。 # このしたのnot_savedのところが部分テンプレートで呼び出されている様子 not_saved: one: エラーが発生したため %{resource} は保存されませんでした。 other: "%{count} 件のエラーが発生したため %{resource} は保存されませんでした。"まとめ
今後まだまだ勉強していきたいと思います。
もしこの文章がとんでもない勘違いを含んでいましたら、ご指摘いただければと思います。
- 投稿日:2020-10-06T15:39:20+09:00
bundle install?yarn install?何してるの
installが多いな
gemやappをインストールした時にbundle installやら yarn installやらたくさんインストールがあって何を表しているのかわかっていませんでした。
bundle install
bundlerというgemが他のgemのバージョンを管理していて、
bundle installとコマンドで実行することで、gem同士互換性があるかをチェックしている。
yarn install
yarnはパッケージマネージャー。gemのbunderのようなもの。
yarn installとコマンドで実行することで、javascriptに関係するパッケージ(ライブラリをまとめたもの)のバージョンを管理して互換性があるかチェックしている。
- 投稿日:2020-10-06T15:31:48+09:00
RubyOnRailsで環境変数を使用する方法
■英語語の記事↓
How to Use Environment Variables in Ruby On Rails環境変数とは
各アプリケーションには、外部サービス用の電子メールアカウント資格情報やAPIキーなどの構成設定が必要です。環境変数を使用して、ローカル構成設定をアプリケーションに渡すことができます。
Ruby On Railsで環境変数を使用する方法はいくつかあり、FigaroGemのようなgemもあります。
この記事には、local_env.ymlファイルを使用して、実装の方法を共有させていただきます。環境変数ファイルをプライベートとして保持する
GitHubを使用してコードを保存および共有していて、プロジェクトがオープンソースである場合、開発者は誰でもコードにアクセスできます。 個人情報やAPIキーを一般の人と共有したくない、プライベートgitリポジトリを使用してチームで共同作業している場合、ローカル設定がチームのすべてのメンバーに適しているとは限りません。
local_env.ymlファイルを使用:
標準のYAMLファイル形式を使用して、各環境変数のキーと値のペアを含む単純なファイルを作成します。
config/local_env.ymlファイルを作成:
MAIL_USERNAME: 'Your_Username'
MAIL_PASSWORD: 'Your_Username'
.gitignoreに設定
アプリケーションのgitリポジトリを作成した場合、アプリケーションのルートディレクトリには.gitignoreという名前のファイルが含まれている必要があります。
.gitignoreファイルに以下の行を追加/config/local_env.ymlRailsアプリケーションファイルに設定
環境変数を設定後で、ファイル「local_env.yml」は「config/application.rb」に設定が必要です。
config/application.rbファイルに下記のコードを設定config.before_configuration do env_file = File.join(Rails.root, 'config', 'local_env.yml') YAML.load(File.open(env_file)).each do |key, value| ENV[key.to_s] = value end if File.exists?(env_file) end上記のコードは、local_env.ymlファイルから環境変数を設定します。
コードに環境変数を使用
RailsアプリケーションでENV ["MAIL_USERNAME"]を使用することができます。
例:ActionMailer::Base.smtp_settings = { address: "smtp.gmail.com", enable_starttls_auto: true, port: 587, authentication: :plain, user_name: ENV["MAIL_USERNAME"], password: ENV["MAIL_PASSWORD"], openssl_verify_mode: 'none' }コーディングを楽しみましょう!

ご不明な点がございましたらご連絡して頂ければと思います。
以上です。よろしくお願いいたします。
- 投稿日:2020-10-06T13:50:17+09:00
【Rails】migrate時にAnnotateが実行されない
はじめに
Annotateが実行できず、コメントが書き出されない時に試したことをまとめました。
環境
- Rails6.0.3
- Ruby2.7.1
- annotate3.1.1
Annotateとは
schemaに書かれている情報をルーティングの情報をファイルの先頭にコメントしてくれるgemです。
カラム情報やルーティングを確認する手間が省くことができます。
導入や詳細な使い方は下記を参考にしました。
【Rails】annotateの使い方発生したバグ(migrate時にコメントが書き出されない)
migrate時にannotateが実行され、modelにコメントされる設定にしているのに、実行されないという問題が発生しました。
作業ブランチで1つ目のmigrationファイルを作成して、migrateした時はコメントが書き出されたのに、作業同じブランチで2つ目のmigrationファイルを作成して、migrateしたら、コメントが書き出されませんでした。いろいろ試しましたが、最終的には一度コメントを削除してから、migrateしたら、上手く行きました。
やったこと
1. 設定ファイルを確認
$ bundle exec rails g annotate:installで生成されたlib/tasks/auto_annotate_models.rakeのAnnotateの設定を確認します。auto_annotate_models.rake'skip_on_db_migrate' => 'false',
falseになっているのでmigrate時にコメントが書き出される設定になっています。(ここは問題なし)2. 手動でAnnotateを実行
migarate時に実行されないので手動でAnnotateを実行します。
これでもコメントが書き出されない。。$ bundle exec annoatate --models3. gemを再インストール
それでもコメントが書き出されない場合は、gemを最インストールします。
再インストールすると直った場合もありました。4. annotateのコメントを削除する
私の場合、いろいろ試してもコメントが書き出されなかったので、コメントを削除することにしました。
$ bundle exec annotate --deletemodelからコメントが削除されたことを確認して、migrateもしくは手動で実行。
$ bundle exec rails db:migrate

or

$ bundle exec annoatate --models
削除して、migrateすると全てのモデルに書き出されました。
おわりに
migrate時にannotateが実行されない原因は結局わかりませんでしたが、ひとまずコメントが書き出されました。
もし、原因がわかる方がいましたら、コメント頂けますと幸いです。
- 投稿日:2020-10-06T13:02:58+09:00
fields_forの使い方
親子関係のモデルで、子のモデルのmigrationファイルにforeign_keyを指定する
question.rb#親モデル class Question < ApplicationRecord has_many :question_similars, dependent: :destroy accepts_nested_attributes_for :question_similars validates :question, presence: true validates :description, presence: true endquestion_similar.rbclass QuestionSimilar < ApplicationRecord belongs_to :question validates :similar_word, presence: true endquestions_controller.rbclass QuestionsController < ApplicationController before_action :require_login before_action :session_number_to_zero def search @questions = Question.where('question ilike ?', "%#{params[:search]}%") end def index @questions = Question.all end def new @question = Question.new @question.question_similars.build end def create @question = Question.new(question_params) if @question.save redirect_to questions_path, notice: '単語を作成しました' else render 'new' end end def show @question = Question.find(params[:id]) end def edit @question = Question.find(params[:id]) end def update @question = Question.find(params[:id]) if @question.update(question_update_params) redirect_to questions_path, notice: '単語を編集しました' else render 'edit' end end def destroy @question = Question.find(params[:id]) if @question.destroy redirect_to questions_path, notice: '単語を削除しました' else redirect_to root_url end end private def question_params params.require(:question).permit(:question, :description, question_similars_attributes: [:similar_word, :question_id]) end def question_update_params params.require(:question).permit(:question, :description, question_similars_attributes: [:similar_word, :question_id, :_delete, :id]) end endquestions/new.html.erb<h1>単語作成</h1> <%= form_for @question do |f| %> <%= render 'layouts/error_messages', model: f.object %> <div class="form-group"> <%= f.label :question, '単語' %> <%= f.text_field :question, class: 'form-control' %> </div> <div class="form-group"> <%= f.label :description, '説明' %> <%= f.text_area :description, class: "form-control" %> </div> <%= f.fields_for :question_similars do |q| %> <div class="form-group"> <%= q.label :similar_word, '類義語' %> <%= q.text_field :similar_word, class: "form-control" %> </div> <% end %> <%= f.submit '作成', class: 'btn btn-primary form-control' %> <% end %>questions/edit.html.erb<%= form_for(@question, url: { controller: 'questions', action: 'update' }) do |f| %> <%= render 'layouts/error_messages', model: f.object %> <div class="form-group"> <%= f.label :question, '単語' %> <%= f.text_field :question, class: 'form-control' %> </div> <div class="form-group"> <%= f.label :description, '説明' %> <%= f.text_area :description, class: "form-control" %> </div> <%= f.fields_for :question_similars do |q| %> <div class="form-group"> <%= q.label :similar_word, '類義語' %> <%= q.text_field :similar_word, class: "form-control" %> <%= q.hidden_field :id, value: q.object.id %> </div> <% end %> <%= f.submit '更新する', class: 'btn btn-primary form-control' %> <% end %>
- 投稿日:2020-10-06T09:35:34+09:00
ReactとRailsを同一サーバーで動かす方法
経緯
Railsの学習を始めるに当たって、 ERBを利用したVIEWでフロント側を構築していたが、
最近はSPAというものが流行っていると小耳に挟んだ。とりあえずチャレンジ!
ということでReactの学習を並行して進めていたが、、、
これどうやってデプロイするんだ。。。となってしまいました笑
とりあえず別サーバーで動かすことにしてCORS制約などもなんとなくクリアして無事にRailsとReactのやりとりが可能になった。
しかし、ReactとRailsを利用したアプリ関係の記事を漁っていると、同一サーバーで動かしているものを多数発見!!!
何回かチャレンジしたものの上手く行かず断念。。。しばらく時間が過ぎ、この土日に絶対動かしてやる!!! と執念で参考記事を探しまくった結果、
Heroku公式のBlogにわかりやすい記事があり、やっと構築ができました笑同じような人がいたら参考になれば良いなと思い投稿するに至りました!
前提条件
- Heroku blogの記事から必要最小限の部分だけ引用したものになります
- Ruby、Rails、Node、npm OR yarnなどの基本的なインストールが済んでいること
- Railsアプリを作成したことがある
- Reactアプリをcreate-react-appで作成したことがある
- Herokuでホスティングをしたことがある(gitでデプロイ)
参考記事:A Rock Solid, Modern Web Stack—Rails 5 API + ActiveAdmin + Create React App on Heroku
Railsアプリの作成
rails new コマンドでrails アプリを作成します。
--apiコマンドでapiモードにするのをお忘れなく
rails new rails_app --api作成したアプリが起動するか確かめましょう。
cd rails_app
rails s
Reactアプリの作成
Railsアプリのルートディレクトリ上でclientという名前でReactアプリを構築します。
npm create-react-app clientRailsと同じように、Reactが動くか確かめましょう。
cd client
npm start
このままだと開発中にReactとRailsで別ポートとなるので
package.jsonに設定を追加します。package.json{ "name": "client", "version": "0.1.0", "private": true, "proxy": "http://localhost:3001", #ここを追加 ... }この設定によりRails側には、Reactアプリがポート3001で起動しているように認識させます。
React - Rails ローカル編
ローカル環境立ち上げ用のタスクを作成します。
ProcfileにReactとRailsを立ち上げるコマンドを書き、Railsのタスクで呼び出す方法にします。
Procfileはheroku上で利用されるファイルで、プロセスのタイプ:コマンドで記述できます。
<process type>: <command>今回は、ルートディレクトリにProcfile.devというファイル名で、RailsアプリとReactアプリの起動コマンドを記述します。
Procfile.devweb: cd client && PORT=3000 npm start api: PORT=3001 && bundle exec rails s呼び出しコマンドを簡潔にしたいため、taskにします。
start.rakenamespace :start do desc 'Start development server' task :dev do exec 'heroku local -f Procfile.dev' end endtaskでprocfileの起動コマンドをキックします。
rake start:devReactとRailsがどちらも立ち上がったと思います。
ターミナル上のログでわかりづらい場合はRails側で何かしらJsonを返すようにしておき、React側からfetchできるようにしておくとわかりやすいと思います。
React - Rails Heroku編
メインテーマであるHeroku上へのデプロイです。
まずはルートディレクトリにpackage.jsonファイルを作成します。
RailsのpublicディレクトリにReactの静的ファイルを作成するコマンドを記述します。
package.json{ "name": "list-of-ingredients", "license": "MIT", "engines": { "node": "10.15.3", "yarn": "1.15.2" }, "scripts": { "build": "yarn --cwd client install && yarn --cwd client build", "deploy": "cp -a client/build/. public/", "heroku-postbuild": "yarn build && yarn deploy" } }production用のProcfileを作成し、railsの起動コマンドを記述します。
必要に応じてrelease後のmigrateコマンドも記述します。
Procfileweb: bundle exec rails s release: bin/rake db:migrate
CLIを利用してheroku上のdynoの作成とビルドパックの設定を行います。アプリの作成heroku apps:createビルドパックの設定heroku buildpacks:add heroku/nodejs --index 1 heroku buildpacks:add heroku/ruby --index 2heroku上の準備ができたのでgitでpushします。
git add .
git commit -m "React - Rails"
git push heroku master
アプリを開きます。
heroku openあとがき
みなさん無事に動きましたでしょうか?
もっと良い方法があれば是非教えていただけるとありがたいです。
もし動かない場合は下記の参考元の記事を読んでみてください!
参考記事:A Rock Solid, Modern Web Stack—Rails 5 API + ActiveAdmin + Create React App on Heroku
- 投稿日:2020-10-06T07:21:05+09:00
RSpec でGoogleMap のピンをクリックしたい
はじめに
RSpecで GoogleMap のピンをクリックするテストを書きたかったがハマってしまったので備忘録です。
記載しているソース、エラーコードは出力されたものを不要なものを省いた状態で載せていますので参考にする場合は注意してください。環境
- macOS 10.15.6
- Ruby 2.5.7
- Rails 5.2.3
- gem capybara
- gem selenium-webdriver
参考URL
https://qiita.com/jnchito/items/607f956263c38a5fec24
https://qiita.com/kon_yu/items/52a0f5f0016564486061
https://stackoverflow.com/questions/31479958/capybara-rspec-not-finding-and-clicking-css-element
https://code-kitchen.dev/html/map-area/
目標
GoogleMap 内のピンをクリックしてinfowindow が表示されるのかテストしたい
問題
- capybara でピンがクリックできなかった
- img タグをクリックすると
Selenium::WebDriver::Error::ElementClickInterceptedError:- map タグをクリックすると
Selenium::WebDriver::Error::ElementNotInteractableError:原因
- 検索したい要素に
display:none,disabled,hiddenになっているとcapybara で検索できない- 検索したい要素の高さが0px なのでcapybara で認識できない
解決策
visible: falseオプション付きでarea タグをfind するとクリックできるgooglemap.html<div id="map"> //地図全体 <img src="https://maps.gstatic.com/mapfiles/api-3/images/spotlight-poi2_hdpi.png" usemap="#gmimap0"> //ピン画像 <map name="gmimap0" id="gmimap0"> <area> //コイツをクリックすればok </map> </div>googlemap_spec.rbrequire 'rails_helper' RSpec.describe "GoogleMap", type: :system do describe "GoogleMap が表示されているページ" do context "GoogleMap の動作確認", js: true do it "ピンをクリックするとinfowindow が表示されること" do pin = find("map#gmimap0 area", visible: false) pin.click expect(page).to have_css "div.infowindow" # infowindow クラスの有無をテスト end end end endダメなパターン その1
ピンのimg タグを探してしてクリックする
- そもそもimg タグはクリックできない
Selenium::WebDriver::Error::ElementClickInterceptedError:- area タグはクリック可能というヒントが表示される
googlemap_spec.rb# ピンのimg タグを探してクリック describe "GoogleMap が表示されているページ" do context "GoogleMap の動作確認", js: true do it "ピンをクリックするとinfowindow が表示されること" do pin = find("img[src$='spotlight-poi2_hdpi.png']") #ピンのイメージを検索 pin.click expect(page).to have_css "div.infowindow" end end end# img タグはクリックできないよエラー # area タグはクリックできるよ Failures: 1) GoogleMap が表示されているページ GoogleMap 表示内容 ピンをクリックするとinfowindow が表示されること Failure/Error: find("img[src$='spotlight-poi2_hdpi.png']").click Selenium::WebDriver::Error::ElementClickInterceptedError: element click intercepted: Element <img alt="" src="https://maps.gstatic.com/mapfiles/api-3/images/spotlight-poi2_hdpi.png" draggable="false" style="position: absolute; left: 0px; top: 0px; width: 27px; height: 43px; user-select: none; border: 0px; padding: 0px; margin: 0px; max-width: none;"> is not clickable at point (699, 750). Other element would receive the click: <area log="miw" coords="13.5,0,4,3.75,0,13.5,13.5,43,27,13.5,23,3.75" shape="poly" title="" style="cursor: pointer; touch-action: none;"> (Session info: headless chrome=85.0.4183.121) [Screenshot]: スクリーンショットが保存されているディレクトリへのパス # 0 chromedriver 0x00000001083091b9 chromedriver + 4911545 . . . # 24 libsystem_pthread.dylib 0x00007fff6c49bb8b thread_start + 15 Finished in 9.05 seconds (files took 0.55005 seconds to load) 1 example, 1 failure Failed examples:ダメなパターン その2
map タグを探してクリックする
- map タグが見つからない
- エラーコードにヒントは無し
googlemap_spec.rb# map タグを探してクリック describe "GoogleMap が表示されているページ" do context "GoogleMap の動作確認", js: true do it "infowindow が表示されること テスト" do pin = find("map#gmimap0").click #mapタグを検索 pin.click expect(page).to have_css "div.infowindow" end end end# map タグは見つからないよエラー Failures 1) GoogleMap が表示されているページ GoogleMap 表示内容 ピンをクリックするとinfowindow が表示されること Failure/Error: pin = find("map#gmimap0").click Capybara::ElementNotFound: Unable to find visible css "map#gmimap0" [Screenshot]: スクリーンショットが保存されているディレクトリへのパス Finished in 7.84 seconds (files took 0.54001 seconds to load) 1 example, 1 failure Failed examples:ダメなパターン その3
map タグを
visible: falseで探してクリックする
- map タグはゼロサイズだからクリックできない
Selenium::WebDriver::Error::ElementNotInteractableError:googlemap_spec.rb# map タグにvisible: false を付けてfind describe "GoogleMap が表示されているページ" do context "GoogleMap 表示内容", js: true do it "infowindow が表示されること テスト" do pin = find("map#gmimap0", visible: false).click #非表示要素の検索オプションを付加してmap タグを検索 pin.click expect(page).to have_css "div.infowindow" end end end# map タグはゼロサイズだからクリックできないよのエラー Failures: 1) GoogleMap が表示されているページ GoogleMap 表示内容 infowindow が表示されること Failure/Error: pin = find("map#gmimap0", visible: false).click Selenium::WebDriver::Error::ElementNotInteractableError: element not interactable: element has zero size (Session info: headless chrome=85.0.4183.121) [Screenshot]: スクリーンショットが保存されているディレクトリへのパス # 0 chromedriver 0x0000000107a8c1b9 chromedriver + 4911545 . . # 21 libsystem_pthread.dylib 0x00007fff7034eb8b thread_start + 15 Finished in 8.19 seconds (files took 0.52799 seconds to load) 1 example, 1 failure学び
- capybara で非表示要素を検索したい場合は
visible: falseオプションでfind するとクリックできる- エラーコードにヒントが隠されているので見逃さない

- 投稿日:2020-10-06T03:11:55+09:00
VagrantにHerokuを入れる際に起きたエラーと解決方法と参考記事
はじめに
ドットインストールで構築したローカル環境でアプリを開発し、公開するため、いざherokuを入れようとしたらエラーが起きまくりました。
【初心者向け】railsアプリをherokuを使って確実にデプロイする方法【決定版】
この記事を参考にしていました。
しかし、herokuを入れる際に、この記事の開発環境が全く違うため、その先に進めずエラーと戦うことになりました。パスがない問題
エラー解決に必死だったため、エラーのコピーは取っていませんが、このようなエラーがでたと思います。
↓エラーの最後の文
Your path is missing /usr/local/bin, you need to add this to use this installer.
/usr/local/binのパスが無いと言われているため、パスを作る必要があるみたいです。パスの確認
$ echo $PATHパスを確認してみますが
/usr/local/bin:はあっても/usr/local/binがないと駄目みたいです。解決方法の前に、解決する中で知った知識
sudoとは、僕の解釈では権限の高いコマンド。
$と#で違いもあり、#のほうが権限が高い。($の方で実行できないことが#で実行できたから)解決方法:偉い権限を使ったり、
viエディタで書き換えたりする。パスの設定に必要な
.bash_profileの設定とsudoの設定は以下を参考にしました。
仮想環境構築後に設定しておきたいこと -メモ-
sudoの設定はこちらの方が親切です。
CentOS で sudo 時に実行ユーザーのPATHを引き継ぐ$ sudo visudoの実行後に、viエディタの操作が必要だったため以下を参考にしました。
viエディタの使い方パスが通ったと思ったら、シンタックスエラー問題
$ heroku --versionherokuのバージョン確認をすると、以下のエラーが...
/usr/local/lib/heroku/node_modules/@oclif/command/lib/index.js:3
const path = require("path");
^^^^^
SyntaxError: Use of const in strict mode.
    at Module._compile (module.js:439:25)
    at Object.Module._extensions..js (module.js:474:10)
    at Module.load (module.js:356:32)
    at Function.Module._load (module.js:312:12)
    at Module.require (module.js:364:17)
    at require (module.js:380:17)
    at Object.<anonymous> (/usr/local/lib/heroku/bin/run:5:1)
    at Module._compile (module.js:456:26)
    at Object.Module._extensions..js (module.js:474:10)
    at Module.load (module.js:356:32)
Node.jsのバージョンが古すぎたみたいです。
$ node -v確認してみたところ
v0.10.48でした。解決方法:キャッシュを消して、新しいバージョンを入れる。
いろいろと試したため、ダイレクトな解決方法にならない場合はすみません。
npmがインストールされていなかったので、インストールしました。ついでにnodeもインストール。
Herokuを入れるためにnpmが必要かどうかはわかりませんが、とりあえずインストールしました。$ sudo yum install nodejs npm偉い権限の方に行く。
$ sudo -s左のやつが
$から#に変わる。インストールするために必要なやつ(正直、よくわかってないですが
setup_11.xの数字の部分でインストールするバージョンを指定。)# curl --silent --location https://rpm.nodesource.com/setup_11.x | bashここから、インストールとアンインストールを繰り返したため、手順が間違っていたらすみません。
以下を参考にしました。先の読んでおいて欲しいです。
yumでのnodejsのバージョンアップにはまった話と解決方法古い方のrpmを削除。
# rm /etc/yum.repos.d/nodesource-el.repoアンインストールする。
# yum -y remove nodejsキャッシュを削除。
# yum clean allインストールする。
# yum -y install nodejsバージョンを確認。
# node -v
v11.15.0
成功です!
そして、偉い権限のところから出る。# su vagrantherokuのバージョンも確認
$ heroku -v
heroku/7.44.0 linux-x64 node-v11.15.0
他の参考記事です。
https://qiita.com/daskepon/items/16a77868d38f8e585840
https://inaba.hatenablog.com/entry/2018/11/13/023933ほぼ同じエラーが出ていた記事
https://teratail.com/questions/256490感謝
参考にさせていただいたサイト管理人の皆様、誠にありがとうございました。
- 投稿日:2020-10-06T02:35:01+09:00
before_action使うべし!!
before_actionってなに?
ここでbefore_actionがなんなのか簡単に説明させて頂きます。
before_actionとは、before_actionを使用するとcontrollerで定義された
アクションが実行される前に、共通の処理を行うことができるメソッドです。
つまり、railsのcontrollerアクションを実行する前に処理を行いたい時、同じ記述の処理をまとめたい時に使用します。言葉で説明されても「どゆこと?」、「イメージができない。。。」と
思いますので下記に例を上げて説明したいと思います。before_action記述例
[例] before_actionclass コントローラ名 < ApplicationController before_action :処理させたいメソッド名また、ここではオプションを同時に使用します。
全部のアクションにbefore_actionを使用する必要はないので、
どのアクションで実行する前に処理を行わせたいのか指定します。
そこで使用するオプションがonlyオプションです。onlyオプションってなに?(記述例)
resourcesと同様にonlyオプションを使用することによって、どのアクションの実行前に、処理を実行させるかなど制限するとこが可能です。
『resources』とは、7つのアクションのルーティングをまとめて設定ができるメソッドのことです。
[例] before_actionclass コントローラ名 < ApplicationController before_action :処理させたいメソッド名, only: [:アクション名, :アクション名]上記のようにbefore_actionの後ろにonlyオプションを記述して使用します。
例のように記述することでアクションを指定することができます。基本は上記のように記述します。
この例を参照してもどう書いたらいいの?となると思いますので、
次はcontrollerの全体的な記述例を上げて説明します。controller全体記述例
ここでは、controllerの全体の記述例を上げて説明していきたいと思います。
先にbefore_actionを使用していない時の記述例です。
下記の例を見て頂きたいのですが、同じ記述がありますね。使用しない場合
[例] controllerclass TweetsController < ApplicationController def index @tweets = Tweet.all end def new @tweet = Tweet.new end def create Tweet.create(tweet_params) end def destroy tweet = Tweet.find(params[:id]) tweet.destroy end def edit @tweet = Tweet.find(params[:id]) ⬅️ ここの箇所!! end def update tweet = Tweet.find(params[:id]) tweet.update(tweet_params) end def show @tweet = Tweet.find(params[:id]) ⬅️ ここの箇所!! end private def tweet_params params.require(:tweet).permit(:name, :image, :text) end endtweetsコントローラーのeditアクションとshowアクションを見ると、
@tweet = Tweet.find(params[:id])が繰り返し記述されています。
この箇所の記述をまとめていきたいと思います。上記の例だともうひとつ被っている記述がありますが、
今回は一箇所だけbefore_actionを使用してまとめていきますので、
気にしないで下さい。w次は使用した時の記述例です。
使用する場合
editアクションとshowアクションの処理"のみ"を実行させて記述を
まとめていきたいと思います。
今回は、before_actionで呼び出すメソッドをtest_tweetとしましょう![例] controllerclass TweetsController < ApplicationController before_action :set_tweet, only: [:edit, :show] def index @tweets = Tweet.all end def new @tweet = Tweet.new end def create Tweet.create(tweet_params) end def destroy tweet = Tweet.find(params[:id]) tweet.destroy end def edit end def update tweet = Tweet.find(params[:id]) tweet.update(tweet_params) end def show end private def tweet_params params.require(:tweet).permit(:name, :image, :text) end def test_tweet @tweet = Tweet.find(params[:id]) end endbefore_actionを使用することで、editアクションとshowアクションの
実行前に、test_tweetというメソッドを呼び出しています。そうすることで、2つのアクションの共通の処理である
@tweet = Tweet.find(params[:id])が動きます。上記の例のようにbefore_actionを使用してまとめてあげることで繰り返し
記述することがないのでスッキリして見やすくなりましたね!!まとめ
・before_actionは、コントローラで定義されたアクションが実行される前に、
指定した共通の処理を行うことができるメソッドのこと
・onlyオプションは、resourcesと同様にonlyオプションを使用することによって、どのアクションの実行前に、処理を実行させるかなど制限すること!!これらの事からコードを記述する際は、同じ記述を繰り返さずに見やすく記述していくのがいいですね!!
- 投稿日:2020-10-06T00:34:13+09:00
Google Cloud Vision APIを使ってみた
Google Cloud Visionとは
Google Cloud VisionはGoogleが提供しているが提供している画像の分析サービスです。
今回は、画像内の文章を読み込むために使ってみました。手順1 Google Cloud Platformに登録する
以下のリンク先からGoogle Cloud Platformに登録しましょう。
なお、登録にはクレジットカードが必要となります。
https://console.cloud.google.com/getting-started?hl=jaCloud Vision APIを有効にする
画面上部の検索窓に「Cloud Vision API」を入力ましょう。
遷移後の画面でCloud Vision APIを有効にすれば完了です。
サービスアカウントの作成
サービスアカウントとは?
ここから引用→https://cloud.google.com/iam/docs/service-accounts?hl=jaサービスアカウントは、ユーザーではなく、アプリケーションや仮想マシン(VM)インスタンスで使用される特別なアカウントです。アプリケーションはサービスアカウントを使用して、承認されたAPI呼び出しを行います。
それではサービスアカウントを作ってみましょう。
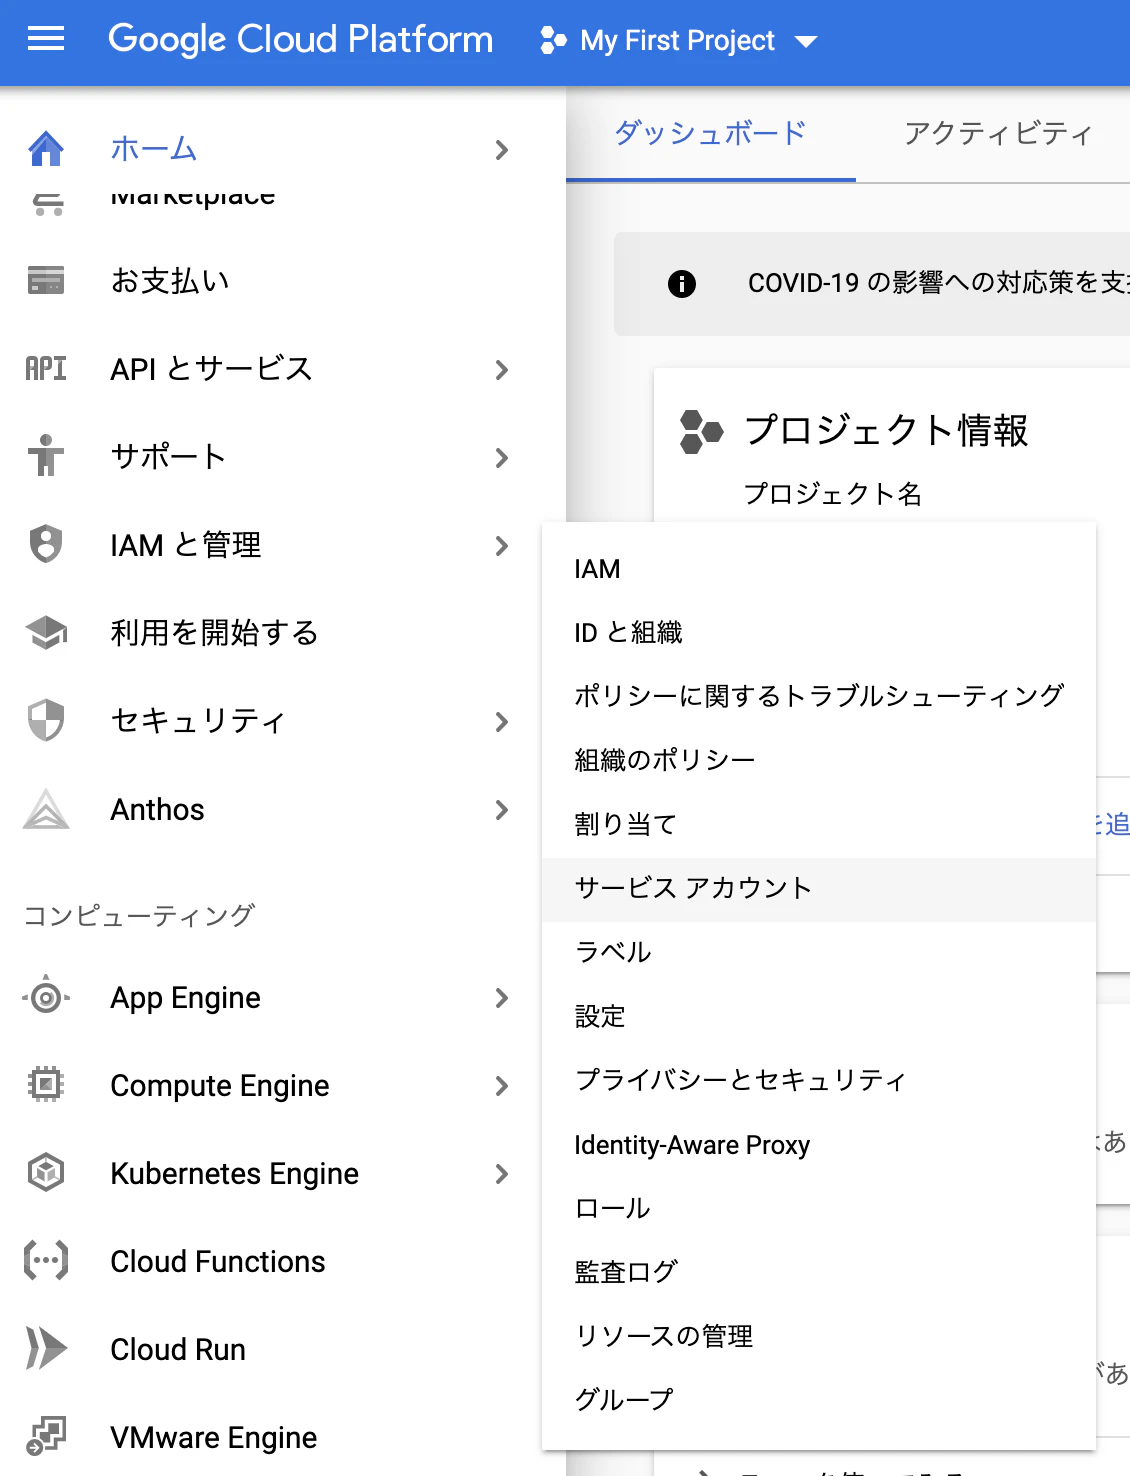
「IAMと管理」からサービスアカウントをクリック。
遷移後の画面で「サービスアカウントを作成」をクリックしましょう。
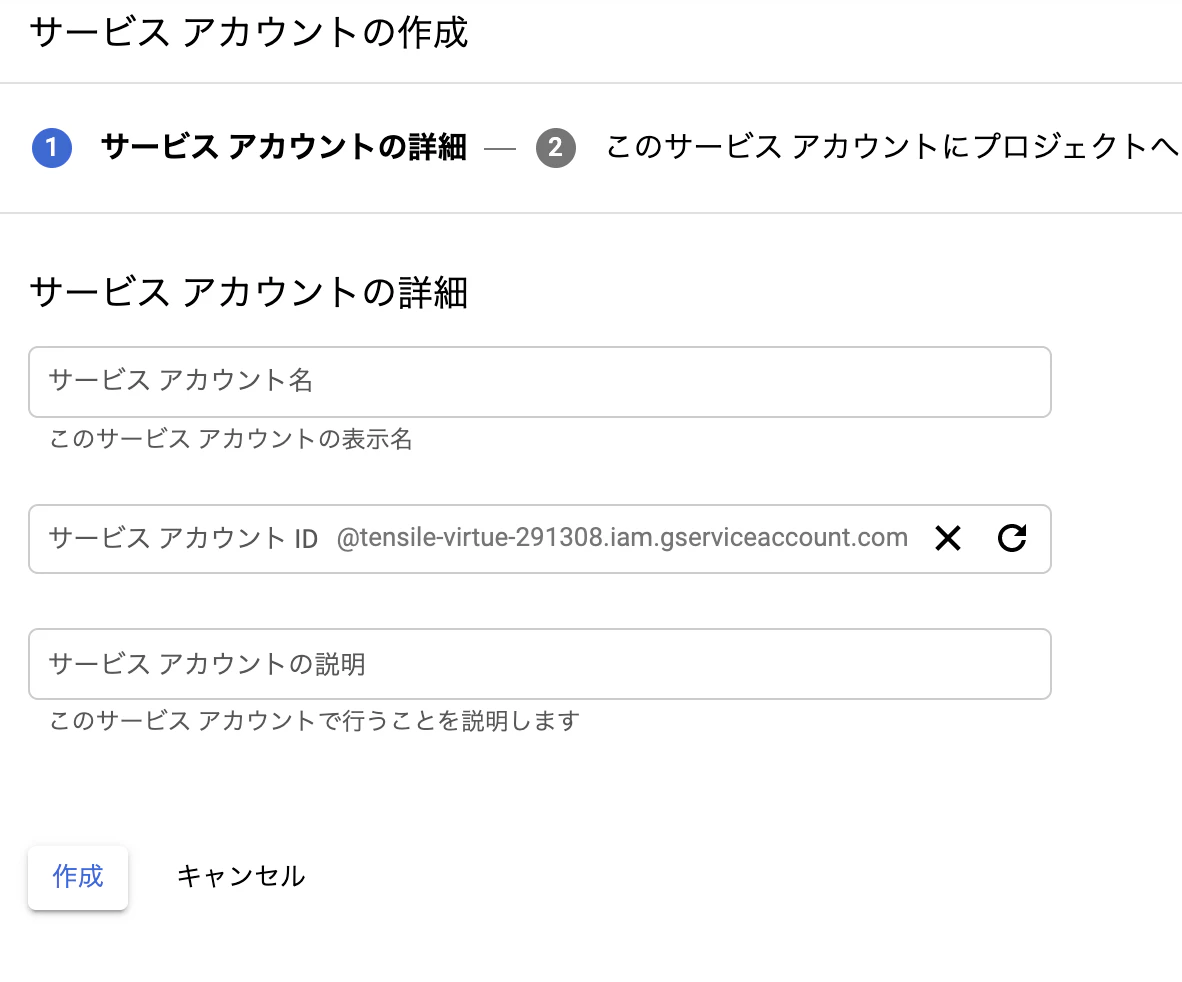
適当なサービスアカウント名を入力して「作成」をクリック
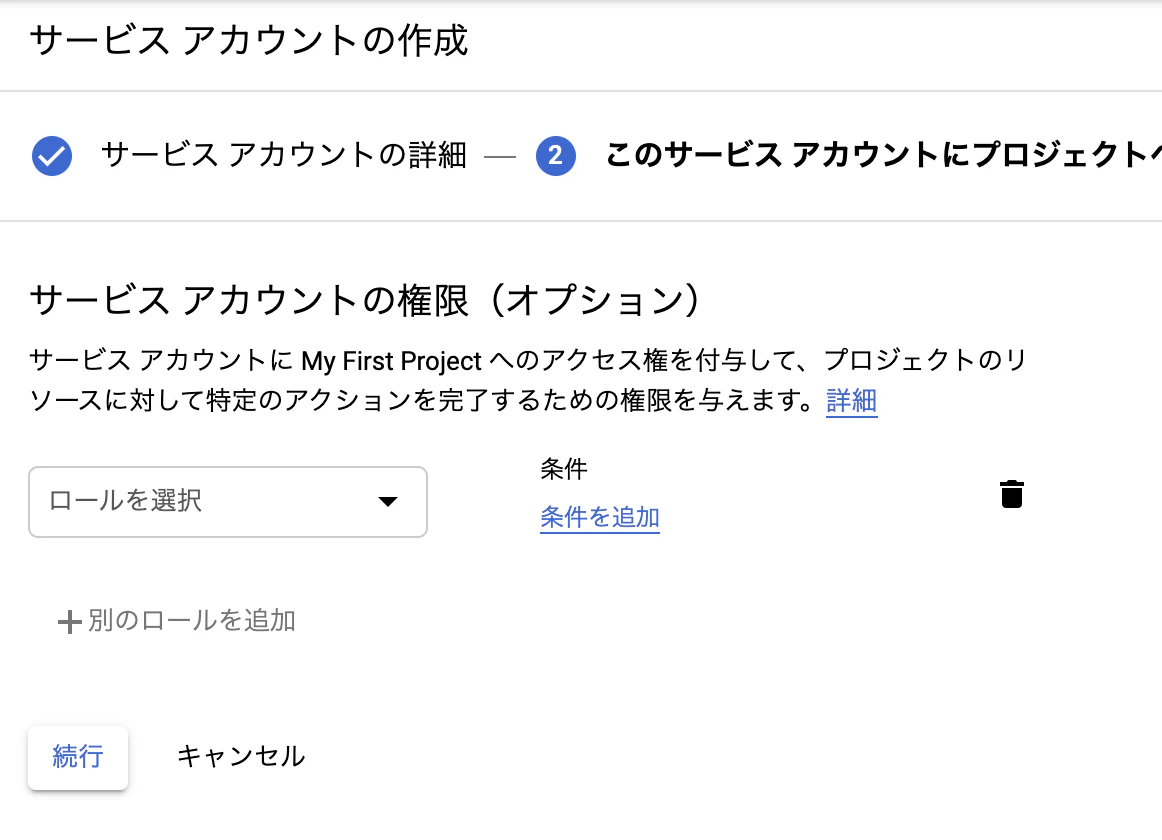
「続行」をクリック
「完了」をクリック
続いて認証用の秘密鍵の作成です。上記の操作を行った後、以下のような画面になっていると思うので「操作」をクリックしてキーの作成を行います
ダイアログが表示されるのでJSONを選択してキーを作成します。
キーは任意のフォルダに配置し、後述の環境変数(GOOGLE_APPLICATION_CREDENTIALS)にキーのパスを指定してください。
gemをインストール。
gem 'google-cloud-vision'秘密鍵のパスを環境変数に設定して、準備は完了です。
export GOOGLE_APPLICATION_CREDENTIALS="/hoge/fuga.json"実装
公式のドキュメントを参考にし、以下のようになりました。
・公式ドキュメント
https://cloud.google.com/vision/docs/libraries?hl=ja#client-libraries-usage-ruby公式の例と最も異なる点はlabel_detectionではなくtext_detectionを使用していることです。
label_detectionを使用すると、どのようなものが画像内に含まれているか検出することが出来ます。
例えば、駅内を撮った写真ですと改札や線路、券売機といった物が検出されるわけです。
今回は画像内の文字を検出したかったため、text_detectionを使用しました。@image = Image.new require "google/cloud/vision" image_annotator = Google::Cloud::Vision.image_annotator # 読み込む画像を指定 file_name = "~/hoge.jpg" # file_nameを引数にしてCloud Visionで解析する response = image_annotator.text_detection image: file_name response.responses.each do |res| @image.OCR = res.text_annotations[0].description endまとめ
Google Cloud Vision APIは、今回の例以外にもPDFファイルの分析や画像内の顔検出などにも使えます。
月に1000件の読み込みまでは無料で行えますので、色々と試して自作アプリに組み込んでみましょう!


- 投稿日:2020-10-06T00:08:15+09:00
【No.007】組織の管理画面と組織へのログイン処理
Issue
PR
【No.006】組織の管理画面とログインのおおまかなデザイン概念等は
組織としていたが、実装は会社とすることにした概要
組織の管理画面と組織へのログイン処理を追加する
ToDo詳細
- Orgモデル・テーブル追加
Terminalbin/rails g model org name:string org_type:integer
- orgs_controllerを追加
Terminalbin/rails g controller orgs要らないファイルは削除しておく
Terminal-> % bin/rails g controller orgs Running via Spring preloader in process 22619 create app/controllers/orgs_controller.rb invoke slim create app/views/orgs invoke test_unit create test/controllers/orgs_controller_test.rb <- これは削除した invoke helper create app/helpers/orgs_helper.rb <- これは削除した invoke test_unit invoke assets invoke coffee invoke scss create app/assets/stylesheets/orgs.scss <- これは削除した
- orgs#indexのrouteを設定し、ビュー追加
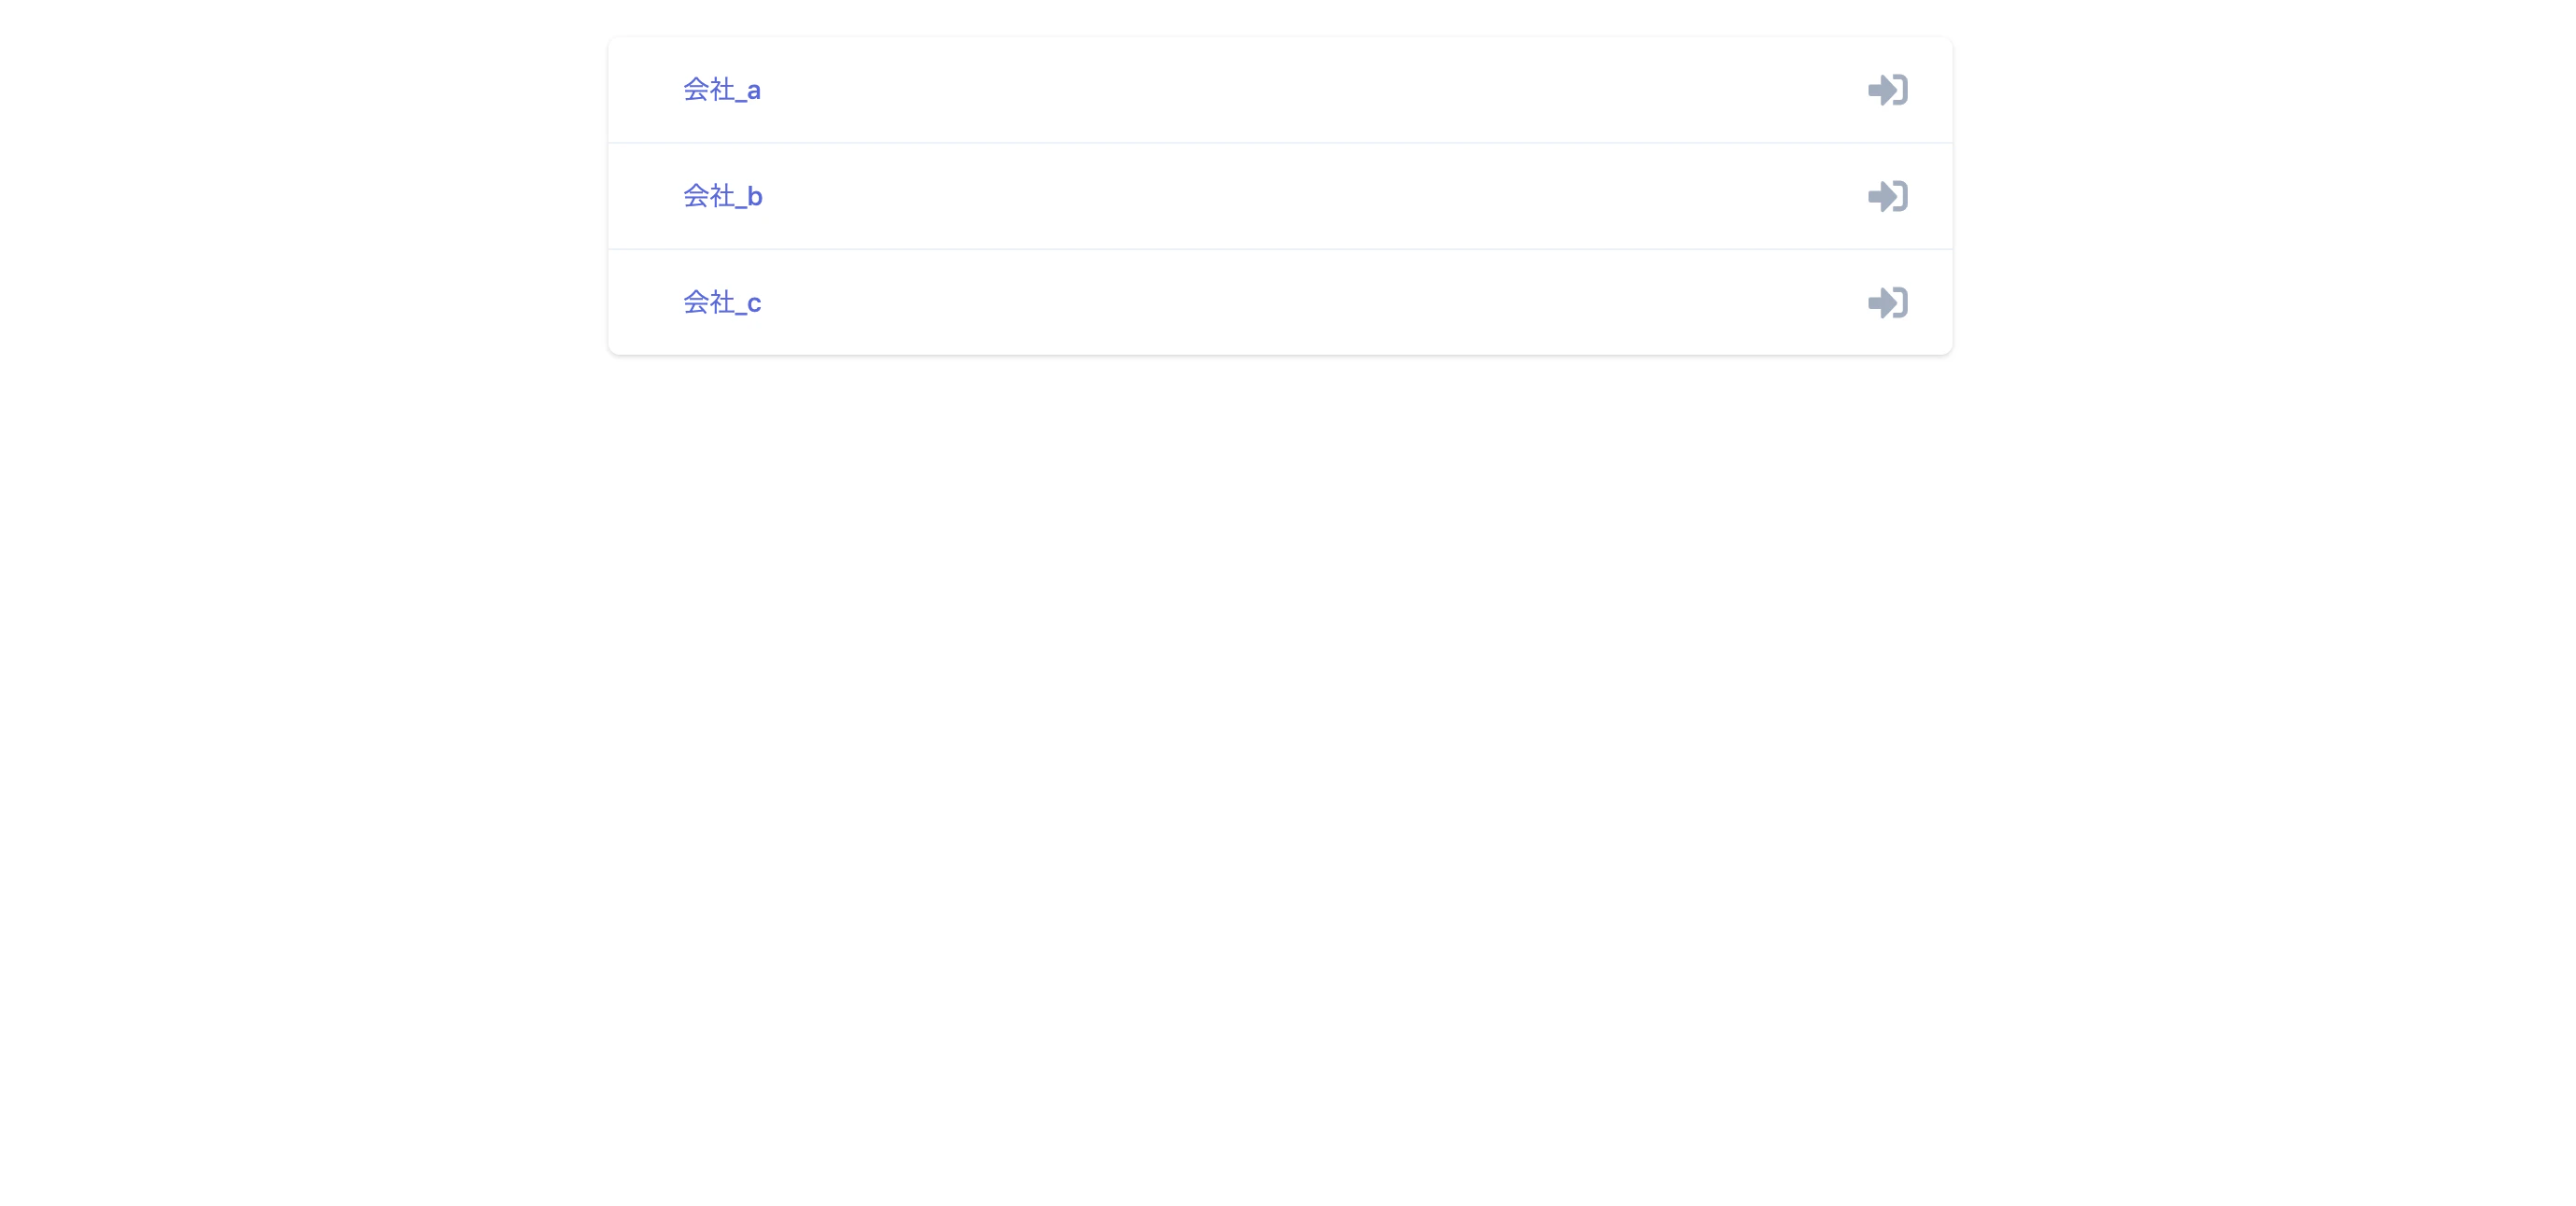
config/routes.rbRails.application.routes.draw do root 'orders/ordering_org_sides#index' # For details on the DSL available within this file, see http://guides.rubyonrails.org/routing.html resource :orgs, only: %i[index] #<-追加 namespace :orders do resources :ordering_org_sides, only: %i[index] end endTerminaltouch app/views/orgs/index.html.slimapp/views/orgs/index.html.slim.bg-white.shadow.m-auto.sm:rounded-md.mt-5(class="w-2/4") ul - @orgs.each do |org| / TODO:Sassで場合分けできるようにする - border_t = org == @orgs.first ? '' : 'border-t border-gray-200' li.(class=border_t) = link_to [org], class: 'block hover:bg-gray-50 focus:outline-none focus:bg-gray-50 transition duration-150 ease-in-out' do .flex.items-center.px-4.py-4.sm:px-6 .min-w-0.flex-1.flex.items-center .min-w-0.flex-1.px-4.md:grid.md:grid-cols-2.md:gap-4 div .text-sm.leading-5.font-medium.text-indigo-600.truncate = org.name div i.fas.fa-sign-in-alt.fa-lg.bg-gray-50.text-gray-500
- orgs#showのrouteを設定し、ビュー追加
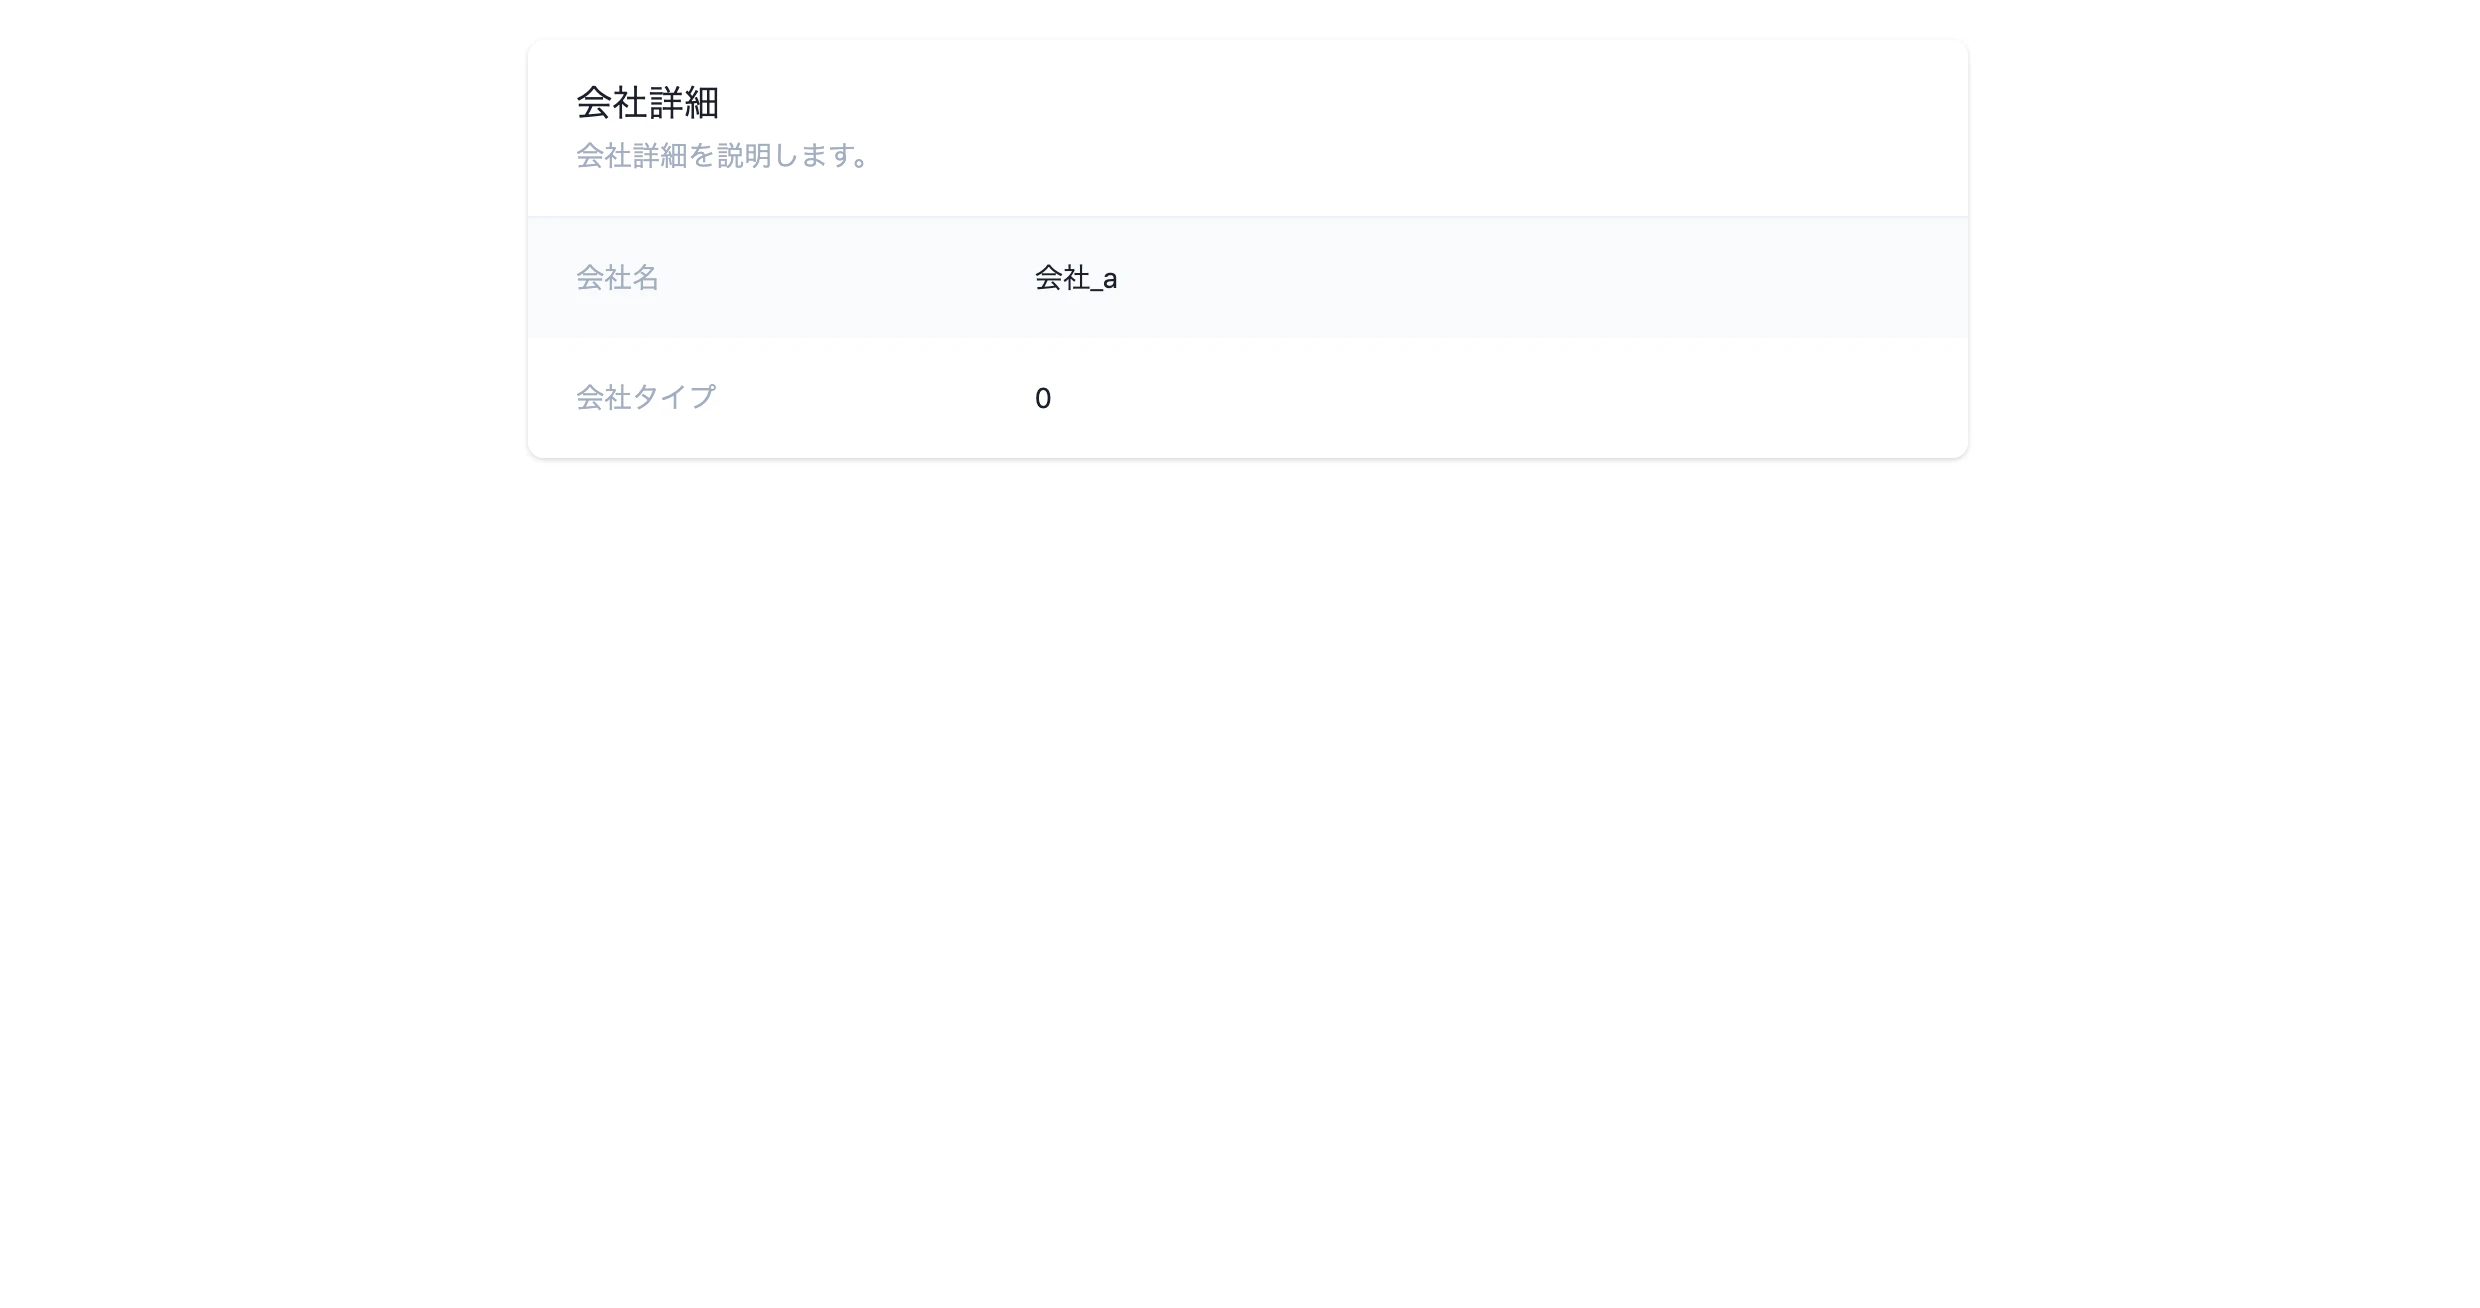
config/routes.rbRails.application.routes.draw do root 'orders/ordering_org_sides#index' # For details on the DSL available within this file, see http://guides.rubyonrails.org/routing.html resource :orgs, only: %i[index, show] #<-showも追加 namespace :orders do resources :ordering_org_sides, only: %i[index] end endTerminaltouch app/views/orgs/show.html.slimapp/views/orgs/show.html.slim.bg-white.shadow.m-auto.mt-5.overflow-hidden.sm:rounded-lg(class="w-1/2") .px-4.py-5.border-b.border-gray-200.sm:px-6 h3.text-lg.leading-6.font-medium.text-gray-900 | 会社詳細 p.mt-1.max-w-2xl.text-sm.leading-5.text-gray-500 | 会社詳細を説明します。 div dl .bg-gray-100.px-4.py-5.sm:grid.sm:grid-cols-3.sm:gap-4.sm:px-6 dt.text-sm.leading-5.font-medium.text-gray-500 | 会社名 dd.mt-1.text-sm.leading-5.text-gray-900.sm:mt-0.sm:col-span-2 = @org.name .bg-white.px-4.py-5.sm:grid.sm:grid-cols-3.sm:gap-4.sm:px-6 dt.text-sm.leading-5.font-medium.text-gray-500 | 会社タイプ dd.mt-1.text-sm.leading-5.text-gray-900.sm:mt-0.sm:col-span-2 = @org.org_type
- 右斜上にそれぞれの導線・リンクを配置
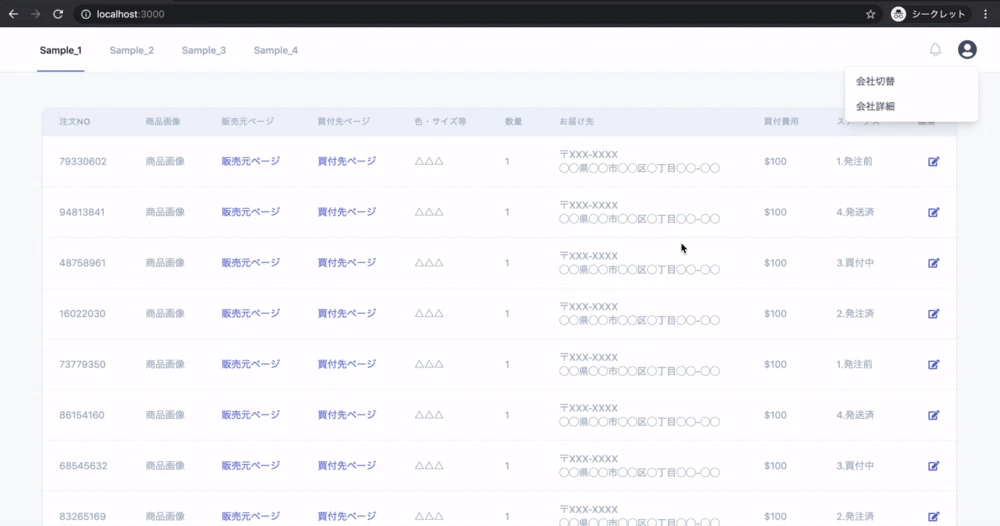
app/views/orders/ordering_org_sides/index.html.slim.bg-gray-100 nav.bg-white.shadow-sm .max-w-7xl.mx-auto.px-4.sm:px-6.lg:px-8 .flex.justify-between.h-16 .flex .flex-shrink-0.flex.items-center .hidden.sm:ml-6.space-x-8.sm:flex a.inline-flex.items-center.px-1.pt-1.border-b-2.border-indigo-500.text-sm.font-medium.leading-5.text-gray-900.focus:outline-none.focus:border-indigo-700.transition.duration-150.ease-in-out[href="#"] | Sample_1 a.inline-flex.items-center.px-1.pt-1.border-b-2.border-transparent.text-sm.font-medium.leading-5.text-gray-500.hover:text-gray-700.hover:border-gray-300.focus:outline-none.focus:text-gray-700.focus:border-gray-300.transition.duration-150.ease-in-out[href="#"] | Sample_2 a.inline-flex.items-center.px-1.pt-1.border-b-2.border-transparent.text-sm.font-medium.leading-5.text-gray-500.hover:text-gray-700.hover:border-gray-300.focus:outline-none.focus:text-gray-700.focus:border-gray-300.transition.duration-150.ease-in-out[href="#"] | Sample_3 a.inline-flex.items-center.px-1.pt-1.border-b-2.border-transparent.text-sm.font-medium.leading-5.text-gray-500.hover:text-gray-700.hover:border-gray-300.focus:outline-none.focus:text-gray-700.focus:border-gray-300.transition.duration-150.ease-in-out[href="#"] | Sample_4 .hidden.sm:ml-6.sm:flex.sm:items-center button.p-1.border-2.border-transparent.text-gray-400.rounded-full.hover:text-gray-500.focus:outline-none.focus:text-gray-500.focus:bg-gray-100.transition.duration-150.ease-in-out[aria-label="Notifications"] svg.h-6.w-6[stroke="currentColor" fill="none" viewbox="0 0 24 24"] path[stroke-linecap="round" stroke-linejoin="round" stroke-width="2" d="M15 17h5l-1.405-1.405A2.032 2.032 0 0118 14.158V11a6.002 6.002 0 00-4-5.659V5a2 2 0 10-4 0v.341C7.67 6.165 6 8.388 6 11v3.159c0 .538-.214 1.055-.595 1.436L4 17h5m6 0v1a3 3 0 11-6 0v-1m6 0H9"] .ml-3.relative div button#user-menu.flex.text-sm.border-2.border-transparent.rounded-full.focus:outline-none.focus:border-gray-300.transition.duration-150.ease-in-out[aria-label="User menu" aria-haspopup="true"] i.fas.fa-user-circle.fa-2x.text-gray-700 .origin-top-right.absolute.right-0.mt-2.w-48.rounded-md.shadow-lg .py-1.rounded-md.bg-white.shadow-xs = link_to [:orgs], class: 'block px-4 py-2 text-sm leading-5 text-gray-700 hover:bg-gray-100 focus:outline-none focus:bg-gray-100 transition duration-150 ease-in-out' do | 会社切替 / TODO:リンクを@orgに書き換える = link_to '/', class: 'block px-4 py-2 text-sm leading-5 text-gray-700 hover:bg-gray-100 focus:outline-none focus:bg-gray-100 transition duration-150 ease-in-out' do | 会社詳細
JSは別PRで対応予定。
- seedにorgsを追加
db/seeds.rborgs = Org.create( [ {name: '会社_a', org_type: 0}, {name: '会社_b', org_type: 1}, {name: '会社_c', org_type: 0} ] )動作確認
準備
bin/rails db:migrate:reset
bin/rails db:reset
受入基準
- 下図のように画面遷移する