- 投稿日:2020-08-24T21:25:05+09:00
UnityでStreamおよび暗号化入門
本記事の対象
暗号化初心者
手を動かして学びたい
将来的にAssetBundle暗号化したい本記事について
以下のステップでStreamと暗号化を実践的に学習する
1. ファイルをStreamで読んでByteで出力
2. 複数Byteずつ読んで出力
3. 複数Byteずつ読んで255でXORして出力
4. 読み込んだByteを適当な文字列でXORして出力
5. XORで復号化しながら読み込んだ文字列を出力
6. XORで暗号化しながら書き込むStreamとXORの内容についての説明はしない。
関数の実行が楽なのでUnity Test Runnerを使用する。
前提
Unity Test Runner使えること (関数呼ぶだけなので別の方法でも可)
環境
Unity 2019.3.8
ファイルをStreamで読んでByteで出力
helloworldという文字列をStreamで読んで出力する
まずは読み込むファイルを用意
プロジェクト/Test/sample.txt を作成Test/sample.txthelloworldそしてこれをFileStreamで読む。
StreamTest.csusing System; using System.Collections.Generic; using System.IO; using System.Text; using NUnit.Framework; using UnityEngine; public class StreamTest { string samplePath = "Test/sample.txt"; // helloworld [Test] public void Test1ファイルをStreamで読んでByteで出力() { var sb = new StringBuilder(); using (var fs = new FileStream(samplePath, FileMode.Open)) { for (int i = 0; i < fs.Length; i++) { // 1byteずつ読む Debug.Log($"Position {fs.Position} Length {fs.Length}"); int b = fs.ReadByte(); // byteなので 0 ~ 255 sb.Append(b.ToString() + " "); } } Debug.Log(sb.ToString()); } ...
Stream.ReadByteで1Byteずつ取得することが可能。
また、fs.Positionとfs.Lengthも出力してみる。結果は以下
Position 0 Length 10
Position 1 Length 10
...
Position 9 Length 10
104 101 108 108 111 119 111 114 108 100
この結果から
Lengthは「helloworld」の文字数と一致 -> 1文字1byte
Positionは0スタート
ということがわかる。
また、byteの数値は文字コードのASCIIの10進数と一致した。
ASCII wikipediah -> 104
e -> 101複数Byteまとめて読む
Test1では
ReadByte()を使ったが、次からはまとめて読む。[Test] public void Test2複数Byteずつ読んで出力() { var sb = new StringBuilder(); using (var fs = new FileStream(samplePath, FileMode.Open)) { for (int i = 0; i < fs.Length; i++) { byte[] buffer = new byte[8]; // 8byteずつ読む int readCount = fs.Read(buffer, 0, buffer.Length); for (int j = 0; j < readCount; j++) { // byteを10進数のintに変換 sb.Append(Convert.ToInt32(buffer[j]).ToString() + " "); } } } Debug.Log(sb.ToString()); }ポイント
// ReadByteの時は読み込んだ1byteが0~255の数値として帰ってくる
int b = fs.ReadByte(); // byteなので 0 ~ 255
// しかし、Readを使うと、引数のbufferに読んだ結果が格納され返り値は読んだbyte数になる。
int readCount = fs.Read(buffer, 0, buffer.Length);
結果はTest1と同様に
104 101 108 108 111 119 111 114 108 100複数Byteずつ読んで255でXORして出力
xorについて簡単にすると、以下のような感じ
0001 0111
xor
0000 1111
=>
0001 1000
要するに比較対象が同じ=>0, 違う=>1となる。
255は1111 1111なのでxorすると以下のように0と1が逆になる。0001 0111 xor 1111 1111 => 1110 1000csharpでは
^を使うとxorすることができる。それを踏まえて以下のコードを動かす。
    [Test]
    public void Test3複数Byteずつ読んで255でXORして出力()
    {
        var sb = new StringBuilder();

        // xorで暗号化
        // わかりやすくするために 1111 1111をキーにする
        byte key = 255;
        using (var fs = new FileStream(samplePath, FileMode.Open))
        {

            for (int i = 0; i < fs.Length; i++)
            {
                byte[] buffer = new byte[8];
                int readCount = fs.Read(buffer, 0, buffer.Length);
                for (int j = 0; j < readCount; j++)
                {
                    buffer[j] ^= key; // ここでxor
                    sb.Append(Convert.ToInt32(buffer[j]).ToString() + " ");
                }
            }
        }

        Debug.Log(sb.ToString());
    }
元々のhelloworldが以下であり、
104 101 108 108 111 119 111 114 108 100上記のコードの結果は以下となった。
151 154 147 147 144 136 144 141 147 1550110 1000 // 104 <- 元。helloworldのh 1111 1111 // 255 <- key 1001 0111 // 151 <- 結果なのでxorできている。
読み込んだByteを適当な文字列でXORして出力
適当な文字列からxorするための1byteを取得するようにする。
文字列は
1234abcdとする。
文字列をByte化する方法は以下string key = "1234abcd"; byte[] keyBytes = Encoding.UTF8.GetBytes(key);あとはこの配列のインデックスをずらせばOK
以下のコードで実行する。
    [Test]
    public void Test4読み込んだByteを適当な文字列でXORして出力()
    {
        var sb = new StringBuilder();
        string key = "1234abcd";
        byte[] keyBytes = Encoding.UTF8.GetBytes(key);
        foreach (var b in keyBytes)
        {
            sb.Append(Convert.ToInt32(b).ToString() + " ");
        }
        Debug.Log(sb.ToString());
        sb.Length = 0;

        using (var fs = new FileStream(samplePath, FileMode.Open))
        {
            for (int i = 0; i < fs.Length; i++)
            {
                byte[] buffer = new byte[8];
                // Positionを保持 (0スタート)
                var startPosition = fs.Position;
                // 8byteずつ読む
                int readCount = fs.Read(buffer, 0, buffer.Length); // byteなので 0 ~ 255
                for (int j = 0; j < readCount; j++)
                {
                    // byteの位置からkeyのindexを算出
                    var keyIndex = (startPosition + j) % keyBytes.Length;
                    buffer[j] ^= keyBytes[keyIndex]; // xor
                    // byteを10進数のintに変換
                    sb.Append(Convert.ToInt32(buffer[j]).ToString() + " ");
                }
            }
        }

        Debug.Log(sb.ToString());
    }
文字列 1234abcd
49 50 51 52 97 98 99 100結果
89 87 95 88 14 21 12 22 93 86確認
// 1byte目
0110 1000 // 104 h
0011 0001 // 49 1
0101 1001 // 89 結果
なので1OK

// 8byte目
0111 0010 // 114 r
0110 0100 // 100 d
0001 0110 // 22 結果
なのでok

// 9byte目
0110 1100 // 108 l
0011 0001 // 49 1 (2週目 1234abcd  1 <-)
0101 1101 // 93 結果
でOK
読み書きする際にXORするStreamを自作する。
事前にキーとなる文字列を渡しておいて、それを使ってXORするStreamを自作。
具体的にはReadとWriteを自作する。
    public class XORCryptStream : Stream
    {
        Stream baseStream;
        byte[] key;

        public XORCryptStream(Stream baseStream, byte[] key)
        {
            this.baseStream = baseStream;
            this.key = key;
        }

        public override bool CanRead => baseStream.CanRead;

        public override bool CanSeek => baseStream.CanSeek;

        public override bool CanWrite => baseStream.CanWrite;

        public override long Length => baseStream.Length;

        public override long Position { get { return baseStream.Position; } set { baseStream.Position = value; } }

        public override void Flush() => baseStream.Flush();

        public override long Seek(long offset, SeekOrigin origin) => baseStream.Seek(offset, origin);

        public override void SetLength(long value) => baseStream.SetLength(value);

        /// <summary>
        /// 復号化しつつ読む
        /// </summary>
        /// <param name="buffer">結果を格納するbuffer</param>
        /// <param name="offset">bufferのoffset番目から格納</param>
        /// <param name="count">何byte読み込むか</param>
        /// <returns>読み取ったbyte数を返す</returns>
        public override int Read(byte[] buffer, int offset, int count)
        {
            var startPosition = Position;
            int readCount = baseStream.Read(buffer, offset, count);

            int keyIndex = (int)(startPosition % key.Length);
            for (int i = 0; i < readCount; i++)
            {
                int bufferIndex = i + offset;
                if (keyIndex == key.Length)
                {
                    keyIndex = 0;
                }
                buffer[bufferIndex] ^= key[keyIndex]; // xor
                keyIndex++;
            }
            return readCount;
        }

        public override void Write(byte[] buffer, int offset, int count)
        {
            if (buffer.Length < offset + count)
            {
                throw new ArgumentException("offset + count is larger than buffer.Length");
            }

            byte[] writeBuffer = new byte[count];
            var startPosition = Position;
            int keyIndex = (int)(startPosition % key.Length);
            for (int i = 0; i < count; i++)
            {
                int bufferIndex = i + offset;
                if (keyIndex == key.Length)
                {
                    keyIndex = 0;
                }

                writeBuffer[i] = buffer[bufferIndex];
                writeBuffer[i] ^= key[keyIndex];
                keyIndex++;
            }
            baseStream.Write(writeBuffer, 0, count);
        }
    }
baseStreamをラップし、Read, Writeの際に事前に与えていたkeyでxorする。
このクラスは以下のようにテストを行った。
    [Test]
    public void TestXORCryptStream_Read()
    {
        string key = "1234abcd";
        byte[] keyBytes = Encoding.UTF8.GetBytes(key);

        using (var fs = new FileStream(xorEncryptedSamplePath, FileMode.Open))
        using (var cs = new XORCryptStream(fs, keyBytes))
        {
            // offsetが機能しているか
            byte[] buffer1 = new byte[3];
            int readCount1 = cs.Read(buffer1, 1, 2);
            Assert.AreEqual(2, readCount1);
            Assert.AreEqual(0, Convert.ToInt32(buffer1[0]));
            Assert.AreEqual(104, Convert.ToInt32(buffer1[1]));
            Assert.AreEqual(101, Convert.ToInt32(buffer1[2]));

            byte[] buffer2 = new byte[4];
            int readCount2 = cs.Read(buffer2, 2, 1);
            Assert.AreEqual(1, readCount2);
            Assert.AreEqual(0, Convert.ToInt32(buffer2[0]));
            Assert.AreEqual(0, Convert.ToInt32(buffer2[1]));
            Assert.AreEqual(108, Convert.ToInt32(buffer2[2]));
            Assert.AreEqual(0, Convert.ToInt32(buffer2[3]));
        }
    }

    [Test]
    public void TestXORCryptStream_Write()
    {
        string key = "1234abcd";
        byte[] keyBytes = Encoding.UTF8.GetBytes(key);

        using (var ms = new MemoryStream())
        using (var cs = new XORCryptStream(ms, keyBytes))
        {
            byte[] encryptedHello = new byte[] { 89, 87, 95, 88, 14 };
            byte[] encryptedWorld = new byte[] { 0, 0, 21, 12, 22, 93, 86 };

            cs.Write(encryptedHello, 0, 5);
            cs.Write(encryptedWorld, 2, 5);

            Assert.AreEqual(10, ms.Length);
            ms.Seek(0L, SeekOrigin.Begin);
            byte[] buffer = new byte[10];
            ms.Read(buffer, 0, buffer.Length);
            Assert.AreEqual("helloworld", Encoding.UTF8.GetString(buffer));
        }
    }
また、ファイルの読み込みを行うために暗号化されたファイルを作っておく
    string xorEncryptedSamplePath = "Test/sample2.txt"; // helloworldを1234abcdをキーにxor暗号化したもの

...

    [Test]
    [Ignore("書き出すときだけ外す")]
    public void samplePathを暗号化して保存()
    {
        string key = "1234abcd";
        byte[] keyBytes = Encoding.UTF8.GetBytes(key);
        List<byte> outputBytes = new List<byte>();

        using (var fs = new FileStream(samplePath, FileMode.Open))
        {
            for (int i = 0; i < fs.Length; i++)
            {
                byte[] buffer = new byte[8];
                // Positionを保持 (0スタート)
                var startPosition = fs.Position;
                // 8byteずつ読む
                int readCount = fs.Read(buffer, 0, buffer.Length); // byteなので 0 ~ 255
                for (int j = 0; j < readCount; j++)
                {
                    // byteの位置からkeyのindexを算出
                    var keyIndex = (startPosition + j) % keyBytes.Length;
                    buffer[j] ^= keyBytes[keyIndex]; // xor
                    outputBytes.Add(buffer[j]);
                }
            }
        }

        File.WriteAllBytes(xorEncryptedSamplePath, outputBytes.ToArray());
    }
そして、その生成したファイルを使って読み込みと書き込み
    [Test]
    public void Test5XOR復号化しながら読み込んだ文字列を出力()
    {
        var sb = new StringBuilder();
        string key = "1234abcd";
        byte[] keyBytes = Encoding.UTF8.GetBytes(key);

        List<byte> bytes = new List<byte>();

        using (var fs = new FileStream(xorEncryptedSamplePath, FileMode.Open))
        using (var cs = new XORCryptStream(fs, keyBytes))
        {
            byte[] buffer = new byte[8];
            while (true){
                // Positionを保持 (0スタート)
                var startPosition = cs.Position;
                // 8byteずつ読む
                int readCount = cs.Read(buffer, 0, buffer.Length);
                if (readCount == 0)
                {
                    break;
                }

                for (int i = 0; i < readCount; i++)
                {
                    bytes.Add(buffer[i]);
                }
            }
        }
        string text = System.Text.Encoding.ASCII.GetString(bytes.ToArray());
        Assert.AreEqual("helloworld", text);
    }

    [Test]
    public void Test6XOR暗号化しながら書き込む()
    {
        string key = "1234abcd";
        byte[] keyBytes = Encoding.UTF8.GetBytes(key);

        using (var fileReader = new FileStream(samplePath, FileMode.Open))
        using (var fileWriter = new FileStream(test6ResultPath, FileMode.Create))
        using (var cs = new XORCryptStream(fileWriter, keyBytes))
        {
            byte[] buffer = new byte[8];
            while(true){
                // Positionを保持 (0スタート)
                var startPosition = fileReader.Position;
                // 8byteずつ読む
                int readCount = fileReader.Read(buffer, 0, buffer.Length); // byteなので 0 ~ 255
                if (readCount == 0)
                {
                    break;
                }
                cs.Write(buffer, 0, readCount);
            }
        }
        Assert.AreEqual(File.ReadAllText(xorEncryptedSamplePath), File.ReadAllText(test6ResultPath));
    }
これでStream, XORを試すことができた。
参考

- 投稿日:2020-08-24T13:59:33+09:00
【Unity】iOSのLaunchScreenにStoryboardを使う
iOSのLaunch Screenの設定方法はいくつかありましたが、iOS13以降のApp Storeに提出されるすべてのAppは、Storyboardを使う必要があるようです。
App StoreにiPhone Appを提出する:Apple公式UnityではすでにStoryboardに対応していて、Unity 2019.3以降では、Storyboardが自動生成できるようになりました。ただ、設定方法が少しトリッキーでハマってしまったので、設定方法をメモしておきます。
LaunchScreenにStoryboardを使う方法
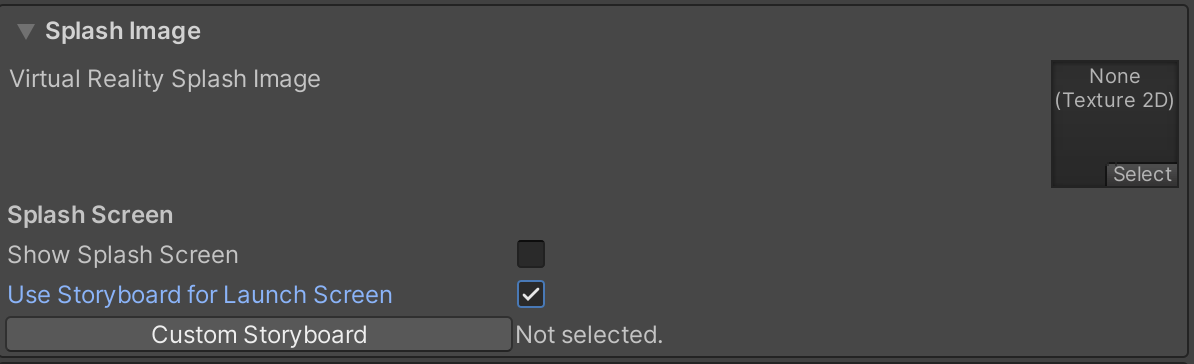
まず、Unityの「Project Settings」→「Player」の「Splash Screen」の項目を開きます。
デフォルトでは色々チェックが入っていますが、チェックをすべて外して、下の状態にします。
「Use Storyboard for Launch Screen」にチェックを入れたい衝動に駆られますが、それはワナです。気をつけて。
「Launch screen type」の項目で、下記のどちらかを選択するとLaunch Screenに表示する画像を指定できます。
Launch screen type 説明 Image and background(relative size) スクリーンに合わせて画像が引き伸ばされます。 Image and background(constant size) 画像サイズを指定できます。 現時点では「Custom XIB」も選択できますが、将来的には非推奨になると思われます。
適当なLaunchScreen用の画像を入れました。
この設定でビルドすると、Storyboardが自動生成されます。Image and background(relative size)
全画面を使うスプラッシュに良さそう。
Image and background(constant size)
Appアイコンを使う場合は、こっちが良さそう。
やり方が分かると、とても簡単ですね。ハマりどころ
私がハマったのは、上記にあった「Use Storyboard for Launch Screen」です。
UnityがStoryboardファイルを自動生成してくれるのかと思いチェックを入れたのですが、ビルドエラーが出るようになりました。
ArgumentException : source Parameter name: The source path cannot be empty.調べてみると、これは「Xcodeで作ったStoryboardファイルを使う」という項目で、Storyboardファイルの指定が必須だったようです。うーん、これは分かりづらい。
ハマる人が大量発生しそうなので、改善してほしいですね。


- 投稿日:2020-08-24T01:58:24+09:00
NatDevice (旧NatCam)でWebカメラの映像をカメラ番号を指定して表示する
NatDevice
NatDeviceを使ってカメラ番号を指定する方法が見つからなかったのでメモ
NatCamTest.csusing System.Collections; using System.Collections.Generic; using UnityEngine; using UnityEngine.UI; using NatSuite.Devices; public class NatCamTest : MonoBehaviour { [Header(@"UI")] public RawImage rawImage; public AspectRatioFitter aspectFitter; [SerializeField] private int camera_num = 0; async void Start () { // Find webcams var criterion = MediaDeviceQuery.Criteria.GenericCameraDevice; var query = new MediaDeviceQuery(criterion); for (int i = 1; i <= camera_num; i++) { query.Advance(); } var device = query.currentDevice as ICameraDevice; Debug.Log(device); // Start the camera preview var previewTexture = await device.StartRunning(); // Display the preview in our UI rawImage.texture = previewTexture; aspectFitter.aspectRatio = (float)previewTexture.width / previewTexture.height; } // Update is called once per frame void Update() { } }備考
- 別々の2つのWebカメラにアクセス可能
- NatDeviceを使ったらUnityのwebcamtextureより遅延が少なくなるかな?と思ったら,あんまり変わんなさそう.
NatDeviceを使用して表示とUnity標準のwebcamtexture比較 pic.twitter.com/ir1oTF7HfO
— さいんす(signs) (@signs0302) August 23, 2020
- ただのwebcamtextureのwrapperぽい?
- テクスチャへのアクセスはしやすそう
- Python使ってアクセスしたほうが遅延が少なく安定した( Unityのwebcamtextureが遅すぎる問題の解決策 )
webcamtextureで取得した映像がものすごく遅延するので,Python経由でWebカメラの映像を取得してみました
— さいんす(signs) (@signs0302) June 10, 2020
明らかに遅延減ってるし画質も良くなった気がしますね
左:Unity標準のwebcamtextureで取得した映像,右:PythonでFlaskサーバ立ててOpenCVで取得した画像をストリーミングした映像 pic.twitter.com/1IvTWKMX8Z参考
- Finding Devices - NatDevice API : (https://docs.natsuite.io/natdevice/workflows/finding-devices)