- 投稿日:2020-08-02T22:57:45+09:00
[初学者向け]cocoapodsの導入方法
cocoapodsとは
複雑な機能をpod(ライブラリ)を使って簡単に機能を実装する手段。
podのインストール方法
①下記コードで
cocoapodsをインストール。ターミナル.$ sudo gem install cocoapods②①のダウンロードを終えたら
pod setupで設定。ターミナル.$ pod setup③podをダウンロードしたいアプリのディレクトリへ移動。
ターミナル.$ cd アプリ名④
pod initを実行してアプリ内にpodfileを作成。ターミナル.$ pod init⑤
podfileを編集してpodをインストール(pod install)する。ターミナル.$ pod install
podfileの編集例。podfire.pod 'SwiftyJSON' pod 'Alamofire' pod 'SDWebImage'最後に
cocoapodsの導入方法についてまとめました。
参考にして下さい!
- 投稿日:2020-08-02T22:52:30+09:00
【iOS13】Vision.frameworkの文字認識(OCR)で遊んでみる
はじめに
Vision.framework とは
iOS11で登場した、画像解析のApple標準フレームワークです。
画像処理に関する研究分野のことを「コンピュータビジョン(computer vision)」と言いますが、Vision.frameworkという名称はそれに由来しています。
同じくiOS11から追加された機械学習フレームワークのCore MLが内部で使われています。Vision - Apple Developer Documentation
iOS13でのアップデートについて
従来の
Vision.frameworkでは、文字と認識されていた部分は矩形の画像領域と判定されていましたが、iOS13ではその部分をテキストデータとして取得できるようになったようです。自分はiOS11の頃の
Vision.frameworkは触ったことがありませんが、当時の記事を拝見する限り、ハマリポイントも減り、簡単に実装できるようになったのではないかと思います(実際、100行にも満たないコードで実装が完了しました)。WWDC 2019の動画が分かりやすいです。
Text Recognition in Vision Framework - WWDC 2019 - Videos - Apple Developer実装
公式サンプルコードをもとにテストアプリを作ってみます。
サンプルコード / Locating and Displaying Recognized Text on a Documentボタンを押したらスキャン用カメラが起動し、画像から検出したテキストデータを画面に表示する簡単なアプリです。
※カメラ機能はシュミレーターでは使えないので、実機ビルドできる環境でお試しください画面を作る
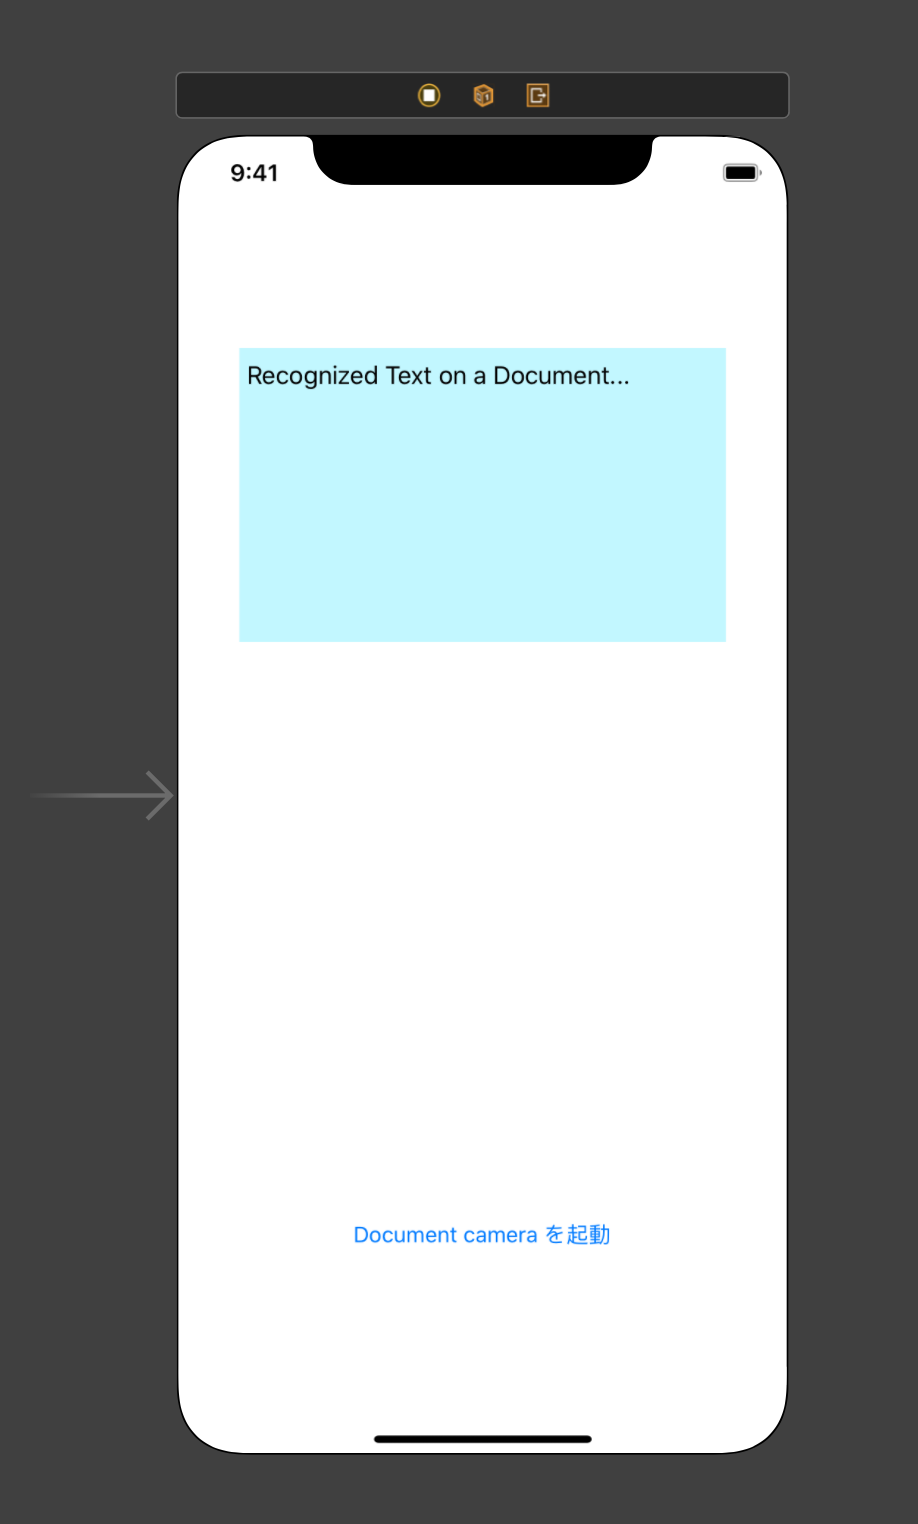
UIButtonとUITextViewだけのシンプルな画面です。
適当なAutoLayoutをつけて、UIButtonはIBOutlet、UITextViewはIBActionで繋げておきます。
コードを書く
まずインポートを記述します。
ViewControllerimport Vision import VisionKit
VNRecognizeTextRequestをセットアップするメソッドを実装し、viewDidLoad()で呼び出します。
VNRecognizeTextRequestで画像から検出したテキスト情報を受け取り、文字列として連結recognitionLevelで「文字認識のレベル」を.accurateに設定
.fastと.accurateの2つの選択肢がある
.fastは動画などのリアルタイム読み込みに向いており、速い代わりに文字認識の精度は低め.accurateは非同期での読み込みに向いており、若干時間はかかるが、筆記体なども正しく認識できるほど精度が高いViewControlleroverride func viewDidLoad() { super.viewDidLoad() setupVision() } // Setup Vision request as the request can be reused func setupVision() { let textRecognitionRequest = VNRecognizeTextRequest { request, _ in guard let observations = request.results as? [VNRecognizedTextObservation] else { print("The observations are of an unexpected type.") return } // 解析結果の文字列を連結する let maximumCandidates = 1 for observation in observations { guard let candidate = observation.topCandidates(maximumCandidates).first else { continue } self.resultingText += candidate.string + "\n" } } // 文字認識のレベルを設定 textRecognitionRequest.recognitionLevel = .accurate self.requests = [textRecognitionRequest] }ボタンが押されたときにスキャン用のカメラが起動するように実装します。
ViewController@IBAction func cameraButtonTapped(_ sender: UIButton) { let documentCameraViewController = VNDocumentCameraViewController() documentCameraViewController.delegate = self present(documentCameraViewController, animated: true) }
VNDocumentCameraViewControllerのデリゲートメソッドdocumentCameraViewController(_:didFinishWith:)を実装します。
これはカメラでスキャン用画像の保存に成功したときに呼ばれます。
- 非同期でリクエストを実行
- メインスレッドで
textViewに検出したテキスト情報を表示するViewControllerextension ViewController: VNDocumentCameraViewControllerDelegate { // DocumentCamera で画像の保存に成功したときに呼ばれる func documentCameraViewController(_ controller: VNDocumentCameraViewController, didFinishWith scan: VNDocumentCameraScan) { controller.dismiss(animated: true) // Dispatch queue to perform Vision requests. let textRecognitionWorkQueue = DispatchQueue(label: "TextRecognitionQueue", qos: .userInitiated, attributes: [], autoreleaseFrequency: .workItem) textRecognitionWorkQueue.async { self.resultingText = "" for pageIndex in 0 ..< scan.pageCount { let image = scan.imageOfPage(at: pageIndex) if let cgImage = image.cgImage { let requestHandler = VNImageRequestHandler(cgImage: cgImage, options: [:]) do { try requestHandler.perform(self.requests) } catch { print(error) } } } DispatchQueue.main.async(execute: { // textViewに表示する self.textView.text = self.resultingText }) } } }最後に、
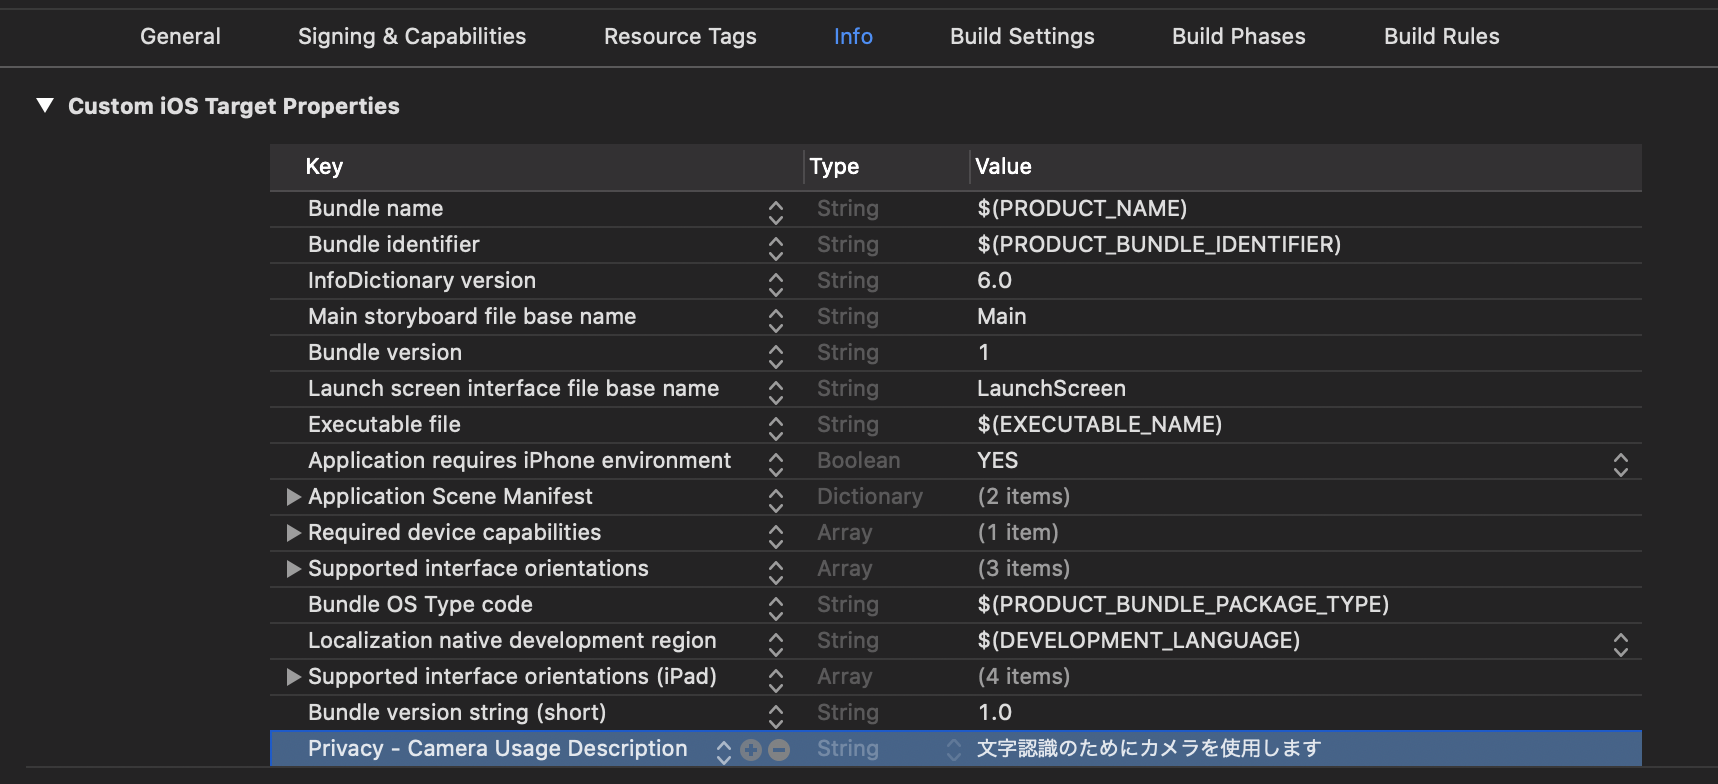
info.plistにPrivacy - Camera Usage DescriptionをKeyとして追加します。
Valueには文字認識のためにカメラを使用しますなど適当な文言を入れます。実機ビルドに成功したら、文字認識で遊ぶ準備完了です
おまけ
下記メソッドを
viewDidLoad()などで呼び出すことで、文字認識がサポートされている言語が配列で取得できます。
現状日本語はサポートされておらず、英数字だけが対応しているようです。ViewController// 文字認識できる言語の取得 private func getSupportedRecognitionLanguages() { let accurate = try! VNRecognizeTextRequest.supportedRecognitionLanguages(for: .accurate, revision: VNRecognizeTextRequestRevision1) print(accurate) // ["en-US"] }GitHub
ここで書いたコードはGitHubに上げています。
https://github.com/orimomo/VisionFrameworkTest遊んでみる
ティッシュ
まずは目についたティッシュをパシャリ
(勝手に文字領域を認識してくれて賢い)
まずはお手並み拝見です。
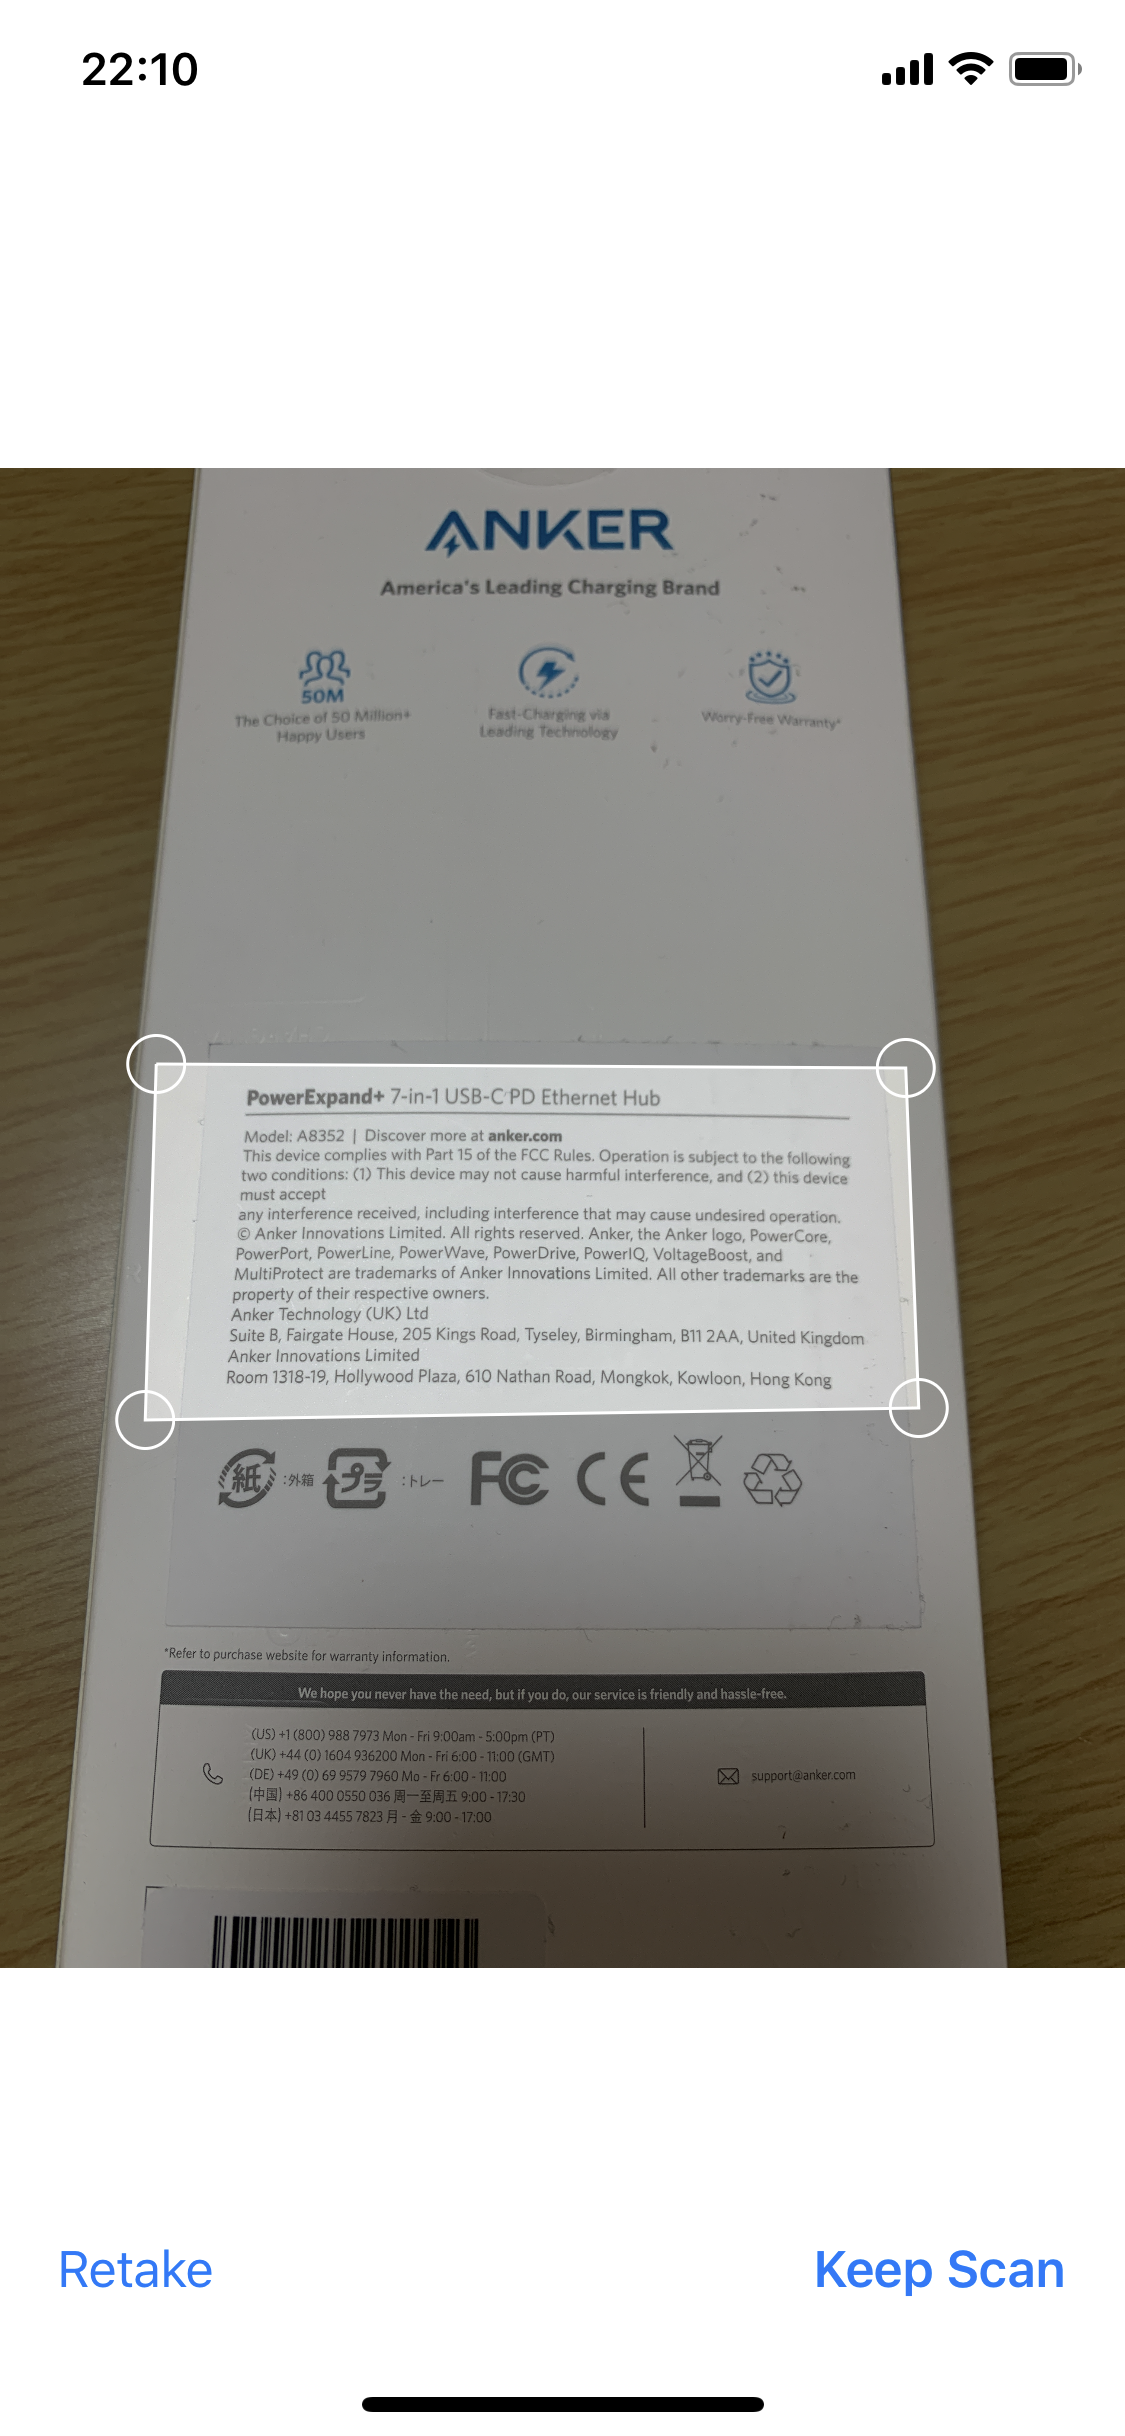
ANKERケーブルの箱の裏
続いてANKERケーブルの箱の裏をパシャリ
文量が多めですが、どうでしょうか?
↓↓解析結果
TextViewが小さくて全部お見せできないのが残念ですが、ちゃんと最後まで認識していました!
箱に書いてある文字が小さいので、半角スペースを読み取れていない箇所が稀にあるものの、ほぼと言える精度です。
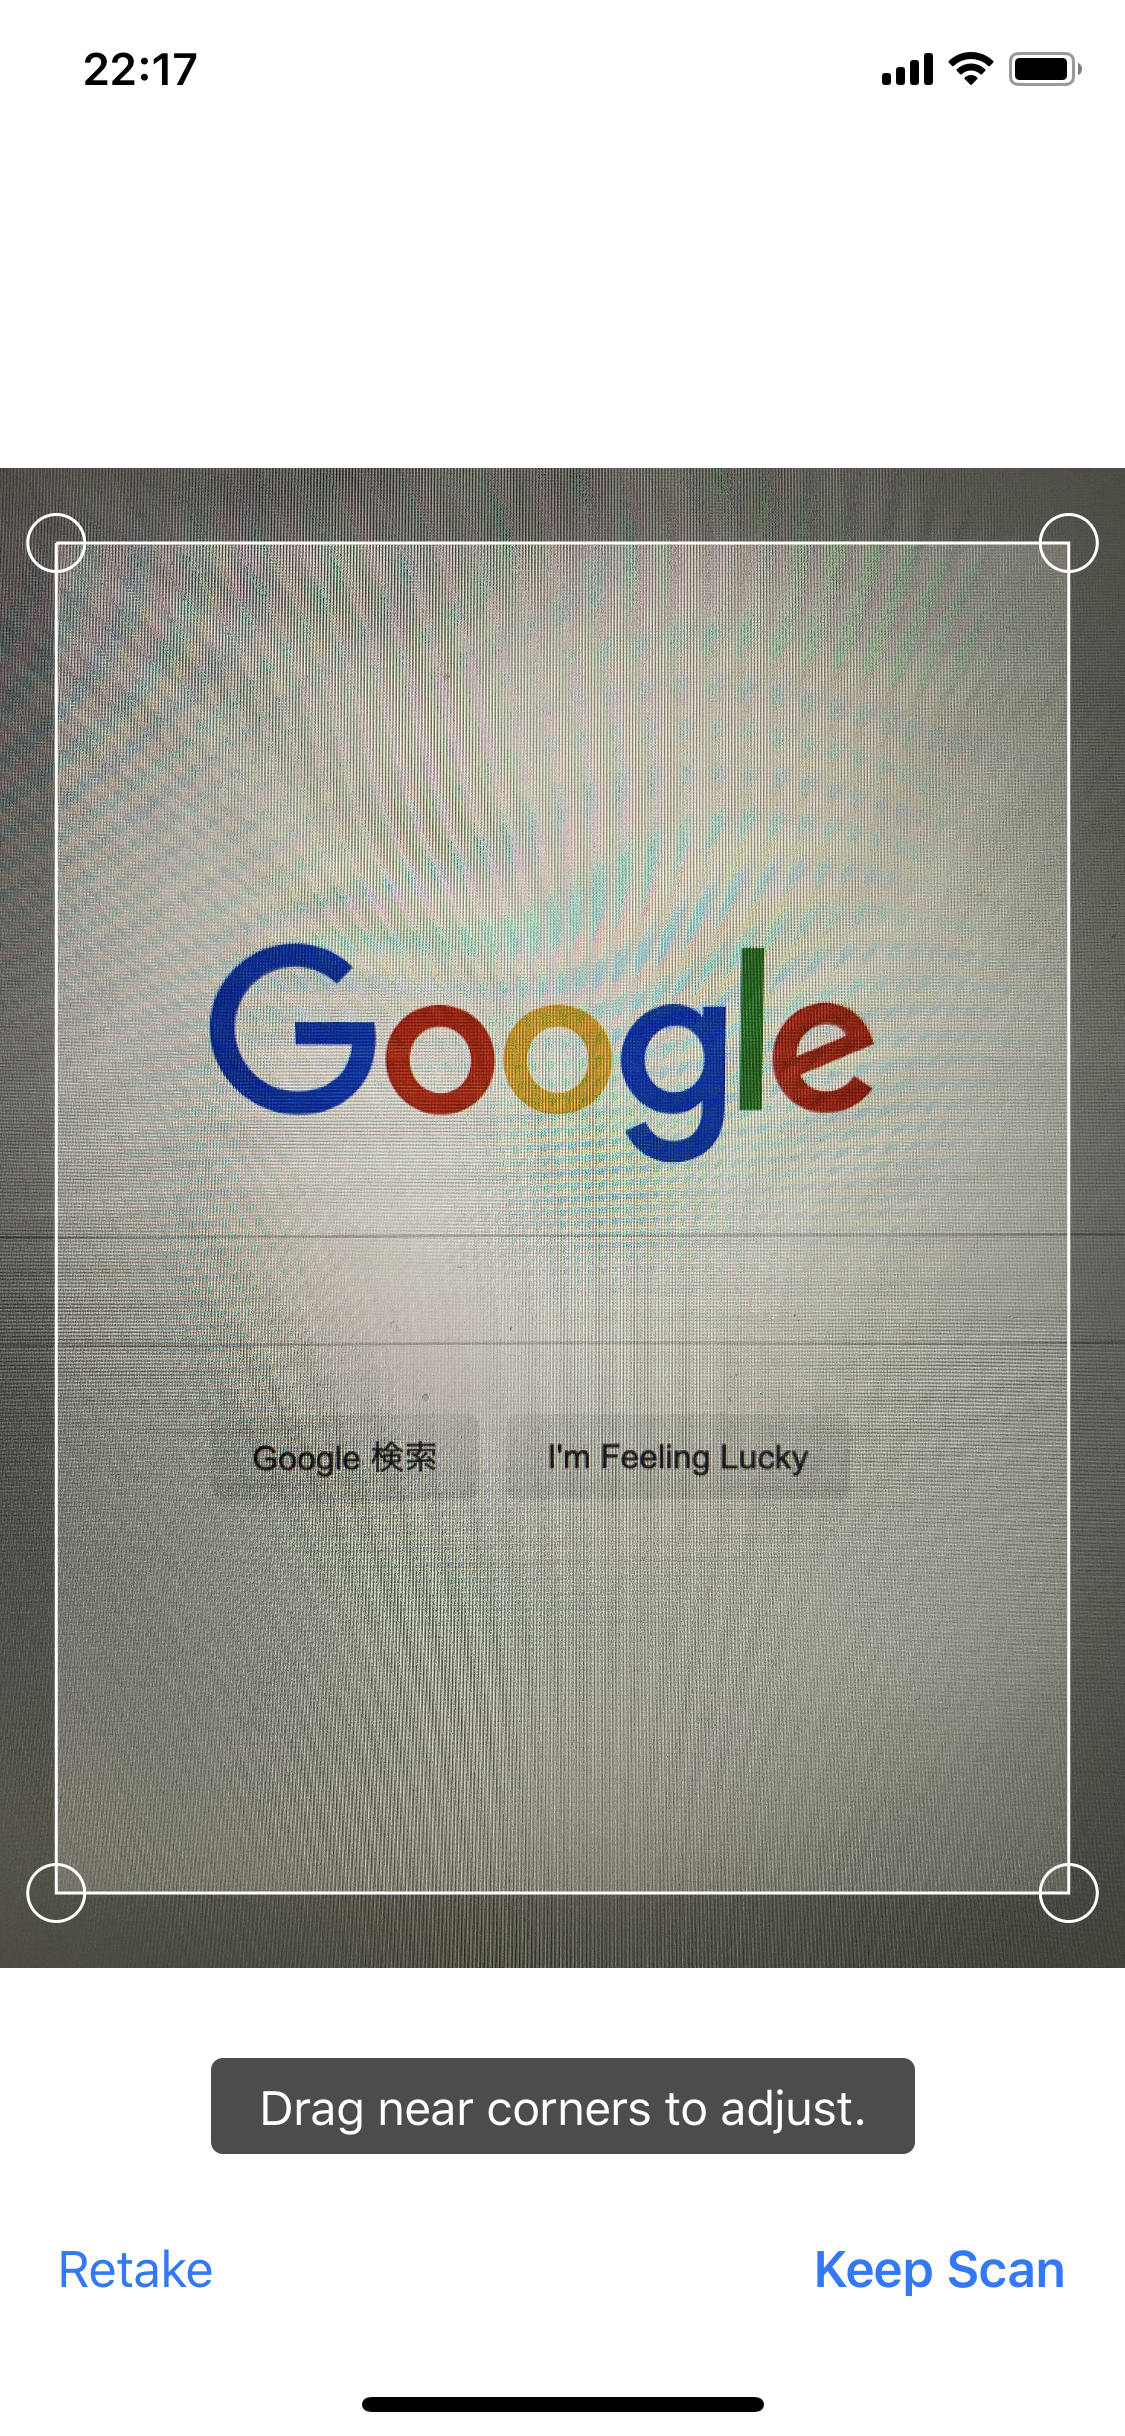
Googleサイト
最後はGoogleサイトをパシャリ

これまでのような印刷物ではなく、また日本語も含まれていますね。結果はいかに!
↓↓解析結果
日本語部分はサポートされていないので当然だめでしたが、英語部分は問題なく認識できました!おわりに
簡単なコードだけで文字認識が実現できたのは驚きでした。
日本語がサポートされれば活用の幅がぐっと広がると思うので、今後の拡張に期待したいと思います参考記事
- 投稿日:2020-08-02T22:16:23+09:00
Xcodeのハイライトについて
ある日の気づき
これまでいつもクラスのフィールドの前には
selfをつけて記述していましたが、今日の昼にやっと気づきました。ローカル変数は白色で、クラスのフィールドやメソッドはちゃんと色が付くようになっていました...
もっと早く気付けばよかった。なので、Xcodeのハイライトがそれぞれどういう意味をしているのかを調べてみようと思いました。
Xcodeのハイライト
Preferencesのところを見ると、このように書いてありました。
Plain Text
その名の通り、普通の記述のことのようです。
Comments
コメントのことです。
Documentation Markup
スラッシュ3つの後ろに記述するドキュメンテーションコメントのことです。
Documentation Markup Keywords
ドキュメンテーションコメントの中のマークアップのキーワードのことです。
Marks
MARK:コメントのことです。
Strings
Stringのことです。
Characters
Characterのことです。
Numbers
数値型のことです。
Keywords
letとかのようなキーワードのことです。
Preprocessor Statements
#if DEBUGのような記述のことです。(Preprocessor macrosとか呼ばれてる?)
URLs
URLのことです。
Attributes
@escapingのようなAttributesのことでしょうか。
僕のXcodeだとKeywordsと同じ色にハイライトされていました。
Type Declerations
typealiasみたいな型の宣言のことです。
Other Declarations
メソッドとかの宣言のことです。
Project Class Names
自身のクラス名のことです。(Extenstionとかでこの色になる)
Project Function and Method Names
自身のメソッドとかフィールドを呼び出すときの色です。
Project Constants
自身のクラスの定数のことです。
Project Type Names
よくわからなかったです...
Project Instance Variables and Globals
自身のインスタンス変数やグローバル変数のことです。
Project Preprocessor Macros
自身のPreprocessor Macrosのことです。
Other Class Names
他のクラス名のことです。
Other Function and Method Names
他のクラスのメソッドとかフィールドを呼び出すときの色です。
Other Constants
他のクラスの定数のことです。
Other Type Names
よくわからなかったです...
Other Instance Variables and Globals
他のクラスのインスタンス変数やグローバル変数のことです。
Other Preprocessor Macros
他のクラスのPreprocessor Macrosのことです。
Heading
よくわからなかったです...さいごに
今まではぼんやりと色が変わるなーくらいにしか思っていなかったけど、ちゃんと見たほうがよさそうですね...
とりあえず不必要なselfを取り除く作業をしてきます。
- 投稿日:2020-08-02T21:51:38+09:00
Ctrl + ドラッグが出来ない、Mac初心者のあなたへ。
ViewController.swiftと、紐付けができない事件
Qiita初投稿です㊗︎。
内容は陳腐です。結論
Ctrlキーを押さず、commandキーを押していました。以上。
MacにはCtrlないのかと思ってた。
WindowsのCtrl = MacのCommand って、よく聞くし。
Could not insert new outlet connection"上記エラーの方は、このサイトを参考に。
上記エラーが出たわけでもなく、ただ何も反応しないだけの方は、
キーボードの位置を今一度確認してくださいまし。割と大きな文字で『control』って書かれたキーが、左隅に潜んでいます。
まとめ
それでもMacは、美しい。
- 投稿日:2020-08-02T21:30:33+09:00
Ctrl + ドラッグが出来ない、Mac初心者のあなたへ。
ViewController.swiftと、紐付けができない事件
Qiita初投稿です㊗︎。
内容は陳腐です。結論
Ctrlキーを押さず、commandキーを押していました。以上。
MacにはCtrlないのかと思ってた。
WindowsのCtrl = MacのCommand って、よく聞くし。
Could not insert new outlet connection"上記エラーの方は、このサイトを参考に。
上記エラーが出たわけでもなく、ただ何も反応しないだけの方は、
キーボードの位置を今一度確認してくださいまし。割と大きな文字で『control』って書かれたキーが、左隅に潜んでいます。
まとめ
それでもMacは、美しい。
- 投稿日:2020-08-02T20:34:35+09:00
TableviewCellのクラスを作る〜Swiftで楽天レシピAPIを表示させてみた〜
やること
前回の続き
TableviewCellのクラスを作るTableviewCellのクラスを作る
①
class RTableViewCell: UITableViewCell {とTableviewcellのクラスを作る。
②UILabelを作成let bodyTextLabel: UILabel = { let label = UILabel() label.text = "something in here" //テキストに表示する文字 label.font = .systemFont(ofSize: 15) //文字のフォントを指定 label.translatesAutoresizingMaskIntoConstraints = false //下記のメモ①参照 return label }()③ UIImageViewを作成
let userImageView: UIImageView = {
       let iv = UIImageView()
        iv.contentMode = .scaleAspectFill              // 画像の大きさを指定
        iv.translatesAutoresizingMaskIntoConstraints = false  //下記のメモ①参照
        iv.clipsToBounds = true                   //描画がUIImageViewの領域内に限定される(メモ②)
        return iv
    }()
メモ①
translatesAutoresizingMaskIntoConstraintsは、AutoresizingMaskの設定値をAuto Layoutの制約に変換するかどうかを決めるもの。
参考記事メモ②
④bodyTextLabelにAPIで取ってきたrecipeTitleを入れてあげる。
    var recip: ResultList.User? {
        didSet {
            bodyTextLabel.text = recip?.recipeTitle
⑤userImageViewにAPIで取ってきたfoodImageUrlを入れてあげる。
UIimageでURL(foodImageUrl)で画像を取得 参考記事let url = URL(string: recip?.foodImageUrl ?? "") do { let data = try Data(contentsOf: url!) let image = UIImage(data: data) userImageView.image = image //userImageViewにfoodImageUrlを入れてあげるコード }catch let err { print("Error : \(err.localizedDescription)") } } }⑥ ④や⑤で作ったuserImageViewとbodyTextLabelをカスタマイズする
参考記事override init(style: UITableViewCell.CellStyle, reuseIdentifier: String?) { super.init(style: style, reuseIdentifier: reuseIdentifier) addSubview(userImageView) addSubview(bodyTextLabel) [ //ビューの左端を指定 userImageView.leadingAnchor.constraint(equalTo: leadingAnchor, constant: 10), //ビューの縦方向中心を指定 userImageView.centerYAnchor.constraint(equalTo: centerYAnchor), //ビューの幅を指定 userImageView.widthAnchor.constraint(equalToConstant: 50), //ビューの高さを指定 userImageView.heightAnchor.constraint(equalToConstant: 50), //テキストの左端を指定 bodyTextLabel.leadingAnchor.constraint(equalTo: userImageView.trailingAnchor, constant: 20), //テキストの縦方向中心を指定 bodyTextLabel.centerYAnchor.constraint(equalTo: centerYAnchor), ].forEach{ $0.isActive = true } //メモ参照 //ビューを丸くする userImageView.layer.cornerRadius = 50 / 2 } required init?(coder: NSCoder) { fatalError("init(coder:) has not been implemented") } }メモ(for each)
for eachはfor inと同じように処理の繰り返しに使う。
ただfor each文はreturnやbreakなどで処理を抜けることがない。
for in文ではreturnで処理を抜けることができる。
参考記事RTableViewCellを反映させる
tableView.register(UITableViewCell.self,
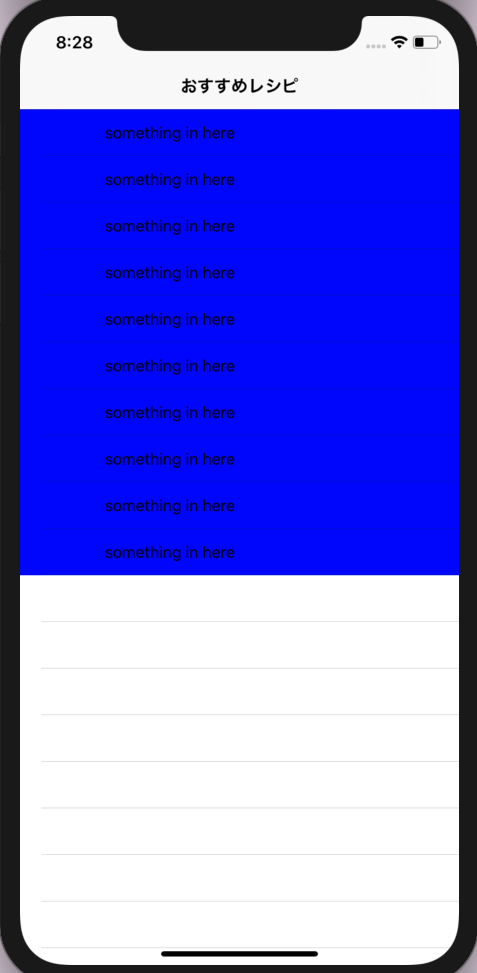
のUITableViewCellを先ほど作ったクラスのRTableViewCellに変えてあげる。tableView.register(RTableViewCell.self, forCellReuseIdentifier: cellId)シミュレーター
これでcellの準備も整いました。
自分なりに調べて解説しているので間違いなどあればご教示していただけると有り難いです。
次こそcellにAPIの情報を反映したいと思います!!今までの全体コード
struct ResultList: Codable {

    let result: [User]

struct User: Codable {
    let foodImageUrl :String
    let recipeTitle  :String
}
}

class ViewController: UIViewController {

    private let cellId = "cellId"
    //tableviewを作っていく
    let tableView: UITableView = {
        let tv = UITableView()
        return tv
    }()

    override func viewDidLoad() {
        super.viewDidLoad()

        view.addSubview(tableView)
        tableView.frame.size = view.frame.size


        tableView.delegate = self
        tableView.dataSource = self
        tableView.register(RTableViewCell.self, forCellReuseIdentifier: cellId)
        navigationItem.title = "おすすめレシピ"

      getRApi()
    }

     private func getRApi(){
            guard let url = URL(string: "楽天api") else {return}

            let task = URLSession.shared.dataTask(with: url) { (data, response, err)in
                if let err = err {
                    print("情報の取得に失敗しました。:", err)
                    return
                }
                if let data = data{
                    do{
                        let resultList = try JSONDecoder().decode(ResultList.self, from: data)

                        print("json: ", resultList)
                    }catch(let err){
                         print("情報の取得に失敗しました。:", err)

                    }
                }
            }
            task.resume()
        }
    }
extension ViewController: UITableViewDelegate,UITableViewDataSource{

        func tableView(_ tableView: UITableView, numberOfRowsInSection section: Int) -> Int {


            return 10
            }

    func tableView(_ tableView: UITableView, cellForRowAt indexPath: IndexPath) -> UITableViewCell {
        let cell = tableView.dequeueReusableCell(withIdentifier: cellId, for: indexPath)
        cell.backgroundColor = .blue   //確認のため

        return cell
    }

}

class RTableViewCell: UITableViewCell {

    let bodyTextLabel: UILabel = {
        let label = UILabel()
        label.text = "something in here"
        label.font = .systemFont(ofSize: 15)
        label.translatesAutoresizingMaskIntoConstraints = false
        return label
    }()

    let userImageView: UIImageView = {
       let iv = UIImageView()
        iv.contentMode = .scaleAspectFill
        iv.translatesAutoresizingMaskIntoConstraints = false
        iv.clipsToBounds = true
        return iv
    }()

    var recip: ResultList.User? {
        didSet {
            bodyTextLabel.text = recip?.recipeTitle
            let url = URL(string: recip?.foodImageUrl ?? "")
            do {
                let data = try Data(contentsOf: url!)
                let image = UIImage(data: data)
                userImageView.image = image
            }catch let err {
                print("Error : \(err.localizedDescription)")
            }
        }
    }


    override init(style: UITableViewCell.CellStyle, reuseIdentifier: String?) {
        super.init(style: style, reuseIdentifier: reuseIdentifier)

        addSubview(userImageView)
        addSubview(bodyTextLabel)
        [
            userImageView.leadingAnchor.constraint(equalTo: leadingAnchor, constant: 10),
            userImageView.centerYAnchor.constraint(equalTo: centerYAnchor),
            userImageView.widthAnchor.constraint(equalToConstant: 50),
            userImageView.heightAnchor.constraint(equalToConstant: 50),

            bodyTextLabel.leadingAnchor.constraint(equalTo: userImageView.trailingAnchor, constant: 20),
            bodyTextLabel.centerYAnchor.constraint(equalTo: centerYAnchor),

            ].forEach{ $0.isActive = true }

        userImageView.layer.cornerRadius = 50 / 2
    }

    required init?(coder: NSCoder) {
        fatalError("init(coder:) has not been implemented")
    }
}
- 投稿日:2020-08-02T20:34:35+09:00
TableviewCellのクラスを作る〜Swiftで楽天レシピAPIを表示させてみた③〜
やること
前回の続き
TableviewCellのクラスを作るTableviewCellのクラスを作る
①
class RTableViewCell: UITableViewCell {とTableviewcellのクラスを作る。
②UILabelを作成let bodyTextLabel: UILabel = { let label = UILabel() label.text = "something in here" //テキストに表示する文字 label.font = .systemFont(ofSize: 15) //文字のフォントを指定 label.translatesAutoresizingMaskIntoConstraints = false //下記のメモ①参照 return label }()③ UIImageViewを作成
let userImageView: UIImageView = {
       let iv = UIImageView()
        iv.contentMode = .scaleAspectFill              // 画像の大きさを指定
        iv.translatesAutoresizingMaskIntoConstraints = false  //下記のメモ①参照
        iv.clipsToBounds = true                   //描画がUIImageViewの領域内に限定される(メモ②)
        return iv
    }()
メモ①
translatesAutoresizingMaskIntoConstraintsは、AutoresizingMaskの設定値をAuto Layoutの制約に変換するかどうかを決めるもの。
参考記事メモ②
④bodyTextLabelにAPIで取ってきたrecipeTitleを入れてあげる。
    var recip: ResultList.User? {
        didSet {
            bodyTextLabel.text = recip?.recipeTitle
⑤userImageViewにAPIで取ってきたfoodImageUrlを入れてあげる。
UIimageでURL(foodImageUrl)で画像を取得 参考記事let url = URL(string: recip?.foodImageUrl ?? "") do { let data = try Data(contentsOf: url!) let image = UIImage(data: data) userImageView.image = image //userImageViewにfoodImageUrlを入れてあげるコード }catch let err { print("Error : \(err.localizedDescription)") } } }⑥ ④や⑤で作ったuserImageViewとbodyTextLabelをカスタマイズする
参考記事override init(style: UITableViewCell.CellStyle, reuseIdentifier: String?) { super.init(style: style, reuseIdentifier: reuseIdentifier) addSubview(userImageView) addSubview(bodyTextLabel) [ //ビューの左端を指定 userImageView.leadingAnchor.constraint(equalTo: leadingAnchor, constant: 10), //ビューの縦方向中心を指定 userImageView.centerYAnchor.constraint(equalTo: centerYAnchor), //ビューの幅を指定 userImageView.widthAnchor.constraint(equalToConstant: 50), //ビューの高さを指定 userImageView.heightAnchor.constraint(equalToConstant: 50), //テキストの左端を指定 bodyTextLabel.leadingAnchor.constraint(equalTo: userImageView.trailingAnchor, constant: 20), //テキストの縦方向中心を指定 bodyTextLabel.centerYAnchor.constraint(equalTo: centerYAnchor), ].forEach{ $0.isActive = true } //メモ参照 //ビューを丸くする userImageView.layer.cornerRadius = 50 / 2 } required init?(coder: NSCoder) { fatalError("init(coder:) has not been implemented") } }メモ(for each)
for eachはfor inと同じように処理の繰り返しに使う。
ただfor each文はreturnやbreakなどで処理を抜けることがない。
for in文ではreturnで処理を抜けることができる。
参考記事RTableViewCellを反映させる
tableView.register(UITableViewCell.self,
のUITableViewCellを先ほど作ったクラスのRTableViewCellに変えてあげる。tableView.register(RTableViewCell.self, forCellReuseIdentifier: cellId)シミュレーター
これでcellの準備も整いました。
自分なりに調べて解説しているので間違いなどあればご教示していただけると有り難いです。
次こそcellにAPIの情報を反映したいと思います!!今までの全体コード
struct ResultList: Codable {

    let result: [User]

struct User: Codable {
    let foodImageUrl :String
    let recipeTitle  :String
}
}

class ViewController: UIViewController {

    private let cellId = "cellId"
    //tableviewを作っていく
    let tableView: UITableView = {
        let tv = UITableView()
        return tv
    }()

    override func viewDidLoad() {
        super.viewDidLoad()

        view.addSubview(tableView)
        tableView.frame.size = view.frame.size


        tableView.delegate = self
        tableView.dataSource = self
        tableView.register(RTableViewCell.self, forCellReuseIdentifier: cellId)
        navigationItem.title = "おすすめレシピ"

      getRApi()
    }

     private func getRApi(){
            guard let url = URL(string: "楽天api") else {return}

            let task = URLSession.shared.dataTask(with: url) { (data, response, err)in
                if let err = err {
                    print("情報の取得に失敗しました。:", err)
                    return
                }
                if let data = data{
                    do{
                        let resultList = try JSONDecoder().decode(ResultList.self, from: data)

                        print("json: ", resultList)
                    }catch(let err){
                         print("情報の取得に失敗しました。:", err)

                    }
                }
            }
            task.resume()
        }
    }
extension ViewController: UITableViewDelegate,UITableViewDataSource{

        func tableView(_ tableView: UITableView, numberOfRowsInSection section: Int) -> Int {


            return 10
            }

    func tableView(_ tableView: UITableView, cellForRowAt indexPath: IndexPath) -> UITableViewCell {
        let cell = tableView.dequeueReusableCell(withIdentifier: cellId, for: indexPath)
        cell.backgroundColor = .blue   //確認のため

        return cell
    }

}

class RTableViewCell: UITableViewCell {

    let bodyTextLabel: UILabel = {
        let label = UILabel()
        label.text = "something in here"
        label.font = .systemFont(ofSize: 15)
        label.translatesAutoresizingMaskIntoConstraints = false
        return label
    }()

    let userImageView: UIImageView = {
       let iv = UIImageView()
        iv.contentMode = .scaleAspectFill
        iv.translatesAutoresizingMaskIntoConstraints = false
        iv.clipsToBounds = true
        return iv
    }()

    var recip: ResultList.User? {
        didSet {
            bodyTextLabel.text = recip?.recipeTitle
            let url = URL(string: recip?.foodImageUrl ?? "")
            do {
                let data = try Data(contentsOf: url!)
                let image = UIImage(data: data)
                userImageView.image = image
            }catch let err {
                print("Error : \(err.localizedDescription)")
            }
        }
    }


    override init(style: UITableViewCell.CellStyle, reuseIdentifier: String?) {
        super.init(style: style, reuseIdentifier: reuseIdentifier)

        addSubview(userImageView)
        addSubview(bodyTextLabel)
        [
            userImageView.leadingAnchor.constraint(equalTo: leadingAnchor, constant: 10),
            userImageView.centerYAnchor.constraint(equalTo: centerYAnchor),
            userImageView.widthAnchor.constraint(equalToConstant: 50),
            userImageView.heightAnchor.constraint(equalToConstant: 50),

            bodyTextLabel.leadingAnchor.constraint(equalTo: userImageView.trailingAnchor, constant: 20),
            bodyTextLabel.centerYAnchor.constraint(equalTo: centerYAnchor),

            ].forEach{ $0.isActive = true }

        userImageView.layer.cornerRadius = 50 / 2
    }

    required init?(coder: NSCoder) {
        fatalError("init(coder:) has not been implemented")
    }
}
- 投稿日:2020-08-02T19:35:38+09:00
【Swift】オプショナル型とnilの基本
はじめに
今回はSwiftを書いていくうえでとても重要な、オプショナル型の基本について解説します。
オプショナル型とnilとは
Swiftでは扱うべき値が存在しないことを表すために、nilという特別な値が存在しています。変数や定数、関数の返り値、式の評価結果や、通常の値だけでなく未設定やエラーなどの状態を表すことがある場合、その値をnilで表現します。
例えば整数の場合、変数や式の型はInt型ですが、通常はInt型の値を持ち、特殊な場合にnilを値として持つことがある変数や式は、Int?型で扱います。これをオプショナルInt型と呼びます。次の例を見てください。var a : Int = 0 var b : Int? = 10 b = nil //代入可能 a = nil //エラーこのように、int型は整数以外の値を保持できませんが、オプショナルint型は整数以外に値nilを保持することができます。
なおオプショナル型は、データ型のイニシャライザの返り値にも使われます。ここではInt型イニシャライザの、文字列を引数とするイニシャライザの例を以下に示します。
let olympic = "2020"
var year : Int? = Int(olympic) //2020が返される
var city : Int? = Int("Tokyo") //整数として評価できないので、nilが返される
このように引数の文字列を整数として評価した値を返しますが、整数として評価できなかった場合はnilを返すため、このイニシャライザの返り値を受け取る変数の型はInt?である必要があります。
オプショナル型の値を開示する
オプショナルInt型(Int?型)の値は整数かnilですが、型がInt型ではないので、そのままInt型に代入することも、Int型として式の中で演算することもできません。そのためにオプショナル型からデータを取り出す、すなわちInt?型からInt型を取り出す必要があります。このことを、ここでは開示と呼ぶこととします。開示のためにはオプショナル型に対して「!」という記号を使います。具体的な例を以下に示します。
let year : Int? = Int("2020")
let next : Int = year! + 4   //開示指定(!)が必要
この例ではyearの後ろに!がないとコンパイル時にエラーとなります。では、オプショナル型の変数の値がnilだった場合はどうなるのでしょうか。
let year : Int? = Int("令和20年") //yearの値はnil
let next : Int = year! + 4  //実行時エラーになる
この場合にはInt型の値を取り出すことができないので、コンパイルはできますが実行時にエラーになります。また、開示さえすれば復合代入演算子を使うこともできます。
条件判定
オプショナル型は開示しようとしても、nilが格納されているとエラーが発生してしまいます。そこで、開示前にどんな値が格納されているのか確認する方法として、比較の演算子「==」や「!=」を利用することができます。この際に開示は必要ありません。以下に例を示します。
var nagano : Int? = Int("1998")
if nagano != nil {                //真(ここでは開示指定は使わない)
    print("Nagano: \(nagano!)")   //ここで開示指定が必要
}
if nagano == 2020 {               //偽(ここでは開示指定は使わない)
    print(2020)
}
変数または定数をnilと比較したとき、nilなのかどうかが調べられます。値と比較すると、nilではなく、かつその値かどうかが調べられます。
終わりに
今回はSwiftを書く上で非常に重要な、オプショナル型の基本について解説しました。オプショナル型についてはまだまだ大切な使い方があるので、また今度オプショナル型に関した記事を書こうと思います。オプショナル型はすごく大切な知識なので、ぜひ身に着けてください。
- 投稿日:2020-08-02T19:06:42+09:00
Custom URL Schemeをstructにマッピングしたい&どこが悪いかすぐ知りたい
URLをstructにマッピングしたい
Custom URL SchemeをURLで受け取った場合、そのままでは使いにくいため、structなどにマッピングしたくなります。そのときの以下の要望を叶える部品が欲しくなったので作ってみました。
- 簡単かつできるだけType Safeにマッピングしたい
- URLに問題がありマッピングに失敗した場合、その原因を知りたい
部品を使ったマッピングと生成の例
myscheme://host/openArticle?title=title-string&url=https://google.com/&mode=0
を以下にマッピングする場合を考えます。struct Article { var title: String var url: URL } enum Mode: Int { case safari = 0 case webView = 1 } struct OpenArticle { var article: Article var mode: Mode }以下のように
URLQueryKeysを用意しURLComponentsCompatibleに対応させて…extension URLQueryKeys { static let title: URLQueryKey<String> = .init("title") static let url: URLQueryKey<URL> = .init("url") static let mode: URLQueryKey<Mode> = .init("mode") } struct Article: URLComponentsCompatible { var title: String var url: URL init(urlComponents: URLComponents) throws { title = try urlComponents.queryValue(key: .title) url = try urlComponents.queryValue(key: .url) } } enum Mode: Int, Codable, URLQueryValueCompatible { case safari = 0 case webView = 1 } struct OpenArticle: URLComponentsCompatible { var article: Article var mode: Mode init(urlComponents: URLComponents) throws { guard urlComponents.path == "/openArticle" else { throw URLComponentsCompatibleError.incompatible(description: nil) } article = try Article(urlComponents: urlComponents) mode = try urlComponents.queryValue(key: .mode) } }実際に生成するときは以下のように呼び出します。
// urlComponentsは
// myscheme://host/openArticle?title=title-string&url=https://google.com/&mode=0
do {
    try OpenArticle(urlComponents: urlComponents)
} catch {
    print(error)
}
例えば
urlが存在しないURLだった場合// urlComponentsは // myscheme://host/openArticle?title=title-string&mode=0 do { try OpenArticle(urlComponents: urlComponents) } catch { print(error) // queryItemNotFound(name: "url") }
queryItemNotFound(name: "url")が投げられてurlが足りないことがすぐにわかります。JSONをDecodableでstructにマッピングするくらい簡単にできると一番嬉しいのですが、これでも十分に役に立つかなと思います。
上記例では一部機能しか使っていませんが、以下の処理に対応しています。
- queryの型として
IntDoubleFloatBoolStringCodableOptionalに対応- queryの型を追加可能
URLQueryKeyに(String?) throws -> Valueを渡し独自の変換処理が可能(100以下のIntなど)- queryが存在しない場合エラーを投げるか投げないか選択可能
- queryの文字列のフォーマットが異なる場合エラーを投げる
マッピングのための部品のコード
省略なしのコードはCustom URL Schemeをstructにマッピングする。 · GitHubを参照してください。
URLQueryItemのvalueを特定の型に変換する
URLQueryItemのvalueは
String?型です。まずString?を各種型に変換します。// URLQueryValue public enum URLQueryValueCompatibleError: Error { case none // nil case empty // isEmpty case format // 期待した書式ではない } public protocol URLQueryValueCompatible { init(urlQueryValue: String?) throws } extension Int: URLQueryValueCompatible { public init(urlQueryValue: String?) throws { guard let urlQueryValue = urlQueryValue else { throw URLQueryValueCompatibleError.none } guard !urlQueryValue.isEmpty else { throw URLQueryValueCompatibleError.empty } guard let int = Int(urlQueryValue) else { throw URLQueryValueCompatibleError.format } self = int } } extension Optional: URLQueryValueCompatible where Wrapped: URLQueryValueCompatible { public init(urlQueryValue: String?) throws { do { self = try Wrapped(urlQueryValue: urlQueryValue) } catch let error as URLQueryValueCompatibleError { switch error { case .none, .empty: self = .none case .format: throw error } } } } extension URLQueryValueCompatible where Self: Codable { public init(urlQueryValue: String?) throws { guard let urlQueryValue = urlQueryValue else { throw URLQueryValueCompatibleError.none } guard !urlQueryValue.isEmpty else { throw URLQueryValueCompatibleError.empty } guard let urlQueryData = urlQueryValue.data(using: .utf8) else { throw URLQueryValueCompatibleError.format } self = try JSONDecoder().decode(Self.self, from: urlQueryData) } }独自の型に
URLQueryValueCompatibleを実装することもできます。URLQueryItemのnameと型を紐付ける
URLQueryItemの
var name: Stringと実際に使用したい型を紐付けるURLQueryKeysを用意します。// URLQueryKey public class URLQueryKeys { public init() {} } public class URLQueryKey<Value>: URLQueryKeys { public typealias Converter = (String?) throws -> Value public var name: String public var converter: Converter public init(_ name: String, converter: @escaping Converter) { self.name = name self.converter = converter super.init() } }
ValueがURLQueryValueCompatibleである場合は簡単に生成できるようにします。extension URLQueryKey where Value: URLQueryValueCompatible { public convenience init(_ name: String) { self.init(name, converter: { source in try Value(urlQueryValue: source) }) } }queryの値を取り出す
おそらく一番面倒なのが
[URLQueryItem]から値を取り出す部分です。
これをできるだけ簡単に取り出せるようにしましょう。// URLComponents public enum URLComponentsCompatibleError: Error { case notURL case incompatible(description: String?) case queryItemNotFound(name: String) case queryValue(name: String, error: Error) } extension URLComponents { public func queryValue<Value>(key: URLQueryKey<Value>) throws -> Value { if let queryItem = queryItems?.first(where: { $0.name == key.name }) { do { return try key.converter(queryItem.value) } catch { throw URLComponentsCompatibleError.queryValue(name: key.name, error: error) } } else { throw URLComponentsCompatibleError.queryItemNotFound(name: key.name) } } public func queryValue<Value>(ifContainsKey key: URLQueryKey<Value>) throws -> Value? { do { return try queryValue(key: key) } catch URLComponentsCompatibleError.queryItemNotFound(_) { return nil } catch { throw error } } public func queryValue<Value>(ifContainsKey key: URLQueryKey<Value?>) throws -> Value? { do { return try queryValue(key: key) } catch URLComponentsCompatibleError.queryItemNotFound(_) { return nil } catch { throw error } } }QueryItemが必ず必要な
key版とと、QueryItemがなくてもいいifContainsKey版があります。
またOptionalが二重にならないようにする対策でifContainsKeyは2種類メソッドがあります。URLComponentsからマッピングできる場合の目印
// URLComponentsCompatible

public protocol URLComponentsCompatible {
    init(urlComponents: URLComponents) throws
}
これは主にわかりやすさのためにつけます。
- 投稿日:2020-08-02T13:02:17+09:00
ソースでUINavigationController 2020summer
Xcode 11.6
iOS 13.6一番下にUINavigationController(のサブクラス)を置くときのやりかた、のとりあえずのメモ。storyboardはさわらない。
- プロジェクト作成
- storyboardいじらず
- 最初に表示したいUIViewController(つまりUINavigationControllerの第1子)を作成。ここではMenuViewControllerという名前とする。
- 次のソースを書く
class ViewController: UINavigationController {
    //ストーリーボードからこれが呼ばれる
    required init?(coder aDecoder: NSCoder) {
        super.init(rootViewController: MenuViewController())
    }
}
5.表示したいUIViewControllerのviewDidLoad()に
view.backgroundColor = UIColor.systemBackground//上部が黒くなるのを回避を追加。
メモ
土台のclass ViewController: UINavigationControllerのviewにbackgroundColorを指定してもいいんだけど、画面推移時にUINavigationController部分の描画がなぜか遅れて、色が不必要で微妙な変化をする(iOS13)。
- 投稿日:2020-08-02T13:02:17+09:00
ソースコードでUINavigationController 2020summer
Xcode 11.6
iOS 13.6アプリの土台にUINavigationController(のサブクラス)を置くときのやりかた、のとりあえずのメモ。storyboardはさわらない。
- プロジェクト作成
- storyboardいじらず
- 最初に表示したいUIViewController(つまりUINavigationControllerの第1子)を作成。ここではMenuViewControllerという名前とする。
- 次のソースを書く。これは最初からあるViewControllerを上書きする。
class ViewController: UINavigationController {
    //ストーリーボードからこれが呼ばれる
    required init?(coder aDecoder: NSCoder) {
        super.init(rootViewController: MenuViewController())
    }
}
5.表示したいUIViewControllerのviewDidLoad()に
view.backgroundColor = UIColor.systemBackground//上部が黒くなるのを回避を追加。
AppDelegateに書くやり方が主流
検索するとほとんどが以下のやり方である。
class AppDelegate: UIResponder, UIApplicationDelegate {

    //⭐️追加する
    var window: UIWindow?

    func application(_ application: UIApplication, didFinishLaunchingWithOptions launchOptions: [UIApplication.LaunchOptionsKey: Any]?) -> Bool {
        // Override point for customization after application launch.

        //⭐️追加する
        self.window = UIWindow(frame: UIScreen.main.bounds)
        self.window?.rootViewController = UINavigationController(rootViewController: MenuViewController())

        return true
    }
しかし、この記事のはじめに書いたやり方で何か不都合があるのだろうか?わからない。
backgroundColorの指定について
UINavigationControllerのviewに指定するのではなく傘下のUIViewControllerのviewで指定している理由
土台のclass ViewController: UINavigationControllerのviewにbackgroundColor = .systemBackgroundを指定すると、画面推移時にUINavigationController部分(戻るボタンなどが表示されるエリア)の描画がなぜか遅れて、色が不必要で微妙な変化をするから(iOS13)。
- 投稿日:2020-08-02T10:59:58+09:00
【Swift】UICollectionViewDiffableDataSourceとNSDiffableDataSourceSnapshot
iOS 13以降で使える
UICollectionViewDiffableDataSourceとNSDiffableDataSourceSnapshotについて調べたので備忘録としてまとめます。どちらもWWDC2019で
Compositional Layoutと合わせて発表されましたね。
個人的な印象では、
- データの更新に強くなった
Compositional Layoutと組み合わせて複雑なレイアウトの表示とデータ管理が楽になったこんな感じの印象です。
NSDiffableDataSourceSnapshot
概要
NSDiffableDataSourceSnapshot<SectionIdentifierType, ItemIdentifierType>
データを格納して管理するクラスSectionIdentifierType: Sectionを定義する型でHashableであること(Enumとかが多そう)
ItemIdentifierType: cellに表示するデータ型でHashableであること用意されているメソッド、プロパティ
データ管理系
- データの追加・削除(SectionとItem)
- append, insert, delete
- 並び替え(SectionとItem)
- moveSection, moveItem
- リロード(SectionとItem)
- reloadItems, reloadSections
データ参照系
- データ数の取得(SectionとItem)
- public var numberOfItems: Int { get }
- public var numberOfSections: Int { get }
- public func numberOfItems(inSection identifier: SectionIdentifierType) -> Int
- 値(一覧)の取得(SectionとItem)
- public var sectionIdentifiers: [SectionIdentifierType] { get }
- public var itemIdentifiers: [ItemIdentifierType] { get }
- public func itemIdentifiers(inSection identifier: SectionIdentifierType) -> [ItemIdentifierType]
- public func sectionIdentifier(containingItem identifier: ItemIdentifierType) -> SectionIdentifierType?
- indexの取得(SectionとItem)
- public func indexOfItem(_ identifier: ItemIdentifierType) -> Int?
- public func indexOfSection(_ identifier: SectionIdentifierType) -> Int?
使い方
詳細は サンプルコード を見てください。
AdvancedLayoutViewController.swiftprivate enum Section { case main } struct SampleItemModel: Codable, Hashable { let value: Int } // initial data let list = Array(0..<100).map { SampleItemModel(value: $0) } var snapshot = NSDiffableDataSourceSnapshot<Section, SampleItemModel>() snapshot.appendSections([.main]) snapshot.appendItems(list)UICollectionViewDiffableDataSource
概要
UICollectionViewDiffableDataSource<SectionIdentifierType, ItemIdentifierType>
データをUIに紐付けて表示するクラスSectionIdentifierType: Sectionを定義する型でHashableであること(Enumとかが多そう)
ItemIdentifierType: cellに表示するデータ型でHashableであることInitializer
- インスタンス生成
public typealias CellProvider = (UICollectionView, IndexPath, ItemIdentifierType) -> UICollectionViewCell?
public init(collectionView: UICollectionView, cellProvider: @escaping CellProvider)
- ヘッダーとフッター追加
public typealias SupplementaryViewProvider = (UICollectionView, String, IndexPath) -> UICollectionReusableView?
public var supplementaryViewProvider: SupplementaryViewProvider?
用意されているメソッド、プロパティ
データ管理系
- データを適用する
- open func apply(_ snapshot: NSDiffableDataSourceSnapshot, animatingDifferences: Bool = true, completion: (() -> Void)? = nil)
データ参照系
- Snapshotの取得
- open func snapshot() -> NSDiffableDataSourceSnapshot
- cellに表示するデータを取得
- open func itemIdentifier(for indexPath: IndexPath) -> ItemIdentifierType?
- indexPathの取得
- open func indexPath(for itemIdentifier: ItemIdentifierType) -> IndexPath?
元のDataSourceにあって引き継がれた系
- @objc open func numberOfSections(in collectionView: UICollectionView) -> Int
- @objc open func collectionView(_ collectionView: UICollectionView, numberOfItemsInSection section: Int) -> Int
- @objc open func collectionView(_ collectionView: UICollectionView, cellForItemAt indexPath: IndexPath) -> UICollectionViewCell
- @objc open func collectionView(_ collectionView: UICollectionView, viewForSupplementaryElementOfKind kind: String, at indexPath: IndexPath) -> UICollectionReusableView
- @objc open func collectionView(_ collectionView: UICollectionView, canMoveItemAt indexPath: IndexPath) -> Bool
- @objc open func collectionView(_ collectionView: UICollectionView, moveItemAt sourceIndexPath: IndexPath, to destinationIndexPath: IndexPath)
- @objc open func indexTitles(for collectionView: UICollectionView) -> [String]?
- @objc open func collectionView(_ collectionView: UICollectionView, indexPathForIndexTitle title: String, at index: Int) -> IndexPath
使い方
詳細は サンプルコード を見てください。
AdvancedLayoutViewController.swiftprivate enum Section { case main } struct SampleItemModel: Codable, Hashable { let value: Int } @IBOutlet weak var advancedCollectionView: UICollectionView! { didSet { advancedCollectionView.register(UINib(nibName: "LabelCell", bundle: nil), forCellWithReuseIdentifier: "LabelCell") advancedCollectionView.autoresizingMask = [.flexibleWidth, .flexibleHeight] } } private var dataSource: UICollectionViewDiffableDataSource<Section, SampleItemModel>! = nil dataSource = UICollectionViewDiffableDataSource<Section, SampleItemModel>(collectionView: advancedCollectionView) { // CellProvider (collectionView: UICollectionView, indexPath: IndexPath, identifier: SampleItemModel) -> UICollectionViewCell? in guard let cell = collectionView.dequeueReusableCell(withReuseIdentifier: "LabelCell", for: indexPath) as? LabelCell else { return UICollectionViewCell() } cell.set(text: "\(identifier.value)") return cell } dataSource.apply(snapshot, animatingDifferences: false)まとめ
使ってみてめちゃくちゃ便利だったのでiOS13以降のアプリで積極的に使っていこうと思いました。
ちなみに下記のライブラリを導入すると、
Compositional LayoutUICollectionViewDiffableDataSourceNSDiffableDataSourceSnapshot
がiOS12以前でも使えます。
ただiOS13の挙動と少し違う部分もあるみたいです。(データを追加取得した時とか)
https://github.com/kishikawakatsumi/IBPCollectionViewCompositionalLayout
- 投稿日:2020-08-02T09:23:37+09:00
Objective-Cクラスを継承したSwiftクラスで、継承元のメンバ変数を扱う方法
はじめに
古くから存在するアプリでは、Objective-CとSwiftが共存していることがよくあります。はじめはObjective-Cで作られ、Swiftが発表された後はSwiftで作っている、というパターンですね。こういったアプリでは、Objective-Cで書かれたクラスをSwiftで継承する、という実装を行う場面が出てくると思います。そのときのメンバ変数の取り扱いで少し手間取ったので、備忘録として残します。
サンプルファイル
以下に、この記事で扱うファイルを記載します。
継承元のObjective-Cファイル
継承元のクラスが書かれたファイルは以下であるとします。
SampleParentViewController.h#import <UIKit/UIKit.h> @protocol SampleDelegate - (void) delegateMethod; @end @interface SampleParentViewController: UIViewController { id<SampleDelegate> sampleDelegate; } - (instancetype)initWithDelegate:(id<SampleDelegate>)delegate; @endSampleParentViewController.m#import "SampleParentViewController.h" @implementation SampleParentViewController - (instancetype)initWithDelegate:(id<SampleDelegate>)delegate { self = [super init]; if (self) { sampleDelegate = delegate; } return self; } - (void)viewDidLoad { [super viewDidLoad]; [sampleDelegate delegateMethod]; } @end継承先のSwiftファイル
以下のように、継承するクラスをSwiftで書いたとします。
SampleChildViewController.swiftimport UIKit class SampleChildViewController: SampleParentViewController { let otherViewController: SampleDelegate = OtherViewController() override func viewDidLoad() { self.sampleDelegate = otherViewController super.viewDidLoad() } }しかし、このSwiftファイルをつくるとコンパイルエラーになります。以下で、このファイルの実装するための変更手順を示していきます。
変更手順
段階を追って、意図通りに動くための手順を示していきます。
プロパティを追加
まずこのsampleDelegateはメンバ変数として定義されているため、クラスの外から参照することはできません。参照できるようにするには、メンバ変数ではなくプロパティに変更する必要があります。そのために、まずはヘッダファイルにプロパティの宣言を追加します。
SampleParentViewController.h#import <UIKit/UIKit.h> @protocol SampleDelegate - (void) delegateMethod; @end @interface SampleParentViewController: UIViewController { id<SampleDelegate> sampleDelegate; } @property id<SampleDelegate> sampleDelegate; - (instancetype)initWithDelegate:(id<SampleDelegate>)delegate; @end一応、これだけでコンパイルエラーは解消します。しかし、実行してみるとotherViewControllerのdelegateMethodは実行されず、sampleDelegateは書き換えられていないことがわかります。これはヘッダファイルで新しくプロパティを宣言し変数を追加しましたが、もともとのsampleDelegateには何の変更も加わっていないためです。
Objective-Cのプロパティ
Objective-Cでは、ヘッダファイルでプロパティを宣言すると、メソッドファイルでは頭に_がついて扱われます。そのため現時点では、もともと存在していたsampleDelegateと新しく追加した_sampleDelegateが存在していることになっています。今回はsampleDelegateをプロパティに置き換えるのが目的なので、メソッドファイルに書かれているsampleDelegateを_sampleDelegateに書き換えていきます。
SampleParentViewController.m#import "SampleParentViewController.h" @implementation SampleParentViewController - (instancetype)initWithDelegate:(id<SampleDelegate>)delegate { self = [super init]; if (self) { _sampleDelegate = delegate; } return self; } - (void)viewDidLoad { [super viewDidLoad]; [_sampleDelegate delegateMethod]; } @endこれで、sampleDelegateが完全にプロパティに置き換わりました。したがって継承先のファイルからsampleDelegateが扱えるようになっています。一応、使わなくなったメンバ変数のsampleDelegateの宣言を消しておきましょう。
SampleParentViewController.h#import <UIKit/UIKit.h> @protocol SampleDelegate - (void) delegateMethod; @end @interface SampleParentViewController: UIViewController @property id<SampleDelegate> sampleDelegate; - (instancetype)initWithDelegate:(id<SampleDelegate>)delegate; @endまとめ
メンバ変数が定義されているObjective-CファイルをSwiftファイルで継承してその変数を扱うために、プロパティで宣言し直してメソッドファイルを書き換える手順を記載しました。Objective-Cはハマると解決に時間がかかる仕様が多いと思います。そんな人の助けになれると幸いです。
