- 投稿日:2020-04-14T23:52:59+09:00
SwiftでARマーカー (ArUco) を検出する
はじめに
Swift で OpenCV の ArUco モジュールを使ってARマーカーを検出するコードを書きました。
ArUcoモジュールによるARマーカー検出は、マーカーの向きや傾きによる影響が少なく、非常に認識精度が高いです。検出したマーカーのから得られる情報にしたがって進行方向を決定する動体の実装などに使えそうです。SwiftにOpenCVを導入する
こちらの記事を参考にしてください。
Swiftで OpenCV の ArUco モジュールを使うプログラム
OpencvWrapper.h#import <Foundation/Foundation.h> #import <UIKit/UIKit.h> @interface opencvWrapper : NSObject { UIImage *_image; NSDictionary *_markerDict; } - (UIImage *)image; // 検出されたマーカーを描画した画像 - (NSDictionary *)markerDict; // 検出されたマーカーの (id, rect) の辞書 //(返り値の型 *)関数名:(引数の型 *)引数名;; - (void)detectARMarker:(UIImage *)input_img; @endObject-C++のヘッダーファイルです。
Swiftから検出されたARマーカーが描画された画像と、ARマーカーのIDおよび座標が取得しやすいように、インスタンス変数として_image、_markerDictを定義しています。OpencvWrapper.mm#import <opencv2/opencv.hpp> #import <opencv2/imgcodecs/ios.h> #import <opencv2/aruco.hpp> #import "opencvWrapper.h" using namespace cv; using namespace std; @implementation opencvWrapper - (UIImage *)image { return _image; }; - (NSDictionary *)markerDict { return _markerDict; } - (void)detectARMarker:(UIImage *)input_img { Mat mat; UIImageToMat(input_img, mat); cvtColor(mat, mat, CV_RGBA2RGB); vector<int> ids; vector<vector<Point2f> > corners; // ArUcoモジュールに事前定義されたARマーカーの辞書を取得する Ptr<aruco::Dictionary> dictionary = aruco::getPredefinedDictionary(aruco::DICT_6X6_250); // detectMarkers でARマーカーを検出する // ids に ARマーカーのID、corners に ARマーカーの座標を格納する aruco::detectMarkers(mat, dictionary, corners, ids); // mat (元の画像) に 検出されたARマーカーを描画する if (ids.size() > 0) aruco::drawDetectedMarkers(mat, corners, ids); // draw bounding boxes. // Mat型の画像を Swiftで扱えるUIImage型に変換 UIImage * output_img = MatToUIImage(mat); _image = output_img; // ids と corners を {id<NSNumber>: corner<NSArray[CGPoint]>} の形式の辞書に変換してmutableDictに格納する NSMutableDictionary *mutableDict = [@{} mutableCopy]; for (int i=0; i<ids.size(); i++) { auto id = ids[i]; NSNumber* markerId = [NSNumber numberWithInt:id]; NSMutableArray* corner = [[NSMutableArray alloc] initWithCapacity:corners[i].size()]; for (auto point: corners[i]) { [corner addObject:[NSValue valueWithCGPoint:CGPointMake(point.x, point.y)]]; } mutableDict[markerId] = corner; } _markerDict = mutableDict; } @endObject-C++の実装ファイルです。
詳しい説明はコード中のコメントとして記述しています。
detectMarkers関数によるARマーカーの検出結果は、検出されたARマーカーのIDとcorners(四隅の座標)の形で得られ、drawDetectedMarkers関数によって画像の中にARマーカーの四隅を直線で結んだ枠とidを描画しています。ViewController.swiftimport UIKit class ViewController: UIViewController { let openCV = opencvWrapper() var imageView: UIImageView? var detectBtn: UIButton? override func viewDidLoad() { super.viewDidLoad() let image = UIImage(named: "armarkertest") self.imageView = UIImageView(image: image) self.imageView?.frame = CGRect(x: 75, y: 200, width: 250, height: 250) self.view.addSubview(self.imageView!) self.detectBtn = UIButton(type: .system) self.detectBtn?.frame = CGRect(x: 75, y: 550, width: 250, height: 90) self.detectBtn?.setTitle("Detect", for: .normal) self.detectBtn?.setTitleColor(UIColor.white, for: .normal) self.detectBtn?.titleLabel?.font = .systemFont(ofSize: 24) self.detectBtn?.backgroundColor = UIColor.blue self.detectBtn?.addTarget(self, action: #selector(detect(_:)), for: .touchUpInside) self.view.addSubview(self.detectBtn!) } @objc func detect(_ sender: UIButton) { openCV.detectARMarker(self.imageView?.image) let aruco_img = openCV.image() self.imageView?.image = aruco_img guard let markers = openCV.markerDict() else { return } if let markerDict = markers as? [Int : Array<CGPoint>] { for (key,data) in markerDict { print("id: \(key), corner: \(data)\n") } } } }ARマーカーが複数個映った画像を画面上部のUIImageViewに配置し、その下に「Detect」ボタンを配置しています。
「Detect」ボタンを押下すると、OpencvWrapper.mm の detectARMarker関数が実行され、UIImageViewの画像がARマーカー検出結果が反映されたものに変わります。
また、同時にARマーカーのIDと座標の情報が標準出力に表示されます。実行結果は以下です。
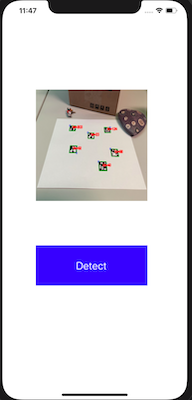
「Detect」後
少し小さいですが、画像の中のARマーカーが緑の枠で囲われ、マーカーIDが赤字で記されています。
標準出力
id: 62, corner: [(233.0, 273.0), (190.0, 273.0), (196.0, 241.0), (237.0, 241.0)]

id: 40, corner: [(359.0, 310.0), (404.0, 310.0), (410.0, 350.0), (362.0, 350.0)]

id: 124, corner: [(425.0, 163.0), (430.0, 186.0), (394.0, 186.0), (390.0, 162.0)]

id: 203, corner: [(195.0, 155.0), (230.0, 155.0), (227.0, 178.0), (190.0, 178.0)]

id: 98, corner: [(427.0, 255.0), (469.0, 256.0), (477.0, 289.0), (434.0, 288.0)]

id: 23, corner: [(298.0, 185.0), (334.0, 186.0), (335.0, 212.0), (297.0, 211.0)]
参考
- 投稿日:2020-04-14T23:27:32+09:00
swiftでEurakaという神ライブラリの使用例
はじめに
Eurekaとは...
公式github参考
よくある設定画面のUIを簡単に作ることができる神ライブラリです!
導入
qiita.rbpod 'Eureka' pod 'ImageRow'ー> pod install
ImageRow使うなら一緒に入れてね!
するだけ!使用例と注意ポイント!
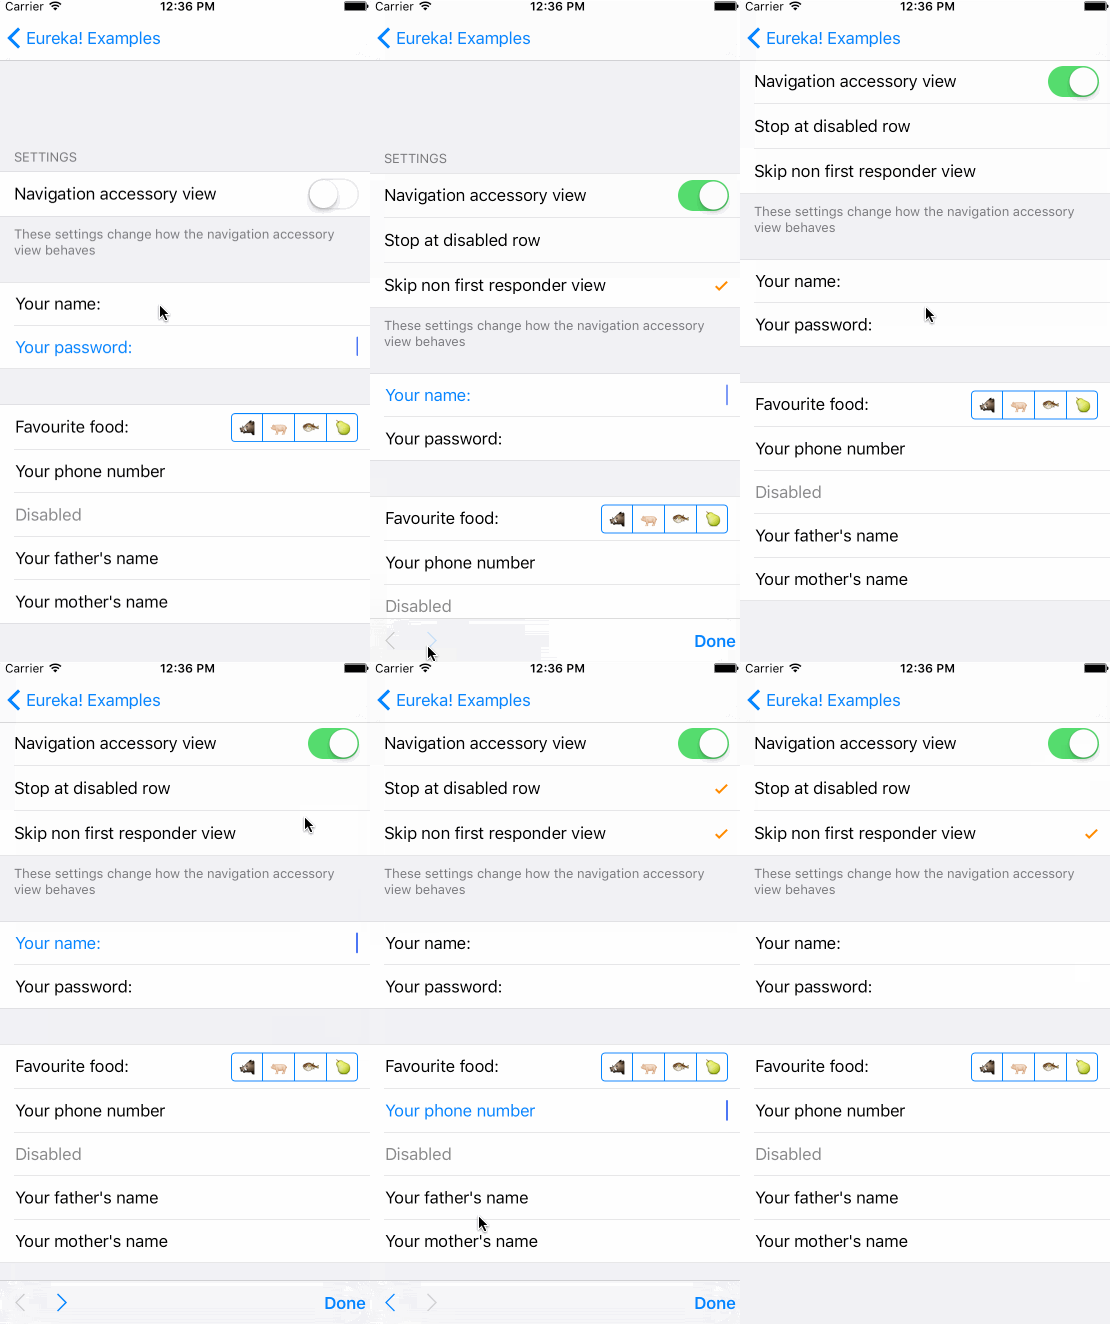
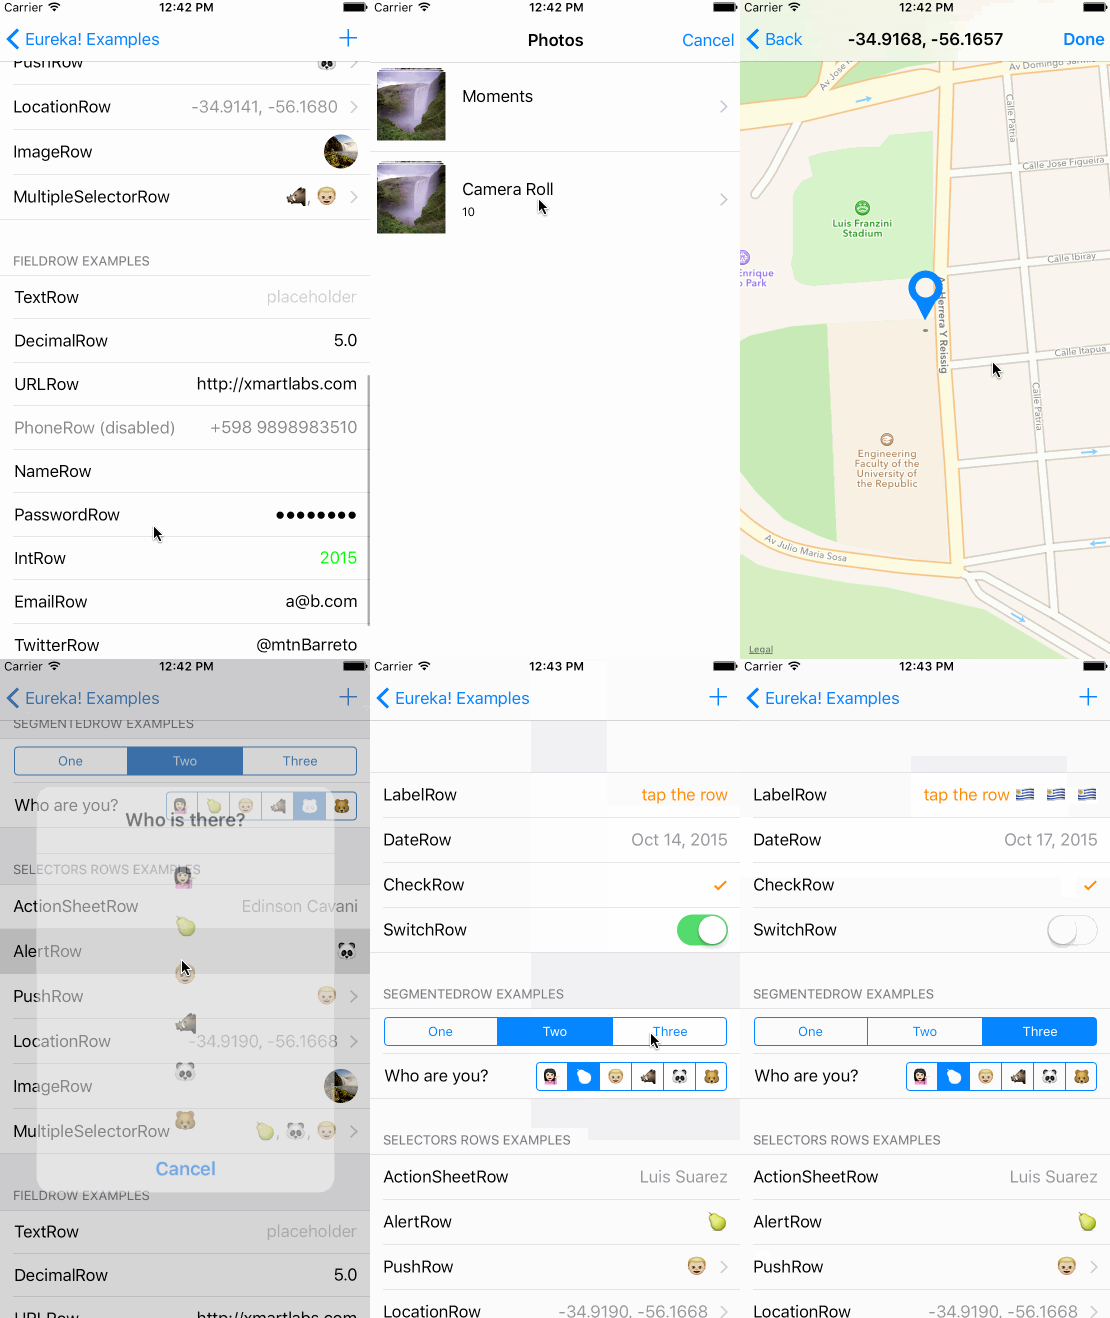
こんな設定画面を作ってみたよ!
code
①まずFormViewControllerの追加
swift5class ViewController: FormViewController {}swift5override func viewDidLoad() { super.viewDidLoad() form +++ Section("プロフィール画像") <<< ImageRow(){ $0.title = "プロフィール画像" $0.sourceTypes = [.Camera,.PhotoLibrary] $0.clearAction = .no }.cellUpdate { cell, row in cell.accessoryView?.layer.cornerRadius = (cell.accessoryView?.bounds.width)! / 2 }.onChange({ (ImageRow) in self.selectedImage = ImageRow.value! }) form +++ Section("自己紹介") <<< TextAreaRow("自己紹介を書いてね!!") { $0.placeholder = "Notes" $0.textAreaHeight = .dynamic(initialTextViewHeight: 50) $0.value = self.introductionText } .onChange({ row in self.introductionText = row.value ?? "はじめまして" }) form +++ Section("基本情報") <<< TextRow(){ row in row.title = "名前" row.placeholder = userNameText }.onChange{ row in self.userNameText = row.value ?? "userName" } <<< TextRow(){ row in row.title = "ユーザーID" row.placeholder = userIDText }.onChange{ row in self.userIDText = row.value ?? "userID" } <<< PickerInlineRow<String>("sex"){ row in row.title = "性別" row.options = ["未選択","MEN","WOMAN"] row.value = selectedSex }.onChange({ [unowned self] row in self.selectedSex = row.value! }) <<< DateRow(){ $0.title = "誕生日" let birthDay = userDefault.object(forKey: "birthDay") as? Cell<Date>.Value if birthDay != nil { $0.value = (userDefault.object(forKey: "birthDay") as! Cell<Date>.Value) let age = self.getDays(date: $0.value) self.selectedage = age }else{ $0.value = Date() } }.onChange({ (date) in let birth = date.value self.userDefault.set(birth,forKey: "birthDay") let age = self.getDays(date: birth) self.selectedage = age }) }おまけ(年齢取得関数)
swift5func getDays(date:Date?,anotherDay:Date? = nil) -> Int{ var retInterval:Double! if anotherDay == nil { retInterval = date?.timeIntervalSinceNow }else{ retInterval = date?.timeIntervalSince(anotherDay!) } let ret = Int(-(retInterval/(86400*365))) return ret }注意点
row.value!のように強制アンラップするとtext入力時にnilになった瞬間落ちます(当たり前やけど...w)
'.onChange({ row in self.hogehoge = row.value ?? "はじめまして" })'githubでサンプル載せておきます!
僕のgithubまだswift3ヶ月のひよこ寄りの卵なんで指摘,アドバイス等々コメントでくださると有り難いです!
- 投稿日:2020-04-14T23:27:32+09:00
swiftでEurekaという神ライブラリの使用例
はじめに
タイトル誤字ってました^^;申し訳ないです(_ _)
Eurekaとは...
公式github参考
よくある設定画面のUIを簡単に作ることができる神ライブラリです!
導入
qiita.rbpod 'Eureka' pod 'ImageRow'ー> pod install
ImageRow使うなら一緒に入れてね!
するだけ!使用例と注意ポイント!
こんな設定画面を作ってみたよ!
code
①まずFormViewControllerの追加
swift5class ViewController: FormViewController {}swift5override func viewDidLoad() { super.viewDidLoad() form +++ Section("プロフィール画像") <<< ImageRow(){ $0.title = "プロフィール画像" $0.sourceTypes = [.Camera,.PhotoLibrary] $0.clearAction = .no }.cellUpdate { cell, row in cell.accessoryView?.layer.cornerRadius = (cell.accessoryView?.bounds.width)! / 2 }.onChange({ (ImageRow) in self.selectedImage = ImageRow.value! }) form +++ Section("自己紹介") <<< TextAreaRow("自己紹介を書いてね!!") { $0.placeholder = "Notes" $0.textAreaHeight = .dynamic(initialTextViewHeight: 50) $0.value = self.introductionText } .onChange({ row in self.introductionText = row.value ?? "はじめまして" }) form +++ Section("基本情報") <<< TextRow(){ row in row.title = "名前" row.placeholder = userNameText }.onChange{ row in self.userNameText = row.value ?? "userName" } <<< TextRow(){ row in row.title = "ユーザーID" row.placeholder = userIDText }.onChange{ row in self.userIDText = row.value ?? "userID" } <<< PickerInlineRow<String>("sex"){ row in row.title = "性別" row.options = ["未選択","MEN","WOMAN"] row.value = selectedSex }.onChange({ [unowned self] row in self.selectedSex = row.value! }) <<< DateRow(){ $0.title = "誕生日" let birthDay = userDefault.object(forKey: "birthDay") as? Cell<Date>.Value if birthDay != nil { $0.value = (userDefault.object(forKey: "birthDay") as! Cell<Date>.Value) let age = self.getDays(date: $0.value) self.selectedage = age }else{ $0.value = Date() } }.onChange({ (date) in let birth = date.value self.userDefault.set(birth,forKey: "birthDay") let age = self.getDays(date: birth) self.selectedage = age }) }おまけ(年齢取得関数)
swift5func getDays(date:Date?,anotherDay:Date? = nil) -> Int{ var retInterval:Double! if anotherDay == nil { retInterval = date?.timeIntervalSinceNow }else{ retInterval = date?.timeIntervalSince(anotherDay!) } let ret = Int(-(retInterval/(86400*365))) return ret }注意点
row.value!のように強制アンラップするとtext入力時にnilになった瞬間落ちます(当たり前やけど...w)
'.onChange({ row in self.hogehoge = row.value ?? "はじめまして" })'githubでサンプル載せておきます!
僕のgithubまだswift3ヶ月のひよこ寄りの卵なんで指摘,アドバイス等々コメントでくださると有り難いです!
- 投稿日:2020-04-14T22:11:13+09:00
Xcodeでユニットテストを実行しようとするとFabricエラーが発生する件
Xcodeでユニットテストを実行しようとするとFabricエラー(
FABException)が発生する現象について、(暫定的ですが)対応方法が分かったのでメモしておきます。前提
Xcodeバージョン
Version 11.4 (11E146)CocoaPodsライブラリバージョン
Crashlytics (3.14.0)
Fabric (1.10.2)
Firebase/Core (6.21.0)
エラーの内容
Xcodeでユニットテストを実行しようとしたところ、以下のようなエラーが発生しました。
2020-04-14 21:25:16.896671+0900 my-app.debug[11653:9277327] [GoogleDataTransport][I-GDTCOR001006] There was an error reading extension bytes from disk: Error Domain=NSCocoaErrorDomain Code=260 "The file “ event-15836755976515215681”  couldn’ t be opened because there is no such file." UserInfo={NSFilePath=/Users/username/Library/Developer/CoreSimulator/Devices/388F2986-4BFC-4913-ABAC-60C79B78307E/data/Containers/Data/Application/67018EDE-63CF-41B1-AF95-78A9BD40EE86/Library/Caches/google-sdks-events/event-15836755976515215681, NSUnderlyingError=0x600002a1d3b0 {Error Domain=NSPOSIXErrorDomain Code=2 "No such file or directory"}}
2020-04-14 21:25:16.897135+0900 my-app.debug[11653:9277327] [GoogleDataTransport][I-GDTCOR001006] There was an error reading extension bytes from disk: Error Domain=NSCocoaErrorDomain Code=260 "The file “ event-15836102738338756022”  couldn’ t be opened because there is no such file." UserInfo={NSFilePath=/Users/username/Library/Developer/CoreSimulator/Devices/388F2986-4BFC-4913-ABAC-60C79B78307E/data/Containers/Data/Application/67018EDE-63CF-41B1-AF95-78A9BD40EE86/Library/Caches/google-sdks-events/event-15836102738338756022, NSUnderlyingError=0x600002a57330 {Error Domain=NSPOSIXErrorDomain Code=2 "No such file or directory"}}
2020-04-14 21:25:16.978966+0900 my-app.debug[11653:9277054] [Crashlytics] Version 3.14.0 (144)
2020-04-14 21:25:17.047625+0900 my-app.debug[11653:9277054] *** Terminating app due to uncaught exception 'FABException', reason: '[Fabric] Value of Info.plist key "Fabric" must be a NSDictionary.'
*** First throw call stack:
(
    0   CoreFoundation                      0x00007fff23e3dcce __exceptionPreprocess + 350
    1   libobjc.A.dylib                     0x00007fff50b3b9b2 objc_exception_throw + 48
    2   CoreFoundation                      0x00007fff23e3db0c +[NSException raise:format:] + 188
    3   my-app.debug            0x00000001102b4240 -[Fabric validFabricConfigFromInfoPlist:] + 334
    4   my-app.debug            0x00000001102b3e21 -[Fabric fabricConfig] + 127
    5   my-app.debug            0x00000001102b3f6e -[Fabric APIKey] + 285
    6   my-app.debug            0x000000011027bf43 -[Crashlytics APIKey] + 55
    7   my-app.debug            0x00000001102873ee -[CLSCrashReportingController APIKey] + 57
    8   my-app.debug            0x0000000110286ace -[CLSCrashReportingController startWithProfilingMark:betaToken:] + 258
    9   my-app.debug            0x000000011027b959 __20-[Crashlytics start]_block_invoke + 617
    10  libdispatch.dylib                   0x00007fff519798cb _dispatch_client_callout + 8
    11  libdispatch.dylib                   0x00007fff5197ab02 _dispatch_once_callout + 20
    12  my-app.debug            0x000000011027b6ee -[Crashlytics start] + 131
    13  my-app.debug            0x000000011027bb04 +[Crashlytics initializeIfNeeded] + 48
    14  my-appTests             0x00000001151bbc41 __15+[Fabric with:]_block_invoke + 535
    15  libdispatch.dylib                   0x00007fff519798cb _dispatch_client_callout + 8
    16  libdispatch.dylib                   0x00007fff5197ab02 _dispatch_once_callout + 20
    17  my-appTests             0x00000001151bba24 +[Fabric with:] + 233
    18  my-appTests             0x00000001151bd992 +[Fabric autoInitialize:] + 680
    19  my-appTests             0x00000001151bd6aa __14+[Fabric load]_block_invoke + 191
    20  Foundation                          0x00007fff2590d694 -[__NSObserver _doit:] + 287
    21  CoreFoundation                      0x00007fff23d68d0c __CFNOTIFICATIONCENTER_IS_CALLING_OUT_TO_AN_OBSERVER__ + 12
    22  CoreFoundation                      0x00007fff23d68185 _CFXRegistrationPost1 + 421
    23  CoreFoundation                      0x00007fff23d67ef1 ___CFXNotificationPost_block_invoke + 193
    24  CoreFoundation                      0x00007fff23e652d3 -[_CFXNotificationRegistrar find:object:observer:enumerator:] + 1795
    25  CoreFoundation                      0x00007fff23d67846 _CFXNotificationPost + 950
    26  Foundation                          0x00007fff2590de2b -[NSNotificationCenter postNotificationName:object:userInfo:] + 59
    27  my-app.debug            0x00000001102ce2a6 +[FIRApp sendNotificationsToSDKs:] + 502
    28  my-app.debug            0x00000001102cca12 +[FIRApp configureWithName:options:] + 1410
    29  my-app.debug            0x00000001102cc34f +[FIRApp configureWithOptions:] + 143
    30  my-app.debug            0x00000001102cc29d +[FIRApp configure] + 157
    31  my-app.debug            0x000000010fd26206 $s24national_flags_ios_debug8LauncherC6launchyyF + 166
    32  my-app.debug            0x000000010fcf5394 $s24national_flags_ios_debug11AppDelegateC11application_29didFinishLaunchingWithOptionsSbSo13UIApplicationC_SDySo0m6LaunchL3KeyaypGSgtF + 100
    33  my-app.debug            0x000000010fcf5613 $s24national_flags_ios_debug11AppDelegateC11application_29didFinishLaunchingWithOptionsSbSo13UIApplicationC_SDySo0m6LaunchL3KeyaypGSgtFTo + 211
    34  UIKitCore                           0x00007fff48c0fecc -[UIApplication _handleDelegateCallbacksWithOptions:isSuspended:restoreState:] + 232
    35  UIKitCore                           0x00007fff48c1186b -[UIApplication _callInitializationDelegatesWithActions:forCanvas:payload:fromOriginatingProcess:] + 3985
    36  UIKitCore                           0x00007fff48c1742d -[UIApplication _runWithMainScene:transitionContext:completion:] + 1226
    37  UIKitCore                           0x00007fff48322a61 -[_UISceneLifecycleMultiplexer completeApplicationLaunchWithFBSScene:transitionContext:] + 122
    38  UIKitCore                           0x00007fff4882d065 _UIScenePerformActionsWithLifecycleActionMask + 83
    39  UIKitCore                           0x00007fff48323573 __101-[_UISceneLifecycleMultiplexer _evalTransitionToSettings:fromSettings:forceExit:withTransitionStore:]_block_invoke + 198
    40  UIKitCore                           0x00007fff48322f82 -[_UISceneLifecycleMultiplexer _performBlock:withApplicationOfDeactivationReasons:fromReasons:] + 296
    41  UIKitCore                           0x00007fff483233a0 -[_UISceneLifecycleMultiplexer _evalTransitionToSettings:fromSettings:forceExit:withTransitionStore:] + 818
    42  UIKitCore                           0x00007fff48322c35 -[_UISceneLifecycleMultiplexer uiScene:transitionedFromState:withTransitionContext:] + 345
    43  UIKitCore                           0x00007fff48327226 __186-[_UIWindowSceneFBSSceneTransitionContextDrivenLifecycleSettingsDiffAction _performActionsForUIScene:withUpdatedFBSScene:settingsDiff:fromSettings:transitionContext:lifecycleActionType:]_block_invoke_2 + 178
    44  UIKitCore                           0x00007fff48743415 +[BSAnimationSettings(UIKit) tryAnimatingWithSettings:actions:completion:] + 852
    45  UIKitCore                           0x00007fff4884b7c2 _UISceneSettingsDiffActionPerformChangesWithTransitionContext + 240
    46  UIKitCore                           0x00007fff48326f41 __186-[_UIWindowSceneFBSSceneTransitionContextDrivenLifecycleSettingsDiffAction _performActionsForUIScene:withUpdatedFBSScene:settingsDiff:fromSettings:transitionContext:lifecycleActionType:]_block_invoke + 153
    47  UIKitCore                           0x00007fff4884b6c5 _UISceneSettingsDiffActionPerformActionsWithDelayForTransitionContext + 84
    48  UIKitCore                           0x00007fff48326daf -[_UIWindowSceneFBSSceneTransitionContextDrivenLifecycleSettingsDiffAction _performActionsForUIScene:withUpdatedFBSScene:settingsDiff:fromSettings:transitionContext:lifecycleActionType:] + 381
    49  UIKitCore                           0x00007fff4817a968 __64-[UIScene scene:didUpdateWithDiff:transitionContext:completion:]_block_invoke + 657
    50  UIKitCore                           0x00007fff48179527 -[UIScene _emitSceneSettingsUpdateResponseForCompletion:afterSceneUpdateWork:] + 253
    51  UIKitCore                           0x00007fff4817a692 -[UIScene scene:didUpdateWithDiff:transitionContext:completion:] + 210
    52  UIKitCore                           0x00007fff48c15975 -[UIApplication workspace:didCreateScene:withTransitionContext:completion:] + 512
    53  UIKitCore                           0x00007fff4876a160 -[UIApplicationSceneClientAgent scene:didInitializeWithEvent:completion:] + 361
    54  FrontBoardServices                  0x00007fff36c6091e -[FBSSceneImpl _callOutQueue_agent_didCreateWithTransitionContext:completion:] + 419
    55  FrontBoardServices                  0x00007fff36c869b1 __86-[FBSWorkspaceScenesClient sceneID:createWithParameters:transitionContext:completion:]_block_invoke.154 + 102
    56  FrontBoardServices                  0x00007fff36c6b347 -[FBSWorkspace _calloutQueue_executeCalloutFromSource:withBlock:] + 220
    57  FrontBoardServices                  0x00007fff36c86642 __86-[FBSWorkspaceScenesClient sceneID:createWithParameters:transitionContext:completion:]_block_invoke + 355
    58  libdispatch.dylib                   0x00007fff519798cb _dispatch_client_callout + 8
    59  libdispatch.dylib                   0x00007fff5197c292 _dispatch_block_invoke_direct + 285
    60  FrontBoardServices                  0x00007fff36cac2d9 __FBSSERIALQUEUE_IS_CALLING_OUT_TO_A_BLOCK__ + 30
    61  FrontBoardServices                  0x00007fff36cabfc7 -[FBSSerialQueue _queue_performNextIfPossible] + 441
    62  FrontBoardServices                  0x00007fff36cac4d6 -[FBSSerialQueue _performNextFromRunLoopSource] + 22
    63  CoreFoundation                      0x00007fff23da1c71 __CFRUNLOOP_IS_CALLING_OUT_TO_A_SOURCE0_PERFORM_FUNCTION__ + 17
    64  CoreFoundation                      0x00007fff23da1b9c __CFRunLoopDoSource0 + 76
    65  CoreFoundation                      0x00007fff23da1374 __CFRunLoopDoSources0 + 180
    66  CoreFoundation                      0x00007fff23d9bf6e __CFRunLoopRun + 974
    67  CoreFoundation                      0x00007fff23d9b884 CFRunLoopRunSpecific + 404
    68  GraphicsServices                    0x00007fff38b5ac1a GSEventRunModal + 139
    69  UIKitCore                           0x00007fff48c19220 UIApplicationMain + 1605
    70  my-app.debug            0x000000010fcf610b main + 75
    71  libdyld.dylib                       0x00007fff519b910d start + 1
    72  ???                                 0x0000000000000007 0x0 + 7
)
libc++abi.dylib: terminating with uncaught exception of type NSException
+[FIRApp sendNotificationsToSDKs:]でクラッシュしているようです。暫定的な対応
この件について、FirebaseのiOS向けQuickstartにIssueが立っていました。
Podfileのテスト用ターゲットにinherit!: search_pathsを記述することで解決したケースもあるようですが、自分の場合はテスト実行中にFirebaseの構成処理を呼び出さないようにすることで暫定対応しました。func isRunningUnitTests() -> Bool { return ProcessInfo.processInfo.environment["XCInjectBundleInto"] != nil } func application(_ application: UIApplication, didFinishLaunchingWithOptions launchOptions: [UIApplication.LaunchOptionsKey: Any]?) -> Bool { ... if !isRunningUnitTests() { FirebaseApp.configure() } ... return true }以上
- 投稿日:2020-04-14T21:51:18+09:00
Swiftで OpenCV の ArUco モジュールを使う
はじめに
OpenCV の ArUco モジュールを使ってARマーカーを生成するコードを書きました。
通常、iOSアプリへの OpenCV のインストールはPodfile等を利用することで簡単に行うことができますが、ArUcoのような OpenCV_contrib (最新の技術を中心とした拡張モジュール群) に含まれるモジュールは iOS版の OpenCV には含まれておらず、OpenCV および OpenCV_contrib のソースコードをダウンロードして自前でビルドする必要があります。OpenCV_contrib を 含めて OpenCV をビルドする
ビルド方法についてはこちらの記事を参考にしました。
http://takesan.hatenablog.com/entry/2018/04/17/210109
以下のリンクからOpenCVとcontribそれぞれのソースコードをダウンロードします。
OpenCV: https://github.com/opencv/opencv/releases
contrib: https://github.com/opencv/opencv_contrib/releases
OpenCVとcontribのバージョンは必ず合わせるようにしてください。
私はV3.4.9を使いました。ダウンロードしたソースコードを展開し、opencv/modules/にある arucoフォルダをopencv_contrib/modulesの下にコピーします。
ターミナルを開き、以下のコマンドでビルドを開始します。
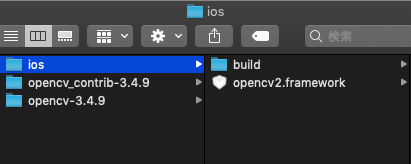
python のところは MacOS標準の python(V2.7) で実行できます。$ cd / $ sudo ln -s /Applications/Xcode.app/Contents/Developer Developer $ cd <path/to/opencv&contrib> $ python opencv/platforms/ios/build_framework.py iosビルドが終わるとカレントディレクトリにios/という名前のフォルダが作成されています。そこに、opencv2.framework というファイルが作られていれば成功です。
このビルドにはかなり時間がかかります。私の環境では45~60分ほどかかりました。
また、ビルドの実行には cmake が使える必要があり、私の環境ではここでエラーが発生してかなり時間を取られてしまいました。
エラーの内容はうろ覚えですが、ビルドに使われる cmake と Xcode が参照している cmake がリンクしていないという内容だった気がします。iOSアプリで OpenCV を使う
- Xcodeでプロジェクトを作成します。
- 先ほど作成した opencv2.framework を Finder から Xcode のナビゲータエリアにドラッグ&ドロップし、「Copy items if needed」をチェックして「Finish」を選択します。
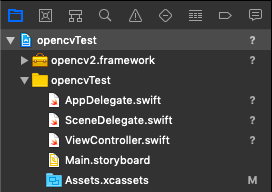
下図のように opencv2.framework がプロジェクトに追加されます。
3. Object-C用のファイルを作成します。OpenCV はもともと C++ で書かれたライブラリなので、Swift で使うためには以下のような少々複雑な方法をとる必要があります。
- Object-C++ (Object-CとC++を混在させた言語) で OpenCV 周りの処理を書いたモジュールを用意する
- ブリッジングヘッダー (<プロジェクト名>-Bridging-Header.h) という Swift と Object-C 間を中継するファイルを介して Swift から Object-C++ の処理を呼び出す
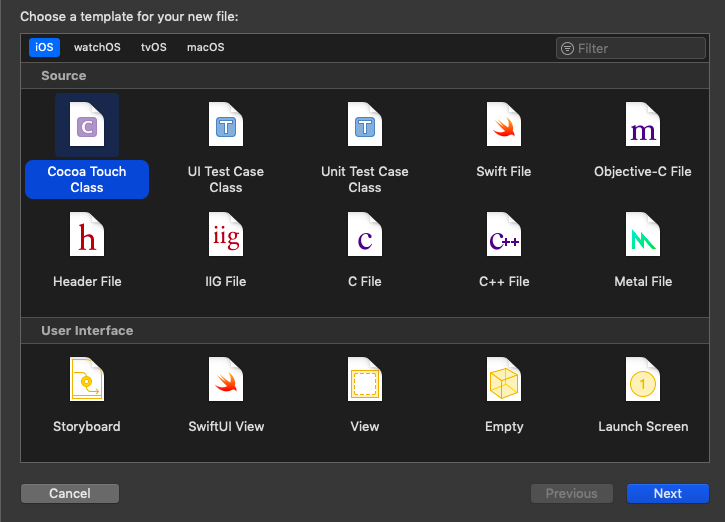
3-1. File > New > File... で新しいファイルの作成画面を開き、「Cocoa Touch Class」を選択して「Next」を押下します。
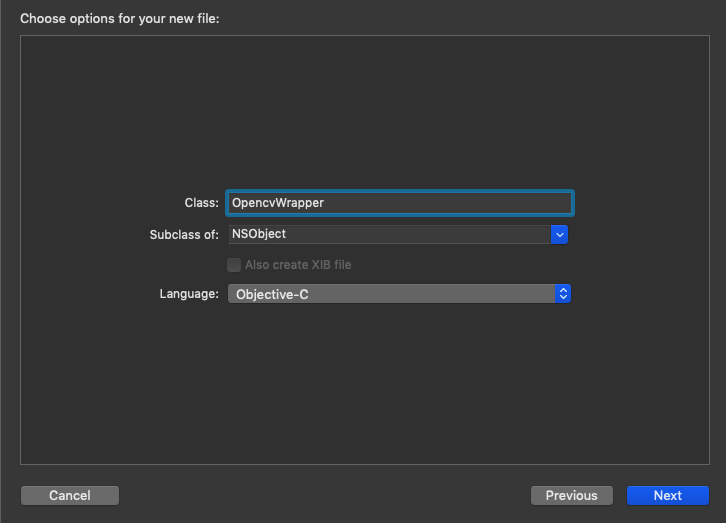
3-2. 任意のクラス名を入力し、「Subclass of:」に「NSObject」、「Language:」に「Object-C」を選択して「Next」を押下します。
3-3. Object-C用のブリッジングヘッダーを作成するかと聞かれるので「Create Bridging Header」を選択します。
Object-C用の拡張子が.hと.mの2つのファイルと共に、下記のブリッジングヘッダーファイルが自動で作成され、SwiftからObject-Cの処理を呼び出すことができるようになります。このファイルにはこれ以上手を加えることはありません。
OpencvTest-Bridging-Header.h// // Use this file to import your target's public headers that you would like to expose to Swift. // #import "OpencvWrapper.h"ARマーカーを生成するコードの作成 (Object-C++)
OpencvWrapper.h#import <Foundation/Foundation.h> #import <UIKit/UIKit.h> @interface OpencvWrapper : NSObject // 関数の定義 (- (返り値の型 *)関数名;) - (UIImage *)createARMarker; @endObject-Cは私も今回が初めてなので詳しくないですが、上記の拡張子.hのファイルはヘッダーファイルといってクラスのインスタンス変数や関数の宣言が行われます。
実際に行われる処理は、下記の拡張子.m (今回はObject-C++なので.mm) の実装ファイルにて記述されます。
OpencvWrapper.mm#import <opencv2/opencv.hpp> #import <opencv2/imgcodecs/ios.h> #import <opencv2/aruco.hpp> #import "opencvWrapper.h" using namespace cv; using namespace std; @implementation OpencvWrapper -(UIImage *)createARMarker { Mat markerImage; Ptr<aruco::Dictionary> dictionary = aruco::getPredefinedDictionary(aruco::DICT_6X6_250); aruco::drawMarker(dictionary, 1, 200, markerImage, 1); UIImage * output_img = MatToUIImage(markerImage); return output_img; } @endcreateARMarkerという名前のARマーカーを生成する関数を実装しています。
処理の内容を簡単に説明すると、ArUcoモジュールの drawMaker 関数で生成したARマーカーを、Mat型のmarkerImageに格納し、最後に MatToUIImage関数で markerImage を UIImage型に変換して返しています。
OpenCVでは基本的に画像をMat型という型で扱いますが、SwiftではMat型は扱うことができないので、Swift の UIImage型に変換するため上記のような処理になっています。getPredefinedDictionary関数は ArUco モジュール内で事前定義されたARマーカーの辞書を取得する関数です。引数でどの辞書を取得するか指定することができ、「aruco::DICT_6X6_250」は、6×6ビットの250個のマーカーが定義された辞書を意味しています。
他の辞書については以下のページに記載があります。
https://docs.opencv.org/3.2.0/d9/d6a/group__aruco.html#gac84398a9ed9dd01306592dd616c2c975また、drawMarker関数の第二引数は生成するARマーカーのIDとなっており、ここをランダムな値が入るように変更することで、毎回異なるARマーカーを生成することが可能になります。
生成したARマーカーを表示するコードの作成 (Swift)
ViewController.swiftimport UIKit class ViewController: UIViewController { let openCV = OpencvWrapper() override func viewDidLoad() { super.viewDidLoad() let aruco_img = openCV.createARMarker() let imageView = UIImageView(image: aruco_img) imageView.center = self.view.center self.view.addSubview(imageView) } }画面のロード後に OpencvWrapper の createARMarker関数でARマーカーを生成して、View に追加しています。
実行結果は下図のようになります。https://github.com/atinfinity/lab/wiki/aruco%E3%83%A2%E3%82%B8%E3%83%A5%E3%83%BC%E3%83%AB%E3%81%A7%E3%83%9E%E3%83%BC%E3%82%AB%E3%83%BC%E3%82%92%E7%94%9F%E6%88%90%E3%81%99%E3%82%8B参考情報

