- 投稿日:2020-04-14T22:52:02+09:00
Flutterエラー Gradle build failed to produce an .apk file. It's likely that this file was generated under プロジェクトディレクトリbuild, but the tool couldn't find it.
Androidの実機でデバッグビルドしようとしたところ、掲題のエラーに遭遇した。
build.gradleでFlavorを追加したのに、実行コマンドが対応していなかったのが原因。
以下のようにflavorを指定した起動設定にすれば解決。
- 投稿日:2020-04-14T19:48:23+09:00
FloatingActionButtonが黒い場合の対処
2020/4/14現在のお話
今後ハマるかもしれないので備忘録として環境
implementation 'com.google.android.material:material:1.2.0-alpha03'実装
<com.google.android.material.floatingactionbutton.FloatingActionButton
            android:layout_width="wrap_content"
            android:layout_height="wrap_content"
            android:layout_marginEnd="16dp"
            android:layout_marginBottom="16dp"
            android:backgroundTint="@color/hogehoge"
            app:layout_constraintBottom_toBottomOf="parent"
            app:layout_constraintEnd_toEndOf="parent"
            app:srcCompat="@drawable/ic_add_white_16dp" />
ic_add_whiteはAndroid StudioのVectorAssetsから作ったいたって標準のもの<vector android:height="16dp" android:tint="#FFFFFF" android:viewportHeight="24.0" android:viewportWidth="24.0" android:width="16dp" xmlns:android="http://schemas.android.com/apk/res/android"> <path android:fillColor="#FF000000" android:pathData="M19,13h-6v6h-2v-6H5v-2h6V5h2v6h6v2z"/> </vector>こんな感じでなにごともなく実装していたが、なぜかic_add_white部分が黒く表示される
アイコン自体は白なのに・・・なぜかと思ったらまさにこちらの話だった
issueでやりとりされているような、
・srcCompat, tintではうまくいかず
・ic_add_whiteのfillColorを白にしてもうまくいかず
・Themeを変えるのはプロダクト上難しく
・動的に色を変えるのは冗長だったのでおとなしく戻しました 個人開発やデグレ等ない場合はこれが一番楽かもしれないですね
- implementation 'com.google.android.material:material:1.2.0-alpha03'
+ implementation 'com.google.android.material:material:1.0.0'
- 投稿日:2020-04-14T17:47:51+09:00
[Android] レビューダイアログ表示
レビューダイアログ表示
以下の手順となります。
・ライブラリ導入して使う
・ダイアログ表示タイミングコンフィグレーションするライブラリ導入
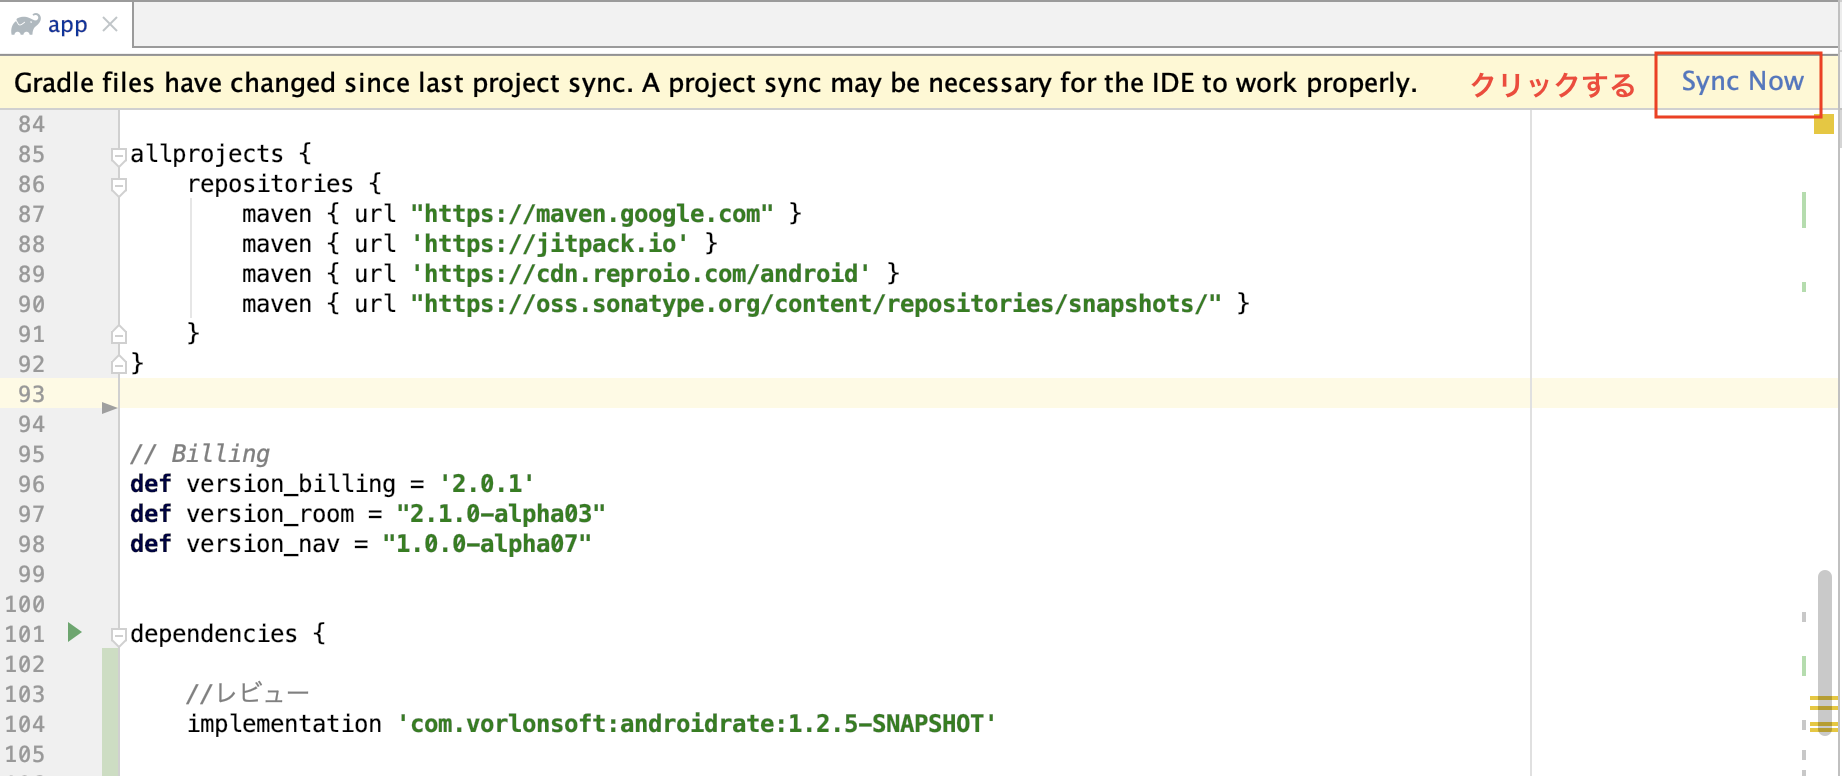
*1.dependencies に追加する *
implementation 'com.vorlonsoft:androidrate:1.2.5-SNAPSHOT'ライブラリ使う
1. 表示したいクラスでインポートする
import com.vorlonsoft.android.rate.*2. レビューダイアロ作成する
AppRate.with(this)3. ダイアログ出るタイミングをコンフィグレーションする
下の設定なら、この条件になります。
アプリインストールした後、5回起動し20日以上時にダイアログが出る。
「また今度」ボタン押した後、5回起動し20日以上時にダイアログが出る。
「レビューしない」または「レビューする」押した後、ダイアログが出ない。.setStoreType(StoreType.GOOGLEPLAY) .setTimeToWait(Time.DAY, 10) .setLaunchTimes(3) .setRemindTimeToWait(Time.DAY,20) .setRemindLaunchesNumber(5) .setSelectedAppLaunches(1) .setShowLaterButton(true) .setVersionCodeCheck(false) .setVersionNameCheck(false) .setDebug(false) .setCancelable(false) .setTitle(R.string.new_rate_dialog_title) .setTextLater(R.string.new_rate_dialog_later) .setMessage(R.string.new_rate_dialog_message) .setTextNever(R.string.new_rate_dialog_never) .setTextRateNow(R.string.new_rate_dialog_ok) .monitor()4. ダイアログのボタンクリックイベント追加
AppRate.with(this).setOnClickButtonListener(object: OnClickButtonListener {
            override fun onClickButton(which:Byte) {

                if(which.toString().equals(RATE)) {
                    //inApp_レビューする
                } else if(which.toString().equals(RATE_LATER)) {

                } else if(which.toString().equals(RATE_NEVER)) {
                    //nApp_レビューしない
                }
            }
        })
5. コンフィグレーションした設定と合わせる時に表示するため
        if (AppRate.with(this).getStoreType() == StoreType.GOOGLEPLAY) { // Checks that current app store type from library options is StoreType.GOOGLEPLAY
            if (GoogleApiAvailability.getInstance().isGooglePlayServicesAvailable(this) != ConnectionResult.SERVICE_MISSING) { // Checks that Google Play is available
                AppRate.showRateDialogIfMeetsConditions(this) // Shows the Rate Dialog when conditions are met
            }
        } else {
            AppRate.showRateDialogIfMeetsConditions(this)    // Shows the Rate Dialog when conditions are met
        }
- 投稿日:2020-04-14T15:40:17+09:00
【Kotlin】そろそろRxを卒業して、Kotlin Coroutines Flow + RetrofitでAPIを叩いてみよう
拝啓、RxJavaを使っている皆様へ
Coroutineはいいぞ
Coroutineこわくないよ概要
現在Androidアプリでよく使われている技術といえば、RxJava(RxKotlin)です。
Retrofitを使ったAPI周りから、Listenerの代用など幅広く使えます。
一方で、明示的にDisposeを書いてあげないとメモリリークする危険などもあり、Rxちょっとな〜と思う場面も多いです。さて、そんなRxに取って代わろうと言わんばかりに、Coroutine周りが進化し続けています。
今回の内容に関するところだけでいうと、
- Coroutines Flowの導入
- Retrofit Version2.6からのCoroutine対応 (suspendつけられるようになった
- 便利なCoroutineScopeの標準実装
などがあります。
これらを駆使すれば、今までやってたRx + Retrofitを使ったAPIの実装なども、Coroutineで簡単にかけるようになりました。今回はおなじみのGithub APIをCoroutine Flow + Retrofitを使ったパターンで叩いてみます。
Coroutineまだまだ難しくて導入しずらいな、という人の助けになれば幸いです。前提
CoroutineとKotlin Coroutine Flowは既に多くの方が解説をしてくださっていますので、
まずはそちらを読んでいただくことをおすすめします。
- Kotlin コルーチンを 理解しよう 2019
- 雰囲気で利用しないためのAndroidにおけるKotlin-Coroutineメモ
- Rx使いに送るKotlin Coroutine入門
- 5分でわかるKotlin Coroutines Flow
Sample
https://github.com/alpha2048/CoroutinesFlowTest
解説
Repository層 (API実装)
Rx
いままでRxを使ってGETを叩く場合は、以下のようなコードを書いていたケースが多いと思います。
Singleで返して、ViewModelなどでsubscribeするおなじみのパターンですね。interface GithubApiInterface { @GET("/search/repositories") fun getGithubRepository(@Query("q") q: String, @Query("page") page: Int): Single<RepoResponse> } class GithubRepository { fun getRepositoryList(q: String, page: Int): Single<RepoResponse> { val retrofit = Retrofit.Builder().略 val service = retrofit.create(GithubApiInterface::class.java) return service .getGithubRepository(q, page) } }Coroutine
これをCoroutine対応します。
Retrofitは2.6 からsuspendがつけられるようになったので、suspendに直します。
そして、Responseを取得しつつ、Repository側でFlowを作って流すようにします。interface GithubApiInterface { @GET("/search/repositories") suspend fun getGithubRepository(@Query("q") q: String, @Query("page") page: Int): RepoResponse } class GithubRepository { suspend fun getRepositoryList(q: String, page: Int): Flow<RepoResponse> = flow { val retrofit = Retrofit.Builder().略 val service = retrofit.create(GithubApiInterface::class.java) emit(service.getGithubRepository(q, page)) }.flowOn(Dispatchers.IO) }ViewModel層
Rx
こちらもいつものパターンですね
受け取った結果をSubscribeしてなにかします。また、Subjectなどのトリガーを発火させたりします。
結果をちゃんとDisposeしてあげないといけないのですが、うっかり忘れてしまうことも少なくないです。GithubRepository().getRepositoryList("Coroutine", 1) .subscribeOn(Schedulers.io()) .observeOn(AndroidSchedulers.mainThread()) .subscribe { t1, t2 -> repositoryList.addAll(t1) trigger.accept(Unit) } .addTo(compositeDisposable)Coroutine
APIの取得をviewModelScopeで起動させることで、ViewModelのライフサイクルで動くようにします。
Disposeを書く必要がないので手間も少なくいい感じです。
また、イベントとしてBroadcastChannelを用意して、取得時に通知を出してあげます。
(BroadcastChannelは1対n用なので、今回の使い方では1対1用のChannelでもよい)viewModelScope.launch(Dispatchers.Main) { GithubRepository().getRepositoryList("Coroutine", 1).collect{ repoItems.addAll(it.items) trigger.send(Unit) } }Activity側
lifecycleScopeでイベントを受け取って、RecyclerViewの更新処理を行います。
こちらもDisposeを書く手間が減っています。おわりに
Coroutineがここまで進化していたとなると、そろそろRxからの本格卒業を検討すべきかもしれないですね。
いずれはCoroutineを使った実装がデフォルトになっていくのかも?参考資料
わたしもコルーチンへの理解はまだまだなところがあるので、色々な資料を読みました。
コードはこちらで動かしてみつつ、下記の資料を参考に理解を深めてくださいませ。解説
- Kotlin コルーチンを 理解しよう 2019
- 雰囲気で利用しないためのAndroidにおけるKotlin-Coroutineメモ
- Rx使いに送るKotlin Coroutine入門
- 5分でわかるKotlin Coroutines Flow
- DroidKaigi 2020 アプリでの学び【Kotlin Coroutines Flow 編】
実装
- 投稿日:2020-04-14T15:40:17+09:00
【Kotlin】そろそろRxを卒業して、Kotlin Coroutines Flow + RetrofitでAPIを叩いてみよう【Coroutine】
拝啓、RxJavaを使っている皆様へ
Coroutineはいいぞ
Coroutineこわくないよ概要
現在Androidアプリでよく使われている技術といえば、RxJava(RxKotlin)です。
Retrofitを使ったAPI周りから、Listenerの代用など幅広く使えます。
一方で、明示的にDisposeを書いてあげないとメモリリークする危険などもあり、Rxちょっとな〜と思う場面も多いです。さて、そんなRxに取って代わろうと言わんばかりに、Coroutine周りが進化し続けています。
今回の内容に関するところだけでいうと、
- Coroutines Flowの導入
- Retrofit Version2.6からのCoroutine対応 (suspendつけられるようになった
- 便利なCoroutineScopeの標準実装
などがあります。
これらを駆使すれば、今までやってたRx + Retrofitを使ったAPIの実装なども、Coroutineで簡単にかけるようになりました。今回はおなじみのGithub APIをCoroutine Flow + Retrofitを使ったパターンで叩いてみます。
Coroutineまだまだ難しくて導入しずらいな、という人の助けになれば幸いです。前提
CoroutineとKotlin Coroutine Flowは既に多くの方が解説をしてくださっていますので、
まずはそちらを読んでいただくことをおすすめします。
- Kotlin コルーチンを 理解しよう 2019
- 雰囲気で利用しないためのAndroidにおけるKotlin-Coroutineメモ
- Rx使いに送るKotlin Coroutine入門
- 5分でわかるKotlin Coroutines Flow
Flowとは、RxでいうところのObservableです。
Cold Streamで、collectを呼ぶことで動作開始します。Sample
https://github.com/alpha2048/CoroutinesFlowTest
解説
Repository層 (API実装)
Rx
いままでRxを使ってGETを叩く場合は、以下のようなコードを書いていたケースが多いと思います。
Singleで返して、ViewModelなどでsubscribeするおなじみのパターンですね。interface GithubApiInterface { @GET("/search/repositories") fun getGithubRepository(@Query("q") q: String, @Query("page") page: Int): Single<RepoResponse> } class GithubRepository { fun getRepositoryList(q: String, page: Int): Single<RepoResponse> { val retrofit = Retrofit.Builder().略 val service = retrofit.create(GithubApiInterface::class.java) return service .getGithubRepository(q, page) } }Coroutine
これをCoroutine対応します。
Retrofitは2.6 からsuspendがつけられるようになったので、suspendに直します。
そして、Responseを取得しつつ、Repository側でFlowを作って流すようにします。interface GithubApiInterface { @GET("/search/repositories") suspend fun getGithubRepository(@Query("q") q: String, @Query("page") page: Int): RepoResponse } class GithubRepository { suspend fun getRepositoryList(q: String, page: Int): Flow<RepoResponse> = flow { val retrofit = Retrofit.Builder().略 val service = retrofit.create(GithubApiInterface::class.java) emit(service.getGithubRepository(q, page)) }.flowOn(Dispatchers.IO) }ViewModel層
Rx
こちらもいつものパターンですね
受け取った結果をSubscribeしてなにかします。また、Subjectなどのトリガーを発火させたりします。
ちゃんとDisposeしてあげないといけないですが、うっかり忘れてしまうことも少なくないです。GithubRepository().getRepositoryList("Coroutine", 1) .subscribeOn(Schedulers.io()) .observeOn(AndroidSchedulers.mainThread()) .subscribe { t1, t2 -> repositoryList.addAll(t1) trigger.accept(Unit) } .addTo(compositeDisposable)Coroutine
APIの取得をviewModelScopeで起動させることで、ViewModelのライフサイクルで動くようにします。
Disposeを書く必要がないので手間も少なくいい感じです。
また、イベントとしてBroadcastChannelを用意して、取得時に通知を出してあげます。
(BroadcastChannelは1対n用なので、今回の使い方では1対1用のChannelでもよい)viewModelScope.launch(Dispatchers.Main) { GithubRepository().getRepositoryList("Coroutine", 1).collect{ repoItems.addAll(it.items) trigger.send(Unit) } }Activity側
lifecycleScopeでイベントを受け取って、RecyclerViewの更新処理を行います。
こちらもDisposeを書く手間が減っています。おわりに
Coroutineがここまで進化していたとなると、そろそろRxからの本格卒業を検討すべきかもしれないですね。
いずれはCoroutineを使った実装がデフォルトになっていくのかも?参考資料
わたしもコルーチンへの理解はまだまだなところがあるので、色々な資料を読みました。
コードはこちらで動かしてみつつ、下記の資料を参考に理解を深めてくださいませ。解説
- Kotlin コルーチンを 理解しよう 2019
- 雰囲気で利用しないためのAndroidにおけるKotlin-Coroutineメモ
- Rx使いに送るKotlin Coroutine入門
- 5分でわかるKotlin Coroutines Flow
- DroidKaigi 2020 アプリでの学び【Kotlin Coroutines Flow 編】
実装
- 投稿日:2020-04-14T12:13:55+09:00
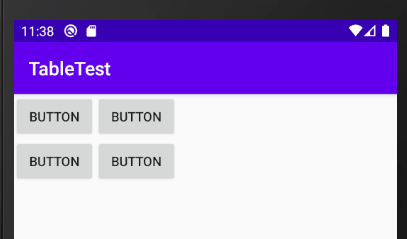
TableLayoutでボタンを画面いっぱいに表示する
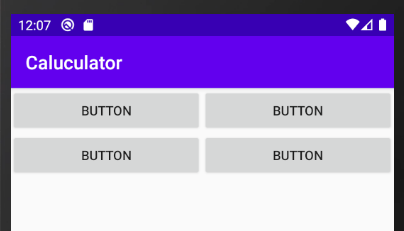
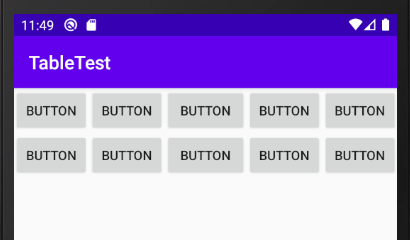
横幅を画面いっぱいに広げたい
元となるコード
activity_main.xml<?xml version="1.0" encoding="utf-8"?> <TableLayout xmlns:android="http://schemas.android.com/apk/res/android" android:layout_width="match_parent" android:layout_height="match_parent"> <TableRow android:layout_width="match_parent" android:layout_height="match_parent"> <Button android:id="@+id/button2" android:layout_width="match_parent" android:layout_height="match_parent" android:text="Button" /> <Button android:id="@+id/button" android:layout_width="match_parent" android:layout_height="match_parent" android:text="Button" /> </TableRow> <TableRow android:layout_width="0dp" android:layout_height="match_parent"> <Button android:id="@+id/button4" android:layout_width="match_parent" android:layout_height="match_parent" android:text="Button" /> <Button android:id="@+id/button3" android:layout_width="match_parent" android:layout_height="match_parent" android:text="Button" /> </TableRow> </TableLayout>stretchColumns
android:stretchColumns="列番号"を設定する。
activity_main.xml<TableLayout xmlns:android="http://schemas.android.com/apk/res/android" android:layout_width="match_parent" android:layout_height="match_parent" android:stretchColumns="0,1">横幅を画面内に収めたい
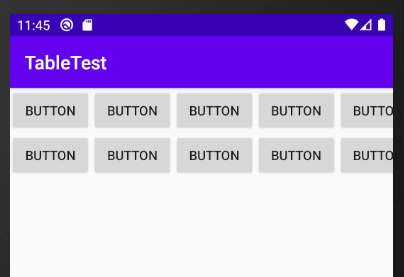
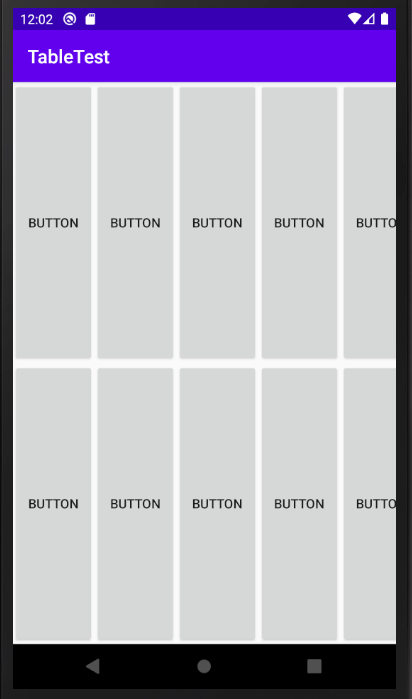
今度はボタンが画面幅からはみ出てしまった場合。
shrinkColumns
android:shrinkColumns="列番号"を設定する。
activity_main.xml<TableLayout xmlns:android="http://schemas.android.com/apk/res/android" android:layout_width="match_parent" android:layout_height="match_parent" android:shrinkColumns="0,1,2,3,4">縦幅を画面いっぱいに広げたい
TableRowにweight="1"を設定します。
activity_main.xml<TableRow android:layout_width="match_parent" android:layout_height="match_parent" android:layout_weight="1">縦横を画面にいっぱいに広げたい
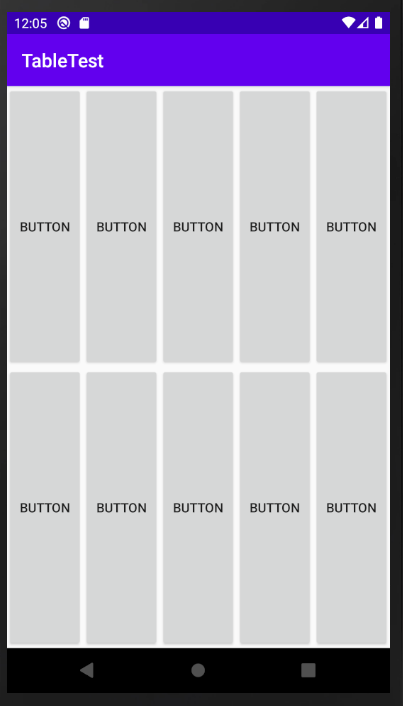
shrinkColumnsとweight="1"を設定します。
activity_main.xml<TableLayout xmlns:android="http://schemas.android.com/apk/res/android" android:layout_width="match_parent" android:layout_height="match_parent" android:shrinkColumns="0,1,3,4"> <TableRow android:layout_width="match_parent" android:layout_height="match_parent" android:layout_weight="1">
- 投稿日:2020-04-14T10:38:18+09:00
[Android] Google Map APIキーのセキュリティ設定
Google Map APIキーのセキュリティ設定
以下の手順となります。
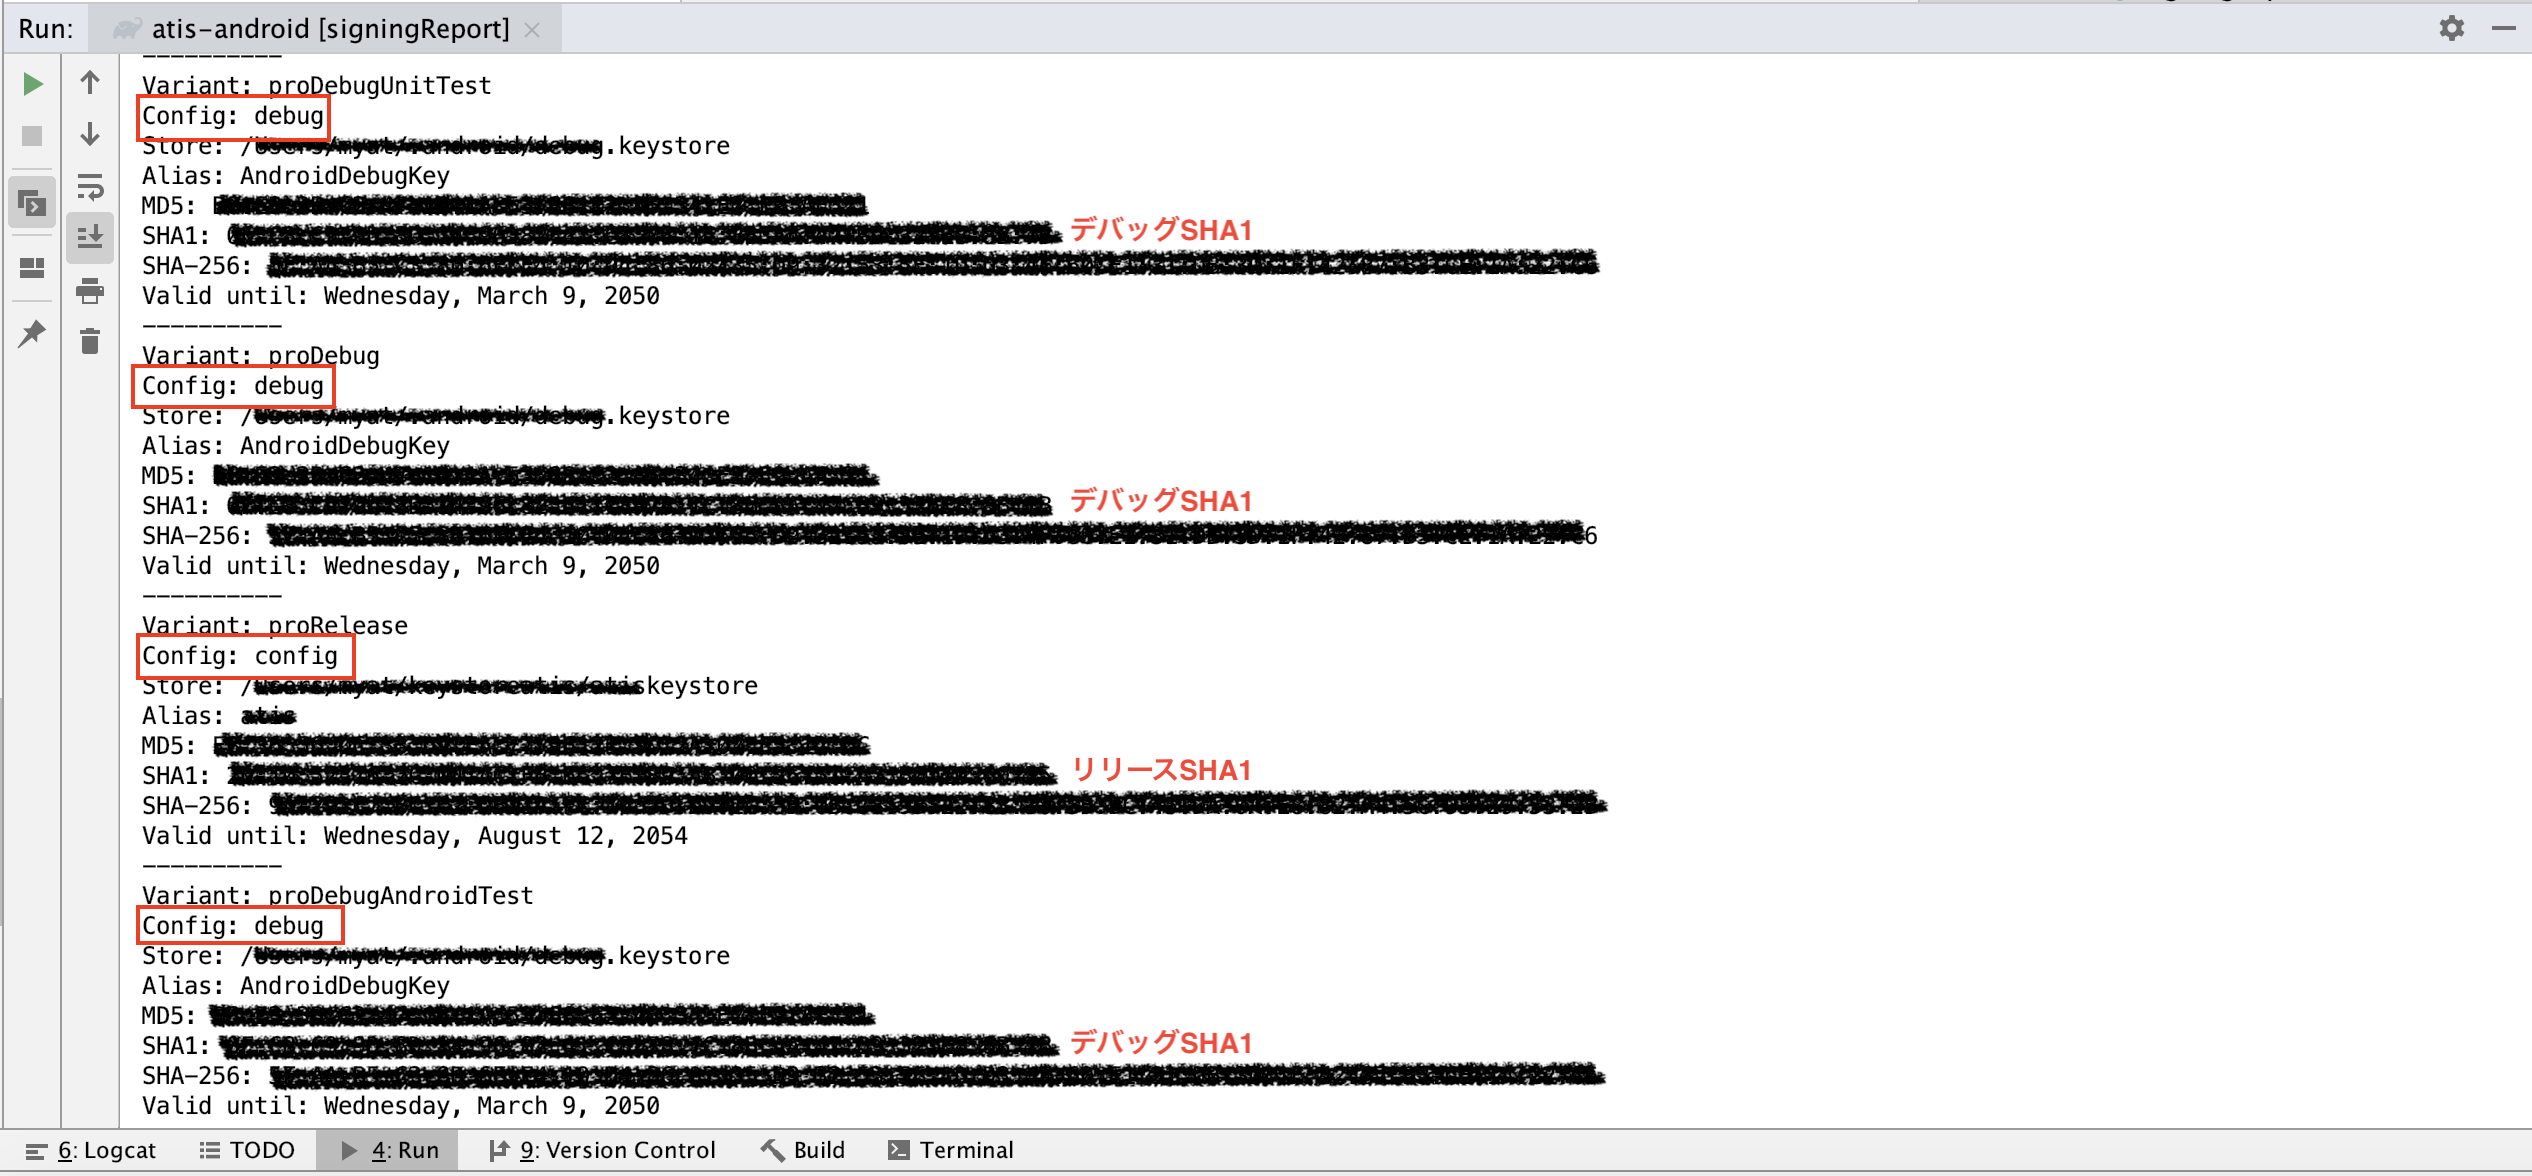
・Android StudioからSHA-1キー(フィンガープリント)を作成する。
・Google Cloud PlatformにAPI キーの制限にこのSHA-1キー(フィンガープリント)を設定する。Android Studio
Android StudioからSHA-1キーを作成する
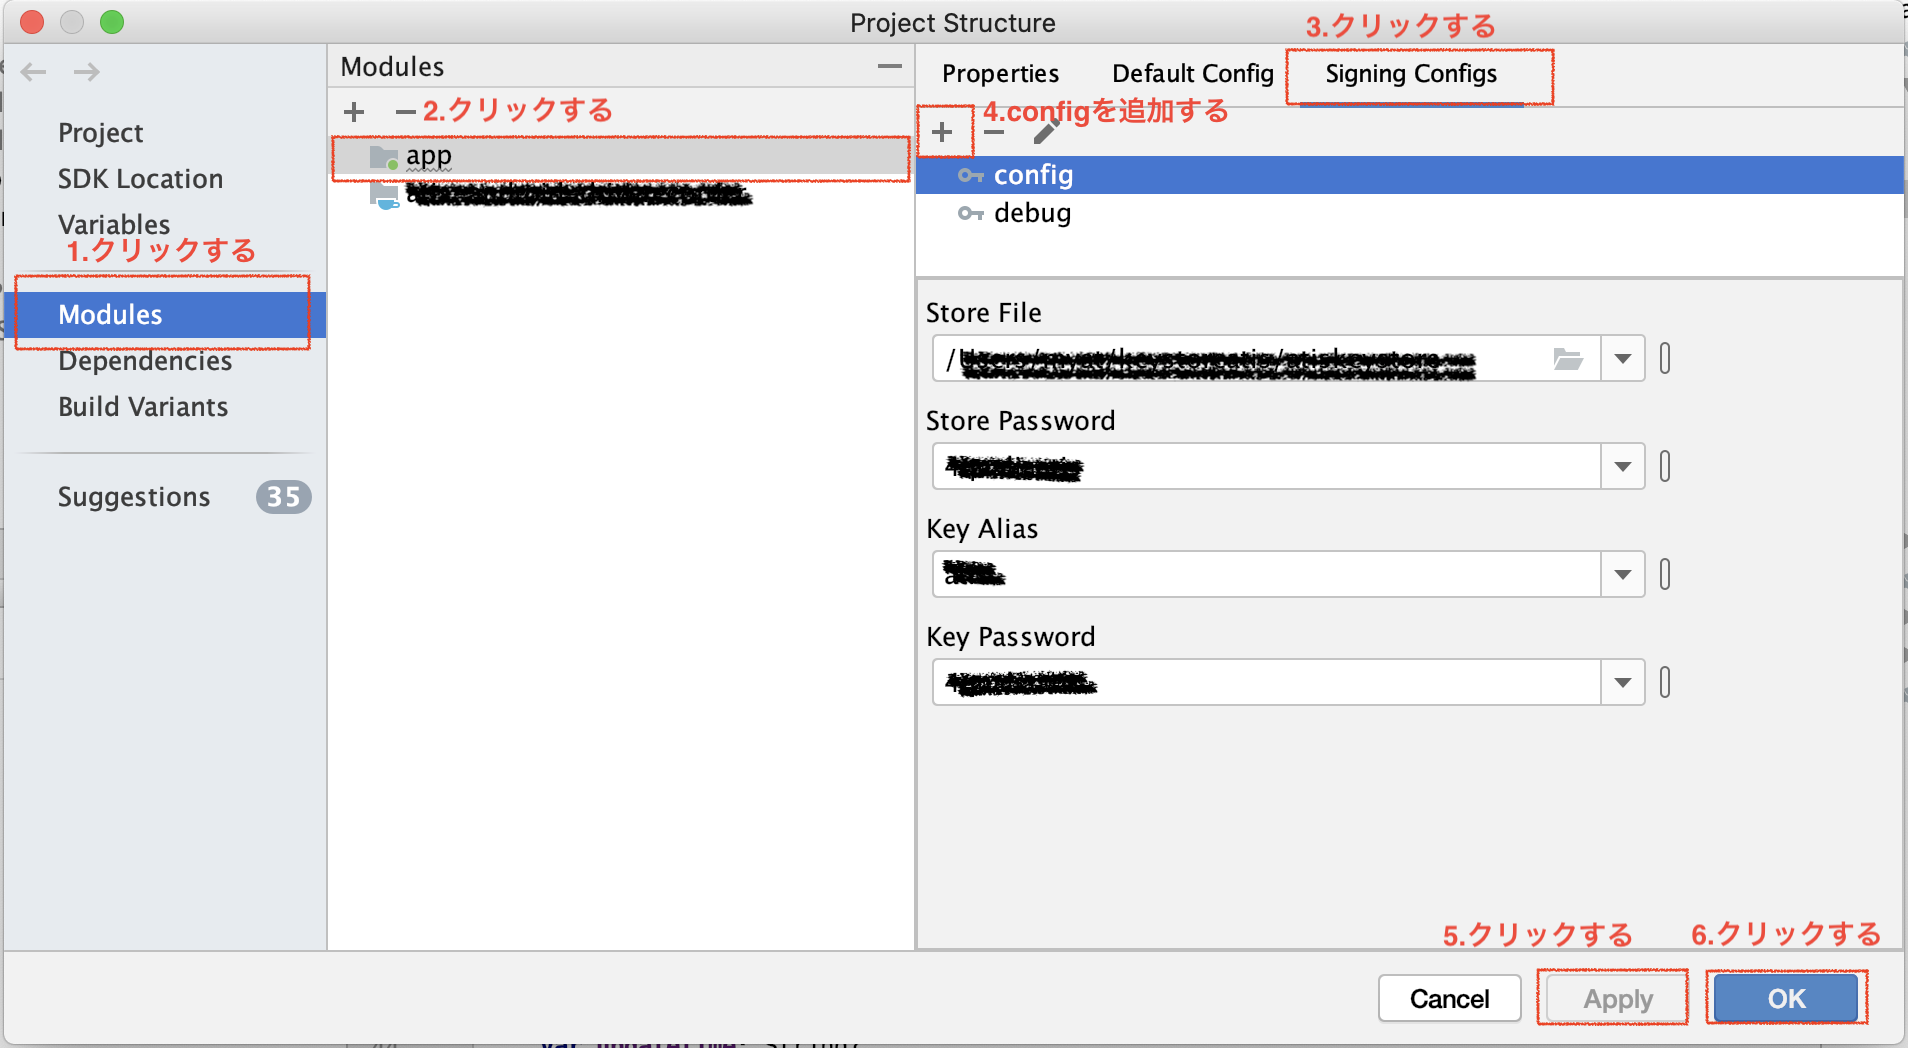
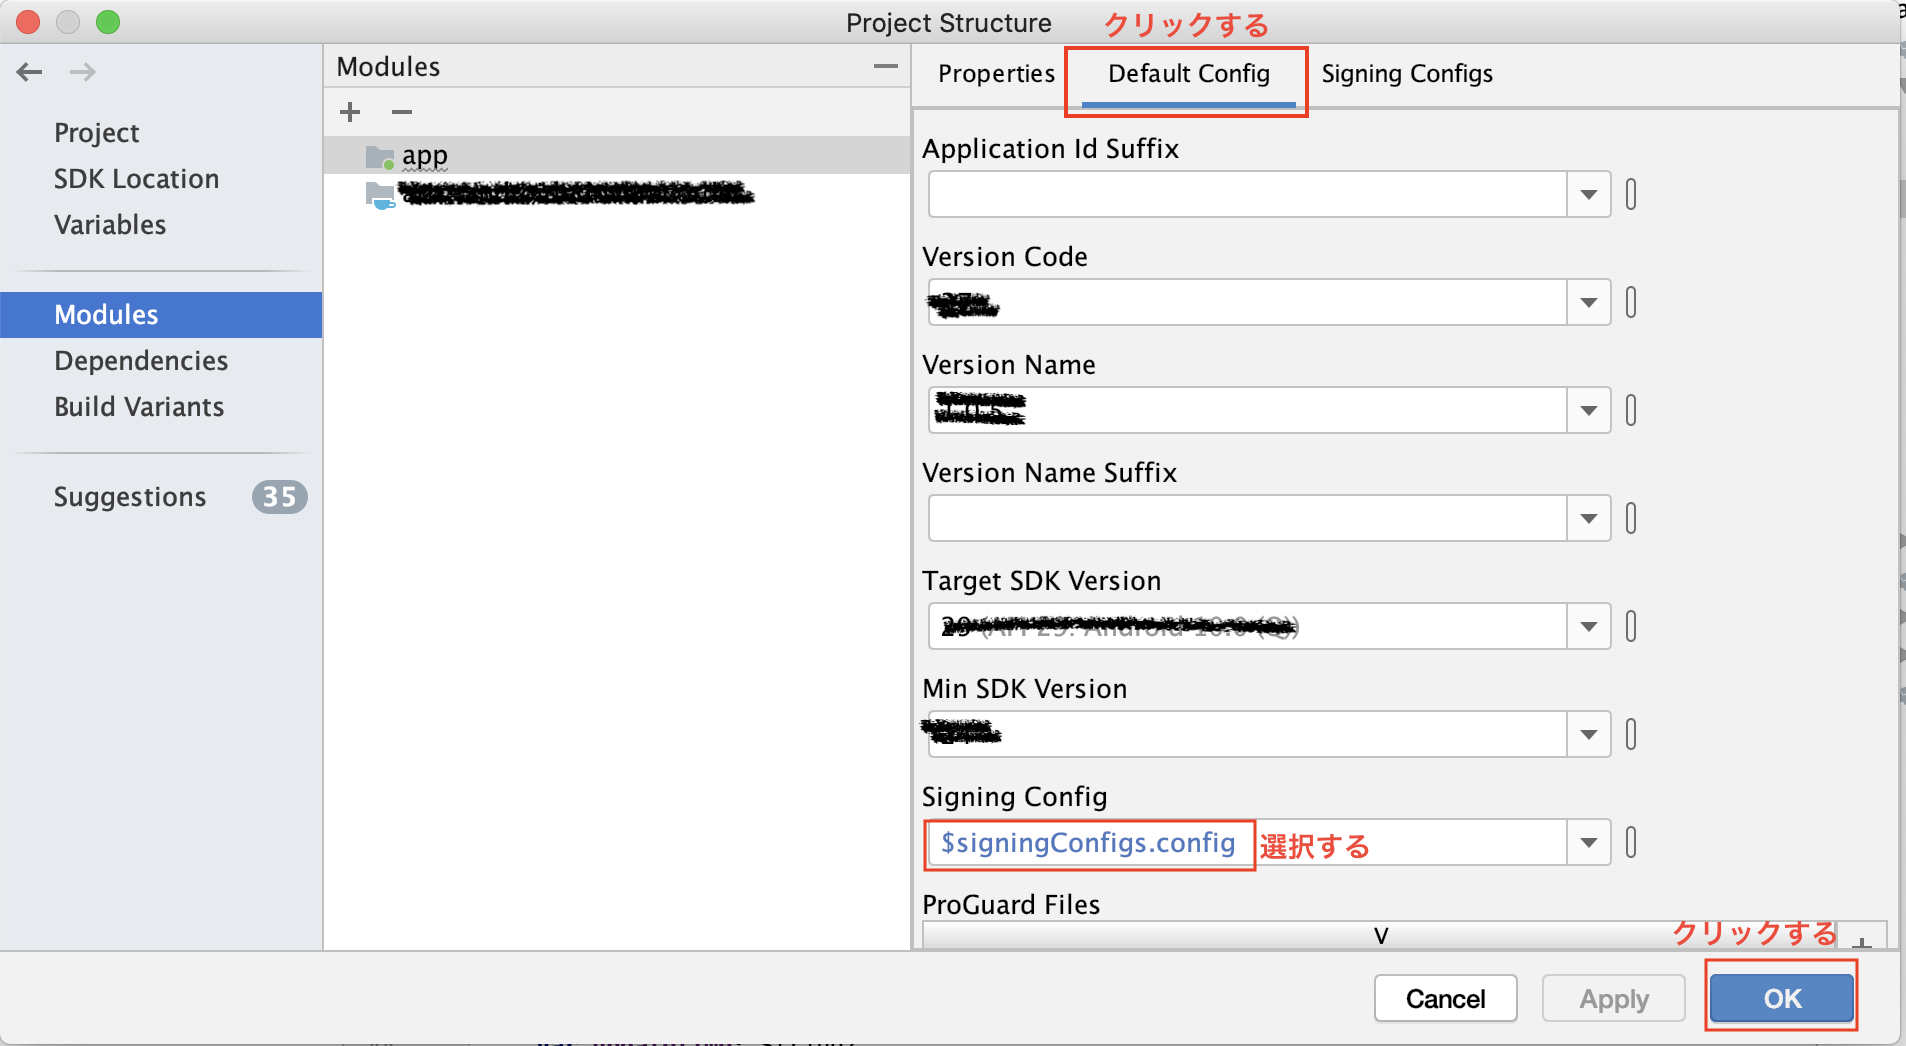
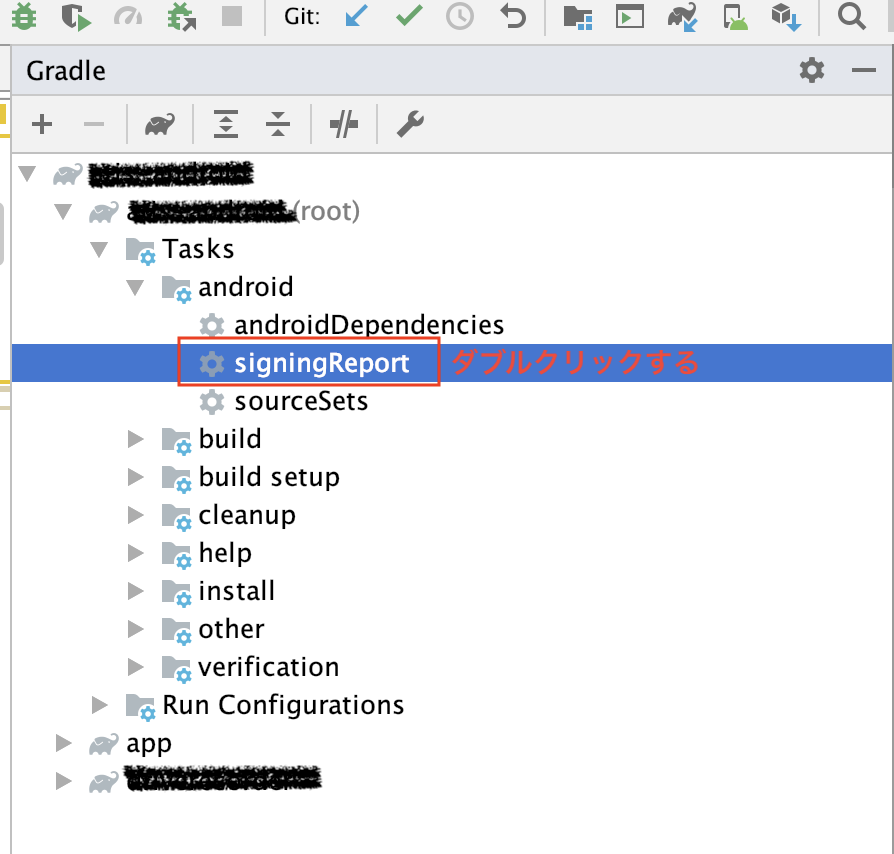
1. Modules で Signing Config 設定する
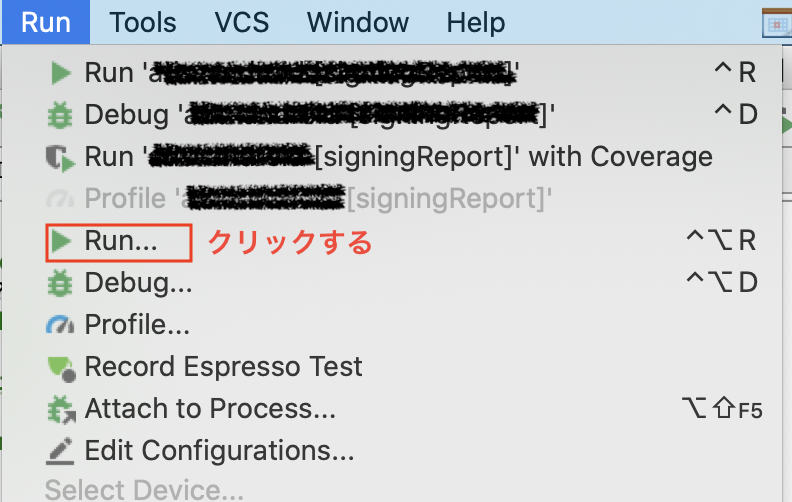
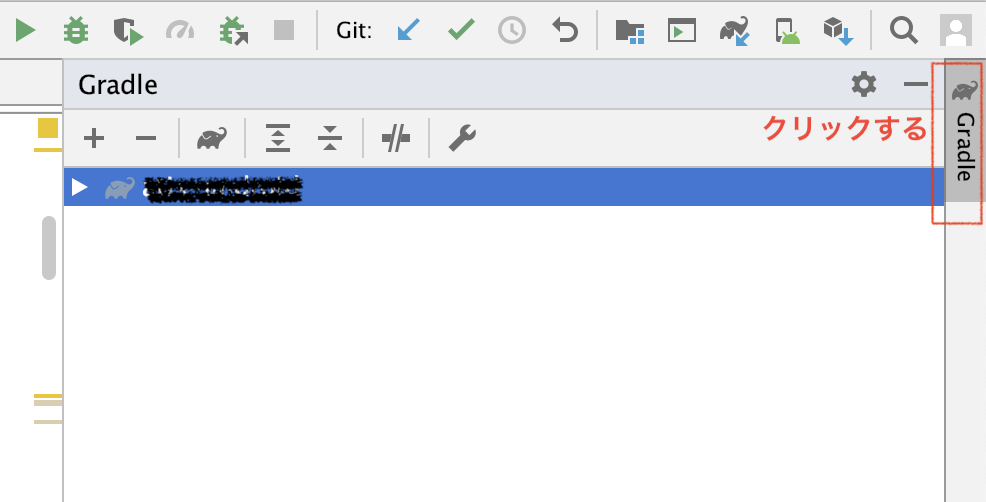
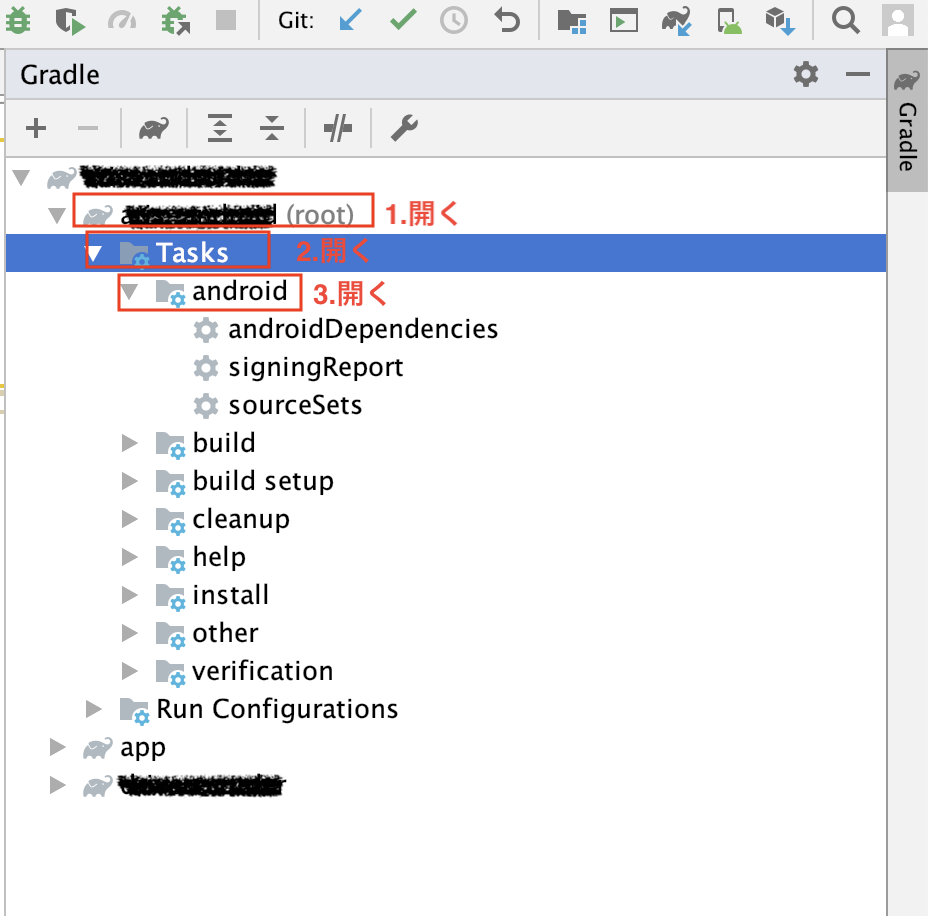
2. SHA-1キー作る
Google Cloud Platform
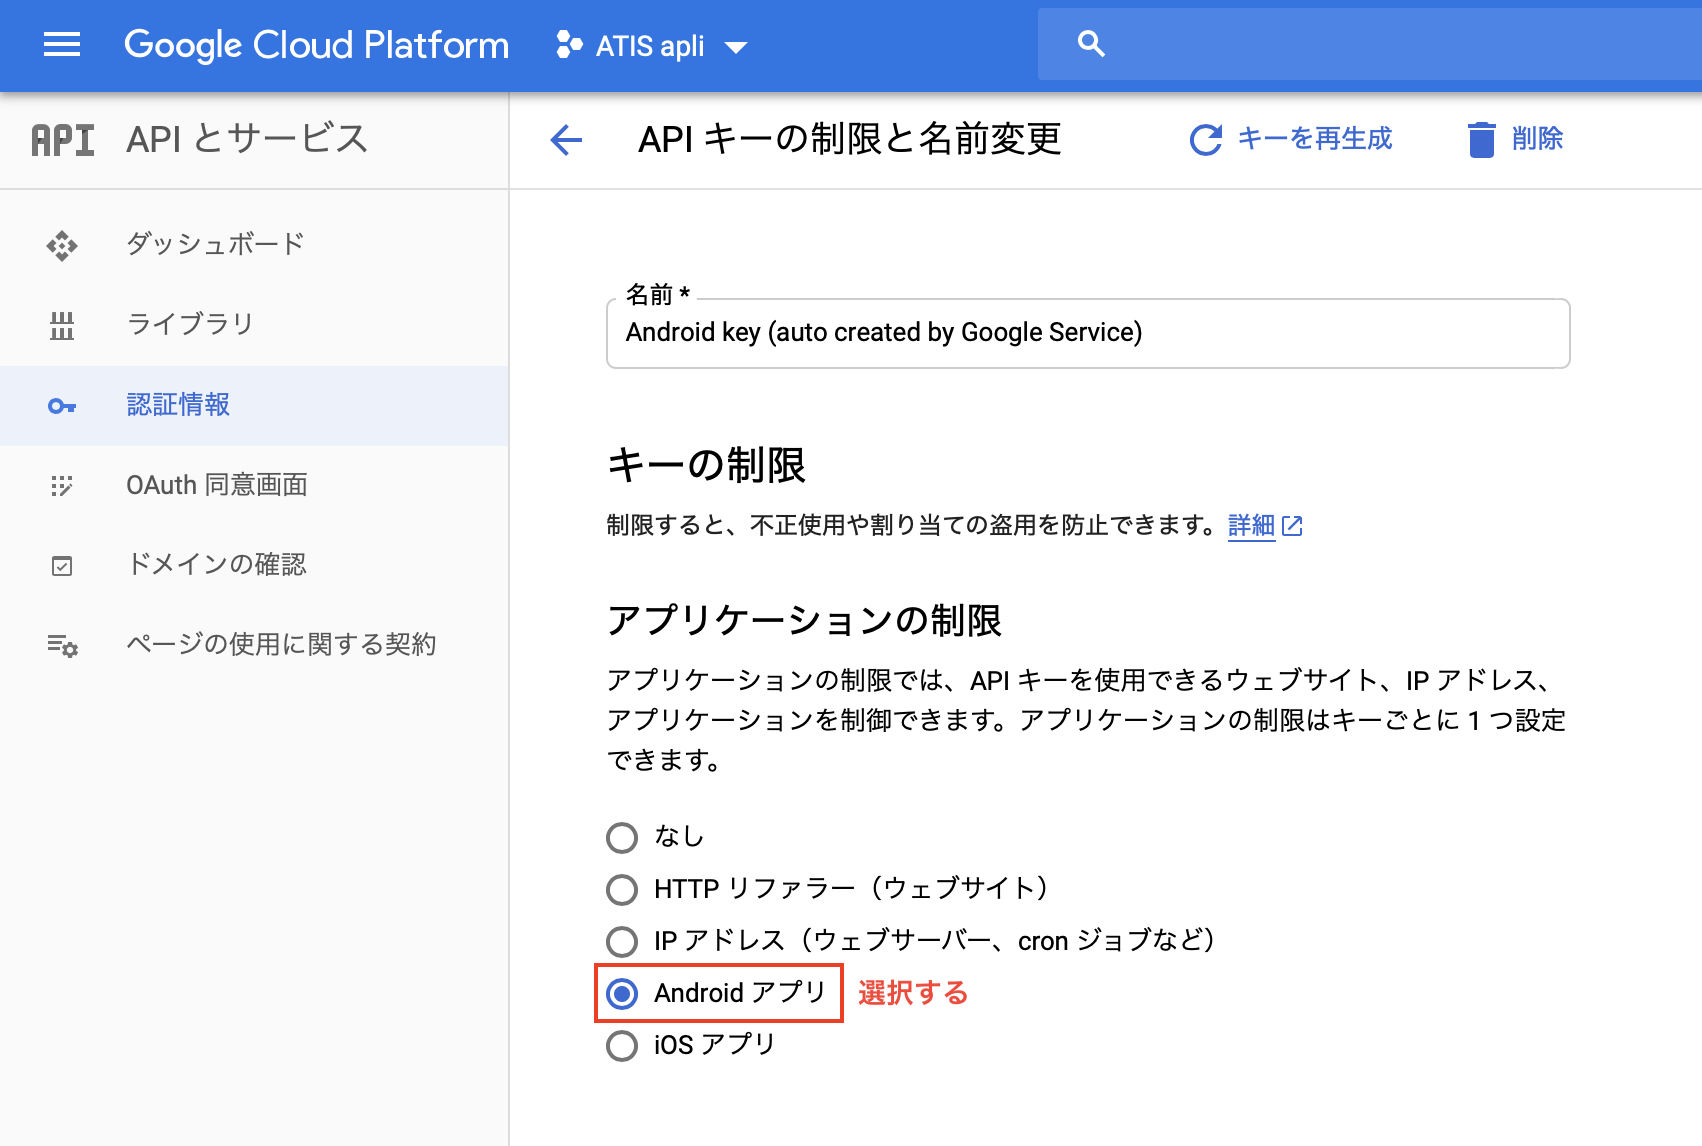
API キーの制限を設定する
1. アプリケーションの制限に「Android アプリ」設定する
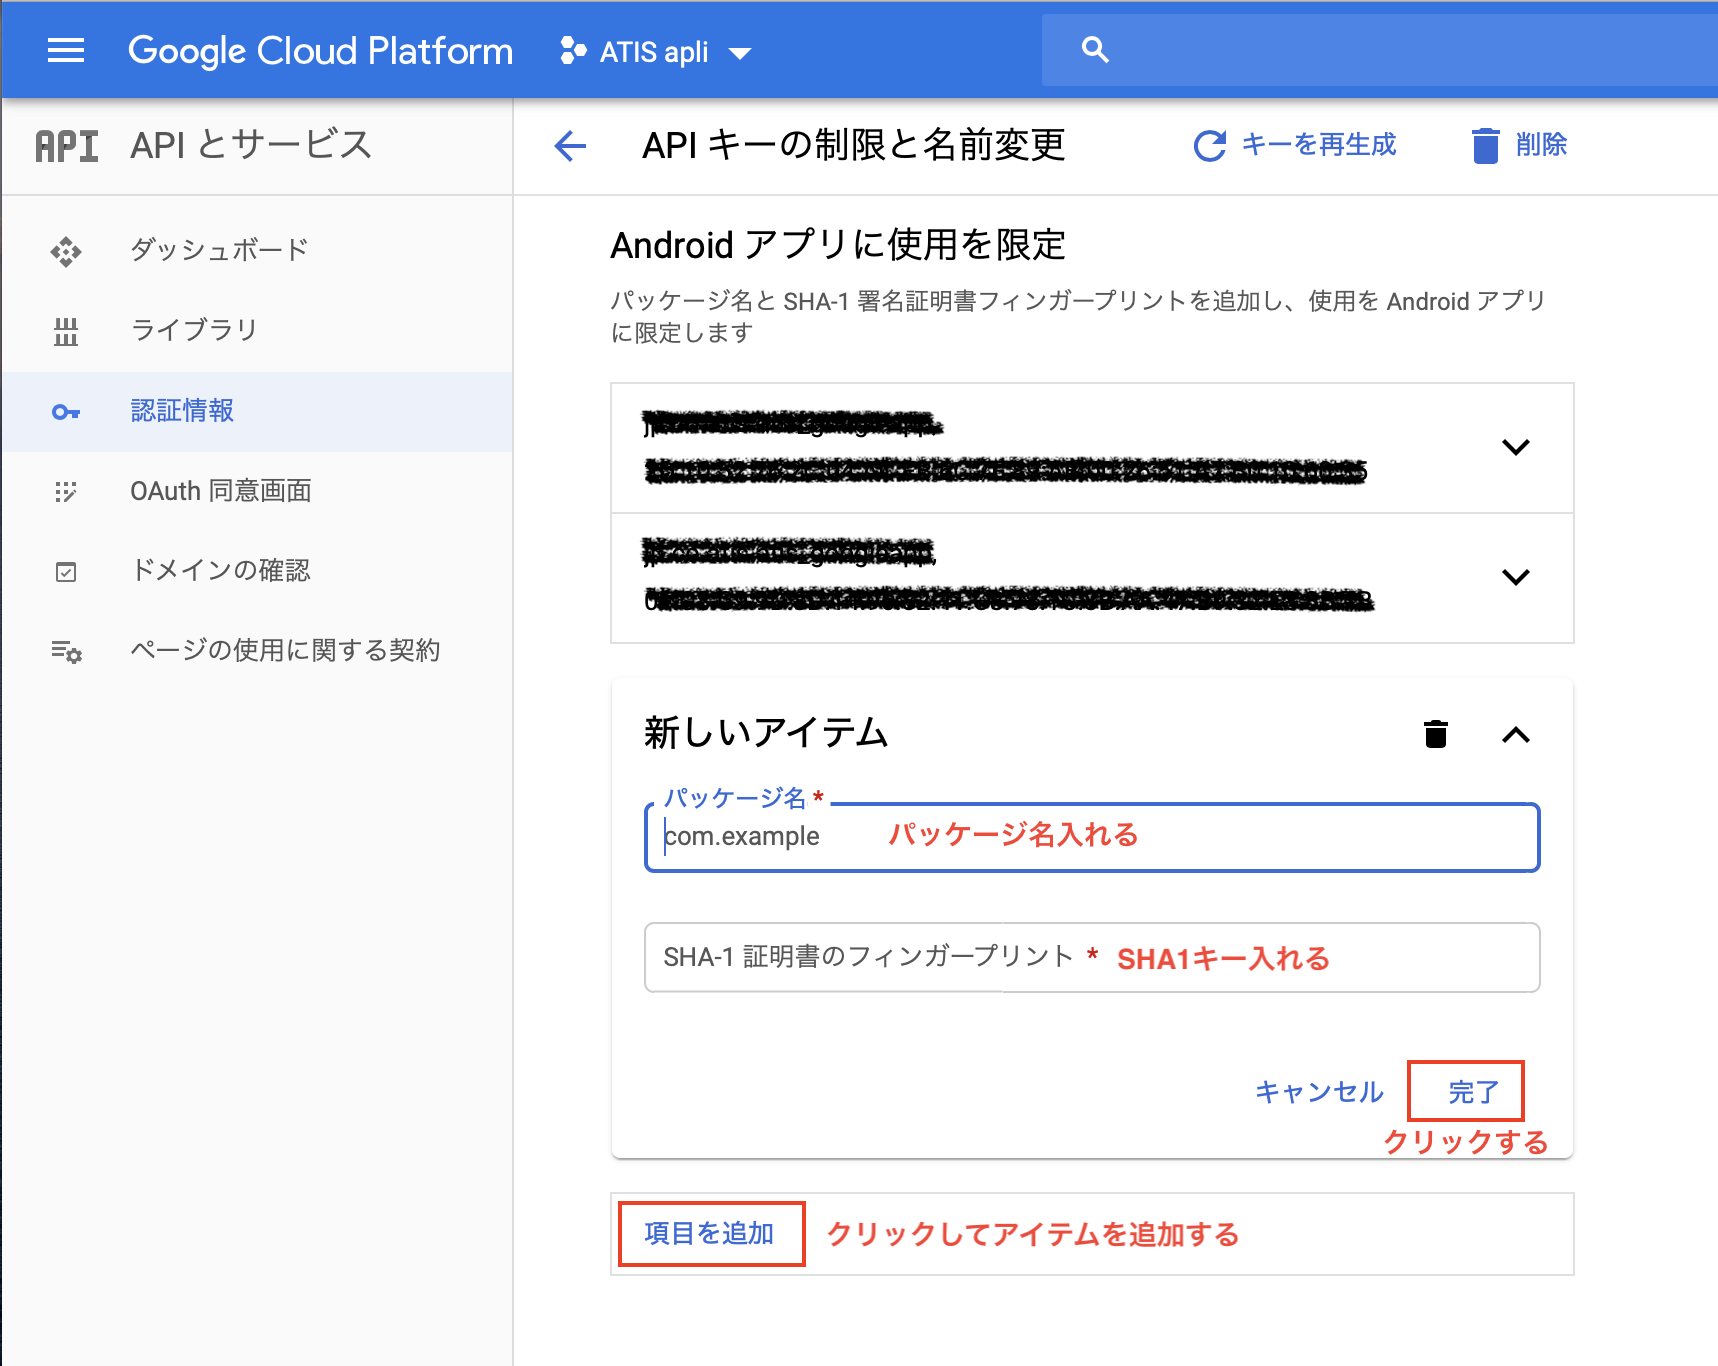
2. Android アプリに使用を限定に項目を追加する
デバッグのパッケージ名とSHA1キーセットとリリースのパッケージ名とSHA1キーセット両方設定する
- 投稿日:2020-04-14T09:51:47+09:00
Androidアプリのアプリ名
- 投稿日:2020-04-14T01:59:23+09:00
ViewBinding導入後binding経由で Button等にアクセスできない方へ
対象
ViewBindingを導入後にonCreateViewを弄らないまま、
binding.fab.setOnClickListnerのようなことをして、動かない方解決方法
HogeFragment.ktprivate lateinit var binding: HogeFragmentBinding override fun onCreateView( inflater: LayoutInflater, container: ViewGroup?, savedInstanceState: Bundle? ): View? { binding = HogeFragmentBinding.inflate(inflater,container,false) return binding.rootとすることで解決すると思います。
考えられる原因
HogeFragment.ktprivate lateinit var binding: HogeFragmentBinding override fun onCreateView( inflater: LayoutInflater, container: ViewGroup?, savedInstanceState: Bundle? ): View? { val view = inflater.inflate(R.layout.hoge_fragment,container,false) binding = HogeFragmentBinding.inflate(inflater,container,false) return viewのような感じになっていて、ViewBindingが適応されていない方のviewを生成して返してしまっているのが原因かと思います。
(自分が引っかかった際はそこでした)


