- 投稿日:2020-01-07T23:57:04+09:00
Sinatraで接続元IPを表示する
Sinatraで接続元IPを表示する。
get '/' do
"Your IP address is #{request.ip}"
end
- 投稿日:2020-01-07T22:49:06+09:00
[Rails]本日のエラー
今度作業する時に、あれ?過去にも同じエラーが起こったことあるぞ!!となった時用に記事として保管しておくのが目的です。
なので、個人的に使用する記事なので投稿内容は大雑把にまとめます。記事の流れ
1.なんの作業中にエラーが起きたのか
2.エラーの内容
3.対処法
4.原因以上の流れで書いていきます。
1.dbをリセットしようとした時
ターミナル.rake db:migrate:reset2.エラー内容
ActiveRecord::NoEnvironmentInSchemaError:

Environment data not found in the schema. To resolve this issue, run:

        bin/rails db:environment:set RAILS_ENV=development


Tasks: TOP => db:migrate:reset => db:drop => db:check_protected_environments
(See full trace by running task with --trace)
3.対処法
rake db:migrate:status上記のコマンドでdbのステータスを確認します。
⬇︎実行内容up 20191223083031 Create articles up 20191223091431 Devise create users up 20191225043801 Add name to user down 20191225083536 Add frequency to habitsどうやら、一番下のマイグレーションファイルが怪しい。。。
確認したところ
habitsテーブルにfrequencyカラムを二回作成していました。。
なので、一番下のマイグレーションファイルを削除してみます。
※downの状態だったら、手動でファイルを削除しても問題ない
⬇︎実行結果== 20191225234523 CreateHabits: migrating ===================================== -- create_table(:habits) -> 0.0302s == 20191225234523 CreateHabits: migrated (0.0302s) ============================ == 20191229141445 AddImageToHabits: migrating ================================= -- add_column(:habits, :image, :string) -> 0.0195s == 20191229141445 AddImageToHabits: migrated (0.0195s) ======================== == 20200101140707 AddDateAtToHabits: migrating ================================ -- add_column(:habits, :date_at, :date) -> 0.0231s == 20200101140707 AddDateAtToHabits: migrated (0.0232s) ======================= == 20200103135302 CreateLikes: migrating ====================================== -- create_table(:likes) -> 0.0157s == 20200103135302 CreateLikes: migrated (0.0158s) ============================= == 20200107020748 AddLikesCountToHabits: migrating ============================ -- add_column(:habits, :likes_count, :integer) -> 0.0174s == 20200107020748 AddLikesCountToHabits: migrated (0.0174s) ===================問題なくできました。
4.原因
1つのテーブルに同じカラム名のカラムを追加、作成するマイグレーションファイルが重複していたため、migrateコマンドが実行できなかったと思われる。
なぜ二つ追加、作成したかは謎。
参考記事
https://blog.freedom-man.com/no-environment-in-schema-error
- 投稿日:2020-01-07T22:20:22+09:00
文字列とシンボルと双方の違いについて
はじめに
学習メモです。
今回扱う対象は以下となります。
- 文字列(リテラル)
- シンボル(リテラル)
文字列から数値へ変換
最初の文字列が整数に変換できない場合は0を返します。
"100".to_i     #=> 100

"1.5".to_f     #=> 1.5

"7/2".to_r     #=> (7/2) Rationalオブジェクトに変換

"1+2i".to_c    #=> (1+2i) Complexオブジェクトに変換

"123ab45".to_i #=> 123 aの前までが変換対象

"123ab45".to_f #=> 123.0 aの前までが変換対象

"2.3".to_i     #=> 2 ピリオドの前までが変換対象

"3.5.6".to_f   #=> 3.5 2番目のピリオドの前までが変換対象

"a123".to_i    #=> 0
バックスラッシュ記法
指定する内容 生成される文字 \x xの文字そのもの \n 改行 \r キャリッジリターン \f 改ページ \a ベル \e エスケープ \s 空白 \b バックスペース \t タブ \v 垂直タブ \nnn 8進数表記 (nは0〜7) \xnn 16進数表記 (nは0〜9、a〜f) \cx または \C-x コントロール文字 (xはASCII文字) \M-x メタx \M-\C-x メタコントロールx \unnnn Unicode文字 (nは0〜9、a〜f、A〜F) \u{nnnn} Unicode文字列 (nは0〜9、a〜f、A〜F) nnnnは16進数で1〜6桁まで指定可能。スペースかタブ区切りで複数のUnicode文字を指定可能 ちなみに、表中に書かれている「キャリッジリターン」とは、文字コード体系において、カーソルを文頭へ戻すことを表す制御文字です。(引用元:Weblio)
8進数表記と16進数表記
# "@"の文字コードは8進数で100、16進数で40
p "\100" #=> @ 8進数表記
p "\x40" #=> @ 16進数表記
出力メソッドの種類と違い
メソッド 改行 出力内容の構築メソッド バックスラッシュ記法 p 引数ごとに改行 inspectメソッド そのまま出力 改行しない to_sメソッド 適用した結果を出力 puts 引数ごとに改行 to_sメソッド 適用した結果を出力 pのバックスラッシュ記法
p "\x61" #=> "a"
p "\x0a" #=> "\n"
バックスラッシュ記法をシングルクォートで囲んだ場合は、シングルクォートとバックスラッシュのエスケープのみ適用され、それ以外はそのまま出力されます。
ヒアドキュメント
改行コードを含む文字列を指定するためにヒアドキュメントを利用します。
ヒアドキュメントは、「<<」に続けて文字列の終端を示す任意の識別子を指定します。ヒアドキュメントには、終端を示す識別子の前にはスペースなどの文字を記述してはいけないというルールがあります。なので、階層が深い場合でも、終端は行頭に指定します。
以下はヒアドキュメントの例です。
終端を示す識別子にSQLを使用しており、2行目と3行目が文字列になります。query = <<SQL select * from animal_table; SQL query #=> " select *\n from animal_table;\n"階層が深い場合のヒアドキュメントでは、開始の識別子の頭にハイフンをつけます。
def foo
  <<-RESULT
    Ba
    nana
  RESULT
end

p foo #=> "    Ba\n    nana\n"
ヒアドキュメントにダブルクォートで囲んだ時と同じような式展開やバックスラッシュ記法の適用を無効とする場合は、識別子をシングルクォートで囲みます。終端の識別子は囲まないよう注意しましょう。
a = 1
s = <<'SAMPLE'
  #{a}
SAMPLE

p s #=> "  \#{a}\n"
識別子をダブルクォートで囲む事により、式展開が有効であることを明示的に示すことができます。
a = 1
s = <<"SAMPLE"
  #{a}
SAMPLE

p s #=> "  1\n"
パーセント記法
パーセント記法を用いる事で文字列を囲む記号をプログラマが指定できます。
文字列の中でダブルクォートを使う場合などに、エスケープしなくてもよいので便利(らしい)です。
文字列を囲む記号には、数値やアルファベット以外の文字が使用可能です。# パーセント記法の例 a = %*cat* # 囲む記号に「*」を使用 p a #=> "cat" # エスケープなしでダブルクォートを文字列中に使用 a = %*"cat"* p a #=> "\"cat\"" # パーセント記号に[]なども使える a = %[cat] p a #=> "cat"文字列のシングルクォートの時と同じにするには「%q」を使います。
また、ダブルクォートの際は「%Q」を使います。a = 1 %q!#{a + 2}! #=> "\#{a + 2}" %Q?#{a + 2}? #=> "3"以下パーセント記法を表にまとめました。
書式 生成される値 % ダブルクォート文字列 %Q ダブルクォート文字列 (%のみと同等) %q シングルクォート文字列 %s シンボル %W 要素がダブルクォート文字列となる配列、要素の区切りは空白文字 %w 要素がシングルクォート文字列となる配列、要素の区切りは空白文字 %x コマンド出力 %r 正規表現 異なる文字コード間での文字列操作
Ruby2.0以降デフォルトのスクリプトエンコーディングはUTF-8となり、明示的に文字コードを指定しない限りUTF-8となります。
x = "モンキー"
x.encoding           #=> #<Encoding:UTF-8>
y = x.encode("SJIS") # "モンキー"をWindows-31Jに変換
y.encoding           #=> #<Encoding:Windows-31J>
x + y                #=> Encoding::CompatibilityError
sprintfによるフォーマット指定
桁数を揃える場合にsprintfという組み込み関数を使います。
sprintfは、第一引数にフォーマット、第二引数以降にフォーマットしたい値を指定します。# 進数の指定 sprintf("result: %#b", 16) #=> "result: 0b10000" sprintf("result: %#o", 16) #=> "result: 020" sprintf("result: %#x", 16) #=> "result: 0x10" sprintf("result: %#X", 16) #=> "result: 0X10" # 桁数の指定 sprintf("result: %02d", 1) #=> "result: 01" sprintf("result: %03d", 1) #=> "result: 001" sprintf("result: %05.2f", 1.1111) #=> "result: 01.11"ここで重要なのはsprintf関数はStringクラスの%演算と同じ結果が得られるということです。
"result: %02d" % 1        #=> "result: 01"
"result: %03d" % 1        #=> "result: 001"
"result: %05.2f" % 1.1111 #=> "result: 01.11"
シンボル
# シンボルの記述例
foo1 = :"foo1"        #=> :foo1
foo2 = :"#{foo1}foo2" #=> :foo1foo2
foo3 = :'foo3'        #=> :foo3
foo4 = :foo4          #=> :foo4
パーセント記法を使ってシンボル生成することもできます。
この場合、「%s」とすることで実現できます。(以下例)%s?foo1? #=> :foo1 %s{foo2} #=> :foo2生成された値はSymbolクラスのインスタンスとなります。
文字列からシンボルを生成するには「to_sym」を使います。v1 = "foo1" #=> "foo1" v2 = v1.to_sym #=> :foo1 v3 = v2.to_s #=> "foo1" シンボルから文字列に変換文字列とシンボルの違い
作成したシンボルは、文字の並びが同じであれば、同一のオブジェクトを参照しますが、文字列リテラルは文字の並びが同一でも、指定するごとに新たなStringオブジェクトが生成されます。
これを確かめるにはオブジェクトID(object_idメソッド)を使います。文字列リテラルでは、毎回新しくオブジェクトを生成するのでオブジェクトIDが変わります。
一方、シンボルは同じオブジェクトを参照するのでオブジェクトIDは変化しません。
また、nilやtrueも、一つのオブジェクトを参照するので、シンボルと同様にオブジェクトIDは変化しません。p "foo1".object_id #=> 70311790346380 p "foo1".object_id #=> 70311790401140 p :foo1.object_id #=> 1537628 p :foo1.object_id #=> 1537628 p :foo2.object_id #=> 1537948Ruby 2.3以降では、「#frozen_string_literal:true」というマジックコメントを記述した場合、文字列リテラルで生成される文字列は値が変更できないようにfreezeされ、同じ内容の文字列リテラルは同一の文字列オブジェクトを返すようになります。
「equal?」メソッドは2つのオブジェクトが同一かどうか(等しいかどうかではない)を論理値で返し、サブクラスではオーバーライドしない慣習となっている(そうです)。
等価演算子「==」は、2つのオブジェクトが等しいかどうかを判定します。
これは多くのクラスでオーバーライドされています。「==」と同様の動作をするメソッドに「eql?」メソッドがあります。
「eql?」メソッドは値の比較だけでなく、型の比較も行うため、値が等しくても型が違えばfalseを返します。
つまり、「eql?」メソッドは「==」よりも厳密に値の比較を行うと考えても良いでしょう。# オブジェクトの同値性・同一性判定 "foo1" == "foo1" #=> true "foo1".equal? "foo1" #=> false 互いにobject_idが異なるため :foo1 == :foo1 #=> true :foo1.equal? :foo1 #=> true # eql?メソッド "foo1".eql? "foo1" #=> true 1.0 == 1 #=> true (1.0).eql? 1 #=> false (1.0).eql? 1.0 #=> true破壊的メソッド
破壊的メソッド「!」は、自分自身の内容を変更するだけでなく、他の変数の参照先にも影響を与えるので気を付けなければなりません。
以下の例に出てくる「chop」メソッドは、最後の文字を取り除いた文字列を返すメソッドです。
# 破壊メソッドの例
a = "foo1"
b = a                # aとbは同じ文字列"foo"を参照
p a.chop             # "foo" aの参照先は変更されない
p b                  #=> "foo1"
p a.chop!            #=> "foo" aの参照先が変更される("foo"に上書きされる)
p b                  #=> "foo"
破壊的メソッドに「!」を付けるのは、同じメソッド名で破壊的でないメソッドもある場合に限った習慣(らしい)です。
「concat」メソッドのように破壊的であっても「!」が付いていないメソッドも存在します。(まとめ) 文字列とシンボルの違い
変数に文字列を代入していくと、たとえ同じ値だとしてもそれぞれ異なるオブジェクトを示しています。
一方シンボルでは、変数に代入しても同じオブジェクトを示しています。x = "foo" y = "foo" z = "foo" # x, y, zはそれぞれ別のオブジェクト p x.object_id #=> 70311790464220 p y.object_id #=> 70311790482240 p z.object_id #=> 70311790500280 x = :foo y = :foo z = :foo # x, y, zは同一のオブジェクト p x.object_id #=> 1538908 p y.object_id #=> 1538908 p z.object_id #=> 1538908
- 投稿日:2020-01-07T22:20:16+09:00
Lambda+API GatewayのレスポンスをJSONとしてパース出来ない
はじめに
「内閣府の祝日CSVをLambda上でJSON形式に加工して、API Gateway経由で使えるようにする」というプログラムを考えたのですが、API GatewayのレスポンスがJSONとして正しくパース出来ないことが分かりました。
Lambda上で動いているRubyプログラムは単体のスクリプトとして問題なく動作することを既に確認していましたが、原因が分かるまで少し時間がかかったので、その記録をまとめてみました。
使用した環境
- Lambda(Ruby)
- API Gateway
正しく動作しなかったコード
JSON.pretty_generateやJSON.generate、JSON.dumpなどでシリアライズした結果を返すと、API Gatewayを通して取得したレスポンスの前後に不要なダブルクォート(")が付いてしまい、JSONとしてパース出来ませんでした。
- その後にさらに調べてみると、API Gatewayを通さずにLambda単体の状態でもレスポンスの前後に不要なダブルクォートが付いていたため、この現象がAPI Gatewayによるものではないと分かりました。
lambda_function.rbrequire 'json' require 'open-uri' def lambda_handler(event:, context:) csv = OpenURI.open_uri('https://www8.cao.go.jp/chosei/shukujitsu/syukujitsu.csv') {|io| io.read } csv = csv.force_encoding("sjis") array = [] csv.split(/\r\n|\r|\n/).each_with_index {|row, i| next if (i==0) # ヘッダ行は読み飛ばす buffs = row.split(",") hash = {"date": buffs[0], "name": buffs[1]} array.push(hash) } return JSON.pretty_generate(array) # この行をJSON.generate()やJSON.dump()に変えても結果は変わらず... end出力結果の例"[\n {\n \"date\": \"1955/1/1\",\n \"name\": \"元日\"\n },...,\n {\n \"date\": \"2020/11/23\",\n \"name\": \"勤労感謝の日\"\n }\n]"正しく動作したコード
- こちらのページに書かれているように、シリアライズせずにオブジェクトをそのまま返す形にコードを直したところ、正しいJSONをレスポンスとして受け取れるようになりました。
- どうやら、 「Lambdaの関数の戻り値として文字列のJSONを指定すると、JSONとして二重にシリアライズされてしまう」 ことが今回の問題の原因のようです。
lambda_function.rbrequire 'json' require 'open-uri' def lambda_handler(event:, context:) csv = OpenURI.open_uri('https://www8.cao.go.jp/chosei/shukujitsu/syukujitsu.csv') {|io| io.read } csv = csv.force_encoding("sjis") array = [] csv.split(/\r\n|\r|\n/).each_with_index {|row, i| next if (i==0) # ヘッダ行は読み飛ばす buffs = row.split(",") hash = {"date": buffs[0], "name": buffs[1]} array.push(hash) } return array # ArrayやHashなどのオブジェクトをそのまま返せばOK! end出力結果の例[{"date":"1955/1/1","name":"元日"},...,{"date":"2020/11/23","name":"勤労感謝の日"}]まとめ
- ある程度調べたところでLambdaの仕様による現象だと分かっていたものの、中々解決策が見つからずに苦労しました。
- 上記の仕様について、AWS公式ページのどこかに記載されているのかもしれませんが、大事な事なのでもう少し分かりやすく書いて欲しかったです。
- もしかしたら私が気付かなかっただけで、どこかに明記されていたのかもしれません。
- あるいは私がLambda初心者で知らなかっただけで、暗黙知だったのかもしれませんが...
- 投稿日:2020-01-07T22:02:42+09:00
初心者によるプログラミング学習ログ 206日目
100日チャレンジの206日目
twitterの100日チャレンジ#タグ、#100DaysOfCode実施中です。
すでに100日超えましたが、継続。100日チャレンジは、ぱぺまぺの中ではプログラミングに限らず継続学習のために使っています。
206日目は
おはようございます
— ぱぺまぺ@webエンジニアを目指したい社畜 (@yudapinokio) January 6, 2020
206日目
息抜きにprogateでjqueryとcss上級編、あとRuby#100DaysOfCode #駆け出しエンジニアと繋がりたい #早起きチャレンジ
- 投稿日:2020-01-07T21:25:49+09:00
【Rails】2つのテーブルを結合しつつ、欲しいカラムだけを抜き出してJSONで返すサンプルコード
はじめに
Railsで2つのテーブルを結合しつつ、欲しいカラムだけを抜き出してJSONにして返すサンプルコードです。
このコードで出来たJSONはネストされておらず、シンプルなので扱いやすいです。
環境
OS: macOS Catalina 10.15.1
Ruby: 2.6.5
Rails: 6.0.2.1
前提
- UserモデルとPostモデルがある
- User1に対してPostが多の関係
- それぞれのテーブル名はusersとposts
- 以下のように関連付け済み
user.rbclass User < ActiveRecord::Base has_many :posts endpost.rbclass Post < ApplicationRecord belongs_to :user end欲しいデータ
各テーブルのカラムは以下のように多数あり、
「不要なデータは取得したくない!」
という状況を想定し、#欲しいを付けたカラムだけを抜き出したJSONが欲しいとします。- usersテーブル - id - name #欲しい - email - ... - postsテーブル - id #欲しい - name #欲しい - description #欲しい - user_id #欲しい - date - ...これは以下コードで実現可能です。
結論
posts_controller.rbdef posts_needed posts_needed = Post.joins(:user) .select(" posts.id, posts.name, description, #ここはusersテーブルと名前が被らない user_id, #ここはusersテーブルと名前が被らない users.name AS user_name #別名を付けられる ") render json: posts_needed end【ポイント】
Post.joins(:user)でpostsテーブルとusersテーブルを結合
.select("カラム1, カラム2, ...")で欲しいカラムを指定元のカラム名が被る場合は
posts.nameやusers.nameのようにテーブル名.カラム名として指定しないと、両方取り出すのは不可
テーブル名.カラム名 AS 任意名で出力されるカラム名を指定可能テーブル名は複数形
出力
出力(JSON)[ { "id": 1, "name": "投稿名1", "description": "投稿詳細1", "user_id": 2, "user_name": "Brutus" }, { "id": 2, "name": "投稿名2", "description": "投稿詳細2", "user_id": 3, "user_name": "Omae Dattanoka" }, ... ]ネストされたものよりシンプルで扱いやすいJSONに仕上がりました
おわりに
最後まで読んで頂きありがとうございました
どなたかの参考になれば幸いです
参考にさせて頂いたサイト(いつもありがとうございます)
- 投稿日:2020-01-07T21:17:20+09:00
Dockerでalpineイメージ使用時に発生したstandard_init_linux.go:211: exec user process caused "no such file or directory" を解決
alpineイメージ使用時に発生するstandard_init_linux.go:211: exec user process caused "no such file or directory" を解決
Docker X Rails6 X MySQL8で環境構築する際に、初めてalpineイメージを使用するとエラーに出会いました。
alpineはLinuxディストリビューションの1つで、CentOSやUbuntuよりも軽量なためDockerイメージのサイズを小さくすることができます。各種設定
DockerfileFROM ruby:2.7.0-alpine ENV LANG C.UTF-8 RUN mkdir /myapp WORKDIR /myapp COPY Gemfile /myapp/Gemfile COPY Gemfile.lock /myapp/Gemfile.lock RUN apk update -qq && apk add --no-cache yarn build-base tzdata libxml2-dev mariadb-dev libxslt-dev alpine-sdk mysql-dev nodejs vim g++ RUN bundle install run yarn install COPY . /myapp # Add a script to be executed every time the container starts. COPY entrypoint.sh /usr/bin/ RUN chmod +x /usr/bin/entrypoint.sh ENTRYPOINT ["entrypoint.sh"] EXPOSE 3000 # Start the main process. CMD ["rails", "server", "-b", "0.0.0.0"]docker-copose.yml~~省略 web: build: . command: bash -c "rm -f tmp/pids/server.pid && bundle exec rails s -p 3000 -b '0.0.0.0'" volumes: - .:/myapp ports: - "3000:3000" ~~省略entrypoint.sh#!/bin/bash set -e # Remove a potentially pre-existing server.pid for Rails. rm -f /myapp/tmp/pids/server.pid # Then exec the container's main process (what's set as CMD in the Dockerfile). exec "$@"(他,
Gemfile,Gemfile.lock)エラー発生
$ docker-compose run web rails new .を実行すると
standard_init_linux.go:211: exec user process caused "no such file or directoryというエラーが発生し、
rails newは実行できませんでした。原因
alpineのシェルは
bashではなくashだった。解決
docker-compose.ymlとentrypoint.shを編集します。docker-compose.ymlweb: build: . # bash → ashに変更 command: ash -c "rm -f tmp/pids/server.pid && bundle exec rails s -p 3000 -b '0.0.0.0'" volumes: - .:/myapp ports: - "3000:3000"entrypoint.sh#!/bin/sh ←bashからshへ set -e # Remove a potentially pre-existing server.pid for Rails. rm -f /myapp/tmp/pids/server.pid # Then exec the container's main process (what's set as CMD in the Dockerfile). exec "$@"編集後、再度
$ docker-compose run web rails new .すれば実行できました。
参考
- 投稿日:2020-01-07T21:17:20+09:00
alpineイメージ使用時に発生するstandard_init_linux.go:211: exec user process caused "no such file or directory" を解決
alpineイメージ使用時に発生するstandard_init_linux.go:211: exec user process caused "no such file or directory" を解決
Docker X Rails6 X MySQL8で環境構築する際に、初めてalpineイメージを使用するとエラーに出会いました。
alpineはLinuxディストリビューションの1つで、CentOSやUbuntuよりも軽量なためDockerイメージのサイズを小さくすることができます。各種設定
DockerfileFROM ruby:2.7.0-alpine ENV LANG C.UTF-8 RUN mkdir /myapp WORKDIR /myapp COPY Gemfile /myapp/Gemfile COPY Gemfile.lock /myapp/Gemfile.lock RUN apk update -qq && apk add --no-cache yarn build-base tzdata libxml2-dev mariadb-dev libxslt-dev alpine-sdk mysql-dev nodejs vim g++ RUN bundle install run yarn install COPY . /myapp # Add a script to be executed every time the container starts. COPY entrypoint.sh /usr/bin/ RUN chmod +x /usr/bin/entrypoint.sh ENTRYPOINT ["entrypoint.sh"] EXPOSE 3000 # Start the main process. CMD ["rails", "server", "-b", "0.0.0.0"]docker-copose.yml~~省略 web: build: . command: bash -c "rm -f tmp/pids/server.pid && bundle exec rails s -p 3000 -b '0.0.0.0'" volumes: - .:/myapp ports: - "3000:3000" ~~省略entrypoint.sh#!/bin/bash set -e # Remove a potentially pre-existing server.pid for Rails. rm -f /myapp/tmp/pids/server.pid # Then exec the container's main process (what's set as CMD in the Dockerfile). exec "$@"(他,
Gemfile,Gemfile.lock)エラー発生
$ docker-compose run web rails new .を実行すると
standard_init_linux.go:211: exec user process caused "no such file or directoryというエラーが発生し、
rails newは実行できませんでした。原因
alpineのシェルは
bashではなくashだった。解決
docker-compose.ymlとentrypoint.shを編集します。docker-compose.ymlweb: build: . # bash → ashに変更 command: ash -c "rm -f tmp/pids/server.pid && bundle exec rails s -p 3000 -b '0.0.0.0'" volumes: - .:/myapp ports: - "3000:3000"entrypoint.sh#!/bin/sh ←bashからshへ set -e # Remove a potentially pre-existing server.pid for Rails. rm -f /myapp/tmp/pids/server.pid # Then exec the container's main process (what's set as CMD in the Dockerfile). exec "$@"編集後、再度
$ docker-compose run web rails new .すれば実行できました。
参考
- 投稿日:2020-01-07T21:17:20+09:00
Dockerでalpineイメージ使用時に発生するstandard_init_linux.go:211: exec user process caused "no such file or directory" を解決
alpineイメージ使用時に発生するstandard_init_linux.go:211: exec user process caused "no such file or directory" を解決
Docker X Rails6 X MySQL8で環境構築する際に、初めてalpineイメージを使用するとエラーに出会いました。
alpineはLinuxディストリビューションの1つで、CentOSやUbuntuよりも軽量なためDockerイメージのサイズを小さくすることができます。各種設定
DockerfileFROM ruby:2.7.0-alpine ENV LANG C.UTF-8 RUN mkdir /myapp WORKDIR /myapp COPY Gemfile /myapp/Gemfile COPY Gemfile.lock /myapp/Gemfile.lock RUN apk update -qq && apk add --no-cache yarn build-base tzdata libxml2-dev mariadb-dev libxslt-dev alpine-sdk mysql-dev nodejs vim g++ RUN bundle install run yarn install COPY . /myapp # Add a script to be executed every time the container starts. COPY entrypoint.sh /usr/bin/ RUN chmod +x /usr/bin/entrypoint.sh ENTRYPOINT ["entrypoint.sh"] EXPOSE 3000 # Start the main process. CMD ["rails", "server", "-b", "0.0.0.0"]docker-copose.yml~~省略 web: build: . command: bash -c "rm -f tmp/pids/server.pid && bundle exec rails s -p 3000 -b '0.0.0.0'" volumes: - .:/myapp ports: - "3000:3000" ~~省略entrypoint.sh#!/bin/bash set -e # Remove a potentially pre-existing server.pid for Rails. rm -f /myapp/tmp/pids/server.pid # Then exec the container's main process (what's set as CMD in the Dockerfile). exec "$@"(他,
Gemfile,Gemfile.lock)エラー発生
$ docker-compose run web rails new .を実行すると
standard_init_linux.go:211: exec user process caused "no such file or directoryというエラーが発生し、
rails newは実行できませんでした。原因
alpineのシェルは
bashではなくashだった。解決
docker-compose.ymlとentrypoint.shを編集します。docker-compose.ymlweb: build: . # bash → ashに変更 command: ash -c "rm -f tmp/pids/server.pid && bundle exec rails s -p 3000 -b '0.0.0.0'" volumes: - .:/myapp ports: - "3000:3000"entrypoint.sh#!/bin/sh ←bashからshへ set -e # Remove a potentially pre-existing server.pid for Rails. rm -f /myapp/tmp/pids/server.pid # Then exec the container's main process (what's set as CMD in the Dockerfile). exec "$@"編集後、再度
$ docker-compose run web rails new .すれば実行できました。
参考
- 投稿日:2020-01-07T21:11:50+09:00
herokuへデプロイ後、We're sorry, but something went wrong.

- 投稿日:2020-01-07T20:54:50+09:00
AWSでのデプロイ手順①ネットワーク環境設定
初心者には難関である、AWSを使用したデプロイ手順を書いてみます
AWSはUIもよく変化するので、
現在のもの(2019/10)で書いています※アカウントがない人はまず新規で申し込みしておいてください
今回内容
STEP1 ネットワーク環境設定
1.VPCの作成
2.サブネットの作成
3.インターネットゲートウェイの作成
4.ルートテーブルの作成
5.サブネットとの紐付け
6.セキュリティグループの作成STEP2 EC2の設定
1.EC2にてインスタンスの作成
2.Elastic IPの割り当て
3.インスタンスにSSHでログイン次回内容
STEP3以降
AWSでデプロイするまでの手順②サーバー(EC2インスタンス)環境設定※ここでいうサーバーとはAWS EC2インスタンス (Amazon Linux) のこととする
STEP1 ネットワーク環境設定
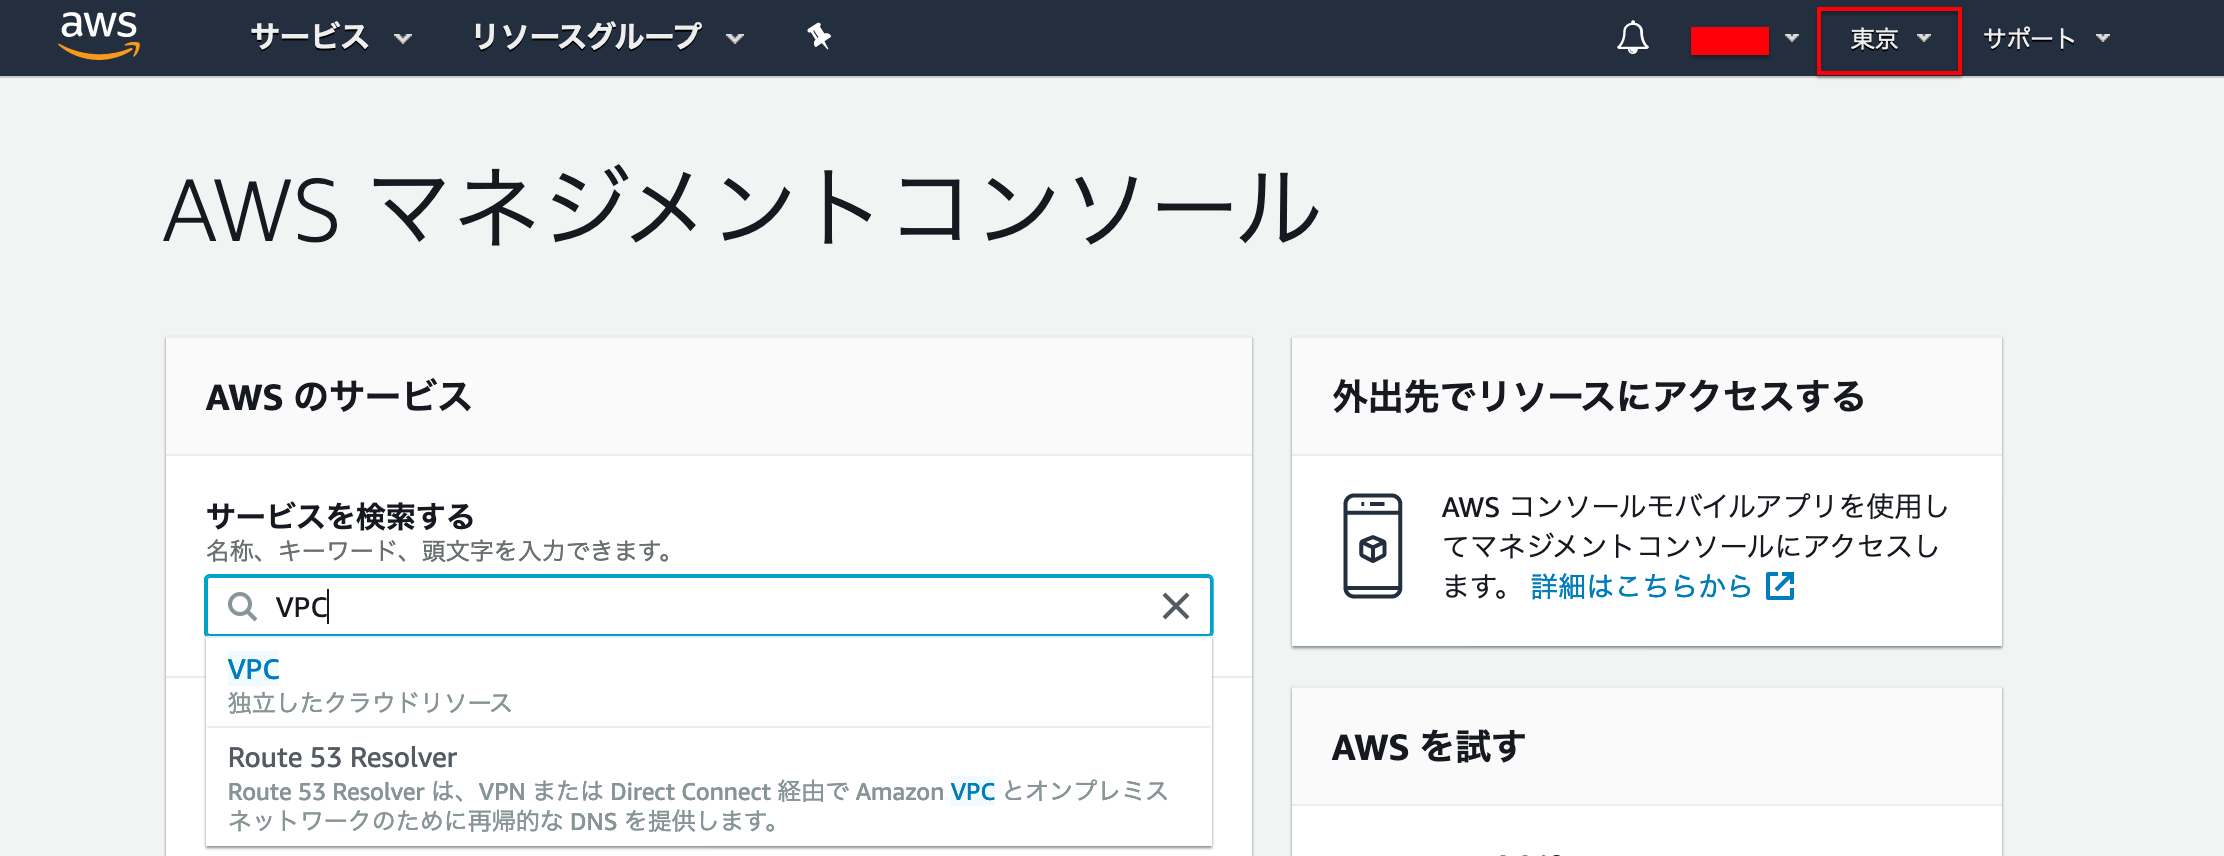
1.VPCの作成
https://aws.amazon.com/
Amazon Web Servicesでサインインしますヘッダーにあるリージョンを東京に設定し、
「VPC」を検索し「VPC」にいきます
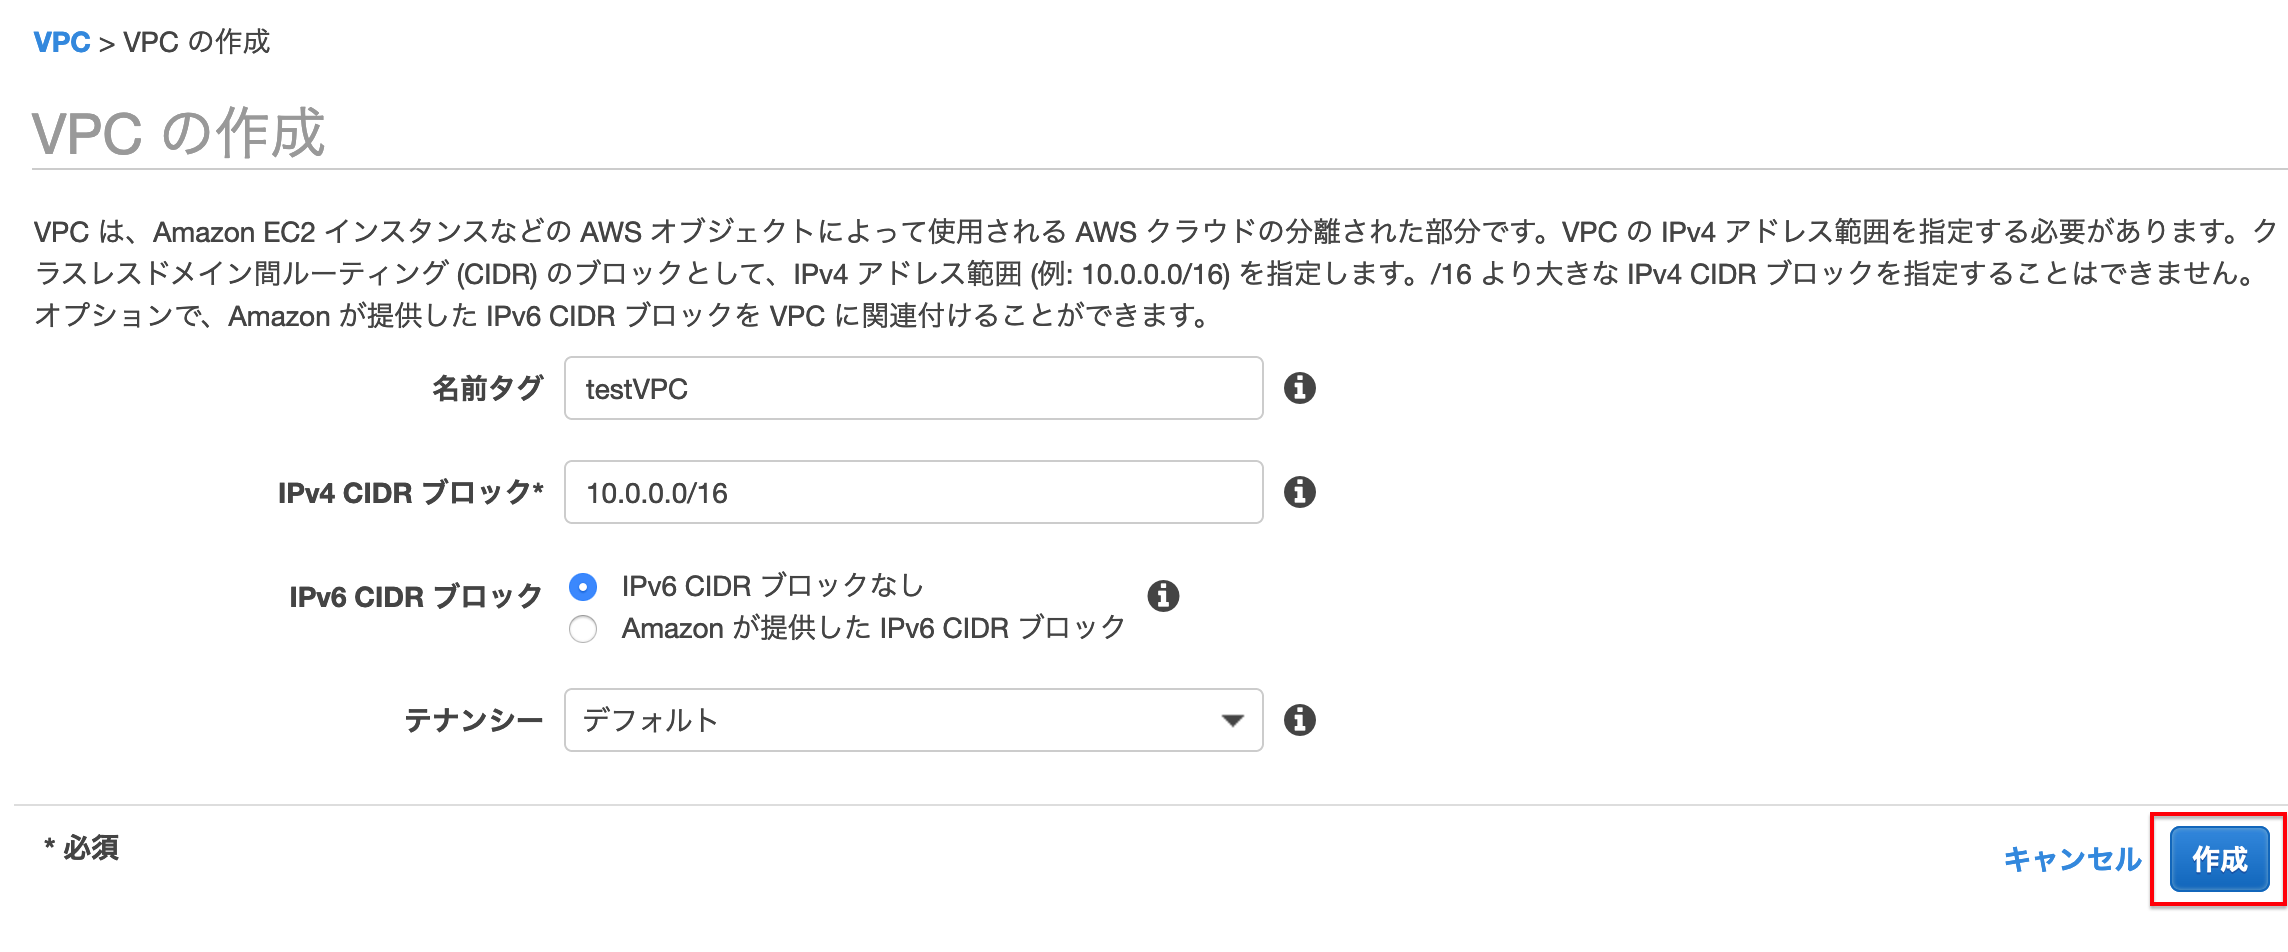
サイドメニューのVPCより[VPCの作成]を押下します
作成画面になるので
今回は下のように設定し、[作成]を押下します・ネームタグ :testVPC ・IPv4 CIDRブロック:10.0.0.0/16 ・IPv4 CIDRブロック:ブロックなし ・テナンシー :デフォルト
2.サブネットの作成
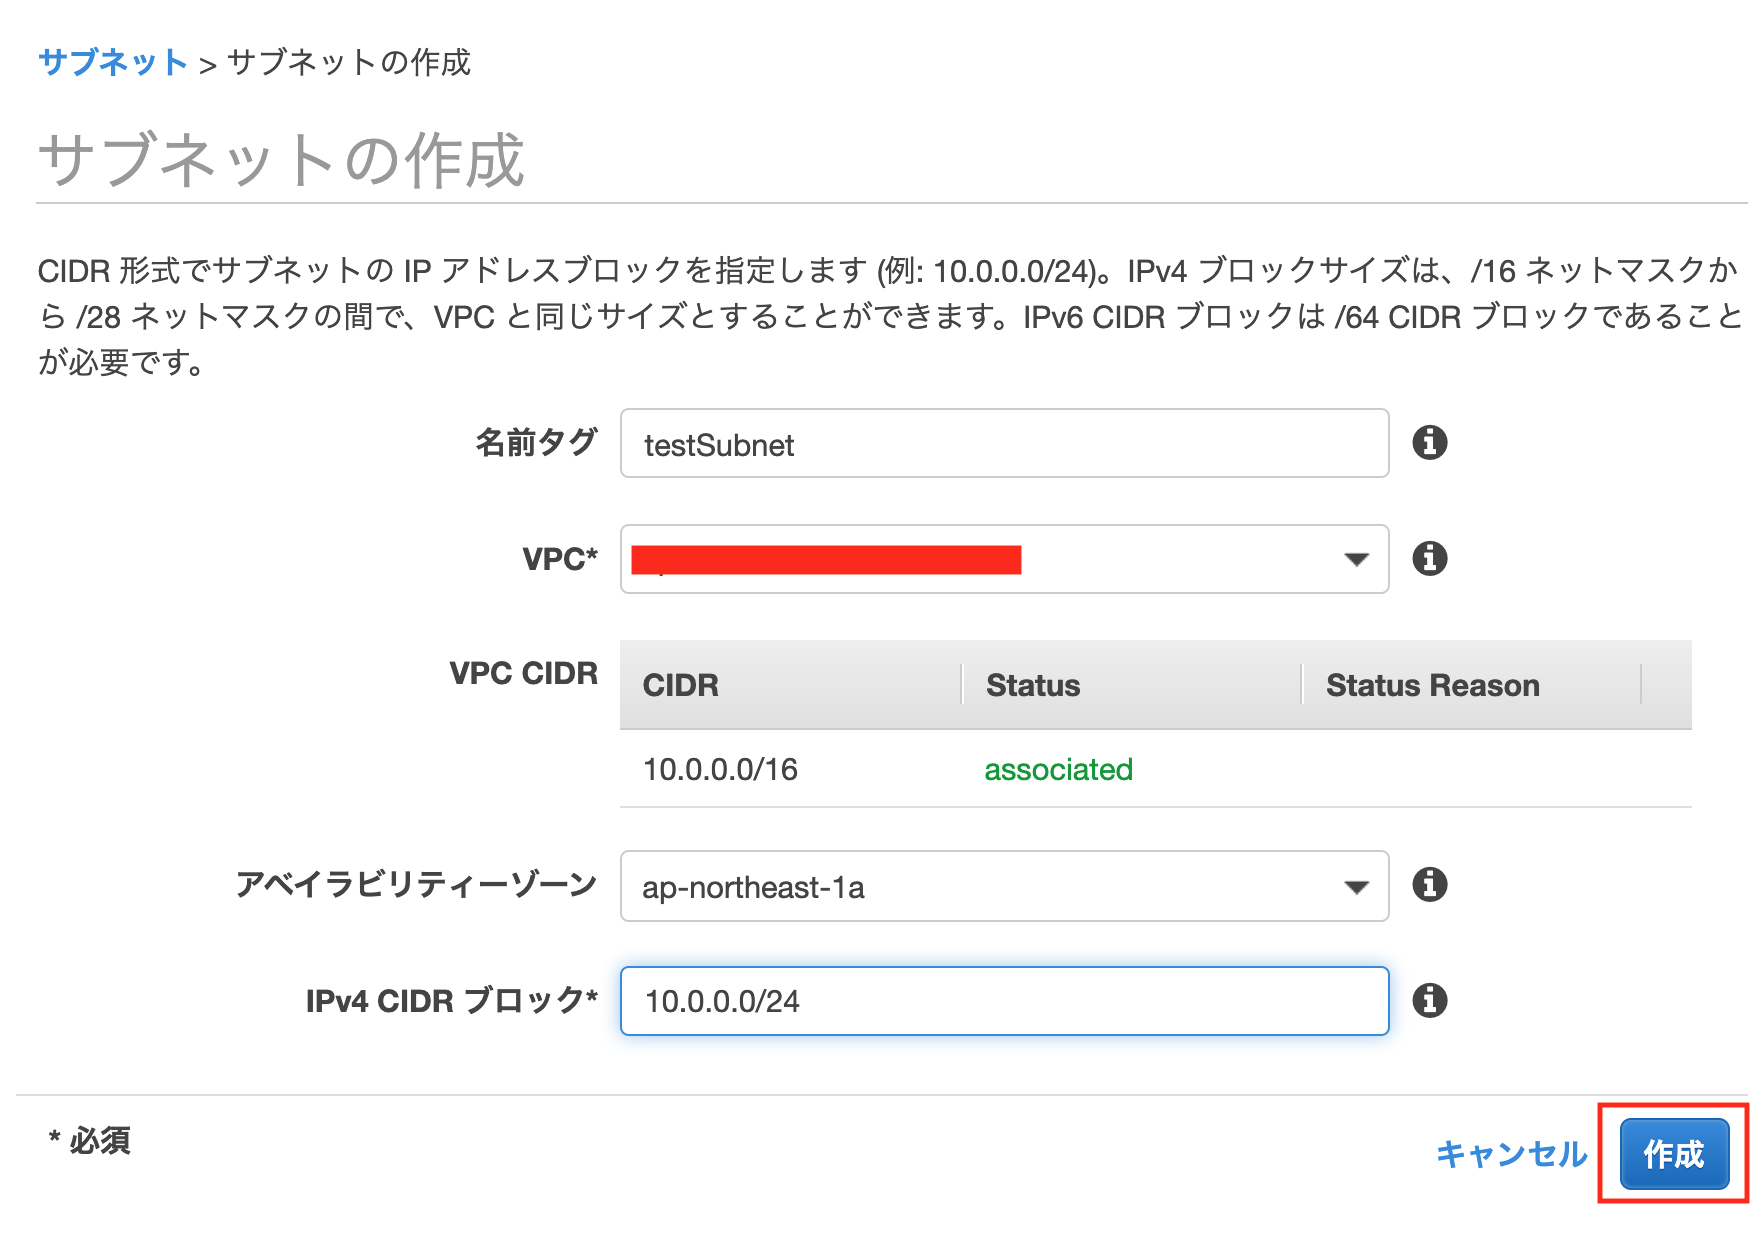
今回のサブネットは[RDS]を配置するためのサブネットを2つを作成する構成です。
サイドメニューのサブネットより[サブネットの作成]を押下します
作成画面になるので
下のように設定し、[作成]を押下します・ネームタグ:testSubnet ・VPC:先ほど作成したものを選択 ・アベイラビリティゾーン:ap-northeast-1a ・CIDRブロック:10.0.0.0/24同様にもう一つ作成します
・ネームタグ:testSubnet2
・VPC:先ほど作成したものを選択
・アベイラビリティゾーン:ap-northeast-1c
・CIDRブロック:10.0.1.0/24
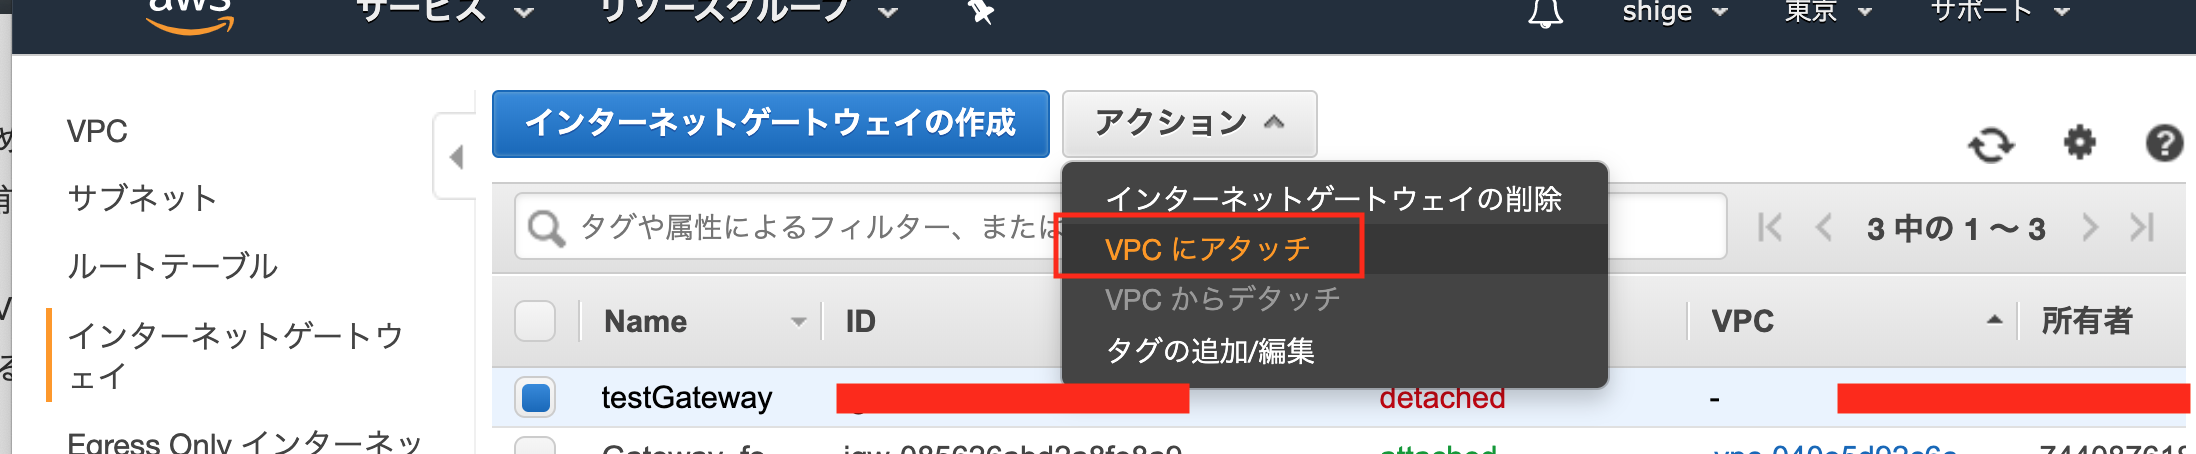
3.インターネットゲートウェイの作成
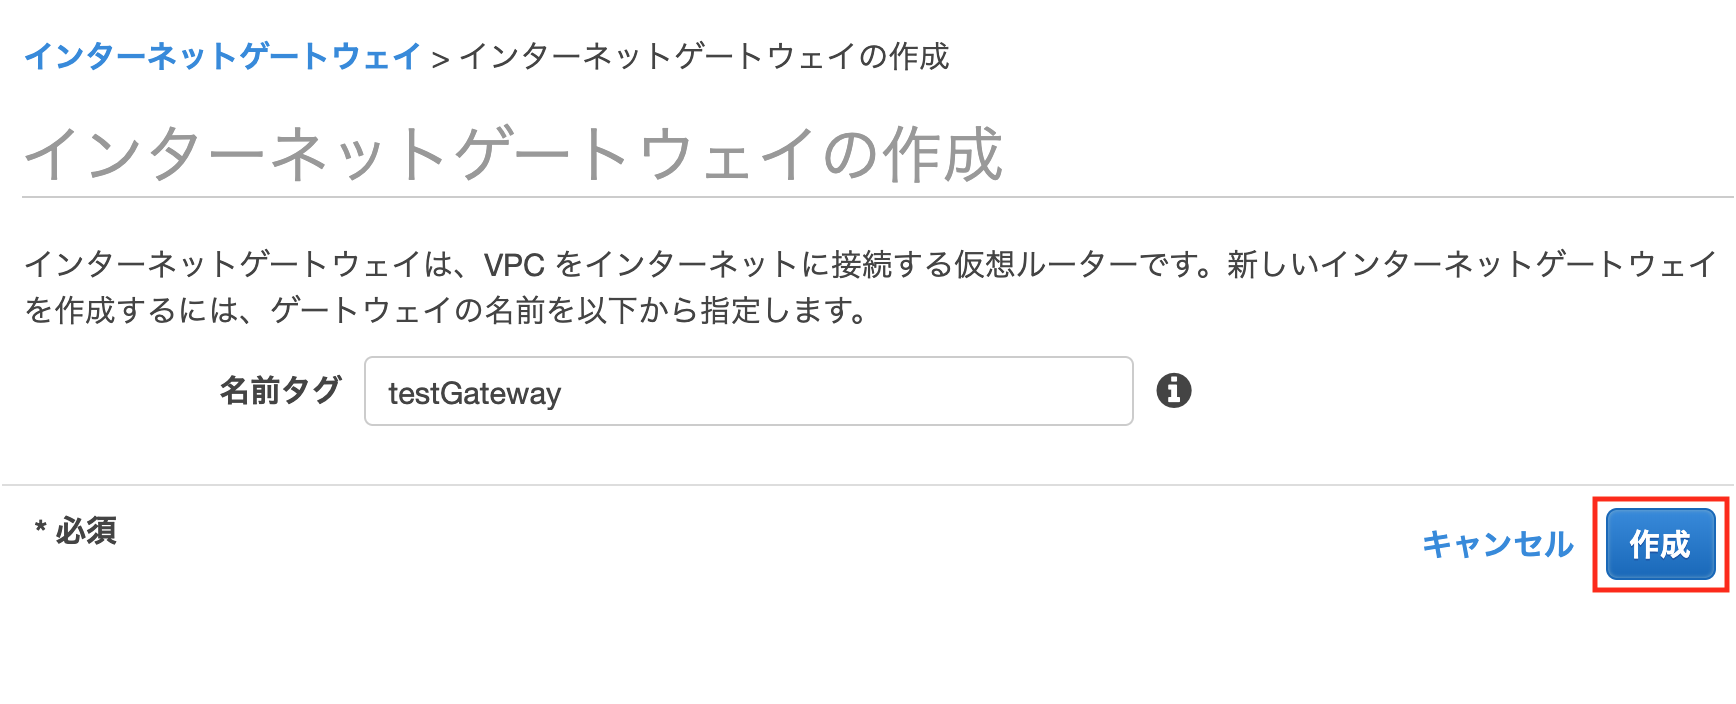
サイドメニューのインターネットゲートウェイより
[インターネットゲートウェイの作成]を押下します
作成画面になるので
下のように設定し、[作成]を押下します名前タグ:testGateway
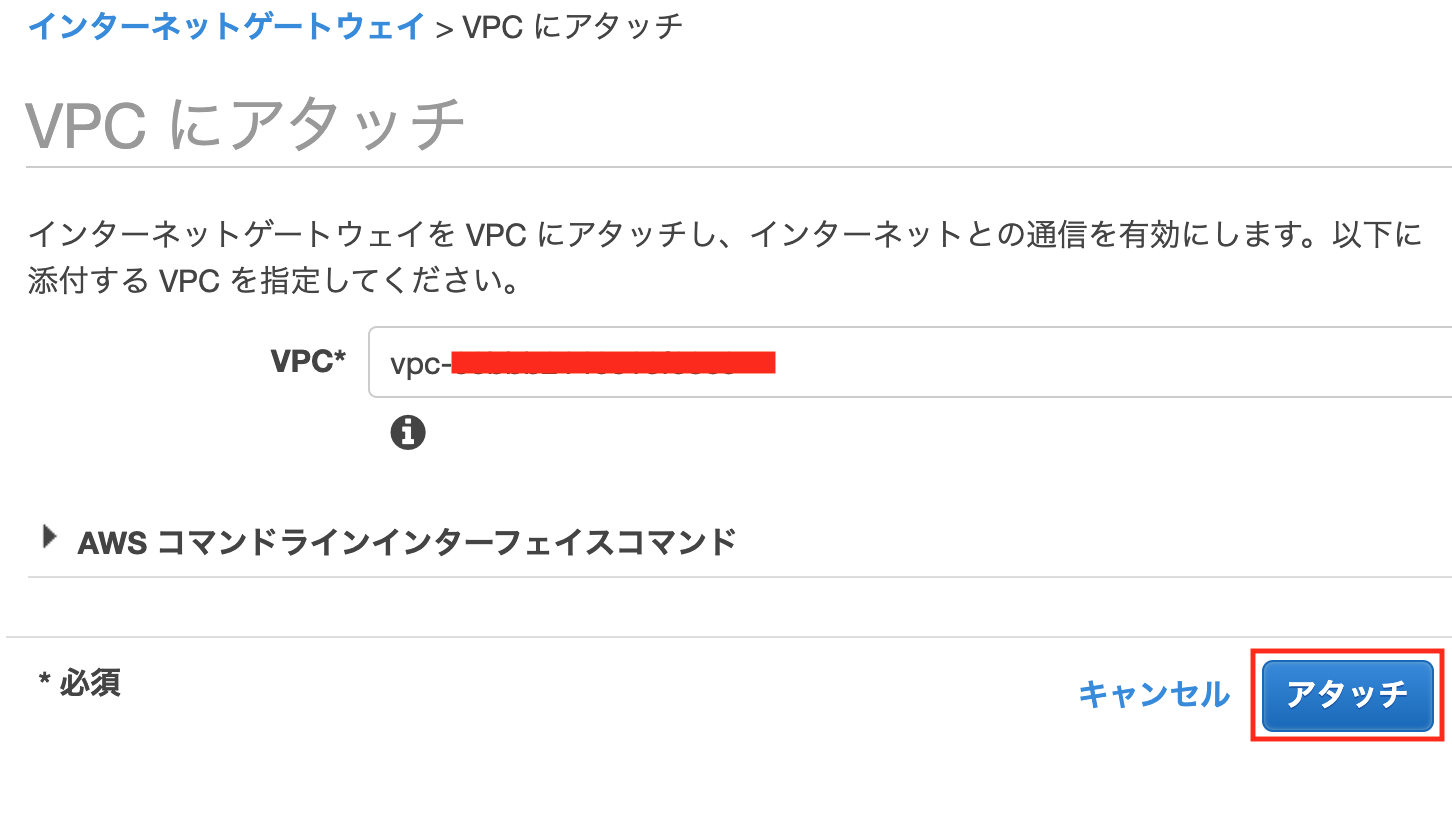
[アクション]を押下し、[VPCにアタッチ]を押下します
下のように設定し、[アタッチ]を押下する
VPC:先ほど作成したものを選択
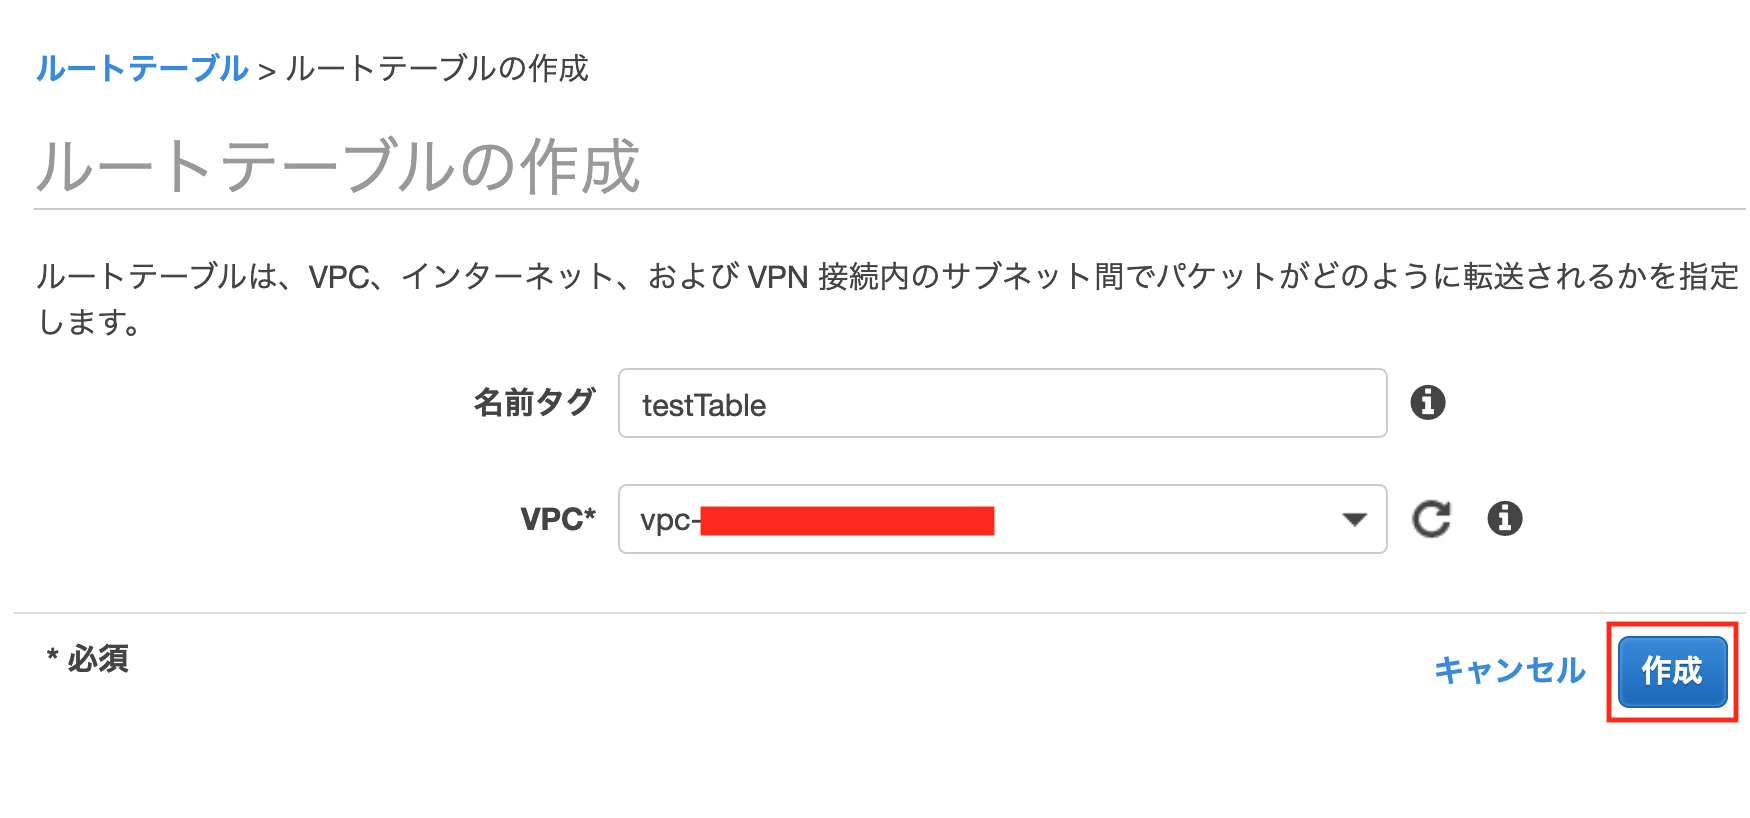
4.ルートテーブルの作成
サイドメニューのルートテーブルより[ルートテーブルの作成]を押下
作成画面になるので
下のように設定し、[作成]を押下します名前タグ:testTable VPC:先ほど作成したものを選択
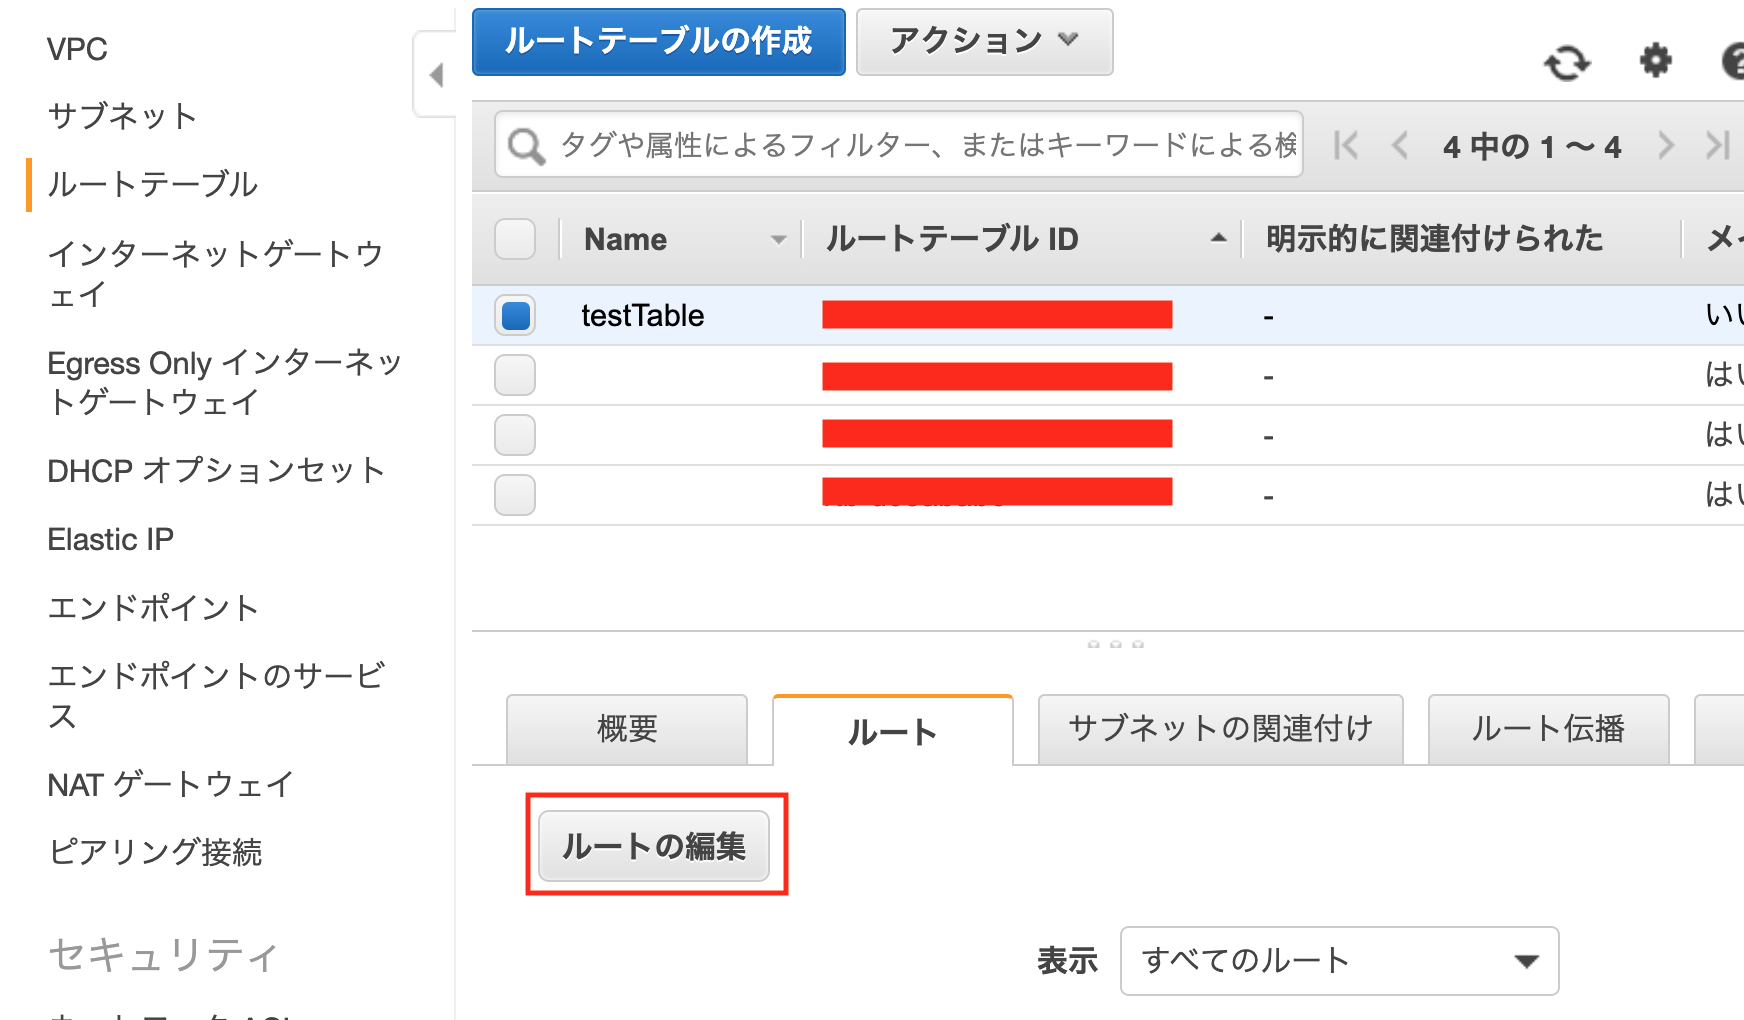
作成したルートテーブルを選択した状態で、
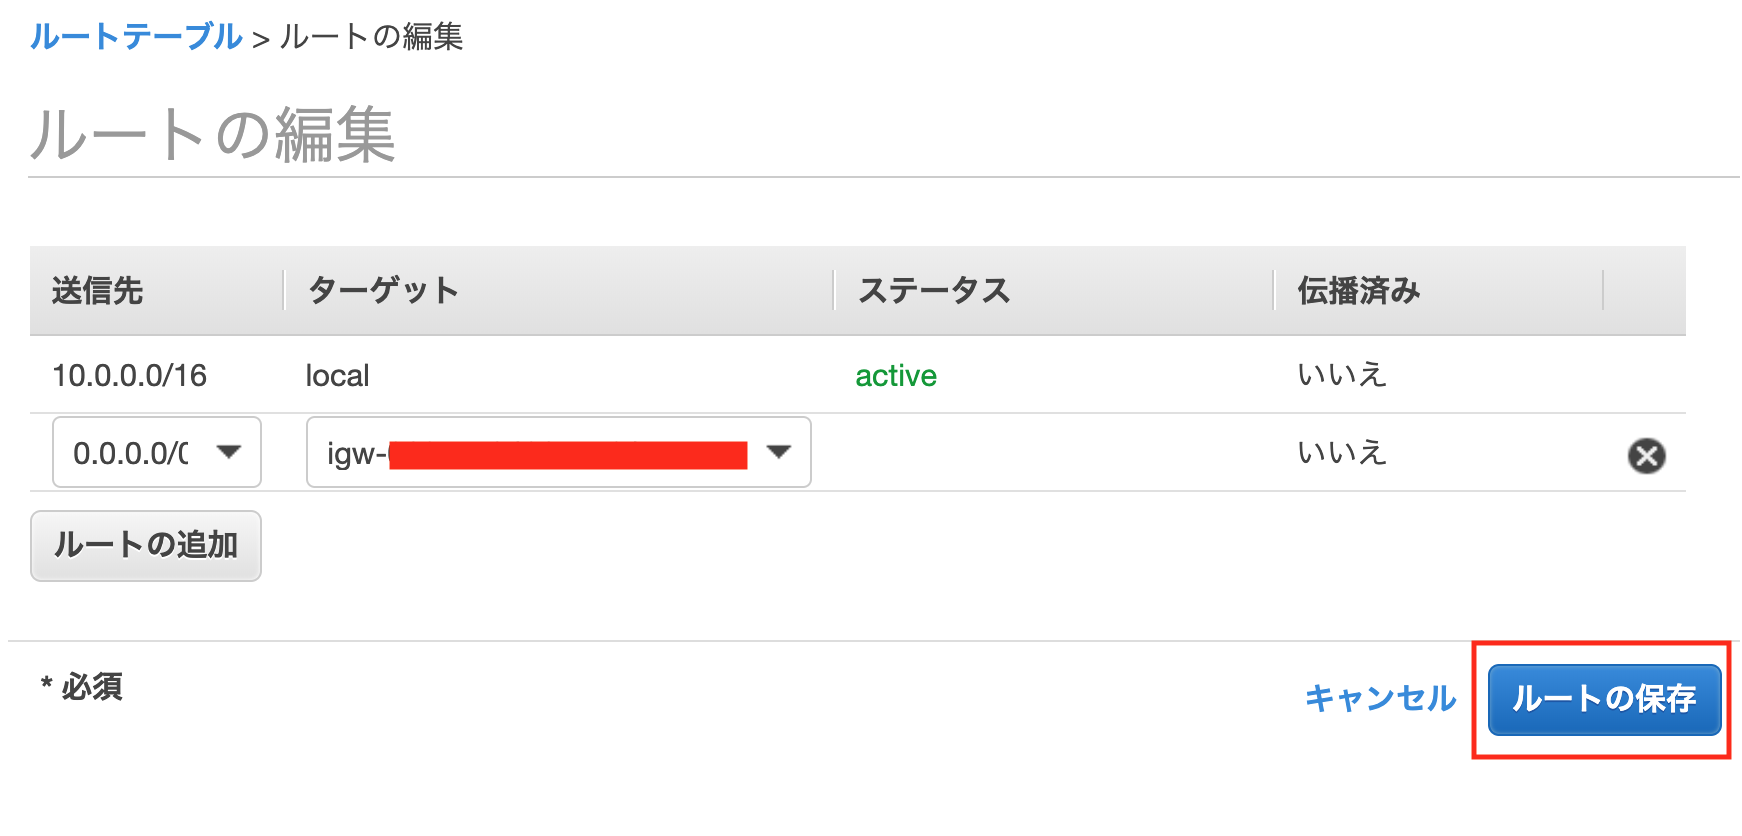
下のタブ「ルート」>「ルートの編集」を押下、[ルートの追加]を押下
下のように設定し[ルールの保存]を押下します
送信先:0.0.0.0/0
ターゲット:Internet Gatewayを選択し、先ほど作成したゲートウェイIDを選択
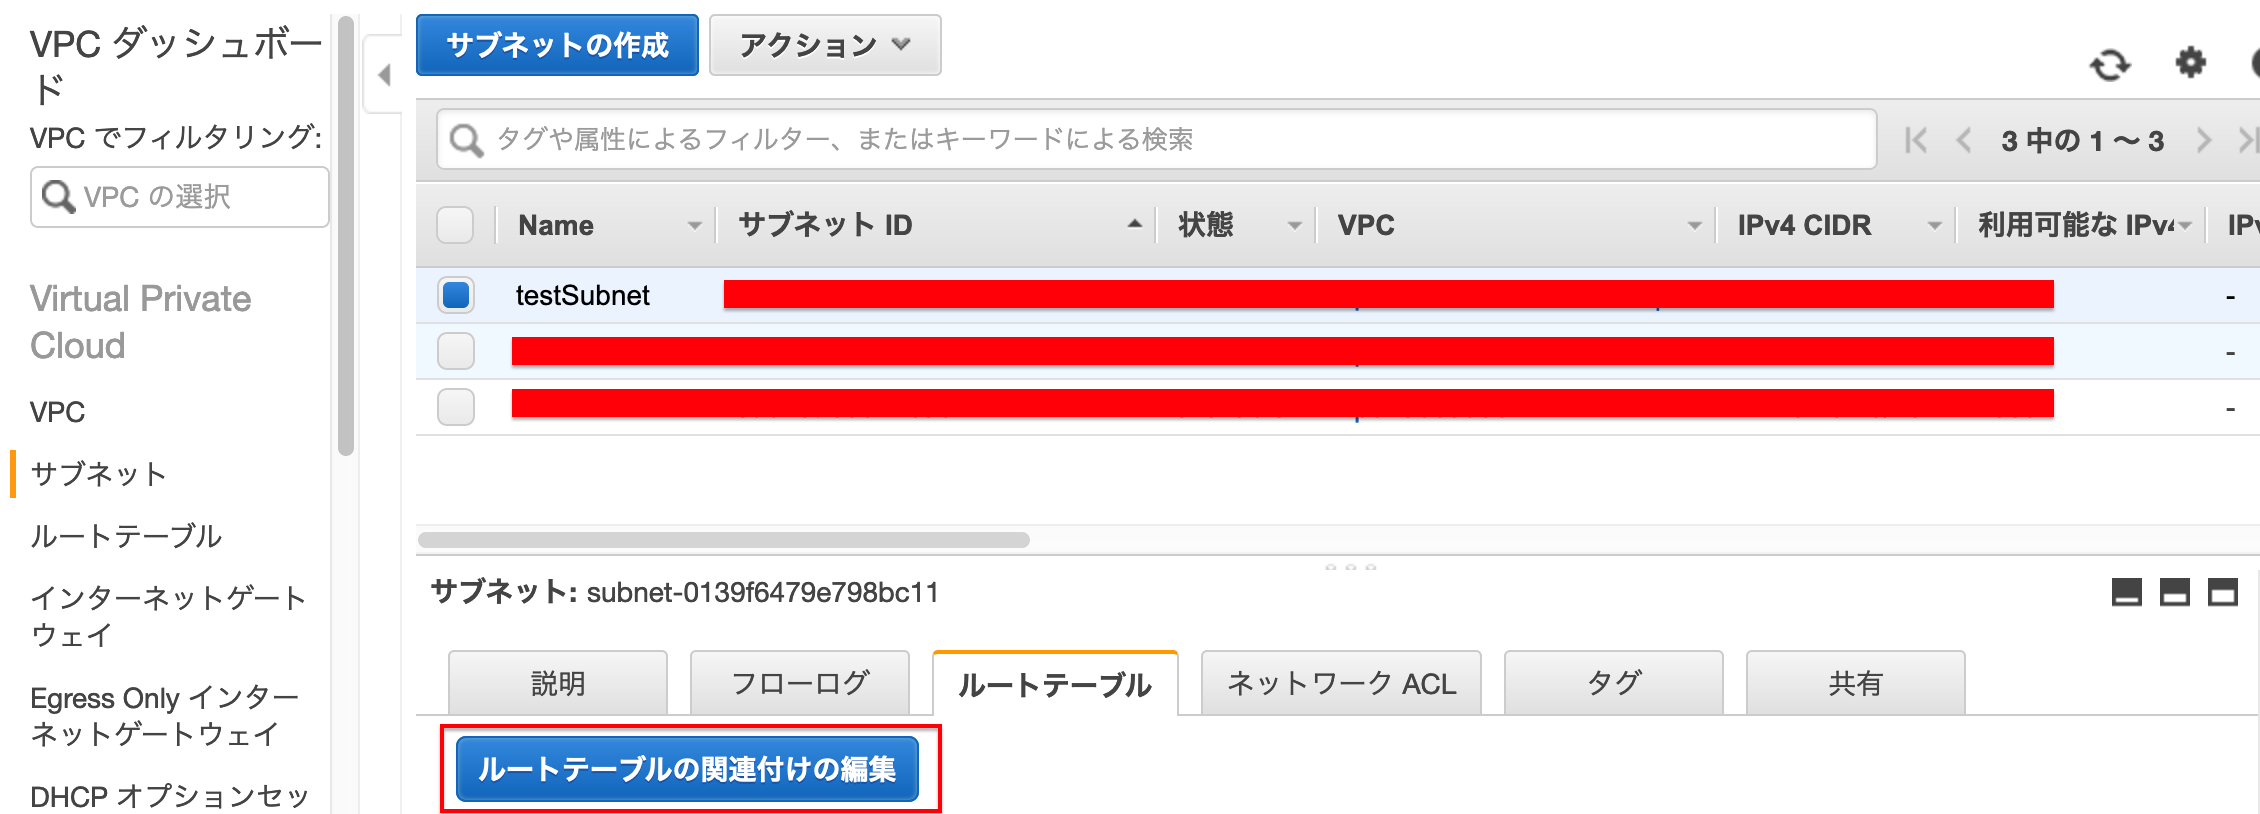
5.サブネットとの紐付け
→左側の「サブネット」を選択します
→関連付けを変更するサブネットを選択します
→画面下のルートテーブルを選択します
→[ルートテーブルの関連付けの編集]を押下します
→先ほど作成したルートテーブルIDを選択します
→[保存]を押下します
6.セキュリティグループの作成
サイドメニューの
セキュリティ>セキュリティグループより>[セキュリティグループの作成]を押下します
下のように設定し、[作成]を押下する
セキュリティグループ名:testSecurityGroup
説明:そのセキュリティグループの説明
VPC:先ほど作成したものを選択
画面下のインバウンドのルールの[ルールの編集]を押下し、[ルールの追加]を押下、
下のように設定し、[ルールの保存]を押下するタイプ:SSH ソース:マイIP
STEP2 EC2の設定
AWSでDBを利用したい場合、
・EC2にてインスタンスの作成
・RDSを利用する
※ ただRDSを使用すると料金が掛かるので、
使用しない場合はサーバーに直接データベースを作成してください。
この2種類の方法があります。
今回は
EC2にてインスタンスの作成(サーバーに直接データベースを作成)
をメインに行なっていきます1.EC2にてインスタンスの作成
インスタンスは起動のままだと
課金請求されるので、使わない場合は
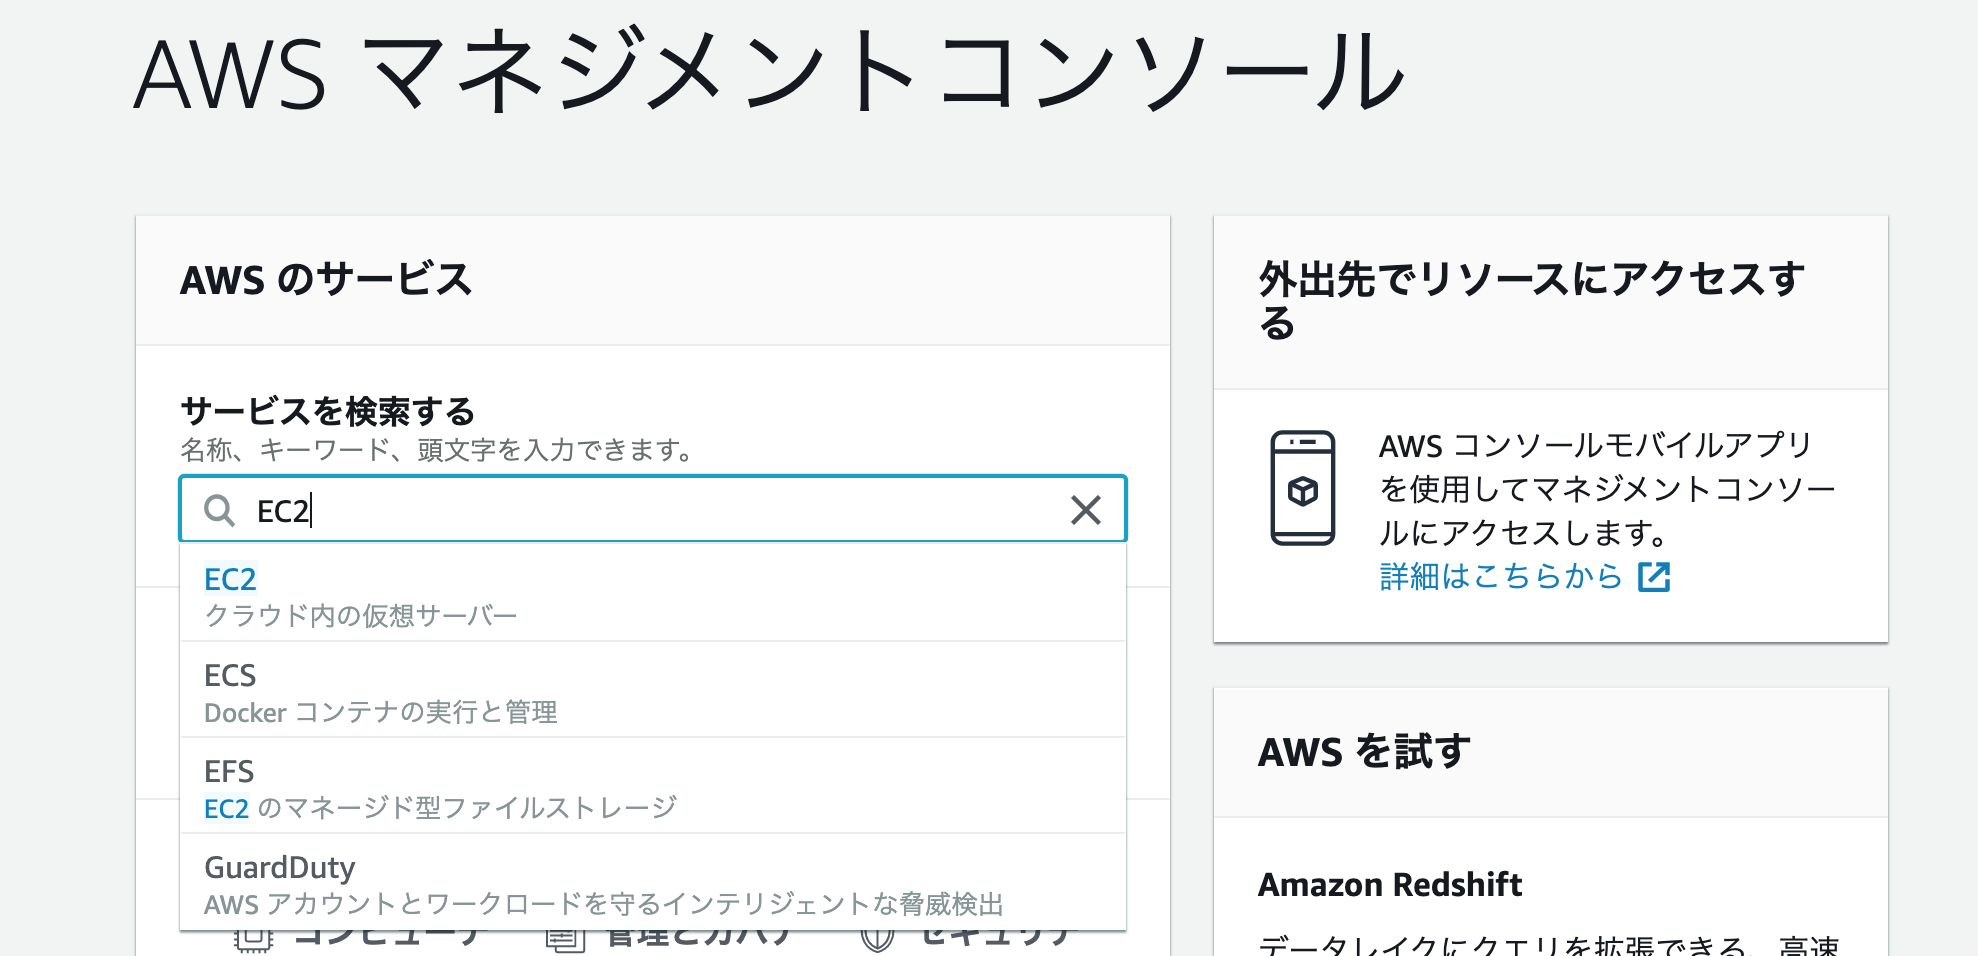
停止状態にすることをお勧めしますAWS マネジメントコンソールにて"EC2"を検索しアクセスする
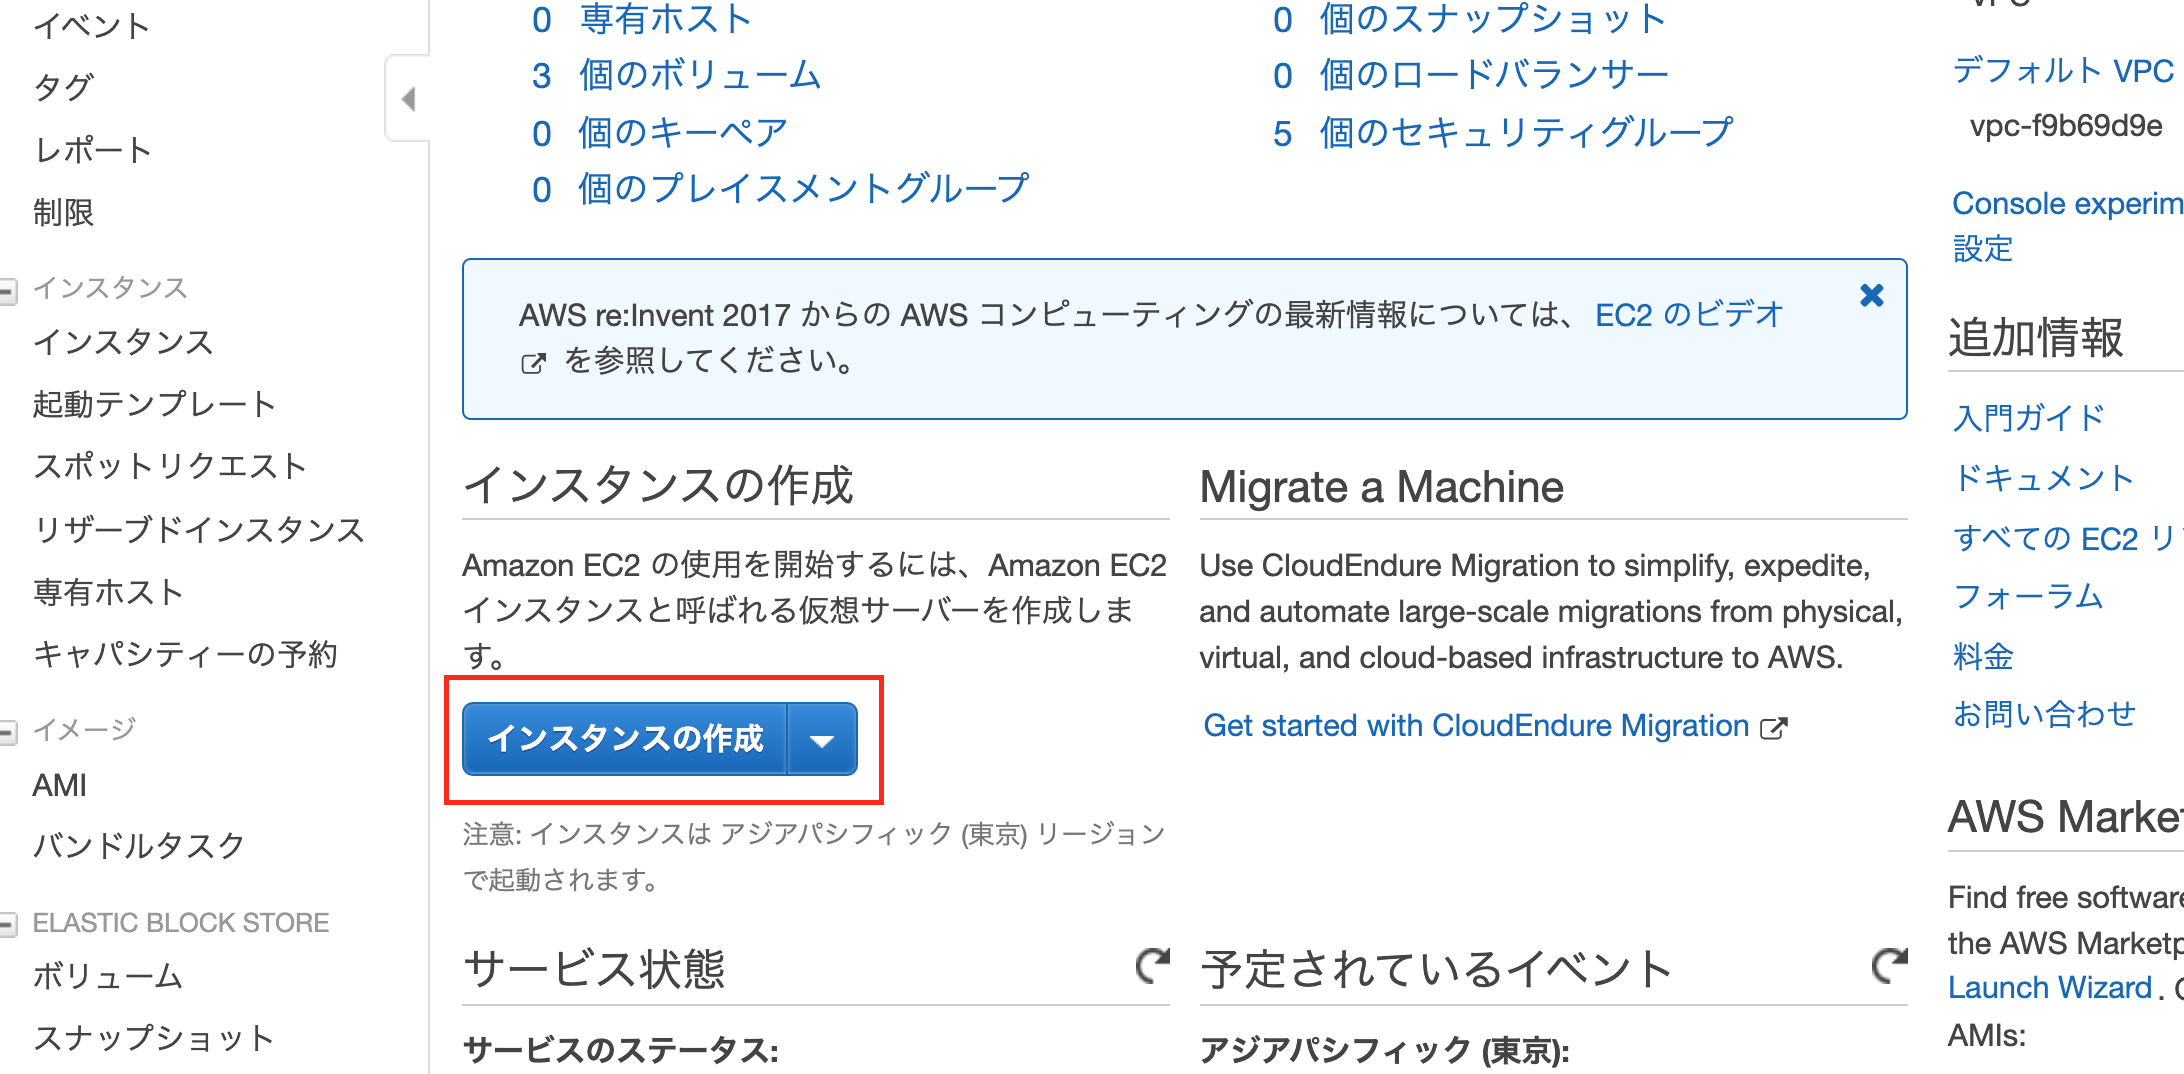
サイドメニューのインスタンスより[インスタンスの作成]を押下する
今回はこちらをクリックします
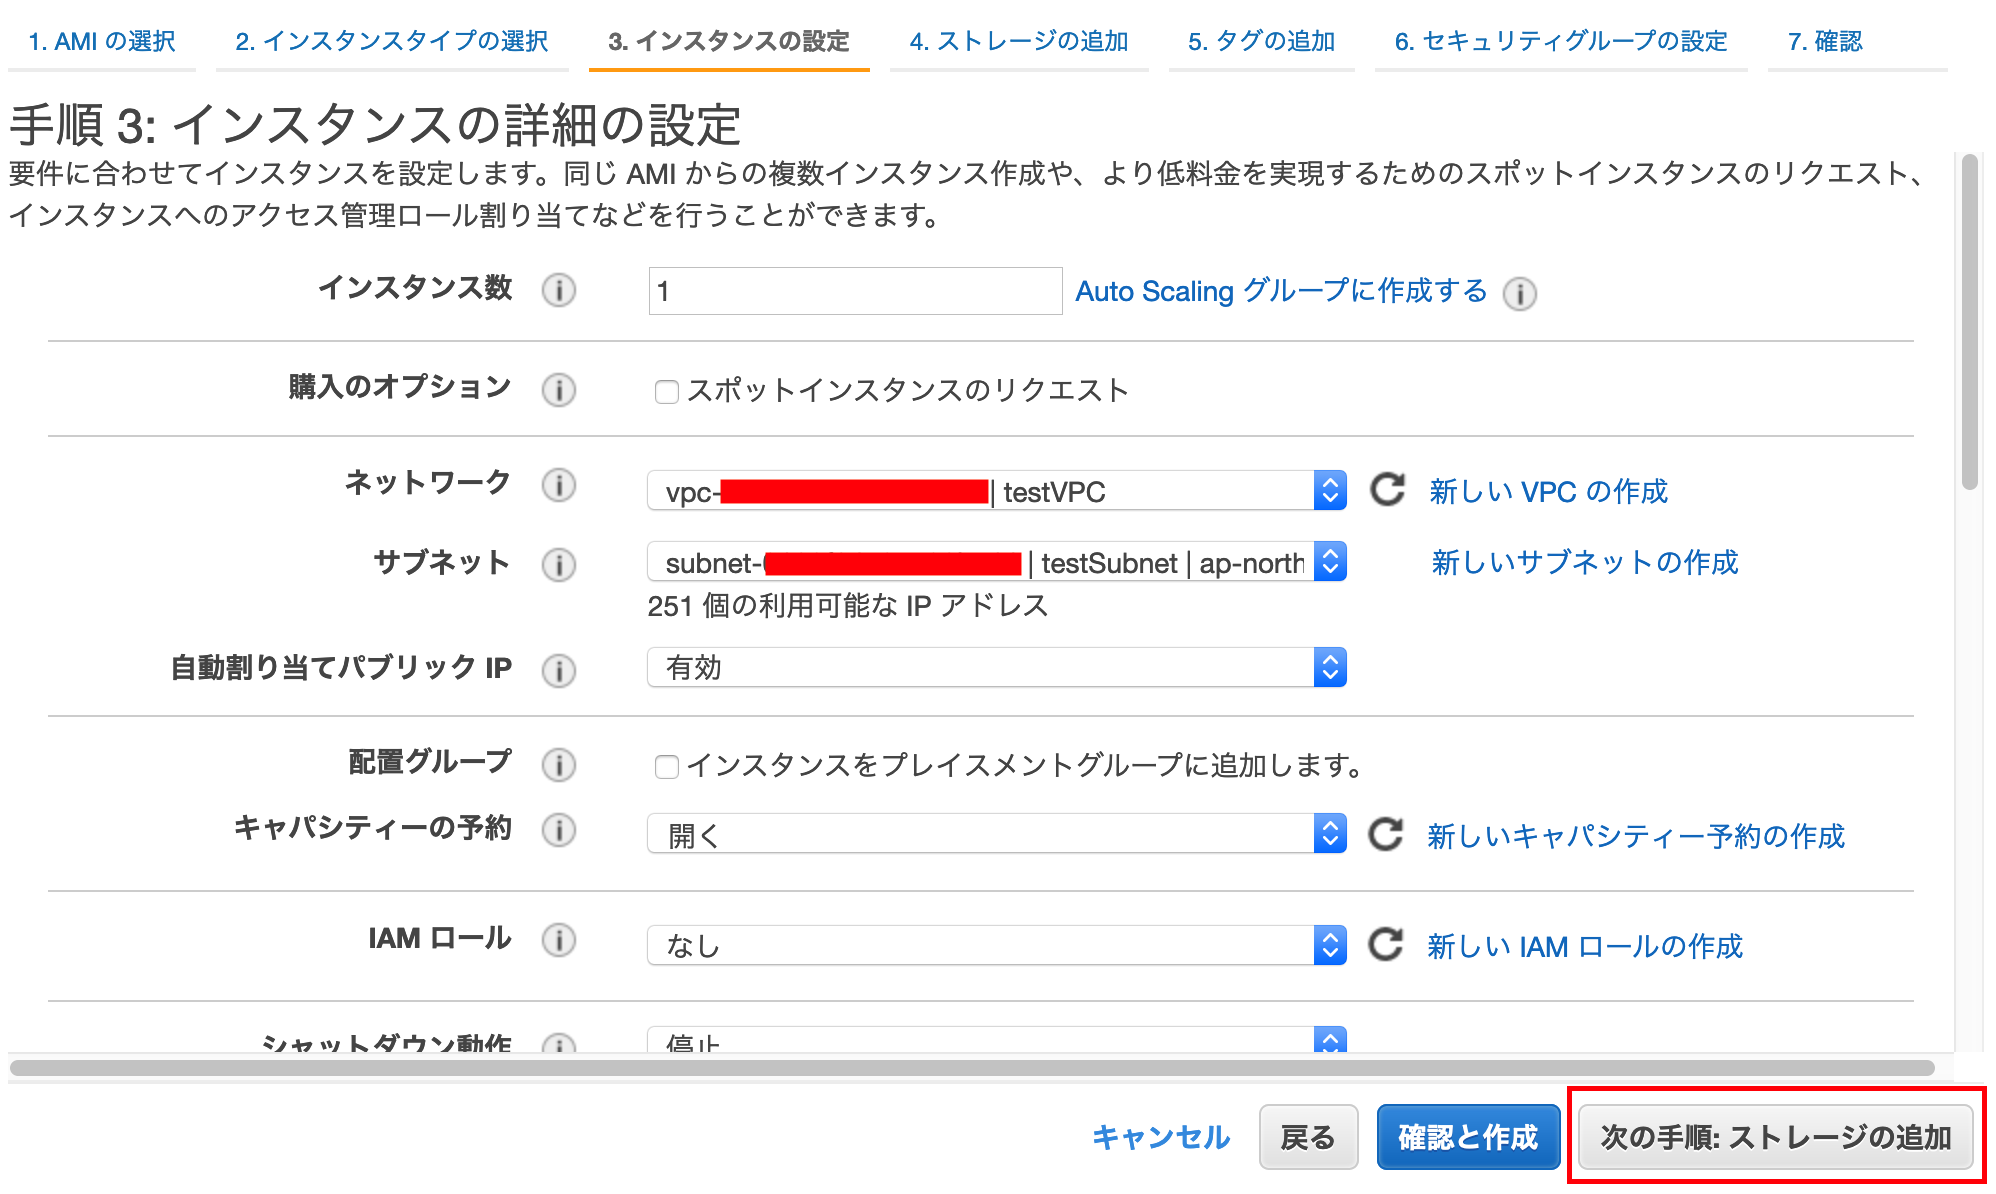
[次の手順: インスタンスの詳細の設定]をクリックする
下を設定し,[次の手順: ストレージの追加]を押下する
ネットワーク:先ほど作成したVPCを選択
サブネット:先ほど作成したサブネットを選択
自動割り当てパブリック IP:有効
他はデフォルトのまま
デフォルトのままで,[次の手順: タグの追加]を押下する
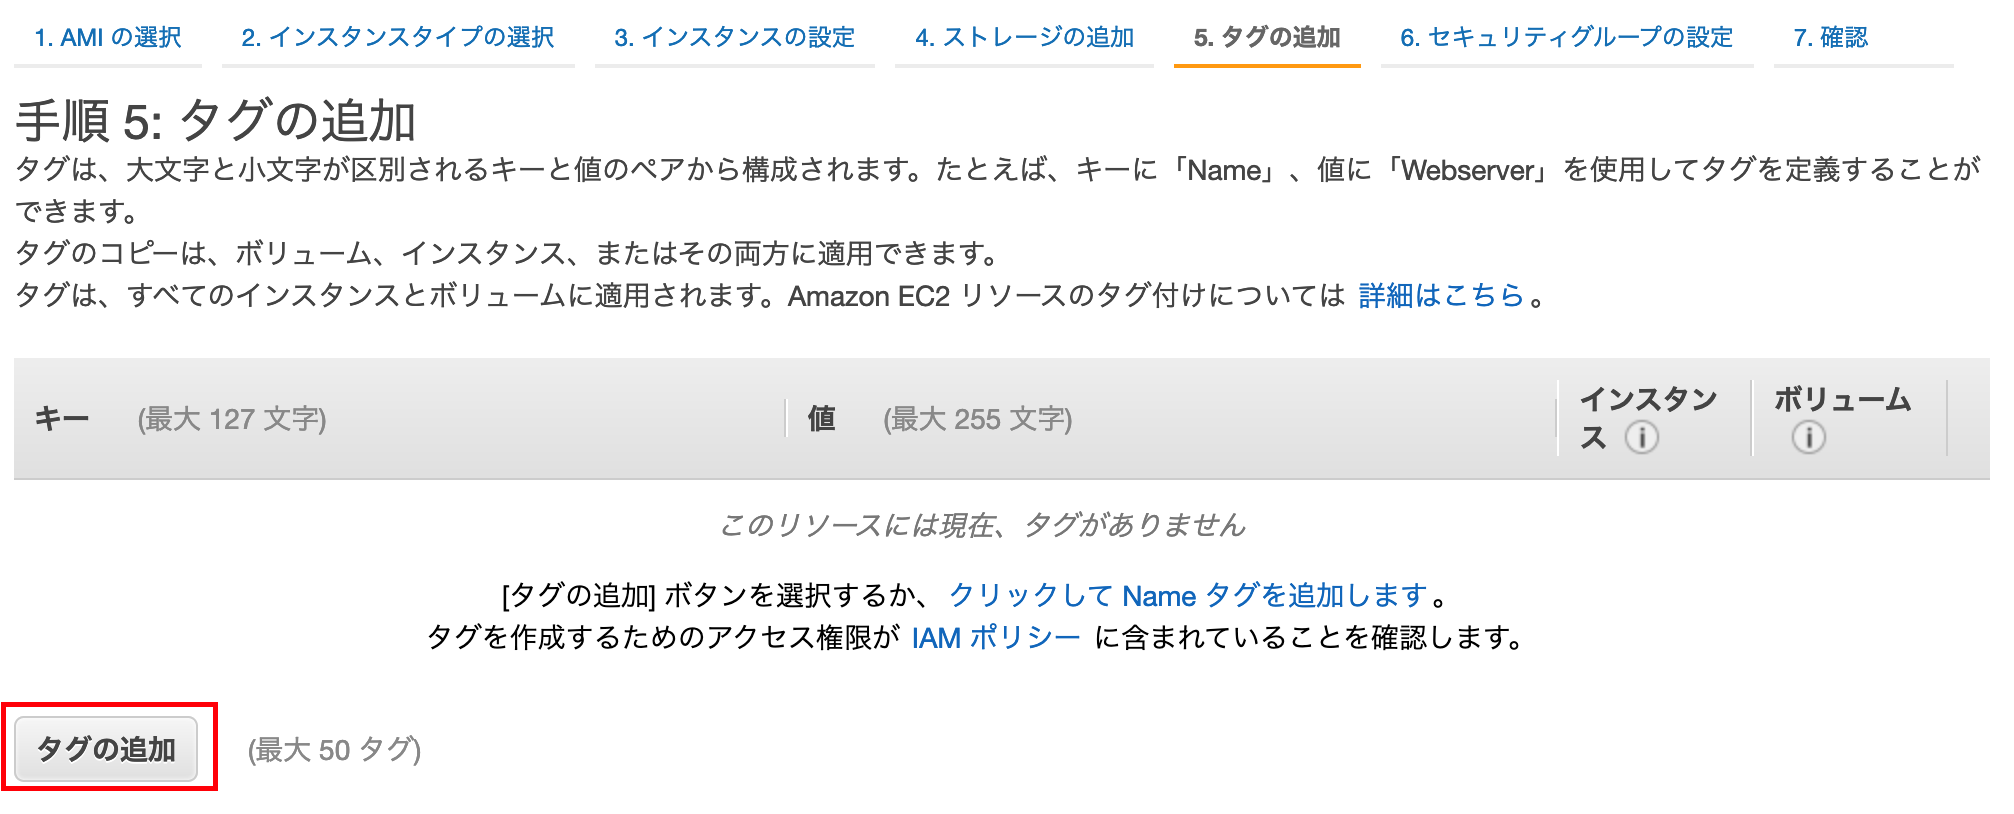
タグを追加する
[タグの追加]を押下する
キー:Name
値:testInstance
で[次の手順: セキュリティグループの設定]を押下する
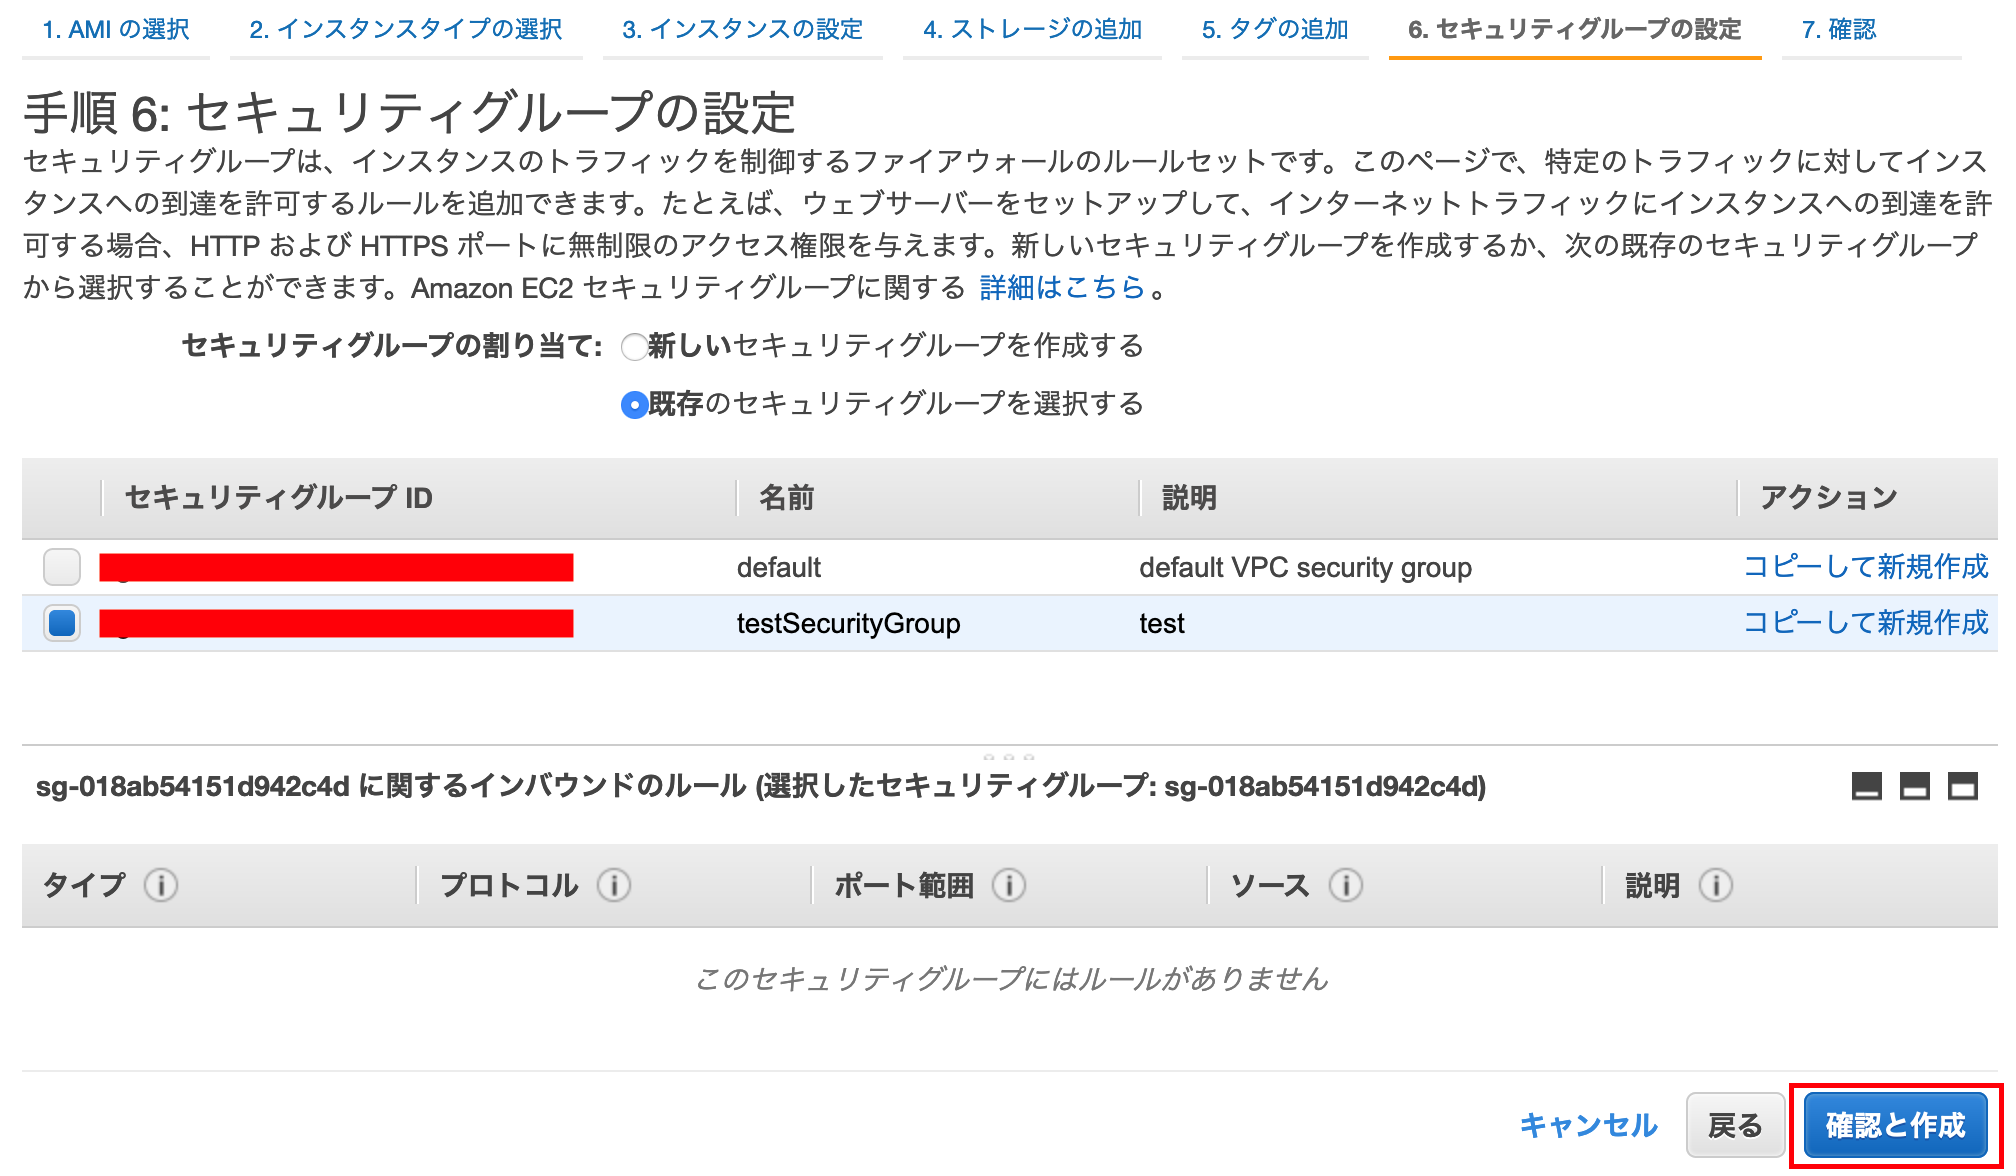
セキュリティグループの設定する
セキュリティグループの割り当て:既存を
選択し、先ほど作成したセキュリティグループを選択し、
[確認と作成]を押下する
一覧画面にて、
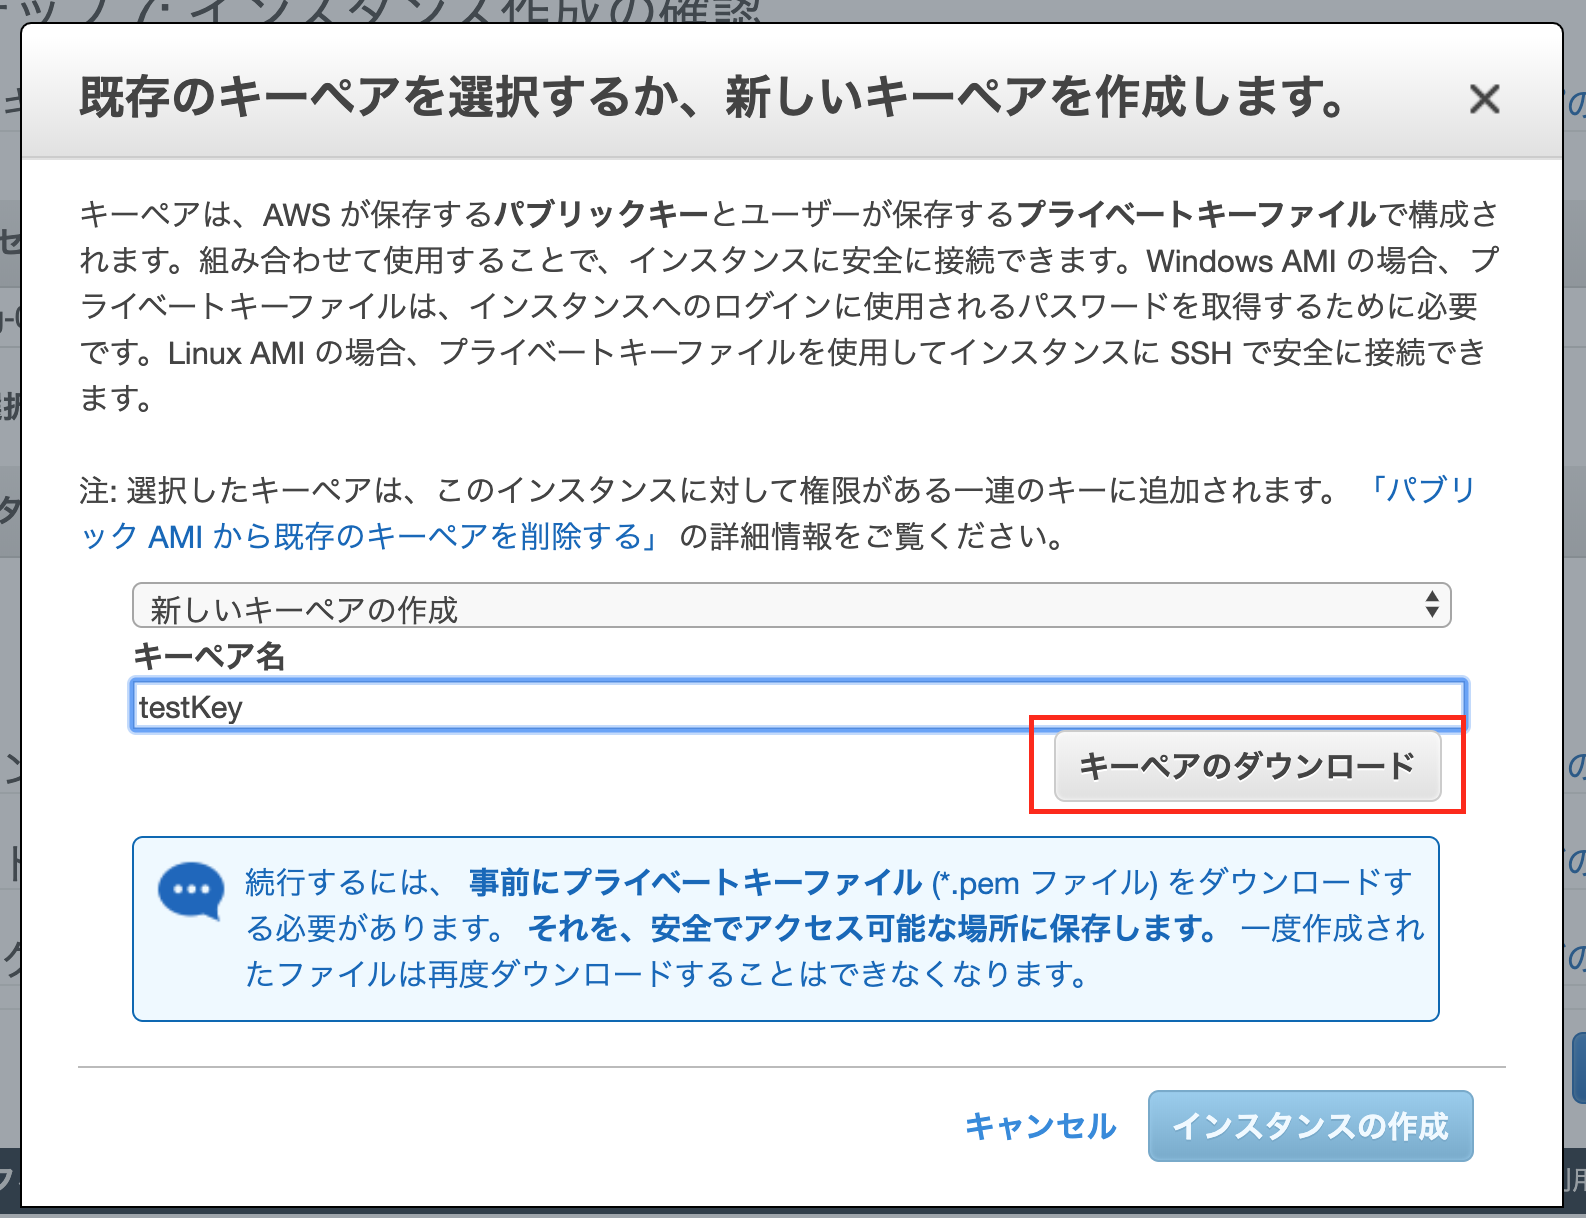
最後に[起動]を押下します下ような表示になり、
新しいキーペアを作成を選択、
キーペア名を入力し、
[キーペアのダウンロード]を押下します
(一度作成されたファイルは再度ダウンロードができなくなるので注意)
ダウンロードしたら[インスタンスの作成]を押下します
しばらくするとインスタンスが作成されます!!
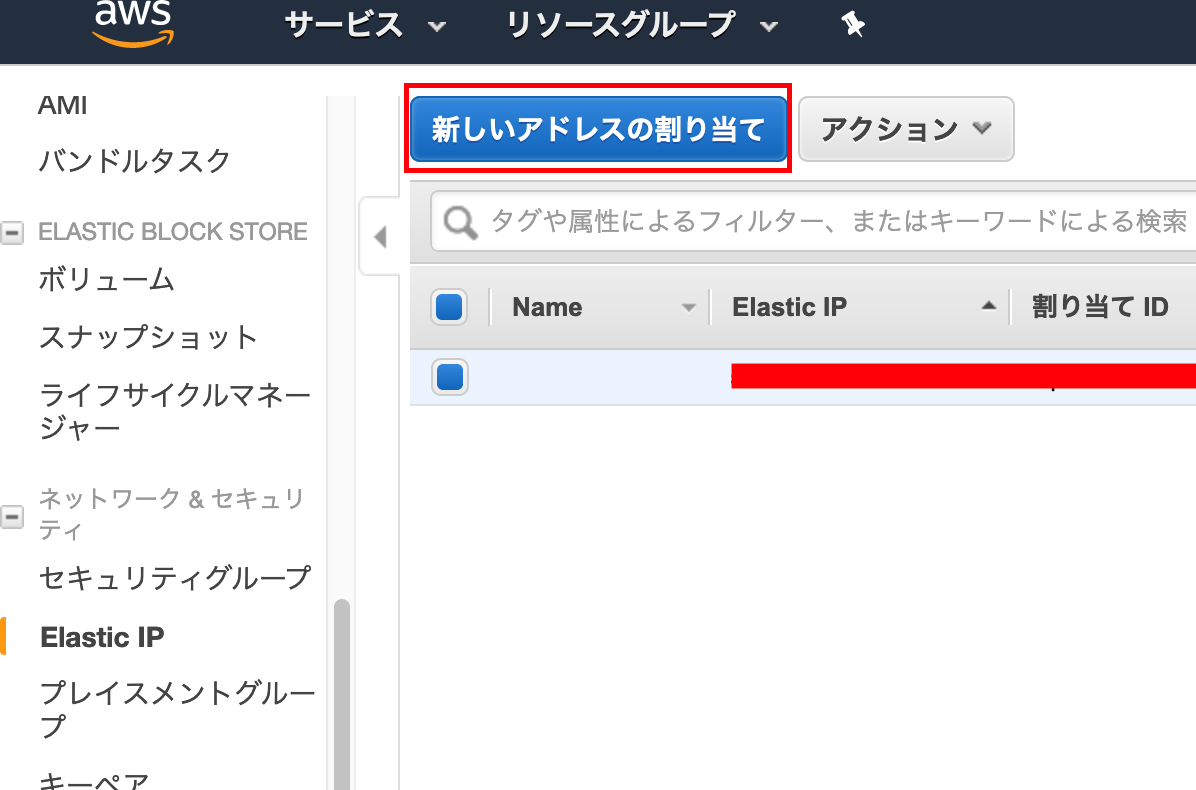
2.Elastic IPの割り当て
サイドメニューの
ネットワーク&セキュリティ>
Elastic IP[新しいアドレスの割り当て]を押下する
[割り当て]を押下します
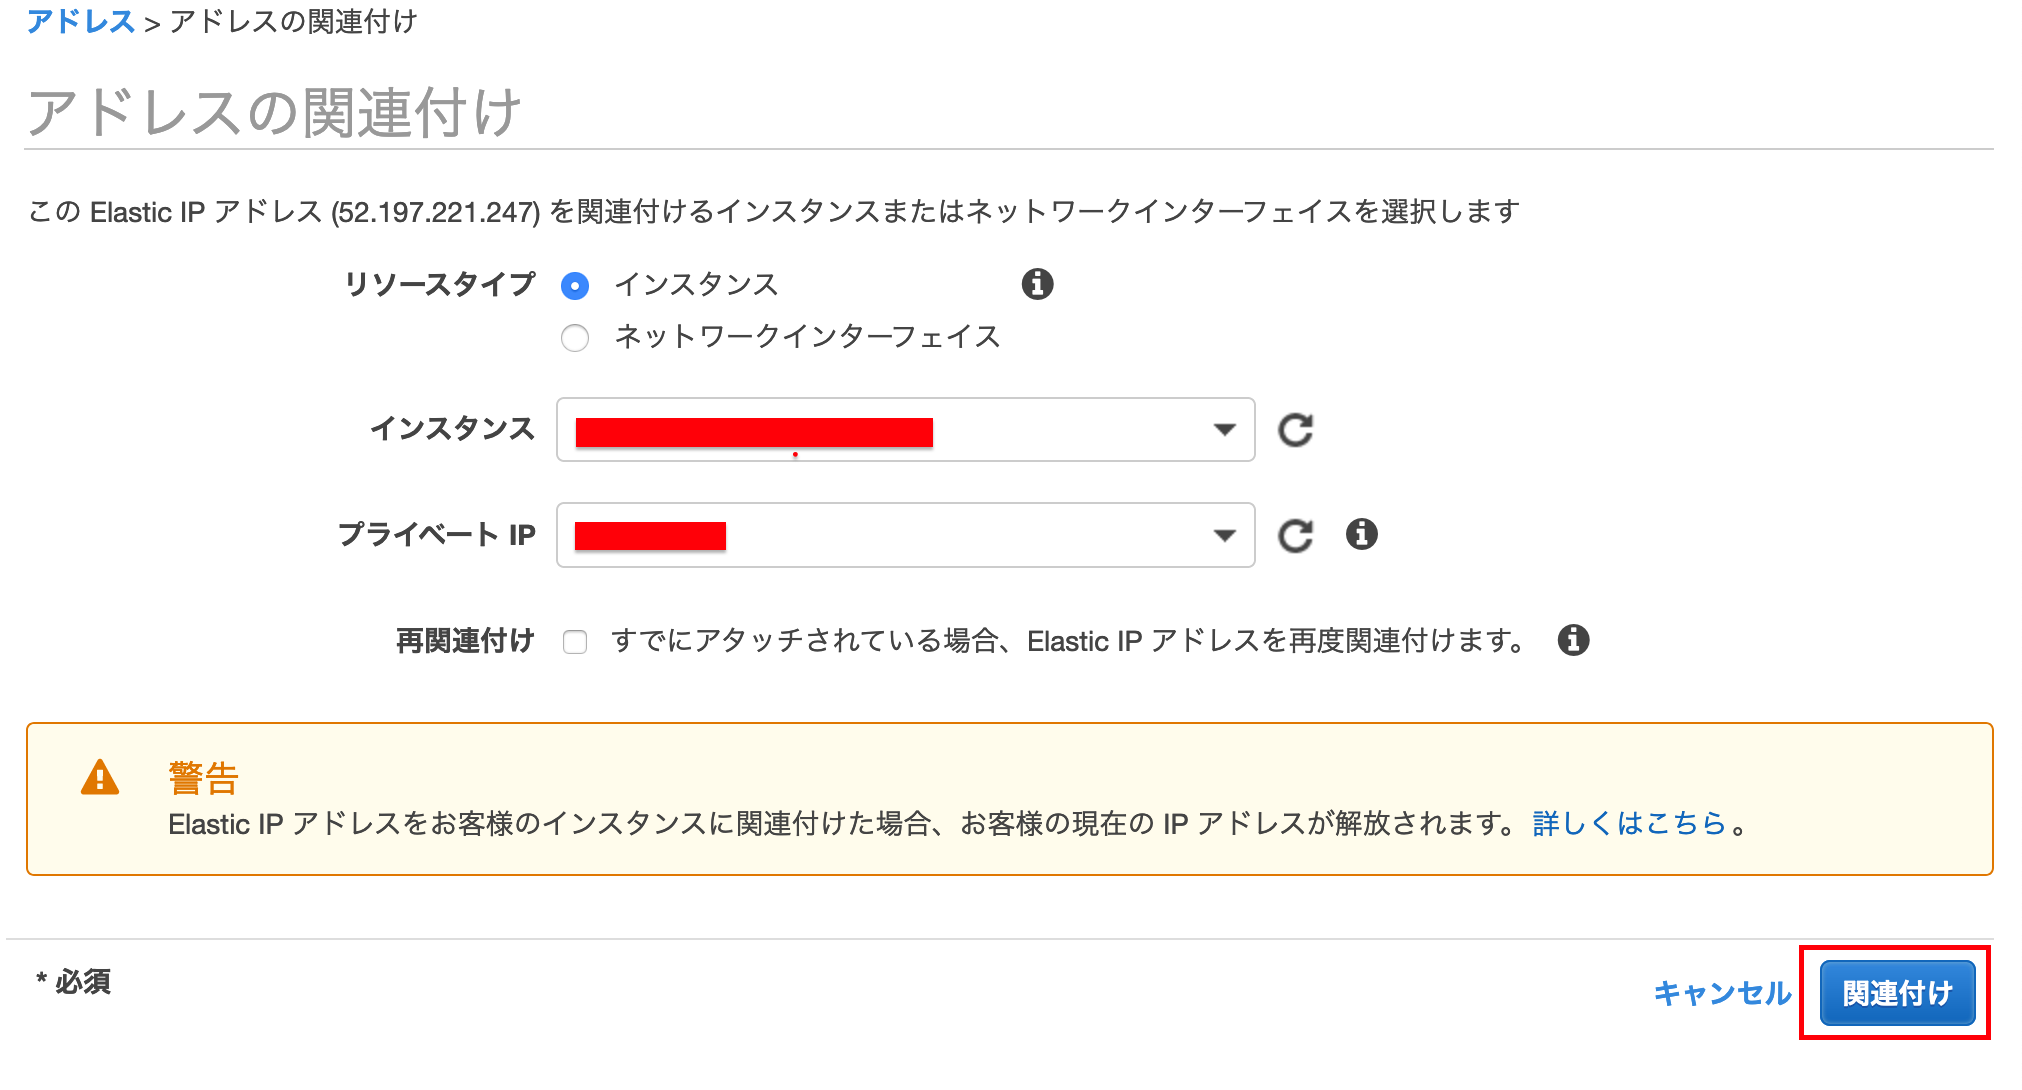
[閉じる]で戻り
[アクション]>アドレスの関連付けを押下します
インスタンスを先ほど作成したものを選択し、[関連付け]を押下する
※停止していたインスタンスにElastic IPを関連付けたままにしていると小額の料金が発生してしまうので、
インスタンスを停止している場合は解放することをお勧めしますElastic IPをアタッチ(関連付け)しているインスタンスが起動している状態であれば、料金は発生しません。しかし、インスタンスが「停止」している状態や、Elastic IPを使っていない場合、料金が発生します。そのため、使わないElastic IPは削除しなければいけません。
Elastic IPがまだインスタンスにアタッチしている場合は、Elastic IPから該当のIPを選択し、「アクション」→「アドレスの関連付けの解除」をクリックします。確認画面が表示されますので、間違いなければ、「アドレスの関連付けの解除」をクリックし、EIPをデタッチします。
その後、再度該当のIPを選択し、「アクション」→「アドレスの解放」をクリックし、EIPを削除します。これで、料金が発生しなくなります。
3.インスタンスにSSHでログイン
各種インストール
python
$ brew install pythonpip(pythonのパッケージ管理システム)
$ easy_install pipawscli(awsをPCのコンソール上から扱うためのもの)
$ pip install awscliできない場合はこちら
https://docs.aws.amazon.com/ja_jp/cli/latest/userguide/install-macos.htmlec2-userでインスタンスにログインする
AWSでは、
EC2インスタンスにログインできるユーザーとして、
デフォルトでec2-userという名のユーザーが用意されています
こちらではまずec2-userでログインしますターミナルで以下を入れていきます
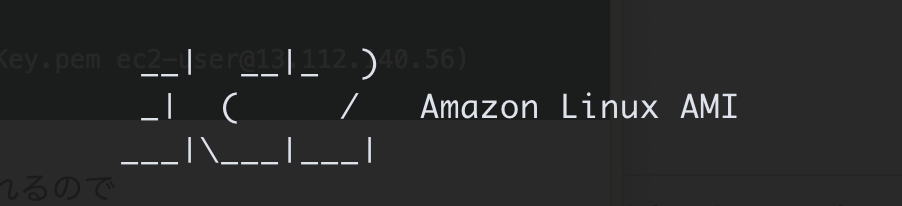
(※testKey.pemは、先ほどSTEP2でダウンロードしたキーです)$ mv Downloads/testKey.pem .ssh/ (#作成した公開鍵をsshフォルダに移動) $ cd .ssh/ (#ディレクトリをsshに移動) $ chmod 600 testKey.pem (#公開鍵に600番で定義されたアクセス権を付与する) $ ssh -i testKey.pem ec2-user@(@以降のURLは、作成したEC2インスタンスと紐付けたElastic IPを使用してください。) (#公開鍵を利用してec2-userとしてログイン) 例: ($ ssh -i testKey.pem ec2-user@13.112.140.56)yes/noを聞かれるので
yesでEnterを押下
無事にログインできました!!!
※
ssh port 22 Operation timed out
エラーになる場合はこちら
https://qiita.com/yokoto/items/338bd80262d9eefb152ehttps://qiita.com/minicoopers0716/items/cac50f29ef79a03f1d8d
ユーザー作成(EC2上での操作)
上記方法でインスタンスにログインしている状態で
[ec2-user|~]$ sudo adduser testuser
(#新規ユーザー名の登録)
[ec2-user|~]$ sudo passwd testuser
(#新規ユーザー名のパスワード登録)


パスワードを登録します
vimでユーザーに権限を追加する記述する$ sudo visudovimモードになります
## Allows people in group wheel to run all commands
# %wheel        ALL=(ALL)       ALL

## Same thing without a password
# %wheel  ALL=(ALL)       NOPASSWD: ALL

## Allows members of the users group to mount and unmount the
## cdrom as root
# %users  ALL=/sbin/mount /mnt/cdrom, /sbin/umount /mnt/cdrom

## Allows members of the users group to shutdown this system
# %users  localhost=/sbin/shutdown -h now
検索モードにし下の
"wheel"を探します
(キーボードで"/wheel"を入力し押下、"N"を押下すると次にいけます)## Same thing without a password # %wheel ALL=(ALL) NOPASSWD: ALLキーボードの「i」を押下し、編集モードで
# %wheel ALL=(ALL) NOPASSWD: ALL
のコメントアウトを外します## Same thing without a password %wheel ALL=(ALL) NOPASSWD: ALLさらに
その下に、作成したユーザーに権限を追加する記述
testuser   ALL=(ALL)       ALL  を追加する
## Allow root to run any commands anywhere root ALL=(ALL) ALL testuser ALL=(ALL) ALLキーボードの「esc」を押下します
「:wq」を入力しEnterで保存しますこちらでユーザーの切り替えを行ってください。
[ec2-user|~]$ sudo su - testuser
(#ユーザー名の切り替え)
[testuser@ ~]
無事に[ec2-user|がtestuser(作成したユーザー名)と切り替わればOKです。
exitを二回いれて
で一度ログアウトする追加ユーザ用キーペアを作成
こちらはローカルでの作業です
$ cd .ssh
[.ssh]$ ssh-keygen -t rsa
(#公開鍵を作成)
-----------------------------
Enter file in which to save the key ():
(#ここでファイルの名前を記述して、エンターを押す)
test_key_rsa

Enter passphrase (empty for no passphrase):
(#何もせずそのままエンター)
Enter same passphrase again:
(#何もせずそのままエンター)
-----------------------------

[.ssh]$ ls
#「test_key_rsa」と「test_key_rsa.pub」が生成されたことを確認
[.ssh]$ vi config
(#VIMを起動し、設定ファイルを編集する)
-----------------------------

キーボードの「i」を押下し、編集モードで

# 以下を追記
Host test_key_rsa
  Hostname 前出のElastic IP (#自分の設定に合わせて)
  Port 22
  User testuser (#先ほどのユーザー名)
  IdentityFile ~/.ssh/test_key_rsa (#秘密鍵の設定)
* ()部分は削除する。
-----------------------------
キーボードの「esc」を押下します
「:wq」で保存します

[.ssh]$ cat test_key_rsa.pub (#鍵の中身をターミナル上に出力)

★ ssh-rsa~~~~localまでをコピーしておく
サーバー側作業
続いてサーバーでの作業です
ec2-userでログインします$ cd .ssh $ ssh -i testKey.pem ec2-user@(@以降のURLは、作成したEC2インスタンスと紐付けたElastic IPを使用してください。) [ec2-user|~]$ sudo su - testuser [testuser@ ~]$ mkdir .ssh [testuser@ ~]$ chmod 700 .ssh [testuser@ ~]$ cd .ssh [testuser@ |.ssh~]$ vi authorized_keys (vimがオープンするので、「i」を押し、 先ほど ★ で、コピーしたssh-rsaをペーストする) キーボードの「esc」を押下します 「:wq」で保存します [testuser@ |.ssh~]$ chmod 600 authorized_keys $ exit もう一度 $ exit ログアウト[~]$ ssh test_key_rsaログインできれば、無事ユーザー設定は終了です。
なお、時間が経つとローカルからログインできなくなることがあるので、その場合は、
セキュリティグループ>インバウンド>編集で
SSHのソースで
マイIPを選択し[保存]すると繋がるようになります


- 投稿日:2020-01-07T19:34:32+09:00
#Ruby + #AWS S3 / publish presigned url ( temporary access URL ) / example codes
Code
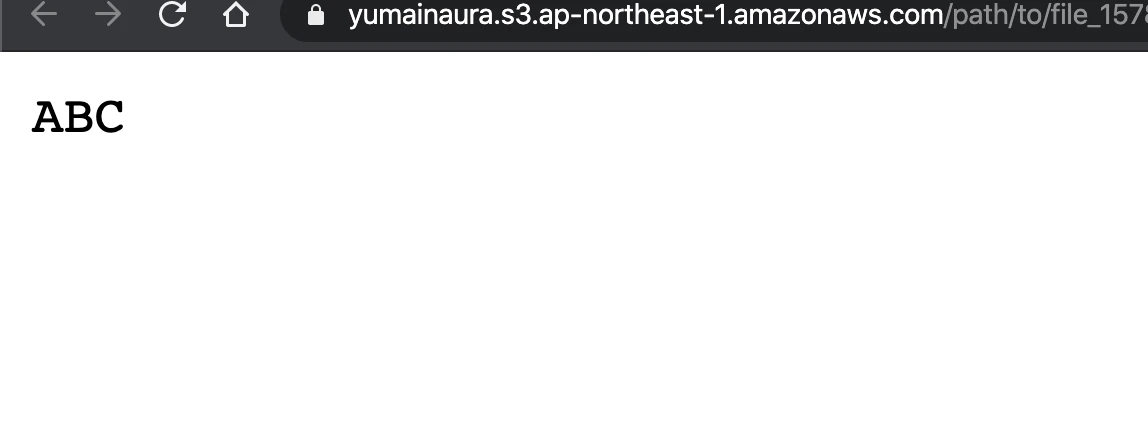
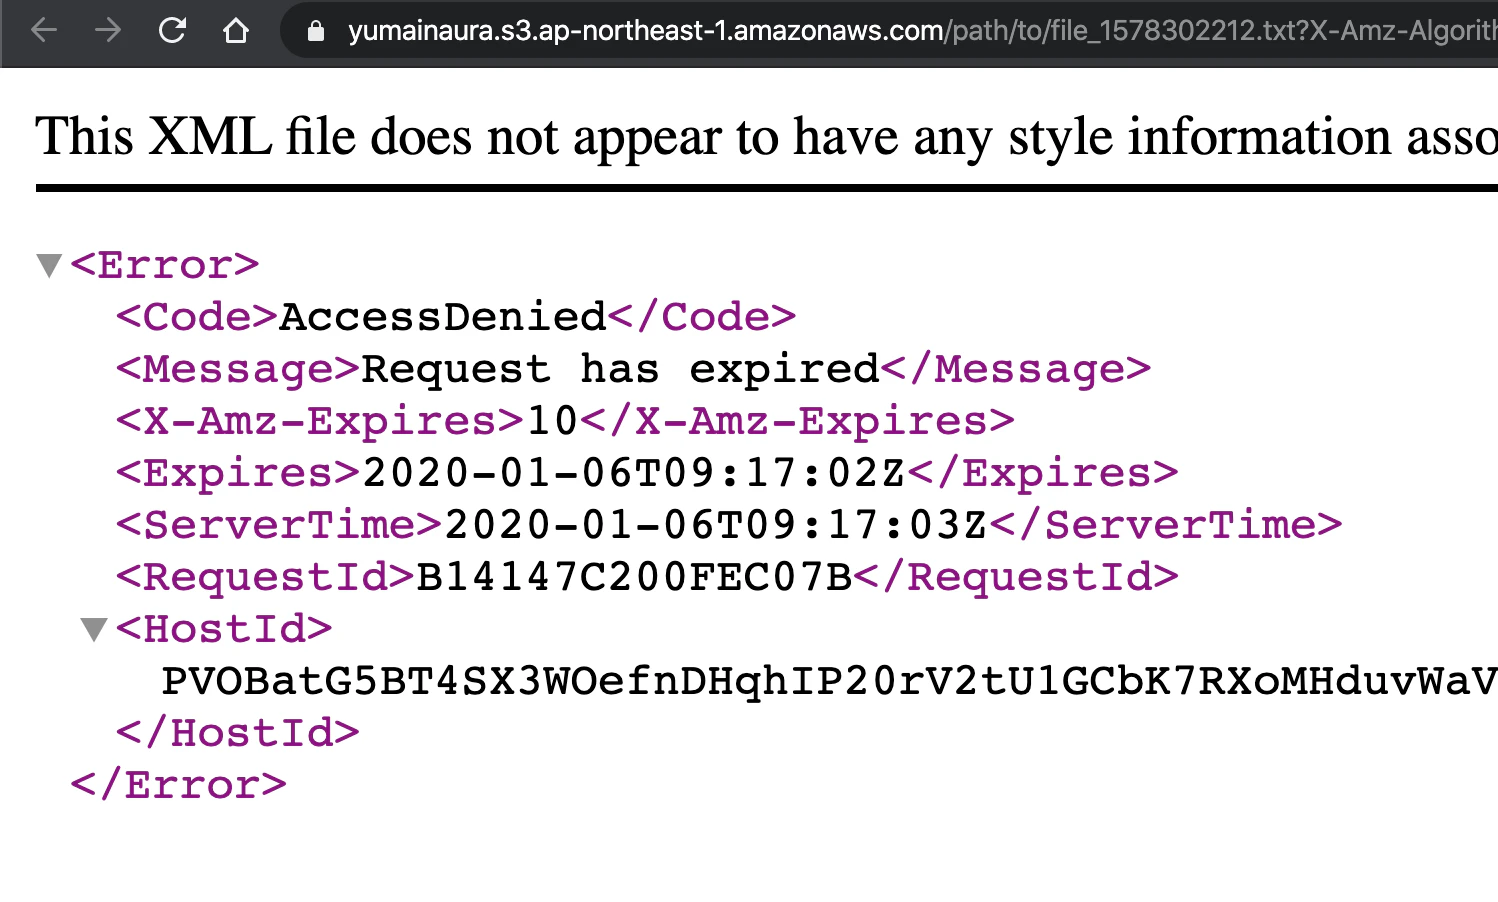
# https://www.rubydoc.info/github/aws/aws-sdk-ruby/Aws%2FS3%2FObject:presigned_url

require 'aws-sdk-s3'

credentials = Aws::Credentials.new(ENV['AWS_ACCESS_KEY_ID'], ENV['AWS_SECRET_ACCESS_KEY'])
s3_resource = Aws::S3::Resource::new(region: ENV['AWS_REGION'], credentials: credentials) # e.g ap-northeast-1

# If no bucket then create
# s3_bucket.create

s3_bucket = s3_resource.bucket(ENV['AWS_BUCKET'])
# <Aws::S3::Bucket:0x00007fd7145b34f0 @arn=nil, @client=#<Aws::S3::Client>, @data=nil, @name="yumainaura", @waiter_block_warned=false>

object = s3_bucket.object("path/to/file_#{Time.now.to_i}.txt")
# #<Aws::S3::Object:0x00007fd7139fb8b0
#  @bucket_name="yumainaura",
#  @client=#<Aws::S3::Client>,
#  @data=nil,
#  @key="path/to/file_1578302095.txt",
#  @waiter_block_warned=false>

object.put(body: 'ABC')

presigned_url = object.presigned_url(:get, expires_in: 10)
# => "https://yumainaura.s3.ap-northeast-1.amazonaws.com/path/to/file_1578302095.txt?X-Amz-Algorithm=AWS4-HMAC-SHA256&X-Amz-Credential=AKIA4INFFTNLCQ6PIZOP%2F20200106%2Fap-northeast-1%2Fs3%2Faws4_request&X-Amz-Date=20200106T091516Z&X-Amz-Expires=10&X-Amz-SignedHeaders=host&X-Amz-Signature=f413cb0d564b69422f58b988cd2cbe39f4ca6b52e7a5e2975d1e22094706d3a0"

p presigned_url
Browser
access to text file
10 seconds later
Original by Github issue


- 投稿日:2020-01-07T19:34:31+09:00
#Ruby + #AWS S3 / パブリックに一時アクセス可能な「resigned URL」を発行するコード例
Ref
【AWS S3】S3 Presigned URLの仕組みを調べてみた - Qiita
https://qiita.com/tmiki/items/87697d3d3d5330c6fc08Code
# https://www.rubydoc.info/github/aws/aws-sdk-ruby/Aws%2FS3%2FObject:presigned_url

require 'aws-sdk-s3'

credentials = Aws::Credentials.new(ENV['AWS_ACCESS_KEY_ID'], ENV['AWS_SECRET_ACCESS_KEY'])
s3_resource = Aws::S3::Resource::new(region: ENV['AWS_REGION'], credentials: credentials) # e.g ap-northeast-1

# If no bucket then create
# s3_bucket.create

s3_bucket = s3_resource.bucket(ENV['AWS_BUCKET'])
# <Aws::S3::Bucket:0x00007fd7145b34f0 @arn=nil, @client=#<Aws::S3::Client>, @data=nil, @name="yumainaura", @waiter_block_warned=false>

object = s3_bucket.object("path/to/file_#{Time.now.to_i}.txt")
# #<Aws::S3::Object:0x00007fd7139fb8b0
#  @bucket_name="yumainaura",
#  @client=#<Aws::S3::Client>,
#  @data=nil,
#  @key="path/to/file_1578302095.txt",
#  @waiter_block_warned=false>

object.put(body: 'ABC')

presigned_url = object.presigned_url(:get, expires_in: 10)
# => "https://yumainaura.s3.ap-northeast-1.amazonaws.com/path/to/file_1578302095.txt?X-Amz-Algorithm=AWS4-HMAC-SHA256&X-Amz-Credential=AKIA4INFFTNLCQ6PIZOP%2F20200106%2Fap-northeast-1%2Fs3%2Faws4_request&X-Amz-Date=20200106T091516Z&X-Amz-Expires=10&X-Amz-SignedHeaders=host&X-Amz-Signature=f413cb0d564b69422f58b988cd2cbe39f4ca6b52e7a5e2975d1e22094706d3a0"

p presigned_url
Browser
access to text file
10 seconds later
Original by Github issue
- 投稿日:2020-01-07T19:34:09+09:00
railsでdeviseを使う手順
ユーザー登録の際に使える、deviseという便利なツール。
よく使うことが多いので、簡単な手順をまとめました。gemを入れる
まずはgemを入れます
gem 'devise'$ bundle installdeviseをインストールする
次にアプリケーション内にdeviseを読み込みます
$ rails g devise:installdeviseを使って、モデルを作成
今回はユーザーモデルを作ってみます
$ rails g model devise user必要な追加カラム等があれば、マイグレーションファイルを編集します
t.string :email,              null: false, default: ""
t.string :encrypted_password, null: false, default: ""
#以下のように追加
t.string :name,              null: false, default: ""
その後、application_controllerを編集し、カラム追加を許可してもらいます
before_action :configure_permitted_parameters, if: :devise_controller?

def configure_permitted_parameters
  devise_parameter_sanitizer.permit(:sign_up, keys: [:name])
end
#[:name]のところが、追加したいカラム名。複数指定の場合はカンマ区切りで記入
必要なビューをダウンロード
新規登録ページやログインページなどのビューをダウンロードします
$ rails g devise:views特殊な処理が必要な場合はdevise用のコントローラーを生成する
$ rails g devise controller users
- 投稿日:2020-01-07T19:27:38+09:00
rails db:migrateでエラー(StandardError: An error has occurred, this and all later migrations canceled:)
$rails db:migrate、または、$rake db:migrateを行った後の謎のエラー。
== 20200107095832 CreateMicroposts: migrating =================================
-- create_table(:microposts)
rails aborted!
StandardError: An error has occurred, this and all later migrations canceled:

SQLite3::SQLException: table "microposts" already exists: CREATE TABLE "microposts" ("id" INTEGER PRIMARY KEY AUTOINCREMENT NOT NULL, "content" text, "user_id" integer, "created_at" datetime NOT NULL, "updated_at" datetime NOT NULL)
・
・以下つづく
・
原因
『この前に行ったコマンドのmigrationで何らかの手違いがあると思います。おそらく、migration処理の途中からエラーが起きていて、テーブルは生成されているが、テーブルを生成したmigrationは未実行まま。といった状態なのかな?と思います。』
解決策
$ rake db:migrate:reset↑これで、データベースのリセットを行った後。
$ rake db:migrate↑もう一度!
直った!
これでオッケーかと❗️
このコマンドで、マイグレーションを順に実行し、データベースに変更を加えていくんですね。
- 投稿日:2020-01-07T19:23:21+09:00
CapistranoをMacOS X MojaveのRoRにインストールする
Capistrano
前提条件
Terminal$ bundle exec cap install STAGES=staging,production bundler: command not found: cap Install missing gem executables with `bundle install`あら。まあそりゃそうです笑
command not found: capとなった場合
この場合、capistranoのGEMがインストールされていない為、GEMインストールを行う
Gemfileを開き、編集
Terminal# Gemfileの編集 $ vi Gemfile group :staging, :production do # Use Capistrano for deployment gem 'capistrano', '3.11.2' gem 'capistrano-rails', '1.4.0' gem 'capistrano-rbenv', '2.1.4 ' gem 'capistrano-passenger', '0.2.0' # 今回はSlack通知も行うため、便宜上載せています gem 'slackistrano', '>=4.0.1' end
- bundle install
Terminal$ bundle _1.17.2_ install --path vendor/bundle The dependency tzinfo-data (>= 0) will be unused by any of the platforms Bundler is installing for. Bundler is installing for ruby but the dependency is only for x86-mingw32, x86-mswin32, x64-mingw32, java. To add those platforms to the bundle, run `bundle lock --add-platform x86-mingw32 x86-mswin32 x64-mingw32 java`. ・・・ Fetching capistrano 3.11.2 Installing capistrano 3.11.2 Fetching capistrano-bundler 1.6.0 Installing capistrano-bundler 1.6.0 Fetching capistrano-passenger 0.2.0 Installing capistrano-passenger 0.2.0 Fetching capistrano-rails 1.4.0 Installing capistrano-rails 1.4.0 Fetching capistrano-rbenv 2.1.4 Installing capistrano-rbenv 2.1.4 ・・・ Fetching slackistrano 4.0.1 Installing slackistrano 4.0.1 ・・・ Bundle complete! 38 Gemfile dependencies, 148 gems now installed. Bundled gems are installed into `./vendor/bundle` Post-install message from capistrano-passenger: ==== Release notes for capistrano-passenger ==== passenger once had only one way to restart: `touch tmp/restart.txt` Beginning with passenger v4.0.33, a new way was introduced: `passenger-config restart-app` The new way to restart was not initially practical for everyone, since for versions of passenger prior to v5.0.10, it required your deployment user to have sudo access for some server configurations. capistrano-passenger gives you the flexibility to choose your restart approach, or to rely on reasonable defaults. If you want to restart using `touch tmp/restart.txt`, add this to your config/deploy.rb: set :passenger_restart_with_touch, true If you want to restart using `passenger-config restart-app`, add this to your config/deploy.rb: set :passenger_restart_with_touch, false # Note that `nil` is NOT the same as `false` here If you don't set `:passenger_restart_with_touch`, capistrano-passenger will check what version of passenger you are running and use `passenger-config restart-app` if it is available in that version. If you are running passenger in standalone mode, it is possible for you to put passenger in your Gemfile and rely on capistrano-bundler to install it with the rest of your bundle. If you are installing passenger during your deployment AND you want to restart using `passenger-config restart-app`, you need to set `:passenger_in_gemfile` to `true` in your `config/deploy.rb`. ================================================
- CapistranoとCapifyアプリケーションをインストールする
Terminal$ bundle exec cap install STAGES=staging,production mkdir -p config/deploy create config/deploy.rb create config/deploy/staging.rb create config/deploy/production.rb mkdir -p lib/capistrano/tasks create Capfile Capified階層構造は以下となる
Tree-map[rails app root] ├─ Capfile ├─ config │ ├─ deploy │ │ ├─production.rb │ │ └─staging.rb │ └─deploy.rb └─ lib └─capistrano └─tasks └─taskscapistranoをインストールしたので、capistrano/setup と capistrano/deploy の準備は一旦はこれでできました
capistrano/deploy タスク
- デプロイを自動化する、capistranoのタスクです
Deployタスクの一覧
実行順 タスク名 意味 1 deploy Deploy実行 2 deploy:starting Deploy実行開始、サーバー待機中 2.1 deploy:check - 2.1.1 #{scm}:check - 2.1.2 deploy:check:directories - 2.1.3 deploy:check:linked_dirs - 2.1.4 deploy:check:make_linked_dirs - 2.1.5 deploy:check:linked_files - 2.2 deploy:set_previous_revision - 3 deploy:started Deploy開始中 4 deploy:updating Deploy実行中 4.1 #{scm}:create_release - 4.2 deploy:symlink:shared - 4.2.1 deploy:symlink:linked_files - 4.2.2 deploy:symlink:linked_dirs - 5 deploy:updated 更新完了 6 deploy:publishing デプロイ処理中 6.1 deploy:symlink:release - 7 deploy:published デプロイ処理終了 8 deploy:finishing デプロイ終了中、サーバークリーンアップ中 8.1 deploy:cleanup - 9 deploy:finished 処理終了 9.1 deploy:log_revision -
実行順 タスク名 意味 1 deploy:rollback 前回リリースバージョンにロールバック 2 deploy:starting Deploy実行開始、サーバー待機中 3 deploy:started Deploy開始中 4 deploy:reverting 前回リリースバージョンにrevert完了 5 deploy:reverted 前回リリースバージョンにrevert 6 deploy:publishing デプロイ処理中 7 deploy:published デプロイ処理終了 8 deploy:finishing_rollback ロールバック完了 9 deploy:finished 処理終了
実行順 タスク名 意味 1 install Capistranoインストール
(凡例:cap install STAGES=staging,production)
- 参考になった技術まとめ
プラグインによるフローの追加
capistrano/rails/assets
- Assetsのプリコンパイルを行う
インストール
Capfilerequire capistrano/rails/assets
実行順 タスク名 意味 5 deploy:updated 更新完了 5.1 deploy:compile_assets 追加される 5.1.1 deploy:assets:precompile 追加される 5.1.2 deploy:assets:backup_manifest 追加される 5.2 deploy:normalize_assets 追加される capistrano/rails/migrations
- DBMigrationを行う
インストール
Capfilerequire "capistrano/rails/migrations"
実行順 タスク名 意味 5 deploy:updated 更新完了 5.1 deploy:migrate 追加される capistrano/npm
- npm installを行う
インストール
Capfilerequire "capistrano/rails/migrations"
実行順 タスク名 意味 4 deploy:updating Deploy実行中 4.1 #{scm}:create_release - 4.2 deploy:symlink:shared - 4.2.1 deploy:symlink:linked_files - 4.2.2 deploy:symlink:linked_dirs - 5 npm:install 追加される 前提条件
- ssh-agentを使用
セットアップ手順
Capfileを編集するCapfile# Load DSL and set up stages require "capistrano/setup" # Include default deployment tasks require "capistrano/deploy" # Load the SCM plugin appropriate to your project: # # require "capistrano/scm/hg" # install_plugin Capistrano::SCM::Hg # or # require "capistrano/scm/svn" # install_plugin Capistrano::SCM::Svn # or require "capistrano/scm/git" install_plugin Capistrano::SCM::Git # Include tasks from other gems included in your Gemfile # # For documentation on these, see for example: # # https://github.com/capistrano/rvm # https://github.com/capistrano/rbenv # https://github.com/capistrano/chruby # https://github.com/capistrano/bundler # https://github.com/capistrano/rails # https://github.com/capistrano/passenger # # require "capistrano/rvm" # require "capistrano/rbenv" # require "capistrano/chruby" # require "capistrano/bundler" # require "capistrano/rails/assets" # require "capistrano/rails/migrations" # require "capistrano/passenger" # if you used rbenv require "capistrano/rbenv" require 'capistrano/rails' require 'capistrano/bundler' # Load custom tasks from `lib/capistrano/tasks` if you have any defined Dir.glob("lib/capistrano/tasks/*.rake").each { |r| import r }
deploy.rbを編集するconfig/deploy.rb# config valid for current version and patch releases of Capistrano lock "~> 3.11.2" set :application, "%app name%" set :repo_url, "git@github.com:****/*****.git" # Default branch is :master # ask :branch, `git rev-parse --abbrev-ref HEAD`.chomp # Default deploy_to directory is /var/www/my_app_name # set :deploy_to, "/var/www/my_app_name" set :deploy_to, "/var/www/#{fetch(:application)}" # Default value for :format is :airbrussh. # set :format, :airbrussh # You can configure the Airbrussh format using :format_options. # These are the defaults. # set :format_options, command_output: true, log_file: "log/capistrano.log", color: :auto, truncate: :auto # Default value for :pty is false # set :pty, true set :pty, true # sudoを使用する場合はtrue # Default value for :linked_files is [] # append :linked_files, "config/database.yml" # Default value for linked_dirs is [] # append :linked_dirs, "log", "tmp/pids", "tmp/cache", "tmp/sockets", "public/system" # Default value for default_env is {} # capistrano用bundleするのに必要 # set :default_env, { path: "/opt/ruby/bin:$PATH" } set :default_env, { path: "/usr/local/rbenv/shims:/usr/local/rbenv/bin:$PATH" } # Default value for local_user is ENV['USER'] # set :local_user, -> { `git config user.name`.chomp } # Default value for keep_releases is 5 # set :keep_releases, 5 set :keep_releases, 5 # Uncomment the following to require manually verifying the host key before first deploy. # set :ssh_options, verify_host_key: :secure # Configure ur Slack's Incoming Webhook # if you want to be disable deployment notifications to a specific stage by setting the :slackistrano configuration variable to false instead of actual settings. # When you desable slackistrano, comment out the description below. set :slackistrano, false # set :slackistrano, { # klass: Slackistrano::CustomMessaging, # channel: '#bot-#{fetch(:application)}_deploy', # webhook: 'https://hooks.slack.com/services/*/*/*' #} # Configure ssh agent set :ssh_options, { keys: %w(~/.ssh/id_rsa), forward_agent: true, auth_methods: %w(publickey) } # Configure # デプロイ開始通知タイミングの変更 # デフォルトだと、gitのチェック等のstarting処理後に通知が行くが、それよりタイミングを早めたいため # 'deploy:starting'の前にすることで、rollbackなのか通常デプロイなのかタスク自体で判別できなくなるため、`deploying`にセットされた値のboolean値でどちらなのか判断している。 # 参考:https://github.com/capistrano/capistrano/blob/v3.11.2/lib/capistrano/tasks/framework.rake#L57 before 'deploy:starting', 'slack:deploy:updating' # デプロイ失敗時にエラーを変数に保存しておくための処理 # https://github.com/capistrano/capistrano/blob/v3.11.2/lib/capistrano/dsl/task_enhancements.rb#L51 # ここの処理に一行追加しているだけ module Capistrano module TaskEnhancements def exit_deploy_because_of_exception(ex) warn t(:deploy_failed, ex: ex.message) set :deploy_failed_exception, ex # 追加した1行 invoke "deploy:failed" exit(false) end end end
- 各環境のデプロイ用ファイルの編集
config/deploy/stating.rb# server-based syntax # ====================== # Defines a single server with a list of roles and multiple properties. # You can define all roles on a single server, or split them: # server "example.com", user: "deploy", roles: %w{app db web}, my_property: :my_value # server "example.com", user: "deploy", roles: %w{app web}, other_property: :other_value # server "db.example.com", user: "deploy", roles: %w{db} # role-based syntax # ================== # Defines a role with one or multiple servers. The primary server in each # group is considered to be the first unless any hosts have the primary # property set. Specify the username and a domain or IP for the server. # Don't use `:all`, it's a meta role. # role :app, %w{deploy@example.com}, my_property: :my_value # role :web, %w{user1@primary.com user2@additional.com}, other_property: :other_value # role :db, %w{deploy@example.com} # Configuration # ============= # You can set any configuration variable like in config/deploy.rb # These variables are then only loaded and set in this stage. # For available Capistrano configuration variables see the documentation page. # http://capistranorb.com/documentation/getting-started/configuration/ # Feel free to add new variables to customise your setup. # Custom SSH Options # ================== # You may pass any option but keep in mind that net/ssh understands a # limited set of options, consult the Net::SSH documentation. # http://net-ssh.github.io/net-ssh/classes/Net/SSH.html#method-c-start # # Global options # -------------- # set :ssh_options, { # keys: %w(/home/rlisowski/.ssh/id_rsa), # forward_agent: false, # auth_methods: %w(password) # } # # The server-based syntax can be used to override options: # ------------------------------------ # server "example.com", # user: "user_name", # roles: %w{web app}, # ssh_options: { # user: "user_name", # overrides user setting above # keys: %w(/home/user_name/.ssh/id_rsa), # forward_agent: false, # auth_methods: %w(publickey password) # # password: "please use keys" # } set :stage, :staging set :branch, ENV['GIT_BRANCH'] || `git rev-parse --abbrev-ref HEAD`.strip set :rails_env, "staging" # for ***** server "%hostname%", user: `whoami`.strip, roles: %w{web app}config/deploy/production.rb# server-based syntax # ====================== # Defines a single server with a list of roles and multiple properties. # You can define all roles on a single server, or split them: # server "example.com", user: "deploy", roles: %w{app db web}, my_property: :my_value # server "example.com", user: "deploy", roles: %w{app web}, other_property: :other_value # server "db.example.com", user: "deploy", roles: %w{db} # role-based syntax # ================== # Defines a role with one or multiple servers. The primary server in each # group is considered to be the first unless any hosts have the primary # property set. Specify the username and a domain or IP for the server. # Don't use `:all`, it's a meta role. # role :app, %w{deploy@example.com}, my_property: :my_value # role :web, %w{user1@primary.com user2@additional.com}, other_property: :other_value # role :db, %w{deploy@example.com} # Configuration # ============= # You can set any configuration variable like in config/deploy.rb # These variables are then only loaded and set in this stage. # For available Capistrano configuration variables see the documentation page. # http://capistranorb.com/documentation/getting-started/configuration/ # Feel free to add new variables to customise your setup. # Custom SSH Options # ================== # You may pass any option but keep in mind that net/ssh understands a # limited set of options, consult the Net::SSH documentation. # http://net-ssh.github.io/net-ssh/classes/Net/SSH.html#method-c-start # # Global options # -------------- # set :ssh_options, { # keys: %w(/home/rlisowski/.ssh/id_rsa), # forward_agent: false, # auth_methods: %w(password) # } # # The server-based syntax can be used to override options: # ------------------------------------ # server "example.com", # user: "user_name", # roles: %w{web app}, # ssh_options: { # user: "user_name", # overrides user setting above # keys: %w(/home/user_name/.ssh/id_rsa), # forward_agent: false, # auth_methods: %w(publickey password) # # password: "please use keys" # } set :stage, :production set :branch, "master" set :rails_env, "production"
- Slackistranoの設定
lib/slackistrano/custom_messaging.rbif defined?(Slackistrano::Messaging) module Slackistrano class CustomMessaging < Messaging::Base # Suppress starting message. def payload_for_updating attachments = [] # 通常デプロイなのかロールバックなのか場合分け title = fetch(:deploying, false) ? 'Deploy start' : 'Rollback start' color = fetch(:deploying, false) ? 'good' : '#439FE0' # メイン attachments << base_attachments(title: title, color: color, fallback: super[:text]) # gitの差分が取れた場合は差分を、取れなかった場合はgitの直近のlogを表示する diff_commits_str = `cap #{fetch(:rails_env)} deploy:pending` unless diff_commits_str.delete("\n").length.zero? diff_commits = convert_diff_commits(diff_commits_str.split("\n\ncommit ")) attachments << { color: color, title: "git 差分", fields: diff_commits.map{|commit| { value: commit } } } else # git log attachments << { color: color, title: "git log", fields: git_last_commits_fields } end return {attachments: attachments} end # デプロイ完了 def payload_for_updated attachments = [] attachments << base_attachments(title: 'Deploy accomplished', color: '#439FE0', fallback: super[:text]) return {attachments: attachments} end # ロールバック開始 def payload_for_reverting # ロールバックの開始はデプロイ開始側のタスクで場合分けしている end # ロールバック完了 def payload_for_reverted attachments = [] attachments << base_attachments(title: 'Rollback accomplished', color: '#439FE0', fallback: super[:text]) return {attachments: attachments} end # デプロイ失敗 def payload_for_failed attachments = [] attachments << base_attachments(title: 'Deploy failed', color: 'danger', fallback: super[:text]) # エラー内容を取得 exception = fetch(:deploy_failed_exception) error_message = exception.inspect + "\n" + exception.backtrace.join("\n") # エラー内容 attachments << { color: 'danger', title: "エラー内容", fields: [{ value: error_message }] } return {attachments: attachments} end private def git_last_commits_fields git_last_commit_messages = `git log -5 --date=iso --pretty=format:'%H_|_%an_|_%s_|_%cd' HEAD`.force_encoding('UTF-8').split("\n").map do |message| data = message.split('_|_') commit_name, pr_number = data[2].scan(/^[\s]*(.*)\s\(\#([^\)]+)\)$/)[0] commit_name = data[2] if commit_name.nil? { hash: data[0], user_name: data[1], commit_name: commit_name, pr_number: pr_number, commit_date: data[3] } end git_last_commit_messages.map do |message| if message[:pr_number].nil? { value: "*#{message[:commit_name]}*>\nAuthor: #{message[:user_name]}\nDate: #{message[:commit_date]}" } else # git@github.com:%organization%/%repo name%.git to github.com/%organization%/%repo name% { value: "*#{message[:commit_name]}* (<https://#{fetch(:repo_url).split("git@").second.split("/").first.sub(/:/, "/")}/#{fetch(:application)}/pull/|##{message[:pr_number]}>)\nAuthor: #{message[:user_name]}\nDate: #{message[:commit_date]}" } end end end def base_attachments(title:, color:, fallback: nil) { color: color, title: "#{application} #{title}", fields: [ { title: 'Environment', value: stage, short: true }, { title: 'Branch', value: branch, short: true }, { title: 'Deployer', value: deployer, short: true }, { title: 'Time', value: elapsed_time, short: true } ], fallback: fallback } end def convert_diff_commits(diff_commits) diff_commits.map do |diff_commit| lines = diff_commit.split("\n") # commit_hash = lines[0] author = lines[1].match(/^Author:\s([^\s]+)/)[1] rescue nil date = Time.parse(lines[2].match(/^Date:\s*(.+)/)[1]) rescue nil commit_name, pr_number = lines[4].scan(/^[\s]*(.*)\s\(\#([^\)]+)\)$/)[0] rescue [] commit_name = lines[4] if commit_name.nil? messages = [] if pr_number.blank? messages << "*#{commit_name}*" else # git@github.com:%organization%/%repo name%.git to github.com/%organization%/%repo name% messages << "*#{commit_name}* (<https://#{fetch(:repo_url).split("git@").second.split("/").first.sub(/:/, "/")}/#{fetch(:application)}/pull/#{pr_number}|##{pr_number}>)" end messages << "Author: <@#{author}>" messages << "Date: #{date}" messages.join("\n") end end def deployer `who -m | awk '{print $1}'` end end end end変更の構成は以下の通り
Terminal$ git status On branch master Your branch is up to date with 'origin/master'. Changes not staged for commit: (use "git add <file>..." to update what will be committed) (use "git checkout -- <file>..." to discard changes in working directory) modified: Gemfile modified: Gemfile.lock modified: config/environments/development.rb modified: config/environments/production.rb Untracked files: (use "git add <file>..." to include in what will be committed) Capfile config/deploy.rb config/deploy/ lib/slackistrano/ADD
Terminal$ git add Gemfile* $ git add config/environments $ git add Capfile $ git add config/deploy* $ git add lib/slackistrano $ git status On branch master Your branch is up to date with 'origin/master'. Changes to be committed: (use "git reset HEAD <file>..." to unstage) new file: Capfile modified: Gemfile modified: Gemfile.lock new file: config/deploy.rb new file: config/deploy/production.rb new file: config/deploy/staging.rb modified: config/environments/development.rb modified: config/environments/production.rb new file: lib/slackistrano/custom_messaging.rbコミット&push
Terminal$ git commit -m "capistranoたたき台" [master 26dbe1b] capistranoたたき台 9 files changed, 567 insertions(+), 3 deletions(-) create mode 100644 Capfile create mode 100644 config/deploy.rb create mode 100644 config/deploy/production.rb create mode 100644 config/deploy/staging.rb create mode 100644 lib/slackistrano/custom_messaging.rb $ git push --set-upstream origin master Enumerating objects: 23, done. Counting objects: 100% (23/23), done. Delta compression using up to 8 threads Compressing objects: 100% (15/15), done. Writing objects: 100% (16/16), 9.37 KiB | 3.12 MiB/s, done. Total 16 (delta 6), reused 0 (delta 0) remote: Resolving deltas: 100% (6/6), completed with 5 local objects. To https://github.com/%organization%/%repos name%.git 578d396..26dbe1b master -> master Branch 'master' set up to track remote branch 'master' from 'origin'.
- 参考になった技術まとめ
- Configure ssh agent
Slackistrano
- Capistranoの自動デプロイをChatOpsに組み込みたいので、Incoming Webhookに連携します
セットアップ手順
Capfileを編集するCapfile# Require the slackistrano need the deploy.rb require 'slackistrano/capistrano'NameError: uninitialized constant Slackistrano::CustomMessaging が発生した場合
この場合、
CapfileにrequireでGemがロードされていないのが原因の為、Capfileを編集するCapfileを開き、編集(上記セットアップ手順を忘れていることが考えられる)
デバッグ実行
設定が一通り終わったら、次はデバッグ実行でチェックしてみます
--dry-runオプションで実行せずにデプロイをシミュレーションします
traceオプションでデプロイ実行中の例外スロー(スタックトレース?)をしますTerminal$ bundle exec cap staging deploy --dry-run --trace ** Invoke staging (first_time) ** Execute staging ** Invoke load:defaults (first_time) ** Execute load:defaults [Deprecation Notice] `set :scm, :git` is deprecated. To ensure your project is compatible with future versions of Capistrano, remove the :scm setting and instead add these lines to your Capfile after `require "capistrano/deploy"`: require "capistrano/scm/git" install_plugin Capistrano::SCM::Git ** Invoke rbenv:validate (first_time) ** Execute rbenv:validate ** Invoke rbenv:map_bins (first_time) ** Execute rbenv:map_bins ** Invoke bundler:map_bins (first_time) ** Execute bundler:map_bins ** Invoke deploy:set_rails_env (first_time) ** Execute deploy:set_rails_env ** Invoke deploy:set_linked_dirs (first_time) ** Execute deploy:set_linked_dirs ** Invoke deploy:set_rails_env ** Invoke deploy (first_time) ** Invoke deploy:git_confirm (first_time) ** Execute deploy:git_confirm 00:00 deploy:git_confirm [git:confirm] Skip git confirm [git:confirm] Skip git confirm ** Execute deploy ** Invoke deploy:starting (first_time) ** Invoke slack:deploy:starting (first_time) ** Execute slack:deploy:starting ** Invoke slack:deploy:updating (first_time) ** Execute slack:deploy:updating ** Invoke deploy:upload (first_time) ** Execute deploy:upload 00:00 deploy:upload 01 mkdir -p /var/www/capistrano_sample_app_v1/shared/config 02 config/database.yml /var/www/capistrano_sample_app_v1/shared/config/database.yml ** Execute deploy:starting ** Invoke deploy:check (first_time) ** Invoke git:check (first_time) ** Invoke git:wrapper (first_time) ** Execute git:wrapper 00:00 git:wrapper 01 mkdir -p /tmp 02 #<StringIO:0x00000000025f9838> /tmp/git-ssh-capistrano_sample_app_v1-staging-webmaster-patche.sh 03 chmod 700 /tmp/git-ssh-capistrano_sample_app_v1-staging-webmaster-patche.sh 04 #<StringIO:0x0000000002617720> /tmp/git-ssh-capistrano_sample_app_v1-staging-webmaster-patche.sh ** Execute git:check 00:00 git:check 01 git ls-remote git@github.com:webmaster-patche/capistrano_sample_app_v1.git HEAD ** Execute deploy:check ** Invoke deploy:check:directories (first_time) ** Execute deploy:check:directories 00:00 deploy:check:directories 01 mkdir -p /var/www/capistrano_sample_app_v1/shared /var/www/capistrano_sample_app_v1/releases ** Invoke deploy:check:linked_dirs (first_time) ** Execute deploy:check:linked_dirs 00:00 deploy:check:linked_dirs 01 mkdir -p /var/www/capistrano_sample_app_v1/shared/bin /var/www/capistrano_sample_app_v1/shared/log /var/www/capistrano_sample_app_v1/shared/tmp/backup /var/www/capistrano_sample_app_v1/shared/tmp/pids /var/www/capistrano_sample_app_v1/shared/tmp/cache /var/www/capistrano_sample_app_v1/shared/t… ** Invoke deploy:check:make_linked_dirs (first_time) ** Execute deploy:check:make_linked_dirs 00:00 deploy:check:make_linked_dirs 01 mkdir -p /var/www/capistrano_sample_app_v1/shared/config ** Invoke deploy:check:linked_files (first_time) ** Execute deploy:check:linked_files ** Invoke deploy:set_previous_revision (first_time) ** Execute deploy:set_previous_revision ** Invoke deploy:started (first_time) ** Execute deploy:started ** Invoke deploy:updating (first_time) ** Invoke deploy:new_release_path (first_time) ** Execute deploy:new_release_path ** Invoke git:create_release (first_time) ** Invoke git:update (first_time) ** Invoke git:clone (first_time) ** Invoke git:wrapper ** Execute git:clone 00:00 git:clone The repository mirror is at /var/www/capistrano_sample_app_v1/repo The repository mirror is at /var/www/capistrano_sample_app_v1/repo ** Execute git:update 00:00 git:update 01 git remote set-url origin git@github.com:webmaster-patche/capistrano_sample_app_v1.git 02 git remote update --prune ** Execute git:create_release 00:00 git:create_release 01 mkdir -p /var/www/capistrano_sample_app_v1/releases/20200108015441 02 git archive master | /usr/bin/env tar -x -f - -C /var/www/capistrano_sample_app_v1/releases/20200108015441 ** Invoke slack:deploy:updating ** Execute deploy:updating ** Invoke deploy:set_current_revision (first_time) ** Invoke git:set_current_revision (first_time) ** Execute git:set_current_revision ** Execute deploy:set_current_revision 00:00 deploy:set_current_revision 01 echo "" > REVISION ** Invoke deploy:symlink:shared (first_time) ** Execute deploy:symlink:shared ** Invoke deploy:symlink:linked_files (first_time) ** Execute deploy:symlink:linked_files 00:00 deploy:symlink:linked_files 01 mkdir -p /var/www/capistrano_sample_app_v1/releases/20200108015441/config ** Invoke deploy:symlink:linked_dirs (first_time) ** Execute deploy:symlink:linked_dirs 00:00 deploy:symlink:linked_dirs 01 mkdir -p /var/www/capistrano_sample_app_v1/releases/20200108015441 /var/www/capistrano_sample_app_v1/releases/20200108015441/tmp /var/www/capistrano_sample_app_v1/releases/20200108015441/vendor /var/www/capistrano_sample_app_v1/releases/20200108015441/public ** Invoke deploy:updated (first_time) ** Invoke bundler:install (first_time) ** Execute bundler:install 00:00 bundler:install The Gemfile's dependencies are satisfied, skipping installation The Gemfile's dependencies are satisfied, skipping installation ** Execute deploy:updated ** Invoke deploy:compile_assets (first_time) ** Invoke deploy:set_rails_env ** Execute deploy:compile_assets ** Invoke deploy:assets:precompile (first_time) ** Execute deploy:assets:precompile ** Invoke deploy:assets:backup_manifest (first_time) ** Execute deploy:assets:backup_manifest ** Invoke deploy:cleanup_assets (first_time) ** Invoke deploy:set_rails_env ** Execute deploy:cleanup_assets ** Invoke deploy:normalize_assets (first_time) ** Invoke deploy:set_rails_env ** Execute deploy:normalize_assets ** Invoke deploy:migrate (first_time) ** Invoke deploy:set_rails_env ** Execute deploy:migrate ** Invoke deploy:publishing (first_time) ** Execute deploy:publishing ** Invoke deploy:symlink:release (first_time) ** Execute deploy:symlink:release 00:00 deploy:symlink:release 01 ln -s /var/www/capistrano_sample_app_v1/releases/20200108015441 /var/www/capistrano_sample_app_v1/releases/current 02 mv /var/www/capistrano_sample_app_v1/releases/current /var/www/capistrano_sample_app_v1 ** Invoke deploy:published (first_time) ** Execute deploy:published ** Invoke deploy:finishing (first_time) ** Execute deploy:finishing ** Invoke deploy:cleanup (first_time) ** Execute deploy:cleanup ** Invoke slack:deploy:updated (first_time) ** Execute slack:deploy:updated ** Invoke deploy:finished (first_time) ** Execute deploy:finished ** Invoke deploy:log_revision (first_time) ** Execute deploy:log_revision 00:00 deploy:log_revision 01 echo "Branch master (at ) deployed as release 20200108015441 by webmaster-patche" >> /var/www/capistrano_sample_app_v1/revisions.log
- 投稿日:2020-01-07T19:09:22+09:00
【Rails】ブックマーク(お気に入り)機能
備忘録です。
掲示板におけるブックマーク機能追加し、ブックマーク一覧ページを作成。
※初学者です。ご指摘あればお願いします!環境
Rails 5.2.3
mysql 5.7.28
gem font-awesome-sass
gem Sorcery
→installしていない場合、後述のcurrent_userメソッドが使用できません。ER図
中間テーブル(Bookmark)使用。
中間テーブル...userとboardのidだけを保存するテーブル。
User:Board = 1:多
User:Bookmark = 1:多
Board:Bookmark = 1:多あくまでブックマーク機能実装の記事ですので、UserとBoardモデルはすでに作成されているものとして進行しますのでご注意ください。
実装
それでは実装していきます。
Bookmarkモデル作成
ターミナル$ rails g model Bookmark user:references board:references上記コマンドで
bookmark.rb(モデルファイル)とxxxxxxxx_create_bookmarks.rb(マイグレーションファイル)が作成されます。
referencesを指定することで外部キー制約がついてインデックスも貼られるので便利です。bookmark.rbbelongs_to :user belongs_to :board validates :user_id, uniqueness: { scope: :board_id } # 追加
uniqueness: trueでモデルレベルで一意性(ユニーク)を保ちます。
Railsガイドバリデーションxxxxxxx_create_bookmarks.rbdef change create_table :bookmarks do |t| t.references :user, foreign_key: true, null: false t.references :board, foreign_key: true, null: false t.timestamps t.index [:user_id, :board_id], unique: true # 追加 end end
t.index [:user_id, :board_id], unique: trueと書き足してDBレベルで一意性(ユニーク)を保ちます。モデルとDB両方に一意性を保つことでより安全性が高まります。
ここでいう一意性とは1人のユーザーが同じ投稿を複数回bookmarkできないようにすることです。ターミナル$ rails db:migrate上記コマンド実行で中間テーブル完成!
UserモデルとBoardモデルのアソシエーション
user.rbclass User < ApplicationRecord has_many :boards, dependent: :destroy has_many :bookmarks, dependent: :destroy has_many :bookmark_boards, through: :bookmarks, source: :board end
dependent: :destroyでユーザーが削除されたとき、そのユーザーに関連する情報を削除するよう紐付けます。注目すべきは
has_many :bookmark_boards, through: :bookmarks, source: :boardです。
has many throughオプションでユーザーがブックマークした投稿を直接アソシエーションで取得できます。
後ほどboard_controller.rb実装時に使用しますので、覚えておいてください。
sourceでは参照するモデルを指定しています。board.rbclass Board < ApplicationRecord belongs_to :user has_many :bookmarks, dependent: :destroy # boardのお気に入り判定 → vies側で呼び出し def bookmark_by?(user) bookmarks.where(user_id: user.id).exists? end endこちらで注目するのは
def bookmark_by?(user)
  bookmarks.where(user_id: user.id).exists?
end
このインスタンスメソッドです。
ここではbookmark_by?(user)というアクションを明記してcurrent_userに特定の投稿がブックマークされているかされていないかの判定をするメソッドを記述しています。後々記述しますが引数の
(user)にはcurrent_userが引き渡されています。インスタンスメソッド...インスタンスに使用するメソッド。
ルーティング設定
routes.rbresources :boards, shallow: true do resource :bookmarks, only: %i[create destroy] get :bookmarks, on: :collection endブックマーク一覧ページを
boards/bookmarksにルーティンングを設定したいのでcollectionオプションを使用します。
ネスト(入れ子)すると外部キーのboard_idを取得するのに容易になります。
また単数形のメソッドであるresourceとしたのはbookmarkのidが必要ないため。
shallowオプションについてはこちら
resources を nest するときは shallow を使うと幸せになれるBookmarkコントローラー作成
ターミナル$ rails g controller bookmarks create destroy上記コマンドで
bookmarks_controller.rbが作成されます。bookmarks_controller.rbclass BookmarksController < ApplicationController def create bookmark = current_user.bookmarks.build(board_id: params[:board_id]) bookmark.save! redirect_to boards_path, success: t('.flash.bookmark') end def destroy current_user.bookmarks.find_by(board_id: params[:board_id]).destroy! redirect_to boards_path, success: t('.flash.not_bookmark') endここの記述でリクエストが送られた際のブックマーク機能を管理しています。
createbookmark = current_user.bookmarks.build(board_id: params[:board_id])ここでcurrent_userのBookmarkインスタンスを生成(buildはnewと同じ意味で、アソシエーションしながらインスタンスを作成するときに形式的に使用される模様)
createbookmark.save! redirect_to boards_path, success: t('.flash.bookmark')登録して、リダイレクト先を指定。
success以降はフラッシュメッセージ関連です。destroycurrent_user.bookmarks.find_by(board_id: params[:board_id]).destroy! redirect_to boards_path, success: t('.flash.not_bookmark')ここではブックマークしているユーザー情報を取得、ブックマークを解除して、リダイレクト先を指定。
destroyやsaveではなくdestroy!やsave!にしているのは条件分岐使わない場合は失敗したときに例外を発生させて処理を終了させるのがベターと見聞きしたのでこの記述にしています。boards_controller実装
boards_controller.rbdef index @boards = Board.all.includes(:user).recent end . . . def bookmarks @boards = current_user.bookmark_boards.includes(:user).recent end今回関係あるのはこの2つのアクションだけなので他は割愛します。
上から見ていきます。def index @boards = Board.all.includes(:user).recent end
indexアクションでは@boardsインスタンス変数にboardsテーブルから全てのデータを取得しています。
includesはn+1問題解消のため。
Rails「N+1問題」超分かりやすい解説・解決方法【includesを使おう】
recentはScopeを用いて可読性を保つために記述しているもので、掲示板を降順で表示するためのオプションをモデルで設定しています。
今回は関係ないので削除しても問題ありません。def bookmarks @boards = current_user.bookmark_boards.includes(:user).recent end
bookmarksアクションでは@boardsインスタンス変数にログインしているユーザー(current_user)がブックマークしている全てのデータを取得しています。
current_user.bookmark_boardsこういう書き方でユーザーがブックマークしてる投稿を取得できるのは先ほどhas many throughでリレーションを組んだことによる効果です。ビュー実装
views/boards/index.html.erb<div class="row d-flex"> <%= render @boards %> </div>パーシャルを読み込んで
views/boards/_board.html.erb<% if current_user.own_board?(board) %> <div style='display: inline; float: right;'> <%= link_to icon('fas', 'pen'), edit_board_path(board), id: :"button-edit-#{board.id}" %> <%= link_to icon('fas', 'trash-alt'), board_path(board), id: :"button-delete-#{board.id}",method: :delete, data: { confirm: '削除してよろしいですか?' } %> </div> <% else %> <div style='display: inline; float: right;'> <%= render 'boards/bookmark_area', board: board %> </div> <% end %>
<% if current_user.own_board?(board) %>で投稿をログインユーザーか他ユーザーかを条件分岐させてます。
own_board?(board)は自身で作成したインスタンスメソッドなので、このままコピペしても動きません。
own_board?メソッド中身はこちら↓
[Rails]ログインidと投稿者が一致した時のみ編集・削除アイコンを表示させる条件式をモデルに書き出すviews/boards/_bookmark_area.html.erb<% if board.bookmark_by?(current_user) %> <%= render 'boards/bookmark', board: board %> <% else %> <%= render 'boards/unbookmark', board: board %> <% end %>
bookmark_by?は先ほどboard.rbで定義したブックマーク判定をするインスタンスメソッドです。引数はログインユーザーであるcurrent_userのインスタンスを引き渡しています。views/boards/_bookmark.html.erb<%= link_to icon('fas', 'star'), board_bookmarks_path(board.id), method: :delete, id: :"js-bookmark-button-for-board-#{board.id}" %>views/boards/_unbookmark.html.erb<%= link_to icon('far', 'star'), board_bookmarks_path(board.id), method: :post, id: :"js-bookmark-button-for-board-#{board.id}" %>参考記事

- 投稿日:2020-01-07T19:09:22+09:00
【Rails】Bookmark機能
備忘録です。
掲示板におけるブックマーク機能追加し、ブックマーク一覧ページを作成。
※初心者です。ご指摘あればお願いします!環境
Rails 5.2.3
mysql 5.7.28
gem font-awesome-sass
gem Sorcery
→installしていない場合、後述のcurrent_userメソッドが使用できません。ER図
中間テーブル(Bookmark)使用。
中間テーブル...userとboardのidだけを保存するテーブル。
User:Board = 1:多
User:Bookmark = 1:多
Board:Bookmark = 1:多あくまでブックマーク機能実装の記事ですので、UserとBoardモデルはすでに作成されているものとして進行しますのでご注意ください。
実装
それでは実装していきます。
Bookmarkモデル作成
ターミナル$ rails g model Bookmark user:references board:references上記コマンドで
bookmark.rb(モデルファイル)とxxxxxxxx_create_bookmarks.rb(マイグレーションファイル)が作成されます。
referencesを指定することで外部キー制約がついてインデックスも貼られるので便利です。bookmark.rbbelongs_to :user belongs_to :board validates :user_id, uniqueness: { scope: :board_id } # 追加
uniqueness: trueでモデルレベルで一意性(ユニーク)を保ちます。
Railsガイドバリデーションxxxxxxx_create_bookmarks.rbdef change create_table :bookmarks do |t| t.references :user, foreign_key: true, null: false t.references :board, foreign_key: true, null: false t.timestamps t.index [:user_id, :board_id], unique: true # 追加 end end
t.index [:user_id, :board_id], unique: trueと書き足してDBレベルで一意性(ユニーク)を保ちます。モデルとDB両方に一意性を保つことでより安全性が高まります。
ここでいう一意性とは1人のユーザーが同じ投稿を複数回bookmarkできないようにすることです。ターミナル$ rails db:migrate上記コマンド実行で中間テーブル完成!
UserモデルとBoardモデルのアソシエーション
user.rbclass User < ApplicationRecord has_many :boards, dependent: :destroy has_many :bookmarks, dependent: :destroy has_many :bookmark_boards, through: :bookmarks, source: :board end
dependent: :destroyでユーザーが削除されたとき、そのユーザーに関連する情報を削除するよう紐付けます。注目すべきは
has_many :bookmark_boards, through: :bookmarks, source: :boardです。
has many throughオプションでユーザーがブックマークした投稿を直接アソシエーションで取得できます。
後ほどboard_controller.rb実装時に使用しますので、覚えておいてください。
sourceでは参照するモデルを指定しています。board.rbclass Board < ApplicationRecord belongs_to :user has_many :bookmarks, dependent: :destroy # boardのお気に入り判定 → vies側で呼び出し def bookmark_by?(user) bookmarks.where(user_id: user.id).exists? end endこちらで注目するのは
def bookmark_by?(user)
  bookmarks.where(user_id: user.id).exists?
end
このインスタンスメソッドです。
ここではbookmark_by?(user)というアクションを明記してcurrent_userに特定の投稿がブックマークされているかされていないかの判定をするメソッドを記述しています。後々記述しますが引数の
(user)にはcurrent_userが引き渡されています。インスタンスメソッド...インスタンスに使用するメソッド。
ルーティング設定
routes.rbresources :boards, shallow: true do resource :bookmarks, only: %i[create destroy] get :bookmarks, on: :collection endブックマーク一覧ページを
boards/bookmarksにルーティンングを設定したいのでcollectionオプションを使用します。
ネスト(入れ子)すると外部キーのboard_idを取得するのに容易になります。
また単数形のメソッドであるresourceとしたのはbookmarkのidが必要ないため。
shallowオプションについてはこちら
resources を nest するときは shallow を使うと幸せになれるBookmarkコントローラー作成
ターミナル$ rails g controller bookmarks create destroy上記コマンドで
bookmarks_controller.rbが作成されます。bookmarks_controller.rbclass BookmarksController < ApplicationController def create bookmark = current_user.bookmarks.build(board_id: params[:board_id]) bookmark.save! redirect_to boards_path, success: t('.flash.bookmark') end def destroy current_user.bookmarks.find_by(board_id: params[:board_id]).destroy! redirect_to boards_path, success: t('.flash.not_bookmark') endここの記述でリクエストが送られた際のブックマーク機能を管理しています。
createbookmark = current_user.bookmarks.build(board_id: params[:board_id])ここでcurrent_userのBookmarkインスタンスを生成(buildはnewと同じ意味で、アソシエーションしながらインスタンスを作成するときに形式的に使用される模様)
createbookmark.save! redirect_to boards_path, success: t('.flash.bookmark')登録して、リダイレクト先を指定。
success以降はフラッシュメッセージ関連です。destroycurrent_user.bookmarks.find_by(board_id: params[:board_id]).destroy! redirect_to boards_path, success: t('.flash.not_bookmark')ここではブックマークしているユーザー情報を取得、ブックマークを解除して、リダイレクト先を指定。
destroyやsaveではなくdestroy!やsave!にしているのは条件分岐使わない場合は失敗したときに例外を発生させて処理を終了させるのがベターと見聞きしたのでこの記述にしています。boards_controller実装
boards_controller.rbdef index @boards = Board.all.includes(:user).recent end . . . def bookmarks @boards = current_user.bookmark_boards.includes(:user).recent end今回関係あるのはこの2つのアクションだけなので他は割愛します。
上から見ていきます。def index @boards = Board.all.includes(:user).recent end
indexアクションでは@boardsインスタンス変数にboardsテーブルから全てのデータを取得しています。
includesはn+1問題解消のため。
Rails「N+1問題」超分かりやすい解説・解決方法【includesを使おう】
recentはScopeを用いて可読性を保つために記述しているもので、掲示板を降順で表示するためのオプションをモデルで設定しています。
今回は関係ないので削除しても問題ありません。def bookmarks @boards = current_user.bookmark_boards.includes(:user).recent end
bookmarksアクションでは@boardsインスタンス変数にログインしているユーザー(current_user)がブックマークしている全てのデータを取得しています。
current_user.bookmark_boardsこういう書き方でユーザーがブックマークしてる投稿を取得できるのは先ほどhas many throughでリレーションを組んだことによる効果です。ビュー実装
views/boards/index.html.erb<div class="row d-flex"> <%= render @boards %> </div>パーシャルを読み込んで
views/boards/_board.html.erb<% if current_user.own_board?(board) %> <div style='display: inline; float: right;'> <%= link_to icon('fas', 'pen'), edit_board_path(board), id: :"button-edit-#{board.id}" %> <%= link_to icon('fas', 'trash-alt'), board_path(board), id: :"button-delete-#{board.id}",method: :delete, data: { confirm: '削除してよろしいですか?' } %> </div> <% else %> <div style='display: inline; float: right;'> <%= render 'boards/bookmark_area', board: board %> </div> <% end %>
<% if current_user.own_board?(board) %>で投稿をログインユーザーか他ユーザーかを条件分岐させてます。
own_board?(board)は自身で作成したインスタンスメソッドなので、このままコピペしても動きません。
<% current_user == board.board.id %>で上記判断ができると思います。views/boards/_bookmark_area.html.erb<% if board.bookmark_by?(current_user) %> <%= render 'boards/bookmark', board: board %> <% else %> <%= render 'boards/unbookmark', board: board %> <% end %>
bookmark_by?は先ほどboard.rbで定義したブックマーク判定をするインスタンスメソッドです。引数はログインユーザーであるcurrent_userのインスタンスを引き渡しています。views/boards/_bookmark.html.erb<%= link_to icon('fas', 'star'), board_bookmarks_path(board.id), method: :delete, id: :"js-bookmark-button-for-board-#{board.id}" %>views/boards/_unbookmark.html.erb<%= link_to icon('far', 'star'), board_bookmarks_path(board.id), method: :post, id: :"js-bookmark-button-for-board-#{board.id}" %>参考記事
- 投稿日:2020-01-07T16:20:39+09:00
Pay.jpとRailsで決済機能実装してみた。
投稿経緯
payjpの実装記事そのものはたくさんあるのですが、hamlで書かれてるのがほとんど。
正直僕はまだslimやhamlのような短縮系での書き方がわからず手間取ったので、今回通常盤での記載で投稿しようと思いました。実装
APIキー取得
1. Payjpにログイン
https://pay.jp/login
※アカウントがなければ↑からも作成可能。2. ログイン後APIをクリック
クリック後が写真の画面になります。
大事な情報になるので、基本的には第三者に見せないようにしましょう。gemの導入
1.Gemfileに記載する。
Gemfile# 決済 gem 'payjp'2.インストール
ターミナルbundle installコントローラー
1.決済情報アクションを作成
pays.controller.rbdef index end def pay Payjp.api_key = 'sk_test_c6a7dfaf173ad9733cd904e9' Payjp::Charge.create( #amountは値段を記載 amount: 3500, card: params['payjp-token'], currency: 'jpy' ) endActionController::InvalidAuthenticityTokenが出た場合
protect_from_forgery except: :payを一番上に記載してください。
有効ではないトークンみたいな感じで弾いてしまうみたいなので、
例外としてpayアクションを指定して通すようにします。pays.controller.rbprotect_from_forgery except: :pay def index end def pay Payjp.api_key = 'sk_test_c6a7dfaf173ad9733cd904e9' Payjp::Charge.create( #amountは値段を記載 amount: 3500, card: params['payjp-token'], currency: 'jpy' ) endView
1.Payjoが用意しているUIを使用する
data-keyの箇所は先ほどのPayjpのAPIに記載されいるものを入れる。
※今回は簡単な導入方法になりますので、セキュリティー面では直かきはよくないみたいなので、本番でやる場合は違う場所書いて参照するようにお願いします。index.html.erb<h1>決済画面</h1> <form action="/pay" method="post"> <script src="https://checkout.pay.jp/" class="payjp-button" data-key="テスト公開鍵"></script> </form>2.トークン
トークンを作成するために必要なものになりますので、indexの一番下に書きます。
index.html.erb<script> $(document).on('turbolinks:load', function() { var form = $("#charge-form"); Payjp.setPublicKey('pk_test_0383a1b8f91e8a6e3ea0e2a9'); $("#charge-form").on("click", "#submit-button", function(e) { e.preventDefault(); form.find("input[type=submit]").prop("disabled", true); var card = { number: parseInt($("#payment_card_no").val()), cvc: parseInt($("#payment_card_security_code").val()), exp_month: parseInt($("#payment_card_expire_mm").val()), exp_year: parseInt($("#payment_card_expire_yy").val()) }; Payjp.createToken(card, function(s, response) { if (response.error) { alert("error") form.find('button').prop('disabled', false); } else { $(".number").removeAttr("name"); $(".cvc").removeAttr("name"); $(".exp_month").removeAttr("name"); $(".exp_year").removeAttr("name"); var token = response.id; $("#charge-form").append($('<input type="hidden" name="payjp_token" class="payjp-token" />').val(token)); $("#charge-form").get(0).submit(); } }); }); }); </script>ルーティング
今回はわかりやすく/payだけのURLで作成します。
変更する場合はindex.html.erbのformのaction="~"で場所を買えてくださいconfig/routes.rbpost '/pay', to: 'pays#pay'完成
index.html.erbにカードで支払うボタンが出てるのそれをクリック
すると入力フォームが出現しますので、記入してカードで支払うボタンをクリックすると元のページへリダイレクトするので、次はpayjpに移動
サイドバーの売上をクリックすると
先ほどの金額で支払済みと確認できましたね。まとめ
今回はかなり簡略的に書きましたので、これをもとに各々に合わせた形にアレンジしていっていただけたらと思いまいす。


- 投稿日:2020-01-07T15:27:01+09:00
haml-railsでerbファイルをhamlに変換する方法
個人アプリ開発において新しく立ち上げる度に何度も調べてしまうので備忘録として残す。
結論
このgemをGemfileに記述
Gemfilegem "haml-rails"bundle installを実行
ターミナル$ bundle install #bundle でも可下記コマンドを実行し、erbファイルをhamlに変換。
ターミナル$ rails haml:erb2haml元のerbファイルを削除するかどうかを聞かれる。不要な場合はyを選択。
ターミナルWould you like to delete the original .erb files? (This is not recommended unless you are under version control.) (y/n) y Deleting original .erb files. -------------------------------------------------------------------------------- Task complete! No .erb files found. Task will now exit.hamlで開発を行う事の利点とは
hamlはdivタグ自体を書く必要がなく、また各タグを閉じる必要もない為、コード量の削減、簡略化ができる。rubyも使用可。
インデントによる管理である事から、誰が書いても似たような構造になり、可読性が高い。
逆にインデントが少しでもずれるとすぐエラーを吐くため慣れるまでが大変。rails newを叩く際にデフォルトで生成されるerbファイルはhtmlとほとんど同じ記述で書けて且つ、rubyも実行できる。
ただhamlと違いタグ1つ1つに対しての閉じタグが必要になる為、コードが冗長になりやすい。
学習し始めのうちは視覚的に理解しやすいので使うのも有り。まとめ
爆速で開発を行いたいのであれば時間が掛かっても少しずつhamlに慣れていくのが良いであろう。
似たような書き方でslimというのもあるが、基本的な書き方はhamlと変わらず、2020年1月現在ではhamlの方が若干使用比率が高いようなので、現場に合わせ必要に応じて学ぶと良いのではないだろうか。
- 投稿日:2020-01-07T13:28:10+09:00
配列の中にネストしたハッシュがある場合の取り出し方
課題で配列の中にネストされたハッシュを取り出すという問題が出題され時間内に課題を解けなかったので健忘禄として。
test.rbuser_data = [ { user: { profile: { name: 'George' } } }, { user: { profile: { name: 'Alice' } } }, { user: { profile: { name: 'Taro' } } } ]この配列の中にあるユーザーのnameの値を取り出して一覧表示をするという内容で
George
Alice
Taro
このように出力させるには
test.rbputs 変数名[:key1][:key2][:key3]のように配列ないのキーに個別にアクセスしていかなければならないようで、
課題のように配列の中にuserが3つありその構造が同じであればeach文で上記の処理を個別に行ってあげれば良い。test.rbuser_data.each do |user| puts user[:user][:profile][:name] endネストされたハッシュが配列の中にあるデータをみるのが初めてで検索の仕方も悪かったのもあり時間内に解決方法を見つけられませんでした。
勉強不足ですね。
- 投稿日:2020-01-07T12:53:38+09:00
Mix-inはやめてくれ。「関数的モジュール」だ!
TL;DR
- Mix-inは危険な機能だ
- Mix-inは必要なシーンにだけ使おう
- 関数だけを提供するだけのモジュールを作るのが、弊害が少なくシンプル
Mix-in は弊害が多い
Mix-inはRubyの基本的な機能であり、入門書でも序盤で紹介されます。
それゆえか単に処理をクラス間で共有するためだけにMix-inを使おうとしているのをしばしば見かけます。
実際には、Mix-inにはうかつに使うと後々痛い目に会う機能であり、大抵のケースではMix-inを使うのは適切ではありません。
落とし穴1: インスタンス変数やメソッドが上書きされる
includeがやっているのは、「単にMix-inのメソッドをクラスにコピーする」ことだけです1。なので同じ名前のメソッドをクラス側で定義すると、Mix-inのメソッドを警告なしに上書きしてしまいます。同様にMix-inのインスタンス変数を、クラス側で参照したり変更したりできてしまいます。
module HttpRequestable
  def get(uri)
    request(:get, uri)
  end

  private

  def request(http_method, uri)
    # HTTPリクエストする処理
  end
end

class StoreAPI
  include HttpRequestable

  ...

  # 商品の入荷をリクエストする機能を追加しよう!
  # (実はHttpRequestableのメソッドを上書きしてしまっている)
  def request(product_id, count)
  end
end
落とし穴2: メソッドの関係が複雑になる
クラスからMix-inのメソッドを呼び出せるだけでなく、Mix-inからクラスのメソッドを呼び出したり、Mix-inから別のMix-inのメソッドを呼び出すことができるため、
クラスのメソッド => Mix-in Aのメソッド => Mix-in Bのメソッド => クラスのメソッド => ...のような複雑な参照関係が生じてしまうことがあります。
呼び出しが適切に管理されていればTemplate Method パターンと呼べるのですが、
おっ、親クラスの〇〇っていうメソッドを呼べば動かせるぞ。よし!!
と、深く考えずに呼んでしまうことが、稀によくあります。
落とし穴3: メソッドの定義場所が分かりにくい
最近はIDEが良くなったので問題になりにくいのですが、includeするモジュールが増えてくると、メソッドの定義箇所がわかりにくくなりがちです。
RailsのActionMailer::Baseには12個のモジュールがincludeされているのですが、この中から
relative_url_rootの定義箇所をIDEなしで見つけるのは一苦労です。落とし穴4: 確信が持てない
最大の問題は、上記のような落とし穴を踏んでいないか確信を持てないことです。Rubyは動的言語なので、静的なチェックが難しく、
これは private メソッドだから、変更しても安全だな!!
と思っていたら、実はMix-inで誤って呼び出していないとも限らないのです。
そこで「関数的モジュール」
(以下の「関数的モジュール」は私の造語です。もっと適切な用語があるのかもしれませんが、調べ方が悪いのか見つからなかったので、ここでは「関数的モジュール」と呼びます)
関数的モジュールとは、特異メソッドだけを提供するモジュールのことです。
module HttpRequestable
  class << self
    def get(uri)
      request(:get, uri)
    end

    private

    def request(http_method, uri)
      # HTTPリクエストする処理
    end
  end
end
使うときは、includeせずメソッドを直接呼び出します。
class StoreApi
  # メソッド名が被っても大丈夫!!
  def request
    HttpRequestable.get(uri)
  end
end
関数的モジュールでは、Mix-inのような問題は起きません。
- インスタンス変数を使わない(使えない2)
- メソッドがコピーされることが無い
- クラス側のメソッドを呼び出すことがない(できない)
- どのモジュールのメソッドを呼んでいるかは明らか
それでもMix-in を使うケース
そうはいっても、Mix-inを定義するのが便利なケースもあります。
Mix-inを定義する際にはTemplate Method パターンとして正しく定義することを心がけましょう。
具体的には・・・
- Mix-inがクラスのどのメソッドを呼ぶか明らかにする
- クラスからはMix-inのどのメソッドを呼んでよいのか明らかにする
- インスタンス変数を避ける
- privateメソッドを避ける(RubyのprivateはC++やJavaのprivateと異なることに気をつける)
- 投稿日:2020-01-07T12:41:09+09:00
無料で特定アカウント群の最新ツイートを自動リツイートする方法
手記として残しておく。
このプログラムの特徴は、
- 無料で
- 複数のアカウントのツイートを
- 1時間ごとに
- 自動リツイート
してくれること。
なんで作ろうと思ったかというと、Twitterのパスワードを組織内で使いまわして欲しくなかった && リツイートが面倒だったから。
ちなみに、Cronとか分からなかったので、HerokuのAuto Scheduleを使った。
GitHub レポジトリ→ https://github.com/tsuchiura-1st-hs-ec/Ichikosai-Auto-Retweeting使ったもの
- Ruby
- Twitter gem
- Heroku
- Twitter Developer Account
この中でも、Twitter Developer Accountは、審査があるので早く通しておいた方がいい。
Consumer API keys & API secret & Access token & access token secretを取ってくる
Twitter Developer Accountで取ってくる。
twitter gemをインストール
% gem i twitterでTwitter gemをインストール。
rubyファイルを作る
% touch retweet.rbで作って、
retweet.rbrequire 'twitter' # Config @client = Twitter::REST::Client.new do |config| config.consumer_key = ENV["CONSUMER_KEY"] config.consumer_secret = ENV["CONSUMER_SECRET"] config.access_token = ENV["CONSUMER_TOKEN"] config.access_token_secret = ENV["CONSUMER_TOKEN_SECRET"] end # PRODUCTION ENVIRONMENT ----------------------------------- @client.list_timeline("ichikosai", "list").each do |tweet| if tweet.user.screen_name != "ichikosai" && !tweet.retweeted? && !tweet.full_text.include?("匿名質問") # Avoidance of a specified word @client.retweet(tweet.id) end endHerokuで環境変数に上のAPI Keysなどの4つを設定する。
これで @ichikosai のリスト「list」のタイムラインに流れてくるツイートをキャッチして、リツイートしてくれる。
(匿名質問を除いているのは、マシュマロの広告を避けるため。)ここで
% ruby retweet.rbとしてあげると、リツイートされると思う。(ローカルに環境変数を設定してね)
定期的にこのコードを実行したい
Heroku Auto Scheduleを使う。
Herokuのアドオンで探して、一時間毎にコードを実行するように設定する。(無料で使えるのが最大で一時間毎。それ以上の短いスパンは有料)
以上。まとめ
ぜひ文化祭に来てね!
文化祭公式Twitterアカウント→ https://twitter.com/ichikosai
- 投稿日:2020-01-07T11:44:18+09:00
Deviseを使ってController側からログアウトさせる
1. 経緯
userテーブルにflgを持たせて、0以外の人はログインさせたくないなぁ・・・
ということで調べてみたところ以下の内容でできました2. 結果
appllication_controller.rbbefore_action :sign_out_user, if: :user_signed_in? protected # ログイン後のパス def after_sign_in_path_for(resource) root_path end # flgが0以外はログアウトさせる def sign_out_user sign_out_and_redirect(current_user) if current_user.flg == 0 end3. 詳しい内容
after_sign_in_path_for
ユーザーがログイン後、どこに飛ばすか
https://rubydoc.info/search/github/plataformatec/devise/master?q=after_sign_in_path_forsign_out_and_redirect
ユーザーがログイン後、ログアウトさせる
https://rubydoc.info/github/plataformatec/devise/master/Devise%2FControllers%2FHelpers:sign_out_and_redirect4. ネットの記事
ネットの記事見てると以下の内容とかもあったんですが、サインアウトはHTTPリクエストからしか
受け付けないみたいで以下の書き方をしてもダメでした・・・。redirect_to :controller=>"user/sessions", :action=>"destroy"4. 最後に
いいね!もらえると励みになるのでよろしくお願いします!
- 投稿日:2020-01-07T10:52:36+09:00
Rubyの公式リファレンスで調べたいとき
Rubyには公式リファレンス( https://docs.ruby-lang.org/ ) がありますが検索ができません。
おまけにググってみると、非公式のものばかりヒットします。
解決策
siteオプションをつけて検索します。
attr_writer site:docs.ruby-lang.orgで検索してみると…


- 投稿日:2020-01-07T10:21:55+09:00
条件付きバリデーション(特定の状況においてバリデーションを発生させる方法)
実現したいこと
PostモデルのFormにてGenreモデルのnameはuniquenessかつnameは空でもバリデーションに引っかからないようにしたい。そして空のデータは表示させたくない。
整理すると、
1. カラムはuniqueness、しかしカラムが空であった場合でもデータ送信ができる。
2. 空の状態を保存したものは出現させない。課題
カラムが空であった場合データ送信ができる=空の場合uniquenessのバリデーションには引っかからないようにする。解決策
条件付きバリデーションを作成する前提
新規投稿を作るformに置いてPostモデルとGenreモデルの2つのデータ送信を同時に行いたい。
Formの一部(ここでPostモデルのFormでGenreモデルのデータも同時に送信)
<%= fields_for @genre, :genres do |form| %>
        <%= form.label :新しくジャンルを作る %>
        <%= form.text_field :name, class:"form-control" %>
      <% end %>
Form全体
<div class="container">
  <%= form_with(model: [:mypage, post], local: true) do |form| %>
    <% if post.errors.any? %>
      <div id="error_explanation">
        <h2><%= pluralize(post.errors.count, "error") %> prohibited this post from being saved:</h2>

        <ul>
          <% post.errors.full_messages.each do |message| %>
            <li><%= message %></li>
          <% end %>
        </ul>
      </div>
    <% end %>
    <div class="form-group">
      <%= form.text_field :title, class:"form-control", placeholder:"タイトル" %>
    </div >
    <div class="form-group">
      <%= form.text_area :body, class:"form-control", placeholder:"自分の辞書をマークダウン記法で記入してみよう" %>
    </div>

    <div class="field">
      <%= form.label :status %>
      <%= form.select :status, Post.statuses.keys,class:"form-control" %>
    </div>

    <div class="field">
      <%= form.label :posted_at %>
      <%= form.datetime_select :posted_at %>
    </div>

    <div class="form-group">
      <%= form.text_area :reason, class:"form-control", placeholder:"メモした経緯を書いてみよう" %>
    </div>

    <div class="field">
      <%= form.label :rank %>
      <%= form.select :rank, Post.ranks.keys, class:"form-control" %>
    </div>

    <div class="form-group">
      <%= form.label :summary %>
      <%= form.text_field :summary, class:"form-control" %>
    </div>

    <div class="form-group">
      <%= form.label :URL %>
      <%= form.text_field :url, class:"form-control" %>
    </div>

    <%= form.label :genre, 'ジャンル' %>
      <%= form.collection_check_boxes(:genre_ids, current_user.genres.where.not(name:""), :id, :name) do |genre| %>
        <%= genre.label do %>
          <%= genre.check_box %>
          <%= genre.text %>
        <% end %>
      <% end %><br>
      <%= fields_for @genre, :genres do |form| %>
        <%= form.label :新しくジャンルを作る %>
        <%= form.text_field :name, class:"form-control" %>
      <% end %>

    <div class="actions">
      <%= form.submit class:"btn btn-info" %>
    </div>
  <% end %>
</div>
Genreモデルでの条件付きバリデーションの作成
これによってから以外でuniquenessが発動するようになったvalidates :name, uniqueness: true, unless: :name_check? def name_check? return true if self.name == "" end空は表示させない
where.not<%= form.collection_check_boxes(:genre_ids, current_user.genres.where.not(name:""), :id, :name) do |genre| %>
- 投稿日:2020-01-07T09:28:00+09:00
ruby: 個人でよく使うtrue falseを返す正規表現の書き方
※備忘録
半角小文字の英文字かどうかを判定
/\A[a-z]+\z/.match?("kaye")
=> true
半角大文字の英文字かどうかを判定
/\A[A-Z]+\z/.match?("KAYE")
=> true
半角数字かどうかを判定
/\A[0-9]+\z/.match?("21")
=> true
半角英文字と半角数字かどうかを判定
/\A[a-zA-Z0-9]+\z/.match?("kayeN21")
=> true
半角英文字と半角数字かどうかを判定
/\A[a-zA-Z0-9]+\z/.match?("kayeN21")
=> true
半角英文字と半角数字と特定の記号のみを許容する判定
/\A[a-z0-9[.][_]]+\z/.match?("kaye.nr")
=> true
適宜暇なときに追記していきます。
なお、こんな書き方の方がいいよとかがあればご教示いただけると嬉しいです。
- 投稿日:2020-01-07T08:55:07+09:00
Rubyをインストールする(macOS)
rbenvを使ってRubyをインストールします(2020/1/7実施)
環境
macOS Catalina 10.15.2
Homebrewのインストール
こちらにアクセス
記載されているコマンドを実行します
/usr/bin/ruby -e "$(curl -fsSL https://raw.githubusercontent.com/Homebrew/install/master/install)"完了確認
brew -vバージョンが表示されて完了です
Homebrew 2.2.2rbenvのインストール
こちらの手順通りコマンドを実行します
brew install rbenv初期設定を行います
rbenv init以下のように表示されました
# Load rbenv automatically by appending
# the following to ~/.bash_profile:

eval "$(rbenv init -)"
.bash_profileを開きます。なければ新規作成になります
vim ~/.bash_profile.bash_profileに以下を追記しましょう
eval "$(rbenv init -)".bash_profileの変更を反映します
source ~/.bash_profile正しく設定できたか確認
curl -fsSL https://github.com/rbenv/rbenv-installer/raw/master/bin/rbenv-doctor | bashこのような表示ならOKです
Checking for `rbenv' in PATH: /usr/local/bin/rbenv
Checking for rbenv shims in PATH: OK
Checking `rbenv install' support: /usr/local/bin/rbenv-install (ruby-build 20191225)
Counting installed Ruby versions: none
  There aren't any Ruby versions installed under `/Users/username/.rbenv/versions'.
  You can install Ruby versions like so: rbenv install 2.2.4
Checking RubyGems settings: OK
Auditing installed plugins: OK
インストールできるRubyのバージョンを確認します
rbenv install -l現時点での最新(2.7.0)をインストールします
rbenv install 2.7.0インストールしたバージョンを有効化します
rbenv rehashバージョンを確認します
rbenv versionsインストールされたバージョンが表示されます。「*」がついているものが設定されています
* system (set by /Users/username/.rbenv/version)
  2.7.0
バージョンを切り替えます
rbenv global 2.7.0バージョンを確認します
ruby -vruby 2.7.0p0 (2019-12-25 revision 647ee6f091) [x86_64-darwin19]これで完了です
- 投稿日:2020-01-07T07:09:20+09:00
バックエンドエンジニアのロードマップ in2020
記事投稿の背景
rubyを独学で勉強している最中、とても参考になるエンジニアの学習ロードマップを発見しました(有名なものらしい)。知識整理のためアウトプットさせていただきます!
元ネタは下記リンクです。
https://github.com/kamranahmedse/developer-roadmapフロントエンド、バックエンド問わず必要になる分野
- Git
- Linuxコマンドなどの基本的なターミナル操作
- データ構造、アルゴリズム
- GitHub
- Semantic Versioning (バージョン番号のつけ方のルールのこと)
- SSH
- HTTP/HTTPS、API
等々。やはりGitHubを使ったバージョン管理は必須スキル、ということですね。そのほかだとデータ構造とアルゴリズム(スタック、キューとか)の勉強は必要になるよう。
バックエンドエンジニアの学習ロードマップ
- まずは言語の選択
- スクリプト言語なのかコンパイラ言語なのか、またその中のどの言語を学習するかを最初に決定。基本的にはどの言語を選択しても学習の流れに大きな違いはない。
- コマンドベースで簡単なアプリケーション作成
- 選択した言語の実行環境を整え、HelloWorldの表示程度の、簡単なプログラムを組んで慣れていく。
- パッケージマネージャーについて学習
- rubyであればgem。javascriptならNode.jsのように、言語毎にパッケージマネージャーが存在。その基本的な使用方法を学習する。
- その言語におけるベストプラクティスは何かを調べる
- 例えばPHPであればPHP-FIGとPSRsをnode.jsとともに使用するケースが多い。このように、学習している言語の一般的な使用方法を整理しておく。
- いくつかアプリを作って公開する
- 簡単なアプリケーションを作成、Githubなどで公開してみる。
- テストの仕方(単体、結合)を学習
- その言語における単体テスト、結合テストの実施方法を調べる。
- テスト(単体、結合)を計画し、実施
- 実際に、作成したアプリケーションに対して単体テスト、結合テストを実施する。
- RDBについて学習する
- RDB(リレーショナルデータベース)について学習。RDBを使用したアプリケーションを作成する。
- 作成したアプリを運用してみる
- 作成したアプリケーションを一般公開してみる。例えば、CRUD機能(ユーザー登録や、削除、ブログ等の投稿機能など)を持ったアプリケーションのようなもの。
- フレームワークを学習する
- その言語における、よく使われるフレームワークを学習。
- これまでに作成したアプリを、フレームワークを用いて再度開発
- 一度作成したアプリケーションを、フレームワークに沿って再度作成してみる
- NoSQLを学習
- NoSQLについても学習し、RDBとの違いを整理してみる。
- キャッシュ(メモリキャッシュ、ブラウザキャッシュ両方)を意識した実装を学習
- ワンランク上の実装を身に着けるため、キャッシュを意識した実装方法を学習。
- REST APIを使用してアプリを作成
- プログラムの中にAPI連携を含むようなアプリケーションを作成
さらに学習するなら
さらにweb関連の知識をつけるために、実装を進める中で疑問に思った点は都度調べていくことがよい。例えば下記のようなことは調べると吉。
- 認証 ( Authentication )と承認 ( Authorization )の違いを学習
- Message brokerについて学習
- サーチエンジンについて学習
- Dockerの使い方を学習
- Webサーバーについて学習
- Webソケットの使い方を学習
- GraphQLを学習
- GraphDBを調べる


- 投稿日:2020-01-07T05:38:09+09:00
serverが起動せず"Usage: rails new APP_PATH [options]..."となってしまう場合の解決法[Ruby on Rails]
経緯
私がRailsの環境を構築する際「Rails s」でサーバーが起動しなかったが解決に至ったためここに記載したいと思う。
投稿に至った経緯は以下の通り。
Web上で私と同じように悩んでいる方が多く、またほとんどの記事において解決に至っていなかったため。
該当する記事がそうないように感じたため。
同じ状況に陥っている同志の助けになりたいと考えたため。
陥った状況
- 前提として使用OSは Windows10
- コマンドプロンプトで
rails sを実行すると「Usage: rails new APP_PATH [options] ...(以下省略)」が表示されてサーバが起動できていない。- Ruby、SQLite、Ruby on Railsはインストールされている。
rails new プロジェクト名を実行済み ( 新しいrailsプロジェクトを生成するコマンド )cd プロジェクト名を実行済み ( プロジェクトのrootに移動するコマンド )詳細な状況
- 本来は
rails sを実行した際、下記のようになればよい。C:¥Users¥leone> rails s => Booting Puma => Rails 5.2.4.1 application starting in development => Run `rails server -h` for more startup options *** SIGUSR2 not implemented, signal based restart unavailable! *** SIGUSR1 not implemented, signal based restart unavailable! *** SIGHUP not implemented, signal based logs reopening unavailable! Puma starting in single mode... * Version 3.12.2 (ruby 2.6.4-p104), codename: Llamas in Pajamas * Min threads: 5, max threads: 5 * Environment: development * Listening on tcp://localhost:3000 Use Ctrl-C to stop
- しかし問題の状態では下記のようになってしまう。
C:¥Users¥leone> rails s
Usage:
  rails new APP_PATH [options]

Options:
      [--skip-namespace], [--no-skip-namespace]            # Skip namespace (affects only isolated applications)
  -r, [--ruby=PATH]                                        # Path to the Ruby binary of your choice
                                                           # Default: C:/Ruby26-x64/bin/ruby.exe
  -m, [--template=TEMPLATE]                                # Path to some application template (can be a filesystem path or URL)
  -d, [--database=DATABASE]                                # Preconfigure for selected database (options: mysql/postgresql/sqlite3/oracle/frontbase/ibm_db/sqlserver/jdbcmysql/jdbcsqlite3/jdbcpostgresql/jdbc)
                                                           # Default: sqlite3
      [--skip-yarn], [--no-skip-yarn]                      # Don't use Yarn for managing JavaScript dependencies
      [--skip-gemfile], [--no-skip-gemfile]                # Don't create a Gemfile
  -G, [--skip-git], [--no-skip-git]                        # Skip .gitignore file
      [--skip-keeps], [--no-skip-keeps]                    # Skip source control .keep files
  -M, [--skip-action-mailer], [--no-skip-action-mailer]    # Skip Action Mailer files
  -O, [--skip-active-record], [--no-skip-active-record]    # Skip Active Record files
      [--skip-active-storage], [--no-skip-active-storage]  # Skip Active Storage files
  -P, [--skip-puma], [--no-skip-puma]                      # Skip Puma related files
  -C, [--skip-action-cable], [--no-skip-action-cable]      # Skip Action Cable files
  -S, [--skip-sprockets], [--no-skip-sprockets]            # Skip Sprockets files
      [--skip-spring], [--no-skip-spring]                  # Don't install Spring application preloader
      [--skip-listen], [--no-skip-listen]                  # Don't generate configuration that depends on the listen gem
      [--skip-coffee], [--no-skip-coffee]                  # Don't use CoffeeScript
  -J, [--skip-javascript], [--no-skip-javascript]          # Skip JavaScript files
      [--skip-turbolinks], [--no-skip-turbolinks]          # Skip turbolinks gem
  -T, [--skip-test], [--no-skip-test]                      # Skip test files
      [--skip-system-test], [--no-skip-system-test]        # Skip system test files
      [--skip-bootsnap], [--no-skip-bootsnap]              # Skip bootsnap gem
      [--dev], [--no-dev]                                  # Setup the application with Gemfile pointing to your Rails checkout
      [--edge], [--no-edge]                                # Setup the application with Gemfile pointing to Rails repository
      [--rc=RC]                                            # Path to file containing extra configuration options for rails command
      [--no-rc], [--no-no-rc]                              # Skip loading of extra configuration options from .railsrc file
      [--api], [--no-api]                                  # Preconfigure smaller stack for API only apps
  -B, [--skip-bundle], [--no-skip-bundle]                  # Don't run bundle install
      [--webpack=WEBPACK]                                  # Preconfigure for app-like JavaScript with Webpack (options: react/vue/angular/elm/stimulus)

Runtime options:
  -f, [--force]                    # Overwrite files that already exist
  -p, [--pretend], [--no-pretend]  # Run but do not make any changes
  -q, [--quiet], [--no-quiet]      # Suppress status output
  -s, [--skip], [--no-skip]        # Skip files that already exist

Rails options:
  -h, [--help], [--no-help]        # Show this help message and quit
  -v, [--version], [--no-version]  # Show Rails version number and quit

Description:
    The 'rails new' command creates a new Rails application with a default
    directory structure and configuration at the path you specify.

    You can specify extra command-line arguments to be used every time
    'rails new' runs in the .railsrc configuration file in your home directory.

    Note that the arguments specified in the .railsrc file don't affect the
    defaults values shown above in this help message.

Example:
    rails new ~/Code/Ruby/weblog

    This generates a skeletal Rails installation in ~/Code/Ruby/weblog.
原因
"Usage: rails new APP_PATH [options]"が表れるということは考えられることはアプリケーションがないことが原因と考えられますが、前提として
rails new プロジェクト名、cd プロジェクト名は実行されているはずです。そこから察するに、実行はされたが何らかが原因で生成されたプロジェクトが認識されてないのではないかと考えました。ではなぜ認識されないのか考えたところ、予想として
rails new プロジェクト名で生成されるファイルが足りないのではないかと考えたため、私はプロジェクトとして生成されたディレクトリ内を確認したのです。すると予想は的中し明らかにファイルが足りなかったのでした。下記は本来、プロジェクト生成時に生成されるはずのファイル、またはその処理
C:¥Users¥leone> rails new アプリケーション名
      create
      create  README.md
      create  Rakefile
      create  .ruby-version
      create  config.ru
      create  .gitignore
      create  Gemfile
         run  git init from "."
Initialized empty Git repository in C:/Users/leone/アプリケーション名/.git/
      create  package.json
      create  app
      create  app/assets/config/manifest.js
      create  app/assets/javascripts/application.js
      create  app/assets/javascripts/cable.js
      create  app/assets/stylesheets/application.css
      create  app/channels/application_cable/channel.rb
      create  app/channels/application_cable/connection.rb
      create  app/controllers/application_controller.rb
      create  app/helpers/application_helper.rb
      create  app/jobs/application_job.rb
      create  app/mailers/application_mailer.rb
      create  app/models/application_record.rb
      create  app/views/layouts/application.html.erb
      create  app/views/layouts/mailer.html.erb
      create  app/views/layouts/mailer.text.erb
      create  app/assets/images/.keep
      create  app/assets/javascripts/channels
      create  app/assets/javascripts/channels/.keep
      create  app/controllers/concerns/.keep
      create  app/models/concerns/.keep
      create  bin
      create  bin/bundle
      create  bin/rails
      create  bin/rake
      create  bin/setup
      create  bin/update
      create  bin/yarn
      create  config
      create  config/routes.rb
      create  config/application.rb
      create  config/environment.rb
      create  config/cable.yml
      create  config/puma.rb
      create  config/storage.yml
      create  config/environments
      create  config/environments/development.rb
      create  config/environments/production.rb
      create  config/environments/test.rb
      create  config/initializers
      create  config/initializers/application_controller_renderer.rb
      create  config/initializers/assets.rb
      create  config/initializers/backtrace_silencers.rb
      create  config/initializers/content_security_policy.rb
      create  config/initializers/cookies_serializer.rb
      create  config/initializers/cors.rb
      create  config/initializers/filter_parameter_logging.rb
      create  config/initializers/inflections.rb
      create  config/initializers/mime_types.rb
      create  config/initializers/new_framework_defaults_5_2.rb
      create  config/initializers/wrap_parameters.rb
      create  config/locales
      create  config/locales/en.yml
      create  config/master.key
      append  .gitignore
      create  config/boot.rb
      create  config/database.yml
      create  db
      create  db/seeds.rb
      create  lib
      create  lib/tasks
      create  lib/tasks/.keep
      create  lib/assets
      create  lib/assets/.keep
      create  log
      create  log/.keep
      create  public
      create  public/404.html
      create  public/422.html
      create  public/500.html
      create  public/apple-touch-icon-precomposed.png
      create  public/apple-touch-icon.png
      create  public/favicon.ico
      create  public/robots.txt
      create  tmp
      create  tmp/.keep
      create  tmp/pids
      create  tmp/pids/.keep
      create  tmp/cache
      create  tmp/cache/assets
      create  vendor
      create  vendor/.keep
      create  test/fixtures
      create  test/fixtures/.keep
      create  test/fixtures/files
      create  test/fixtures/files/.keep
      create  test/controllers
      create  test/controllers/.keep
      create  test/mailers
      create  test/mailers/.keep
      create  test/models
      create  test/models/.keep
      create  test/helpers
      create  test/helpers/.keep
      create  test/integration
      create  test/integration/.keep
      create  test/test_helper.rb
      create  test/system
      create  test/system/.keep
      create  test/application_system_test_case.rb
      create  storage
      create  storage/.keep
      create  tmp/storage
      create  tmp/storage/.keep
      remove  config/initializers/cors.rb
      remove  config/initializers/new_framework_defaults_5_2.rb
         run  bundle install
Fetching gem metadata from https://rubygems.org/.............
Fetching gem metadata from https://rubygems.org/.
Resolving dependencies....
Using rake 13.0.1
Using concurrent-ruby 1.1.5
Using i18n 1.7.0
Using minitest 5.13.0
Using thread_safe 0.3.6
Using tzinfo 1.2.6
Using activesupport 5.2.4.1
Using builder 3.2.4
Using erubi 1.9.0
Using mini_portile2 2.4.0
Using nokogiri 1.10.7 (x64-mingw32)
Using rails-dom-testing 2.0.3
Using crass 1.0.5
Using loofah 2.4.0
Using rails-html-sanitizer 1.3.0
Using actionview 5.2.4.1
Using rack 2.0.8
Using rack-test 1.1.0
Using actionpack 5.2.4.1
Using nio4r 2.5.2
Using websocket-extensions 0.1.4
Using websocket-driver 0.7.1
Using actioncable 5.2.4.1
Using globalid 0.4.2
Using activejob 5.2.4.1
Using mini_mime 1.0.2
Using mail 2.7.1
Using actionmailer 5.2.4.1
Using activemodel 5.2.4.1
Using arel 9.0.0
Using activerecord 5.2.4.1
Using mimemagic 0.3.3
Using marcel 0.3.3
Using activestorage 5.2.4.1
Using public_suffix 4.0.3
Using addressable 2.7.0
Using io-like 0.3.0
Using archive-zip 0.12.0
Using bindex 0.8.1
Using msgpack 1.3.1 (x64-mingw32)
Using bootsnap 1.4.5
Using bundler 1.17.2
Using byebug 11.0.1
Using regexp_parser 1.6.0
Using xpath 3.2.0
Using capybara 3.30.0
Using childprocess 3.0.0
Using chromedriver-helper 2.1.1
Using coffee-script-source 1.12.2
Using execjs 2.7.0
Using coffee-script 2.4.1
Using method_source 0.9.2
Using thor 1.0.1
Using railties 5.2.4.1
Using coffee-rails 4.2.2
Using duktape 2.3.0.0
Using ffi 1.11.3 (x64-mingw32)
Using jbuilder 2.9.1
Using puma 3.12.2
Using sprockets 3.7.2
Using sprockets-rails 3.2.1
Using rails 5.2.4.1
Using rb-fsevent 0.10.3
Using rb-inotify 0.10.1
Using rubyzip 2.0.0
Using sass-listen 4.0.0
Using sass 3.7.4
Using tilt 2.0.10
Using sass-rails 5.1.0
Using selenium-webdriver 3.142.7
Using sqlite3 1.4.2
Using turbolinks-source 5.2.0
Using turbolinks 5.2.1
Using tzinfo-data 1.2019.3
Using uglifier 4.2.0
Using web-console 3.7.0
Bundle complete! 16 Gemfile dependencies, 76 gems now installed.
Use `bundle info [gemname]` to see where a bundled gem is installed.
下記は陥った状況
C:¥Users¥leone> rails new アプリケーション名
      create
      create  README.md
      create  Rakefile
      create  .ruby-version
      create  config.ru
      create  .gitignore
      create  Gemfile
  //ここらで終わっていた。
ではなぜこのようなことが起こるのか。
それはgitがインストールされていない、または上手くインストールされていないためです。
既にしている場合は、gitbashしかgitコマンド使用の許可がされていない。つまりはpathが通っていないことが原因ということになります。解決方法
Gitをインストールする
既にインストールしてある場合は再インストール、またはpathを設定し直す。
pathを設定し直すのが早くC:\Program Files\Git\cmdをpathに追加。
再インストールする際は、インストール前にアンインストールを行う。アンインストール手順
デスクトップ > スタート > 設定 > ホーム > アプリ > Git version〇〇を選択 > アンインストールGitインストール手順
Gitのインストール方法は検索して該当したサイトを参考にインストールして構いませんが、下記に記す部分は注意してほしい。
https://proengineer.internous.co.jp/content/columnfeature/6893(こちらのサイトを参考にするとよい)Gitインストール時の注意点
上記の画面に進んだら画像のように真ん中を選んでください。これはbash以外のシェルでもgitコマンドを使えるようにするためです。もし上を選んでインストールしてしまったら環境変数からpathを追加することをおすすめしますが、pathの概念がわからなければ再インストールしても問題はありません。
最後に
私はこのような方法で解決に至ったのですが、皆さんはどうだったでしょうか。当投稿でお力添え出来たら幸いです。
解決出来た、または役に立ったという方がいればグッドボタンを押して頂けると励みになります。
