- 投稿日:2020-01-03T23:43:09+09:00
[Flutter] FlipCardを使ってカード型のWidgetを回転させてみる
やりたいこと
カード型のWidgetをタップするといい具合にアニメーションつけて裏側を表示するように回転したい。
使用したライブラリ
pub get
- pubspec.yamlに「flip_card: ^0.4.4」を追記して
flutter pub getする- dartソースに
import 'package:flip_card/flip_card.dart';を追記する実装
FlipCard(
  front: Card(...), // カード前面に表示するWidget
  back: Card(...), // カード背面に表示するWidget
  direction: FlipDirection.HORIZONTAL, // カード回転向き(HORIZONTAL:横<デフォルト>, VERTICAL:縦)
  flipOnTouch: true, // タッチ可否(true:カード部タップで回転する<デフォルト>, false:タップしても回転しない)
  speed: 500, // 回転スピード(500ミリ秒<デフォルト>)
  onFlip: () {}, // タップイベント
  onFlipDone: (isFront) {}, // タップイベント(前面かどうかbool値で判断できる)
)
サンプル
横回転
縦回転
実装サンプル
https://github.com/unbam/flip_card_sample
(おまけ)カード部分をタップではなくアイコンなどの別Widgetをタップすると回転するようにしたい
GlobalKeyを設定してtoggleCardメソッドを実行する。
final cardKey = GlobalKey<FlipCardState>();

FlipCard(
  key: cardKey, // キーを設定
  front: Card(
    child: IconButton(
      icon: Icon(Icons.compare_arrows),
      onPressed: () => cardKey.currentState.toggleCard(), // 回転イベント実行
    )
  )
)

- 投稿日:2020-01-03T20:24:06+09:00
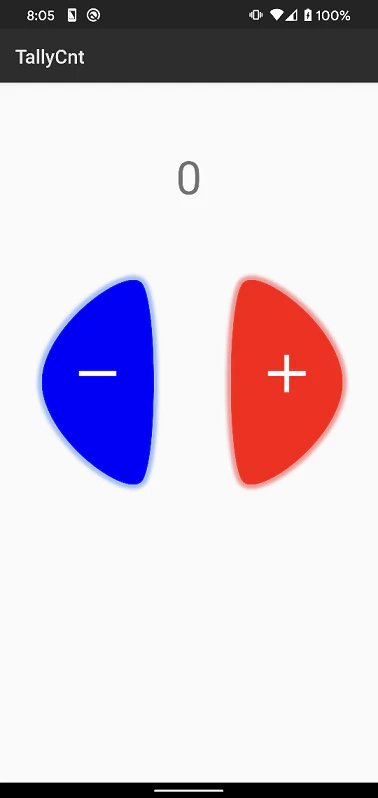
F#でAndroidアプリ開発 カウンター(数取器)編
F#でAndroidアプリ開発としてカウンター(数取器)の作成方法を紹介します.
F#でのAndroidアプリ開発の基本は以下の記事を参考にしてください.
F#でAndroidアプリ開発 Helloworld編ソリューションエクスプローラーのResources\layout\Main.axmlを開くと画面レイアウトが表示されます.
Main.axmlにツールボックス内の"TextView"や"ImageButton"を配置します.
Main.axml<?xml version="1.0" encoding="utf-8"?> <LinearLayout xmlns:android="http://schemas.android.com/apk/res/android" android:orientation="vertical" android:layout_width="match_parent" android:layout_height="match_parent"> <TextView android:text="@string/cnt" android:layout_width="match_parent" android:layout_height="254.5dp" android:id="@+id/counterText" android:gravity="center" android:textSize="@android:dimen/app_icon_size"/> <LinearLayout android:layout_width="match_parent" android:layout_height="wrap_content" android:orientation="horizontal"> <ImageButton android:src="@drawable/decrement" android:layout_width="194.0dp" android:layout_height="233.0dp" android:scaleType="centerInside" android:layout_weight="1" android:background="@null" android:id="@+id/imageButton1" android:layout_marginTop="0.0dp" android:layout_marginRight="0.0dp" /> <ImageButton android:src="@drawable/increment" android:layout_width="180.0dp" android:layout_height="match_parent" android:scaleType="centerInside" android:layout_weight="1" android:background="@null" android:id="@+id/imageButton2" android:layout_marginTop="0.0dp" /> </LinearLayout> </LinearLayout>android:text="@string/cnt"また,上記箇所の参照を追記します.
Resources\values\Strings.xml下記のように編集することで,文字列を参照することができます.Strings.xml<?xml version="1.0" encoding="utf-8"?> <resources> <string name="cnt">0</string> <string name="hello">Hello World, Click Me!</string> <string name="app_name">TallyCnt</string> </resources>MainActivity.fsは以下のようにしました.
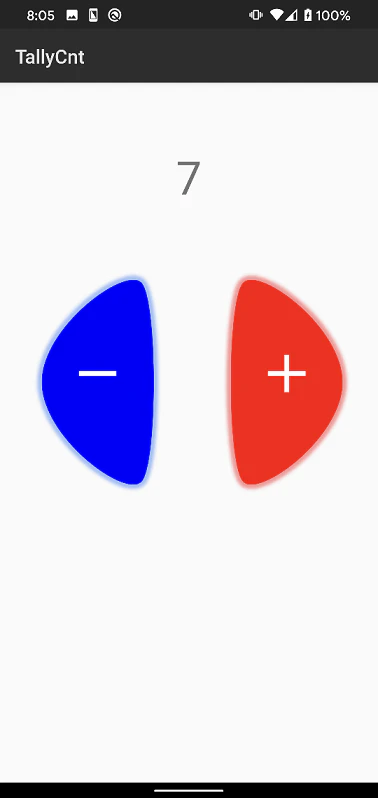
imageButton2が押されたときはカウントを+1し,
imageButton1が押されたときはカウントを-1しています.
# 事前にビルドをしておかないとエラーが起こるように見えるかもしれません.MainActivity.fsnamespace TallyCnt open System open Android.App open Android.Content open Android.OS open Android.Runtime open Android.Views open Android.Widget type Resources = TallyCnt.Resource [<Activity (Label = "TallyCnt", MainLauncher = true, Icon = "@mipmap/icon")>] type MainActivity () = inherit Activity () let mutable count:int = 1 let mutable counter:int = 0 override this.OnCreate (bundle) = base.OnCreate (bundle) // Set our view from the "main" layout resource this.SetContentView (Resources.Layout.Main) let cntText = this.FindViewById<TextView>(Resources.Id.counterText); let incrementButton = this.FindViewById<ImageButton>(Resources.Id.imageButton2); incrementButton.Click.Add(fun args -> counter <- counter + 1 cntText.Text <- sprintf "%d" counter ) let dencrementButton = this.FindViewById<ImageButton>(Resources.Id.imageButton1); dencrementButton.Click.Add(fun args -> counter <- counter - 1 if counter < 0 then counter <- 0; cntText.Text <- sprintf "%d" counter )デバッグしてみると出来上がりです.


- 投稿日:2020-01-03T15:40:33+09:00
[kotlin] コピペでandroidに通知を出す
今回やること
ボタンを押したら通知を出せるようにする。
アクションボタンやその他オプションは今回は触れません。
こんなやつ ↓
さっそくコピペ
activity_main.xmlにpushBtnのIDで適当にボタンを配置
そして以下をペーストMainActivity.ktoverride fun onCreate(savedInstanceState: Bundle?) { super.onCreate(savedInstanceState) setContentView(R.layout.activity_main) val CHANNEL_ID = "channel_id" val channel_name = "channel_name" val channel_description = "channel_description " ///APIレベルに応じてチャネルを作成 if (Build.VERSION.SDK_INT >= Build.VERSION_CODES.O) { val name = channel_name val descriptionText = channel_description val importance = NotificationManager.IMPORTANCE_DEFAULT val channel = NotificationChannel(CHANNEL_ID, name, importance).apply { description = descriptionText } /// チャネルを登録 val notificationManager: NotificationManager = getSystemService(Context.NOTIFICATION_SERVICE) as NotificationManager notificationManager.createNotificationChannel(channel) } /// 通知の中身 val builder = NotificationCompat.Builder(this, CHANNEL_ID) .setSmallIcon(R.drawable.ic_launcher_background) /// 表示されるアイコン .setContentTitle("ハローkotlin!!") /// 通知タイトル .setContentText("今日も1日がんばるぞい!") /// 通知コンテンツ .setPriority(NotificationCompat.PRIORITY_DEFAULT) /// 通知の優先度 var notificationId = 0 /// notificationID pushBtn.setOnClickListener { /// ボタンを押して通知を表示 with(NotificationManagerCompat.from(this)) { notify(notificationId, builder.build()) notificationId += 1 } }これで完了!! いやー思って以上に簡単でびっくり。
Android8.0(API26)から通知を出す際にチャネルの登録が必要になった。
notificationIDは適当に一意のものをつける。別に一意じゃなくても大丈夫だが、通知として表示される際IDが同じものは1個しか表示されないので注意。

- 投稿日:2020-01-03T01:25:53+09:00
[kotlin] ViewPagerをボタンで切り替える
今回やること
これ↓
ViewPagerを使ってフラグメントの切り替えをスワイプとボタンでできるようにする。(kotlinで書きます)
OnPageChangeListenerを使います
※今回はViewPager実装済みとしてやっていくのでアダプターなどには触れません。まだ実装してないよという方はよろしければこちら参考に。[kotlin] ViewPagerでフラグメントを切り替える
ボタンを作成
レイアウトファイルにボタンを作る。
activity_main<?xml version="1.0" encoding="utf-8"?> <androidx.constraintlayout.widget.ConstraintLayout xmlns:android="http://schemas.android.com/apk/res/android" xmlns:app="http://schemas.android.com/apk/res-auto" xmlns:tools="http://schemas.android.com/tools" android:layout_width="match_parent" android:layout_height="match_parent" tools:context=".MainActivity"> <Button android:id="@+id/nextPageBtn" android:layout_width="wrap_content" android:layout_height="wrap_content" android:text="次へ" app:layout_constraintBottom_toBottomOf="parent" app:layout_constraintEnd_toEndOf="parent" app:layout_constraintHorizontal_bias="0.9" app:layout_constraintStart_toStartOf="parent" app:layout_constraintTop_toTopOf="parent" app:layout_constraintVertical_bias="0.95" /> <Button android:id="@+id/prevPageBtn" android:layout_width="wrap_content" android:layout_height="wrap_content" android:text="前へ" app:layout_constraintBottom_toBottomOf="parent" app:layout_constraintEnd_toEndOf="parent" app:layout_constraintHorizontal_bias="0.1" app:layout_constraintStart_toStartOf="@+id/viewPager" app:layout_constraintTop_toTopOf="parent" app:layout_constraintVertical_bias="0.95" /> <androidx.viewpager.widget.ViewPager android:id="@+id/viewPager" android:layout_width="match_parent" android:layout_height="match_parent" app:layout_constraintBottom_toBottomOf="parent" app:layout_constraintEnd_toEndOf="parent" app:layout_constraintStart_toStartOf="parent" app:layout_constraintTop_toTopOf="parent" > </androidx.viewpager.widget.ViewPager> </androidx.constraintlayout.widget.ConstraintLayout>ViewPagerに加えて「次へ」「前へ」の2つのボタンをつける。
ボタンは全フラグメント共通で表示したいのでフラグメントのレイアウトxmlファイルではなくViewPagerを実装しているレイアウトxmlファイルにつける。リスナーをセット
上記で作成したボタンにリスナーをセットする
MainActivity.ktpackage com.example.viewpagersample import androidx.appcompat.app.AppCompatActivity import android.os.Bundle import androidx.core.view.isVisible import androidx.fragment.app.Fragment import androidx.viewpager.widget.ViewPager import kotlinx.android.synthetic.main.activity_main.* class MainActivity : AppCompatActivity() { override fun onCreate(savedInstanceState: Bundle?) { super.onCreate(savedInstanceState) setContentView(R.layout.activity_main) /// フラグメントのリストを作成 val fragmentList = arrayListOf<Fragment>( Sample1Fragment(), Sample2Fragment(), Sample3Fragment() ) /// adapterのインスタンス生成 val adapter = SamplePagerAdapter(supportFragmentManager, fragmentList) viewPager.adapter = adapter /// ページ遷移のリスナーをセット nextPageBtn.setOnClickListener { // ページを1つ進める viewPager.currentItem += 1 } prevPageBtn.setOnClickListener { // ページを1つ戻す viewPager.currentItem -= 1 } } }とりあえず完成。
ただしこのままだと一番最初のぺージや最後のページでも「次へ」「前へ」ボタンが表示されるのでOnPageChangeListenerを使うOnPageChangeListener
OnPageChangeListener: ViewPagerに用意されているメソッドの一つ似たようなものに
SimpleOnPageChangeListenerがある。こちらはimplementsしなければならないメソッドがより少なくonPageSelectedだけになっている。上記のコードに以下を追加する。
MainActivity.kt/// prevBtnの初期visibility prevPageBtn.isVisible = false /// スクロール中の変更処理 viewPager.addOnPageChangeListener(object : ViewPager.OnPageChangeListener { /// implementする override fun onPageSelected(position: Int) { /// btnの表示制御(端では表示しない) prevPageBtn.isVisible = position != 0 nextPageBtn.isVisible = position != fragmentList.size - 1 } override fun onPageScrollStateChanged(state: Int) { } override fun onPageScrolled( position: Int, positionOffset: Float, positionOffsetPixels: Int ) { } })
onPageSelectedのタイミングでposition(その時のページ)が最初と最後の時ボタンをINVISIBLEにするOnPageChangeListener メソッド
メソッド名 呼び出されるタイミング onPageSelected 新しいページが選択され終わったとき onPageScrollStateChanged スクロールの状態が変わった時(多分スクロールされ始めた時とスクロールを終えたとき「状態:スクローリング」「状態:停止」って感じで動く) onPageScrolled ページがスクロールされている最中
onPageScrollStateChangedのとこだけあんまり自信がないので間違ってたら教えてください。おわり
onPageSelectedしか使ってないけどなんとなくでOnPageChangeListener使いました。
kotlin好き。
今回フリー素材のイラストを利用させていただきました。(三日月アルペジオ)
