- 投稿日:2020-01-01T23:37:01+09:00
RuboCopはじめました
Railチュートリアルをカンニングしながらインスタクローンを作っているのですが、RuboCopを導入してみました
初期設定で色々と戸惑ってしまったので、対処方法を自分用にまとめます
RuboCopとは
Ruby Style Guideに則ってコードを自動修正してくれたり、誤った書き方を指摘してくれるgemです
公式ドキュメント
https://docs.rubocop.org/en/stable/GitHub
https://github.com/rubocop-hq/rubocopインストール方法
直接インストール
$ gem install rubocopGemfileからインストール
Gemfilegem 'rubocop', require: falseドキュメントによると、RuboCopはアップデートによって過去のバージョンと互換性のない変化を起こすことがあるらしいので、不測のアップデートを避けたい方はこちらの方法でとのこと
Gemfilegem 'rubocop', '~> 0.78.0', require: false基本的な使用方法
以下のコマンドを実行するだけ。
$rubocopこのままだとどこが規約違反なのか指摘してくれるだけなので、自動で直して欲しい時は-aを付け加える
$rubocop -aこうするとインデントなどの小さな規約違反を自動で直してくれます
自動で直してくれない部分は自分で直す必要あり
ただデフォルトの設定は少し厳しすぎるので、自分で設定を変更してみます
設定を変える
設定を変える方法はルートディレクトリに.rubocop.ymlというファイルを作り、そこに設定を書き込んでいくだけでオーケーです
以下は自分が最初に行っておくべきと感じた設定です
.rubocop.ymlLineLength: Max: 100 Documentation: Enabled: false AsciiComments: Enabled: false MixinUsage: Enabled: false ClassAndModuleChildren: Enabled: falseRails newした直後にrubocop -aを実行してもかなりの数の規約違反が出てきてびっくりすると思いますが、とりあえずこの設定にしておけばRails newの直後からrubocop先生に怒られることはないと思います
またどんな設定があるのかは、ググるよりもGitHubのソースコードを見た方が早いです
rubocop -aを実行して怒られた箇所をGitHubのソースコードから探してみましょう
最後に
自分用なのでかなり雑に書いています。申し訳ないです。
また、おかしい部分がありましたらご指摘ください
- 投稿日:2020-01-01T14:33:22+09:00
Rails 6のDeviseのフォームをBootstrap4 + RailsLayoutでカッコ良くしたい
はじめに
以前、DeviseのフォームをBootstrap4 + RailsLayoutでカッコ良くしたいという記事を書いたが、あの当時はRailsLayoutはBootstrap4未対応だった。しかし、バージョン 2.3.1では対応しているので、Rails 6環境で検証してみた。
環境
- Rails 6.0.2.1
- Ruby 2.5.3
- rails_layout 2.3.11. devise環境の準備
私の記事「Devise4.7をRails6で動かす」の1と2を実行して基本的に動く状態のdevise環境を構築しておく。
2. RailsLayout Gemのインストールとセットアップ
rails_layout のREADMEの中程にあるInstall the RailsLayout Gemの手順に従ってインストールする。
(1) Gemfileに追記してbundle install
Gemfile# Bootstrap gem 'bootstrap', '~>4.0.0' gem 'jquery-rails' gem 'sprockets-rails', '>= 2.3.2' # RailsLayout group :development do gem 'rails_layout' endbundle_install$ bundle install The dependency tzinfo-data (>= 0) will be unused by any of the platforms Bundler is installing for. Bundler is installing for ruby but the dependency is only for x86-mingw32, x86-mswin32, x64-mingw32, java. To add those platforms to the bundle, run `bundle lock --add-platform x86-mingw32 x86-mswin32 x64-mingw32 java`. Using rake 13.0.1 Using concurrent-ruby 1.1.5 Using i18n 1.7.0 長いので省略 Bundle complete! 21 Gemfile dependencies, 81 gems now installed. Use `bundle info [gemname]` to see where a bundled gem is installed. Process finished with exit code 0(2) The “layout:install” Command
Bootstrap4用の
rails generate layout:install bootstrap4コマンドを実行してApplication レイアウト, Navigation, Flash メッセージファイルを生成する。$ rails generate layout:install bootstrap4 Running via Spring preloader in process 69109 remove app/assets/stylesheets/application.css create app/assets/stylesheets/application.css.scss create app/assets/stylesheets/1st_load_framework.css.scss create app/assets/javascripts/application.js remove app/assets/stylesheets/simple.css remove app/assets/stylesheets/foundation_and_overrides.css.scss append app/assets/stylesheets/1st_load_framework.css.scss remove app/views/layouts/application.html.erb create app/views/layouts/application.html.erb create app/views/layouts/_messages.html.erb create app/views/layouts/_navigation.html.erb create app/views/layouts/_navigation_links.html.erb以下のファイルが生成される。
app/views/layouts/application.html.erb
app/views/layouts/messages.html.erb
app/views/layouts/_navigation.html.erb
app/views/layouts/navigation_links.html.erbここで試しにRailsを起動したらエラーになった。
ActionView::Template::Error (Asset `application.js` was not declared to be precompiled in production.
Declare links to your assets in `app/assets/config/manifest.js`.

  //= link application.js
メッセージの通りに
app/assets/config/manifest.jsを修正。app/assets/config/manifest.js//= link_tree ../images //= link_directory ../stylesheets .css //= link application.js <=これを追加(3) Navigationファイルに各種リンク追加
$ rails generate layout:navigation bootstrap4
Running via Spring preloader in process 70208
   identical  app/views/layouts/_navigation_links.html.erb
      create  app/views/layouts/_nav_links_for_auth.html.erb
        gsub  app/views/layouts/_navigation.html.erb
(4) Devise Viewsを再生成
GemのREADMEには書いてないが
rails generate layout:devise bootstrap4が動くようなので実行。$ rails generate layout:devise bootstrap4 Running via Spring preloader in process 70341 conflict app/views/devise/sessions/new.html.erb Overwrite /Users/your home/devise-rails6/app/views/devise/sessions/new.html.erb? (enter "h" for help) [Ynaqdhm] Y force app/views/devise/sessions/new.html.erb conflict app/views/devise/passwords/new.html.erb Overwrite /Users/your home/devise-rails6/app/views/devise/passwords/new.html.erb? (enter "h" for help) [Ynaqdhm] Y force app/views/devise/passwords/new.html.erb conflict app/views/devise/passwords/edit.html.erb Overwrite /Users/your home/devise-rails6/app/views/devise/passwords/edit.html.erb? (enter "h" for help) [Ynaqdhm] Y force app/views/devise/passwords/edit.html.erb conflict app/views/devise/registrations/edit.html.erb Overwrite /Users/your home/devise-rails6/app/views/devise/registrations/edit.html.erb? (enter "h" for help) [Ynaqdhm] Y force app/views/devise/registrations/edit.html.erb(5) 動作確認
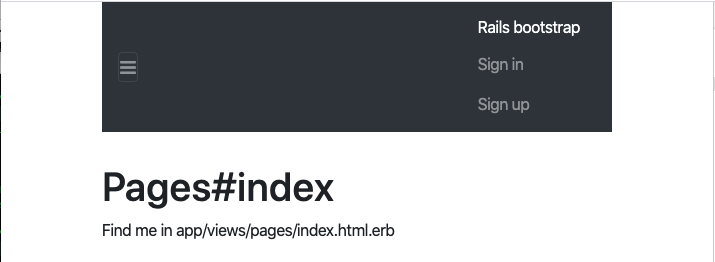
やることはこれだけなので、ここでブラウザで確認してみたら、何か出てるが真っ白だった。これは以前書いた記事DeviseのフォームをBootstrap4 + RailsLayoutでカッコ良くしたいの時と同じである。
3. 真っ白画面の修正
見た目だけの問題と思うので、
app/views/layouts/application.html.erbをチェックし、ここから呼び出されるlayouts/navigationを見ると、背景色として<nav class="navbar navbar-dark bg-inverse">でbg-inverseを指定しているが、参考記事によればBootstrap4はbg-inverse持っていない。従って、全体背景色の白が出ているだけであった。そこで、bg-darkにしてみたらちゃんと表示された。app/views/layouts/_navigation.html.erb<%# navigation styled for Bootstrap 4.0 %> <div class="container"> <nav class="navbar navbar-dark bg-dark"> <=ここを修正 <ul class="nav navbar-nav clearfix"> <li class="nav-item"> <button class="navbar-toggler hidden-sm-up nav-link" type="button" data-toggle="collapse" data-target="#exCollapsingNavbar2" aria-controls="exCollapsingNavbar2" aria-expanded="false" aria-label="Toggle navigation"> ☰ </button> </li> </ul> <div class="collapse navbar-toggleable-xs" id="exCollapsingNavbar2"> <%= link_to "Rails bootstrap", root_path, class: 'navbar-brand' %> <ul class="nav navbar-nav"> <%= render 'layouts/navigation_links' %> <%= render 'layouts/nav_links_for_auth' %> </ul> </div> </nav> </div>
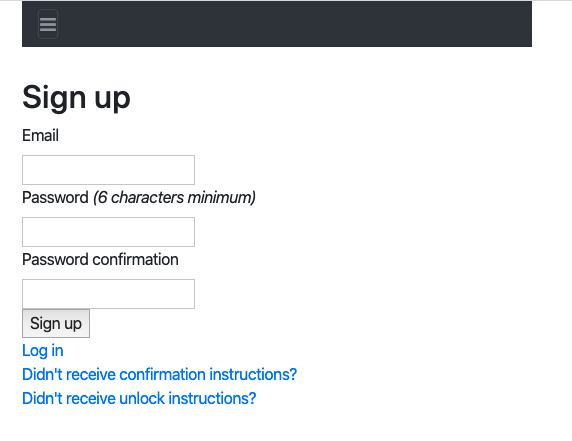
Sign upをクリックするとサインアップ画面もRailsLayoutによって置き換えられていた。これでBootstrap4 + RailsLayoutでカッコ良くなった。
ここから先はCSSなりViewなりを満足するまでゴリゴリやって下さい。下記のexamplesが参考になります。
関連記事
Devise4.7をRails6で動かす
DeviseのフォームをBootstrap4 + RailsLayoutでカッコ良くしたい参考記事
- 投稿日:2020-01-01T10:56:24+09:00
Devise4.7をRails6で動かす
はじめに
1年前に書いた「Rails5でdeviseをAmazon SES SMTPサーバーを使って動かす」をそのままRails6でやろうとしたら若干修正が必要だったので更新版を書いた。
1. Railsプロジェクト準備
(1) 空のRailsプロジェクト
空のRailsプロジェクトを rails new して、DB設定と rake db:create まで終わらせておきます。この記事の環境は次の通り。なお、ruby 2.6はbundler 1系を包含していて後々面倒になるので使わなかった。また、ruby 2.7はrailsでDefaultでインストールされるSpring 2.1が未対応でrails serverが起動しなかったので使わなかった。
- Rails 6.0.2.1
- Ruby 2.5.3
- Devise 4.7.1
/bin/bash -c "env RBENV_VERSION=2.5.3 /usr/local/Cellar/rbenv/1.1.2/libexec/rbenv exec ruby /Users/your_home/devise-rails6/bin/spring rails 'db:create'"
Created database 'devise_rails6_development'
Created database 'devise_rails6_test'

Process finished with exit code 0
(2) トップpageを作る。
私はpagesとしましたが、任意です。
$ rails g controller Pages index(3) routingに作ったトップpageを
localhost:3000でアクセスできるように追加する。config/routesRails.application.routes.draw do root 'pages#index' <=追加rootは特別なので / ではなく # を使う事に注意 get 'pages/index' <=rails gで自動作成されたもの # For details on the DSL available within this file, see http://guides.rubyonrails.org/routing.html end2. deviseインストール
基本的にはDeviseのREADMEの通りに進めます。
(1) Gemfileにdeviseを追記してbundle install
# devise gem 'devise', '>=4.7.1'bundle_install/bin/bash -c "env RBENV_VERSION=2.5.3 /usr/local/Cellar/rbenv/1.1.2/libexec/rbenv exec bundle install" The dependency tzinfo-data (>= 0) will be unused by any of the platforms Bundler is installing for. Bundler is installing for ruby but the dependency is only for x86-mingw32, x86-mswin32, x64-mingw32, java. To add those platforms to the bundle, run `bundle lock --add-platform x86-mingw32 x86-mswin32 x64-mingw32 java`. Using rake 13.0.1 Using concurrent-ruby 1.1.5 省略 Using web-console 4.0.1 Using webpacker 4.2.2 Bundle complete! 15 Gemfile dependencies, 71 gems now installed. Use `bundle info [gemname]` to see where a bundled gem is installed. Process finished with exit code 0(2) rails generate
$ rails generate devise:install
Running via Spring preloader in process 38797
      create  config/initializers/devise.rb
      create  config/locales/devise.en.yml
===============================================================================

Some setup you must do manually if you haven't yet:

  1. Ensure you have defined default url options in your environments files. Here
     is an example of default_url_options appropriate for a development environment
     in config/environments/development.rb:

       config.action_mailer.default_url_options = { host: 'localhost', port: 3000 }

     In production, :host should be set to the actual host of your application.

  2. Ensure you have defined root_url to *something* in your config/routes.rb.
     For example:

       root to: "home#index"

  3. Ensure you have flash messages in app/views/layouts/application.html.erb.
     For example:

       <p class="notice"><%= notice %></p>
       <p class="alert"><%= alert %></p>

  4. You can copy Devise views (for customization) to your app by running:

       rails g devise:views

===============================================================================
(3) development環境のDevise mailer用default URLオプション を設定
config/environments/development.rbに以下を追記config/environments/development.rbRails.application.configure do # Settings specified here will take precedence over those in config/application.rb. 途中省略 # devise config.action_mailer.default_url_options = { host: 'localhost', port: 3000 } end(4) deviseで管理するユーザーのモデルを生成
$ rails generate devise Users
Running via Spring preloader in process 39709
[WARNING] The model name 'Users' was recognized as a plural, using the singular 'User' instead. Override with --force-plural or setup custom inflection rules for this noun before running the generator.
      invoke  active_record
      create    db/migrate/20200101012615_devise_create_users.rb
      create    app/models/user.rb
      insert    app/models/user.rb
       route  devise_for :users
(5) DB migrate
/bin/bash -c "env RBENV_VERSION=2.5.3 /usr/local/Cellar/rbenv/1.1.2/libexec/rbenv exec ruby /Users/your home/devise-rails6/bin/spring rails 'db:migrate'"
== 20200101012615 DeviseCreateUsers: migrating ================================
-- create_table(:users)
   -> 0.0179s
-- add_index(:users, :email, {:unique=>true})
   -> 0.0212s
-- add_index(:users, :reset_password_token, {:unique=>true})
   -> 0.0154s
== 20200101012615 DeviseCreateUsers: migrated (0.0547s) =======================


Process finished with exit code 0
(6) defaultのdevise viewをカスタマイズするためにアプリにViewを追加する
$ rails generate devise:views
Running via Spring preloader in process 41745
      invoke  Devise::Generators::SharedViewsGenerator
      create    app/views/devise/shared
      create    app/views/devise/shared/_error_messages.html.erb
      create    app/views/devise/shared/_links.html.erb
      invoke  form_for
      create    app/views/devise/confirmations
      create    app/views/devise/confirmations/new.html.erb
      create    app/views/devise/passwords
      create    app/views/devise/passwords/edit.html.erb
      create    app/views/devise/passwords/new.html.erb
      create    app/views/devise/registrations
      create    app/views/devise/registrations/edit.html.erb
      create    app/views/devise/registrations/new.html.erb
      create    app/views/devise/sessions
      create    app/views/devise/sessions/new.html.erb
      create    app/views/devise/unlocks
      create    app/views/devise/unlocks/new.html.erb
      invoke  erb
      create    app/views/devise/mailer
      create    app/views/devise/mailer/confirmation_instructions.html.erb
      create    app/views/devise/mailer/email_changed.html.erb
      create    app/views/devise/mailer/password_change.html.erb
      create    app/views/devise/mailer/reset_password_instructions.html.erb
      create    app/views/devise/mailer/unlock_instructions.html.erb
(7) Userモデルの編集
omniauthable以外全部使ってみます。
app/models/user.rbclass User < ApplicationRecord # Include default devise modules. Others available are: # :confirmable, :lockable, :timeoutable, :trackable and :omniauthable devise :database_authenticatable, :registerable, :recoverable, :rememberable, :validatable, :confirmable, :lockable, :timeoutable end(8) User migrationファイルの編集
Userモデルに合わせて編集します。全部使うのでコメントを全部外しました。
db/migrate/20200101hhmmss_devise_create_users.rb# frozen_string_literal: true class DeviseCreateUsers < ActiveRecord::Migration[6.0] def change create_table :users do |t| ## Database authenticatable t.string :email, null: false, default: "" t.string :encrypted_password, null: false, default: "" ## Recoverable t.string :reset_password_token t.datetime :reset_password_sent_at ## Rememberable t.datetime :remember_created_at ## Trackable t.integer :sign_in_count, default: 0, null: false t.datetime :current_sign_in_at t.datetime :last_sign_in_at t.string :current_sign_in_ip t.string :last_sign_in_ip ## Confirmable t.string :confirmation_token t.datetime :confirmed_at t.datetime :confirmation_sent_at t.string :unconfirmed_email # Only if using reconfirmable ## Lockable t.integer :failed_attempts, default: 0, null: false # Only if lock strategy is :failed_attempts t.string :unlock_token # Only if unlock strategy is :email or :both t.datetime :locked_at t.timestamps null: false end add_index :users, :email, unique: true add_index :users, :reset_password_token, unique: true add_index :users, :confirmation_token, unique: true add_index :users, :unlock_token, unique: true end end再度migrationします。
/bin/bash -c "env RBENV_VERSION=2.5.3 /usr/local/Cellar/rbenv/1.1.2/libexec/rbenv exec ruby /Users/your home/devise-rails6/bin/spring rails 'db:migrate'"

Process finished with exit code 0
(9) 動作確認
とりあえず、ここまでで動作確認してみます。
app/views/layouts/application.html.erbにサインアップ、ログインのリンクを追加してブラウザで確認します。app/views/layouts/application.html.erb<!DOCTYPE html> <html> <head> <title>DeviseRails6</title> <%= csrf_meta_tags %> <%= csp_meta_tag %> <%= stylesheet_link_tag 'application', media: 'all', 'data-turbolinks-track': 'reload' %> <%= javascript_pack_tag 'application', 'data-turbolinks-track': 'reload' %> </head> <body> ------------------------- ここから <header> <nav> <% if user_signed_in? %> <strong>Login account : <%= current_user.email %></strong> <strong><%= link_to "Home", root_path %></strong> <%= link_to 'プロフィール変更', edit_user_registration_path %> <%= link_to 'ログアウト', destroy_user_session_path, method: :delete %> <% else %> <%= link_to 'サインアップ', new_user_registration_path %> <%= link_to 'ログイン', new_user_session_path %> <% end %> </nav> </header> <p class="notice"><%= notice %></p> <p class="alert"><%= alert %></p> ------------------------- ここまで <%= yield %> </body> </html>ブラウザで開いて以下のようになっていればDeviseは動いています。
サインアップをクリックしたところ
(10) SMTPの設定
まだSMTPの設定をしてませんから、サインアップしてもメールアドレス確認の自動メールが送信できないので、実際にユーザー登録をすることはまだできません。
メールの設定は私の過去記事「Rails5でdeviseをAmazon SES SMTPサーバーを使って動かす」を参照して下さい。
今回はAmazon SESではなく、ロリポップを試しました。
config/environments/development.rbRails.application.configure do 途中省略 # devise default url config.action_mailer.default_url_options = { host: 'localhost', port: 3000 } # SMTP configuration config.action_mailer.raise_delivery_errors = true config.action_mailer.delivery_method = :smtp config.action_mailer.smtp_settings = { :address => "smtp.lolipop.jp", :port => 587, :user_name => "<ロリポップのユーザー名>", :password => Rails.application.credentials.LOLIPOP_PASSWORD, <=rails credential内にパスワードを定義しました。 :authentication => :'login', <=ロリポップはこの設定にして下さい。 :enable_starttls_auto => true } end基本的なDeviseの構築は以上で完了。
3. Userテーブルにカラム追加
現実的な業務用件には普通は氏名や電話番号などがあるだろう。その場合、Userテーブルにカラムを追加し、RegistrationのViewに該当項目を追加すれば良い。例えば、名前、苗字、会員番号を追加するなら以下のようになる。
db/migrate/20200101hhmmss_add_devise_column_to_users.rbadd_column :users, :AccountNum, :bigint add_column :users, :FirstName, :string add_column :users, :LastName, :string関連記事
Rails5でdeviseをAmazon SES SMTPサーバーを使って動かす
Rails 6のDeviseのフォームをBootstrap4 + RailsLayoutでカッコ良くしたい
- 投稿日:2020-01-01T10:00:53+09:00
Rails5.2でSendGridを使う
Rails5.2で色々やってみる という記事の続きで、メール送信機能を実装します。
まずは、railsコマンドでメーラの作成をします。
rails g mailer Notifications greet
:(省略)
greetというメソッドとテンプレート(textとhtml)が生成されています。今回は送信先のアドレスのみ引数として受け付けるように修正しました(その他はそのまま)。
app/mailers/notifications_mailer.rbdef greet(to) @greeting = "Hi" mail to: to endメールの送信フォーム(mail1)と送信完了のページ(mail2)を作成します。
config/routes.rbget '/mail1', to: 'pages#mail1' post '/mail2', to: 'pages#mail2'コントローラ内の実装は以下のようになります。先に定義したgreetメソッドにメールの送信先を渡してそのまま配信しています。
app/controllers/pages_controller.rbdef mail1 end def mail2 @to = params[:to] NotificationsMailer.greet(@to).deliver_later end対応するビューは以下のようになります。
app/views/pages/mail1.html.erb<%= form_tag mail2_path do %> <% if flash[:error].present? %> <div id="error_explanation"> <p><%= flash[:error] %></p> </div> <% end %> To: <%= text_field_tag :to, "", {placeholder: "smith@example.com" ,size: 60} %> <%= submit_tag 'Send email' %> <% end %>app/views/pages/mail2.html.erb<p>Message was sent to <%= @to %></p> <p><%= link_to 'Back', mail1_path %></p>ローカルの開発環境(development)では実際にメールは送信されず、ログに送信されるメールが出力されますので、ここまでの設定でテストが可能なはずです。次にproduction環境にSendGridを設定します。SendGridのダッシュボードから秘密鍵を取得しておいてください。
config/environments/production.rbActionMailer::Base.smtp_settings = { :user_name => 'apikey', :password => Rails.application.credentials.sendgrid_secret_key, :domain => 'wiki.lmlab.net', :address => 'smtp.sendgrid.net', :port => 2525, :authentication => :plain, :enable_starttls_auto => true }
sendgrid_secret_keyは以下のコマンドでcredentials.ymlを開いて書き込んでください(master.keyの無い環境では読み書きできません、heroku環境でのRAILS_MASTER_KEYの設定方法については Rails5.2でStripeを使うのおまけ欄を参照してください)。EDITOR=vim rails credentials:edit
- 投稿日:2020-01-01T04:34:49+09:00
Railsでモデルから年齢の計算ロジックを別クラスに切り出す
Railsでモデルから年齢の計算ロジックを別クラスに切り出す方法です。
前提
誕生日のカラムを持つモデルが存在する
e.g.
- User モデルの birthed_on カラム
- Employee モデルの birthed_on カラム実装
Age というクラスを作成する
class Age
  def initialize(birthed_on)
    @birthed_on = birthed_on
    @value = calculate
  end

  def ==(other_age)
    to_i == other_age.to_i
  end

  def to_i
    value
  end

  def to_s
    value.to_s
  end

  def inspect
    to_i
  end

  private
  attr_reader :birthed_on, :value

  def calculate
    current = Time.current.strftime('%Y%m%d').to_i
    birthed = birthed_on.strftime('%Y%m%d').to_i
    (current - birthed) / 10_000
  end
end
年齢の計算ロジックを切り出すモデルに composed_of を追加する
# 例) ユーザモデル
class User < ApplicationRecord
  # 追加
  composed_of :age, mapping: [:birthed_on]
end

# 例) 従業員モデル
class Employee < ApplicationRecord
  # 追加
  composed_of :age, mapping: [:birthed_on]
end

# 例) 子どもモデル
class Child < ApplicationRecord
  # 追加
  composed_of :age, mapping: [:birthed_on]
end
確認
pry(main)> User.find(1).update(birthed_on: Date.parse('1990-01-01'))
=> true
pry(main)> User.find(1).age
=> 30
以上です。


