- 投稿日:2019-10-12T20:20:01+09:00
"作りながら学ぶReact入門"を参考に、React+NodeのWebアプリをHerokuにデプロイする入門。
初学者向けの内容にしたつもりです。
自分自身も初学者なのでいろいろ無駄な点があると思いますがあしからず。環境構築とかの詳しい説明は書籍の方でお確かめください。(ダイマ)
Amazonリンク
作りながら学ぶReact入門結果
ここ
https://react-node-first-connect.herokuapp.com/環境構築
金欠マンのためWindows10でやりました。Mac欲しい。
※Nodeをお持ちでない方はまず ここ からダウンロード。推奨版でOK。まずプロジェクト作成。
mkdir プロジェクト名
cd プロジェクト名
mkdir public src
npm init -y
出来たpakage.jsonにサーバー起動とWebpackビルドのスクリプトを追加しておきます。
package.json--省略-- "main":"index.js", "scripts":{ "start": "node server.js", "build": "webpack", "test": "echo \"Error: no test specified\" && exit 1" }, "keywords":[], --省略--とりあえずReact環境構築に必要なものをインストールしていきます。
・React本体
・Webpack (モジュールバンドラー。jsとかcssとか画像とかを一つのjsファイルにまとめてくれる奴?)
・Babel(webpackで使うトランスパイラ。Reactの構文を変換してくれる奴?)
あとついでにBootstrapもとっとこハムタロサァン...。書籍の方にはwebpack-dev-serverやESLintなどもありますが、今回の目標は本番環境へのデプロイなので省略。
npm install react react-dom
npm install webpack webpack-cli css-loader style-loader  --save-dev
npm install @babel/core @babel/preset-env @babel/preset-react @babel/cli babel-loader--save-dev
npm install bootstrap
各種設定ファイルを作っていきます。
Windowsの作成コマンドはこちら。
copy nul ファイル名(コピペ用。拡張子のみのは最後にピリオドいる)
wepback.config.js
.babelrc.webpack.config.jsmodule.exports = { entry: { app: "./src/pre-page-main.js" //ファイル名は何でも構いません }, output: { path: __dirname + '/public/js', filename: "[name].js" }, devtool: "eval-source-map", mode: 'production', module: { rules: [ { test: /\.css$/, loader: ["style-loader", "css-loader"] }, { test: /\.js$/, exclude: /node_modules/, loader: 'babel-loader', } ] } }.babelrc{ "presets": ["@babel/preset-env", "@babel/preset-react"] }実行ファイル作成
index.html(htmlファイル)
pre-page.main.js(Reactのjsファイル)
server.js(nodeのjsファイル)↓こういう感じでフォルダを配置。
フォルダ構造/ - public - index.html | - src - pre-page-main.js | - server.jspublic/index.html<!DOCTYPE html> <html> <head> <meta charset="utf-8"> <meta name="viewport" content="width=device-width, initial-scale=1, shrink-to-fit=no"> <meta http-equiv="X-UA-Compatible" content="IE=Edge, chrome=1" /> <title>React-Express</title> </head> <body> <div id="root"></div> <p>あ</p> <script type="text/javascript" src="app.js"></script> </body> </html>src/pre-page-main.jsimport React from 'react'; import ReactDOM from 'react-dom'; import '../node_modules/bootstrap/dist/css/bootstrap.min.css'; const FirstNav = () => { return ( <nav className="navbar navbar-expand-sm navbar-dark bg-primary"> <a href="./"><h4 className="navbar-brand col-1 py-2">Title</h4></a> <a href="#" className="nav-item nav-link text-light offset-1">Home</a> <a href="#" className="nav-item nav-link text-light">My-Tasks</a> </nav> ) } ReactDOM.render( <FirstNav />, document.getElementById('root') )server.jsconst express = require('express'); const app = express(); app.use(express.static('src')) app.use(express.static('public')) app.use(express.static('public/js')) app .get('/', (req, res) => { res.sendFile(__dirname + '/index.html'); }) //ローカル環境での実行 /* app.listen(3030, () => { console.log('just moving...'); }); */ //デプロイ時の実行 /* app.listen(process.env.PORT); */必要に応じてコメントアウト消してください。
Webpackビルド
webpack.config.jsを参考に実際に読み込まれるファイルを作成します。
(成功すればpublicフォルダ内にjsフォルダ、その中にapp.jsが作成されているはずです。)npm run buildこれで一応ローカル上ではReactの動作確認ができる状態です。
確認したい方は
①server.js内の上側のapp.listen()をコメントアウトしてるので消す。
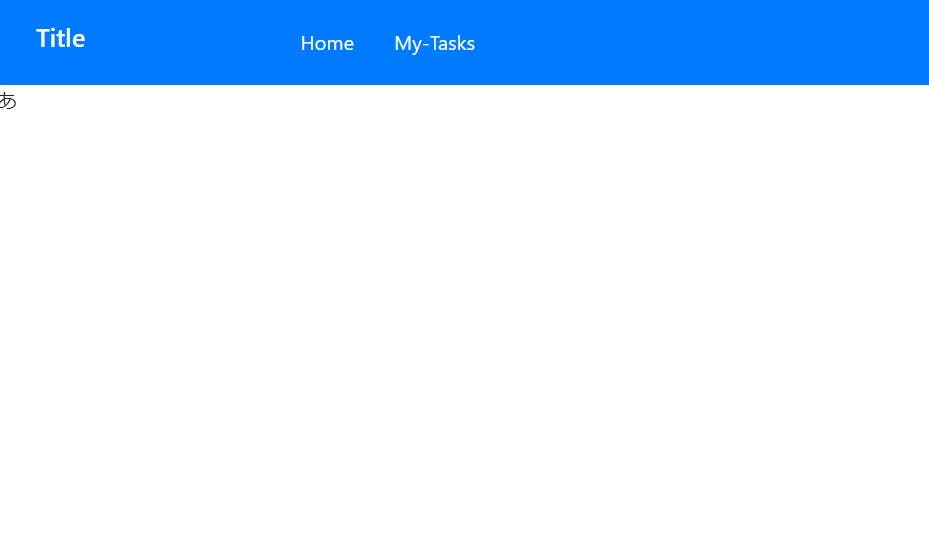
②サーバー起動。npm start③ターミナル(コマンドプロンプト)を閉じずにhttp://localhost/3030 にアクセス。
こんなのが出るはず。
④動作確認できたらCtrl+Cでサーバー停止。
⑤念のため上側のapp.listen()をもう一回コメントアウトしておく。Herokuの操作いろいろ
①Herokuの会員登録をする。Herokuトップページ
②コマンドラインからHerokuを動かせるHeroku-cliをダウンロードする。Heroku-cli
③コマンドラインからHerokuへログインする。(オプションに-iをつけることでブラウザを介さずにログインできます。)
heroku login -i④Herokuのアプリを作成
heroku create アプリ名いよいよHerokuへデプロイ
①本番環境用にserver.js内の下側のapp.listen()を再表示。(コメントアウト消す)
②Gitリポジトリを作成。
※Gitをお持ちでない方は こちらgit init③プロジェクトをGitの管理下におく。
git add .
git commit -m "first commit."
④リモートリポジトリにHerokuのプロジェクトを紐づけする?(ここら辺曖昧)
heroku git:remote -a アプリ名⑤リモートリポジトリへpush。
git push heroku masterこれでエラーがでなければデプロイは完了です。
結果を見たい場合、コマンドラインで
heroku openと打つか、ブラウザでHerokuの操作をすることで見れます。
①右上のダッシュボードを選択
②自分の作ったプロジェクトを選択
③右上のOpen appを選択
- 投稿日:2019-10-12T16:15:52+09:00
`Node-Postgres` を使ったときに、試行錯誤してできたPostgresクラス
はじめに
この記事は自分が小規模アプリ開発でバックエンドを1から担当したときに、失敗を経て最終的に出来上がった
Node-Postgresのクラスを紹介するものです。一応Node-Postgresは2019年8月の時のものを使用しています。改善点などありましたら是非是非教えてください!
Node-Postgresのベストプラクティスが中々見つからないどのサイトもチュートリアル的なものだったり、
Poolを使わずClientをそのままインスタンス化して使用している古いものばかりで、ベストプラクティスを探すのに時間がかかりました。(最近はORMが主流だからなんですかねやっぱり)
結局見つからなかったのでドキュメント、GitHubであがっていた質問、テストで出てきたバグ等を参考にして更新していきました。まずはコード
長々と説明するのもあれなのでまずはソースコード出します。こんな感じになりました。
postgres.jsconst { Pool } = require('pg'); const connectionString = 'postgresql://postgres:postgres@localhost:5432/hogehoge_db'; const pool = new Pool({ connectionString }); /** * Postgresクラス */ class Postgres { /** * Poolからclientを取得 * @return {Promise<void>} */ async init() { this.client = await pool.connect(); } /** * SQLを実行 * @param query * @param params * @return {Promise<*>} */ async execute(query, params = []) { return (await this.client.query(query, params)).rows; } /** * 取得したクライアントを解放してPoolに戻す * @return {Promise<void>} */ async release() { await this.client.release(true); } /** * Transaction Begin * @return {Promise<void>} */ async begin() { await this.client.query('BEGIN'); } /** * Transaction Commit * @return {Promise<void>} */ async commit() { await this.client.query('COMMIT'); } /** * Transaction Rollback * @return {Promise<void>} */ async rollback() { await this.client.query('ROLLBACK'); } } /** * Postgresのインスタンスを返却 * @return {Promise<Postgres>} */ const getClient = async () => { const postgres = new Postgres(); await postgres.init(); return postgres; }; module.exports.getPostgresClient = getClient;
Poolは一つ生成するpostgres.jsconst pool = new Pool({ connectionString });はクラスの外でインスタンス化しました。理由は再度使う
Clientを保存する(?)コネクションプールなので、複数も必要ないからです。
ClientはPool経由で生成するpostgres.jsasync init() { this.client = await pool.connect(); }前の
Node-PostgresではClientを直接インスタンス化するようになっていましたが、今はPool.connect()を使って生成することを公式でも推奨しています。
Node-Postgres Pooling
ちなみにconstructorではない理由は、async awaitが使えなかったからです。これについては後述します。使用するときは直接このクラスを
newしないpostgres.js/** * Postgresのインスタンスを返却 * @return {Promise<Postgres>} */ const getClient = async () => { const postgres = new Postgres(); await postgres.init(); return postgres; }; module.exports.getPostgresClient = getClient;ここで
getClientメソッドを、(この名前が適切かは別として…)getPostgresClientと言う名前でexportsしています。
constructorではasync awaitが使えないため、メソッド内でnewしてinit()メソッドを呼んでもらうことで確実にClientインスタンスを生成するようにしています。使う時
SomeFunc.jsconst { getPostgresClient } = require('postgres'); async function someFunc() { const db = await getPostgresClient(); try { const sql = `UPDATE ~`; const params = ['1', 'name']; await db.begin(); await db.execute(sql, params); await db.commit(); } catch (e) { await db.rollback(); throw e; } finally { await db.release(); } }失敗履歴
Postgres classのインスタンス生成時の度に、new Pool()を行っていた。
- つまり
constructorの中でnew Pool()呼んでました。- コネクションプールのメリットを完全に潰してました。当時の自分は何を考えていたのだろう…。
- シングルトンパターンでPoolを管理していた。
- 短時間で10リクエスト送ると
client.release()でエラーが多発し処理が止まりました。- 表示されたエラーは
Release called on client which has already been released to the pool.
- 他で既に
releaseしたclientを再度リリースしていたらしいです。Clientオブジェクトまで全てのリクエストで共有されてたんですね。 2つめの失敗のコードの一部がこちらpostgres.js/** * Poolから接続 * @return {Promise<void>} */ static async connect() { try { // poolが無いなら生成 if (typeof this.pool === 'undefined') { this.pool = new Pool({ connectionString: process.env.DATABASE_URL || 'postgresql://postgres:postgres@localhost:5432/hogehoge_db' }); Log.info('Initial Postgres instantiation'); } // poolから接続できるクライアントを取得 this.client = await this.pool.connect(); } catch (e) { throw e; } }ちなみにその他のメソッドは全て
staticメソッドでした。
(ちなみにこの時はまだgetClientメソッドはありませんでした。)
なぜあのエラーが出てしまうのかは、イベントループを勉強すればわかりそうな気がしているのでそのあたり探ってみます。参考サイト
他にもあったんですが保存するのを忘れてました
- 投稿日:2019-10-12T14:52:17+09:00
dnmonsterで生成した画像データをiterm2上で表示してみる
dnmonsterとは
githubの初期アイコンなどのランダムな画像はindenticonと呼ばれるみたい。
dnmonsterはindenticonを生成して返却してくれるNode.jsで作られたwebサーバ。
amouat/dnmonster: Dockerised Node server for KevinGuadin's monsterids
モンスターがかわいい。実行環境
- macOS Mojave
- iterm2
- docker
試してみる
$ docker run -d -p 8000:8080 amouat/dnmonster
$ curl http::/localhost:8000/monster/sk8metal
�PNG

bKGD�������oIDAT8�c`C�\����*��Ĩe"d1bD�
�lb耑�!��X�b�2�a���D{�[葁.��P
                             g���^�zb$֕�
                                       řa��E
.��t!�+a��Q@]��R�\]��IEND�B`�%
PNGの画像データとして返ってきた。
imgcatを用意する
iterm2で画像を表示するためにimgcatを用意する。
$ cd /usr/local/bin;wget "https://www.iterm2.com/utilities/imgcat";sudo chmod +x imgcatdnmonsterから返却された画像データを表示してみる
imgcatを利用してdnmonsterから返却された画像データをiterm2上で表示してみる。
$ curl http:/localhost:8000/monster/sk8metal | imgcat
別のリクエストに変えると画像データも変わる。
参考


- 投稿日:2019-10-12T14:19:45+09:00
自分のGoogleカレンダーにJWTを使って予定を追加してみる
やりたいこと
アプリケーションからGoogleカレンダーに予定を追加することはGoogle Calendar APIを利用すれば可能です。当然ながら、カレンダーに予定を追加するためには、ユーザ認証が必要なわけですが、この認証がかなり複雑です。特に、Calendar APIのクイックスタートに掲載されている方法は、ブラウザによるGoogleアカウントでのログイン操作が必要で、アプリケーションからの利用には向いていません。
そこで今回は、JWT(JSON Web Token)を使って、ブラウザからのログイン操作なしで特定のGoogleカレンダーに予定を追加することをやってみます。
全体の流れ
JWTを使ってGoogleカレンダーに予定を追加する全体の流れは以下の通りです。
1.Google Calendar APIの有効化
2.Googleカレンダーへのサービスアカウントの権限追加
3.予定の投稿用プログラムの作成1.Google Calendar APIの有効化
まずは、Google Calendar APIを有効化します。そして、Calendar APIを通じてカレンダーに予定を追加する専用アカウントであるサービスアカウントを作成し、このサービスアカウントを利用するためのKey情報(JSON)を取得します。
①Google Cloud プラットフォームサイトにアクセス
Google Calendar APIを有効にするためにGoogle Cloud プラットフォームにアクセスします。
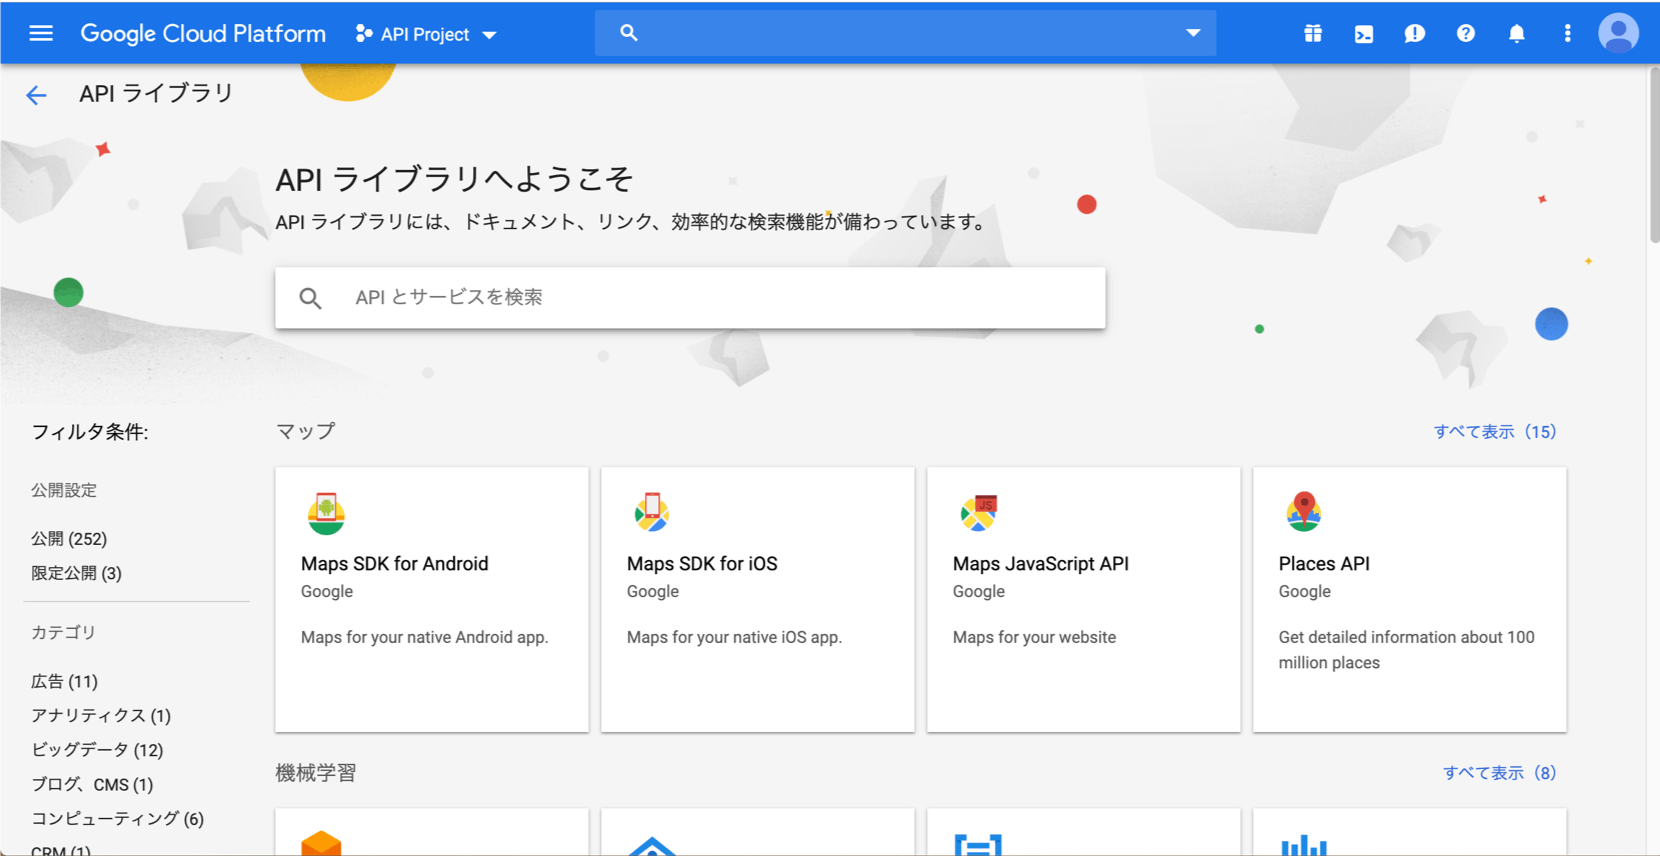
②Calendar APIを検索
検索欄に「calendar」と入力して検索して、Google Calendar APIを選択します。ちなみに、カタカナで検索しても出てこないので、ちゃんと英語で検索しましょう。
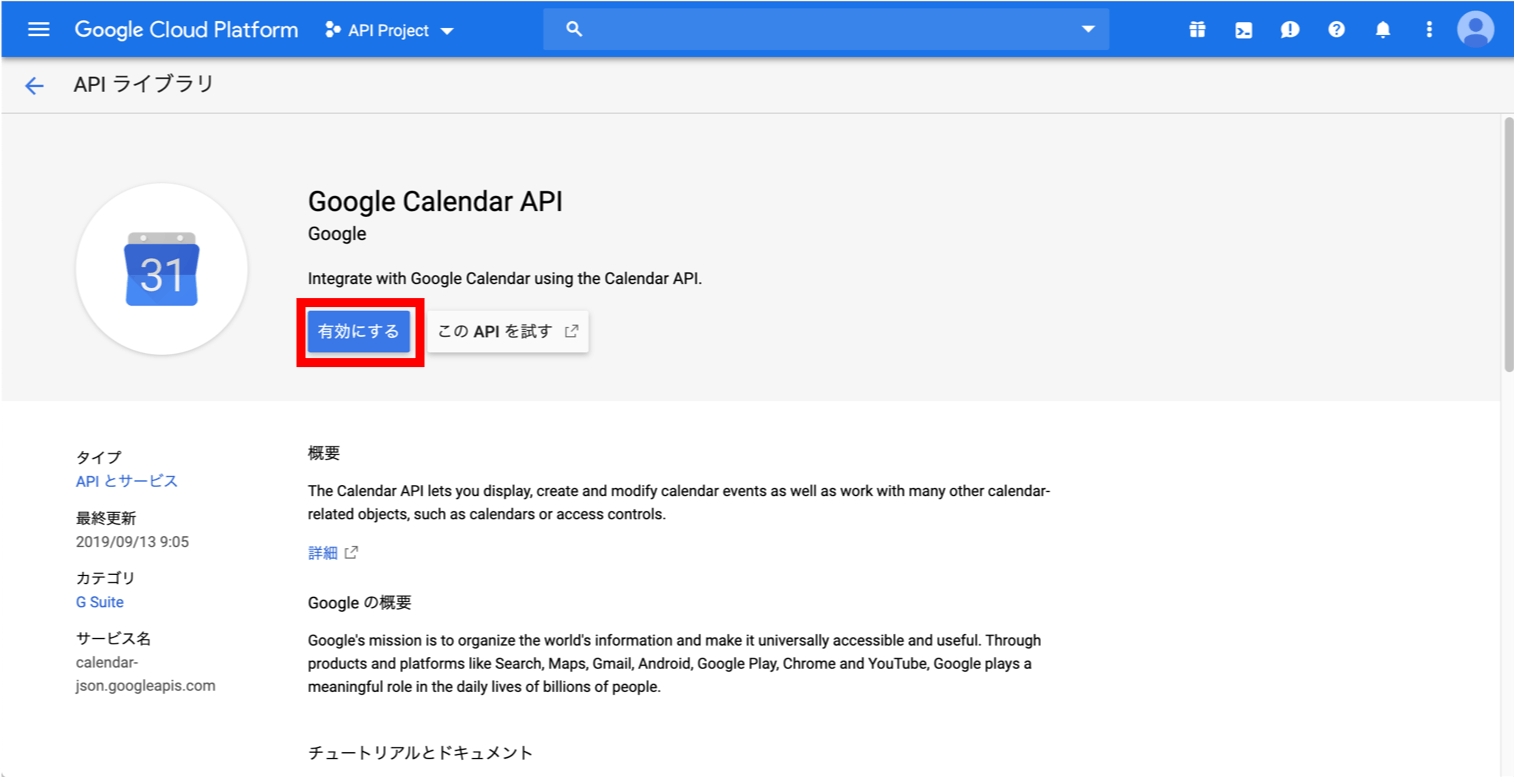
③Calendar APIを有効化
Google Calendar APIの画面で「有効にする」ボタンをクリックして、Google Calendar APIを有効化します。
④認証情報の追加
次に、画面左側の「認証情報」を選択します。
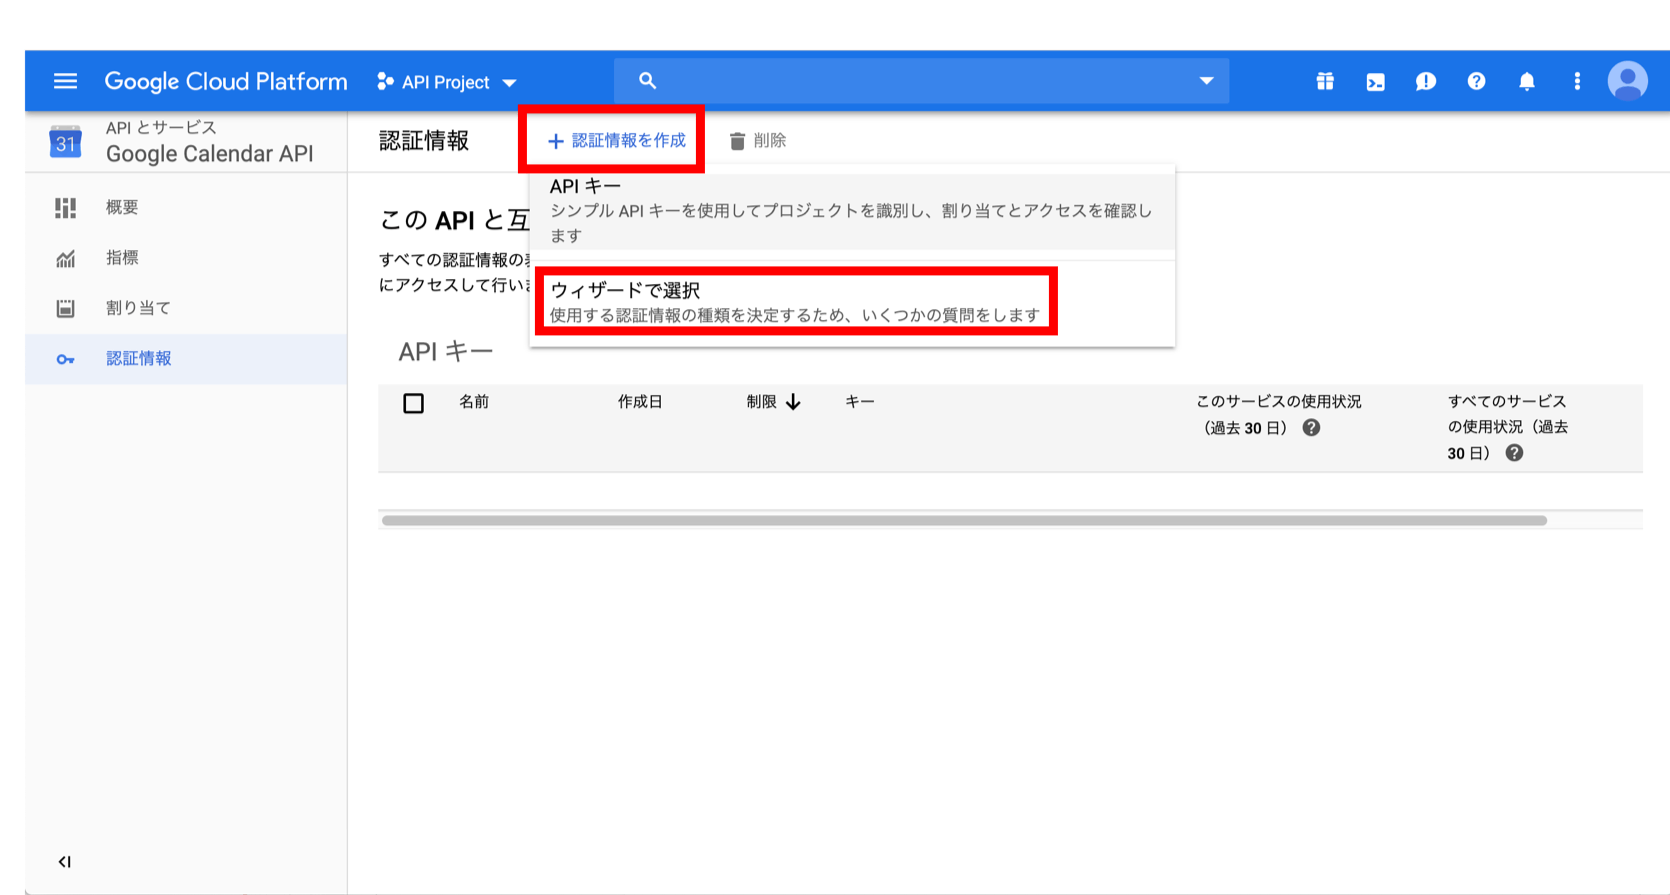
⑤認証情報の追加
画面上部の「+認証情報を作成」をクリックし「ウィザードで選択」をクリックします。
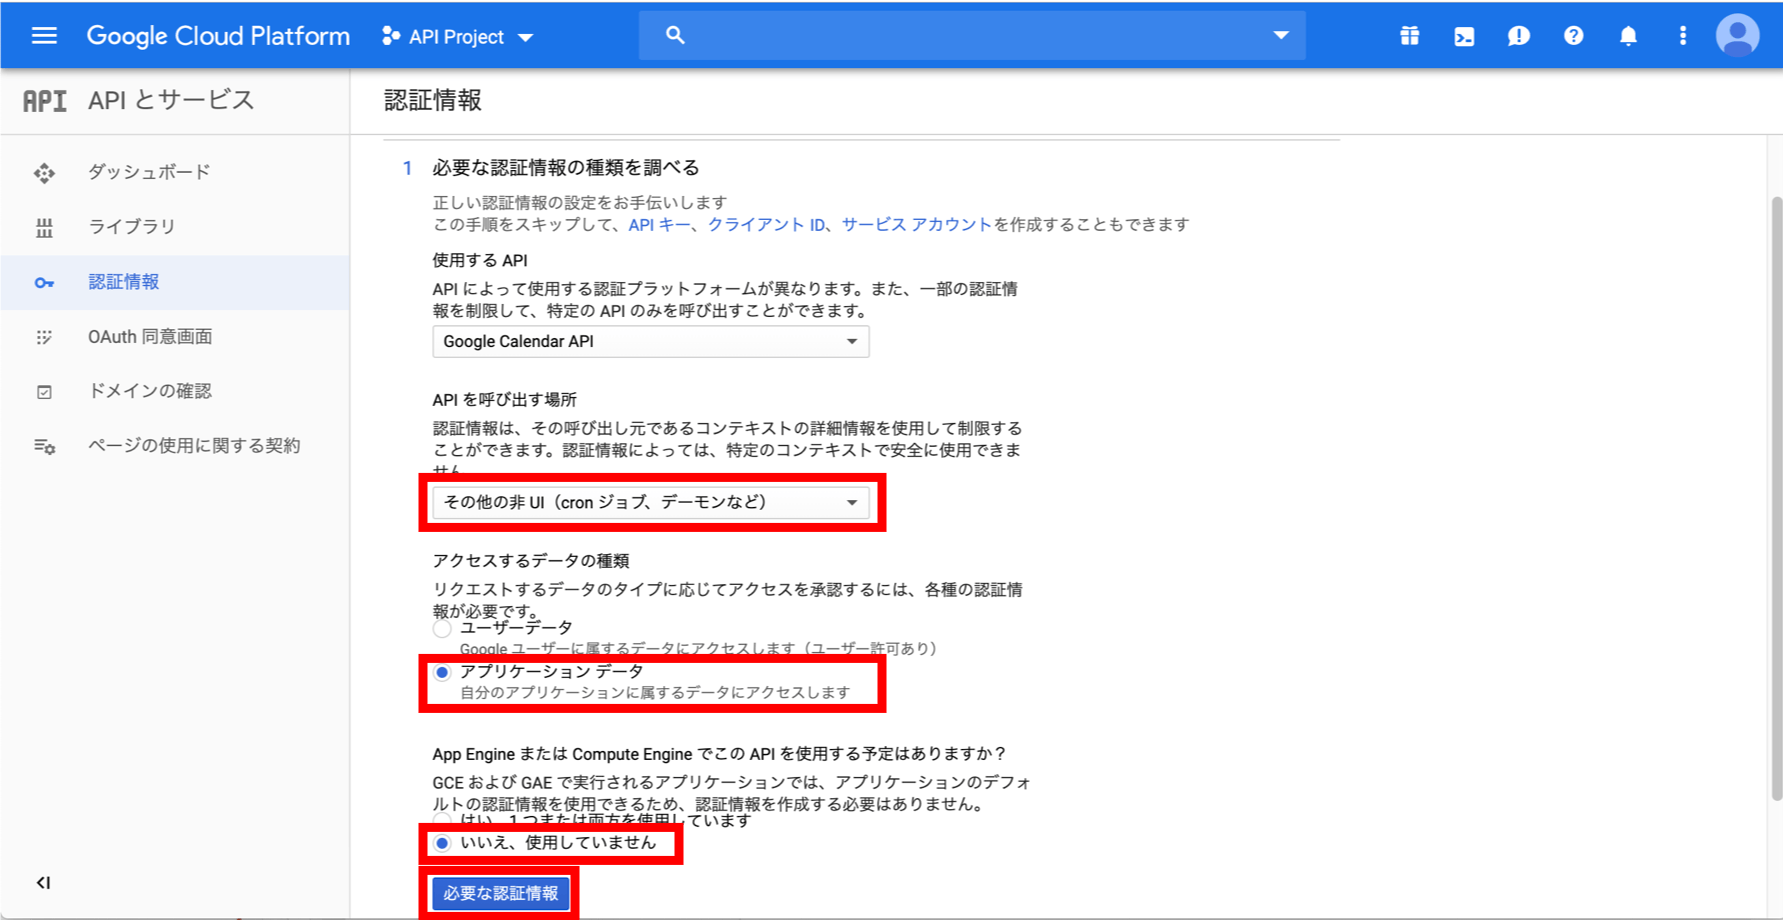
⑥認証情報の設定
認証情報の設定画面で、以下のように入力して「必要な認証情報」ボタンをクリックします。
・APIを呼び出す場所:その他の非UI(cronジョブ、デーモンなど)
・アクセスするデータの種類:アプリケーションデータ
・App Engineまたは・・・:いいえ、使用していません
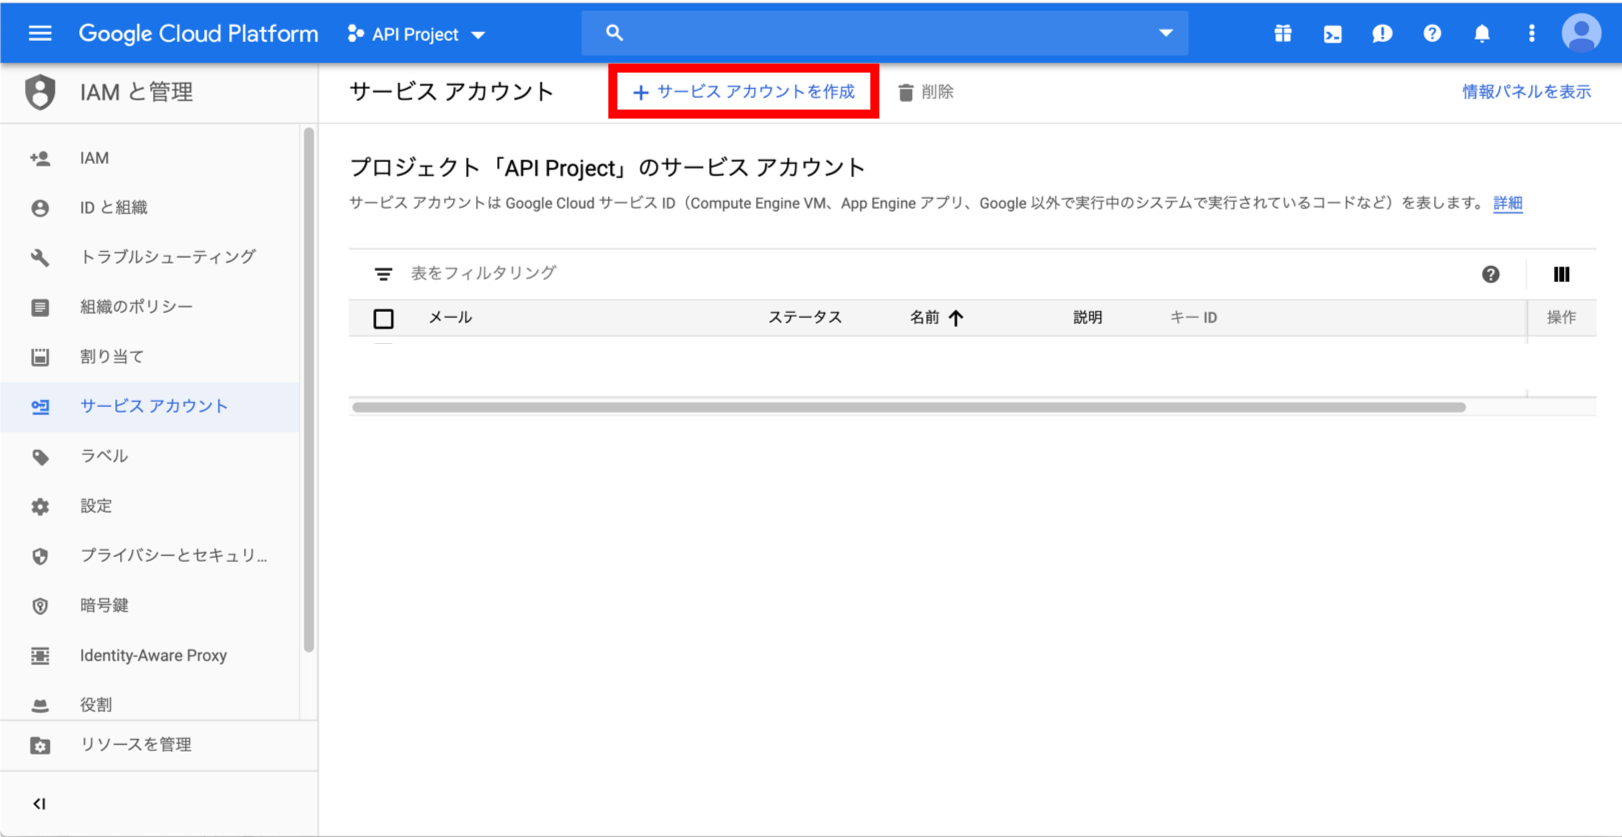
⑦サービスアカウントの追加
IAMと管理のサービスアカウントの画面に遷移したら「+サービスアカウントを作成」ボタンをクリックします。
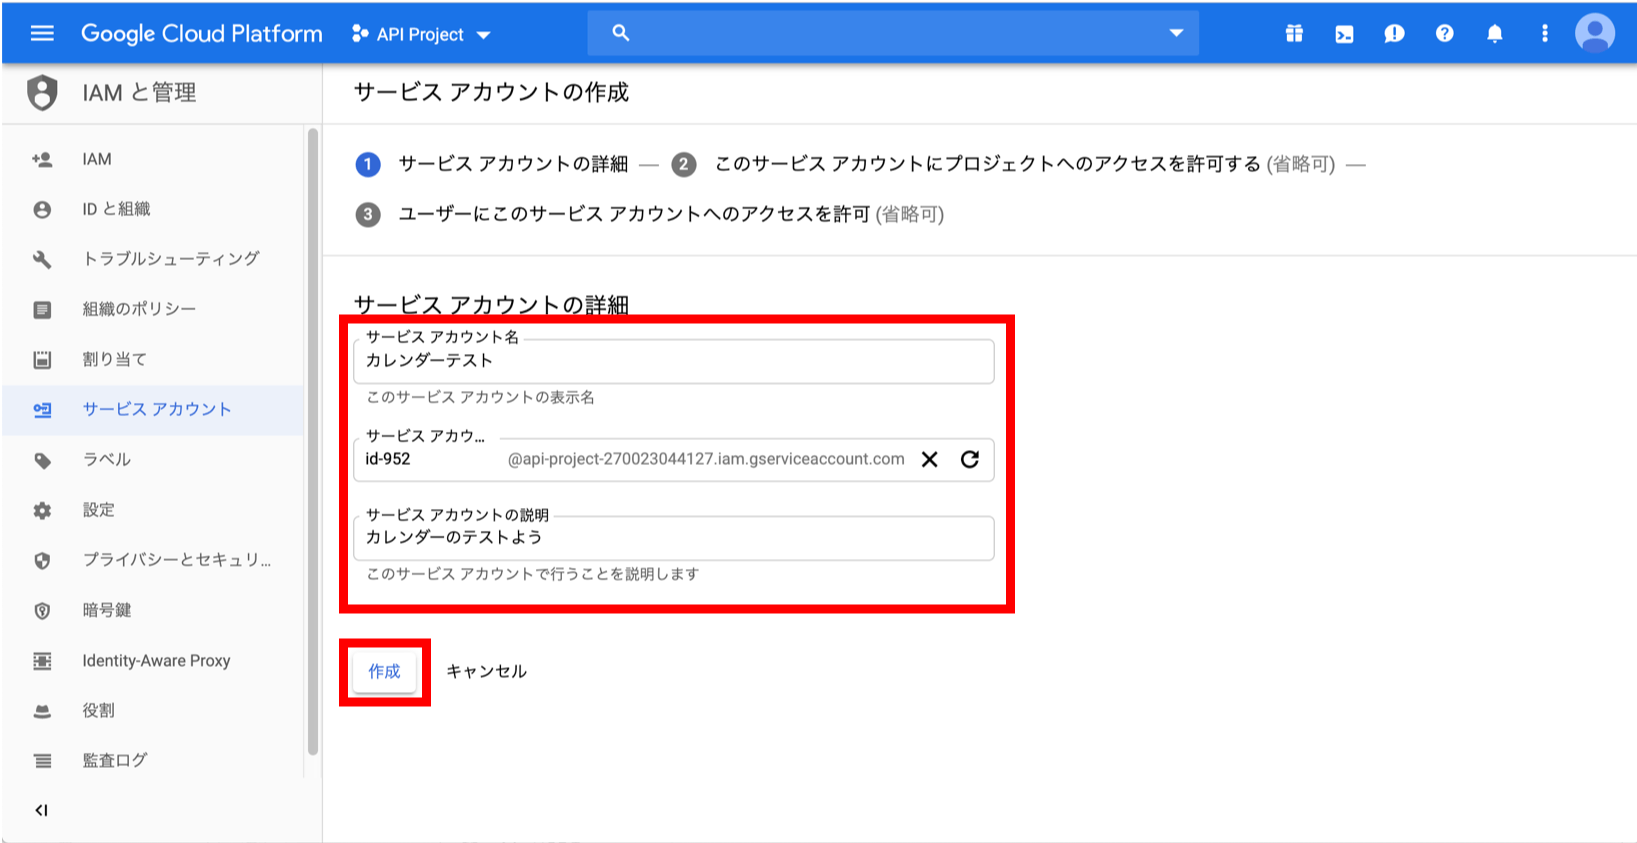
⑧サービスアカウントの設定
サービスアカウントの設定画面で必要事項を入力します。また、サービスアカウントのメールアドレスが後で必要になるので、テキストエディタなどにメモしておきましょう。メモしたら「作成」ボタンをクリックします。
※サービスアカウント名などは、任意の名前でOKです。
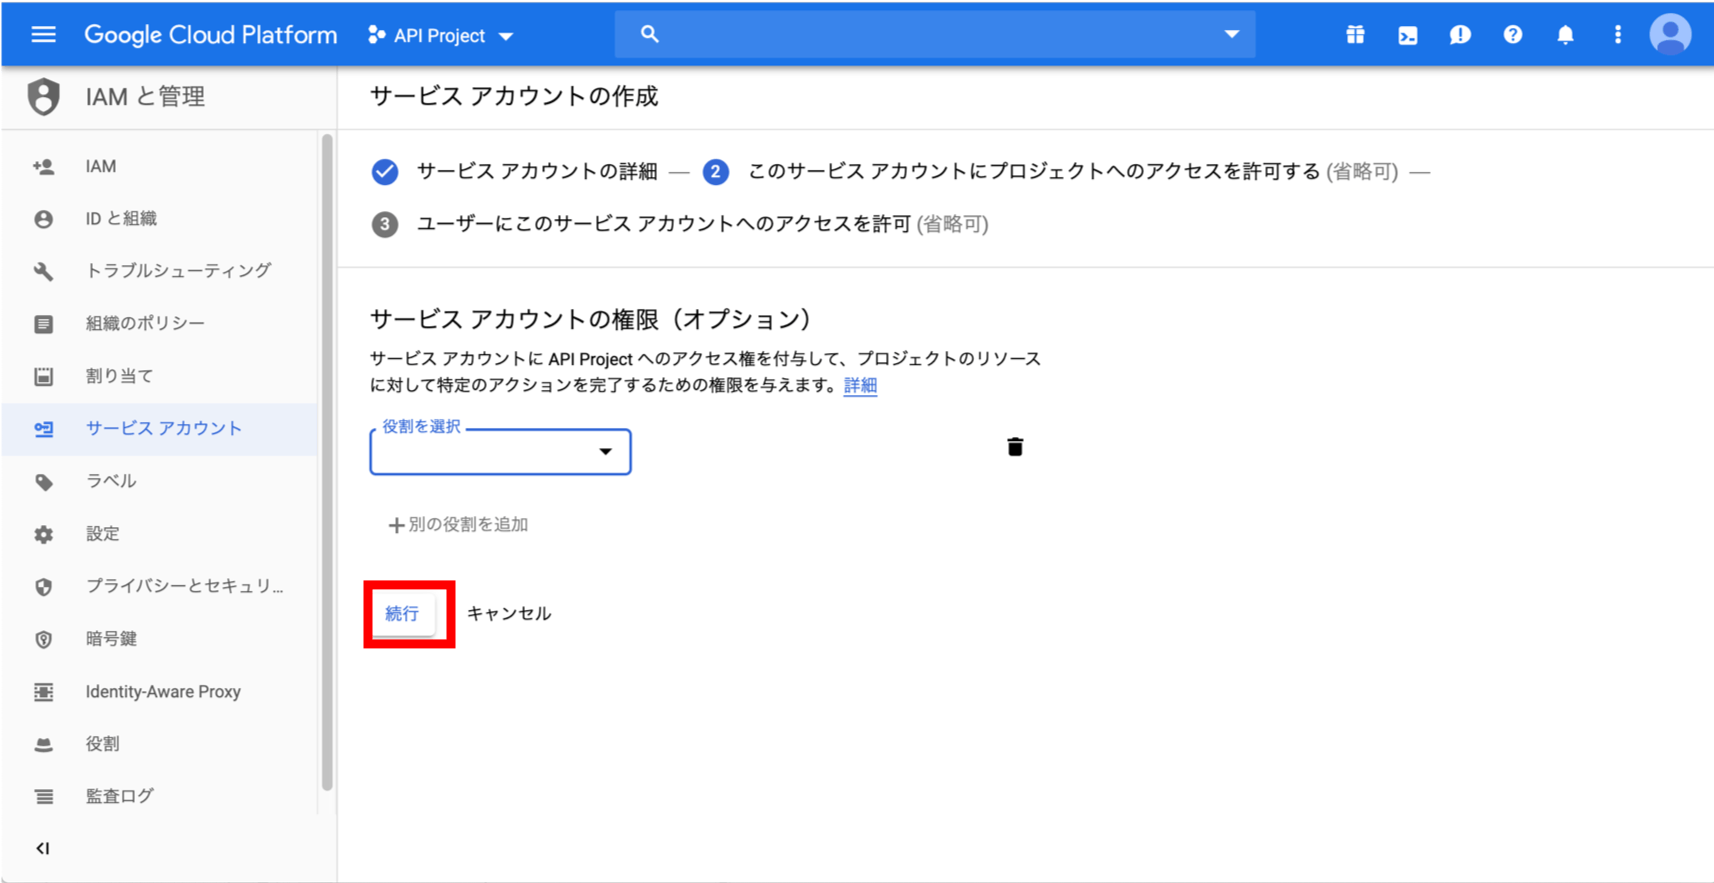
⑨役割の設定
この画面は、設定不要なので「続行」ボタンをクリックします。
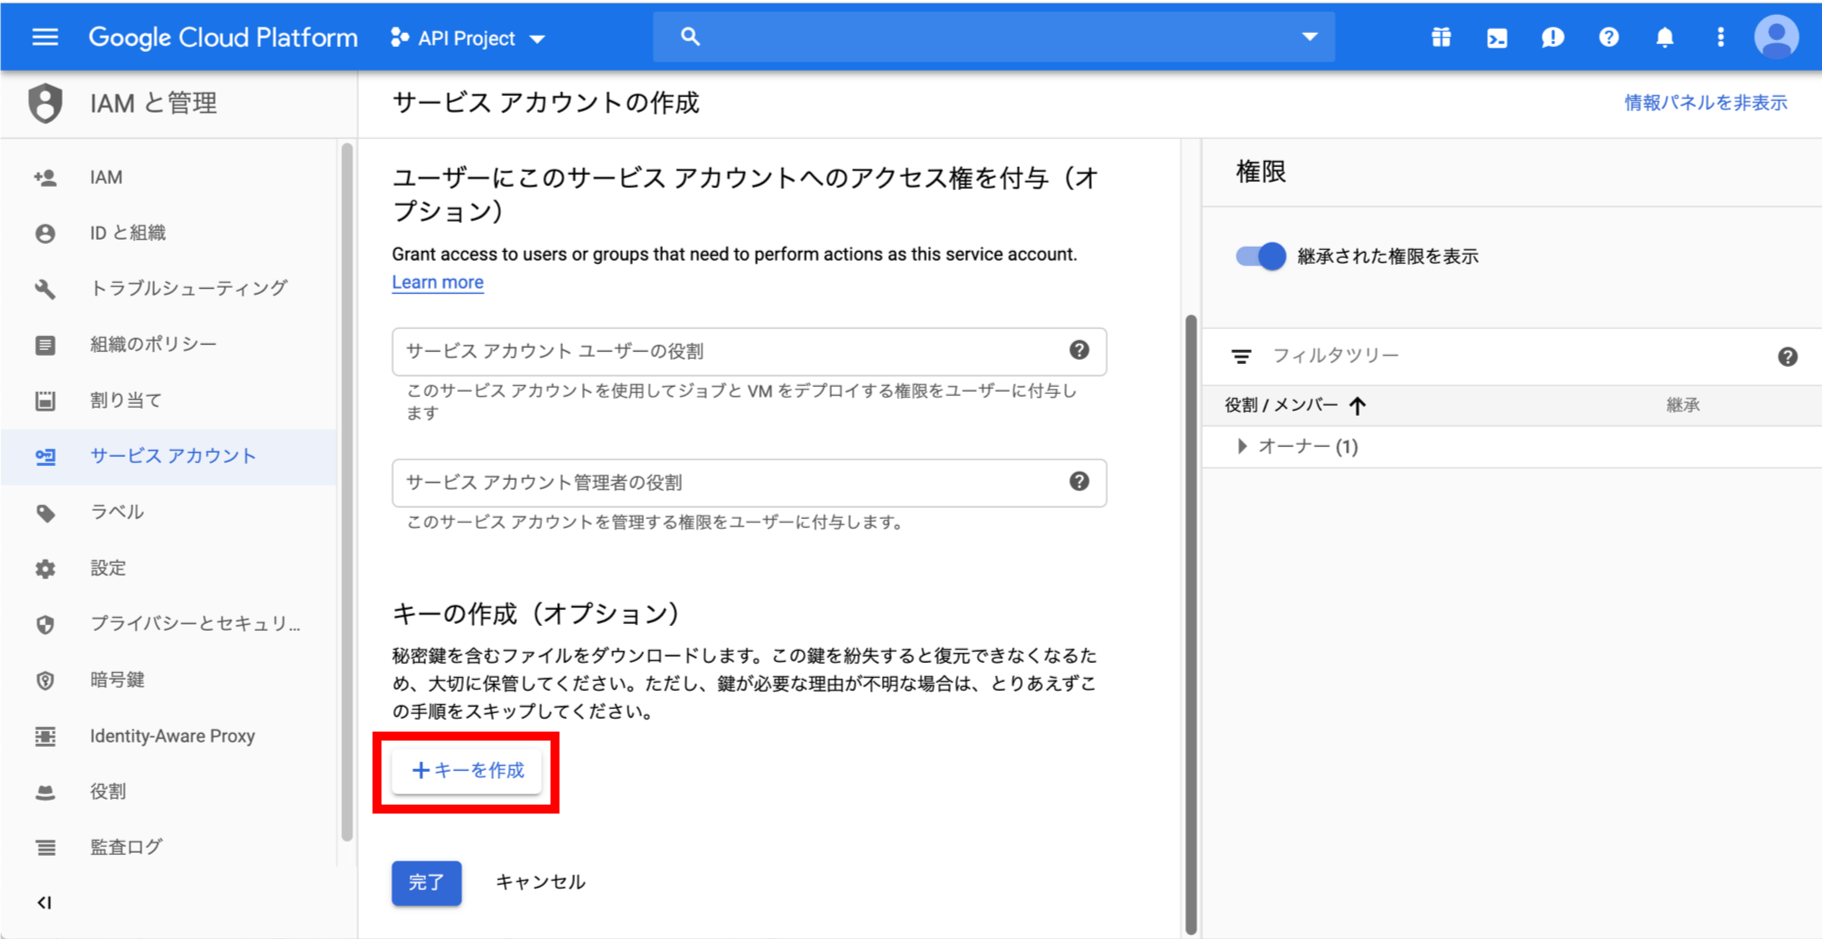
⑩キーの作成
この画面の「+キーを作成」ボタンをクリックします。
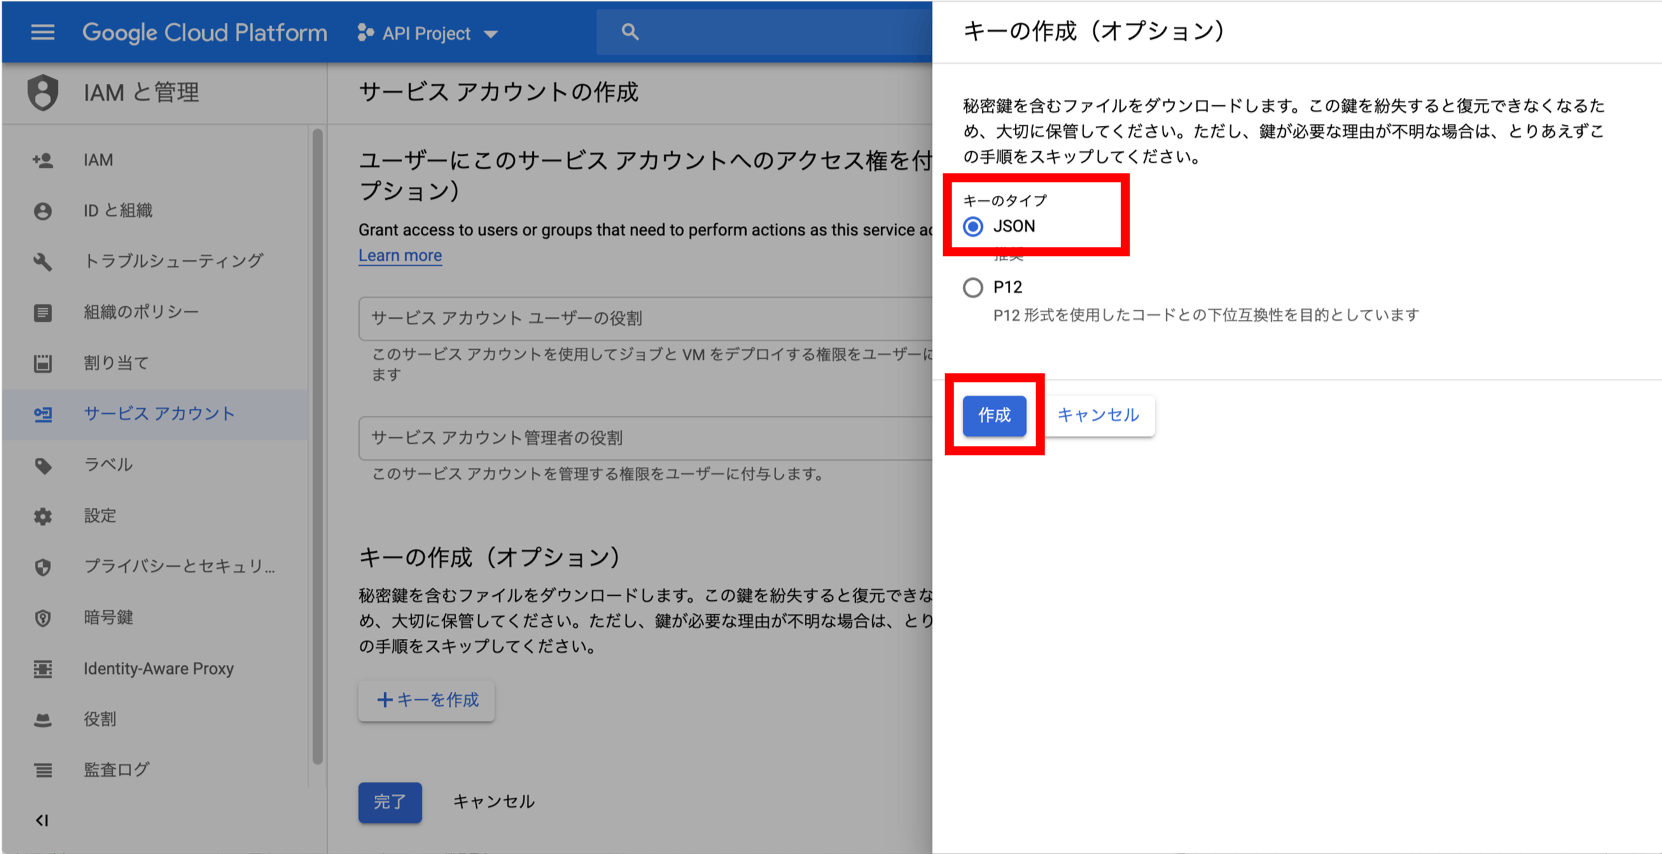
出てきた右側の画面で、キーのタイプで「JSON」を選択し、「作成」ボタンをクリックします。すると、キーファイルがダウンロードされるので、このファイルを保存します。
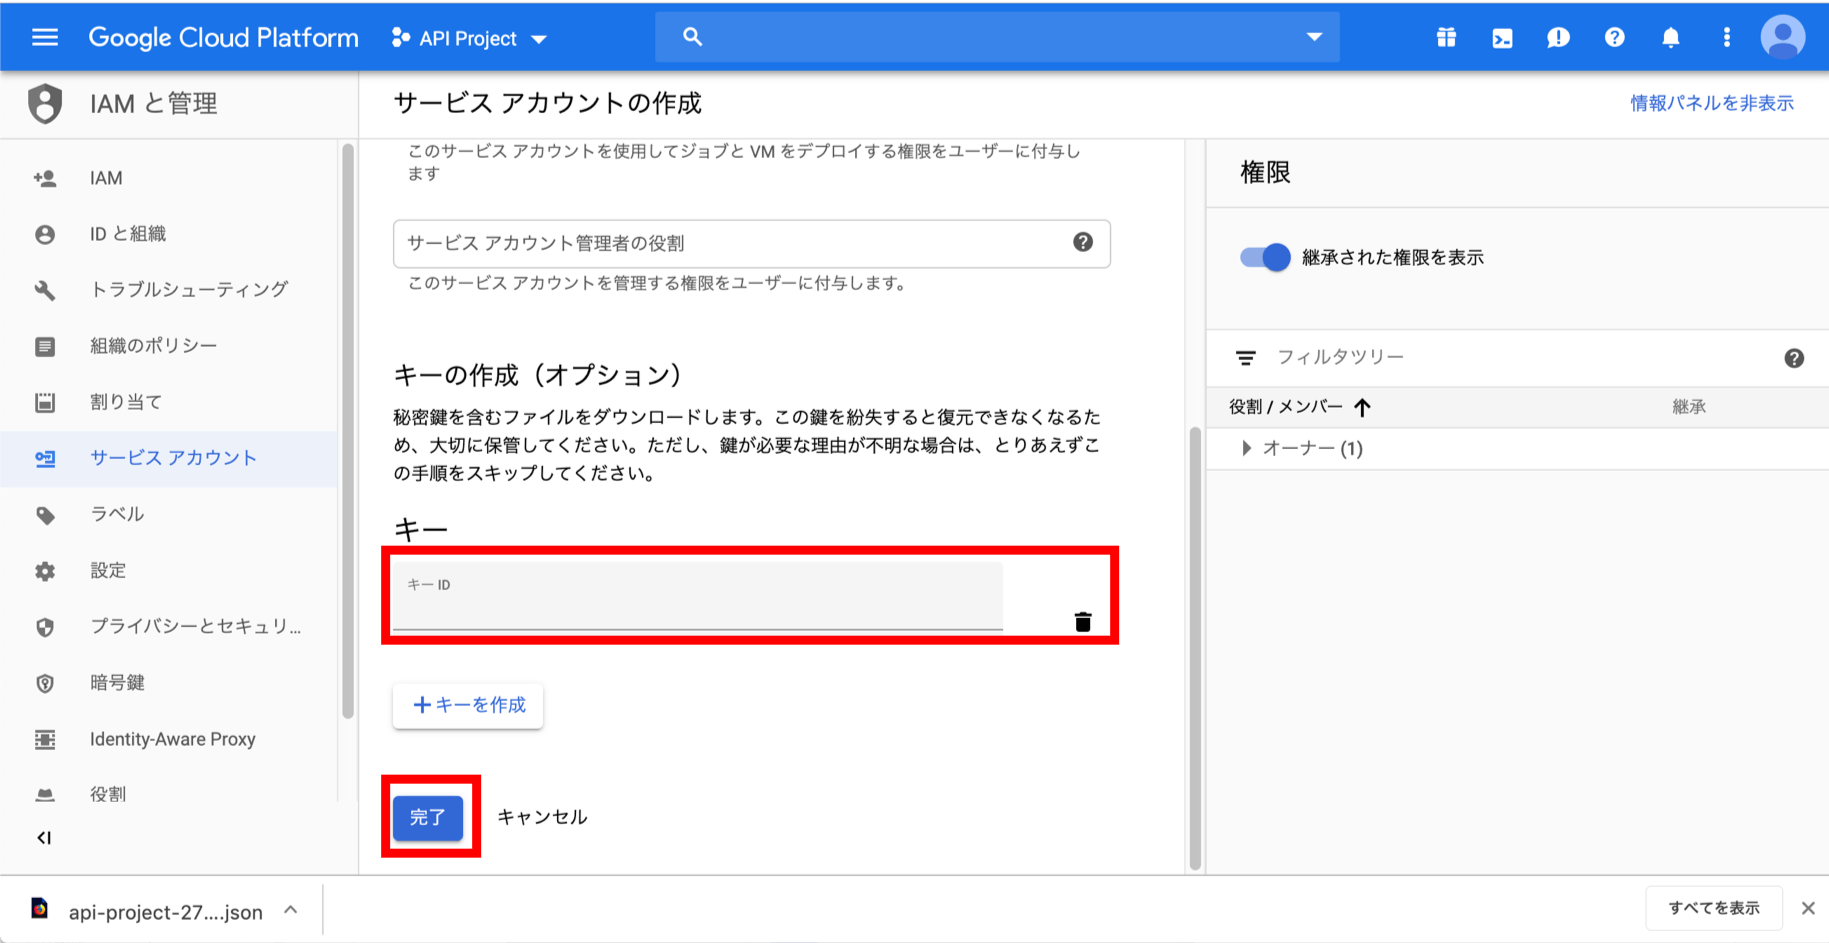
(11)完了
キーが作成されていることを確認し、「完了」ボタンをクリックします。
2.Googleカレンダーへのサービスアカウントの権限追加
次に、Googleカレンダーに新しいカレンダーを追加して、先ほど作成したサービスアカウントにイベントの登録・閲覧権限を付与します。
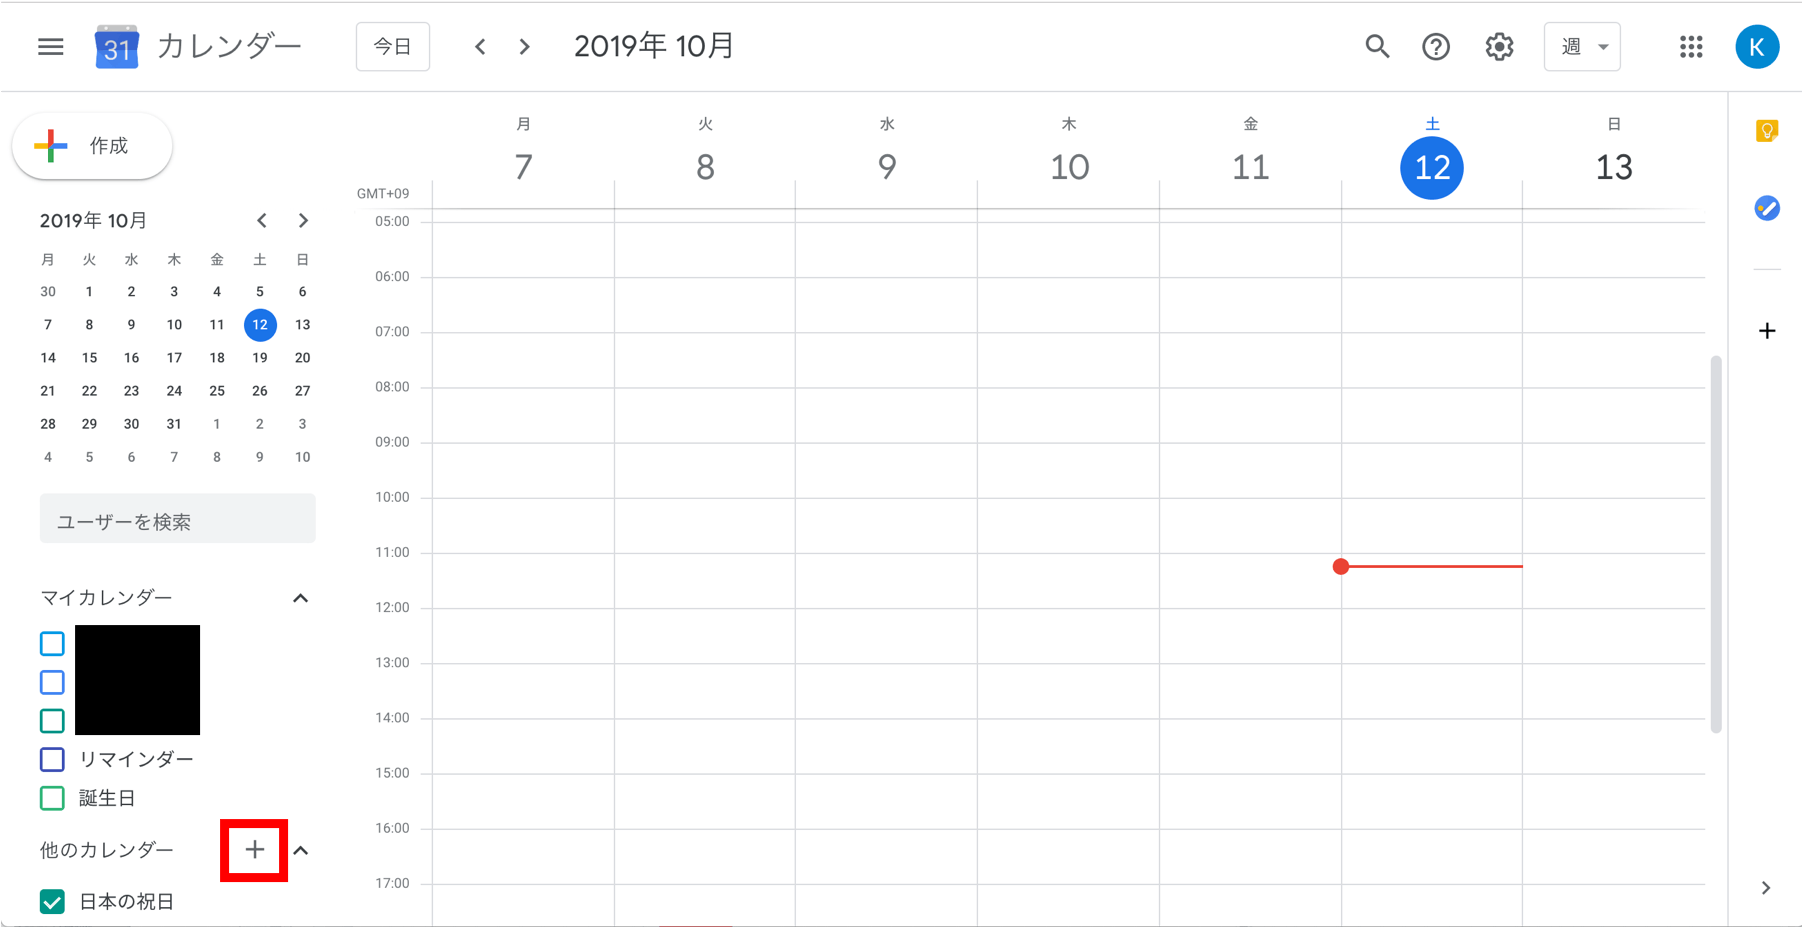
①Googleカレンダにアクセス
ブラウザで新しいタブを開きGoogleカレンダーを開きます。そして「他のカレンダー」の右側にある「+」をクリックします。
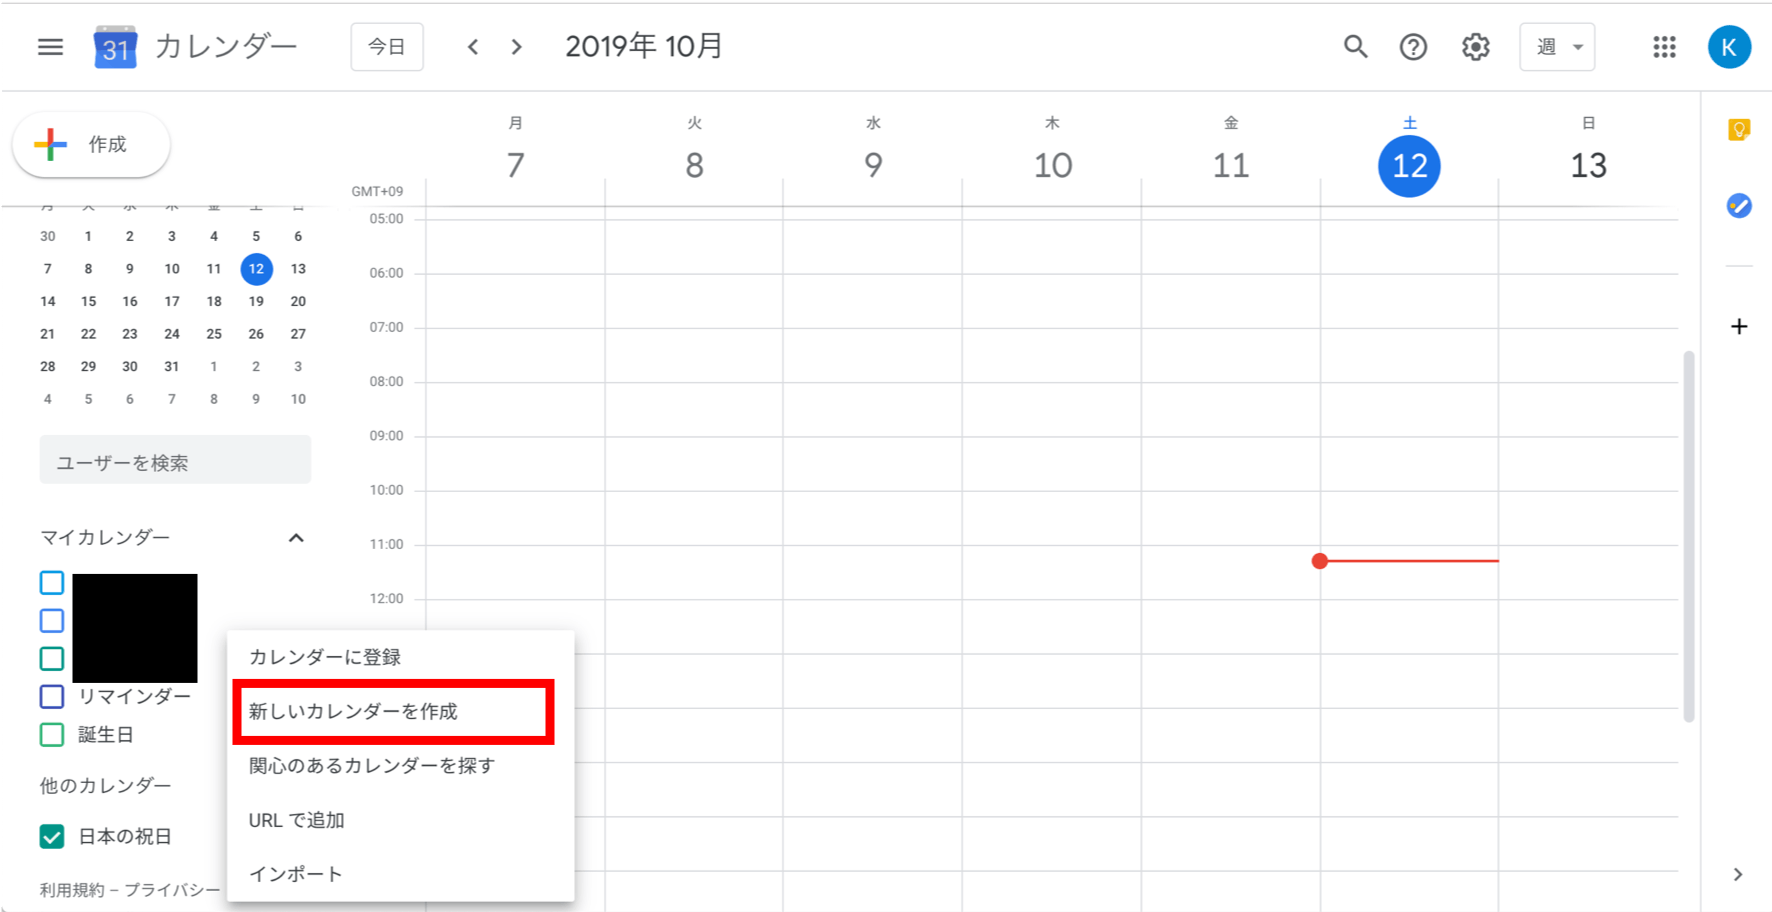
②新しいカレンダーの作成
出てきたポップアップウィンド内の「新しいカレンダーを作成」を選択します。
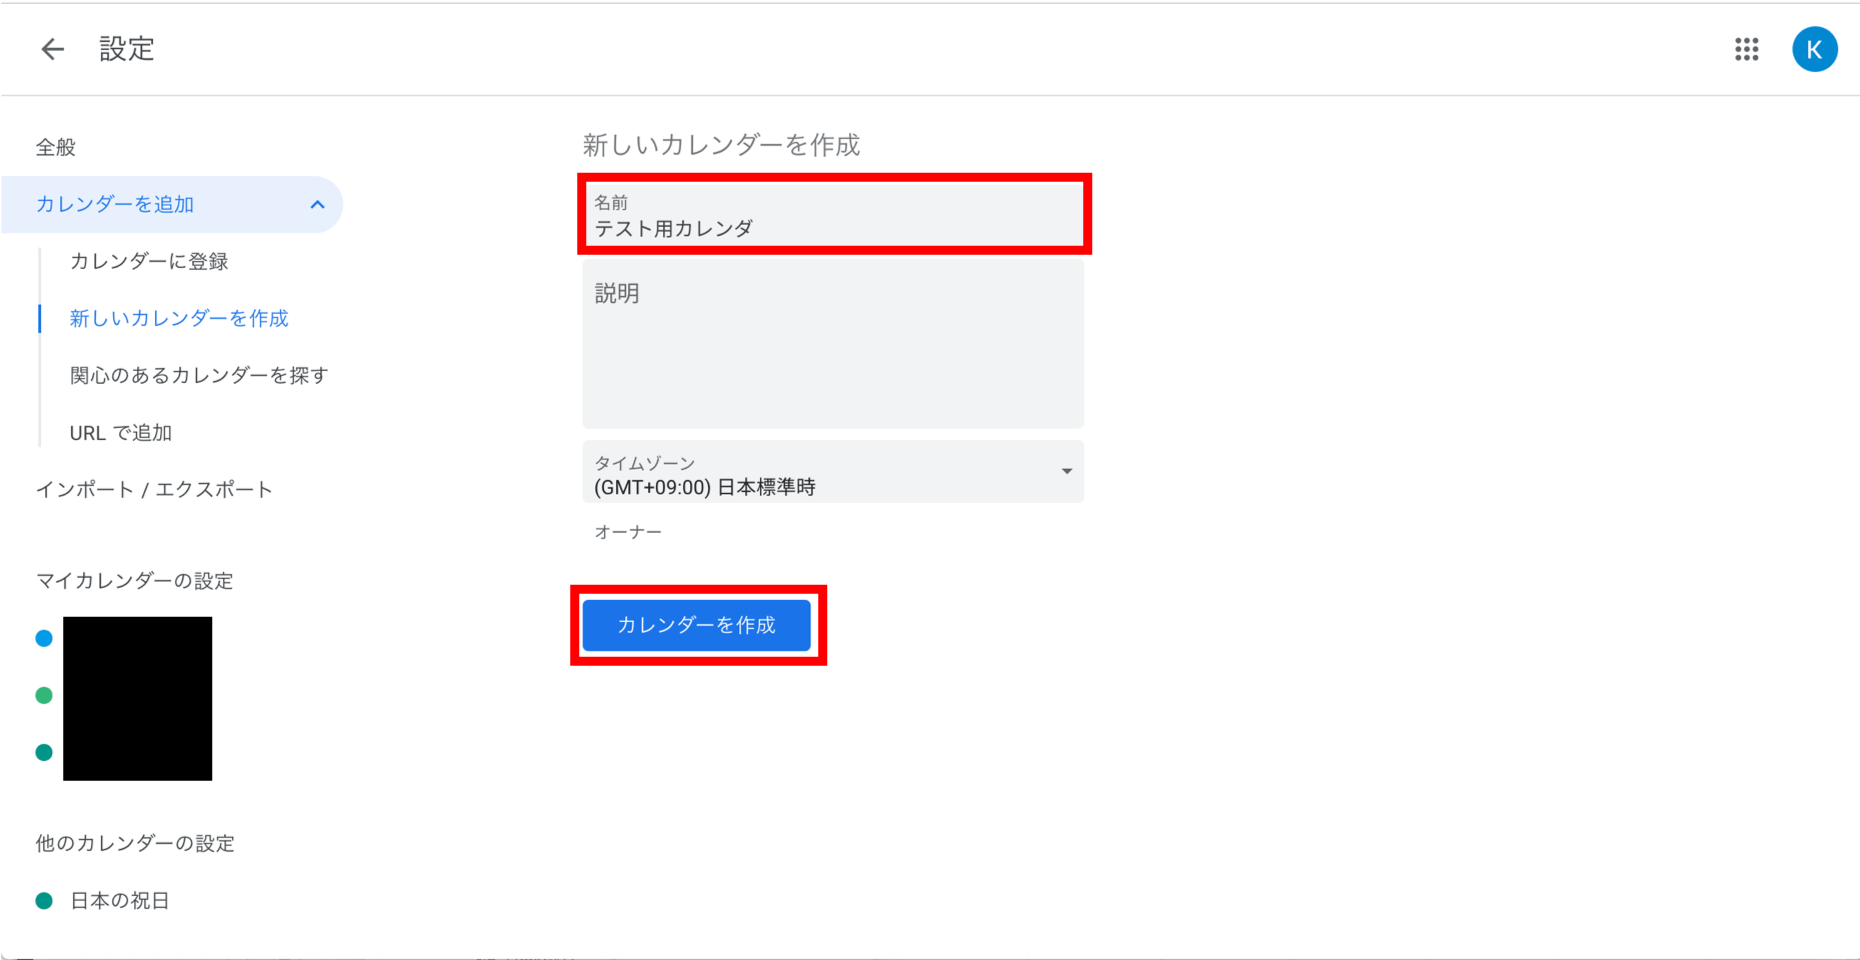
③カレンダーの名前の入力
作成するカレンダーの名前を適当に入力し、「カレンダーを作成」ボタンをクリックします。
画面下に「カレンダーを作成しました」と表示されたら、画面左上の「⇦」ボタンをクリックして戻ります。
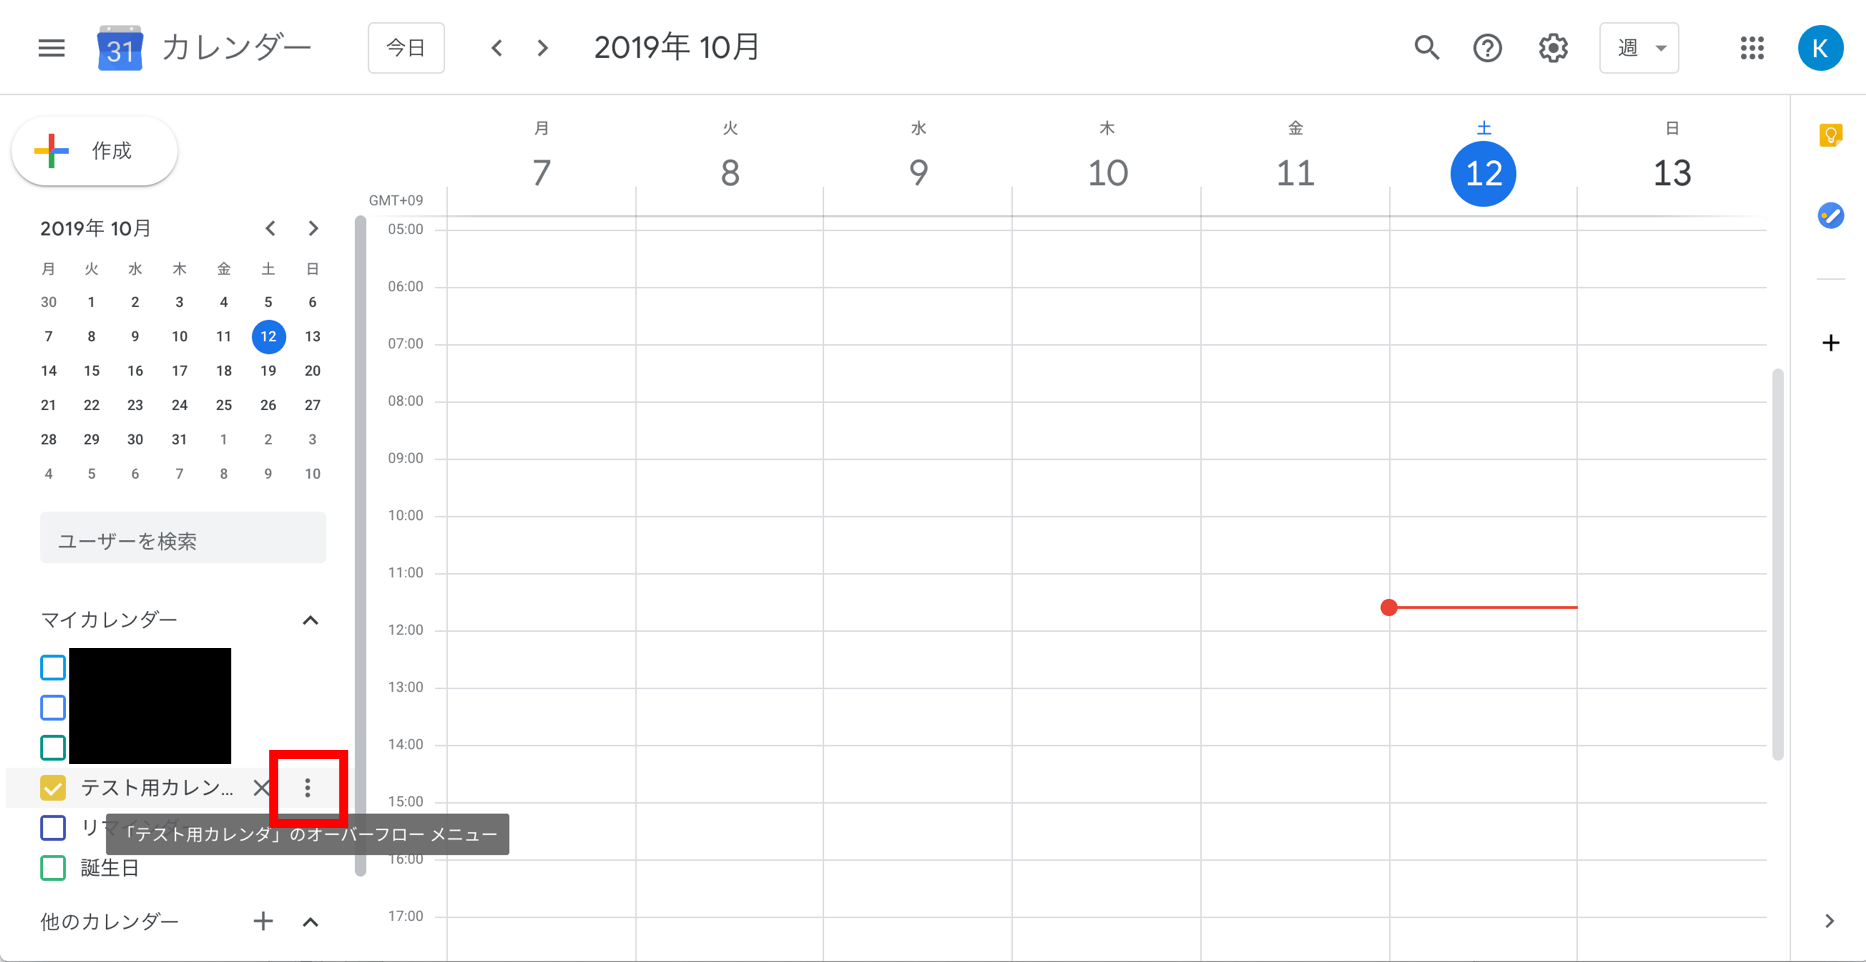
④カレンダーの設定1
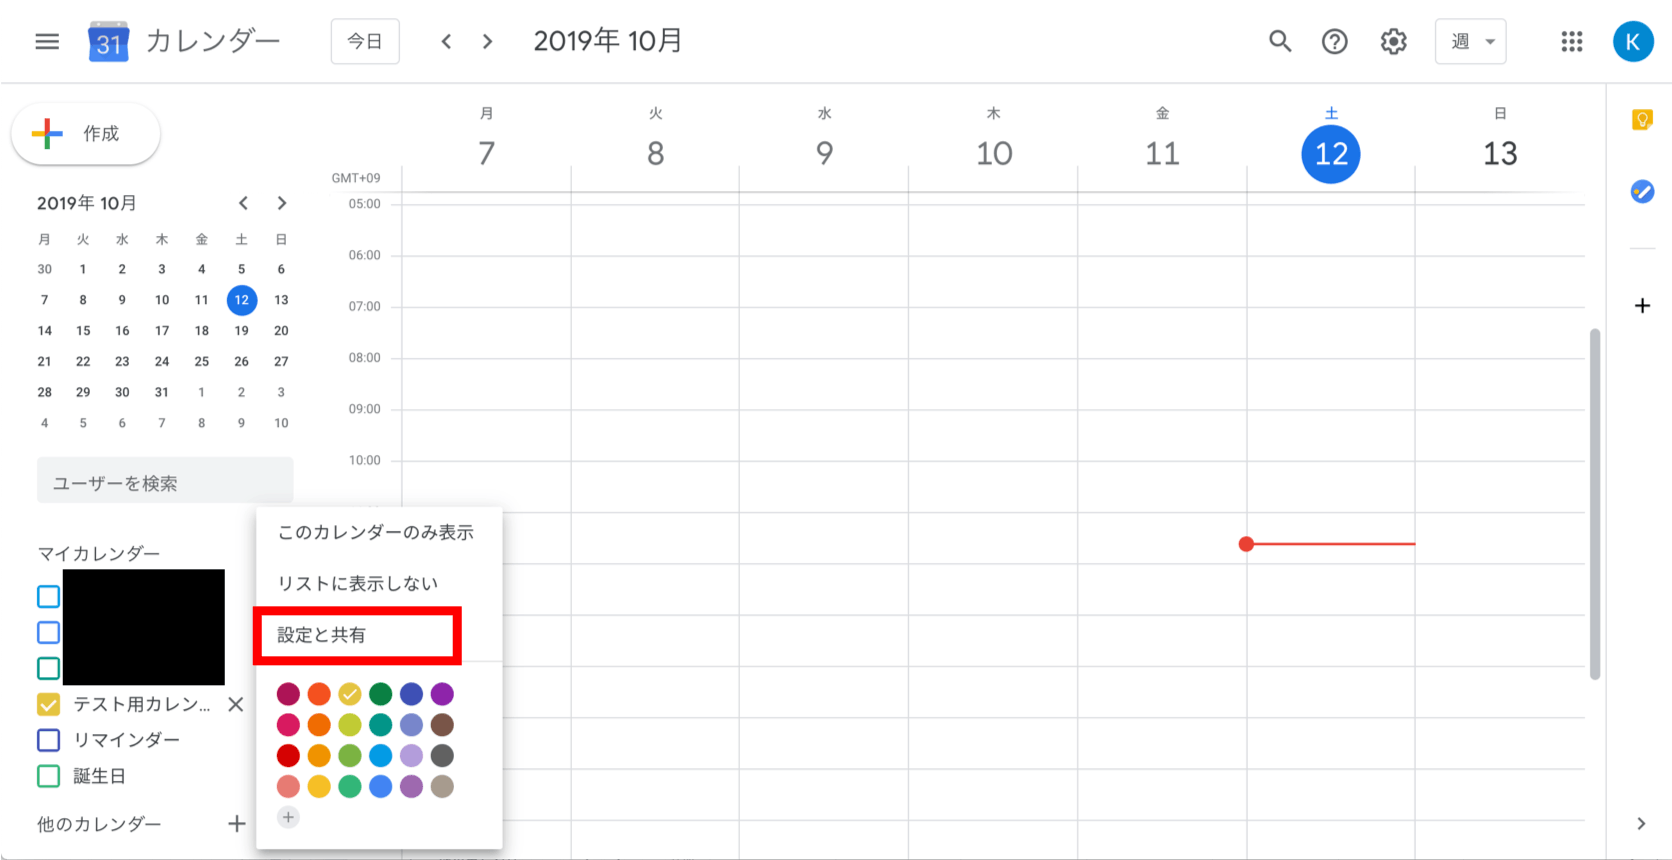
作成したカレンダーがマイカレンダーの欄に追加されている事を確認し、作成したカレンダーの右にある、「・・・」ボタンをクリックします。
⑤カレンダーの設定2
ポップアップで表示されるメニューから「設定と共有」を選択します。
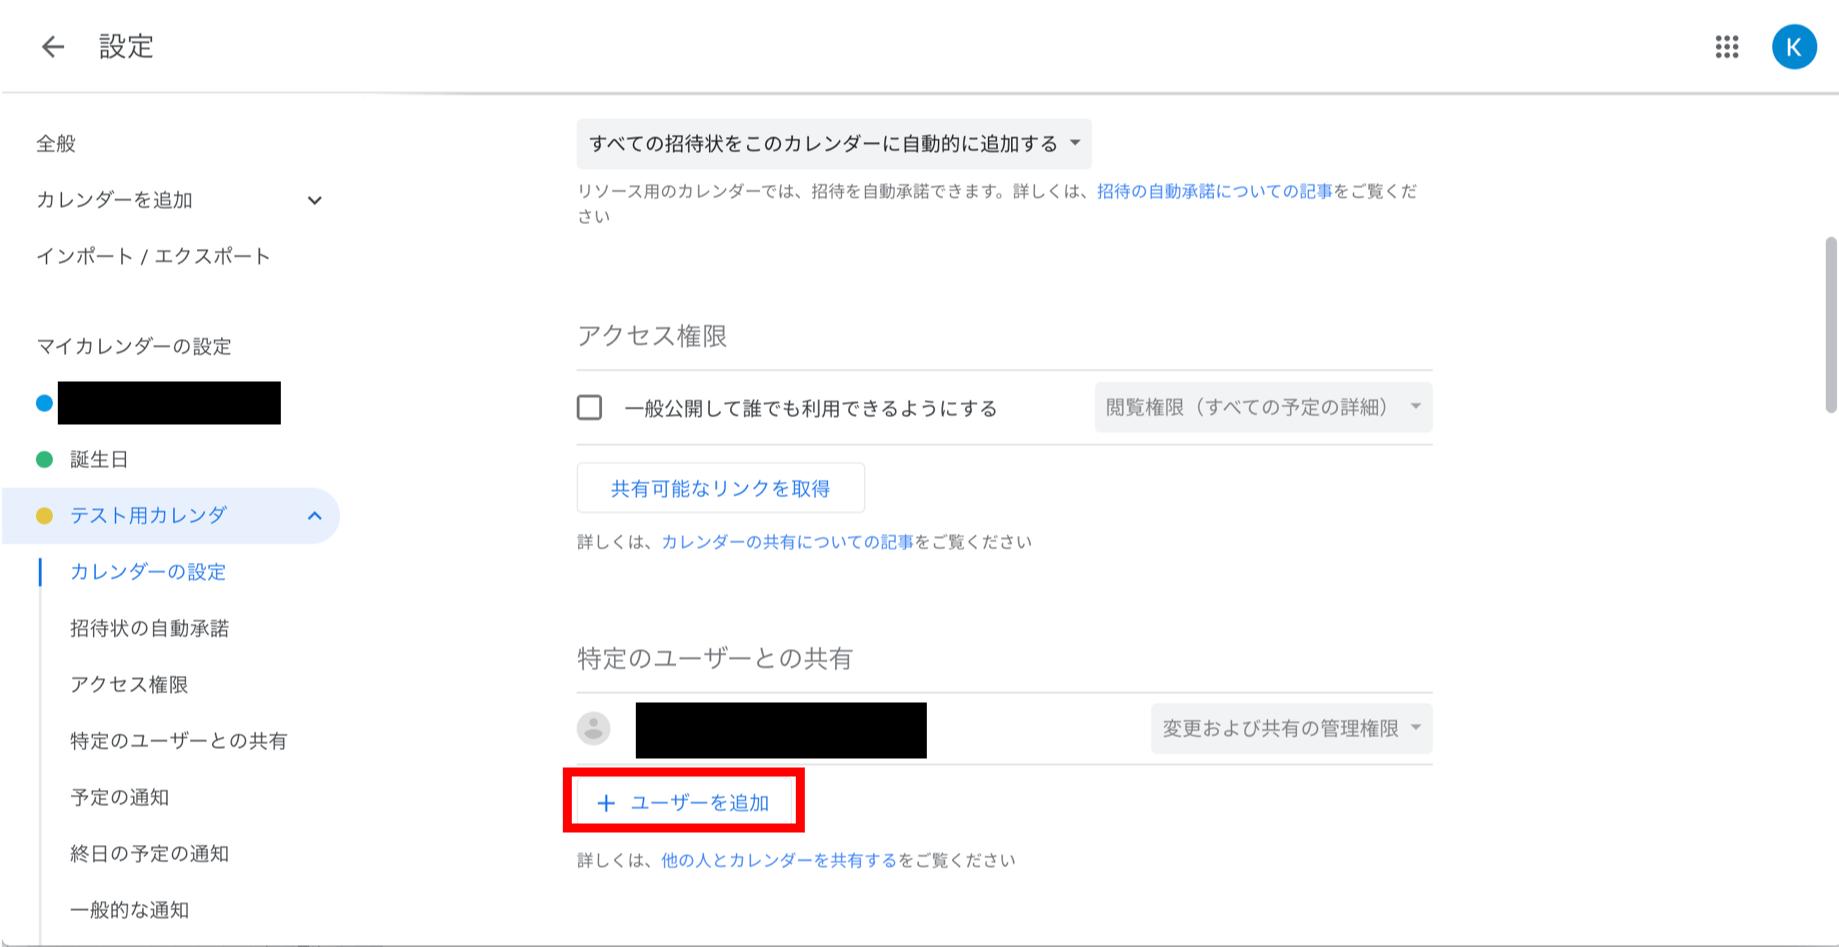
⑥ユーザの追加
「特定のユーザとの共有」の欄にある「+ユーザを追加」ボタンをクリックします。
⑦メールアドレスと権限の設定
出てきたウィンドウに、上でメモしたサービスアカウントのメールアドレスを入力し、エンターを押します。また、権限欄は「予定の変更権限」を選択し、「送信」ボタンをクリックします。
※メールアドレスを入力した後に「エンターキー」を押して確定しないと「送信」ボタンが押せないので注意です。
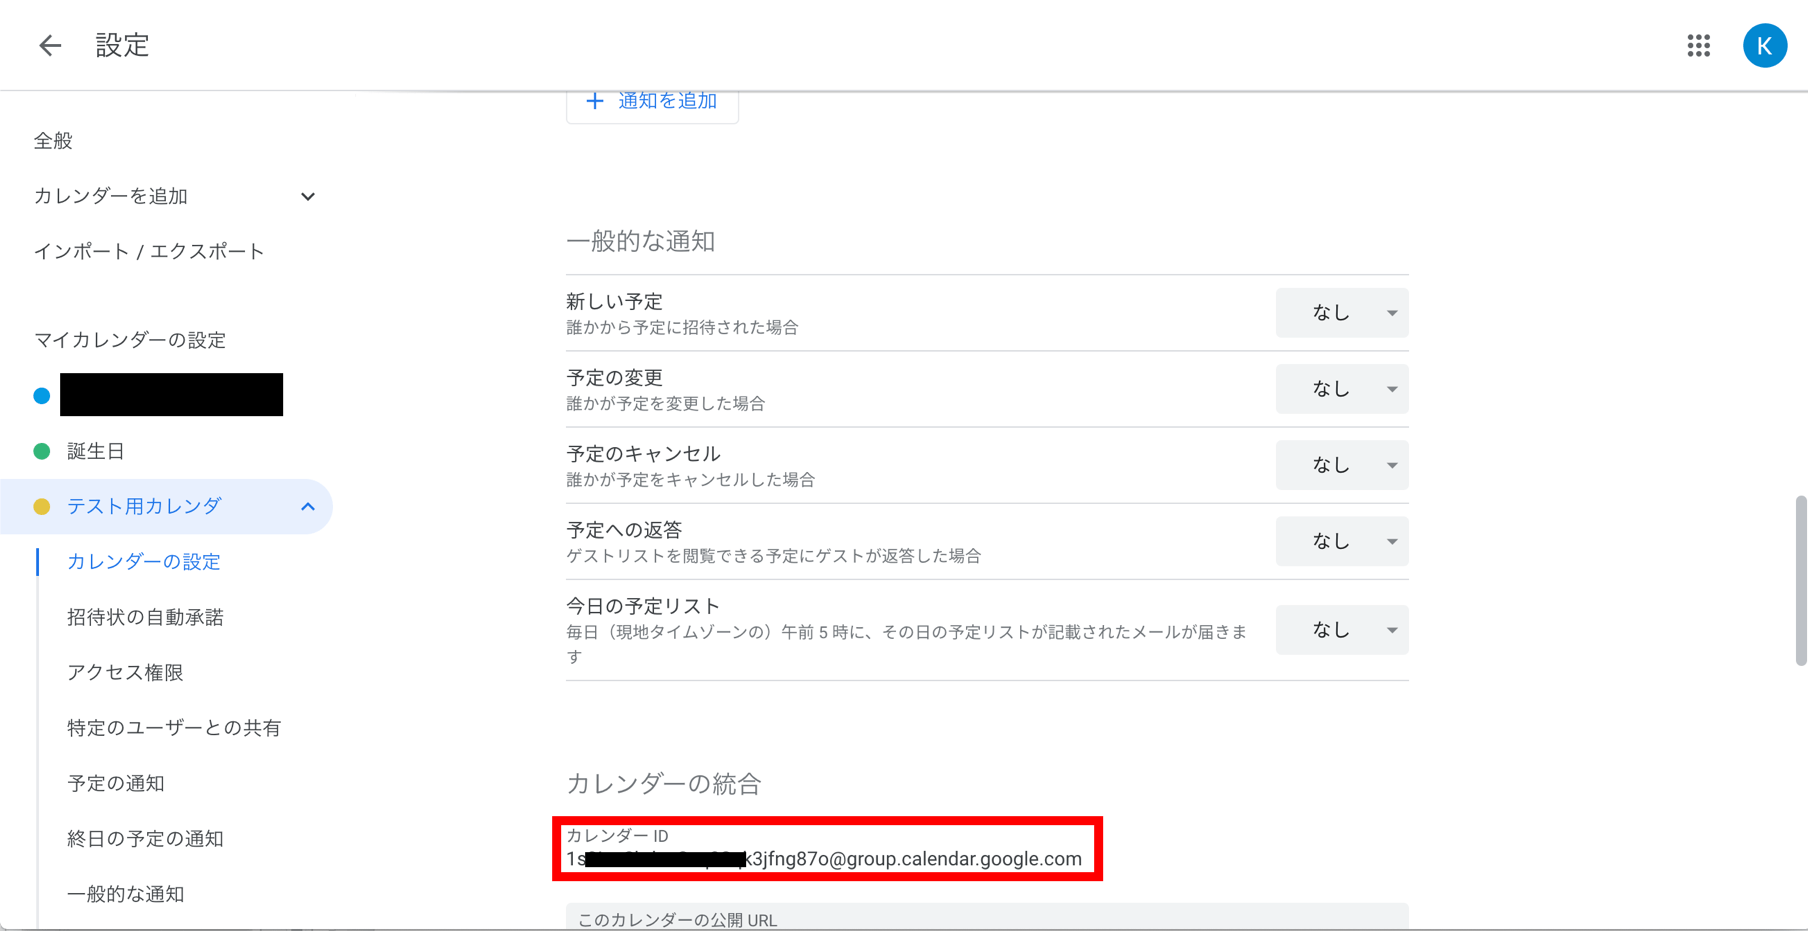
⑧カレンダーIDのメモ
最後に、後ほど必要となるカレンダーIDをテキストエディタなどにメモしておきます。
3.予定の投稿用プログラムの作成
最後に、Google Calendar APIをキックし、予定を登録するプログラムを作成していきます。なお、今回使用した環境は以下の通りです。
・OS :Ubuntu 18.04.1
・node:10.16.0
・npm :6.11.3①Google APIのインストール
まずは、nodeからGoogle Calendarを利用するために、GoogleAPIsパッケージをインストールします。
コマンド$npm install googleapis②プログラムの作成
JWTを用いてGoogle Calendarに予定を登録するプログラムを作成します。なお、以下の変数は適宜、変更してください。
・keyfile変数:上でダウンロードしたサービスアカウントのキーファイル名
・calendarId変数:上でメモしたカレンダーID
・event変数:登録する予定の情報また、キーファイルとプログラムは同じフォルダに格納してくださいね。
insertCalendar.jsconst {google} = require('googleapis'); //----------------------------------------------------------------------- const keyfile='./api-project-xxxxxxxxxxxx-7c5ac86d4f1b.json'; const calendarId='xxxxxxxxxxxxxxx@group.calendar.google.com'; //----------------------------------------------------------------------- const event = { 'summary': 'テスト予定', 'location': '東京駅', 'description': '', 'start': { 'dateTime': '2019-10-12T10:00:00+09:00', 'timeZone': 'Asia/Tokyo', }, 'end': { 'dateTime': '2019-10-12T11:00:00+09:00', 'timeZone': 'Asia/Tokyo', }, 'attendees': [], 'colorId': 1, 'reminders': { 'useDefault': false, 'overrides': [ {'method': 'email', 'minutes': 24 * 60}, {'method': 'popup', 'minutes': 10}, ], }, }; //----------------------------------------------------------------------- process.env.GOOGLE_APPLICATION_CREDENTIALS = keyfile const key = require(keyfile); const scope = ['https://www.googleapis.com/auth/calendar', 'https://www.googleapis.com/auth/calendar.events']; const jwt = new google.auth.JWT(key.client_email, null, key.private_key, scope) const calendar = google.calendar("v3"); jwt.authorize((err, response) => { calendar.events.insert({ auth: jwt, calendarId: calendarId, resource: event, }, (err, event) => { if (err) { console.log('エラー:' + err); return; } console.log('予定を登録しました'); }); })プログラム自体を見てもらえれば、何をやっているかは理解できると思います。認証部分はKeyfileを読み込むだけであり、OAuth2を使う場合と比較してかなり簡潔なプログラムとなっているのが、わかると思います。
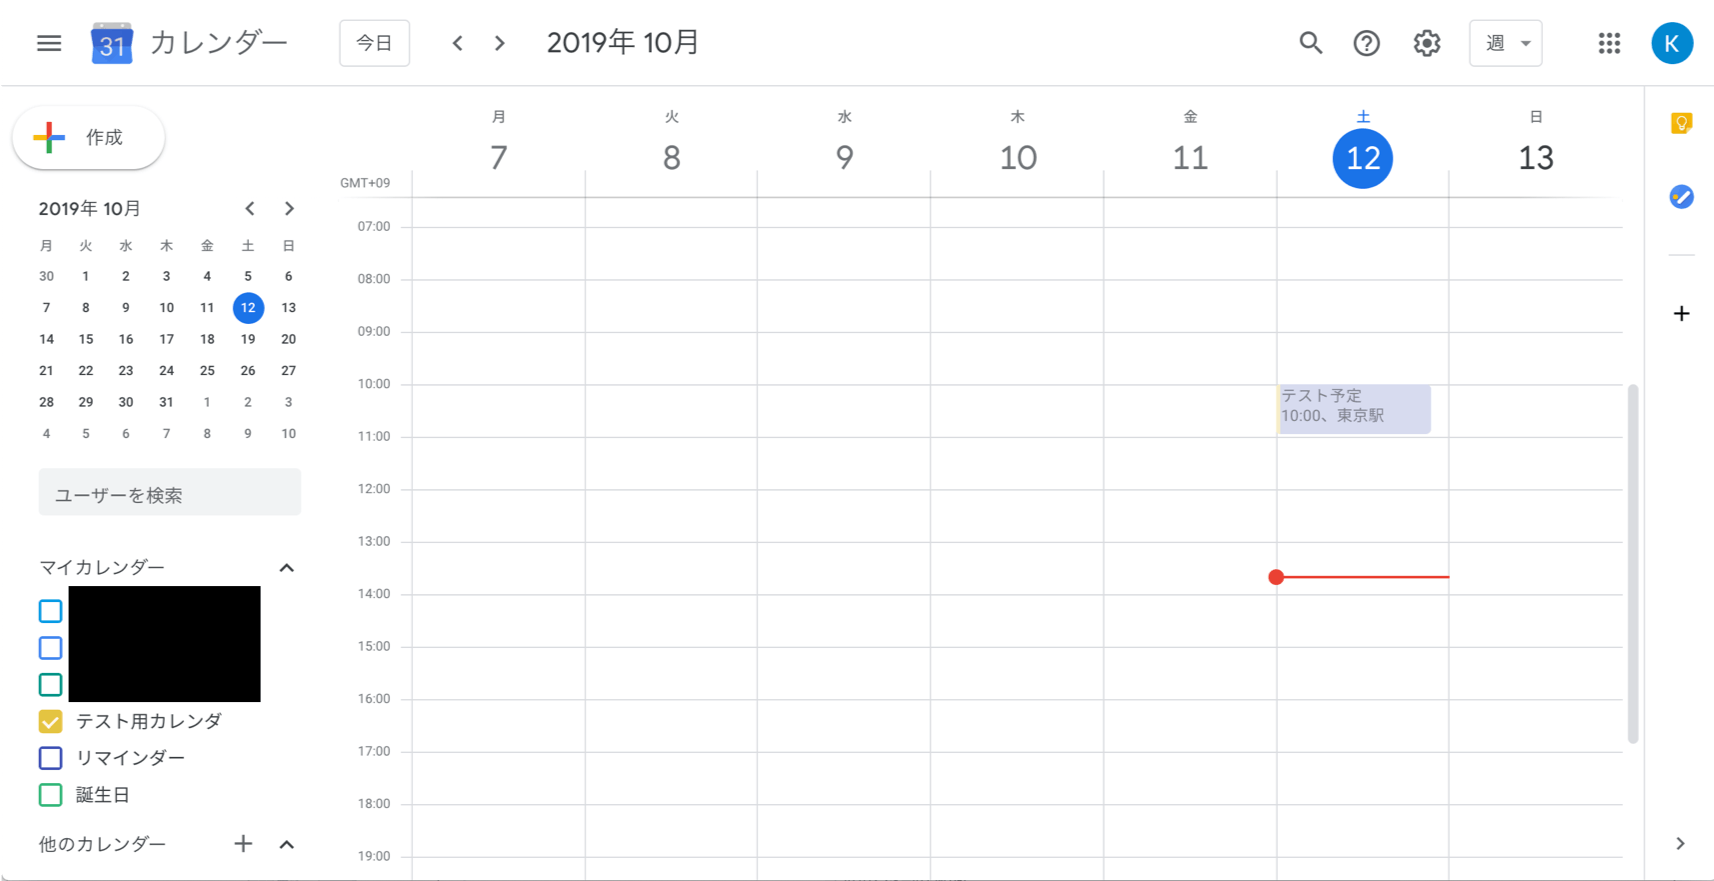
③テスト
それでは、作成したプログラムを実行してみましょう!!!
「予定を登録しました」と出れば、正常に動いています。コマンド$node insertCalendar.js 予定を登録しました $Googleカレンダーの画面も確認してみましょう。ちゃんと、予定が登録されました!!
おわりに
今回はJWTを使って、Google Calendarに予定を登録することをやってみました。次は、この機能を使って、子供のミルクやオムツの時間を記録する「みるく&おむつボタン」を作ってみようと思っています。


- 投稿日:2019-10-12T13:29:38+09:00
ずんだの1桁足し算問題 Node.js編
↑
Node.jsで書いたものです(=゚ω゚)ノちなみに, ずんだ成分ゼロです
※ずんだ=ずんだまるさん = https://twitter.com/edamametsubu318コード
const numberArray = [...Array(9).keys()].map(i => ++i)
// これはなくても動く
let total

numberArray.forEach(i => {
   numberArray.forEach(j => {
      total = (i+j)
      console.log(`${i}+${j}=${"~".repeat(total)} ${total}`)
   })
})
出力
1+1=~~ 2
1+2=~~~ 3
1+3=~~~~ 4
1+4=~~~~~ 5
1+5=~~~~~~ 6
1+6=~~~~~~~ 7
1+7=~~~~~~~~ 8
1+8=~~~~~~~~~ 9
1+9=~~~~~~~~~~ 10
2+1=~~~ 3
2+2=~~~~ 4
2+3=~~~~~ 5
2+4=~~~~~~ 6
2+5=~~~~~~~ 7
2+6=~~~~~~~~ 8
2+7=~~~~~~~~~ 9
2+8=~~~~~~~~~~ 10
2+9=~~~~~~~~~~~ 11
3+1=~~~~ 4
3+2=~~~~~ 5
3+3=~~~~~~ 6
3+4=~~~~~~~ 7
3+5=~~~~~~~~ 8
3+6=~~~~~~~~~ 9
3+7=~~~~~~~~~~ 10
3+8=~~~~~~~~~~~ 11
3+9=~~~~~~~~~~~~ 12
4+1=~~~~~ 5
4+2=~~~~~~ 6
4+3=~~~~~~~ 7
4+4=~~~~~~~~ 8
4+5=~~~~~~~~~ 9
4+6=~~~~~~~~~~ 10
4+7=~~~~~~~~~~~ 11
4+8=~~~~~~~~~~~~ 12
4+9=~~~~~~~~~~~~~ 13
5+1=~~~~~~ 6
5+2=~~~~~~~ 7
5+3=~~~~~~~~ 8
5+4=~~~~~~~~~ 9
5+5=~~~~~~~~~~ 10
5+6=~~~~~~~~~~~ 11
5+7=~~~~~~~~~~~~ 12
5+8=~~~~~~~~~~~~~ 13
5+9=~~~~~~~~~~~~~~ 14
6+1=~~~~~~~ 7
6+2=~~~~~~~~ 8
6+3=~~~~~~~~~ 9
6+4=~~~~~~~~~~ 10
6+5=~~~~~~~~~~~ 11
6+6=~~~~~~~~~~~~ 12
6+7=~~~~~~~~~~~~~ 13
6+8=~~~~~~~~~~~~~~ 14
6+9=~~~~~~~~~~~~~~~ 15
7+1=~~~~~~~~ 8
7+2=~~~~~~~~~ 9
7+3=~~~~~~~~~~ 10
7+4=~~~~~~~~~~~ 11
7+5=~~~~~~~~~~~~ 12
7+6=~~~~~~~~~~~~~ 13
7+7=~~~~~~~~~~~~~~ 14
7+8=~~~~~~~~~~~~~~~ 15
7+9=~~~~~~~~~~~~~~~~ 16
8+1=~~~~~~~~~ 9
8+2=~~~~~~~~~~ 10
8+3=~~~~~~~~~~~ 11
8+4=~~~~~~~~~~~~ 12
8+5=~~~~~~~~~~~~~ 13
8+6=~~~~~~~~~~~~~~ 14
8+7=~~~~~~~~~~~~~~~ 15
8+8=~~~~~~~~~~~~~~~~ 16
8+9=~~~~~~~~~~~~~~~~~ 17
9+1=~~~~~~~~~~ 10
9+2=~~~~~~~~~~~ 11
9+3=~~~~~~~~~~~~ 12
9+4=~~~~~~~~~~~~~ 13
9+5=~~~~~~~~~~~~~~ 14
9+6=~~~~~~~~~~~~~~~ 15
9+7=~~~~~~~~~~~~~~~~ 16
9+8=~~~~~~~~~~~~~~~~~ 17
9+9=~~~~~~~~~~~~~~~~~~ 18
おもろかったし, node というか JavaScript の復習になった.
ではでは(=゚ω゚)ノ
- 投稿日:2019-10-12T09:39:08+09:00
[okadash] The story of making the dashboard tool for Mac and Windows with Electron
Introduction
What is okadash??
- The ansrew is, A tool to combine multiple sites on one screen!
- Aiming to be an easy-to-use & highly customizable tool as a core concept ?
How convenient is it?
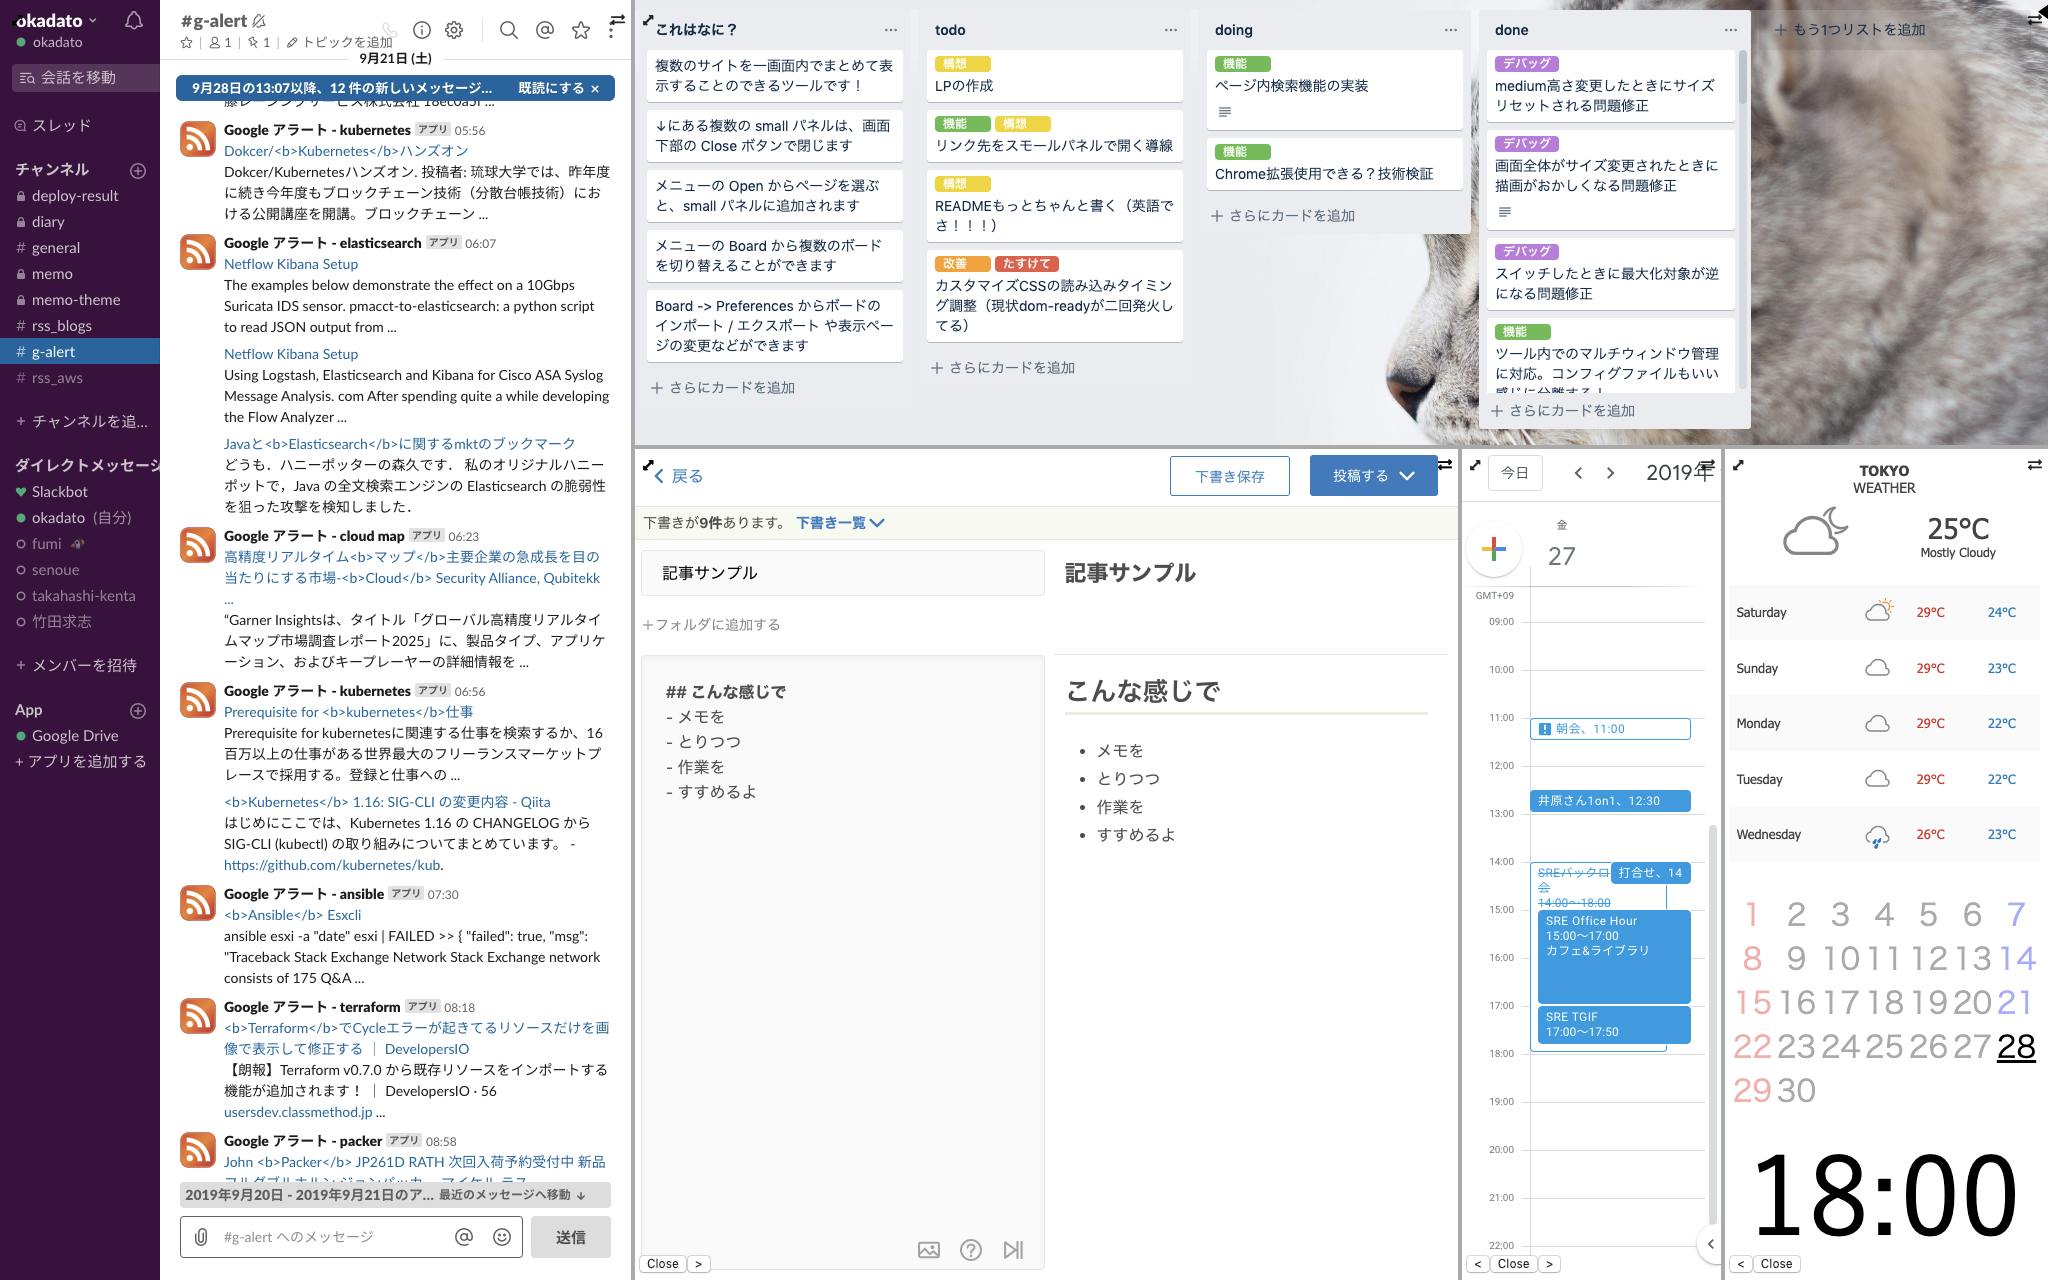
As an example, here are some examples of how I actually use it during my work.
(? This isokadash's screenshot. It may be easier to see if you click on the image to enlarge it)
Slack, Trello, Kibela, Google Calendar, weather and normal calendar are displayed in one screen.
Basically, this dashboard is always displayed in full screen on one display, while the IDE or browser is opened on another display.The key of this dashboard is when something happens in the communication on Slack
- You can draft in Trello almost to no time as a ToDo
- You can immediately check the schedule of the day with the scheduler and instantly estimate the time budget for the task.
And Kibela is always open and used to write daily reports and work logs.
It is a tool that allows you to create a dashboard like above example.
In the following, I will explain the functions more specifically , focusing on what you can do with this tool, especially the high degree of customization !
Definition of terms
Before that, I will first define the terms specific to this tool.
[NOTE] All of them are current at the time of article submission and may change in the future.
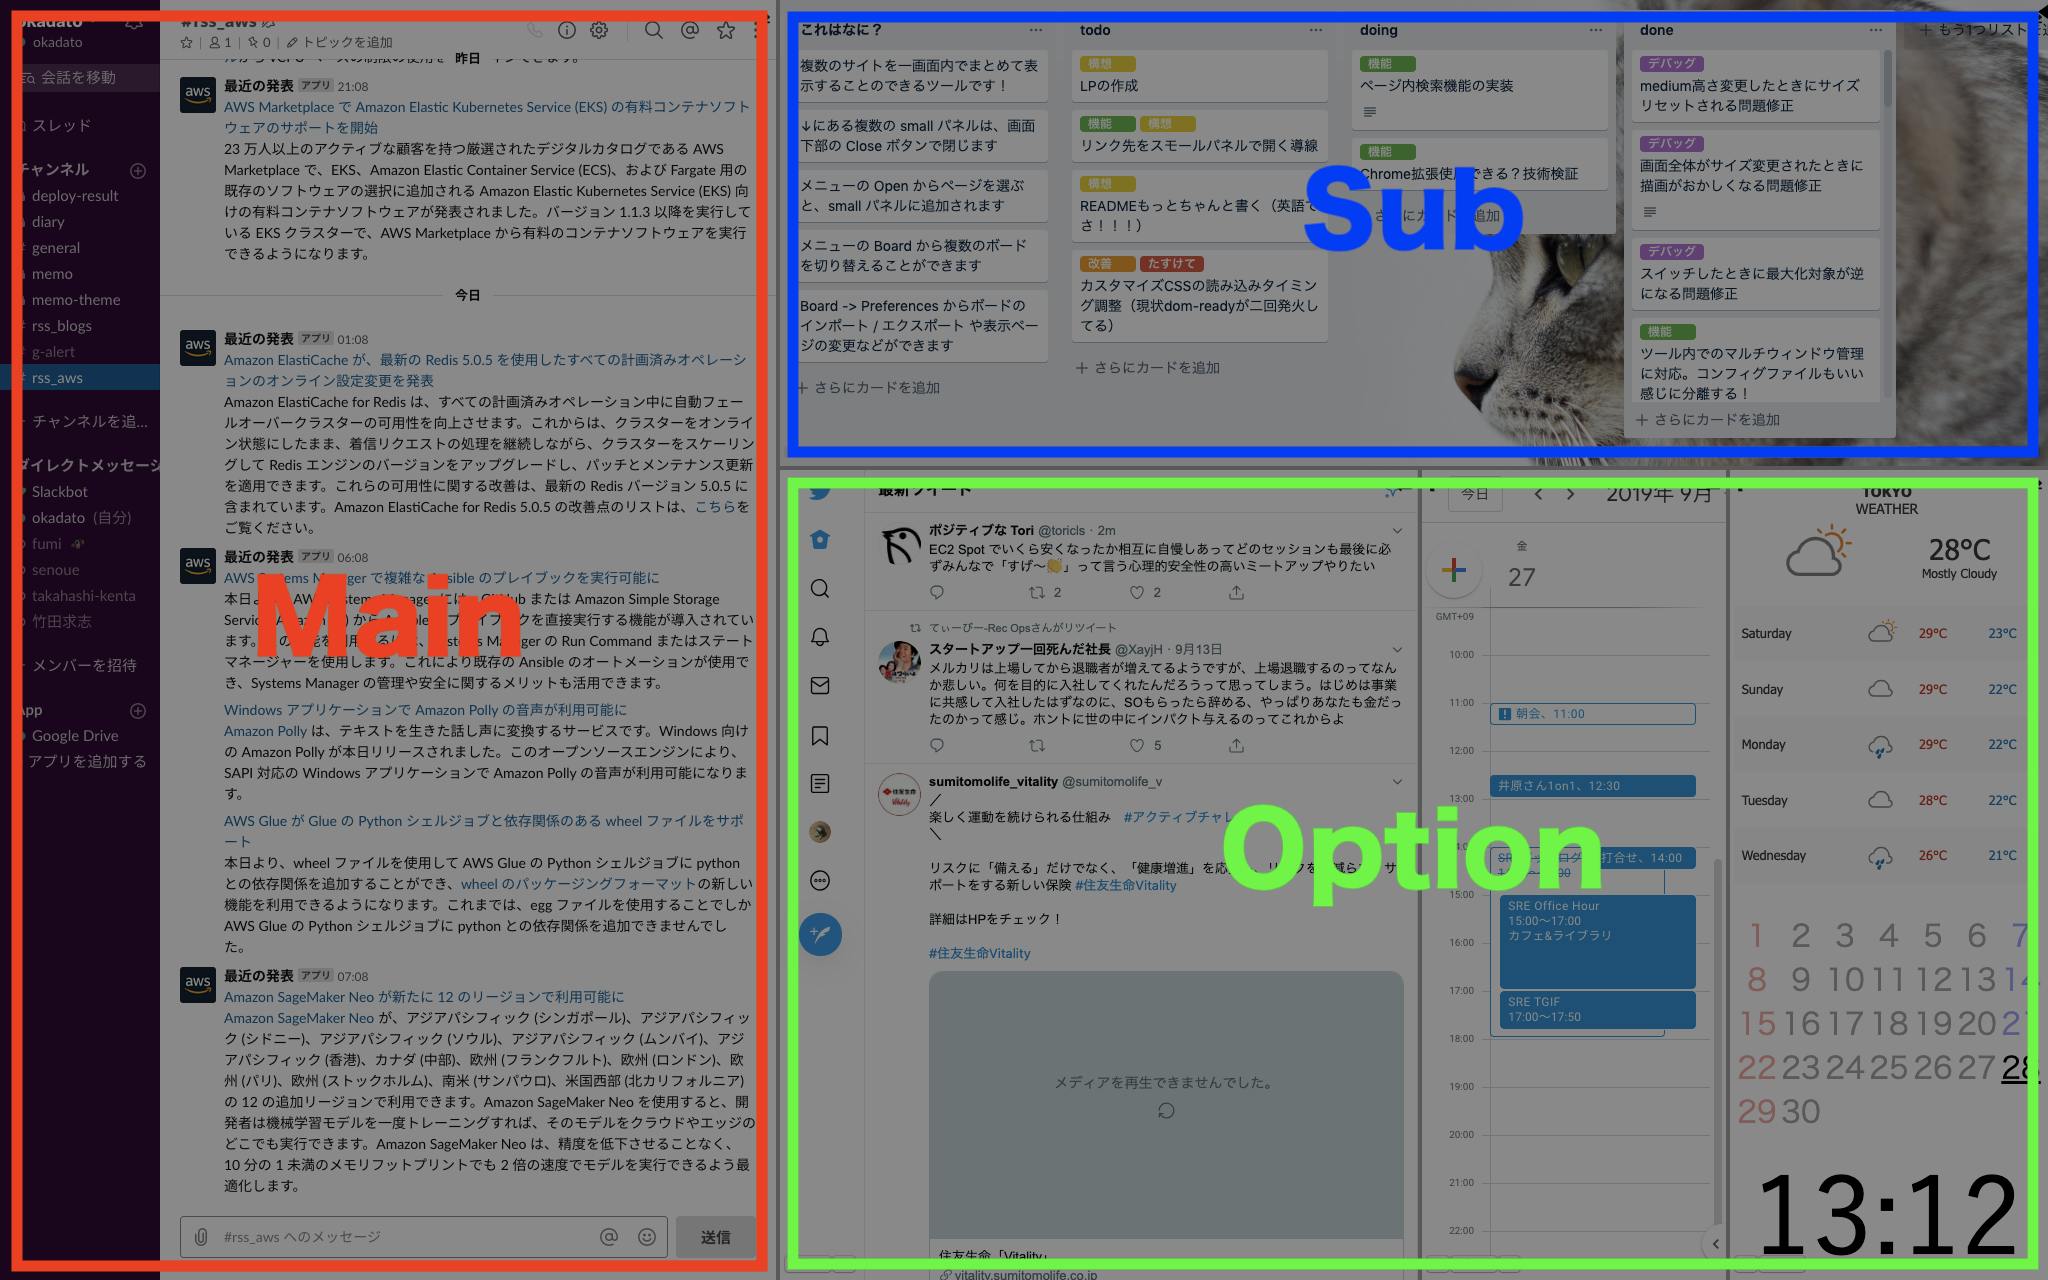
term Definition board The entire window displaying multiple sites panel One screen showing each site
? This is one board, and each part surrounded by a frame is a panel.
As shown in the image, the left large panel is defined as aMainpanel, the upper right horizontal panel is defined as aSubpanel, and the multiple lower right panel groups areOptiondefined as panels.[NOTE] Tested Environment
This tool works on both Mac and Windows , but has been confirmed to work only on Mac.
All the shortcut keys that appear below are assumed to be on the Mac.
The repository is below.
By the way, Why
okadash?
Because it is a dashboard tool created by me, Okada, so okadash. Really easy to understand ?How to get started
Let's actually use this !! Start the tool included in
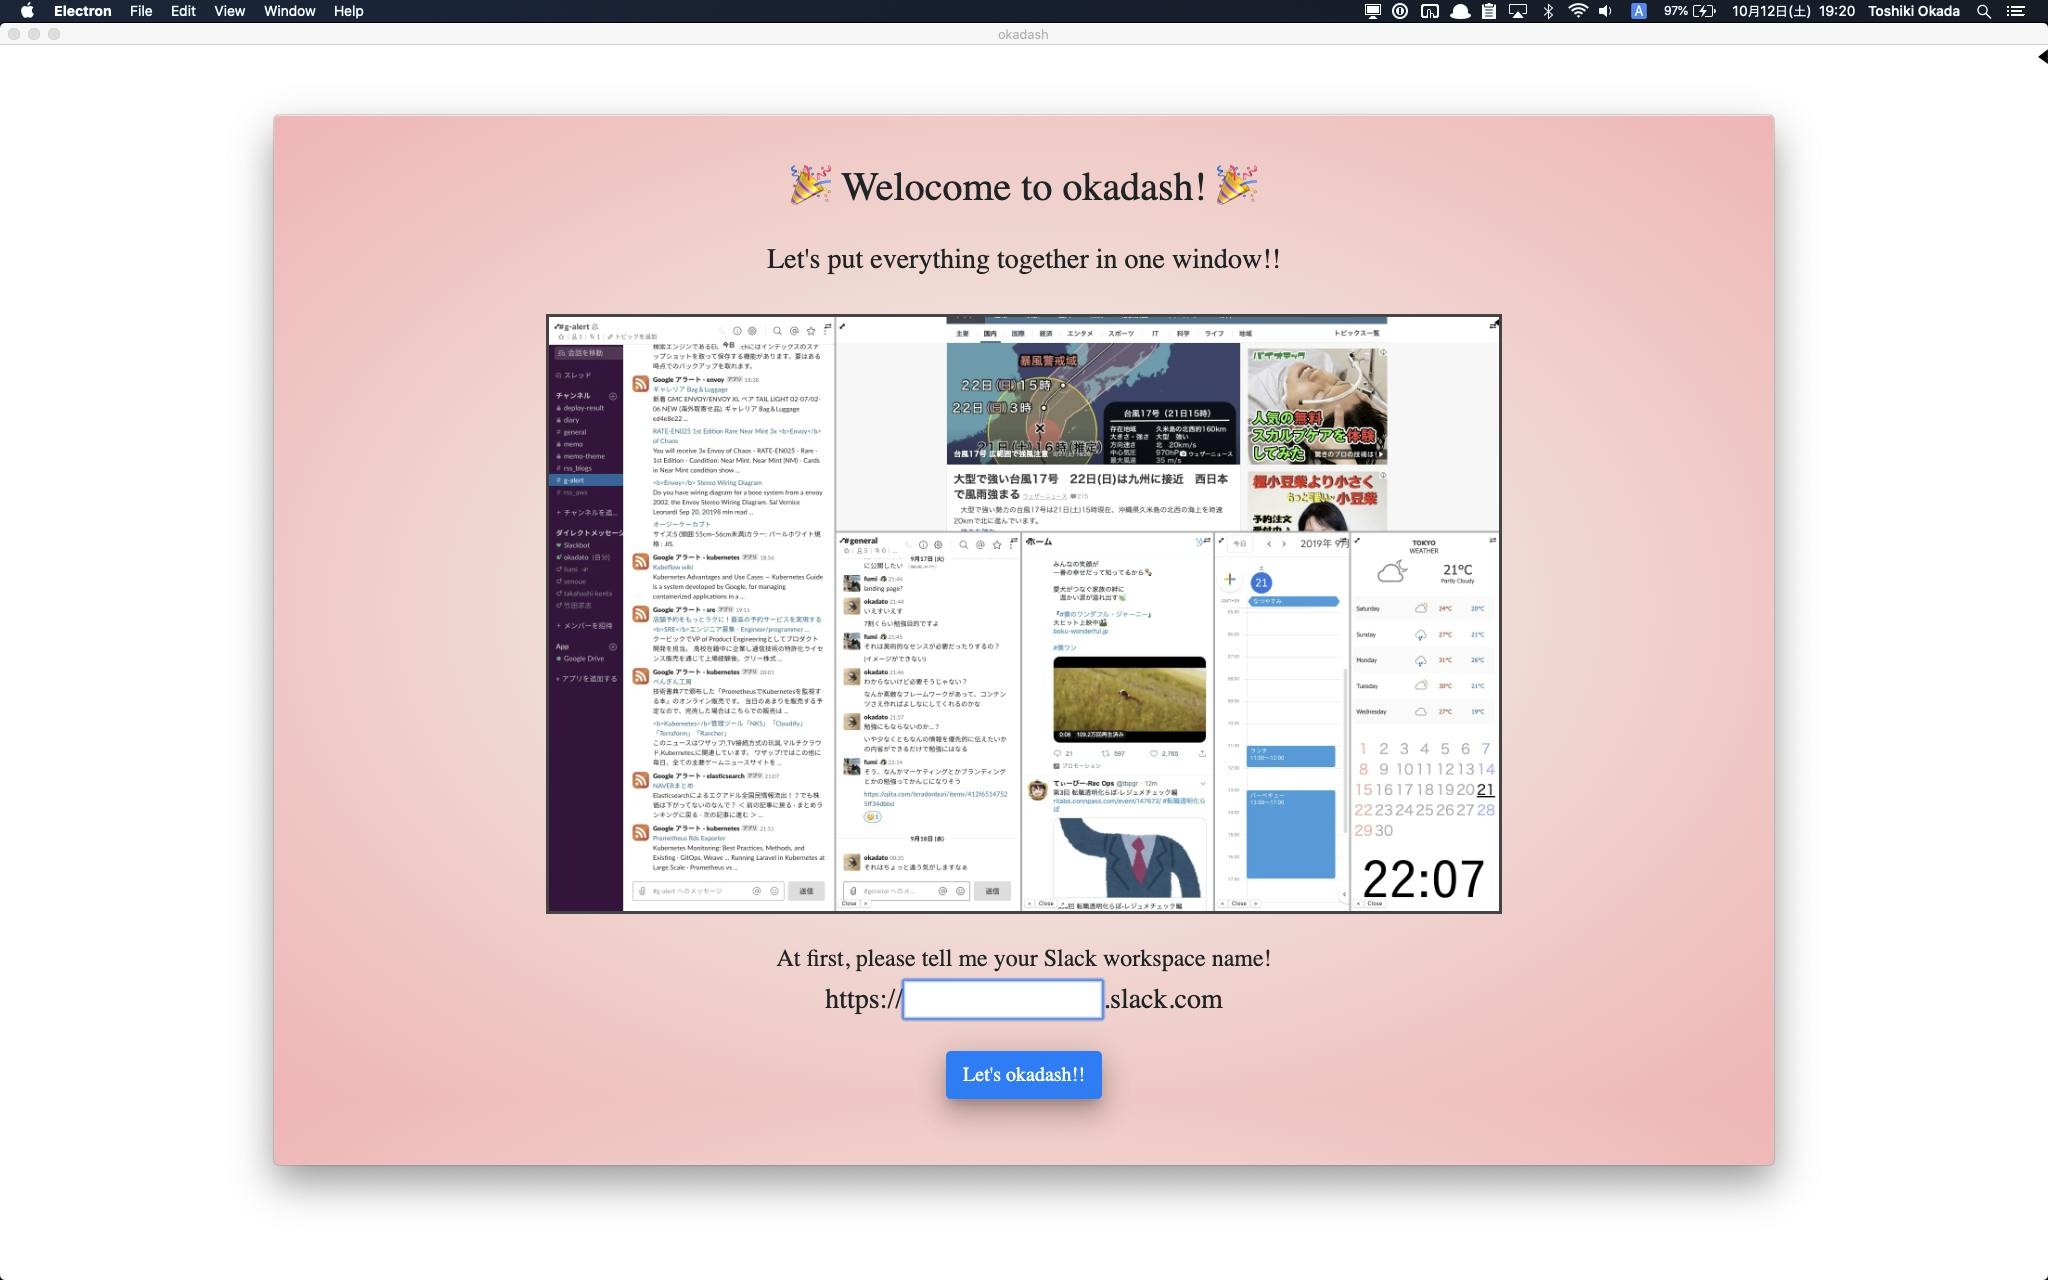
zip!
The following welcome page will be displayed when you first start up (Welcome to okadash!)
First, enter the name of your usual Slack workspace and click
Let's okadash!!
Then, you will see the board in the default state as shown below.
You need to log in to Slack and Twitter, as you only need to log in for the first time.
The installation procedure is That's All! From here, let's customize to your own board! !
(Switching the channel with the small Slack in theOptionpanel byCommand + K)Board display functions
Let's start by explaining the basic functions related to board operation and display methods. You can do this on
the displayed board ! I will explain that.1. Drag the width and height of each panel
- The information on the changed panel size is retained even when the screen is updated or next time it is started.
2. Maximized display mode
- Click the arrow icon at the top left of each panel to maximize that panel.
- Use the
Esckey to close the maximized panel.- Use this when you want to concentrate on one of the panels.
3. Display page in each panel can be changed
- Click the switch icon in the upper right part of each panel to change the page displayed in that panel.
4. Display position can be changed and closed only on the Option panel
- Only the bottom right
Optionpanel can be switched and closed with the button at the bottom of the panel.
- Also you can close the panel by
Command + Wthat has focus.
- Although it is a little difficult to understand, they are buttons surrounded by a red frame.
5. Option panel can be added
- You can close, so you can also open !
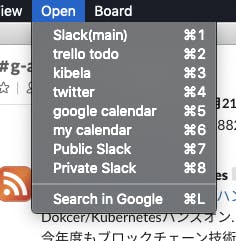
- It is possible to open from the top menu
Open, but it is easy to open with the shortcut key ?- By the way, with
Command + LGoogle will open. Useful when you want to do a quick search.
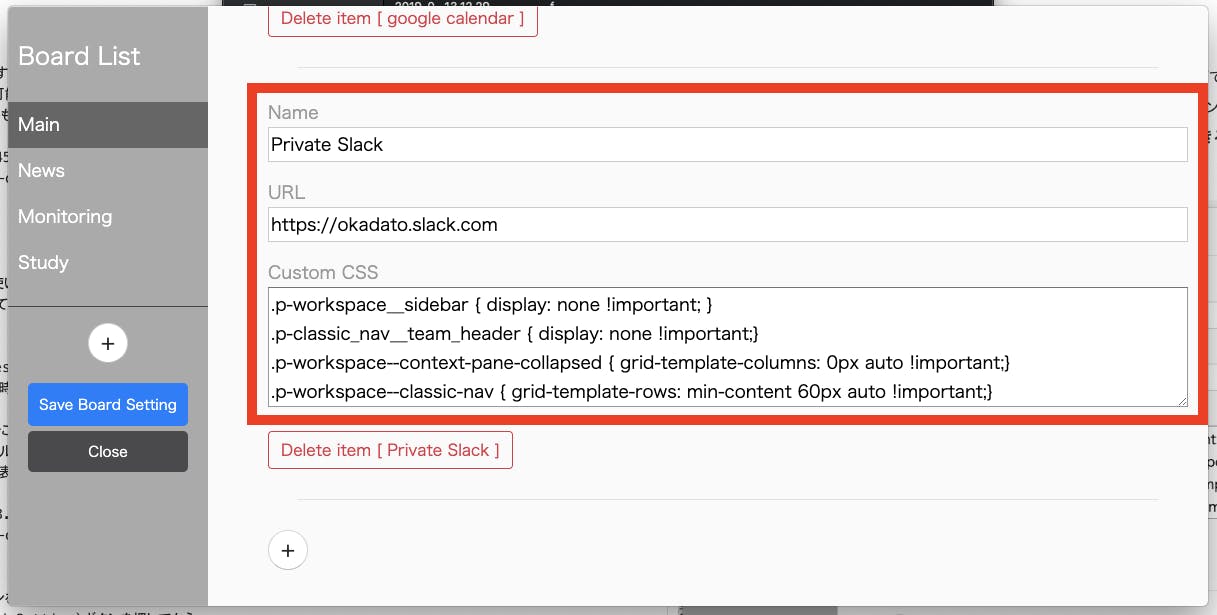
6. Set the display items of the board
- Open the board settings screen from the top menu
Board -> Preferences.
- Each page displayed on each panel has the following setting items.
Item Content Name Display name used when switching menus and pages URL URL of the page to display Custom CSS Setting value for overriding CSS when displaying page
- In the below image, I am using
Custom CSSonly the content part of Slack. You can extract and display only the necessary parts on a narrow panel, it is very convenient to use it well!
- If you press the button
+at the bottom of the setting screen, you can add items.- After changing the setting Save Board Setting, press the blue button in the left column and then press the
Closebutton to return to the board display screen.
- In the example below, you can see that the number of
Optionpanels has actually increased.
Actual usage pattern of mine
Now, the explanation of
okadashfunctions so far is over.
Here are some examples of how you actually use them like this!1. Daily business use (repost)
This is reposted.
Once again, the reason for this board is that when a task occurs in communication on Slack...
- You can draft in Trello almost to no time as a ToDo
- You can check the schedule of the day with the scheduler and instantly estimate the time budget to spend on tasks
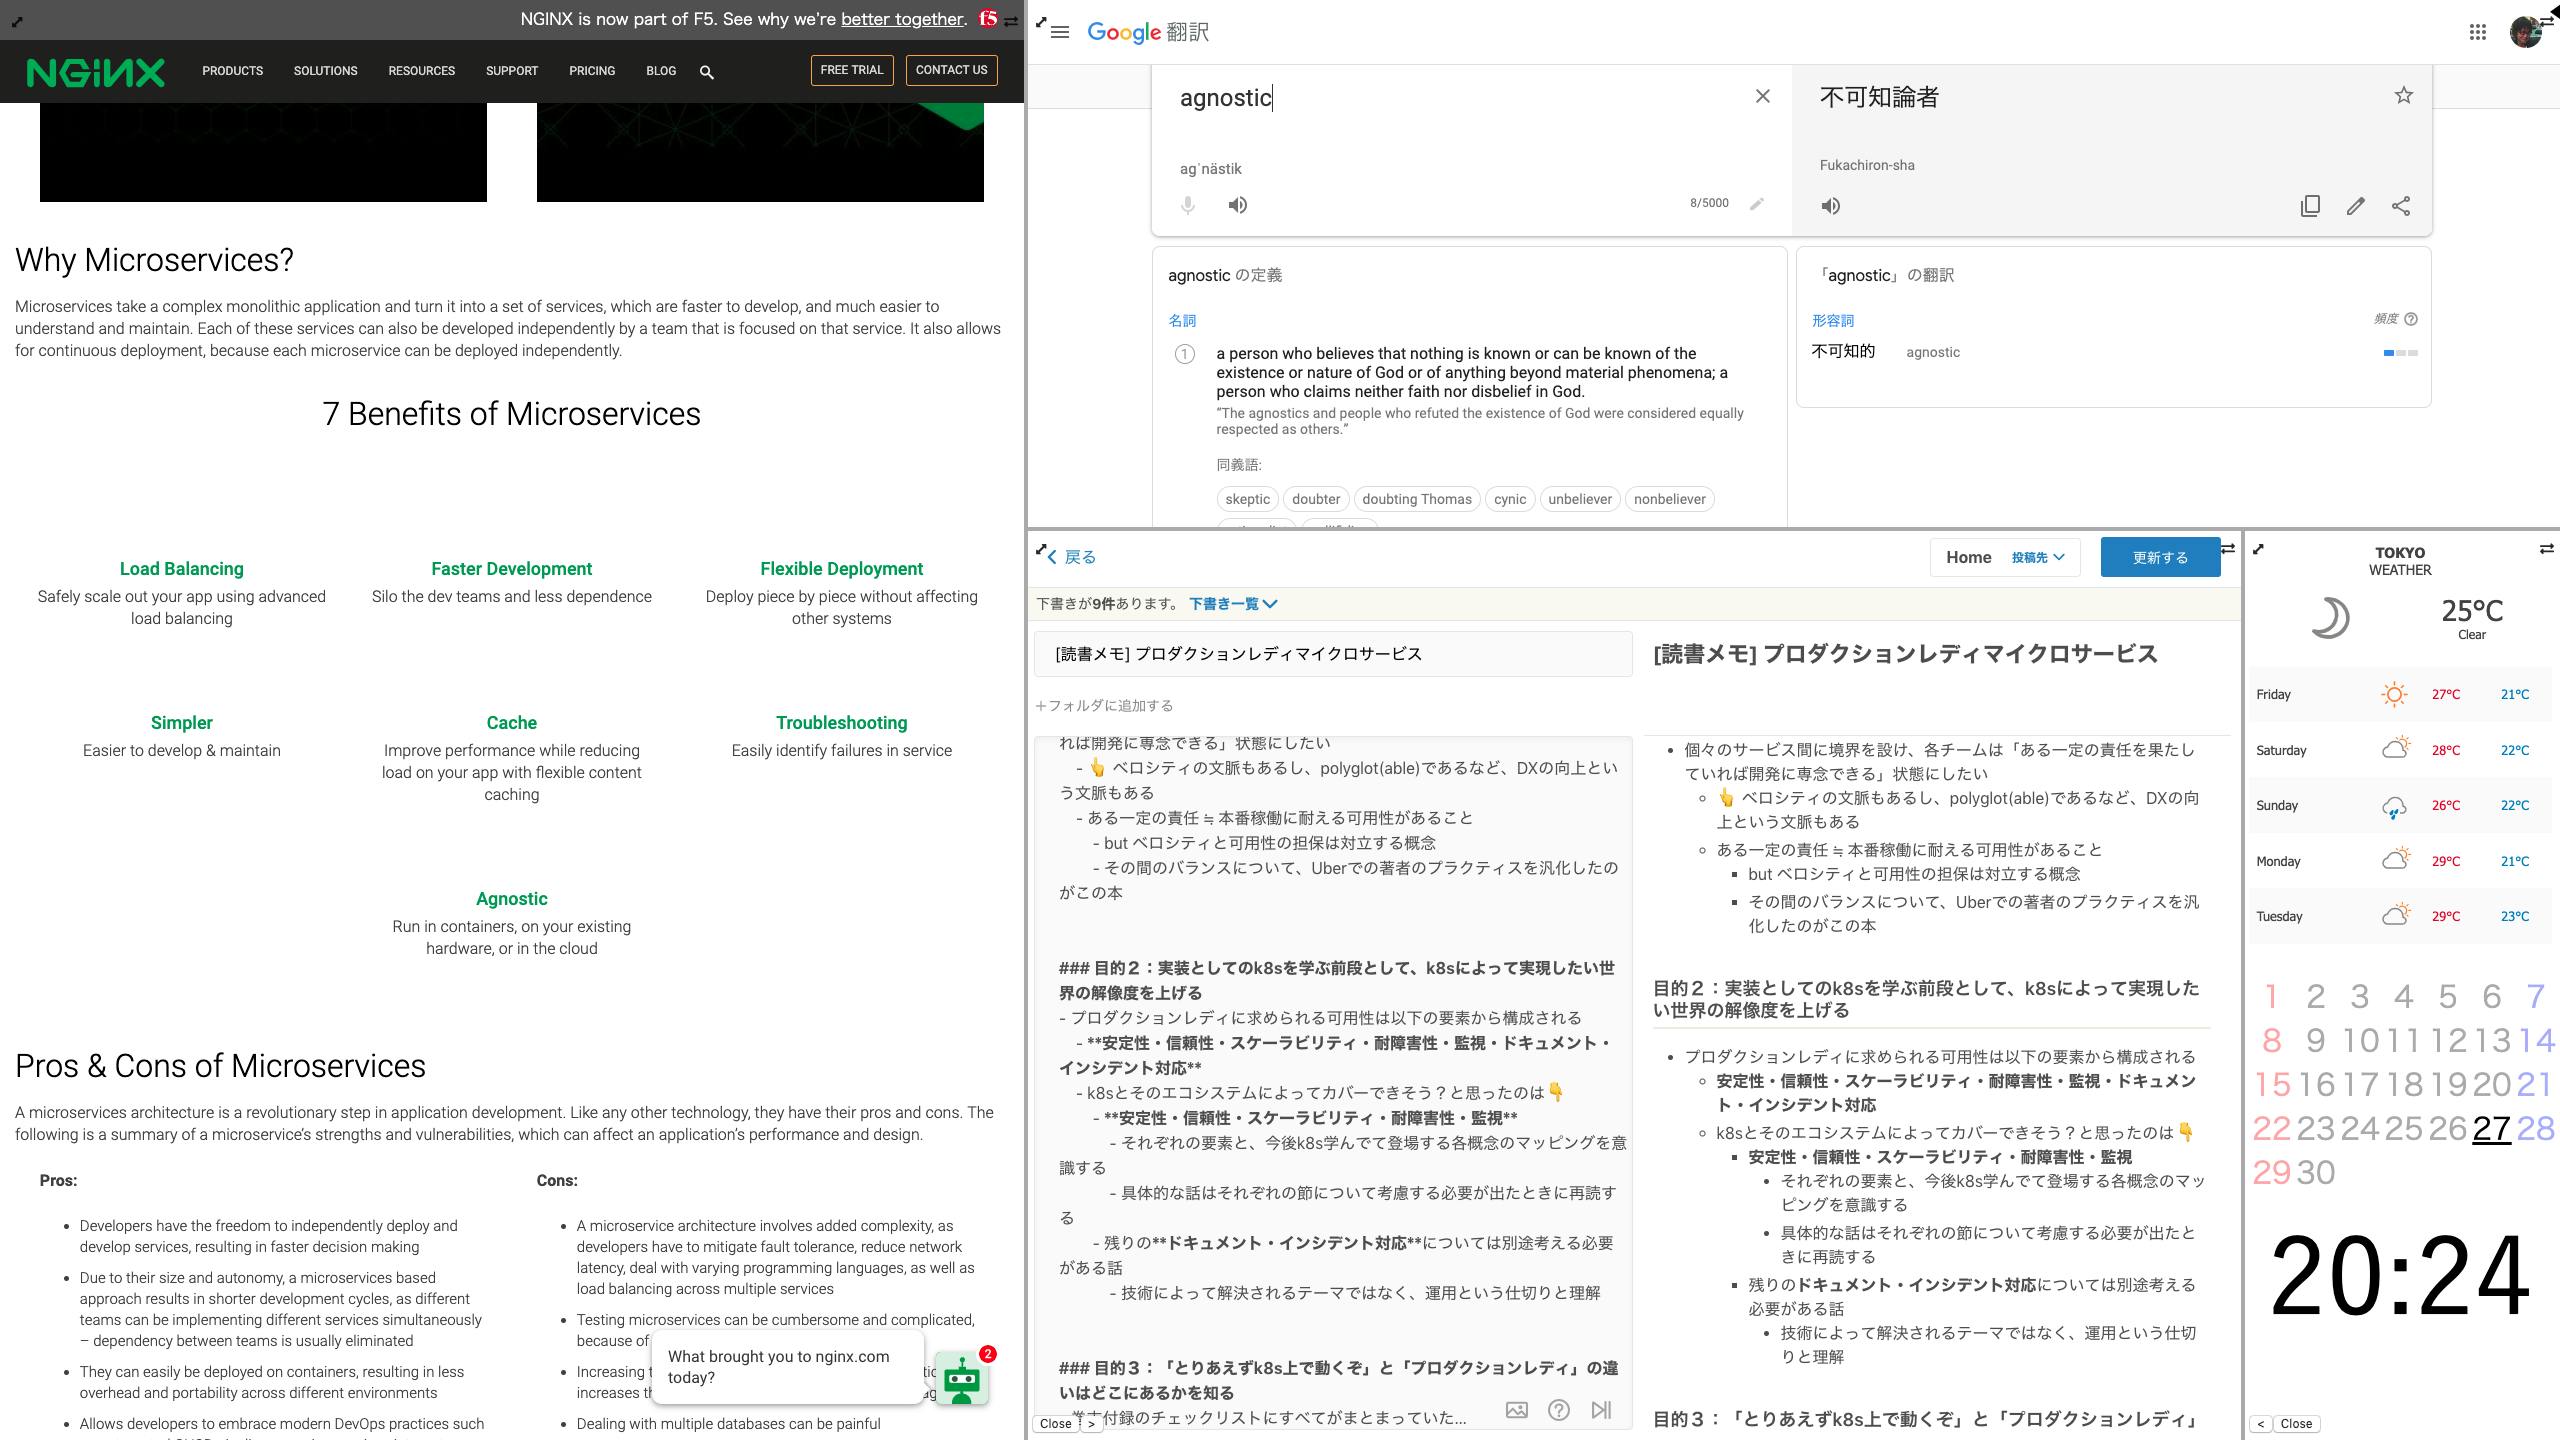
2. Study on a theme
This board was opened while reading a book called Production Ready Micro Services.
It's like using Nginx's explanation page while reading and applying Google Translate to words I don't know.
When you want to concentrate like this, Slack and Twitter are completely noisy, so create a board for the study.3. Monitoring dashboard
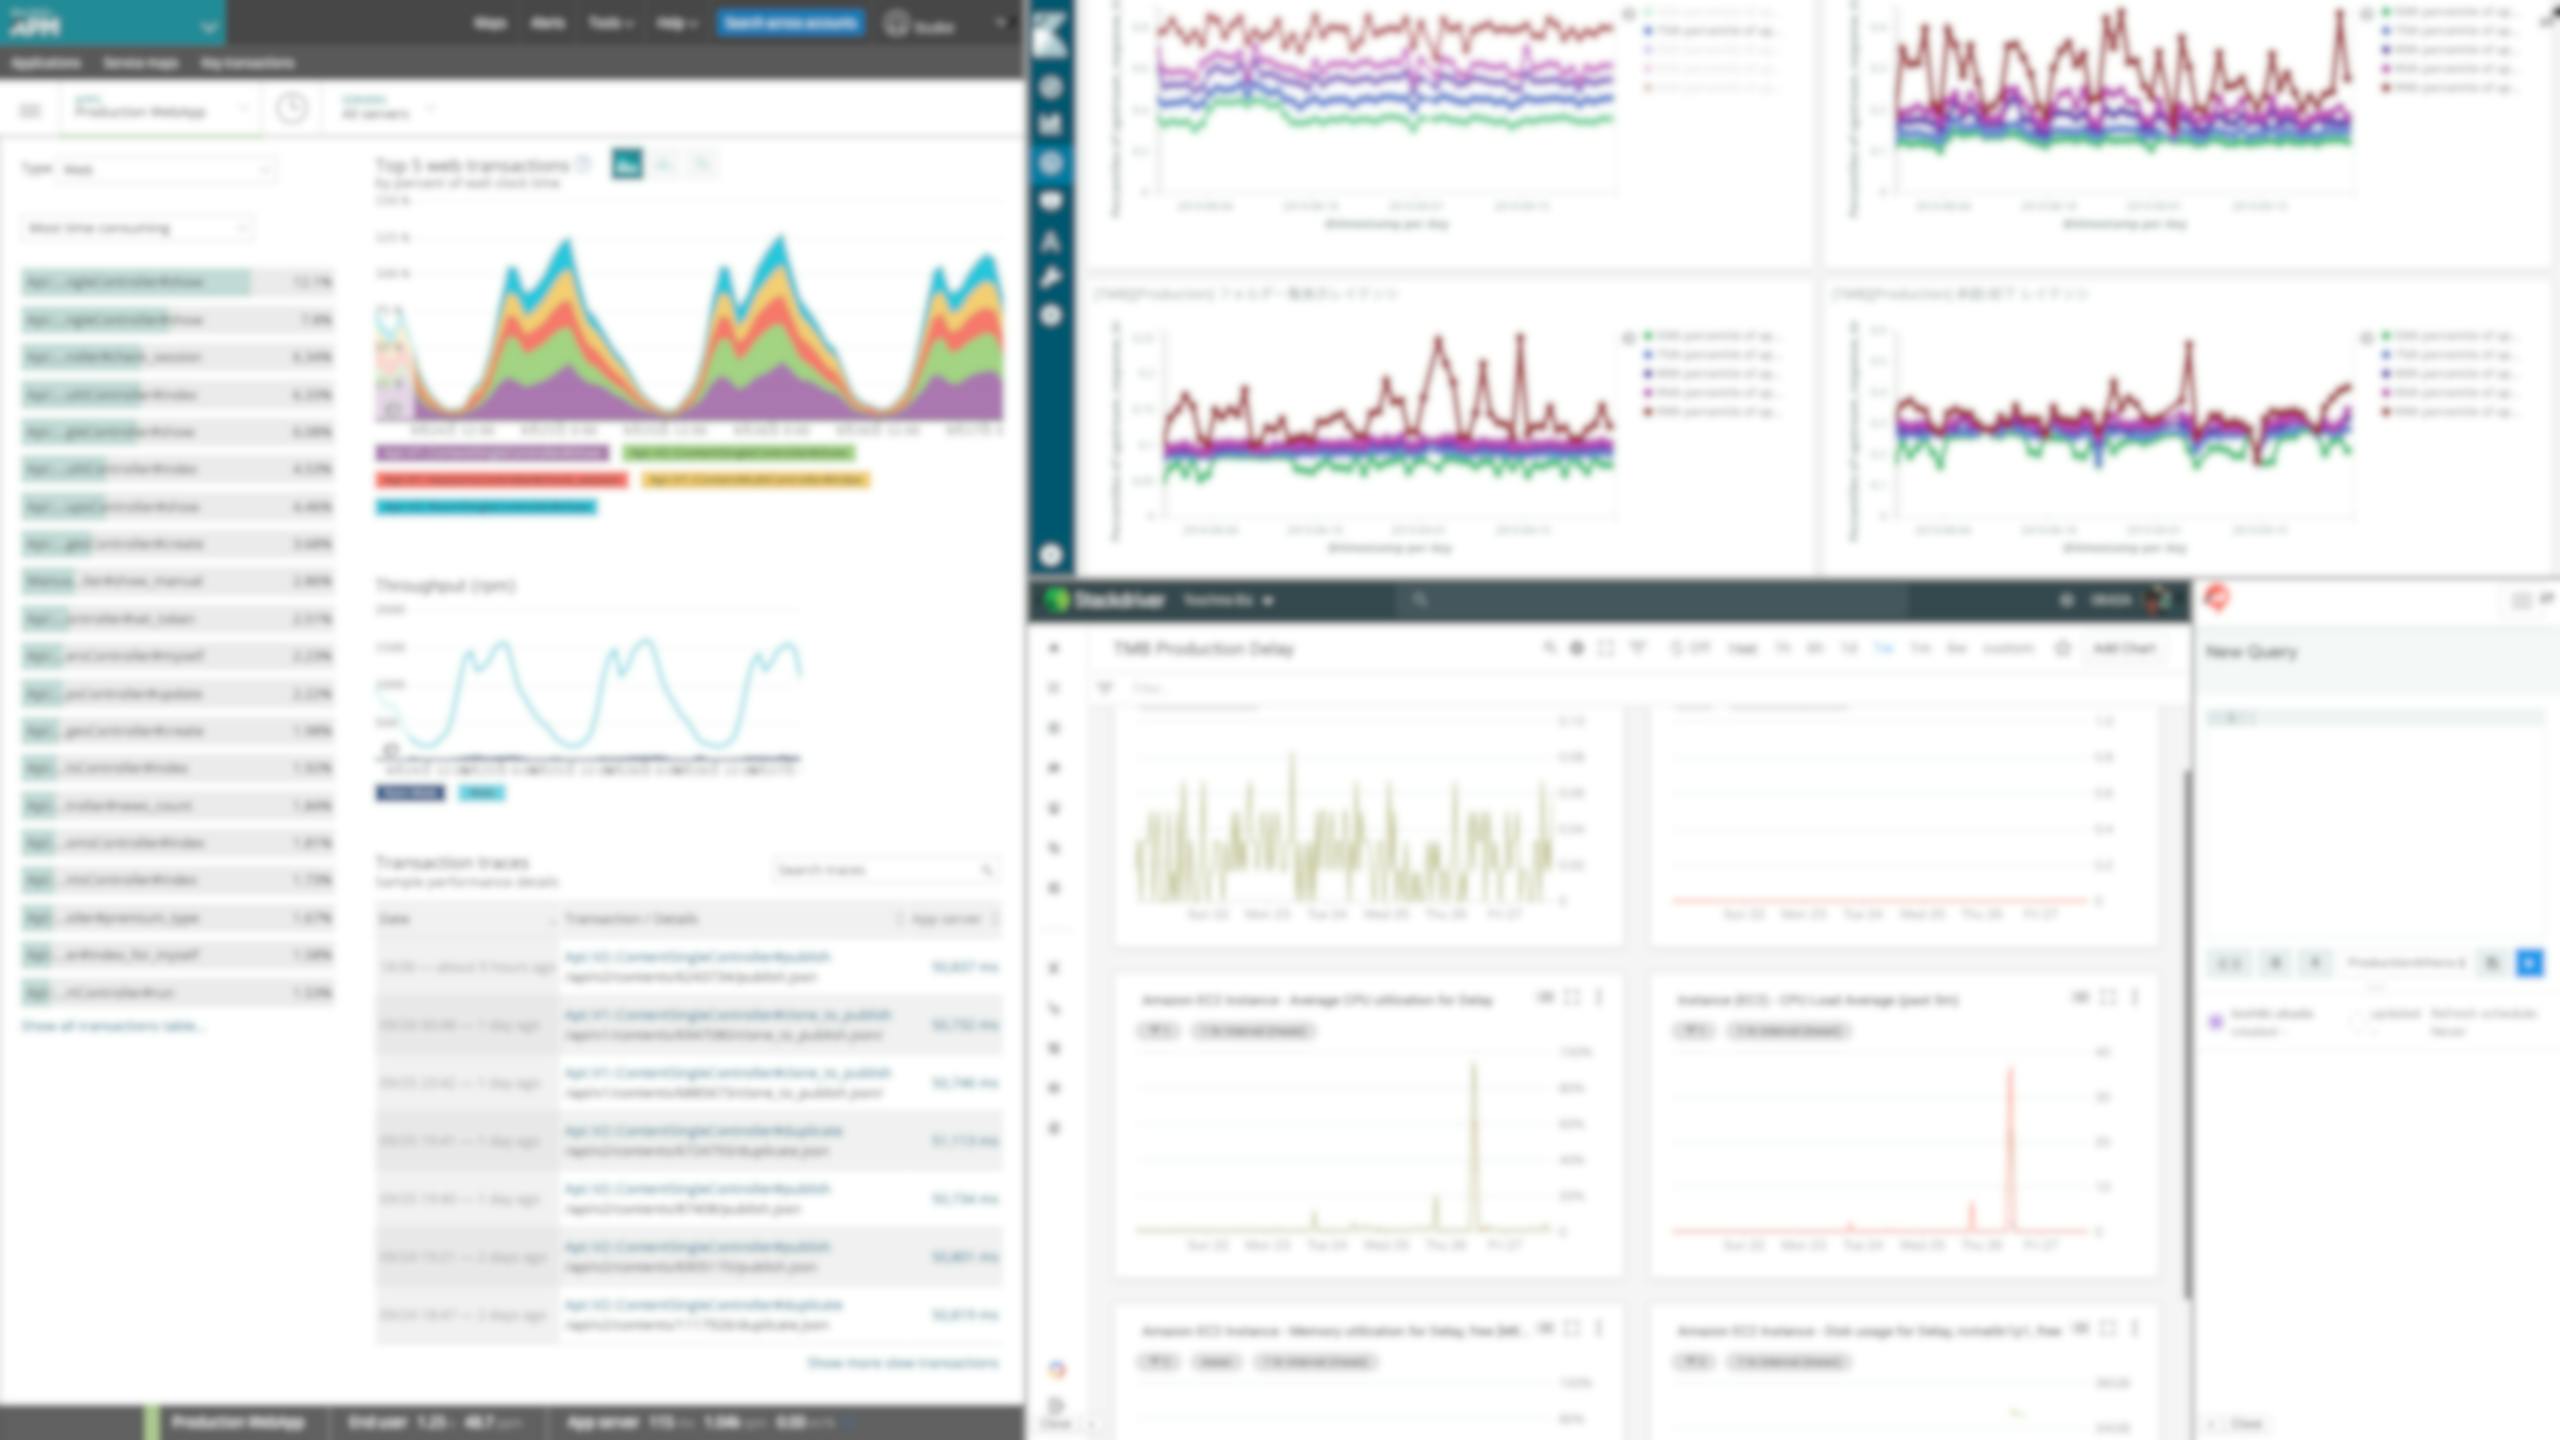
I think that it is a rather royal way to use as a dashboard tool, but I create a board that gives a bird's-eye view of the tools used in my work and check them regularly.
Opening one by one is very troublesome, so it is very convenient to see it on one screen.Finally
- I'd be happy if you could use it and comment if you have any impressions, feature requests, or improvements !
- Because it is still under development. . . I look forward to Pull Requests too !!!
- The most recent development planned items are...
- Word search corresponding in each panel ( Like
Command + Fsearch console)- Chrome extension support
- And If you LOVE this tool...
- https://github.com/konoyono/okadash
- Since it is my dream to be able to install with
brew cask, more than 50 Github stars are needed ?- I really appreciate for your cooperation

- At the time of posting this article (12/10/2019) Stars are
30!!!


- 投稿日:2019-10-12T09:39:08+09:00
[okadash] My story of creating a dashboard tool for Mac and Windows with Electron
Introduction
What is okadash??
- The ansrew is, A tool to combine multiple sites on one screen!
- Aiming to be an easy-to-use & highly customizable tool as a core concept ?
How useful is it?
As an example, here are some examples of how I actually use it during my work.
(? This isokadash's screenshot. It may be easier to see if you click on the image to enlarge it)
Slack, Trello, Kibela, Google Calendar, weather and normal calendar are displayed in one screen.
Basically, this dashboard is always displayed in full screen on one display, while the IDE or browser is opened on another display.The key of this dashboard is when something happens in the communication on Slack
- You can draft in Trello almost to no time as a ToDo
- You can immediately check the schedule of the day with the scheduler and instantly estimate the time budget for the task.
And Kibela is always open and used to write daily reports and work logs.
It is a tool that allows you to create a dashboard like above example.
In the following, I will explain the functions more specifically , focusing on what you can do with this tool, especially the high degree of customization !
Definition of terms
Before that, I will first define the terms specific to this tool.
[NOTE] All of them are current at the time of article submission and may change in the future.
term Definition board The entire window displaying multiple sites panel One screen showing each site
? This is one board, and each part surrounded by a frame is a panel.
As shown in the image, the left large panel is defined as aMainpanel, the upper right horizontal panel is defined as aSubpanel, and the multiple lower right panel groups areOptiondefined as panels.[NOTE] Tested Environment
This tool works on both Mac and Windows , but has been confirmed to work only on Mac.
All the shortcut keys that appear below are assumed to be on the Mac.
The repository is below.
By the way, Why
okadash?
Because it is a dashboard tool created by me, Okada, so okadash. Really easy to understand ?How to get started
Let's actually use this !! Start the tool included in
zip!
The following welcome page will be displayed when you first start up (Welcome to okadash!)
First, enter the name of your usual Slack workspace and click
Let's okadash!!
Then, you will see the board in the default state as shown below.
You need to log in to Slack and Twitter, as you only need to log in for the first time.
The installation procedure is That's All! From here, let's customize to your own board! !
(Switching the channel with the small Slack in theOptionpanel byCommand + K)Board display functions
Let's start by explaining the basic functions related to board operation and display methods. You can do this on
the displayed board ! I will explain that.1. Drag the width and height of each panel
- The information on the changed panel size is retained even when the screen is updated or next time it is started.
2. Maximized display mode
- Click the arrow icon at the top left of each panel to maximize that panel.
- Use the
Esckey to close the maximized panel.- Use this when you want to concentrate on one of the panels.
3. Display page in each panel can be changed
- Click the switch icon in the upper right part of each panel to change the page displayed in that panel.
4. Display position can be changed and closed only on the Option panel
- Only the bottom right
Optionpanel can be switched and closed with the button at the bottom of the panel.
- Also you can close the panel by
Command + Wthat has focus.
- Although it is a little difficult to understand, they are buttons surrounded by a red frame.
5. Option panel can be added
- You can close, so you can also open !
- It is possible to open from the top menu
Open, but it is easy to open with the shortcut key ?- By the way, with
Command + LGoogle will open. Useful when you want to do a quick search.
6. Set the display items of the board
- Open the board settings screen from the top menu
Board -> Preferences.
- Each page displayed on each panel has the following setting items.
Item Content Name Display name used when switching menus and pages URL URL of the page to display Custom CSS Setting value for overriding CSS when displaying page
- In the below image, I am using
Custom CSSonly the content part of Slack. You can extract and display only the necessary parts on a narrow panel, it is very convenient to use it well!
- If you press the button
+at the bottom of the setting screen, you can add items.- After changing the setting Save Board Setting, press the blue button in the left column and then press the
Closebutton to return to the board display screen.
- In the example below, you can see that the number of
Optionpanels has actually increased.
Actual usage pattern of mine
Now, the explanation of
okadashfunctions so far is over.
Here are some examples of how you actually use them like this!1. Daily business use (repost)
This is reposted.
Once again, the reason for this board is that when a task occurs in communication on Slack...
- You can draft in Trello almost to no time as a ToDo
- You can check the schedule of the day with the scheduler and instantly estimate the time budget to spend on tasks
2. Study on a theme
This board was opened while reading a book called Production Ready Micro Services.
It's like using Nginx's explanation page while reading and applying Google Translate to words I don't know.
When you want to concentrate like this, Slack and Twitter are completely noisy, so create a board for the study.3. Monitoring dashboard
I think that it is a rather royal way to use as a dashboard tool, but I create a board that gives a bird's-eye view of the tools used in my work and check them regularly.
Opening one by one is very troublesome, so it is very convenient to see it on one screen.Finally
- I'd be happy if you could use it and comment if you have any impressions, feature requests, or improvements !
- Because it is still under development. . . I look forward to Pull Requests too !!!
- The most recent development planned items are...
- Word search corresponding in each panel ( Like
Command + Fsearch console)- Chrome extension support
- And If you LOVE this tool...
- https://github.com/konoyono/okadash
- Since it is my dream to be able to install with
brew cask, more than 50 Github stars are needed ?- I really appreciate for your cooperation
- At the time of posting this article (12/10/2019) Stars are
30!!!
- 投稿日:2019-10-12T09:39:08+09:00
[okadash] Story of creating a dashboard tool for Mac and Windows with Electron
Introduction
What is okadash??
- The ansrew is, A tool to combine multiple sites on one screen!
- Aiming to be an easy-to-use & highly customizable tool as a core concept ?
How useful is it?
As an example, here are some examples of how I actually use it during my work.
(? This isokadash's screenshot. It may be easier to see if you click on the image to enlarge it)
Slack, Trello, Kibela, Google Calendar, weather and normal calendar are displayed in one screen.
Basically, this dashboard is always displayed in full screen on one display, while the IDE or browser is opened on another display.The key of this dashboard is when something happens in the communication on Slack
- You can draft in Trello almost to no time as a ToDo
- You can immediately check the schedule of the day with the scheduler and instantly estimate the time budget for the task.
And Kibela is always open and used to write daily reports and work logs.
It is a tool that allows you to create a dashboard like above example.
In the following, I will explain the functions more specifically , focusing on what you can do with this tool, especially the high degree of customization !
Definition of terms
Before that, I will first define the terms specific to this tool.
[NOTE] All of them are current at the time of article submission and may change in the future.
term Definition board The entire window displaying multiple sites panel One screen showing each site
? This is one board, and each part surrounded by a frame is a panel.
As shown in the image, the left large panel is defined as aMainpanel, the upper right horizontal panel is defined as aSubpanel, and the multiple lower right panel groups areOptiondefined as panels.[NOTE] Tested Environment
This tool works on both Mac and Windows , but has been confirmed to work only on Mac.
All the shortcut keys that appear below are assumed to be on the Mac.
The repository is below.
By the way, Why
okadash?
Because it is a dashboard tool created by me, Okada, so okadash. Really easy to understand ?How to get started
Let's actually use this !! Start the tool included in
zip!
The following welcome page will be displayed when you first start up (Welcome to okadash!)
First, enter the name of your usual Slack workspace and click
Let's okadash!!
Then, you will see the board in the default state as shown below.
You need to log in to Slack and Twitter, as you only need to log in for the first time.
The installation procedure is That's All! From here, let's customize to your own board! !
(Switching the channel with the small Slack in theOptionpanel byCommand + K)Board display functions
Let's start by explaining the basic functions related to board operation and display methods. You can do this on
the displayed board ! I will explain that.1. Drag the width and height of each panel
- The information on the changed panel size is retained even when the screen is updated or next time it is started.
2. Maximized display mode
- Click the arrow icon at the top left of each panel to maximize that panel.
- Use the
Esckey to close the maximized panel.- Use this when you want to concentrate on one of the panels.
3. Display page in each panel can be changed
- Click the switch icon in the upper right part of each panel to change the page displayed in that panel.
4. Display position can be changed and closed only on the Option panel
- Only the bottom right
Optionpanel can be switched and closed with the button at the bottom of the panel.
- Also you can close the panel by
Command + Wthat has focus.
- Although it is a little difficult to understand, they are buttons surrounded by a red frame.
5. Option panel can be added
- You can close, so you can also open !
- It is possible to open from the top menu
Open, but it is easy to open with the shortcut key ?- By the way, with
Command + LGoogle will open. Useful when you want to do a quick search.
6. Set the display items of the board
- Open the board settings screen from the top menu
Board -> Preferences.
- Each page displayed on each panel has the following setting items.
Item Content Name Display name used when switching menus and pages URL URL of the page to display Custom CSS Setting value for overriding CSS when displaying page
- In the below image, I am using
Custom CSSonly the content part of Slack. You can extract and display only the necessary parts on a narrow panel, it is very convenient to use it well!
- If you press the button
+at the bottom of the setting screen, you can add items.- After changing the setting Save Board Setting, press the blue button in the left column and then press the
Closebutton to return to the board display screen.
- In the example below, you can see that the number of
Optionpanels has actually increased.
Actual usage pattern of mine
Now, the explanation of
okadashfunctions so far is over.
Here are some examples of how you actually use them like this!1. Daily business use (repost)
This is reposted.
Once again, the reason for this board is that when a task occurs in communication on Slack...
- You can draft in Trello almost to no time as a ToDo
- You can check the schedule of the day with the scheduler and instantly estimate the time budget to spend on tasks
2. Study on a theme
This board was opened while reading a book called Production Ready Micro Services.
It's like using Nginx's explanation page while reading and applying Google Translate to words I don't know.
When you want to concentrate like this, Slack and Twitter are completely noisy, so create a board for the study.3. Monitoring dashboard
I think that it is a rather royal way to use as a dashboard tool, but I create a board that gives a bird's-eye view of the tools used in my work and check them regularly.
Opening one by one is very troublesome, so it is very convenient to see it on one screen.Finally
- I'd be happy if you could use it and comment if you have any impressions, feature requests, or improvements !
- Because it is still under development. . . I look forward to Pull Requests too !!!
- The most recent development planned items are...
- Word search corresponding in each panel ( Like
Command + Fsearch console)- Chrome extension support
- And If you LOVE this tool...
- https://github.com/konoyono/okadash
- Since it is my dream to be able to install with
brew cask, more than 50 Github stars are needed ?- I really appreciate for your cooperation
- At the time of posting this article (12/10/2019) Stars are
30!!!