- 投稿日:2019-08-04T23:44:50+09:00
Oracle Linux上にDockerをインストール
参考にしたのは以下のブログ
Install Docker on Oracle Linux 7実行環境
Oracle Linux Server release 7.5
yum の設定
# cd /etc/yum.repos.d/
# wget http://yum.oracle.com/public-yum-ol7.repo
# vi public-yum-ol7.repo

[ol7_latest]
name=Oracle Linux $releasever Latest ($basearch)
baseurl=http://yum.oracle.com/repo/OracleLinux/OL7/latest/$basearch/
gpgkey=file:///etc/pki/rpm-gpg/RPM-GPG-KEY-oracle
gpgcheck=1
enabled=1

[ol7_UEKR5]
name=Latest Unbreakable Enterprise Kernel Release 5 for Oracle Linux $releasever ($basearch)
baseurl=https://yum.oracle.com/repo/OracleLinux/OL7/UEKR5/$basearch/
gpgkey=file:///etc/pki/rpm-gpg/RPM-GPG-KEY-oracle
gpgcheck=1
enabled=1

[ol7_addons]
name=Oracle Linux $releasever Add ons ($basearch)
baseurl=http://yum.oracle.com/repo/OracleLinux/OL7/addons/$basearch/
gpgkey=file:///etc/pki/rpm-gpg/RPM-GPG-KEY-oracle
gpgcheck=1
enabled=1
yumでdocker-engineをインストール
# yum install docker-engine
Loaded plugins: langpacks, ulninfo
ksplice-uptrack                                                                                       |  951 B  00:00:00
ol7_UEKR5                                                                                             | 1.2 kB  00:00:00
ol7_addons                                                                                            | 1.2 kB  00:00:00
ol7_developer                                                                                         | 1.2 kB  00:00:00
ol7_developer_EPEL                                                                                    | 1.2 kB  00:00:00
ol7_latest                                                                                            | 1.4 kB  00:00:00
ol7_optional_latest                                                                                   | 1.2 kB  00:00:00
ol7_software_collections                                                                              | 1.2 kB  00:00:00
Resolving Dependencies
--> Running transaction check
---> Package docker-engine.x86_64 0:18.03.1.ol-0.0.9.el7 will be installed
--> Processing Dependency: container-selinux >= 2.9 for package: docker-engine-18.03.1.ol-0.0.9.el7.x86_64
--> Processing Dependency: pigz for package: docker-engine-18.03.1.ol-0.0.9.el7.x86_64
--> Processing Dependency: libltdl.so.7()(64bit) for package: docker-engine-18.03.1.ol-0.0.9.el7.x86_64
--> Running transaction check
---> Package container-selinux.noarch 2:2.21-1.el7 will be installed
---> Package libtool-ltdl.x86_64 0:2.4.2-22.el7_3 will be installed
---> Package pigz.x86_64 0:2.3.4-1.el7 will be installed
--> Finished Dependency Resolution

Dependencies Resolved

=============================================================================================================================
 Package                          Arch                  Version                              Repository                 Size
=============================================================================================================================
Installing:
 docker-engine                    x86_64                18.03.1.ol-0.0.9.el7                 ol7_addons                 35 M
Installing for dependencies:
 container-selinux                noarch                2:2.21-1.el7                         ol7_addons                 28 k
 libtool-ltdl                     x86_64                2.4.2-22.el7_3                       ol7_latest                 48 k
 pigz                             x86_64                2.3.4-1.el7                          ol7_addons                 80 k

Transaction Summary
=============================================================================================================================
Install  1 Package (+3 Dependent packages)

Total download size: 35 M
Installed size: 151 M
Is this ok [y/d/N]: y
Downloading packages:
(1/4): container-selinux-2.21-1.el7.noarch.rpm                                                        |  28 kB  00:00:00
(2/4): pigz-2.3.4-1.el7.x86_64.rpm                                                                    |  80 kB  00:00:00
(3/4): docker-engine-18.03.1.ol-0.0.9.el7.x86_64.rpm                                                  |  35 MB  00:00:02
(4/4): libtool-ltdl-2.4.2-22.el7_3.x86_64.rpm                                                         |  48 kB  00:00:02
-----------------------------------------------------------------------------------------------------------------------------
Total                                                                                         13 MB/s |  35 MB  00:00:02
Running transaction check
Running transaction test
Transaction test succeeded
Running transaction
  Installing : 2:container-selinux-2.21-1.el7.noarch                                                                     1/4
  Installing : libtool-ltdl-2.4.2-22.el7_3.x86_64                                                                        2/4
  Installing : pigz-2.3.4-1.el7.x86_64                                                                                   3/4
  Installing : docker-engine-18.03.1.ol-0.0.9.el7.x86_64                                                                 4/4
xfs_info: /var/lib is not a mounted XFS filesystem
  Verifying  : pigz-2.3.4-1.el7.x86_64                                                                                   1/4
  Verifying  : libtool-ltdl-2.4.2-22.el7_3.x86_64                                                                        2/4
  Verifying  : docker-engine-18.03.1.ol-0.0.9.el7.x86_64                                                                 3/4
  Verifying  : 2:container-selinux-2.21-1.el7.noarch                                                                     4/4

Installed:
  docker-engine.x86_64 0:18.03.1.ol-0.0.9.el7

Dependency Installed:
  container-selinux.noarch 2:2.21-1.el7        libtool-ltdl.x86_64 0:2.4.2-22.el7_3        pigz.x86_64 0:2.3.4-1.el7

Complete!
docker serviceの起動
systemctlに未だに慣れない(笑)
# systemctl start docker
# systemctl status docker
● docker.service - Docker Application Container Engine
   Loaded: loaded (/usr/lib/systemd/system/docker.service; disabled; vendor preset: disabled)
  Drop-In: /etc/systemd/system/docker.service.d
           └─docker-sysconfig.conf
   Active: active (running) since Wed 2018-11-14 13:16:51 GMT; 25min ago
     Docs: https://docs.docker.com
 Main PID: 3409 (dockerd)
    Tasks: 18
   Memory: 40.8M
   CGroup: /system.slice/docker.service
           ├─3409 /usr/bin/dockerd --selinux-enabled
           └─3414 docker-containerd --config /var/run/docker/containerd/containerd.toml
...
Container Registry
Oracle Container Registry
Blogでは上記のようなContainer Registryも紹介されていたが、まだ使い方がよく分かっていない。
たぶんここらへんを読めばいいのだろうか
Oracle Container Runtime for Dockerユーザーズ・ガイド
- 投稿日:2019-08-04T23:11:23+09:00
Docker+k8s勉強会に行ってきた話【JAZUG女子部×Java女子部】
JAZUG女子部×Java女子部コラボのDocker&Kubernetes勉強会にスタッフとして参加してきました!
Java女子部のイベントには何度か参加していたんですが、運営側での参加は今回が初めてです。せっかくなので参加レポを書いておきます。イベント概要
【東京】【女性限定】【JAZUG女子部コラボ】Japan Tour in Summer: Java & k8s on Azure まつり by #てらだよしおがんばれ
2019-08-03(土)10:00 - 17:00
日本マイクロソフト 31階roomA
https://javajo.doorkeeper.jp/events/94041講師:寺田佳央さん(https://twitter.com/yoshioterada)
ハッシュタグ:#てらだよしおまつりスケジュール
午前:Dockerについてのお勉強(座学)、ハンズオンのチーム分け
午後:Azure+Docker+Kubernetesのハンズオン(モブプロ)イベント準備
事前のスタッフ間のやり取りはSlack、FacebookMessengerでした。
当日スタッフは9:00に集合して会場設営やライブ配信の準備などをしていました。
(遠方から参加の方用にGoogleHangoutsでライブ配信したんですが、色々おぼつかなかったので今後のために勉強しておこうと思いました;;)午前の部
午前は座学でみんなでDockerについてお勉強。
参加者30人前後で、Docker使ったことあるのは半分以下くらい、Kubernetesは初めての方が大多数でした。
コンテナってなに?からKubernetesを使うとなにが嬉しいの?まで丁寧に教えてもらえました。午後の部 Azure×Docker×k8sハンズオン
午後は6人くらい×4チームに別れてAzureを使ったモブプロ形式のハンズオン。
Azureのアカウントを作るところからスタート。会場にチーム分の大きいモニターがなかったので、画面の共有にはTeamsを使っています。
Teamsでの画面共有初めてでしたが使いやすくて良かったです。ブラウザ版だと他人の画面を見ることはできるけど自分の画面を共有できないので、アプリ版が必要でした。レベル感
- Docker、Kubernetesはほとんどの参加者が未経験だったので大丈夫!
- Javaの知識もなくて大丈夫!
- 踏み台のLinuxサーバにssh接続してコマンド叩いたりファイル修正したりするので、Linuxは多少触ったことないと厳しいかも
- でも多少わからないことがあってもモブプロなのでチームの仲間が助けてくれる!大丈夫!
内容
AzureにLinuxサーバを立てて、その中でDockerイメージを作る→Azureにプッシュする→Kubernetesでイメージを持ってきてアプリケーションを動かす、の流れでした。
チーム内で順番に操作者を回していきます。
Azureのクラウドシェルでssh使えるけど結構動作がもっさりしてたので、bashやTeraTermの方が快適でした。資料や実際に動かしたシェル、アプリケーション等は寺田さんのGitHubのリポジトリからクローン。
https://github.com/yoshioterada/k8s-Azure-Container-Service-AKS--on-Azure感想
モブプロすごく楽しかった!
最初6人だと人数が多く感じたんですが、意外とコミュニケーションも取りやすいし、途中詰まっても誰かがフォローできるので良かったです。わからなくて置いていかれる人も出ませんでした。
コンテナのバージョンの切り替えとかさくさくできて楽しかった!Kubernetesで実行したアプリケーションに実際に外部IPでアクセスして、APIのレスポンスが帰ってきた時は女子6人でわいわい盛り上がりました 笑
1日だとかなりコンテンツがぎっちりで、途中シェルの内容とか流し読んでしまった部分もあったので、改めて復習したいと思います。イベント参加したい人!
2019/9/7(土)に開催のJAZUG9周年イベントでもDocker×Kubernetesのハンズオンを実施予定とのことです。てらだよしおまつりファイナル!
https://jazug.connpass.com/event/140843/Java女子部の次回イベントは10月頃の開催予定ですので、そわそわお待ちください!私もそわそわ待ってます!
https://javajo.doorkeeper.jp/
- 投稿日:2019-08-04T22:50:26+09:00
NotebookのServerlessバッチジョブ化
はじめに
Jupyter Notebookで作成したPythonコードをAWSマネージドサービスを利用してバッチジョブ化できないかと思い試してみました。
用意したもの
- AWS CLI
- Papermill(Notebookの実行に利用)
- Jupyter Notebook
- Docker
環境
- Jupyter Notebookサーバー(EC2)
- ECS
- ECR
- Step Functions
- CloudWatch
やったこと
- Notebookファイル作成
- Dockerイメージ作成
- S3へのNotebookファイル保存
- IAMロール作成
- ECSタスク作成
- StepFunctionsステートマシーン作成
※ECSクラスターやVPC,Subnetなど諸々は事前に作成していたものを利用しました。
処理フロー
- CloudWatchEventsのインプットにPapermillのパラメーターを設定
- CloudWatchEventsから10分にStepFunctionsステートマシーンを実行
- StepFunctionsステートマシーンからECSタスクを実行
- ECSタスクにてPapermillを実行
- PapermillからS3にNotebook実行結果が保存される
詳細
Notebookファイル作成
Jupyter Notebook上でパラメーター付きのNotebookファイルを作成
※nteractだとセルの右上から"Toggle Parameter Cell"の選択でパラメーター化できました。
パラメーターセルmsg = "Hello, World!"プログラムprint(msg)Dockerイメージの作成&Push
DockerfileFROM python:3 RUN pip install papermill[all] RUN pip install jupyterDokerイメージ作成&Push$(aws ecr get-login --no-include-email --region ap-northeast-1) docker build -t xxxxxxx.dkr.ecr.ap-northeast-1.amazonaws.com/papermill ./ docker push xxxxxxx.dkr.ecr.ap-northeast-1.amazonaws.com/papermill:latestS3 Bucket作成&Notebookファイルコピー
SAM,INPUT/OUTPUT用のBucketを作成
aws s3 mb s3://${SAM_BUCKET}
aws s3 mb s3://${INPUT_NOTEBOOK}
aws s3 mb s3://${OUTPUT_NOTEBOOK}
S3へファイルをコピー
shell-session

aws s3 cp HelloWorld.ipynb s3://${INPUT_NOTEBOOK}/HelloWorld.ipynb
IAMロール,ECSタスク,StepFunctionsステートマシーン,CloudWatch Events作成
CloudFormationを利用したため、テンプレートファイルを作成
template.yamlAWSTemplateFormatVersion : '2010-09-09' Transform: AWS::Serverless-2016-10-31 Parameters: S3RolePolicyName: Type: String Default: hello-s3 HelloWorldTaskExecutionRoleName: Type: String Default: hello-taskexec HelloWorldECSTaskName: Type: String Default: HelloWorldTask HelloWorldInvocationRoleName: Type: String Default: HelloWorld-Invocation ImageRepoURI: Type: String Default: xxxxxxxxx.dkr.ecr.ap-northeast-1.amazonaws.com/papermill:latest InputS3FileURI: Type: String Default: s3://xxxxxxxxx/HelloWorld.ipynb OutputS3FileURI: Type: String Default: s3://xxxxxxxxx/output.ipynb MsgParameter: Type: String Default: "Hello,Papermill" ClusterArn: Type: String Default: arn:aws:ecs:ap-northeast-1:xxxxxxxxx:cluster/xxxxxxxxx SubnetID: Type: AWS::EC2::Subnet::Id Default: subnet-xxxxxxxxx Resources: #ECSタスクからのS3アクセス用ロール作成 HelloWorldS3BucketRole: Type: AWS::IAM::Role Properties: AssumeRolePolicyDocument: Version: 2012-10-17 Statement: - Effect: Allow Principal: Service: - ecs-tasks.amazonaws.com Action: - sts:AssumeRole Policies: - PolicyName: !Ref S3RolePolicyName PolicyDocument: Version: 2012-10-17 Statement: - Effect: Allow Action: - s3:PutObject - s3:GetObject - s3:ListBucket - s3:DeleteObject - s3:PutObjectAcl Resource: "*" HelloWorldTaskExecutionRole: Type: AWS::IAM::Role Properties: AssumeRolePolicyDocument: Version: 2012-10-17 Statement: - Effect: Allow Principal: Service: - ecs-tasks.amazonaws.com Action: - sts:AssumeRole Policies: - PolicyName: !Ref HelloWorldTaskExecutionRoleName PolicyDocument: Version: 2012-10-17 Statement: - Effect: Allow Action: - ecr:GetAuthorizationToken - ecr:BatchCheckLayerAvailability - ecr:GetDownloadUrlForLayer - ecr:BatchGetImage - logs:CreateLogStream - logs:PutLogEvents Resource: "*" #ECSタスク作成 HelloWorldECSTask: Type: AWS::ECS::TaskDefinition Properties: ContainerDefinitions: - Name: !Ref HelloWorldECSTaskName Image: !Ref ImageRepoURI Memory: 500 Command: - "papermill" - !Ref InputS3FileURI - !Ref OutputS3FileURI Cpu: 256 Memory: 512 NetworkMode: awsvpc RequiresCompatibilities: - FARGATE TaskRoleArn: !GetAtt [ HelloWorldS3BucketRole, Arn ] ExecutionRoleArn: !GetAtt [ HelloWorldTaskExecutionRole, Arn ] #StepFunctionからのECSタスク実行用ロール作成 HelloWorldTaskExecution: Type: AWS::IAM::Role Properties: AssumeRolePolicyDocument: Version: 2012-10-17 Statement: - Effect: Allow Principal: Service: - !Sub states.amazonaws.com Action: sts:AssumeRole Policies: - PolicyName: StatesExecutionPolicy PolicyDocument: Version: 2012-10-17 Statement: - Effect: Allow Action: - iam:PassRole - ecs:DescribeTasks - events:PutTargets - events:PutRule - events:DescribeRule - ecs:RunTask - ecs:StartTask - ecs:StopTask Resource: "*" #StepFunctionsステートマシーン作成 HelloWorldStateMachine: Type: AWS::StepFunctions::StateMachine Properties: DefinitionString: !Sub - |- { "Comment": "A Hello World example using an AWS ECS function", "TimeoutSeconds": 3600, "StartAt": "HelloWorld", "States": { "HelloWorld": { "Type": "Task", "Resource": "arn:aws:states:::ecs:runTask.sync", "Parameters": { "LaunchType": "FARGATE", "Cluster": "${ClusterArn}", "TaskDefinition": "${TaskArn}", "Overrides": { "ContainerOverrides": [ { "Name": "${HelloWorldECSTaskName}", "Command.$": "$.Command" } ] }, "NetworkConfiguration": { "AwsvpcConfiguration": { "Subnets": [ "${SubnetID}" ], "AssignPublicIp": "DISABLED" } } }, "End": true } } } - { TaskArn: !Ref HelloWorldECSTask } RoleArn: !GetAtt [ HelloWorldTaskExecution, Arn ] #CloudWatchからのStepFunctionsステートマシーン実行用ロール作成 HelloWorldInvocationRole: Type: AWS::IAM::Role Properties: AssumeRolePolicyDocument: Version: 2012-10-17 Statement: - Effect: Allow Principal: Service: - events.amazonaws.com Action: - sts:AssumeRole Policies: - PolicyName: !Ref HelloWorldInvocationRoleName PolicyDocument: Version: 2012-10-17 Statement: - Effect: Allow Action: - states:StartExecution Resource: !Ref HelloWorldStateMachine #CloudWatch Eventsのルール作成 HelloWorldSchedule: Type: AWS::Events::Rule Properties: Description: ScheduledRule ScheduleExpression: "rate(10 minutes)" State: ENABLED Targets: - Arn: !Ref HelloWorldStateMachine Id: StepFunctionExecV1 RoleArn: !GetAtt [HelloWorldInvocationRole, Arn] #InputとしてESCタスクのコマンドを文字列として設定 #ここでPapermillのパラメーターを設定 Input: !Sub "{\"Command\": [\"papermill\",\"${InputS3FileURI}\",\"${OutputS3FileURI}\",\"-p\",\"msg\",\"${MsgParameter}\"]}"参考
Beyond Interactive: Notebook Innovation at Netflix : https://medium.com/netflix-techblog/notebook-innovation-591ee3221233

- 投稿日:2019-08-04T21:47:11+09:00
Dockerイメージをレジストリに登録する(ECR含む)
Dockerイメージの登録についてまとめておきます。
ローカルレジストリに登録
ローカルレジストリを作成
ローカル環境にdockerレジストリを作成します。
Docker Hubに公式イメージの「registry」が用意されていますので、今回はこちらを利用します。以下コマンドで5000番ポートにレジストリを立ち上げます。
$ docker image pull registry:latest
$ docker container run -t -p 5000:5000 registry:latest
登録するDockerイメージを作成します。
今回はgo言語で
Hello World!!を返却するWebアプリを作成してみます。
以下2つのファイルが今回利用するgoのWebアプリケーションとDockerfileになります。main.gopackage main import ( "fmt" "net/http" ) func main() { http.HandleFunc("/", func(w http.ResponseWriter, r *http.Request) { fmt.Fprintf(w, "Hello World!!") }) http.ListenAndServe(":8080", nil) }DockerfileFROM golang:latest COPY main.go /go/src/ CMD ["go", "run", "/go/src/main.go"]ビルドします
$ docker image build -t example/go:latest .
Sending build context to Docker daemon  3.072kB
Step 1/3 : FROM golang:latest
 ---> 9fe4cdc1f173
Step 2/3 : COPY main.go /go/src/
 ---> Using cache
 ---> 38b645fa14c8
Step 3/3 : CMD ["go", "run", "/go/src/main.go"]
 ---> Using cache
 ---> 273a059475c4
Successfully built 273a059475c4
Successfully tagged example/go:latest
タグをつけます
形式は
docker image tag [ローカルのイメージ名]:[タグ名] [リポジトリ名][イメージ名]:[タグ名]になります。$ docker image tag example/go:latest localhost:5000/example/go:20190804Dockerイメージを作成したレジストリに登録します。
以下コマンドでDockerイメージをレジストリに登録することが可能です。
docker image push [リポジトリURL][作成したタグ名]$ docker image push localhost:5000/example/go:20190804作成されたことを以下のコマンドで確認可能です。
$ curl http://localhost:5000/v2/_catalog
{"repositories":["example/go"]}
念のためレジストリからローカルにpullしてみます。
最初にローカルにあるタグを削除します。
$docker image rm localhost:5000/example/go:20190804
$ docker image ls | grep example/go
example/go                                                       latest              e4a2773a9830        14 minutes ago      781MB
20190804のタグは削除されました。
pullします。
$ docker pull localhost:5000/example/go:20190804
20190804: Pulling from example/go
Digest: XXXXXX:XXXXXXXXXXXXXXXXXXXXXXXXXXXXXXXXXXXXXXX
Status: Downloaded newer image for localhost:5000/example/go:20190804
localhost:5000/example/go:20190804
$ docker image ls | grep example/go example/go latest e4a2773a9830 15 minutes ago 781MB localhost:5000/example/go 20190804 e4a2773a9830 15 minutes ago 781MB5000番ポートに作成したレジストリからpull出来ました。
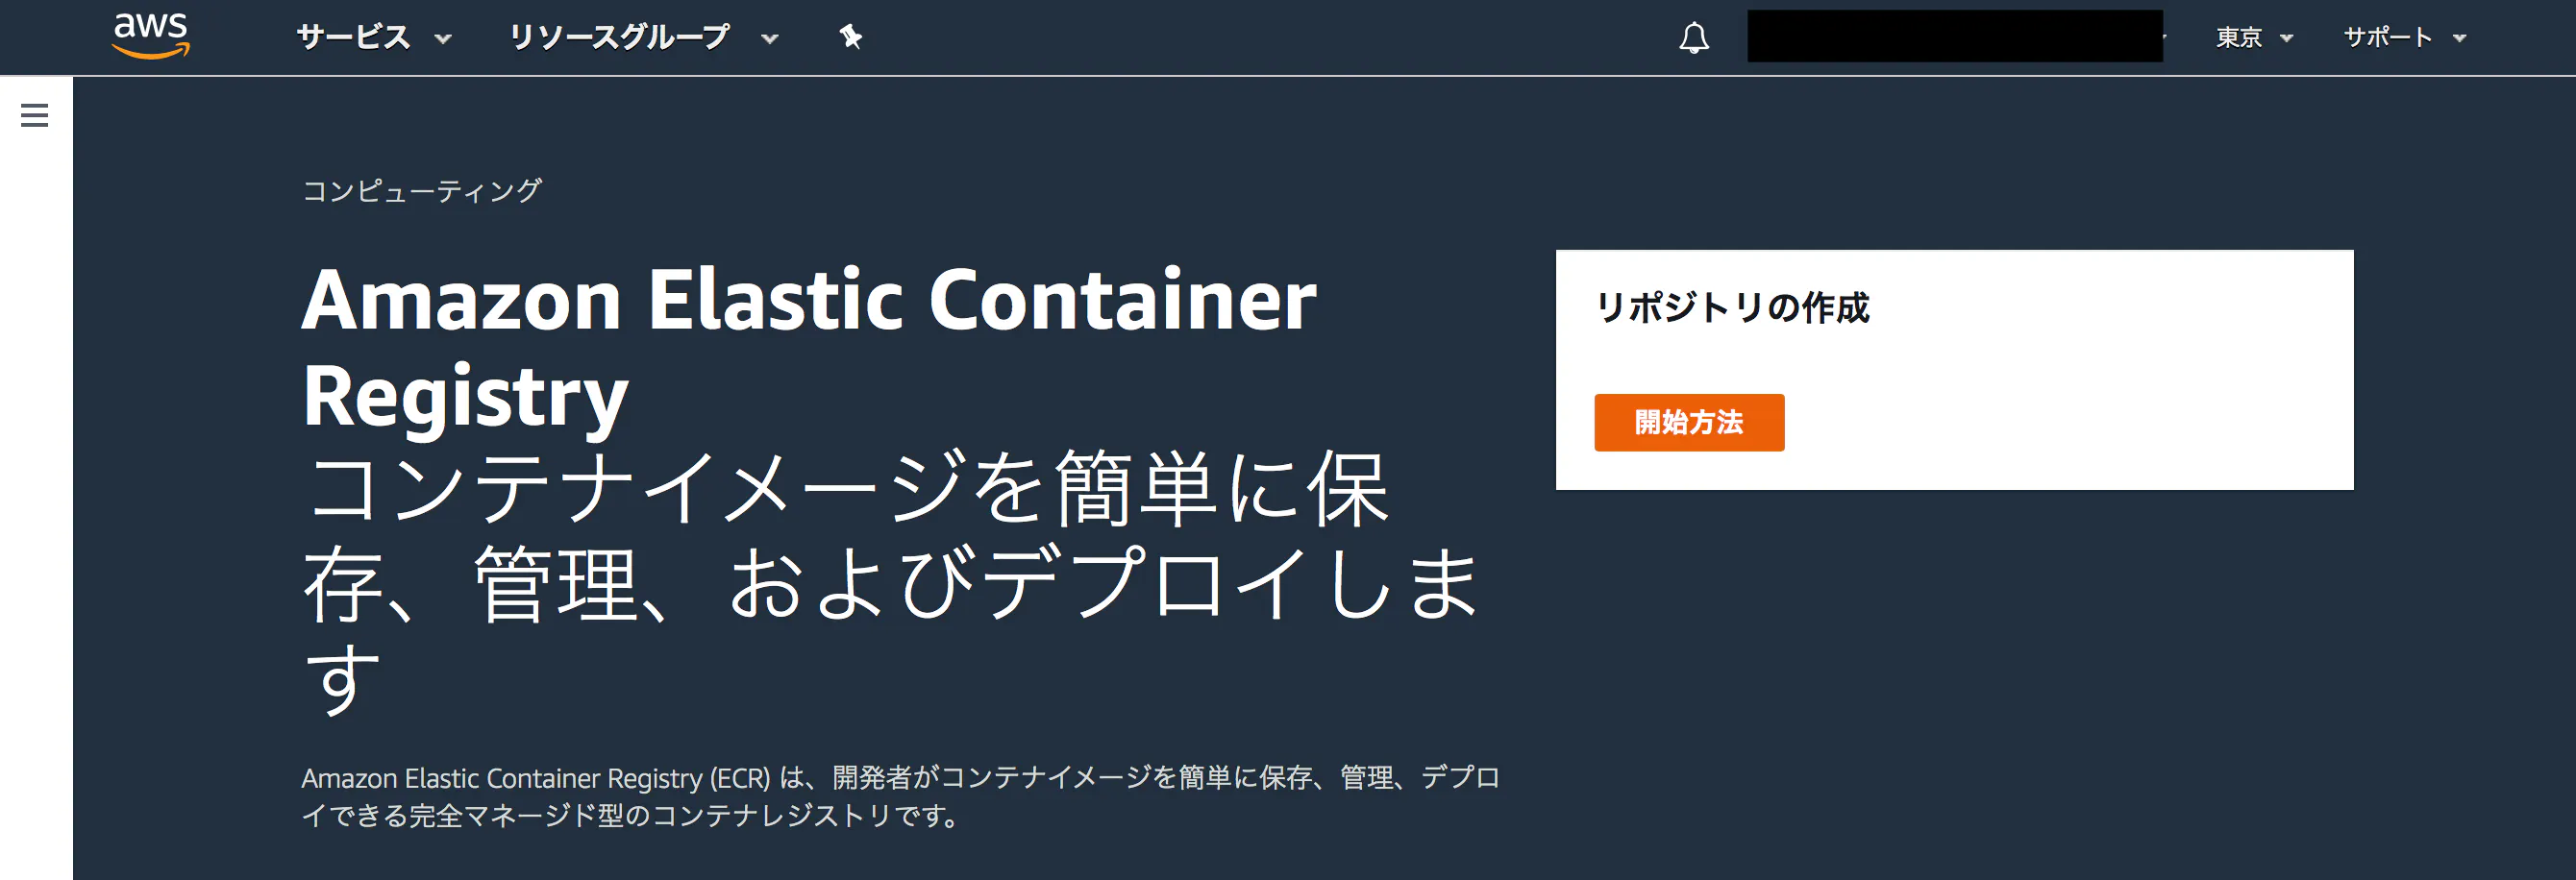
ECRに登録する
次にECRに登録してみます。
aws cliの設定は既に終わっている前提とします。ECRにリポジトリを作成
ECRの画面から
リポジトリの作成を選択します。
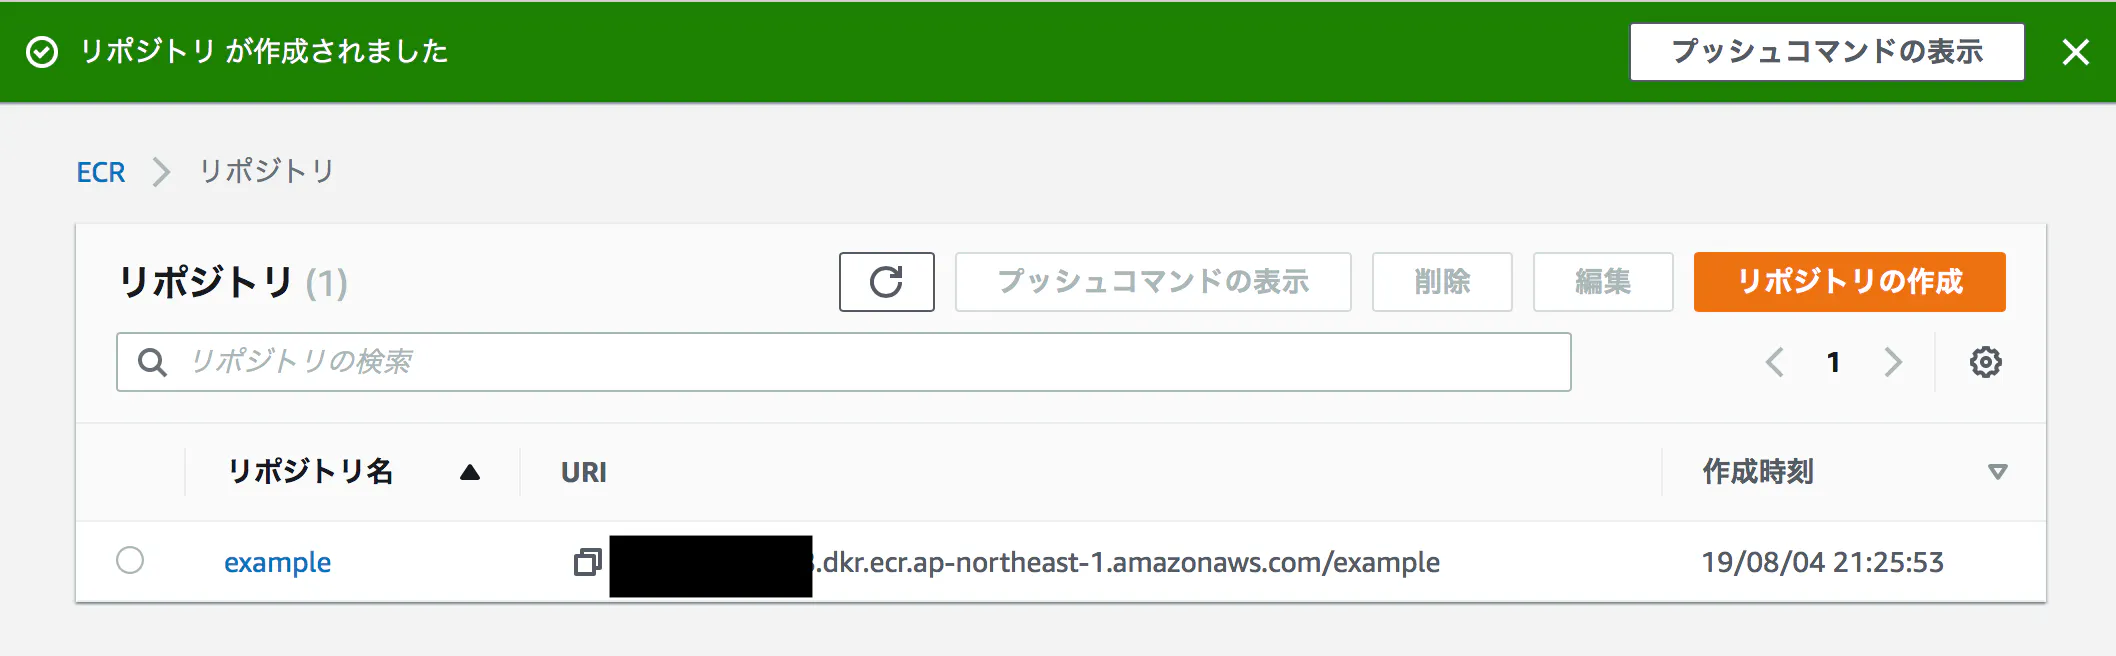
リポジトリ名を入力してリポジトリの作成をクリックします。
今回はexampleにしてみます。
リポジトリが作成されました。
ECRにpushする
ECRにログイン
$(aws ecr get-login --no-include-email)レジストリを確認します
$ aws ecr describe-repositories

{
    "repositories": [
        {
            "repositoryArn": "arn:aws:ecr:ap-northeast-1:XXXXXXXXXXXX:repository/example",
            "registryId": "XXXXXXXXXXXX",
            "repositoryName": "example",
            "repositoryUri": "XXXXXXXXXXXX.dkr.ecr.ap-northeast-1.amazonaws.com/example",
            "createdAt": 1564921553.0
        }
    ]
}
pushします
push先のリポジトリはECRで作成したリポジトリになります。
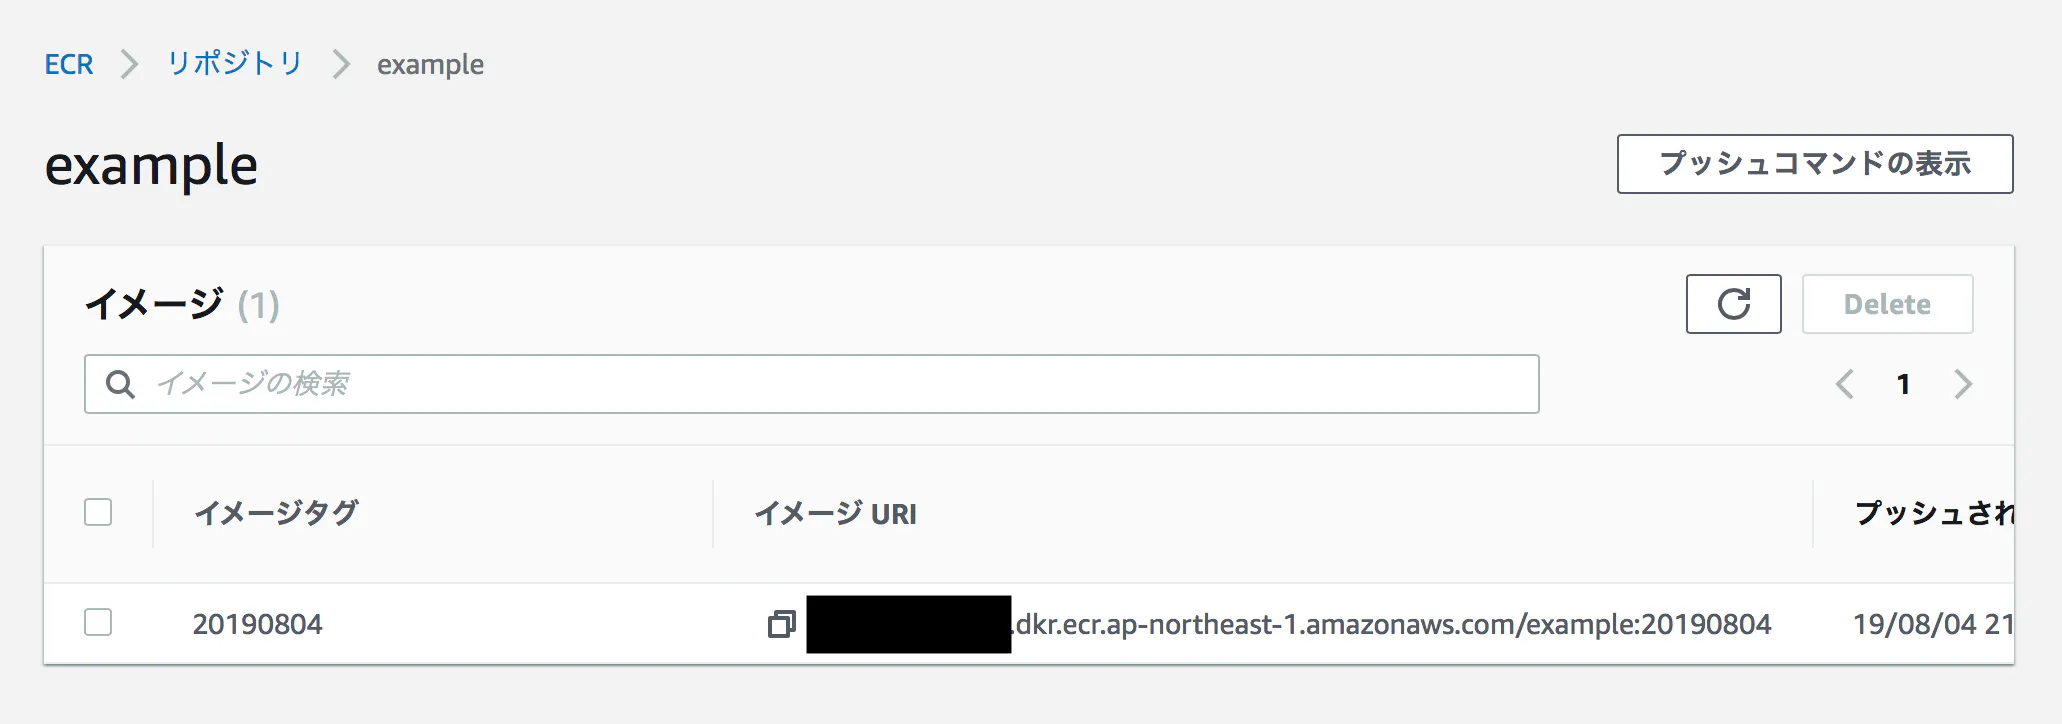
ECRの画面にあるURIを指定します。$ docker image tag example/go:latest XXXXXXXXXXXX.dkr.ecr.ap-northeast-1.amazonaws.com/example:20190804 $ docker push XXXXXXXXXXXX.dkr.ecr.ap-northeast-1.amazonaws.com/example:20190804ECRにタグが作成されました。
ちなみにAWS CLIでも確認可能です。
$ aws ecr describe-images --repository-name example
{
    "imageDetails": [
        {
            "registryId": "XXXXXXXXXX",
            "repositoryName": "example",
            "imageTags": [
                "20190804"
            ],
            "imageSizeInBytes": 296164653,
            "imagePushedAt": 1564922252.0
        }
    ]
}
参考にしたもの
Docker/Kubernetes 実践コンテナ開発入門
大変分かりやすい本でした。ありがとうございました。

- 投稿日:2019-08-04T21:44:28+09:00
【Ubuntu 18.04】Ansible で Docker と docker-compose をインストールする
業務で Ansible を使い始めたので、プライベートの Ubuntu マシンも Ansible で環境構築中です
公式サイトでの手順を Ansible のお作法にのっとって書き直しただけですが、無事にインストールできました?【参考】
https://docs.docker.com/install/linux/docker-ce/ubuntu/
https://docs.docker.com/compose/install/
https://gist.github.com/rbq/886587980894e98b23d0eee2a1d84933前提
- Ansible Roles を使用
- sudo のパスワードは別途指定が必要
- Docker/docker-compose のバージョンを固定したい場合はそれぞれ追加の指定が必要
できたもの
roles/docker/tasks/main.yml--- - name: Add docker GPG key apt_key: url: https://download.docker.com/linux/ubuntu/gpg become: yes - name: Install basic list of packages apt: name: "{{ packages }}" state: present update_cache: yes vars: packages: - apt-transport-https - ca-certificates - curl - gnupg2 - software-properties-common become: yes - name: Add apt repository apt_repository: repo: "deb [arch=amd64] https://download.docker.com/linux/ubuntu {{ ansible_distribution_release }} stable" become: yes - name: Install Docker packages apt: name: "{{ packages }}" state: present vars: packages: - docker-ce - docker-ce-cli - containerd.io become: yes - name: Add user to docker group user: name: "{{ ansible_env.USER }}" groups: docker append: yes become: yes - name: Ensure docker service is enabled systemd: name: docker state: started enabled: yes become: yes - name: Install docker-compose get_url: url: "https://github.com/docker/compose/releases/download/1.24.0/docker-compose-{{ ansible_system }}-{{ ansible_architecture }}" dest: /usr/local/bin/docker-compose mode: +x become: yes一部解説
GPG Key
$ curl -fsSL https://download.docker.com/linux/ubuntu/gpg | sudo apt-key add -公式では上記コマンドですが、
apt-keyモジュールのパラメータで url が指定できるので簡潔にできます- name: Add docker GPG key apt_key: url: https://download.docker.com/linux/ubuntu/gpg become: yesDocker 用リポジトリ
$ sudo add-apt-repository \
   "deb [arch=amd64] https://download.docker.com/linux/ubuntu \
   $(lsb_release -cs) \
   stable"
lsb_release -csは bionic や xenial などの ubuntu のリリースバージョンを取得するコマンドですが
Ansible ではgather_factsを有効にしていればansible_distribution_releaseで取得できます- name: Add apt repository apt_repository: repo: "deb [arch=amd64] https://download.docker.com/linux/ubuntu {{ ansible_distribution_release }} stable" become: yesdocker-compose
$ sudo curl -L "https://github.com/docker/compose/releases/download/1.24.1/docker-compose-$(uname -s)-$(uname -m)" -o /usr/local/bin/docker-compose
$ sudo chmod +x /usr/local/bin/docker-compose
公式は curl なので
get_urlモジュールを使います
uname -s/uname -mはそれぞれansible_system/ansible_architectureで取得しています
また、ダウンロード先のパーミッションも同時に指定できるので1回のタスクで済みます- name: Install docker-compose get_url: url: "https://github.com/docker/compose/releases/download/1.24.0/docker-compose-{{ ansible_system }}-{{ ansible_architecture }}" dest: /usr/local/bin/docker-compose mode: +x become: yes
- 投稿日:2019-08-04T21:07:50+09:00
codeigniter 3.1.10 と Smarty 3.1を連携する開発環境を構築する
はじめに
PHP5系でcodeigniter 2.0.xで開発されたシステムをPHP7系に移植する作業を依頼されました。
腕のいい開発者さんが作ったのでしょう。シンプルな中にも質実剛健のような作りで、見ていて気持ちがいいです。ですが、この世に産み落とされてから早x年。
時代は、codeigniterからLaravelに移り、開発者さん自身もメンテナンスを放棄されてしまったようで、私のところへの依頼となりました。さて、codeigniterの2.0.xから2.2までは問題なくアップデートができたのですが、3系へのアップグレード時に、使われていたSmartyが使えなくなりました。
そこで、Codeigniter3系でSmartyのインストール方法を探しましたが、ロストテクノロジーなので、メチャメチャ苦労しました。
そのため、ここで導入方法を記録しておきます。驚いたことに、Smartyの導入さえできれば、開発されたコードは、そのまま使えましたので、まだまだ現役稼働ができる見込みが立ちました。
システムのリフォーム? リストア? 蘇ると嬉しいですね。今回のサンプルコードをGithubにあげています。もし、参考になったのでしたら、スターをつけていただくとモチベーションがあがります
https://github.com/idani/CodeIgniter3.1-Smarty3.1-Smaple環境
- php 7.3(5.4)
- 移行絡みでしたので、5系、7系の両方を用意して対応してます。
- Codeigniter 3.1.10
- Smarty 3.1.33
codeigniterの特徴
さて、私、Codeigniterって今回、所見でした。なので、自分用のメモとして触った感じをメモ。
applicationとsystemディレクトリに分かれています。
systemの機能を拡張したい場合でも、applicaitonディレクトリの方で、継承、上書きなどを行って独自にカスタマイズできることが可能です。また、この構成のおかげで、Systemのバージョンアップをする場合にも、Systemディレクトリを最新バージョンで上書きするだけで動くという、すっごい楽なメンテナンス性がよいですね。
開発環境構築
まずは、codeigniterを動作させるためのPHPの実行・開発環境を用意します。
https://github.com/idani/CodeIgniter3.1-Smarty3.1-Smapleディレクトリ構成は、このようになっています。
基本的にSRCの部分を差し替えて、いろいろのPHPの開発で使いまわしています。
このあたり、Dockerの部分がわからない場合は、以下のサンプルコードと記事を見てもらえれば理解できます。
https://github.com/idani/nginx-http2-php-mysql
今回は、SRCに、「codeignter-3.1.10」を展開からスタートしました。
smartyのインストール
docker-compose.ymlの最後の部分でComposerイメージを使ってインストールします。
まずは、以下のようにdocker-compose.ymlを書き換えます。
docker-compose.yamlcomposer: image: composer volumes: - ./src/application:/app command: composer require smarty/smartyその上で、docker-composeを実行して、インストールを行います。
Smartyのダウンロードを行いますので、終了するまでネットワーク環境によりますが、2,3分かかります。$ docker-compose up composer Creating network "codeigniter31-smarty31-smaple_default" with the default driver Creating codeigniter31-smarty31-smaple_composer_1 ... done Attaching to codeigniter31-smarty31-smaple_composer_1 Gracefully stopping... (press Ctrl+C again to force) Stopping codeigniter31-smarty31-smaple_composer_1 ... donecodeigniterでのcomposerの読み込み設定
「application/config/config.php」で「composer_autoload」をTrusにする。
config.phpに書いてありますが、
「application/vendor/autoload.php」を読み込む場合は、先のように「$config['composer_autoload'] = TRUE;」にするだけでOKです。composerのインストールしたディレクトリを変更する場合は、「$config['composer_autoload'] = '/path/to/vendor/autoload.php';」と設定します。
ディレクトリの作成
Smarty用のテンプレートディレクトリとテンプレートキャッシュ用のディレクトリを作成します。
application/views/templates
application/views/templates_c
の2つのディレクトリをchmod 777で作成しておきます。Smarty用のライブラリ作成
参考文献記載のライブラリを作成して、CodeigniterとSmartyの橋渡しをします。
ここで、Codeigniter側の制限ですが、ファイル名とクラス名は合わせる必要があり、また、すでにSmartyクラスはあるので、「Smartie」としています。
ここは気持ち悪いのですが、後ほど、ライブラリの読み込み時に「Smarty」に補正をかけます。
application/library/Smartie.php<?php if (!defined('BASEPATH')) exit('No direct script access allowed'); /** * Smartie Class * * @package CodeIgniter * @subpackage Libraries * @category Smarty * @author Kepler Gelotte * @link http://www.coolphptools.com/codeigniter-smarty */ class Smartie extends Smarty { var $debug = false; function __construct() { parent::__construct(); $this->setTemplateDir(APPPATH . "views/templates"); $this->setCompileDir(APPPATH . "views/templates_c"); if ( ! is_writable( $this->compile_dir ) ) { // make sure the compile directory can be written to @chmod( $this->compile_dir, 0777 ); } // Uncomment these 2 lines to change Smarty's delimiters // $this->left_delimiter = '{{'; // $this->right_delimiter = '}}'; $this->assign( 'FCPATH', FCPATH ); // path to website $this->assign( 'APPPATH', APPPATH ); // path to application directory $this->assign( 'BASEPATH', BASEPATH ); // path to system directory log_message('debug', "Smarty Class Initialized"); } function setDebug( $debug=true ) { $this->debug = $debug; } /** * Parse a template using the Smarty engine * * This is a convenience method that combines assign() and * display() into one step. * * Values to assign are passed in an associative array of * name => value pairs. * * If the output is to be returned as a string to the caller * instead of being output, pass true as the third parameter. * * @access public * @param string * @param array * @param bool * @return string */ function view($template, $data = array(), $return = FALSE) { if ( ! $this->debug ) { $this->error_reporting = false; } $this->error_unassigned = false; foreach ($data as $key => $val) { $this->assign($key, $val); } if ($return == FALSE) { $CI =& get_instance(); if (method_exists( $CI->output, 'set_output' )) { $CI->output->set_output( $this->fetch($template) ); } else { $CI->output->final_output = $this->fetch($template); } return; } else { return $this->fetch($template); } } } // END Smartie Classライブラリを読み込む
「application/config/autoload.php」の「libraries」の項目を以下のように修正します。
先程の「smartie」という部分を「smarty」に読み替えてロードしています。
application/config/autoload.php/* | ------------------------------------------------------------------- | Auto-load Libraries | ------------------------------------------------------------------- | These are the classes located in system/libraries/ or your | application/libraries/ directory, with the addition of the | 'database' library, which is somewhat of a special case. | | Prototype: | | $autoload['libraries'] = array('database', 'email', 'session'); | | You can also supply an alternative library name to be assigned | in the controller: | | $autoload['libraries'] = array('user_agent' => 'ua'); */ $autoload['libraries'] = array('smartie'=>'smarty');動作確認
デバッグメッセージを出力させるために、Configをいじります。
今回は「4:All Messages」を設定します。application/config/config.php/* |-------------------------------------------------------------------------- | Error Logging Threshold |-------------------------------------------------------------------------- | | You can enable error logging by setting a threshold over zero. The | threshold determines what gets logged. Threshold options are: | | 0 = Disables logging, Error logging TURNED OFF | 1 = Error Messages (including PHP errors) | 2 = Debug Messages | 3 = Informational Messages | 4 = All Messages | | You can also pass an array with threshold levels to show individual error types | | array(2) = Debug Messages, without Error Messages | | For a live site you'll usually only enable Errors (1) to be logged otherwise | your log files will fill up very fast. | */ $config['log_threshold'] = 4;ブラウザで「 http://127.0.0.1:8000/ 」を表示させます。
正常に動作したなら、以下のデフォルトのページが表示されます。
そして、ログにもSmartyライブラリの初期化完了のログ「Smarty Class Initialized」が出力されます。
application/logs/log-.php・・・ INFO - 2019-08-04 20:07:34 --> Loader Class Initialized DEBUG - 2019-08-04 20:07:34 --> Smarty Class Initialized INFO - 2019-08-04 20:07:34 --> Controller Class Initialized INFO - 2019-08-04 20:07:34 --> File loaded: /src/application/views/welcome_message.php INFO - 2019-08-04 20:07:34 --> Final output sent to browser DEBUG - 2019-08-04 20:07:34 --> Total execution time: 0.0578サンプルを作成する
codeigniterが初見なので、サンプルを書いてみます。
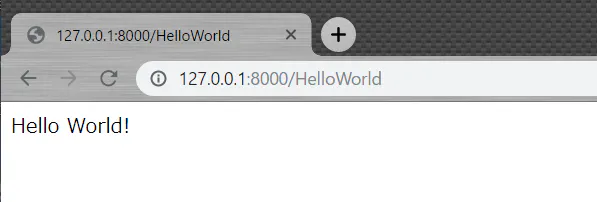
application/controllers/HelloWorld.php<?php defined('BASEPATH') OR exit('No direct script access allowed'); class HelloWorld extends CI_Controller { public function index() { $data = [ 'title' => 'Hello World!', ]; $this->smarty->view('HelloWorld.tpl',$data); } }application/views/template/HelloWorld.tpl{$title}ブラウザで、「 http://127.0.0.1:8000/HelloWorld 」にアクセスをすると、以下のように表示されます。
「HelloWorld.php」の$data['title']を変更して、動的に表示が変更されることを確認してみてください。
以上の構築した環境を、以下のGithubで公開をしています。スターを付けていただけると、誰かの役に立ったんだとわかって、モチベーションがあがります。よろしくお願い致します。
https://github.com/idani/CodeIgniter3.1-Smarty3.1-Smaple
参考文献


- 投稿日:2019-08-04T20:52:18+09:00
“Docker" First Try (2)
My Studied Log
1. Created Docker file
2. Build Container by referencing Docker file
3. Run Container■"From”
pointing out Base Image file composing dockerfile(1)Start Docker deamon
$sudo systemctl start docker
$ docker ps -a
CONTAINER ID IMAGE COMMAND CREATED STATUS PORTS NAMES
4173f3027999 ubuntu:16.04 "bash" 16 hours ago Exited (0) 16 hours ago dreamy_elion
7f5e26aad2ce hello-world "/hello" 23 hours ago Exited (0) 23 hours ago agitated_galileo(2)Create Dockerfile ,then build Docker image using it.
*Posted created file into below directory.
/home/ec2-user/samplefilebox
*contents
$ cat Dockerfile_sample
FROM ubuntuRUN echo foo
RUN echo bar$ chmod +x Dockerfile_sample
$ docker build -f Dockerfile_sample -t build:from_simple .
Sending build context to Docker daemon 2.048kB
Step 1/3 : FROM ubuntu
latest: Pulling from library/ubuntu
7413c47ba209: Pull complete
0fe7e7cbb2e8: Pull complete
1d425c982345: Pull complete
344da5c95cec: Pull complete
Digest: sha256:c303f19cfe9ee92badbbbd7567bc1ca47789f79303ddcef56f77687d4744cd7a
Status: Downloaded newer image for ubuntu:latest
---> 3556258649b2
Step 2/3 : RUN echo foo
---> Running in e0f5b8c0b42c
foo
Removing intermediate container e0f5b8c0b42c
---> cf507a94be22
Step 3/3 : RUN echo bar
---> Running in 463f6b46421a
bar
Removing intermediate container 463f6b46421a
---> 450c66ab74e2
Successfully built 450c66ab74e2
Successfully tagged build:from_simple*-f : quating file
*-t : pointing out tagname(3)comfirmed from "docker images"
$ docker images
REPOSITORY TAG IMAGE ID CREATED SIZE
build from_simple 450c66ab74e2 3 minutes ago 64.2MB
sampledocker latest f669c3195c60 16 hours ago 203MB
ubuntu 16.04 5e13f8dd4c1a 11 days ago 120MB
ubuntu latest 3556258649b2 11 days ago 64.2MB
hello-world latest fce289e99eb9 7 months ago 1.84kB■ENV
setting Environment variable into docker container.
stile is below 2type there.
1. ENV
2. ENV =...■LABEL
Added metadata to Docker images.■RUN
by executing shell command, setup container.■EXPOSE
Declarate Port that will use in the container.■ENTRYPOINT / CMD
Specified command that will be executed when container starts
- 投稿日:2019-08-04T19:41:03+09:00
Docker for Windowsでrubyファイルを実行する
docker run -it --rm --name ruby -v D:/ユーザー名/workspace/foo_dir:/myapp -w /myapp ruby:2.5 bashエディタでの編集内容は自動的に反映されるので、コンテナのbashからrubyファイルを実行
各オプションとか
-it bash コンテナのbashに入って操作
--rm 終了時にコンテナを削除(終了したコンテナが溜まっていくので)
--name コンテナの名前を指定
-v ボリュームをマウント(各々のPCのディレクトリ構成に合わせる)
-w Docker内のワーキングディレクトリを指定
- 投稿日:2019-08-04T17:36:09+09:00
Dockerのイメージ更新のチェック
備忘メモ
Dockerはオプションなしで実行したとき、ローカルに一致するイメージ名:タグがある場合はリポジトリのイメージの更新をチェックしない。
検証ソース
https://github.com/tky-k/docker/tree/master/docker_tag_testDockerは特にオプションなしでrunによって実行した場合はリポジトリの更新をチェックしないようです。
リポジトリの更新チェックのオプションがありそうな気がするんですが、調査中。。。
- 投稿日:2019-08-04T17:07:26+09:00
Ubuntu 18.04 + Cuda 10.0 + Cudnn 7 + tensorflow 1.13.1 + pytorch
Ubuntu 18.04 + Cuda 10 + Cudnn 7 + tensorflow 1.13.1 + pytorch
たまたまRTX2080Tiサーバーを何台か立ち上げることになったので、その環境整備周りについて殴り書きしておく。
また、直でインストールしたら、どハマりして、半日ぐらい無駄にしたので、そんなことせずにできる人のためのdocker編も書いておく。前提として、Tensorflow / Pytorch / Cuda10 がインストールされた前提のUbuntu18.04の環境を作り上げる。
直でインストールする編
こちらの記事を参考にして、基本的にこのページの最後にある成功編で色々やった。
echo 'export LD_LIBRARY_PATH=$LD_LIBRARY_PATH:/usr/local/cuda/extras/CUPTI/lib64' >> ~./bashrcNVIDIA Cuda 10.0 を入れる。そうじゃないと、RTX様が怒る。
wget https://developer.download.nvidia.com/compute/cuda/repos/ubuntu1804/x86_64/cuda-repo-ubuntu1804_10.0.130-1_amd64.deb
sudo dpkg -i cuda-repo-ubuntu1804_10.0.130-1_amd64.deb
sudo apt-key adv --fetch-keys https://developer.download.nvidia.com/compute/cuda/repos/ubuntu1804/x86_64/7fa2af80.pub
sudo apt-get update
wget http://developer.download.nvidia.com/compute/machine-learning/repos/ubuntu1804/x86_64/nvidia-machine-learning-repo-ubuntu1804_1.0.0-1_amd64.deb
sudo apt install ./nvidia-machine-learning-repo-ubuntu1804_1.0.0-1_amd64.deb
sudo apt-get update
NVIDIA ドライバーをCLIから入れる
いっぱいドライバーに失敗すると、autoinstallとか.run以外信じない主義になっていくが、これは本当に安心。
418でうまくいかなかったら、ubuntu-drivers devicesでオススメされているものをチェックするべき
今回は418でいく
sudo apt-get install --no-install-recommends nvidia-driver-418入れたら、それで起動するかを確かめる、
rebootGPUドライバーとcuda 確認する
$ nvidia-smi+-----------------------------------------------------------------------------+ | NVIDIA-SMI 418.67 Driver Version: 418.67 CUDA Version: 10.1 | |-------------------------------+----------------------+----------------------+喜ぶ。
次にCudnn 7 を入れる。そうじゃないと、tensorflow-gpuが怒る。devもちゃんとインストールする。
sudo apt-get install --no-install-recommends \
    cuda-10-0 \
    libcudnn7=7.4.1.5-1+cuda10.0  \
    libcudnn7-dev=7.4.1.5-1+cuda10.0
入れたら、それで起動するかを確かめる、
rebootGPUドライバーとcuda 確認する
$ nvidia-smi+-----------------------------------------------------------------------------+ | NVIDIA-SMI 418.67 Driver Version: 418.67 CUDA Version: 10.1 | |-------------------------------+----------------------+----------------------+喜ぶ。
Docker編
以下が使ってるdockerfile
Nvidia Docker前提で、
立ち上げコマンドとして、Dockerfile作成して下のdockerfileをコピペして、
docker build ./
からの
docker run -it --runtime=nvidia -e NVIDIA_VISIBLE_DEVICES=1,2,3 {docker-image-id} /bin/bashとかで操作できるFROM nvidia/cuda:10.0-cudnn7-devel-ubuntu18.04 LABEL maintainer="kkshmz" ENV LANG=C.UTF-8 LC_ALL=C.UTF-8 RUN apt-get update --fix-missing && \ apt-get install -y --no-install-recommends wget bzip2 ca-certificates libglib2.0-0 libxext6 libsm6 libxrender1 git mercurial subversion unzip libjpeg-dev libpng-dev build-essential && \ apt-get -y autoremove && apt-get -y autoclean RUN rm -rf /var/cache/apt #install anaconda and install pytorch RUN wget --quiet https://repo.anaconda.com/archive/Anaconda3-2019.07-Linux-x86_64.sh -O ~/anaconda.sh && \ /bin/bash ~/anaconda.sh -b -p /opt/conda && \ rm ~/anaconda.sh && \ ln -s /opt/conda/etc/profile.d/conda.sh /etc/profile.d/conda.sh && \ echo ". /opt/conda/etc/profile.d/conda.sh" >> ~/.bashrc && \ echo "conda activate base" >> ~/.bashrc && \ /opt/conda/bin/conda install -y python=$PYTHON_VERSION numpy pyyaml scipy ipython mkl mkl-include ninja cython typing && \ /opt/conda/bin/conda install -y pytorch torchvision cudatoolkit=10.0 -c pytorch && \ find /opt/conda/ -follow -type f -name '*.a' -delete && \ find /opt/conda/ -follow -type f -name '*.js.map' -delete && \ /opt/conda/bin/conda clean -ya #set conda env ENV PATH /opt/conda/bin:$PATH #set command default CMD [ "/bin/bash" ] #install tensorflow RUN pip install tensorflow-gpu==1.13.1tensorflow 系のをdockerで整備しようと思うと、こういうエラーが出てくるけど、
include/cudnn.h:14:30: fatal error: cuda_runtime.h: No such file or directory
これらは公式docs にも書かれているように、参照しているdocker file の起点を
FROM nvidia/cuda:10.0-cudnn7-runtime-ubuntu18.04からFROM nvidia/cuda:10.0-cudnn7-devel-ubuntu18.04に変えることによって解消できる。
- 投稿日:2019-08-04T16:57:16+09:00
環境はdockerイメージはphp:7.2-apacheで htaccessを書きたい
Dockerでhtaccessいじろうとしたらハマったので、今更ながらと思いつつもメモっときます
書きかけですが、続き書きます
環境はDocker
使ったのイメージはphp:7.2-apacheで、下記ファイルを用意しました。
・docker-compose.yml
・Dockerfile
・php.ini細かいことは割愛します。
apacheの色々見てみよう
#docker exec で中に入って
docker exec -it コンテナID bash

#どこだ?
#とりあえず探す
find / -name httpd.conf
#Permission denied えー!
あれそもそもapache2の設定ファイルはRed Hat系とDebian系で色々違うみたい
http://www.linux.net-japan.info/install08.htmlDebian系は/etc/apache2/ディレクトリ以下にapacheの設定ファイルがあるみたい。
主となる設定ファイルはapache2.confだって。
ファイル名さえ違うじゃん!cat /etc/issue # Debian GNU/Linux 9 \n \l apachectl -v # Server version: Apache/2.4.25 (Debian) # Server built: 2018-11-03T18:46:19あ、すいません。
そゆことですか。
では気を取り直してあとapacheの設定は下記コマンドでも確認できるみたい
apachectl -S
# AH00558: apache2: Could not reliably determine the server's fully qualified domain name, # # using 172.30.0.3. Set the 'ServerName' directive globally to suppress this message
# VirtualHost configuration:
# *:80                   172.30.0.3 (/etc/apache2/sites-enabled/000-default.conf:1)
# ServerRoot: "/etc/apache2"
# Main DocumentRoot: "/var/www/html"
# Main ErrorLog: "/var/log/apache2/error.log"
# Mutex default: dir="/var/run/apache2/" mechanism=default
# Mutex mpm-accept: using_defaults
# Mutex watchdog-callback: using_defaults
# PidFile: "/var/run/apache2/apache2.pid"
# Define: DUMP_VHOSTS
# Define: DUMP_RUN_CFG
# User: name="www-data" id=33
# Group: name="www-data" id=33
cd /etc/apache2 #移動して ls -l #見てみる # -rw-r--r-- 1 root root 7224 Nov 3 2018 apache2.conf # drwxr-xr-x 1 root root 4096 Dec 29 2018 conf-available # drwxr-xr-x 1 root root 4096 Dec 29 2018 conf-enabled # -rw-r--r-- 1 root root 1924 Dec 29 2018 envvars # -rw-r--r-- 1 root root 31063 Nov 3 2018 magic # drwxr-xr-x 1 root root 4096 Dec 29 2018 mods-available # drwxr-xr-x 1 root root 4096 Dec 29 2018 mods-enabled # -rw-r--r-- 1 root root 320 Nov 3 2018 ports.conf # drwxr-xr-x 2 root root 4096 Dec 29 2018 sites-available # drwxr-xr-x 2 root root 4096 Dec 29 2018 sites-enabledあ、めっちゃ嬉しい。
apache2の設定ファイル構成(有効な)
apache2.confより抜粋# /etc/apache2/ # |-- apache2.conf # | `-- ports.conf # |-- mods-enabled # | |-- *.load # | `-- *.conf # |-- conf-enabled # | `-- *.conf # `-- sites-enabled # `-- *.conf上はあくまで有効なもので実際に見てみると下記のようになっている。
apache2ディレクトリ直下のディレクトリやファイル一覧ls -l # apache2.conf # conf-available # conf-enabled # envvars # magic # mods-available # mods-enabled # ports.conf # sites-enabledapache2.confが基本の設定ファイルで、
XXXXX-eanbledディレクトリ以下のファイルも有効逆に
XXXX-availableディレクトリ以下のファイルは無効の状態って感じ
使いたいときに追加で有効化するってイメージapache2.confより抜粋# Global configuration # # # ServerRoot: The top of the directory tree under which the server's # configuration, error, and log files are kept. # # NOTE! If you intend to place this on an NFS (or otherwise network) # mounted filesystem then please read the Mutex documentation (available # at <URL:http://httpd.apache.org/docs/2.4/mod/core.html#mutex>); # you will save yourself a lot of trouble. # # Do NOT add a slash at the end of the directory path. # #ServerRoot "/etc/apache2" # # The accept serialization lock file MUST BE STORED ON A LOCAL DISK. # #Mutex file:${APACHE_LOCK_DIR} default # # The directory where shm and other runtime files will be stored. # DefaultRuntimeDir ${APACHE_RUN_DIR} # # PidFile: The file in which the server should record its process # identification number when it starts. # This needs to be set in /etc/apache2/envvars # PidFile ${APACHE_PID_FILE} # # Timeout: The number of seconds before receives and sends time out. # Timeout 300 # # KeepAlive: Whether or not to allow persistent connections (more than # one request per connection). Set to "Off" to deactivate. # KeepAlive On # # MaxKeepAliveRequests: The maximum number of requests to allow # during a persistent connection. Set to 0 to allow an unlimited amount. # We recommend you leave this number high, for maximum performance. # MaxKeepAliveRequests 100 # # KeepAliveTimeout: Number of seconds to wait for the next request from the # same client on the same connection. # KeepAliveTimeout 5 # These need to be set in /etc/apache2/envvars User ${APACHE_RUN_USER} Group ${APACHE_RUN_GROUP} # # HostnameLookups: Log the names of clients or just their IP addresses # e.g., www.apache.org (on) or 204.62.129.132 (off). # The default is off because it'd be overall better for the net if people # had to knowingly turn this feature on, since enabling it means that # each client request will result in AT LEAST one lookup request to the # nameserver. # HostnameLookups Off # ErrorLog: The location of the error log file. # If you do not specify an ErrorLog directive within a <VirtualHost> # container, error messages relating to that virtual host will be # logged here. If you *do* define an error logfile for a <VirtualHost> # container, that host's errors will be logged there and not here. # ErrorLog ${APACHE_LOG_DIR}/error.log # # LogLevel: Control the severity of messages logged to the error_log. # Available values: trace8, ..., trace1, debug, info, notice, warn, # error, crit, alert, emerg. # It is also possible to configure the log level for particular modules, e.g. # "LogLevel info ssl:warn" # LogLevel warn # Include module configuration: IncludeOptional mods-enabled/*.load IncludeOptional mods-enabled/*.conf # Include list of ports to listen on Include ports.conf # Sets the default security model of the Apache2 HTTPD server. It does # not allow access to the root filesystem outside of /usr/share and /var/www. # The former is used by web applications packaged in Debian, # the latter may be used for local directories served by the web server. If # your system is serving content from a sub-directory in /srv you must allow # access here, or in any related virtual host. <Directory /> Options FollowSymLinks AllowOverride None Require all denied </Directory> <Directory /usr/share> AllowOverride None Require all granted </Directory> <Directory /var/www/> Options Indexes FollowSymLinks AllowOverride None Require all granted </Directory> #<Directory /srv/> # Options Indexes FollowSymLinks # AllowOverride None # Require all granted #</Directory> # AccessFileName: The name of the file to look for in each directory # for additional configuration directives. See also the AllowOverride # directive. # AccessFileName .htaccess # # The following lines prevent .htaccess and .htpasswd files from being # viewed by Web clients. # <FilesMatch "^\.ht"> Require all denied </FilesMatch> # # The following directives define some format nicknames for use with # a CustomLog directive. # # These deviate from the Common Log Format definitions in that they use %O # (the actual bytes sent including headers) instead of %b (the size of the # requested file), because the latter makes it impossible to detect partial # requests. # # Note that the use of %{X-Forwarded-For}i instead of %h is not recommended. # Use mod_remoteip instead. # LogFormat "%v:%p %h %l %u %t \"%r\" %>s %O \"%{Referer}i\" \"%{User-Agent}i\"" vhost_combined LogFormat "%h %l %u %t \"%r\" %>s %O \"%{Referer}i\" \"%{User-Agent}i\"" combined LogFormat "%h %l %u %t \"%r\" %>s %O" common LogFormat "%{Referer}i -> %U" referer LogFormat "%{User-agent}i" agent # Include of directories ignores editors' and dpkg's backup files, # see README.Debian for details. # Include generic snippets of statements IncludeOptional conf-enabled/*.conf # Include the virtual host configurations: IncludeOptional sites-enabled/*.conf # vim: syntax=apache ts=4 sw=4 sts=4 sr noetディレクティブの説明#.htaccess 有効・無効の設定 AllowOverride #どの認証済みユーザがリソースをアクセスできるか Require #ディレクトリに対して使用可能な機能を設定 Optionsmod_rewriteモジュールが有効になってる?
おいー
Rewrite****見たいなディレクティブをhtaccessに記述するとエラーになる〜<IfModule mod_rewrite.c> XXXXXXXX XXXXXXXX </IfModule>って書いてやるとRewriteできない代わりにエラー消えるし
そもそもmod_rewriteモジュール有効なのか・・・?
調べよう
有効なmoduleを調べるapachectl -M #AH00558: apache2: Could not reliably determine the server's fully qualified domain name, #using 172.30.0.3. Set the 'ServerName' directive globally to suppress this message #Loaded Modules: # core_module (static) # so_module (static) # watchdog_module (static) # http_module (static) # log_config_module (static) # logio_module (static) # version_module (static) # unixd_module (static) # access_compat_module (shared) # alias_module (shared) # auth_basic_module (shared) # authn_core_module (shared) # authn_file_module (shared) # authz_core_module (shared) # authz_host_module (shared) # authz_user_module (shared) # autoindex_module (shared) # deflate_module (shared) # dir_module (shared) # env_module (shared) # filter_module (shared) # mime_module (shared) # mpm_prefork_module (shared) # negotiation_module (shared) # php7_module (shared) # reqtimeout_module (shared) # setenvif_module (shared) # status_module (shared)あれ?ない。
Dockerfileに追記します。
DockerfileFROM php:7.2-apache #COPY ./apache2.conf /etc/apache2/apache2.conf COPY php.ini /usr/local/etc/php/ RUN apt-get update \ && apt-get install -y libfreetype6-dev libjpeg62-turbo-dev libpng-dev libmcrypt-dev \ && mv /etc/apache2/mods-available/rewrite.load /etc/apache2/mods-enabled #ここ追加 # /etc/apache2/mods-available/にあるrewrite.loadを/etc/apache2/mods-enabledディレクトリに移動してやる # mod_rewriteを 有効に RUN /bin/sh -c a2enmod rewritedocker-composeコマンドで再build
docker-compose stop #一回ストップして
docker-compose rm コンテナ名  #コンテナ削除して

#ここが重要。no-cacheオプションをつけないと変更が反映されなくて、あれー?ってなるかも
docker-compose build --no-cache  #構築時にイメージのキャッシュを使わない

#立ち上げ
docker-compoe up -d
再度rewriteモジュールが有効になっているか確認しよう
# コンテナに入って
docker exec -it コンテナ名 bash

#ロードしているモジュールの一覧表示
apachectl -M
# XXXXXXXX省略します
# so_module (static)  # ←←いたー!
# XXXXXXXX省略します
htaccessでRewriteができるか試してみる
リクエストの書き換え
RewriteEngine on #Rewrite機能(URLの書き換え)をONにする
RewriteBase / #ベースとなるディレクトリを明示的に指定
RewriteCond %{REQUEST_URI} !^/index.php #RewriteRule を実行するための条件を定義
RewriteCond %{QUERY_STRING} (.*)$
RewriteRule ^(.+)$ /index.php?u=$1&%1 [L] #正規表現で対象URLを定義 転送先を定義 フラグ
いけた
正規表現で困ったらよくここを使います
https://weblabo.oscasierra.net/tools/regex/
- 投稿日:2019-08-04T16:57:16+09:00
環境はdockerイメージはphp:7.2-apacheでmod_rewriteモジュール有効にしたい!!!
Dockerでhtaccessいじろうとしたらハマったので、今更ながらと思いつつもメモっときます
書きかけですが、続き書きます
環境はDocker
使ったのイメージはphp:7.2-apacheで、下記ファイルを用意しました。
・docker-compose.yml
・Dockerfile
・php.ini細かいことは割愛します。
apacheの色々見てみよう
#docker exec で中に入って
docker exec -it コンテナID bash

#どこだ?
#とりあえず探す
find / -name httpd.conf
#Permission denied えー!
あれそもそもapache2の設定ファイルはRed Hat系とDebian系で色々違うみたい
http://www.linux.net-japan.info/install08.htmlDebian系は/etc/apache2/ディレクトリ以下にapacheの設定ファイルがあるみたい。
主となる設定ファイルはapache2.confだって。
ファイル名さえ違うじゃん!cat /etc/issue # Debian GNU/Linux 9 \n \l apachectl -v # Server version: Apache/2.4.25 (Debian) # Server built: 2018-11-03T18:46:19あ、すいません。
そゆことですか。
では気を取り直してあとapacheの設定は下記コマンドでも確認できるみたい
apachectl -S
# AH00558: apache2: Could not reliably determine the server's fully qualified domain name, # # using 172.30.0.3. Set the 'ServerName' directive globally to suppress this message
# VirtualHost configuration:
# *:80                   172.30.0.3 (/etc/apache2/sites-enabled/000-default.conf:1)
# ServerRoot: "/etc/apache2"
# Main DocumentRoot: "/var/www/html"
# Main ErrorLog: "/var/log/apache2/error.log"
# Mutex default: dir="/var/run/apache2/" mechanism=default
# Mutex mpm-accept: using_defaults
# Mutex watchdog-callback: using_defaults
# PidFile: "/var/run/apache2/apache2.pid"
# Define: DUMP_VHOSTS
# Define: DUMP_RUN_CFG
# User: name="www-data" id=33
# Group: name="www-data" id=33
cd /etc/apache2 #移動して ls -l #見てみる # -rw-r--r-- 1 root root 7224 Nov 3 2018 apache2.conf # drwxr-xr-x 1 root root 4096 Dec 29 2018 conf-available # drwxr-xr-x 1 root root 4096 Dec 29 2018 conf-enabled # -rw-r--r-- 1 root root 1924 Dec 29 2018 envvars # -rw-r--r-- 1 root root 31063 Nov 3 2018 magic # drwxr-xr-x 1 root root 4096 Dec 29 2018 mods-available # drwxr-xr-x 1 root root 4096 Dec 29 2018 mods-enabled # -rw-r--r-- 1 root root 320 Nov 3 2018 ports.conf # drwxr-xr-x 2 root root 4096 Dec 29 2018 sites-available # drwxr-xr-x 2 root root 4096 Dec 29 2018 sites-enabledあ、めっちゃ嬉しい。
apache2の設定ファイル構成(有効な)
apache2.confより抜粋# /etc/apache2/ # |-- apache2.conf # | `-- ports.conf # |-- mods-enabled # | |-- *.load # | `-- *.conf # |-- conf-enabled # | `-- *.conf # `-- sites-enabled # `-- *.conf上はあくまで有効なもので実際に見てみると下記のようになっている。
apache2ディレクトリ直下のディレクトリやファイル一覧ls -l # apache2.conf # conf-available # conf-enabled # envvars # magic # mods-available # mods-enabled # ports.conf # sites-enabledapache2.confが基本の設定ファイルで、
XXXXX-eanbledディレクトリ以下のファイルも有効逆に
XXXX-availableディレクトリ以下のファイルは無効の状態って感じ
使いたいときに追加で有効化するってイメージapache2.confより抜粋# Global configuration # # # ServerRoot: The top of the directory tree under which the server's # configuration, error, and log files are kept. # # NOTE! If you intend to place this on an NFS (or otherwise network) # mounted filesystem then please read the Mutex documentation (available # at <URL:http://httpd.apache.org/docs/2.4/mod/core.html#mutex>); # you will save yourself a lot of trouble. # # Do NOT add a slash at the end of the directory path. # #ServerRoot "/etc/apache2" # # The accept serialization lock file MUST BE STORED ON A LOCAL DISK. # #Mutex file:${APACHE_LOCK_DIR} default # # The directory where shm and other runtime files will be stored. # DefaultRuntimeDir ${APACHE_RUN_DIR} # # PidFile: The file in which the server should record its process # identification number when it starts. # This needs to be set in /etc/apache2/envvars # PidFile ${APACHE_PID_FILE} # # Timeout: The number of seconds before receives and sends time out. # Timeout 300 # # KeepAlive: Whether or not to allow persistent connections (more than # one request per connection). Set to "Off" to deactivate. # KeepAlive On # # MaxKeepAliveRequests: The maximum number of requests to allow # during a persistent connection. Set to 0 to allow an unlimited amount. # We recommend you leave this number high, for maximum performance. # MaxKeepAliveRequests 100 # # KeepAliveTimeout: Number of seconds to wait for the next request from the # same client on the same connection. # KeepAliveTimeout 5 # These need to be set in /etc/apache2/envvars User ${APACHE_RUN_USER} Group ${APACHE_RUN_GROUP} # # HostnameLookups: Log the names of clients or just their IP addresses # e.g., www.apache.org (on) or 204.62.129.132 (off). # The default is off because it'd be overall better for the net if people # had to knowingly turn this feature on, since enabling it means that # each client request will result in AT LEAST one lookup request to the # nameserver. # HostnameLookups Off # ErrorLog: The location of the error log file. # If you do not specify an ErrorLog directive within a <VirtualHost> # container, error messages relating to that virtual host will be # logged here. If you *do* define an error logfile for a <VirtualHost> # container, that host's errors will be logged there and not here. # ErrorLog ${APACHE_LOG_DIR}/error.log # # LogLevel: Control the severity of messages logged to the error_log. # Available values: trace8, ..., trace1, debug, info, notice, warn, # error, crit, alert, emerg. # It is also possible to configure the log level for particular modules, e.g. # "LogLevel info ssl:warn" # LogLevel warn # Include module configuration: IncludeOptional mods-enabled/*.load IncludeOptional mods-enabled/*.conf # Include list of ports to listen on Include ports.conf # Sets the default security model of the Apache2 HTTPD server. It does # not allow access to the root filesystem outside of /usr/share and /var/www. # The former is used by web applications packaged in Debian, # the latter may be used for local directories served by the web server. If # your system is serving content from a sub-directory in /srv you must allow # access here, or in any related virtual host. <Directory /> Options FollowSymLinks AllowOverride None Require all denied </Directory> <Directory /usr/share> AllowOverride None Require all granted </Directory> <Directory /var/www/> Options Indexes FollowSymLinks AllowOverride None Require all granted </Directory> #<Directory /srv/> # Options Indexes FollowSymLinks # AllowOverride None # Require all granted #</Directory> # AccessFileName: The name of the file to look for in each directory # for additional configuration directives. See also the AllowOverride # directive. # AccessFileName .htaccess # # The following lines prevent .htaccess and .htpasswd files from being # viewed by Web clients. # <FilesMatch "^\.ht"> Require all denied </FilesMatch> # # The following directives define some format nicknames for use with # a CustomLog directive. # # These deviate from the Common Log Format definitions in that they use %O # (the actual bytes sent including headers) instead of %b (the size of the # requested file), because the latter makes it impossible to detect partial # requests. # # Note that the use of %{X-Forwarded-For}i instead of %h is not recommended. # Use mod_remoteip instead. # LogFormat "%v:%p %h %l %u %t \"%r\" %>s %O \"%{Referer}i\" \"%{User-Agent}i\"" vhost_combined LogFormat "%h %l %u %t \"%r\" %>s %O \"%{Referer}i\" \"%{User-Agent}i\"" combined LogFormat "%h %l %u %t \"%r\" %>s %O" common LogFormat "%{Referer}i -> %U" referer LogFormat "%{User-agent}i" agent # Include of directories ignores editors' and dpkg's backup files, # see README.Debian for details. # Include generic snippets of statements IncludeOptional conf-enabled/*.conf # Include the virtual host configurations: IncludeOptional sites-enabled/*.conf # vim: syntax=apache ts=4 sw=4 sts=4 sr noetディレクティブの説明#.htaccess 有効・無効の設定 AllowOverride #どの認証済みユーザがリソースをアクセスできるか Require #ディレクトリに対して使用可能な機能を設定 Optionsmod_rewriteモジュールが有効になってる?
おいー
Rewrite****見たいなディレクティブをhtaccessに記述するとエラーになる〜<IfModule mod_rewrite.c> XXXXXXXX XXXXXXXX </IfModule>って書いてやるとRewriteできない代わりにエラー消えるし
そもそもmod_rewriteモジュール有効なのか・・・?
調べよう
有効なmoduleを調べるapachectl -M #AH00558: apache2: Could not reliably determine the server's fully qualified domain name, #using 172.30.0.3. Set the 'ServerName' directive globally to suppress this message #Loaded Modules: # core_module (static) # so_module (static) # watchdog_module (static) # http_module (static) # log_config_module (static) # logio_module (static) # version_module (static) # unixd_module (static) # access_compat_module (shared) # alias_module (shared) # auth_basic_module (shared) # authn_core_module (shared) # authn_file_module (shared) # authz_core_module (shared) # authz_host_module (shared) # authz_user_module (shared) # autoindex_module (shared) # deflate_module (shared) # dir_module (shared) # env_module (shared) # filter_module (shared) # mime_module (shared) # mpm_prefork_module (shared) # negotiation_module (shared) # php7_module (shared) # reqtimeout_module (shared) # setenvif_module (shared) # status_module (shared)あれ?ない。
Dockerfileに追記します。
DockerfileFROM php:7.2-apache #COPY ./apache2.conf /etc/apache2/apache2.conf COPY php.ini /usr/local/etc/php/ RUN apt-get update \ && apt-get install -y libfreetype6-dev libjpeg62-turbo-dev libpng-dev libmcrypt-dev \ && mv /etc/apache2/mods-available/rewrite.load /etc/apache2/mods-enabled #ここ追加 # /etc/apache2/mods-available/にあるrewrite.loadを/etc/apache2/mods-enabledディレクトリに移動してやる # mod_rewriteを 有効に RUN /bin/sh -c a2enmod rewritedocker-composeコマンドで再build
docker-compose stop #一回ストップして
docker-compose rm コンテナ名  #コンテナ削除して

#ここが重要。no-cacheオプションをつけないと変更が反映されなくて、あれー?ってなるかも
docker-compose build --no-cache  #構築時にイメージのキャッシュを使わない

#立ち上げ
docker-compoe up -d
再度rewriteモジュールが有効になっているか確認しよう
# コンテナに入って
docker exec -it コンテナ名 bash

#ロードしているモジュールの一覧表示
apachectl -M
# XXXXXXXX省略します
# so_module (static)  # ←←いたー!
# XXXXXXXX省略します
htaccessでRewriteができるか試してみる
リクエストの書き換え
RewriteEngine on #Rewrite機能(URLの書き換え)をONにする
RewriteBase / #ベースとなるディレクトリを明示的に指定
RewriteCond %{REQUEST_URI} !^/index.php #RewriteRule を実行するための条件を定義
RewriteCond %{QUERY_STRING} (.*)$
RewriteRule ^(.+)$ /index.php?u=$1&%1 [L] #正規表現で対象URLを定義 転送先を定義 フラグ
いけた
正規表現で困ったらよくここを使います
https://weblabo.oscasierra.net/tools/regex/
- 投稿日:2019-08-04T16:51:57+09:00
DockerでYii2の開発環境を作った時にハマったこと -2-
DockerでYii2のfrontend, backendなどのコンテナを作ると、そのままではgiiが使えないです。
なぜなら、デフォルトではlocalhostからのアクセスしかgiiは認めていないから。
ということで、backend側のmain-local.phpを編集する。
$config['modules']['gii'] = [
    'class' => 'yii\gii\Module',
];
ここに
'allowedIPs' => ['192.168.*'],を追加してやる。
これでOK。実際に設定するIPアドレスは、各自の環境に合わせてください。
- 投稿日:2019-08-04T15:39:17+09:00
DockerでYii2の開発環境を作った時にハマったこと -1-
Yii2でWebアプリを作るにあたって、Dockerでfrontend, backend, mysqlのコンテナを作った。
アプリケーション側からはちゃんとmysqlのデータを取得できたりするのを確認済み。
で、いざ新しいテーブル等を作るためにmigrateしようとしたらエラーになる。
おなじみのこんなエラー。
Exception 'yii\db\Exception' with message 'SQLSTATE[HY000] [2002] php_network_getaddresses: getaddrinfo failed: nodename nor servname provided, or not known'
でも、common/config/main-local.phpに書かれているDBの設定は読み込まれているし、なんでつながらないんだろうと悩むこと一週間。
そうだ、frontendコンテナとmysqlコンテナの間は名前解決できているけれど、consoleからいきなりmysqlコンテナに接続しにいこうとしてもダメなんじゃないか。
ということで、console/config/main-local.phpにcomponents/dbの設定を追加。
接続先のdsnには、mysql:host=127.0.0.1を指定した。
無事にmigrateできた。
ふぅ、なかなかの難敵だな、Dockerは。
- 投稿日:2019-08-04T13:56:44+09:00
Laradock 起動時にphp-redisのFailed to fetchが出て失敗した時の対処法
最近
Dockerの基本を勉強したので、早速Laravelで何か作ってみようとLaradockをローカルで起動しようとした際に表題のエラーが出たので対処した方法を記載します。もっと簡単な、あるいはまっとうなやりかたあれば教えていただきたく、です。
(確認の仕方も含めて丁寧目に書いています)※Qiitaへの投稿は初めてなので、色々不安ですが、誤りなどありましたらご指摘ください。
状況
ローカルへの環境構築でdocker起動までの手順は下記の記事に従いました。
なお私の環境はmacです。
DockerでLaravelの環境を構築し、Herokuへのデプロイを目指すためのチュートリアルdockerの起動
laradockディレクトリ内でdocker-compose upします。$ docker-compose up -d nginx mysql phpmyadminすると今回は以下のようなエラーが出て、起動に失敗しました。
エラー内容
E: Failed to fetch http://ppa.launchpad.net/ondrej/php/ubuntu/pool/main/p/php-redis/php-redis_4.2.0-1+ubuntu16.04.1+deb.sury.org+1_amd64.deb  404  Not Found

E: Unable to fetch some archives, maybe run apt-get update or try with --fix-missing?
ERROR: Service 'workspace' failed to build: The command '/bin/sh -c if [ ${INSTALL_PHPREDIS} = true ]; then     apt-get install -yqq php-redis ;fi' returned a non-zero code: 100
php-redisのfetchに失敗しています。※ ちなみにurl(http://ppa.launchpad.net/ondrej/php/ubuntu/pool/main/p/php-redis/php-redis_4.2.0-1+ubuntu16.04.1+deb.sury.org+1_amd64.deb) を確認するとたしかに該当のページが存在しません。
続いて「
run apt-get updateするか--fix-missingオプションつけてやってみて」みたいなことが書いてあります。
とりあえずapt-get updateを試してみることにします。手順
最後のエラーメッセージに
workspaceのビルドの際に下記のコマンドで失敗してるとあります。'/bin/sh -c if [ ${INSTALL_PHPREDIS} = true ]; then apt-get install -yqq php-redis ;fi' returned a non-zero code: 100なので今回はこの上記の箇所に
apt-get updateを足してみることにします。上記の箇所ってどこ?
Dockerではコンテナ起動時に
Dockerfileの内容に従ってビルドを行います。
なのでworkspaceのDockerfileを探します。# カレントディレクトリを確認 $ pwd # laradockディレクトリ内であることを確認 # 私の場合 → /Users/ユーザー名/Docker/project_name/laradock # ディレクトリ内のリストを表示 $ ls DOCUMENTATION ide-codiad nginx LICENSE ide-icecoder percona adminer ide-theia php-fpm aerospike ide-webide php-worker apache2 ipython phpmyadmin aws-eb-cli jenkins portainer beanstalkd jupyterhub postgres beanstalkd-console kibana postgres-postgis caddy laravel-echo-server rabbitmq cassandra laravel-horizon redis certbot logs redis-cluster couchdb logstash redis-webui docker-compose.sync.yml maildev rethinkdb docker-compose.yml mailhog selenium docker-registry manticore solr docker-sync.yml mariadb sonarqube docker-web-ui memcached sync.sh elasticsearch minio thumbor env-example mongo traefik gitlab mongo-webui travis-build.sh grafana mosquitto varnish graylog mssql 'workspace' haproxy mysql zookeeper hhvm neo4j # workspaceがあるのを確認 ※わざとハイライトにしています # workspaceへ移動 $ cd workspace # workspace内のリストを表示 $ ls 'Dockerfile' composer.json insecure_id_rsa.pub aerospike.ini crontab mc aliases.sh insecure_id_rsa xdebug.ini auth.json insecure_id_rsa.ppk # Dockerfileがあるのを確認 ※わざとハイライトにしています # Dockerfileを編集 $ vim Dockerfileコマンドモードで
/[ ${INSTALL_PHPREDIS} = true ]などとして該当箇所を検索します。DockerfileRUN if [ ${INSTALL_PHPREDIS} = true ]; then \ apt-get install -yqq php-redis \ ;fi # 上記を下記のように書き換える RUN if [ ${INSTALL_PHPREDIS} = true ]; then \ apt-get update && \ apt-get install -yqq php-redis \ ;fi
:wqで保存してファイルを閉じます。dockerを再度起動
laradockディレクトリに戻って再度起動してみます。$ cd ../ # workspaceディレクトリから一つ上のディレクトリに戻る $ docker-compose up -d nginx mysql phpmyadmin ... # 初回起動時はそこそこ時間がかかる Creating project_name_docker-in-docker_1 ... done Creating project_name_mysql_1 ... done Creating project_name_workspace_1 ... done Creating project_name_phpmyadmin_1 ... done Creating project_name_php-fpm_1 ... done Creating project_name_nginx_1 ... done今度はうまく起動できたようです。
一応dockerコンテナの起動を確認します。
$ docker ps --format "table {{.Names}}"
NAMES
project_name_nginx_1
project_name_php-fpm_1
project_name_phpmyadmin_1
project_name_workspace_1
project_name_mysql_1
project_name_docker-in-docker_1
上記のように表示されればコンテナが起動できています。
お疲れ様でした。
- 投稿日:2019-08-04T03:55:47+09:00
「Docker」&「Kubernetes」について簡単に解説(学習まとめ)
本文は、筆者個人が学習のまとめとして作成したものですが、一人でも、だれかのお役に立てればと思います。
筆者は、某IT会社にて研修を受けている身で、技術的に(非常に)拙いため、内容に漏れや誤りがあるかもしれませんので、
より詳細で正確な情報については、読者の方々ご自身がネット上の各ソースについてあたっていただければと思います。
それでは、少しの間お付き合いください。「Docker」とは?
Dockerとは、ホストマシンにコンテナと呼ばれる仮想のアプリケーション実行環境を用意してくれるソフトウェアです。
Dockerは、VMwareなどの従来の類似製品に比べると、
実行環境(コンテナ)の構築やアプリケーションの起動が速く、ディスク使用量が少ないなどのメリットがあります。
これは、VMwareでは「ハイバーバイザ」といって、複数の異なるOSをサポートする仕組みを採用しているためです。
(Dockerでは、Linuxのみのサポートとなります)。Dockerでは、一つのホストマシンに複数のコンテナを構築することができ、
コンテナは互いに通信をすることで連携して動作することが可能となります。
また、同一のホストマシンに搭載されるコンテナ同士は、
プライベートなネットワークを経由することで通信することができますが、
複数のマシンに跨ってコンテナ同士が通信する場合は、NAT(IP Masquerade)を用いる必要があります。
Dockerの標準の環境では、この複数のマシンに跨ったコンテナ間の通信・連携が難しいため、
複数のマシンで構成される環境では、コンテナ間の通信・連携を代行するソフトウェアを用意する必要があります。
(また、複数のマシンで構成される環境のことを「クラスタ」と呼びます)。「Kubernetes」とは?
Dockerの章で書きましたが、Docker単体では、複数のマシンに跨ってのコンテナ間の通信・連携を行うことが難しいため、
これを代行するソフトウェアを用意する必要があります。これを行うのが、Kubernetesになります。Kubernetesを導入することで、クラスタをあたかも一台のマシンのように扱うことができます。
したがって、複数のマシンに跨ったコンテナ間の通信・連携を容易に行うことができるようになるのです。また、Kubernetesの持つ機能としては、「スケジューリング」「スケーリング」などがあります。
スケジューリングとは、外部からコンテナを起動する要求があると、
クラスタ全体のリソース(CPU&メモリ&補助記憶)の使用状況を把握した上で、
現在の状況に最適なコンテナを自動的に選定してくれる機能です。
スケーリングとは、要求の増大に伴って、マシンを増設するなどしてクラスタ全体の性能を向上させることです。以上で解説を終えます。
個人的には、できれば、具体的にクラスタ全体でなにができるのか、
MapReduceなどの手法やアルゴリズムについても解説したかったのですが、
いかんせん、筆者の勉強不足からそこまでには至りませんでした。
今後は、その辺りのことについても勉強して内容をまとめた上で解説したいです。Dockerについて参考になったサイト
[https://ja.wikipedia.org/wiki/Docker]Kubernetesについて参考になったサイト
[https://ja.wikipedia.org/wiki/Kubernetes]
- 投稿日:2019-08-04T01:39:11+09:00
GrafanaとPrometheusでJenkins監視
やったこと
Mac OS環境でdocer-composeを使用してJenkins, Prometheus, Grafanaを起動しました。
Jenkins Pluginをインストールし、 Jenkinsのメトリクス監視を可視化しました。稼働環境
- Mac OS Mojave
- Docker version 19.03.1
- docker-compose version 1.24.1
docker-composeを使用した起動
Prometheusで、Jenkinsのメトリクス監視を追加します。
prometheus.yml# my global config global: scrape_interval: 15s # Set the scrape interval to every 15 seconds. Default is every 1 minute. evaluation_interval: 15s # Evaluate rules every 15 seconds. The default is every 1 minute. # scrape_timeout is set to the global default (10s). # Alertmanager configuration alerting: alertmanagers: - static_configs: - targets: # - alertmanager:9093 # Load rules once and periodically evaluate them according to the global 'evaluation_interval'. rule_files: # - "first_rules.yml" # - "second_rules.yml" # A scrape configuration containing exactly one endpoint to scrape: # Here it's Prometheus itself. scrape_configs: # The job name is added as a label `job=<job_name>` to any timeseries scraped from this config. - job_name: 'prometheus' # metrics_path defaults to '/metrics' # scheme defaults to 'http'. static_configs: - targets: ['localhost:9090'] ### 追加 ## - job_name: ‘jenkins’ metrics_path: /prometheus/ static_configs: - targets: ['docker.for.mac.localhost:8080']Jenkins, Prometheus, Grafanaを起動するためのymlファイルを作成します。
docker-compose.ymlversion: '3' services: jenkins: image: jenkins/jenkins:lts container_name: jenkins restart: always ports: - 8080:8080 - 50000:50000 volumes: - ./jenkins/jenkins_home:/var/jenkins_home prometheus: image: prom/prometheus:v2.11.1 container_name: prometheus volumes: - ./prometheus/prometheus.yml:/etc/prometheus/prometheus.yml ports: - 9090:9090 grafana: image: grafana/grafana:6.2.5 container_name: grafana ports: - 3000:3000
docker-compose up -d --buildで起動します。$ docker-compose up -d --build Creating network "default" with the default driver Creating prometheus ... done Creating jenkins ... done Creating grafana ... doneInstall Jenkins Plugin
JenkinsのURLを開き、初期設定を行います。設定方法は省略します。
「Jenkinsの構成」 -> 「プラグインの管理」 でプラグインマネージャーを開きます。
検索欄でprometheusを入力し、Prometheus metrics pluginをインストールします。
インストール後は再起動してください。JenkinsとPrometheus連携
Jenkinsの再起動が完了ましたら、PrometheusのURLを開きます。
上部バーの「Status」 -> 「Targets」を開き、Jenkinsがupとなっていることが確認できます。
PrometheusとGrafanaの連携は、調べれば出てきますので省略します。
Grafanaでの可視化
Grafana Labsで公開されているdashboardのtemplateをインポートします。
今回はa Jenkins performance and health overview for jenkinsci/prometheus-pluginをインポートします。
dashboardのIDを控えます。GrafanaのURLにアクセスし、「Home」 -> 「Import dashboard」を開きます。
控えたIDを入力し、インポートします。
表示されるようになりました。
参考情報
https://medium.com/@eng.mohamed.m.saeed/monitoring-jenkins-with-grafana-and-prometheus-a7e037cbb376
備考
prometheus公式サイトでは、jenkinsが提供するexporterを使用したメトリクス監視も紹介されています。リポジトリは以下です。
https://github.com/lovoo/jenkins_exporter


- 投稿日:2019-08-04T00:32:00+09:00
Hyper-V上でDockerコンテナ(CentOS)を立ち上げる
概要
Wimdows10のHyper-Vの機能を利用してDocker環境を作成します。またDockerを利用してCentOSのDockerコンテナを作成します。
0. 前提条件
- Windows10 Proであること
- メモリが4GB以上あること
- Hyper-Vを有効化していること
1. Dockerのインストール
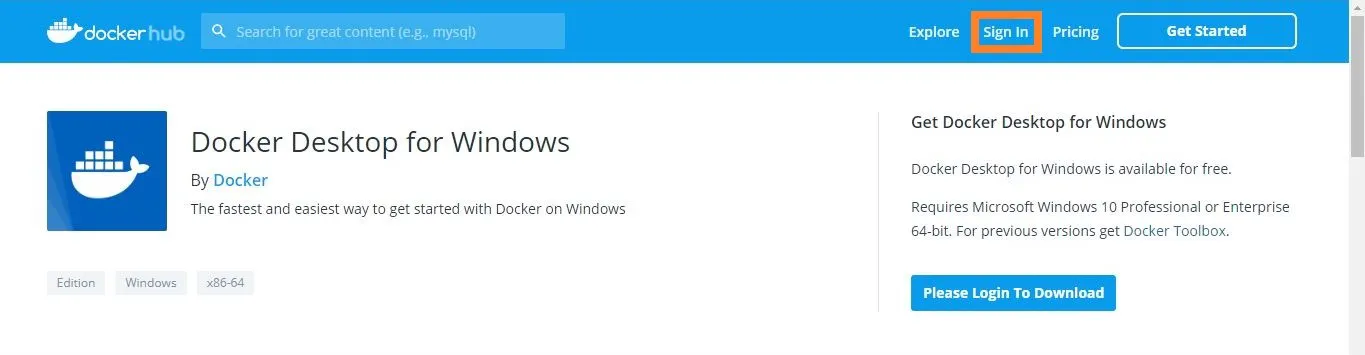
https://hub.docker.com/editions/community/docker-ce-desktop-windows に移動する。
Docker Hub(Docker向けのコンテナ共有サービス)にログインする。
「Get Docker」をクリックしてダウンロードする。
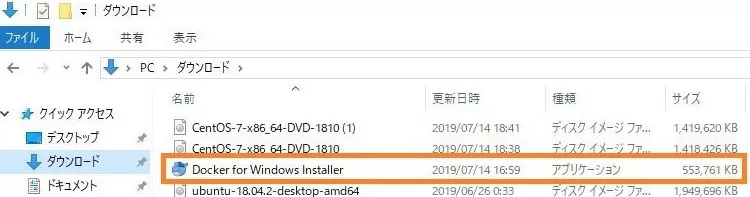
ダウンロードした「Docker for Windows Installer」を起動する。
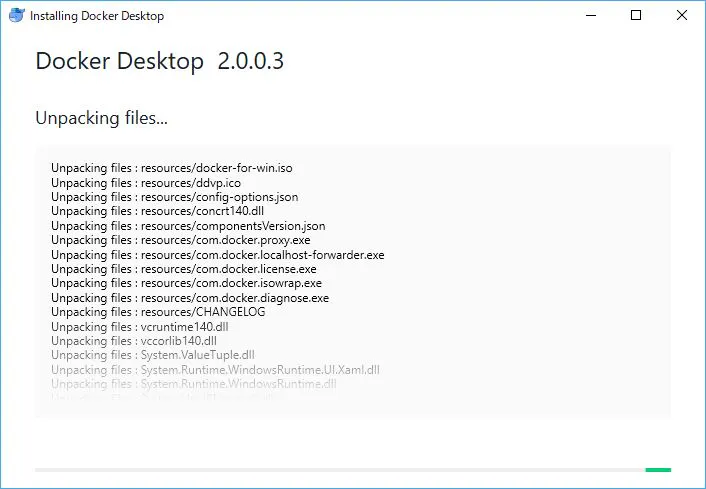
「OK」をクリックする。
インストールが開始されるので待機する。
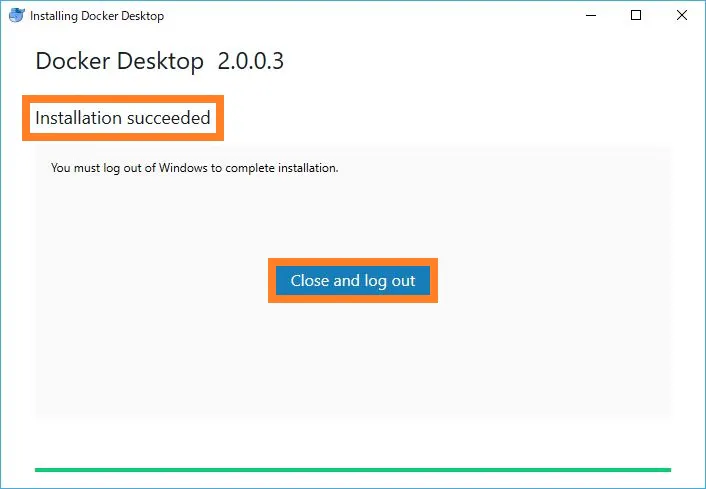
「Installation succeeded」と表示されることを確認し「Close and log out」をクリックする。
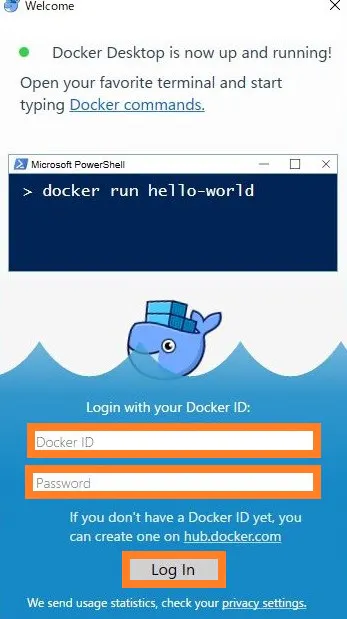
2. Dockerの起動確認
Docker Hubへのログインが求められる画面が表示される。
Docker Hubのアカウント名・パスワードを入力し「Log In」をクリックする。
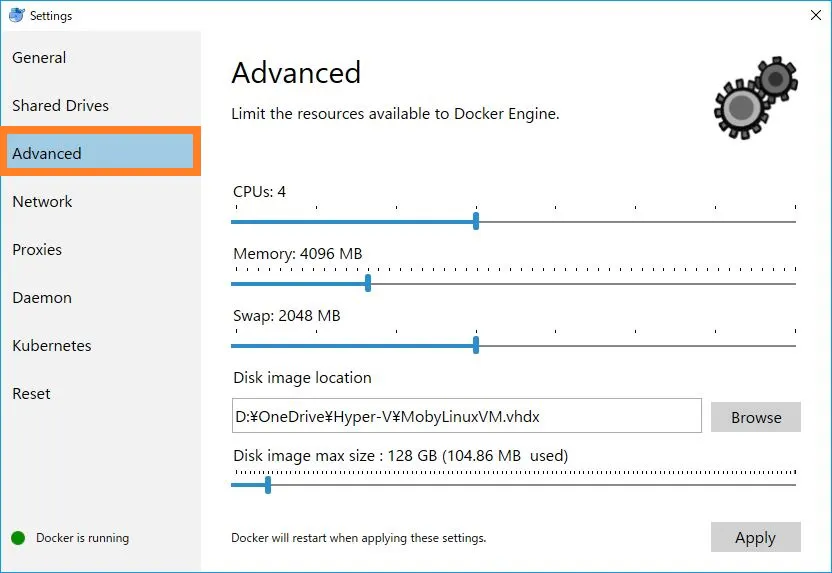
タスクバーにあるDockerのアイコンを右クリックし、「Settings」をクリックする。
左下に「Docker running」と表示されていることを確認する。
Dockerの動作が重い場合は「Advanced」メニューでCPU・メモリを増やす。
3. Dockerとの接続
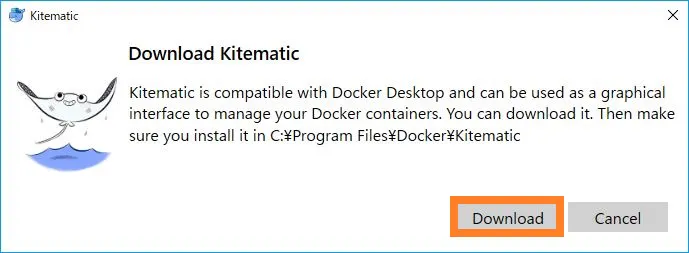
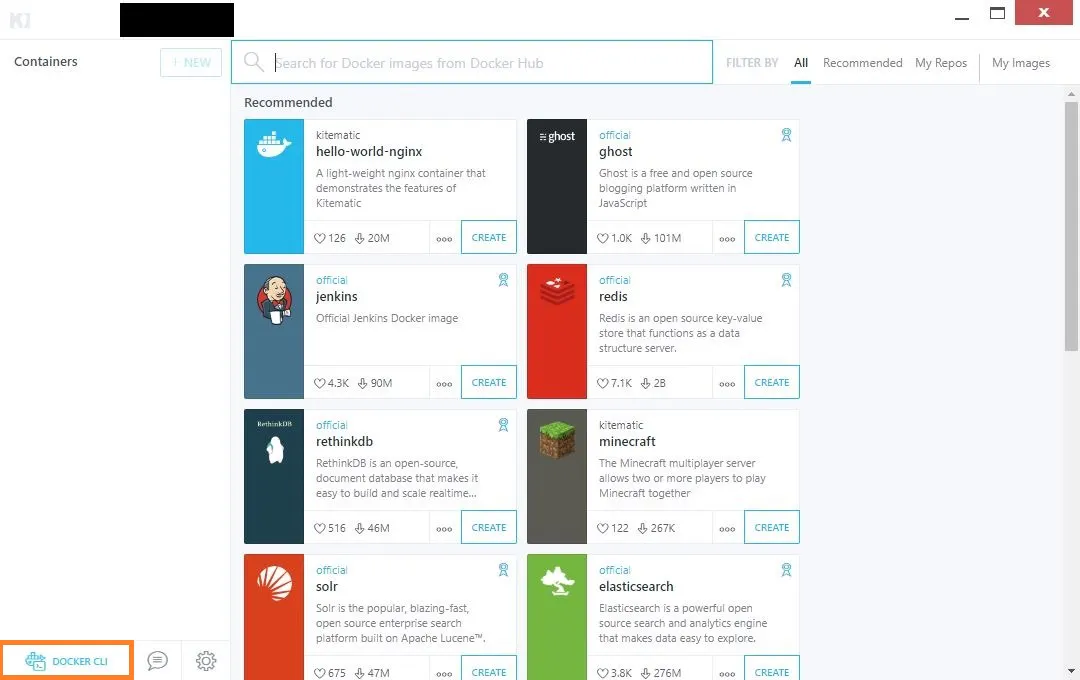
タスクバーにあるDockerアイコンを右クリックし、「Kitematic」をクリックする。
「Download」をクリックする。
「Kitematic-Windows.zip」をダウンロードする。
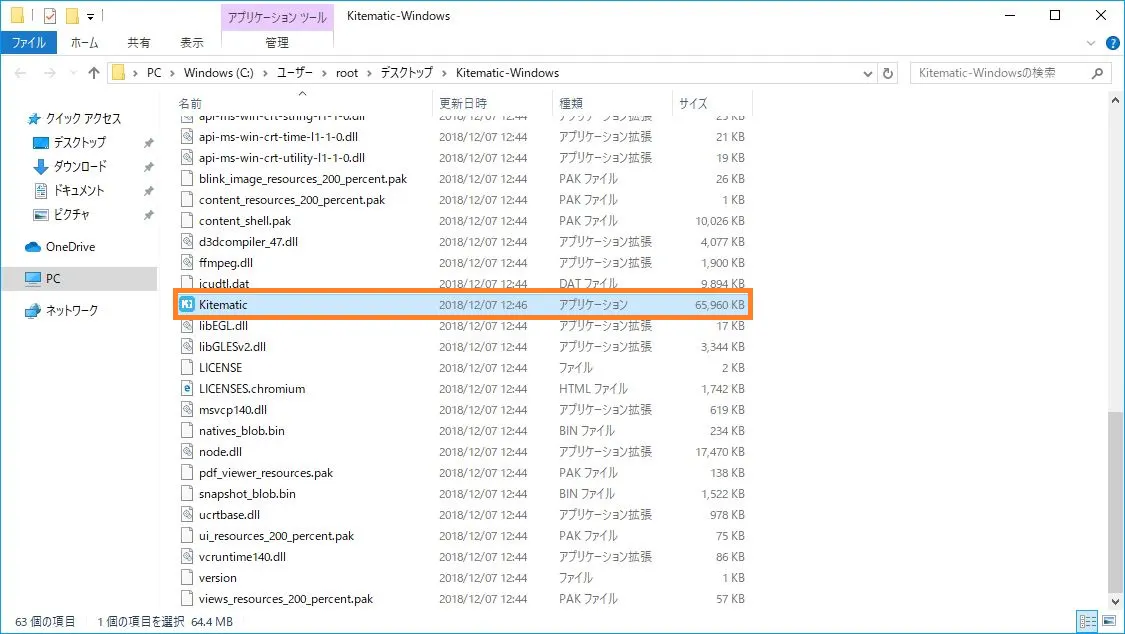
解凍したフォルダにある「Kitematic」を起動する。
「Connect to Docker Hub」の画面が表示される。
Docker Hubのアカウント名・パスワードを入力し「Log In」をクリックする。
Dockerイメージ一覧の画面が表示されたことを確認する。
その後、左下の「Docker CLI」をクリックする。
Power Shellが起動したことを確認する。
Dockerに接続したことを確認する。
> docker --version
Docker version 18.09.2, build 6247962
4. CentOSのDockerコンテナを作成する
CentOSのDockerイメージをダウンロードする。
> docker pull centos
Using default tag: latest
latest: Pulling from library/centos
8ba884070f61: Pull complete
Digest:`<br> `sha256:a799dd8a2ded4a83484bbae769d97655392b3f86533ceb7dd96bbac929809f3c
Status: Downloaded newer image for centos:latest
Dockerイメージをダウンロードされたことを確認する。
> docker images
REPOSITORY          TAG                 IMAGE ID            CREATED             SIZE
centos              latest              9f38484d220f        4 months ago        202MB
CentOSのDockerコンテナを作成する。
使用するコマンドはdocker run -d --privileged -h <ホスト名> --name <コンテナ名> <イメージ名> /sbin/init> docker run -d --privileged -h centos_test --name centos_container centos /sbin/init b79f4102071fdcb36e76f1c6281e590ba740f59e0842a5565e4ff56c1da48cac作成したDockerコンテナのコンソール画面に入る。
使用するコマンドはdocker exec -it <コンテナ名> /bin/bash> docker exec -it centos_container /bin/bashCentOSのコンソール画面に入ったことを確認する。
# uname -a
Linux 591f1d983b96 4.9.125-linuxkit #1 SMP Fri Sep 7 08:20:28 UTC 2018 x86_64 x86_64 x86_64 GNU/Linux
# cat /etc/redhat-release CentOS Linux release 7.6.1810 (Core)その後はお好みに設定する。
CentOSのコンソールから抜ける際は
exitを実行する。# exit5. Dockerコンテナを停止する
起動しているDockerコンテナ一覧を表示する。
> docker ps
CONTAINER ID        IMAGE               COMMAND             CREATED             STATUS              PORTS               NAMES
b79f4102071f        centos              "/sbin/init"        2 weeks ago         Up 3 minutes                            centos_container
使用しないDockerコンテナを停止する。
使用するコマンドはdocker stop <CONTAINER ID または コンテナ名>> docker stop b79f4102071f指定したDockerコンテナが停止したことを確認する。
STATUSの値がExitedと表示されていることを確認する。> docker ps -a CONTAINER ID IMAGE COMMAND CREATED STATUS PORTS NAMES b79f4102071f centos "/sbin/init" 2 weeks ago Exited (137) About a minute ago centos_container6. DockerコンテナをDockerイメージとして保存する。
Dockerイメージとして保存したいDockerコンテナの
CONTAINER IDを確認する。> docker ps -a CONTAINER ID IMAGE COMMAND CREATED STATUS PORTS NAMES b79f4102071f centos "/sbin/init" 2 weeks ago Exited (137) About a minute ago centos_containerDockerイメージとして保存する。
使用するコマンドはdocker commit <CONTAINER ID> <Dockerイメージ名>>docker commit b79f4102071f centos_image sha256:7176ddb9332f1bed330958e8b843e40502628754ba0338de195788aedd5ba802Dockerイメージが保存されたことを確認する。
> docker images
REPOSITORY          TAG                 IMAGE ID            CREATED             SIZE
centos_image        latest              7176ddb9332f        9 minutes ago       202MB
centos              latest              9f38484d220f        4 months ago        202MB
最後に
Windows10のHyper-Vを利用してDockerを立ち上げ、軽量で高速にCentOS環境が作成することができます。またUbuntuなどのOSもDockerイメージをダウンロードすることで、様々なOSのDockerコンテナが作成できます。