- 投稿日:2019-08-04T23:53:13+09:00
React Component について(React基礎講座3)
はじめに
今回は、React Component について書きます。
シリーズ
本記事はReact基礎講座のための連載になっています。気になる方のために、前の章は以下です。
JSXで変数を展開させたい場合やアロー関数について(React基礎講座2) - Qiita
最初の記事は、以下です。
Reactを使ってJSXの内容をレンダリングする(create-react-app)(React基礎講座1) - Qiita
コンポーネントとは
コンポートの概念は、関数と似ています。つまり、inputがあって、なんらかの処理をした結果を、Outputするパーツや部品のことをコンポーネントと言います。そして、このコンポーネントを組み合わせて、より大きなアプリケーションを構築します。
シンタックス
まずは、通常の React Element を作成して、そして次に React Component を作成しましょう。
React Element
import React from "react";
import { render } from "react-dom";

const returnTxt = () => {
  return <p>sample txt</p>;
};

render(returnTxt(), document.getElementById("root"));
では、これを React Component で書いてみましょう。
React Component
定義する際は、いくつかルールがあります。
- const で宣言する場合や、renderの第1引数のJSXとして渡す際、文頭を大文字にします
- renderの第1引数のJSXとして渡す際、タグで囲みます(閉じタグも書く) 例:
<Tag />import React from "react"; import { render } from "react-dom"; const ReturnTxt = () => { return <p>sample txt</p>; }; render(<ReturnTxt />, document.getElementById("root"));結果は同じになりますが、
React Componentが作成されている点が異なります。では、話を進めて、
React Componentに何か値を渡してみましょう。その場合は、renderの第1引数のJSXの中に
key="value"的な感じでReact Componentに引数的な値を渡します。index.jsimport React from "react"; import { render } from "react-dom"; const ReturnTxt = props => { return <h1>{props.title}</h1>; }; render(<ReturnTxt title="My Blog" />, document.getElementById("root"));
引数を複数渡すこともできます。
index.jsimport React from "react"; import { render } from "react-dom"; const ReturnTxt = props => { return ( <div> <h1>{props.title}</h1> <p>{props.body}</p> </div> ); }; render( <ReturnTxt title="My Blog" body="hello, world" />, document.getElementById("root") );
React Componentの中でpropsをの中身をみてみましょう。console.log(props)コンソールには、以下のように出力されます。
Object {title: "My Blog", body: "hello, world"}
    title: "My Blog"
    body: "hello, world"
titleとbodyに、値が代入されているとわかります。
propsとして、受け取る以外の受け取り方もあります。先にコードを書いてみます。index.jsimport React from "react"; import { render } from "react-dom"; const ReturnTxt = ({title, body}) => { return ( <div> <h1>{title}</h1> <p>{body}</p> </div> ); }; render( <ReturnTxt title="My Blog" body="hello, world" />, document.getElementById("root") );何が違うかと言うと、アロー関数の引数を受け取る部分に、なみ括弧(ブレース)
{ }で受け取ることで、今回であればtitleとbodyという変数にオブジェクトされた中身を入れて、直接この変数名で展開することができます。
propsで書くより、上記のように何を受け取っているかわかるのがいいと思います。参考
- 改訂新版JavaScript本格入門 ~モダンスタイルによる基礎から現場での応用まで | 山田 祥寛


- 投稿日:2019-08-04T22:29:38+09:00
JSXで変数を展開させたい場合やアロー関数について(React基礎講座2)
はじめに
今回は、アロー関数について書きます。
シリーズ
本記事はReact基礎講座のための連載になっています。気になる方のために、前の章は以下です。
Reactを使ってJSXの内容をレンダリングする(create-react-app)(React基礎講座1) - Qiita
JSXの中で変数を使いたい場合
変数の中身を展開させたい場合、なみ括弧(ブレース)
{ }で囲うと展開されます。const greeting = "Hello, React"; // 変数代入 const jsx = <h1>{greeting}</h1>; // 変数の中身を展開JSXの中は1つのタグで囲う
なので、以下だとエラーになります。
const greeting = "Hello, React";
const introduction = "My Name is JS";
const jsx = <h1>{greeting}</h1><p>{introduction}</p>;
エラーメッセージは
Adjacent JSX elements must be wrapped in an enclosing tag. Did you want a JSX fragment <>...</>?タグは複数ある場合は、それを囲むタグを用意せよと。では、
divタグで囲って見ましょう。index.jsimport React from "react"; import { render } from "react-dom"; const greeting = "Hello, React"; const introduction = "My Name is JS"; const jsx = ( <div> <h1>{greeting}</h1> <p>{introduction}</p> </div> ); render(jsx, document.getElementById("root"));これでエラーは出なくなりました。
JSXで関数を使いたい場合
展開の仕方は変数と同じです。今回は、JSに最初から定義されているDateクラスの関数を使ってみます。
import React from "react";
import { render } from "react-dom";

// 今日の日付で Date オブジェクトを作成
let now = new Date();

const greeting = "Hello, React";
const introduction = "My Name is JS";
const jsx = (
  <div>
    <h1>{greeting}</h1>
    <p>{introduction}</p>
    <p>This Year is {now.getFullYear()}</p>
  </div>
);

render(jsx, document.getElementById("root"));
今年の年号が展開されましたね。なみ括弧(ブレース)
{ }で囲うと、変数だけでなく関数やオブジェクトも使えると言うことがわかりました。アロー関数で定義した中身を表示させたい場合
文字列とセットで今日の年号を返すアロー関数を定義して見ました。
import React from "react";
import { render } from "react-dom";

// 文字列とセットで今日の年号を返すアロー関数
const returnThisYear = () => {
  // 今日の日付で Date オブジェクトを作成
  let now = new Date();
  return `This Year is ${now.getFullYear()}`
}

const greeting = "Hello, React";
const introduction = "My Name is JS";
const jsx = (
  <div>
    <h1>{greeting}</h1>
    <p>{introduction}</p>
    <p>{returnThisYear()}</p>
  </div>
);

render(jsx, document.getElementById("root"));
呼び出すときは、今回もブレースで囲みます。
{returnThisYear()}正しく呼び出されたと思います。
アロー関数とは
アロー関数は ES2015(ES6) 以降生まれた 関数を定義するためのシンタックスです。
thisの挙動をコントロールしやすくなるなどの利点があり利用されています。シンタックス
昔からある関数の定義と比較して見ましょう。両方とも、文字列を返すだけの単純な関数です。
// 昔の関数
const mukashi_func = function() {
  return "昔の関数"
}
console.log(mukashi_func);
// => function mukashi_func() {}
// =>   <constructor>: "Function"
// =>     name: "Function"

// アロー関数
const arrow_func = () => {
  return "アロー関数"
}
console.log(arrow_func);
// => function arrow_func() {}
// =>   <constructor>: "Function"
// =>     name: "Function"
アロー関数で引数を渡す場合
const arrow_func = (param) => {
  console.log(param)
}
arrow_func('test');

// => test
引数が1つなら、かっこを省略できます。
const arrow_func = param => {
  console.log(param)
}
arrow_func('test');

// => test
引数が2つの場合は
()を省略できません。const arrow_func = (param1, param2) => { console.log(param1, param2); }; arrow_func('first', 'second' ) // => first second1ライナーでの書き方
const arrow_func = () => {
  console.log("one line");
}

arrow_func();

// => one line
上記は、
returnするだけなので、以下のように1行で書くことができます。const arrow_func = () => console.log("one line"); arrow_func(); // => one lineアロー関数の色々な書き方(省略形)を紹介しました。
React でアロー関数を使用する
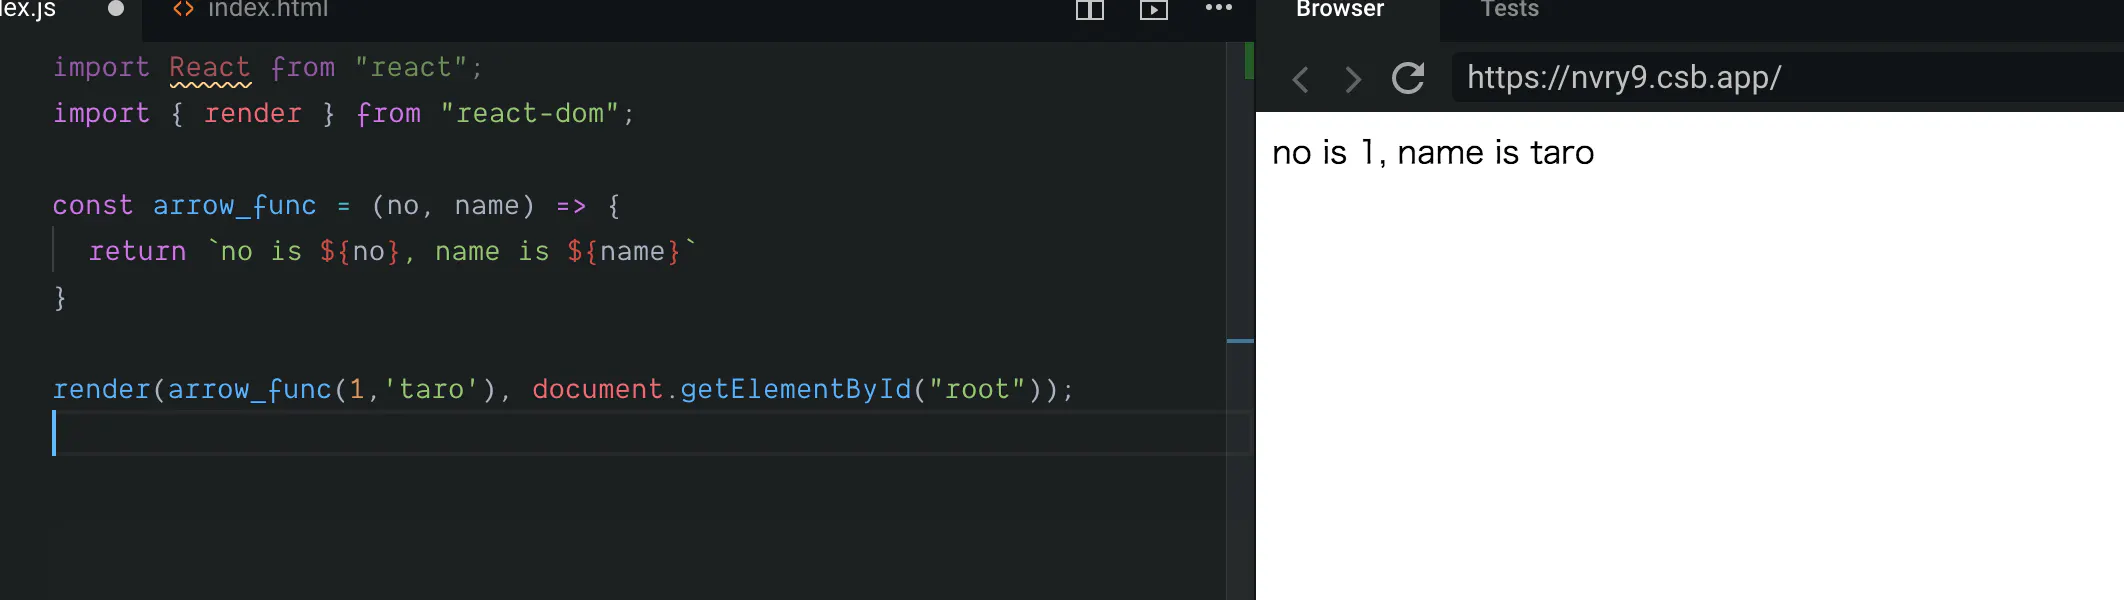
引数を2つ渡して、アロー関数でもらった引数を整形して、
render()中のJSXに返す処理を書きます。import React from "react"; import { render } from "react-dom"; const arrow_func = (no, name) => { return `no is ${no}, name is ${name}` } render(arrow_func(1,'taro'), document.getElementById("root"));
参考
- 改訂新版JavaScript本格入門 ~モダンスタイルによる基礎から現場での応用まで | 山田 祥寛

- 投稿日:2019-08-04T21:40:11+09:00
Eslint設定
4ヶ月ぶりにReactのプロジェクトを触ることになりその際に環境構築などの設定を1から設定したいのでその為にeslintの簡単な設定を忘れてしまったので備忘録までにメモ
今回はyarnを使用しています
先ずはeslintのinstallから
$ yarn add eslintreactも入れたいので
$ yarn add eslint-plugin-react今回はairbnbのstyleを使用します
$ yarn add eslint-config-airbnb eslint-plugin-import eslint-plugin-jsx-a11yこれを入れた後に
$ ./node_modules/.bin/eslint --init諸々設定していると.eslintrc.jsが生成されるので
module.exports = {
    "env": {
        "browser": true,
        "es6": true
    },
    "extends":  "airbnb",
    "globals": {
        "Atomics": "readonly",
        "SharedArrayBuffer": "readonly"
    },
    "parserOptions": {
        "ecmaFeatures": {
            "jsx": true
        },
        "ecmaVersion": 2015,
        "sourceType": "module"
    },
    "plugins": [
        "react"
    ],
    "rules": {
    }
};
僕のはこうなっていました。
あまり理解できていない箇所も多いので今後調べらたアップデートしていこうと思います
- 投稿日:2019-08-04T18:17:07+09:00
React×Redux×Typescriptにおける環境開発で、初っ端からこけた際の対処法
新しくReactをTypescriptで起動し、Reduxを導入しようとするとビルドできなくなるというエラーに突然ぶち当たりました。
とても簡単に解決できたので、備忘録として残しておきます。いつも通り下記でReactアプリケーションをTypescriptで構築します。
npx create-react-app sample-ts-react-app --typescript

# この時点ではちゃんとビルドする
cd yarn
yarn build
ここで下記の手順で、reduxを導入すると突然エラーが出るようになりました。
npm install --save redux react-redux
npm install -D @types/react-redux
yarn build

#エラー文
TypeScript error in /sample-ts-react-app/src/App.tsx(1,19):
Could not find a declaration file for module 'react'. '/sample-ts-react-app/node_modules/react/index.js' implicitly has an 'any' type.
  If the 'react' package actually exposes this module, consider sending a pull request to amend 'https://github.com/DefinitelyTyped/DefinitelyTyped/tree/master/types/react`  TS7016
ドキュメントなどを読んで調べてみると、原因はtsconfigにあるようでした。
したがって下記をcreate-reaxct-appで生成されたtsconfig.jsonに追加するだけで、ちゃんと起動することができるようになりました。"noImplicitAny": false,参考記事
- 投稿日:2019-08-04T15:24:02+09:00
Reactを使ってJSXの内容をレンダリングする(create-react-app)(React基礎講座1)
はじめに
webページにレンダリングをする必要最小限の
React Appを実装するのに必要なことを書いていきます。開発環境
- codesandbox(POPULAR TEMPLATESはReactでCreateする)
不要なファイルは削除しています。
importについて
import自体は、ES2015(ES6)から導入されたメソッドで、これを使うと、JSのパッケージ(モジュール)の中身(関数や変数やクラスなど)を使えるようになります。なので、読み込めばこのファイル
index.jsで定義されていない関数や変数やクラスなどの、JSのモジュールをindex.jsで使えるようになります。index.jsimport React from "react";これは、
reactというパッケージ(モジュール)から、Reactをimportしていると言うことになります。上記を追加することで、Reactを読み込んでrenderメソッドなどを使えるようにしています。
render()についてindex.jsimport { render } from "react-dom";これは、
react-domというパッケージ(モジュール)から、renderというページにレンダリングするメソッドをimportしていると言うことになります。
render()は2つの引数を必要とします。render(JSX, target)
- JSX: JSの拡張言語で、HTMLのようなもの
- target: 作成したReactアプリを、どこの
DOM Elementsに紐づけるかの指定と言うことで、結果、以下のようになります。
render(<h1>Hello, React</h1>, document.getElementById('root'))このよう書くと、React(のrennder)が、
index.htmlにあるタグの中の<div id="root"></div>の中に、JSXで記入した内容をレンダリングします。コード
index.jsimport React from "react"; import { render } from "react-dom"; render(<h1>Hello, React</h1>, document.getElementById("root"));結果
JSX は HTML ではない
JSXですが、とてもHTMLに近いシンタックスですが、JSのファイルのなので、本来HTMLはかけないし、実際、HTMLではありません。
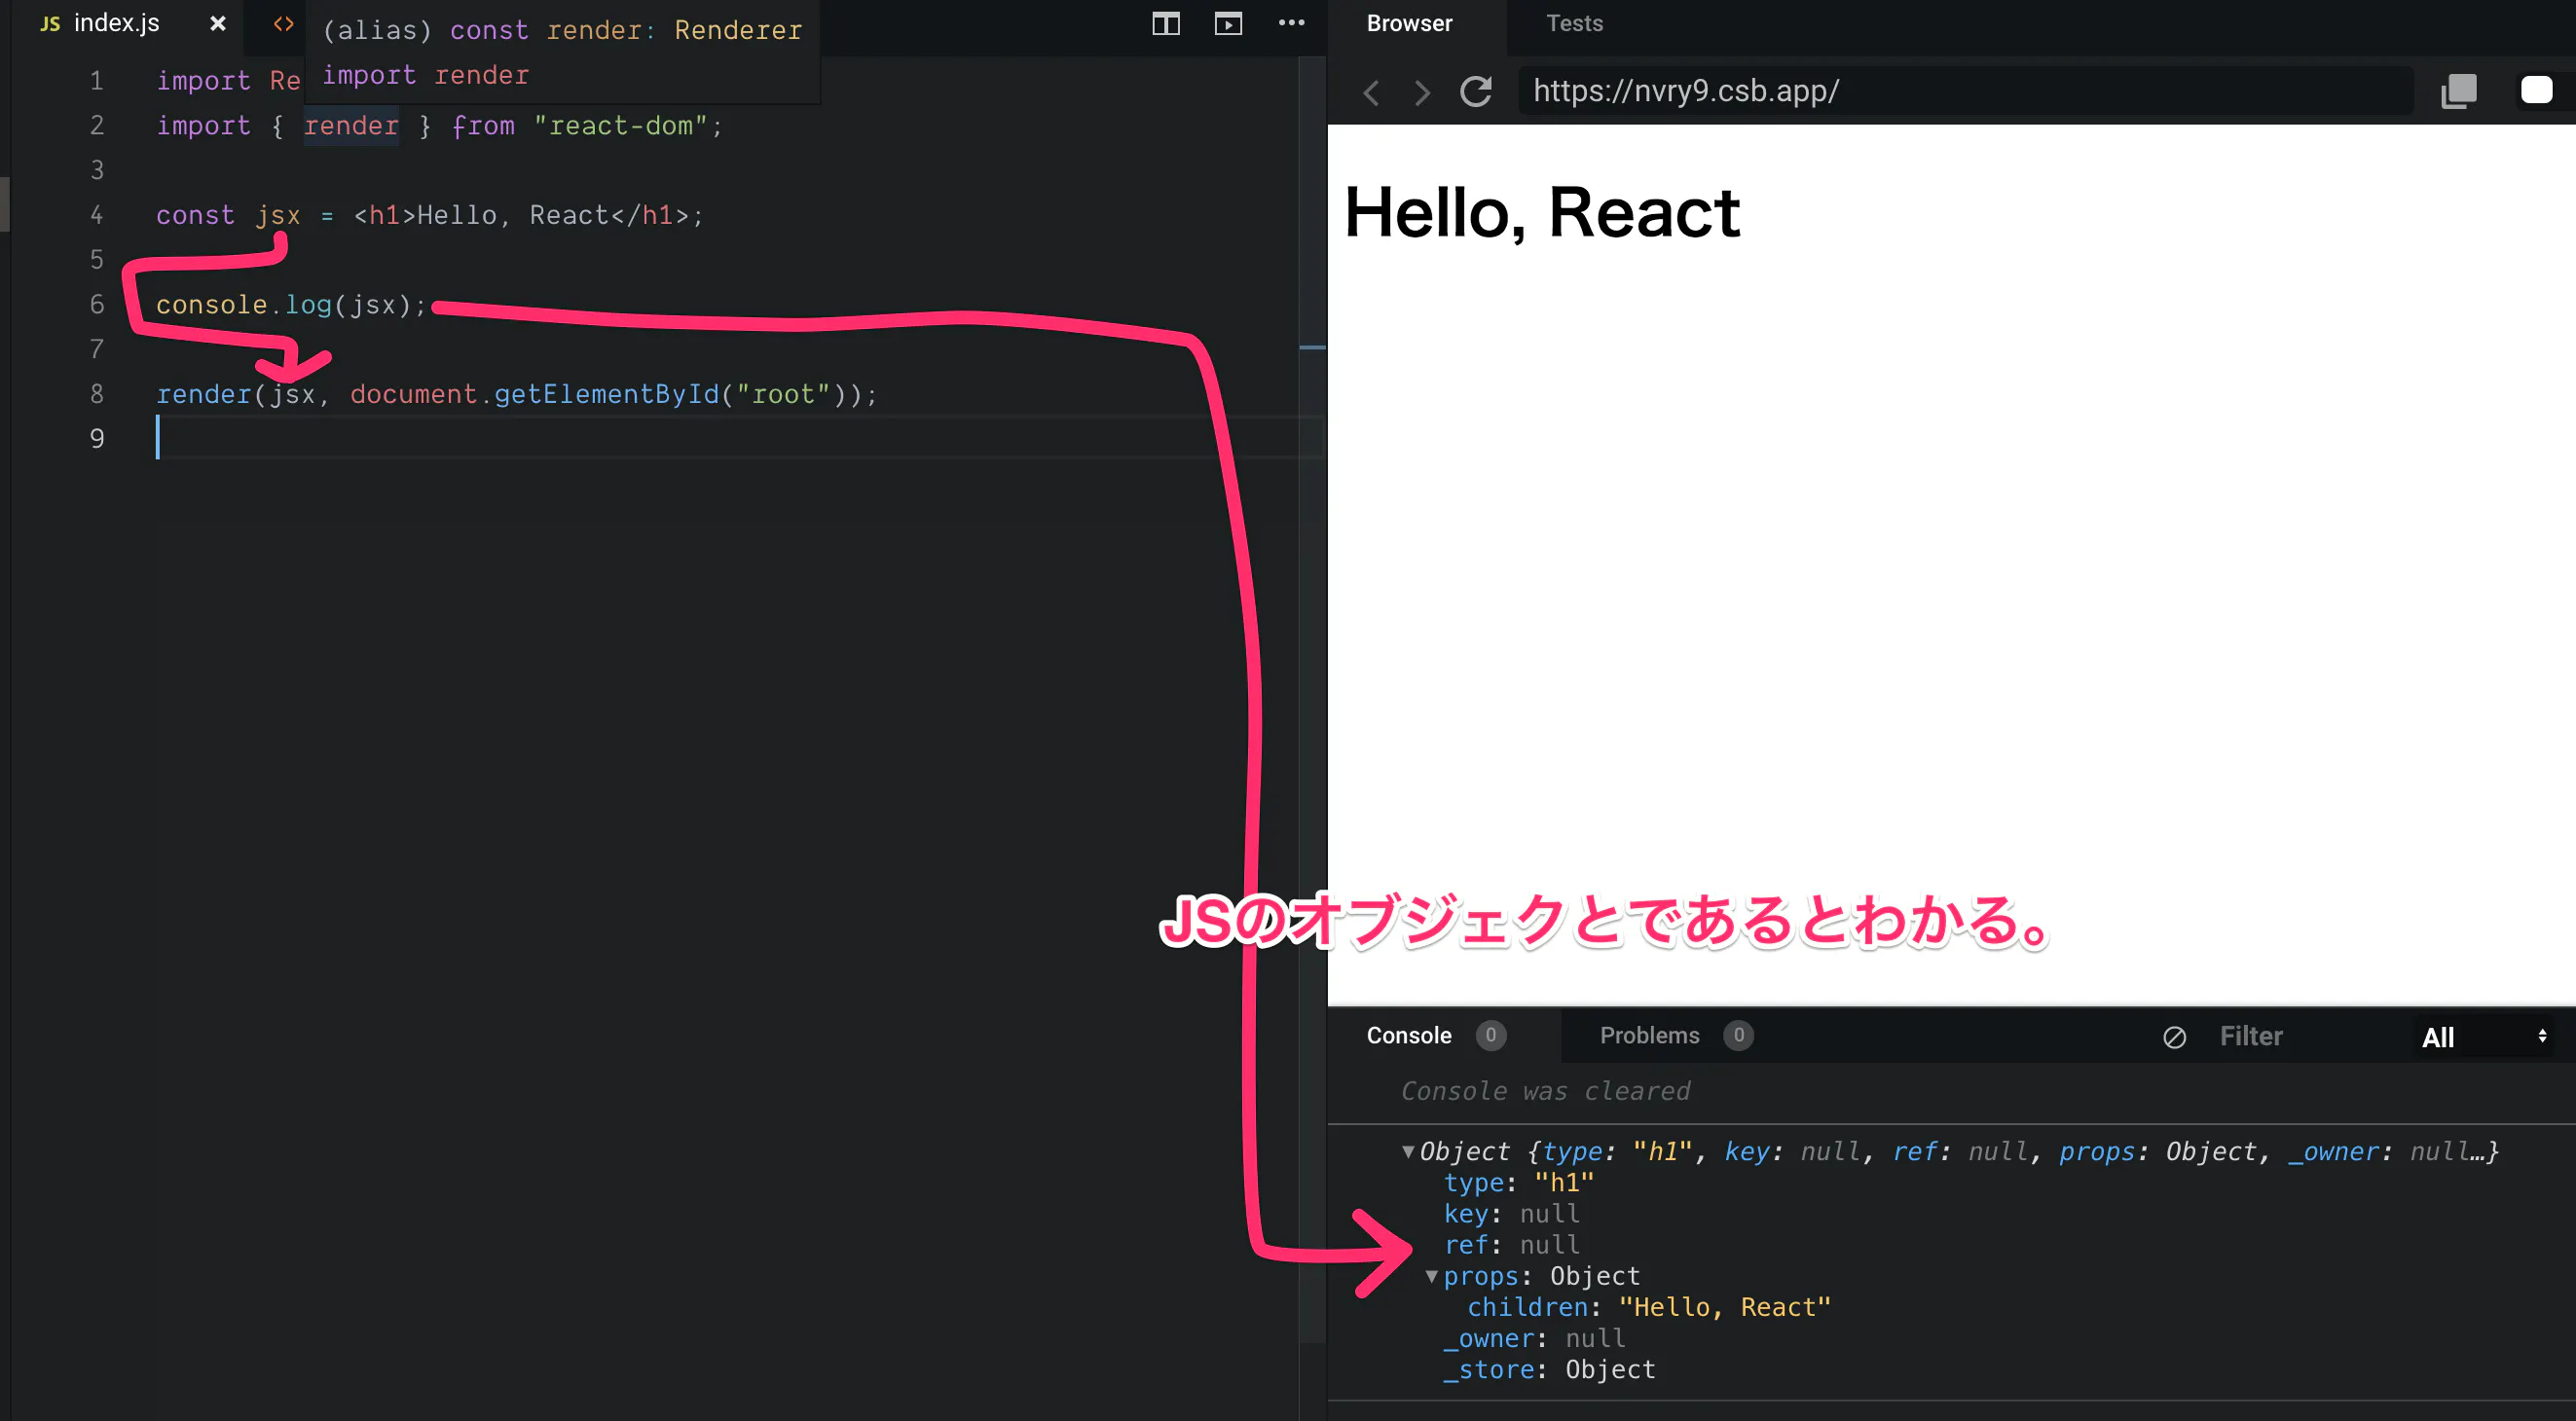
では、なぜwebページにHTMLぽく表示されるのかというと、babelなどの開発環境がJSXをReact Element(JSのオブジェクト)にトランスパイルしてくれているからです。JSのオブジェクトなので、変数代入や、console.logでの表示など、JSの操作が可能になります。JSのオブジェクトになった段階で、
render()メソッドでレンダリングを可能にしています。例えば、JSXを変数(
jsx)に代入して、console.logさせることも可能です。
jsにおけるオブジェクトとは
詳細には記述しませんが、オブジェクトとは、名前をキーにした配列です。Rubyでいうハッシュです。連想配列と言ったりもするJSのデータ型の1つです。
参考
- 改訂新版JavaScript本格入門 ~モダンスタイルによる基礎から現場での応用まで | 山田 祥寛

- 投稿日:2019-08-04T11:16:35+09:00
rails generate react:install実行時のrun() in thread failed: inotify event queue has overflowed対応
現象
rails webpacker:installを実行するとrun() in thread failed: inotify event queue has overflowedと表示される。
app/assets/javascripts/application.jsが作成されない。環境
docker-composeでruby:2.6.3をベースに構築。
対応
方法その1.Dockerの設定を変更する。
環境設定→AdvancedのCPUs,Memory,Swapの値を増加する。
方法その2.コンテナ内のファイル以下の記述を追加しsysctl設定にロードする。
/etc/sysctl.conffs.inotify.max_user_watches = 999999 fs.inotify.max_queued_events = 999999 fs.inotify.max_user_instances = 999999以下のコマンドを実行
sudo sysctl -p補足:以下のエラーが表示される場合、privilegedでコンテナを起動する必要がある。
sysctl: setting key "fs.inotify.max_user_watches": Read-only file systemprivilegedを以下の通り記載してコンテナを起動し、再度コンテナ内でsudo sysctl -pを実行する。
docker-compose.ymlversion: '3' services: web: privileged: true結果
rails generate react:installでエラーが出ず、正しくapp/assets/javascripts/application.jsが作成される!
参考にさせていただいたサイト
https://github.com/guard/listen/wiki/Increasing-the-amount-of-inotify-watchers
https://github.com/guard/rb-inotify/issues/61
https://qiita.com/osamunmun/items/1786aac5904439522d72
- 投稿日:2019-08-04T00:15:07+09:00
create-react-appを使わずコピペ一発でReactの開発環境を整える
環境構築めんどくさすぎる...
Reactの環境構築をcreate-react-appを用いずに行う場合,ターミナルでコマンドと戯れながら環境を作っていくことになります.
また,webpackなどの設定もエディタを開いて逐次編集していく必要があり,まぁまぁ面倒です.
そこで各ファイルの作成と基本的な設定の記述,必要なモジュールのインストールをコピペ一発でできれば便利と思ったので,必要な手順とファイル作成・書き込みの処理を羅列したスクリプトを書きました.以下に筆者の実行環境を記述します.
- macOS Mojave v10.14.5
- node v12.7.0
- npm 6.10.2はじめに
本記事はこちらの記事を非常に参考にさせていただきました.
ショートカットとしてコピペのみで環境構築をするのもアリですが,ゆっくり仕組みを理解するのも大切だと思いますので元記事様をぜひご参照ください.コマンド
以下のスクリプトで基本となる環境構築ができます.
実行する前に,まず作成するアプリケーションの名前を設定してください.
名前を変更しなくても良い方は以下をそのままコピペしてください(testAppという名前で作成されます).ちなみにシェルで変数宣言する際は,'='の前後に空白があると正しく実行できないので注意してください.
APPNAMEを適切に設定したら以下の
APPNAME=testAppより下の行をコピーしてターミナルにペーストしてください.
スクリプトの下に各コマンドの説明があるので,気になる方はまず下からみてみてください.
また記事後方にテストコードもあります.terminal.APPNAME=testApp mkdir $APPNAME cd $APPNAME git init echo "node_modules" > .gitignore npm init -y mkdir src dist npm i -D @babel/core babel-loader @babel/preset-env @babel/preset-react @babel/register echo '{ "presets": [ "@babel/preset-env", "@babel/preset-react" ] }' > .babelrc npm i -D webpack webpack-cli echo "require('@babel/register'); module.exports = require('./development');" > webpack.config.js echo "import path from 'path' import HtmlWebpackPlugin from 'html-webpack-plugin' const src = path.resolve(__dirname, 'src') const dist = path.resolve(__dirname, 'dist') export default { mode: 'development', entry: src + '/index.jsx', output: { path: dist, filename: 'bundle.js' }, module: { rules: [ { test: /\.jsx$/, exclude: /node_modules/, loader: 'babel-loader' } ] }, resolve: { extensions: ['.js', '.jsx'] }, plugins: [ new HtmlWebpackPlugin({ template: src + '/index.html', filename: 'index.html' }) ] } " > development.js npm i -S react react-dom npm i -D webpack-dev-server html-webpack-pluginコマンド解説
最初から解説していきます.
terminal.APPNAME=testApp mkdir $APPNAME cd $APPNAMEこれは特に見る必要ないですね.ディレクトリを作ってそこに移動しているだけです.
terminal.git init echo "node_modules" > .gitignoreここではgitの初期設定を行い,.gitignoreというファイルを作成してそこに'node_modules'を書き込んでいます.
node_modulesをgitにpushすると(容量的に)悲惨なことになるので,初めから書き込んでおくこととします.
terminal.npm init -y mkdir src distここではnpmの初期化を-yオプションをつけて実行しています.
npm initは本来対話的に色々設定してくれるんですが,-yオプションをつけるとそれを全部エンターで飛ばしたのと同じになります.さらにソースコードを格納するsrcディレクトリ,babelでバンドルした結果を格納するdistディレクトリを作成します.
terminal.npm i -D @babel/core babel-loader @babel/preset-env @babel/preset-react @babel/register echo '{ "presets": [ "@babel/preset-env", "@babel/preset-react" ] }' > .babelrcここではまずbabel関連の各種モジュールをインストールします.-D(つまり--save-dev)オプションをつけて,package.jsonに依存関係を記述しています.
その後babelの設定を.babelrcというファイルを作成してそこに書き込みます.terminal.npm i -D webpack webpack-cli echo "require('@babel/register'); module.exports = require('./development');" > webpack.config.jsbabelをインストールできたら,次はwebpackをインストールしていきます.
babelと同様にpackage.jsonに依存関係を記述しつつ,webpack.config.jsに設定を記述します.development.jsに具体的な設定を記述します.
以下がその記述内容です.terminal.echo "import path from 'path' import HtmlWebpackPlugin from 'html-webpack-plugin' const src = path.resolve(__dirname, 'src') const dist = path.resolve(__dirname, 'dist') export default { mode: 'development', entry: src + '/index.jsx', output: { path: dist, filename: 'bundle.js' }, module: { rules: [ { test: /\.jsx$/, exclude: /node_modules/, loader: 'babel-loader' } ] }, resolve: { extensions: ['.js', '.jsx'] }, plugins: [ new HtmlWebpackPlugin({ template: src + '/index.html', filename: 'index.html' }) ] } " > development.js詳しい説明は省きますが,srcディレクトリのindex.jsxとindex.htmlをもとにバンドルされたファイルをbandle.jsとしてdistディレクトリに出力します.
最後に以下のコマンドを実行します.
terminal.npm i -S react react-dom npm i -D webpack-dev-server html-webpack-pluginこのコマンドでreact等をインストールします.
以上で終わりです.
もしエラーが出たときは,node,npmのバージョンを確認してあげてみるなど,エラーメッセージをみながら対応してみてください.
作成後のディレクトリ構成はこんな感じです.
terminal.. ├── development.js ├── dist ├── package-lock.json ├── package.json ├── src └── webpack.config.js動作確認
元記事様のコードを参考に以下のテストコード作成用スクリプトも書きました.
srcディレクトリにindex.htmlとindex.jsxを作成してコードを書き込み,webpackでバンドルします.terminal.echo 'import React from '"'react'"'; import {render} from '"'react-dom'"'; class App extends React.Component { render () { return <p> Hello React!</p>; } } render(<App/>, document.getElementById('"'app'"'));' > src/index.jsx echo '<!DOCTYPE html> <html> <head> <meta charset="utf-8"> <title>React Test</title> </head> <body> <div id="app" /> </body> </html>' > src/index.html ./node_modules/.bin/webpack ./node_modules/.bin/webpack-dev-serverコマンド実行後は
http://localhost:8080/にアクセスすることでローカルサーバー上での動作を確認できます.ちなみに
./node_modules/.bin/webpack
./node_modules/.bin/webpack-dev-server
は
npx webpack
npx webpack-dev-server
でも実行できます.こっちの方が簡潔ですね.
まとめ
元記事様のコードを大いに参考にさせて頂いていますので,ぜひそちらもご覧ください.