- 投稿日:2019-07-09T20:13:02+09:00
g++, clang++ and vscode++ をdockerで(まだエラー中)
docker gcc(g++) and llvm(clang++)
https://qiita.com/kaizen_nagoya/items/059874ea39c4de64c0f7docker and vscode not visual studio code
https://qiita.com/kaizen_nagoya/items/165a281570a8c62ca50ag++
macOS$ docker run -it gcc /bin/bash Unable to find image 'gcc:latest' locally latest: Pulling from library/gcc 6f2f362378c5: Pull complete 494c27a8a6b8: Pull complete 7596bb83081b: Pull complete 372744b62d49: Pull complete 615db220d76c: Pull complete dd1e0ba56aac: Pull complete b4c62fab8fa1: Pull complete df32917a83ac: Pull complete 5100809ee8fa: Pull complete Digest: sha256:f46393c64e0e5a98aff814fec705582a08c3d8067196857910036ed324242ceb Status: Downloaded newer image for gcc:latestclang++/llvm
docker/ubuntu# apt update; apt -y upgrade # apt install clang+ Reading package lists... Done Building dependency tree Reading state information... Done The following additional packages will be installed: binfmt-support clang-3.8 libclang-common-3.8-dev libclang1-3.8 libgc1c2 libjsoncpp1 libllvm3.8 libobjc-6-dev libobjc4 libpipeline1 llvm-3.8 llvm-3.8-dev llvm-3.8-runtime Suggested packages: gnustep gnustep-devel clang-3.8-doc llvm-3.8-doc The following NEW packages will be installed: binfmt-support clang clang-3.8 libclang-common-3.8-dev libclang1-3.8 libgc1c2 libjsoncpp1 libllvm3.8 libobjc-6-dev libobjc4 libpipeline1 llvm-3.8 llvm-3.8-dev llvm-3.8-runtime 0 upgraded, 14 newly installed, 0 to remove and 0 not upgraded. Need to get 58.0 MB of archives.vscode
Ubuntu / DebianにコマンドでVSCode (Visual Studio Code) をインストールする方法
https://www.karelie.net/ubuntu-debian-command-install-vscode/docker/ubuntu# curl https://packages.microsoft.com/keys/microsoft.asc | gpg --dearmor > microsoft.gpg % Total % Received % Xferd Average Speed Time Time Time Current Dload Upload Total Spent Left Speed 100 983 100 983 0 0 1644 0 --:--:-- --:--:-- --:--:-- 1646 # install -o root -g root -m 644 microsoft.gpg /etc/apt/trusted.gpg.d/ root@7a86e7a198a9:/# sh -c 'echo "deb [arch=amd64] https://packages.microsoft.com/repos/vscode stable main" > /etc/apt/sources.list.d/vscode.list' # apt install apt-transport-https # apt update Hit:1 http://security.debian.org/debian-security stretch/updates InRelease Ign:2 http://deb.debian.org/debian stretch InRelease Hit:3 http://deb.debian.org/debian stretch-updates InRelease Hit:4 http://deb.debian.org/debian stretch Release Get:6 https://packages.microsoft.com/repos/vscode stable InRelease [3181 B] Get:7 https://packages.microsoft.com/repos/vscode stable/main amd64 Packages [126 kB] Fetched 129 kB in 0s (131 kB/s) Reading package lists... Done Building dependency tree Reading state information... Done All packages are up to date. # apt install code Reading package lists... Done Building dependency tree Reading state information... Done The following additional packages will be installed: adwaita-icon-theme at-spi2-core dconf-gsettings-backend dconf-service glib-networking glib-networking-common glib-networking-services gsettings-desktop-schemas libatk-bridge2.0-0 libatspi2.0-0 libcolord2 libdconf1 libdrm2 libegl1-mesa libepoxy0 libgbm1 libgtk-3-0 libgtk-3-bin libgtk-3-common libjson-glib-1.0-0 libjson-glib-1.0-common libnotify4 libnspr4 libnss3 libproxy1v5 librest-0.7-0 libsecret-1-0 libsecret-common libsoup-gnome2.4-1 libsoup2.4-1 libwayland-client0 libwayland-cursor0 libwayland-egl1-mesa libwayland-server0 libx11-xcb1 libxcb-dri2-0 libxcb-dri3-0 libxcb-present0 libxcb-sync1 libxcb-xfixes0 libxkbcommon0 libxkbfile1 libxshmfence1 libxss1 libxtst6 notification-daemon xkb-data Suggested packages: colord gvfs The following NEW packages will be installed: adwaita-icon-theme at-spi2-core code dconf-gsettings-backend dconf-service glib-networking glib-networking-common glib-networking-services gsettings-desktop-schemas libatk-bridge2.0-0 libatspi2.0-0 libcolord2 libdconf1 libdrm2 libegl1-mesa libepoxy0 libgbm1 libgtk-3-0 libgtk-3-bin libgtk-3-common libjson-glib-1.0-0 libjson-glib-1.0-common libnotify4 libnspr4 libnss3 libproxy1v5 librest-0.7-0 libsecret-1-0 libsecret-common libsoup-gnome2.4-1 libsoup2.4-1 libwayland-client0 libwayland-cursor0 libwayland-egl1-mesa libwayland-server0 libx11-xcb1 libxcb-dri2-0 libxcb-dri3-0 libxcb-present0 libxcb-sync1 libxcb-xfixes0 libxkbcommon0 libxkbfile1 libxshmfence1 libxss1 libxtst6 notification-daemon xkb-data 0 upgraded, 48 newly installed, 0 to remove and 0 not upgraded. Need to get 77.3 MB of archives.Effective ModernC++をclang++, g++でコンパイルしてみる
https://qiita.com/kaizen_nagoya/items/2fafaf28782d192e237e# apt install vim sudo cmake wget # wget https://github.com/BartVandewoestyne/Effective-Modern-Cpp/archive/master.zip # unzip msdyrt.xip # cd Effective-Modern-Cpp-master # cmake CMakeLists.txt -- The C compiler identification is GNU 9.1.0 -- The CXX compiler identification is Clang 3.8.1 -- Check for working C compiler: /usr/bin/cc -- Check for working C compiler: /usr/bin/cc -- works -- Detecting C compiler ABI info -- Detecting C compiler ABI info - done -- Detecting C compile features -- Detecting C compile features - done -- Check for working CXX compiler: /usr/bin/c++ -- Check for working CXX compiler: /usr/bin/c++ -- works -- Detecting CXX compiler ABI info -- Detecting CXX compiler ABI info - done -- Detecting CXX compile features -- Detecting CXX compile features - done -- Looking for pthread.h -- Looking for pthread.h - found -- Looking for pthread_create -- Looking for pthread_create - not found -- Looking for pthread_create in pthreads -- Looking for pthread_create in pthreads - not found -- Looking for pthread_create in pthread -- Looking for pthread_create in pthread - found -- Found Threads: TRUE CMake Error at /usr/share/cmake-3.7/Modules/FindBoost.cmake:1831 (message): Unable to find the requested Boost libraries. Unable to find the Boost header files. Please set BOOST_ROOT to the root directory containing Boost or BOOST_INCLUDEDIR to the directory containing Boost's headers. Call Stack (most recent call first): Item04_Know_how_to_view_deduced_types/CMakeLists.txt:8 (find_package) CMake Error: The following variables are used in this project, but they are set to NOTFOUND. Please set them or make sure they are set and tested correctly in the CMake files: Boost_INCLUDE_DIR (ADVANCED) used as include directory in directory /tmp/Effective-Modern-Cpp-master/Item04_Know_how_to_view_deduced_types used as include directory in directory /tmp/Effective-Modern-Cpp-master/Item04_Know_how_to_view_deduced_types used as include directory in directory /tmp/Effective-Modern-Cpp-master/Item04_Know_how_to_view_deduced_types used as include directory in directory /tmp/Effective-Modern-Cpp-master/Item04_Know_how_to_view_deduced_types used as include directory in directory /tmp/Effective-Modern-Cpp-master/Item04_Know_how_to_view_deduced_types used as include directory in directory /tmp/Effective-Modern-Cpp-master/Item04_Know_how_to_view_deduced_types -- Configuring incomplete, errors occurred! See also "/tmp/Effective-Modern-Cpp-master/CMakeFiles/CMakeOutput.log". See also "/tmp/Effective-Modern-Cpp-master/CMakeFiles/CMakeError.log".原因調査中。
ubuntu/docker# code -h You are trying to start vscode as a super user which is not recommended. If you really want to, you must specify an alternate user data directory using the --user-data-dir argument. # code --user-data-dir /tmp /usr/share/code/bin/../code: error while loading shared libraries: libasound.so.2: cannot open shared object file: No such file or directory
- 投稿日:2019-07-09T20:13:02+09:00
g++, clang++ and vscode++
docker gcc(g++) and llvm(clang++)
https://qiita.com/kaizen_nagoya/items/059874ea39c4de64c0f7docker and vscode not visual studio code
https://qiita.com/kaizen_nagoya/items/165a281570a8c62ca50aUbuntu / DebianにコマンドでVSCode (Visual Studio Code) をインストールする方法
https://www.karelie.net/ubuntu-debian-command-install-vscode/macOS$ docker run -it gcc /bin/bash Unable to find image 'gcc:latest' locally latest: Pulling from library/gcc 6f2f362378c5: Pull complete 494c27a8a6b8: Pull complete 7596bb83081b: Pull complete 372744b62d49: Pull complete 615db220d76c: Pull complete dd1e0ba56aac: Pull complete b4c62fab8fa1: Pull complete df32917a83ac: Pull complete 5100809ee8fa: Pull complete Digest: sha256:f46393c64e0e5a98aff814fec705582a08c3d8067196857910036ed324242ceb Status: Downloaded newer image for gcc:latestdocker/ubuntu# apt update; apt -y upgrade # apt install clang+ Reading package lists... Done Building dependency tree Reading state information... Done The following additional packages will be installed: binfmt-support clang-3.8 libclang-common-3.8-dev libclang1-3.8 libgc1c2 libjsoncpp1 libllvm3.8 libobjc-6-dev libobjc4 libpipeline1 llvm-3.8 llvm-3.8-dev llvm-3.8-runtime Suggested packages: gnustep gnustep-devel clang-3.8-doc llvm-3.8-doc The following NEW packages will be installed: binfmt-support clang clang-3.8 libclang-common-3.8-dev libclang1-3.8 libgc1c2 libjsoncpp1 libllvm3.8 libobjc-6-dev libobjc4 libpipeline1 llvm-3.8 llvm-3.8-dev llvm-3.8-runtime 0 upgraded, 14 newly installed, 0 to remove and 0 not upgraded. Need to get 58.0 MB of archives. # curl https://packages.microsoft.com/keys/microsoft.asc | gpg --dearmor > microsoft.gpg % Total % Received % Xferd Average Speed Time Time Time Current Dload Upload Total Spent Left Speed 100 983 100 983 0 0 1644 0 --:--:-- --:--:-- --:--:-- 1646 # install -o root -g root -m 644 microsoft.gpg /etc/apt/trusted.gpg.d/ root@7a86e7a198a9:/# sh -c 'echo "deb [arch=amd64] https://packages.microsoft.com/repos/vscode stable main" > /etc/apt/sources.list.d/vscode.list' # apt install apt-transport-https # apt update Hit:1 http://security.debian.org/debian-security stretch/updates InRelease Ign:2 http://deb.debian.org/debian stretch InRelease Hit:3 http://deb.debian.org/debian stretch-updates InRelease Hit:4 http://deb.debian.org/debian stretch Release Get:6 https://packages.microsoft.com/repos/vscode stable InRelease [3181 B] Get:7 https://packages.microsoft.com/repos/vscode stable/main amd64 Packages [126 kB] Fetched 129 kB in 0s (131 kB/s) Reading package lists... Done Building dependency tree Reading state information... Done All packages are up to date. # apt install code Reading package lists... Done Building dependency tree Reading state information... Done The following additional packages will be installed: adwaita-icon-theme at-spi2-core dconf-gsettings-backend dconf-service glib-networking glib-networking-common glib-networking-services gsettings-desktop-schemas libatk-bridge2.0-0 libatspi2.0-0 libcolord2 libdconf1 libdrm2 libegl1-mesa libepoxy0 libgbm1 libgtk-3-0 libgtk-3-bin libgtk-3-common libjson-glib-1.0-0 libjson-glib-1.0-common libnotify4 libnspr4 libnss3 libproxy1v5 librest-0.7-0 libsecret-1-0 libsecret-common libsoup-gnome2.4-1 libsoup2.4-1 libwayland-client0 libwayland-cursor0 libwayland-egl1-mesa libwayland-server0 libx11-xcb1 libxcb-dri2-0 libxcb-dri3-0 libxcb-present0 libxcb-sync1 libxcb-xfixes0 libxkbcommon0 libxkbfile1 libxshmfence1 libxss1 libxtst6 notification-daemon xkb-data Suggested packages: colord gvfs The following NEW packages will be installed: adwaita-icon-theme at-spi2-core code dconf-gsettings-backend dconf-service glib-networking glib-networking-common glib-networking-services gsettings-desktop-schemas libatk-bridge2.0-0 libatspi2.0-0 libcolord2 libdconf1 libdrm2 libegl1-mesa libepoxy0 libgbm1 libgtk-3-0 libgtk-3-bin libgtk-3-common libjson-glib-1.0-0 libjson-glib-1.0-common libnotify4 libnspr4 libnss3 libproxy1v5 librest-0.7-0 libsecret-1-0 libsecret-common libsoup-gnome2.4-1 libsoup2.4-1 libwayland-client0 libwayland-cursor0 libwayland-egl1-mesa libwayland-server0 libx11-xcb1 libxcb-dri2-0 libxcb-dri3-0 libxcb-present0 libxcb-sync1 libxcb-xfixes0 libxkbcommon0 libxkbfile1 libxshmfence1 libxss1 libxtst6 notification-daemon xkb-data 0 upgraded, 48 newly installed, 0 to remove and 0 not upgraded. Need to get 77.3 MB of archives.# apt install vim sudo cmake wget # wget https://github.com/BartVandewoestyne/Effective-Modern-Cpp/archive/master.zip # unzip msdyrt.xip # cd Effective-Modern-Cpp-master # cmake CMakeLists.txt -- The C compiler identification is GNU 9.1.0 -- The CXX compiler identification is Clang 3.8.1 -- Check for working C compiler: /usr/bin/cc -- Check for working C compiler: /usr/bin/cc -- works -- Detecting C compiler ABI info -- Detecting C compiler ABI info - done -- Detecting C compile features -- Detecting C compile features - done -- Check for working CXX compiler: /usr/bin/c++ -- Check for working CXX compiler: /usr/bin/c++ -- works -- Detecting CXX compiler ABI info -- Detecting CXX compiler ABI info - done -- Detecting CXX compile features -- Detecting CXX compile features - done -- Looking for pthread.h -- Looking for pthread.h - found -- Looking for pthread_create -- Looking for pthread_create - not found -- Looking for pthread_create in pthreads -- Looking for pthread_create in pthreads - not found -- Looking for pthread_create in pthread -- Looking for pthread_create in pthread - found -- Found Threads: TRUE CMake Error at /usr/share/cmake-3.7/Modules/FindBoost.cmake:1831 (message): Unable to find the requested Boost libraries. Unable to find the Boost header files. Please set BOOST_ROOT to the root directory containing Boost or BOOST_INCLUDEDIR to the directory containing Boost's headers. Call Stack (most recent call first): Item04_Know_how_to_view_deduced_types/CMakeLists.txt:8 (find_package) CMake Error: The following variables are used in this project, but they are set to NOTFOUND. Please set them or make sure they are set and tested correctly in the CMake files: Boost_INCLUDE_DIR (ADVANCED) used as include directory in directory /tmp/Effective-Modern-Cpp-master/Item04_Know_how_to_view_deduced_types used as include directory in directory /tmp/Effective-Modern-Cpp-master/Item04_Know_how_to_view_deduced_types used as include directory in directory /tmp/Effective-Modern-Cpp-master/Item04_Know_how_to_view_deduced_types used as include directory in directory /tmp/Effective-Modern-Cpp-master/Item04_Know_how_to_view_deduced_types used as include directory in directory /tmp/Effective-Modern-Cpp-master/Item04_Know_how_to_view_deduced_types used as include directory in directory /tmp/Effective-Modern-Cpp-master/Item04_Know_how_to_view_deduced_types -- Configuring incomplete, errors occurred! See also "/tmp/Effective-Modern-Cpp-master/CMakeFiles/CMakeOutput.log". See also "/tmp/Effective-Modern-Cpp-master/CMakeFiles/CMakeError.log".
- 投稿日:2019-07-09T20:13:02+09:00
g++, clang++ and vscode++ をdockerで
docker gcc(g++) and llvm(clang++)
https://qiita.com/kaizen_nagoya/items/059874ea39c4de64c0f7docker and vscode not visual studio code
https://qiita.com/kaizen_nagoya/items/165a281570a8c62ca50ag++
macOS$ docker run -it gcc /bin/bash Unable to find image 'gcc:latest' locally latest: Pulling from library/gcc 6f2f362378c5: Pull complete 494c27a8a6b8: Pull complete 7596bb83081b: Pull complete 372744b62d49: Pull complete 615db220d76c: Pull complete dd1e0ba56aac: Pull complete b4c62fab8fa1: Pull complete df32917a83ac: Pull complete 5100809ee8fa: Pull complete Digest: sha256:f46393c64e0e5a98aff814fec705582a08c3d8067196857910036ed324242ceb Status: Downloaded newer image for gcc:latestclang++/llvm
docker/ubuntu# apt update; apt -y upgrade # apt install clang+ Reading package lists... Done Building dependency tree Reading state information... Done The following additional packages will be installed: binfmt-support clang-3.8 libclang-common-3.8-dev libclang1-3.8 libgc1c2 libjsoncpp1 libllvm3.8 libobjc-6-dev libobjc4 libpipeline1 llvm-3.8 llvm-3.8-dev llvm-3.8-runtime Suggested packages: gnustep gnustep-devel clang-3.8-doc llvm-3.8-doc The following NEW packages will be installed: binfmt-support clang clang-3.8 libclang-common-3.8-dev libclang1-3.8 libgc1c2 libjsoncpp1 libllvm3.8 libobjc-6-dev libobjc4 libpipeline1 llvm-3.8 llvm-3.8-dev llvm-3.8-runtime 0 upgraded, 14 newly installed, 0 to remove and 0 not upgraded. Need to get 58.0 MB of archives.vscode
Ubuntu / DebianにコマンドでVSCode (Visual Studio Code) をインストールする方法
https://www.karelie.net/ubuntu-debian-command-install-vscode/docker/ubuntu# curl https://packages.microsoft.com/keys/microsoft.asc | gpg --dearmor > microsoft.gpg % Total % Received % Xferd Average Speed Time Time Time Current Dload Upload Total Spent Left Speed 100 983 100 983 0 0 1644 0 --:--:-- --:--:-- --:--:-- 1646 # install -o root -g root -m 644 microsoft.gpg /etc/apt/trusted.gpg.d/ root@7a86e7a198a9:/# sh -c 'echo "deb [arch=amd64] https://packages.microsoft.com/repos/vscode stable main" > /etc/apt/sources.list.d/vscode.list' # apt install apt-transport-https # apt update Hit:1 http://security.debian.org/debian-security stretch/updates InRelease Ign:2 http://deb.debian.org/debian stretch InRelease Hit:3 http://deb.debian.org/debian stretch-updates InRelease Hit:4 http://deb.debian.org/debian stretch Release Get:6 https://packages.microsoft.com/repos/vscode stable InRelease [3181 B] Get:7 https://packages.microsoft.com/repos/vscode stable/main amd64 Packages [126 kB] Fetched 129 kB in 0s (131 kB/s) Reading package lists... Done Building dependency tree Reading state information... Done All packages are up to date. # apt install code Reading package lists... Done Building dependency tree Reading state information... Done The following additional packages will be installed: adwaita-icon-theme at-spi2-core dconf-gsettings-backend dconf-service glib-networking glib-networking-common glib-networking-services gsettings-desktop-schemas libatk-bridge2.0-0 libatspi2.0-0 libcolord2 libdconf1 libdrm2 libegl1-mesa libepoxy0 libgbm1 libgtk-3-0 libgtk-3-bin libgtk-3-common libjson-glib-1.0-0 libjson-glib-1.0-common libnotify4 libnspr4 libnss3 libproxy1v5 librest-0.7-0 libsecret-1-0 libsecret-common libsoup-gnome2.4-1 libsoup2.4-1 libwayland-client0 libwayland-cursor0 libwayland-egl1-mesa libwayland-server0 libx11-xcb1 libxcb-dri2-0 libxcb-dri3-0 libxcb-present0 libxcb-sync1 libxcb-xfixes0 libxkbcommon0 libxkbfile1 libxshmfence1 libxss1 libxtst6 notification-daemon xkb-data Suggested packages: colord gvfs The following NEW packages will be installed: adwaita-icon-theme at-spi2-core code dconf-gsettings-backend dconf-service glib-networking glib-networking-common glib-networking-services gsettings-desktop-schemas libatk-bridge2.0-0 libatspi2.0-0 libcolord2 libdconf1 libdrm2 libegl1-mesa libepoxy0 libgbm1 libgtk-3-0 libgtk-3-bin libgtk-3-common libjson-glib-1.0-0 libjson-glib-1.0-common libnotify4 libnspr4 libnss3 libproxy1v5 librest-0.7-0 libsecret-1-0 libsecret-common libsoup-gnome2.4-1 libsoup2.4-1 libwayland-client0 libwayland-cursor0 libwayland-egl1-mesa libwayland-server0 libx11-xcb1 libxcb-dri2-0 libxcb-dri3-0 libxcb-present0 libxcb-sync1 libxcb-xfixes0 libxkbcommon0 libxkbfile1 libxshmfence1 libxss1 libxtst6 notification-daemon xkb-data 0 upgraded, 48 newly installed, 0 to remove and 0 not upgraded. Need to get 77.3 MB of archives.Effective ModernC++をclang++, g++でコンパイルしてみる
https://qiita.com/kaizen_nagoya/items/2fafaf28782d192e237e# apt install vim sudo cmake wget # wget https://github.com/BartVandewoestyne/Effective-Modern-Cpp/archive/master.zip # unzip msdyrt.xip # cd Effective-Modern-Cpp-master # cmake CMakeLists.txt -- The C compiler identification is GNU 9.1.0 -- The CXX compiler identification is Clang 3.8.1 -- Check for working C compiler: /usr/bin/cc -- Check for working C compiler: /usr/bin/cc -- works -- Detecting C compiler ABI info -- Detecting C compiler ABI info - done -- Detecting C compile features -- Detecting C compile features - done -- Check for working CXX compiler: /usr/bin/c++ -- Check for working CXX compiler: /usr/bin/c++ -- works -- Detecting CXX compiler ABI info -- Detecting CXX compiler ABI info - done -- Detecting CXX compile features -- Detecting CXX compile features - done -- Looking for pthread.h -- Looking for pthread.h - found -- Looking for pthread_create -- Looking for pthread_create - not found -- Looking for pthread_create in pthreads -- Looking for pthread_create in pthreads - not found -- Looking for pthread_create in pthread -- Looking for pthread_create in pthread - found -- Found Threads: TRUE CMake Error at /usr/share/cmake-3.7/Modules/FindBoost.cmake:1831 (message): Unable to find the requested Boost libraries. Unable to find the Boost header files. Please set BOOST_ROOT to the root directory containing Boost or BOOST_INCLUDEDIR to the directory containing Boost's headers. Call Stack (most recent call first): Item04_Know_how_to_view_deduced_types/CMakeLists.txt:8 (find_package) CMake Error: The following variables are used in this project, but they are set to NOTFOUND. Please set them or make sure they are set and tested correctly in the CMake files: Boost_INCLUDE_DIR (ADVANCED) used as include directory in directory /tmp/Effective-Modern-Cpp-master/Item04_Know_how_to_view_deduced_types used as include directory in directory /tmp/Effective-Modern-Cpp-master/Item04_Know_how_to_view_deduced_types used as include directory in directory /tmp/Effective-Modern-Cpp-master/Item04_Know_how_to_view_deduced_types used as include directory in directory /tmp/Effective-Modern-Cpp-master/Item04_Know_how_to_view_deduced_types used as include directory in directory /tmp/Effective-Modern-Cpp-master/Item04_Know_how_to_view_deduced_types used as include directory in directory /tmp/Effective-Modern-Cpp-master/Item04_Know_how_to_view_deduced_types -- Configuring incomplete, errors occurred! See also "/tmp/Effective-Modern-Cpp-master/CMakeFiles/CMakeOutput.log". See also "/tmp/Effective-Modern-Cpp-master/CMakeFiles/CMakeError.log".原因調査中。
ubuntu/docker# code -h You are trying to start vscode as a super user which is not recommended. If you really want to, you must specify an alternate user data directory using the --user-data-dir argument. # code --user-data-dir /tmp /usr/share/code/bin/../code: error while loading shared libraries: libasound.so.2: cannot open shared object file: No such file or directory
- 投稿日:2019-07-09T20:07:10+09:00
LaradockでLaravel環境構築【手順書】
はじめに
laradockでlaravel環境を作る手順書です。
単純に動かすだけの手順でなく、下記点を含んでいます。
- laradockで2つ目の環境を構築する時に困らないための設定事項
- 設定しておくと開発時に多少楽になるための設定事項
- 嵌った点の備忘録
前提環境
- docker-composeが使用できること
- windowsの場合Windows10 Proであること
- docker-composeがインストールされていること
- ターミナルを使用できること
- windowsの場合gitbashやpower shell推奨
- 海外のCDNサーバにブロックされていたりしないこと
- 短期間に環境を作りまくったせいか一部サーバに一時的にブロックされたことがあります
- この場合ネットワークを変えることで解決したりします(ポケットwifi等)
- 2018年以前に取得したlaradockを使用しないこと
- laradockの使用しているdocker-compose.ymlがv2である可能性があります
完成形
サーバ構成
- nginx
- + php-fpm
- mysql
- redis
- APサーバ(workspace)
ディレクトリ構成
laradockとプロジェクトディレクトリ(laravel)を同階層に置く想定です
my_project
├── laravel
│   ├── app
│   ├── bootstrap
│   ├── config
│   └ ...
└── laradock
    ├── adminer
    ├── aerospike
    └ ...
手順
- laradock取得
- laradockの設定ファイル修正
- laradockビルド・アクセス
- laravelインストール・yarnインストール
- laravel設定ファイル修正
- ブラウザアクセス
1.laradock取得
適当な場所にプロジェクト用ディレクトリを作成し、laradockをダウンロード
mkdir ~/my_project
cd ~/my_project
git clone https://github.com/Laradock/laradock.git
2.laradockの設定ファイル修正
- 設定ファイルの作成
- .env作成
- createdb.sql作成
cd ./laradock
cp -a ./env-example ./.env
cp -a ./mysql/docker-entrypoint-initdb.d/createdb.sql.example ./mysql/docker-entrypoint-initdb.d/createdb.sql
- 下記ファイルを修正
.env+ APP_CODE_PATH_HOST=../laravel/ - APP_CODE_PATH_HOST=../ + APP_CODE_PATH_CONTAINER=/var/www/laravel/ - APP_CODE_PATH_CONTAINER=/var/www/ //mysql等のデータ本体の置き場所。これを修正しておかないと未来で困る。 + DATA_PATH_HOST=~/.laradock/my_project/data - DATA_PATH_HOST=~/.laradock/data //コンテナ区別用prefix。これを修正しておかないと未来で困る。 + COMPOSE_PROJECT_NAME=my_project-laradock - COMPOSE_PROJECT_NAME=laradock + PHP_VERSION=7.3 - PHP_VERSION=7.2 //laravelがmysql8.0を使うにはユーザ設定に追加で修正が必要なため5系を指定 + MYSQL_VERSION=5.7 - MYSQL_VERSION=latest/nginx/sites/default.conf+ server_name dev.my_project.com; - server_name localhost; + root /var/www/laravel/public; - root /var/www/public;/mysql/docker-entrypoint-initdb.d/createdb.sql+ CREATE DATABASE IF NOT EXISTS `project_db` COLLATE 'utf8_general_ci' ; + GRANT ALL ON `project_db`.* TO 'default'@'%' ; - #CREATE DATABASE IF NOT EXISTS `dev_db_1` COLLATE 'utf8_general_ci' ; - #GRANT ALL ON `dev_db_1`.* TO 'default'@'%' ; // テスト用DB作成(ユーザは使いまわす想定) + CREATE DATABASE IF NOT EXISTS `test` COLLATE 'utf8_general_ci' ; + GRANT ALL ON `test`.* TO 'default'@'%' ; - #CREATE DATABASE IF NOT EXISTS `dev_db_2` COLLATE 'utf8_general_ci' ; - #GRANT ALL ON `dev_db_2`.* TO 'default'@'%' ;3. laradockビルド・アクセス
下記コマンドを実行し、サーバを構築・ビルド
cd ~/my_project/laradock
docker-compose build workspace nginx mysql redis
docker-compose up -d nginx mysql redis
下記コマンドでworkspaceサーバへアクセス
docker-compose exec --user=laradock workspace bash4. laravelインストール・yarnインストール
workspaceサーバ内で下記コマンド実行
laradock@~~~~:/var/www$ composer create-project laravel/laravel --prefer-dist
laradock@~~~~:/var/www$ cd laravel
laradock@~~~~:/var/www/laravel$ yarn install
5. laravel設定ファイル修正
.envを修正
.env+ DB_HOST=mysql - DB_HOST=127.0.0.1 + DB_DATABASE=project_db - DB_DATABASE=default + DB_USERNAME=default - DB_USERNAME=homestead6. ブラウザアクセス
hostsの修正
windowsの場合
メモ帳を管理者で実行し、下記ファイルを修正
C\Windows\System32\drivers\etc\hosts+ 127.0.0.1 dev.my_project.commacの場合
/private/etc/hosts+ 127.0.0.1 dev.my_project.com
ブラウザアクセス
ブラウザを開き、http://dev.my_project.com へアクセス
laravelが表示されていれば完了です!
おまけ
ありがちな失敗
docker-compose buildに失敗する
npm ERR! code EAI_AGAIN
npm ERR! errno EAI_AGAIN
上記のようなエラーが発生した場合、時間をおいて再ビルドすれば直ることがあります。
docker-compose up時にmysqlが起動しない
既にlaradockでプロジェクトを立ち上げたことがある場合、
そのプロジェクトとDATA_PATH_HOSTの場所被った場合立ち上げに失敗します。DATA_PATH_HOSTを変えビルドしなおし(docker-compose build --no-cache mysql)をしたり、
既存のDATA_PATH_HOSTの中身を削除したりしてみてください。
(削除して大丈夫かはご自身でご判断ください)docker-compose upが全体的に失敗する
過去にdocker等で仮想イメージを作ったことがある場合、
既存のものとポートが被ったりすることが多々あります。workspace, nginx, mysql, redisのポートをずらしたりdockerを再起動したりビルドしなおしたり色々試してください。
*特に2018年までのlaradockにはCOMPOSE_PROJECT_NAMEの設定が無いため、コンテナ名が被りますmysqlを誤って8.0で作成してしまった
laravelは最新版でもmysql8.0標準の暗号化方法(caching_sha2_password)をサポートしていません。(2019/6/28現在)
mysql8.0を作成してしまい、そこで作ってしまったユーザでログインしたい場合、
下記のようなsqlによりパスワード設定を更新してください。ユーザ:'default'を、パスワード:'secret'で更新
ALTER USER 'default' IDENTIFIED WITH mysql_native_password BY 'secret';Q.A
php5.4は使えないのか?
使えません。5.6以上となります。
windows10 homeでは使えないのか?
現在のところ使えません。
どうしても使いたい人はWSL2でググると道があります。DBにつながるか確認したい
workspace内で下記コマンド打てばテーブル作成処理が走るので、試してみるといいと思います。
$ cd /var/www/laravel/
$ php artisan migrate
成功後は下記コマンドでだいたい元通りにできます
$ php artisan migrate:rollback
- 投稿日:2019-07-09T17:08:27+09:00
RubyMine / Docker for Windows: docker-compose上で作ったrbenvのRuby環境をうまくロードできないトラブル 2019-07版
問題
- Windows 10 Pro
- RubyMine 2019.1
- docker-compose (Docker for Windows)
にて、Dockerコンテナ上でrbenvを使って作ったRuby環境を、RubyMineがうまくロードしてくれない。
解決方法を簡潔に
RubyMine 2019.2以降をインストールする。
ただし現状(2019-07-09)では Early Access Program (EAP) の段階なので、EAPのRubyMineを入れる。
※ 正式に2019.2以降がリリースされたときは、そちらをインストールしてください!(要ライセンス購入 or 試用)
前提
- ホスト
- Windows 10 Pro 10.0.18362
- Docker for Windows Community 2.0.0.3
- docker-composeを使用
- RubyMine
2019.12019.2
- これをバージョンアップする
- コンテナ
- Dockerイメージ:
centos:7
- docker-compose経由でDockerイメージを作成
Dockerfile
FROM centos:7

ENV APP_PATH /app
WORKDIR ${APP_PATH}

ENV ruby_ver="2.6.3"

ENV RBENV_ROOT="/usr/local/rbenv"
ENV RBENV_SH="/etc/profile.d/rbenv.sh"
ENV CONFIGURE_OPTS="--disable-install-doc"
ENV PATH="${RBENV_ROOT}/bin:${PATH}"

# 日本語表示を正しくする (lessとRuby向け)
ENV LESSCHARSET="utf-8"
ENV LANG="en_US.UTF-8"

# yum (EPEL): ビルドに必要なライブラリをインストール
RUN set -x && \
    yum -y update && \
    yum -y install epel-release && \
    yum -y install \
        autoconf \
        bzip2 \
        curl \
        gcc-c++ \
        git \
        glibc-headers \
        libyaml-devel \
        make \
        openssl-devel \
        readline \
        readline-devel \
        sqlite-devel \
        zlib \
        zlib-devel \
    && \
    yum -y install less which && \
    yum clean all

# Ruby (rbenv) のインストール
RUN set -x && \
    git clone https://github.com/sstephenson/rbenv.git /usr/local/rbenv && \
    git clone https://github.com/sstephenson/ruby-build.git /usr/local/rbenv/plugins/ruby-build && \
    echo 'eval "$(rbenv init --no-rehash -)"'  > ${RBENV_SH} && \
    source ${RBENV_SH} && \
    rbenv install ${ruby_ver} && \
    rbenv global ${ruby_ver}

# Ruby: Bundlerで必要なGemをインストール
COPY Gemfile ${APP_PATH}
COPY Gemfile.lock ${APP_PATH}
RUN set -x && \
    source /etc/profile.d/rbenv.sh && \
    rbenv exec gem install bundler && \
    bundle install

# その他、Rubyと関係ないインストールをここに書いている

VOLUME [ ${APP_PATH} ]
やったこと
- Early Access Program (EAP) からRubyMine 2019.2をダウンロードしインストールする
- Dockerfile中で
whichコマンドをインストールする:
yum -y install which- RubyMineがRubyのパスを検索するときにwhichを使う?
- RubyMineでDockerを設定する
- ポップアップが出るので、指示に従えばOK
- RubyMineのSettings
- Languages & Frameworks -> Ruby SDK and Gems
- 「+」→「New Remote...」をクリックする→ダイアログが表示される
- Configure Remote Ruby Interpreter ダイアログ
- 「Docker Compose」を選択
- Server: 既に設定したDockerの項目を選ぶ
- Service: docker-compose.ymlに書いたサービス名
- Ruby or version manager path (次に説明)
Ruby or version manager path
この項目は重要です。
動いた例
/usr/local/rbenv/bin/rbenv
/usr/local/rbenv/versions/2.6.3/bin/ruby
- フルパス
2.6.3は実際にインストールしたRubyのバージョン番号- ユーザのホームディレクトリにインストールした場合は
/home/foo/.rbenv/versions/2.6.3/bin/rubyになるはずです。(試してませんが)うまく動かなかった例
ruby
rbenv
/usr/local/rbenv/bin/rbenv
/usr/local/rbenv/shims/ruby
参考
- RubyMineでremoteのrbenvで使っているgemを読みこませる - Qiita
- シンボリックリンクを使ったハックもあるようです(試してません)
これでOKをクリックして、Gemの一覧が出てくれば成功です!
以上です。
- 投稿日:2019-07-09T16:08:53+09:00
【備忘録】DockerでRuby 2.6.3, Rails 5.2.3, MySQL 8.0.16の環境を構築し,Herokuにデプロイするまで
- 2019/7/10 修正
Heroku にデプロイするまでにかなり時間がかかってしまったので,備忘録として。初心者なので,ミスや無駄があればコメントいただけるとありがたいです。
開発環境
- macOS Mojave 10.14.5
公式ドキュメント
参考
手順
1. インストール・新規登録
- 以下は,Homebrew, git, Docker desktopなどのインストール, GitHubの新規登録, Herokuの新規登録・クレジットカード登録などの初期作業を行っている前提とします
2. Dockerコンテナの作成・開始
- 次のシェルスクリプトを作成して実行
- (7/10 修正) シェルスクリプトを分解して記事を書いていましたが,
docker-compose upの後にエラーが発生したので,使用しているシェルスクリプトをそのまま掲載します。docker1.sh#!/bin/bash echo "docker pull ruby:2.6.3" docker pull ruby:2.6.3 echo "docker pull mysql:8.0.16" docker pull mysql:8.0.16 echo "docker images" docker images # make Dockerfile cat <<'EOF' > Dockerfile FROM ruby:2.6.3 ENV LANG C.UTF-8 RUN apt-get update -qq \ && apt-get install -y build-essential libpq-dev nodejs && \ rm -rf /var/lib/apt/lists/* RUN gem install bundler WORKDIR /tmp COPY Gemfile Gemfile COPY Gemfile.lock Gemfile.lock RUN bundle install ENV APP_HOME /my_app RUN mkdir -p $APP_HOME WORKDIR $APP_HOME COPY . $APP_HOME EOF # make Gemfile cat <<'EOF' > Gemfile source 'https://rubygems.org' gem 'rails' EOF # make Gemfile.lock touch Gemfile.lock # make docker-compose.yml cat <<'EOF' > docker-compose.yml version: '3.2' services: db: image: mysql:8.0.16 command: mysqld --default-authentication-plugin=mysql_native_password volumes: - ./db/mysql_data:/var/lib/mysql environment: MYSQL_ROOT_PASSWORD: root MYSQL_DATABASE: root ports: - "3306:3306" web: build: . command: bundle exec rails s -p 3000 -b '0.0.0.0' volumes: - .:/my_app ports: - "3000:3000" links: - db tty: true stdin_open: true EOF echo "docker-compose run web rails new . --force --database=mysql --skip-bundle" docker-compose run web rails new . --force --database=mysql --skip-bundle docker-compose build # fix config/database.yml sed config/database.yml echo "fix config/database.yml" cat <<'EOF' > config/database.yml default: &default adapter: mysql2 encoding: utf8 pool: <%= ENV.fetch("RAILS_MAX_THREADS") { 5 } %> username: <%= ENV.fetch("MYSQL_USERNAME", "root") %> password: <%= ENV.fetch("MYSQL_PASSWORD", "root") %> host: <%= ENV.fetch("MYSQL_HOST", "db") %> development: <<: *default database: my_app_development test: <<: *default database: my_app_test production: <<: *default database: my_app_production EOF echo "docker-compose up" docker-compose upターミナルで実行bash docker1.sh3. データベースの作成
- 「Command + N」などで新しいターミナルを開き,作業ディレクトリまで移動
ターミナルで実行docker-compose exec web rails db:create
- この作業で「NoDatabaseError」が解消され,ブラウザから
http://localhost:3000にアクセスすると,「Yay! You’re on Rails!」が見られる。4. git の準備
ターミナルで実行git init git add . git commit -m ”first commit”5. Heroku の準備
- ブラウザから Heroku にログインしておく
ターミナルで実行heroku login
- 適当なキーを押して,ログインボタンを押す
ターミナルで実行heroku create <アプリ名>
補足
- この作業で「Heroku」にアプリが作成されると同時に,「heroku」という git のリモートリポジトリが作成される。
- <アプリ名>は自由。<>をターミナルに入力しないこと。
- すでに使用されているアプリ名は使用できない。
- アプリ名に「アルファベット大文字」は使えない。
- アプリ名を入力しなくてもよい(その場合はランダムに決定される)
データベースの設定を MySQL に変更する
ターミナルで実行heroku addons:add cleardb heroku config | grep CLEARDB_DATABASE_URL
- 表示された
mysql://〜〜〜の部分を取り出し,「mysql」を「mysql2」に変更- 次の
DATABASE_URL=の後にmysql2://〜〜〜を貼り付けたものをターミナルで実行ターミナルで実行heroku config:set DATABASE_URL=【補足】
ブラウザからアプリを選択し,「Setting」の「Reveal Config Vars」のページから編集してもよい。
「CLEARDB_DATABASE_URL」の
「CLEARDB_DATABASE_URL」を「DATABASE_URL」
「mysql」を「mysql2」に変更したものを追加すればよい。6. Heroku にデプロイ
ターミナルで実行git push heroku master heroku run rake db:migrate heroku openここまでで最低限度の作業は終了です。お疲れ様でした。
7. おまけ
- 終了するときは,ブラウザを閉じるだけでなく,Heroku のログアウトと Docker コンテナの停止をしておくこと
ターミナルで実行heroku logout docker-compose down
- コマンドの変更点
dockerを使用しないときのコマンドの例rails console rails g controller home top rails g model Post content:text rake db:migratedocker-composeコマンドの例docker-compose exec web rails console docker-compose exec web rails g controller home top docker-compose exec web rails g model Post content:text docker-compose exec web rake db:migrate
- 投稿日:2019-07-09T13:03:14+09:00
Laravel+Nuxt.jsでDocker開発環境構築からHerokuデプロイまで
はじめに
本記事では「フレームワークをインストールして、それをインターネットに公開する」という0から1までのフェーズについて、Laravel+Nuxt.jsによって「蔵書管理」システムを構築して解説したいと思います。
また、実際に構築したシステムは下記になります。
- Heroku: https://frozen-castle-47874.herokuapp.com/
- Github: https://github.com/kon-shou/bcm-qiita-example
目次
- システムアーキテクチャ
- Laravel/Nuxt.jsインストール
- Docker環境構築
- Nginx設定
- Typescript対応
- サーバーでのモデル/ビジネスロジック実装
- フロントでのモデル/ビジネスロジック実装
- Heroku設定
システムアーキテクチャ
下記の技術スタックを用います。
サーバーサイド: Laravel 5.8
フロントサイド: Nuxt.js 2.8.1 (SPA)
Webサーバー: Nginx
開発環境構築: docker
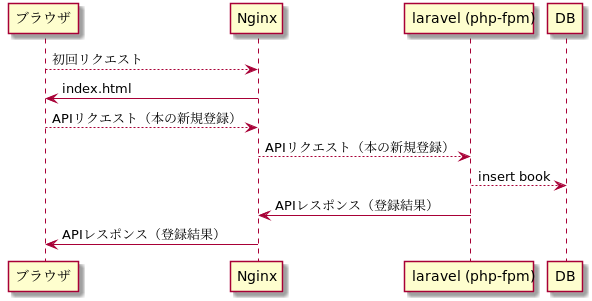
デプロイ: Herokuまた処理フローの図は下記になります。
「ブラウザにNuxt.jsで生成したSPAを返し、そのSPAからAPIサーバーであるLaravelにAPIリクエストを、Nginxを介して行う」というフローです。
Laravel/Nuxt.jsインストール
まずはLaravelドキュメントに従って Laravelでプロジェクトを作成します。
composer create-project --prefer-dist laravel/laravel book-collection-management作成したLaravelプロジェクトに
clientというディレクトリを新設して、そこにNuxt.jsドキュメントに従って Nuxt.jsをインストールします。yarn create nuxt-app client ./clientコマンド実行後の選択肢は各自の要望に応じて設定してください。
自分の場合、下記のように設定しました。? Project name client ? Project description My fantastic Nuxt.js project ? Author name kon-shou ? Choose the package manager Yarn ? Choose UI framework Buefy ? Choose custom server framework None (Recommended) ? Choose Nuxt.js modules Axios ? Choose linting tools ESLint, Prettier ? Choose test framework None ? Choose rendering mode Single Page Appコマンドによって
./clientにNuxt.jsがインストールされましたが、このままだとプロジェクトの二重管理になるため、下記を行います。
./client/node_moduleを削除
rm -rdf ./client/node_modules./clientの git 管理を解除
rm -rdf ./client/.git/./clientにある各種設定ファイルを laravel のルートに移動&更新設定ファイルの更新は各自の環境に合わせて行ってください。
ただ下記の2つのファイルは特に重要なので、注記します。
.package.json
- npm scripts に nuxt コマンドを追記
- nuxt に必要なライブラリを追加
- 修正後の.package.json
nuxt.config.js
srcDir: 'client/'を追記- nuxt build によって生成される
index.htmlの出力先をpublic/distに変更- 修正後のnuxt.config.js
index.htmlの出力先の変更は、ドキュメントルートであるpublic以下に配置することを意図しています。
詳細は「Nginx設定」で解説します。その
index.htmlの出力先の変更は https://github.com/nuxt/nuxt.js/issues/3217 に従ってnuxt.config.jsgenerate: { dir: 'public/dist' }を追記することで出力先を変更することができます。
以上を実行した後のディレクトリ構造は下記になります。
(root)
├── .editorconfig
├── .env
├── .env.example
├── .eslintrc.js
├── .git
├── .gitattributes
├── .gitignore
├── .idea
├── .prettierrc
├── .styleci.yml
├── app
├── artisan
├── bootstrap
├── client
│   ├── README.md
│   ├── assets
│   ├── components
│   ├── layouts
│   ├── middleware
│   ├── pages
│   ├── plugins
│   ├── static
│   └── store
├── composer.json
├── composer.lock
├── config
├── database
├── node_modules
├── nuxt.config.js
├── package.json
├── phpunit.xml
├── public
├── readme.md
├── resources
├── routes
├── server.php
├── storage
├── tests
├── vendor
├── webpack.mix.js
└── yarn.lock
Docker環境構築
次は、DockerでWebサーバーとDBを構築して
docker-compose up -dでアプリが立ち上がるようにします。
追加するファイルは下記になります。(root) ├── Dockerfile => docker-compose.yml の app.build.dockerfile で参照される ├── docker │ ├── entrypoint-app.sh => docker-compose.yml の app.command で参照される │ ├── nginx.conf => docker-compose.yml の app.volumes で参照される │ └── php-fpm.conf => docker-compose.yml の app.volumes で参照される ├── docker-compose.yml └── scripts └── provisioning.sh => docker-compose.yml の app.command で参照されるdocker-compose.ymlは下記になります。
docker-compose.ymlversion: '3' services: mysql: image: mysql:5.7 volumes: # host/docker間で共有するデータを指定 - "${HOME}/book-management_mysql:/var/lib/mysql" environment: MYSQL_ALLOW_EMPTY_PASSWORD: 1 TZ: "Asia/Tokyo" ports: - "3306:3306" app: build: . # Dockerfileのディレクトリを指定 user: ubuntu volumes: # host/docker間で共有するデータを指定 - .:/srv - ./docker/nginx.conf:/etc/nginx/sites-enabled/bcm - ./docker/php-fpm.conf:/etc/php/7.2/fpm/pool.d/bcm.conf command: docker/entrypoint-app.sh # 起動処理を設定 depends_on: - mysql links: - mysql ports: - "8000:8000" working_dir: /srv
docker-compose up -dの処理の順番は下記になります。
- mysqlコンテナの起動
- appコンテナの起動
Dockerfile(provisioning.sh) からdocker imageの作成nginx.conf/php-fpm.confのマウントentrypoint-app.shの nginx / php-fpm の起動各ステップについて解説します。
1. mysqlコンテナの起動
mysqlコンテナは、mysql5.7のイメージを元にして、パスワード省略及びタイムゾーンを東京にして、ホスト/dockerの3306番ポートでアクセスを可能にしています。
ホストからmysqlコンテナへのアクセスは
mysql -h 127.0.0.01 -urootで行えます。
またappコンテナからmysqlへのアクセスはdocker-compose exec app bashでappコンテナに入りmysql -h mysql -urootで行えます。2. appコンテナの起動
appコンテナは、Dockerfileで必要なライブラリをインストールしたイメージを準備し、
/srvにプロジェクトディレクトリをマウントし、ホスト/dockerの8000番ポートでアクセスを可能にしています。2.1
Dockerfile(provisioning.sh) からdocker imageの作成Dockerfileは下記になります。
DockerfileFROM ubuntu:18.04 COPY scripts/provisioning.sh /tmp/provisioning.sh # provisioning.sh による必要ライブラリのインストール RUN /tmp/provisioning.sh # nginxの初期設定を削除 RUN rm /etc/nginx/sites-enabled/default # php-fpmの初期設定を削除 RUN rm /etc/php/7.2/fpm/pool.d/www.conf # ubuntuユーザーを追加 RUN useradd -m -s /bin/bash -u 1000 -g users ubuntu RUN apt install sudo # ubuntuでのsudoのパスワード要求をしないように RUN echo "ubuntu ALL=(ALL:ALL) NOPASSWD:ALL" >> /etc/sudoers RUN chown ubuntu:users /srvDockerfileにて
provisioning.shによってライブラリをインストールし、その後にユーザー関連の設定を行います。
provisioning.shは下記になります。provisioning.sh#!/usr/bin/env bash function package_install() { env DEBIAN_FRONTEND=noninteractive apt install -y $1 } apt-get update -y package_install php-fpm package_install php-mysql package_install php-imagick package_install php-gd package_install php-curl package_install php-mbstring package_install php-bcmath package_install php-xml package_install php-zip package_install php-redis package_install php-intl package_install nginx package_install composer package_install mysql-client package_install zip package_install unzip package_install jq package_install git package_install jq package_install vim package_install curlもし、appコンテナで追加のライブラリが必要になったら、この
provisioning.shに追記し、改めてイメージをビルドするのが良いかと思います。2.2
nginx.conf/php-fpm.confのマウントこの2つの設定ファイルを配置することで、nginx/php-fpmが正しく起動できるようになります。
php-fpm.confは下記になります。php-fpm.conf[bcm] user = ubuntu group = users listen = /run/php/bcm.sock listen.owner = www-data listen.group = www-data pm = dynamic pm.start_servers = 1 pm.max_children = 4 pm.min_spare_servers = 1 pm.max_spare_servers = 2 request_terminate_timeout = 300 chdir = /srv
php-fpm.confについては 公式のマニュアル でオプションを逐一調べていくのが早いかと思います。またソケットがどういうものか理解するのかは https://qiita.com/kuni-nakaji/items/d11219e4ad7c74ece748 の記事が非常に分かりやすく、参考にさせていただきました。
nginx.confの詳細については次の「Nginx設定」にて解説します。2.3
entrypoint-app.shの nginx / php-fpm の起動
entrypoint-app.shは下記になります。entrypoint-app.sh#!/bin/bash sudo service php7.2-fpm start sudo service nginx start tail -f /dev/null内容としては、php-fpm/nginxの起動と、dockerが落ちないようにする処理です。
これをdocker起動処理として行うことで
docker-compose up -dだけでphp-fpm/nginxの起動をさせることができます。なお
tail -f /dev/nullの詳細については http://kimh.github.io/blog/jp/docker/gothas-in-writing-dockerfile-jp/#hack_to_run_container_in_the_background のブログ記事が非常にわかりやすく、参考にさせていただきました。Nginx設定
Laravel/Nuxt.jsのインストールによって、初回アクセス時にブラウザに返却される
index.htmlと、そのindex.htmlからのAPIアクセスを受けるindex.phpを準備できるようになりました。そこで、下記の前提条件を元にして、Nginxの設定を行いたいと思います。
- ドキュメントルートは
/publicとするnuxt buildによって生成されるindex.html、及びそのindex.htmlから呼ばれる js ファイルはpublic/dist/以下に配置する- ブラウザに返された
index.htmlからのAPIリクエストはpublic/index.phpにルーティングするこの前提条件を満たす
nginx.confは下記になります。nginx.confserver { # Nginxが待ちうけるポートを指定 listen 8000 default_server; # ドキュメントルートを指定 root /srv/public; # {URL}/ の場合に {URL}/index.html を返す # index index.html (デフォルト) # /{任意の文字列} に前方一致するURLの場合に # 1. /srv/public/{任意の文字列} に一致するファイルが存在すればそれを返し、存在しなければ # 2. /dist/index.html?$query_string にリダイレクトする location / { try_files $uri /dist/index.html?$query_string; } # {任意の文字列1}/_nuxt/{任意の文字列2}に一致するURLの場合に # 1. /srv/public/{任意の文字列1}/_nuxt/{任意の文字列2} に一致するファイルが存在すればそれを返し、存在しなければ # 2. /dist/_nuxt/{任意の文字列2} にリダイレクトする location ~ /(_nuxt)/(.+)$ { try_files $uri /dist/$1/$2; } # {任意の文字列1}/api/{任意の文字列2}に一致するURLの場合に # 1. /srv/public/{任意の文字列1}/api/{任意の文字列2} に一致するファイルが存在すればそれを返し、存在しなければ # 2. /index.php?$query_string にリダイレクトする location ~ /api/ { try_files $uri /index.php?$query_string; } # {任意の文字列}.phpに一致するURLの場合に # 1. /srv/public/{任意の文字列}.php に一致するファイルが存在すれば、そのリクエストをFastCGIに渡し、存在しなければ404を返す # 2. /index.php?$query_string にリダイレクトする location ~ \.php$ { try_files $uri =404; fastcgi_split_path_info ^(.+\.php)(/.+)$; fastcgi_pass unix:/run/php/bcm.sock; fastcgi_index index.php; include fastcgi_params; fastcgi_param SCRIPT_FILENAME $document_root$fastcgi_script_name; } }実際のアクセスでどういう処理になるかは下記になります。
順番 どういうアクセスか Nginxはどういう処理をするか 1 初回アクセス URLが /に一致するためsrv/public/dist/index.htmlをブラウザに返却する2 index.htmlの<script>タグに記述された_nuxt/xxxx.jsを取得するアクセスURLが /(_nuxt)/(.+)$に一致するためsrv/public/dist/_nuxt/xxxx.jsをブラウザに返却する3 index.htmlからの /api/xxxというAPIアクセスURLが /api/に一致するためsrv/public/index.phpを経て、Laravelで実装したレスポンスをブラウザに返却するこの nginx.conf でルーティングがどうなるか読み解く鍵は下記かと思います。
- locationの前方一致と正規表現の優先順位の違い
- try_files の挙動
https://heartbeats.jp/hbblog/2012/04/nginx05.html の記事が非常に分かりやすく、参考にさせていただきました。
Typescript対応
必ずしも必要ではありませんが、Nuxt.jsの場合ではTypescriptの導入が容易であるため、ついでに導入します。
公式の導入手順 に従っていけば導入できます。
- 必要ライブラリのインストール
yarn add -D @nuxt/typescript @typescript-eslint/eslint-plugin @typescript-eslint/parser
yarn add ts-node vue-class-component vue-property-decorator
touch tsconfig.json
nuxt.config.jsの修正
NuxtConfigurationを追記nuxt.config.jsへリネーム- 修正後のnuxt.config.ts
npm run dev後にtsconfig.jsonの修正
"exclude": ["node_modules", "vendor"]を追記"baseUrl": "./client"と修正- 修正後のtsconfig.json
lint対応
parser/pluginsの修正- 修正後の.eslintrc.js
.vueファイルをTypescript対応
- 修正後のindex.vue (
フロントでのモデル/ビジネスロジック実装で新規でpage/componentを作るのでここでの修正は必要ありませんが、参考までに)以上を実行すれば、Typescript でフロントを実装できると思います。
サーバーでのモデル/ビジネスロジック実装
サーバで実装するのは下記の5つになります。
- Bookモデル
- migrationファイル
- Bookレポジトリ
- Bookコントローラ
- ルーティング
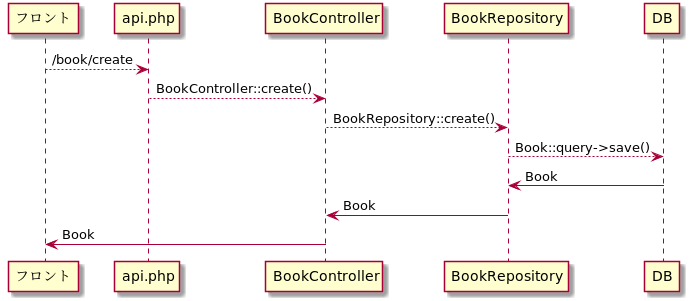
(root)
├── app
│   ├── Eloquent
│   │   └── Book.php    => Bookモデル
│   ├── Http
│   │   ├── Controllers
│   │   │   └── BookController.php  => Bookコントローラ
│   └── Repository
│       └── BookRepository.php      => Bookレポジトリ
├── database
│   └── migrations
│       └── 2019_06_12_150818_create_books_table.php    => migrationファイル
└── routes
   └── api.php  => ルーティング
また、本の登録のAPIリクエストがフロントから来た場合の、フローは下記になります。
それぞれについて解説します。
Bookモデル
Book.php<?php namespace App\Eloquent; use Illuminate\Database\Eloquent\Model; /** * Class Book * @package App\Eloquent * * @property int $id * @property int $title */ class Book extends Model { }本には「ID」と「タイトル」のみ存在するものとして、Bookモデルを定義します。
今回の場合、最低限の記述で良いかと思いますmigrationファイル
database/migrations/2019_06_12_150818_create_books_table.php<?php use Illuminate\Support\Facades\Schema; use Illuminate\Database\Schema\Blueprint; use Illuminate\Database\Migrations\Migration; class CreateBooksTable extends Migration { /** * Run the migrations. * * @return void */ public function up() { Schema::create('books', function (Blueprint $table) { $table->bigIncrements('id'); $table->string('title'); $table->timestamps(); }); } /** * Reverse the migrations. * * @return void */ public function down() { Schema::dropIfExists('books'); } }BookモデルはActiveRecordであるため、モデルのプロパティと同様のカラムを持たせています。
Bookレポジトリ
BookRepository.php<?php namespace App\Repository; use App\Eloquent\Book; use Illuminate\Support\Collection; class BookRepository { public function find(int $id): ?Book { return Book::query()->find($id); } public function list(): Collection { return Book::query()->get(); } public function create(string $title): Book { $book = new Book(); $book->title = $title; $book->save(); return $book; } public function delete(Book $book) { return Book::query()->find($book->id)->delete(); } }コントローラで直接にデータを更新するのでなく、レポジトリでデータの更新を行い、コントローラはレポジトリのメソッドを呼び出すようにします。
このようにすることで「データが持たせ方が変わった場合(例: Bookの格納をRDSでなくNoSQLに変更する)に、修正範囲を限定させることが出来る」等々のメリットがあります。
Bookコントローラ
BookController.php<?php namespace App\Http\Controllers; use App\Repository\BookRepository; use Dotenv\Exception\ValidationException; use Illuminate\Http\Request; class BookController extends Controller { private $bookRepository; public function __construct(BookRepository $bookRepository) { $this->bookRepository = $bookRepository; } public function list() { return $this->bookRepository->list(); } public function create(Request $request) { $title = $request->get('title'); if (!$title) { throw new ValidationException('titleは必須です'); } return $this->bookRepository->create($title); } public function delete(int $id) { $book = $this->bookRepository->find($id); if (!$book) { throw new ValidationException('削除対象のbookが存在しません'); } $this->bookRepository->delete($book); return []; } }コントローラでは、基本的にレポジトリのメソッドを呼び出すことで、Bookモデルの取得/登録/削除を行います。
また、BookRepositoryはコンストラクタでDIを行うことで、コントローラとレポジトリの依存関係を薄くしています。
こうすることで「ユニットテストでは、特別に用意したBookRepositoryを呼び出すことができ、ユニットテストの書きやすさが向上する」等々のメリットが有ります。ルーティング
api.php<?php use Illuminate\Http\Request; Route::group(['prefix' => 'book'], function ($route) { $route->get('/', 'BookController@list'); $route->post('/create', 'BookController@create'); $route->delete('/delete/{id}', 'BookController@delete'); });本の取得/登録/削除の3つのエンドポイントを用意し、それぞれからコントローラの対応するメソッドを呼びます。
確認
実際にAPIリクエストによってDBが更新されるか確認するためには以下の手順を踏みます。
.envの更新- MySQL に database を追加
- migration実行
今回の場合だと mysqlコンテナの設定に合わせて、下記のように
.envを更新します。.envDB_CONNECTION=mysql DB_HOST=mysql DB_PORT=3306 DB_DATABASE=laravel DB_USERNAME=root DB_PASSWORD=
.envを更新した後にphp artisan config:cacheとしてやることで.envの変更を反映させます。その後、appコンテナから mysqlに接続 (
docker-compose exec app mysql -h mysql -uroot) しcreate database laravel;とすることで laravel データベースを作成します。
そして
php artisan migrateと実行することで、migrationが実行できるかと思います。以上の準備をしたあとで、
curl http://localhost:8000/api/book/create -X POST -H "Content-Type: application/json" -d '{"title":"book_test"}'と叩くことで、更新が行われ、そのレスポンスが帰ってくることが確認できるかと思います。
フロントでのモデル/ビジネスロジック実装
フロントでは下記の6つを実装します。
- Bookモデル
- Bookレポジトリ
- plugins/dependency.ts
- index.d.ts
- Axios の proxy
- index.vue
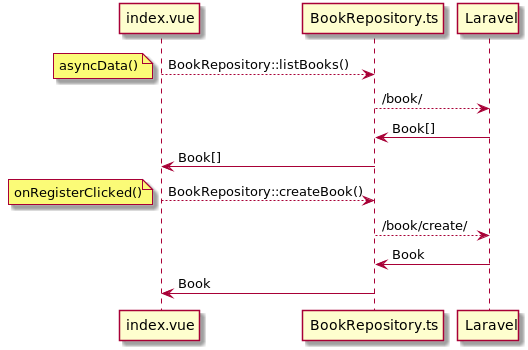
(root)
├── client
│   ├── domain
│   │   └── Book
│   │       ├── Book.ts
│   │       └── BookRepository.ts
│   ├── pages
│   │   ├── index.vue
│   ├── plugins
│   │   └── dependency.ts
│   └── static
├── index.d.ts
└── nuxt.config.js
フロントにおけるBook取得/登録のフローは下記です。
なおフロントにレポジトリ層を持たせる設計については、拙作ではありますが こちらのスライド にて詳細を解説していますので、ご参考ください。
Bookモデル
Book.tsimport _ from 'lodash' export default class Book { constructor(protected properties: { [key: string]: any }) {} get id(): string { return _.get(this.properties, 'id') } get title(): string { return _.get(this.properties, 'title') } }サーバーと同様のBookモデルを定義します。
これによってnew Book({id: xxx, titile: yyy})という形式でモデルを作ることができ、このモデルで型宣言を行うことができるようになります。Bookレポジトリ
BookRepository.tsimport _ from 'lodash' import { AxiosInstance } from 'axios' import Book from '~/domain/Book/Book' export default class BookRepository { private axios: AxiosInstance constructor(axios: AxiosInstance) { this.axios = axios } public async listBooks(): Promise<Book[]> { const response = await this.axios.get('/book/') return _.map(response.data, bookData => new Book(bookData)) } public async createBook(title: string): Promise<Book> { const response = await this.axios.post('/book/create', { title: title }) return new Book(response.data) } public async deleteBook(book: Book) { await this.axios.delete(`/book/delete/${book.id}`) } }こちらもサーバーと同様にBookRepositoryを実装します。
メリットについてもサーバーと同様です。コンストラクタで axiso を注入をしていますが、これは後述する
plugins/dependency.tsにて注入を行っています。
注入によって axios の context を維持しつつAPIリクエストを投げられるようになります。plugins/dependency.ts
dependency.tsimport BookRepository from '~/domain/Book/BookRepository' export default (context, inject) => { const bookRepository = new BookRepository(context.$axios) inject('bookRepository', bookRepository) }BookRepositoryに
context.$axiosを渡し、生成されたbookRepositoryを$bookRepositoryとして Vue インスタンス内で呼び出せるように登録しています。このプラグインを
nuxt.config.tsにて呼び出します。nuxt.config.tsplugins: ['~/plugins/dependency'],なお、NuxtにおけるInjectionについては公式ドキュメント と https://tech.cydas.com/entry/nuxt-inject の記事が非常にわかりやすく、参考にさせていただきました。
index.d.ts
dependency.tsにて$bookRepositoryを登録しましたが、このままだと Typescript のチェックでエラーが出るので型定義ファイルに$bookRepositoryに追加します。index.d.tsimport BookRepository from '~/domain/Book/BookRepository' declare module 'vue/types/vue' { interface Vue { $bookRepository: BookRepository } }Axios の proxy
BookRepository にて axios を利用していますが、このままだと 例えば本の登録では、Nginxがリッスンしている
http://localhost:8000/api/book/createでなくhttp://localhost:3000/book/createに対してリクエストをしてしまうので、下記の修正を行います。
- axios.baseURL の指定
下記を追記することで、urlのプレフィックスとして
/apiを付与します。axios: { baseURL: '/api' },
@nuxtjs/proxyの利用nuxt の proxy-module を利用して、axiosからのリクエストを proxy します。
今回の場合は
.envにAPIサーバーのURLを追記して、それをnuxt.config.tsに呼び出すことにします。まず
.envに下記を追加して.envAPI_BASE_URL=http://localhost:8000/api次に
nuxt.config.tsを修正します。nuxt.config.tsimport NuxtConfiguration from '@nuxt/config' require('dotenv').config() const config: NuxtConfiguration = { ... modules: [ // Doc: https://buefy.github.io/#/documentation 'nuxt-buefy', // Doc: https://axios.nuxtjs.org/usage '@nuxtjs/axios', '@nuxtjs/eslint-module', '@nuxtjs/proxy' ], ... } if (process.env.API_BASE_URL) { config.proxy = [process.env.API_BASE_URL] } export default configこれによって axios のリクエストが
http://localhost:8000/apiに行われるようになります。index.vue
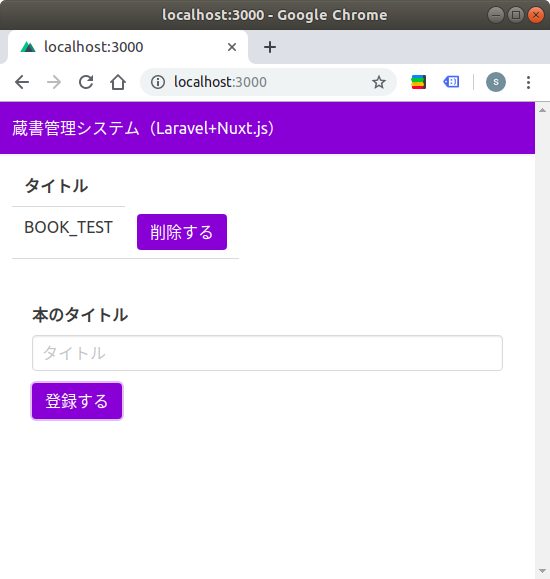
最後に index.vue の修正を行います。
index.vue では主に下記の3つの処理を行います。
- asynData() で
$bookRepository.listBooks()を実行し、本の一覧を取得- 登録ボタンクリックで
$bookRepository.createBook(this.title)を実行し、本を登録し、その後に一覧を再取得- 削除ボタンクリックで
$bookRepository.deleteBook(book)を実行し、本を削除し、その後に一覧を再取得index.vue<template> <section> <table class="table"> <tr> <th>ID</th> <th>タイトル</th> </tr> <tr v-for="book in books" :key="book.id"> <td>{{ book.id }}</td> <td>{{ book.title }}</td> <td> <button type="button" class="button is-primary" @click.prevent="deleteBook(book)" > 削除する </button> </td> </tr> </table> <section class="modal-card-body"> <b-field label="本のタイトル"> <b-input v-model="title" type="input" placeholder="タイトル" /> </b-field> <button type="button" class="button is-primary" @click.prevent="createBook()" > 登録する </button> </section> <p v-if="error">{{ error }}</p> </section> </template> <script lang="ts"> import { Component, Vue } from 'vue-property-decorator' import Book from '~/domain/Book/Book' @Component({ async asyncData({ app }) { const books = await app.$bookRepository.listBooks() return { books } } }) export default class extends Vue { private books private title = '' private error = '' async createBook() { try { await this.$bookRepository.createBook(this.title) this.books = await this.$bookRepository.listBooks() this.title = '' } catch (e) { this.error = e } } async deleteBook(book: Book) { try { await this.$bookRepository.deleteBook(book) this.books = await this.$bookRepository.listBooks() } catch (e) { this.error = e } } } </script>確認
以上のフロント/サーバーでの実装が完了した後に
- docker-compose up -d
- npm run dev
を実行すれば、
http://localhost:3000/にてシステムが動作してることが確認できるかと思います。
Heroku設定
herokuの設定としては、下記の5つを実装します
infra/nginx/nginx.conf/Procfileの追加- heroku buildpack の追加
- Clear DB の設定
app/Providers/AppServiceProvider.phpの修正- 環境変数の設定
(root)
├── Procfile
├── app
│   └── Providers
│       └── AppServiceProvider.php
└── infra
    └── heroku
        └── nginx.conf
なお
heroku createによるherokuとの連携は完了してる前提です。
infra/nginx/nginx.conf/Procfileの追加herokuで Nginx を使うために
infra/nginx/nginx.confを herokuの公式ドキュメント に従って、新しく作成します。
- location ディレクティブのみを使う
fastcgi_passはheroku-fcgiを指定するという点を反映させると、下記のようになると思います。
nginx.conflocation / { try_files $uri /public/dist/index.html?$query_string; } location ~ /_nuxt/(.+)$ { try_files $uri /public/dist/_nuxt/$1; } location ~ /api/ { try_files $uri /public/index.php?$query_string; } location ~ \.php$ { try_files $uri /public/index.php =404; fastcgi_split_path_info ^(.+\.php)(/.+)$; fastcgi_pass heroku-fcgi; fastcgi_index index.php; fastcgi_param SCRIPT_FILENAME $document_root$fastcgi_script_name; include fastcgi_params; }また、上記の
nginx.confを利用するように、下記のProcfileを追加します。Procfileweb: vendor/bin/heroku-php-nginx -C infra/heroku/nginx.confProcfileの役割については 公式ドキュメント に記載が有ります。
heroku buildpack の追加
heroku にデプロイは
git push heroku masterで行いますが、その push 後の起動処理を行うためにビルドパックを追加します。heroku buildpacks:add heroku/nodejs heroku buildpacks:add heroku/phpこれによって、フロントのビルドや必要ライブラリのインストールを実行されます。
Clear DB の設定
heroku でも mysql を利用するために ClearDB を利用したいと思います。
まず下記コマンドを叩きます。
heroku addons:add cleardbすると
CLEARDB_DATABASE_URLという変数がheroku configに設定されると思います。
このCLEARDB_DATABASE_URLは下記のように読み解けます。mysql://{DB_USERNAME}:{DB_PASSWORD}@{DB_HOST}/{DB_DATABASE}?reconnect=trueそこで下記のようにHerokuの環境変数にセットすることで、laravelからDBアクセスを行えるようになります。
heroku config:set DB_HOST={DB_HOST}
heroku config:set DB_DATABASE={DB_DATABASE}
heroku config:set DB_USERNAME={DB_USERNAME}
heroku config:set DB_PASSWORD={DB_PASSWORD}
以上で、本来ならば Mysql接続が完了してほしいところですが、laravel の想定してる Mysql のバージョンとHerokuのMysql のバージョンが異なっているためか、migration 実行時にエラーが発生します。
そのため、下記のように修正を行います。
AppServiceProvider.php<?php namespace App\Providers; use Illuminate\Support\Facades\Schema; use Illuminate\Support\ServiceProvider; class AppServiceProvider extends ServiceProvider { /** * Register any application services. * * @return void */ public function register() { // } /** * Bootstrap any application services. * * @return void */ public function boot() { Schema::defaultStringLength(191); } }こちらの対応は https://qiita.com/beer_geek/items/6e4264db142745ea666f を参考にさせていただきました。
確認
以上の準備が完了した後に
git push heroku masterheroku run php artisan migrateを実行すれば、実際にブラウザで動作していることが確認できると思います。
終わりに
以上で、Lareavel+Nuxt.jsで作ったwebアプリをHerokuにデプロイさせることが出来ました。
記事の内容で誤ってる点や追記が必要な点も多いと思いますが、その際にはコメントや編集リクエストでご指摘いただければと思います。
この記事がWeb開発における0から1へのフェーズに学習する方の参考になれば幸いです。
参考
- https://readouble.com/laravel/5.8/ja/
- https://ja.nuxtjs.org/
- https://www.php.net/manual/ja/install.fpm.configuration.php
- https://github.com/nuxt/nuxt.js/issues/3217
- https://heartbeats.jp/hbblog/2012/04/nginx05.html
- http://kimh.github.io/blog/jp/docker/gothas-in-writing-dockerfile-jp/#hack_to_run_container_in_the_background
- https://tech.cydas.com/entry/nuxt-inject
- https://devcenter.heroku.com/articles/custom-php-settings#using-a-custom-application-level-nginx-configuration
- https://qiita.com/kuni-nakaji/items/d11219e4ad7c74ece748
- https://qiita.com/beer_geek/items/6e4264db142745ea666f
- https://speakerdeck.com/kon_shou/shi-yun-yong-niokerularaveltonuxtdefalserepositoryfalsereiyafen-ge-falsehua
- 投稿日:2019-07-09T10:48:39+09:00
Docker Engineを立ててクライアントからいじる
Dockerってサーバクライアントモデルなんですよ。
いわゆるDockerをPCにインストールした!っていうのはクライアントとサーバをローカルにインストールして、ローカルからローカルに通信しているんですよね。DockerではクライアントのことをDocker Client、サーバのことをDocker EngineとかDocker Daemonっていいます。
今回はDocker EngineをサーバにインストールしてクライアントからリモートでDockerをいぢれるようにしてみます。
※サーバ、クライアントともにDockerがインストールされている必要があります。サーバは社内にある個人用kvmインスタンスを利用します。
TL;DR
証明書を作ってサーバーとクライアントの設定をします。コンテナはサーバ側で動作します。
証明書の作成と配置
http://docs.docker.jp/engine/security/https.html
こちらの手順では既存のDocker Engineとクライアントの通信を構築する方法が記載されています。httpsでの通信なので証明書などの設定が主ですね。
この通りに証明書を作っていきます。sslの証明書を作る時と同じですね。
/etc/docker/の中身がこんなになり〼。[murata@localhost docker]$ ll total 44 -r-------- 1 root root 3326 Jul 5 19:58 ca-key.pem -r--r--r-- 1 root root 2000 Jul 5 19:58 ca.pem -rw-r--r-- 1 root root 17 Jul 5 20:01 ca.srl -r--r--r-- 1 root root 1814 Jul 5 20:01 cert.pem -rw-r--r-- 1 root root 1582 Jul 5 20:01 client.csr -rw-r--r-- 1 root root 30 Jul 5 20:01 extfile.cnf -rw------- 1 root root 244 Mar 12 18:37 key.json -r-------- 1 root root 3243 Jul 5 20:01 key.pem -r--r--r-- 1 root root 1842 Jul 5 20:00 server-cert.pem -rw-r--r-- 1 root root 1606 Jul 5 19:59 server.csr -r-------- 1 root root 3243 Jul 5 19:59 server-key.pemDocker Engineを起動
とりあえずサーバー側のsystemdのdockerをoffにします。
# systemctl stop docker.service
# systemctl disable docker.service
とか。
手動で起動
[root@localhost docker]# dockerd-ce --tlsverify --tlscacert=/etc/docker/ca.pem --tlscert=/etc/docker/server-cert.pem --tlskey=/etc/docker/server-key.pem -H=0.0.0.0:2376
INFO[2019-07-05T20:04:18.381531783+09:00] parsed scheme: "unix"                         module=grpc
INFO[2019-07-05T20:04:18.381859433+09:00] scheme "unix" not registered, fallback to default scheme  module=grpc
INFO[2019-07-05T20:04:18.382109267+09:00] parsed scheme: "unix"                         module=grpc
INFO[2019-07-05T20:04:18.382276187+09:00] scheme "unix" not registered, fallback to default scheme  module=grpc
INFO[2019-07-05T20:04:18.382314578+09:00] ccResolverWrapper: sending new addresses to cc: [{unix:///run/containerd/containerd.sock 0  <nil>}]  module=grpc
INFO[2019-07-05T20:04:18.382581290+09:00] ClientConn switching balancer to "pick_first"  module=grpc
systemdで運用する際には、
/etc/systemd/system/multi-user.target.wants/docker.serviceのExecStartに↑のオプションを追記すればよさそうです。
rpmで入れている場合、闇抱えるけど。。。クライアント側からいぢる
自分のクライアントの ~/.docker/ に ca.pem, cert.pem, key.pem をコピーします。
クライアント側からinfoを見てみます。
※172.16.11.154はサーバのIPアドレスです。murata:~/.docker $ DOCKER_TLS_VERIFY=1 DOCKER_HOST=tcp://172.16.11.154:2376 docker info Containers: 4 Running: 1 Paused: 0 Stopped: 3 Images: 33 Server Version: 18.09.7 Storage Driver: overlay2 Backing Filesystem: xfs Supports d_type: true Native Overlay Diff: true Logging Driver: json-file Cgroup Driver: cgroupfs Plugins: Volume: local Network: bridge host macvlan null overlay Log: awslogs fluentd gcplogs gelf journald json-file local logentries splunk syslog Swarm: inactive Runtimes: runc Default Runtime: runc Init Binary: docker-init containerd version: 894b81a4b802e4eb2a91d1ce216b8817763c29fb runc version: 425e105d5a03fabd737a126ad93d62a9eeede87f init version: fec3683 Security Options: seccomp Profile: default Kernel Version: 3.10.0-957.21.3.el7.x86_64 Operating System: CentOS Linux 7 (Core) OSType: linux Architecture: x86_64 CPUs: 4 Total Memory: 3.607GiB Name: localhost.localdomain ID: USBJ:LDES:EZJN:J6AA:XNCG:DXYZ:FNNH:26Z3:K4TE:T266:YBNU:4GRM Docker Root Dir: /var/lib/docker Debug Mode (client): false Debug Mode (server): false Registry: https://index.docker.io/v1/ Labels: Experimental: false Insecure Registries: 127.0.0.0/8 Live Restore Enabled: false Product License: Community Engine
DOCKER_TLS_VERIFY=1 DOCKER_HOST=tcp://172.16.11.154:2376の部分は自身の.bash_profileなどに書いておくと便利ですね。試しにクライアントで
docker run -it ubuntu bashしてみます。murata:~ $ DOCKER_TLS_VERIFY=1 DOCKER_HOST=tcp://172.16.11.154:2376 docker run -it ubuntu bash root@9ac925cbd3a2:/# root@9ac925cbd3a2:/# uname -a Linux 9ac925cbd3a2 3.10.0-957.21.3.el7.x86_64 #1 SMP Tue Jun 18 16:35:19 UTC 2019 x86_64 x86_64 x86_64 GNU/Linux起動しました。
サーバ側で起動しているか確認します。サーバ側では鍵ファイルを~/.dockerに置いていないので指定する必要があります。(お好みでどうぞ)
[murata@localhost docker]$ sudo docker  --tlsverify --tlscacert=/etc/docker/ca.pem --tlscert=/etc/docker/server-cert.pem --tlskey=/etc/docker/server-key.pem -H=172.16.11.154:2376 container ls
CONTAINER ID        IMAGE               COMMAND             CREATED              STATUS              PORTS               NAMES
9ac925cbd3a2        ubuntu              "bash"              About a minute ago   Up About a minute                       objective_hofstadter
まとめ
これで自身のPC内での開発からおさらばできます。カフェでドヤ開発はできなくなりますが。
複数人でDocker Engineを共有することでうまくDocker Engineを使うことができるんじゃないでしょうか。
ただし、リポジトリ名が被ると困るので名前とかを入れておくといいかもですね。その辺のデフォルト値を設定できたりしないんだろうか。。。
もちろん使う人に証明書を配る必要があります。ローカルで運用する方法をよく見かけますが、オペレーションするPCとサーバは別にしておきたいですよね。ということで今回まとめました。
- 投稿日:2019-07-09T09:24:05+09:00
docker pull について確認する
docker pull した時のイメージの構成などを調査した時のメモ。
以下などを参考にさせて頂きました。環境
$docker info
Containers: 30
 Running: 4
 Paused: 0
 Stopped: 26
Images: 10
Server Version: 18.06.1-ce
Storage Driver: overlay2
 Backing Filesystem: extfs
 Supports d_type: true
 Native Overlay Diff: true
Logging Driver: json-file
Cgroup Driver: cgroupfs
Plugins:
 Volume: local
 Network: bridge host macvlan null overlay
 Log: awslogs fluentd gcplogs gelf journald json-file logentries splunk syslog
Swarm: inactive
Runtimes: runc
Default Runtime: runc
Init Binary: docker-init
containerd version: 468a545b9edcd5932818eb9de8e72413e616e86e
runc version: 69663f0bd4b60df09991c08812a60108003fa340
init version: fec3683
Security Options:
 seccomp
  Profile: default
Kernel Version: 4.14.77-80.57.amzn2.x86_64
Operating System: Amazon Linux 2
OSType: linux
Architecture: x86_64
CPUs: 1
Total Memory: 985.7MiB
Name: ip-172-31-30-243.ap-northeast-1.compute.internal
ID: QMDS:ZXZE:7TGX:JJGD:MYCF:6XB4:UVK5:OVX5:5CSQ:HG7K:NP7C:C4PU
Docker Root Dir: /var/lib/docker
Debug Mode (client): false
Debug Mode (server): false
Registry: https://index.docker.io/v1/
Labels:
Experimental: false
Insecure Registries:
 127.0.0.0/8
Live Restore Enabled: false
試す
docker pullしてdocker saveしてみます# pull するとレイヤーを並列でダウンロードする $docker pull # イメージが存在する $docker images |grep nginx nginx latest f68d6e55e065 3 days ago 109MB # tar に保存 $docker save -o nginx.tar nginx $tar -xvf nginx.tar 9de6aebfff35261996e4315105c546a002a8e42be30bc9189851384adc3abf6b/ 9de6aebfff35261996e4315105c546a002a8e42be30bc9189851384adc3abf6b/VERSION 9de6aebfff35261996e4315105c546a002a8e42be30bc9189851384adc3abf6b/json 9de6aebfff35261996e4315105c546a002a8e42be30bc9189851384adc3abf6b/layer.tar a4e2f1136e50ce782b4712f7f31628a9d8d973035072f6d7a2c5728c87270dc0/ a4e2f1136e50ce782b4712f7f31628a9d8d973035072f6d7a2c5728c87270dc0/VERSION a4e2f1136e50ce782b4712f7f31628a9d8d973035072f6d7a2c5728c87270dc0/json a4e2f1136e50ce782b4712f7f31628a9d8d973035072f6d7a2c5728c87270dc0/layer.tar d5990701c3a040b2eb442c195e9d62a3936bb91d7ee918c66751b6f164ec490a/ d5990701c3a040b2eb442c195e9d62a3936bb91d7ee918c66751b6f164ec490a/VERSION d5990701c3a040b2eb442c195e9d62a3936bb91d7ee918c66751b6f164ec490a/json d5990701c3a040b2eb442c195e9d62a3936bb91d7ee918c66751b6f164ec490a/layer.tar f68d6e55e06520f152403e6d96d0de5c9790a89b4cfc99f4626f68146fa1dbdc.json manifest.json tar: manifest.json: implausibly old time stamp 1970-01-01 00:00:00 repositories tar: repositories: implausibly old time stamp 1970-01-01 00:00:00 # いくつかのファイルが生成される $ls 9de6aebfff35261996e4315105c546a002a8e42be30bc9189851384adc3abf6b a4e2f1136e50ce782b4712f7f31628a9d8d973035072f6d7a2c5728c87270dc0 d5990701c3a040b2eb442c195e9d62a3936bb91d7ee918c66751b6f164ec490a f68d6e55e06520f152403e6d96d0de5c9790a89b4cfc99f4626f68146fa1dbdc.json manifest.json nginx.tar repositories # フォルダ構成 $ tree . . ├── 9de6aebfff35261996e4315105c546a002a8e42be30bc9189851384adc3abf6b │ ├── json │ ├── layer.tar │ └── VERSION ├── a4e2f1136e50ce782b4712f7f31628a9d8d973035072f6d7a2c5728c87270dc0 │ ├── json │ ├── layer.tar │ └── VERSION ├── d5990701c3a040b2eb442c195e9d62a3936bb91d7ee918c66751b6f164ec490a │ ├── json │ ├── layer.tar │ └── VERSION ├── f68d6e55e06520f152403e6d96d0de5c9790a89b4cfc99f4626f68146fa1dbdc.json ├── manifest.json ├── nginx.tar └── repositories 3 directories, 13 filesまずは
mainifest.jsonを見てみるmanifest.json[ { "Config": "f68d6e55e06520f152403e6d96d0de5c9790a89b4cfc99f4626f68146fa1dbdc.json", "RepoTags": [ "nginx:latest" ], "Layers": [ "a4e2f1136e50ce782b4712f7f31628a9d8d973035072f6d7a2c5728c87270dc0/layer.tar", "d5990701c3a040b2eb442c195e9d62a3936bb91d7ee918c66751b6f164ec490a/layer.tar", "9de6aebfff35261996e4315105c546a002a8e42be30bc9189851384adc3abf6b/layer.tar" ] } ]上記を見るとこのイメージは3つのレイヤーで構成されているように見えます。
docker image hisotyで見てみます。$docker image history nginx:latest IMAGE CREATED CREATED BY SIZE COMMENT f68d6e55e065 3 days ago /bin/sh -c #(nop) CMD ["nginx" "-g" "daemon… 0B <missing> 3 days ago /bin/sh -c #(nop) STOPSIGNAL SIGTERM 0B <missing> 3 days ago /bin/sh -c #(nop) EXPOSE 80 0B <missing> 3 days ago /bin/sh -c ln -sf /dev/stdout /var/log/nginx… 22B <missing> 3 days ago /bin/sh -c set -x && addgroup --system -… 54.1MB <missing> 3 days ago /bin/sh -c #(nop) ENV PKG_RELEASE=1~stretch 0B <missing> 3 days ago /bin/sh -c #(nop) ENV NJS_VERSION=0.3.3 0B <missing> 3 days ago /bin/sh -c #(nop) ENV NGINX_VERSION=1.17.1 0B <missing> 3 weeks ago /bin/sh -c #(nop) LABEL maintainer=NGINX Do… 0B <missing> 3 weeks ago /bin/sh -c #(nop) CMD ["bash"] 0B <missing> 3 weeks ago /bin/sh -c #(nop) ADD file:5ffb798d64089418e… 55.3MBあれ、3つ以上あるのではと思ったが、サイズを見ると 0B ではないのは3つしかない
以下に書いてあるようにレイヤーが出来るのは
RUN、COPY、ADDだけなので上記のようになっていると思われます。Only the instructions RUN, COPY, ADD create layers. Other instructions create temporary intermediate images, and do not increase the size of the build.
答え合わせという感じで nginx の Dockerifle を見てみる。
docker-nginx/mainline/stretch/Dockerfile
FROM debian:stretch-slim

LABEL maintainer="NGINX Docker Maintainers <docker-maint@nginx.com>"

ENV NGINX_VERSION   1.17.1
ENV NJS_VERSION     0.3.3
ENV PKG_RELEASE     1~stretch

RUN set -x \
# create nginx user/group first, to be consistent throughout docker variants
    && addgroup --system --gid 101 nginx \
    && adduser --system --disabled-login --ingroup nginx --no-create-home --home /nonexistent --gecos "nginx user" --shell /bin/false --uid 101 nginx \
    && apt-get update \
    && apt-get install --no-install-recommends --no-install-suggests -y gnupg1 apt-transport-https ca-certificates \
    && \
    NGINX_GPGKEY=573BFD6B3D8FBC641079A6ABABF5BD827BD9BF62; \
    found=''; \
    for server in \
        ha.pool.sks-keyservers.net \
        hkp://keyserver.ubuntu.com:80 \
        hkp://p80.pool.sks-keyservers.net:80 \
        pgp.mit.edu \
    ; do \
        echo "Fetching GPG key $NGINX_GPGKEY from $server"; \
        apt-key adv --keyserver "$server" --keyserver-options timeout=10 --recv-keys "$NGINX_GPGKEY" && found=yes && break; \
    done; \
    test -z "$found" && echo >&2 "error: failed to fetch GPG key $NGINX_GPGKEY" && exit 1; \
    apt-get remove --purge --auto-remove -y gnupg1 && rm -rf /var/lib/apt/lists/* \
    && dpkgArch="$(dpkg --print-architecture)" \
    && nginxPackages=" \
        nginx=${NGINX_VERSION}-${PKG_RELEASE} \
        nginx-module-xslt=${NGINX_VERSION}-${PKG_RELEASE} \
        nginx-module-geoip=${NGINX_VERSION}-${PKG_RELEASE} \
        nginx-module-image-filter=${NGINX_VERSION}-${PKG_RELEASE} \
        nginx-module-njs=${NGINX_VERSION}.${NJS_VERSION}-${PKG_RELEASE} \
    " \
    && case "$dpkgArch" in \
        amd64|i386) \
# arches officialy built by upstream
            echo "deb https://nginx.org/packages/mainline/debian/ stretch nginx" >> /etc/apt/sources.list.d/nginx.list \
            && apt-get update \
            ;; \
        *) \
# we're on an architecture upstream doesn't officially build for
# let's build binaries from the published source packages
            echo "deb-src https://nginx.org/packages/mainline/debian/ stretch nginx" >> /etc/apt/sources.list.d/nginx.list \
            \
# new directory for storing sources and .deb files
            && tempDir="$(mktemp -d)" \
            && chmod 777 "$tempDir" \
# (777 to ensure APT's "_apt" user can access it too)
            \
# save list of currently-installed packages so build dependencies can be cleanly removed later
            && savedAptMark="$(apt-mark showmanual)" \
            \
# build .deb files from upstream's source packages (which are verified by apt-get)
            && apt-get update \
            && apt-get build-dep -y $nginxPackages \
            && ( \
                cd "$tempDir" \
                && DEB_BUILD_OPTIONS="nocheck parallel=$(nproc)" \
                    apt-get source --compile $nginxPackages \
            ) \
# we don't remove APT lists here because they get re-downloaded and removed later
            \
# reset apt-mark's "manual" list so that "purge --auto-remove" will remove all build dependencies
# (which is done after we install the built packages so we don't have to redownload any overlapping dependencies)
            && apt-mark showmanual | xargs apt-mark auto > /dev/null \
            && { [ -z "$savedAptMark" ] || apt-mark manual $savedAptMark; } \
            \
# create a temporary local APT repo to install from (so that dependency resolution can be handled by APT, as it should be)
            && ls -lAFh "$tempDir" \
            && ( cd "$tempDir" && dpkg-scanpackages . > Packages ) \
            && grep '^Package: ' "$tempDir/Packages" \
            && echo "deb [ trusted=yes ] file://$tempDir ./" > /etc/apt/sources.list.d/temp.list \
# work around the following APT issue by using "Acquire::GzipIndexes=false" (overriding "/etc/apt/apt.conf.d/docker-gzip-indexes")
#   Could not open file /var/lib/apt/lists/partial/_tmp_tmp.ODWljpQfkE_._Packages - open (13: Permission denied)
#   ...
#   E: Failed to fetch store:/var/lib/apt/lists/partial/_tmp_tmp.ODWljpQfkE_._Packages  Could not open file /var/lib/apt/lists/partial/_tmp_tmp.ODWljpQfkE_._Packages - open (13: Permission denied)
            && apt-get -o Acquire::GzipIndexes=false update \
            ;; \
    esac \
    \
    && apt-get install --no-install-recommends --no-install-suggests -y \
                        $nginxPackages \
                        gettext-base \
    && apt-get remove --purge --auto-remove -y apt-transport-https ca-certificates && rm -rf /var/lib/apt/lists/* /etc/apt/sources.list.d/nginx.list \
    \
# if we have leftovers from building, let's purge them (including extra, unnecessary build deps)
    && if [ -n "$tempDir" ]; then \
        apt-get purge -y --auto-remove \
        && rm -rf "$tempDir" /etc/apt/sources.list.d/temp.list; \
    fi

# forward request and error logs to docker log collector
RUN ln -sf /dev/stdout /var/log/nginx/access.log \
    && ln -sf /dev/stderr /var/log/nginx/error.log

EXPOSE 80

STOPSIGNAL SIGTERM

CMD ["nginx", "-g", "daemon off;"]
これを見ると
RUNは2回実行していた。
一つは「FROM」に対応するベースイメージの情報だとするとレイヤーが3つというのは正しそうです。
docker image hisotryは表示内容が上から下にかけて Dockerfile では逆の下から上の内容に合致してそうです。各レイヤーの情報を確認する
各レイヤーの
tarを確認する。$ ll 9de6aebfff35261996e4315105c546a002a8e42be30bc9189851384adc3abf6b/layer.tar -rw-r--r-- 1 ec2-user ec2-user 3584 Jul 1 21:25 9de6aebfff35261996e4315105c546a002a8e42be30bc9189851384adc3abf6b/layer.tar $ll a4e2f1136e50ce782b4712f7f31628a9d8d973035072f6d7a2c5728c87270dc0/layer.tar -rw-r--r-- 1 ec2-user ec2-user 58445312 Jul 1 21:25 a4e2f1136e50ce782b4712f7f31628a9d8d973035072f6d7a2c5728c87270dc0/layer.tar $ll d5990701c3a040b2eb442c195e9d62a3936bb91d7ee918c66751b6f164ec490a/layer.tar -rw-r--r-- 1 ec2-user ec2-user 54617088 Jul 1 21:25 d5990701c3a040b2eb442c195e9d62a3936bb91d7ee918c66751b6f164ec490a/layer.tar9d...がとてもサイズが小さい。
まずは9d...を解凍してみる。$tar -xvf layer.tar var/ var/log/ var/log/nginx/ var/log/nginx/access.log var/log/nginx/error.logこれは Dokerfile の以下の箇所に該当してそうです。
RUN ln -sf /dev/stdout /var/log/nginx/access.log \
&& ln -sf /dev/stderr /var/log/nginx/error.log各レイヤーは差分情報のみを保持するのでこのようなファイル構成になってそうです。
次にa4e2f..を解凍してみます。
$tar -xvf layer.tar書ききれないぐらい大量にファイル及びディレクトリが生成されました。
Dockefile の内容を見ると RUN コマンド内にて && を使って連続で複数のコマンドを実行しており、それによる差分も大きいためにこの様になっていると思われます。最後の d59... もかなり多くのファイル及びディレクトリが生成されました。
docker pull/docker push ではどのように各レイヤーをダウンロード・アップロードするのか
docker pullはデフォルトで 3つのレイヤーを同時 にダウンロードしますBy default the Docker daemon will pull three layers of an image at a time.
docker pushはデフォルトで 5つのレイヤーを同時 にアップロードします。By default the Docker daemon will push five layers of an image at a time.
f68d6e55e06..って JSON ファイル何?
docker saveして解凍した時にf68d6e55e06520f152403e6d96d0de5c9790a89b4cfc99f4626f68146fa1dbdc.jsonというファイルが出来ていたのでこちらも確認します。f68d6e55e06520f152403e6d96d0de5c9790a89b4cfc99f4626f68146fa1dbdc.json{ "architecture": "amd64", "config": { "Hostname": "", "Domainname": "", "User": "", "AttachStdin": false, "AttachStdout": false, "AttachStderr": false, "ExposedPorts": { "80/tcp": {} }, "Tty": false, "OpenStdin": false, "StdinOnce": false, "Env": [ "PATH=/usr/local/sbin:/usr/local/bin:/usr/sbin:/usr/bin:/sbin:/bin", "NGINX_VERSION=1.17.1", "NJS_VERSION=0.3.3", "PKG_RELEASE=1~stretch" ], "Cmd": [ "nginx", "-g", "daemon off;" ], "ArgsEscaped": true, "Image": "sha256:b3589c805dd193e4dc7305c2f550112d1c624d5917df39743cbc6edfe603de02", "Volumes": null, "WorkingDir": "", "Entrypoint": null, "OnBuild": null, "Labels": { "maintainer": "NGINX Docker Maintainers <docker-maint@nginx.com>" }, "StopSignal": "SIGTERM" }, "container": "2aa9b07987cb2b14da48fc2c46389920c877d8d2992978b30c08766b0e024611", "container_config": { "Hostname": "2aa9b07987cb", "Domainname": "", "User": "", "AttachStdin": false, "AttachStdout": false, "AttachStderr": false, "ExposedPorts": { "80/tcp": {} }, "Tty": false, "OpenStdin": false, "StdinOnce": false, "Env": [ "PATH=/usr/local/sbin:/usr/local/bin:/usr/sbin:/usr/bin:/sbin:/bin", "NGINX_VERSION=1.17.1", "NJS_VERSION=0.3.3", "PKG_RELEASE=1~stretch" ], "Cmd": [ "/bin/sh", "-c", "#(nop) ", "CMD [\"nginx\" \"-g\" \"daemon off;\"]" ], "ArgsEscaped": true, "Image": "sha256:b3589c805dd193e4dc7305c2f550112d1c624d5917df39743cbc6edfe603de02", "Volumes": null, "WorkingDir": "", "Entrypoint": null, "OnBuild": null, "Labels": { "maintainer": "NGINX Docker Maintainers <docker-maint@nginx.com>" }, "StopSignal": "SIGTERM" }, "created": "2019-07-01T21:25:40.051159139Z", "docker_version": "18.06.1-ce", "history": [ { "created": "2019-06-10T23:24:23.197964064Z", "created_by": "/bin/sh -c #(nop) ADD file:5ffb798d64089418ef4d3a261df5ad7cfa038eb2ef778db2b92604ac87228d99 in / " }, { "created": "2019-06-10T23:24:23.42168058Z", "created_by": "/bin/sh -c #(nop) CMD [\"bash\"]", "empty_layer": true }, { "created": "2019-06-11T00:02:42.070507226Z", "created_by": "/bin/sh -c #(nop) LABEL maintainer=NGINX Docker Maintainers <docker-maint@nginx.com>", "empty_layer": true }, { "created": "2019-07-01T21:25:10.821974727Z", "created_by": "/bin/sh -c #(nop) ENV NGINX_VERSION=1.17.1", "empty_layer": true }, { "created": "2019-07-01T21:25:10.970434769Z", "created_by": "/bin/sh -c #(nop) ENV NJS_VERSION=0.3.3", "empty_layer": true }, { "created": "2019-07-01T21:25:11.125664497Z", "created_by": "/bin/sh -c #(nop) ENV PKG_RELEASE=1~stretch", "empty_layer": true }, { "created": "2019-07-01T21:25:38.776299791Z", "created_by": "/bin/sh -c set -x && addgroup --system --gid 101 nginx && adduser --system --disabled-login --ingroup nginx --no-create-home --home /nonexistent --gecos \"nginx user\" --shell /bin/false --uid 101 nginx && apt-get update && apt-get install --no-install-recommends --no-install-suggests -y gnupg1 apt-transport-https ca-certificates && NGINX_GPGKEY=573BFD6B3D8FBC641079A6ABABF5BD827BD9BF62; found=''; for server in ha.pool.sks-keyservers.net hkp://keyserver.ubuntu.com:80 hkp://p80.pool.sks-keyservers.net:80 pgp.mit.edu ; do echo \"Fetching GPG key $NGINX_GPGKEY from $server\"; apt-key adv --keyserver \"$server\" --keyserver-options timeout=10 --recv-keys \"$NGINX_GPGKEY\" && found=yes && break; done; test -z \"$found\" && echo >&2 \"error: failed to fetch GPG key $NGINX_GPGKEY\" && exit 1; apt-get remove --purge --auto-remove -y gnupg1 && rm -rf /var/lib/apt/lists/* && dpkgArch=\"$(dpkg --print-architecture)\" && nginxPackages=\" nginx=${NGINX_VERSION}-${PKG_RELEASE} nginx-module-xslt=${NGINX_VERSION}-${PKG_RELEASE} nginx-module-geoip=${NGINX_VERSION}-${PKG_RELEASE} nginx-module-image-filter=${NGINX_VERSION}-${PKG_RELEASE} nginx-module-njs=${NGINX_VERSION}.${NJS_VERSION}-${PKG_RELEASE} \" && case \"$dpkgArch\" in amd64|i386) echo \"deb https://nginx.org/packages/mainline/debian/ stretch nginx\" >> /etc/apt/sources.list.d/nginx.list && apt-get update ;; *) echo \"deb-src https://nginx.org/packages/mainline/debian/ stretch nginx\" >> /etc/apt/sources.list.d/nginx.list && tempDir=\"$(mktemp -d)\" && chmod 777 \"$tempDir\" && savedAptMark=\"$(apt-mark showmanual)\" && apt-get update && apt-get build-dep -y $nginxPackages && ( cd \"$tempDir\" && DEB_BUILD_OPTIONS=\"nocheck parallel=$(nproc)\" apt-get source --compile $nginxPackages ) && apt-mark showmanual | xargs apt-mark auto > /dev/null && { [ -z \"$savedAptMark\" ] || apt-mark manual $savedAptMark; } && ls -lAFh \"$tempDir\" && ( cd \"$tempDir\" && dpkg-scanpackages . > Packages ) && grep '^Package: ' \"$tempDir/Packages\" && echo \"deb [ trusted=yes ] file://$tempDir ./\" > /etc/apt/sources.list.d/temp.list && apt-get -o Acquire::GzipIndexes=false update ;; esac && apt-get install --no-install-recommends --no-install-suggests -y $nginxPackages gettext-base && apt-get remove --purge --auto-remove -y apt-transport-https ca-certificates && rm -rf /var/lib/apt/lists/* /etc/apt/sources.list.d/nginx.list && if [ -n \"$tempDir\" ]; then apt-get purge -y --auto-remove && rm -rf \"$tempDir\" /etc/apt/sources.list.d/temp.list; fi" }, { "created": "2019-07-01T21:25:39.534862179Z", "created_by": "/bin/sh -c ln -sf /dev/stdout /var/log/nginx/access.log && ln -sf /dev/stderr /var/log/nginx/error.log" }, { "created": "2019-07-01T21:25:39.707598949Z", "created_by": "/bin/sh -c #(nop) EXPOSE 80", "empty_layer": true }, { "created": "2019-07-01T21:25:39.879242256Z", "created_by": "/bin/sh -c #(nop) STOPSIGNAL SIGTERM", "empty_layer": true }, { "created": "2019-07-01T21:25:40.051159139Z", "created_by": "/bin/sh -c #(nop) CMD [\"nginx\" \"-g\" \"daemon off;\"]", "empty_layer": true } ], "os": "linux", "rootfs": { "type": "layers", "diff_ids": [ "sha256:cf5b3c6798f77b1f78bf4e297b27cfa5b6caa982f04caeb5de7d13c255fd7a1e", "sha256:197c666de9dd65f1c350e2c44628c5d530f366c9edf0197373f8603cf9af9e50", "sha256:d2f0b6dea592c39bfc4f06a1f6502d58a2fa6d9e6b6cf1aaf0d458d5d61d4515" ] } }前半は
docker inspectと同じような内容が見えます。
後半は各レイヤーの情報が分かり、empty_layerを見るとその名称の通り「空のレイヤーか否か」というのが分かる気がします。
最後は「sha256」のようなので確認。$sha256sum 9de6aebfff35261996e4315105c546a002a8e42be30bc9189851384adc3abf6b/layer.tar d2f0b6dea592c39bfc4f06a1f6502d58a2fa6d9e6b6cf1aaf0d458d5d61d4515 9de6aebfff35261996e4315105c546a002a8e42be30bc9189851384adc3abf6b/layer.tar合ってそうです。
残疑問点
- マニフェストファイルの形式が Image Manifest V 2, Schema 2 でも Image Manifest V 2, Schema 1 でもない。centos でもやってみたが同じだったが、現在どのうな状況かまで分からず。
docker pullの時の動作として最初に Manifest ファイルをダウンロードして各レイヤーを並行してダウンロードして sha256 を確認してそうだが動きのドキュメントなどが確認できず。ソースコードを追うと分かる?
- 投稿日:2019-07-09T00:37:54+09:00
Docker で Amazon S3 に定期的に差分バックアップをとる
Docker Volume やディレクトリを Amazon S3 に定期的に差分バックアップをとるための hoto17296/backup-s3 という Docker Image を作ったので、その紹介。
やりたいこと
Docker で運用しているサーバに関するデータを Docker Volume に保存しているとして、その中身を定期的にバックアップをとりたい。1
バックアップを保存する場所としては Amazon S3 が無難で、Amazon S3 にバックアップをとるときによく使われるツールとして AWS CLI の S3 Sync がある。
sync — AWS CLI Command Reference
S3 Sync には様々なオプションがあってバックアップの方法を柔軟に指定できるのだけど、それは他の記事を見てもらえればいいとして、問題は「定期的に」バックアップする部分にある。
AWS CLI とそれを動かすための Python を入れて、バックアップ対象の Volume を Amazon S3 に Sync するシェルスクリプトを書いて、あとはそれを cron で定期実行するように設定して・・・で出来るかと思いきや OS ごとに cron の癖があってハマるのでググりながら修正して・・・と、思ったよりも面倒だったりする。
ていうか Docker が入ってるなら Docker で解決すれば良さそう。
作ったもの
Docker コンテナの中で crond と AWS CLI が動くので、ホスト OS に Python を入れる必要がないし OS ごとの cron の挙動の違いを意識する必要もない。いくつか必要な設定をしてコンテナを起動するだけでいい。
使い方は簡単で、
- いくつか環境変数を指定する
SCHEDULEバックアップをとるスケジュールを crontab フォーマットで指定するS3_URLバックアップ先の S3 バケットを指定するAWS_*コンテナ内から S3 バケットにアクセスするための認証情報を指定する/srcにバックアップ対象のディレクトリもしくは Docker Volume をマウントするこれだけ設定して、コンテナを起動する。
その他にも、タイムゾーンを指定できたり、S3 Sync のオプション (
--deleteとか) を追加できたり、除外設定--excludeをまとめて設定できたり、いくつかのオプションがある。詳しくは README を参照。Docker Compose の例
Jupyter Notebook を Docker で動かしており、その Notebook を
notebooksという Docker Volume に保存している場合の例。docker-compose.ymlversion: '3' services: backup-s3: image: hoto17296/backup-s3 environment: TZ: Asia/Tokyo SCHEDULE: '0 21 * * *' AWS_ACCESS_KEY_ID: XXXXXXXXXXXXXXXXXXXX AWS_SECRET_ACCESS_KEY: xxxxxxxxxxxxxxxxxxxxxxxxxxxxxxxxxxxxxxxx S3_URL: s3://backup/notebooks SYNC_OPTIONS: --delete EXCLUDE_FILES: '*.git/*, *.ipynb_checkpoints/*' volumes: - notebooks:/src上記の指定をすると、
notebooksVolume の中身を日本時間 21 時にs3://backup/notebooksにバックアップをとってくれる。追加で
--deleteオプションも指定しているので、削除されたファイルは自動的に S3 バケットからも削除される。参考
ちゃんとした Web サービスなどを運用するなら、そもそも「状態」は外部 DB に切り出せという話はある ↩