- 投稿日:2019-05-30T23:06:11+09:00
【Kotlin】パイプライン関数を作る
JavaScript への追加が検討されているパイプライン演算子を Kotlin で作ってみた。
この記事に触発されました。
→Pipe関数の力JavaScript のパイプライン演算子とは
c( b( a ) )↑のようなコードを↓のように書ける。
a |> b |> c詳しくは
→パイプライン演算子 - JavaScript | MDNKotlin で実装してみる
infix fun <T, R> T.pipe(unary: (T) -> R): R = unary(this)
|>というような演算子は作れないので、pipeで我慢する。使用例:
fun main() {
    "Hello, World!" pipe ::println // > Hello, World!
    Math.PI pipe Math::round pipe ::println // > 3
}
やっぱり記号にしたい?
まあいくつかの記号は使えますけど…。
operator fun <T, R> T.plus(unary: (T) -> R): R = unary(this)
operator fun <T, R> T.minus(unary: (T) -> R): R = unary(this)
operator fun <T, R> T.times(unary: (T) -> R): R = unary(this)
operator fun <T, R> T.div(unary: (T) -> R): R = unary(this)
operator fun <T, R> T.rem(unary: (T) -> R): R = unary(this)
operator fun <T, R> T.rangeTo(unary: (T) -> R): R = unary(this)
使用例:
fun main() {
    "Hello, World!" as Any? + ::println // > Hello, World!
    "Hello, World!" - ::println // > Hello, World!
    "Hello, World!" * ::println // > Hello, World!
    "Hello, World!" / ::println // > Hello, World!
    "Hello, World!" % ::println // > Hello, World!
    "Hello, World!"..::println // > Hello, World!
}
+だけはprintlnのどのオーバーロードを使えばよいか解決できなかったため、as Any?で明示した。/以上
- 投稿日:2019-05-30T15:31:29+09:00
AndroidStudio 他のプロジェクトのモジュール内のC++を参照しよう(Java / kotlin)
「AndroidStudio モジュール内のC++を参照する(Java / kotlin)」
https://qiita.com/sanoh/items/484e61729ab69f250fecで作成したモジュールを他のプロジェクトから参照する手順の覚書
■Step1:プロジェクト作成
「File」「New」「New Project」からプロジェクトを作成します。
「Native C++」を選択してから「Next」を押します。
今回のNameは「test03」で
Save locationは作業ディレクトリを指定
Languageは「Java」を指定します(Kotklinでも問題ないです)
設定が終われば「Next」で次の画面に
「Finish」でプロジェクト作成は終了です。■Step2:他のプロジェクトのモジュールを参照
settings.gradleを編集して外部のモジュールを参照します。
settings.gradleinclude ':app', ':native-module' project(':native-module').projectDir = new File(settingsDir, '../test02/test02module')参照したいtest02moduleの位置は、ここのプロジェクトで調整してください
ここで「Sync Now」を押せば
プロジェクトに追加されたことがわかると思います。次にアプリケーションのbuild.gradle(Module: app)を編集します。
build.gradleandroid { : : } dependencies { : : implementation project(':native-module') }native-moduleを追加したのでこれでアプリケーションから参照が可能になります。
■Step3:アプリケーションから参照
CmakeList.txtに登録します。
CmakeList.txt  # For more information about using CMake with Android Studio, read the # documentation: https://d.android.com/studio/projects/add-native-code.html # Sets the minimum version of CMake required to build the native library. cmake_minimum_required(VERSION 3.4.1) # Creates and names a library, sets it as either STATIC # or SHARED, and provides the relative paths to its source code. # You can define multiple libraries, and CMake builds them for you. # Gradle automatically packages shared libraries with your APK. add_library( # Sets the name of the library. native-lib # Sets the library as a shared library. SHARED # Provides a relative path to your source file(s). native-lib.cpp) include_directories(../../../../../test02/test02module/src/main/cpp) add_library( native-module SHARED IMPORTED ) set_target_properties( native-module PROPERTIES IMPORTED_LOCATION ../../../../../../test02/test02module/src/lib/${ANDROID_ABI}/libnative-module.so) # Searches for a specified prebuilt library and stores the path as a # variable. Because CMake includes system libraries in the search path by # default, you only need to specify the name of the public NDK library # you want to add. CMake verifies that the library exists before # completing its build. find_library( # Sets the name of the path variable. log-lib # Specifies the name of the NDK library that # you want CMake to locate. log) # Specifies libraries CMake should link to your target library. You # can link multiple libraries, such as libraries you define in this # build script, prebuilt third-party libraries, or system libraries. target_link_libraries( # Specifies the target library. native-lib native-module # Links the target library to the log library # included in the NDK. ${log-lib})最後にnative-lib.cppから、モジュール内のクラスを参照します。
native-lib.cpp#include <jni.h> #include <string> #include "subTest.h" extern "C" JNIEXPORT jstring JNICALL Java_l_toox_test03_MainActivity_stringFromJNI( JNIEnv *env, jobject /* this */) { subTest ss; ss.Hoge(32); std::string hello = "Hello from C++"; return env->NewStringUTF(hello.c_str()); }


- 投稿日:2019-05-30T09:52:57+09:00
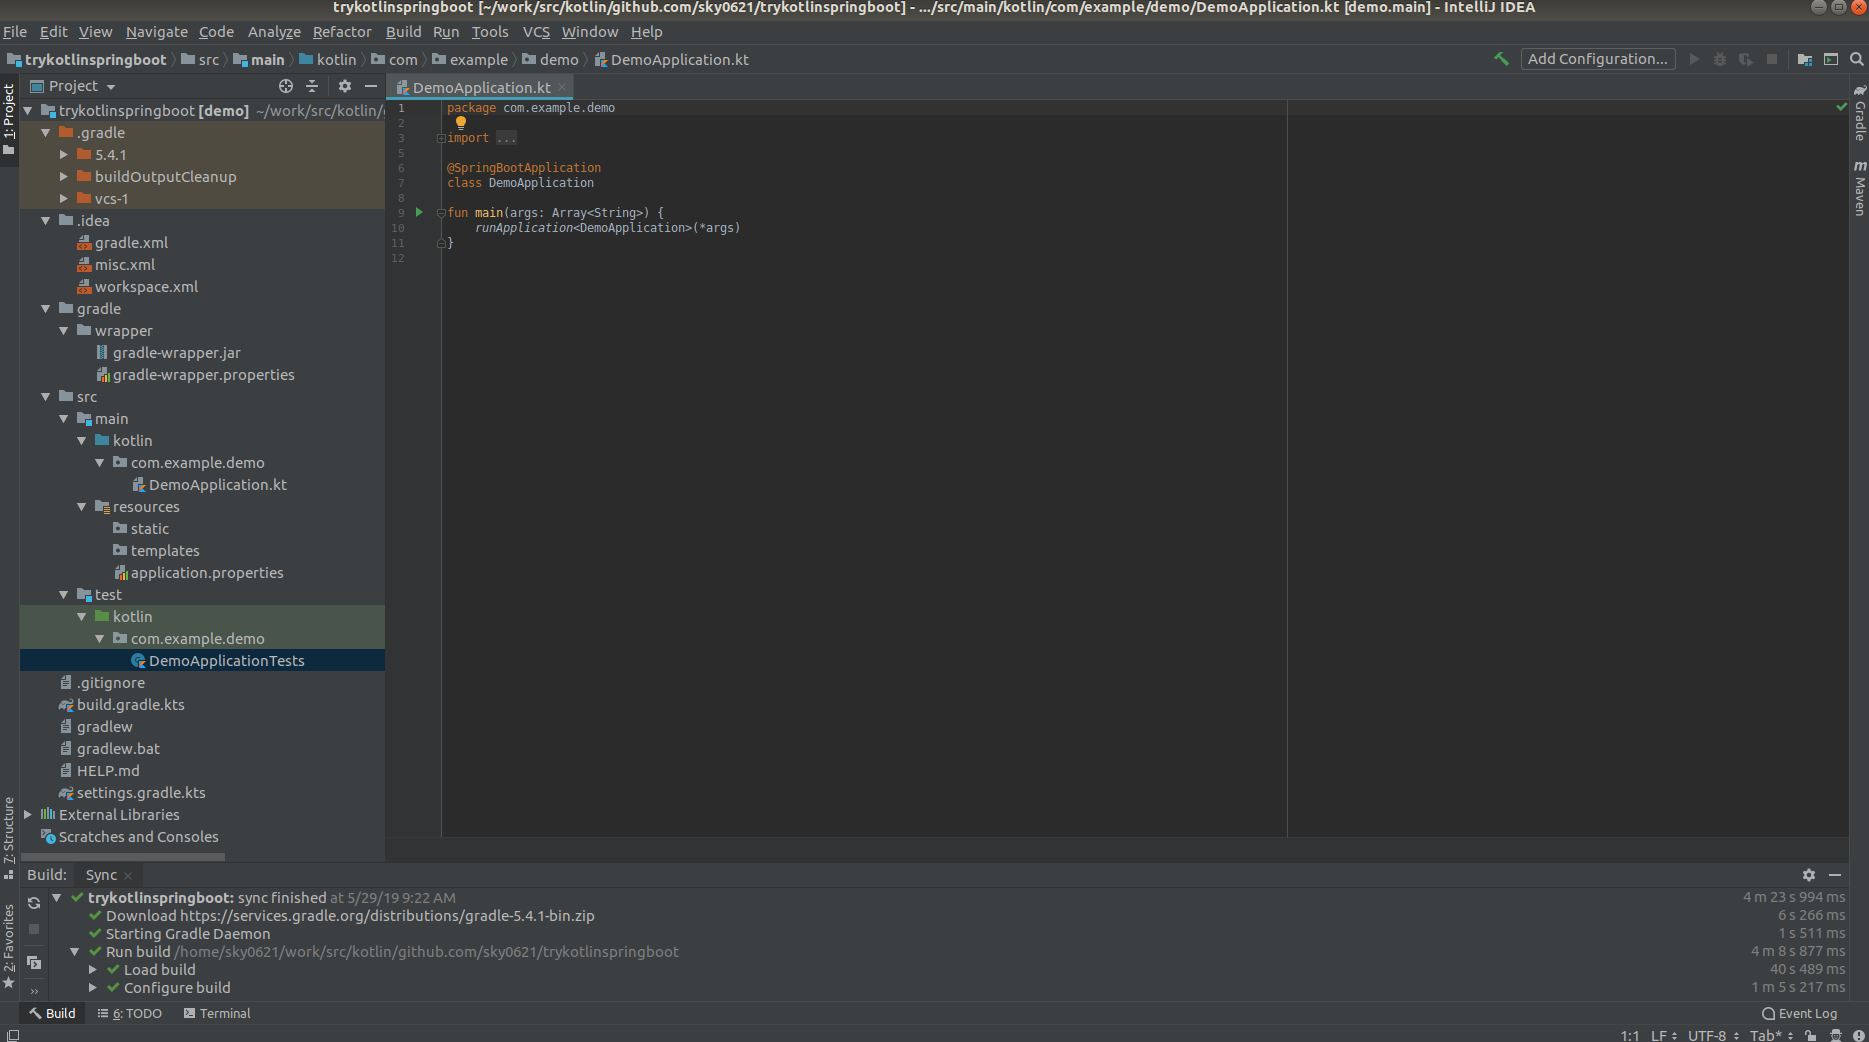
【試行】KotlinとSpring Bootの組み合わせでIntelliJプロジェクト作成からローカル環境でのアプリケーション起動まで
お題
表題について、実践。
KotlinもSpring Bootも業務では未経験で、何年か前に独学で少しやったくらいなので、まったくもって新鮮な気持ちで始める。今回のソース全量は下記。
https://github.com/sky0621/try-kotlin-springboot/tree/master/trykotlinspringboot開発環境
# OS - Linux(Ubuntu)
$ cat /etc/os-release
NAME="Ubuntu"
VERSION="18.04.2 LTS (Bionic Beaver)"
# IDE - IntelliJ IDEA
IntelliJ IDEA 2019.1.2 (Community Edition)
Build #IC-191.7141.44, built on May 7, 2019
JRE: 1.8.0_202-release-1483-b49 amd64
JVM: OpenJDK 64-Bit Server VM by JetBrains s.r.o
Linux 4.15.0-47-generic
# Kotlin
Current Kotlin plugin version: 1.3.31-release-IJ2019.1-1# Java
11(java version "11.0.3"# Spring Boot
2.1.5# Docker
$ sudo docker version
Client:
 Version:           18.09.2
 API version:       1.39
 Go version:        go1.10.4
 Git commit:        6247962
 Built:             Tue Feb 26 23:52:23 2019
 OS/Arch:           linux/amd64
 Experimental:      false

Server:
 Engine:
  Version:          18.09.2
  API version:      1.39 (minimum version 1.12)
  Go version:       go1.10.4
  Git commit:       6247962
  Built:            Wed Feb 13 00:24:14 2019
  OS/Arch:          linux/amd64
  Experimental:     false
実践
プロジェクト作成
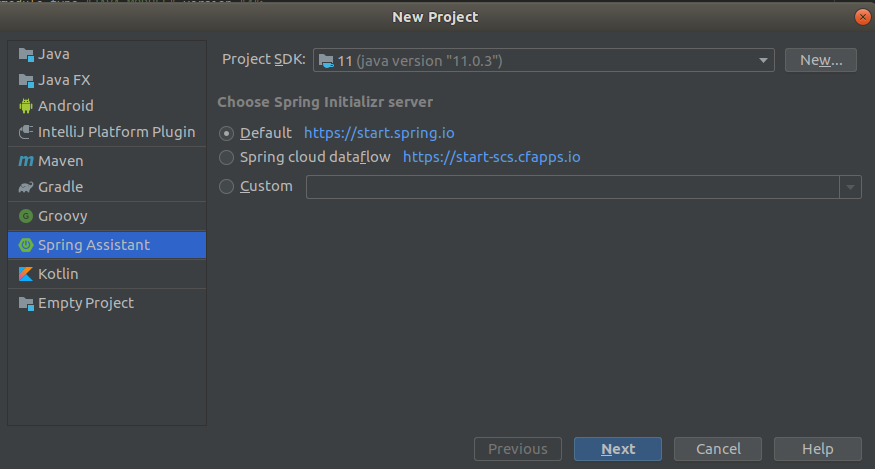
01) IntelliJのメニューより、 [File] -> [New] -> [Project...] を選択
02) Spring Assistantを選択し、Project SDKを選択後、 [Next] 押下
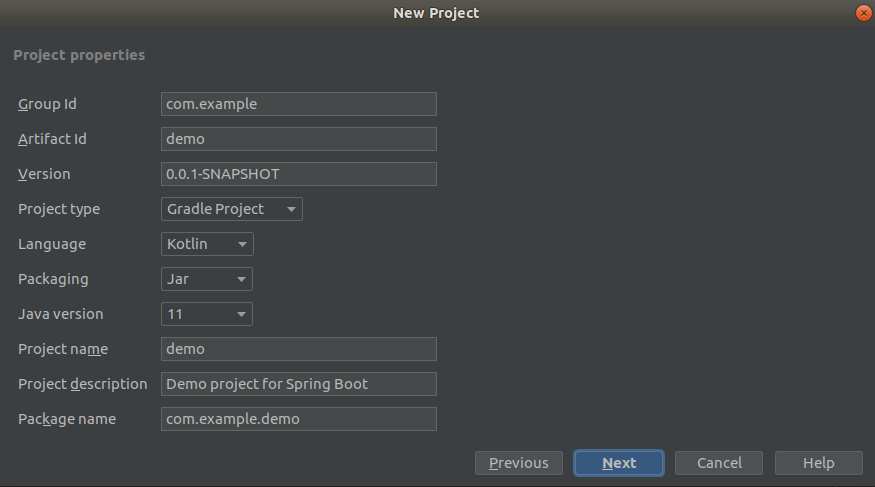
03) Project Typeは「
Gradle Project」、Languageは「Kotlin」、Java versionは「11」を選択後、 [Next] 押下
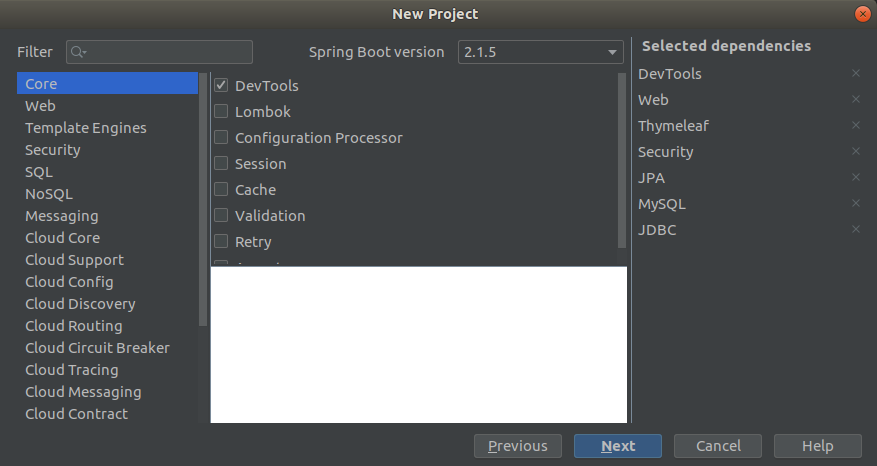
04) 使用ライブラリの選定後、 [Next] 押下
正直、今の時点で何を使うかなんてわからない。。。
ので、適当な感覚で選定。
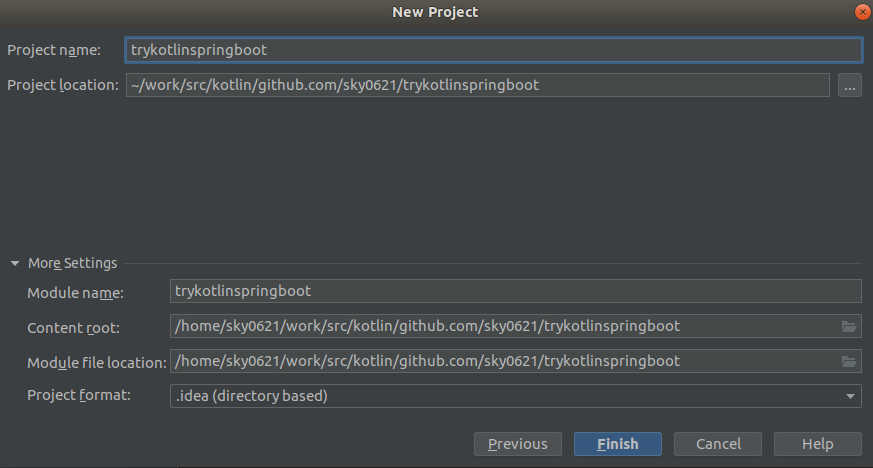
05) プロジェクト名を決めて、 [Finish] 押下
後、 [Next] 押下
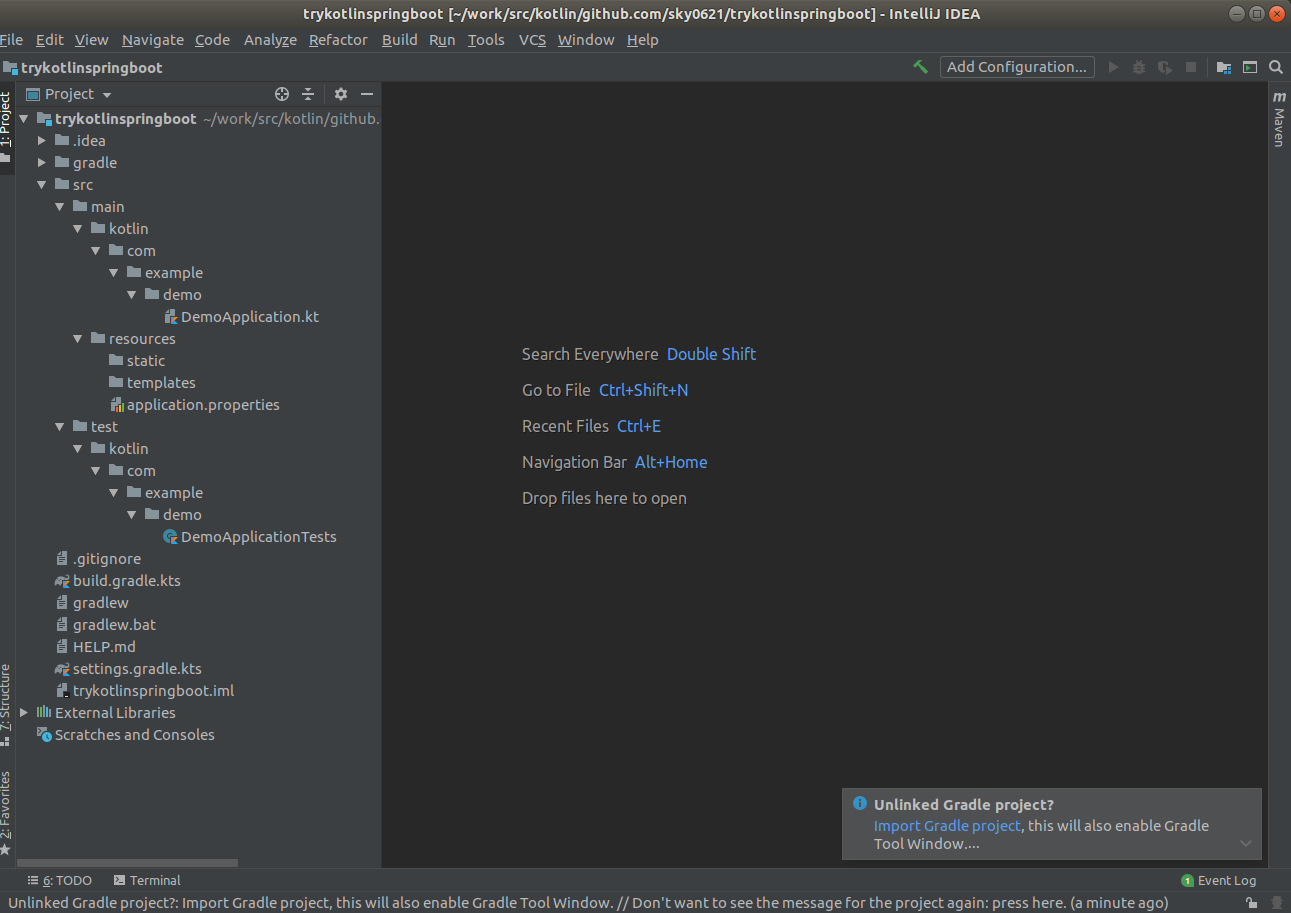
06) プロジェクト完成
画面右下に「Unlinked Gradle project?」とあり、「
Import Gradle project」というリンクがあるので押下。
表示されたウインドウにてデフォルトのまま「OK」押下。
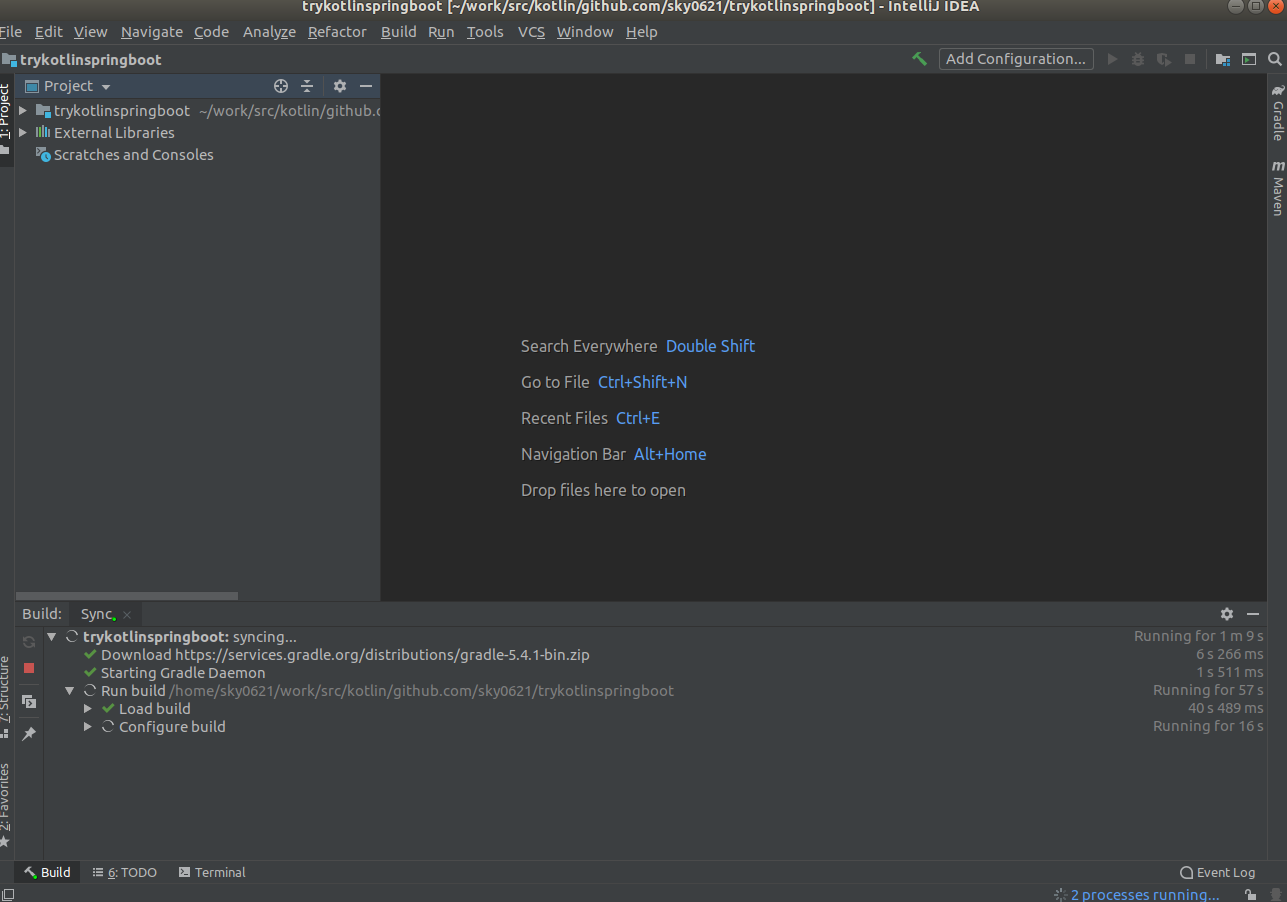
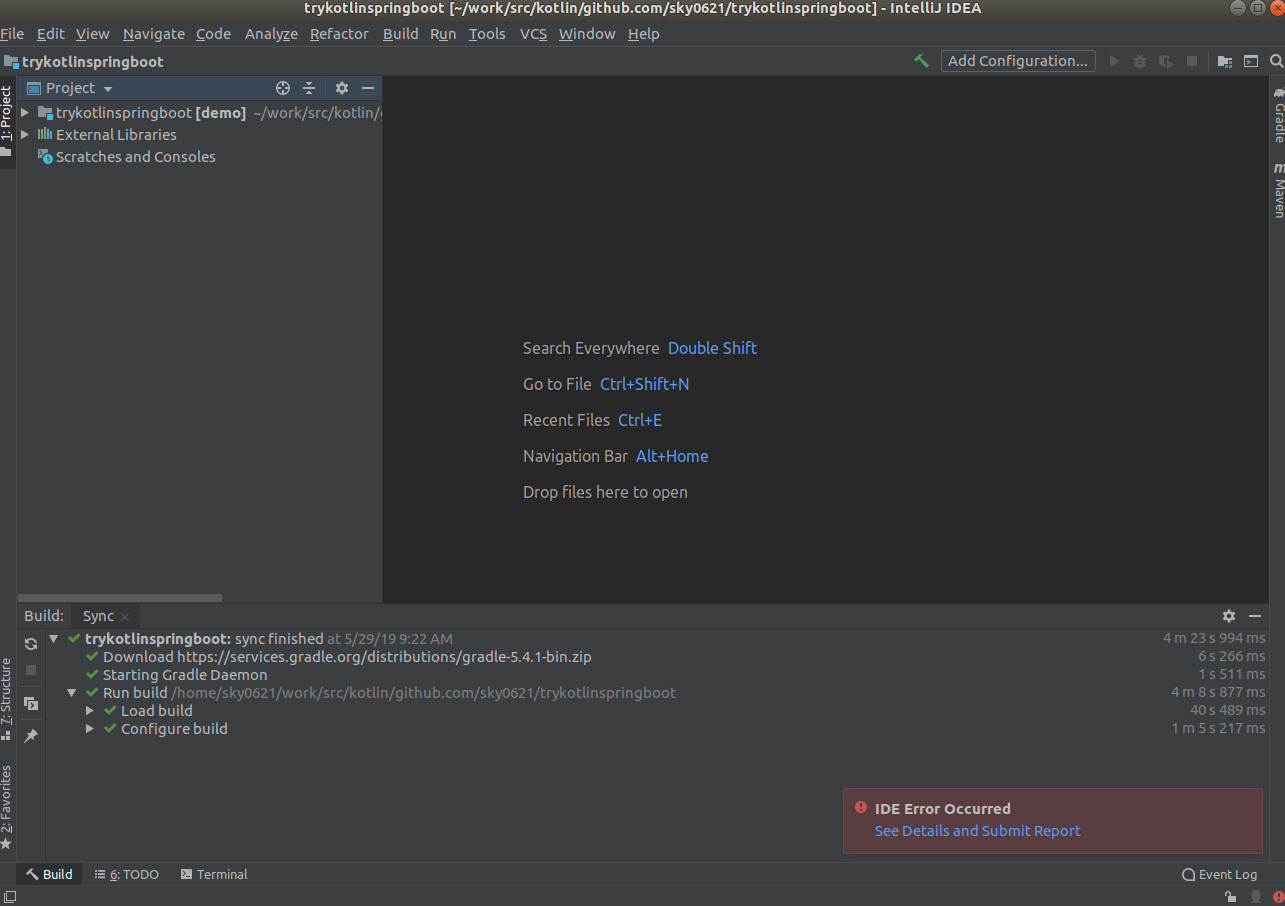
すると、、、
Gradleプロジェクトとしてのセッティング??
そして、終わったかと思いきや、「IDE Error Occurred」。
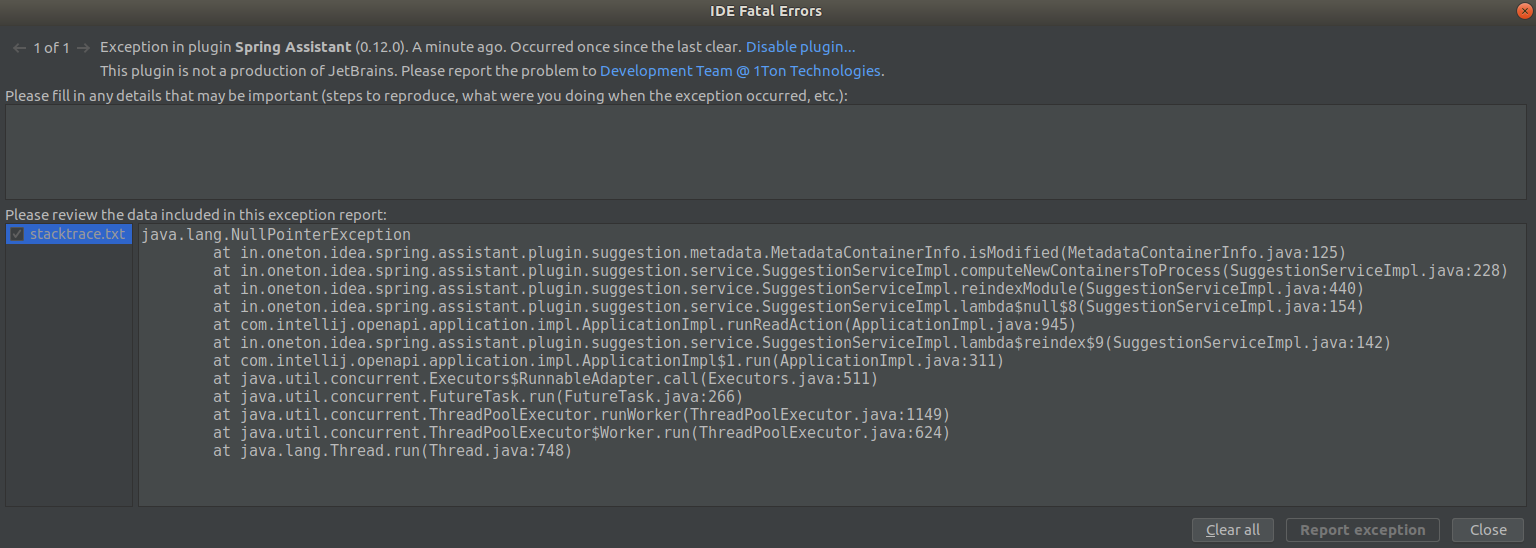
「
See Details and Submit Report」押下すると、NullPointerExceptionが起きていた。。。
ただ、以下の通り、ひとまず必要そうなファイルは生成されているようなので、いったんプロジェクト作成完了としよう。
ローカル起動
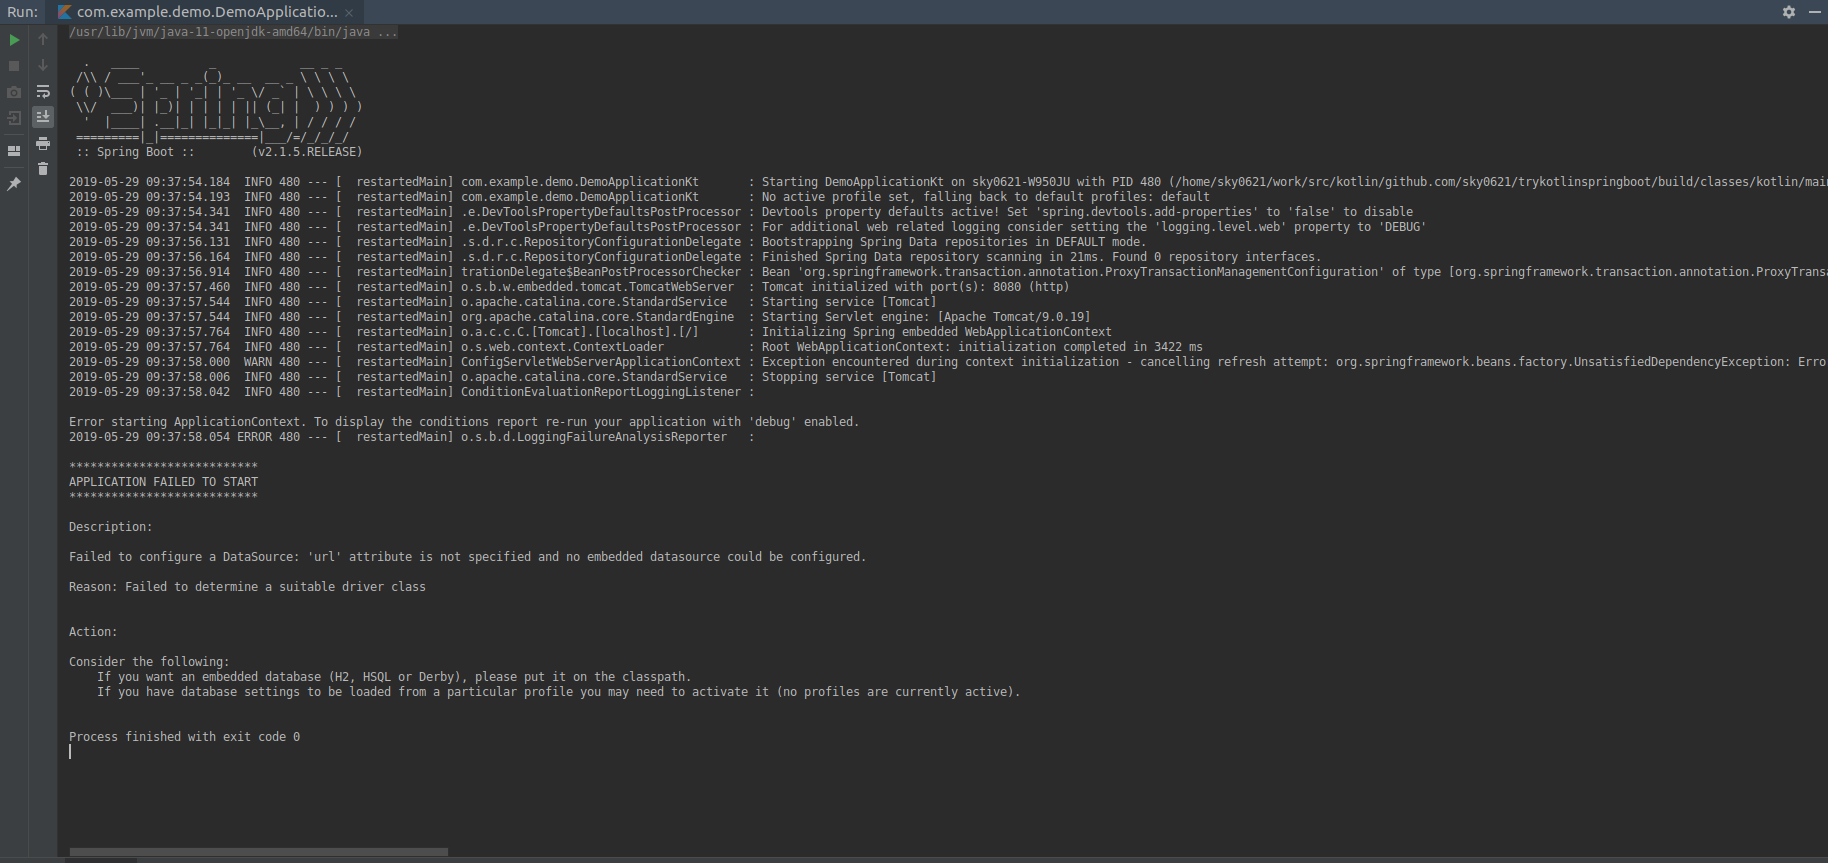
ソースの中身の確認などはさておき、まずは起動。
ん? 起動に失敗した。Failed to configure a DataSource: 'url' attribute is not specified and no embedded datasource could be configured. Reason: Failed to determine a suitable driver class Action: Consider the following: If you want an embedded database (H2, HSQL or Derby), please put it on the classpath. If you have database settings to be loaded from a particular profile you may need to activate it (no profiles are currently active).なるほど、プロジェクト作成時のライブラリ選定で「
JPA」とか「MySQL」とかDB使う想定でチェック付けたけど、「DB使うんだからデータソースの定義しろ!」ってことか。
そういえば、JDBCドライバーが必要か。
ソースコード中でDB使うコードを書いていなくても、アプリケーション起動の時点でそのへんチェック入るんだね。データソースの定義
ひとまず定義があればいいのかな。
[application.properties]spring.datasource.url=jdbc:mysql://localhost:3306/xxxx spring.datasource.username=xxxx spring.datasource.password=xxxx spring.datasource.driverClassName=com.mysql.jdbc.Driver spring.jpa.database=MYSQL spring.jpa.hibernate.ddl-auto=update再度ローカル起動
  .   ____          _            __ _ _
 /\\ / ___'_ __ _ _(_)_ __  __ _ \ \ \ \
( ( )\___ | '_ | '_| | '_ \/ _` | \ \ \ \
 \\/  ___)| |_)| | | | | || (_| |  ) ) ) )
  '  |____| .__|_| |_|_| |_\__, | / / / /
 =========|_|==============|___/=/_/_/_/
 :: Spring Boot ::        (v2.1.5.RELEASE)

2019-05-30 09:05:43.971  INFO 4897 --- [  restartedMain] com.example.demo.DemoApplicationKt       : Starting DemoApplicationKt on sky0621-W950JU with PID 4897 (/home/sky0621/work/src/kotlin/github.com/sky0621/trykotlinspringboot/build/classes/kotlin/main started by sky0621 in /home/sky0621/work/src/kotlin/github.com/sky0621/trykotlinspringboot)
2019-05-30 09:05:43.977  INFO 4897 --- [  restartedMain] com.example.demo.DemoApplicationKt       : No active profile set, falling back to default profiles: default
2019-05-30 09:05:44.133  INFO 4897 --- [  restartedMain] .e.DevToolsPropertyDefaultsPostProcessor : Devtools property defaults active! Set 'spring.devtools.add-properties' to 'false' to disable
        〜〜〜 省略 〜〜〜
2019-05-30 09:05:48.459  INFO 4897 --- [  restartedMain] com.zaxxer.hikari.HikariDataSource       : HikariPool-1 - Starting...
2019-05-30 09:05:48.465  WARN 4897 --- [  restartedMain] com.zaxxer.hikari.util.DriverDataSource  : Registered driver with driverClassName=com.mysql.jdbc.Driver was not found, trying direct instantiation.
2019-05-30 09:05:49.579 ERROR 4897 --- [  restartedMain] com.zaxxer.hikari.pool.HikariPool        : HikariPool-1 - Exception during pool initialization.

com.mysql.cj.jdbc.exceptions.CommunicationsException: Communications link failure

The last packet sent successfully to the server was 0 milliseconds ago. The driver has not received any packets from the server.
    at com.mysql.cj.jdbc.exceptions.SQLError.createCommunicationsException(SQLError.java:174) ~[mysql-connector-java-8.0.16.jar:8.0.16]
    at com.mysql.cj.jdbc.exceptions.SQLExceptionsMapping.translateException(SQLExceptionsMapping.java:64) ~[mysql-connector-java-8.0.16.jar:8.0.16]
    at com.mysql.cj.jdbc.ConnectionImpl.createNewIO(ConnectionImpl.java:835) ~[mysql-connector-java-8.0.16.jar:8.0.16]
        〜〜〜 省略 〜〜〜
    at java.base/jdk.internal.reflect.DelegatingMethodAccessorImpl.invoke(DelegatingMethodAccessorImpl.java:43) ~[na:na]
    at java.base/java.lang.reflect.Method.invoke(Method.java:566) ~[na:na]
    at org.springframework.boot.devtools.restart.RestartLauncher.run(RestartLauncher.java:49) ~[spring-boot-devtools-2.1.5.RELEASE.jar:2.1.5.RELEASE]
Caused by: com.mysql.cj.exceptions.CJCommunicationsException: Communications link failure

      〜〜〜 省略 〜〜〜

The last packet sent successfully to the server was 0 milliseconds ago. The driver has not received any packets from the server.
    at java.base/jdk.internal.reflect.NativeConstructorAccessorImpl.newInstance0(Native Method) ~[na:na]
    at java.base/jdk.internal.reflect.NativeConstructorAccessorImpl.newInstance(NativeConstructorAccessorImpl.java:62) ~[na:na]
    at java.base/jdk.internal.reflect.DelegatingConstructorAccessorImpl.newInstance(DelegatingConstructorAccessorImpl.java:45) ~[na:na]
        〜〜〜 省略 〜〜〜
    at com.mysql.cj.NativeSession.connect(NativeSession.java:152) ~[mysql-connector-java-8.0.16.jar:8.0.16]
    at com.mysql.cj.jdbc.ConnectionImpl.connectOneTryOnly(ConnectionImpl.java:955) ~[mysql-connector-java-8.0.16.jar:8.0.16]
    at com.mysql.cj.jdbc.ConnectionImpl.createNewIO(ConnectionImpl.java:825) ~[mysql-connector-java-8.0.16.jar:8.0.16]
    ... 53 common frames omitted
Caused by: java.net.ConnectException: Connection refused (Connection refused)
    at java.base/java.net.PlainSocketImpl.socketConnect(Native Method) ~[na:na]
    at java.base/java.net.AbstractPlainSocketImpl.doConnect(AbstractPlainSocketImpl.java:399) ~[na:na]
    at java.base/java.net.AbstractPlainSocketImpl.connectToAddress(AbstractPlainSocketImpl.java:242) ~[na:na]
        〜〜〜 省略 〜〜〜
    at java.base/java.net.Socket.connect(Socket.java:591) ~[na:na]
    at com.mysql.cj.protocol.StandardSocketFactory.connect(StandardSocketFactory.java:155) ~[mysql-connector-java-8.0.16.jar:8.0.16]
    at com.mysql.cj.protocol.a.NativeSocketConnection.connect(NativeSocketConnection.java:65) ~[mysql-connector-java-8.0.16.jar:8.0.16]
    ... 56 common frames omitted


Process finished with exit code 0
例外発生。実際にDBに接続しにいくようなので、ローカル環境にMySQLサーバ立てるか。
ローカル環境にてMySQLサーバ起動
docker-composeでMySQLコンテナ立てることにする。
※Dockerならびにdocker-compose自体のインストールやらセッティングやらは記事内容と無関係なので省略docker-compose.ymlを作成
[docker-compose.yml]version: '3' services: db: restart: always image: mysql:5.7.24 command: mysqld --character-set-server=utf8 --collation-server=utf8_unicode_ci ports: - "3306:3306" environment: MYSQL_ROOT_PASSWORD: rootpass MYSQL_USER: localuser MYSQL_PASSWORD: localpass MYSQL_DATABASE: localdbMySQLコンテナ起動
$ sudo docker-compose up
Creating network "trykotlinspringboot_default" with the default driver
Pulling db (mysql:5.7.24)...
5.7.24: Pulling from library/mysql
177e7ef0df69: Pull complete
cac25352c4c8: Pull complete
8585afabb40a: Pull complete
1e4af4996053: Pull complete
c326522894da: Pull complete
9020d6b6b171: Pull complete
55eb37ec6e5f: Pull complete
1a9d2f77e0e7: Pull complete
d7e648ad64aa: Pull complete
4120d828ea6b: Pull complete
3b39dc5451af: Pull complete
Creating trykotlinspringboot_db_1_7075558a2fe2 ... done
Attaching to trykotlinspringboot_db_1_dae5d2a605f3
db_1_dae5d2a605f3 | Initializing database
db_1_dae5d2a605f3 | 2019-05-30T00:33:54.062776Z 0 [Warning] TIMESTAMP with implicit DEFAULT value is deprecated. Please use --explicit_defaults_for_timestamp server option (see documentation for more details).
db_1_dae5d2a605f3 | 2019-05-30T00:33:54.510746Z 0 [Warning] InnoDB: New log files created, LSN=45790
db_1_dae5d2a605f3 | 2019-05-30T00:33:54.597840Z 0 [Warning] InnoDB: Creating foreign key constraint system tables.
db_1_dae5d2a605f3 | 2019-05-30T00:33:54.670311Z 0 [Warning] No existing UUID has been found, so we assume that this is the first time that this server has been started. Generating a new UUID: 9acfcca7-8272-11e9-98b0-0242ac1c0002.
db_1_dae5d2a605f3 | 2019-05-30T00:33:54.671851Z 0 [Warning] Gtid table is not ready to be used. Table 'mysql.gtid_executed' cannot be opened.
db_1_dae5d2a605f3 | 2019-05-30T00:33:54.672400Z 1 [Warning] root@localhost is created with an empty password ! Please consider switching off the --initialize-insecure option.

  〜〜〜 省略 〜〜〜

db_1_dae5d2a605f3 | 2019-05-30T00:34:06.132207Z 0 [Warning] 'tables_priv' entry 'user mysql.session@localhost' ignored in --skip-name-resolve mode.
db_1_dae5d2a605f3 | 2019-05-30T00:34:06.132223Z 0 [Warning] 'tables_priv' entry 'sys_config mysql.sys@localhost' ignored in --skip-name-resolve mode.
db_1_dae5d2a605f3 | 2019-05-30T00:34:06.136900Z 0 [Note] Event Scheduler: Loaded 0 events
db_1_dae5d2a605f3 | 2019-05-30T00:34:06.137378Z 0 [Note] mysqld: ready for connections.
db_1_dae5d2a605f3 | Version: '5.7.24'  socket: '/var/run/mysqld/mysqld.sock'  port: 3306  MySQL Community Server (GPL)
MySQLコンテナ起動確認
$ sudo docker ps
[sudo] password for sky0621:
CONTAINER ID        IMAGE               COMMAND                  CREATED             STATUS              PORTS                               NAMES
358a3965bd0e        mysql:5.7.24        "docker-entrypoint.s…"   2 minutes ago       Up 2 minutes        0.0.0.0:3306->3306/tcp, 33060/tcp   trykotlinspringboot_db_1_dae5d2a605f3
$ sudo docker ps [sudo] password for sky0621: CONTAINER ID IMAGE COMMAND CREATED STATUS PORTS NAMES 358a3965bd0e mysql:5.7.24 "docker-entrypoint.s…" 2 minutes ago Up 2 minutes 0.0.0.0:3306->3306/tcp, 33060/tcp trykotlinspringboot_db_1_dae5d2a605f3 $ $ sudo docker exec -it 358a3965bd0e /bin/sh # mysql -u localuser -p Enter password: Welcome to the MySQL monitor. Commands end with ; or \g. Your MySQL connection id is 2 Server version: 5.7.24 MySQL Community Server (GPL) Copyright (c) 2000, 2018, Oracle and/or its affiliates. All rights reserved. Oracle is a registered trademark of Oracle Corporation and/or its affiliates. Other names may be trademarks of their respective owners. Type 'help;' or '\h' for help. Type '\c' to clear the current input statement. mysql> show databases; +--------------------+ | Database | +--------------------+ | information_schema | | localdb | +--------------------+ 2 rows in set (0.00 sec) mysql>データソースの定義
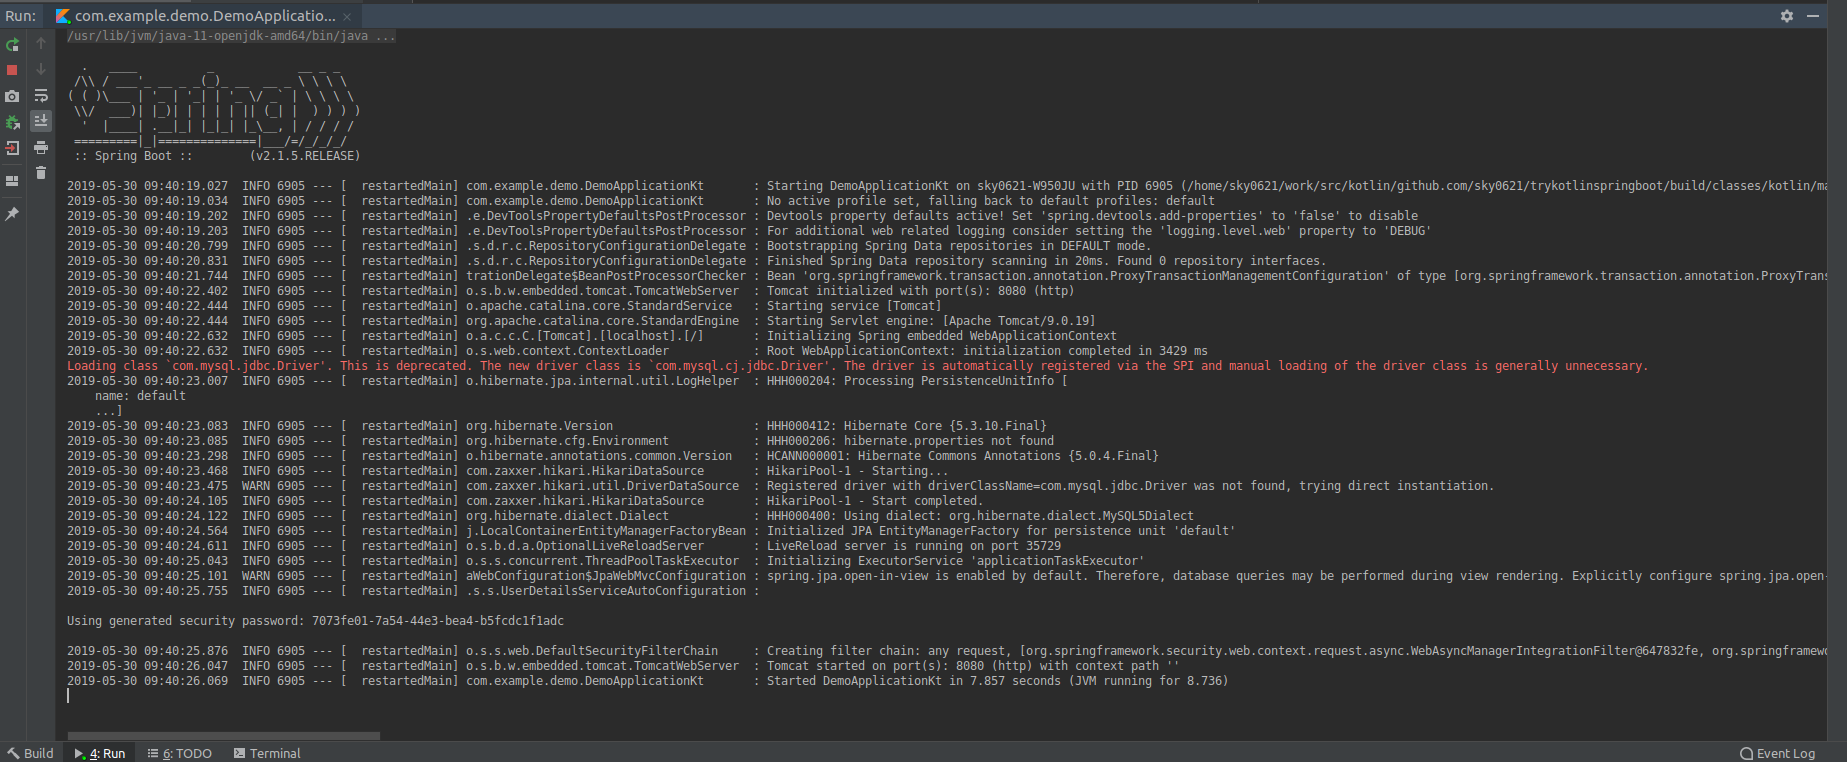
docker-compose.yml記載のDB接続情報に従い、以下のように修正。[application.properties]spring.datasource.url=jdbc:mysql://localhost:3306/localdb spring.datasource.username=localuser spring.datasource.password=localpass spring.datasource.driverClassName=com.mysql.jdbc.Driver spring.jpa.database=MYSQL spring.jpa.hibernate.ddl-auto=update再々度ローカル起動
今度は起動したようだ。
Loading class `com.mysql.jdbc.Driver'. This is deprecated. The new driver class is `com.mysql.cj.jdbc.Driver'. The driver is automatically registered via the SPI and manual loading of the driver class is generally unnecessary.非推奨のJDBCドライバーを使っていたことで警告されていた様子。
「ドライバはSPIを介して自動的に登録され、ドライバクラスの手動ロードは通常不要です。」とのこと。
ライブラリ選定時に「JDBC」にチェック付けたけど、それが不要だったんだろうか・・・。備考
Springプロジェクトの作成は、IntelliJ に標準で付いていた Spring Assistant を使った。
以下に同様の機能を持っていると思われるWeb版(?)もあるみたい。
https://start.spring.io/