- 投稿日:2019-03-23T21:44:18+09:00
【Unity(C#)】シンプルな入れ替えパズルの入れ替えロジック
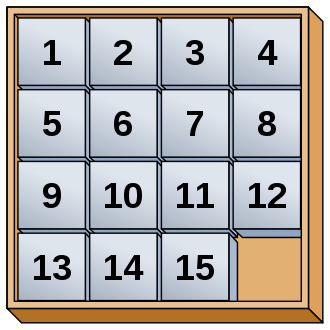
入れ替えパズルとは
こんな感じのやつです。
wiki物理的に移動可能なマス目が一つだけ用意されていて、ブロックを移動させることで
イラストを完成させたり、数字を並べ替えたり、道をつないだりするゲームです。unity1week
文字通り一週間でMade With Unityなゲームを完成させようという
デスマーチです。
愉快な企画です。今回、私も初参加しました。
毎回テーマが設定されて、そのテーマに沿った(こじつけでも可)ゲームを作成します。
今回のテーマは「つながる」でした。入れ替えパズルの上をUnityちゃんに歩いてもらってゴールを目指すというものを作りました。
入れ替えロジック
完成当初の入れ替えロジックは複雑に考えすぎてとんでもない遠回りな実装方法を取り入れてました。
今回作ったゲームもぐちゃぐちゃな実装のまま放置しているのでプレイする度に何かしらバグります。もっとシンプルにできないかと思って考えてみました。
最終的に思いついた(というか上司からヒントもらった)のは
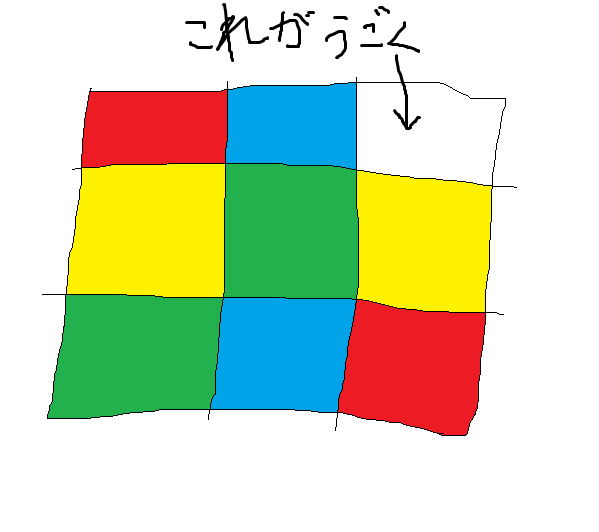
透明なブロックを動かして衝突した色付きブロックと入れ替えるという方法です。
上のとてもわかり易い図の通りです。透明なブロックの移動範囲(今回は移動できる回数にしました)を3×3で定めて、
そのエリア内を移動させます。以下、コードです。
    int x_MoveCount = 1;
    int z_MoveCount = 1;
    Vector3 thisObjPosition;
    Vector3 saveThisObjPosition;

    void Update()
    {

        if (Input.anyKey == false)
        {
            return;
        }

        thisObjPosition = this.gameObject.transform.position;

        if (Input.GetKeyDown(KeyCode.LeftArrow) && x_MoveCount > -1)
        {
            saveThisObjPosition = this.gameObject.transform.position;
            thisObjPosition.x -= 1;
            this.gameObject.transform.position = thisObjPosition;
            x_MoveCount -= 1;
        }

        if (Input.GetKeyDown(KeyCode.RightArrow) && x_MoveCount < 1)
        {
            saveThisObjPosition = this.gameObject.transform.position;
            thisObjPosition.x += 1;
            this.gameObject.transform.position = thisObjPosition;
            x_MoveCount += 1;
        }

        if (Input.GetKeyDown(KeyCode.UpArrow) && z_MoveCount < 1)
        {
            saveThisObjPosition = this.gameObject.transform.position;
            thisObjPosition.z += 1;
            this.gameObject.transform.position = thisObjPosition;
            z_MoveCount += 1;
        }

        if (Input.GetKeyDown(KeyCode.DownArrow) && z_MoveCount > -1)
        {
            saveThisObjPosition = this.gameObject.transform.position;
            thisObjPosition.z -= 1;
            this.gameObject.transform.position = thisObjPosition;
            z_MoveCount -= 1;
        }
    }

    void OnTriggerStay(Collider other)
    {
        //衝突してほしいゲームオブジェクトでなければ抜ける
        if (other.gameObject.tag != "Area")
        {
            return;
        }
        other.transform.position = saveThisObjPosition;
    }
透明なブロックの移動前の位置を保存
左の矢印キーを押した場合を例に見ていきます。
 if (Input.GetKeyDown(KeyCode.LeftArrow) && x_MoveCount > -1)
        {
            saveThisObjPosition = this.gameObject.transform.position;
            thisObjPosition.x -= 1;
            this.gameObject.transform.position = thisObjPosition;
            x_MoveCount -= 1;
        }
saveThisObjPosition = this.gameObject.transform.position;
で移動前の位置を保存してからポジションを変更しています。void OnTriggerEnter(Collider other) { //衝突してほしいゲームオブジェクトでなければ抜ける if (other.gameObject.tag != "Area") { return; } other.transform.position = saveThisObjPosition; }衝突したら、その移動前のポジションを
衝突したゲームオブジェクトに代入しています。
other.transform.position = saveThisObjPosition;
できました。
ただこれだと同時入力(同一フレーム内で2ボタンの入力を受け取る)が可能?なのか
めちゃくちゃ早く動かすとバグります。
どうやらUnityにはキーボード入力の受付を一時的に止めるみたいな機能はないっぽいです。
なのでInputManagerみたいなのを自分で作って同時入力できないようにする必要があります。
もう少し調べて見つかったらまた記事まとめます。
追記if (Input.anyKey == false) { isCheckInput = false; return; } if (isCheckInput == false) { if (Input.GetKeyDown(KeyCode.RightArrow)) { isCheckInput = true; } }こんな感じでいけました!
教えてくださった方ありがとうございます!
- 投稿日:2019-03-23T21:22:11+09:00
【Unity × ARKit】塗り絵ARを開発したので、技術的な話をまとめてみる
前々から作りたかった塗り絵AR、ついにUnityで開発できました!初の自作Unityアプリになります。2ヶ月ほどかかりましたが、何とか完成できて感無量…!!
塗り絵ARはすでに色々な企業でやられていますが、技術的な話は少なく、参考になるソースもあまりなくて、険しい道のりでした。。
ここでは自身の備忘録、また塗り絵ARに興味がある方に向けて、仕組み、実装のプロセスを記したいと思います!
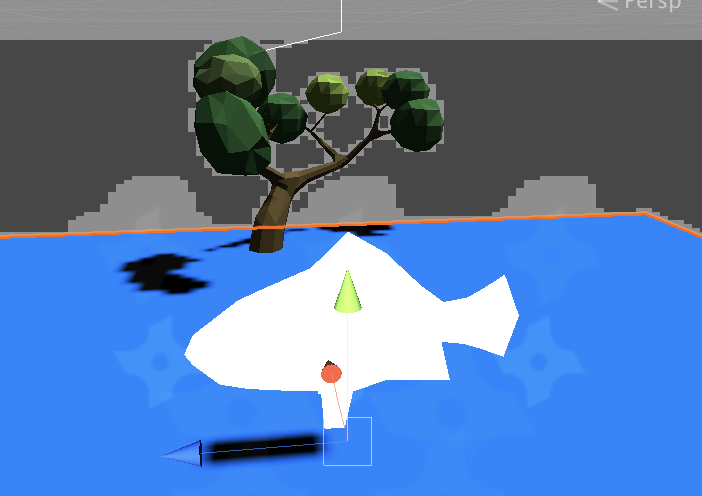
塗り絵ARの仕組み
塗り絵ARの概略をシンプルにまとめてみました。
- openCVでカメラからスキャン
- スキャンしたUVマップをモデルにラッピング
- ARkitでモデルを召喚!
勘所やポイント、詰まりやすいところ
モデリングについて
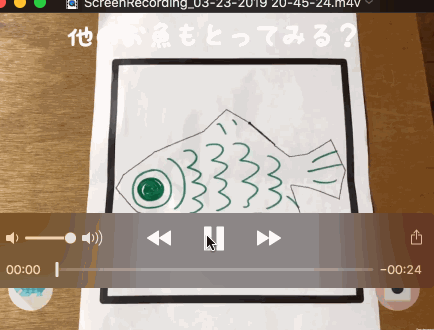
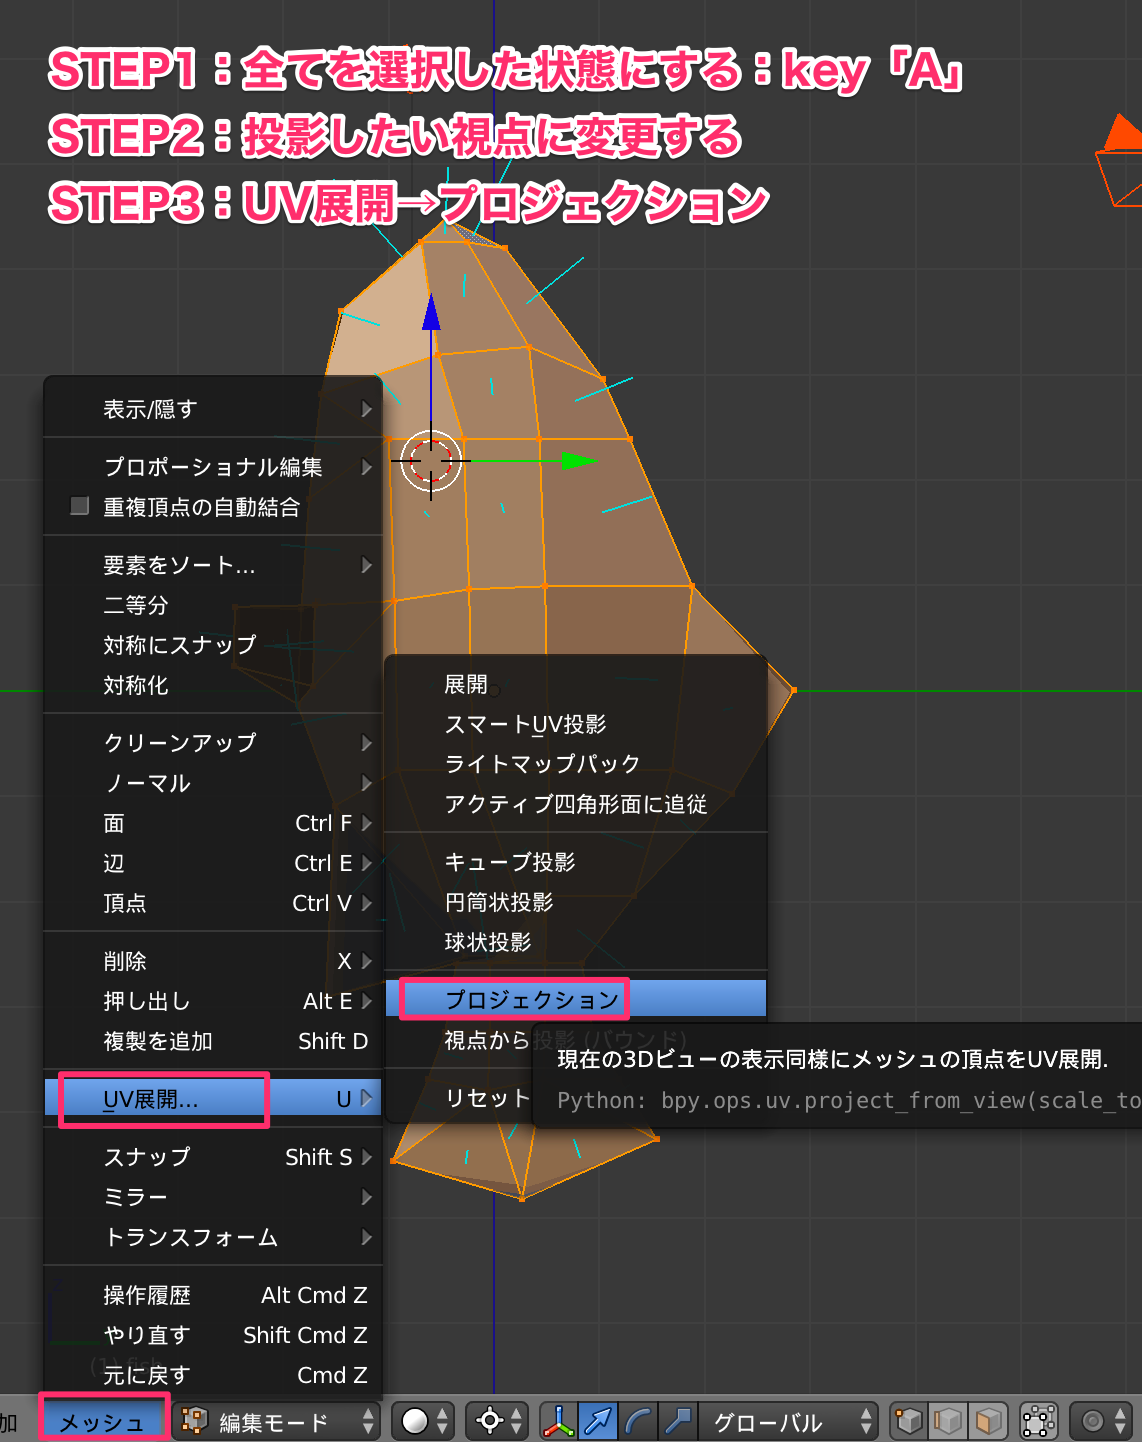
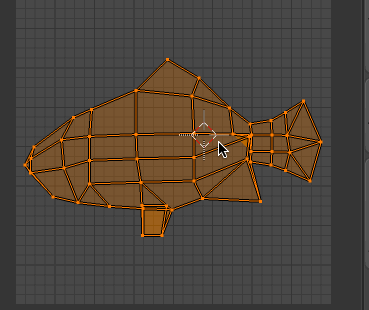
モデルに貼りつけるテクスチャ(ここでは塗り絵の下地)の型をそれっぽくする(今回は魚)よう設定するために、自分でモデリングする必要があります。
ソフトはフリーのblenderを使用しました!
Blenderのお話をすると長くなるので、ここでは塗り絵ARに特化して、勘所だけ紹介させて頂きます。ポイントはUV展開です。Blender限定ですが、操作はこちらになります!
・参考リンク:【Blender】テンキーでの視点変更【カメラ,フロント,ライト,トップ等】
ここまできたら、好きなように動かしたり回転させたら、ひとまず完了です!!!
・参考リンク:【Blender】キーボードでオブジェクトを移動・回転・拡大・縮小する方法(1/2)
openCVについて
次にopenCV(画像処理)を使って、塗られた絵をスキャンする必要があります。
(正確にスキャンするならプリンター一択ですが、手軽さに欠けるので、今回はカメラからスキャンします)Asset StoreにOpenCV for Unityというプラグインがありますが、有料です(号泣
わりとお高いので、お試しするには少し不安だったので、つい前に無料になったOpenCV plus Unityを使いました(2019/3/23現在)
情報はそこまで落ちていないですが、Demoを解読しながら使えば、使えなくはなかったです。
ただしプラグインをインポートする時、Unsafeコードをチェックする必要があります。こちらの記事を参考にすればOKですので、ご興味ある方はぜひお試しください!
File>BuildSettings>PlayerSettingsを開いてOtherSettingsの"Allow 'unsafe' Code"の部分にチェックを入れます。
ARKitのカメラ情報について
そもそもOpenCVでスキャンするには、webカメラで写した画像を渡す必要があります。ここで、もしARKitを使うとなると、Unityが用意しているクラス”WebCamTexture”が使えません。
そのかわり、ARKit Pluginで用いたカメラ画像を使うことになります。
流れとして、ARKit Pluginが最終的に映し出すマテリアル”YUVMaterial”のテクスチャを取得すればOK。UnityARVideo.csに
GetWebCamTexture関数を追加。流れはこんな感じです!
- マテリアルの内容をRenderTextureに書出
- Texture2Dにコピー
全ソースは下記の通り。ぜひ参考にしてみてください
UnityARVideo.csusing System; using System.Runtime.InteropServices; using UnityEngine; using UnityEngine.UI; using UnityEngine.Rendering; namespace UnityEngine.XR.iOS { public class UnityARVideo : MonoBehaviour { public Material m_ClearMaterial; private CommandBuffer m_VideoCommandBuffer; private Texture2D _videoTextureY; private Texture2D _videoTextureCbCr; private Matrix4x4 _displayTransform; private bool bCommandBufferInitialized; public void Start() { UnityARSessionNativeInterface.ARFrameUpdatedEvent += UpdateFrame; bCommandBufferInitialized = false; } void UpdateFrame(UnityARCamera cam) { _displayTransform = new Matrix4x4(); _displayTransform.SetColumn(0, cam.displayTransform.column0); _displayTransform.SetColumn(1, cam.displayTransform.column1); _displayTransform.SetColumn(2, cam.displayTransform.column2); _displayTransform.SetColumn(3, cam.displayTransform.column3); } void InitializeCommandBuffer() { m_VideoCommandBuffer = new CommandBuffer(); m_VideoCommandBuffer.Blit(null, BuiltinRenderTextureType.CurrentActive, m_ClearMaterial); GetComponent<Camera>().AddCommandBuffer(CameraEvent.BeforeForwardOpaque, m_VideoCommandBuffer); bCommandBufferInitialized = true; } void OnDestroy() { if (m_VideoCommandBuffer != null) { GetComponent<Camera>().RemoveCommandBuffer(CameraEvent.BeforeForwardOpaque, m_VideoCommandBuffer); } UnityARSessionNativeInterface.ARFrameUpdatedEvent -= UpdateFrame; bCommandBufferInitialized = false; } #if !UNITY_EDITOR && UNITY_IOS public void OnPreRender() { ARTextureHandles handles = UnityARSessionNativeInterface.GetARSessionNativeInterface().GetARVideoTextureHandles(); if (handles.IsNull()) { return; } if (!bCommandBufferInitialized) { InitializeCommandBuffer (); } Resolution currentResolution = Screen.currentResolution; // Texture Y if (_videoTextureY == null) { _videoTextureY = Texture2D.CreateExternalTexture(currentResolution.width, currentResolution.height, TextureFormat.R8, false, false, (System.IntPtr)handles.TextureY); _videoTextureY.filterMode = FilterMode.Bilinear; _videoTextureY.wrapMode = TextureWrapMode.Repeat; m_ClearMaterial.SetTexture("_textureY", _videoTextureY); } // Texture CbCr if (_videoTextureCbCr == null) { _videoTextureCbCr = Texture2D.CreateExternalTexture(currentResolution.width, currentResolution.height, TextureFormat.RG16, false, false, (System.IntPtr)handles.TextureCbCr); _videoTextureCbCr.filterMode = FilterMode.Bilinear; _videoTextureCbCr.wrapMode = TextureWrapMode.Repeat; m_ClearMaterial.SetTexture("_textureCbCr", _videoTextureCbCr); } _videoTextureY.UpdateExternalTexture(handles.TextureY); _videoTextureCbCr.UpdateExternalTexture(handles.TextureCbCr); m_ClearMaterial.SetMatrix("_DisplayTransform", _displayTransform); } #else public void SetYTexure(Texture2D YTex) { _videoTextureY = YTex; } public void SetUVTexure(Texture2D UVTex) { _videoTextureCbCr = UVTex; } public void OnPreRender() { if (!bCommandBufferInitialized) { InitializeCommandBuffer (); } m_ClearMaterial.SetTexture("_textureY", _videoTextureY); m_ClearMaterial.SetTexture("_textureCbCr", _videoTextureCbCr); m_ClearMaterial.SetMatrix("_DisplayTransform", _displayTransform); } #endif //追加した関数 public Texture2D GetWebCamTexture() { RenderTexture _arTexture = new RenderTexture(Screen.width, Screen.height, 0); Texture2D _arTexture2D = new Texture2D(_arTexture.width, _arTexture.height, TextureFormat.ARGB32, false); if (_videoTextureY != null && _videoTextureCbCr != null) { Graphics.Blit(null, _arTexture, m_ClearMaterial); RenderTexture back = RenderTexture.active; RenderTexture.active = _arTexture; _arTexture2D.ReadPixels(new Rect(0, 0, _arTexture.width, _arTexture.height), 0, 0); _arTexture2D.Apply(); RenderTexture.active = back; } return _arTexture2D; } } }・参考リンク
- UnityのARKit Pluginのカメラ映像を利用してなにかする
- Unity ARKit Plugin のカメラ映像を使って何かするにはShaderについて
ここでは、魅せ方のお話です。細かい内容なので、ご興味ある方のみご覧いただければと思います。
ARでより現実と調和させるには、影が必要不可欠です。一方で、塗り絵ARはライティングせず、ハッキリと表示させたい…という我儘な考えがありました。
この場合、UnlitでShaderを作成し、UsePassを通せば完成できます。
UsePass "Legacy Shaders/VertexLit/SHADOWCASTER"公式ページでサンプルもありますので、是非チェックしてみてください!
・参考URL:公式:頂点シェーダーとフラグメントシェーダーの例次に新たな問題があります。海面に影を映し出さなくてはなりません。この時、シェーダーを少し改造する必要があり、影を実装する方法は以下の手順を踏むことになります。
Tagsの中に"LightMode"="ForwardBase"(※1)を入れる
CGPROGRAMの下に#pragmaを追加。(#pragma multi_compile_fwdbase)
CGPROGRAM内でファイルをincludeする。(#include "UnityCG.cginc"、#include "AutoLight.cginc")
vertex shaderからfragment shaderに渡す構造体の定義の中にLIGHTING_COORDS(idx1, idx2)を入れる(※2)vertex shader内でTRANSFER_VERTEX_TO_FRAGMENT(o);(マクロ)を記述する。
(o)は出力される構造体名fragment shader内でLIGHT_ATTENUATION(i)マクロを使って影の度合いを得る
(i)は入力される構造体名fragment shader内でLIGHT_ATTENUATION(i)マクロを使って影の度合いを得る
(i)は入力される構造体名こちら参考に作ったShader(サンプル)がこちらです!
ToonSeaShader.shaderShader "Unlit/ToonSeaShader" { Properties { _Color ("Color", Color) = (1, 1, 1, 1) } SubShader { Tags { "RenderType"="Opaque"} LOD 100 Pass { CGPROGRAM #pragma vertex vert #pragma fragment frag #pragma multi_compile_fwdbase #include "UnityCG.cginc" #include "AutoLight.cginc" struct appdata { float4 vertex : POSITION; float2 uv : TEXCOORD0; }; struct v2f { float2 uv : TEXCOORD0; float4 vertex : SV_POSITION; LIGHTING_COORDS(0,1) }; fixed4 _Color; v2f vert (appdata v) { v2f o; o.vertex = UnityObjectToClipPos(v.vertex); o.uv = v.uv; TRANSFER_VERTEX_TO_FRAGMENT(o); return o; } fixed4 frag (v2f i) : SV_Target { fixed4 col = _Color; float attenuation = LIGHT_ATTENUATION(i); return col* attenuation; } ENDCG } } }今回、手順1にある"LightMode"="ForwardBase"は必要なかった(ライティングに関わらず、あえて単調にしたかった)ので、入れていません。
これが大まかな影付きのでShader作成の処理の流れになるので、フラグメントシェーダーの内部処理を変えれば、影がつけれるようになります!
ちなみに単純にただ影だけ出したい場合は、ARKit Pluginに用意されているMobileARShadowシェーダを使えば解決できます!
・参考リンク:Unityで始めるARKit入門 影の表示編最後に
塗り絵ARを作ってみて、Unityだけではなくモデリングやシェーダー、OpenCVなど総合的にスキルアップできました!(嬉しい)
折角ここまで頑張ったので、もっとブラッシュアップしたり種類を増やして、ストアに出そうかな…なんて思っています。
これから塗り絵ARを作ろう!と思っている方の参考にもなれば幸いです。
ここまでご覧いただき、ありがとうございましたm(_ _)m


- 投稿日:2019-03-23T17:46:18+09:00
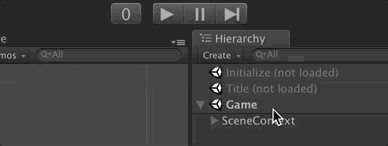
【Unity】実機と同じシーケンスで再生開始するボタンをプレイボタンの横に追加【エディタ拡張】
動作
InitializeシーンがすぐTitleシーンをロードしているのでわかりづらいが、[0]をクリックしたら現在アクティブなGameシーンからではなくInitializeシーンから再生が開始されている。上記gifだと最初からHierarchyに
Initializeシーンが置いてあるけど、なくても大丈夫。モチベーション
普段は Zenject でDIしているので各シーンを直接再生しながら開発しているけど、たまに実機と同じシーケンスで再生したいことがあった。
それまでは
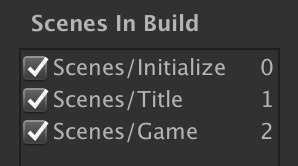
- Hierarchyに"Scenes In Build"で0にしてある
Initializeシーンを配置&Unload状態に- 必要なときに
Initializeシーンだけアクティブにして再生をやってたけど何度もやってて切り替えが面倒になったので、押しやすい場所にやりたいことを一発でやれるボタンを置こうと思った。
導入方法
再生ボタンの両サイドにボタンを配置できるエディタ拡張「unity-toolbar-extender」を入れて、以下のコードを適当な
Editor/以下に配置する。PlayFromScene0Button.cs#if UNITY_EDITOR using System.Linq; using UnityEditor; using UnityEditor.SceneManagement; using UnityEngine; using UnityEngine.SceneManagement; namespace UnityToolbarExtender { internal static class ToolbarStyles { public static readonly GUIStyle CommandButtonStyle; static ToolbarStyles() { CommandButtonStyle = new GUIStyle("Command") { fontSize = 16, alignment = TextAnchor.MiddleCenter, imagePosition = ImagePosition.ImageAbove, }; } } [InitializeOnLoad] public class PlayFromScene0Button { private const string Scene0HierarchyIndexKey = "Scene0HierarchyIndex"; private const string ShouldResetPlayModeStartSceneKey = "ShouldResetPlayModeStartScene"; private const string ButtonLabel = "0"; private const string ButtonTooltip = "Play from first scene of \"Scenes In Build\""; static PlayFromScene0Button() { ToolbarExtender.LeftToolbarGUI.Add(OnToolbarGUI); EditorApplication.playModeStateChanged += OnPlayModeStateChanged; } private static string GetConfigValue(string name) { return EditorUserSettings.GetConfigValue(name); } private static void SetConfigValue(string name, string value) { EditorUserSettings.SetConfigValue(name, value); } private static void ResetConfigValue(string name) { EditorUserSettings.SetConfigValue(name, null); } private static void OnToolbarGUI() { if (Validate() == false) return; GUILayout.FlexibleSpace(); // ボタン表示 if (GUILayout.Button(new GUIContent(ButtonLabel, ButtonTooltip), ToolbarStyles.CommandButtonStyle)) { PlayFromScene0(); } } [MenuItem("Edit/Play from scene 0 %@", true)] private static bool Validate() { // "Scenes In Build"にシーンが登録されていなければinvalid if (EditorBuildSettings.scenes.Length == 0) return false; // プレイモード時はinvalid if (EditorApplication.isPlayingOrWillChangePlaymode) return false; return true; } [MenuItem("Edit/Play from scene 0 %@", false, 149)] private static void PlayFromScene0() { // シーンを保存するかどうか尋ねる if (EditorSceneManager.SaveCurrentModifiedScenesIfUserWantsTo()) { var scene0Path = EditorBuildSettings.scenes[0].path; var scene0Asset = AssetDatabase.LoadAssetAtPath<SceneAsset>(scene0Path); var sceneSetups = EditorSceneManager.GetSceneManagerSetup(); var scene0Setup = sceneSetups.FirstOrDefault(s => s.path == scene0Path); // シーン0がHierarchyに存在&ロードされていない場合は閉じる(その状態でHierarchyに存在しているとうまく動かない) if (scene0Setup != null && scene0Setup.isLoaded == false) { var scene = SceneManager.GetSceneByPath(scene0Path); EditorSceneManager.CloseScene(scene, true); var scene0HierarchyIndex = sceneSetups.ToList().IndexOf(scene0Setup).ToString(); // シーン0をあとでHierarchyに復元するためにインデックスを保存 SetConfigValue(Scene0HierarchyIndexKey, scene0HierarchyIndex); } SetConfigValue(ShouldResetPlayModeStartSceneKey, bool.TrueString); EditorSceneManager.playModeStartScene = scene0Asset; EditorApplication.isPlaying = true; } } private static void OnPlayModeStateChanged(PlayModeStateChange state) { if (state == PlayModeStateChange.EnteredPlayMode && GetConfigValue(ShouldResetPlayModeStartSceneKey) == bool.TrueString) { ResetConfigValue(ShouldResetPlayModeStartSceneKey); EditorSceneManager.playModeStartScene = null; } if (state == PlayModeStateChange.EnteredEditMode) { int scene0HierarchyIndex; // 必要であればシーン0をHierarchyに復元(特別な場合を除き自動で復元される) if (int.TryParse(GetConfigValue(Scene0HierarchyIndexKey), out scene0HierarchyIndex) && -1 < scene0HierarchyIndex) { ResetConfigValue(Scene0HierarchyIndexKey); var scene0Path = EditorBuildSettings.scenes[0].path; var scene0 = EditorSceneManager.OpenScene(scene0Path, OpenSceneMode.AdditiveWithoutLoading); var dstScenePath = EditorSceneManager.GetSceneManagerSetup()[scene0HierarchyIndex].path; var dstScene = SceneManager.GetSceneByPath(dstScenePath); EditorSceneManager.MoveSceneBefore(scene0, dstScene); } } } } } #endifコメントにちょっと書いてるけど"Scenes In Build"で0のシーンがUnload状態でHierarchyに置いてある場合だけ挙動が変だったので、その場合は一旦シーンをHierarchyから消して後で復元している。
仕様
- 動作確認済み
- macOS High Sierra(10.13.6)
- Unity 2018.2.20f1
- シーン0が
- Hierarchyにない
- Hierarchyにある
- ロード状態
- アンロード状態
- 他のシーンを(複数)開いているとき
- ショートカットキー:
⌘@- "Scenes In Build"にシーンが登録されていなければボタン非表示
- 再生中もボタン非表示
- 再生前に必要であればシーンを保存するか確認
- "Don't Save"なら保存せずに再生
- "Cancel"なら再生しない
- 再生後に再生前のHierarchy復元
コガネブログさんによると
自分が「unity-toolbar-extender」を試してみたところ、
MacBook Pro の Unity では正常に動作しましたが、
Windows 7 や Windows 10 の Unity ではボタンが表示されない現象に遭遇しましたもしかしたら「unity-toolbar-extender」は Windows では使用できないかもしれません
とのことなのでWindowsなどでは動かないかも。
所感
Unityエディターのデフォルト機能としてほしいくらいには便利。
参考
- SceneSwitcher.cs
- 【Unity】エディタ拡張でstaticなフィールドに置いたインスタンスが、コンパイル/再生時に初期化される問題の対策について
- 最初staticフィールドに復元情報入れてたら再生時にnullになって困った
- EditorUserSettings.Set/GetConfigValue
EditorUserSettingsに情報を保存しておけば再生時にリセットされない- 第8章 MenuItem
- ショートカットキー周り
- 投稿日:2019-03-23T15:25:42+09:00
【備忘録】Unityでクイズゲームを作成するためにCSV取り込みを行ってみた
完全なる初心者の備忘録です。
またほぼこの方のページのコピペです。
http://ikedih.blog69.fc2.com/blog-entry-241.html【事の経緯】
1.だいぶ前にAndroidStudioでクイズゲームを作成した。
その際参考にしたサイト→https://terakoya.site/course/android-quiz/
完成したゲーム→https://play.google.com/store/apps/details?id=shohei.yamamoto.quizcollege2.今度はUnityでクイズゲームを作成したい。問題文はCSV管理したい。
3.UnityにCSV取り込むってどうやってやるのか、試行錯誤。
4.いろいろ当たった結果、初心者の自分は以下のやり方が一番うまくいったのでメモ。無事コンソールにCSVの行数、項数、データの中身が表示された。←いまここ
5.さて、いつになればクイズゲームは完成するのか…。using UnityEngine; using System.Collections; using System.Collections.Generic; // 追記 public class CSVRerder: MonoBehaviour { public TextAsset csvFile; // GUIでcsvファイルを割当 List<string[]> csvDatas = new List<string[]>(); //ここは参考ブログとは違う // Use this for initialization void Start() { // 格納 string[] lines = csvFile.text.Replace("\r\n", "\n").Split("\n"[0]); foreach (var line in lines) { if (line == "") { continue; } csvDatas.Add(line.Split(',')); // string[]を追加している } // 書き出し Debug.Log(csvDatas.Count); // 行数 Debug.Log(csvDatas[0].Length); // 項目数 Debug.Log(csvDatas[1][2]); // 2行目3列目 } }
- 投稿日:2019-03-23T13:29:03+09:00
Unity超簡単!チュートリアルの作り方
やりたいことのイメージ
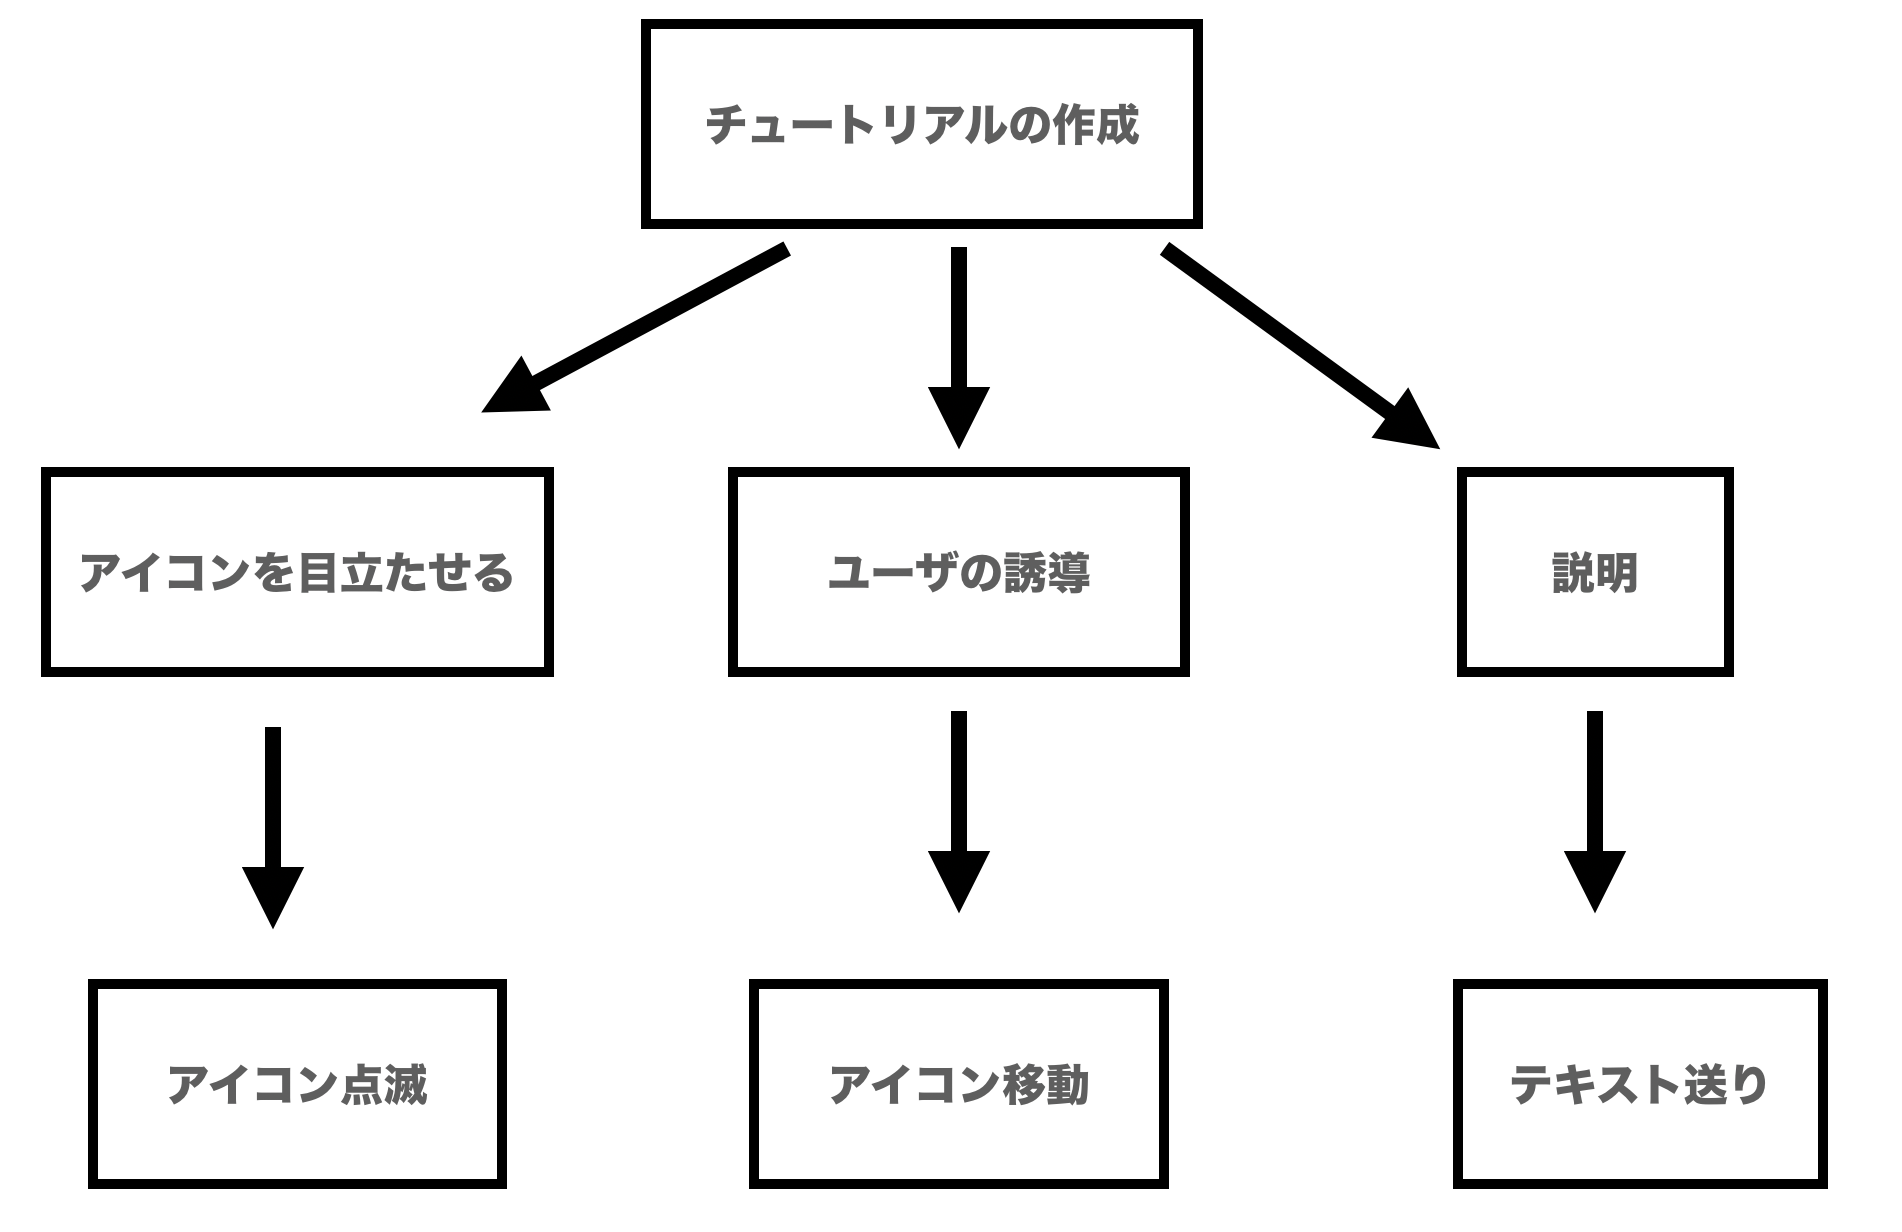
実装一覧
・テキスト送り
・テキスト送り後クリックアイコンを表示
・クリックアイコンの点滅
・ボタンを押せばクリックアイコンが移動階層
テキスト送り
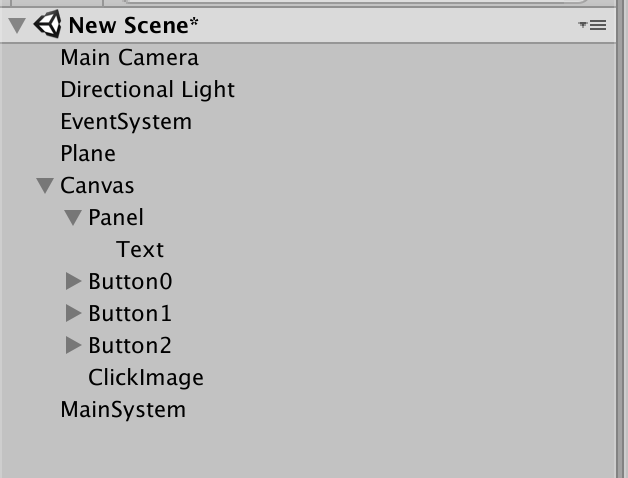
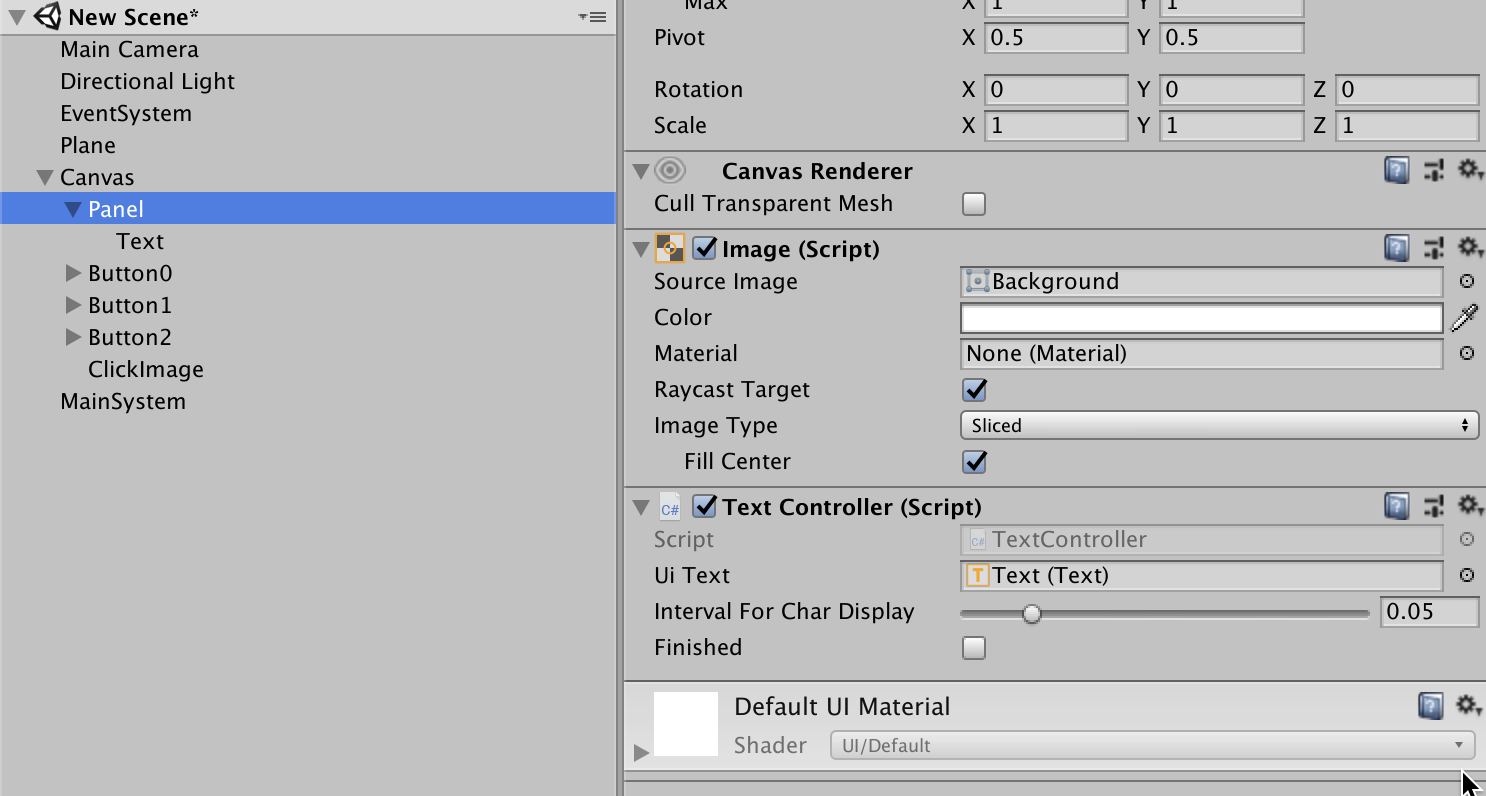
・Panelを作成
・PanelにTextを作成TextController.csusing System.Collections; using System.Collections.Generic; using UnityEngine; using UnityEngine.UI; public class TextController : MonoBehaviour { string[] sentences; // 文章を格納する [SerializeField] Text uiText; // uiTextへの参照 [SerializeField][Range(0.001f, 0.3f)] float intervalForCharDisplay = 0.05f; // 1文字の表示にかける時間 private int currentSentenceNum = 0; //現在表示している文章番号 private string currentSentence = string.Empty; // 現在の文字列 private float timeUntilDisplay = 0; // 表示にかかる時間 private float timeBeganDisplay = 1; // 文字列の表示を開始した時間 private int lastUpdateCharCount = -1; // 表示中の文字数 public bool finished; void Start () { sentences = new string[]{ "みなさんこんにちは", "スタジオしまづの嶋津です", }; SetNextSentence (); } public void TextUpdate(bool _IsPush) { // 文章の表示完了 / 未完了 if (IsDisplayComplete ()) { //最後の文章ではない & ボタンが押された if (currentSentenceNum < sentences.Length && _IsPush) { SetNextSentence (); } else if(currentSentenceNum >= sentences.Length){ finished = true; currentSentenceNum = 0; } } else { if (_IsPush) { timeUntilDisplay = 0; //※1 } } //表示される文字数を計算 int displayCharCount = (int)(Mathf.Clamp01((Time.time - timeBeganDisplay) / timeUntilDisplay) * currentSentence.Length); //表示される文字数が表示している文字数と違う if (displayCharCount != lastUpdateCharCount) { uiText.text = currentSentence.Substring (0, displayCharCount); //表示している文字数の更新 lastUpdateCharCount = displayCharCount; } } // 次の文章をセットする void SetNextSentence(){ currentSentence = sentences [currentSentenceNum]; timeUntilDisplay = currentSentence.Length * intervalForCharDisplay; timeBeganDisplay = Time.time; currentSentenceNum++; lastUpdateCharCount = 0; } bool IsDisplayComplete(){ return Time.time > timeBeganDisplay + timeUntilDisplay; //※2 } }以下のようにUiTextに表示したいTextを設定
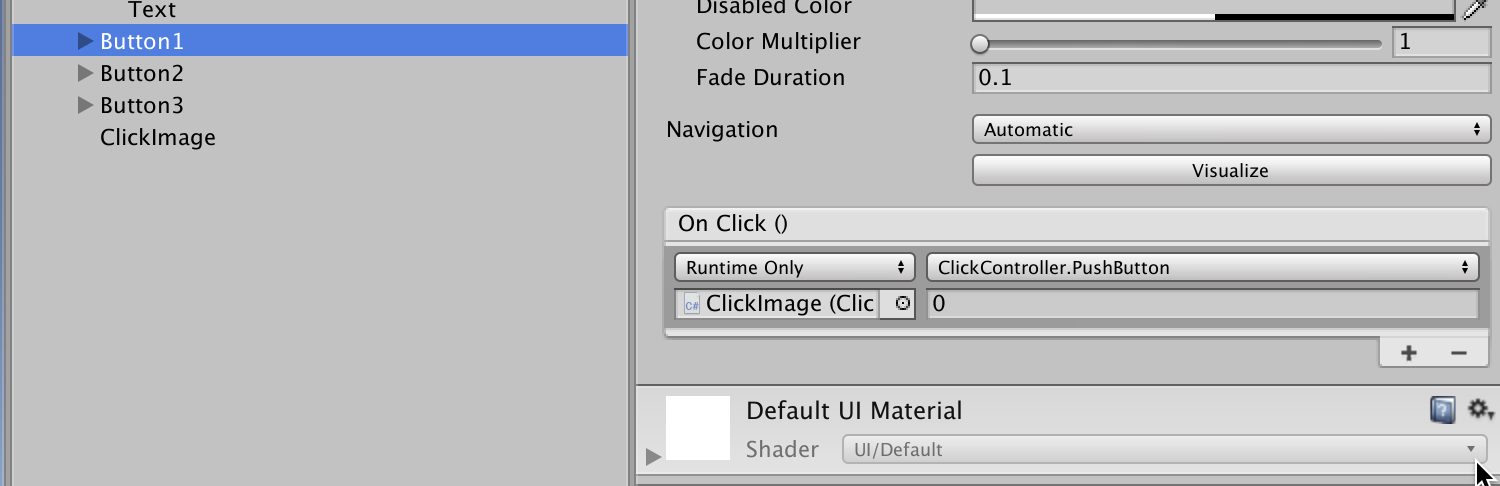
・Textにボタンを設定クリックアイコン
・ClickImageを作成
ClickController.csusing System.Collections; using System.Collections.Generic; using UnityEngine; using UnityEngine.UI; public class ClickController : MonoBehaviour { Image clickImage; int phase; List<Vector3> position = new List<Vector3>(){ new Vector3(-330,147,0), new Vector3(0,147,0), new Vector3(330,147,0), }; // Use this for initialization void Start () { phase = -1; clickImage = GetComponent<Image>(); clickImage.enabled = false; } void Update(){ clickImage.color = new Color(1,1,1, Mathf.PingPong(Time.time,1)); } void ViewClickImage(int _phase){ if(_phase>=position.Count){ _phase = -1; clickImage.enabled = false; return; } this.transform.localPosition = position[_phase]; clickImage.enabled = true; } public void ViewClickIcon(){ phase = 0; ViewClickImage(phase); } public void PushButton(int _number){ if(_number != phase){ return; } phase++; ViewClickImage(phase); } }・ボタンを3つ作成
・それぞれのボタンのOnClickに設定
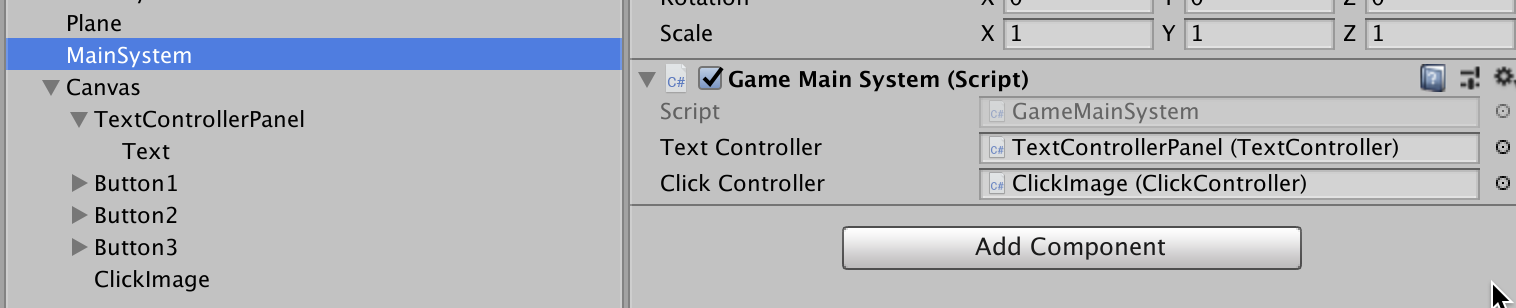
GameMainSystem
・テキスト送りの開始を管理
・クリックアイコンの表示タイミングを管理GameMainSystem.csusing System.Collections; using System.Collections.Generic; using UnityEngine; using UnityEngine.UI; public class GameMainSystem : MonoBehaviour { [SerializeField] TextController textController; bool IsTextPush = false; [SerializeField] ClickController clickController; void Update(){ if(textController.finished){ textController.finished = false; clickController.ViewClickIcon(); return; } textController.TextUpdate(IsTextPush); IsTextPush = false; } public void PushText(){ IsTextPush = true; } }・それぞれ設定
・Textに設定したボタンでPushTextが発動するように設定おまけ
チュートリアルの作り方は色々あると思います。どれが正解かはわかりませんが、自分はコマンドクラフトというゲームでこれらのテクニックを使いました。その結果前作にあった「チュートリアルがひどい」というコメントは0件になりました。
何かの役に立てればと思います^^
- 投稿日:2019-03-23T10:36:49+09:00
UI.Button をスクリプトで複製した時に、onClick イベントも複製される時・されない時
スクリプトで複製したボタン
このボタンのコールバックを削除したい。リセットしたい。全消ししたい。
ときに、イベントも複製されるんだっけ...されないんだっけ...と思って。
- 環境 2018.3.8f1
1. スクリプトで、AddListener() した場合。(非永続的)
onClick イベントは複製されない。引き継がれない
2. インスペクタ上から登録した場合。(永続的)
onClick イベントも複製される。引き継がれる
削除する。(削除はできないから呼ばれないようにする)
int persistentEventCount = btn.onClick.GetPersistentEventCount();
for (int i = 0; i < persistentEventCount; i++)
    btn.onClick.SetPersistentListenerState(i, UnityEventCallState.Off);
- 投稿日:2019-03-23T10:34:45+09:00
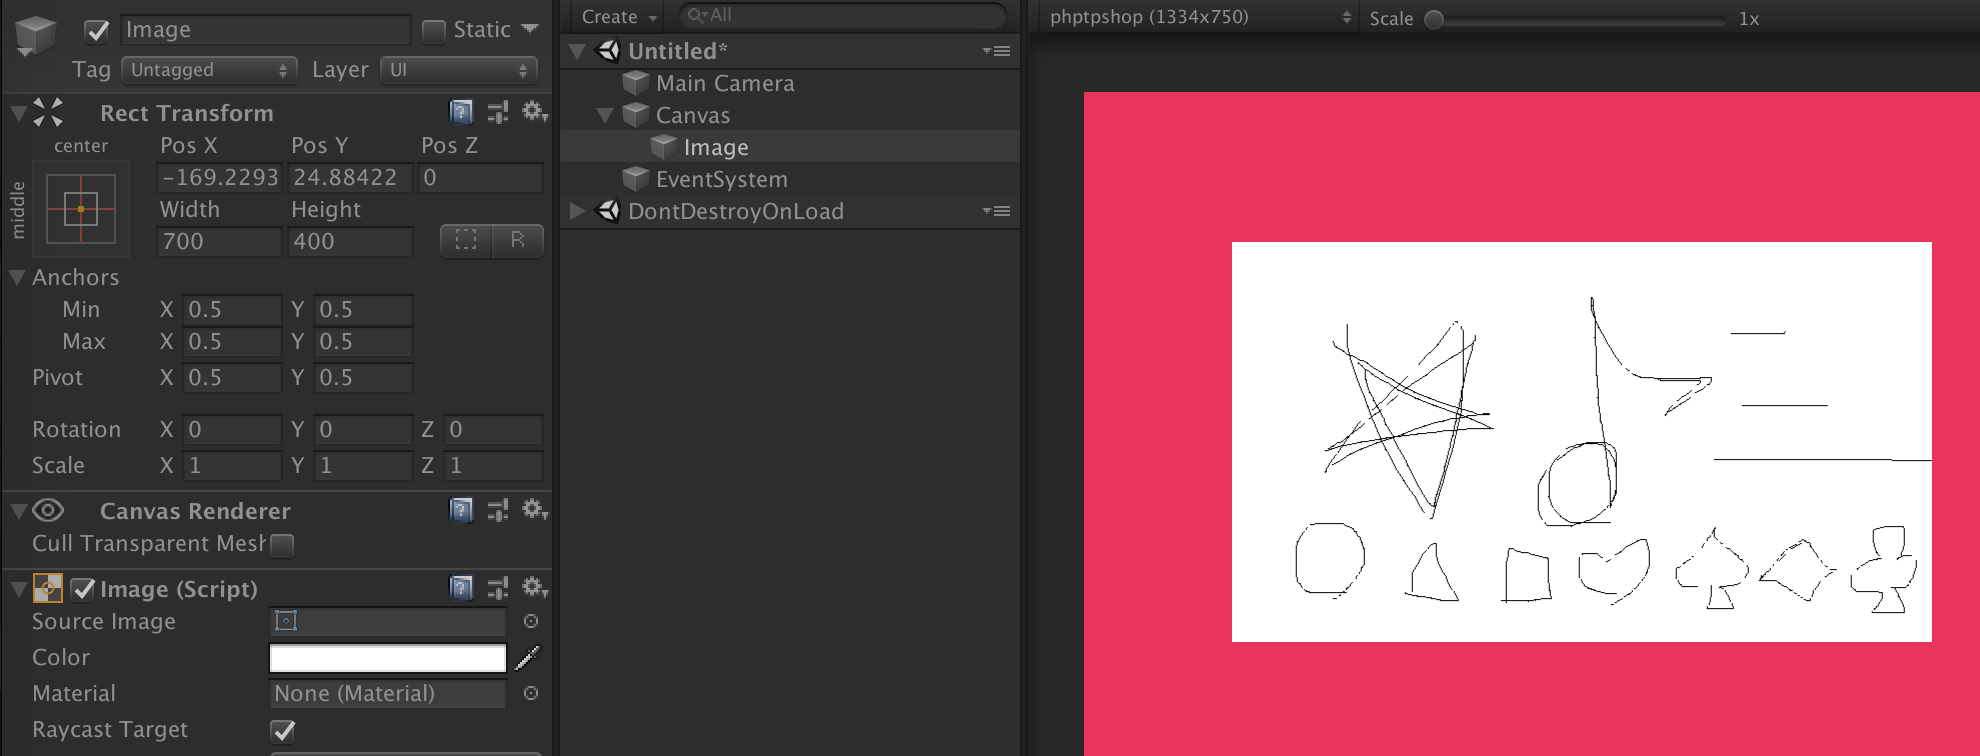
UI.Image にペイントする。線を手書きする。
描けた。
参考
Find x,y cordinates of click on UI.Image new gui system - Unity Answers
Unityでお絵描きしてみる
背景が透明なTexture2Dを作る
Enumerable.Repeat(TResult, Int32) Method (System.Linq) | Microsoft Docs
Sprite.Create - Unity スクリプトリファレンス
なんかきっとどこかで必要になったら使おう。
環境
- バージョン 2018.3.8f1
Canvasは、 Screen Space – Overlay
Imageのピボットは、(0.5、0.5)
ImageのGameObjectにアタッチする。using UnityEngine; using System; using System.Linq; using UnityEngine.UI; using UnityEngine.EventSystems; /// <summary> /// お絵描き /// </summary> public class Painter : MonoBehaviour { Texture2D texture; Vector3 beforeMousePos; Color bgColor = Color.white; Color lineColor = Color.black; void Start() { var img = GetComponent<Image>(); var rt = GetComponent<RectTransform>(); var width = (int)rt.rect.width; var height = (int)rt.rect.height; texture = new Texture2D(width, height, TextureFormat.ARGB32, false); img.sprite = Sprite.Create(texture, new Rect(0, 0, texture.width, texture.height), Vector2.zero); //背景が透明なTexture2Dを作る //http://d.hatena.ne.jp/shinriyo/20140520/p2 Color32[] texColors = Enumerable.Repeat<Color32>(bgColor, width * height).ToArray(); texture.SetPixels32(texColors); texture.Apply(); } void Update() { if (Input.GetMouseButtonDown(0)) { beforeMousePos = GetPosition(); } else if (Input.GetMouseButton(0)) { Vector3 v = GetPosition(); LineTo(beforeMousePos, v, lineColor); beforeMousePos = v; texture.Apply(); } } /// <summary> /// UIのクリック座標のx、y座標を求める - 新しいguiシステムの画像 - Unity Answers /// https://answers.unity.com/questions/892333/find-xy-cordinates-of-click-on-uiimage-new-gui-sys.html /// </summary> public Vector3 GetPosition() { var dat = new PointerEventData(EventSystem.current); dat.position = Input.mousePosition; var rect1 = GetComponent<RectTransform>(); var pos1 = dat.position; if (!RectTransformUtility.ScreenPointToLocalPointInRectangle(rect1, pos1, null, out Vector2 localCursor)) return localCursor; int xpos = (int)(localCursor.x); int ypos = (int)(localCursor.y); if (xpos < 0) xpos = xpos + (int)rect1.rect.width / 2; else xpos += (int)rect1.rect.width / 2; if (ypos > 0) ypos = ypos + (int)rect1.rect.height / 2; else ypos += (int)rect1.rect.height / 2; Debug.Log("Correct Cursor Pos: " + xpos + " " + ypos); return new Vector3(xpos, ypos, 0); } /// <summary> /// Unityでお絵描きしてみる /// http://tech.gmo-media.jp/post/56101930112/draw-a-picture-with-unity /// </summary> public void LineTo(Vector3 start, Vector3 end, Color color) { float x = start.x, y = start.y; // color of pixels Color[] wcolor = { color }; if (Mathf.Abs(start.x - end.x) > Mathf.Abs(start.y - end.y)) { float dy = Math.Abs(end.x - start.x) < float.Epsilon ? 0 : (end.y - start.y) / (end.x - start.x); float dx = start.x < end.x ? 1 : -1; //draw line loop while (x > 0 && x < texture.width && y > 0 && y < texture.height) { try { texture.SetPixels((int)x, (int)y, 1, 1, wcolor); x += dx; y += dx * dy; if (start.x < end.x && x > end.x || start.x > end.x && x < end.x) { break; } } catch (Exception e) { Debug.LogException(e); break; } } } else if (Mathf.Abs(start.x - end.x) < Mathf.Abs(start.y - end.y)) { float dx = Math.Abs(start.y - end.y) < float.Epsilon ? 0 : (end.x - start.x) / (end.y - start.y); float dy = start.y < end.y ? 1 : -1; while (x > 0 && x < texture.width && y > 0 && y < texture.height) { try { texture.SetPixels((int)x, (int)y, 1, 1, wcolor); x += dx * dy; y += dy; if (start.y < end.y && y > end.y || start.y > end.y && y < end.y) { break; } } catch (Exception e) { Debug.LogException(e); break; } } } } }
- 投稿日:2019-03-23T02:19:21+09:00
[Unity]AssetDatabaseにあるアセットの型名を全て取得する
実装
AssetFinder.cs//Asset型の型情報をすべて取得 public Type[] GetAllAssetClassTypeInfo() { return AssetDatabase.FindAssets("t:object").Select(guid => new { var assetPath = AssetDatabase.GUIDToAssetPath(guid); return AssetDatabase.GetMainAssetTypeAtPath(assetPath); }).Distinct(); }解説
UnityのアセットはUnityEngine.Object型を継承しているはずなので、FindAssetsで型検索でobjectを指定してguidを取得。
取得したguidを元にアセットクラスのType型に変換できるGetMainAssetTypeAtPathで型情報を取得。
このままだと重複するのでDistinctで型情報が重複しないようにする。
- 投稿日:2019-03-23T02:01:22+09:00
[Unity] エラーが出たらEditorWindowで作った画面を開くようにする
ErrorReceivedWindow.cspublic class ErrorReceivedWindow : EditorWindow { //1回だけ呼び出したいので画面を開いたときに呼び出す [InitializeOnLoadMethod] private static void _onInit() { //ログが更新されたら呼び出すようにEイベントを登録 Application.logMessageReceived += ApplicationOnLogMessageReceived; } private static void ApplicationOnLogMessageReceived(string condition, string stacktrace, LogType type) { //エラーが出たら画面を開く if (type == LogType.Exception) { GetWindow<ErrorReceivedWindow>(); } } }