- 投稿日:2019-03-23T22:33:31+09:00
AndroidのRuntime Permissionの対応にjavaの匿名クラスを使ってみた
はじめに
AndroidのRuntime Permissionの対応にjavaの匿名クラスを使ってみました。
権限が必要な機能をいろいろな場所から呼び出したり、
違うシチュエーションで同じ権限を必要とする場合などに、
パラメタなどの保存/復元処理が不要になり、
便利に権限チェックができます。背景
2018 年 11 月 1 日以降、Google Playにアプリを公開するには、
targetSdkVersionをAndroid 8.0(API レベル 26)以降に設定する必要があり、注1: https://developer.android.com/distribute/best-practices/develop/target-sdk?hl=JA
Android 6.0(API レベル 23)以降では、
アプリのインストール時ではなく、アプリの実行時にパーミッションの確認が行われます。注2: https://developer.android.com/training/permissions/requesting?hl=ja
Runtime Permissionの対応を行う場合、
requestPermissions()で権限を要求したあとの制御が
ActivityのonRequestPermissionsResult()メソッドに戻ってくるため、
権限が必要な機能を呼び出す際にパラメタをどこかに保存しておかなければ、
権限をもらったあとに処理を続行できません。
- 権限が必要な機能を呼び出すごとにパラメタを保存して
- onRequestPermissionsResultメソッドで保存したパラメタを復元して
- さらに本来実行したい処理を続行させる
というのはとてもしんどそうでした。
ならば、権限が必要な処理をRunnableの匿名クラスとして保存しておいて、
権限が付与されたらActivityのonRequestPermissionsResult()メソッドから
そのRunnbaleを実行すればOKという発想で作ってみました。androidの権限の確認ダイアログのフロー
以下の記事を参考にして確認ダイアログのフローを実装しました。
https://techbooster.org/android/application/17223/
実装した権限の確認ダイアログのフローでは、
権限の確認ダイアログで拒否を繰り返した場合、
大雑把には以下のようになります。
- 初回
- OSの権限確認ダイアログ表示
- 拒否を選択
- 2回め
- ユーザへ権限がなんのために必要か説明するダイアログを表示
- OSの権限確認ダイアログ表示(今後は表示しないチェックボックスあり)
- 今後は表示しないチェックボックスをチェックして拒否
- 今後は表示しない
- アプリの権限設定変更の案内ダイアログ表示
2-2の権限が拒否された場合に、2回め以降に追加でダイアログを表示するのは、
以下のガイドラインに従っています。https://developer.android.com/training/permissions/requesting?hl=ja#perm-request
コードの説明
サンプルコードは以下においてあります。
https://bitbucket.org/cnaos/runtimepermissionexample/src/master/
権限チェックの呼び出し元
以下が権限のチェックが必要な処理の呼び出し部分です。
ボタンを押したときのリスナーとして実装しています。2つのボタンにそれぞれ別の機能を設定していますが、
両方ともカメラの機能をつかっていても、
一方はアイコン画像の変更、もう一方は写真投稿という
微妙に機能が異なるというシチュエーションです。
findViewById(R.id.button_change_icon).setOnClickListener(new View.OnClickListener() { @Override public void onClick(View v) { //ボタンが押されたときのコールバック checkAppPermission( REQUEST_CAMERA_PERMISSION, // arg1: ActivityのRequestCode Manifest.permission.CAMERA, // arg2: 必要な権限 new Runnable() { @Override public void run() { Log.d(TAG,"OP:change icon"); showLaunchCameraDialog("機能:アイコン変更","カメラで撮影した画像をアイコンに設定します。"); } }, // arg3: 権限が付与されているときに実行したい処理 "アイコン画像を撮影するために、カメラを利用します" // arg4: 権限が拒否された場合に、2回め以降に追加で表示するダイアログの説明メッセージ ); } });findViewById(R.id.button_post_photo).setOnClickListener(new View.OnClickListener() { @Override public void onClick(View v) { //ボタンが押されたときのコールバック checkAppPermission( REQUEST_CAMERA_PERMISSION, // arg1: ActivityのRequestCode Manifest.permission.CAMERA, // arg2: 必要な権限 new Runnable() { @Override public void run() { // 権限が必要な、本来実行したい処理 Log.d(TAG,"OP:post photo"); showLaunchCameraDialog("機能:写真投稿","カメラで撮影した画像を投稿します。"); } }, // arg3: 権限が付与されているときに実行したい処理 "写真投稿で使う画像を撮影するために、カメラを利用します" // arg4: 権限が拒否された場合に、2回め以降に追加で表示するダイアログの説明メッセージ ); } });checkAppPermission()メソッドが、今回実装した権限のチェック用メソッドです。
- 第1引数: ActivityのRequestCode
- 第2引数: 要求するPermission、
- 第3引数: 権限が必要な、実行したい処理、
- 第4引数: 権限が拒否された場合に、2回め以降に追加で表示するダイアログの説明メッセージ
showLaunchCameraDialog
Runtime Permissionの動作確認のためのメソッドです。
ダイアログを表示したあとにカメラを起動しているだけです。private void showLaunchCameraDialog(String title, String message) { new AlertDialog.Builder(this) .setTitle(title) .setMessage(message) .setPositiveButton("OK",new DialogInterface.OnClickListener() { @Override public void onClick(DialogInterface dialog, int which) { // カメラを起動する Intent intent = new Intent(); intent.setAction(MediaStore.ACTION_IMAGE_CAPTURE); intent.addCategory(Intent.CATEGORY_DEFAULT); startActivityForResult(intent, 0); } }) .setNegativeButton("Cancel", null) .show(); } }checkAppPermission
今回実装した権限のチェック用メソッドです。
権限チェックの前半分です。
以下のことを行います。
- 権限が付与されているかどうかのチェック
- 権限が付与されている場合は、引数permissionGrantedOperationの処理の実行
- 権限が付与されたあとに実行する処理として、引数permissionGrantedOperationを保存。
- 権限が付与されていない場合に、権限を要求する理由についての説明ダイアログを出す
- 権限が付与されていない場合に権限を要求する
private synchronized void checkAppPermission(
        final int requestCode,
        @NonNull final String checkPermission,
        @NonNull final Runnable permissionGrantedOperation,
        @NonNull final String permissionExplanationMessage){
    // A: 権限が付与されているか確認する。
    if(PermissionChecker.checkSelfPermission(
            this, checkPermission) == PackageManager.PERMISSION_GRANTED){
        // 権限が付与されているので実行する
        Log.d(TAG, "checkAppPermission: GRANTED:"+checkPermission+", requestCode="+requestCode);
        this.mPermissionGrantedOperation = null;
        permissionGrantedOperation.run();

        return;
    }

    // B: 権限が付与されたあとに処理が続行できるように、処理を保存しておく
    this.mPermissionGrantedOperation = permissionGrantedOperation;

    // C: ユーザに対して権限についての説明が必要かどうか確認する。
    if (ActivityCompat.shouldShowRequestPermissionRationale(this, checkPermission)) {
        Log.d(TAG, "checkAppPermission: shouldShowRequestPermissionRationale = true");
        // ユーザが一度権限を拒否しているので、権限についての説明のダイアログを表示する。
        new AlertDialog.Builder(this)
                .setTitle("パーミッションを要求する理由")
                .setMessage(permissionExplanationMessage)
                .setCancelable(false)
                .setNegativeButton(android.R.string.cancel, null)
                .setPositiveButton(android.R.string.ok,
                        new DialogInterface.OnClickListener() {
                            @Override
                            public void onClick(DialogInterface dialogInterface, int i) {
                                // 権限の説明ダイアログでOKが押された場合に、権限の要求を行う
                                Log.d(TAG, "checkAppPermission: requestPermissions(dialog): "+ checkPermission +", requestCode="+ requestCode);
                                ActivityCompat.requestPermissions(MainActivity.this,
                                        new String[]{checkPermission}, requestCode);
                            }
                        })
                .create()
                .show();
        return;
    }

    // D: 権限が付与されていないので、権限の要求を行う。
    Log.d(TAG, "checkAppPermission: requestPermissions: "+ checkPermission +", requestCode="+ requestCode);
    ActivityCompat.requestPermissions(this,
            new String[]{checkPermission},
            requestCode);

}
onRequestPermissionsResult
OSの表示した権限の確認ダイアログの表示が終わると呼び出される
onRequestPermissionsResultメソッドです。手抜きでpermissionは1個ずつしか要求しない想定です。
requestCodeで処理を分岐させて、processRequestPermissionResultメソッドに
完全に権限が拒否された場合のメッセージを渡しているだけです。public void onRequestPermissionsResult( int requestCode, @NonNull String[] permissions, @NonNull int[] grantResults) { if( grantResults.length == 0){ super.onRequestPermissionsResult(requestCode, permissions, grantResults); return; } if( requestCode != REQUEST_CAMERA_PERMISSION){ super.onRequestPermissionsResult(requestCode, permissions, grantResults); return; } switch(requestCode){ case REQUEST_CAMERA_PERMISSION: { processRequestPermissionResult( requestCode, Manifest.permission.CAMERA, grantResults[0], "アプリ情報>許可でカメラへのアクセスを許可してください" ); return; } } }processRequestPermissionResult
権限チェックの後ろ半分、
onRequestPermissionsResultメソッドから呼び出されるメソッドです。public void processRequestPermissionResult( final int requestCode, @NonNull final String requestedPermission, final int grantResult, @NonNull final String deniedDialogMessage) { // A: OSの権限確認ダイアログで、権限が付与されたか確認する。 if ( grantResult == PackageManager.PERMISSION_GRANTED) { Log.d(TAG, "processRequestPermissionResult: GRANTED:" + requestedPermission + ", requestCode=" + requestCode); // 権限が付与されたので処理を実施する。 executePermissionGrantedOperation(); return; } // B: 権限が付与されてない。 Log.d(TAG, "processRequestPermissionResult: DENIED:"+ requestedPermission +", requestCode="+requestCode); if ( ! ActivityCompat.shouldShowRequestPermissionRationale(this, requestedPermission)){ // B-2: 今後表示しないが選択されているので、案内を出す Log.d(TAG, "processRequestPermissionResult: show app settings guide"); new AlertDialog.Builder(this) .setMessage(deniedDialogMessage) .setNegativeButton("やめる",null) .setPositiveButton("設定", new DialogInterface.OnClickListener() { @Override public void onClick(DialogInterface dialogInterface, int i) { openAppSettings(); } }) .create() .show(); } }executePermissionGrantedOperation
保存してある権限が必要となる処理を実行します。
気休め程度にsynchronizedをつけています。private synchronized void executePermissionGrantedOperation() { Log.d(TAG,"executePermissionGrantedOperation"); final Runnable tmpPermissionGrantedOperation = this.mPermissionGrantedOperation; if( tmpPermissionGrantedOperation == null ){ Log.d(TAG,"executePermissionGrantedOperation: mPermissionGrantedOperation is null."); return; } this.mPermissionGrantedOperation = null; tmpPermissionGrantedOperation.run(); }

- 投稿日:2019-03-23T20:55:35+09:00
AndroidでRoom+RxJavaを実装する
本記事ではAACのRoomPersistenceLibraryとRxJavaを組み合わせた、基本的な実装のお話をしていこうと思います。
記事内のコードはKotlinで記述していますが、Coroutineなどは使っていないため、基本的にJavaに置き換えることも可能です。対象読者
- Room初学者
- Room + RxJavaに興味がある方
セットアップ
最初にbuild.gradle(app)に以下を記述します。
def room_version='2.1.0-alpha06'
implementation "androidx.room:room-runtime:$room_version"
implementation "androidx.room:room-rxjava2:$room_version"
annotationProcessor "androidx.room:room-compiler:$room_version"
kapt "androidx.room:room-compiler:$room_version"

implementation 'io.reactivex.rxjava2:rxandroid:2.0.2'
androidx.room:room-rxjava2を記述することによって、DAOの戻り値でSingleやMaybeなどを指定することができます。room_versionに関しては2.1.0以上を使ってください。理由は後ほど詳しく記述しますが、2.1.0からInsertやdeleteの戻り値にCompletableを指定できるようになったからです。- AndroidXに対応していないと、
2.0.0以上のバージョンを使うことができないため、1.1.1を使ってください。詳しくは こちら のサイトが参考になると思います。Entity
次にEntityを記述します。
@Entity(tableName = "user")
data class UserEntity constructor(
    @PrimaryKey(autoGenerate = true) //default false
    val id: Long = 0,

    @ColumnInfo(name = "user_name")
    val userName: String,

    val createAt: String
)
@Entityこれをつけることによって、Roomで利用できるEntityになります。tableNameはオプションで、クラス名と実際に生成されるTable名を変えたいときにつけます。@PrimaryKeyは、1つのEntityに最低1つはつける必要があります。複数のPrimaryKeyを持つ場合は、以下のように@Entityアノテーション内に定義できます。@Entity(primaryKeys = ["id", "user_name"])
autoGenerate = trueになっている場合、idに0を渡すと、自動的にincrementしてくれます。idを指定する必要がない場合は、0を指定してください。
@Ignoreを定義することによって、そのカラムを無視することができます。しかしdata classで@Ignoreを定義するとEntities and Pojos must have a usable public constructor.というエラーが吐かれます。これは全てのカラムにデフォルト値を指定することによって解消できます。@ColumnInfo(name = "user_name") var userName: String = "", @Ignore var createAt: String = ""DAO
次にData Access Object(DAO)を記述します。
@Dao
interface UserDao {

    @Insert(onConflict = OnConflictStrategy.REPLACE)
    fun insertiOrUpdateUser(entity: UserEntity): Completable

    @Insert(onConflict = OnConflictStrategy.REPLACE)
    fun insertiOrUpdateUsers(entities: List<UserEntity>): Completable

    @Query("SELECT * FROM user WHERE id = :id")
    fun findById(id: Long): Single<UserEntity>

    @Delete
    fun delete(entity: UserEntity): Completable
}
@Insertは、UserEntity単体、複数(List)のどちらでもInserすることができます。また、onConflictは、任意の値を指定することによって、PrimaryKeyが同じものがInsertされた場合の挙動を指定することができます。今回は上書きするようにOnConflictStrategy.REPLACEを指定しました。その他の指定については こちら のサイトが参考になると思います。
@Insertの戻り値はCompletableを指定できます。
@Deleteでは引数にUserEntityを渡すことによって、渡したEntityを削除することができます。この戻り値もCompletableを指定することができます。Query
@Queryの戻り値にはMaybe, Single, Flowable/Observableを指定することができます。各々挙動が違うので、要件に合ったものを選ぶといいと思います。Maybe
@Query("SELECT * FROM user WHERE id = :id")
fun findById(id: Long): Maybe<UserEntity>
- データベース内に該当するUserEntityが
ない場合、何も返さずにonCompleteが呼ばれます。- データベース内に該当するUserEntityが
ある場合、onSuccessが呼ばれ、終了します(onCompleteは呼ばれません)。- Maybeが終了した後にUserEntityが更新されても何もしません。
Single
@Query("SELECT * FROM user WHERE id = :id")
fun findById(id: Long): Single<UserEntity>
- データベース内に該当するUserEntityが
ない場合、onError(EmptyResultSetException)が呼ばれます。
- データベース内に該当するUserEntityが
ないかつ、List型を返す場合はonError(EmptyResultSetException)が呼ばれず、空のListが返されます。- データベース内に該当するUserEntityが
ある場合、onSuccessが呼ばれ、終了します。- Singleが終了した後にUserEntityが更新されても何もしません。
Flowable/Observable
@Query("SELECT * FROM user WHERE id = :id")
fun findById(id: Long): Flowable<UserEntity>
- データベース内に該当するUserEntityが
ない場合、何も返さず、何も呼ばれません。- データベース内に該当するUserEntityが
ある場合、onNextが呼ばれます。- UserEntityが更新されるたびに、自動で
onNextが呼ばれます。Database
次にDatabaseを記述します。
@Database(entities = [UserEntity::class], version = SampleDatabase.DATABASE_VERSION)
abstract class SampleDatabase : RoomDatabase() {

    abstract fun userDao(): UserDao

    companion object {
        const val DATABASE_VERSION = 1
        private const val DATABASE_NAME = "sample.db"

        private var instance: SampleDatabase? = null

        fun init(context: Context) {
            Room.databaseBuilder(context, SampleDatabase::class.java, DATABASE_NAME)
                .build().also { instance = it }
        }

        fun getInstance() = instance
    }
}
- RoomDatabaseを継承したabstractクラスを作成します。
@Database内のentitiesにアプリ内で使うEntityを宣言します。Entityが増えるたびに、ここに追加していく形になります。@Database内のversionにデータベースのversionを定義します。最小値は1です。abstract fun userDao(): UserDaoの部分はDAOの宣言になります。DAOが増えるたびに、ここに追加していくことになります。- init()やgetInstance()を生やしておき、外部から呼び出せるようにしておきます。
Databaseの初期化
最後に上で定義したDatabaseをApplicationクラスで初期化します。
class SampleApplication : Application() {

    override fun onCreate() {
        super.onCreate()
        SampleDatabase.init(this)
    }
}
簡単ですね。これでSampleDatabaseをどこからでも呼び出せるようになりました。
使ってみる
それでは準備が整ったので、実際に使ってみようと思います。
今回は
1. 複数のUserEntityをInsert
2. idからUserEntityを取得
3. 2で取得したUserEntityを削除
この3つの処理を書いていこうと思います。val users: List<UserEntity> = //任意の値を入れてください SampleDatabase.getInstance()?.let { sampleDatabase -> val userDao = sampleDatabase.userDao() userDao .insertiOrUpdateUsers(users) .andThen(userDao.findById(1)) //Single<UserEntity>を返しています .flatMapCompletable { user -> userDao.delete(user) } .subscribeOn(Schedulers.io()) .observeOn(AndroidSchedulers.mainThread()) .subscribe({}, { e -> e.printStackTrace() }) }たったこれだけです! すごくシンプルに書けます。
subscribeOn()ここだけ説明しておきます。Room実行は基本的にBackgroundThreadを指定しないといけません。MainThreadで実行するとExceptionが吐かれます。もしMainThreadでの実行を許可したい場合は、RoomのInstance生成時に以下のような定義が必要になります。Room.databaseBuilder(context, SampleDatabase::class.java, DATABASE_NAME) .allowMainThreadQueries() //MainThreadでの実行を許可します .build().also { instance = it }最後に
RoomはThread制限があったり、Queryが間違っていたらBuild時に教えてくれたり、とても親切なライブラリです。
皆さんも是非使ってみてください。参考文献
- 投稿日:2019-03-23T19:37:40+09:00
JavaもSwiftも知らん素人がIonicでスマホアプリをつくる(その2 アプリリリース編)
おつかれさまです、かきうち(@kakistuter)です。
背景
JavaもSwiftも知らん素人がIonicでスマホアプリをつくる(その1 開発準備とテストアプリ作成編)の続き。
で、アプリ作りこむとか、最初はそんなん後回し。
まずはリリース。リリースが一番大事。
まずは世に出す。WidgetIdの変更
あんま気にしなくていいんだが、WidgetIdというのが世のリリース済アプリと同じだとリリースできないので変えて置く必要がある。
下記のように
アプリ名/config.xmlの2行目のwidget idを適当に変更。アプリ名/config.xml<?xml version='1.0' encoding='utf-8'?> <widget id="io.ionic.starterrrrrrrrrrrrrrrr" version="0.0.1" xmlns="http://www.w3.org/ns/widgets" xmlns:cdv="http://cordova.apache.org/ns/1.0">Androidアプリに変換する
ちまただと
ビルドとか言われるが、そんな用語はどーでもいい。
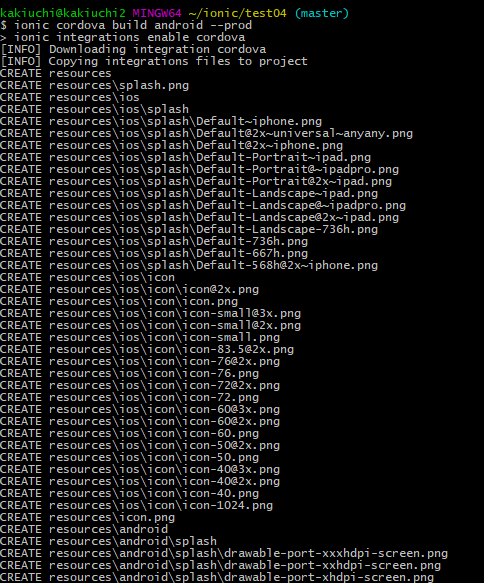
とりあえず下記コマンドを打つと、HTML, CSS, Javascriptで書いたコードがAndroidアプリなソースコードに変換されるのだ。$ ionic cordova build android --prod下記のようにビャーーーって文字がでてくる。気にするな。英語は気にしない。
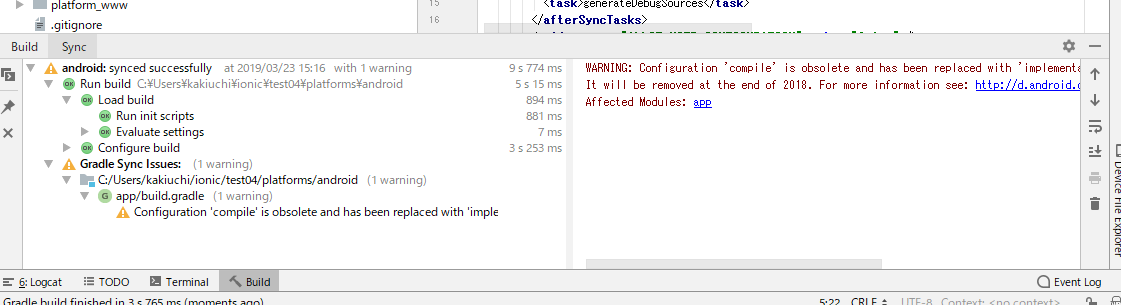
ビルド中にエラー発生
ログの下部に予期しないエラー。
File C:\Users\kakiuchi\.android\repositories.cfg could not be loaded.
Checking the license for package Android SDK Platform 27 in C:\Users\kakiuchi\AppData\Local\Android\sdk\licenses
Warning: License for package Android SDK Platform 27 not accepted.

FAILURE: Build failed with an exception.

* What went wrong:
A problem occurred configuring project ':CordovaLib'.
> You have not accepted the license agreements of the following SDK components:
  [Android SDK Platform 27].
  Before building your project, you need to accept the license agreements and complete the installation of the missing components using the Android Studio SDK Manager.
  Alternatively, to learn how to transfer the license agreements from one workstation to another, go to http://d.android.com/r/studio-ui/export-licenses.html

* Try:
Run with --stacktrace option to get the stack trace. Run with --info or --debug option to get more log output.

* Get more help at https://help.gradle.org

BUILD FAILED in 3m 10s
cmd: Command failed with exit code 1 Error output:
FAILURE: Build failed with an exception.
なんやこれ。
とりあえずAndroid Studio SDK Managerで「Android SDK Platform 27」をacceptすればよいとあたりをつける。
どうやらAndroid StudioのConfigureからSDK Managerを選択できて27っぽいやつを選択して様子を見る。
すると下記のようになり、Android SDK Platform 27っぽいのがダウンロードされてる。これはいけるぞ。
いけた。
よゆうやな。
すると
アプリ名/platforms/androidというディレクトリが出来上がって、その中にAndroidアプリなソースコードがジャブジャブに入っている。
AndroidStudioでの起動確認
このディレクトリ
アプリ名/platforms/androidをAndroidStudioから開きます。
AndroidStudioでの起動確認中にエラー発生
なんやまた。
エラーメッセージはこんな感じ。
The minSdk version should not be declared in the android manifest file. You can move the version from the manifest to the defaultConfig in the build.gradle file.
<a href="remove.sdk.from.manifest">Move minSdkVersion to build files and sync project</a>
Affected Modules: <a href="openFile:C:/Users/kakiuchi/ionic/test04/platforms/android/CordovaLib/AndroidManifest.xml">CordovaLib</a>, <a href="openFile:C:/Users/kakiuchi/ionic/test04/platforms/android/app/src/main/AndroidManifest.xml">app</a>
Google翻訳すると
minSdkのバージョンは、Androidのマニフェストファイルでではなくbuild.gradleファイルのdefaultConfigかけということっぽい。そしてAndroidのマニフェストファイルはどうやら
アプリ名/platforms/android/CordovaLib/AndroidManifest.xmlと
アプリ名/platforms/android/app/src/main/AndroidManifest.xmlにあるっぽいな。そしてbuild.gradleファイルは
アプリ名/platforms/android/app/buiid.gradeに発見。ということで、まずは
アプリ名/platforms/android/CordovaLib/AndroidManifest.xmlの編集。【変更前】アプリ名/platforms/android/CordovaLib/AndroidManifest.xml<?xml version="1.0" encoding="utf-8"?> <manifest xmlns:android="http://schemas.android.com/apk/res/android" package="org.apache.cordova" android:versionName="1.0" android:versionCode="1"> <uses-sdk android:minSdkVersion="19" /> </manifest>の下から2行目の
<uses-sdk android:minSdkVersion="19" />を削除。【変更後】アプリ名/platforms/android/CordovaLib/AndroidManifest.xml<?xml version="1.0" encoding="utf-8"?> <manifest xmlns:android="http://schemas.android.com/apk/res/android" package="org.apache.cordova" android:versionName="1.0" android:versionCode="1"> </manifest>つぎに
アプリ名/platforms/android/app/src/main/AndroidManifest.xmlの編集。【変更前】アプリ名/platforms/android/app/src/main/AndroidManifest.xml<?xml version='1.0' encoding='utf-8'?> <manifest android:hardwareAccelerated="true" android:versionCode="1" android:versionName="0.0.1" package="io.ionic.starter" xmlns:android="http://schemas.android.com/apk/res/android"> <supports-screens android:anyDensity="true" android:largeScreens="true" android:normalScreens="true" android:resizeable="true" android:smallScreens="true" android:xlargeScreens="true" /> <uses-permission android:name="android.permission.INTERNET" /> <application android:hardwareAccelerated="true" android:icon="@mipmap/icon" android:label="@string/app_name" android:supportsRtl="true"> <activity android:configChanges="orientation|keyboardHidden|keyboard|screenSize|locale" android:label="@string/activity_name" android:launchMode="singleTop" android:name="MainActivity" android:theme="@android:style/Theme.DeviceDefault.NoActionBar" android:windowSoftInputMode="adjustResize"> <intent-filter android:label="@string/launcher_name"> <action android:name="android.intent.action.MAIN" /> <category android:name="android.intent.category.LAUNCHER" /> </intent-filter> </activity> </application> <uses-sdk android:minSdkVersion="19" android:targetSdkVersion="27" /> </manifest>ここの下から2行目の
<uses-sdk android:minSdkVersion="19" android:targetSdkVersion="27" />を削除。【変更前】アプリ名/platforms/android/app/src/main/AndroidManifest.xml<?xml version='1.0' encoding='utf-8'?> <manifest android:hardwareAccelerated="true" android:versionCode="1" android:versionName="0.0.1" package="io.ionic.starter" xmlns:android="http://schemas.android.com/apk/res/android"> <supports-screens android:anyDensity="true" android:largeScreens="true" android:normalScreens="true" android:resizeable="true" android:smallScreens="true" android:xlargeScreens="true" /> <uses-permission android:name="android.permission.INTERNET" /> <application android:hardwareAccelerated="true" android:icon="@mipmap/icon" android:label="@string/app_name" android:supportsRtl="true"> <activity android:configChanges="orientation|keyboardHidden|keyboard|screenSize|locale" android:label="@string/activity_name" android:launchMode="singleTop" android:name="MainActivity" android:theme="@android:style/Theme.DeviceDefault.NoActionBar" android:windowSoftInputMode="adjustResize"> <intent-filter android:label="@string/launcher_name"> <action android:name="android.intent.action.MAIN" /> <category android:name="android.intent.category.LAUNCHER" /> </intent-filter> </activity> </application> </manifest>最後に
アプリ名/platforms/android/app/buiid.gradeの編集。【変更前】アプリ名/platforms/android/app/buiid.grade# 省略 android { defaultConfig { versionCode cdvVersionCode ?: new BigInteger("" + privateHelpers.extractIntFromManifest("versionCode")) applicationId privateHelpers.extractStringFromManifest("package") if (cdvMinSdkVersion != null) { minSdkVersion cdvMinSdkVersion } } # 省略 } # 省略で
minSdkVersionが19でtargetSdkVersionが27であると追記。【変更後】アプリ名/platforms/android/app/buiid.grade# 省略 android { defaultConfig { minSdkVersion 19 targetSdkVersion 27 versionCode cdvVersionCode ?: new BigInteger("" + privateHelpers.extractIntFromManifest("versionCode")) applicationId privateHelpers.extractStringFromManifest("package") if (cdvMinSdkVersion != null) { minSdkVersion cdvMinSdkVersion } } # 省略 } # 省略するとこんな感じになってビルドエラーはクリア。
そしてAndroid Studio画面右上の緑▽ボタン(Run app)を押す。
しかし右下に新たなエラー発生。
Emulator: emulator: ERROR: x86 emulation currently requires hardware acceleration!なんやまた。
とりあえずエラーメッセでググる。じゃあ
Intel x86 Emulator Acceleratorを何やかんやせよということらしい。
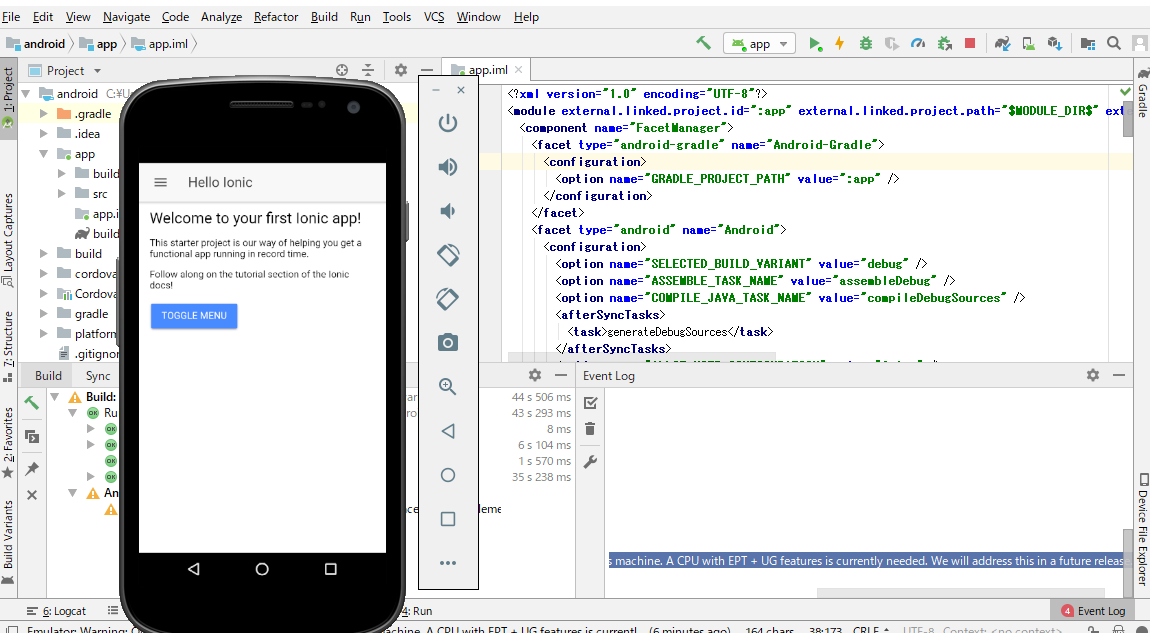
参考サイト:Androidエミュレーター(AVD)が起動せずに「Emulator: emulator: ERROR: x86 emulation currently requires hardware acceleration」とエラー表示された場合で再度Android Studioを起動してRun app。
するとこんな感じでスマホアプリの画面デモが表示されます。
よゆうやな。これをちまたではエミュレーションとかいうらしいですが、そんな言葉はどうでもいいでしょう。
APKファイルとかいうやつを作る
Androidアプリをリリースするためには、Android StudioのプロジェクトをまとめてドカンとAPKファイルというやつに変換する必要がある。
そしてそのあとAPKファイルに署名(自分のだよという証明)をする必要がある。まずはAndroid Studioのメニューバーの
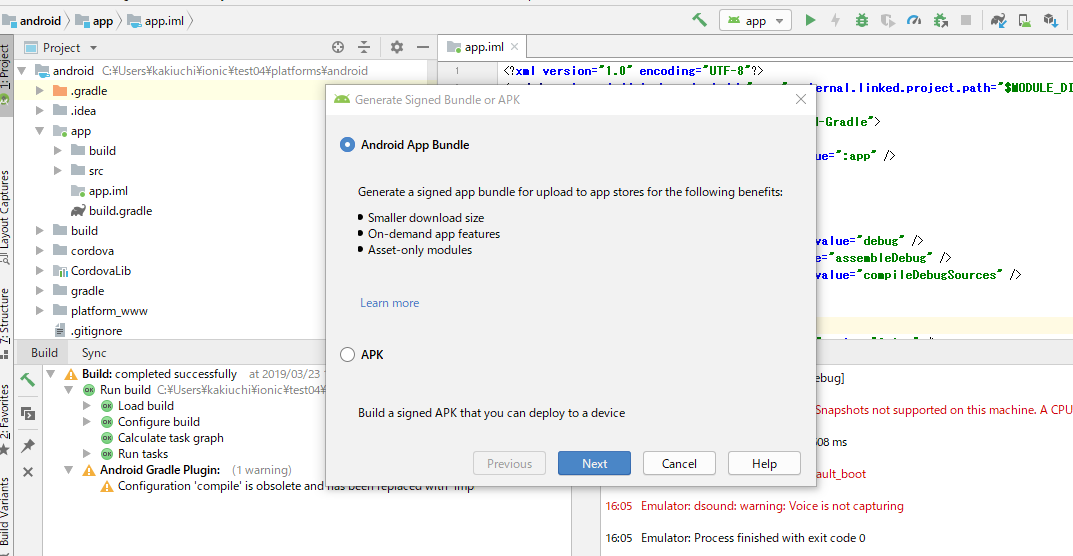
BuildからGenerate Singled APK...というのをクリック。
下記のような画面がでてきてAndroid App Bundleを選択してNext
(Android App BundleというのはGoogle Playへアップロードするための新しい形式らしいが、あんま難しいことは気にしない)
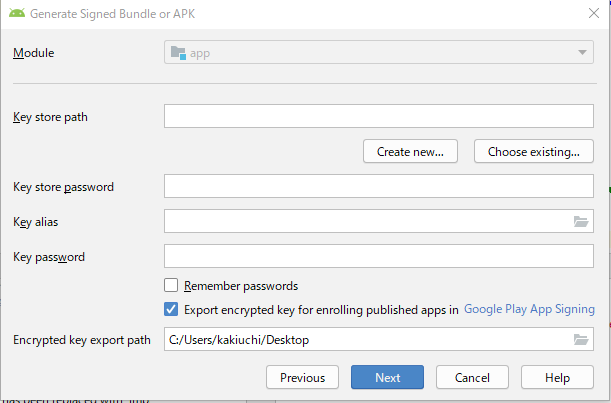
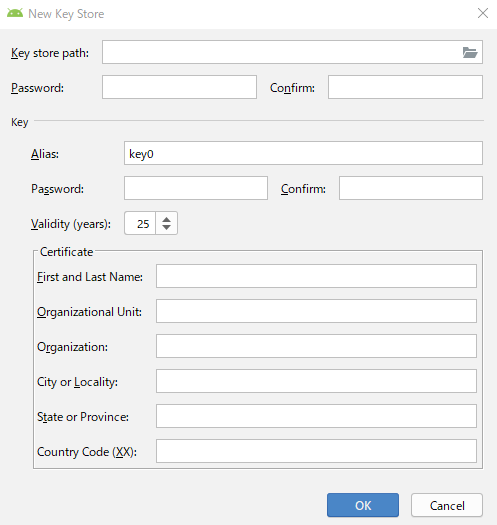
すると下記のようなKeyを作る画面になる。これが署名的な要素を担う。
このKeyはアプリをリリースするときやバージョンアップするときに必要な大事なものだ。
ちゃんとやろう。
まず初作成の場合は
Create new
各項目は下記のようなイメージだ。
英語 日本語 Key store path Key storeとなるファイルの場所とファイル名 Password Key storeのパスワード Confirm Key storeのパスワードの確認 Alias Keyのニックネーム的なもの Password Keyのパスワード Confirm Keyのパスワードの確認 Validity Keyの有効期間 First and Last Name 氏名 Organization Unit 組織の部門名 Organization 組織名 City or Locality 住んでる市 State or Province 国 Country Code 国番号、日本は81
Key StoreとKeyは別物だ。違いは下記URLに書いてるが、眠かったので読んでも理解できなかった。
https://blog.aroundit.net/android-keystore-alias/きにぜず、その後、デフォのまますすんで下記画面で
releaseを選んでフィニッシュ
Google Playの申請
ついに申請だ。
GooglePlayConsole登録
GooglePlayにアプリを公開するためにはGooglePlayConsoleというところへ開発者登録をしないといけない。
そして残念ながら初回のみ25$のお金が必要だ。(どんまい。きにすんな。呑み会1回分だ。がまんの時。)下記から登録を進める。
https://play.google.com/apps/publish/signup
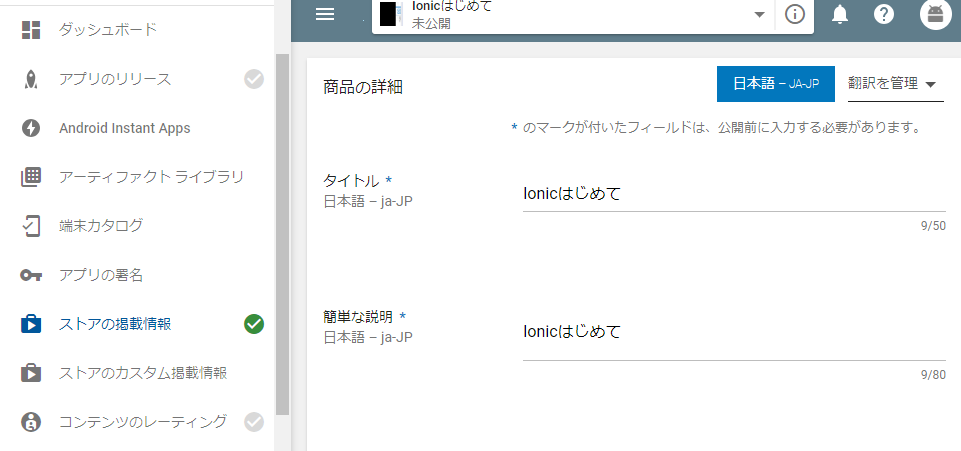
お金は払う以外は簡単なのでやり方は割愛する。順調にいくと下記画面にたどり着く。
ストア掲載情報
アプリの作成をクリックすると下記画面に行く。
てきとーに入力して保存。
これは下記のようなGooglePlayのアプリ画面の情報たちの登録にあたる。
アプリのリリース
左のカラムから
アプリのリリースを選ぶ
追加するAndroid App BundleとAPKで、さきほど作ったAKPファイルを入れる。
ただし拡張子はakpでない。
なんか進化しているAndroid App Bundleという形式でつくったので、拡張子はaabだ。細かいことは気にしない。
とりあえずアプリ名\platforms\android\app\release\app.aabをドロップ。その他は適当に入力でOKでしょう。
コンテンツのレーティング
特に難しくないでしょう。割愛
価格と配布
特に難しくないでしょう。割愛
もっかいアプリのリリース
全部ちゃんと回答していると
製品版として公開を開始がクリックできる。
クリックして数時間たてば、もう公開されてます。よゆうやな。(今回はじゃっかんエラーおおめで焦った。)
おめでとう。Androidアプリエンジニアです。
MacないのでiOSアプリの検証でけへん。


- 投稿日:2019-03-23T18:47:57+09:00
ConstrainLayoutメモ
基本
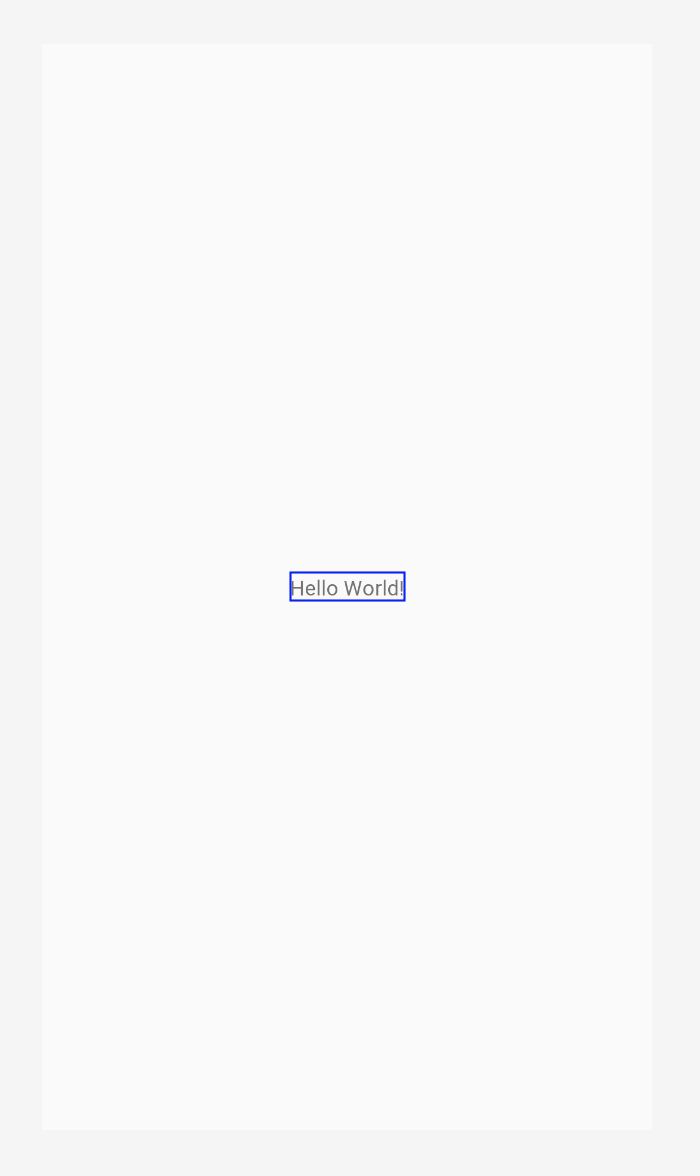
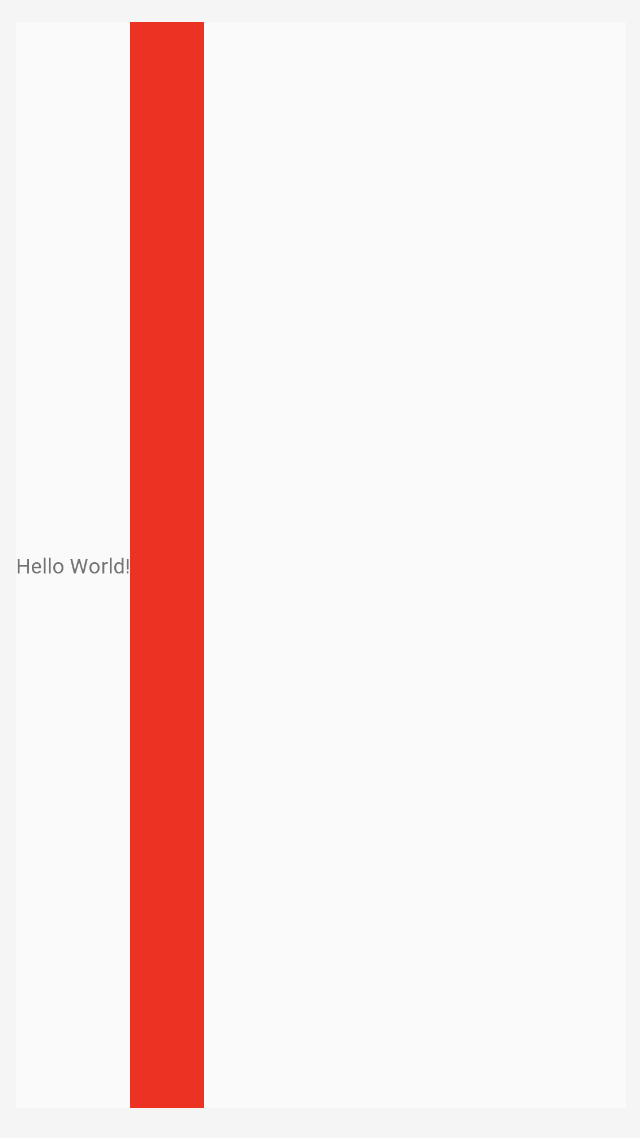
- 親の左に紐付いている
<androidx.constraintlayout.widget.ConstraintLayout
    android:layout_width="match_parent"
    android:layout_height="match_parent">

    <TextView
        android:layout_width="wrap_content"
        android:layout_height="wrap_content"
        android:text="Hello World!"
        app:layout_constraintBottom_toBottomOf="parent"
        app:layout_constraintLeft_toLeftOf="parent"
        app:layout_constraintTop_toTopOf="parent"/>

</androidx.constraintlayout.widget.ConstraintLayout>
基本
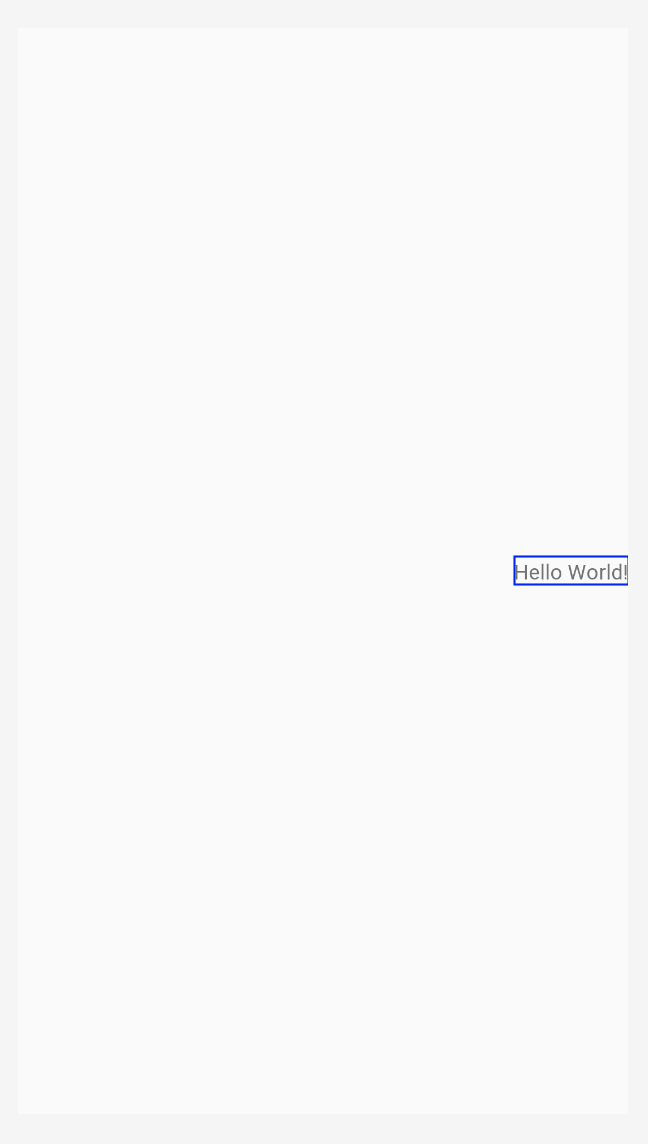
- 親の左右に紐付いている
- 紐付いている空間の真ん中に配置される
<androidx.constraintlayout.widget.ConstraintLayout
    android:layout_width="match_parent"
    android:layout_height="match_parent">

    <TextView
        android:layout_width="wrap_content"
        android:layout_height="wrap_content"
        android:text="Hello World!"
        app:layout_constraintBottom_toBottomOf="parent"
        app:layout_constraintLeft_toLeftOf="parent"
        app:layout_constraintRight_toRightOf="parent"
        app:layout_constraintTop_toTopOf="parent"/>

</androidx.constraintlayout.widget.ConstraintLayout>
layout_constraintHorizontal_bias / layout_constraintVertical_bias
- 紐付いている空間に配置される場所を調整する
- layout_constraintHorizontal_biasが0で左、1が右となり、小数で微調整可能
- layout_constraintVertical_biasが0で上、1が下となり、小数で微調整可能
<androidx.constraintlayout.widget.ConstraintLayout
    android:layout_width="match_parent"
    android:layout_height="match_parent">

    <TextView
        android:layout_width="wrap_content"
        android:layout_height="wrap_content"
        android:text="Hello World!"
        app:layout_constraintHorizontal_bias="0"
        app:layout_constraintBottom_toBottomOf="parent"
        app:layout_constraintLeft_toLeftOf="parent"
        app:layout_constraintRight_toRightOf="parent"
        app:layout_constraintTop_toTopOf="parent"/>

</androidx.constraintlayout.widget.ConstraintLayout>
<androidx.constraintlayout.widget.ConstraintLayout
    android:layout_width="match_parent"
    android:layout_height="match_parent">

    <TextView
        android:layout_width="wrap_content"
        android:layout_height="wrap_content"
        android:text="Hello World!"
        app:layout_constraintHorizontal_bias="1"
        app:layout_constraintBottom_toBottomOf="parent"
        app:layout_constraintLeft_toLeftOf="parent"
        app:layout_constraintRight_toRightOf="parent"
        app:layout_constraintTop_toTopOf="parent"/>

</androidx.constraintlayout.widget.ConstraintLayout>
chain(app:layout_constraintHorizontal_chainStyle="spread")
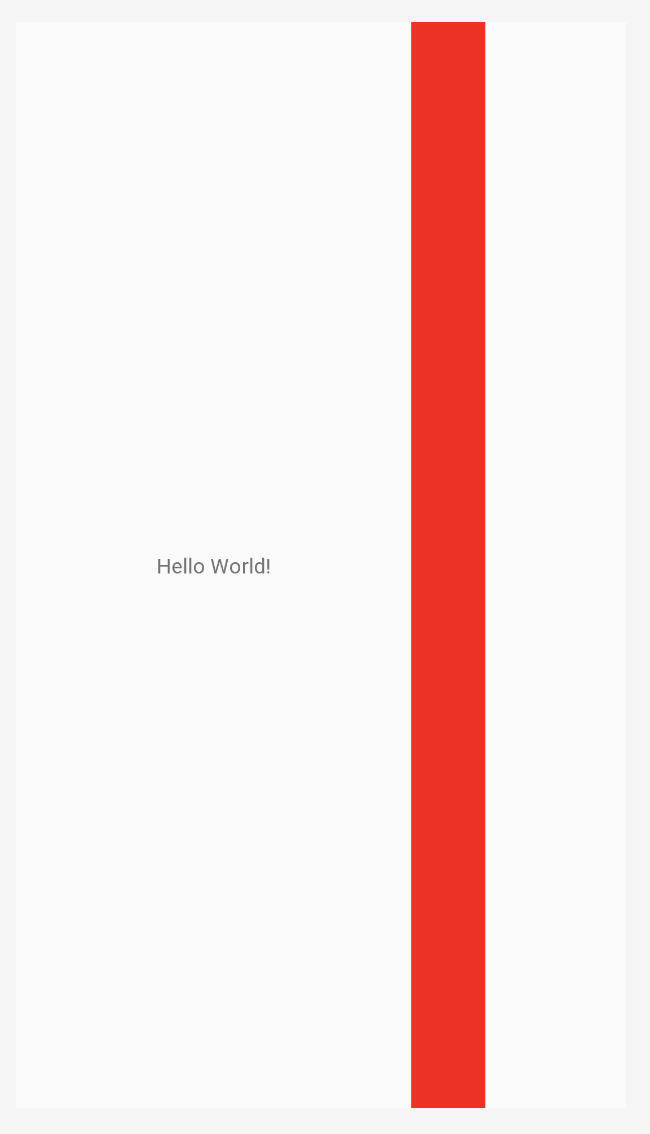
- Viewどおしを紐付けることによってchainとなる
- chainが未指定の場合、デフォルトでapp:layout_constraintHorizontal_chainStyle="spread"となる
- spreadは余白が均等になるように配置される
<androidx.constraintlayout.widget.ConstraintLayout
    android:layout_width="match_parent"
    android:layout_height="match_parent">

    <TextView
        android:id="@+id/text_view"
        android:layout_width="wrap_content"
        android:layout_height="wrap_content"
        android:text="Hello World!"
        app:layout_constraintBottom_toBottomOf="parent"
        app:layout_constraintLeft_toLeftOf="parent"
        app:layout_constraintRight_toLeftOf="@+id/red_view"
        app:layout_constraintTop_toTopOf="parent"/>

    <View
        android:id="@+id/red_view"
        android:layout_width="50dp"
        android:layout_height="match_parent"
        android:background="#FF0000"
        app:layout_constraintLeft_toRightOf="@+id/text_view"
        app:layout_constraintRight_toRightOf="parent"/>

</androidx.constraintlayout.widget.ConstraintLayout>
app:layout_constraintHorizontal_chainStyle="packed"
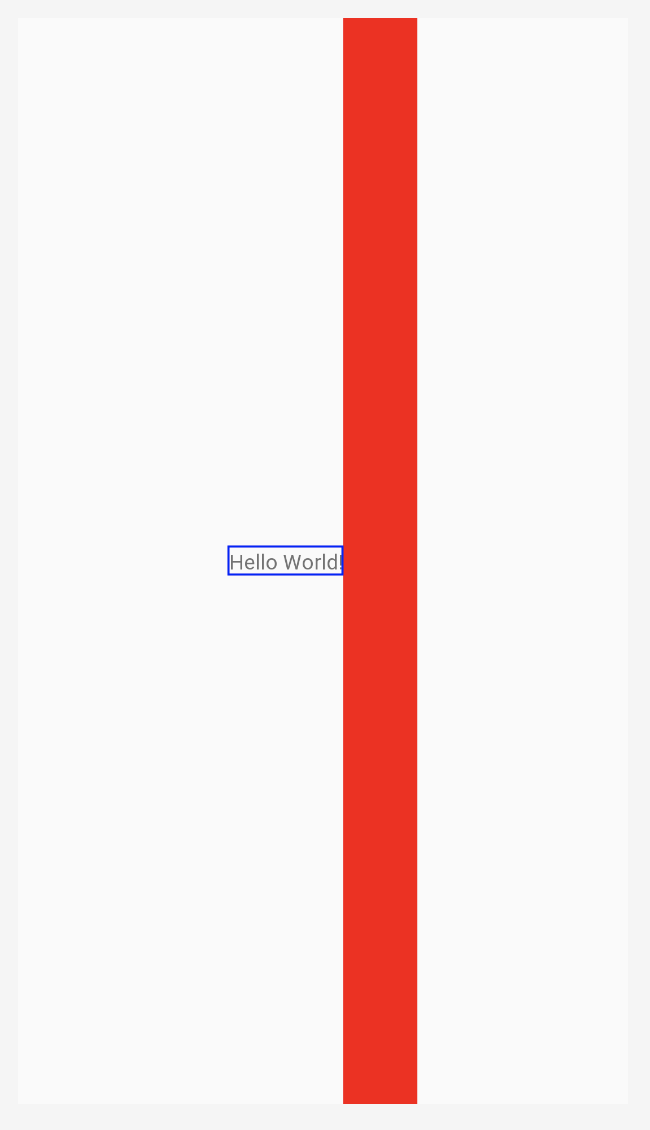
- chainしたViewどおしがくっついて配置される
<androidx.constraintlayout.widget.ConstraintLayout
    android:layout_width="match_parent"
    android:layout_height="match_parent">

    <TextView
        android:id="@+id/text_view"
        android:layout_width="wrap_content"
        android:layout_height="wrap_content"
        android:text="Hello World!"
        app:layout_constraintHorizontal_chainStyle="packed"
        app:layout_constraintBottom_toBottomOf="parent"
        app:layout_constraintLeft_toLeftOf="parent"
        app:layout_constraintRight_toLeftOf="@+id/red_view"
        app:layout_constraintTop_toTopOf="parent"/>

    <View
        android:id="@+id/red_view"
        android:layout_width="50dp"
        android:layout_height="match_parent"
        android:background="#FF0000"
        app:layout_constraintLeft_toRightOf="@+id/text_view"
        app:layout_constraintRight_toRightOf="parent"/>

</androidx.constraintlayout.widget.ConstraintLayout>
app:layout_constraintHorizontal_bias
- chainしたまとまりでbiasが機能する
<androidx.constraintlayout.widget.ConstraintLayout
    android:layout_width="match_parent"
    android:layout_height="match_parent">

    <TextView
        android:id="@+id/text_view"
        android:layout_width="wrap_content"
        android:layout_height="wrap_content"
        android:text="Hello World!"
        app:layout_constraintHorizontal_chainStyle="packed"
        app:layout_constraintHorizontal_bias="0"
        app:layout_constraintBottom_toBottomOf="parent"
        app:layout_constraintLeft_toLeftOf="parent"
        app:layout_constraintRight_toLeftOf="@+id/red_view"
        app:layout_constraintTop_toTopOf="parent"/>

    <View
        android:id="@+id/red_view"
        android:layout_width="50dp"
        android:layout_height="match_parent"
        android:background="#FF0000"
        app:layout_constraintLeft_toRightOf="@+id/text_view"
        app:layout_constraintRight_toRightOf="parent"/>

</androidx.constraintlayout.widget.ConstraintLayout>
app:layout_constrainedWidth
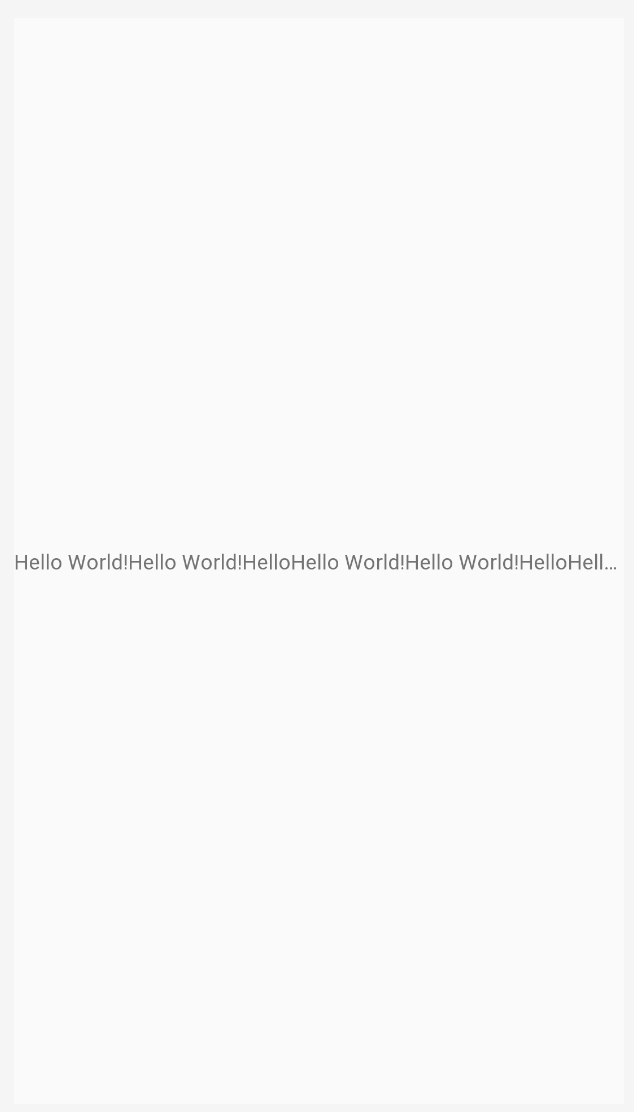
* text_viewの文言が長くなった場合、red_viewが画面外にはみ出す
<androidx.constraintlayout.widget.ConstraintLayout
    android:layout_width="match_parent"
    android:layout_height="match_parent">

    <TextView
        android:id="@+id/text_view"
        android:layout_width="wrap_content"
        android:layout_height="wrap_content"
        android:text="Hello World!Hello World!HelloHello World!Hello World!HelloHello World!Hello World!Hello"
        android:ellipsize="end"
        android:maxLines="1"
        app:layout_constraintHorizontal_chainStyle="packed"
        app:layout_constraintHorizontal_bias="0"
        app:layout_constraintBottom_toBottomOf="parent"
        app:layout_constraintLeft_toLeftOf="parent"
        app:layout_constraintRight_toLeftOf="@+id/red_view"
        app:layout_constraintTop_toTopOf="parent"/>

    <View
        android:id="@+id/red_view"
        android:layout_width="50dp"
        android:layout_height="match_parent"
        android:background="#FF0000"
        app:layout_constraintLeft_toRightOf="@+id/text_view"
        app:layout_constraintRight_toRightOf="parent"/>

</androidx.constraintlayout.widget.ConstraintLayout>
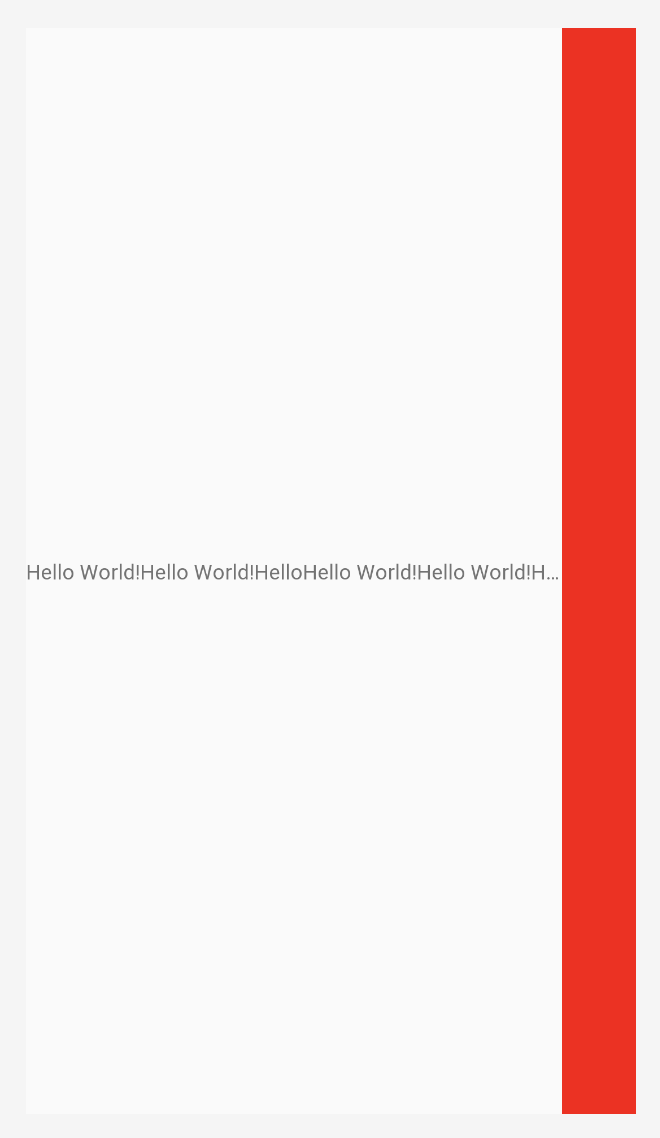
- app:layout_constrainedWidthをtrueで指定することで制約を強制し、red_viewはparentからはみ出しません
<androidx.constraintlayout.widget.ConstraintLayout
    android:layout_width="match_parent"
    android:layout_height="match_parent">

    <TextView
        android:id="@+id/text_view"
        android:layout_width="wrap_content"
        android:layout_height="wrap_content"
        android:text="Hello World!Hello World!HelloHello World!Hello World!HelloHello World!Hello World!Hello"
        android:ellipsize="end"
        android:maxLines="1"
        app:layout_constraintHorizontal_chainStyle="packed"
        app:layout_constraintHorizontal_bias="0"
        app:layout_constrainedWidth="true"
        app:layout_constraintBottom_toBottomOf="parent"
        app:layout_constraintLeft_toLeftOf="parent"
        app:layout_constraintRight_toLeftOf="@+id/red_view"
        app:layout_constraintTop_toTopOf="parent"/>

    <View
        android:id="@+id/red_view"
        android:layout_width="50dp"
        android:layout_height="match_parent"
        android:background="#FF0000"
        app:layout_constraintLeft_toRightOf="@+id/text_view"
        app:layout_constraintRight_toRightOf="parent"/>

</androidx.constraintlayout.widget.ConstraintLayout>
- 投稿日:2019-03-23T18:47:57+09:00
ConstraintLayoutメモ
基本
- 親の左に紐付いている
<androidx.constraintlayout.widget.ConstraintLayout
    android:layout_width="match_parent"
    android:layout_height="match_parent">

    <TextView
        android:layout_width="wrap_content"
        android:layout_height="wrap_content"
        android:text="Hello World!"
        app:layout_constraintBottom_toBottomOf="parent"
        app:layout_constraintLeft_toLeftOf="parent"
        app:layout_constraintTop_toTopOf="parent"/>

</androidx.constraintlayout.widget.ConstraintLayout>
基本
- 親の左右に紐付いている
- 紐付いている空間の真ん中に配置される
<androidx.constraintlayout.widget.ConstraintLayout
    android:layout_width="match_parent"
    android:layout_height="match_parent">

    <TextView
        android:layout_width="wrap_content"
        android:layout_height="wrap_content"
        android:text="Hello World!"
        app:layout_constraintBottom_toBottomOf="parent"
        app:layout_constraintLeft_toLeftOf="parent"
        app:layout_constraintRight_toRightOf="parent"
        app:layout_constraintTop_toTopOf="parent"/>

</androidx.constraintlayout.widget.ConstraintLayout>
layout_constraintHorizontal_bias / layout_constraintVertical_bias
- 紐付いている空間に配置される場所を調整する
- layout_constraintHorizontal_biasが0で左、1が右となり、小数で微調整可能
- layout_constraintVertical_biasが0で上、1が下となり、小数で微調整可能
<androidx.constraintlayout.widget.ConstraintLayout
    android:layout_width="match_parent"
    android:layout_height="match_parent">

    <TextView
        android:layout_width="wrap_content"
        android:layout_height="wrap_content"
        android:text="Hello World!"
        app:layout_constraintHorizontal_bias="0"
        app:layout_constraintBottom_toBottomOf="parent"
        app:layout_constraintLeft_toLeftOf="parent"
        app:layout_constraintRight_toRightOf="parent"
        app:layout_constraintTop_toTopOf="parent"/>

</androidx.constraintlayout.widget.ConstraintLayout>
<androidx.constraintlayout.widget.ConstraintLayout
    android:layout_width="match_parent"
    android:layout_height="match_parent">

    <TextView
        android:layout_width="wrap_content"
        android:layout_height="wrap_content"
        android:text="Hello World!"
        app:layout_constraintHorizontal_bias="1"
        app:layout_constraintBottom_toBottomOf="parent"
        app:layout_constraintLeft_toLeftOf="parent"
        app:layout_constraintRight_toRightOf="parent"
        app:layout_constraintTop_toTopOf="parent"/>

</androidx.constraintlayout.widget.ConstraintLayout>
chain(app:layout_constraintHorizontal_chainStyle="spread")
- Viewどおしを紐付けることによってchainとなる
- chainが未指定の場合、デフォルトでapp:layout_constraintHorizontal_chainStyle="spread"となる
- spreadは余白が均等になるように配置される
<androidx.constraintlayout.widget.ConstraintLayout
    android:layout_width="match_parent"
    android:layout_height="match_parent">

    <TextView
        android:id="@+id/text_view"
        android:layout_width="wrap_content"
        android:layout_height="wrap_content"
        android:text="Hello World!"
        app:layout_constraintBottom_toBottomOf="parent"
        app:layout_constraintLeft_toLeftOf="parent"
        app:layout_constraintRight_toLeftOf="@+id/red_view"
        app:layout_constraintTop_toTopOf="parent"/>

    <View
        android:id="@+id/red_view"
        android:layout_width="50dp"
        android:layout_height="match_parent"
        android:background="#FF0000"
        app:layout_constraintLeft_toRightOf="@+id/text_view"
        app:layout_constraintRight_toRightOf="parent"/>

</androidx.constraintlayout.widget.ConstraintLayout>
app:layout_constraintHorizontal_chainStyle="packed"
- chainしたViewどおしがくっついて配置される
<androidx.constraintlayout.widget.ConstraintLayout
    android:layout_width="match_parent"
    android:layout_height="match_parent">

    <TextView
        android:id="@+id/text_view"
        android:layout_width="wrap_content"
        android:layout_height="wrap_content"
        android:text="Hello World!"
        app:layout_constraintHorizontal_chainStyle="packed"
        app:layout_constraintBottom_toBottomOf="parent"
        app:layout_constraintLeft_toLeftOf="parent"
        app:layout_constraintRight_toLeftOf="@+id/red_view"
        app:layout_constraintTop_toTopOf="parent"/>

    <View
        android:id="@+id/red_view"
        android:layout_width="50dp"
        android:layout_height="match_parent"
        android:background="#FF0000"
        app:layout_constraintLeft_toRightOf="@+id/text_view"
        app:layout_constraintRight_toRightOf="parent"/>

</androidx.constraintlayout.widget.ConstraintLayout>
app:layout_constraintHorizontal_bias
- chainしたまとまりでbiasが機能する
<androidx.constraintlayout.widget.ConstraintLayout
    android:layout_width="match_parent"
    android:layout_height="match_parent">

    <TextView
        android:id="@+id/text_view"
        android:layout_width="wrap_content"
        android:layout_height="wrap_content"
        android:text="Hello World!"
        app:layout_constraintHorizontal_chainStyle="packed"
        app:layout_constraintHorizontal_bias="0"
        app:layout_constraintBottom_toBottomOf="parent"
        app:layout_constraintLeft_toLeftOf="parent"
        app:layout_constraintRight_toLeftOf="@+id/red_view"
        app:layout_constraintTop_toTopOf="parent"/>

    <View
        android:id="@+id/red_view"
        android:layout_width="50dp"
        android:layout_height="match_parent"
        android:background="#FF0000"
        app:layout_constraintLeft_toRightOf="@+id/text_view"
        app:layout_constraintRight_toRightOf="parent"/>

</androidx.constraintlayout.widget.ConstraintLayout>
app:layout_constrainedWidth
* text_viewの文言が長くなった場合、red_viewが画面外にはみ出す
<androidx.constraintlayout.widget.ConstraintLayout
    android:layout_width="match_parent"
    android:layout_height="match_parent">

    <TextView
        android:id="@+id/text_view"
        android:layout_width="wrap_content"
        android:layout_height="wrap_content"
        android:text="Hello World!Hello World!HelloHello World!Hello World!HelloHello World!Hello World!Hello"
        android:ellipsize="end"
        android:maxLines="1"
        app:layout_constraintHorizontal_chainStyle="packed"
        app:layout_constraintHorizontal_bias="0"
        app:layout_constraintBottom_toBottomOf="parent"
        app:layout_constraintLeft_toLeftOf="parent"
        app:layout_constraintRight_toLeftOf="@+id/red_view"
        app:layout_constraintTop_toTopOf="parent"/>

    <View
        android:id="@+id/red_view"
        android:layout_width="50dp"
        android:layout_height="match_parent"
        android:background="#FF0000"
        app:layout_constraintLeft_toRightOf="@+id/text_view"
        app:layout_constraintRight_toRightOf="parent"/>

</androidx.constraintlayout.widget.ConstraintLayout>
- app:layout_constrainedWidthをtrueで指定することで制約を強制し、red_viewはparentからはみ出しません
<androidx.constraintlayout.widget.ConstraintLayout
    android:layout_width="match_parent"
    android:layout_height="match_parent">

    <TextView
        android:id="@+id/text_view"
        android:layout_width="wrap_content"
        android:layout_height="wrap_content"
        android:text="Hello World!Hello World!HelloHello World!Hello World!HelloHello World!Hello World!Hello"
        android:ellipsize="end"
        android:maxLines="1"
        app:layout_constraintHorizontal_chainStyle="packed"
        app:layout_constraintHorizontal_bias="0"
        app:layout_constrainedWidth="true"
        app:layout_constraintBottom_toBottomOf="parent"
        app:layout_constraintLeft_toLeftOf="parent"
        app:layout_constraintRight_toLeftOf="@+id/red_view"
        app:layout_constraintTop_toTopOf="parent"/>

    <View
        android:id="@+id/red_view"
        android:layout_width="50dp"
        android:layout_height="match_parent"
        android:background="#FF0000"
        app:layout_constraintLeft_toRightOf="@+id/text_view"
        app:layout_constraintRight_toRightOf="parent"/>

</androidx.constraintlayout.widget.ConstraintLayout>
- 投稿日:2019-03-23T18:09:25+09:00
CordovaでAndroidアプリを作る(Vue+Cordova入門)
前回の記事"Vue.jsで画像を一覧表示する(vue入門)"でVueについて記載したが、ここではVueとCordovaを使ったAndroidアプリ開発について記す。
Cordovaプロジェクト作成
以下のようなコマンドでプロジェクト(ここでは前回と同じ"my-project")を作成する。
事前にAndroid Studioをインストールして、デバッグできる環境を用意しておく。# vue cli 3.0のインストール (インストール済みなら不要) yarn global add @vue/cli # プロジェクト"my-project"作成 vue create my-project # cordovaのセットアップ(以前の記事(*)の続きの場合はここから) cd my-project\ vue add cordova # ここで質問されるため、デフォルトのまま以下のように回答した(適宜変更する) # ? Name of folder where cordova should be installed src-cordova # ? ID of the app com.vue.example.app # ? Name of the app VueExampleAppName # ? Select Platforms: Android, iOS, Browser, OSX # 対応するプラットフォームとして全て(Android, iOS, Browser, OSX)のものを選択した。デバッグ
デバッグはUSB接続したAndroid端末のアプリからHTTPでPCに接続することで行う。以下のコマンドでデバッグ用のAPKを作成し、Android端末にインストールするとともに、PCにWebサーバを立ち上げる。
npm run cordova-serve-android画面表示はHTTPが利用されており、PCがWebサーバーとなり画面を提供する。PCにウイルス対策ソフトなどでファイヤーウォールが入っている場合は、該当するポートを開く必要がある。開いているポート(URL)は、
cordova-serve-androidの処理の中で次のように表示される。ここでの例では8080ポートにPCの外部(Androidスマホ)からアクセスできる必要がある。また、AndroidスマホがPCと同じLANに接続されていることに注意する。App running at: - Local: http://localhost:8080 - Network: http://192.168.100.135:8080PCのChromeを立ち上げ、
chrome://inspectとURL部分に入れると、DevToolsの画面が開き、この中の"Remote Target" に表示されているアプリ(ここでは"my-project")の下にある"inspect"という文字をクリックすることで新しいウインドウが開き、デバッグ画面が表示される。コンソールの内容が表示されるなど、デバッグ方法はWebアプリとよく似ている。
APKの作成
npm run cordova-build-androidでAndroid Studioで読み込めるプロジェクトフォルダ(/src-cordova/platforms/android)が生成される。
署名つきAPKをAndroid Studioで作成すれば、任意の端末にもインストールできるAPKができる。まとめ
Webアプリ開発の知見であれば、比較的簡単にスマートフォンアプリが開発できることがわかった。

- 投稿日:2019-03-23T17:52:08+09:00
DroidKaigi 公式アプリのKotlin Multiplatform
どこでもKotlin #7 〜Kotlin MPP特集〜で話す予定の内容です!他の方の発表面白そうですし、先着順でまだ空きがあるようなので参加まだの方いれば早めにどうぞ!
https://m3-engineer.connpass.com/event/123055/概要
自分の知見というより、DroidKaigiアプリとしての知見になりますが、このままではもったいないので、書いておきます。
このあたり、自分はAndroid版の機能をレビュー、実装している間に、コントリビューターの方々がやっていただけたものになります。 @kikuchy さんが特にこの基盤作りをメインにやってくれていました。他にもiOSの有名な方々など、さまざまな方が開発に参加していただけました。DroidKaigiではAndroid版とiOS版をリリースしています。そこで培った知見を公開しておこうと思います。
https://itunes.apple.com/jp/app/droidkaigi-2019/id1450771424?mt=8
Kotlin Multiplatformとは
Kotlin Multiplatformを使うとAndroidとiOSでコードを共通化することが出来ます。
例えば、DroidKaigi 2019のアプリではKotlin Multiplatformを使って、APIの呼び出しや、アプリ内で使うモデルのクラスたちを共通化しています。現状のKotlin Multiplatformを使った開発では、UIの共通化を行うことはあまり考えられておらず、UIの部分はiOSであればSwiftで開発し、AndroidではKotlinまたはJavaを用いて開発を行い、APIやDBなどの部分を共通化するのが普通です。
これはいい面も悪い面もあります。UI、UXはプラットフォームに合わせて最適化しやすいのですが、逆に共通化できる部分は結構少なくなります。Androidでのビルド
KotlinのコードはJavaと同様にJavaのクラスファイル、バイトコードに変換され、それがDalvikバイトコードに変換されます。
Kotlin Multiplatformのコードも同様に変換されます。何も問題なく動作します。iOSでのビルド
Kotlin/Nativeによって、ネイティブバイナリにKotlinを変換することができ、JVMなどの仮想環境がないiOSでも実行することが出来ます。
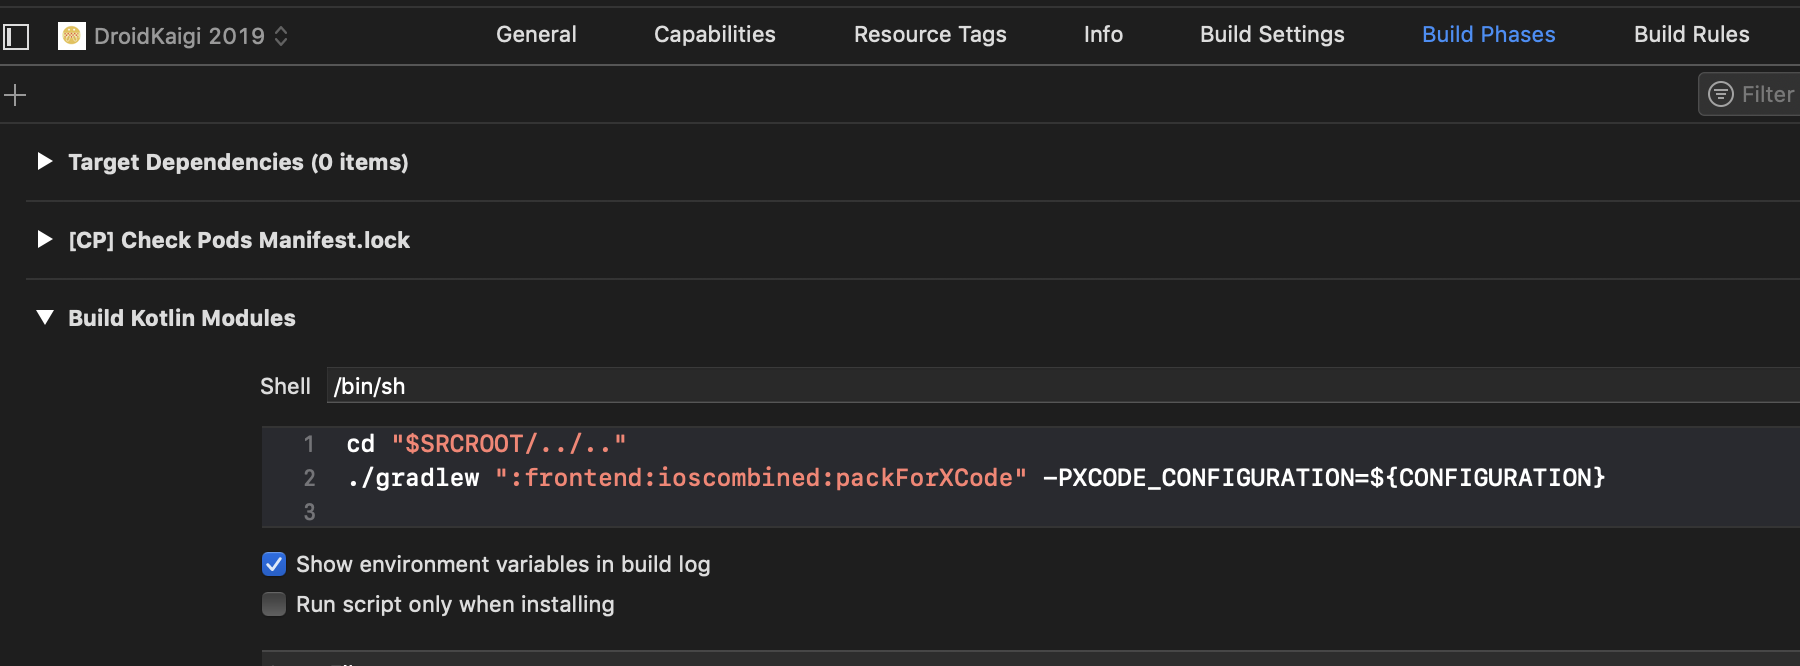
基本的には以下のようなGradleタスクを動かして、iOSのFrameworkを作成して、使います。task packForXCode(type: Sync) { final File frameworkDir = new File(buildDir, "xcode-frameworks") final String mode = project.findProperty("XCODE_CONFIGURATION")?.toUpperCase() ?: 'DEBUG' def target = project.findProperty("kotlin.target") ?: "iOS" inputs.property "mode", mode dependsOn kotlin.targets."$target".compilations.main.target.binaries.findFramework("", mode).linkTask from { kotlin.targets."$target".compilations.main.target.binaries.findFramework("", mode).outputFile.parentFile } into frameworkDir doLast { new File(frameworkDir, 'gradlew').with { text = "#!/bin/bash\nexport 'JAVA_HOME=${System.getProperty("java.home")}'\ncd '${rootProject.rootDir}'\n./gradlew \$@\n" setExecutable(true) } } }そしてこのGradleタスクをXcodeのBuild Phasesで指定してあげることで、作ってあげることが出来ます。
使ったライブラリ
Kotlin Multiplatformのために現在、さまざまなライブラリが開発されており、DroidKaigiではKtor-ClientやTimber、Klockなどのライブラリを用いて開発を行いました。これを使うことで、Multiplatformで例えばAPIの呼び出しの処理を共通化出来たりします。
Ktor-Client
https://ktor.io/clients/http-client.html
Kotlin Multiplatformで使えるHttpClient。 OkHttpと連携できたり、GsonやKotlinx.Serializationと連携できる。インターフェースはRetrofitのほうがいい感じ。
Kotlinx.Serialization
https://github.com/Kotlin/kotlinx.serialization
Kotlin Multiplatformで使えるJSON, CBOR, Protobufフォーマットが使えるシリアライザ。gsonやmoshiの代わりに使う。
Klock
Kotlin Multiplatformで使える日付や時間を表現できるライブラリ。これを使わない場合は、自分でそれぞれのプラットフォームのDate型とかを定義しないといけないのでだいぶ助かります。JetBrains公式ではなく、今後JetBrains公式のものを考えているようなので、それが出るまでのつなぎになりそうな気がしています。
Timber
com.jakewharton.timber:timber-common:5.0.0-SNAPSHOTを使うことで、Androidで有名なログライブラリのTimberを使えます。
現状、Kotlin/Native(iOS向け)には対応していないので注意が必要DroidKaigiでの構成
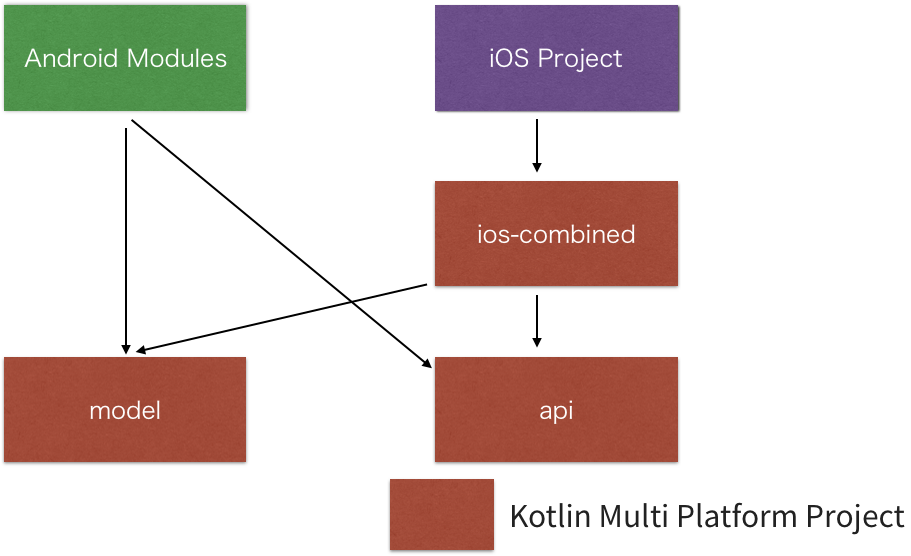
DroidKaigiではAPI呼び出しの部分とModel部分を共通化しています。
Kotlin MultiplatformとMulti Module
なぜこのような構成になっているのか見ていきましょう。
まず最初に自分が作っていたときは機能を実装していかなくてはいけないので、APIやModelのモジュールを分けており、ModelはKotlin Multiplatform Project(MPP) モジュールで作っていました。
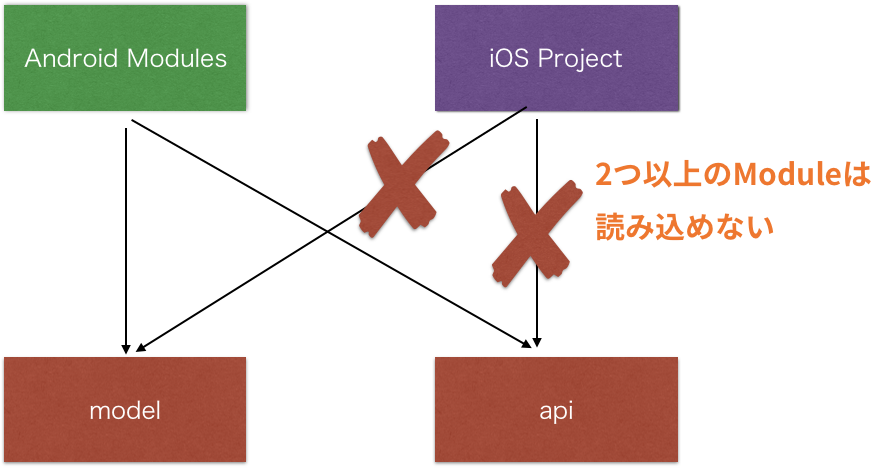
そこでiOS版を作るときに1つ問題が発生しました。iOSのプロジェクトから複数のKotlin MPPモジュールを参照できませんでした。
https://twitter.com/kikuchy/status/1083999701160972290 より
そのため1つのモジュールで、それぞれのモジュールを参照できるモジュール
ios-combinedを作成し、srcDirsを使って無理やり参照するという荒業により解決しました。sourceSets { final List<String> projectsList = [ ":model", ":data:api", ":data:api-impl", ... ] commonMain { projectsList.forEach { kotlin.srcDirs += "${project(it).projectDir}/src/commonMain/kotlin" }ただ、この構成も完璧ではありません。Android Studio 3.4以上で以下のエラーがAndroid Studio上で起こることが観測されています。現状は、settings.gradleを変更しながら開発する必要があります。
https://github.com/DroidKaigi/conference-app-2019/issues/738Kotlin MultiplatformとDagger
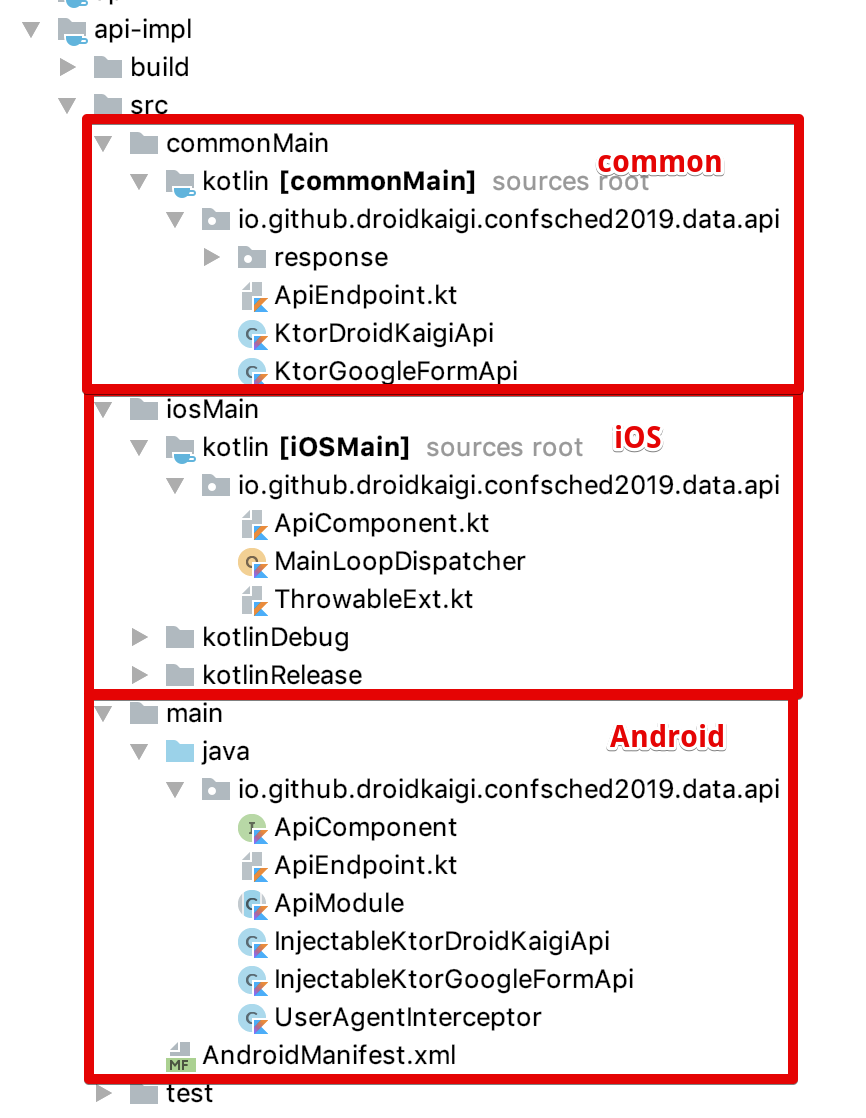
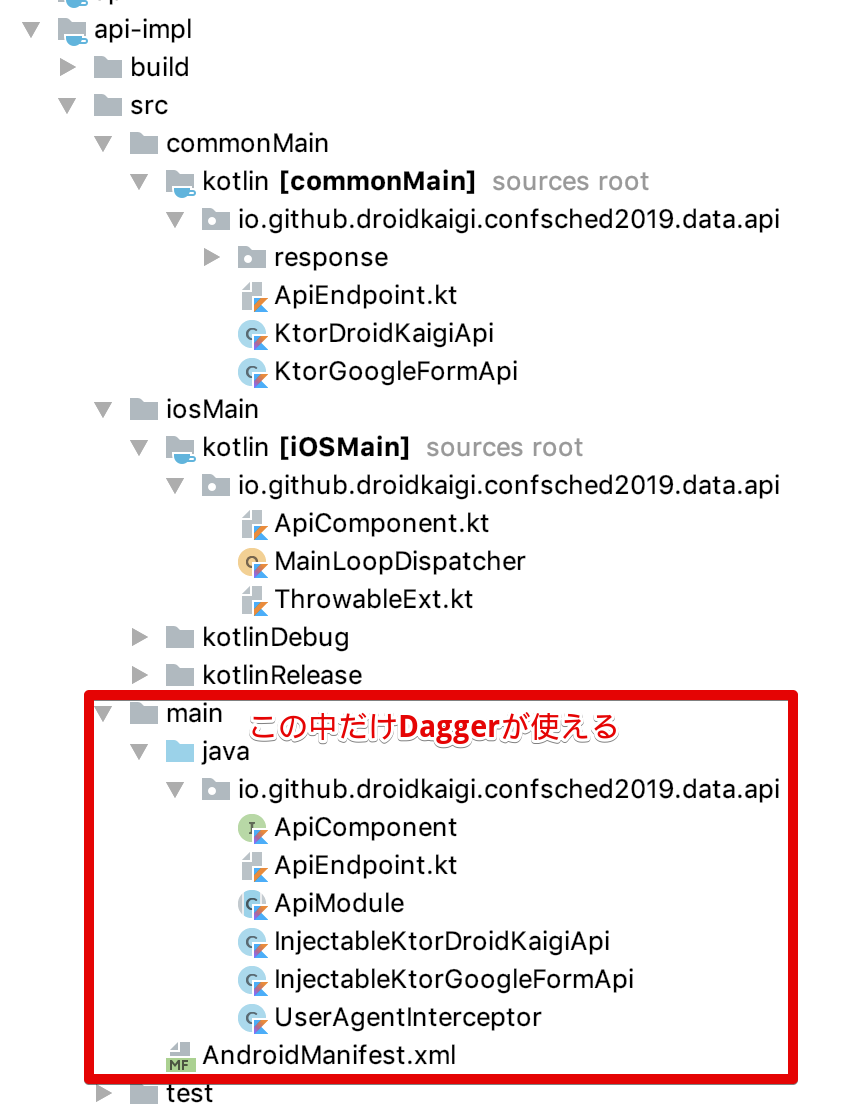
Kotlin MPPモジュールではプラットフォーム依存のコードも入れることが出来、Kotlin MPPモジュール内のAndroidのモジュール内限定になりますが、Daggerに関連するコードも書くことが出来ます。
この中の一番下の部分だけDaggerが使えます。
そのため、以下のように継承するなどすることで、配布することが出来ます。
Kotlin MPPモジュール内
interface DroidKaigiApi {
    suspend fun getSessions(): Response
...
}
open class KtorDroidKaigiApi constructor( val httpClient: HttpClient, val apiEndpoint: String, val coroutineDispatcherForCallback: CoroutineContext? ) : DroidKaigiApi { override suspend fun getSessions(): Response { ... // Ktorの処理は本筋ではないので省略 }api-impl/src/main(Android用のフォルダ内)
class InjectableKtorDroidKaigiApi @Inject constructor(
    httpClient: HttpClient,
    @Named("apiEndpoint") apiEndpoint: String
) : KtorDroidKaigiApi(httpClient, apiEndpoint, null)
internal abstract class ApiModule { @Binds abstract fun DroidKaigiApi(impl: InjectableKtorDroidKaigiApi): DroidKaigiApiKotlin MultiplatformとKotlin Coroutines
iOSアプリからKotlinのsuspend functionを呼ぶことは通常できません。
そのため最初は以下のようにコールバックを作成し、実装していました。
これを1つずつ繰り返すのはかなり骨が折れる作業ではないでしょうか override fun getSessions( callback: (response: Response) -> Unit, onError: (error: Exception) -> Unit ) { GlobalScope.launch(requireNotNull(coroutineDispatcherForCallback)) { try { val response = getSessions() callback(response) } catch (ex: Exception) { onError(ex) } } }
Deferredを返す関数を作っておけば、iOSからDeferred.invokeOnCompletion()を呼び出せば可能であることに着目し、
Kotlinx_coroutines_core_nativeDeferredに対するextension functionを生やすことでRxSwiftのSingleを返せるようなメソッドを作り、それを使うことで @nukka123 さんが通信を可能にしてくれました。https://github.com/DroidKaigi/conference-app-2019/pull/601
Kotlin MPPのコード
    override fun getSessionsAsync(): Deferred<Response> =
        GlobalScope.async(requireNotNull(coroutineDispatcherForCallback)) {
            getSessions()
        }
Swiftの呼び出しコード
        return ApiComponentKt.generateDroidKaigiApi()
            .getSessionsAsync()
            .asSingle(Response.self)
SwiftのDeferredに対するextension function
import Foundation
import RxSwift
import ioscombined

extension KotlinThrowable: LocalizedError {
    public var errorDescription: String? {
        return self.message ?? "No message. \(self)"
    }
}

extension Kotlinx_coroutines_core_nativeDeferred {

    func asSingle<ElementType>(_ elementType: ElementType.Type) -> Single<ElementType> {
        return Single<ElementType>.create { observer in
            self.invokeOnCompletion { cause in
                if let cause = cause {
                    observer(.error(cause))
                    return KotlinUnit()
                }

                if let result = self.getCompleted() as? ElementType {
                    observer(.success(result))
                    return KotlinUnit()
                }

                fatalError("Illegal state or invalid elementType.")
            }

            return Disposables.create {
                self.cancel()
            }
        }
    }
}
Kotlin MultiplatformとDynamic Feature Module
AndroidではDynamic Feature Moduleという後からモジュールを読み込むことで、アプリを小さくできる仕組みがあります。これを組み込もうとしたときに以下のようなエラーが出ました。
ZipException: duplicate entry: META-INF/ktor-client-core.kotlin_moduleこれは
ktor-client-core-1.1.2.jarとktor-client-core-jvm-1.1.2.jarで同じktor-client-core.kotlin_moduleが含まれているため起こっていると思われます。
現在、以下のissueを作成しており、S1の優先度で対応していただいているので、そのうち直ると思われます。
https://issuetracker.google.com/issues/125696148Parcelizeとの連携
ParcelableはAndroidでIntentにインスタンスを乗せてデータを送ったりするときに使う仕組みです。ParcelizeはAndroid向けのParcelableを簡単に作ってくれるKotlinの機能です。そのParcelizeは工夫することで、Kotlin Multiplatform Moduleの中でも使えます。
詳しくは以下の最高の記事があるのでそれをご覧ください。
https://aakira.app/blog/2018/12/kotlin-mpp-android-parcelable/ハマったポイント(うろ覚え)
Kotlin/Nativeの対応ArchitectureによるiOSでのリリースの制限
iOSのリリースの前日、
Undefined symbols for architecture armv7というエラーに悩まされる。そもそもサポートされていなかったので除外して解決。(古いiPhoneでは動かない模様)
https://github.com/JetBrains/kotlin-native/issues/1460Kotlin MultiplatformのクラスがAndroid Studio上で赤くて解決されない
enableFeaturePreview('GRADLE_METADATA')がないとダメ。
Kotlin Multiplatformで1モジュール指定でプラットフォームごとに読み込める理由はGradle module metadataファイル を読み込んで、platform-typeとか指定されているから勝手に使えるっぽい。この機能を使うにはGradle 4.7でenableFeaturePreview('GRADLE_METADATA')じゃないとうまく動かない。 pic.twitter.com/0HWlaPKvb9
— takahirom (@new_runnable) 2018年12月22日
https://github.com/DroidKaigi/conference-app-2019/pull/81
Gradle Metadataにもバージョンがあって、Gradle 4.7のMetadataとそれ以降のMetadataがあり、現状は、新しいバージョンのメタデータに大体のライブラリが対応しているので、それを使うと問題なく利用できます。(うまくビルドできないときは確認してみると良さそう)
ちなみに、Gradle 5.3からGradle module metadataは1.0になるみたいでまたライブラリのアップデート必要そうかもです

https://github.com/gradle/gradle/blob/de88b30e5374ede4dc393f5709fa71a7f349785e/subprojects/docs/src/docs/design/gradle-module-metadata-1.0-specification.mdまとめ
iOSの実装など、ほとんど自分の力ではないのですが、さまざまな人の力によりDroidKaigiのKotlin Multiplatformの実装がされました。このようにPRによって知見が集まってくることは、個人的にはかなりすごいことだと思っています。

- 投稿日:2019-03-23T16:08:45+09:00
5 Best Free Music Applications for iOS and Android in 2019
Use these five free musical apps for listening to music. These are some of the free music applications through which you can listen to your music library, know about some new artists, search radio stations nearby, listen the running music, etc. These applications are usually free of cost and are compatible with iPhone and Android. Locate the application store on the phone, and get these apps. You will be addicted to these apps in no time.
Pandora
Pandora is famous for a reason. Some people have ranked it to be one of the best music apps. Write about your favorite artist. Pandora will be playing songs along with the artists that are recommended by Pandora. The user will find new music that is similar to songs that you love already. Users can even rate the songs. It will learn and improve the suggestions that are based on ratings. Favorite artists can also be bookmarked for further access. Pandora app will be working very well if you have a connection with Wi-Fi for streaming the songs without any hindrance.Shazam
It is a fantastic application for music. If you are not able to remember the name of that song that is playing on the radio, then Shazam will listen to that song that is being played, and you will get to know about the artist and song. Users have the option of sharing the discovery along with watching a music video. Each song saved by the app will get stored as a tag. Simply share the tags. Lyrics can also be seen while listening to the song.Spotify
One of the best thing with Spotify is that numerous playlists can be made with it. Users can even listen to the playlists that have been created by other people. Premium can be tried for 30 days. Spotify is one fantastic music apps through which you may follow the artists and even sync the music directly from the desktop. Users can also make the radio station. Search the music by seeing the top lists. Favorite songs can be added, and they can be played later. Anyone can create the playlist and share it with other people. For example- Spotify is perfect for family functions.iHeartRadio
It incorporates radio, music, and podcasts, plus it shows 0 commercial, and it is known for working on numerous devices. If you are hearing to the music from the app directly, then you need to log in. Users can skip only a specific number of songs each day. If you need a radio application for the mobile device that you have, then iHeart is the best option for you. Tons of services are being supported by it. Listeners can even listen to podcasts; they can make their music stations depending on their favorite song; categories can be searched like the hits of the 80s and 90s. There are categories like rock, classical, holiday, oldies and much more. Listeners can save the stations as presets and an alarm clock too.Slacker Radio
One of the best thing with this app is that you don’t need to have an account for streaming the music. Several premade stations are there that are just a single tap away. Users can even adjust the quality of audio streaming. Users will be notified regarding the sports updates and music news. It is one free of cost application with so many radio stations. While listening to the radio, users can fine tune them for playing more songs. Users can even set up new stations or keep track of the currently playing songs.
Source : https://my-norton.net/5-best-free-music-applications-for-ios-and-android-in-2019/
- 投稿日:2019-03-23T11:41:45+09:00
osmdroid-wms を使って国土国交省の Capabilitiesを解析し地図画像を表示する
mdroid-wms を使ってAndroid に国土国交省の地図画像を表示する
の続きですWMS の Capabilities
WMSサーバで配信しているレイヤ(地図画像のデータセット)の一覧をXML形式で記述したもの
国交省のCapabilities機能の説明
http://nlftp.mlit.go.jp/webmapc/help.html#N3-1osmdroid-wms の WMSParser
Capabilities を解析するXMLパーサー
HtpURLConnection  c = (HttpURLConnection) new URL(Capabilitiesのurl).openConnection();
InputStream is = c.getInputStream();
WMSEndpoint endpoint = WMSParser.parse(is);
// レイヤの一覧
List<WMSLayer> list = endpoint.getLayers();
レイヤの一覧をListView に表示する。
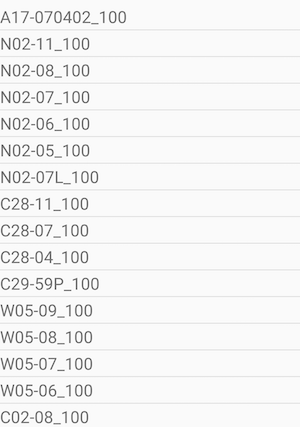
2000件くらいある。
レイヤ名の一覧が表示されるが、中身が推測できない。
下記から、レイヤ名と名称の対応表を作成する。
国交省の地図レイヤ定義一覧
http://nlftp.mlit.go.jp/webmapc/LayerList.htmlPython の BeautifulSoup を使用した。
ソースコードはこちら。
https://github.com/ohwada/Android_Samples/blob/master/tools/python/parse_milt_layer_list.py作成した対応表の例
800件くらいある。N03-180101_100, H29_都道府県界 N02-17_100, H29_鉄道勘案すると、中身が推測できない状態で、1000件ほど公開されているわけです。
Capabilitiesの解析結果と合わせてListView に表示する。
レイヤ名が決まれば、前回の記事と同様にして、地図画像を表示します。
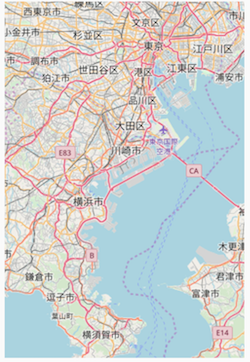
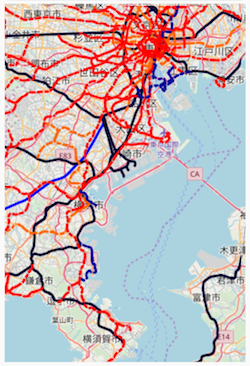
スクリーンショット
国交省の鉄道を表示する。
左はベースのOSM地図、右は鉄道を重ねたもの

github にサンプルコードを公開した
https://github.com/ohwada/Android_Samples/tree/master/Osmdroidwms2

- 投稿日:2019-03-23T10:39:44+09:00
[Flutter] Delayを使う方。
Tread Delayみたいなのはないかな?
FlutterではFutureを使ってDelayを使用します。基本
main.dartFuture.delayed(Duration(milliseconds: 10)) .then((_) => _animationController.forward());例。
main.dart@override void initState() { // TODO: implement initState super.initState(); // your code Future.delayed(Duration(milliseconds: 10)) .then((_) => _animationController.forward()); }Durationで欲しい時間入れば、ちゃんと動きます。