- 投稿日:2019-03-23T22:25:35+09:00
TypeScriptでReact
概要
ReactをTypeScriptでやってみます。
まずは、情報収集など。環境
$ yarn --version
1.15.2
$ create-react-app --version
2.1.8
三行まとめ
- React + TypeScriptについて調べた
- TypeScript有無のプロジェクトを比較した
- SFC?FC?
情報収集
ググって収集できた情報源。
意外とヒットしなかった印象。
まだあまり使われていない組み合わせ?https://facebook.github.io/create-react-app/docs/adding-typescript
https://www.typescriptlang.org/docs/handbook/react-&-webpack.html
https://www.typescriptlang.org/docs/handbook/jsx.html
https://www.typescriptlang.org/docs/handbook/tsconfig-json.html
https://qiita.com/alfas/items/539ade65926deb530e0e
https://typescript-jp.gitbook.io/deep-dive/tsx/react
https://github.com/Microsoft/TypeScript-React-Starter#typescript-react-starter
https://qiita.com/namaozi/items/7446804126a055caf254
https://www.dkrk-blog.net/javascript/react_ts03プロジェクト作成
create-react-appで--typescript有無のプロジェクトを作成し、比較する。
node_modulesは比較から除外。$ create-react-app tsx-react-app # typescript無し $ tree -I node_modules ./jsx-react-app/ ./jsx-react-app/ ├── README.md ├── package.json ├── public │ ├── favicon.ico │ ├── index.html │ └── manifest.json ├── src │ ├── App.css │ ├── App.js │ ├── App.test.js │ ├── index.css │ ├── index.js │ ├── logo.svg │ └── serviceWorker.js └── yarn.lock 2 directories, 13 files $ create-react-app tsx-react-app --typescript # typescript有り $ tree -I node_modules ./tsx-react-app/ ./tsx-react-app/ ├── README.md ├── package.json ├── public │ ├── favicon.ico │ ├── index.html │ └── manifest.json ├── src │ ├── App.css │ ├── App.test.tsx │ ├── App.tsx │ ├── index.css │ ├── index.tsx │ ├── logo.svg │ ├── react-app-env.d.ts │ └── serviceWorker.ts ├── tsconfig.json └── yarn.lock 2 directories, 15 filesプロジェクト比較
$ diff --new-file --unified ./jsx-react-app/ ./tsx-react-app/
共通のサブディレクトリー: ./jsx-react-app/.git と ./tsx-react-app/.git
diff --new-file --unified ./jsx-react-app/README.md ./tsx-react-app/README.md
--- ./jsx-react-app/README.md   2019-03-23 20:42:45.877562453 +0900
+++ ./tsx-react-app/README.md   2019-03-23 20:41:53.565223301 +0900
@@ -42,27 +42,3 @@
 You can learn more in the [Create React App documentation](https://facebook.github.io/create-react-app/docs/getting-started).

 To learn React, check out the [React documentation](https://reactjs.org/).
-
-### Code Splitting
-
-This section has moved here: https://facebook.github.io/create-react-app/docs/code-splitting
-
-### Analyzing the Bundle Size
-
-This section has moved here: https://facebook.github.io/create-react-app/docs/analyzing-the-bundle-size
-
-### Making a Progressive Web App
-
-This section has moved here: https://facebook.github.io/create-react-app/docs/making-a-progressive-web-app
-
-### Advanced Configuration
-
-This section has moved here: https://facebook.github.io/create-react-app/docs/advanced-configuration
-
-### Deployment
-
-This section has moved here: https://facebook.github.io/create-react-app/docs/deployment
-
-### `npm run build` fails to minify
-
-This section has moved here: https://facebook.github.io/create-react-app/docs/troubleshooting#npm-run-build-fails-to-minify
共通のサブディレクトリー: ./jsx-react-app/node_modules と ./tsx-react-app/node_modules
diff --new-file --unified ./jsx-react-app/package.json ./tsx-react-app/package.json
--- ./jsx-react-app/package.json    2019-03-23 20:42:45.877562453 +0900
+++ ./tsx-react-app/package.json    2019-03-23 20:41:53.561223273 +0900
@@ -1,11 +1,16 @@
 {
-  "name": "jsx-react-app",
+  "name": "tsx-react-app",
   "version": "0.1.0",
   "private": true,
   "dependencies": {
+    "@types/jest": "24.0.11",
+    "@types/node": "11.11.6",
+    "@types/react": "16.8.8",
+    "@types/react-dom": "16.8.3",
     "react": "^16.8.5",
     "react-dom": "^16.8.5",
-    "react-scripts": "2.1.8"
+    "react-scripts": "2.1.8",
+    "typescript": "3.3.4000"
   },
   "scripts": {
     "start": "react-scripts start",
共通のサブディレクトリー: ./jsx-react-app/public と ./tsx-react-app/public
共通のサブディレクトリー: ./jsx-react-app/src と ./tsx-react-app/src
diff --new-file --unified ./jsx-react-app/tsconfig.json ./tsx-react-app/tsconfig.json
--- ./jsx-react-app/tsconfig.json   1970-01-01 09:00:00.000000000 +0900
+++ ./tsx-react-app/tsconfig.json   2019-03-23 20:41:53.833225155 +0900
@@ -0,0 +1,25 @@
+{
+  "compilerOptions": {
+    "target": "es5",
+    "lib": [
+      "dom",
+      "dom.iterable",
+      "esnext"
+    ],
+    "allowJs": true,
+    "skipLibCheck": true,
+    "esModuleInterop": true,
+    "allowSyntheticDefaultImports": true,
+    "strict": true,
+    "forceConsistentCasingInFileNames": true,
+    "module": "esnext",
+    "moduleResolution": "node",
+    "resolveJsonModule": true,
+    "isolatedModules": true,
+    "noEmit": true,
+    "jsx": "preserve"
+  },
+  "include": [
+    "src"
+  ]
+}
diff --new-file --unified ./jsx-react-app/yarn.lock ./tsx-react-app/yarn.lock
--- ./jsx-react-app/yarn.lock   2019-03-23 20:42:43.465547689 +0900
+++ ./tsx-react-app/yarn.lock   2019-03-23 20:41:52.557216320 +0900
@@ -970,16 +970,53 @@
     "@svgr/plugin-svgo" "^4.0.3"
     loader-utils "^1.1.0"

+"@types/jest-diff@*":
+  version "20.0.1"
+  resolved "https://registry.yarnpkg.com/@types/jest-diff/-/jest-diff-20.0.1.tgz#35cc15b9c4f30a18ef21852e255fdb02f6d59b89"
+  integrity sha512-yALhelO3i0hqZwhjtcr6dYyaLoCHbAMshwtj6cGxTvHZAKXHsYGdff6E8EPw3xLKY0ELUTQ69Q1rQiJENnccMA==
+
+"@types/jest@24.0.11":
+  version "24.0.11"
+  resolved "https://registry.yarnpkg.com/@types/jest/-/jest-24.0.11.tgz#1f099bea332c228ea6505a88159bfa86a5858340"
+  integrity sha512-2kLuPC5FDnWIDvaJBzsGTBQaBbnDweznicvK7UGYzlIJP4RJR2a4A/ByLUXEyEgag6jz8eHdlWExGDtH3EYUXQ==
+  dependencies:
+    "@types/jest-diff" "*"
+
 "@types/node@*":
   version "11.10.5"
   resolved "https://registry.yarnpkg.com/@types/node/-/node-11.10.5.tgz#fbaca34086bdc118011e1f05c47688d432f2d571"
   integrity sha512-DuIRlQbX4K+d5I+GMnv+UfnGh+ist0RdlvOp+JZ7ePJ6KQONCFQv/gKYSU1ZzbVdFSUCKZOltjmpFAGGv5MdYA==

+"@types/node@11.11.6":
+  version "11.11.6"
+  resolved "https://registry.yarnpkg.com/@types/node/-/node-11.11.6.tgz#df929d1bb2eee5afdda598a41930fe50b43eaa6a"
+  integrity sha512-Exw4yUWMBXM3X+8oqzJNRqZSwUAaS4+7NdvHqQuFi/d+synz++xmX3QIf+BFqneW8N31R8Ky+sikfZUXq07ggQ==
+
+"@types/prop-types@*":
+  version "15.7.0"
+  resolved "https://registry.yarnpkg.com/@types/prop-types/-/prop-types-15.7.0.tgz#4c48fed958d6dcf9487195a0ef6456d5f6e0163a"
+  integrity sha512-eItQyV43bj4rR3JPV0Skpl1SncRCdziTEK9/v8VwXmV6d/qOUO8/EuWeHBbCZcsfSHfzI5UyMJLCSXtxxznyZg==
+
 "@types/q@^1.5.1":
   version "1.5.1"
   resolved "https://registry.yarnpkg.com/@types/q/-/q-1.5.1.tgz#48fd98c1561fe718b61733daed46ff115b496e18"
   integrity sha512-eqz8c/0kwNi/OEHQfvIuJVLTst3in0e7uTKeuY+WL/zfKn0xVujOTp42bS/vUUokhK5P2BppLd9JXMOMHcgbjA==

+"@types/react-dom@16.8.3":
+  version "16.8.3"
+  resolved "https://registry.yarnpkg.com/@types/react-dom/-/react-dom-16.8.3.tgz#6131b7b6158bc7ed1925a3374b88b7c00481f0cb"
+  integrity sha512-HF5hD5YR3z9Mn6kXcW1VKe4AQ04ZlZj1EdLBae61hzQ3eEWWxMgNLUbIxeZp40BnSxqY1eAYLsH9QopQcxzScA==
+  dependencies:
+    "@types/react" "*"
+
+"@types/react@*", "@types/react@16.8.8":
+  version "16.8.8"
+  resolved "https://registry.yarnpkg.com/@types/react/-/react-16.8.8.tgz#4b60a469fd2469f7aa6eaa0f8cfbc51f6d76e662"
+  integrity sha512-xwEvyet96u7WnB96kqY0yY7qxx/pEpU51QeACkKFtrgjjXITQn0oO1iwPEraXVgh10ZFPix7gs1R4OJXF7P5sg==
+  dependencies:
+    "@types/prop-types" "*"
+    csstype "^2.2.0"
+
 "@types/tapable@1.0.2":
   version "1.0.2"
   resolved "https://registry.yarnpkg.com/@types/tapable/-/tapable-1.0.2.tgz#e13182e1b69871a422d7863e11a4a6f5b814a4bd"
@@ -2858,6 +2895,11 @@
   dependencies:
     cssom "0.3.x"

+csstype@^2.2.0:
+  version "2.6.3"
+  resolved "https://registry.yarnpkg.com/csstype/-/csstype-2.6.3.tgz#b701e5968245bf9b08d54ac83d00b624e622a9fa"
+  integrity sha512-rINUZXOkcBmoHWEyu7JdHu5JMzkGRoMX4ov9830WNgxf5UYxcBUO0QTKAqeJ5EZfSdlrcJYkC8WwfVW7JYi4yg==
+
 cyclist@~0.2.2:
   version "0.2.2"
   resolved "https://registry.yarnpkg.com/cyclist/-/cyclist-0.2.2.tgz#1b33792e11e914a2fd6d6ed6447464444e5fa640"
@@ -9355,6 +9397,11 @@
   resolved "https://registry.yarnpkg.com/typedarray/-/typedarray-0.0.6.tgz#867ac74e3864187b1d3d47d996a78ec5c8830777"
   integrity sha1-hnrHTjhkGHsdPUfZlqeOxciDB3c=

+typescript@3.3.4000:
+  version "3.3.4000"
+  resolved "https://registry.yarnpkg.com/typescript/-/typescript-3.3.4000.tgz#76b0f89cfdbf97827e1112d64f283f1151d6adf0"
+  integrity sha512-jjOcCZvpkl2+z7JFn0yBOoLQyLoIkNZAs/fYJkUG6VKy6zLPHJGfQJYFHzibB6GJaF/8QrcECtlQ5cpvRHSMEA==
+
 uglify-js@3.4.x, uglify-js@^3.1.4:
   version "3.4.9"
   resolved "https://registry.yarnpkg.com/uglify-js/-/uglify-js-3.4.9.tgz#af02f180c1207d76432e473ed24a28f4a782bae3"
プロジェクトの主な違い
- tsxでは、READMEの後半部が削除されている
- tsxでは、
package.jsonとyarn.lockに、typescript関連が追加されている- tsxでは、
tsconfig.jsonが新規追加されているpublicフォルダ比較
$ diff --report-identical-files ./jsx-react-app/public/ ./tsx-react-app/public/
ファイル ./jsx-react-app/public/favicon.ico と ./tsx-react-app/public/favicon.ico は同一です
ファイル ./jsx-react-app/public/index.html と ./tsx-react-app/public/index.html は同一です
ファイル ./jsx-react-app/public/manifest.json と ./tsx-react-app/public/manifest.json は同一です
srcフォルダ比較
$ diff --brief --report-identical-files ./jsx-react-app/src/ ./tsx-react-app/src/
ファイル ./jsx-react-app/src/App.css と ./tsx-react-app/src/App.css は同一です
./jsx-react-app/src/ のみに存在: App.js
./jsx-react-app/src/ のみに存在: App.test.js
./tsx-react-app/src/ のみに存在: App.test.tsx
./tsx-react-app/src/ のみに存在: App.tsx
ファイル ./jsx-react-app/src/index.css と ./tsx-react-app/src/index.css は異なります
./jsx-react-app/src/ のみに存在: index.js
./tsx-react-app/src/ のみに存在: index.tsx
ファイル ./jsx-react-app/src/logo.svg と ./tsx-react-app/src/logo.svg は同一です
./tsx-react-app/src/ のみに存在: react-app-env.d.ts
./jsx-react-app/src/ のみに存在: serviceWorker.js
./tsx-react-app/src/ のみに存在: serviceWorker.ts
.jsファイルと.tsxファイル比較
App.jsとApp.tsx$ diff --unified --report-identical-files ./jsx-react-app/src/App.js ./tsx-react-app/src/App.tsx --- ./jsx-react-app/src/App.js 2019-03-23 20:42:45.877562453 +0900 +++ ./tsx-react-app/src/App.tsx 2019-03-23 20:41:53.565223301 +0900 @@ -9,7 +9,7 @@ <header className="App-header"> <img src={logo} className="App-logo" alt="logo" /> <p> - Edit <code>src/App.js</code> and save to reload. + Edit <code>src/App.tsx</code> and save to reload. </p> <a className="App-link"App.test.jsとApp.test.tsx$ diff --unified --report-identical-files ./jsx-react-app/src/App.test.js ./tsx-react-app/src/App.test.tsx ファイル ./jsx-react-app/src/App.test.js と ./tsx-react-app/src/App.test.tsx は同一ですindex.jsとindex.tsx$ diff --unified --report-identical-files ./jsx-react-app/src/index.js ./tsx-react-app/src/index.tsx ファイル ./jsx-react-app/src/index.js と ./tsx-react-app/src/index.tsx は同一ですserviceWorker.jsとserviceWorker.ts$ diff --unified --report-identical-files ./jsx-react-app/src/serviceWorker.js ./tsx-react-app/src/serviceWorker.ts --- ./jsx-react-app/src/serviceWorker.js 2019-03-23 20:42:45.877562453 +0900 +++ ./tsx-react-app/src/serviceWorker.ts 2019-03-23 20:41:53.565223301 +0900 @@ -20,10 +20,18 @@ ) ); -export function register(config) { +type Config = { + onSuccess?: (registration: ServiceWorkerRegistration) => void; + onUpdate?: (registration: ServiceWorkerRegistration) => void; +}; + +export function register(config?: Config) { if (process.env.NODE_ENV === 'production' && 'serviceWorker' in navigator) { // The URL constructor is available in all browsers that support SW. - const publicUrl = new URL(process.env.PUBLIC_URL, window.location.href); + const publicUrl = new URL( + (process as { env: { [key: string]: string } }).env.PUBLIC_URL, + window.location.href + ); if (publicUrl.origin !== window.location.origin) { // Our service worker won't work if PUBLIC_URL is on a different origin // from what our page is served on. This might happen if a CDN is used to @@ -54,7 +62,7 @@ } } -function registerValidSW(swUrl, config) { +function registerValidSW(swUrl: string, config?: Config) { navigator.serviceWorker .register(swUrl) .then(registration => { @@ -98,7 +106,7 @@ }); } -function checkValidServiceWorker(swUrl, config) { +function checkValidServiceWorker(swUrl: string, config?: Config) { // Check if the service worker can be found. If it can't reload the page. fetch(swUrl) .then(response => {また、
react-app-env.d.tsはtsxのみreact-app-env.d.ts/// <reference types="react-scripts" />感想
- React + TypeScriptは、まだまだこれから?
- Stateless Functional Component(SFC)はなくなった?
- Function Components(FC)ができた?
- 何か作って理解を深めよう
- TypeScriptを使いたいならAngular?
tsconfig.jsonとは?react-app-env.d.tsとは?以上
- 投稿日:2019-03-23T21:10:53+09:00
【React】create-react-appを使わずにReactの開発環境を構築する
はじめに
ReactでWebアプリケーションを作る際、
create-react-appを使って環境を構築することが多いと思う。だがwebpackの設定をカスタマイズしたいケース、create-react-appでインストールされるreact-scriptsが邪魔になるケースなど、独自で環境を構築したいときどうすれば環境を作れるのだろうか。このような疑問を持っている方のために、Reactの環境構築の方法をここに記す。webpackとbabelの導入
webpackは、複数のファイルをひとつにまとめるツールで、babelはES6等新しい書き方をしたjavascriptをどのブラウザでも読み込めるよう変換するツールです。
※プラグインもインストールしています。
mkdir react-env
cd react-env
npm install -D @babel/core @babel/preset-env @babel/preset-react babel-loader file-loader url-loader webpack webpack-cli webpack-dev-server html-webpack-plugin
webpackとbabelの設定
webpackとbabelを利用する設定を書きます。
webpackの設定
webpack.config.jsを作成しましょう。webpack.config.jsconst path = require('path'); const HtmlWebpackPlugin = require('html-webpack-plugin'); module.exports = { mode: 'development', entry: './src/index.js', output: { path: path.resolve(__dirname, 'dist'), filename: 'bundle.js' }, devServer: { port: 3000, contentBase: 'dist' }, resolve: { extensions: ['.js', '.jsx'] }, module: { rules: [ { test: /\.jsx?$/, use:{ loader: 'babel-loader' }, include: path.resolve(__dirname, 'src') }, { test: /\.(png|jpg|gif)$/i, use: [ { loader: 'url-loader', options: { limit: 8192 } } ] } ] }, plugins: [ new HtmlWebpackPlugin({ template: path.resolve(__dirname, 'html/index.html'), filename: 'index.html' }), ] };
entryには、読み込むファイルを設定します。create-react-appで使ったアプリケーションでいうindex.jsです。outputには読み込んだファイルに紐付くコードをまとめたファイルをどこに出力するか設定します。ここでが、distフォルダにbundle.jsとして出力させるようにしています。module.exports = { ... entry: './src/index.js', output: { path: path.resolve(__dirname, 'dist'), filename: 'bundle.js' }, ... };
webpack-dev-serverを利用して、ローカル環境でアプリケーションを起動させるとき参照するフォルダと、利用するポート番号を設定します。module.exports = { ... devServer: { port: 3000, contentBase: 'dist' }, ... }
moduleのrulesには、ローダーを適用するファイルと、使用するローダーを設定します。ここでは、srcフォルダのjsとjsxのファイルをbabel-loaderで、画像ファイルをurl-loaderで変換するように設定しています。module.exports = { ... module: { rules: [ { test: /\.jsx?$/, use:{ loader: 'babel-loader' }, include: path.resolve(__dirname, 'src') }, { test: /\.(png|jpg|gif)$/i, use: [ { loader: 'url-loader', options: { limit: 8192 } } ] } ] } ... }
pluginsではwebpackを拡張できます。今回はhtmlファイルを作成するプラグインを導入しています。htmlフォルダのindex.htmlにwebpackを通じで出力されるbundle.jsを読み込むコードを追記して、outputに出力されます。module.exports = { ... plugins: [ new HtmlWebpackPlugin({ template: path.resolve(__dirname, 'html/index.html'), filename: 'index.html' }), ] };babelの設定
webpack.config.jsのbael-loaderでも設定できるが、今回は切り出して設定します。
.babelrcを作成しましょう。.babelrc{ "presets": [ "@babel/env", "@babel/preset-react" ] }必要なフォルダとファイルを準備
webpackの設定でわかるように、ビルドさせるエントリーファイルである
src/index.js、ビルドされたファイルが出力されるdistフォルダ、distフォルダに作成されるhtmlファイルのもととなるhtml/index.htmlが必要なので作成する。※
index.jsは次のセクションで書きます。├── dist ├── html │ └── index.html ├── package-lock.json ├── package.json ├── src │ └── index.js └── webpack.config.jsindex.html<!DOCTYPE html> <html> <head> <meta charset="utf-8"> <title>React Test</title> </head> <body> <div id="root"></div> </body> </html>Reactアプリケーションを開発
必要なモジュールをインストールします。
npm install --save react react-dom
src/index.jsで「Hello React」を表示させます。index.jsimport React from 'react' import ReactDOM from 'react-dom' ReactDOM.render( <h1>Hello React</h1>, document.getElementById('root') )コマンドの設定
npm startでローカル環境でReactアプリケーションの起動、npm run buildでReactアプリケーションのビルドを行わせます。package.json{ ... "scripts": { "start": "webpack-dev-server", "build": "webpack --mode production --progress" }, ... }さいごに
独自でReactの環境を作れるようになれば、
Next.jsを使わずにサーバーサイドレンダリングも簡単にできたりもします。ぜひ一度お試しあれ。
- 投稿日:2019-03-23T16:07:34+09:00
React Static 公式ドキュメント和訳 「基礎概念」編
React Static とは
Reactベースの静的サイトジェネレータです。
つまり、全てハードコードの静的サイトはもちろん、ブログのようなCMSベースのサイトも
- React+αの知識で!
- DBなしに!
- サーバーの(大した)設定もせず!
- 超高速表示に!
作れる優れもの。
僕のようなフロントエンドに知識が偏ってる人間には特に福音だったりします。その中でもReact Staticは、Mediumで3,000clapを叩き出した記事 「2019年のReactジェネレータ」でもGatsbyに続き2番手に選ばれたイケてる子!
しかもGatsbyよりも学習コスト≒React+αのα部分が少ないと僕の中で噂に。ということで公式ドキュメントの「基礎概念」(Core concepts)部分を以下に訳します。
続編 React Static 設定大全 https://qiita.com/IYA_UFO/items/b01ca2eb1ec0082c4b79
MIT License
Copyright (c) 2013-present, Nozzle, Inc.
https://github.com/nozzle/react-static/blob/master/LICENSE
概要
React Staticは他の多くのReactベースの静的サイトジェネレータとは異なります。データから静的ファイル、さらにはプログレッシブに強化された(progressively enhanced)Reactアプリケーションに至るまでのとても自然なデータの流れを持っています。これにより、「データ」と「テンプレート」の関心の分離を手軽に行えます。また、データとテンプレートを可能な限りはっきり分離し、React自身がそうであるように、データの写像としてのサイトを、1つの流れの中でビルド・視覚化することができます。
開発中に起きること
- サイトに必要な全てのデータは、事前に
static.config.jsに好きな方法で集められます。取得元はマークダウンファイル、ヘッドレスCMSs、GraphQLのエンドポイントからなどなど自由です。データはビルド段階でコンパイルされます。- ページは1つのReactコンポーネントをexportするファイルとして定義され、必要なときにレンダリングされます。
pages内のファイルは自動的にルーティングされます。- ページコンポーネントを指定して、静的なルーティングを設定することも可能です。
- React Staticのコンポーネントにある
RoutePropsやSitePropsを使ってルートごとのデータを取得しページをレンダリングすることができます。これらのコンポーネントのHOC版も利用できます。- 以上を設定すれば、React Staticは正確に、スピーディーに全ページを出力します。
クライアントサイドで起きること
- 最初のロードでは、最速でページを表示するために最低限のアセットだけがダウンロードされます。これには、ページ特有のHTMLと、ビルド時にエクスポートされた全てのCSSが含まれます。
- そのページに同期的に必要なデータがHTMLから抽出されます。
- ReactがHTMLにアプリケーションをマウントします
- サイトの残りの部分は、ページ遷移が起こるたびにpreload・キャッシュされ、遷移は即座に起きているように見えます。
コード・データの分割
React Staticはとてもユニークで素晴らしいやりかたで、各ページに必要な最小限のデータをピッタリのタイミングでリクエストします。React Staticは以下の要素に従ってコードとデータを分割します。
ページテンプレート
static.config.jsにルートを書いておくだけで、React Staticは内部的・自動的に各ルート用のテンプレートを分割します。ページデータ
各ルート用の
getData関数の結果が、そのページ専用のJSONファイルとしてHTMLの隣にexportされます。これで9割のケースでデータをうまく分割できます。また、複数のページで何度もアクセスされるデータなどについてさらに最適化したい場合は、以下で説明するsharedDataとcreateSharedDataの2つのAPIでより詳しい操作が可能です。サイトデータ
多くのルートで必要なデータは、
config.getSiteData関数に渡すことで全てのページからアクセスできるようになります。react-universal-componentを使った手動のコード分割
React Staticはデフォルトで
react-universal-componentをサポートしています。つまり、React Staticが持つ自動コード分割に加え、必要であれば手動で巨大なコンポーネントを分割することができます。動的インポートの例を見てください。簡単です!ページ共有データ(上級者向け)
ほとんどのプロジェクトでは必要ありませんが、稀に「全てのページで使うわけではないが、複数のページで全く同じデータを使う」場合があります。その対応には、ページ共有データAPIを使って複数ルートで同じデータを1つのJSONファイルとして共有することができます。例はこちら
ユニバーサルな、「Nodeセーフな」コードを書く
React StaticはブラウザとNode(ビルド中)の両方で動くため、コードの全てが「ユニバーサル」、言い換えれば「Nodeセーフ」であることがとても重要です。私達の多くはブラウザでJavaScriptを書くことになれているので、以下のような点に注意が必要です。
window、documentやブラウザAPIを利用する場合、利用の前に存在チェックをしてください。最も簡単な方法は、これらを利用するコードをcomponentDidMountの中に書くか、if文の中に書くことです。if (typeof document !== 'undefined') { // documentオブジェクトを使う }
window、documentやブラウザAPIに依存するライブラリがNode環境でインポートされないようにしてください。これらのライブラリの一部はブラウザのオブジェクトをすぐに必要とするので、ビルド時にエラーが出ます。エラーを解消するには、スタブを用意して条件分岐で内容をrequireしてください。let CoolLibrary = {} // Nodeで動かす必要があるコードではこのスタブを利用する. if (typeof document !== 'undefined') { CoolLibrary = require('cool-library').default }環境変数
色々試すなかで、特定の環境変数が必要になるかもしれません。以下がReact Static全体で利用できます。
process.env.REACT_STATIC_ENV以下のどれかになります
- production - webpackで本番用にビルド中
- development - webpackで開発用にビルド中
- node - nodeでSSR用にビルド中
本番用のビルド
本番用ビルドの前に、いくつか追加で準備することをおすすめします
static.config.jsにsiteRootを追加してください。siteRootによってReact Staticは絶対パスのリンクを最適化します。また、もしもアプリケーションがhttps://mysite.com/my-static-site/などルート以外の場所で動作する場合も、この設定により普通に機能するようになります。react-static build --stagingを使って、ローカルで本番ビルドをテストしてください。このコマンドでは、本番用のビルドを行いますが、特別にlocalhostで普通に見られるようになります。- 本番ビルドでバグを見つけたら、ビルドコマンドに
--debugをつけてコードの圧縮を停止できます。ビルドの準備ができたら、
react-static buildで本番用ビルドを開始してください。本番用のファイルはdistファイル、またはあなたがカスタム設定したフォルダに出力されます。このフォルダの中身をホストにアップロードしてください。継続的インテグレーション
サイトが頻繁に更新される場合、何らかのサービスを使って継続的インテグレーションを設定すると良いかもしれません。よくあるのは、NetlifyとそれにリンクしたGithubリポジトリの組み合わせです。これにより、コードが変更された時に自動でサイトを再ビルドすることができます。素晴らしい!
カスタマイズ可能なホスティングサービスを探している場合、Travis CIを使ってカスタマイズされた場所にデプロイするのも良いでしょう。可能性は無限大!ホスティング
過去、静的サイトのデプロイがこんなに簡単だった時代はありません。静的サイトを安く、または無料でホストできるサービスがたくさんあります。実際これは静的サイトの最大のメリットの1つでもあります。つまり、サーバーのメンテナンスが不要で、スケーラビリティをあまり心配しなくて良いのです。以下はおすすめのサービスです。
CMSを使う
CMSはサイトの整理や更新にとても便利です。React Staticチームのお気に入はGraphCMS、Contentful、
Netlify CMSですが、 https://headlesscms.org/ (React Staticで作られています)で自分に合うものを選んでも良いでしょう。
Webhookで再ビルドする
CMSをつかう場合、CMSが変わったときサイトをビルドし直したいな、と考えると思います。
Webhookを使いましょう!ほとんどのモダンなCMSはWebhookを提供します。これらは、単純にCMSに変更があったときにpingされるURLです。CIツールやホスティングサービスに自動リビルドさせるのに使うのが効果的です。例:
404エラーのハンドリング
React Staticで404ページを作るのは簡単です。サーバーによっていくつかの異なる方法で設定できます。
404.jsReactコンポーネントをpagesに置く- 以下のルートを設定する
{
  path: '404',
  component: 'path/to/your/404/component.js'
}
404コンポーネントはどう使われるか
- 404 コンポーネントはビルド時にルートの
404.htmlファイルとして出力されます。多くのサーバーはルートが存在しない時に自動的にこのファイルを利用します。- もし
<Routes />コンポーネントがレンダリングされて、マッチするルートやテンプレートがない場合、404コンポーネントが表示されます。動的ルーティング
訳者がよくわからないのでスキップ
https://github.com/nozzle/react-static/blob/master/docs/guides/dynamic-routes-reach-router.mdWebpackのカスタム設定とプラグイン
React StaticはReact用に調整された素晴らしいデフォルトのWebpack configを持っています。これだけでほとんどの場合は十分なはずです。しかし、設定を変えたくなったら
node.api.jsファイルを設置してwebpack APIで拡張することができます。ページネーション
ページネーションガイドをお読みください!
ブラウザサポート
React StaticはReact自体のサポートブラウザとあなたが選ぶBabelのpolyfillに依存してサポートの範囲を決めます。
- モダンブラウザ(Chrome, Firefox, Safari)の最新版はデフォルトでサポートされています。
- IEはサポートできますが、
babel-polyfillをが必要です。
static.config.jsを拡張してIEに対応させるには、まずはbabel-polyfillをインストールしてください。その後、以下のオブジェクトを
static.config.jsのエクスポートに追加して、既存のwebpack設定を拡張してください。webpack: (config, { stage }) => { if (stage === 'prod') { config.entry = ['babel-polyfill', config.entry] } else if (stage === 'dev') { config.entry = ['babel-polyfill', ...config.entry] } return config },

- 投稿日:2019-03-23T15:33:46+09:00
react-sidenavを使ってみた、ついでにstyled-componentsも
概要
react-sidenavを使ってみました。サイドバーを作成するライブラリですね。
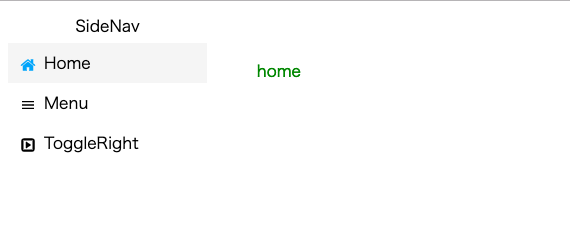
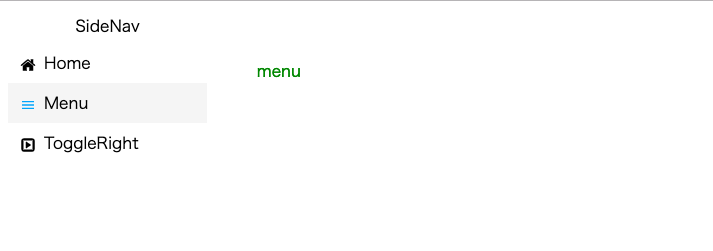
公式をみてみるとstyled-componentsも使っていたのでこの期に学んでみました。完成形はこちらです。
クリックするとアイコン色や背景色を変え、文字を表示しています。
必要なものをインストール
yarn add react-sidenav react-icons-kit styled-components
yarnでインストールしています。アイコンはreact-icons-kitを使います。
create-react-appで作りますが最初の方は割愛します。styled-components
後々使う
styled-componentsを最初に作っておきます。styled/sidenav.jsimport styled from 'styled-components'; export const SideNavContainer = styled.div` display: flex; flex-direction: column; height: 100%; width: 20%; `; export const Title = styled.div` display: flex; justify-content: center; align-items: center; padding: 5px; `;学んでわかりましたがかなり便利ですね。
コンポーネント
MainPage.jsimport React from 'react'; import { SideNavContainer, Title } from '../styled/sidenav'; import AppNavigation from './sidenav'; class MainPage extends React.Component { state = { selectedPath: 'home'}; changePath = (path) => { this.setState({ selectedPath: path }); } displayText = () => { return ( <div style={{ margin: '50px', color: 'green' }}> {this.state.selectedPath} </div> ); } render() { return ( <div style={{ display: 'flex' }}> <SideNavContainer> <Title>SideNav</Title> <AppNavigation changePath={this.changePath} /> </SideNavContainer> {this.displayText()} </div> ); } } export default MainPage;
styled-componentsから引っ張ってきたものをここで使っています。
ここではstateで選ばれたものを管理してその変更を文字で表示しています。
AppNavigationの部分がsidenavなので見ていきましょう。sidenav/index.jsimport React from 'react'; import { Nav, SideNav, NavIcon } from 'react-sidenav'; import { Icon } from 'react-icons-kit'; import styled from 'styled-components'; import { home } from 'react-icons-kit/fa/home'; import { ic_menu } from 'react-icons-kit/md/ic_menu'; import { toggleRight } from 'react-icons-kit/fa/toggleRight'; const theme = { hoverBgColor: '#f5f5f5', selectionBgColor: '#f5f5f5', selectionIconColor: '#03A9F4', }; const Text = styled.div` padding-left: 8px; `; class AppNavigation extends React.Component { state = { selectedPath: ''}; onItemSelection = (arg) => { this.setState({ selectedPath: arg.path }); this.props.changePath(arg.path); }; render() { return ( <SideNav theme={theme} defaultSelectedPath="home" selectedPath={this.state.selectedPath} onItemSelection={this.onItemSelection} > <Nav id={"home"}> <NavIcon> <Icon icon={home} /> </NavIcon> <Text>Home</Text> </Nav> <Nav id={"menu"}> <NavIcon> <Icon icon={ic_menu} /> </NavIcon> <Text>Menu</Text> </Nav> <Nav id={"toggle"}> <NavIcon> <Icon icon={toggleRight} /> </NavIcon> <Text>ToggleRight</Text> </Nav> </SideNav> ); } }; export default AppNavigation;注目ポイントは
<SideNav>の部分ですね。
defaultSelectedPathで開いた時に選択したい要素を指定できます。
selectedPathで選ばれている要素をstateで管理しています。
onItemSelectionは選んだ時の動作で、これで状態を変更し、親のstateも変更して、文字も変えているという感じです。まとめ
react-sidenavを使ってみました。
react-icons-kitといい、便利なライブラリが多いですね。
うまく活用していきたいです。
styled-componentsもいい勉強になりました。
- 投稿日:2019-03-23T08:02:56+09:00
Flowtypeのバージョンアップを難なくこなすために型アノテーションを理解する(React Hooksの導入にも)
React + Redux + React Routerを導入したSPAアプリケーションで、Flowのバージョンを上げるのに少し苦労したのでその知見を共有します。
Flowバージョンが0.84以下でReduxを採用しており、Flowのバージョンアップをした時にほぼ必ず起こるエラーですが、意外と英語情報を含めてまとまった解説がなかったのでお役に立てればと思います。
Flow 0.85からexport時にアノテーションが必須となった
React Hookを使うべくReactとFlowのバージョンを上げ、意気揚々と動作確認をしようとしていたところ、Redux周りで大量のFlowエラーが検出される…なんてことがこれから起こるかもしれません。
既存プロジェクトでFlowのバージョンが0.84以下を採用している場合、React Hooksを使うにはFlowのバージョンを0.87以上に上げる必要があります。
しかしFlowの0.85から既存コードにエラーが検出されうる変更が加えられているので、その内容を抑えておく必要があります。
詳しい変更内容は以下のリンクにあるのですが、英語情報なので要約しながら解説していきます。
- Asking for required annotations既存コードにエラーが発生するのに主に「ジェネリック型にアノテーションを付与しないままexportした時」です。「何を言っているのか分からない」という方もいるかもしれませんが、これさえ理解できれば全て解決するので少しだけ頑張って読み進めてください。
そもそもジェネリックとは型を動的に設定するもので、Javaではおなじみですが、FlowやTypeScriptでも重宝されています。例えば以下のようなクラスがあったとします。
class Demo<T> {
  x: T | null = null;
  get(): T {
    if (this.x == null) {
      throw new Error("unset");
    }
    return this.x;
  }
  set(x: T) {
    this.x = x;
  }
}
この時
Tという型が一意に存在するのではなく、string型でもnumber型でも一貫した値を使っていれば、flowが適切に型チェックを行なってくれます。const demo = new Demo(); demo.set('hoge'); const val1 = demo.get(); // setでstring型を指定しているので、getは自動的にstring型になるしかしこのままインスタンスをexportするとflowエラーが出てしまいます。
const demo = new Demo();
demo.set('hoge');
export { demo };
14: const demo = new Demo(); ^ Missing type annotation for `T`. `T` is a type parameter declared in `Demo` [1] and was implicitly instantiated at new `Demo` [2]. References: 3: class Demo<T> { ^ [1] 14: const demo = new Demo(); ^ [2]なぜexportした途端にエラーが出てしまうのでしょうか。
型アノテーションをつける理由とは
先程掲載した記事には、アノテーションが要求される要因として「型を正確に推測すること」、そして何より「パフォーマンスの大幅な向上」が挙げられています。
ジェネリックの型が確定しないままexportされると、その依存元に至るまでを全ての箇所を調べなくてはならず、「理論的には可能だが、実際のコードベースのサイズまでスケールさせるのは不可能」と説明されています。
ちなみに「アノテーションを付与」とは以下のことを指します。
const demo = new Demo<string>();
demo.set('hoge');
export { demo };
new Demoとなった時点で
const demoの型が確定するので、exportしても上記の問題は発生しません。こうした明示的なアノテーションによって並列処理が可能となり、大幅にパフォーマンスが向上するほか、型を正確に推測するカバレッジが上がることが期待されています。
要するにFlow設計者側の要求ではあるのですが、いずれにせよReactの新機能を使うなどの際にはこれにキャッチアップする必要があります。
Redux, React-Reduxの型アノテーションに対応する
ジェネリックを理解しないままバージョンを上げると真っ先にハマるのはReact, React-Redux周りではないでしょうか。
利用者が多い割に情報が少なく、GithubのIssueを見ても以下のような付け焼き刃の対応が紹介されていたりします。
const container = connect<*, *, *, *, *>(
  mapStateToProps,
  mapDispatchToProps
)(Component);
(*は型推論を強制するものですが、ほとんど型定義を放棄しているので、これを行うのならFlowTypedを置く意義を考え直したほうがよいかもしれません)
React-Reduxの型定義ファイルはかなり力技にも見えますが、しっかりと型情報を失わない形でPropsをコンポーネントのPropsを生成できるように上手く設計されています。
こんな感じの型定義がズラッと並んでいて最初は圧倒されますが、実は一番の近道はこの定義ファイルをしっかりと読み解くことかもしれません。
declare export function connect<-P, -OP, -SP, -DP, S, D>(
  mapStateToProps: MapStateToProps<S, OP, SP>,
  mapDispatchToProps: DP,
  mergeProps: MergeProps<P, OP, SP, $ObjMap<DP, Bind<D>>>,
  options?: ?Options<S, OP, SP, P>,
): Connector<P, OP, P>;
そもそものReact-Reduxの役割を考えればさほど難しくありません。
connectで行っているのは、ReduxのStateからコンポーネントに渡すための情報を抽出する
mapStateToProps、同じくDispatchからコンポーネントへ渡すためのmapDispatchToPropsが主たる要素で、これにOwnPropsを合わせた3つがコンポーネントが受け取るProps型になれば良いのです。例として以下のケースを考えてみましょう。
type StateProps = {| count: number |};
type DispatchProps = {| action: typeof Action |};
type OwnProps = {| children: React.Node |}
type Props = {| ...StateProps, ...DispatchProps, ...OwnProps |}

const Component = (props: Props) =>
  <Custom {...props} />

const mapStateToProps = (state: State): StateProps => ...
const mapDispatchToProps = (dispatch: Dispatch): DispatchProps => ...

const container = connect<Props, OwnProps, StateProps, DispatchProps, State, Dispatch>(
  mapStateToProps,
  mapDispatchToProps
)(Component);
このようにconnectにアノテーションを付与すると、Flow側でもOwnProps、StateProps、DispatchPropsの3つの型を統合したものがPropsになるかを検証してくれます。
また多くの場合はOwnPropsを利用しませんが、その場合はvoidを指定すれば、StatePropsとDispatchPropsの2つを重ねたらPropsになるかを見てくれます。
つまりそれぞれの型を適切に定義すればFlowが通るようになっているので、エラーを地道に潰していけば自ずと良い感じに型が付いているはずです。
最後に
JavaScriptはエコシステムの進化が早すぎると言われていますが、Flowのこの変更が加わったのは2018年10月のことで、まだまだ網羅的な情報は少ないです。
一方でReact Hooksは良い意味でこれまでのReactの実装を大きく変えるものということで、早い段階でキャッチアップしたいところです。Reduxを入れているとここで紹介したエラーに遭遇する可能性が高いということで、本記事が参考になれば幸いです。