- 投稿日:2019-03-18T20:35:30+09:00
Learn Android Online
Android is an operating system based on Linux with a Java programming interface for mobile devices such as Smartphone (Touch Screen Devices who supports Android OS) as well for Tablets too.
To learn more about android, check following URLs.
https://www.tutlane.com/tutorial/android
https://www.tutlane.com/tutorial/android/android-introduction
https://www.tutlane.com/tutorial/android/android-architecture
https://www.tutlane.com/tutorial/android/android-development-environment-setup
https://www.tutlane.com/tutorial/android/android-studio-installation-for-development-environment
https://www.tutlane.com/tutorial/android/android-hello-world-app-example
https://www.tutlane.com/tutorial/android/android-setup-emulator-or-create-avd-android-virtual-device
https://www.tutlane.com/tutorial/android/android-activity-lifecycle
https://www.tutlane.com/tutorial/android/android-content-providers-with-examples
https://www.tutlane.com/tutorial/android/android-broadcastreceivers-with-example
https://www.tutlane.com/tutorial/android/android-services-with-examples
https://www.tutlane.com/tutorial/android/android-fragments-with-examples
https://www.tutlane.com/tutorial/android/android-app-project-folder-structure
https://www.tutlane.com/tutorial/android/android-intents-implicit-explicit
https://www.tutlane.com/tutorial/android/android-implicit-intents-with-examples
https://www.tutlane.com/tutorial/android/android-explicit-intents-with-examples
https://www.tutlane.com/tutorial/android/android-intent-filters-with-examples
https://www.tutlane.com/tutorial/android/android-view-and-viewgroup-with-examples
https://www.tutlane.com/tutorial/android/android-linearlayout-with-examples
https://www.tutlane.com/tutorial/android/android-relativelayout-with-examples
https://www.tutlane.com/tutorial/android/android-tablelayout-with-examples
https://www.tutlane.com/tutorial/android/android-framelayout-with-examples
https://www.tutlane.com/tutorial/android/android-listview-with-examples
https://www.tutlane.com/tutorial/android/android-gridview-with-examples
https://www.tutlane.com/tutorial/android/android-webview-with-examples
https://www.tutlane.com/tutorial/android/android-ui-controls-textview-edittext-radio-button-checkbox
https://www.tutlane.com/tutorial/android/android-textview-with-examples
https://www.tutlane.com/tutorial/android/android-edittext-with-examples
https://www.tutlane.com/tutorial/android/android-autocompletetextview-with-examples
https://www.tutlane.com/tutorial/android/android-button-with-examples
https://www.tutlane.com/tutorial/android/android-imagebutton-with-examples
https://www.tutlane.com/tutorial/android/android-toggle-button-with-examples
https://www.tutlane.com/tutorial/android/android-checkbox-with-examples
https://www.tutlane.com/tutorial/android/android-radiobutton-with-examples
https://www.tutlane.com/tutorial/android/android-radiogroup-with-examples
https://www.tutlane.com/tutorial/android/android-progressbar-with-examples
https://www.tutlane.com/tutorial/android/android-spinner-dropdown-list-with-examples
https://www.tutlane.com/tutorial/android/android-datepicker-with-examples
https://www.tutlane.com/tutorial/android/android-timepicker-with-examples
https://www.tutlane.com/tutorial/android/android-seekbar-with-examples
https://www.tutlane.com/tutorial/android/android-ratingbar-with-examples
https://www.tutlane.com/tutorial/android/android-textclock-with-examples
https://www.tutlane.com/tutorial/android/android-switch-on-off-button-with-examples
https://www.tutlane.com/tutorial/android/android-alertdialog-with-examples
https://www.tutlane.com/tutorial/android/android-menus-options-context-popup
https://www.tutlane.com/tutorial/android/android-options-menu-with-examples
https://www.tutlane.com/tutorial/android/android-context-menu-with-examples
https://www.tutlane.com/tutorial/android/android-popup-menu-with-examples
https://www.tutlane.com/tutorial/android/android-toast-with-examples
https://www.tutlane.com/tutorial/android/android-custom-toast-with-examples
https://www.tutlane.com/tutorial/android/android-progress-notification-with-examples
https://www.tutlane.com/tutorial/android/android-push-notifications-using-firebase-cloud-messaging
https://www.tutlane.com/tutorial/android/android-input-events-event-listeners-event-handling
https://www.tutlane.com/tutorial/android/android-styles-and-themes-with-examples
https://www.tutlane.com/tutorial/android/android-drag-and-drop-with-examples
https://www.tutlane.com/tutorial/android/android-custom-views-components-with-examples
https://www.tutlane.com/tutorial/android/android-google-maps-api-with-examples
https://www.tutlane.com/tutorial/android/android-send-email-with-examples
https://www.tutlane.com/tutorial/android/android-send-sms-with-examples
https://www.tutlane.com/tutorial/android/android-phone-calls-with-examples
https://www.tutlane.com/tutorial/android/android-animations-with-examples
https://www.tutlane.com/tutorial/android/android-slide-up-down-animations-with-examples
https://www.tutlane.com/tutorial/android/android-fade-in-out-animations-with-examples
https://www.tutlane.com/tutorial/android/android-zoom-in-out-animations-with-examples
https://www.tutlane.com/tutorial/android/android-bluetooth-with-examples
https://www.tutlane.com/tutorial/android/android-bluetooth-turn-on-or-off-with-examples
https://www.tutlane.com/tutorial/android/android-bluetooth-device-discoverable-with-examples
https://www.tutlane.com/tutorial/android/android-bluetooth-list-paired-devices-with-examples
https://www.tutlane.com/tutorial/android/android-wifi-with-examples
https://www.tutlane.com/tutorial/android/android-camera-app-with-examples
https://www.tutlane.com/tutorial/android/android-audio-media-player-with-examples
https://www.tutlane.com/tutorial/android/android-video-player-with-examples
https://www.tutlane.com/tutorial/android/android-audio-recorder-with-examples
https://www.tutlane.com/tutorial/android/android-audiomanager-with-examples
https://www.tutlane.com/tutorial/android/android-xml-parsing-using-sax-parser
https://www.tutlane.com/tutorial/android/android-xml-parsing-using-dom-parser
https://www.tutlane.com/tutorial/android/android-xml-parsing-using-xmlpullparser
https://www.tutlane.com/tutorial/android/android-json-parsing-with-examples
https://www.tutlane.com/tutorial/android/android-clipboard-with-examples
https://www.tutlane.com/tutorial/android/android-imageswitcher-with-examples
https://www.tutlane.com/tutorial/android/android-loading-spinner-with-examples
https://www.tutlane.com/tutorial/android/android-shared-preferences-with-examples
https://www.tutlane.com/tutorial/android/android-session-management-with-examples
https://www.tutlane.com/tutorial/android/android-internal-storage-with-examples
https://www.tutlane.com/tutorial/android/android-external-storage-with-examples
https://www.tutlane.com/tutorial/android/android-sqlite-database-with-examples
https://www.tutlane.com/tutorial/android/android-localization-multi-language-with-examples
https://www.tutlane.com/tutorial/android/android-navigation-drawer-sliding-menu
https://www.tutlane.com/tutorial/android/android-internet-connection-status-with-examples
https://www.tutlane.com/tutorial/android/android-texttospeech-with-examples
https://www.tutlane.com/tutorial/android/android-login-and-registration-screen-design
https://www.tutlane.com/tutorial/android/android-tabs-with-fragments-and-viewpager
https://www.tutlane.com/tutorial/android/android-app-widgets-with-examples
https://www.tutlane.com/tutorial/android/android-gestures-with-examples
https://www.tutlane.com/tutorial/android/android-sensors-with-examples
https://www.tutlane.com/tutorial/android/android-test-app-on-real-device-mobile-phone
https://www.tutlane.com/tutorial/android/android-publish-app-on-google-play-store
https://www.tutlane.com/tutorial/android/android-integrate-admob-ads-tutorial
https://www.tutlane.com/tutorial/android/android-integrate-admob-banner-ads-in-app
https://www.tutlane.com/tutorial/android/android-integrate-admob-interstitial-ads-in-app
https://www.tutlane.com/tutorial/android/android-integrate-admob-rewarded-video-ads-in-app
https://www.tutlane.com/tutorial/android/android-facebook-integration-login-with-examples
https://www.tutlane.com/tutorial/android/android-scrollview-horizontal-vertical-with-examples
https://www.tutlane.com/tutorial/android/android-change-app-icon
https://www.tutlane.com/tutorial/android/android-firebase-cloud-messaging-with-examples
https://www.tutlane.com/tutorial/android/android-sqlite-listview-with-examples
- 投稿日:2019-03-18T16:31:10+09:00
Android Developers Blog 適当意訳 #7 Introducing a new Google Play app and game icon specification
新しいGoogle Playアプリとゲームのアイコン仕様のお知らせ
2019年3月15日
原文
※英語の勉強と自分用のメモ程度のかなり適当なものです。Google Play Store でのユーザー体験の向上の一環として、新しいアプリアイコンデザインの仕様をお知らせします。
4月の前半から、Google Play Console に新しい仕様のアイコンをアップロードし、新しいアイコンの仕様を満たしているかを確認できます。
この時点では現在のアイコンは引き続きGoogle Play Storeで利用可能です。
5月1日以降は、新しいアイコンの仕様を満たしていないものはアップロード出来なくなり、既存のアイコンも変更されないままとなります。6月24日までにやるべき作業:
- アイコンを新しい仕様 に更新する
- Play Console にアイコンをアップロードする
- Play Console で正しく表示されているかを確認する
ユーザーに最適な環境を提供するために、出来る限り早く新しい仕様のアイコンに変更する事を強くお勧めします。
何が変わるのか
- アイコン画像は変わらず512 x 512ですが、背景を透過させる事は出来なくなります
- Android と Chrome OS 上の Google Play は動的にアイコンの角を丸くし、影を描画します。角の角度は環境に依存しないために、アイコンのサイズの20%とします
- TV, Wear, Autoなどの Google Play 上の他のものには変更はありません
- 今回の変更はAndroidのランチャーアイコンには影響しません
タイムライン 変更点 4月上旬 Google Play Console に新しい仕様のアイコンをアップロードし、新しいアイコンの仕様を満たしているかを確認できます
- 現状のアイコンは引き続き正しく Google Play で表示されます
- 新しい仕様のアイコンは正しく Google Play で表示されます5月1日 Play Console にアップロードするアイコンは、新仕様を満たしている必要があります
- 現状のアイコンは引き続き正しく Google Play で表示されます
- 新しい仕様のアイコンは正しく Google Play で表示されます6月24日 現状のアイコンは レガシーモード に変換されます。必ず Play Console にアップロードするアイコンは、新仕様を満たしている必要がある事を確認してください
- 現状のアイコンは レガシーモード に変換されます
- 新しい仕様のアイコンは正しく Google Play で表示されますこれらの更新はよりGoogle Play に統一的で一環したルックアンドフィールをもたらす助けとなり、あなたのアプリやゲームをよりよく紹介出来るようになり、ユーザーにより良いユーザー体験を提供出来ます。
我々は今後数ヶ月間これらの変更に関する情報の提供を続けますので、情報の更新を確認してください。
それと同時に、新しいアイコンの仕様も確認してください。
- 投稿日:2019-03-18T14:04:53+09:00
Navigation component の利用
iOSのStoryboardのように、画面遷移をレイアウトエディタから設定できる Navigation componentを使ってみたメモ
参考ドキュメント
Get started with the Navigation component | Android Developers
Pass data between destinations | Android Developers
1. ナビゲーショングラフを追加する
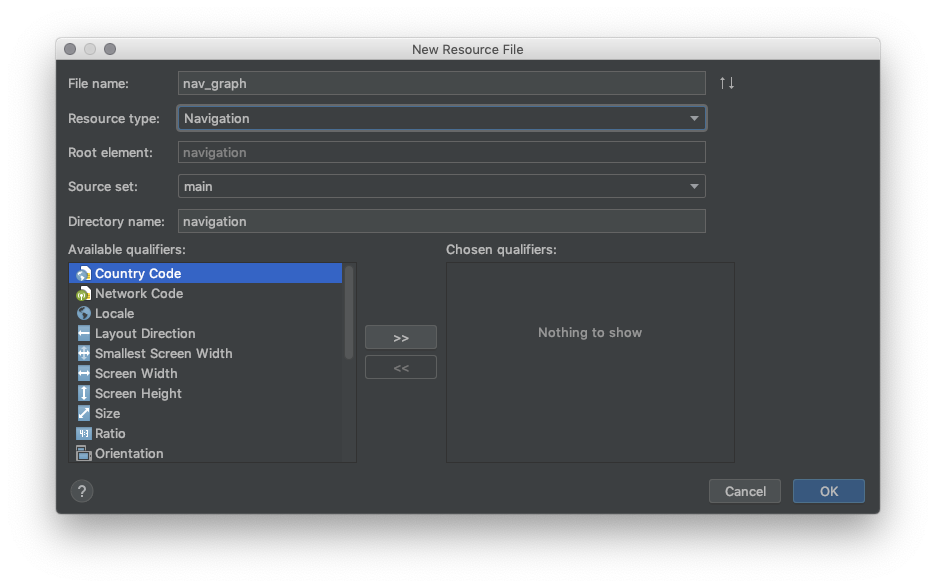
- 「Project」ウィンドウでresディレクトリを右クリックし、「New」>「Android Resource Files」を選択。[ New Resource File ]ダイアログが表示される。(図1)
- 名前を入力。ここでは「nav_graph」とする。
- [Resource type]ドロップダウンリストから[Navigation]を選択し、[ OK ]をクリック。
図1
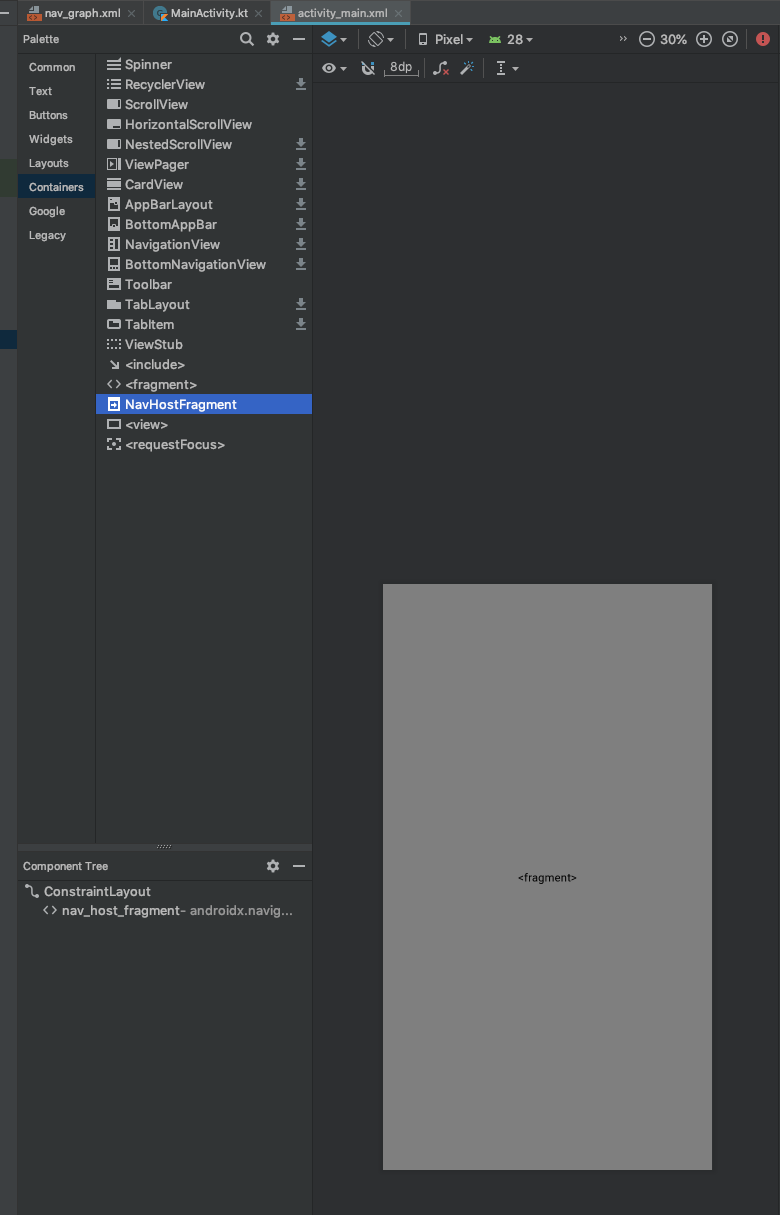
2. アクティビティにNavHostを追加する
activity_main.xmlにNavHostFragmentを追加する。
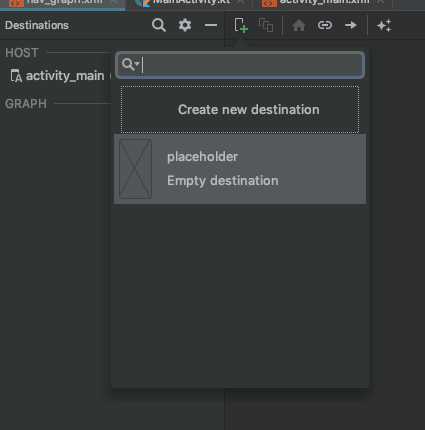
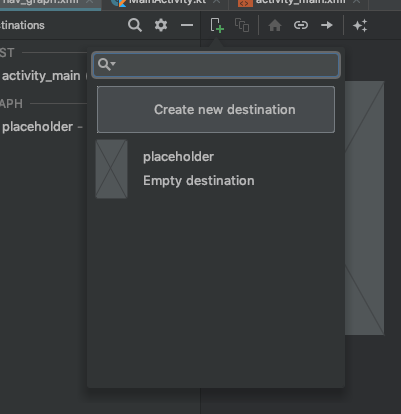
3.ナビゲーショングラフに遷移先を追加する
初期ナビゲーションを追加する
遷移先フラグメントを作成、追加する
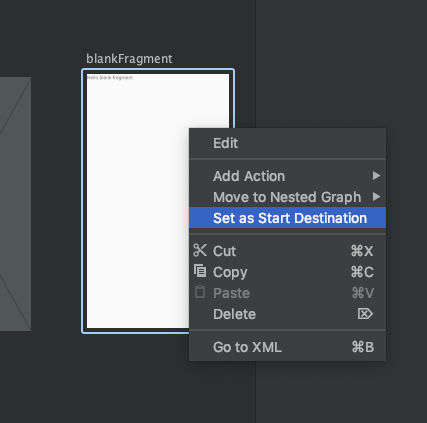
初期デスティネーションとして設定する
先のフラグメントを初期デスティネーションとして設定する
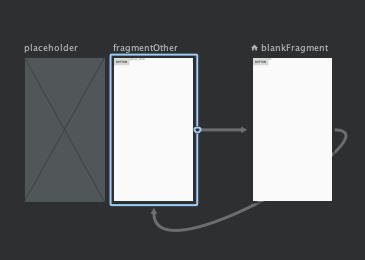
4.デスティネーションを接続する
ドラッグして接続する
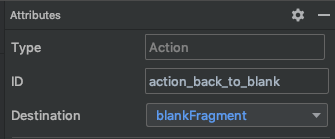
アトリビュートにIDを設定する
action_blankFragment_to_fragmentOther
5.ナビゲーションを呼び出す
各フラグメントに
jumpButton,jumpButton2を設定しました。
それぞれ以下のように、Navigationインスタンスのnavigateメソッドを実行しますFragmentOther.kt... override fun onCreateView( inflater: LayoutInflater, container: ViewGroup?, savedInstanceState: Bundle? ): View? { val view = inflater.inflate(R.layout.fragment_fragment_other, container, false) view.jumpButton2?.setOnClickListener{ Navigation.findNavController(it).navigate( R.id.action_back_to_blank ) } return view } ...以上で2つのフラグメント間を遷移します
6.遷移間でデータをやり取りする
navigateを通してbundleをやりとりできます
BlankFragment.kt... // 遷移先フラグメントにBundleを送信 val bundle = bundleOf("myArgs" to "send from BlankFragment") Navigation.findNavController(it).navigate( R.id.action_blankFragment_to_fragmentOther, bundle) ...FragmentOther.kt... override fun onViewCreated(view: View, savedInstanceState: Bundle?) { // 遷移元から送信されたBundleデータを取得 fragmentOtherTextView.text = arguments?.getString("myArgs") } ...また、safeArgsを利用すると型安全にやりとりできらしい。
用語
ナビゲーショングラフ
画面間の関係を設定するxmlファイル。
ナビゲーションホスト
空のコンテナ。ユーザーがアプリな尾を移動するときに行き先が入れ替わります。
デスティネーション
遷移先のフラグメント
プロジェクトファイル
以下に今回使用したAndroid Studioプロジェクトファイルをアップロードしました。
ymmtyuhei/NavigationEditorTrial
- 投稿日:2019-03-18T13:59:37+09:00
NestedScrollView内にRecycleViewを置くとスクロールがずれる問題について
この記事について
NestedScrollView内にあるViewを置いてからRecyclerViewを置いた時に、RecyclerViewの上端にスクロールされてしまい、最初に置いたViewが隠れてしまう問題に遭遇したので、対処法をメモする。
問題の詳細
<android.support.v4.widget.NestedScrollView
    android:layout_width="match_parent"
    android:layout_height="wrap_content">

    <LinearLayout
        android:layout_width="match_parent"
        android:layout_height="wrap_content"
        android:orientation="vertical">

        <TextView
            android:layout_width="wrap_content"
            android:layout_height="wrap_content"
            android:text="このViewが隠れてしまう" />

        <android.support.v7.widget.RecyclerView
            android:layout_width="match_parent"
            android:layout_height="wrap_content" />

    </LinearLayout>
</android.support.v4.widget.NestedScrollView>
上記のようにレイアウトを作って、RecyclerViewにAdapterをセットした場合、RecylcerViewの上端にスクロールされた状態で表示され、TextViewは上にスクロールしないと表示されなかった。
解決策
    <LinearLayout
        android:layout_width="match_parent"
        android:layout_height="wrap_content"
        android:focusableInTouchMode="true"
        android:orientation="vertical">

        ~ 省略 ~

    </LinearLayout>
NestedScrollView直下のViewGroup(今回はLinearLayout)に
android:focusableInTouchMode="true"をつける参考
https://stackoverflow.com/questions/36923948/recycleview-steals-focus-when-inside-a-nestedscrollview
- 投稿日:2019-03-18T12:45:55+09:00
【VisualStudio】新規プロジェクト製作時、ターゲットプラットフォームが選択できないときの対処法


- 投稿日:2019-03-18T12:30:51+09:00
Flutterウィークリー #50
Flutterウィークリーとは?
FlutterファンによるFlutterファンのためのニュースレター
https://flutterweekly.net/この記事は#50の日本語訳です
https://mailchi.mp/flutterweekly/flutter-weekly-50※Google翻訳を使って自動翻訳を行っています。翻訳に問題がある箇所を発見しましたら編集リクエストを送っていただければ幸いです。
読み物&チュートリアル
Flutter 1.2:このリリースの新機能
https://hackernoon.com/flutter-1-2-whats-new-in-this-release-799062b36c36
Dart 1.2の新機能のレビューFlutterの主な違い:すべてのピクセルを所有する
https://medium.com/flutter-community/flutters-key-difference-owning-every-pixel-e2135b44c8a
Tom Gilderが、 Flutterが画面をどのように使用し、他のフレームワークと比較するかをレビューします。Flutter TikTokのUIを構築する - パート2:小さな部品を構築する
Flutter TikTok UIを作成する方法に関するDane Mackierによるチュートリアル。Flutterアニメーションはかつてないほど簡単になりました - パート1
https://medium.com/flutter-community/flutter-animation-has-never-been-easier-part-1-e378e82b2508
このチュートリアルの最初の部分で、Mellati MeftahがFlutterでのアニメーションの仕組みについて説明します。Dartは元気で落ち着いているはず
https://tudorprodan.com/dart-is-fine/
なぜDart for Flutterを使用するかについての議論についてのTudor Prodan。Flutter素晴らしいログイン画面を作成する
https://medium.com/flutter-community/creating-awesome-login-screen-in-flutter-88d46c0d76ae
Subir Chakrabortyによるこのチュートリアルに従って、クールなログイン画面を作成してください。Dart演算子を使った簡単でバグのないコード
https://medium.com/@dev.n/simple-and-bug-free-code-with-dart-operators-2e81211cecfe
Deven Joshiが最も強力なDartオペレータをレビューします。ツールボックス - カスタムフォントの使い方
https://fluttersensei.com/posts/the-toolbox-how-to-use-custom-fonts/
Flutterプロジェクトでカスタムフォントを使用することがどれほど簡単かを学びましょう。UI2CODEの紹介:自動Flutter UIコードジェネレータ
Alibaba Techチームは、設計からFlutterコードを自動的に生成するための新しいツールを紹介します。Flutterスケッチします。自動的に
https://blog.prototypr.io/sketch-to-flutter-automatically-cf693ea1c892
Supernova、SketchデザインからFlutter用のコードを自動的に生成することを可能にするツールへのイントロ。Flutterにおける非対称鍵生成
https://medium.com/flutter-community/asymmetric-key-generation-in-flutter-ad2b912f3309
GonçaloPalmaが非対称鍵生成のためにあなたのFlutterアプリにPointy Castleを統合する方法を説明します。FlutterピアノをFlutter
https://rodydavisjr.com/2019/03/12/making-a-piano/
Rody DavisがFlutterピアノを作成する方法を説明します。ソースへのリンクが含まれています。
debugPrintと、 Dartログを非表示にしてカスタマイズする機能
GonçaloPalmaによるアプリの正しい方法でのログインに関する記事。FlutterレディFlutterゴー(フレーバー、コネクティビティなど)
https://medium.com/flutter-community/flutter-ready-to-go-e59873f9d7de
Julio Henrique Bitencourtが彼のすぐに使えるテンプレートプロジェクトの使い方を説明します。ビデオ&メディア
Flutterステートマネジメント - グランドツアー
https://www.youtube.com/watch?v=3tm-R7ymwhc
Flutter 10の素晴らしい状態管理技術のツアーに参加してくださいMLキット( Flutter In Focus)を使用したコンピュータビジョン
Matt Sullivanが、 Flutter ML Kit Visionプラグインを使用する方法を説明します。Flutter 2019:FloatingActionButtonのような新しいGmailを作る
https://www.youtube.com/watch?v=fiOAAiZ41Zs&feature=youtu.be
フラッターでカラフルなフローティングアクションボタンのような新しいGmailを作成する方法に関するビデオFlutterチュートリアル - Flutterグーグルマップ
https://www.youtube.com/watch?v=lNqEfnnmoHk
このビデオでは、google_maps_flutterプラグインを使用して、フラッターアプリケーションにGoogleマップを統合する方法を説明します。Flutter UI - 最小限のデザイン - 植物
https://www.youtube.com/watch?v=ok5zoeE_5x0&feature=youtu.be
Raja YoganがFlutter植物カタログのUIを作成することによる素晴らしい挑戦です。ライブラリ&コード
pichillilorenzo / flutter_inappbrowser
https://github.com/pichillilorenzo/flutter_inappbrowser
インラインWebビューを追加したり、アプリ内のブラウザウィンドウを開くことができるFlutterプラグイン(人気のcordova-plugin-applbrowserに触発されています)。
アニメーションストリームリスト
https://gitlab.com/otsoaUnLoco/animated-stream-list
ストリームからのアニメーション化された変更を含むリストを簡単に表示するためのFlutterライブラリ。Vanethos / stream_disposable
https://github.com/Vanethos/stream_disposable
StreamSubscriptionsを破棄するためのStreamDisposableヘルパークラス
samarthagarwal / Flutterスクリーン
https://github.com/samarthagarwal/FlutterScreens
Flutterを使用して作成された画面と魅力的なUIの集まりで、アプリケーションで使用することができます。
thosakwe / vim-flutter
https://github.com/thosakwe/vim-flutter
Flutter用のVimコマンド。保存時のホットリロードなど。
AppleEducate / gmail_clone
https://github.com/AppleEducate/gmail_clone
Flutter作られたGmailクローン
pichillilorenzo / flutter_inappbrowser
https://github.com/pichillilorenzo/flutter_inappbrowser
インラインのWebビューを追加したり、アプリ内のブラウザウィンドウを開いたりできるFlutterプラグイン。
rxlabz / flutter_animation_explorer
https://github.com/rxlabz/flutter_animation_explorer
さまざまなアニメーションウィジェットで遊べるアプリです。


- 投稿日:2019-03-18T01:14:39+09:00
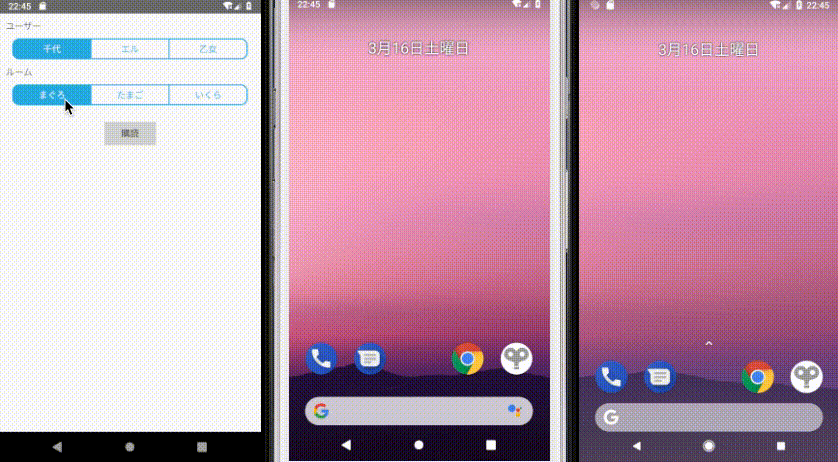
Nginx,Redis,MySQLを使ってほんの少し実践的なRails ActionCableと、iOS/Androidのサンプルアプリを作って全体像を学ぶ〜Android編〜
前置き
「Rails ActionCableで双方向通信してみたい」「モバイルアプリでリアルタイム通信アプリ作りたい」と思いサンプルアプリを作ってみました。個々の詳細については既に解説してくださっている記事はありますので、大まかに環境構築やソースコードを記事にします。以下の3部構成になっています。
お遊びサンプルの紹介
以下のアニメーションGIF(ちょっと荒いですね
)をご覧ください。各ユーザーのアクティブ状況を表示して、メッセージをやりとります。もっと砕けた表現をするならば、筆者の愛犬たちが寝起きして、鳴いたり、遠吠えしたり、唸ったりします。
このアプリでは大きく2つのActionCableの使い方があります。
- 同じルーム内の全ユーザーにブロードキャスト
- ルームに入る
現在ルーム内にいるユーザー(以下、アクティブユーザー)にルームに入ったことを通知し、アクティブユーザーを取得します。 そして、各ユーザーのアクティブ状況を表示します。- 「ワンワン」ボタンと「ワオーーン」ボタン
文字入力で任意の文字が送れないだけで、チャットでいうところの「メッセージ」とほぼ同義です。ボタンに対応したメッセージを送信します。
※アニメーションGIFでは「わんわん」「ワオォーン」になっています。途中から文字を修正しました
- ルームから出る
「←」をタップしたり、アプリを閉じたりするとルームから出たことにします。ルームに入るときと同様にアクティブユーザーを取得して、各ユーザーのアクティブ状況を表示します。- 自分にブロードキャスト
- 「独り言」
「独り言」ということで自分のみメッセージを受信します。構成
名前 バージョン macOS Mojave 10.14.3 AndroidStudio 3.3.2 Kotlin 1.3.21 AVD(API) Pixel(28), Pixel2(27 / 28)
hosts(AVD)
よろしければ筆者の記事をご覧ください。筆者はこのサンプルアプリを作る過程でAVDのhostsについて知り記事にしました。hosts10.0.2.2 devnokiyo.example.comソースコードはGitHubに公開しています。よろしければご覧ください。
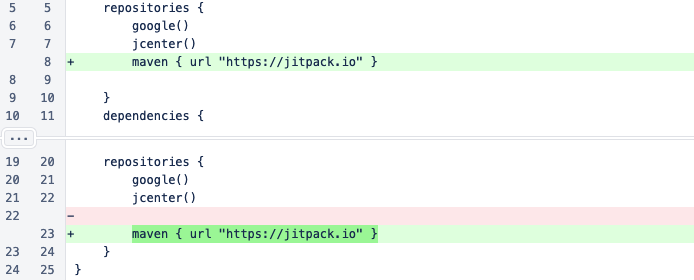
actioncable-client-javaを導入する
ライブラリを利用して開発しますのでgradleに追記してAndroidStudioで同期します。
build.gradle
app/build.gradle
ソースコードの説明
サンプルアプリはActionCableと本質的に関係ない部分も多いので、GitHubに公開しているソースコードの原形を保ちながら主要な部分を抽出しました。ソースコードの中にコメントで説明します。
app/src/main/java/com/devnokiyo/actioncableapp/activities/BarkActivity.ktclass BarkActivity : AppCompatActivity() { private val cableUrl = "ws://devnokiyo.example.com/cable" // ActionCableのコネクションのエンドポイント private val channelIdentifier = "RoomChannel" // チャンネル名 private lateinit var client: Consumer // ActionCableのコネクションに関連するインスタンス private lateinit var channel: Subscription // ActionCableのチャンネルを関連するインスタンス private var handler = Handler() // メインスレッドで実行するハンドラー override fun onCreate(savedInstanceState: Bundle?) { super.onCreate(savedInstanceState) setContentView(R.layout.activity_bark) // 「ワンワン」ボタンなどのリスナーを設定する。 initListener() } override fun onResume() { super.onResume() // ActionCable関連のインスタンスを初期化・接続する。 initClientAndChannel() } override fun onPause() { super.onPause() // 画面を閉じるときはコネクションを切断する。 // サンプルでは便宜上onPause()で実装しておく。 client.disconnect() } private fun initListener() { bawBawButton.setOnClickListener { // 「ワンワン」ボタン押下時はRoomChannelのbarkアクションを呼出す。 // 送信情報) "content":"bawbaw" bark(bark = "bawbaw") } WaooonButton.setOnClickListener { // 「ワオーーン」ボタン押下時はRoomChannelのbarkアクションを呼出す。 // 送信情報) "content":"waooon" bark(bark = "waooon") } mumblingButton.setOnClickListener { // 「独り言」ボタン押下時はRoomChannelのmumblingアクションを呼出す。 // 送信情報) 無し。アクションを呼出すのみ。 channel.perform("mumbling") } } private fun initClientAndChannel() { // コネクションのエンドポイントを指定する。 // 送信情報) 呼出し元アクティビティから取得したaccount // 【補足】ユーザーの割出しと認証が必要ならOpenID Connectのアクセストークンなどになると思います。 client = ActionCable.createConsumer(URI("$cableUrl/?account=$account")) // チャンネルを作成する。サブスクライブは手動で行う。 // 送信情報) "room":ルーム名(ID) channel = client.subscriptions.create(Channel(channelIdentifier).apply { addParam("room", room) }) channel.onConnected { // サブスクライブしたら、ルームに入ったことになる。 // 同じルームのアクティブユーザーに通知するのでRoomChannelのgreetingアクションを呼出す。 channel.perform("greeting") } channel.onReceived { data -> // UIスレッド(メインスレッド)で実行する。 handler.post { // 自他問わずアクティブユーザーより送信された情報をこのコールバックで受信する。 RoomChannelResponse.create(data)?.let { response -> // 誰に関する情報か判定する。自身も含まれる。 // 受信情報) "account":ユーザーのアカウント // findUserStatusViewメソッドは以下のいずれかのクラス変数を返却する。 // chiyoUsv // eruUsv // otomeUsv val userStatusView = findUserStatusView(response.account) when (response.type) { SocketType.RoomIn -> { // ルームに入ったらユーザーのステータスを更新する。 // 受信情報) "type":"in" // 受信情報) "roommate":"[アクティブユーザーのアカウント...]" // updateUserStatusメソッドはアクティブユーザーを以下のようにする。 // 表示内容:(^○^) // オンラインの色(緑) updateUserStatus(accounts = response.roommate, type = response.type) // ルームに入ったユーザーは挨拶する。 // 受信情報) "type":"in" 表示内容: (^○^) (言語:日本語) // getResourceStringメソッドはstrings.xml内の指定したname属性の内容を取得する。 userStatusView.bark.text = getResourceString(response.type.rawValue) } SocketType.RoomOut -> { // ルームから出たユーザーは挨拶する。 // 受信情報) "type":"out" 表示内容: ( ˘ω˘ ) (言語:日本語) userStatusView.bark.text = getResourceString(response.type.rawValue) // オフラインの色(赤)に変更する。 userStatusView.online.setBackgroundColor(Color.RED) } SocketType.Mumbling -> { // 受信情報) // "type":"mumbling" // "content":"(゚Д゚;)" 表示内容: (゚Д゚;) (言語:不問) バックエンドの固定値なので言語設定に依存しない // 【補足】「独り言」は自身が送信した情報をActionCableを経由して自身のみが受信します。 response.content?.let { content -> userStatusView.bark.text = content userStatusView.rockBark() } } SocketType.Bark -> { // 受信情報) // "type":"bark" // "content":"bawbaw" / "wooon" 表示内容: ワンワン / ワオーーン (言語:日本語) response.content?.let { content -> userStatusView.bark.text = getResourceString(content) userStatusView.rockBark() } } } } } } // 【補足】他にも以下のコールバックが用意されています。 // channel.onFailed { e: ActionCableException -> } // channel.onDisconnected {} // channel.onRejected {} // 【補足】以下のプロパティで再接続のポリシーを設定出来るようです。(厳密に確認していません。) // val options = Consumer.Options().apply { // reconnection = true // reconnectionMaxAttempts = 30 // reconnectionDelay = 3 // reconnectionDelayMax = 30 // } // client = ActionCable.createConsumer(URI("$cableUrl/?account=$account"), options) // コネクションに接続してチャンネルをサブスクライブする。 client.connect() } private fun bark(bark: String) { // 「ワオーーン」ボタン押下時はRoomChannelのbarkアクションを呼出す。 // 送信情報) "content":bark channel.perform("bark", JsonObject().apply { addProperty("content", bark) }) } // res/values/strings.xml内の指定したname属性の内容を取得する。 private fun getResourceString(name: String): String = getString(resources.getIdentifier(name, "string", packageName)) }終わりに
チャットアプリのサンプルが定番なので、少し違うアプローチでサンプルを作っていたはずなのですが、結局仕組みは似たり寄ったりになってきました。iOS版ではハマったことがありましたが、iOS版がある程度仕上がってからAndroid版を実装したので仕様でハマるところはありませんでした。Xcode/Swiftを見ながらAndroidStudio/Kotlinへ書写した感じですね。iOS版同様に細かい作込みはしていませんが、バックエンドとアプリの双方を実装して、やりたいことの表現と仕組みを概ね理解することができました。

- 投稿日:2019-03-18T01:13:45+09:00
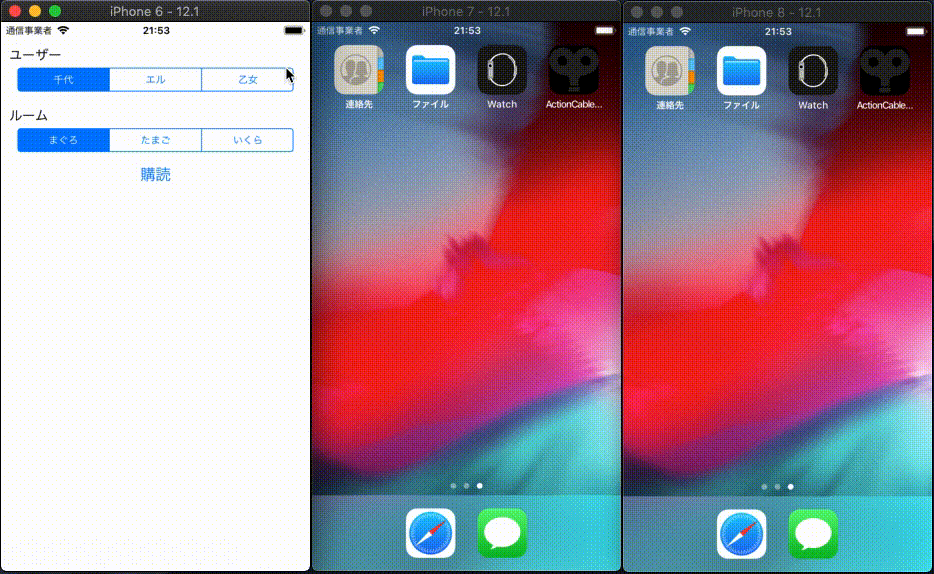
Nginx,Redis,MySQLを使ってほんの少し実践的なRails ActionCableと、iOS/Androidのサンプルアプリを作って全体像を学ぶ〜iOS編〜
前置き
「Rails ActionCableで双方向通信してみたい」「モバイルアプリでリアルタイム通信アプリ作りたい」と思いサンプルアプリを作ってみました。個々の詳細については既に解説してくださっている記事はありますので、大まかに環境構築やソースコードを記事にします。以下の3部構成になっています。
お遊びサンプルの紹介
以下のアニメーションGIFをご覧ください。各ユーザーのアクティブ状況を表示して、メッセージをやりとります。もっと砕けた表現をするならば、筆者の愛犬たちが寝起きして、鳴いたり、遠吠えしたり、唸ったりします。
このアプリでは大きく2つのActionCableの使い方があります。
- 同じルーム内の全ユーザーにブロードキャスト
- ルームに入る
現在ルーム内にいるユーザー(以下、アクティブユーザー)にルームに入ったことを通知し、アクティブユーザーを取得します。そして、各ユーザーのアクティブ状況を表示します。- 「ワンワン」ボタンと「ワオーーン」ボタン
文字入力で任意の文字が送れないだけで、チャットでいうところの「メッセージ」とほぼ同義です。ボタンに対応したメッセージを送信します。
※アニメーションGIFでは「ワオーン」とか「ワオォーン」になっています。途中から文字を修正しました- ルームから出る
「キャンセル」をタップしたり、アプリを閉じたりするとルームから出たことにします。ルームに入るときと同様にアクティブユーザーを取得して、各ユーザーのアクティブ状況を表示します。- 自分にブロードキャスト
- 「独り言」
「独り言」ということで自分のみメッセージを受信します。構成
名前 バージョン macOS Mojave 10.14.3 Xcode 10.1 Swift 4.2.1 iOS 12.1 シミュレーター iPhone 6 / 7 / 8
hosts(macOS)
hosts127.0.0.1 devnokiyo.example.comソースコードはGitHubに公開しています。よろしければご覧ください。
ActionCableClientを導入する
ライブラリを利用して開発します。少し変則的な導入をしているので説明します。
まず通常どおりCocoaPodsで導入する
公式の説明どおり一般的な導入をまず行います。
Podfilepod "ActionCableClient"$ pod installビルドエラーを解消する
残念ながら現行バージョン(0.2.3)ではSwift4.2に対応しきれていないようで、筆者の環境ではビルドエラーが発生してしまいます。また、開発中と思われる最新のコードはビルドは通りますが動作が不安定です。(バージョンのタグ付けがないので不安定なのは当たり前ですね。)
同件と思われるissueに便乗しつつ、今回はビルドエラーの箇所を修正することにしました。
- Pods/ActionCableClient/Source/Classes/RetryHandler.swift
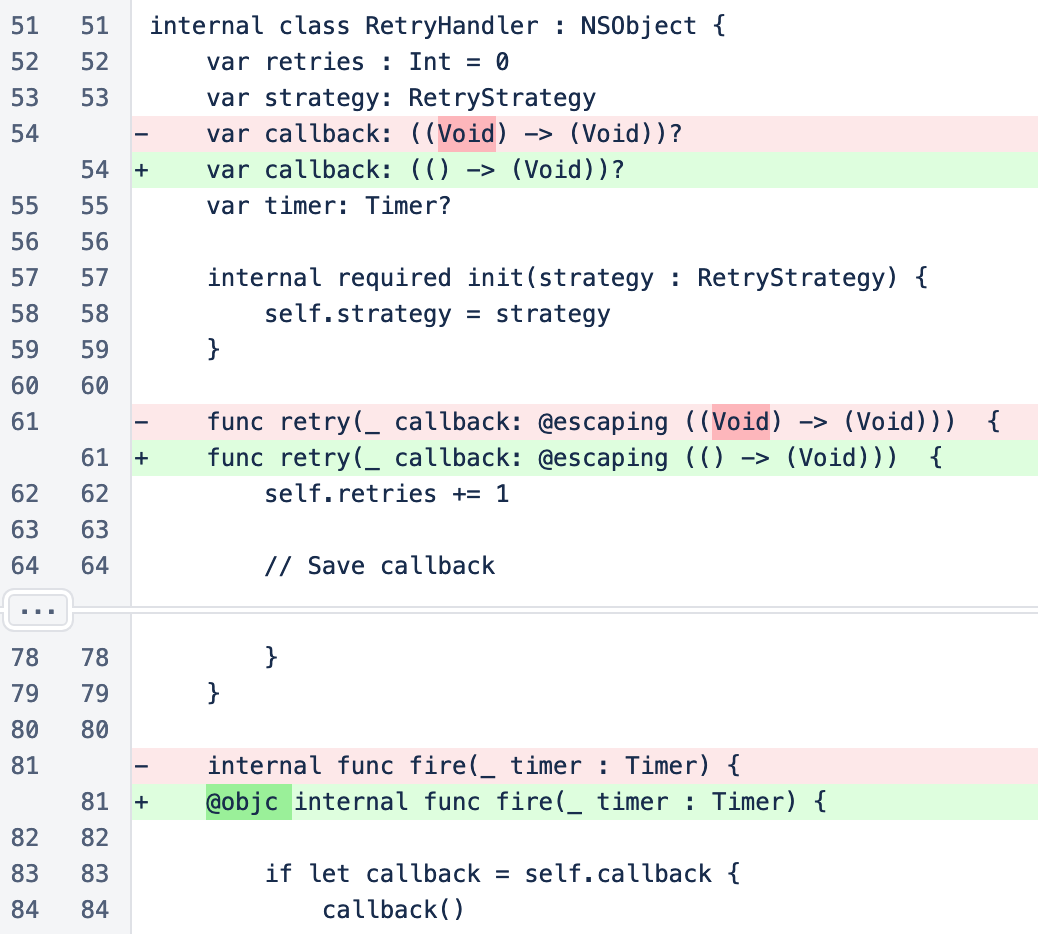
- noshilan/Pods/Starscream/Source/WebSocket.swift

今回はこの修正がありますのでCocoaPodsでインストールしたライブラリもGitの管理対象に含めました。
ソースコードの説明
サンプルアプリはActionCableと本質的に関係ない部分も多いので、GitHubに公開しているソースコードの原形を保ちながら主要な部分を抽出しました。ソースコードの中にコメントで説明します。
ActionCableApp/ViewControllers/BarkVc.swiftclass BarkVc: UIViewController { private let CableUrl = "ws://devnokiyo.example.com/cable" // ActionCableのコネクションのエンドポイント private let ChannelIdentifier = "RoomChannel" // チャンネル名 private var client: ActionCableClient! // ActionCableのコネクションに関連するインスタンス private var channel: Channel! // ActionCableのチャンネルを関連するインスタンス // 【補足】「ユーザーをRDBから取得して、その分だけ動的に表示して・・・」と // 要件が大きくなるとサンプルの目的が反れるので、3ユーザーのみに限定して作成しました。 @IBOutlet weak var chiyoUsv: UserStatusView! // 上段ユーザーのステータス @IBOutlet weak var eruUsv: UserStatusView! // 中段ユーザーのステータス @IBOutlet weak var otomeUsv: UserStatusView! // 下段ユーザーのステータス override func viewDidLoad() { super.viewDidLoad() // ActionCable関連のインスタンスを初期化・接続する。 initClient() } override func viewDidDisappear(_ animated: Bool) { super.viewDidDisappear(animated) // 画面を閉じるときはコネクションを切断する。 // サンプルではアプリの中断は考慮しない。 client.disconnect() } @IBAction func tapBawBawButton(_ sender: Any) { // 「ワンワン」ボタン押下時はRoomChannelのbarkアクションを呼出す。 // 送信情報) "content":"bawbaw" bark(bark: "bawbaw") } @IBAction func tapWaooonButton(_ sender: Any) { // 「ワオーーン」ボタン押下時はRoomChannelのbarkアクションを呼出す。 // 送信情報) "content":"waooon" bark(bark: "waooon") } @IBAction func tapMumblingButton(_ sender: Any) { // 「独り言」ボタン押下時はRoomChannelのmumblingアクションを呼出す。 // 送信情報) 無し。アクションを呼出すのみ。 channel?.action("mumbling") } private func initClient() { // コネクションのエンドポイントを指定する。 // 送信情報) 呼出し元ViewControllerから取得したaccount // 【補足】ユーザーの割出しと認証が必要ならOpenID Connectのアクセストークンなどになると思います。 client = ActionCableClient(url: URL(string: "\(CableUrl)/?account=\(account!)")!) client.onConnected = { // 【補足】このサンプルではチャンネルをサブスクライブした直後にRoomChannelのgreetingアクションを呼出します。 // コネクションの接続完了を待たずにチャンネルを作成してしまうと非同期の問題でRoomChannelのgreetingアクションが // 呼ばれないことがありました。そのため、コネクションの接続が完了してからチャンネルをサブスクライブします。 self.initChannel() } // 【補足】onConnectedの他にも以下のコールバックが用意されています。 // client.willConnect = {} // client.onDisconnected = { (error: ConnectionError?) in } // client.willReconnect {} // 【補足】以下のプロパティで再接続のポリシーを設定出来るようです。(厳密に確認していません。) // client.reconnectionStrategy // コネクションに接続する。 client.connect() } private func initChannel() { // チャンネルを作成する。サブスクライブは手動で行う。 // 送信情報) "room":ルーム名(ID) self.channel = self.client.create(ChannelIdentifier, identifier: ["room": room], autoSubscribe: false) self.channel.onSubscribed = { // サブスクライブしたら、ルームに入ったことになる。 // 同じルームのアクティブユーザーに通知するのでRoomChannelのgreetingアクションを呼出す。 self.channel?.action("greeting") } self.channel.onReceive = {(data: Any?, error: Error?) in // 自他問わずアクティブユーザーより送信された情報をこのコールバックで受信する。 if let response = RoomChannelResponse(data: data) { // 誰に関する情報か判定する。自身も含まれる。 // findUserStatusViewメソッドは以下のいずれかのクラス変数を返却する。 // chiyoUsv // eruUsv // otomeUsv // 受信情報) "account":ユーザーのアカウント let userStatusView = self.findUserStatusView(account: response.account) switch response.type { case .roomIn: // 受信情報) "type":"in" // 受信情報) "roommate":"[アクティブユーザーのアカウント...]" // updateUserStatusメソッドはアクティブユーザーを以下のようにする。 // 表示内容:(^○^) // オンラインの色(緑) self.updateUserStatus(accounts: response.roommate, type: response.type) // ルームに入ったユーザーは挨拶する。 // 受信情報) "type":"in" 表示内容: (^○^) (言語:日本語) userStatusView.bark.text = NSLocalizedString(response.type.rawValue, comment: self.defaultComment) break case .roomOut: // ルームから出たユーザーは挨拶する。 // 受信情報) "type":"out" 表示内容: ( ˘ω˘ ) (言語:日本語) userStatusView.bark.text = NSLocalizedString(response.type.rawValue, comment: self.defaultComment) // オフラインの色(赤)に変更する。 userStatusView.online.backgroundColor = UIColor.red break case .mumbling: // 受信情報) // "type":"mumbling" // "content":"(゚Д゚;)" 表示内容: (゚Д゚;) (言語:不問) バックエンドの固定値なので言語設定に依存しない // 【補足】「独り言」は自身が送信した情報をActionCableを経由して自身のみが受信します。 if let content = response.content { userStatusView.bark.text = content } break case .bark: // 受信情報) // "type":"bark" // "content":"bawbaw" / "wooon" 表示内容: ワンワン / ワオーーン (言語:日本語) if let content = response.content { userStatusView.bark.text = NSLocalizedString(content, comment: self.defaultComment) } break } } } // チャンネルをサブスクライブする。 self.channel.subscribe() } private func bark(bark: String) { // 「ワオーーン」ボタン押下時はRoomChannelのbarkアクションを呼出す。 // 送信情報) "content":bark channel?.action("bark", with: ["content": bark]) }筆者がハマったところ
ActionCableClientのビルドエラー
前述のとおり修正しました。チャンネルの初期化
コネクションに接続した直後にチャンネルのアクションへ送信するとき、送信できないときがありました。チャンネルの初期化はコネクションの接続が完了してから行います。非同期処理のタイミングによる問題だと思います。失敗例client.connect() channel = self.client.create(ChannelIdentifier, identifier: ["room": room], autoSubscribe: false) channel.subscribe()成功例client.onConnected = { channel = self.client.create(ChannelIdentifier, identifier: ["room": room], autoSubscribe: false) channel.subscribe() } client.connect()参考
Rails 5 Action CableチャットアプリのiOSクライアント側を作る
終わりに
チャットアプリのサンプルが定番なので、少し違うアプローチでサンプルを作っていたはずなのですが、結局仕組みは似たり寄ったりになってきました。筆者はiOS、Androidの順で実装しているのでバックエンドとの主な仕様調整はiOS版で行なっています。その意味ではiOS版のほうが壁に当たることが多いです。細かい作込みはしていませんが、バックエンドとアプリの双方を実装して、やりたいことの表現と仕組みを概ね理解することができました。

- 投稿日:2019-03-18T00:24:23+09:00
Androidエミュレーターのhostsを書換えてローカルサーバーへ接続する
前置き
小ネタになります
macOSにローカルサーバー立ててiOSシミュレーターとAndroidエミュレーターからアクセスする開発環境を構築しています。iOSシミュレーターはmacOSのhostsを認識しているようでしたが、Andoridエミュレーターでは別途hostsを設定する必要がありました。開発環境はmacOSを想定しています。adb/emulatorのパスを通す
必須ではありませんがコンソールの可読性も上がりますのでパスを通しておきます。
.bash_profileを編集
$ vi ~/.bash_profileパスを追加
AndroidStudio一式をデフォルトでインストールした場合、以下のパスになっていると思います。.bash_profileexport PATH="$PATH:$HOME/Library/Android/sdk/platform-tools" export PATH="$PATH:$HOME/Library/Android/sdk/emulator"再読込み
$ source ~/.bash_profileエミュレーターを設定する
対象エミュレーターを選定
$ emulator -list-avds
Pixel_2_API_28
書込み可能状態でエミュレーターを起動
$ emulator -avd Pixel_2_API_28 -writable-system
emulator: WARNING: System image is writable
emulator: INFO: boot completed
rootを取得
前述の「書込み可能状態でエミュレーターを起動」を行うとコマンドの結果がフォアグラウンドになるので、以降のコマンドはもう1つコンソールを立ち上げて実行します。(バックグランド実行でも良いですね。)$ adb root restarting adbd as root/systemを書込み可能にして再マウント
$ adb remount
remount succeeded
hostsに書込む
AndroidシミュレーターからmacOSのローカルホストへ接続するにはIPアドレスに10.0.2.2を指定します。127.0.0.1ではありません。ご注意ください$ adb shell "echo 10.0.2.2 devnokiyo.example.com >> /system/etc/hosts"なお、上記の例では追記しか出来ないので、一度AndroidエミュレーターのhostsファイルをmacOSで編集してから、Androidエミュレーターへ配置する方法も有用だと思います。
Androidシミュレーターのhostsを取得
$ adb pull /system/etc/hosts .hostsを編集
hostsをAndroidシミュレーターへ配置
$ adb push .hosts /system/etc/hostsこの時点でChromeを起動または再起動すると反映されていることが確認できます
非rootに変更
$ adb unroot
restarting adbd as non root
再起動
$ adb rebootトラブルシューティング
API28の他、API27でも試してみましたが、筆者の環境では不安定になることがあります。
「書込み可能状態でエミュレーターを起動」を行うとコマンドの結果が、途中から以下のように表示される続けることがあります。WARNING: AsyncSocketServer.cpp:99: Error when accepting host connectionError message: Bad file descriptor : :完全な解決策がわかっていないのですが、AndroidStudioやAndroidエミュレーターを再起動すると解決します。「解決」というより仕切り直しの意味合いが多いですね。
参考
Android Emulatorのhostsを書き換える方法
Android端末のhostsを書き換える方法
Androidのエミュレーターから自身のPC(localhost)へ接続終わりに
筆者はiOS、Androidの順で開発を進めており先入観が2つありました。
- AndroidエミュレーターにもmacOSのhostsが適用されているはず
→ されてませんでした。- hostsにローカルIP(ループバック)
127.0.0.1を追加する
→10.0.0.22でした。ご参考になれば幸いです。

- 投稿日:2019-03-18T00:21:40+09:00
ビルド時に生成されるAPK/AABの名前を変更する方法
Android Studioで「Generate Signed Budle / APK」したときに生成される APK/AAB のファイル名。そのままでもそんな問題があるって訳でもないけど、所望のファイル名つけたいなって思いますよね。
知らない人が調べるのはしんどいと思うので、というか自分がしんどかったので、書きます。デフォルト状態
まずは、特段なにも指定しない場合にどうなるかをまとめてみます。
APKの場合
ビルドタイプのみの場合
/app/release/app-release.apkモジュール配下に
[buildType]/のディレクトリが作られ、[module]-[buildType].apkという名前のファイルになります。プロダクトフレーバーを設定している場合
/app/production/release/app-production-release.apkモジュール配下に
[prodctFlavor]/[buildType]/のディレクトリが作られ、[module]-[productFlavor]-[buildType].apkという名前のファイルになります。AAB (Android App Bundle) の場合
ビルドタイプのみの場合
/app/release/app.aabモジュール配下に
[buildType]/のディレクトリが作られ、[module].aabという名前のファイルになります。プロダクトフレーバーを設定している場合
/app/production/release/app-production-release.apkモジュール配下に
[prodctFlavor]/[buildType]/のディレクトリが作られ、[module].aabという名前のファイルになります。どちらにしてもAABの場合、モジュール名しか名前に反映されません。
APKのファイル名を変更する方法
APKのファイル名を完全に制御する、スマートな方法はなさそうです。
以下のようにして指定することができますが、多分バージョンが変わるとこの方法では通用しなくなります。
また、この方法ではAABの名前は変更できません。
※ Gradle 4.10.3の時点で動作することを確認しています。android { ... applicationVariants.all { variant -> if (variant.buildType.name != "release") { return } variant.outputs.all { outputFileName = "hogehoge.apk" } } }作成されるディレクトリは変わらず以下のように生成されるファイル名が変わっています。
hogehoge.apk「アプリ名+バージョン名」みたいな名前にしたいので私は以下のように指定したりします。
def applicationName = "Application"
def versionMajor = 0
def versionMinor = 0
def versionPatch = 1

android {
    compileSdkVersion 28
    defaultConfig {
        applicationId "net.mm2d.myapplication"
        minSdkVersion 21
        targetSdkVersion 28
        versionCode versionMajor * 10000 + versionMinor * 100 + versionPatch
        versionName "${versionMajor}.${versionMinor}.${versionPatch}"
    }
    applicationVariants.all { variant ->
        if (variant.buildType.name != "release") {
            return
        }
        variant.outputs.all {
            outputFileName = "${applicationName}-${versionName}.apk"  // ←ココ
        }
    }
}
こうなります。
Application-0.0.1.apkAAB(Android App Bundle) のファイル名を変更する方法
AABの方が簡単です。
デフォルト状態でモジュール名が当てはめられていた部分の名前はarchivesBaseNameを指定することで変更できます。
以下のようにするとarchivesBaseName = "hogehoge"作成されるディレクトリは変わらず以下のように生成されるファイル名が変わっています。
hogehoge.aab「アプリ名+バージョン名」にしてみましょう。
def applicationName = "Application"
def versionMajor = 0
def versionMinor = 0
def versionPatch = 1

android {
    compileSdkVersion 28
    defaultConfig {
        applicationId "net.mm2d.myapplication"
        minSdkVersion 21
        targetSdkVersion 28
        versionCode versionMajor * 10000 + versionMinor * 100 + versionPatch
        versionName "${versionMajor}.${versionMinor}.${versionPatch}"

        archivesBaseName = "${applicationName}-${versionName}"  // ←ココ
    }
}
できました。
Application-0.0.1.aabAPKの場合も同様に、モジュール名部分が
archivesBaseNameで指定した名前に変化します。Application-0.0.1-production-release.apkAPKの場合は、名前の後ろに
-[productFlavor]-[buildType]がつきますが、これで十分な場合も多いでしょう。こっちは技巧的な変更方法って訳ではないので、多分前述の方法よりは長く使えそうです。
以上です。
- 投稿日:2019-03-18T00:21:40+09:00
ビルド時に生成されるAPK/AABのファイル名を変更する方法
Android Studioで「Generate Signed Budle / APK」したときに生成される APK/AAB のファイル名。そのままでもそんな問題があるって訳でもないけど、所望のファイル名つけたいなって思いますよね。
知らない人が調べるのはしんどいと思うので、というか自分がしんどかったので、書きます。デフォルト状態
まずは、特段なにも指定しない場合にどうなるかをまとめてみます。
APKの場合
ビルドタイプのみの場合
/app/release/app-release.apkモジュール配下に
[buildType]/のディレクトリが作られ、[module]-[buildType].apkという名前のファイルになります。プロダクトフレーバーを設定している場合
/app/production/release/app-production-release.apkモジュール配下に
[prodctFlavor]/[buildType]/のディレクトリが作られ、[module]-[productFlavor]-[buildType].apkという名前のファイルになります。AAB (Android App Bundle) の場合
ビルドタイプのみの場合
/app/release/app.aabモジュール配下に
[buildType]/のディレクトリが作られ、[module].aabという名前のファイルになります。プロダクトフレーバーを設定している場合
/app/production/release/app-production-release.apkモジュール配下に
[prodctFlavor]/[buildType]/のディレクトリが作られ、[module].aabという名前のファイルになります。どちらにしてもAABの場合、モジュール名しか名前に反映されません。
APKのファイル名を変更する方法
APKのファイル名を完全に制御する、スマートな方法はなさそうです。
以下のようにして指定することができますが、多分バージョンが変わるとこの方法では通用しなくなります。
また、この方法ではAABの名前は変更できません。
※ Gradle 4.10.3の時点で動作することを確認しています。android { ... applicationVariants.all { variant -> if (variant.buildType.name != "release") { return } variant.outputs.all { outputFileName = "hogehoge.apk" } } }作成されるディレクトリは変わらず以下のように生成されるファイル名が変わっています。
hogehoge.apk「アプリ名+バージョン名」みたいな名前にしたいので私は以下のように指定したりします。
def applicationName = "Application"
def versionMajor = 0
def versionMinor = 0
def versionPatch = 1

android {
    compileSdkVersion 28
    defaultConfig {
        applicationId "net.mm2d.myapplication"
        minSdkVersion 21
        targetSdkVersion 28
        versionCode versionMajor * 10000 + versionMinor * 100 + versionPatch
        versionName "${versionMajor}.${versionMinor}.${versionPatch}"
    }
    applicationVariants.all { variant ->
        if (variant.buildType.name != "release") {
            return
        }
        variant.outputs.all {
            outputFileName = "${applicationName}-${versionName}.apk"  // ←ココ
        }
    }
}
こうなります。
Application-0.0.1.apkAAB(Android App Bundle) のファイル名を変更する方法
AABの方が簡単です。
デフォルト状態でモジュール名が当てはめられていた部分の名前はarchivesBaseNameを指定することで変更できます。
以下のようにするとarchivesBaseName = "hogehoge"作成されるディレクトリは変わらず以下のように生成されるファイル名が変わっています。
hogehoge.aab「アプリ名+バージョン名」にしてみましょう。
def applicationName = "Application"
def versionMajor = 0
def versionMinor = 0
def versionPatch = 1

android {
    compileSdkVersion 28
    defaultConfig {
        applicationId "net.mm2d.myapplication"
        minSdkVersion 21
        targetSdkVersion 28
        versionCode versionMajor * 10000 + versionMinor * 100 + versionPatch
        versionName "${versionMajor}.${versionMinor}.${versionPatch}"

        archivesBaseName = "${applicationName}-${versionName}"  // ←ココ
    }
}
できました。
Application-0.0.1.aabAPKの場合も同様に、モジュール名部分が
archivesBaseNameで指定した名前に変化します。Application-0.0.1-production-release.apkAPKの場合は、名前の後ろに
-[productFlavor]-[buildType]がつきますが、これで十分な場合も多いでしょう。こっちは技巧的な変更方法って訳ではないので、多分前述の方法よりは長く使えそうです。
以上です。