- 投稿日:2019-03-10T23:15:01+09:00
リンクのみタップ&選択可能な UITextView
UITextView中の、リンクのタップ可と、テキストの選択不可を両立させる方法です!
UITextViewにタップ可能なリンクを挿入すると…
リンクをタップできる
UITextViewのサンプルコード (タップで開く)リンクをタップできるUITextViewimport UIKit class LinkTextViewController: UIViewController { let textView: UITextView = { let textView = UITextView(frame: CGRect(x: 0, y: 0, width: 200, height: 200)) textView.isSelectable = true textView.isEditable = false let text = "リンク集\nYahoo!\nGoogle" let attributedString = NSMutableAttributedString(string: text) attributedString.addAttribute(.font, value: UIFont.systemFont(ofSize: 32), range: NSRange.init(location: 0, length: attributedString.length)) attributedString.addAttribute(.link, value: "https://www.yahoo.co.jp/", range: NSString(string: text).range(of: "Yahoo!")) attributedString.addAttribute(.link, value: "https://www.google.com/", range: NSString(string: text).range(of: "Google")) textView.attributedText = attributedString return textView }() override func viewDidLoad() { super.viewDidLoad() view.backgroundColor = .white view.addSubview(textView) textView.center = view.center } } extension UIViewController: UITextViewDelegate { public func textView(_ textView: UITextView, shouldInteractWith URL: URL, in characterRange: NSRange, interaction: UITextItemInteraction) -> Bool { UIApplication.shared.open(URL) return false } }リンクをタップ可能にしたい場合には、
isSelectable = trueとする必要があるのですが、
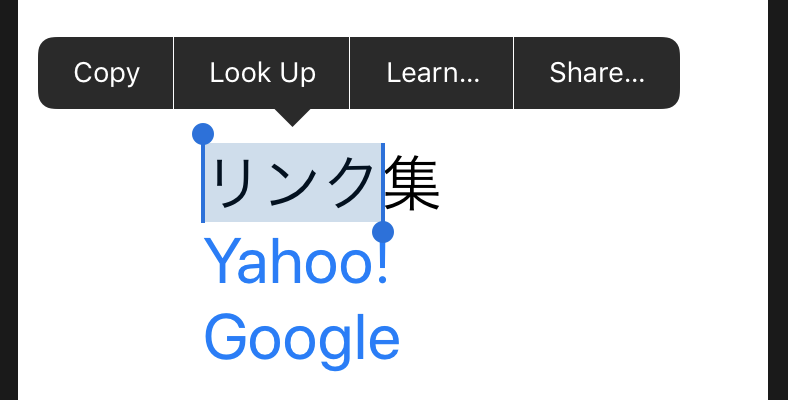
そうするとテキストが選択可能になってしまう
リンクのみタップ&選択可能にする
下記のように、
.link属性しかタップおよび選択できないようにし、
さらに、.link属性が選択されたとしても、メニューを出さないようにすることで、
リンクだけがタップ可能な (他のテキストは選択できない)UITextViewとすることができます リンクがタップでき、テキストは選択できないUITextViewclass MyTextView: UITextView { // NOTE: リンクテキストしかタップおよび選択できないようにする override func point(inside point: CGPoint, with event: UIEvent?) -> Bool { guard let position = closestPosition(to: point), let range = tokenizer.rangeEnclosingPosition(position, with: .character, inDirection: UITextLayoutDirection.left.rawValue) else { return false } let startIndex = offset(from: beginningOfDocument, to: range.start) return attributedText.attribute(.link, at: startIndex, effectiveRange: nil) != nil } // NOTE: テキストが選択された場合に、コピーなどのメニューを出さないようにする override func becomeFirstResponder() -> Bool { return false } }
リンクのみタップ&選択できる
UITextViewのサンプルコード (タップで開く)import UIKit class LinkTextViewController: UIViewController { class MyTextView: UITextView { // NOTE: リンクテキストしかタップおよび選択できないようにする override func point(inside point: CGPoint, with event: UIEvent?) -> Bool { guard let position = closestPosition(to: point), let range = tokenizer.rangeEnclosingPosition(position, with: .character, inDirection: UITextLayoutDirection.left.rawValue) else { return false } let startIndex = offset(from: beginningOfDocument, to: range.start) return attributedText.attribute(.link, at: startIndex, effectiveRange: nil) != nil } // NOTE: テキストが選択された場合に、コピーなどのメニューを出さないようにする override func becomeFirstResponder() -> Bool { return false } } let textView: MyTextView = { let textView = MyTextView(frame: CGRect(x: 0, y: 0, width: 200, height: 200)) textView.isSelectable = true textView.isEditable = false let text = "リンク集\nYahoo!\nGoogle" let attributedString = NSMutableAttributedString(string: text) attributedString.addAttribute(.font, value: UIFont.systemFont(ofSize: 32), range: NSRange.init(location: 0, length: attributedString.length)) attributedString.addAttribute(.link, value: "https://www.yahoo.co.jp/", range: NSString(string: text).range(of: "Yahoo!")) attributedString.addAttribute(.link, value: "https://www.google.com/", range: NSString(string: text).range(of: "Google")) textView.attributedText = attributedString return textView }() override func viewDidLoad() { super.viewDidLoad() view.backgroundColor = .white view.addSubview(textView) textView.center = view.center } } extension UIViewController: UITextViewDelegate { public func textView(_ textView: UITextView, shouldInteractWith URL: URL, in characterRange: NSRange, interaction: UITextItemInteraction) -> Bool { UIApplication.shared.open(URL) return false } }どや!テキスト選択できまい!
余談
別に選択できても良いとは思うけれども、
リンクがあるところのテキストだけ選択可能になっていると、ちょっとね…。参考

- 投稿日:2019-03-10T21:42:13+09:00
Swift MediaPlayer ミュージックPlaylist一覧取得
概要
ミュージックのPlaylist一覧取得。
ソース
example
import UIKit
import MediaPlayer

class ViewController: UIViewController {

    override func viewDidLoad() {
        super.viewDidLoad()
        let mPMediaQuery = MPMediaQuery.playlists()
        if let collections = mPMediaQuery.collections {
            print(MPMediaType.music)
            print(collections.count)
            for collection in collections {
                print("-/\\-")
                print("\(collection.mediaTypes)")
                collection.toString()
            }
        }
    }

}

extension MPMediaItemCollection {
    func toString() {
        print("MPMediaItemCollection")
        let keys = [MPMediaPlaylistPropertyName]
        for key in keys {
            if let value = self.value(forKey: key) {
                if let value = value as? Bool {
                    print("- Bool \(key):\(value)")
                }
                else if let value = value as? String {
                    print("- String \(key):\(value)")
                }
                else if let value = value as? Int {
                    print("- Int \(key):\(value)")
                }
            }
        }
    }
}
プレイリスト名取得
MPMediaItemCollectionのMPMediaPlaylistPropertyName。
memo
自分で作成したPlaylistはMPMediaType 1(MPMediaType.music)です。
MPMediaType 0は「トップレート」「最近再生した項目」「最近追加した項目」等です。
- 投稿日:2019-03-10T20:23:02+09:00
Pinterest風にジェスチャで画面遷移するサンプル
iOS版Pinterestのような画面を引き下げて前の画面に遷移するジェスチャーとアニメーションを再現してみました。
サンプルコードはこちらにあります。
GitHub - PinterestLikePullToPop概略
UINavigationControllerスタック上のview controllerの遷移になります。まずは対象のUIScrollViewにUIPanGestureRecognizerをあらたに付加してスクロールと連動。そしてキャプチャした複数のviewをwindow上に重ねてアニメーションを再現。前の画面に戻るときにUIViewControllerAnimatedTransitioningを使って後始末をしています。ここで使われているアニメーションの一部はこちらの記事に抜き出しています。
Panジェスチャ後のvelocityを利用した放物線アニメーション
- 投稿日:2019-03-10T18:07:18+09:00
なっとく!アルゴリズム(p32)をSwiftで書く(配列の要素を小さいものから順に並べていくサンプルコード)
配列の要素を小さいものから順に並べていくサンプルコード
import Foundation

//配列を入れると、一番小さいindexを返す
func findSmallest(array: [Int]) -> Int{
    var smallest = array[0]
    var smallestIndex = 0
    //iは0~ 配列の数
    let totalArray = array.count - 1

    for i in smallestIndex ... totalArray {
        if array[i] < smallest {
            smallest = array[i]
            smallestIndex = i
        }

    }
    return smallestIndex
}

//新しい配列をつくる
func selectionSort(array:[Int]) -> [Int] {
    var inputArray = array
    var newArray = [Int]()
    var totalArray = inputArray.count - 1

    for i in 0 ... totalArray {
        //pytonでいう array.pop(smallest)がない? 指定した位置の要素を削除し、値を取得みたいなやつ
        //配列の中の一番小さい値のはいっているindexを習得したら、新しい配列に入れて配列から消す
        let smallest = findSmallest(array:inputArray)
        newArray.append(array[smallest])
        inputArray.remove(at:smallest)
    }
    return newArray
}

var array = [6,4,1]
print(selectionSort(array:array))
実行結果
[1, 4, 6]Paizaも
https://paiza.io/projects/6jP7hjM4PqqVMQVRPAQMKg?locale=en-us躓いたところ
func selectionSort(array:[Int]) -> [Int] {
    var newArray = [Int]()
    var totalArray = array.count - 1

    for i in 0 ... totalArray {
        //pytonでいう array.pop(smallest)がない? 指定した位置の要素を削除し、値を取得みたいなやつ
        //配列の中の一番小さい値のはいっているindexを習得したら、新しい配列に入れて配列から消す
        let smallest = findSmallest(array:array)
        newArray.append(array[smallest])
        array.remove(at:smallest)
    }
    return newArray
}
エラー内容
入れている配列は変数のはずなのになぜこういうエラーが出るのか不思議だった
main.swift:30:9: error: cannot use mutating member on immutable value: 'array' is a 'let' constant
        array.remove(at:smallest)
参考文献のリンクを参照し、もしかして値渡しをしなくてはいけないのかなと思い書き直した。
また、関数引数は定数(let)はこういう問題に直面しないと、知らないなとも思った↓
Swiftは関数引数は定数(let)。関数引数を直接書き換えることはできない。参考文献
- 投稿日:2019-03-10T16:12:11+09:00
なっとく!アルゴリズム二分探索(p9)をSwiftで書く
はじめに
なっとく!アルゴリズムの理解を深めるために、慣れているSwiftで書いてみた時のメモ
import Foundation

//第一引数とある配列を渡す
//第二引数、その配列内に特定の数字が入っていたら、その場所を返すようにする
func binarySearch(list:[Int],item:Int) {
    var low = 0
    var high = list.count - 1

    //取り出した配列の中見を比較して、同じあたいになるまでループする
    //初回 0 < 4
    //2 0 < 1
    while (low < high) {
        print("low",low)
        print("high",high)

        //真ん中を取り出す
        let mid = Int(ceil(Double(low + high) / 2))
        //値をとりだす
        let value = list[mid]

        //とりだした値が、探したい値よりおおきいかちいさいかをしらべる
        if value == item {
            print("正解")
            return print(mid)
        } else if value < item {
            low = mid + 1
        } else {
            high = mid - 1
        }
    }
    return print("当てはまるものはない")

}

let my_list = [1,3,5,7,9]

print(binarySearch(list:my_list,item:9))
paizaでも動かしたのでメモ
https://paiza.io/projects/Zb9KetD1X-U3x7lh1ss07Q
Int(ceil(Double(low + high) / 2))でつまったのでメモ
本はpythonで書かれていて
pythonの//の表現をうまくSwiftで表現できなくて苦戦したのをメモしたmid = (low + high) // 2
- 投稿日:2019-03-10T16:07:34+09:00
Swift 計算の順番を間違えて詰まったのでメモ
忘れないようにメモ
はじめに
下記のような変数があったとする
var low = 0
var high = 3
これと
Int(ceil(Double((low + high) / 2)))これ
Int(ceil(Double(low + high) / 2))当たり前だが、計算結果が違う
playgroundで実行してみる
import Foundation
var low = 0
var high = 3
print(Int(ceil(Double((low + high) / 2))))
// 1と出力

print(Int(ceil(Double(low + high) / 2)))
// 2と出力
それぞれ分解してみる
print("low + high: ",low + high)
print("(low + high) / 2 :", (low + high) / 2)
print("Double((low + high) / 2)) :",Double((low + high) / 2) )
print("ceil(Double((low + high) / 2)) : ", ceil(Double((low + high) / 2)))
print("Int(ceil(Double((low + high) / 2))) : ",Int(ceil(Double((low + high) / 2))))
low + high: 3 (low + high) / 2 : 1 Double((low + high) / 2)) : 1.0 ceil(Double((low + high) / 2)) : 1.0 Int(ceil(Double((low + high) / 2))) : 1print("low + high: ",low + high) print("Double(low + high) : ", Double(low + high)) print("Double(low + high) / 2 :", Double(low + high) / 2) print("ceil(Double(low + high) / 2) :",ceil(Double(low + high) / 2)) print("Int(ceil(Double(low + high) / 2)) : ", Int(ceil(Double(low + high) / 2)))low + high: 3 Double(low + high) : 3.0 Double(low + high) / 2 : 1.5 ceil(Double(low + high) / 2) : 2.0 Int(ceil(Double(low + high) / 2)) : 2
Doubleに型を変換するタイミングを間違えて時間をくってしまったのだが、おちついて考えるとまあそうですよね・・・という気持ちになる
- 投稿日:2019-03-10T14:45:55+09:00
Swift MediaPlayer ミュージックAlbum一覧取得
概要
ミュージックのAlbum一覧取得。
Apple Musicで追加したAlbumも対象にしたい。ソース
example
曲数5曲より大きいAlbumを表示。
import UIKit
import MediaPlayer

class ViewController: UIViewController {

    override func viewDidLoad() {
        super.viewDidLoad()

        let mPMediaQuery = MPMediaQuery.albums()
        if let collections = mPMediaQuery.collections {
            print(collections.count)
            for collection in collections {
                if collection.count > 5 {
                    print("\(collection.items[0].albumTitle!) : \(collection.count)")
                }
            }
        }
    }

}
注意
Info.plistに「Privacy – Media Library Usage Description」追加が必要。
追加しない場合、実行時エラーになります。
「[access] This app has crashed because it attempted to access privacy-sensitive data without a usage description. The app’s Info.plist must contain an NSAppleMusicUsageDescription key with a string value explaining to the user how the app uses this data.」
- 投稿日:2019-03-10T12:02:00+09:00
Cocoaアプリのバインディングの設定の仕方
Cocoaアプリのバインディングの設定の仕方
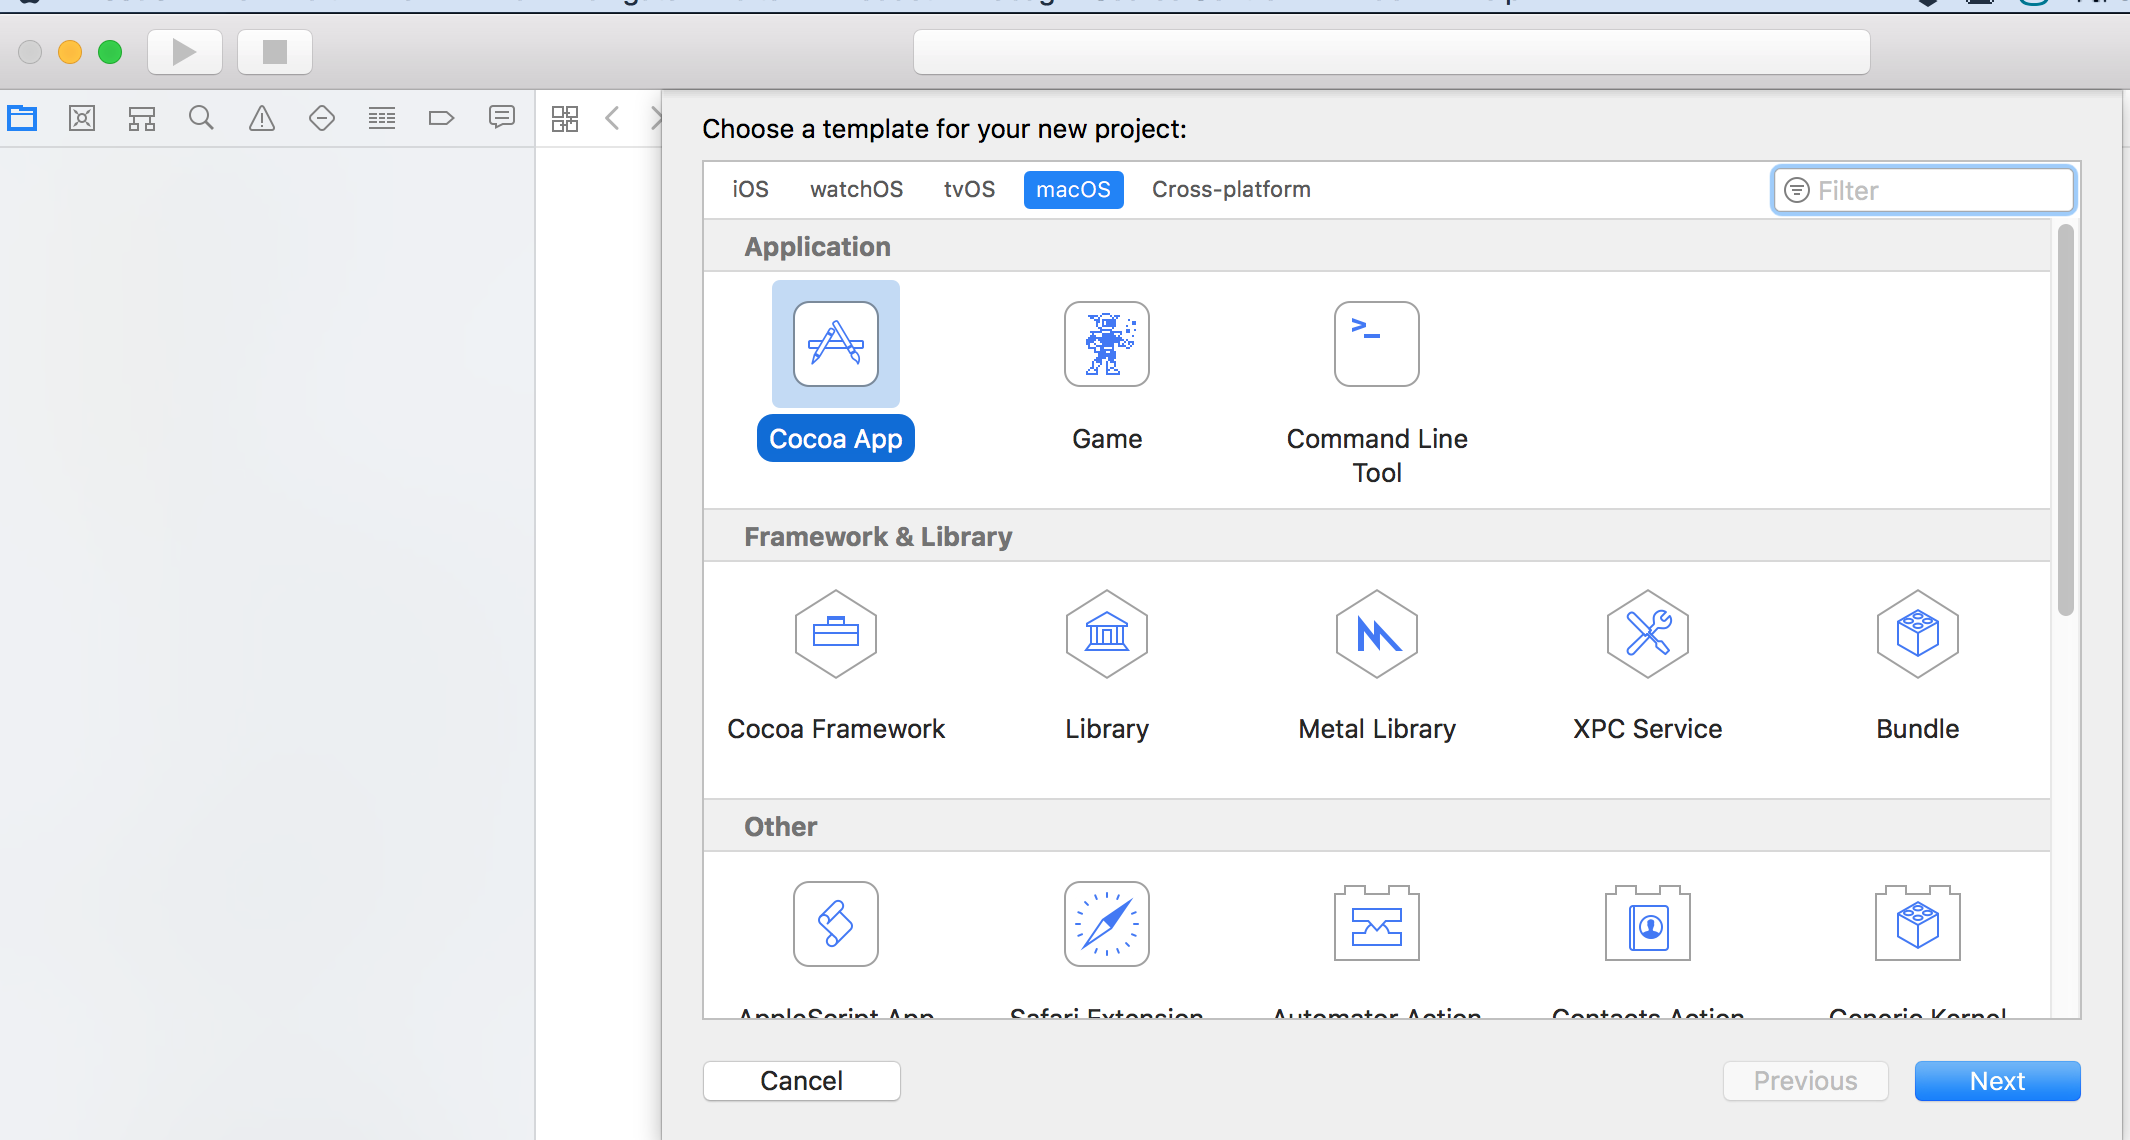
Cocoaアプリの作成
CocoaAppを選択する
Modelの作成
Modelを作成します
testModel.h
@interface testModel : NSObject

@property (nonatomic, copy) NSString *title;
@property (nonatomic, copy) NSString *body;

@property (nonatomic, copy) NSString *url;
@property (nonatomic, copy) NSString *imageUrl;
@property (nonatomic, copy) NSDate *updatedAt;

@end
testModel.m #import "testModel.h" @implementation testModel @endNSArrayControlloerの設定
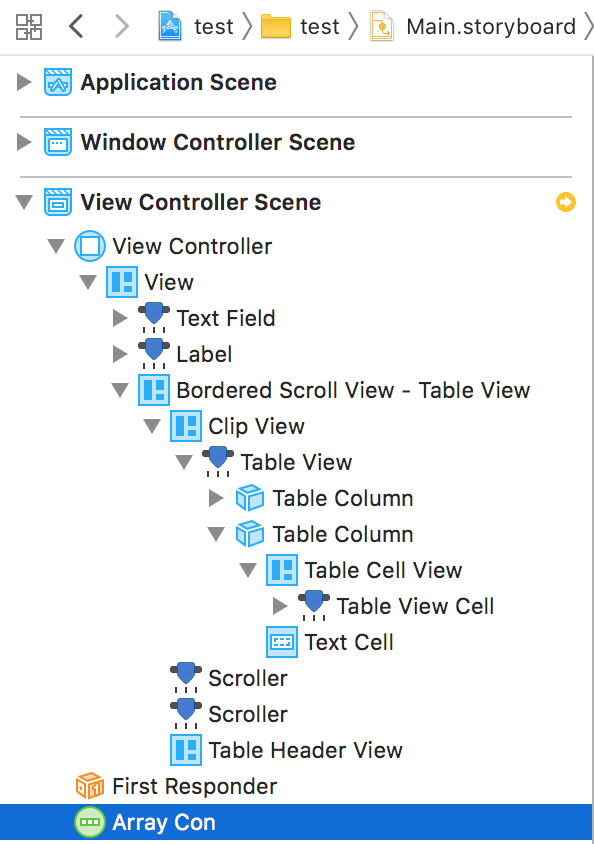
コントロールパネルからNSArrayControlloerをViewControlloerに追加します。
NSArrayControlloerをアウトレットします。ViewController.h #import <Cocoa/Cocoa.h> @interface ViewController : NSViewController @property (strong) IBOutlet NSArrayController *arrayCon; @endNSArrayControllerのcontentにデータを入れてやる
ViewController.m

#import "ViewController.h"
//モデルを読み込みます
#import "testModel.h"

@implementation ViewController

- (void)viewDidLoad {
    [super viewDidLoad];

    NSMutableArray*dataArray = [NSMutableArray new];

    for(int i = 0;i < 10;i++){
        testModel*testModel1 = [testModel new];
        testModel1.title = [NSString stringWithFormat:@"タイトル %d",i];
        testModel1.body = [NSString stringWithFormat:@"ボティ %d",i];
        [dataArray addObject:testModel1];
    }
    //NSArrayControllerのcontentにデータを入れてやる
    self.arrayCon.content = dataArray;

}
@end
NSTableViewの設定
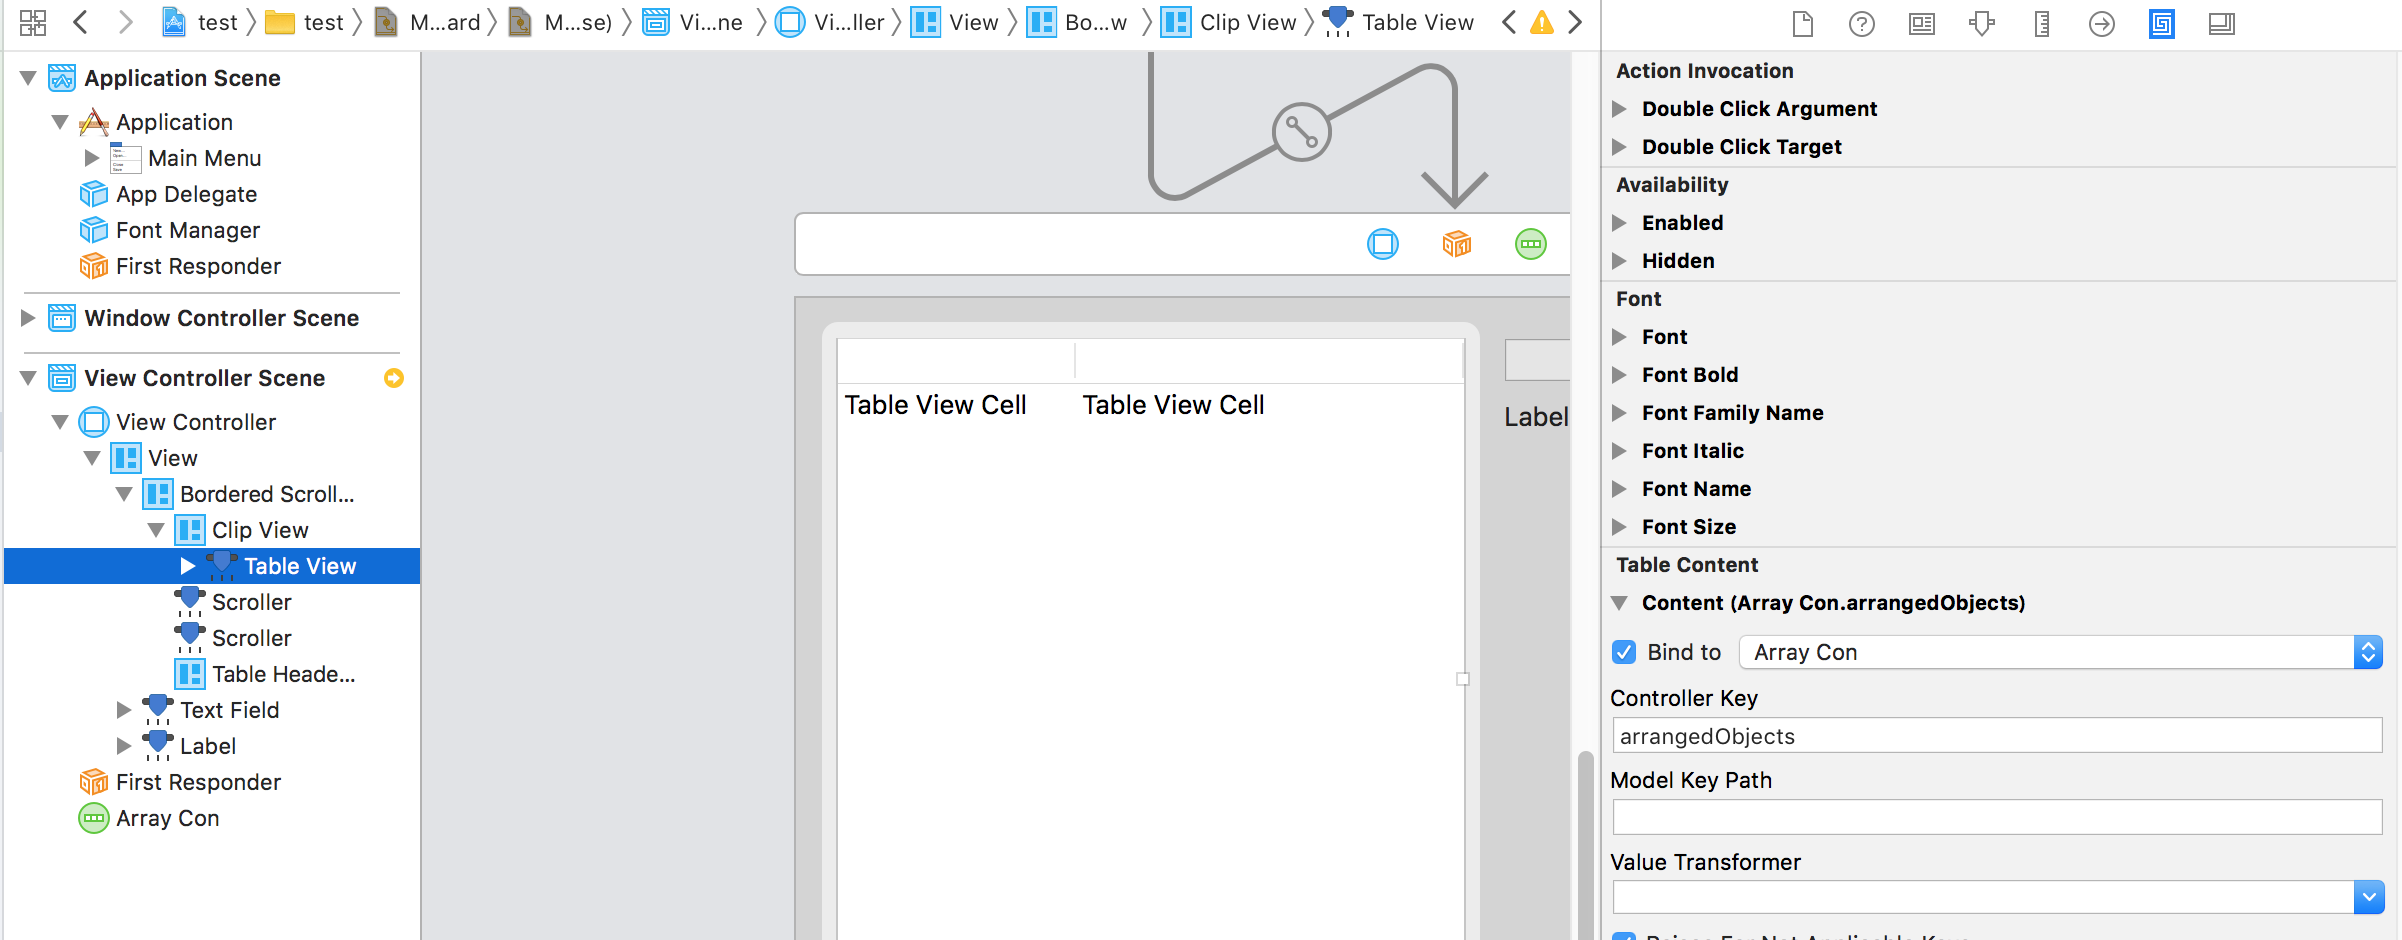
NSTableViewを追加する。
TableContent Bind toをチェックを入れる。追加したNSArrayControllerを選択する
Cellの設定
Cellには2種類ある
NSTableCellView iOSでいうUITableCellViewのようなもの
NSTextFiledCell 機能がそれだけのもの
NSImageCell
NSComboBoxCell
etcそれぞれバインドの設定が違う
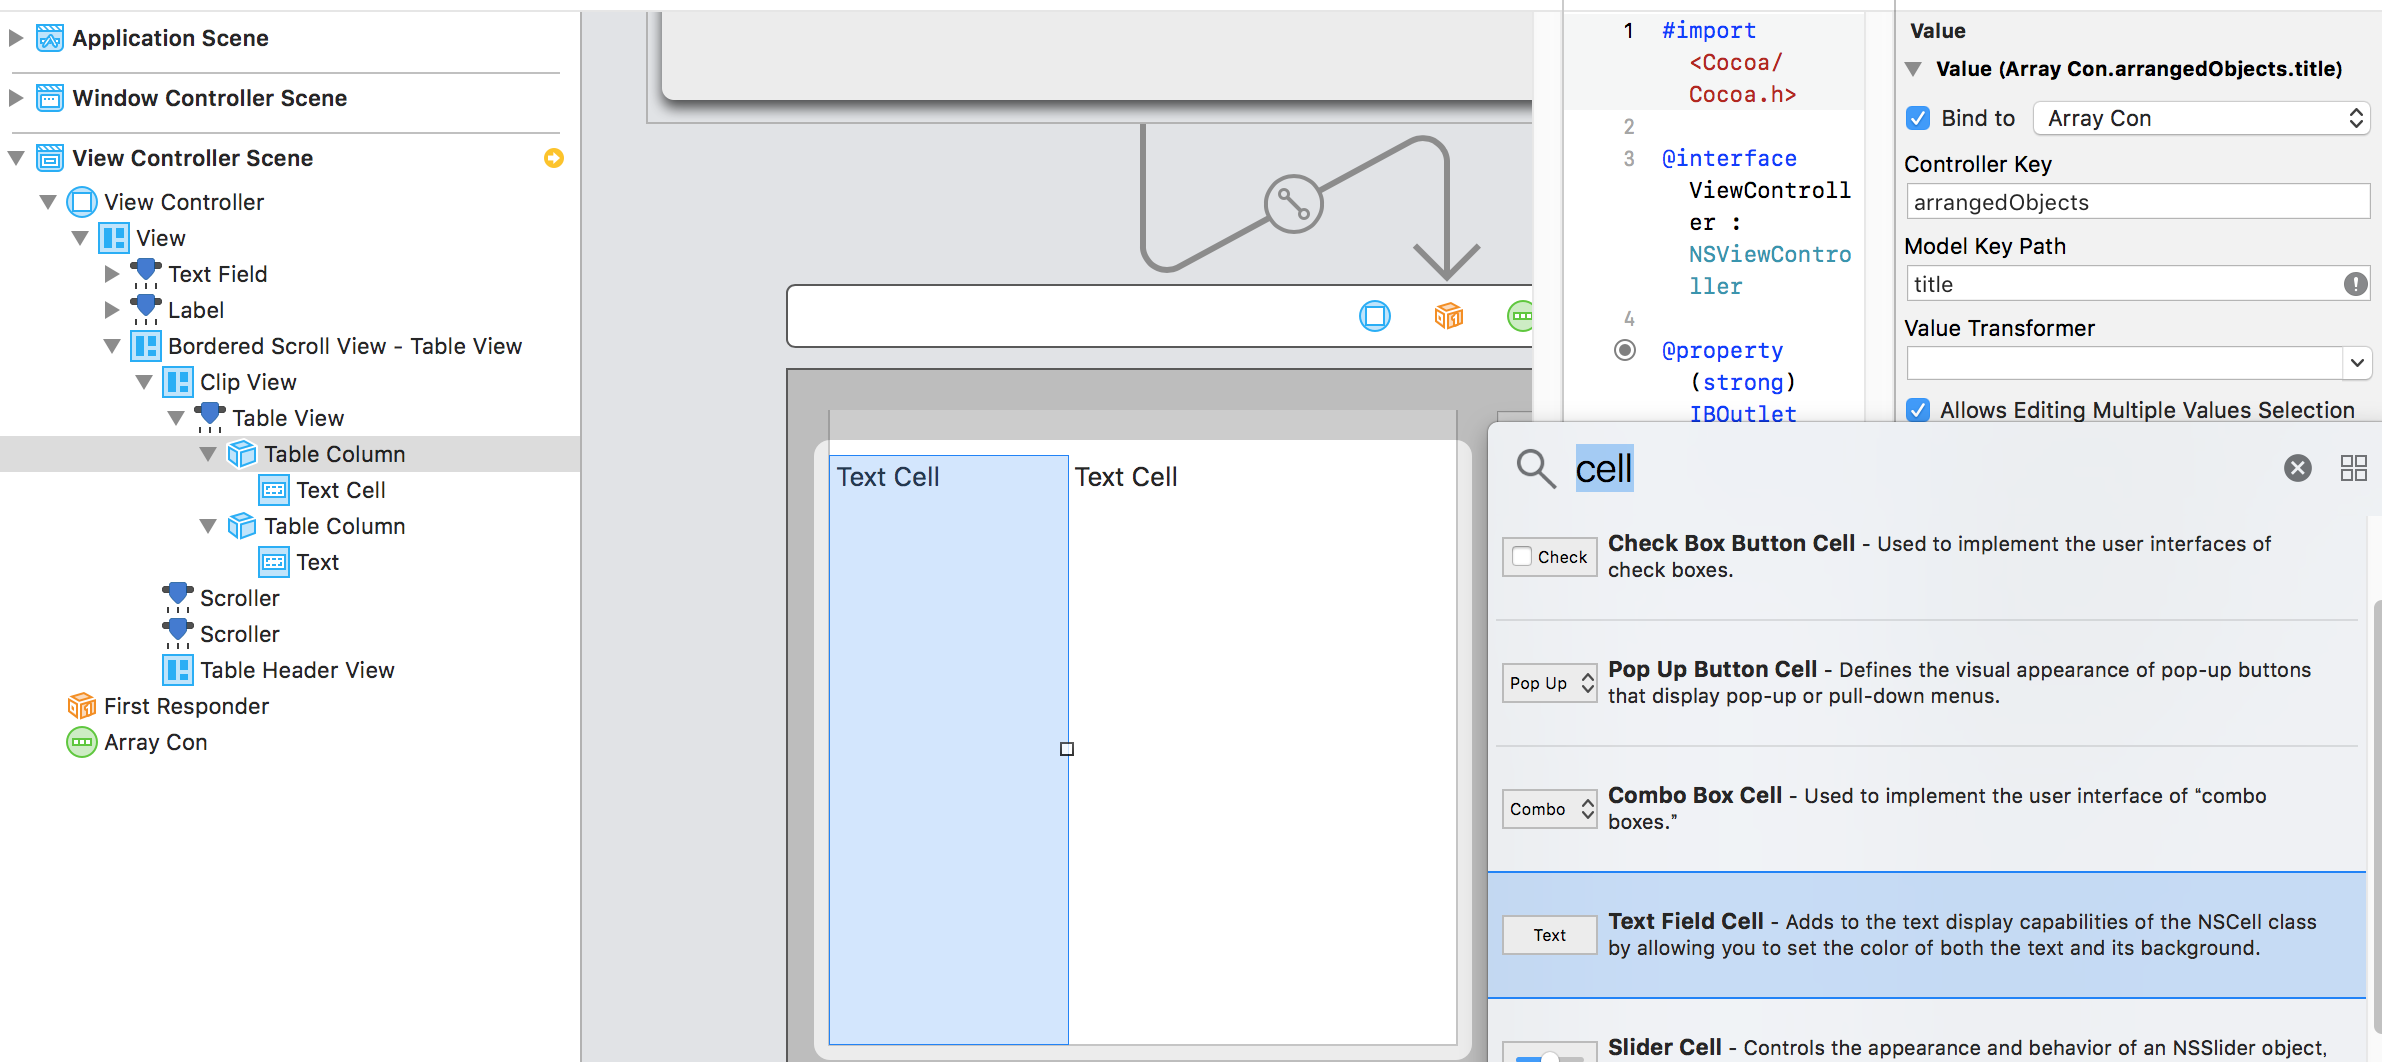
NSTextFiledCellのバインドの設定はNSTableColumnで設定する。
Bind Toを選択する。ModelKeyPathにキー名(titleやbody)を記入する
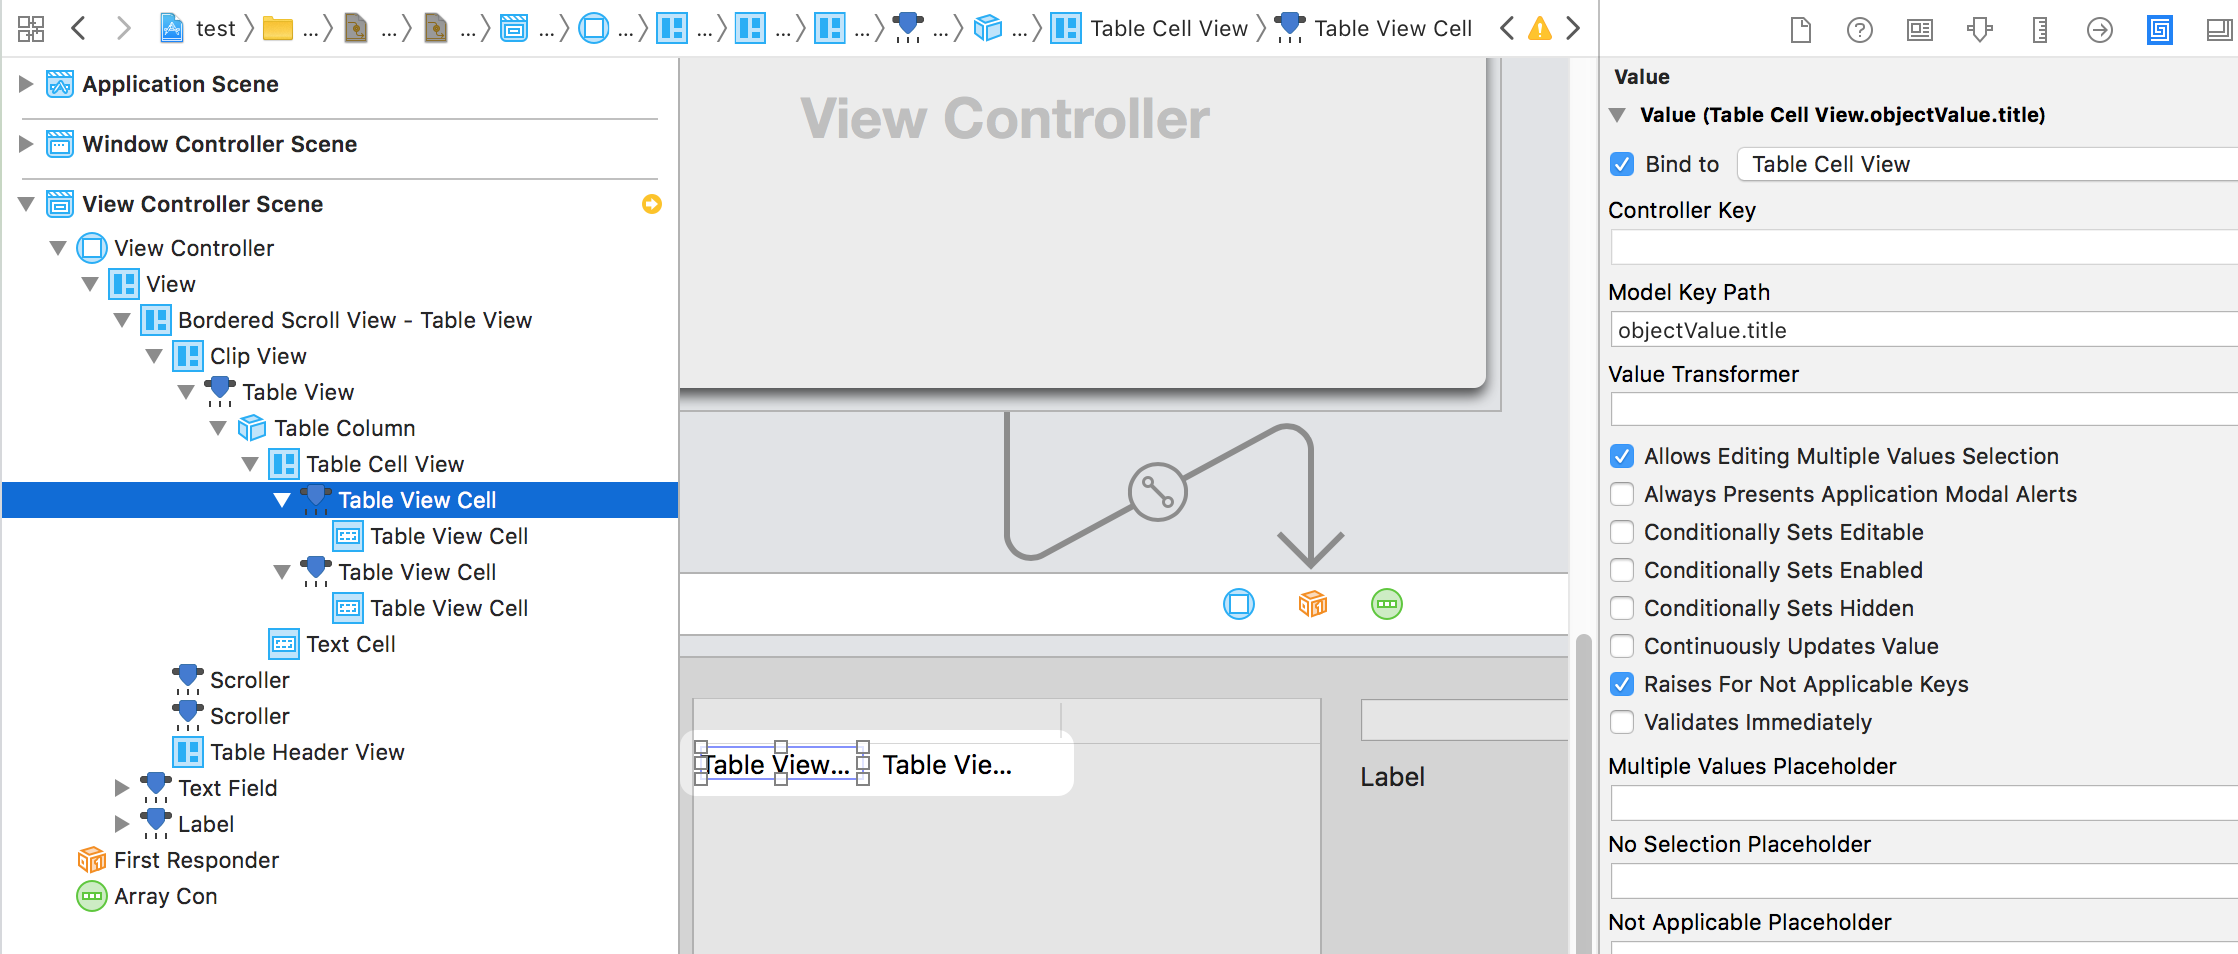
NSTableCellViewはCellの中に入っているNSTextFiledで設定する
Bind Toを選択する。ObjectValue.title
ObjectValue.の後にキー名(titleやbody)を書く
NSTextFiledのバインドの設定
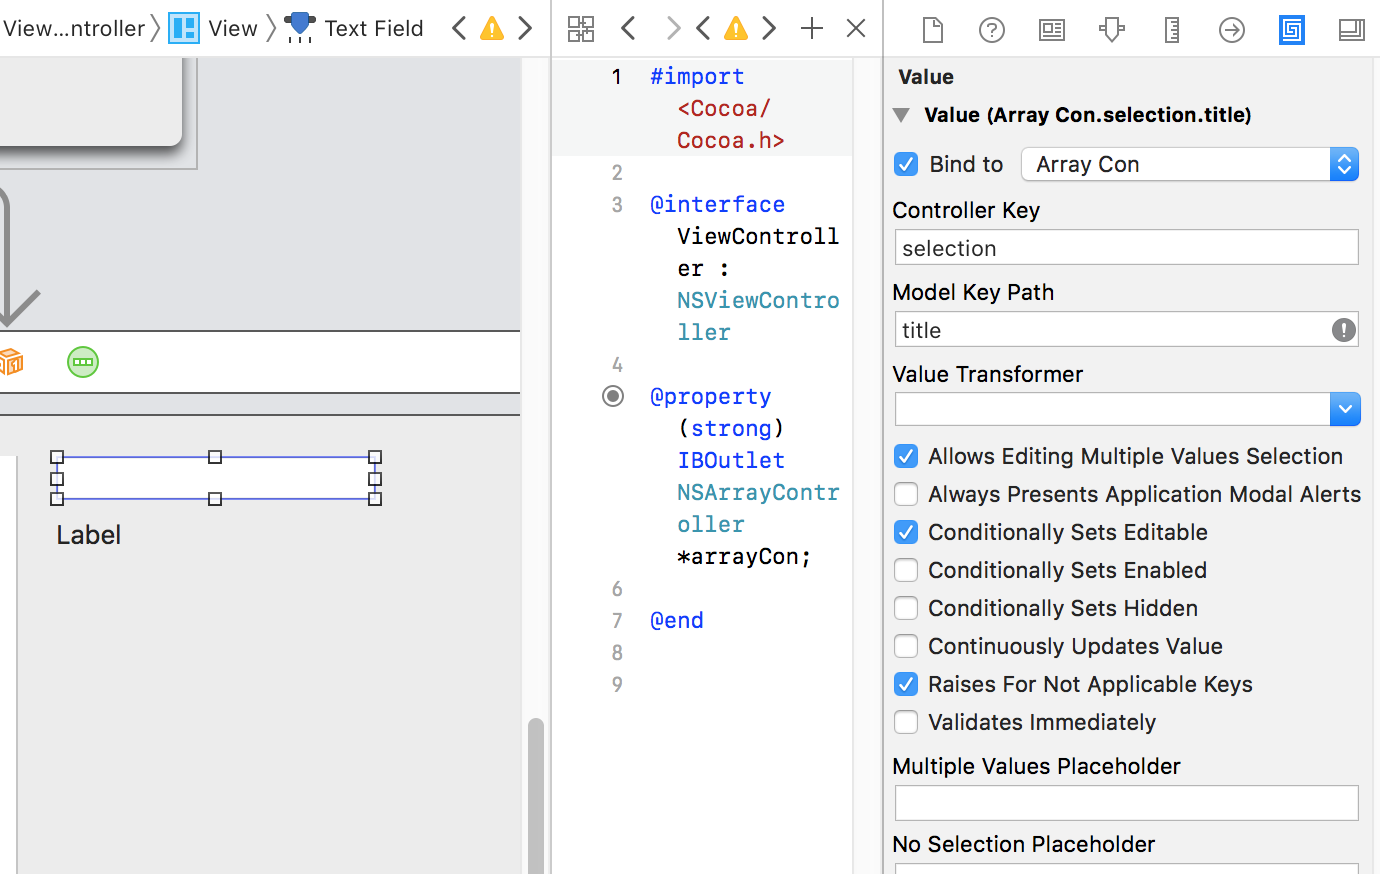
NSTextFiled単体のバインドの設定
ValueのところのBindToを選択する
ModelKeyPathにキー名(titleやbody)を記入する
Cocoaバインディングの設定は以上になります
- 投稿日:2019-03-10T05:43:28+09:00
【Swift】CollectionViewを再理解する
経緯
WWDC2018の中でCollectionViewに関するセッションがあり
今回はそれに関してまとめてみることで
改めてCollectionViewの動きに関して見直しをしてみました。
https://developer.apple.com/videos/play/wwdc2018/225/※実は昨年これに関して発表する予定でしたが、
風邪で倒れて発表できなかった経緯もあります
https://speakerdeck.com/shiz/06203つの主要コンセプト
CollectionViewを構成する要素として主に下記の3つがあります。
- Layout
- Datasource
- Delegate
UICollectionViewLayout
どこにコンテンツをどのように配置するのかを示します。
データなどは関わりません。https://developer.apple.com/documentation/uikit/uicollectionviewlayout
UICollectionViewDataSource
CollectionViewの内容を提供します。
セクションやアイテムの数なども管理します。https://developer.apple.com/documentation/uikit/uicollectionviewdatasource
UICollectionViewDelegate
オプショナルなプロトコルです。
CollectionViewに対するユーザのアクションに対応します。https://developer.apple.com/documentation/uikit/uicollectionviewdelegate
実装を通して理解を深める
以下ではFlowLayoutの実装を見ながら
ColletionViewの動きを見ていきたいと思います。UICollectionViewFlowLayout
UICollectionViewLayoutのサブクラスです。
UICollectionViewのデフォルトのレイアウトとはこれが指定されています。
縦や横に均等に並べるようなLine-Basedのデザインはこれでカバーできます。https://developer.apple.com/documentation/uikit/uicollectionviewflowlayout
UICollectionViewFlowLayoutのカスタマイズ(実装)
prepareメソッドをoverrideすることで簡単にカスタマイズすることができます。
prepareメソッド
https://developer.apple.com/documentation/uikit/uicollectionviewlayout/1617752-prepare
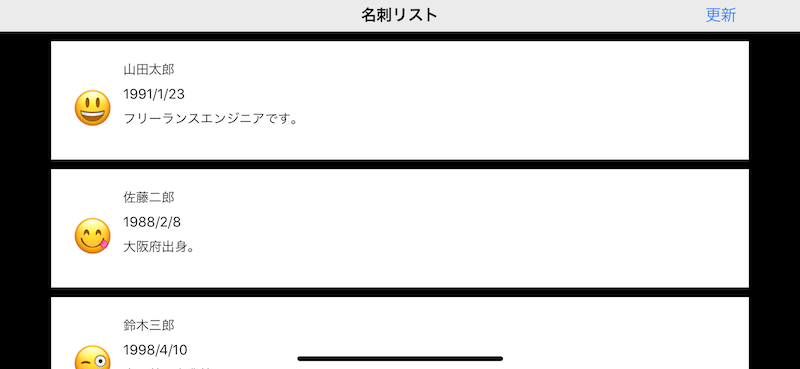
class ColumnFlowLayout: UICollectionViewFlowLayout {

    // After invalidateLayouts
    override func prepare() {
        super.prepare()

        guard let cv = collectionView else { return }
        self.itemSize = CGSize(width: cv.bounds.inset(by: cv.layoutMargins).size.width, height: 120.0)

        self.sectionInset = UIEdgeInsets(top: self.minimumInteritemSpacing, left: 0.0, bottom: 0.0, right: 0.0)
        self.sectionInsetReference = .fromSafeArea
    }
}
このメソッドはinvalidLayout発生する度に呼ばれます。
itemSizeの指定やsectionInsetsの指定をします。WWDCの発表の中では、
また、CollectionViewは横向きにした場合、
左右に対するsafeAreaの制約が効いていないように見え、self.sectionInsetReference = .fromSafeAreaを設定すると解消されると紹介されていましたが
実際試してみると
あってもなくても特に挙動が変わりませんでした
ドキュメントにも何も記載がないので謎です。itemsizeを可変にしてみる
https://developer.apple.com/documentation/uikit/uicollectionviewflowlayout/1617711-itemsize
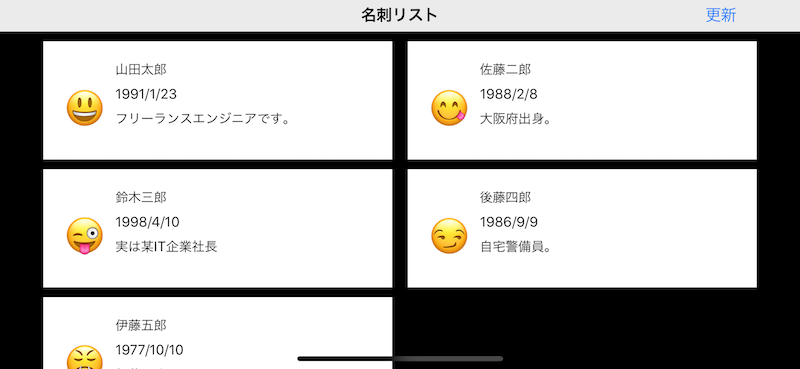
FlowaLayoutは
できる限り同じ行に列を詰めようとする性質があり
これを活用することでLandscape時のレイアウトを変更することができます。上記のprepareメソッドの場合は下記のようになりますが、
これを下記のようにitemSizeを設定することで
レイアウトが変わります。class ColumnFlowLayout: UICollectionViewFlowLayout { // After invalidateLayouts override func prepare() { super.prepare() guard let cv = collectionView else { return } // 一行で利用できる幅 let availableWidth = cv.bounds.inset(by: cv.layoutMargins).size.width // セルの最小幅を設定 let minColumnWidth = CGFloat(300.0) // 表示可能なカラム数を決定 let maxNumColumns = Int(availableWidth / minColumnWidth) // 1個1個のセルの幅を決定 let cellWidth = (availableWidth / CGFloat(maxNumColumns)).rounded(.down) self.itemSize = CGSize(width: cellWidth, height: 120.0) self.sectionInset = UIEdgeInsets(top: self.minimumInteritemSpacing, left: 0.0, bottom: 0.0, right: 0.0) self.sectionInsetReference = .fromSafeArea } }すると下記のようになります。
FlowLayoutには
できる限り同じ行にカラムを詰め込もうとする性質もあり
これを活用しています。UICollectionViewLayoutの継承
LineBaseのFlowLayoutでは対応仕切れないLayoutが必要な場合
UICollectionViewLayoutを継承します。基本的なメソッド
1つは上記でも出てきたprepareメソッドで
この中でUICollectionViewLayoutAttributesをメモリ上に保存したり
collectionViewContentSizeの計算を行います。collectionViewContentSize
// CollectionView全体のサイズ
override var collectionViewContentSize: CGSize
これはUIScrollView.contentSizeに設定され
スクロールの量を知るために必要です。layoutAttributesForItem
// IndexPathのアイテムのAttributesを返す override func layoutAttributesForItem(at indexPath: IndexPath) -> UICollectionViewLayoutAttributes?layoutAttributesForElements
// rectの範囲内に存在するアイテムのAttributesを返す override func layoutAttributesForElements(in rect: CGRect) -> [UICollectionViewLayoutAttributes]?shouldInvalidateLayout
shouldInvalidateLayoutはサイズや位置の変更があった場合に呼ばれ、
処理を加えることができます。結果としてtrueを返すとInvalidateLayoutが呼ばれ
レイアウトの再描画が起きます。
これはスクロール中もずっと呼ばれます。override func shouldInvalidateLayout(forBoundsChange newBounds: CGRect) -> Bool { guard let cv = collectionView else { return false } return !newBounds.size.equalTo(cv.bounds.size) }MosaicLayoutの例
UICollectionViewLayoutの継承の例として
簡単なモザイクアートのようなレイアウトを作成します。final class MosaicLayout: UICollectionViewLayout { var columns = MosaicColumns() // 全体のサイズ var contentBounds = CGRect.zero // 各セルの属性情報を保持 var cachedAttributes = [IndexPath: UICollectionViewLayoutAttributes]() // 今回は3カラム/行に限定 var numberOfColumns = 3 var rowHeight: CGFloat = 0.0 private var contentWidth: CGFloat { get { let insets = collectionView!.contentInset return collectionView!.bounds.width - (insets.left + insets.right) } } override var collectionViewContentSize: CGSize { get { let height = columns.smallestColumn.columnHeight return CGSize(width: contentWidth, height: height) } } override func shouldInvalidateLayout(forBoundsChange newBounds: CGRect) -> Bool { guard let cv = collectionView else { return false } return !newBounds.size.equalTo(cv.bounds.size) } override func layoutAttributesForItem(at indexPath: IndexPath) -> UICollectionViewLayoutAttributes? { return cachedAttributes[indexPath] } override func layoutAttributesForElements(in rect: CGRect) -> [UICollectionViewLayoutAttributes]? { return cachedAttributes.values.filter { (attributes) -> Bool in return rect.intersects(attributes.frame) } } override func prepare() { super.prepare() guard let _ = collectionView else { return } reset() createAttributes() } }layoutAttributesForElementsのパフォーマンス問題
さらに、WWDCの発表ではlayoutAttributesForElementsの検索処理の効率が悪いということで
バイナリー検索を用いてより高速に動くようにしています。minYの小さい順に属性の配列を並べることで、
最初にヒットした位置から横続きにどんどん調べていけば
欲しいデータが見つかるという考えです。サンプルなどがありませんでしたので
仮で実装してみました
(実装がシンプルなの今回はあまり違いは感じられませんでした)override func layoutAttributesForElements(in rect: CGRect) -> [UICollectionViewLayoutAttributes]? { var attributesArray = [UICollectionViewLayoutAttributes]() guard let firstMatchIndex = binarySearchAttributes(range: 0...cachedAttributes.endIndex, rect: rect) else { return attributesArray } for attributes in cachedAttributes[..<firstMatchIndex.item].reversed() { guard attributes.frame.maxY >= rect.minY else { break } attributesArray.append(attributes) } for attributes in cachedAttributes[firstMatchIndex.item...] { guard attributes.frame.minY <= rect.maxY else { break } attributesArray.append(attributes) } return attributesArray } private func binarySearchAttributes(range: ClosedRange<Int>, rect: CGRect) -> IndexPath? { var lower = range.lowerBound var upper = range.upperBound while (true) { let current = (lower + upper) / 2 let indexPath = IndexPath(item: current, section: 0) guard cachedAttributes.count > indexPath.item else { return nil } let attributes = cachedAttributes[indexPath.item] if rect.intersects(attributes.frame) { return indexPath } else if lower > upper { return nil } else { if attributes.frame.maxY < rect.minY { lower = current + 1 } else { upper = current - 1 } } } }アニメーション
最後にアニメーションについて考えていきます。
アニメーションに加えてセルの部分更新にも関わってくるので
一緒にみていきたいと思います。performBatchUpdates
https://developer.apple.com/documentation/uikit/uicollectionview/1618045-performbatchupdates
複数のアニメーションを同時に行う際は
performBatchUpdatesを使います。
これはアニメーションのアップデートを一律で行ってくれます。DataSourceの更新と
CollectionViewの更新を
updatesクロージャの中で定義します。collectionView.performBatchUpdates({ let movedPerson = people[3] people.remove(at: 3) people.remove(at: 2) people.insert(movedPerson, at: 0) collectionView.reloadItems(at: [IndexPath(item: 3, section: 0)]) collectionView.deleteItems(at: [IndexPath(item: 2, section: 0)]) collectionView.moveItem(at: IndexPath(item: 3, section: 0), to: IndexPath(item: 0, section: 0)) })これを実行するときれいに...エラーになります。
reason: 'attempt to delete and reload the same index path (<NSIndexPath: 0x6000015c82c0> {length = 2, path = 0 - 3})'エラーを見てみると
削除とリロードを同じIndexPath(item: 3, section: 0)に行おうとしていると書かれてあります。しかし
IndexPath(item: 3, section: 0)に対して削除を行っているつもりはありませんでした。
どこで何が起こっているのでしょうか?performBatchUpdatesの性質
performBatchUpdatesには以下の特徴があります。
CollectionViewの更新は順序が関係ない(メソッド内で決まっている)
つまり
deleteItemsを先に書こうが
insertItemsを先に書こうが
実行される順番としてはdelete->insertになります。下記は各アクションの一覧です。
アクション 特徴 IndexPathの参照タイミング Delete 降順にIndexPathを扱う バッチ更新前 Insert 昇順にIndexPathを扱う バッチ更新前 Move 移動前: バッチ更新前 移動後: バッチ更新後 Reload DeleteとInsertを合わせたもの バッチ更新前 Deleteは
更新が走る前のIndexPathを元に降順
にセルを削除し、Insertは
削除が実行されたあとのIndexPathを元に昇順に
セルの挿入を行うということのようです。さらにReloadに関してはDeleteとInsertを合わせたものになります。
主要なエラーの原因4つ
上記のアクションを踏まえた上で
performBatchUpdatesのエラーと考えられる原因として
以下の4つがあげられます。
- 移動させる対象アイテムのIndexPathと削除するIndexPathに一致するものがある
- 移動させる対象アイテムのIndexPathと追加するIndexPathに一致するものがある
- 同じ位置に2つ以上のアイテムを移動させようとしている
- 不正なIndexPathを参照している
今回の場合は
reloadItemsとmoveItemで同じIndexPathを参照していることが原因で
これがエラーの元になっています。解決策
reloadItemsの更新を別にすれば解決します。
UIView.performWithoutAnimation {

    // リロードは別の更新で行う
    collectionView.performBatchUpdates({
        collectionView.reloadItems(at: [IndexPath(item: 3, section: 0)])
    })
}

collectionView.performBatchUpdates({

    collectionView.deleteItems(at: [IndexPath(item: 2, section: 0)])
    collectionView.moveItem(at: IndexPath(item: 3, section: 0), to: IndexPath(item: 0, section: 0))
})
DataSourceの更新の問題点と注意点
先ほど、CollectionViewの更新は順序が関係ないと記載しましたが、DataSourceは逆に更新の順番が影響します。順番を間違えるとCollectionViewとデータの不整合が生じるなどエラーの原因になります。
そのため、DataSourceの更新は下記のルールに従って行うべきです。
DataSource Updatesの鉄則
・MoveはDelete+Insertに分解する
・全てのDeleteとInsertは一緒に更新する
・Deleteを最初に降順で行う
・Insertは最後に昇順で行う
先ほどの更新の場合だと下記のようになります。
UIView.performWithoutAnimation {
    collectionView.performBatchUpdates({
        collectionView.reloadItems(at: [IndexPath(item: 3, section: 0)])
    })
}

collectionView.performBatchUpdates({

    // 2 updates
    // index2の削除
    // index3のアイテムをindex0に移動する

    // delete item at index2
    // delete item at index3
    // insert item from index3 at index 0

    let movedPerson = people[3]

    // 降順で削除
    people.remove(at: 3)
    people.remove(at: 2)

    // 昇順で挿入
    people.insert(movedPerson, at: 0)

    collectionView.deleteItems(at: [IndexPath(item: 2, section: 0)])
    collectionView.moveItem(at: IndexPath(item: 3, section: 0), to: IndexPath(item: 0, section: 0))
})
Reload Dataは?
確かにあらゆる問題は解決できますが
アニメーションも何も起きず
かなり乱暴なやり方になりますので使わないのが得策です。今回はperformBatchUpdatesでしたが
他の同じような性質を持ったメソッドに関しても同様のことが言えると思いますので
ぜひドキュメントなどで各アクションが
いつどのタイミングで、何を参照してアクションを起こしているのか
確認してみると良いかもしれません。まとめ
UICollectionViewは頻繁に使われるViewですが
意外と知らなかったことがあるのではないかとWWDC2018の動画を見て感じました。ドキュメントやWWDCの動画を改めて見返すと
今まで意識していなかった箇所や発見があり
理解を深めることができるので良いなと思いましたもし何か間違いなどございましたら
ご指摘頂けますと幸いです
- 投稿日:2019-03-10T00:10:05+09:00
Alamofire JSONをPOST
パラメータにJSONを指定する例
curlだとこう
curl -X POST \
  http://api.exsample.com/api/v1/login \
  -H 'Content-Type: application/json' \
  -H 'cache-control: no-cache' \
  -d '{
    "auth": {
        "phone_number": "090xxxxxxxx",
        "password": "password"
    }
}'
Alamofireの場合
let parameters = [
    "auth": [
             "phone_number": "090xxxxxxxx",
             "password": "password"
            ]
    ]

Alamofire.request("http://api.exsample.com/api/v1/login",
  method: .post,
  parameters: parameters,
  encoding: JSONEncoding.default, headers: nil)
.responseJSON { response in
    if let result = response.result.value as? [String: Any] {
       print(result)
    }
}