- 投稿日:2019-03-10T18:50:22+09:00
Elastic Beanstalkで外部のRDSといい感じに接続する
背景
- Beanstalkで作成したEC2インスタンスとRDSのDBインスタンスを接続したい
- RDSまで全部Beanstalkで作ると環境を終了(削除と同じです)したときに一緒に全部消えてしまう
- RDSは消したくない
- Beanstalkの裏で動いているのはCloudFormationなので頑張れば何でもできる
- できるだけ簡易的な方法で実現したい
下準備
- Beanstalkで作成したものは環境終了時に一緒に消えてしまうので、消えてほしくないものをこちらで先に作っておきます。
RDS
- DBインスタンスをいい感じに作って起動しておきます。
- ここではMySQLとしておきます。
SecurityGroup
- あらかじめEC2とRDSをつなぐためのセキュリティグループを作成しておきます。
- 名前はたとえば
web-db-connectとしておきます。- このセキュリティグループにはインバウンドもアウトバウンドも何も定義しなくて大丈夫です。
- これを先ほど作成したDBインスタンスのセキュリティグループのインバウンドに、3306ポートで通信を許可するソースとして追加しておきます。
- ※ ソースに指定する場合はセキュリティグループの名前ではなくIDを指定する必要があります。
設定ファイル
- Elastic Beanstalkは
.ebextentionsディレクトリを作成し、そこにconfigファイルを置くことで、詳細な設定ができるようになります。- ここでDBインスタンスへの接続の設定ファイルなども作成しますが、使用する言語によっていろいろあるのでここでは省略します。
- 拡張子が
.configであればファイル名自体は何でもよく、一つにまとめる必要もないので、いい感じにファイルを分けると保守がしやすいです。- セキュリティグループについての設定ファイルを作成します。例えば
securitygroup.configとでもしておいて、そこに以下の内容を記述します。option_settings: - namespace: aws:autoscaling:launchconfiguration option_name: SecurityGroups value: web-db-connect
- ここで指定した
web-db-connectはもちろん先ほど作成したセキュリティグループの名前です。環境の作成
- あとはEB CLIにしたがって環境を作成します。
- 自動作成されるセキュリティグループとこちらで作成したセキュリティグループの両方がEC2インスタンスにアタッチされ、いい感じにRDSに接続できるようになっています。
- 裏で動いているのがCloudFormationであることからもわかるように、環境作成後に後から手で設定をいじると環境を終了するときに失敗してしまうのですが、あらかじめ外で作った置いたものを参照して環境を作成した場合だと問題なく終了できますし、外で作ったものが削除されてしまうこともありません。
- 投稿日:2019-03-10T18:48:29+09:00
Glueの使い方的な㊱(RDBからの読み取りを並列化する)
GlueでRDSから読み取りはデフォでは1つのExecutorで実行され、もしメモリ超過する場合は並列化しよう
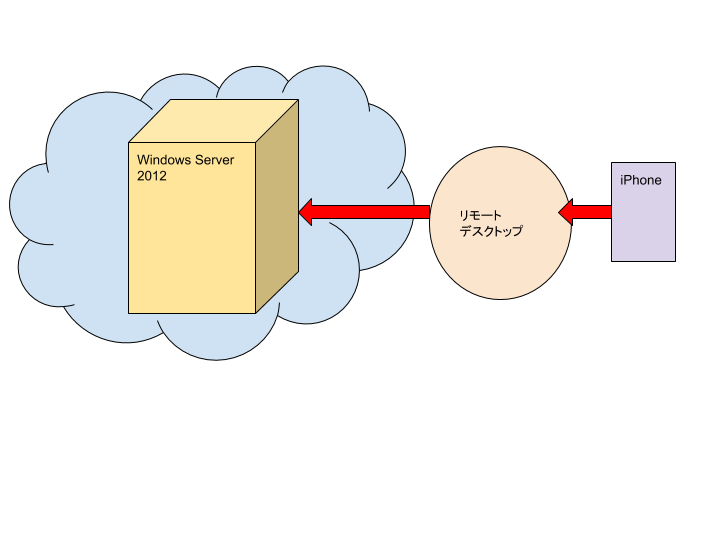
今回実施する構成図は以下のような感じになります。RedshiftをRDSに置き換えて見てください。
GlueからRDSのデータを読み込みparquetにしてS3に出力します。
全体の流れ
- 前準備
- Glueジョブ作成(デフォルト)
- ログ確認
- Glueジョブ作成(並列化)
- ログ確認
- 出力確認
前準備
自己参照セキュリティグループなどの作り方や意味合いはこちらを参照ください。
GlueのConnectionの作成もこちらをご参照ください
https://qiita.com/pioho07/items/05c912333e88788a1391
https://qiita.com/pioho07/items/3a07cf6dccb8dfe046ffRDSを作成し、テーブル、スキーマ、データインポート。作業は割愛します。クエリの確認のためRDSのパラメータグループでgeneral_logを1にしておく。
インポートデータは以下
- カラム情報 deviceid,uuid,appid,country,year,month,day,hour
※RDSはGlueの使い方的な㉟と同じものを利用
cvlogiphone,11111,001,JP,2017,12,14,12 android,11112,001,FR,2017,12,14,14 iphone,11113,009,FR,2017,12,16,21 iphone,11114,007,AUS,2017,12,17,18 other,11115,005,JP,2017,12,29,15 iphone,11116,001,JP,2017,12,15,11 pc,11118,001,FR,2017,12,01,01 pc,11117,009,FR,2017,12,02,18 iphone,11119,007,AUS,2017,11,21,14 other,11110,005,JP,2017,11,29,15 iphone,11121,001,JP,2017,11,11,12 android,11122,001,FR,2017,11,30,20 iphone,11123,009,FR,2017,11,14,14 iphone,11124,007,AUS,2017,12,17,14 iphone,11125,005,JP,2017,11,29,15 iphone,11126,001,JP,2017,12,19,08 android,11127,001,FR,2017,12,19,14 iphone,11128,009,FR,2017,12,09,04 iphone,11129,007,AUS,2017,11,30,14RDS側でselectして確認
MySQL [db]> select * from cvlog;
+----------+-------+-------+---------+------+-------+------+------+
| deviceid | uuid  | appid | country | year | month | day  | hour |
+----------+-------+-------+---------+------+-------+------+------+
| iphon    | 11111 |     1 | JP      | 2017 |    12 |   14 |   12 |
| andro    | 11112 |     1 | FR      | 2017 |    12 |   14 |   14 |
| iphon    | 11113 |     9 | FR      | 2017 |    12 |   16 |   21 |
| iphon    | 11114 |     7 | AUS     | 2017 |    12 |   17 |   18 |
| other    | 11115 |     5 | JP      | 2017 |    12 |   29 |   15 |
| iphon    | 11116 |     1 | JP      | 2017 |    12 |   15 |   11 |
| pc       | 11118 |     1 | FR      | 2017 |    12 |    1 |    1 |
| pc       | 11117 |     9 | FR      | 2017 |    12 |    2 |   18 |
| iphon    | 11119 |     7 | AUS     | 2017 |    11 |   21 |   14 |
| other    | 11110 |     5 | JP      | 2017 |    11 |   29 |   15 |
| iphon    | 11121 |     1 | JP      | 2017 |    11 |   11 |   12 |
| andro    | 11122 |     1 | FR      | 2017 |    11 |   30 |   20 |
| iphon    | 11123 |     9 | FR      | 2017 |    11 |   14 |   14 |
| iphon    | 11124 |     7 | AUS     | 2017 |    12 |   17 |   14 |
| iphon    | 11125 |     5 | JP      | 2017 |    11 |   29 |   15 |
| iphon    | 11126 |     1 | JP      | 2017 |    12 |   19 |    8 |
| andro    | 11127 |     1 | FR      | 2017 |    12 |   19 |   14 |
| iphon    | 11128 |     9 | FR      | 2017 |    12 |    9 |    4 |
| iphon    | 11129 |     7 | AUS     | 2017 |    11 |   30 |   14 |
+----------+-------+-------+---------+------+-------+------+------+
MySQL [db]> show create table cvlog\G *************************** 1. row *************************** Table: cvlog Create Table: CREATE TABLE `cvlog` ( `deviceid` varchar(5) DEFAULT NULL, `uuid` int(11) DEFAULT NULL, `appid` int(11) DEFAULT NULL, `country` varchar(5) DEFAULT NULL, `year` int(11) DEFAULT NULL, `month` int(11) DEFAULT NULL, `day` int(11) DEFAULT NULL, `hour` int(11) DEFAULT NULL ) ENGINE=InnoDB DEFAULT CHARSET=latin1Glueジョブ作成
以下のコードでジョブを作成し実行します。
RDS->S3se2_job21import sys from awsglue.transforms import * from awsglue.utils import getResolvedOptions from pyspark.context import SparkContext from awsglue.context import GlueContext from awsglue.job import Job ## @params: [JOB_NAME] args = getResolvedOptions(sys.argv, ['JOB_NAME']) sc = SparkContext() glueContext = GlueContext(sc) spark = glueContext.spark_session job = Job(glueContext) job.init(args['JOB_NAME'], args) datasource0 = glueContext.create_dynamic_frame.from_catalog(database = "se2", table_name = "se2_36_db_cvlog", transformation_ctx = "datasource0" ) applymapping1 = ApplyMapping.apply(frame = datasource0, mappings = [("country", "string", "country", "string"), ("month", "int", "month", "int"), ("hour", "int", "hour", "int"), ("year", "int", "year", "int"), ("appid", "int", "appid", "int"), ("deviceid", "string", "deviceid", "string"), ("uuid", "int", "uuid", "int"), ("day", "int", "day", "int")], transformation_ctx = "applymapping1") resolvechoice2 = ResolveChoice.apply(frame = applymapping1, choice = "make_struct", transformation_ctx = "resolvechoice2") dropnullfields3 = DropNullFields.apply(frame = resolvechoice2, transformation_ctx = "dropnullfields3") datasink4 = glueContext.write_dynamic_frame.from_options(frame = dropnullfields3, connection_type = "s3", connection_options = {"path": "s3://test-glue00/se2/out17"}, format = "parquet", transformation_ctx = "datasink4") job.commit()ログ確認
MySQL側のクエリログを確認すると、Glueから全件SELECTしている
MySQL [(none)]> select event_time, argument from mysql.general_log order by event_time desc \G

*************************** 32. row ***************************
event_time: 2019-03-10 08:57:02
  argument: SELECT `deviceid`,`uuid`,`appid`,`country`,`year`,`month`,`day`,`hour` FROM cvlog
Glueジョブ確認(並列化)
DynamicFrameReaderクラスのfrom_catalogのAdditional optionで、hashfieldを使う。
additional_options – AWS Glue に指定する追加のオプション。並列読み込みを実行する JDBC 接続を使用するには、hashfield、hashexpression、または hashpartitions オプションを設定できます。
今回はhashefieldキーに"country"を指定。(均等に分散しているキーが望ましい)
修正は、以下のオプションを追加したのみadditional_options = {"hashfield": "country"} )
- hashfield:文字列など数値以外の、指定したカラムをキーにして、ハッシュ化した値をwhereのキーにする
- hashexpression:数値の、指定したカラムをキーにして、ハッシュ化した値をwhereのキーにする
- hashpartitions:JDBC テーブルの並列読み込みの数を hashpartitions に設定します。このプロパティが設定されていない場合、デフォルト値は7
※末尾に公式ドキュメントのリンクあり
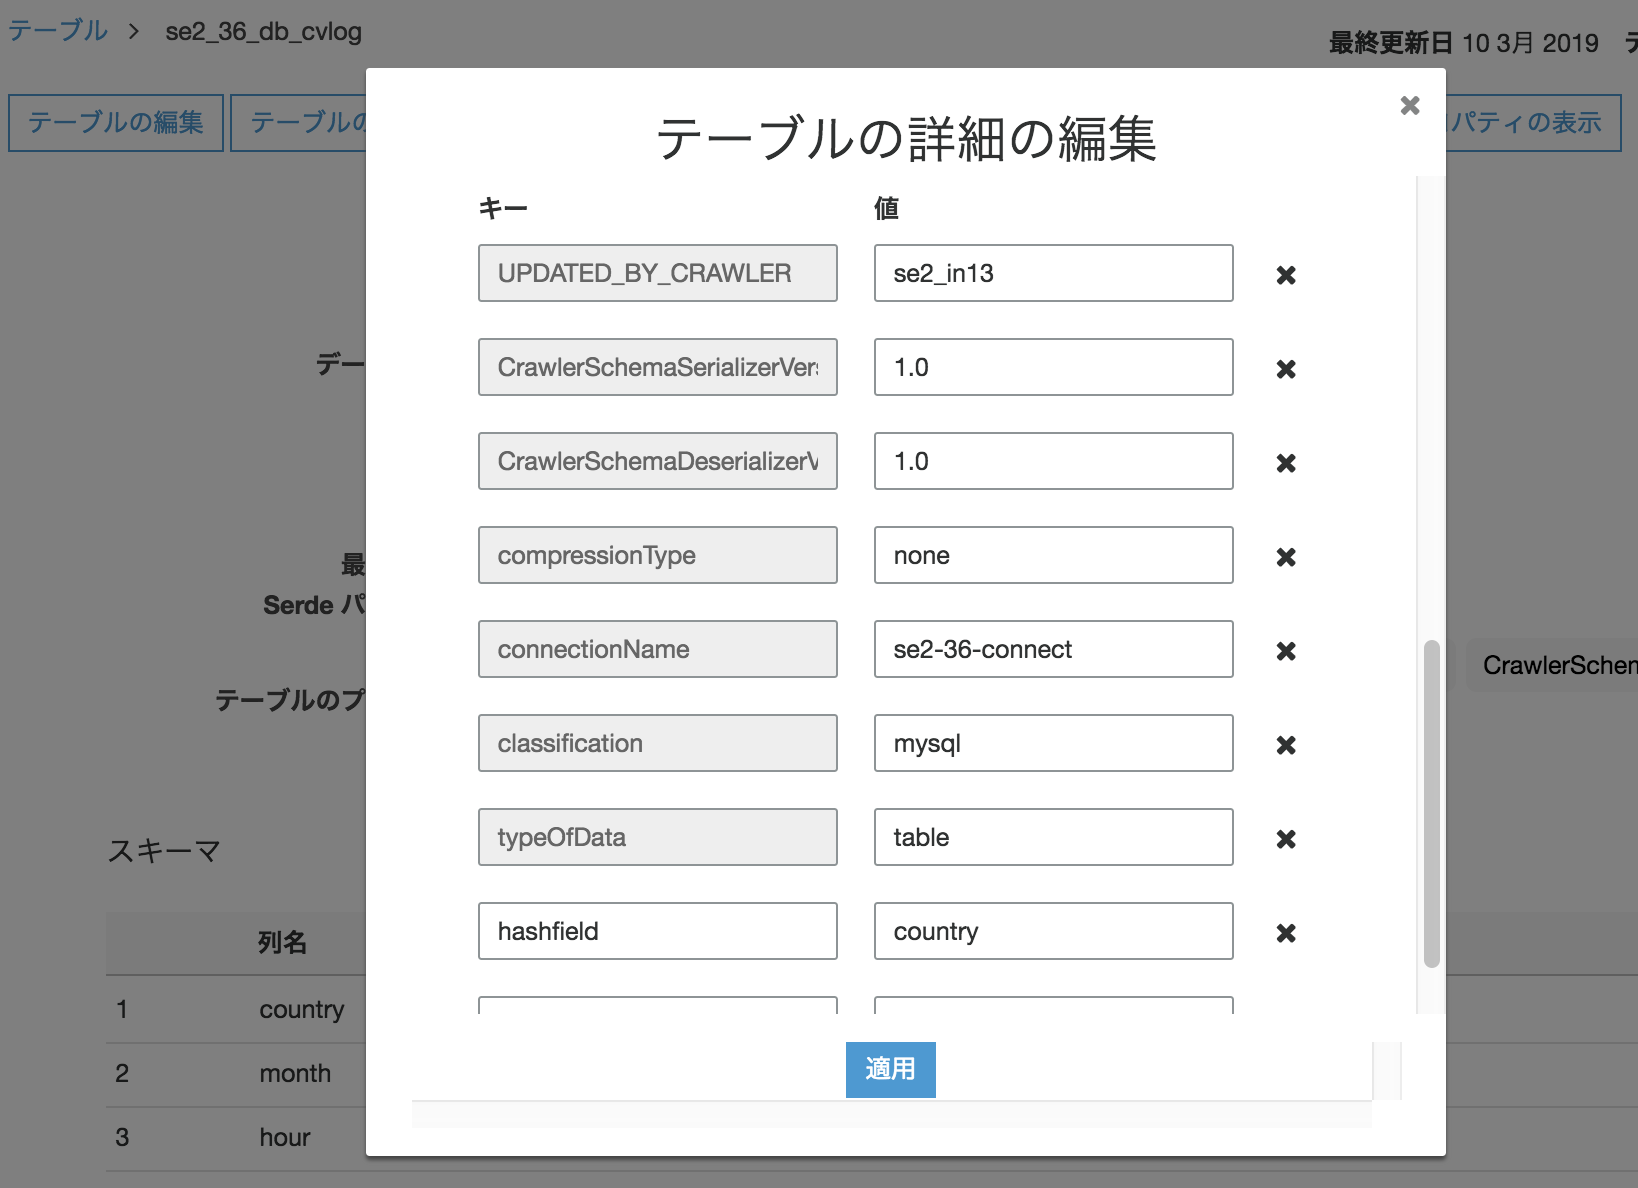
se2_job21import sys from awsglue.transforms import * from awsglue.utils import getResolvedOptions from pyspark.context import SparkContext from awsglue.context import GlueContext from awsglue.job import Job ## @params: [JOB_NAME] args = getResolvedOptions(sys.argv, ['JOB_NAME']) sc = SparkContext() glueContext = GlueContext(sc) spark = glueContext.spark_session job = Job(glueContext) job.init(args['JOB_NAME'], args) datasource0 = glueContext.create_dynamic_frame.from_catalog(database = "se2", table_name = "se2_36_db_cvlog", transformation_ctx = "datasource0", additional_options = {"hashfield": "country"} ) applymapping1 = ApplyMapping.apply(frame = datasource0, mappings = [("country", "string", "country", "string"), ("month", "int", "month", "int"), ("hour", "int", "hour", "int"), ("year", "int", "year", "int"), ("appid", "int", "appid", "int"), ("deviceid", "string", "deviceid", "string"), ("uuid", "int", "uuid", "int"), ("day", "int", "day", "int")], transformation_ctx = "applymapping1") resolvechoice2 = ResolveChoice.apply(frame = applymapping1, choice = "make_struct", transformation_ctx = "resolvechoice2") dropnullfields3 = DropNullFields.apply(frame = resolvechoice2, transformation_ctx = "dropnullfields3") datasink4 = glueContext.write_dynamic_frame.from_options(frame = dropnullfields3, connection_type = "s3", connection_options = {"path": "s3://test-glue00/se2/out17"}, format = "parquet", transformation_ctx = "datasink4") job.commit()本オプションはGlueのテーブルプロパティからの適用できる。DynamicFrameでなくても使えるということになる。
ログ確認
MySQL側のクエリログを確認すると、Glueからハッシュ化されたクエリを実行している(並列化されている)
MySQL [(none)]> select event_time, argument from mysql.general_log order by event_time desc \G


*************************** 116. row ***************************
event_time: 2019-03-10 12:53:11
  argument: SELECT `deviceid`,`uuid`,`appid`,`country`,`year`,`month`,`day`,`hour` FROM (select * from cvlog WHERE CONV(SUBSTRING(MD5(CONCAT('',country)), -8, 8), 16, 10) % 7 = 2) as cvlog
*************************** 117. row ***************************
event_time: 2019-03-10 12:53:11
  argument: SELECT `deviceid`,`uuid`,`appid`,`country`,`year`,`month`,`day`,`hour` FROM (select * from cvlog WHERE CONV(SUBSTRING(MD5(CONCAT('',country)), -8, 8), 16, 10) % 7 = 3) as cvlog
*************************** 118. row ***************************
event_time: 2019-03-10 12:53:11
  argument: SELECT `deviceid`,`uuid`,`appid`,`country`,`year`,`month`,`day`,`hour` FROM (select * from cvlog WHERE CONV(SUBSTRING(MD5(CONCAT('',country)), -8, 8), 16, 10) % 7 = 1) as cvlog
*************************** 119. row ***************************
event_time: 2019-03-10 12:53:11
  argument: SELECT `deviceid`,`uuid`,`appid`,`country`,`year`,`month`,`day`,`hour` FROM (select * from cvlog WHERE CONV(SUBSTRING(MD5(CONCAT('',country)), -8, 8), 16, 10) % 7 = 0) as cvlog
*************************** 139. row ***************************
event_time: 2019-03-10 12:53:11
  argument: SELECT `deviceid`,`uuid`,`appid`,`country`,`year`,`month`,`day`,`hour` FROM (select * from cvlog WHERE CONV(SUBSTRING(MD5(CONCAT('',country)), -8, 8), 16, 10) % 7 = 4) as cvlog
*************************** 143. row ***************************
event_time: 2019-03-10 12:53:11
  argument: SELECT `deviceid`,`uuid`,`appid`,`country`,`year`,`month`,`day`,`hour` FROM (select * from cvlog WHERE CONV(SUBSTRING(MD5(CONCAT('',country)), -8, 8), 16, 10) % 7 = 6) as cvlog
*************************** 155. row ***************************
event_time: 2019-03-10 12:53:11
  argument: SELECT `deviceid`,`uuid`,`appid`,`country`,`year`,`month`,`day`,`hour` FROM (select * from cvlog WHERE CONV(SUBSTRING(MD5(CONCAT('',country)), -8, 8), 16, 10) % 7 = 5) as cvlog
*************************** 165. row ***************************
event_time: 2019-03-10 12:53:07
  argument: SELECT * FROM (select * from cvlog WHERE CONV(SUBSTRING(MD5(CONCAT('',country)), -8, 8), 16, 10) % 7 = 1) as cvlog WHERE 1=0
*************************** 166. row ***************************
event_time: 2019-03-10 12:53:07
  argument: SELECT * FROM (select * from cvlog WHERE CONV(SUBSTRING(MD5(CONCAT('',country)), -8, 8), 16, 10) % 7 = 1) as cvlog WHERE 1=0
*************************** 176. row ***************************
event_time: 2019-03-10 12:53:07
  argument: SELECT * FROM (select * from cvlog WHERE CONV(SUBSTRING(MD5(CONCAT('',country)), -8, 8), 16, 10) % 7 = 2) as cvlog WHERE 1=0
*************************** 177. row ***************************
event_time: 2019-03-10 12:53:07
  argument: SELECT * FROM (select * from cvlog WHERE CONV(SUBSTRING(MD5(CONCAT('',country)), -8, 8), 16, 10) % 7 = 2) as cvlog WHERE 1=0
*************************** 187. row ***************************
event_time: 2019-03-10 12:53:07
  argument: SELECT * FROM (select * from cvlog WHERE CONV(SUBSTRING(MD5(CONCAT('',country)), -8, 8), 16, 10) % 7 = 3) as cvlog WHERE 1=0
*************************** 188. row ***************************
event_time: 2019-03-10 12:53:07
  argument: SELECT * FROM (select * from cvlog WHERE CONV(SUBSTRING(MD5(CONCAT('',country)), -8, 8), 16, 10) % 7 = 3) as cvlog WHERE 1=0
*************************** 198. row ***************************
event_time: 2019-03-10 12:53:07
  argument: SELECT * FROM (select * from cvlog WHERE CONV(SUBSTRING(MD5(CONCAT('',country)), -8, 8), 16, 10) % 7 = 4) as cvlog WHERE 1=0
*************************** 199. row ***************************
event_time: 2019-03-10 12:53:07
  argument: SELECT * FROM (select * from cvlog WHERE CONV(SUBSTRING(MD5(CONCAT('',country)), -8, 8), 16, 10) % 7 = 4) as cvlog WHERE 1=0
*************************** 209. row ***************************
event_time: 2019-03-10 12:53:07
  argument: SELECT * FROM (select * from cvlog WHERE CONV(SUBSTRING(MD5(CONCAT('',country)), -8, 8), 16, 10) % 7 = 5) as cvlog WHERE 1=0
*************************** 210. row ***************************
event_time: 2019-03-10 12:53:07
  argument: SELECT * FROM (select * from cvlog WHERE CONV(SUBSTRING(MD5(CONCAT('',country)), -8, 8), 16, 10) % 7 = 5) as cvlog WHERE 1=0
*************************** 220. row ***************************
event_time: 2019-03-10 12:53:07
  argument: SELECT * FROM (select * from cvlog WHERE CONV(SUBSTRING(MD5(CONCAT('',country)), -8, 8), 16, 10) % 7 = 6) as cvlog WHERE 1=0
*************************** 221. row ***************************
event_time: 2019-03-10 12:53:07
  argument: SELECT * FROM (select * from cvlog WHERE CONV(SUBSTRING(MD5(CONCAT('',country)), -8, 8), 16, 10) % 7 = 6) as cvlog WHERE 1=0
*************************** 231. row ***************************
event_time: 2019-03-10 12:53:06
  argument: SELECT * FROM (select * from cvlog WHERE CONV(SUBSTRING(MD5(CONCAT('',country)), -8, 8), 16, 10) % 7 = 0) as cvlog WHERE 1=0
*************************** 232. row ***************************
event_time: 2019-03-10 12:53:06
  argument: SELECT * FROM (select * from cvlog WHERE CONV(SUBSTRING(MD5(CONCAT('',country)), -8, 8), 16, 10) % 7 = 0) as cvlog WHERE 1=0
件数が少なすぎて分かりづらいが分散してる
MySQL [db]> SELECT `deviceid`,`uuid`,`appid`,`country`,`year`,`month`,`day`,`hour` FROM (select * from cvlog WHERE CONV(SUBSTRING(MD5(CONCAT('',country)), -8, 8), 16, 10) % 7 = 0) as cvlog
    -> ;
+----------+-------+-------+---------+------+-------+------+------+
| deviceid | uuid  | appid | country | year | month | day  | hour |
+----------+-------+-------+---------+------+-------+------+------+
| andro    | 11112 |     1 | FR      | 2017 |    12 |   14 |   14 |
| iphon    | 11113 |     9 | FR      | 2017 |    12 |   16 |   21 |
| iphon    | 11114 |     7 | AUS     | 2017 |    12 |   17 |   18 |
| pc       | 11118 |     1 | FR      | 2017 |    12 |    1 |    1 |
| pc       | 11117 |     9 | FR      | 2017 |    12 |    2 |   18 |
| iphon    | 11119 |     7 | AUS     | 2017 |    11 |   21 |   14 |
| andro    | 11122 |     1 | FR      | 2017 |    11 |   30 |   20 |
| iphon    | 11123 |     9 | FR      | 2017 |    11 |   14 |   14 |
| iphon    | 11124 |     7 | AUS     | 2017 |    12 |   17 |   14 |
| andro    | 11127 |     1 | FR      | 2017 |    12 |   19 |   14 |
| iphon    | 11128 |     9 | FR      | 2017 |    12 |    9 |    4 |
| iphon    | 11129 |     7 | AUS     | 2017 |    11 |   30 |   14 |
+----------+-------+-------+---------+------+-------+------+------+
12 rows in set (0.00 sec)

MySQL [db]> SELECT * FROM (select * from cvlog WHERE CONV(SUBSTRING(MD5(CONCAT('',country)), -8, 8), 16, 10) % 7 = 1) as cvlog WHERE 1=0;
Empty set (0.00 sec)

MySQL [db]> SELECT `deviceid`,`uuid`,`appid`,`country`,`year`,`month`,`day`,`hour` FROM (select * from cvlog WHERE CONV(SUBSTRING(MD5(CONCAT('',country)), -8, 8), 16, 10) % 7 = 1) as cvlog;
+----------+-------+-------+---------+------+-------+------+------+
| deviceid | uuid  | appid | country | year | month | day  | hour |
+----------+-------+-------+---------+------+-------+------+------+
| iphon    | 11111 |     1 | JP      | 2017 |    12 |   14 |   12 |
| other    | 11115 |     5 | JP      | 2017 |    12 |   29 |   15 |
| iphon    | 11116 |     1 | JP      | 2017 |    12 |   15 |   11 |
| other    | 11110 |     5 | JP      | 2017 |    11 |   29 |   15 |
| iphon    | 11121 |     1 | JP      | 2017 |    11 |   11 |   12 |
| iphon    | 11125 |     5 | JP      | 2017 |    11 |   29 |   15 |
| iphon    | 11126 |     1 | JP      | 2017 |    12 |   19 |    8 |
+----------+-------+-------+---------+------+-------+------+------+
7 rows in set (0.00 sec)

MySQL [db]> SELECT * FROM (select * from cvlog WHERE CONV(SUBSTRING(MD5(CONCAT('',country)), -8, 8), 16, 10) % 7 = 2) as cvlog WHERE 1=0;
Empty set (0.00 sec)

MySQL [db]> SELECT `deviceid`,`uuid`,`appid`,`country`,`year`,`month`,`day`,`hour` FROM (select * from cvlog WHERE CONV(SUBSTRING(MD5(CONCAT('',country)), -8, 8), 16, 10) % 7 = 2) as cvlog;
出力確認
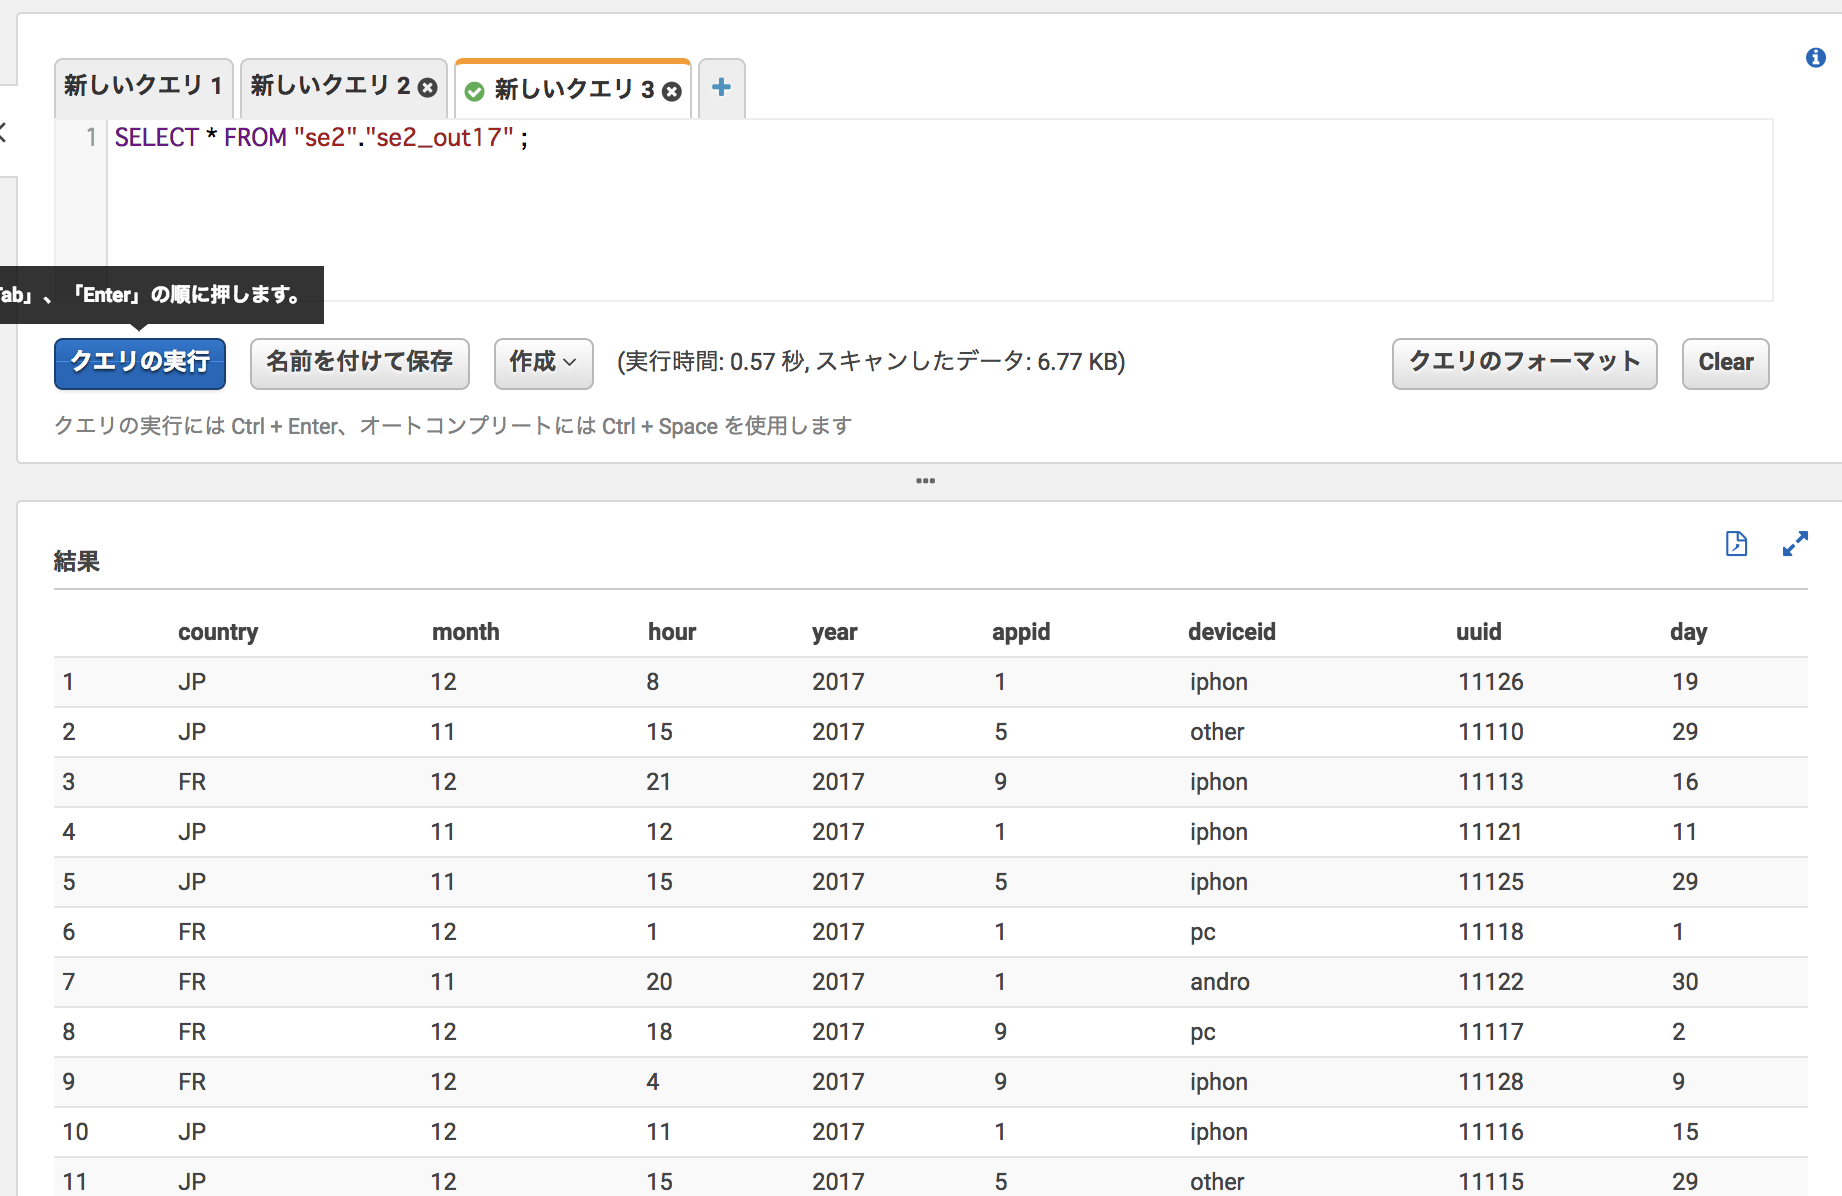
Athenaで確認し、どちらのGlueジョブでも結果は変わらない
こちらも是非
JDBC テーブルから並列読み取り
https://docs.aws.amazon.com/ja_jp/glue/latest/dg/run-jdbc-parallel-read-job.htmlDynamicFrameReader クラス
https://docs.aws.amazon.com/ja_jp/glue/latest/dg/aws-glue-api-crawler-pyspark-extensions-dynamic-frame-reader.htmlGlueの使い方まとめ
https://qiita.com/pioho07/items/32f76a16cbf49f9f712f

- 投稿日:2019-03-10T14:41:26+09:00
Amazon AthenaでSELECTするとHIVE_INVALID_METADATA
エラー内容
Amazon Athenaテーブル作成・パーティションのロードまでは成功するが、例えばプレビューなどでSELECTをすると以下のエラーとなる
HIVE_INVALID_METADATA: org.apache.hadoop.hive.serde2.lazy.LazySimpleSerDe: columns has 49 elements while columns.types has 48 elements!
定義したものと実際のデータがカラム数がズレているようなエラーですが、合っているはず・・という状況
解決策
列名を全て英数字にしたらエラーが発生しなくなりました。
テーブルの列名にマルチバイトが含まれると、上記のエラーになる場合がある様子です。
(どのマルチバイトが邪魔したかは追えてません)日本語の項目名が付いたものをデータレイクとしてS3に放り込みたかったりするので、別の解決策か原因があると良いのですが。
- 投稿日:2019-03-10T14:08:29+09:00
Amazon SageMakerのチュートリアルを触ってみる
はじめに
Amazon SageMakerを触ってみようと思い、チュートリアルを触ってみた。
そのときに詰まったポイントなどを簡単にまとめています。チュートリアル
チュートリアルはこちら。
https://aws.amazon.com/jp/getting-started/tutorials/build-train-deploy-machine-learning-model-sagemaker/#
コードをコピペするだけなので、よく分からないうちにものが完成します。笑詰まったポイント① リージョン
チュートリアルの3c.に書かれている以下のプログラム、
「東京」リージョンで実行するとエラーになりました。
リージョンを「オレゴン」に変えて実施したところ、エラーになりませんでした。
なんでだろう?# import libraries import boto3, re, sys, math, json, os, sagemaker, urllib.request from sagemaker import get_execution_role import numpy as np import pandas as pd import matplotlib.pyplot as plt from IPython.display import Image from IPython.display import display from time import gmtime, strftime from sagemaker.predictor import csv_serializer # Define IAM role role = get_execution_role() prefix = 'sagemaker/DEMO-xgboost-dm' containers = {'us-west-2': '433757028032.dkr.ecr.us-west-2.amazonaws.com/xgboost:latest', 'us-east-1': '811284229777.dkr.ecr.us-east-1.amazonaws.com/xgboost:latest', 'us-east-2': '825641698319.dkr.ecr.us-east-2.amazonaws.com/xgboost:latest', 'eu-west-1': '685385470294.dkr.ecr.eu-west-1.amazonaws.com/xgboost:latest'} # each region has its XGBoost container my_region = boto3.session.Session().region_name # set the region of the instance print("Success - the MySageMakerInstance is in the " + my_region + " region. You will use the " + containers[my_region] + " container for your SageMaker endpoint.")詰まったポイント②
3d.に書かれているコード。
bucket_name = 'your_s3_bucket_name' # <--- change this variable to a unique name for your bucket上記のバケット名を修正する必要があったので、
bucket_name = 'SageMakerXXXX' # <--- change this variable to a unique name for your bucketとしたら、エラーになりました↓
S3 error: An error occurred (InvalidBucketName) when calling the CreateBucket operation: The specified bucket is not valid.原因は、S3バケットの命名規則。
https://docs.aws.amazon.com/ja_jp/AmazonS3/latest/dev/BucketRestrictions.html
- 大文字またはアンダースコアをバケット名に含めることはできません。
- 2018 年 3 月 1 日、世界中のすべての AWS リージョンで使用されている命名規則と一致するように、米国東部(バージニア北部) リージョンの S3 バケットの命名規則を更新しました。現在 Amazon S3 では、大文字やアンダースコアを含むバケット名の作成がサポートされていません。
バケット名を
SageMakerXXXX→sagemakerXXXに修正したところ、
S3 bucket created successfullyとなりました。
- 投稿日:2019-03-10T14:08:29+09:00
Amazon SageMakerのチュートリアルを触ってみた
はじめに
Amazon SageMakerを触ってみようと思い、AWSのチュートリアルを触ってみた。
そのときに詰まったポイントなどを簡単にまとめています。チュートリアル
チュートリアルはこちら。
https://aws.amazon.com/jp/getting-started/tutorials/build-train-deploy-machine-learning-model-sagemaker/#
コードをコピペするだけなので、よく分からないうちにものが完成します。笑
10分程度で終わりますし、とりあえず雰囲気は掴めますが、詳細はあまり期待しない方で良さそうです。詰まったポイント① リージョン
チュートリアルの3c.に書かれている以下のプログラム、
「東京」リージョンで実行するとエラーになりました。
リージョンを「オレゴン」に変えて実施したところ、エラーになりませんでした。
なんでだろう?# import libraries import boto3, re, sys, math, json, os, sagemaker, urllib.request from sagemaker import get_execution_role import numpy as np import pandas as pd import matplotlib.pyplot as plt from IPython.display import Image from IPython.display import display from time import gmtime, strftime from sagemaker.predictor import csv_serializer # Define IAM role role = get_execution_role() prefix = 'sagemaker/DEMO-xgboost-dm' containers = {'us-west-2': '433757028032.dkr.ecr.us-west-2.amazonaws.com/xgboost:latest', 'us-east-1': '811284229777.dkr.ecr.us-east-1.amazonaws.com/xgboost:latest', 'us-east-2': '825641698319.dkr.ecr.us-east-2.amazonaws.com/xgboost:latest', 'eu-west-1': '685385470294.dkr.ecr.eu-west-1.amazonaws.com/xgboost:latest'} # each region has its XGBoost container my_region = boto3.session.Session().region_name # set the region of the instance print("Success - the MySageMakerInstance is in the " + my_region + " region. You will use the " + containers[my_region] + " container for your SageMaker endpoint.")詰まったポイント② バケット名
3d.に書かれているコード。
bucket_name = 'your_s3_bucket_name' # <--- change this variable to a unique name for your bucket上記のバケット名を修正する必要があったので、
bucket_name = 'SageMakerXXXX' # <--- change this variable to a unique name for your bucketとしたら、エラーになりました↓
S3 error: An error occurred (InvalidBucketName) when calling the CreateBucket operation: The specified bucket is not valid.原因は、S3バケットの命名規則。
https://docs.aws.amazon.com/ja_jp/AmazonS3/latest/dev/BucketRestrictions.html
- 大文字またはアンダースコアをバケット名に含めることはできません。
- 2018 年 3 月 1 日、世界中のすべての AWS リージョンで使用されている命名規則と一致するように、米国東部(バージニア北部) リージョンの S3 バケットの命名規則を更新しました。現在 Amazon S3 では、大文字やアンダースコアを含むバケット名の作成がサポートされていません。
バケット名を
SageMakerXXXX→sagemakerXXXに修正したところ、
S3 bucket created successfullyとなりました。
- 投稿日:2019-03-10T14:04:07+09:00
ECS service discovery によって作られた Route53 zone を削除する
aws --profile project-pacify --region ap-northeast-1 servicediscovery list-namespaces
{
    "Services": [
        {
            "Id": "srv-szht3ggfxhxgu2if",
            "Arn": "arn:aws:servicediscovery:ap-northeast-1:845095852924:service/srv-szht3ggfxhxgu2if",
            "Name": "pacify-service"
        }
    ]
}

aws --profile project-pacify --region ap-northeast-1 servicediscovery delete-service --id=srv-szht3ggfxhxgu2if


aws --profile project-pacify --region ap-northeast-1 servicediscovery list-namespaces
{
    "Namespaces": [
        {
            "Id": "ns-t3u6vsx72jozucai",
            "Arn": "arn:aws:servicediscovery:ap-northeast-1:845095852924:namespace/ns-t3u6vsx72jozucai",
            "Name": "local",
            "Type": "DNS_PRIVATE"
        }
    ]
}
aws --profile project-pacify --region ap-northeast-1 servicediscovery delete-namespace --id=ns-t3u6vsx72jozucai
{
    "OperationId": "pckrnx3xdd5jziyqvanrx6ll3uud3gwa-jt2ga4j5"
}
参考
- 投稿日:2019-03-10T11:40:11+09:00
AWS StepFunctions を使った機械学習ワークフローの管理
本記事でやること
AWS StepFunctionsを使って、トレーニングからエンドポイントの作成までの以下ワークフローを作成する。
- 1.S3にトレーニング用のデータファイルが存在しているのかのチェック
- 2.SageMakerによるトレーニングジョブの開始
- 3.トレーニングジョブが開始された事をSlackに通知
- 4.トレーニングが終了するまでステータスを監視してポーリング
- 5.トレーニングが終了した事をSlackに通知
- 6.学習モデルのデプロイ、エンドポイントの作成(または更新)
- 7.エンドポイントが作成されるまでステータスを監視してポーリング
- 8.エンドポイントが作成(または更新)された事をSlackに通知
上記のワークフローをCloudFormationを使って作成する。
AWS公式が公開しているワークフローを参考にして作成をしております。
(トレーニングデータを置いているS3のPrefixなど想定しているケースが異なる箇所があるので所々改変して作成しております)本記事でやらないことは以下の通りなので、私が以前書いた記事を参照してください。
- トレーニングジョブ用のDocker imageのAWS ECRへのPush(こちらを参照してください)
- 各種IAMの設定
また、今回書いたコードはGithubに上げておりますので、適宜ご参照して頂ければと思います。
対象読者
- AWS SageMakerを使ってトレーニングや推論までを行なった事がある方
- AWS StepFunctionsに関して一通りの知識がある方
使用言語
- Python 3.6.3
想定ケース
- トレーニングを行う対象のデータは、前日に作成されたファイルを使用する
- S3のPrefix及びデータファイル名は以下の構成
input-data-trainingなどのフォルダ以下に日付のフォルダを作成する。- トレーニングを行う日付は、StepFunctions実行時に環境変数として与える。
bucket
  ├── input-data-training
  │    └── YYYY-MM-DD
  │          └── multiclass
  │               └── iris.csv # 対象のデータファイル
  │
  ├── input-data-validation
  │    └── YYYY-MM-DD
  │          └── multiclass
  │               └── iris.csv # 対象のデータファイル
  ├── input-data-prediction
  │    └── YYYY-MM-DD
  │          └── multiclass
  │               └── iris.csv # 対象のデータファイル
  └── output-model
       └── YYYY-MM-DD
             └── multiclass
                  └── training-job-name
                       └── output
                             └── model.tar.gz # 学習モデル
使用するファイル及びフォルダの構成
StepFunctionsをCloudformationで作成する際に使用するファイルと構成は以下の様になります。
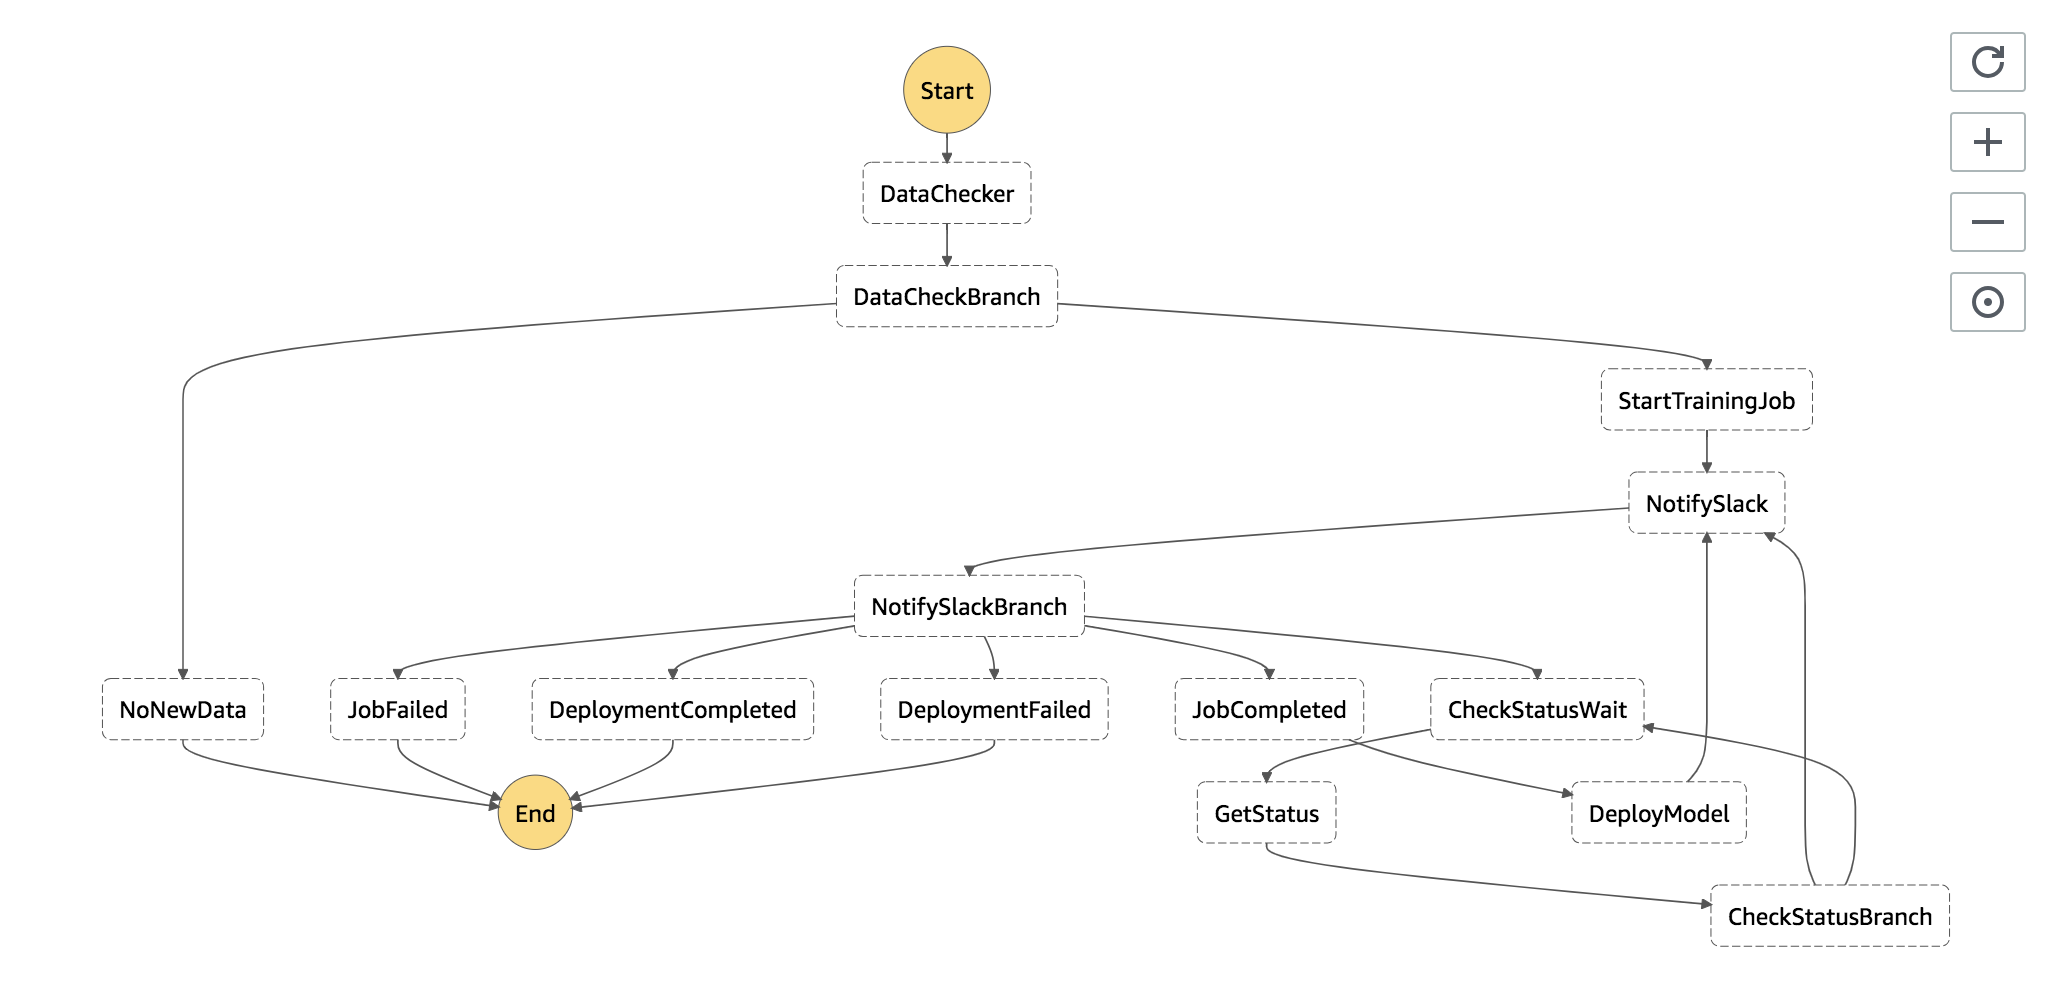
最初にlambda_scriptsの説明を行い。その後に、Stepfunctionsの定義ファイルやCloudformationのテンプレートファイルの説明を行います。. ├── cloudformation │ ├── cloudformation.yml # cloudformation定義用ファイル │ └── cloudformation.yml.tpl # cloudformation定義用ファイルのテンプレート │ ├── create-stack.sh # cloudformationのスタック作成ファイル ├── delete-stack.sh # cloudformationのスタック削除ファイル │ ├── formation_config_creator.py # cloudformationテンプレートファイルにレンダリングするファイル │ ├── lambda_scripts │ ├── data_checker.py # トレーニング用データファイルの存在を確認 │ ├── deploy_model.py # 学習モデルのデプロイ~エンドポイントの作成 │ ├── get_status.py # SageMaker上でのトレーニングジョブ・エンドポイント作成のステータスを取得 │ ├── notify_slack.py # slack通知 │ └── start_training_job.py # トレーニングジョブの開始 │ └── stepfunctions └── state_machine.json # StepFunctionsの定義今回作成するワークフローの説明
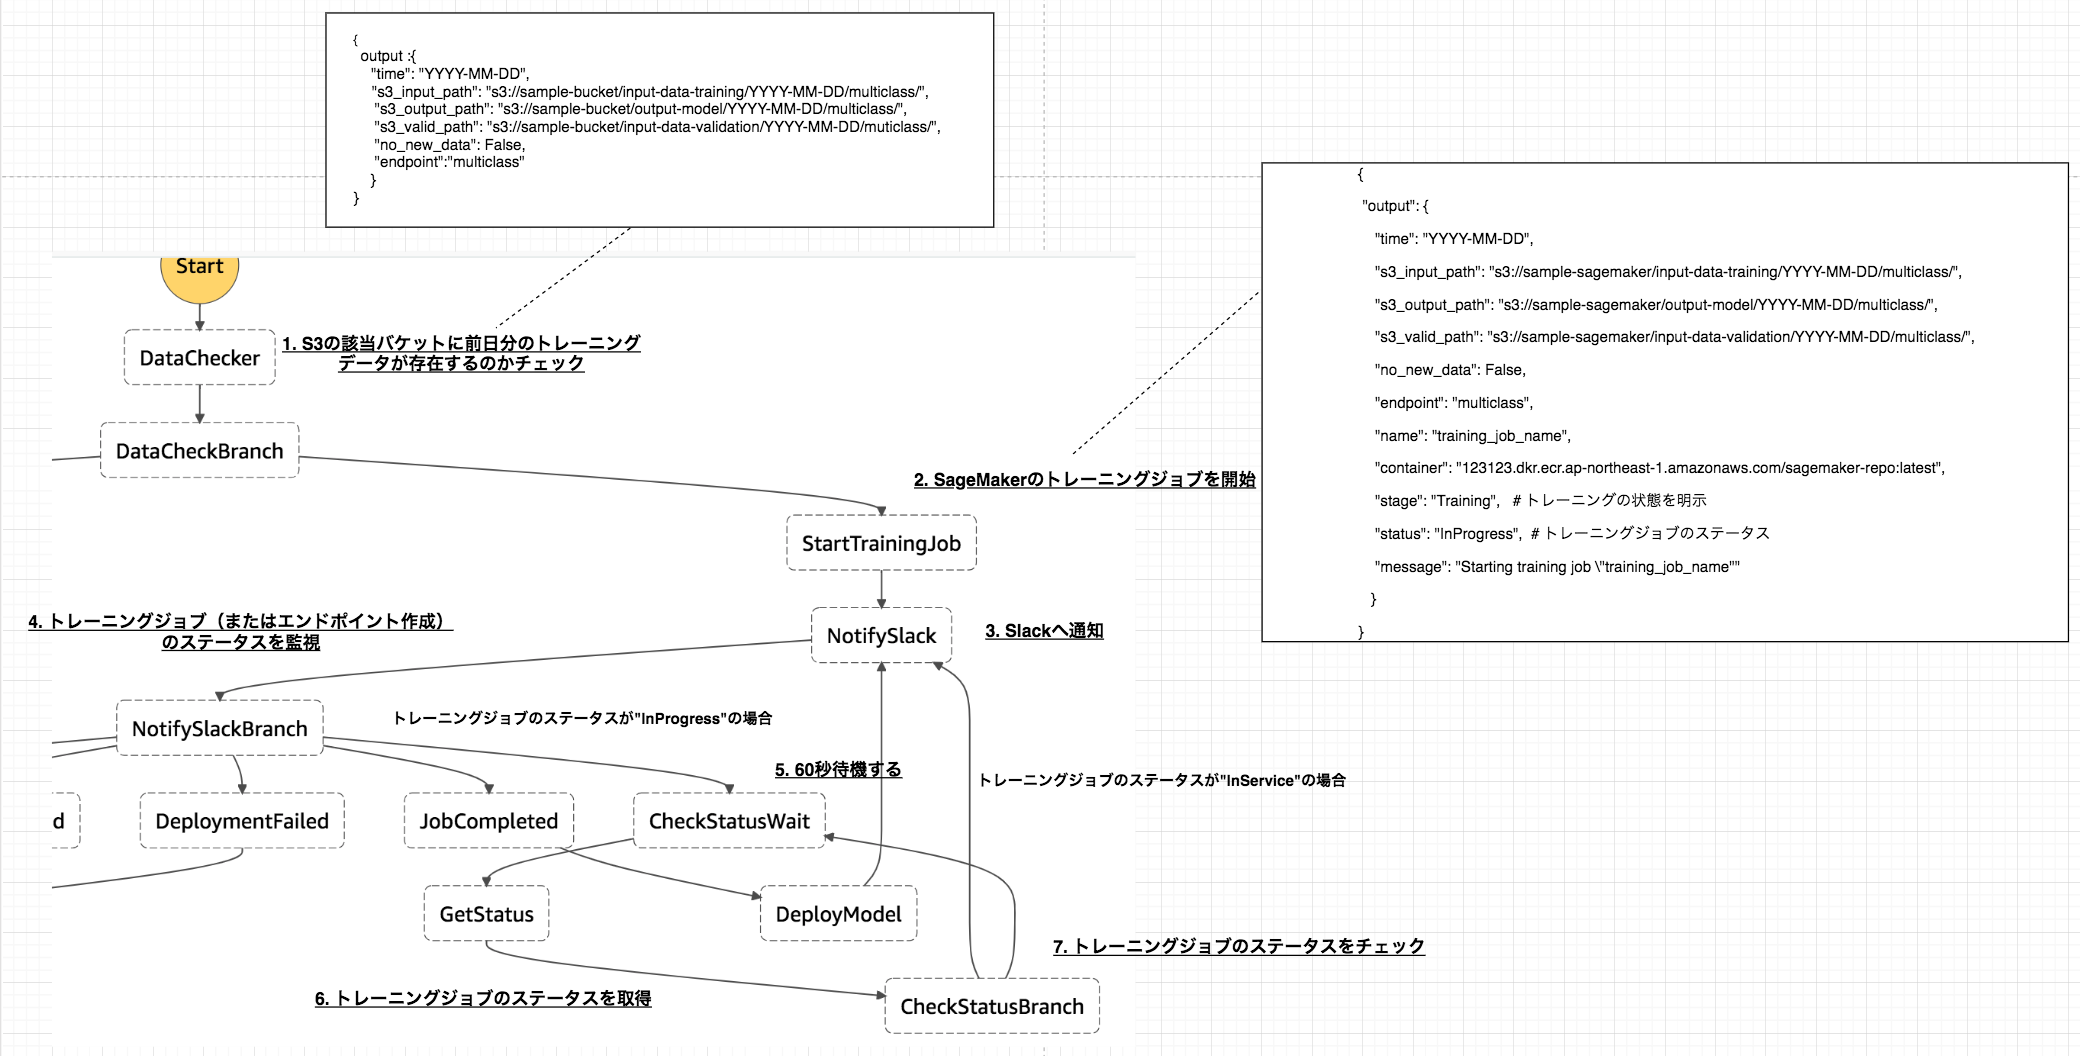
トレーニング時のワークフロー概要
1. S3の該当バケットに前日分のトレーニングデータが存在しているのかチェック
以下のファイルで行なっている内容は、
- StepFunctions実行時に与えられた日付の前日の日付を取得
- S3の対象Prefixに指定したファイル名が存在しているのかをチェック
- 存在していれば、
日付とS3のinput-data-path、output-data-pathvalidation-data-pathendpointに値を入れ返す。またno_new_dataにfalseを入れる。- 存在していなければ、
no_new_dataにtrueを入れて返す。data_checker.pyimport os import logging import boto3 from datetime import datetime, timedelta, timezone # データ確認用のバケット BUCKET = "sample-bucket" # 存在を確認するファイル名 FILE_NAME = "iris.csv" # エンドポイント名 ENDPOINT_NAME = "multiclass" # loggerの作成 LOGGER = logging.getLogger() LOGGER.setLevel(logging.INFO) def lambda_handler(event, _context): LOGGER.info(event) s3_client = boto3.client("s3") # 指定された日付の前日の日付を取得 one_days_before = add_days(event["DATE"], -1) # 前日分の訓練データが存在するのか確認 status = check_data(s3_client, one_days_before) if status is not True: print('No new data uploaded since last training run.') print('Skipping training until next scheduled training run.') return { "no_new_data": True } s3_input_path, s3_output_path, s3_valid_path = generate_s3_path(one_days_before) return { "time": one_days_before, "s3_input_path": s3_input_path, "s3_output_path": s3_output_path, "s3_valid_path": s3_valid_path, "no_new_data": False, "endpoint": ENDPOINT_NAME } def check_data(s3_client, date): prefix = "input-data-training" response = s3_client.list_objects( Bucket=BUCKET, Prefix=prefix ) assumed_keys = [f'input-data-training/{date}/multiclass/{FILE_NAME}'] try: keys = [content['Key'] for content in response['Contents']] print("keys:", keys) status = set(assumed_keys).issubset(keys) except KeyError: status = False return status def generate_s3_path(date): train_set_prefix = os.path.join('input-data-training', date, 'multiclass') output_set_prefix = os.path.join("output-model", date, "multiclass") validation_set_prefix = os.path.join("input-data-validation", date, "multiclass") s3_input_path = os.path.join('s3://', BUCKET, train_set_prefix, '') s3_output_path = os.path.join('s3://', BUCKET, output_set_prefix, '') s3_valid_path = os.path.join('s3://', BUCKET, validation_set_prefix, '') return s3_input_path, s3_output_path, s3_valid_path def datetime_to_str(date: datetime) -> str: year = str(date.year) month = str("{0:02d}".format(date.month)) day = str("{0:02d}".format(date.day)) str_date = '{0}-{1}-{2}'.format(year, month, day) return str_date def str_to_datetime(str_date: str) -> datetime: return datetime.strptime(str_date, '%Y-%m-%d') def add_days(str_dt: str, days: int) -> str: datetime_dt = str_to_datetime(str_dt) n_days_after = datetime_dt + timedelta(days=days) str_n_days_after = datetime_to_str(n_days_after) return str_n_days_after2. SageMakerのトレーニングジョブを開始
SageMakerへトレーニングジョブを投げるファイルです。
また、以下のファイルで行なっている内容は、
トレーニングジョブを投げる際のパラメータに埋め込む変数を取得する。
training_job_name: トレーニングジョブの名前(定義したBASE_JOB_NAMEに日時を加える)target: トレーニングジョブの対象(今回は多クラス分類なのでmulticlassとする)num_class: 分類数image_arn: 予めECRにpushしておいた独自アルゴリズムのDocker imageinput_data_path: インプットデータが置いてあるS3のパスvalid_data_path: バリデーションデータが置いてあるS3のパスoutput_data_path: 学習したモデルを置くS3のパストレーニングジョブを投げるパラメータを作成する。
トレーニングジョブを投げる
event内に以下の変数を代入する。
name: トレーニングジョブ名container: Docker imageのarnstage: トレーニングの状態を明示するための文字列(ここではTrainingを代入)status: トレーニングジョブのステータス(一番最初のループではInProgressを代入)message: Slackに通知する文言の文字列start_training_job.pyimport logging import os import boto3 import copy from time import strftime, gmtime TARGET = os.environ["TARGET"] BASE_JOB_NAME = f"dev-sagemaker-{TARGET}" NUM_CLASS = os.environ["NUM_CLASS"] IMAGE_ARN = f"123123.dkr.ecr.ap-northeast-1.amazonaws.com" \ f"/sagemaker-repo:latest" LOGGER = logging.getLogger() LOGGER.setLevel(logging.INFO) def lambda_handler(event, _context): LOGGER.info(event) sagemaker_client = boto3.client("sagemaker", region_name="ap-northeast-1") base_training_conf = create_training_conf(event) training_conf = generate_name_with_timestamp(base_training_conf, "training_job_name") training_params = create_parameter(training_conf) create_training_job(training_params, sagemaker_client) event["name"] = training_conf["training_job_name"] event["container"] = training_conf["image_arn"] event["stage"] = "Training" event["status"] = "InProgress" event['message'] = 'Starting training job "{}"'.format(training_conf["training_job_name"]) return event def create_training_job(params, client): try: response = client.create_training_job(**params) LOGGER.info(response) except Exception as e: LOGGER.info('Unable to create training job.') raise (e) def generate_name_with_timestamp(conf: dict, key: str): conf = copy.deepcopy(conf) name = conf[key] + "-" + strftime("%Y-%m-%d-%H-%M-%S", gmtime()) conf[key] = name return conf def create_training_conf(event): input_data_path = event["s3_input_path"] valid_data_path = event["s3_valid_path"] output_data_path = event["s3_output_path"] return { "training_job_name": BASE_JOB_NAME, "target": TARGET, "num_class": NUM_CLASS, "image_arn": IMAGE_ARN, "input_data_path": input_data_path, "valid_data_path": valid_data_path, "output_data_path": output_data_path } def create_parameter(conf): params = { "TrainingJobName": conf["training_job_name"], "HyperParameters": { "objective": conf["target"], "num_class": conf["num_class"], "max_leaf_nodes": "5" }, "AlgorithmSpecification": { "TrainingImage": conf["image_arn"], "TrainingInputMode": "File" }, "RoleArn": "arn:aws:iam::507635064363:role/dev-sagemaker", "InputDataConfig": [ { "ChannelName": "training", "DataSource": { "S3DataSource": { "S3DataType": "S3Prefix", "S3Uri": conf["input_data_path"] } } }, { "ChannelName": "validation", "DataSource": { "S3DataSource": { "S3DataType": "S3Prefix", "S3Uri": conf["valid_data_path"] } } } ], "OutputDataConfig": { "S3OutputPath": conf["output_data_path"] }, "ResourceConfig": { "InstanceType": "ml.m4.xlarge", "InstanceCount": 1, "VolumeSizeInGB": 10 }, "StoppingCondition": { "MaxRuntimeInSeconds": 1800 } } return params3. Slackへ通知
トレーニングの開始、エンドポイントの作成・更新または完了をSlackへ通知するファイル。
一般的な処理内容なので、説明は割愛します。notify_slack.pyimport os import logging from urllib.request import Request, urlopen import json CHANNEL = os.environ["CHANNEL"] HOOK_URL = os.environ["HOOK_URL"] LOGGER = logging.getLogger() LOGGER.setLevel(logging.INFO) def lambda_handler(event, _context): message = event["message"] contents = { "channel": CHANNEL, "text": message, "username": "incoming-webhook" } post_message(contents) return event def post_message(contents): req = Request(HOOK_URL, json.dumps(contents).encode('utf-8')) response = urlopen(req) response.read() LOGGER.info("Message posted to %s", contents["channel"])6. トレーニングジョブまたはエンドポイントのステータスを取得
SageMakerで行われているトレーニングジョブまたはエンドポイントのステータスを取得するファイルになります。
以下の処理内容は、「トレーニングを行なっている」状態(stage="Training")と「エンドポイントを作成している」(stage="Deployment")状態の2つに分かれています。
- 「トレーニングを行なっている」状態(stage="Training")
- event内に予め置いたトレーニング名(
name)を取得する。- boto3の
describe_training_jobメソッドを用いて、1で定義したトレーニングジョブ名のステータスを取得する。- ステータスが
Completedであれば、以下をeventに代入する。
- 学習モデルが出力されるS3のパス
- slackに通知するためのメッセージ
- ステータスが
Failedであれば、エラーメッセージをeventに代入する。- ステータスが、
InProgressのままであればeventのステータスに再度代入する。エンドポイントの作成も上記同様にSageMakerのステータスを取得し、ステータス毎にメッセージを変えてeventに代入をしているだけです。
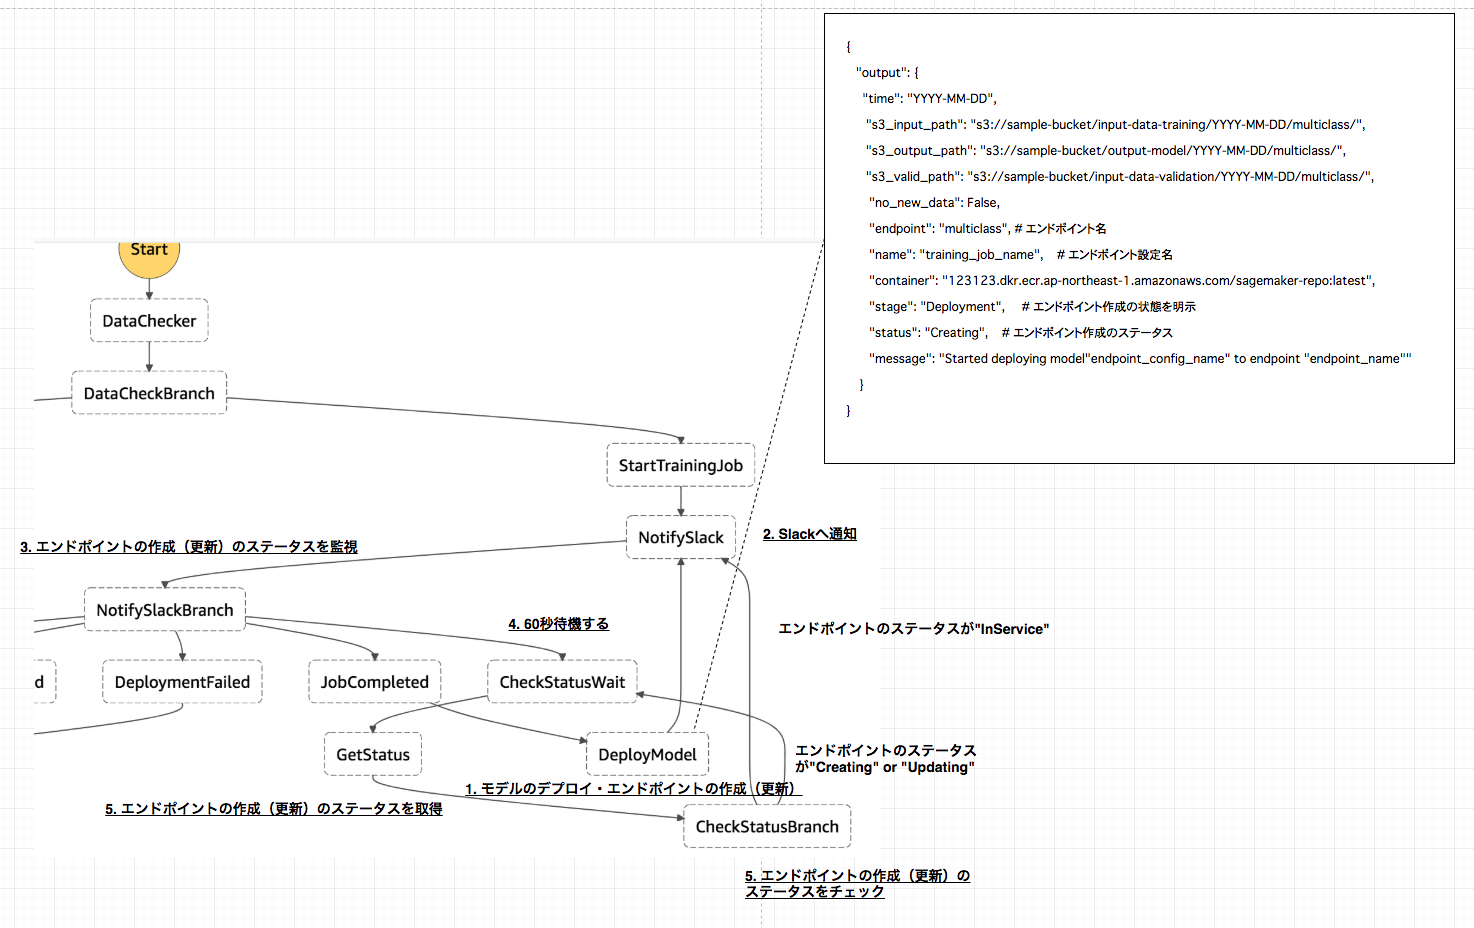
get_status.pyimport os import boto3 def lambda_handler(event, _context): sagemaker_client = boto3.client("sagemaker", region_name="ap-northeast-1") stage = event["stage"] # トレーニングジョブの場合 if stage == "Training": # トレーニングジョブ名を取得 name = event["name"] training_details = describe_training_job(name, sagemaker_client) status = training_details["TrainingJobStatus"] # 'InProgress'|'Completed'|'Failed'|'Stopping'|'Stopped' # トレーニングジョブの状態 if status == "Completed": s3_output_path = training_details["OutputDataConfig"]["S3OutputPath"] model_data_url = os.path.join(s3_output_path, name, "output/model.tar.gz") event["message"] = 'Training job "{}" complete. Model data uploaded to "{}"'.format(name, model_data_url) event["model_data_url"] = model_data_url elif status == "Failed": failure_reason = training_details['FailureReason'] event['message'] = 'Training job failed. {}'.format(failure_reason) # エンドポイント作成・更新の場合 elif stage == "Deployment": # エンドポイントの名前 name = event["endpoint"] endpoint_details = describe_endpoint(name, sagemaker_client) # 'OutOfService'|'Creating'|'Updating'|'SystemUpdating'|'RollingBack'|'InService'|'Deleting'|'Failed' status = endpoint_details["EndpointStatus"] # エンドポイントの状態 if status == "InService": event["message"] = 'Deployment completed for endpoint "{}".'.format(name) elif status == "Failed": failure_reason = endpoint_details['FailureReason'] event["message"] = 'Deployment failed for endpoint "{}". {}'.format(name, failure_reason) elif status == 'RollingBack': event[ 'message'] = 'Deployment failed for endpoint "{}", rolling back to previously deployed version.'.format( name) event["status"] = status return event def describe_training_job(training_job_name, client): try: response = client.describe_training_job( TrainingJobName=training_job_name ) except Exception as e: print(e) print('Unable to describe training job.') raise (e) return response def describe_endpoint(endpoint_name, client): try: response = client.describe_endpoint( EndpointName=endpoint_name ) except Exception as e: print(e) print('Unable to describe endpoint.') raise (e) return responseモデルのデプロイ・エンドポイント作成時のワークフロー概要
2.Slackへの通知や5.エンドポイントの作成(更新)のステータスを取得の処理内容は、上記トレーニングジョブのワークフローで説明した通りなので、ここでは1.モデルのデプロイ・エンドポイントの作成(更新)のlambdaスクリプトについてのみ説明します。1. モデルのデプロイ・エンドポイントの作成(更新)
トレーニングジョブが完了したら、SageMakerへモデルのデプロイとエンドポイントの作成(更新)のジョブを投げるステップへ移行します。
以下がその処理を行うファイルになります。基本的には、トレーニングジョブを投げる際に行なっていることと同様です。
モデルをデプロイする際のパラメータを取得する。
- モデル名は、eventの
nameを使用する。(トレーニングジョブ名と同様の名前になります)- Docker imageは、予めeventに代入していた
containerを使用する。- 学習モデルが格納されているS3パスは、上記トレーニングジョブのステータスを取得した際にeventに代入した
model_data_urlを使用する。上記パラメータを引数としてSageMakerへモデルのデプロイを行う。
エンドポイント設定の作成を行う。
- エンドポイント設定名もeventの
nameを使用するので、モデル名・トレーニングジョブ名と同様の名前になります。エンドポイントの名前を予めeventに代入していた
endpointで定義する。上記で定義したエンドポイント名前と同様の名前でエンドポイントが既に作成されていたら、更新作業を行う。存在していなかったら作成作業を行う。
deploy_model.pyimport os import boto3 EXECUTION_ROLE = os.environ['EXECUTION_ROLE'] def lambda_handler(event, _context): sagemaker_client = boto3.client("sagemaker", region_name="ap-northeast-1") model_params = create_parameter(event) print('Creating model resource from training artifact...') # モデルの作成 create_model(model_params, sagemaker_client) print('Creating endpoint configuration...') # エンドポイントの設定の作成 create_endpoint_config(event, sagemaker_client) print('Checking if model endpoint already exists...') endpoint_name = event["endpoint"] config_name = event["name"] # エンドポイントの存在を確認 if check_endpoint_exists(endpoint_name, sagemaker_client): update_endpoint(endpoint_name, config_name, sagemaker_client) else: print('There is no existing endpoint for this model. Creating new model endpoint...') create_endpoint(endpoint_name, config_name, sagemaker_client) event['stage'] = 'Deployment' event['status'] = 'Creating' event['message'] = 'Started deploying model "{}" to endpoint "{}"'.format(config_name, endpoint_name) return event def create_model(model_params, client): try: client.create_model(**model_params) except Exception as e: print(e) print('Unable to create model.') raise(e) def create_parameter(event): return { "ExecutionRoleArn": EXECUTION_ROLE, "ModelName": event["name"], "PrimaryContainer": { "Image": event["container"], "ModelDataUrl": event["model_data_url"] } } def create_endpoint_config(event, client): client.create_endpoint_config( EndpointConfigName=event["name"], ProductionVariants=[ { 'VariantName': 'hoge', 'ModelName': event["name"], 'InitialInstanceCount': 1, 'InstanceType': 'ml.m4.xlarge' } ] ) def check_endpoint_exists(endpoint_name, client): try: client.describe_endpoint( EndpointName=endpoint_name ) return True except Exception as e: return False def update_endpoint(endpoint_name, config_name, client): try: client.update_endpoint( EndpointName=endpoint_name, EndpointConfigName=config_name ) except Exception as e: print(e) print('Unable to update endpoint.') raise(e) def create_endpoint(endpoint_name, config_name, client): try: client.create_endpoint( EndpointName=endpoint_name, EndpointConfigName=config_name ) except Exception as e: print(e) print('Unable to create endpoint.') raise(e)StepFunctions定義ファイル
個人的に理解が難しかった
NotifySlackBranch、CheckStatusBranchに関して説明を行います。
NotifySlackBranch
- このステップは、基本的にはトレーニングジョブの状態 or エンドポイント作成の状態でのSageMaker上の各ジョブのステータスによって、次のステップを決める分岐点になっています。
- トレーニングジョブのステータスが
InProgressor エンドポイント作成のステータスがCreatingorUpdatingであれば、CheckStatusWaitステップへ移行して60秒待機します。- トレーニングジョブのステータスが
Failedであれば、JobFailedのステップへ移行し、終了します。- エンドポイントの作成のステータスが
FailedorRollingBackであれば、DeploymentFailedへ移行し終了します。- トレーニングジョブのステータスが
Completedであれば、JobCompletedへ移行し、モデルのデプロイ・エンドポイント作成のステップへと続きます。- エンドポイント作成のステータスが
InServiceであれば、DeploymentCompletedへと移行し、終了します。
CheckStatusBranch
- このステップは、 トレーニングジョブの状態 or エンドポイント作成のSageMaker上の各ジョブが完了しているかどうかを判断し、次のステップを決める分岐点になっています。
- トレーニングジョブのステータスが
Completedor エンドポイント作成のステータスがInServiceであれば、NotifySlackへ移行しslackへメッセージを通知する。- トレーニングジョブのステータスが
InProgressor エンドポイント作成のステータスがCreatingorUpdatingであれば、CheckStatusWaitへ戻り60秒待機する。- トレーニングジョブまたはエンドポイント作成のステータスが、
FailedorRollingBackであれば、NotifySlackへ移行し、slackへメッセージを通知する。state_machine.json{ "Comment": "dev-sagemaker-orchestration flow", "StartAt": "DataChecker", "States": { "DataChecker": { "Comment": "check data", "Type": "Task", "Resource": "${DataCheckerArn}", "InputPath": "$", "ResultPath": "$", "OutputPath": "$", "Next": "DataCheckBranch" }, "DataCheckBranch": { "Comment": "check data branch", "Type": "Choice", "Choices": [ { "Variable": "$.no_new_data", "BooleanEquals": true, "Next": "NoNewData" }, { "Variable": "$.no_new_data", "BooleanEquals": false, "Next": "StartTrainingJob" } ] }, "NoNewData": { "Type": "Pass", "End": true }, "StartTrainingJob": { "Type": "Task", "Resource": "${StartTrainingJob.Arn}", "ResultPath": "$", "Next": "NotifySlack" }, "NotifySlack": { "Type": "Task", "Resource": "${NotifySlack.Arn}", "ResultPath": "$", "Next": "NotifySlackBranch" }, "NotifySlackBranch": { "Type": "Choice", "Choices": [{ "Or": [{ "Variable": "$.status", "StringEquals": "InProgress" }, { "Variable": "$.status", "StringEquals": "Creating" }, { "Variable": "$.status", "StringEquals": "Updating" }], "Next": "CheckStatusWait" }, { "And": [{ "Variable": "$.status", "StringEquals": "Failed" }, { "Variable": "$.stage", "StringEquals": "Training" }], "Next": "JobFailed" }, { "Variable": "$.status", "StringEquals": "Completed", "Next": "JobCompleted" }, { "Variable": "$.status", "StringEquals": "InService", "Next": "DeploymentCompleted" }, { "And": [{ "Or": [{ "Variable": "$.status", "StringEquals": "Failed" }, { "Variable": "$.status", "StringEquals": "RollingBack" } ] }, { "Variable": "$.stage", "StringEquals": "Deployment" } ], "Next": "DeploymentFailed" } ] }, "CheckStatusWait": { "Type": "Wait", "Seconds": 60, "Next": "GetStatus" }, "GetStatus": { "Type": "Task", "Resource": "${GetStatus.Arn}", "ResultPath": "$", "Next": "CheckStatusBranch" }, "CheckStatusBranch": { "Type": "Choice", "Choices": [{ "Or": [{ "Variable": "$.status", "StringEquals": "Completed" }, { "Variable": "$.status", "StringEquals": "InService" }], "Next": "NotifySlack" }, { "Or": [{ "Variable": "$.status", "StringEquals": "InProgress" }, { "Variable": "$.status", "StringEquals": "Creating" }, { "Variable": "$.status", "StringEquals": "Updating" }], "Next": "CheckStatusWait" }, { "Or": [{ "Variable": "$.status", "StringEquals": "Failed" }, { "Variable": "$.status", "StringEquals": "RollingBack" } ], "Next": "NotifySlack" } ] }, "JobFailed": { "Type": "Fail" }, "JobCompleted": { "Type": "Pass", "Next": "DeployModel" }, "DeployModel": { "Type": "Task", "Resource": "${DeployModel.Arn}", "Next": "NotifySlack" }, "DeploymentCompleted": { "Type": "Pass", "End": true }, "DeploymentFailed": { "Type": "Fail" } } }CloudFromationによるStepFunctionsのステートマシンの作成
CloudFormationを使ってこれまで説明したワークフローのStepFunctionsのステートマシンを作成します。
上記、StepFunctionsのstate_machine.jsonやlambdaスクリプトをレンダリングするテンプレートファイルが以下になります。(こちらのテンプレートファイルへのレンダリング方法は割愛させて頂きます。詳細はGithubをご参照ください。)cloudformation.yml.tpl--- # define include macro {% macro include(file) %}{% include(file) %}{% endmacro %} AWSTemplateFormatVersion: 2010-09-09 Description: Build SageMaker Orchestration environment # =======set parameters======== # Parameters: Runtime: Description: Language of scripts Type: String Default: python3.6 NumClass: Description: Number of class Type: String Default: 3 Target: Description:Targets Type: String Default: multiclass HookUrl: Description: hookurl of slack Type: String Default: https://hooks.slack.com/services/hogehoge SlackChannel: Description: channel of slack Type: String Default: aws_notify ExecutionRole: Description: sagemaker execution role Type: String Default: arn:aws:iam::123123:role/dev-sagemaker Resources: # =======IAM======== # StepFunctionsRole: Type: AWS::IAM::Role Properties: AssumeRolePolicyDocument: Version: '2012-10-17' Statement: - Effect: Allow Principal: Service: - states.amazonaws.com Action: - sts:AssumeRole ManagedPolicyArns: - arn:aws:iam::aws:policy/AWSLambdaFullAccess Path: "/service-role/" DataCheckerLambdaRole: Type: AWS::IAM::Role Properties: AssumeRolePolicyDocument: Version: "2012-10-17" Statement: - Effect: Allow Principal: Service: - lambda.amazonaws.com Action: - sts:AssumeRole ManagedPolicyArns: - arn:aws:iam::aws:policy/AWSLambdaFullAccess - arn:aws:iam::aws:policy/AmazonSageMakerFullAccess Path: "/service-role/" # =======Step Functions======== # SageMakerStateMachine: Type: "AWS::StepFunctions::StateMachine" Properties: StateMachineName: "dev-SageMaker-orchestration" DefinitionString: !Sub - |- {{ include('./stepfunctions/state_machine.json')|indent(12) }} - DataCheckerArn: !GetAtt DataChecker.Arn RoleArn: !GetAtt StepFunctionsRole.Arn # =======Lambda======== # DataChecker: Type: AWS::Lambda::Function Properties: Code: ZipFile: !Sub | {{ include('./lambda_scripts/data_checker.py')|indent(10) }} Description: "SagaMaker orchestration data checker lambda" FunctionName: "DataChecker" Handler: index.lambda_handler MemorySize: 128 Role: !GetAtt DataCheckerLambdaRole.Arn Runtime: !Ref Runtime Timeout: 15 StartTrainingJob: Type: AWS::Lambda::Function Properties: Code: ZipFile: !Sub | {{ include('./lambda_scripts/start_training_job.py')|indent(10) }} Description: "SagaMaker orchestration start training job lambda" FunctionName: "StartTrainingJob" Handler: index.lambda_handler MemorySize: 128 Role: !GetAtt DataCheckerLambdaRole.Arn Runtime: !Ref Runtime Timeout: 15 Environment: Variables: TARGET: !Ref Target NUM_CLASS: !Ref NumClass NotifySlack: Type: AWS::Lambda::Function Properties: Code: ZipFile: !Sub | {{ include('./lambda_scripts/notify_slack.py')|indent(10) }} Description: "SagaMaker orchestration notify slack" FunctionName: "NotifySlack" Handler: index.lambda_handler MemorySize: 128 Role: !GetAtt DataCheckerLambdaRole.Arn Runtime: !Ref Runtime Timeout: 15 Environment: Variables: HOOK_URL: !Ref HookUrl CHANNEL: !Ref SlackChannel GetStatus: Type: AWS::Lambda::Function Properties: Code: ZipFile: !Sub | {{ include('./lambda_scripts/get_status.py')|indent(10) }} Description: "SagaMaker orchestration get status" FunctionName: "GetStatus" Handler: index.lambda_handler MemorySize: 128 Role: !GetAtt DataCheckerLambdaRole.Arn Runtime: !Ref Runtime Timeout: 15 DeployModel: Type: AWS::Lambda::Function Properties: Code: ZipFile: !Sub | {{ include('./lambda_scripts/deploy_model.py')|indent(10) }} Description: "SagaMaker orchestration deploy model" FunctionName: "DeployModel" Handler: index.lambda_handler MemorySize: 128 Role: !GetAtt DataCheckerLambdaRole.Arn Runtime: !Ref Runtime Timeout: 15 Environment: Variables: EXECUTION_ROLE: !Ref ExecutionRole以下、コマンドを適切なディレクトリで実行してください。スタックが無事作成されれば完了です。
create_stack.sh#!/bin/bash # ECRへのログイン eval $(aws ecr get-login --region ap-northeast-1 --no-include-email --profile your_profile) echo "スタックを作成します" # CloudFormationのテンプレートファイルへのレンダリングを実行 python formation_config_creator.py # スタックの作成を実行 aws cloudformation create-stack \ --stack-name sagemaker-orchestration \ --template-body file://$PWD/cloudformation/cloudformation.yml \ --capabilities CAPABILITY_IAM \ --profile your_profile終わりに
今回は、TrainingジョブとPredictionジョブに依存関係を持たせた機械学習の一連のフローをStepFunctionsを使って作成してみました。また、このワークフローはAWS公式が公開しているレポジトリーを参考にして作成をしております。
個人的には、このワークフローはベストプラクティスではなく機械学習のワークフローをSageMakerを使って学ぶチュートリアルみたいなものだと感じました。
TrainingジョブとPredictionジョブに依存関係を持たせる方法として、1つのステートマシンにまとめる以外にも「Traininジョブが完了したらSQSにキューを出力し、Predictionジョブが毎分・毎時でキューを見にいく」とかでもいいのかなと思っています。この方法についても、手が空いた時に実験してみたいと思います。また、今回書いたコードはGithubに上げておりますのでそちらも適宜参照して頂ければと思います。
- 投稿日:2019-03-10T10:21:00+09:00
環境が変わって戸惑いながらEC2を作成しました。。
はじめに
AWSでインターネット接続のできるEC2を作成したときのメモです。それだけです。
たったそれだけなんですが、プロジェクト変更による作業環境の違いによってここまで焦るものなのか。。と学んだため、初心忘れるべからずで記事を作成しました。ちなみに作業環境の違いとは、
・以前:IAMでロール管理していないrootアカウントとMacで好き勝手にバリバリやってOKなWeb系
・現在:IAMで管理されたReadOnlyのアカウント(作業時にロールの切り替えが必要)、踏み台複数経由、マシンのスペックが低い大手Sier
です。面倒でもパラメータシート書いたほうがいいなとか、サービスローンチ後の運用を考慮したときにIAMでガチガチに管理するのは大切(当然かもしれませんが)だしそうあるべき、とか学びは多いのですがそれでもやっぱりパフォーマンスは発揮しにくいですね。ぼくの偏見込みではありますが、若くて優秀なエンジニアが大手Sier選ぶ理由ってもうない気がします。
閑話休題!
ちなみに今回久しぶりにAmazon Web Services 基礎からのネットワーク&サーバー構築 改訂版を読み直しました。よき。作業開始
ターゲットの把握と手順を妄想
今回は「適当にEC2作る」「それをインターネット接続できるようVPCも触る」です。
今までですとEC2から作りはじめていたのですが、今回はサーバを立てるNW環境から作成します。
こっちのほうがわかりやすいというか頭の整理がしやすい。VPCの作成
最初にVPCを作成します。VPCってEC2のおまけくらいにしか当初思ってなかったのですが(マジです)、今考えると全然そんなことないですね!w
CIDRは10.0.0.0/16で作成します。
AWSアーキテクチャでNWとか基盤の設計構築って完全に独学なのですが、VPC作成したら連動してACLとかルートテーブルってできるの今手を動かしてて知りました。。サブネットの作成
先ほどのVPCの中にサブネットを作成します。NW領域(VPC)の中に更にNWを作る。
RDSを考慮して2つ作成します。アベイラビリティゾーンは別にする。
CIDRは10.0.1.0/24と10.0.2.0/24で。インターネットゲートウェイの作成&アタッチ
VPCにGWを作ります。オンプレでこれやるならコストかかるんだろうなーと思いました。抽象化すごい。
セキュリティグループの作成
インバウンドのルールにsshを追加します。IPはよくわからなければ0.0.0.0/0、ip nowとかでググったグローバルを指定。
ルートテーブルの設定
Destinationは0.0.0.0/0、先ほど作成したゲートウェイと紐付けます。
EIPの割り当て
ここでVPCの作業は完了。EC2を立てるNWが完成しました。
インスタンスの作成
CentOS7で。EIPも紐づけてグローバルIPを付与します。
この時点で外部との接続可能になっています、それでもsshできなければNW(社内ルールとか踏み台とか)を確認しましょう。自分のせいではないですw所感
現在のプロジェクトが大手Sierでの作業でして、そういうところって大概がNWの口(全社的な出入り口)のセキュリティが高く、プロキシしてたりACLでがっちりコントロールしてたりで、my ipでヒットしたグローバルIPをセキュリティグループに入れたくらいじゃアクセスできない。
大人数のプロジェクトに参画したことがなかったので、それを知らずに作業していたらEC2に一生sshできませんでして。
なぜおれはこの作業にこんな時間かかっとーとや。。(福岡出身です)と、自分が情けなくなったので今回改めて整理した次第です。おそらくですが金融系とかになるともっとキツそうな気がします。
システム受託開発系の作業環境とか作業ルールはよく確認&管理者に質問しまくりましょうっていうお話でした。以上です。