- 投稿日:2019-03-10T22:17:06+09:00
【Java】Java12特徴について
概要
- OpenJDKの公式サイトに有るように、「Release-Candidate Phase」のフェーズに達しました。
- 2019/03/19にはリリース予定
- 特徴についてまとめておきたいと思います。
特徴
189: GCの休止時間を短くするアルゴリズム「Shenandoah」を追加 ※実験段階?
- GCアルゴリズムにShenandoahを新規に追加するそうです。実行中のスレッドと平行して実行することによりGCの休止時間を短縮するようです。
- アルゴリズムの詳細はこのページに記載されています。
230: JMHをバンドル
- JDKとは別に提供されていたJMH(Java Micro Benchmark Harness)をJDKに含めるようです。
- 既存のJMHが機能追加されたものがバンドルされるわけではないようです。
325: Switch文の機能を拡張
- switch文が拡張されました。
- 以下、公式サイトより引用
従来のswitch文
switch (day) {
    case MONDAY:
    case FRIDAY:
    case SUNDAY:
        System.out.println(6);
        break;
    case TUESDAY:
        System.out.println(7);
        break;
    case THURSDAY:
    case SATURDAY:
        System.out.println(8);
        break;
    case WEDNESDAY:
        System.out.println(9);
        break;
}
拡張されたswitch文
switch (day) {
    case MONDAY, FRIDAY, SUNDAY -> System.out.println(6);
    case TUESDAY                -> System.out.println(7);
    case THURSDAY, SATURDAY     -> System.out.println(8);
    case WEDNESDAY              -> System.out.println(9);
}
- シンプルな記載が出来るようになり、読みやすくなりましたね。
334: JVM Constants API
- java.lang.invoke.constantパッケージが追加されたようです。
340: arm64のソースコードを削除
- ARM64bit用のPortのソースコードからarm64を削除したとの事です。
- aarch64のソースと重複していたので、開発者の負担を減らすのが目的のようです。
341: CDSアーカイブのデフォルト化
- 64ビット版のみの対応
- CDSアーカイブ生成作業の簡略化として、デフォルトのクラスリストを利用できるように変更したようです。
- これにより、起動時間の短縮化。「-Xshare:dump」をユーザに実行させる手間を省かせることが可能となります。
344: Mixed GCを停止可能とする
- G1のMixed GCを中止できるようにしたようです。
346: G1ガベージコレクタの強化
- アイドル状態時、自動的にヒープメモリをOSに返却するようにG1ガベージコレクタを強化したようです。
- 投稿日:2019-03-10T22:06:48+09:00
Kotlin vs. Java: Which Programming Language to Choose for Your Android App
The question is which is better Kotlin or Java. With the appearance of Kotlin this struggle started in 2011, when at the same time, Java was completely beating any new competitors off. With the help of Google and JetBrains, Kotlin was developed to eliminate any of Java’s faults. Beginning with the Google I/O 2017 Developer Conference, Kotlin started to move into a high level.
Is it possible for Kotlin to replace Java completely? Is it difficult to find good Kotlin developers? Here you will find out about this and about the benefits and drawbacks of each language.
Kotlin vs. Java: Intro to Official Android Programming Languages
Android and Java have always been connected. Android SDK is even written in Java. The situation has started to change after the invention of Kotlin. Below you will read about the differences between Kotlin vs. Java in order to understand if adopting Kotlin is worthwhile.
Java Android Development
Java is an object-oriented, class-based programming language. It was designed by a “Green Team” led by James Gosling at Sun Microsystems (now owned by Oracle Corporation) and was originally planned to serve the digital cable television industry. However, the language appeared to be too sophisticated for this purpose and found its place instead in the world of Internet programming.
Java was released in May 1995 and today there is hardly a developer who hasn't heard of it. No wonder, as it is the second most popular language on GitHub with around 70K repositories.
Apart from using Java for Android applications, developers are also able to create desktop apps and app back ends. Unsurprisingly, as it has a tremendous community and almost 25 years of usage, Java has proven to be trusted and secure.
Java vs. Kotlin: Advantages of Java
If we look at Java and Kotlin, we will see that both languages have positive characteristics worth considering when choosing between them. The advantages of Java are:
- Easy to learn
It is the biggest advantage of Java. This means that it is easy to write, compile, and debug using Java. It has a digestible and understandable syntax and can be a good starting point while learning programming.
- Strong community
It has almost one million repositories on GitHub. That is why, there are thousands of different libraries and frameworks which can be utilized and, as a result, speed up the development process.
- Platform-independent
Java compiler converts the source code to bytecode, which serves as a so-called “intermediate” language. Bytecode can be executed on any platform using Java Virtual Machine. You can even write Java code on Android using a special app called Java N-IDE.
Java vs. Kotlin: Downsides of Java
Just like any other programming language, Java has its disadvantages like:
- Verbosity
Java needs far more code to be written than Kotlin, and that is why there is a higher risk of errors.
On the other hand, Kotlin is clearer and more concise.
- Performance
Unfortunately, Java is slow and consumes more memory space in comparison with Kotlin. Due to the need to load all the classes before work can begin, the startup time is also slower.
- Nullability Problems
NullPoinerExceptions is a real issue for Java developers using non-nullable variables. It can be frustrating because null represents absence of value. Hence, developers need to write additional lines of code to solve this issue.
It may seem that making Android apps with Java is a dead-end job if we take into account all of this. If you want to know more about it, below you will find it out.
Recommendation: Why Use Java in 2019?
After everything mentioned above Kotlin looks like the perfect language to develop with. Why is Java still used today? Read on to find out:
There are Java gurus in a team who don't want to switch to Kotlin.
A team tried Kotlin and was unsatisfied with it.
If a successful project was developed in Java (although, it is not a problem to develop new features in Kotlin, in this case). Don't forget that Java code needs to be supported by Java if you don’t want the transition of the whole project to Kotlin.Kotlin: New Android Language
Kotlin is a brand new Android programming language that was first introduced by JetBrains in 2011. It got its name from the Kotlin Island in Russia and in 2017 became the officially supported language for Android development. Kotlin can also be used for developing server-side and web client-side apps.
Since the 2017 Google I/O conference, the use of Kotlin language has started to rise exponentially. This should come as no surprise, as it was made to be completely JVM (Java Virtual Machine) compatible and compiles down to Java bytecode. This means that both Java and Kotlin code can co-exist within one project.
In 2018, a lot of huge companies switched to Kotlin as it is 100% interoperable with Java. Among such companies are Google, Uber, Trello, Pinterest, Kickstarter, and many more.
Kotlin vs. Java: Advantages of Kotlin
In spite of the fact that Kotlin is a new language, it has already shown a lot of benefits in comparison with Java. Below you will read the advantages of Kotlin:
- Conciseness
This language is proven to be more concise than Java. It has been estimated that about 40% in the number of lines of code are cut. The quality increases because there is less space for bugs and errors.
- Interoperability
Kotlin is completely interoperable with Java. JetBrains’ Java to Kotlin converter, integrated into IntelliJ, provides a smooth transition to Java code. Besides, Kotlin supports almost all existing Java libraries and compiles with Java compatible bytecode.
- Functional programming support
Kotlin supports both object-oriented and functional programming. Kotlin has proper function types built in and it can help solve many problems developers face more easily.
- Fail-fast system
Kotlin language has a built-in fail-fast system which helps to reduce bugs and avoid errors in the code. For this purpose, there are three standard library functions: check, require, and assert.
- Supportive community
Despite the fact that it is a young language, it has quite a supportive community. Every developer can join a Kotlin Slack channel where he can get support and help from other Kotlin devs.
Learn more here. In this article you will find out which language is better Kotlin or Java.


- 投稿日:2019-03-10T17:29:53+09:00
JavaでFacadeパターン
はじめに
GoFのデザインパターンを紹介している『増補改訂版 Java言語で学ぶデザインパターン入門』を読んで、学んだ内容についてまとめます。
Facadeパターン
Facadeとは
日本語に訳すと「(建物の)正面」を意味します。
複数のクラスが絡むプログラムを使用する場合には、それぞれのクラスのメソッドを適切な順番で実行する必要があります。
例えば「処理Xを行いたい場合にはAクラスのBメソッドを呼んだ後に、CクラスのDメソッドとEメソッドを呼び、最後にFクラスのGメソッドを呼ぶ」などです。
上記の例ではクラスもメソッドもそれほど多くありませんでしたが、これがもっと多くの数になればなるほど、処理を行う際のクラスとメソッドの制御は複雑になっていきます。
このような場合に、処理を依頼する側から見た際に「窓口」となるインタフェース(API)を用意してあげるようなパターンのことをFacadeパターンと言います。
このパターンを適用することで、処理を依頼する側は複雑な処理の制御を把握する必要がなくなります。登場人物
Facadeパターン使用するのは以下のクラス図に登場するクラスです。
実装クラス
Facade
処理を行うためのクラスをまとめるクラスで、Clientに対しての窓口となります。
実装すべき内容に関しては特に縛りなどはなく、難しい点もありません。その他クラス
処理を行うために呼び出されるクラスたちです。
実装すべき内容に関しては特に縛りなどはありません。
特段難しい点はありませんが、ポイントとしては使用されるクラスたちは窓口となるFacadeのことを意識しないことです。
その他のクラスたちからFacadeのことを呼び出すことはないためです。Client
Facadeを呼び出すクラスです。
実装すべき内容に関しては特に縛りなどはなく、難しい点もありません。具体例
具体例として、以下のクラスをもとに説明します。
実装クラス
- ListFacadeクラス
ListFacade.javaimport java.io.FileWriter; import java.io.IOException; import java.util.Map; import java.util.Properties; public class ListFacade { private ListFacade() { // newでインスタンス生成させないためにprivate宣言 } public static void makeMemberList(String inputFileName, String outputFileName) { try { Properties memberProperties = MemberList.getProperties(inputFileName); outputFileName = "C:\\work\\Facade\\src\\" + outputFileName + ".txt"; TxtWriter writer = new TxtWriter(new FileWriter(outputFileName)); Map<String, String> propertiesMap = writer.toMap(memberProperties); writer.writeHeader(); writer.writeContents(propertiesMap); writer.writeFooter(); writer.close(); System.out.println(String.format("ファイルを出力しました。ファイル名:%s", outputFileName)); } catch (IOException e) { e.printStackTrace(); } } }
ListFacadeクラスはClientであるMainクラスの窓口となるクラスです。
statisなmakeMemberListメソッドのみが定義されており、MemberListクラスからプロパティを受け取り、そのプロパティをもとにMapを受け取り、ファイルに出力していることが分かります。
また処理が成功した場合にはファイルを出力した旨のメッセージをコンソールに出力しています。
ポイントとしては、これらの一連の処理の流れをMainクラスではなく、窓口であるListFacadeクラスに記述してあるという点のみです。
パターンの学習として、他に関しては特段難しい点はありません。
- MemberListクラス
MemberList.javaimport java.io.FileInputStream; import java.io.IOException; import java.util.Properties; public class MemberList { private MemberList() { // newでインスタンス生成させないためにprivate宣言 } public static Properties getProperties(String fileName) { // ファイル名からPropertiesを得る fileName = "C:\\work\\Facade\\src\\" + fileName + ".txt"; Properties properties = new Properties(); try { properties.load(new FileInputStream(fileName)); } catch (IOException e) { System.out.println(String.format("ファイルの読み込みに失敗しました。ファイル名:%s", fileName)); } return properties; } }2つあるその他のクラスの1つ目です。
staticなgetPropertiesメソッドのみが定義されており、ファイル名を受け取ることでプロパティファイルを返しています。
特段難しい点はありません。
- TxtWriterクラス
TxtWriter.javaimport java.io.IOException; import java.io.Writer; import java.util.HashMap; import java.util.Map; import java.util.Map.Entry; import java.util.Properties; public class TxtWriter { private Writer writer; public TxtWriter(Writer writer) { // コンストラクタ this.writer = writer; } // プロパティを受け取り値(キー)が25を超えるものをMapに格納 public Map<String, String> toMap(Properties properties) { Map<String, String> propertiesMap = new HashMap<>(); for (Entry<Object, Object> e : properties.entrySet()) { if (Integer.parseInt((String) e.getValue()) > 25) { propertiesMap.put(e.getKey().toString(), e.getValue().toString()); } } return propertiesMap; } // ヘッダーを出力 public void writeHeader() throws IOException { writer.write("***************Header***************"); writer.write(System.lineSeparator()); } // 内容を出力 public void writeContents(Map<String, String> propertiesMap) throws IOException { writer.write("年齢が25歳を超えるメンバーは以下です。"); writer.write(System.lineSeparator()); for (Entry<String, String> e : propertiesMap.entrySet()) { writer.write(" ・名前:" + e.getKey() + " 年齢:" + e.getValue()); writer.write(System.lineSeparator()); } } // フッターを出力 public void writeFooter() throws IOException { writer.write("***************Footer***************"); } // 閉じる public void close() throws IOException { writer.close(); } }その他のクラスの2つ目です。
プロパティを受け取ってMapに格納するメソッドや、テキストファイルに出力するためのメソッドなどいくつかメソッドが定義されていますが、こちらに関しても特段難しい点はありません。その他
- テキストファイル
memberList.txt#name=age Tanaka_Tarou=25 Hoge_Hogeko=10 Yamada_Hanako=30 Neko_Nekota=50 Foo_Footarou=80
MemberListクラスの読み込みの対象となるテキストファイルです。
keyに名前、valueに年齢が当てはまります。実行クラス
- Mainクラス
Main.javaimport java.io.FileWriter; import java.io.IOException; import java.util.Map; import java.util.Properties; public class Main { public static void main(String[] args) { // 1.Facadeパターンを適用した場合 ListFacade.makeMemberList("memberList", "outputFile1"); // 2.Facadeパターンを未適用の場合 try { String inputFileName = "memberList"; String outputFileName = "outputFile2"; Properties memberProperties = MemberList.getProperties(inputFileName); outputFileName = "C:\\work\\Facade\\src\\" + outputFileName + ".txt"; TxtWriter writer = new TxtWriter(new FileWriter(outputFileName)); Map<String, String> propertiesMap = writer.toMap(memberProperties); writer.writeHeader(); writer.writeContents(propertiesMap); writer.writeFooter(); writer.close(); System.out.println(String.format("ファイルを出力しました。ファイル名:%s", outputFileName)); } catch (IOException e) { e.printStackTrace(); } } }1.Facadeパターンを適用した場合だと、窓口である
ListFacadeクラスに対してstaticなmakeMemberListメソッドを呼び出してあげるだけで、目的の処理を実行することができます。
また処理を複数回行いたい場合にも同様にメソッドを呼び出してあげるだけで済みます。、
2.Facadeパターンを未適用の場合の場合には、ListFacadeクラスに記述してある内容をそのまま記述しないと、目的の処理を実行することはできません。
また、処理を複数回行いたい場合には、処理を行いたい数だけ、複雑な処理を記述する必要があります。(※今回はMainクラスからその他のクラスを利用していますが、パッケージを分けてprotectedを指定することで窓口からしかその他のクラスを利用できなくするということもあり得ます。
ここではFacadeを利用した場合と利用しない場合の違いが分かりやすいように、Clientからも呼び出せるようにしています。)実行結果
Main.javaを実行した結果は以下になります。
パターンを適用した場合と未適用の場合で、処理の結果には違いがないことが確認できます。実行結果(コンソール)ファイルを出力しました。ファイル名:C:\work\Facade\src\outputFile1.txt ファイルを出力しました。ファイル名:C:\work\Facade\src\outputFile2.txt実行結果(outputFile1.txt)***************Header*************** 年齢が25歳を超えるメンバーは以下です。 ・名前:Yamada_Hanako 年齢:30 ・名前:Foo_Footarou 年齢:80 ・名前:Neko_Nekota 年齢:50 ***************Footer***************実行結果(outputFile2.txt)***************Header*************** 年齢が25歳を超えるメンバーは以下です。 ・名前:Yamada_Hanako 年齢:30 ・名前:Foo_Footarou 年齢:80 ・名前:Neko_Nekota 年齢:50 ***************Footer***************メリット
Facadeパターンのメリットは以下になります。
1.呼び出し側で詳細な制御を記述する必要がないので、コードをシンプルにすることができる。
2.意図しない呼び出しを行いバグになってしまうということを防ぐことができる。
3.インタフェースの呼び出し口を絞ることで、外部と疎結合にすることができ、再利用性が高まる。まとめ
複雑な処理の制御を行う窓口を提供するFacadeパターンに関して学びました。
以下でサンプルコードをアップしていますのでよろしければ参考にどうぞ。また、他のデザインパターンに関しては以下でまとめていますので、こちらも参考にどうぞ。
参考文献


- 投稿日:2019-03-10T16:16:19+09:00
Android 非同期でのUIスレッド処理について
- 投稿日:2019-03-10T16:08:39+09:00
Javaのラムダ式、stream APIに関して、Javaを始めて半年たった今、見直してみた。
結局ラムダ式って何なの
Java SE 8から導入された技術
ラムダ式を使うと、今日のコンピュータが搭載している複数のプロセッサ・コアを使ったマルチスレッド・プログラムを、これまでよりも大幅に簡潔なコードで作ることができます。
引用
ラムダ式とストリームAPIでJavaプログラミングはここまでシンプルになる!--Java SE 8に今すぐ移行すべき理由
https://builder.japan.zdnet.com/sp_oracle/35065645/ラムダ式を使うと、シンプルにコーディングができるようです。
とりあえあず、ラムダ式使える場面では絶対に使えくらいの気持ちでいいような気がします。
リストに以下のようなデータが入ってるとします。
このデータの中から、年齢が40歳以上の人を抽出し、年齢の若い順に出力する
というプログラムを書くとします。List<Musician> users = Arrays.asList( new Musician(1, "小山田", "壮平", 34, "福岡県"), new Musician(2, "岸田", "繁", 42, "京都府"), new Musician(3, "向井", "秀徳", 45, "福岡県"), new Musician(4, "藤原", "基央", 39, "千葉県"),)これも引用ですが、Java SE 7まででは
40歳以上のデータ抽出に以下
Set<Musician> musician = new HashSet<>();
for (Musician user : users) {
    if (user.getAge() > 40 ) {
        musisian.add(user);
    }
}
抽出したデータのソートに以下
List<Musician> sorted = new ArrayList<>(musician);
Collections.sort(sorted, new Comparator<Musician>() {
    public int compare(Musician m1, Musician m2) {
        return Integer.compare(m1.getAge(), m2.getAge());
    }
})
ソートされたデータの出力に以下
for (Musician user : sorted) {
    System.out.println(user.getFirstName());
}
という具合でコーディングします。
実現したい処理のために、中間処理でソート結果を保持する変数を新たに宣言したりしている。
この処理を並列化しようと試みると、中間処理で変数を宣言したりすると、同期処理が必要になり、パフォーマンスが低下したり、並列化の実現難度も高くなってしまう。
コードの保守性もあんまり良くないよねってのもある。
本質的な処理は、抽出、ソート、結果出力であるのに対して、中間処理が多く存在してしまっている。
そこで、Java SE 8
users.Stream()
.filter(u -> u.getAge() > 40)
.sorted((m1, m2) -> Integer.compare(m1.getAge(), m2.getAge()))
.forEach(user -> System.out.println(user.getFirstName()));
って感じで圧倒的に感覚的に、シンプルにコーディングすることができます。
Stream APIって何なの
簡単に並列化処理が実現できますよ!
ってやつusers.parallelStream() .filter(u -> u.getAge() > 40) .sorted((m1, m2) -> Integer.compare(m1.getAge(), m2.getAge())) .sequential() .forEach(user -> System.out.println(user.getFirstName()));
users.parallelStream()
を付け加えるだけで簡単に並列処理が実装可能なんですね。ちなみに、以下の
.sequential()は、出力処理は、パラレルで処理しないよって意味ですね。
以上備忘も兼ねたまとめでした。
- 投稿日:2019-03-10T16:03:46+09:00
AndroidでJUnitのコードカバレッジを取得する。
設定
AndroidStudioでカバレッジ取得について、Jacocoがサポートされてるのでそれをつかう。
やることは設定を一つgradleに加えるだけ、
buildTypes {
    debug {
        testCoverageEnabled true
    }
}
これで準備はOK!
コードカバレッジを取得する
いろいろみてみたら取得するのにgitコマンドをつかうらしい、めんどくさいので別の方法で取得する。
AndroidStudio右上の「Gradle」をクリックするをこんな感じに表示される。
上記の設定をしていると「createDebugCoverageReport」が追加されてるはず、
それをダブルクリックでカバレッジが取得できる。(※instrumentedTestの結果)
この際、エミュレータを起動しておきましょう。
そうすると、「/app/build/outputs/reports/」にカバレッジができてるはず!
カバレッジの見方についてはめんどくさいので割愛。おわり

- 投稿日:2019-03-10T13:09:13+09:00
Spring 単項目バリデーションのテスト
はじめに
Formクラスなどの単項目バリデーションの動作確認を、Controllerのテストで書いているのを見かけることがあります。Controllerのテストは事前に書くことが多く、テストパターンが多いとテストクラスが大きくなって可読性も悪くなります。
Formクラスのテストとして書けばコード量も減り、テスト内容も明確にすることができます。以下、Spring Boot 2.0.5 で確認。
テスト対象クラス
以下の
UserFormクラスのバリデーションをテストします。import lombok.Data; import javax.validation.constraints.NotBlank; import javax.validation.constraints.NotNull; import javax.validation.constraints.Size; @Data public class UserForm { @NotNull private Integer userId; @Size(max = 2) @NotBlank private String userName; }バリデーション
各フィールドにアノテーションで以下のバリデーションを実装。
userId
@NotNull
nullを許可しない。userName
@Size(max = 2)
- 最大文字数は2。
@NotBlank
null、空文字、半角スペースのみ入力を許可しない。テストクラス
UserFormクラスに対するテストクラスとして作成。import org.junit.Before; import org.junit.Test; import org.junit.runner.RunWith; import org.springframework.beans.factory.annotation.Autowired; import org.springframework.boot.test.context.SpringBootTest; import org.springframework.test.context.junit4.SpringJUnit4ClassRunner; import org.springframework.validation.BindException; import org.springframework.validation.BindingResult; import org.springframework.validation.Validator; import static org.hamcrest.CoreMatchers.nullValue; import static org.hamcrest.core.Is.is; import static org.junit.Assert.assertThat; @RunWith(SpringJUnit4ClassRunner.class) @SpringBootTest public class UserFormTest { @Autowired Validator validator; private UserForm userForm = new UserForm(); private BindingResult bindingResult = new BindException(userForm, "UserForm"); @Before public void before() { userForm.setUserId(1); userForm.setUserName("劉備"); } /** * エラーなし */ @Test public void noError() { validator.validate(userForm, bindingResult); assertThat(bindingResult.getFieldError(), is(nullValue())); } /** * userIdがnull */ @Test public void userIdIsNull() { userForm.setUserId(null); validator.validate(userForm, bindingResult); assertThat(bindingResult.getFieldError().getField(), is("userId")); assertThat(bindingResult.getFieldError().getDefaultMessage(), is("must not be null")); } /** * userNameのサイズが上限超え */ @Test public void userNameSizeIsOverLimit() { userForm.setUserName("夏侯惇"); validator.validate(userForm, bindingResult); assertThat(bindingResult.getFieldError().getField(), is("userName")); assertThat(bindingResult.getFieldError().getDefaultMessage(), is("size must be between 0 and 2")); } /** * userNameがnull */ @Test public void userNameIsNull() { userForm.setUserName(null); validator.validate(userForm, bindingResult); assertThat(bindingResult.getFieldError().getField(), is("userName")); assertThat(bindingResult.getFieldError().getDefaultMessage(), is("must not be blank")); } /** * userNameが空文字 */ @Test public void userNameIsBlank() { userForm.setUserName(""); validator.validate(userForm, bindingResult); assertThat(bindingResult.getFieldError().getField(), is("userName")); assertThat(bindingResult.getFieldError().getDefaultMessage(), is("must not be blank")); } /** * userNameが半角スペースのみ */ @Test public void userNameIsOnlySpace() { userForm.setUserName(" "); validator.validate(userForm, bindingResult); assertThat(bindingResult.getFieldError().getField(), is("userName")); assertThat(bindingResult.getFieldError().getDefaultMessage(), is("must not be blank")); } }
org.springframework.validation.Validatorを@Autowiredし、userFormとbindingResultをvalidateメソッドに渡せば、バリデーションを実行できます。バリデーション結果はbindingResultに入っているので、その中身に対しアサートをかければOKです。テストメソッドの書き方としては、
beforeで正常系の状態を作っておき、各テストメソッドで一部だけ異常系に変更してテストするのが、見た目的にもスッキリしていいかなと思います。補足
Formクラスで単項バリデーションテストできるからControllerのテストは全くいらないかと言われるとそうではなく、例えばControllerでエラーメッセージの変換をしているとか、そもそもFormクラスにバリデーションがかかっているのか確認したいとかいう時はControllerでテストする必要があります。ただ網羅的なテストは
Formクラスのテストで抑えられるので、Controllerでのテストパターンが減らせることは間違いないです。
- 投稿日:2019-03-10T12:16:28+09:00
[123MoviE] Watch Captain Marvel ONLINE (2019) Full and FrEe Movie HD Sub En
Watch HD Click Here =>> nufilm.live/movie/299537/watch-frele-hd-full-movie-captain-marvel-leaked.mp4
- 投稿日:2019-03-10T11:42:53+09:00
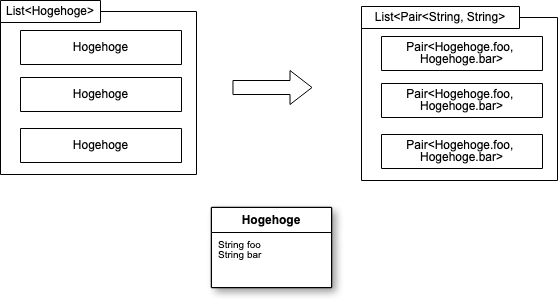
Collection.stream().map()からの拒絶を経て
実装したかったこと
Listの要素のクラスから2つの
Stringを抽出し、
その2つのStringを格納したPairのListを生成する。
Stream使えばいけそう^^
ビルドできない
List<Hogehoge> list;

list
.stream()
.map(Pair.of(Hogehoge::getFoo, Hogehoge::getBar))
// ↑↑ Object is not a functional interface ↑↑
.collect(Collectors.toList())
ん!?
Functional Interface !?
関数型インタフェースは、
関数メソッドと呼ばれる単一の抽象メソッドが含まれているインターフェース
ref . パッケージjava.util.function
ref . Java8 in Action加えて...
ラムダ式を使うことで、
関数型インターフェースの抽象メソッドの実装をインラインで明示でき、
その全体式を関数型インターフェースのインスタンスとして扱うことができる。
(つまるところ、関数型インターフェースの実装となる)
ref . Java8 in Actionなるほど。
ここで、以下の2つのことを理解。
1. 関数型インターフェースは、単一の抽象メソッドが含まれているインターフェース
2. ラムダ式により、関数型インターフェースを実装可能そもそもStream.map()の定義って ^^;
Stream map(Function<? super T,? extends R> mapper)
パラメータ: mapper
- 各要素に適用する非干渉でステートレスな関数
インタフェースStream<T>引数mapperの型であるFunctionは、
単一抽象メソッドapplyを持つ「関数型インターフェース」
ref. Interface Function<T,R>本題に戻って
関数型インターフェースであるFunctionをラムダ式で実装して、
mapに渡せばよいことがわかった。List<Hogehoge> list; Function<Hogehoge,Pair<String,String>> makePairsFromObj = hoge -> Pair.of(hoge.getFoo(), hoge.getBar()); List<Pair<String, String>> pList = list .stream() //.map(makePairFromObj::apply) .map(makePairFromObj) // Function型の変数を渡せばよい by @swordone .collect(Collectors.toList());もしくは、直接ラムダ式を渡す(@swordoneさんからの指摘)
List<Hogehoge> list;

List<Pair<String, String>> pList = list
                .stream()
                .map(hoge -> Pair.of(hoge.getFoo(), hoge.getBar()))
                .collect(Collectors.toList());
\(^o^)/
- 投稿日:2019-03-10T02:20:30+09:00
JavaでPOSTした結果を取得する
背景
JavaからWebサイトにデータをPOSTし、結果を取得したい場合のメモです。
今回はヤマト運輸の荷物問い合わせシステムに伝票番号をPOSTし、問い合わせ結果を取得します。準備
荷物問い合わせシステムのソースからPOSTするデータのname属性を調べます。
view-source<td align="left">詳細情報 <input type="radio" name="number00" value="1" checked>あり <input type="radio" name="number00" value="2">なし </td> ・・・省略・・・ <td class="input"> <input name="number01" size="20" maxlength="14"> </td>ソースから詳細情報を 表示する/表示しない を選択するラジオボタンの名前が number00
伝票番号を入力するテキストボックスの名前が number01 ~ number10 であることが分かります。問い合わせ結果の取得
以下のコードで取得を行います。
Post.javaimport java.io.BufferedReader; import java.io.InputStream; import java.io.InputStreamReader; import java.io.OutputStream; import java.net.HttpURLConnection; import java.net.URL; public class Post { public String getResultPage(String postData, String postURL){ try{ String data = postData; URL url = new URL(postURL); HttpURLConnection uc = (HttpURLConnection)url.openConnection(); uc.setDoOutput(true); //生成したURL接続からOutputStreamを取得するためのフラグを立てる uc.setRequestMethod("POST"); OutputStream os = uc.getOutputStream(); os.write(data.getBytes()); os.flush(); os.close(); InputStream is = uc.getInputStream(); BufferedReader reader = new BufferedReader(new InputStreamReader(is,"Shift_JIS")); String line; StringBuffer buf = new StringBuffer(); while((line = reader.readLine()) != null){ buf.append(line + "\n"); } is.close(); uc.disconnect(); return buf.toString(); }catch(Exception e){ e.printStackTrace(); return null; } } public static void main(String[] args) { String url = "https://toi.kuronekoyamato.co.jp/cgi-bin/tneko"; String query = "number00=1&number01=伝票番号"; //※データをPOSTする際は name=value&name=value... という形式になる System.out.println(new Post().getResultPage(query,url)); } }実行結果
POSTした結果が出力されます
・・・省略・・・
 <table class="meisai">
<tr>
 <th width="55"><br></th>
 <th>荷物状況</th>
 <th>日 付</th>
 <th>時 刻</th>
 <th>担当店名</th>
 <th>担当店コード</th>
</tr>
<tr class="odd">
 <td class="image"><img src="/images/ya_02.gif" alt="経過"></td>
 <td>発送</td>
 <td>02/21</td>
 <td>13:47</td>
 <td><a href="http://sneko2.kuronekoyamato.co.jp/sneko2/Sngp?ID=NET_C&JC=031902&DN=&MD=&F=2" target="_blank">東京法人営業支店</a></td>
 <td>031902</td>
</tr>
<tr class="even">
 <td class="image"><img src="/images/ya_02.gif" alt="経過"></td>
 <td>配達予定</td>
 <td>02/22</td>
 <td>12:30</td>
 <td>最寄りの営業所</td>
 <td>最寄りの営業所のセンターコード</td>
</tr>
<tr class="odd">
 <td class="image"><img src="/images/ya_02.gif" alt="経過"></td>
 <td>配達予定</td>
 <td>02/22</td>
 <td>17:37</td>
 <td>最寄りの営業所</td>
 <td>最寄りの営業所のセンターコード</td>
</tr>
<tr class="even">
 <td class="image"><img src="/images/nimotsu_01.gif" alt="最新"></td>
 <td>配達完了</td>
 <td>02/22</td>
 <td>19:11</td>
 <td><a href="最寄りの営業所へのリンク" target="_blank">最寄りの営業所</a></td>
 <td>最寄りの営業所のセンターコード</td>
</tr>
</table>
・・・省略・・・
以上です。